m-11620-h200 2002-03 harley/f150 vacuum boost gauge ... · this kit was developed by ford racing...
TRANSCRIPT
M-11620-H200 2002-03 Harley/F150 Vacuum Boost Gauge INSTALLATION INSTRUCTIONS
NO PART OF THIS DOCUMENT MAY BE REPRODUCED WITHOUT PRIOR AGREEMENT AND WRITTEN PERMISSION OF FORD RACING PERFORMANCE PARTS
Please contact the Tech “Hot Line” for the most current instruction information (586) 468-1356
! ! ! PLEASE READ THE FOLLOWING INSTRUCTIONS CAREFULLY PRIOR TO INSTALLATION ! ! !
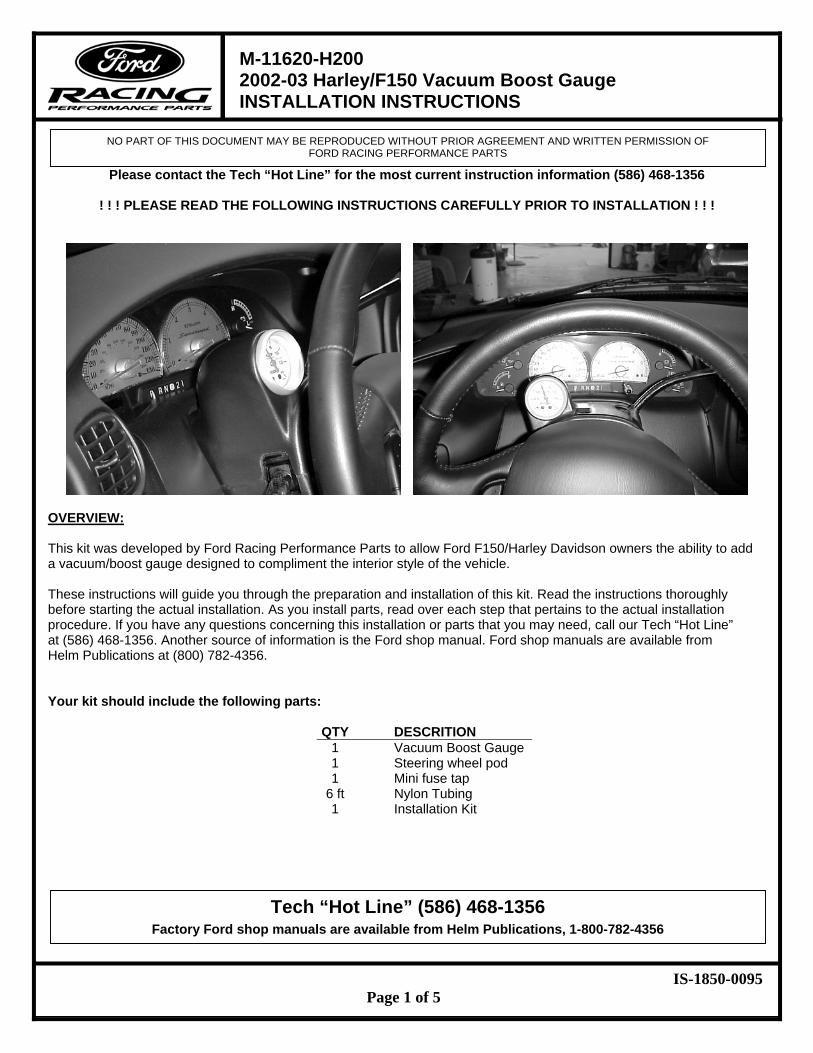
OVERVIEW: This kit was developed by Ford Racing Performance Parts to allow Ford F150/Harley Davidson owners the ability to add a vacuum/boost gauge designed to compliment the interior style of the vehicle. These instructions will guide you through the preparation and installation of this kit. Read the instructions thoroughly before starting the actual installation. As you install parts, read over each step that pertains to the actual installation procedure. If you have any questions concerning this installation or parts that you may need, call our Tech “Hot Line” at (586) 468-1356. Another source of information is the Ford shop manual. Ford shop manuals are available from Helm Publications at (800) 782-4356. Your kit should include the following parts:
QTY DESCRITION 1 Vacuum Boost Gauge 1 Steering wheel pod 1 Mini fuse tap
6 ft Nylon Tubing 1 Installation Kit
Tech “Hot Line” (586) 468-1356 Factory Ford shop manuals are available from Helm Publications, 1-800-782-4356
IS-1850-0095 Page 1 of 5

M-11620-H200 2002-03 Harley/F150 Vacuum Boost Gauge INSTALLATION INSTRUCTIONS
NO PART OF THIS DOCUMENT MAY BE REPRODUCED WITHOUT PRIOR AGREEMENT AND WRITTEN PERMISSION OF FORD RACING PERFORMANCE PARTS
INSTALLATION INSTRUCTIONS: STEP 1: Locate the body grommet on the firewall behind the Brake booster. With a sharp knife, pierce the center
of the body grommet. STEP 2: Snake the 1/8th inch hose from your kit through the grommet and into the passenger compartment. Run
the hose along the steering column and under the rubber flap.
Tech “Hot Line” (586) 468-1356 Factory Ford shop manuals are available from Helm Publications, 1-800-782-4356
IS-1850-0095 Page 2 of 5
M-11620-H200 2002-03 Harley/F150 Vacuum Boost Gauge INSTALLATION INSTRUCTIONS
NO PART OF THIS DOCUMENT MAY BE REPRODUCED WITHOUT PRIOR AGREEMENT AND WRITTEN PERMISSION OF FORD RACING PERFORMANCE PARTS
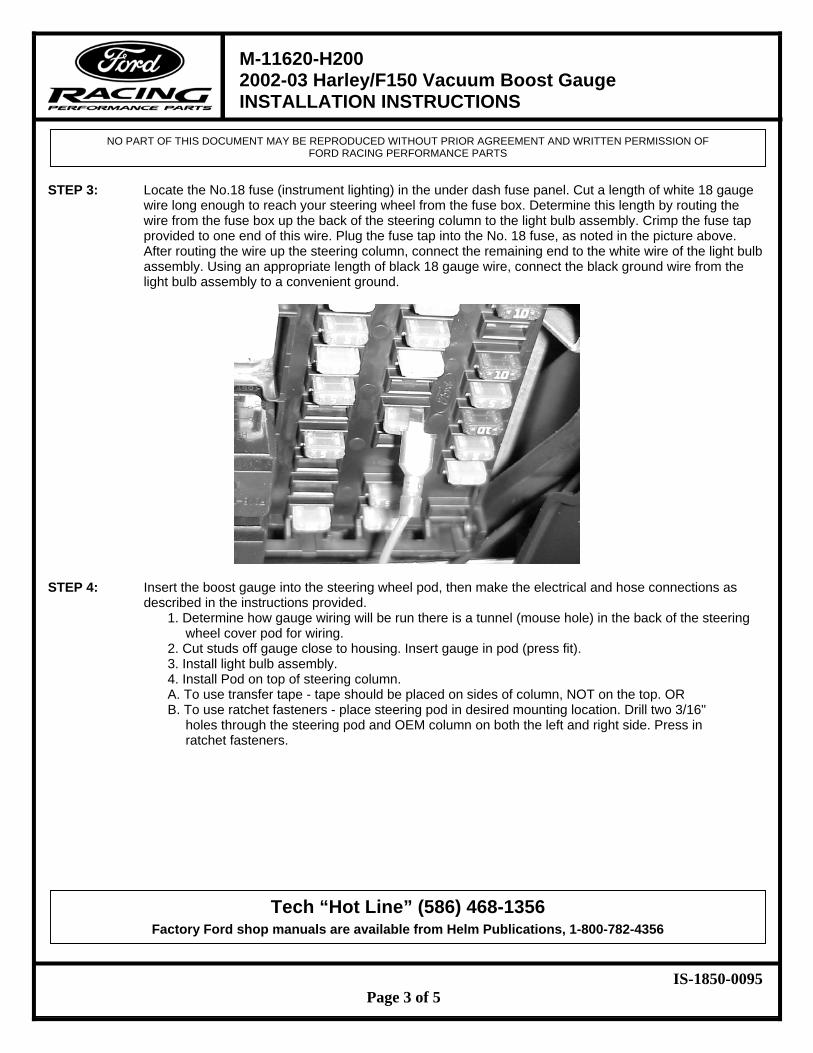
STEP 3: Locate the No.18 fuse (instrument lighting) in the under dash fuse panel. Cut a length of white 18 gauge
wire long enough to reach your steering wheel from the fuse box. Determine this length by routing the wire from the fuse box up the back of the steering column to the light bulb assembly. Crimp the fuse tap provided to one end of this wire. Plug the fuse tap into the No. 18 fuse, as noted in the picture above. After routing the wire up the steering column, connect the remaining end to the white wire of the light bulb assembly. Using an appropriate length of black 18 gauge wire, connect the black ground wire from the light bulb assembly to a convenient ground.
STEP 4: Insert the boost gauge into the steering wheel pod, then make the electrical and hose connections as described in the instructions provided.
1. Determine how gauge wiring will be run there is a tunnel (mouse hole) in the back of the steering wheel cover pod for wiring.
2. Cut studs off gauge close to housing. Insert gauge in pod (press fit). 3. Install light bulb assembly. 4. Install Pod on top of steering column. A. To use transfer tape - tape should be placed on sides of column, NOT on the top. OR B. To use ratchet fasteners - place steering pod in desired mounting location. Drill two 3/16"
holes through the steering pod and OEM column on both the left and right side. Press in ratchet fasteners.
Tech “Hot Line” (586) 468-1356 Factory Ford shop manuals are available from Helm Publications, 1-800-782-4356
IS-1850-0095 Page 3 of 5
M-11620-H200 2002-03 Harley/F150 Vacuum Boost Gauge INSTALLATION INSTRUCTIONS
NO PART OF THIS DOCUMENT MAY BE REPRODUCED WITHOUT PRIOR AGREEMENT AND WRITTEN PERMISSION OF FORD RACING PERFORMANCE PARTS
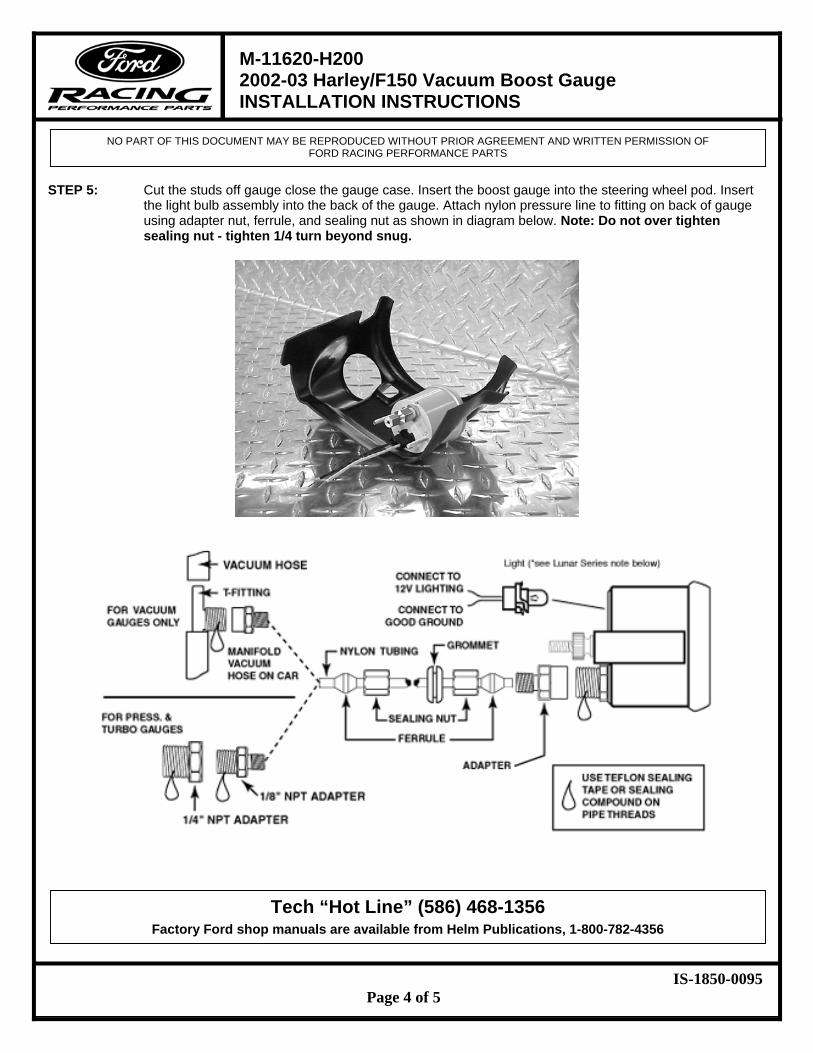
STEP 5: Cut the studs off gauge close the gauge case. Insert the boost gauge into the steering wheel pod. Insert
the light bulb assembly into the back of the gauge. Attach nylon pressure line to fitting on back of gauge using adapter nut, ferrule, and sealing nut as shown in diagram below. Note: Do not over tighten sealing nut - tighten 1/4 turn beyond snug.
Tech “Hot Line” (586) 468-1356 Factory Ford shop manuals are available from Helm Publications, 1-800-782-4356
IS-1850-0095 Page 4 of 5
M-11620-H200 2002-03 Harley/F150 Vacuum Boost Gauge INSTALLATION INSTRUCTIONS
NO PART OF THIS DOCUMENT MAY BE REPRODUCED WITHOUT PRIOR AGREEMENT AND WRITTEN PERMISSION OF FORD RACING PERFORMANCE PARTS
STEP 6: Install pod/gauge assembly on top of steering column. Place steering pod in desired mounting position.
Drill two 3/16" holes on both sides of pod through the steering pod and OEM column on both the left and right side. Press in ratchet fasteners supplied in shipping kit.
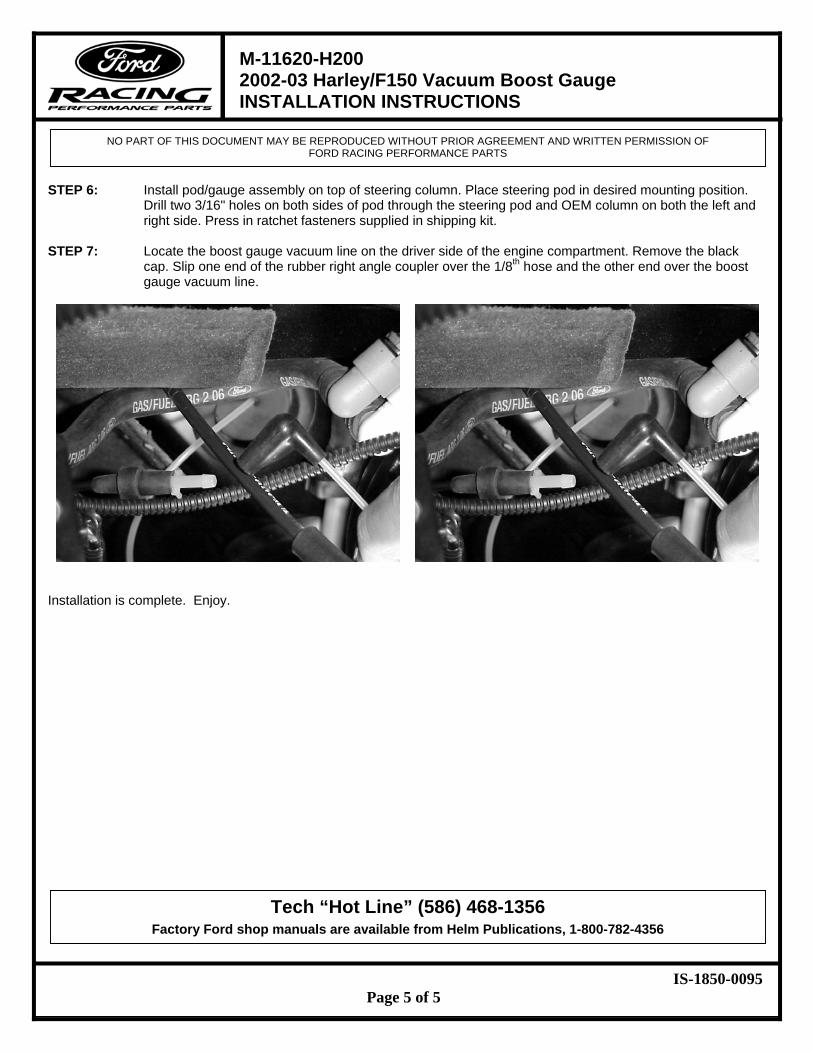
STEP 7: Locate the boost gauge vacuum line on the driver side of the engine compartment. Remove the black
cap. Slip one end of the rubber right angle coupler over the 1/8th hose and the other end over the boost gauge vacuum line.
Tech “Hot Line” (586) 468-1356 Factory Ford shop manuals are available from Helm Publications, 1-800-782-4356
IS-1850-0095 Page 5 of 5
Installation is complete. Enjoy.