mrts 2210.003 – intro to production film mondays … · the documentary form: a documentary can...
TRANSCRIPT

1
Objective: This section will introduce students to all phases of single-camera video and film production theory and techniques that can be applied to fiction, documentary, commercial, experimental or music video genres. Students will learn skills in pre-production, production and post-production through assignments that include conceptual, technical and collaborative fundamentals.
Assignments and Grading:
Project 1: Camera and Composition Skills – 25%Students will demonstrate their knowledge of basic camera shots and composition elements. Due on Day Five.
Project 2: Single-Camera Video Production – 35%Students will with work with a partner to create a 5 minute video short in either the narrative fiction or documentary form. Due on Day Nine.
Collaboration and Participation –15%
Section Exam – 25%
Attendance – Roll will be taken in class, and each unexcused absence will subtract 10 points from your film section grade.
Required Materials and Supplies: 2 SDHC memory cards, Class 6 or higher Muff headphones
Equipment Rules: Video cameras and the Adobe Premiere editing lab are available to you ONLY when you are in the Film portion of the 2210 course rotation. This equipment may only be used for classwork.
Overnight Requests for Equipment: These are available only for Project #2. The process is explained in the document on Blackboard.
MRTS 2210.003 – INTRO TO PRODUCTION - FILM Mondays / Wednesday 9:00 - 10:50 am Spring
2017
Instructor: Robert Bowen Office Hours: Mon: 11:00-12:00pm Wed: 11:00 - 12:00pm Office: RTFP 222 Email: [email protected]
2
FILM SECTION SCHEDULE
Day 1 Introduction to film section. Overview of narrative filmmaking and story structure. Introduction to composition theory.
Day 2 Camera lenses, f-stops, depth of field, color temperature, white balancing, filters.
Day 3 In-class demonstration of Video Cameras and tripods. Discuss Project #1. Application of composition theory.
Day 4 Work day.
Day 5 Project #1 Due. Discuss Project #2. Video Post-Production. Discussion will include basic rules of shooting and editing for continuity, master scene structure and parallel editing. Plan and prepare Project #2 during remainder of class time.
Day 6 Demonstration of Adobe Premiere non-linear editing equipment and techniques. Work on video editing exercise in class.
Day 7 Demonstration of Soundminer and Adobe Encore. Complete working on video editing exercise in class.
Day 8 Introduction to basic lighting design, techniques, filters and tools.
Day 9 Section Exam. Project #2 due at beginning of class.
NOTE:ANY PORTION OF THIS SYLLABUS IS SUBJECT TO CHANGE.
3
DAY ONE Introduction to film section. Overview of narrative filmmaking and story structure. Introduction to composition theory.
Narrative Filmmaking: A story told in either fiction or documentary form, on film or video, must possess characters and events that unfold over time in a structure with a beginning, middle and end. Characters face conflicts, challenges or obstacles that they react to physically and psychologically to try to resolve. The conclusion presents a culminating action that joins all the elements of the story,resulting in the main character(s) achieving a goal. The story is often structured in “three acts”, with the introduction of characters and conflict being introduced in the first “act”, the climax occurring at the end of the second “act” and the resolution near the end of the final “act”. The theme of a narrative is the message the filmmaker wants to share with the viewer.
The Fiction Form: The fiction film implies a written script with actors following the director’s “vision” for the film. It can be feature length (90+ minutes), a made-for-TV movie (60- 90 min.) or a short (2-30 min.) Different length fiction films have different narrative structures. While the feature film will often follow the classic three-act structure, the made- for-TV movie will be structured to allow for commercial breaks. The short film can follow a truncated 3-act structure, but often relies on character over plot and action over dialogue. Short films often have surprise plot twists at the end. The fiction film can be set in a studio or on location and is shot out of sequence for maximum efficiency. If you and your partner decide to produce a fiction film, you may not use dialogue but instead must tell your story with action. You may incorporate music and other audio as desired.
The Documentary Form: A documentary can include a process, an action, a portrait of a person or place, a historical overview, or an issue-oriented film. Documentary is often defined as “the creative treatment of actuality.” Of course, a film can never be totally unbiased. The mere placement of a camera alters reality. The choice of editing one shot next to another alters reality.
The documentary filmmaker’s job is to record real events and present them in an engaging manner to the viewer. This can be accomplished in a fairly straightforward manner or a fragmented, manipulative, artistic manner. The goal of the documentary filmmaker should be to articulate and represent actual events in an engaging manner for the audience. Documentaries often incorporate interviews, observational footage, interaction between the
F-4
filmmaker and the documentary subject, and other approaches. If you and your team choose to produce a documentary, you may not use dialogue but may incorporate music and other audio.
Basic Positions on a Film Crew Executive Producer—Usually responsible for putting together financial or creative package; handles many films at a time Producer—Responsible for staying within budget; liaison between production company, studio, and director; first one on and last one off Line Producer—Oversees budget and Unit Production Manager Associate Producer—Supports producer Unit Production Manager—Budget and expenditures Production Coordinator—Organizes logistics in office for shipping, accommodations, transportation Production Assistants—Assists in errands, clerical work, carrying equipment
Director—Directs activities of cast and crew during all stages, makes creative decisions 1st AD—Works with production manager and director to oversee shooting schedule; assists in direction of extras, crowd scenes, and special EFX; manages paperwork, like call sheets, releases, and overtime; SET BOSS 2nd AD—Supports 1st AD Dialogue Director—Reviews lines w actors 2nd Unit Director—Oversees non-sync sound shots and shots without principal actors Script Supervisor—Records scene, take number, camera position, lens, performance continuity, dialogue changes, and running time of each shot Director of Photography (DP)—Selects camera & lighting equipment, supervises those crews, determines lighting & exposure for each scene, collaborates w director to create style Camera Operator—Operates camera at all times, maintains compositions determined by DP 1st Camera Assistant—Sets up lens, focus, and filters; cleans film gate 2nd Camera Assistant—Loads & unloads film; sets up camera; maintains & cleans all elements; camera paperwork, like shipping labels & slate. Production Sound Mixer—Selects & operates sound equipment; responsible for quality of sound; slates each take; maintains records Boom Operator—Places microphones; handles boom Cable Puller/Utility—Stringing, connecting, and handling cables to sound equipment Gaffer—Chief electrician, executes lighting patterns
F-5
Best Boy—Assistant electrician Electricians—Operate lighting, electrical Generator Operator—Maintains & operates generators Key Grip—Responsible to DP for grip crews; assists gaffer; build platforms, rigs vehicles, blacks out windows, lays dolly track Dolly Grip—Operates & maintains all dolly & crane equipment Grips—Assists Key Grip
F-6
Aspect Ratios The aspect ratio is the relationship between the width and height of an image. While the image dimensions may vary in size according to projection requirements, the aspect ratio should comply with the cinematographic intent. The industry standard for 35mm theatrical motion pictures remained a constant 1.37:1 between the introduction of sound and the introduction of Cinemascope in 1953, when “wide screen” presentations arrived. These wide screen presentations had aspect ratios from 1.66:1 all the way to 2:1. Then, in the early 1950’s, television’s demands for feature films increased. The typical television display provides a fixed ratio of 1.33:1, also referred to as 4X3, and many of the films shown on television to fill the video screen height, lost a substantial part of the image at the edges. After several approaches to rectify this, the industry came to the current consensus that 1.85:1 would be the “normal” theatrical projection ratio, but that the negative would have an image of greater height so that is could fill a television screen without creating borders.
Today, the usual procedure when filming productions for theatrical release and eventual television showing is to “matte” the camera viewfinder to clearly indicated 1.85:1 and to keep all pertinent action within this area. The cinematographer must make certain no scene rigging, mike booms, cables, or lights are included in the expanded area. The aspect ratio for High Definition Television (HDTV) is 1.78:1, also written as 16X9, which is quite close to theatrical, 1.85:1.
Composition Composition is the arrangement of elements in the action field in relation to the frame lines of the picture. Composition falls into three parts: framing, camera modification (zooming in or out), and action field control (camera moves)
There are many books, theories and “rules” of composition. The following discussion will be limited to only a few guidelines. Since the frame aspect ratio is 4 horizontally to 3 vertically, the design of sets, titles, charts, maps, etc., must fit these proportions.

F-7
Basic movements of a Film or Video Camera a. panb. tiltc. dollyd. trucking or trackinge. boom
Basic shots a. Extreme long shot (XLS)b . Long shot (LS)c. Medium shot (MS)c. Close up (CU)e. Extreme close up (ECU
Lead Room When you follow action with the camera, it is a good idea to “lead” the action slightly. If you do not, and if the action gets near the side of the frame toward which it is going, your audience may get the uncomfortable feeling that the subject will run into the edge of the frame.
Low Angles and High Angles Low Angles put the audience in an inferior position. High angles put the audience in a superior position. Low angles are good for showing a character who is more powerful than another character. High angles are good for showing characters weaker than other characters. From this, you can see that a low angle would be good to use in a shot of an intruder approaching his or her victim, and a high angle appropriate for the shot of the victim cringing on the ground.
Foreground Treatment Foreground treatment is really an additional kind of framing which helps emphasize the center of interest. A shot of a farmhouse with a field of hay in the foreground and bald sky all around usually doesn’t look as pleasing as it would if it had a picket fence and some tree branches in the foreground.
Rule of Thirds This rule states that important information and horizon lines should be compositionally placed on the upper or lower third “line” of the frame and not on the center “line”. As a general rule, put an actor’s eyes in the upper half of the frame.
8 [Type text]
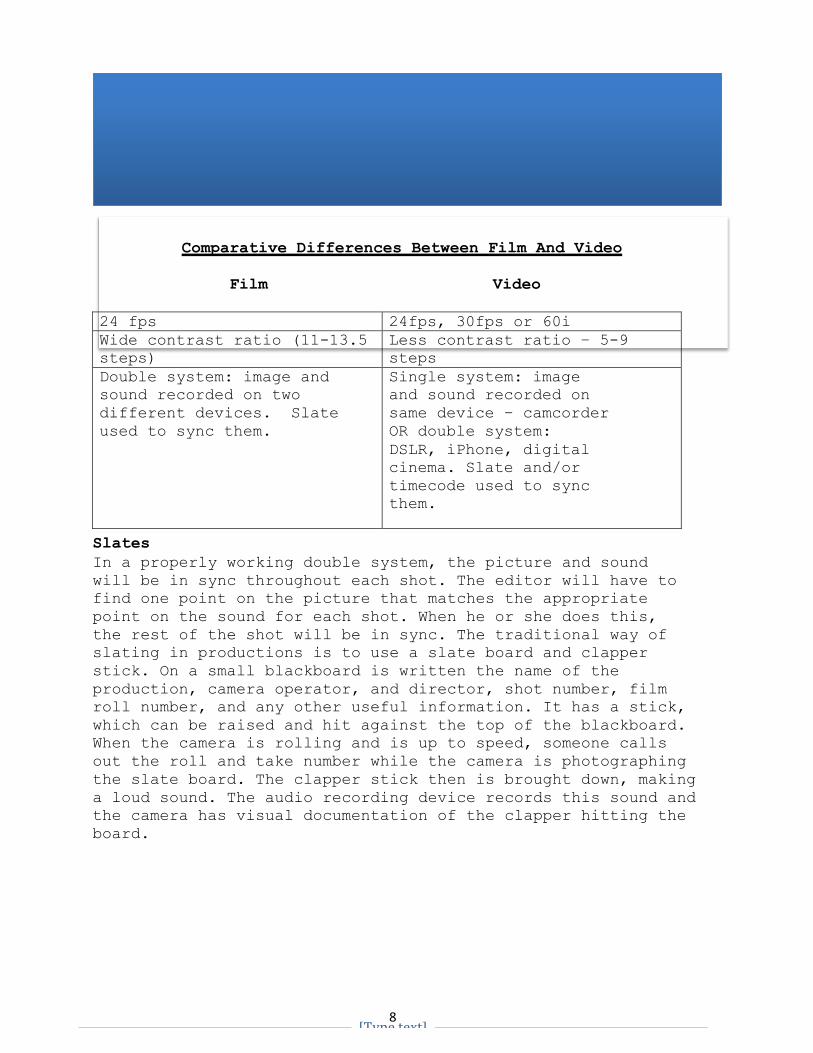
Comparative Differences Between Film And Video
Film Video
24 fps 24fps, 30fps or 60i Wide contrast ratio (11-13.5
steps) Less contrast ratio – 5-9 steps
Double system: image and sound recorded on two different devices. Slate used to sync them.
Single system: image and sound recorded on same device – camcorder OR double system: DSLR, iPhone, digital cinema. Slate and/or timecode used to sync them.
Slates In a properly working double system, the picture and sound will be in sync throughout each shot. The editor will have to find one point on the picture that matches the appropriate point on the sound for each shot. When he or she does this, the rest of the shot will be in sync. The traditional way of slating in productions is to use a slate board and clapper stick. On a small blackboard is written the name of the production, camera operator, and director, shot number, film roll number, and any other useful information. It has a stick, which can be raised and hit against the top of the blackboard. When the camera is rolling and is up to speed, someone calls out the roll and take number while the camera is photographing the slate board. The clapper stick then is brought down, making a loud sound. The audio recording device records this sound and the camera has visual documentation of the clapper hitting the board.
9 [Type text]
Lenses
1. Definition of focal length2. Wide Angle3. Telephoto4. Normal Focal Length5. Variable (zoom)
F-Stops
1. Lens settings — the size of the aperture opening in thelens.
2. Common F-Stop numbers3. How F-Stop changes effect depth of field
Terms: 1. Fast/slow lens2. Open up3. Close down (stop down)
10 [Type text]
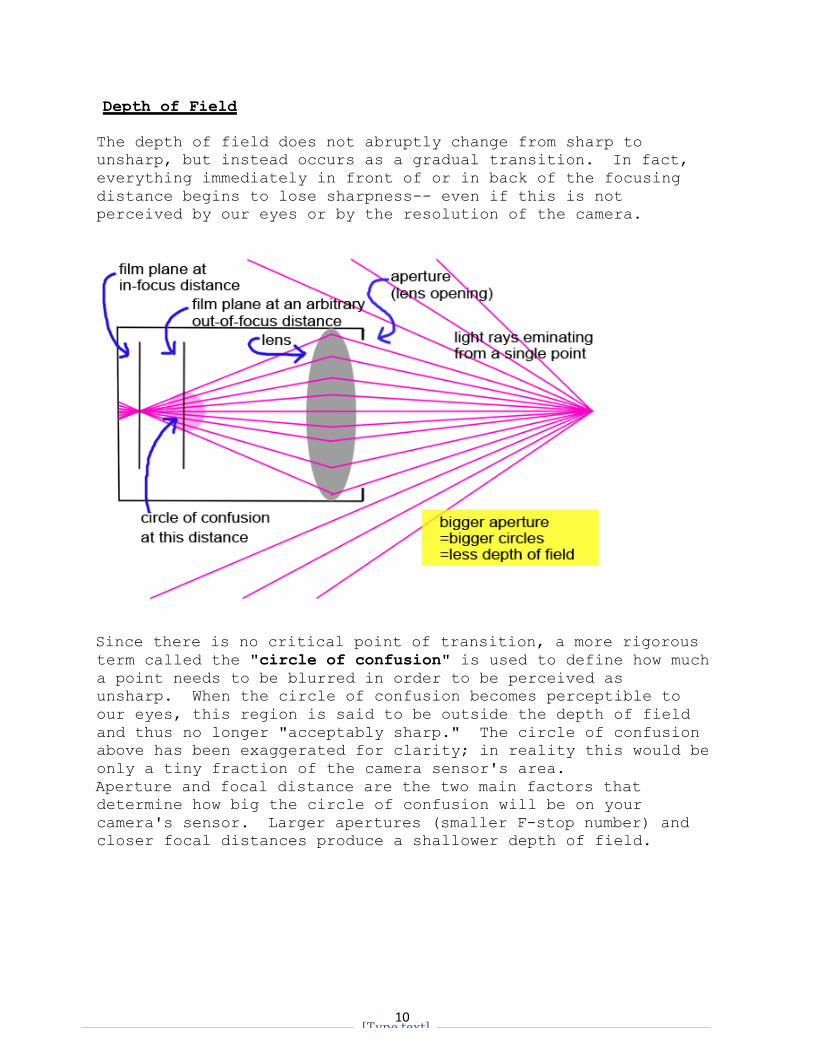
Depth of Field
The depth of field does not abruptly change from sharp to unsharp, but instead occurs as a gradual transition. In fact, everything immediately in front of or in back of the focusing distance begins to lose sharpness-- even if this is not perceived by our eyes or by the resolution of the camera.
Since there is no critical point of transition, a more rigorous term called the "circle of confusion" is used to define how much a point needs to be blurred in order to be perceived as unsharp. When the circle of confusion becomes perceptible to our eyes, this region is said to be outside the depth of field and thus no longer "acceptably sharp." The circle of confusion above has been exaggerated for clarity; in reality this would be only a tiny fraction of the camera sensor's area. Aperture and focal distance are the two main factors that determine how big the circle of confusion will be on your camera's sensor. Larger apertures (smaller F-stop number) and closer focal distances produce a shallower depth of field.
11 [Type text]
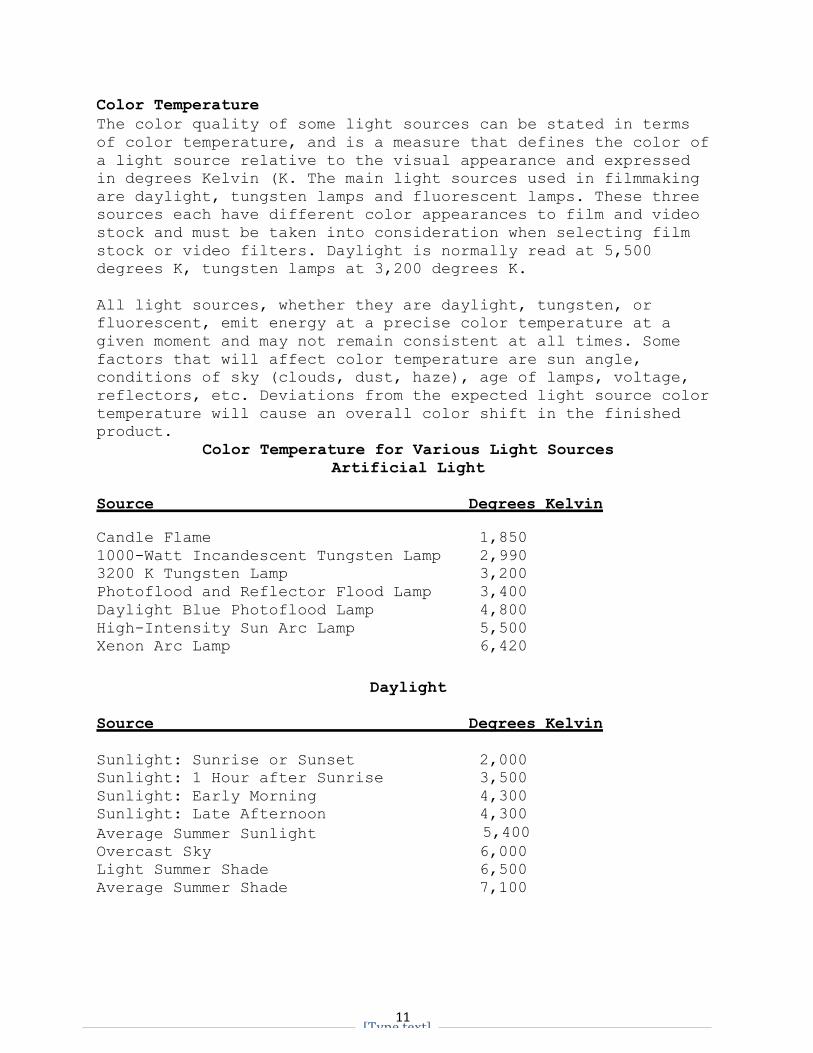
Color Temperature The color quality of some light sources can be stated in terms of color temperature, and is a measure that defines the color of a light source relative to the visual appearance and expressed in degrees Kelvin (K. The main light sources used in filmmaking are daylight, tungsten lamps and fluorescent lamps. These three sources each have different color appearances to film and video stock and must be taken into consideration when selecting film stock or video filters. Daylight is normally read at 5,500 degrees K, tungsten lamps at 3,200 degrees K.
All light sources, whether they are daylight, tungsten, or fluorescent, emit energy at a precise color temperature at a given moment and may not remain consistent at all times. Some factors that will affect color temperature are sun angle, conditions of sky (clouds, dust, haze), age of lamps, voltage, reflectors, etc. Deviations from the expected light source color temperature will cause an overall color shift in the finished product.
Color Temperature for Various Light Sources Artificial Light
Source Degrees Kelvin
Candle Flame 1,850 1000-Watt Incandescent Tungsten Lamp 2,990 3200 K Tungsten Lamp 3,200 Photoflood and Reflector Flood Lamp 3,400 Daylight Blue Photoflood Lamp 4,800 High-Intensity Sun Arc Lamp 5,500 Xenon Arc Lamp 6,420
Daylight
Source Degrees Kelvin
Sunlight: Sunrise or Sunset 2,000 Sunlight: 1 Hour after Sunrise 3,500 Sunlight: Early Morning 4,300 Sunlight: Late Afternoon 4,300 Average Summer Sunlight 5,400 Overcast Sky 6,000 Light Summer Shade 6,500 Average Summer Shade 7,100
12 [Type text]
Camera Filters
Neutral Density Filters reduce the intensity of light reaching the video sensor without affecting the tonal rendition of colors in the scene. Neutral density filters can either be put on the camera lens to lower the amount of all light, or on windows or other outdoor openings to only lower the amount of light coming through them. Many cameras also have neutral density filters that are electronically “rolled in” in increments of 1/3, 2/3 or a full stop to reduce the amount of light received by the CCD.
Polarizing filters are used to subdue reflections from surfaces such as glass, water and polished wood and also to control the brightness of the sky. Polarizing filters are actually two pieces of glass held together by an outer ring. The pieces of glass have tiny wire meshing inside, so that when you rotate the pieces of glass and look at a shiny object, the glare is reduced. By reducing glare, the polarizing filter will also increase the color saturation of the object. It is important to remember that with a polarizing filter, be sure to remember that this filter has a filter factor. This means that the filter eliminates some of the light coming through the lens, and you must compensate for this by increasing the film exposure with a larger aperture opening.

13 [Type text]
14 [Type text]
DAY FIVEPost-Production. Discussion will include basic rules of shooting and editing for continuity, master scene structure and creating film space and time. PROJECT 1 DUE. DISCUSS PROJECT 2.
Editing and Shooting
It is important to understand the relationship between editing and shooting. The editor is not going to be able to construct a film successfully from the footage shot unless adequate footage is returned from shooting. The editor will not be able to vary camera angle, achieve continuity or give the film an acceptable pace unless the footage is adequate to the task. When the film is shot, the filmmaker must have an idea of what goes into the editing process so that he or she can know what to shoot and how to shoot it. Of course, this is more important for a narrative film than for an abstract film, which may be made almost totally in the editing.
Approaches to Shooting and Editing
Master Scene Technique: In this technique, the action for an entire scene is covered in one continuous shot. Often, portions of the complete scene are then covered from different angles and distances in close-up shots after the master scene has been shot. These additional shots emphasize reactions, points of view, details, and reverse angles. In editing, these additional shots are inserted into the master scene in a way that gives the appearance of uninterrupted action - - the “match cut”. By editing these shots together, the viewer perceives continuous movement in the action, There are rules for this style of shooting and editing. These principles of “continuity” must be followed in order to preserve the illusion of continuous time and coherent spatial relationships. Cutting often appears to be motivated by the action itself, and for this reason is often referred to as the “invisible” edit. This style of editing, where the edits are not obvious, is often called “Classic Hollywood Editing”.
Parallel Editing: Cutting back and forth from one location to another or one storyline to another, usually to show that two actions are occurring simultaneously but sometimes also to compare or contrast two actions.
DAY FOURWORK DAY
15 [Type text]
Shooting Ratios: The unedited footage is called rushes or dailies. They are given these names because often the director will send the exposed negative off to a lab to be developed on a daily basis so that he or she can see what was shot within 24 hours. Almost invariably, there is a considerably greater amount of rushes than there is of final film. The ratio of film shot to final footage is usually between 5:1 and 10:1. But, the ratio varies tremendously depending on the type of film being made and the method of filming. Documentary filmmakers often have much higher shooting ratios because of the unknown nature of what exactly will happen on location, sometimes garnering shooting ratios of 40:1 and higher. Often one of the most difficult tasks in writing up a budget for a film is to estimate the amount of footage that will be needed.
When there is a script for a film, a great deal of additional footage is shot to give the editor a selection of shots and to guarantee that there will not be any continuity gaps either within scenes or in the story line. It is not unusual when two possibilities for a story line exist, for both to be filmed and the final choice delayed until the film is being edited. Often the same actions filmed several times in several “takes” to get different camera angles (positions) and to guarantee that the actors have performed their task well.
When no script is being used, either because actors are improvising or because it is a documentary film, much footage is wasted because the camera operator is unable to predict what will happen.
Film Time and Film Space: Film time and film space are very different from actual space and time. It is important to understand how. Film time and space are created in the editing room. One of the most difficult concepts for the novice filmmaker is the realization that the sequence of events as they happen in real life or as they are acted out is not necessarily the way those events will appear in the film. Take the case of a film that is acted from a script. There is a tendency for the novice to shoot the events to be filmed in the order that they will be edited, but this may be unnecessarily inefficient. Scenes to be shot at the same locale and scenes using the same actors should be shot close to one another in time, though they may be far apart in the final film. Similarly, in the space that a film creates, one person may appear to be looking at another, though the two people were not filmed in the same place or at the same time.
16 [Type text]
Continuity Shooting Matching Action: If the type of film you are making demands continuity of action within scenes, that is, the action is to look as though it occurred in a continuous time period, various precautions must be exercised in shooting to guarantee the editor footage adequate to the editing of such scenes. Whenever the editor has to make a cut within the scene, he or she has to have two shots which match, that give the illusion that no time has passed between them. When one take ends and the next begins with a different camera angle or a lens of different focal length, and the action involves the same actor, there must be what is called an overlap of action. That is, whatever action was performed toward the end of the first take must be repeated at the beginning of the next take. This will allow the editor a choice as to what point to cut. It guarantees that there will be no gap in the action. For example, if in the first take the actor strikes a match and lights his cigarette and in the second shot we want a closeup of him puffing, we will take the first shot through his puff. The next take might start just before the puff and continue through it. The overlap of action gives the editor some freedom and guarantees continuity.
It should be obvious that details and continuity of action must match from shot to shot to allow for continuity editing. Positions should be the same, neckties should not change color in mid-scene, hand positions should not jump unexpectedly from one shot to the next, the sky should not go from sunny to cloudy in one scene, and so forth.
Cut-away shots: When the rushes are not adequate to indicate continuity, the editor needs a cut-away, a shot not in the main action. A cutaway could be someone reacting to the main action or perhaps to an important object. The rushes should contain enough cutaways to get the editor over such continuity bumps. The cutaway is a shot supposedly taking place at the same time as the main action, but not directly involved in the main action. The most common variety of cut-away is the reaction shot. This is simply a shot of a person reacting to the main action as listener or spectator. Cut-aways, when properly used, do not interfere with the integrity or continuity of the main action. Cut-aways are one of the easiest ways of stretching or condensing actual time to give the film different time. If we cut between a race and the spectators’ reactions, we often lengthen the actual time of the race. On the other hand, if we cut away for part of a movement, when we cut back we may have cut out a large chunk of action.
17 [Type text]
180 degree rule: In general, all the camera angles of an object or person should stay on the same side of the action to avoid disconcerting changes of position. If we draw an imaginary line through the main action, all the camera shots must be on the same side of that line.
To illustrate this, consider a conversation between two people, A and B, looking at each other. A is at the right looking at B who is at the left looking at A. If we were to draw a line through the action, from A to B, and to keep all our camera positions on one side of that line, we would always preserve the screen direction. A is looking left in any shot and B is looking right. If we crossed the 180 degree line, however, even though the actors had not physically moved, it would appear that they had switched places, with B looking left and A looking right. An edit between two shots of the same subject matter where the camera has crossed the 180 degree line is disconcerting to the viewer. The viewer will accept shots from many different vantage points, heights, and distances, and will incorporate them into an interpretation of real space, but when the above rule is violated, relationships of people and objects may be obscured. If the camera must cross over this line, it is important to either show the actor changing direction or to insert a neutral shot (a shot with the camera right on the 180 degree line) in between the shots where it crosses over.
Screen direction: The typical “chase” scenes in films show both the pursuer and the pursued moving in the same direction on the screen so as to heighten the illusion of a chase. When cutting between subjects that are about to make contact, opposite screen directions are used to emphasize that the subjects are moving toward each other (A moving left to right and B moving right to left) to convey that they are about to meet.
Eyeline Match/POV Match: The direction of a person’s gaze must match the angle of the person or object that she is looking at in the next shot. For example, CU of person looking down. The next shot of a dog should be from a high angle to match the person’s eyeline. If a person in shot 1 looks screen right, the object of the gaze must be shot at her eyelevel to match the eyeline.
30 degree rule: Every cut, like every camera movement, should have significance. Cuts should not involve slight changes in image size or camera angle. A cut from a person filmed at a distance of five feet to a shot taken of the subject at five
18 [Type text]
feet would be meaningless and inefficient. The subject would jump a little closer but no new information would be revealed. The same goes for a medium shot of a subject cut to a medium shot of the same subject with the camera moved a foot to the right or left. These two shots, cut together on the screen would visibly “jump” and there would be no new information for the viewer. The 30 degree rule states that if you are going to edit together two shots of the same subject, the camera needs to have moved at least 30 degrees (think of an arc) between the two shots to eliminate the appearance of a jump.
Jump-cutting: In recent years it has become popular to dispense with match cutting and other “rules” of continuity editing to purposely include jump-cuts. The most common type of jump-cut used is simple cutting out of footage that would otherwise give the sequence normal continuity. One should only break continuity editing rules if it truly benefits the telling of the story. Do not fall into copying a fad without considering how it truly affects what you are attempting to communicate with your audience.
Types of jump cuts: 1. Action cut out of a scene2. Mis-match of action3. Mis-match of screen position4. Too similar angle (break the 30 degree rule between
shots)5. Reverse in direction6. Change in details, props or costumes7. A moving shot to a static shot or vice-versa in the same
scene8. Mis-match in lighting or color9. Mis-match in logical progression of events or action10.Mis-match in sound
19
DAY SIXDemonstration of Adobe Premiere non-linear editing equipment and techniques. Work on video editing exercise in class.
Non-Linear Editing Terms Source Monitor- where raw footage clips are displayed Program Monitor- where edited sequences are displayed Clip- a selection of captured footage Project – the clips, sequences, FX, history and settings of a NLE work. Media- an audio or video source Trim – adjust the in-point or out-point of an edit in the timeline Extract – remove a clip or portion of a clip in the timeline and leave no gap between clips Lift – remove a clip or portion of a clip in the timeline and leave a gap between clips
Three-Point Editing The ability to work quickly without sacrificing quality is one of the hallmarks of a good editor. This involves making editing decisions and executing them in the most efficient manner. Professional editors have found that using keystrokes instead of the mouse improves their speed and efficiency. The three-point editing method is also a more efficient way to edit because it forces you to make decisions about what part of the clip you want to use in the sequence.
The frame where you want the clip to begin is called the in- point. The frame where you decide it should end is the outpoint. The keystrokes for these processes are easy to remember: “I” key for IN, “O” key for OUT. When you mark these points, that is two of the three necessary to make an edit.
The third point is marked at either the In-point or the Out- point in the sequence. If you know where you want the clip to start in the sequence, mark an In-point. If you want to back- time the clip to end at a certain place, mark an Out-point.
From here you will select an editing function – either Insert or Overlay. Insert does just what it says.It inserts the clip on the timeline either after an existing clip or in between two clips. Overlay replaces the portion of a clip that it “overlays”.
20
Trimming After the clip is in a sequence on the timeline, you can adjust the in-point or out-point with the trim function. You will see the clip change in the program monitor as you drag the trim icons. This will be demonstrated in the lab. This is the function that you use to fine cut your rough assembly.
Steps In Non-Linear Editing
1. Organize media: rename clips, make subclips, sort intobins2. Assemble shots in script order3. Rough Cut: change sequence of scenes as necessary to
improve story flow4. Fine Cut: trim footage to improve pacing, rhythm and
timing5. Add Transitions and Effects6. Add Music, SFX and adjust audio levels7. Output to Storage Media (DVD, tape, Flash drive)
In-Class Exercise Edit the Trauma Room exercise using the Master Scene structure technique. Insert the cut-aways and close-ups in the positions that communicate the scene most effectively.
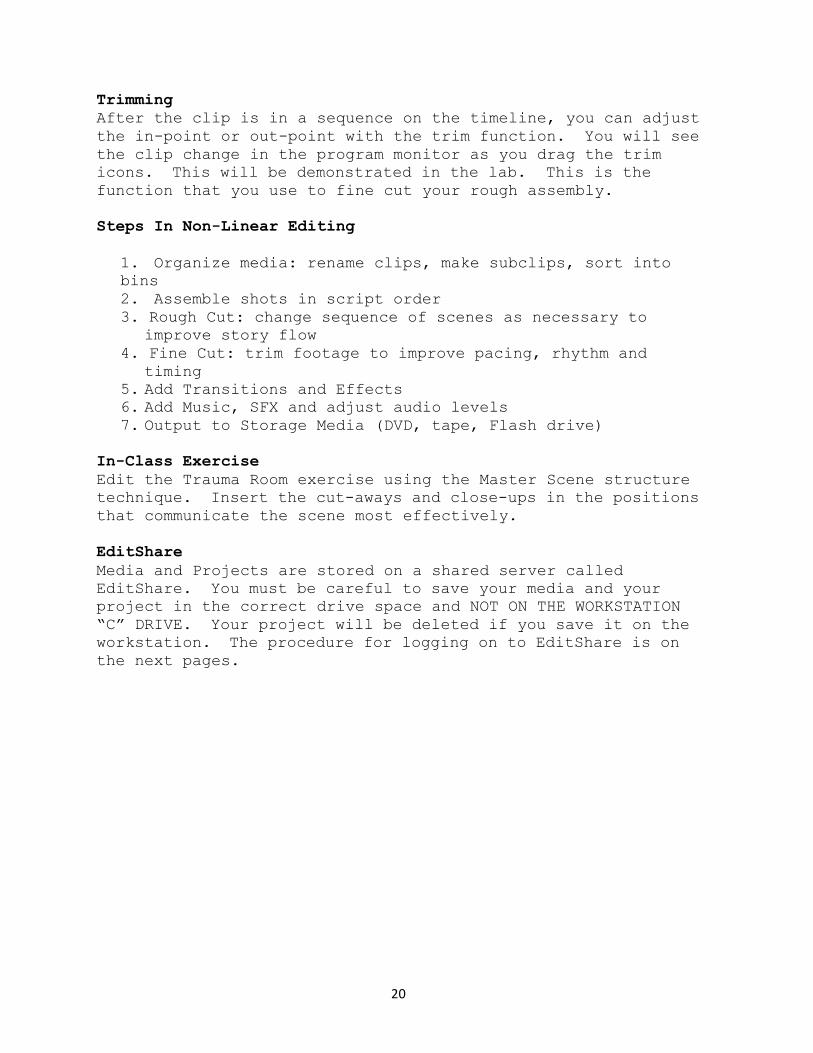
EditShare Media and Projects are stored on a shared server called EditShare. You must be careful to save your media and your project in the correct drive space and NOT ON THE WORKSTATION “C” DRIVE. Your project will be deleted if you save it on the workstation. The procedure for logging on to EditShare is on the next pages.
21
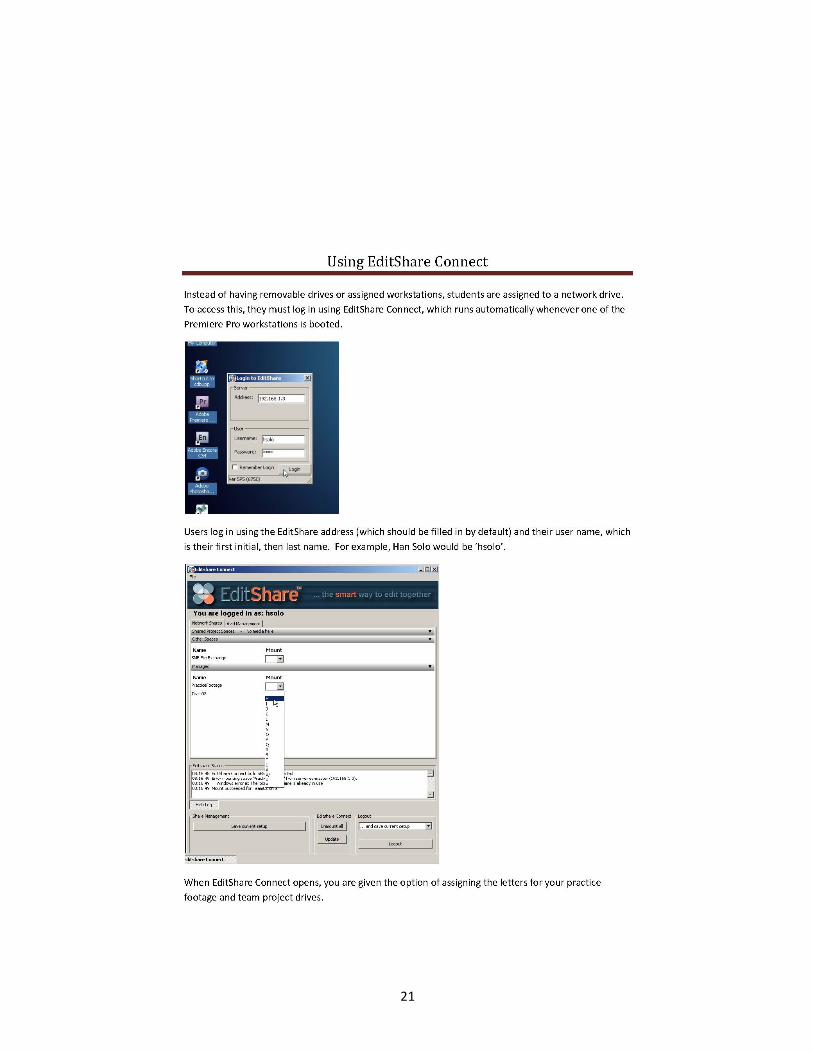
22
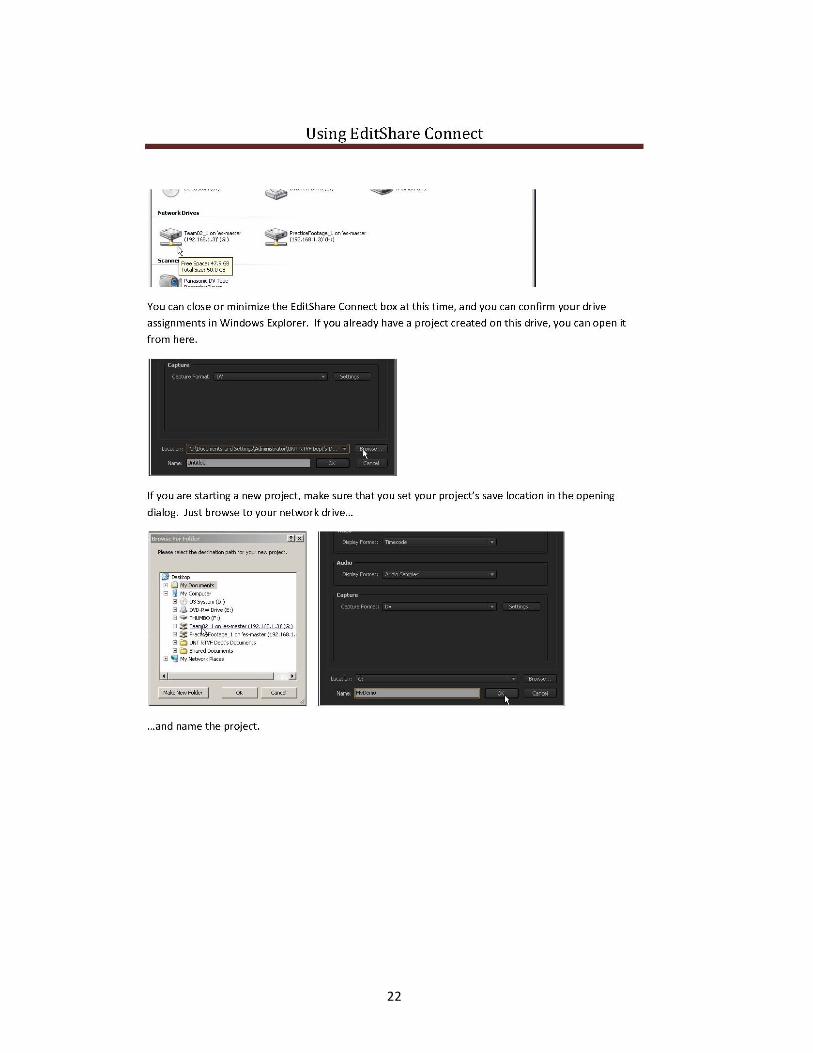
23

24
DAY SEVENDemonstration of Soundminer and Adobe Encore. Complete video editing exercise in class.
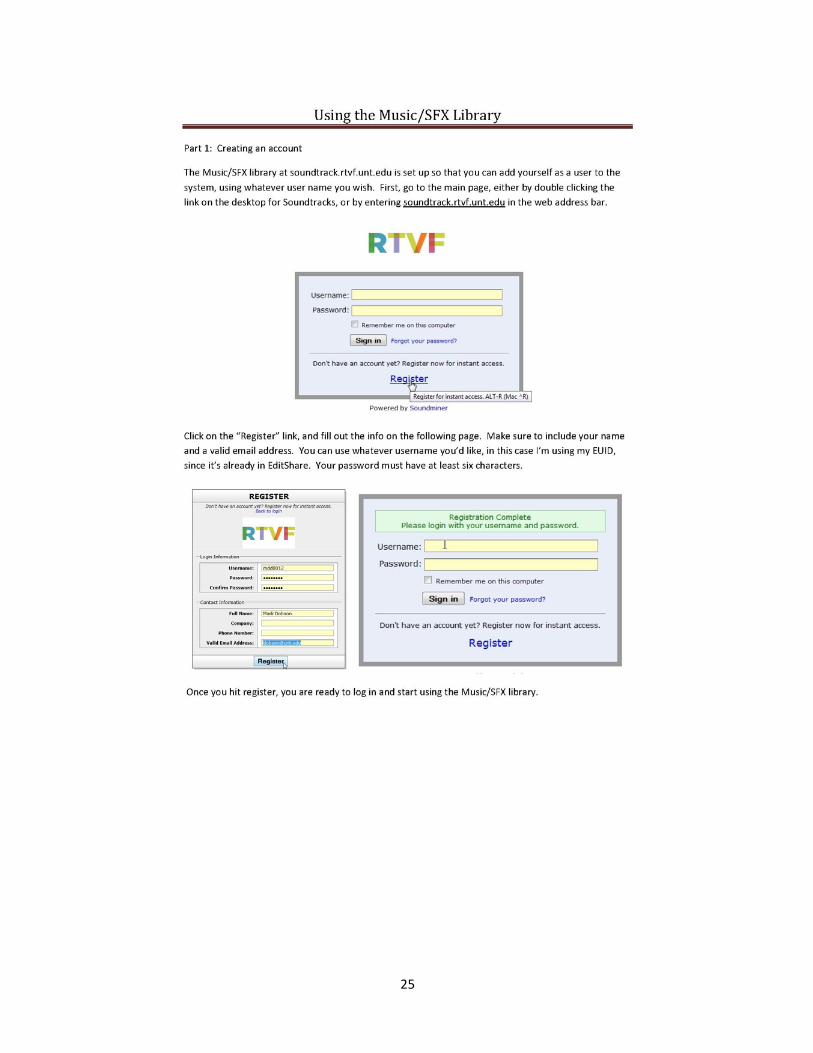
EditShare Soundtrack or “Soundminer” is the music and SFX library for use in your projects. You can preview and download any of the files you wish to use and save them in your EUID space. The following page details the log-in procedure.
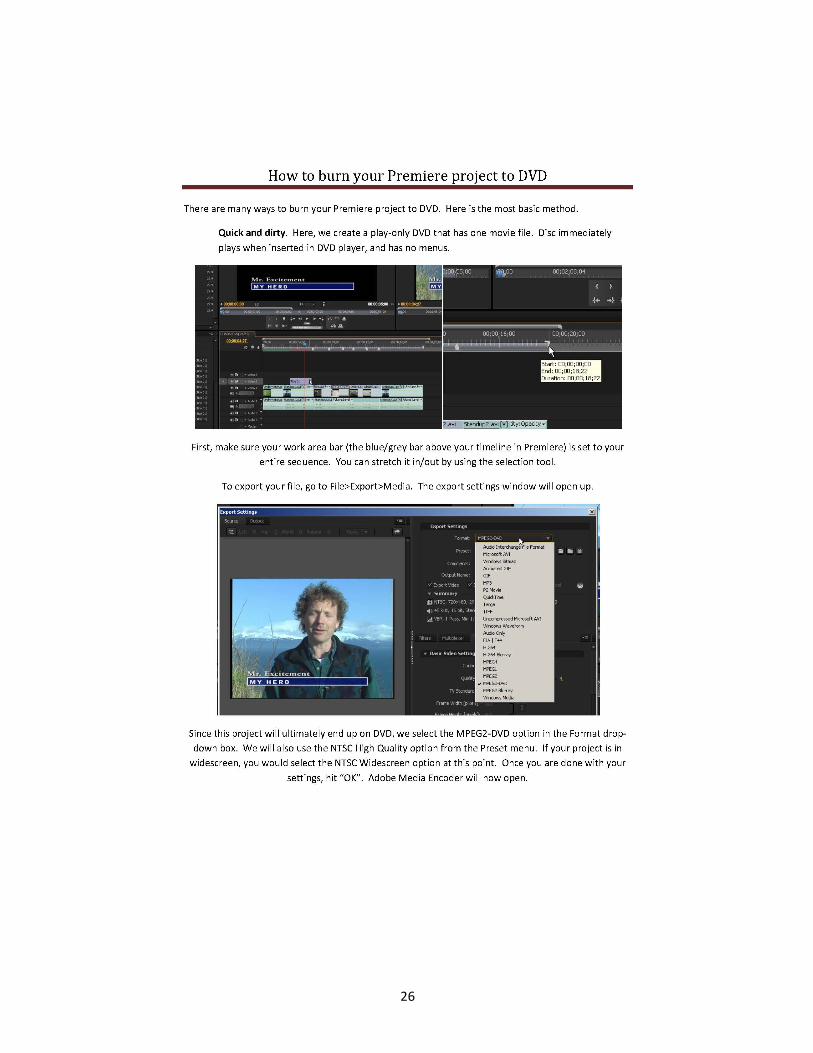
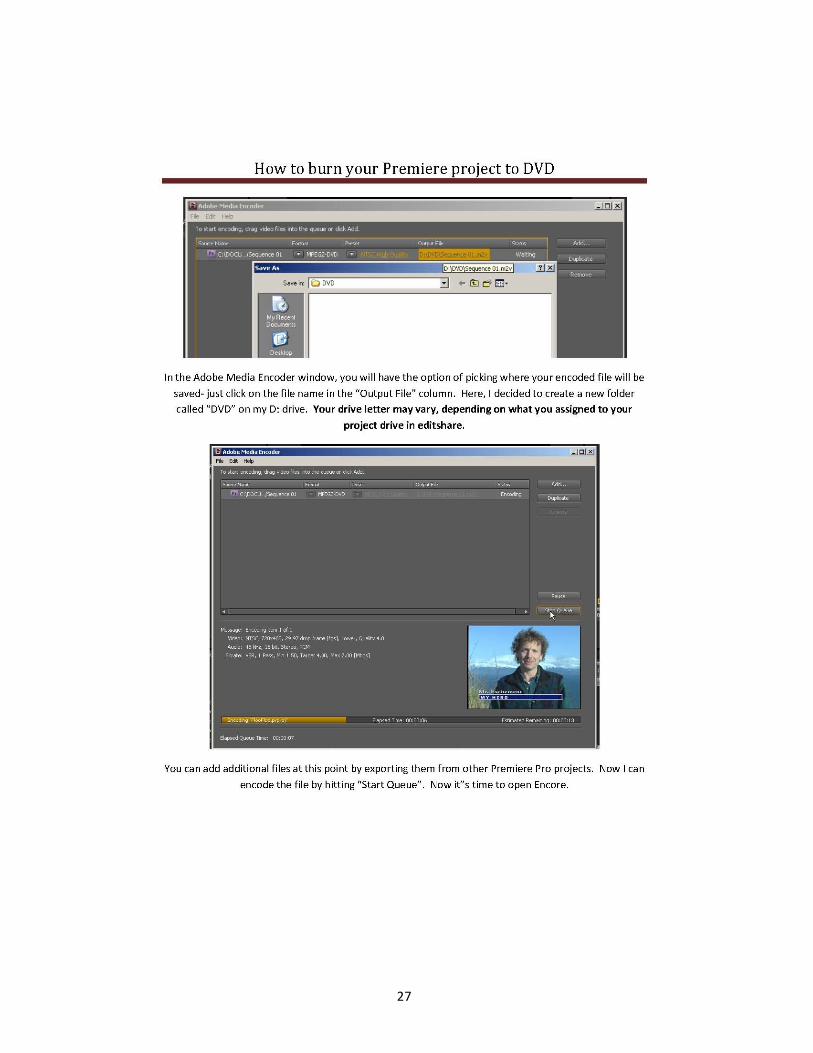
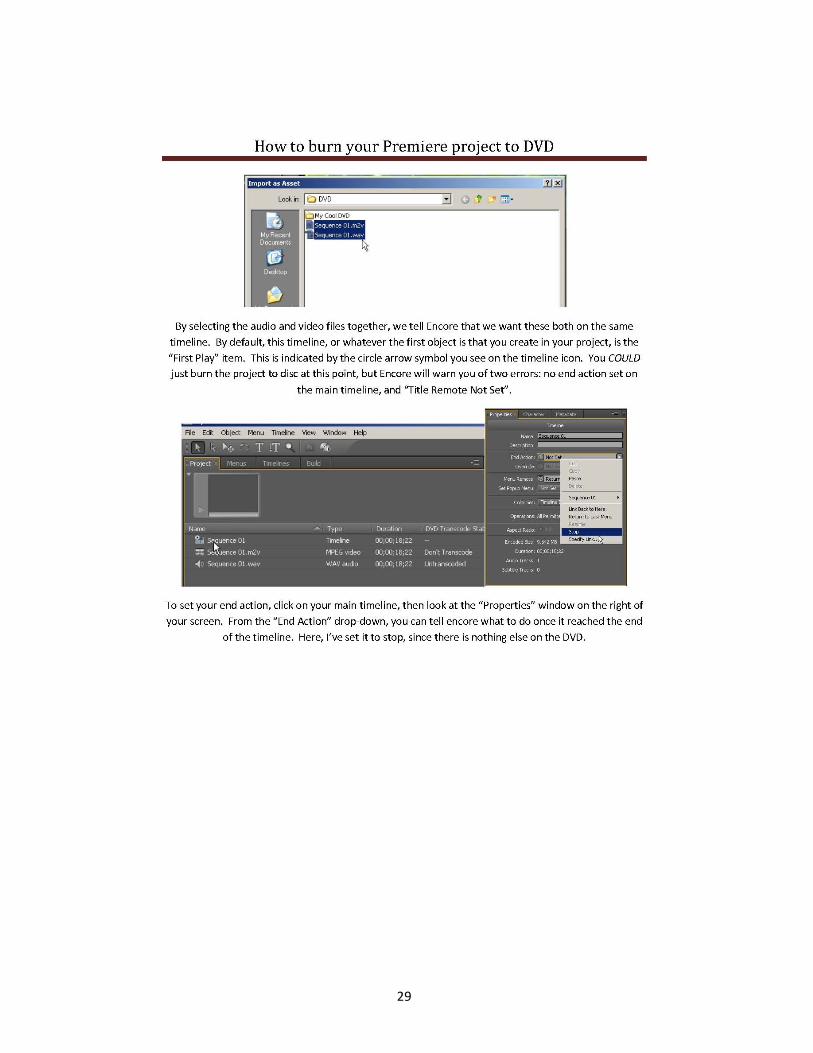
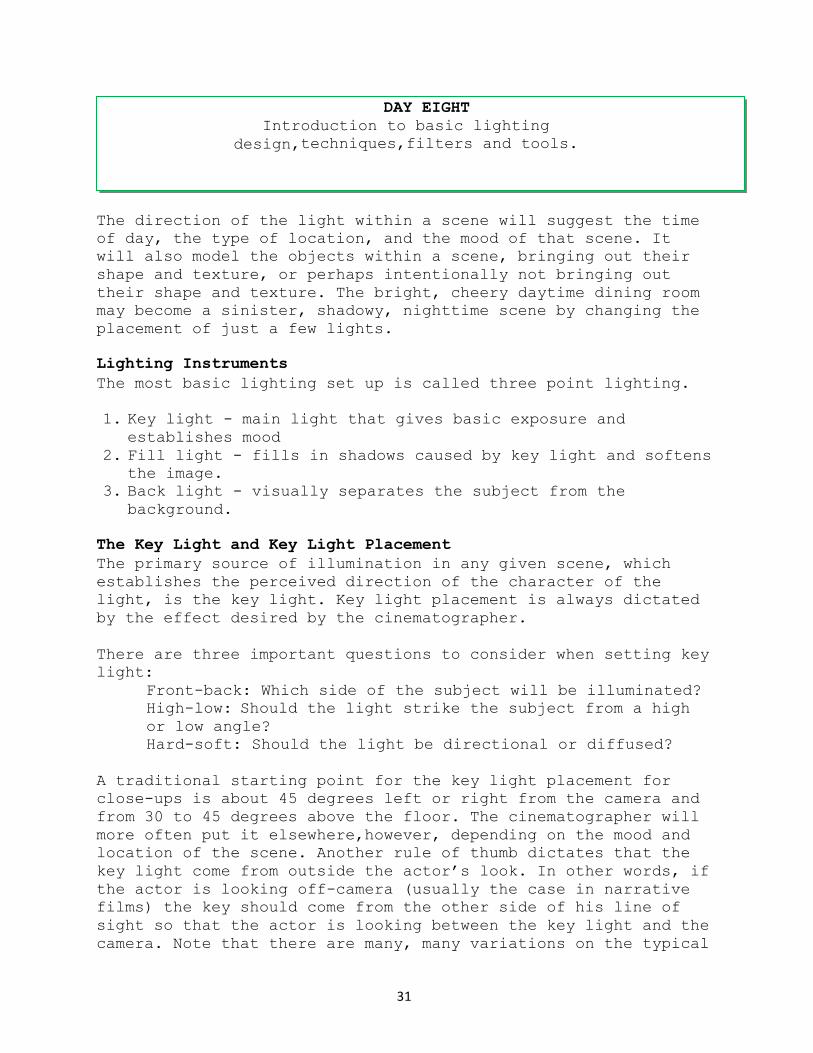
Outputting Completed Sequences When your work is finished, you will need to output it to DVD to turn in. You may also want to make a copy for yourself. This is done through the Adobe Encore software. The following pages are a tutorial in its use. Be sure to use a DVD-R disc as this format plays in most computers and DVD players. Always check your DVD after burning in the players in the rack to make sure they play properly.
25
26
27

28
29
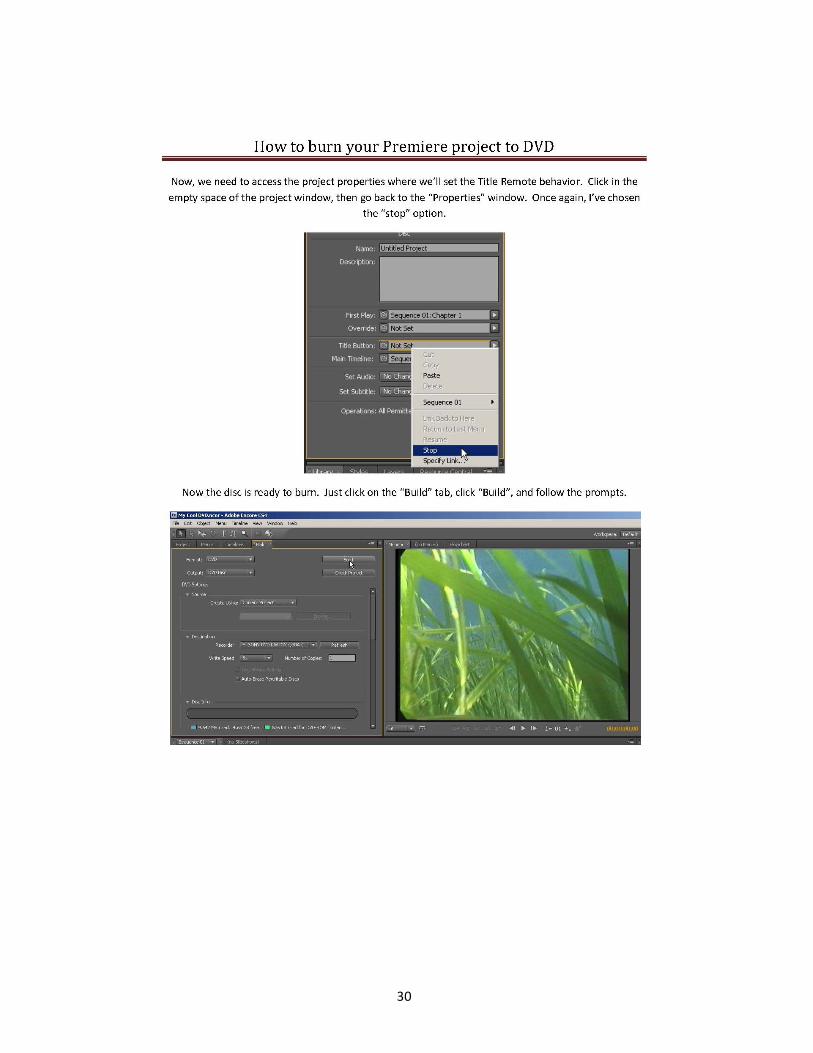
30
31
DAY EIGHTIntroduction to basic lighting
design,techniques,filters and tools.
The direction of the light within a scene will suggest the time of day, the type of location, and the mood of that scene. It will also model the objects within a scene, bringing out their shape and texture, or perhaps intentionally not bringing out their shape and texture. The bright, cheery daytime dining room may become a sinister, shadowy, nighttime scene by changing the placement of just a few lights.
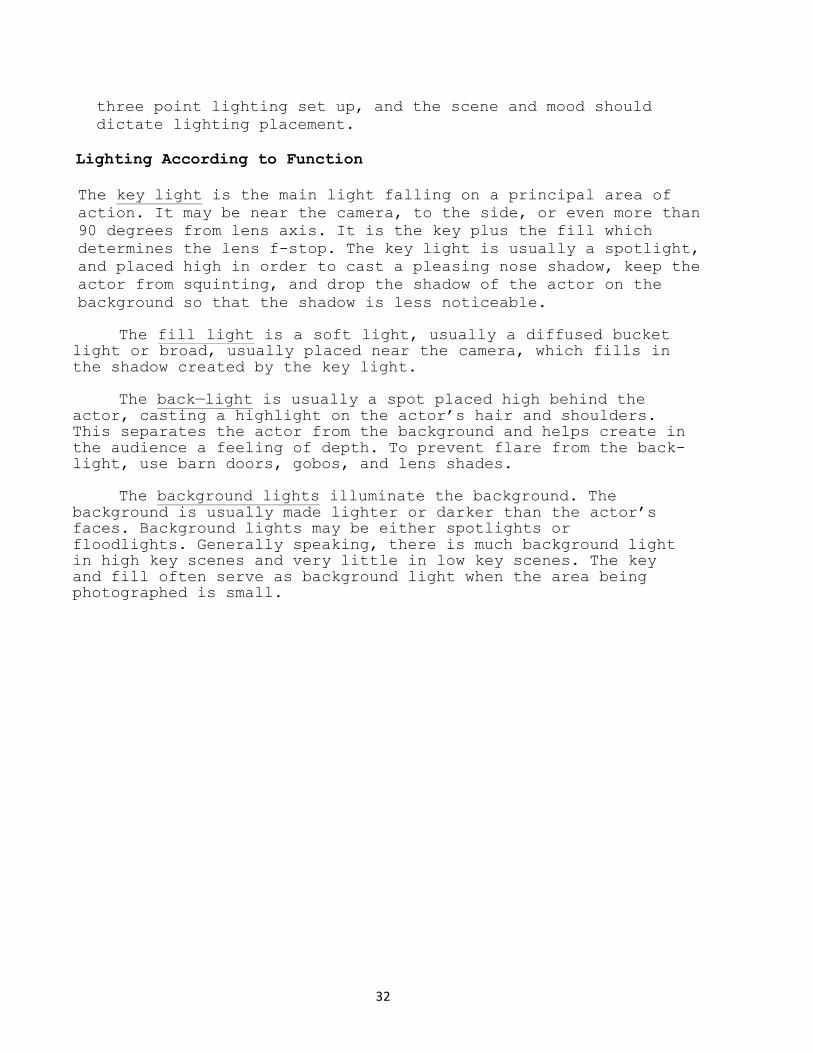
Lighting Instruments The most basic lighting set up is called three point lighting.
1. Key light - main light that gives basic exposure andestablishes mood
2. Fill light - fills in shadows caused by key light and softensthe image.
3. Back light - visually separates the subject from thebackground.
The Key Light and Key Light Placement The primary source of illumination in any given scene, which establishes the perceived direction of the character of the light, is the key light. Key light placement is always dictated by the effect desired by the cinematographer.
There are three important questions to consider when setting key light:
Front-back: Which side of the subject will be illuminated? High-low: Should the light strike the subject from a high or low angle? Hard-soft: Should the light be directional or diffused?
A traditional starting point for the key light placement for close-ups is about 45 degrees left or right from the camera and from 30 to 45 degrees above the floor. The cinematographer will more often put it elsewhere,however, depending on the mood and location of the scene. Another rule of thumb dictates that the key light come from outside the actor’s look. In other words, if the actor is looking off-camera (usually the case in narrative films) the key should come from the other side of his line of sight so that the actor is looking between the key light and the camera. Note that there are many, many variations on the typical
32
three point lighting set up, and the scene and mood should dictate lighting placement.
Lighting According to Function
The key light is the main light falling on a principal area of action. It may be near the camera, to the side, or even more than 90 degrees from lens axis. It is the key plus the fill which determines the lens f-stop. The key light is usually a spotlight, and placed high in order to cast a pleasing nose shadow, keep the actor from squinting, and drop the shadow of the actor on the background so that the shadow is less noticeable.
The fill light is a soft light, usually a diffused bucket light or broad, usually placed near the camera, which fills in the shadow created by the key light.
The back—light is usually a spot placed high behind the actor, casting a highlight on the actor’s hair and shoulders. This separates the actor from the background and helps create in the audience a feeling of depth. To prevent flare from the back- light, use barn doors, gobos, and lens shades.
The background lights illuminate the background. The background is usually made lighter or darker than the actor’s faces. Background lights may be either spotlights or floodlights. Generally speaking, there is much background light in high key scenes and very little in low key scenes. The key and fill often serve as background light when the area being photographed is small.
33
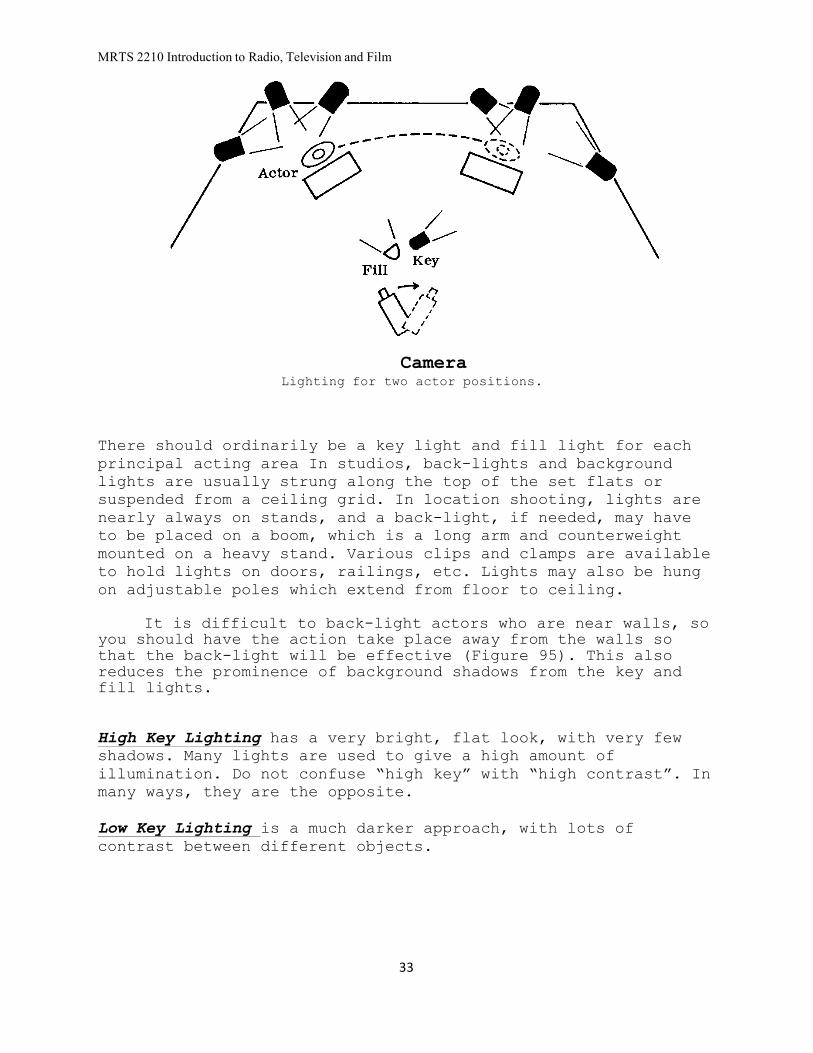
MRTS 2210 Introduction to Radio, Television and Film
Camera Lighting for two actor positions.
There should ordinarily be a key light and fill light for each principal acting area In studios, back-lights and background lights are usually strung along the top of the set flats or suspended from a ceiling grid. In location shooting, lights are nearly always on stands, and a back-light, if needed, may have to be placed on a boom, which is a long arm and counterweight mounted on a heavy stand. Various clips and clamps are available to hold lights on doors, railings, etc. Lights may also be hung on adjustable poles which extend from floor to ceiling.
It is difficult to back-light actors who are near walls, so you should have the action take place away from the walls so that the back-light will be effective (Figure 95). This also reduces the prominence of background shadows from the key and fill lights.
High Key Lighting has a very bright, flat look, with very few shadows. Many lights are used to give a high amount of illumination. Do not confuse “high key” with “high contrast”. In many ways, they are the opposite.
Low Key Lighting is a much darker approach, with lots of contrast between different objects.

34
MRTS 2210 Introduction to Radio, Television and Film
Lighting Tools:
1. Cucoloris. Often simply called a“cookie” on the set, a cucolorisis used to create a shadowpattern on a backdropor another object. When it ispositioned in front of a lightsource, the cookie breaks up anevenly or flatly lit area intopools of light and shadow. Aswith most professional lightinginstruments, cookies are veryexpensive, but can also be madeinexpensively with somecardboard or tree branches, etc. Aprofessional cookie is made with wood orwire mesh and has cut outpatterns withinit.
Use of a cookie
35
MRTS 2210 Introduction to Radio, Television and Film
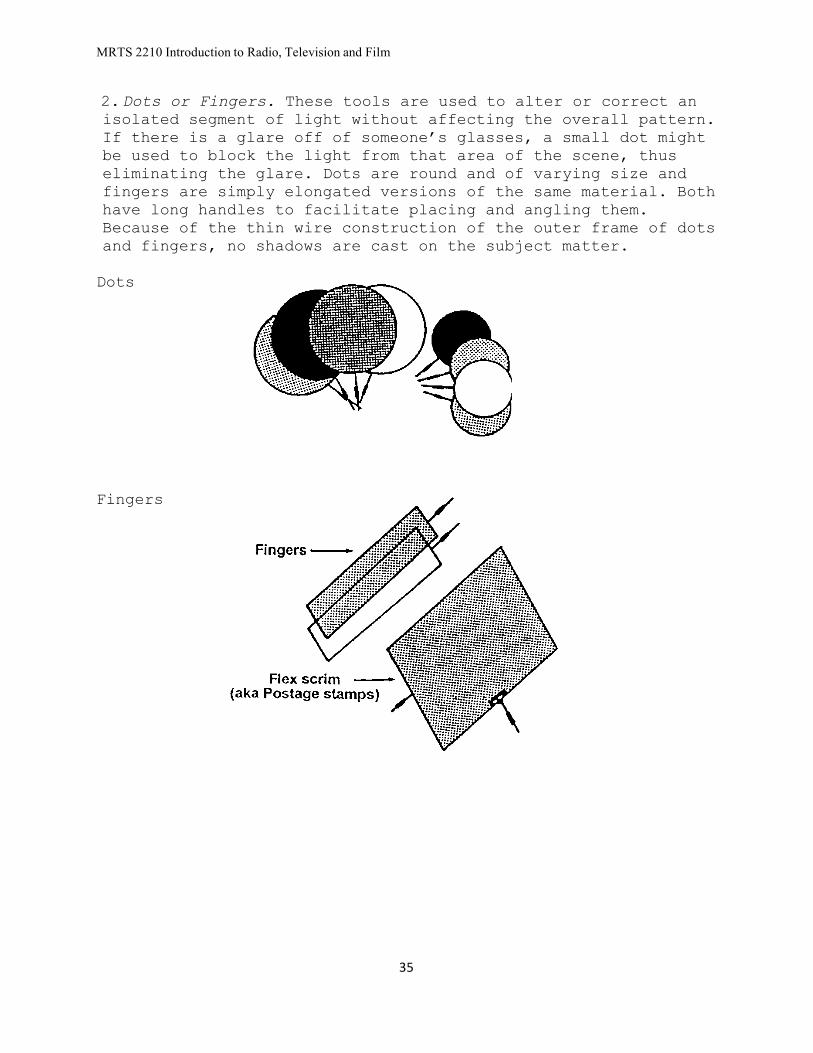
2.Dots or Fingers. These tools are used to alter or correct anisolated segment of light without affecting the overall pattern.If there is a glare off of someone’s glasses, a small dot mightbe used to block the light from that area of the scene, thuseliminating the glare. Dots are round and of varying size andfingers are simply elongated versions of the same material. Bothhave long handles to facilitate placing and angling them.Because of the thin wire construction of the outer frame of dotsand fingers, no shadows are cast on the subject matter.
Dots
Fingers
36
MRTS 2210 Introduction to Radio, Television and Film
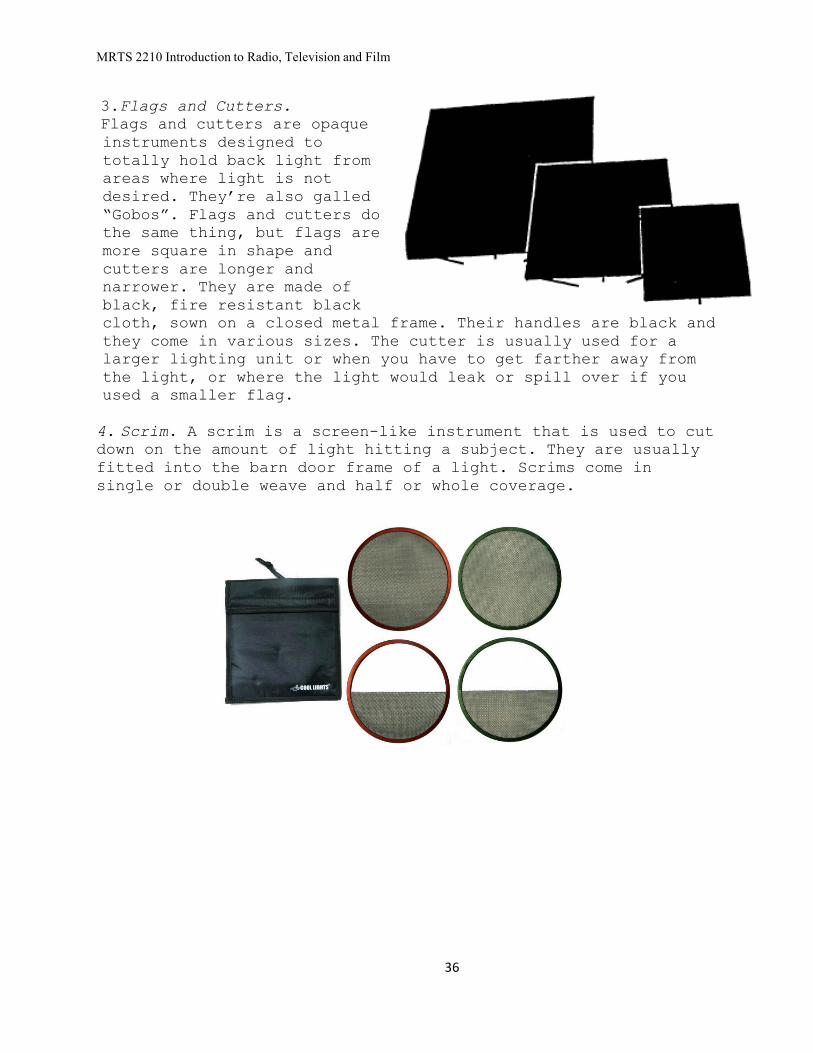
3.Flags and Cutters.Flags and cutters are opaqueinstruments designed tototally hold back light fromareas where light is notdesired. They’re also galled“Gobos”. Flags and cutters dothe same thing, but flags aremore square in shape andcutters are longer andnarrower. They are made ofblack, fire resistant blackcloth, sown on a closed metal frame. Their handles are black andthey come in various sizes. The cutter is usually used for alarger lighting unit or when you have to get farther away fromthe light, or where the light would leak or spill over if youused a smaller flag.
4. Scrim. A scrim is a screen-like instrument that is used to cutdown on the amount of light hitting a subject. They are usuallyfitted into the barn door frame of a light. Scrims come insingle or double weave and half or whole coverage.
37
MRTS 2210 Introduction to Radio, Television and Film
5. Sandbag. Professional motion picture sandbags are made fromcanvas or heavy vinyl and filled with sand or lead pellets. Thebags are placed on all lighting, tripod and other stands oncethey have been set up properly and are in place. The bagsusually just lay over one leg of the stand. Always try to placethe bag on the leg opposite any weight attached to the stand tobalance it out. Bags come in several sizes and weights, and arefairly expensive if purchased at a professional equipmentfacility. Many students choose to make their own sandbags (besure to sew it shut tightlyK. In a pinch, a backpack with lotsof books in it will serve as a “sandbag.”
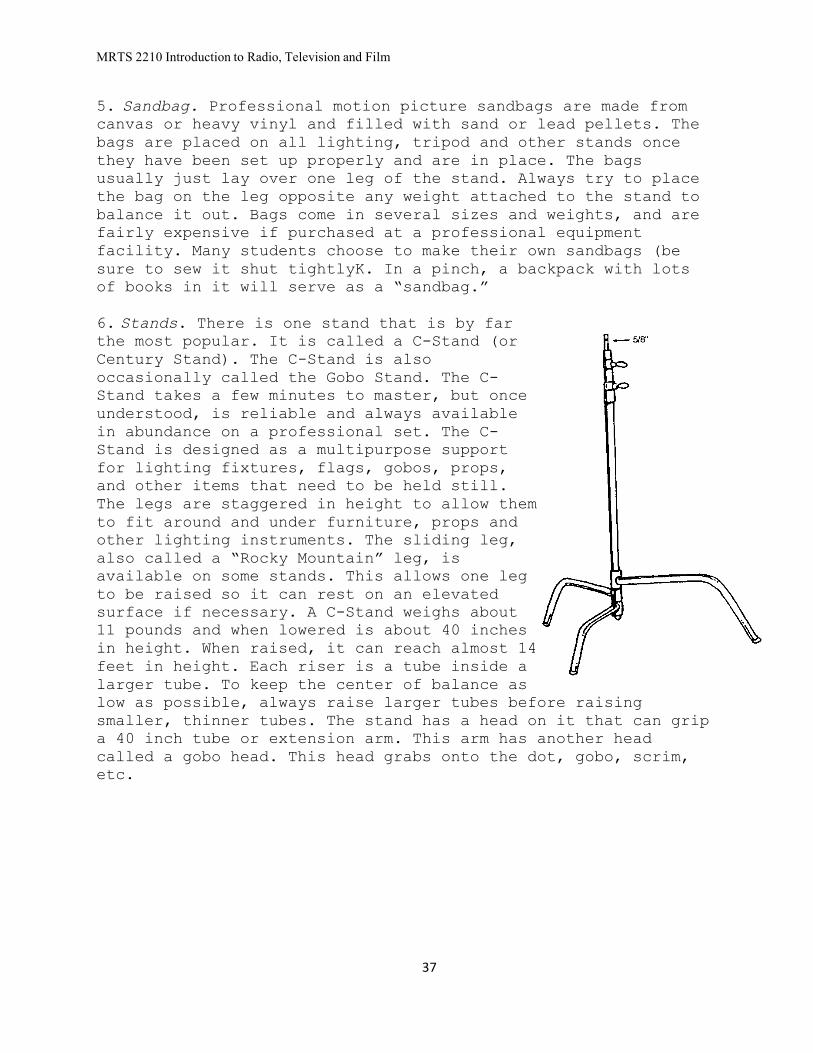
6. Stands. There is one stand that is by farthe most popular. It is called a C-Stand (orCentury Stand). The C-Stand is alsooccasionally called the Gobo Stand. The C- Stand takes a few minutes to master, but onceunderstood, is reliable and always availablein abundance on a professional set. The C- Stand is designed as a multipurpose supportfor lighting fixtures, flags, gobos, props,and other items that need to be held still.The legs are staggered in height to allow themto fit around and under furniture, props andother lighting instruments. The sliding leg,also called a “Rocky Mountain” leg, isavailable on some stands. This allows one legto be raised so it can rest on an elevatedsurface if necessary. A C-Stand weighs about11 pounds and when lowered is about 40 inchesin height. When raised, it can reach almost 14feet in height. Each riser is a tube inside alarger tube. To keep the center of balance aslow as possible, always raise larger tubes before raisingsmaller, thinner tubes. The stand has a head on it that can gripa 40 inch tube or extension arm. This arm has another headcalled a gobo head. This head grabs onto the dot, gobo, scrim,etc.

38
MRTS 2210 Introduction to Radio, Television and Film
The C-Stand should always be used with the tightening knuckle (knob) “on the right”. The reason the knuckles are on the right is that any time a flag or other weight is put in the head, gravity will pull it downward. The knuckle or knob is tightened clockwise. The weight of the flag will cause the head to bite by pulling down (clockwise), causing friction and locking it into place. If you put the knuckle or knob on the left, the opposite will occur, and you will end up with your lighting instrument on the ground. Position one of the legs facing forward to support the weight of the object that the stand is holding to keep it from falling over. To help balance this, place a sandbag on the back leg.
7. Barn Doors. These are metal “doors”attached to a light that can be partiallyclosed to direct the light in specificdirections.
Light Meters: Light meters are instruments that allow you to measure the amount of light in a location. The purpose of the light meter is to understand what F-Stop setting to set your camera at under these specific lighting conditions. In order to get the best recommendation, you need not only to measure the light but also need to “tell” the light meter what speed film you are using (what ASA it is meaning how sensitive it is to light. Please note that film “speed” is NOT how quickly or slowly film moves through the camera.). “Fast film” is very sensitive to light and has a higher ASA number such as 1600. “Slow film” is less sensitive to light and has a lower ASA number such as 200. You also then need to tell the light meter what shutter speed you are using on the camera. If you are filming in real time, the shutter speed is 24 frames per second (fps)

39
MRTS 2210 Introduction to Radio, Television and Film
There are three types of light meters - Incident, Reflected and Spot
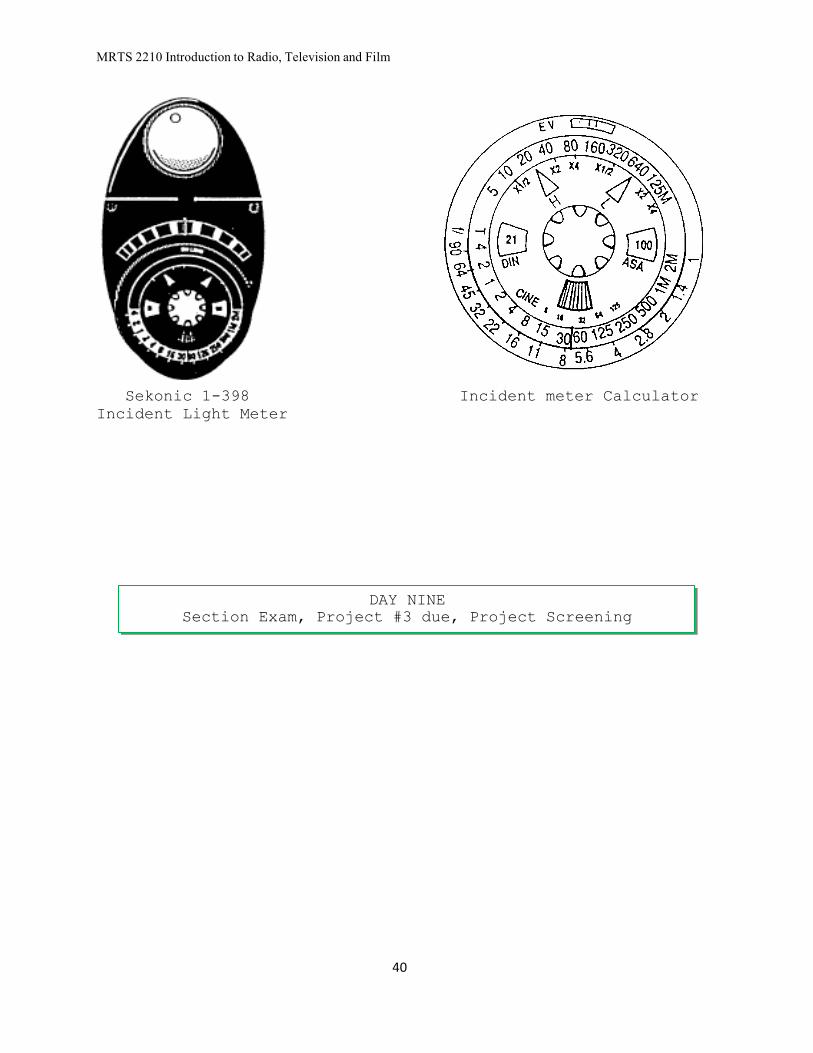
Incident - Designed to measure the amount of light falling directly onto the main subject of the scene. The light meter is held next to the object and facing back toward the lights.
Reflected - Designed with the light-sensitive cell located behind some sort of shield to control the light acceptance angle. This shield may be a perforated grid, a simple narrow tube or a magnifier. The purpose of the design is to produce a meter that is more or less directional so that the meter can be pointed toward a given object and not read light from all directions at once. For a reflected light reading, the light meter is normally held near the camera and measure the light coming back from specific parts of the scene (usually characters’ faces, since this is the object most crucial to proper exposure.)
Spot — These are reflected readings where the meter is fitted with a special lens that allows only a very narrow angle of acceptance, usually from 5 degrees to minus 5 degrees. Because the measuring angle is so small, spot meters also have a viewfinder. Spot meters are capable of giving accurate readings of small portions of a scene. They will also measure flesh tones from a great distances, making them ideal to use with long camera lenses. Spot meters are ideal in situations where taking incident readings would be inconvenient or impossible, such as at a concert or similar event. Unfortunately, like most specialized precision instruments, they are very expensive.
40
MRTS 2210 Introduction to Radio, Television and Film
Sekonic 1-398 Incident meter Calculator Incident Light Meter
DAY NINE Section Exam, Project #3 due, Project Screening