office 365 outlook quick reference - siue.edu · office 365 outlook . quick reference . ... - will...
TRANSCRIPT
Office 365 Outlook
Quick Reference
Office 365 /ÕÔÌÏÏË Quick Reference http://office365.siue.edu
Office365OutlookQuickReference Page 2 of 27 April 30, 2015

Office 365 /ÕÔÌÏÏË Quick Reference http://office365.siue.edu
Table of Contents
OFFICE 365 OUTLOOK 4
Sign In 4
Office 365 Outlook 4 Mail Settings 5
Mail 8 Menus 8 Folders Pane 9 Conversations (Messages) 10 Signature 11 Deleted Items 12 Rules (Filters) 13 Categories 15
People (Contacts) 16 My Contacts 16 Directory 21 Groups 21
Calendar 22 Calendar Setting 22 Create Event 23 Edit/Delete an Event 23 Create New Calendar 23 Share Calendar 24 Calendar Menu 24 Accept Calendar Share Request 25
Tasks 26 Create Task 26 Edit Task 26 Mark Task Complete 27 Delete Task 27 Tasks View 27
ADDITIONAL RESOURCES 27 Phone Numbers 27 Web Sites 27 Email Addresses 27 External Training 27
Office365OutlookQuickReference Page 3 of 27 April 30, 2015

Office 365 /ÕÔÌÏÏË Quick Reference http://office365.siue.edu
Office 365 Outlook Sign In • Open browser
- Internet Explorer is preferred • In Address field enter the following URL:
http://office365.siue.edu - Will sign in to Office 365, which is where SharePoint
Sites are located • If prompted, select Work or school account • Key in email address (if prompted) and password
- Username – Key in your email address OR click email address
- Password – Key in e-id password • Click Note: This document covers the basics of using Office 365 Outlook. For more information on additional
features, click for the current app you are using. Office.com has an Office 365 Learning Center that offers online training and tutorials (links available at end of document).
Sign In Prompt
Sign In
Office 365 Outlook • Office 365 Outlook actually consist of apps
- Mail - Calendar - People (Contacts) - Tasks
• Can have more than one tab open within a browser with Office 365 - This allows using Mail and Word (or whatever app) at
the same time • Will open Office 365
• To open Mail, select
- If at another Office 365 app, click • Outlook Mail opens
Office 365 Main Page
Office365OutlookQuickReference Page 4 of 27 April 30, 2015

Office 365 /ÕÔÌÏÏË Quick Reference http://office365.siue.edu
Mail Settings
• Click • Select Mail Setting to view/modify • Refresh - Refreshes Inbox (looks for new mail)
Mail Settings
• Automatic replies – set up auto-replies for vacation, etc. - Select Automatic replies - Select to send - Check if only during specific time period - Set Start and End date/times - If reply is to SIUE contacts only; type in message of
first box - If reply outside of SIUE contacts, check box and
complete second box - Click
Automatic Replies
Office365OutlookQuickReference Page 5 of 27 April 30, 2015

Office 365 /ÕÔÌÏÏË Quick Reference http://office365.siue.edu
• Display settings - Message list - Conversations - Reading pane
• Message list: - Select preferred layout - Select whether to preview text of message - Click
Display Settings/Message List
• Conversations: - Select order (new or old first) - Select whether deleted items show - Click
Display Settings/Conversations
• Reading Pane: - Select where or if a reading pane is viewed - Check if this setting is to apply to all folders - Click
Display Settings/Reading Pane
Office365OutlookQuickReference Page 6 of 27 April 30, 2015

Office 365 /ÕÔÌÏÏË Quick Reference http://office365.siue.edu
• Manage apps: - Check/uncheck to turn on/off apps - Select app and click minus sign to delete
o Default apps cannot be deleted, just turned off - Click the plus sign to add apps - Automatically saved
Manage Apps
• Change theme: - Select theme - Click
Change Theme
• Options: - Opens Mail Options
o Some are shown on the drop down list - Select option to view/change - Main categories:
o Automatic processing o Accounts o Layout o S/MIME
- Can also get to other areas: o General o Calendar o People o Other
Options
Office365OutlookQuickReference Page 7 of 27 April 30, 2015

Office 365 /ÕÔÌÏÏË Quick Reference http://office365.siue.edu
Mail Mail is the app used to read, send and store conversations (email messages). • Window consist of:
- Inbox - Reading pane - Folders - Access to menus - Search - Create new conversation (message)
Mail Inbox
Menus • There are 4 ways to access menus
- Quick – Menu options available - Right Click – Select conversation and right click - Ellipsis – Click on ellipsis ( ) to open additional
menu options o Will usually be seen in addition to Quick menu
- Dropdown – Click down arrow ( ) to open menu options
Quick Menu Example
Right Click Menu Example
Ellipsis Menu Example
Dropdown Menu Example
Office365OutlookQuickReference Page 8 of 27 April 30, 2015
Office 365 /ÕÔÌÏÏË Quick Reference http://office365.siue.edu
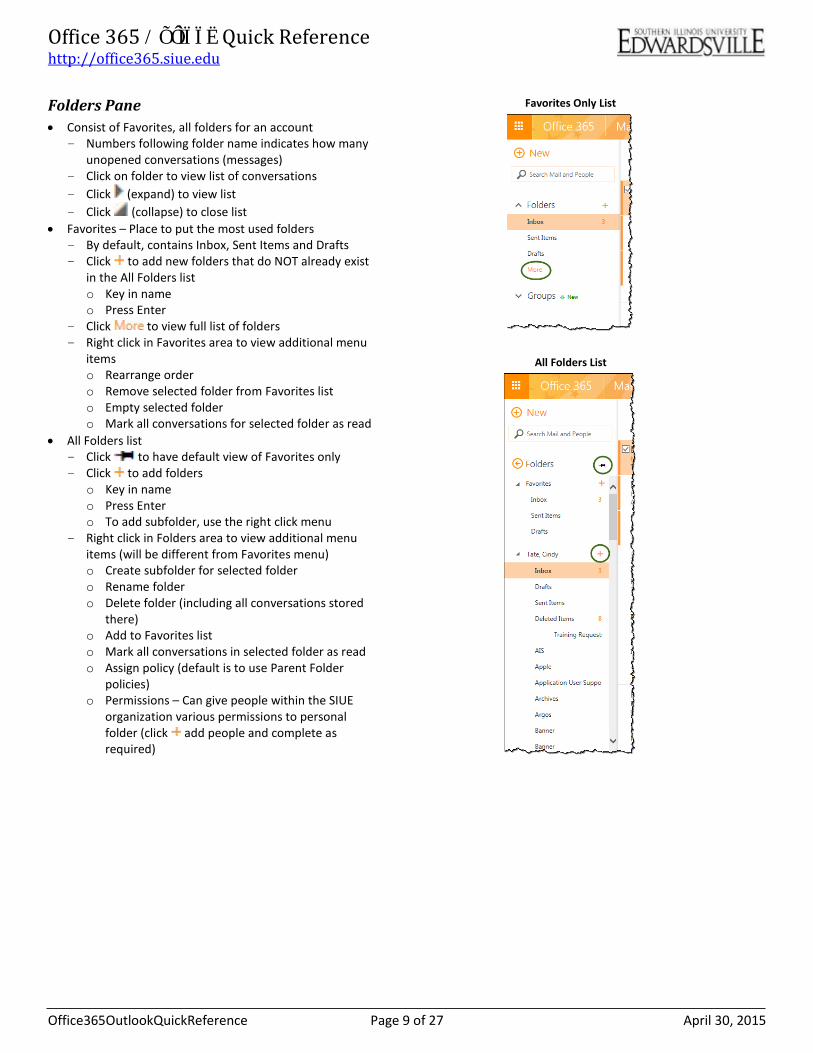
Folders Pane • Consist of Favorites, all folders for an account
- Numbers following folder name indicates how many unopened conversations (messages)
- Click on folder to view list of conversations - Click (expand) to view list - Click (collapse) to close list
• Favorites – Place to put the most used folders - By default, contains Inbox, Sent Items and Drafts - Click to add new folders that do NOT already exist
in the All Folders list o Key in name o Press Enter
- Click to view full list of folders - Right click in Favorites area to view additional menu
items o Rearrange order o Remove selected folder from Favorites list o Empty selected folder o Mark all conversations for selected folder as read
• All Folders list - Click to have default view of Favorites only - Click to add folders
o Key in name o Press Enter o To add subfolder, use the right click menu
- Right click in Folders area to view additional menu items (will be different from Favorites menu) o Create subfolder for selected folder o Rename folder o Delete folder (including all conversations stored
there) o Add to Favorites list o Mark all conversations in selected folder as read o Assign policy (default is to use Parent Folder
policies) o Permissions – Can give people within the SIUE
organization various permissions to personal folder (click add people and complete as required)
Favorites Only List
All Folders List
Office365OutlookQuickReference Page 9 of 27 April 30, 2015
Office 365 /ÕÔÌÏÏË Quick Reference http://office365.siue.edu
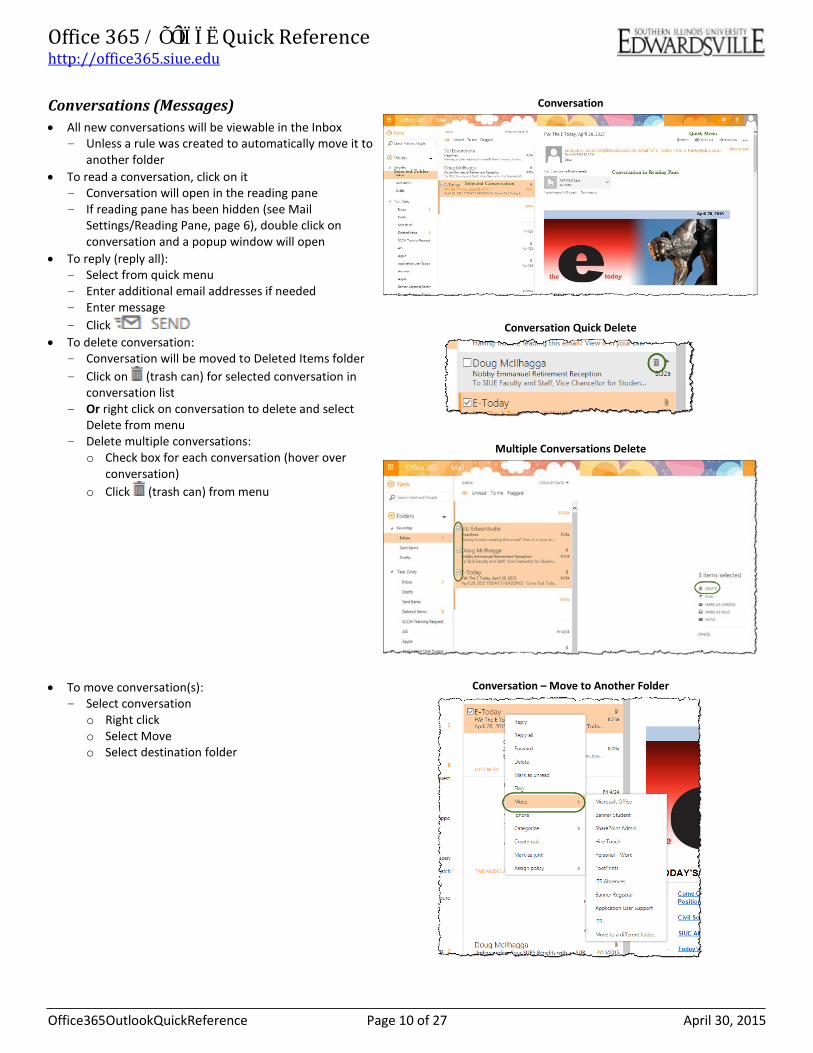
Conversations (Messages) • All new conversations will be viewable in the Inbox
- Unless a rule was created to automatically move it to another folder
• To read a conversation, click on it - Conversation will open in the reading pane - If reading pane has been hidden (see Mail
Settings/Reading Pane, page 6), double click on conversation and a popup window will open
• To reply (reply all): - Select from quick menu - Enter additional email addresses if needed - Enter message - Click
• To delete conversation: - Conversation will be moved to Deleted Items folder - Click on (trash can) for selected conversation in
conversation list - Or right click on conversation to delete and select
Delete from menu - Delete multiple conversations:
o Check box for each conversation (hover over conversation)
o Click (trash can) from menu
Conversation
Conversation Quick Delete
Multiple Conversations Delete
• To move conversation(s): - Select conversation
o Right click o Select Move o Select destination folder
Conversation – Move to Another Folder
Office365OutlookQuickReference Page 10 of 27 April 30, 2015

Office 365 /ÕÔÌÏÏË Quick Reference http://office365.siue.edu
- Move multiple conversations: o Must be moving to the same destination folder o Check box for each conversation (hover over
conversation) o Click Move from menu o Select destination folder o Click Move
Multiple Conversations – Move to Another Folder
• To create a new conversation: - Click - Key in e-id or last name or first name or group name - If recognized, will show options
o Click on name - If no options shown, click
o Will search contacts (SIUE & non-SIUE) and directory (SIUE, does not have to be in your contacts)
o Click on name OR
o Key in complete email address and accept address as is
- Add more email addresses as needed - Key in Subject - Key in message
o Format as needed - Click to include attachments - Click
New Conversation
Signature • To automatically attach a signature to outgoing
conversations:
- Click - Options will open - Expand Mail, if needed - Expand Layout, if needed - Select Email signature - Check box if signature is to be used on all messages
you send - Create signature - Click
Options/Signature
Office365OutlookQuickReference Page 11 of 27 April 30, 2015

Office 365 /ÕÔÌÏÏË Quick Reference http://office365.siue.edu
Deleted Items • Conversations that deleted are moved to the Deleted
Items folder • To empty folder:
- Select Deleted Items folder - Right click - Select Empty folder
• To recover items emptied from Deleted Items folder: - Conversations can be recovered up to 30 days after
being deleted - Select Deleted Items folder - Right click - Select Recover deleted items … - Popup of deleted items (conversations) will open - Select conversation(s) to be recovered - Click Recover - If Purge selected, purged conversations cannot be
recovered at a later date; even if less than 30 days from initial emptying of Deleted Items folder
Deleted Items Folder – Right Click Menu
Recover Deleted Items (Conversations)
Office365OutlookQuickReference Page 12 of 27 April 30, 2015

Office 365 /ÕÔÌÏÏË Quick Reference http://office365.siue.edu
Rules (Filters) • Rules are set up to filter incoming conversations
- Conversations can be marked as read - Moved to another folder to be read later - Moved to the Deleted Items folder
• Rules can be created two ways: - Right click menu for selected conversation
o Rule will auto-populate with items from conversation
- Options menu o Will enter all parameters for rule
• To view/manage current list of rules:
- Click (settings) - Options menu will open - Expand Mail - Select Inbox rules
o Very important to name rules o Unnamed rules will show as the first criteria: i.e.:
It was received from…, It includes these words in the subject…
- Can turn rules on and off o Do not have to delete rules, can turn off o Uncheck/check box for On o Checked box is On, meaning rule will run
- Can change order: o Select (highlight) rule to be moved o Use to move rules within list
- To delete rule: o Select (highlight) rule to be deleted o Click
• To edit existing rule: - Open Inbox rules (See view/manage current list) - Select (highlight) rule to be edited - Click to edit - Rule will open - Make required changes - Click
• To create a new rule from the Options Menu - Open Inbox rules (same as viewing list) - Click to add new rule - New inbox rule opens, complete fields:
o Enter rule name o Enter criteria (when message arrives) o Add condition if additional criteria apply o Complete action (do the following) o Add action if additional actions apply o Add exceptions if needed o Check to stop processing rules (If additional rules
can apply to a conversation, do not check) o Click o Rule will only apply to new inbox conversations
received after rule was created and saved
Inbox Rules
Edit Inbox Rule
New Inbox Rule
Office365OutlookQuickReference Page 13 of 27 April 30, 2015

Office 365 /ÕÔÌÏÏË Quick Reference http://office365.siue.edu
• To create a new rule from Quick Menu - Select conversation to create rule for - Right click - Select Create rule… - New inbox rule opens, complete fields:
o Enter rule name o Criteria (when message arrives) auto-populated
from selected conversation, can be changed o Add condition if additional criteria apply o Complete action (do the following) o Add action if additional actions apply o Add exceptions if needed o Check to stop processing rules (If additional rules
can apply to a conversation, do not check) o Click
- Rule will only apply to new inbox conversations received after rule was created and saved
Conversation Quick Menu
New Inbox Rule – Partial Populated
Office365OutlookQuickReference Page 14 of 27 April 30, 2015

Office 365 /ÕÔÌÏÏË Quick Reference http://office365.siue.edu
Categories Categories can be used in Mail, Calendar and Tasks apps. Categories can be managed from Mail or Calendar apps. By default categories are assigned a color and the name is the color. • To manage the Categories:
- Click - Select Categorize - Select Manage categories…
Manage Categories
• To add category: - Click - Select color from dropdown menu - Key in category - Click twice
Note: Can change color of a category but cannot change text.
Add Category
Add New Category
• To delete category: - From Manage categories, select category - Click - Click twice
Delete Category
Confirm Delete
Office365OutlookQuickReference Page 15 of 27 April 30, 2015
Office 365 /ÕÔÌÏÏË Quick Reference http://office365.siue.edu
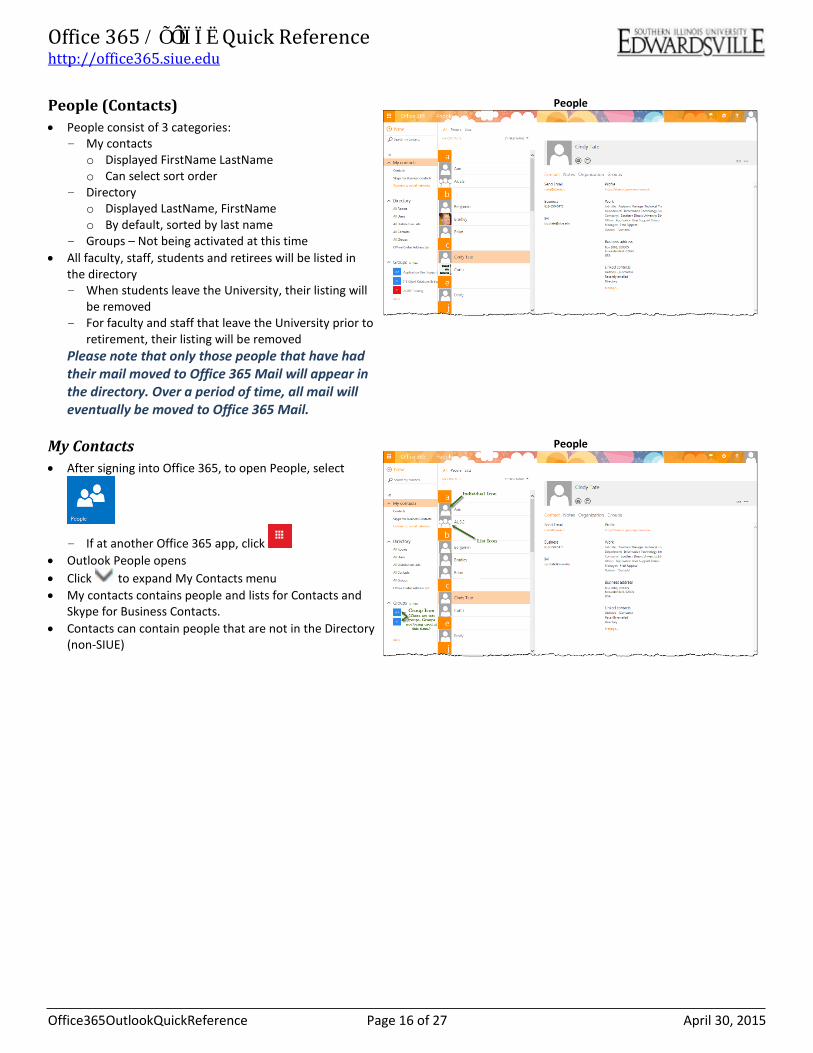
People (Contacts) • People consist of 3 categories:
- My contacts o Displayed FirstName LastName o Can select sort order
- Directory o Displayed LastName, FirstName o By default, sorted by last name
- Groups – Not being activated at this time • All faculty, staff, students and retirees will be listed in
the directory - When students leave the University, their listing will
be removed - For faculty and staff that leave the University prior to
retirement, their listing will be removed Please note that only those people that have had their mail moved to Office 365 Mail will appear in the directory. Over a period of time, all mail will eventually be moved to Office 365 Mail.
People
My Contacts • After signing into Office 365, to open People, select
- If at another Office 365 app, click • Outlook People opens • Click to expand My Contacts menu • My contacts contains people and lists for Contacts and
Skype for Business Contacts. • Contacts can contain people that are not in the Directory
(non-SIUE)
People
Office365OutlookQuickReference Page 16 of 27 April 30, 2015
Office 365 /ÕÔÌÏÏË Quick Reference http://office365.siue.edu
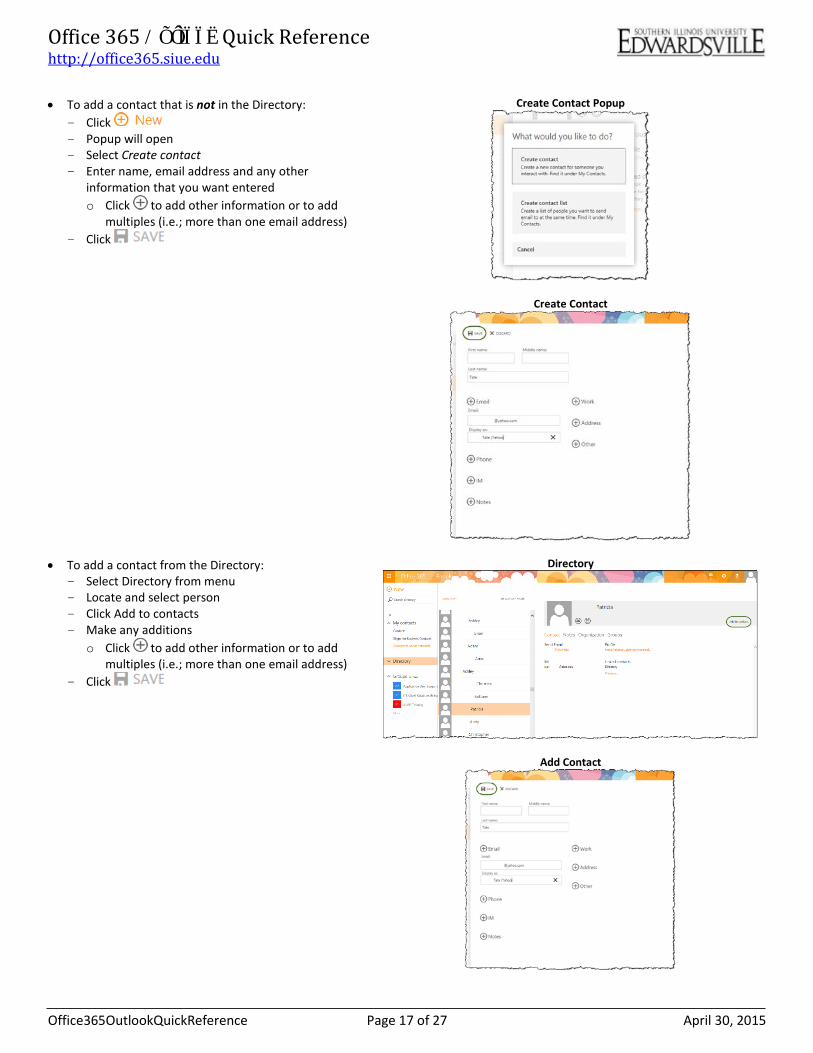
• To add a contact that is not in the Directory: - Click - Popup will open - Select Create contact - Enter name, email address and any other
information that you want entered o Click to add other information or to add
multiples (i.e.; more than one email address) - Click
Create Contact Popup
Create Contact
• To add a contact from the Directory: - Select Directory from menu - Locate and select person - Click Add to contacts - Make any additions
o Click to add other information or to add multiples (i.e.; more than one email address)
- Click
Directory
Add Contact
Office365OutlookQuickReference Page 17 of 27 April 30, 2015
Office 365 /ÕÔÌÏÏË Quick Reference http://office365.siue.edu
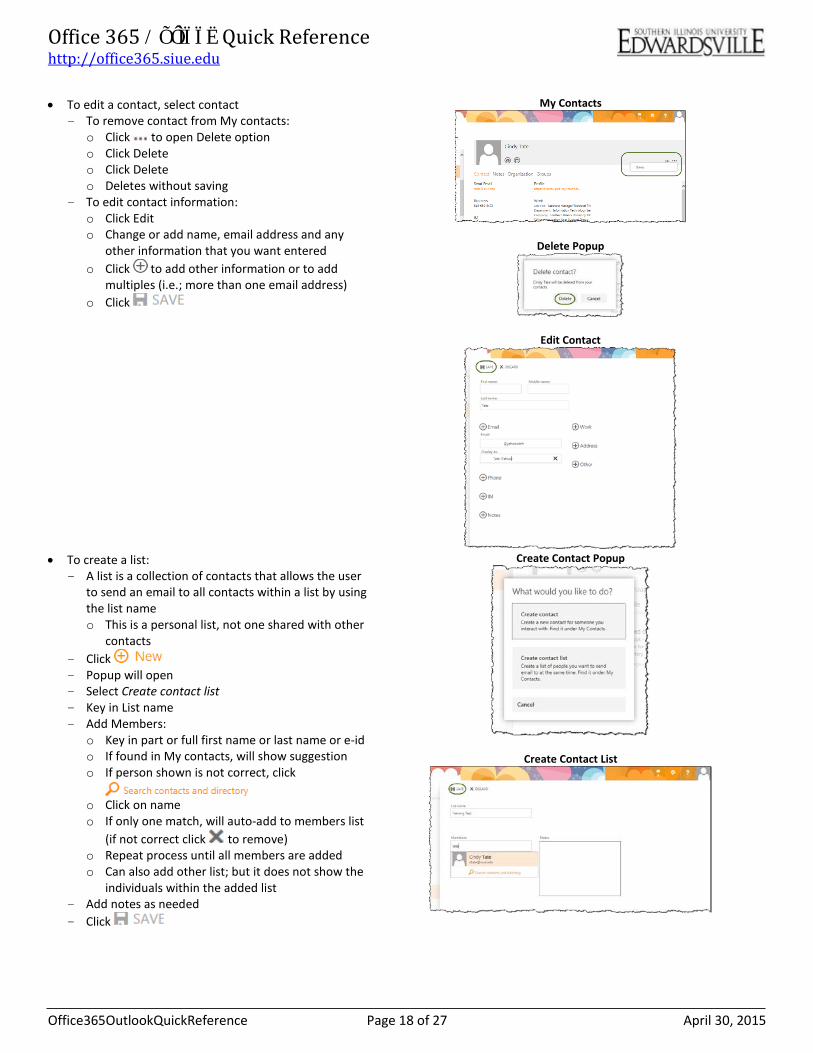
• To edit a contact, select contact - To remove contact from My contacts:
o Click to open Delete option o Click Delete o Click Delete o Deletes without saving
- To edit contact information: o Click Edit o Change or add name, email address and any
other information that you want entered o Click to add other information or to add
multiples (i.e.; more than one email address) o Click
My Contacts
Delete Popup
Edit Contact
• To create a list:
- A list is a collection of contacts that allows the user to send an email to all contacts within a list by using the list name o This is a personal list, not one shared with other
contacts - Click - Popup will open - Select Create contact list - Key in List name - Add Members:
o Key in part or full first name or last name or e-id o If found in My contacts, will show suggestion o If person shown is not correct, click
o Click on name o If only one match, will auto-add to members list
(if not correct click to remove) o Repeat process until all members are added o Can also add other list; but it does not show the
individuals within the added list - Add notes as needed - Click
Create Contact Popup
Create Contact List
Office365OutlookQuickReference Page 18 of 27 April 30, 2015
Office 365 /ÕÔÌÏÏË Quick Reference http://office365.siue.edu
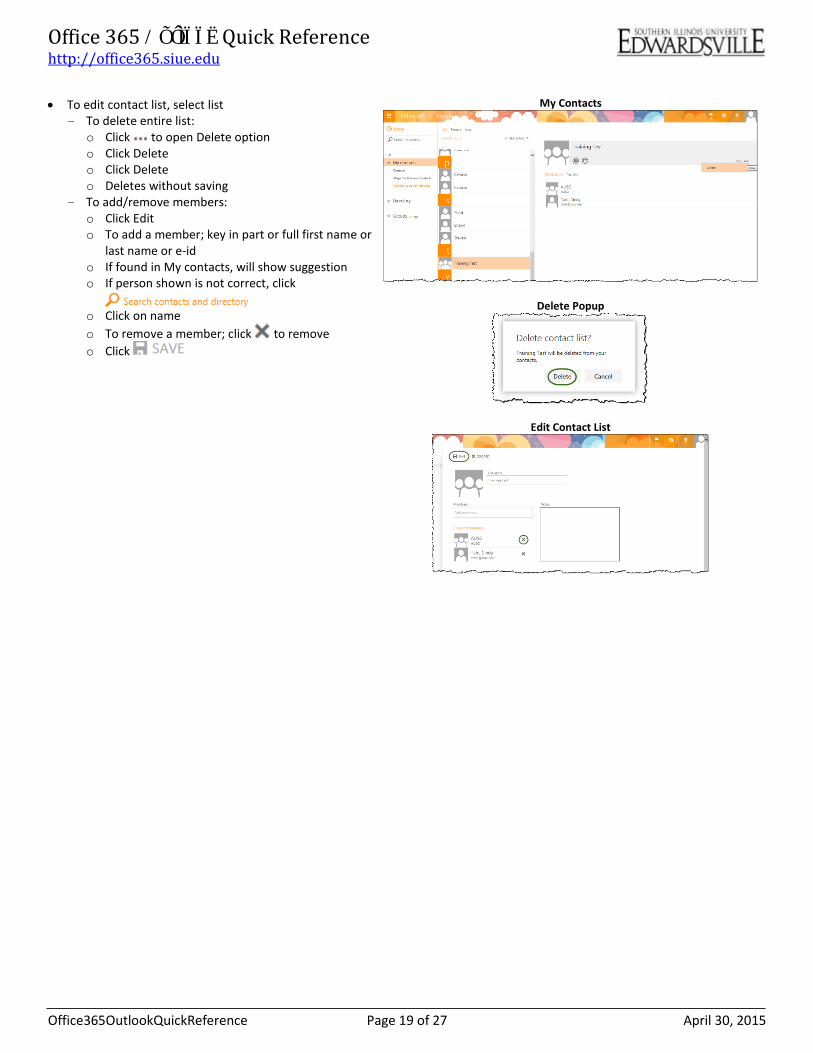
• To edit contact list, select list - To delete entire list:
o Click to open Delete option o Click Delete o Click Delete o Deletes without saving
- To add/remove members: o Click Edit o To add a member; key in part or full first name or
last name or e-id o If found in My contacts, will show suggestion o If person shown is not correct, click
o Click on name o To remove a member; click to remove o Click
My Contacts
Delete Popup
Edit Contact List
Office365OutlookQuickReference Page 19 of 27 April 30, 2015
Office 365 /ÕÔÌÏÏË Quick Reference http://office365.siue.edu
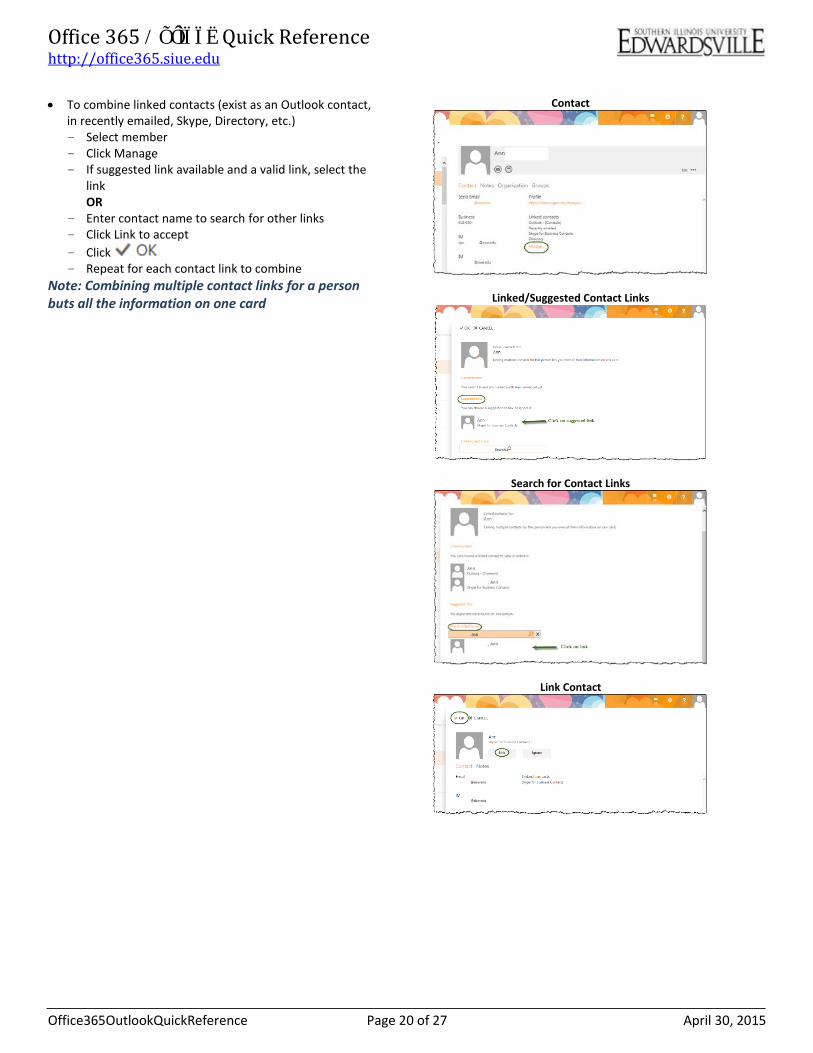
• To combine linked contacts (exist as an Outlook contact, in recently emailed, Skype, Directory, etc.) - Select member - Click Manage - If suggested link available and a valid link, select the
link OR
- Enter contact name to search for other links - Click Link to accept - Click - Repeat for each contact link to combine
Note: Combining multiple contact links for a person buts all the information on one card
Contact
Linked/Suggested Contact Links
Search for Contact Links
Link Contact
Office365OutlookQuickReference Page 20 of 27 April 30, 2015
Office 365 /ÕÔÌÏÏË Quick Reference http://office365.siue.edu
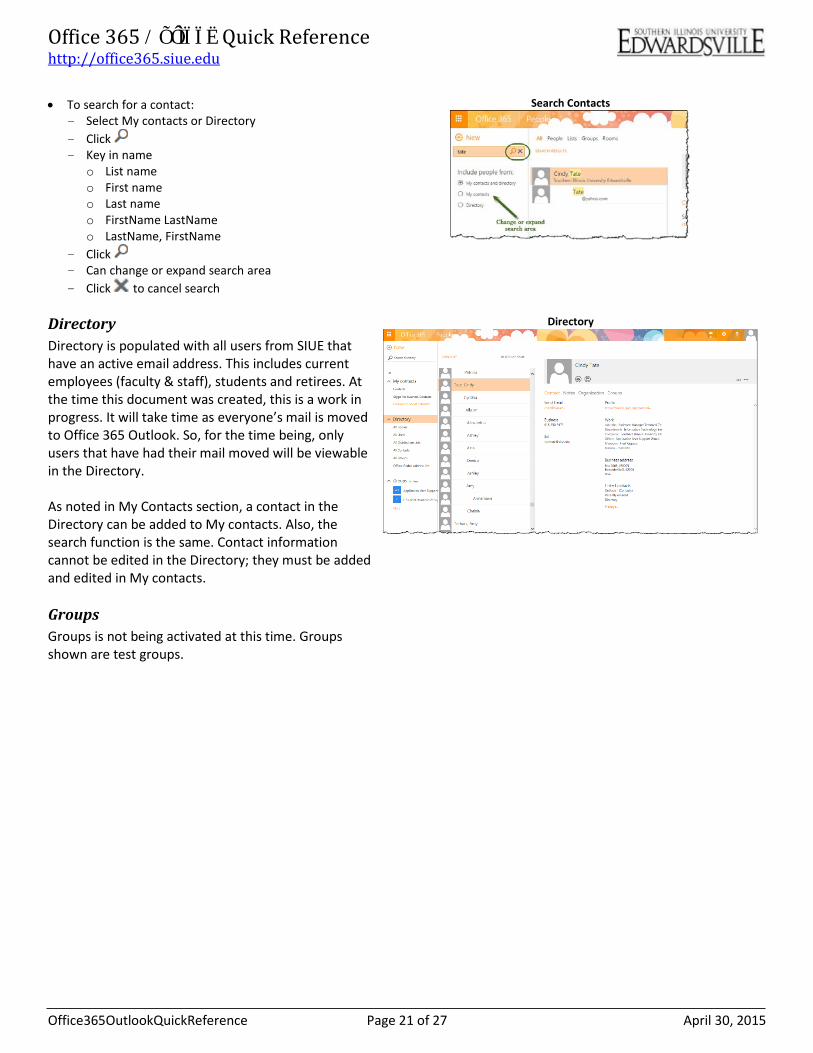
• To search for a contact: - Select My contacts or Directory - Click - Key in name
o List name o First name o Last name o FirstName LastName o LastName, FirstName
- Click - Can change or expand search area - Click to cancel search
Search Contacts
Directory Directory is populated with all users from SIUE that have an active email address. This includes current employees (faculty & staff), students and retirees. At the time this document was created, this is a work in progress. It will take time as everyone’s mail is moved to Office 365 Outlook. So, for the time being, only users that have had their mail moved will be viewable in the Directory. As noted in My Contacts section, a contact in the Directory can be added to My contacts. Also, the search function is the same. Contact information cannot be edited in the Directory; they must be added and edited in My contacts.
Directory
Groups Groups is not being activated at this time. Groups shown are test groups.
Office365OutlookQuickReference Page 21 of 27 April 30, 2015
Office 365 /ÕÔÌÏÏË Quick Reference http://office365.siue.edu
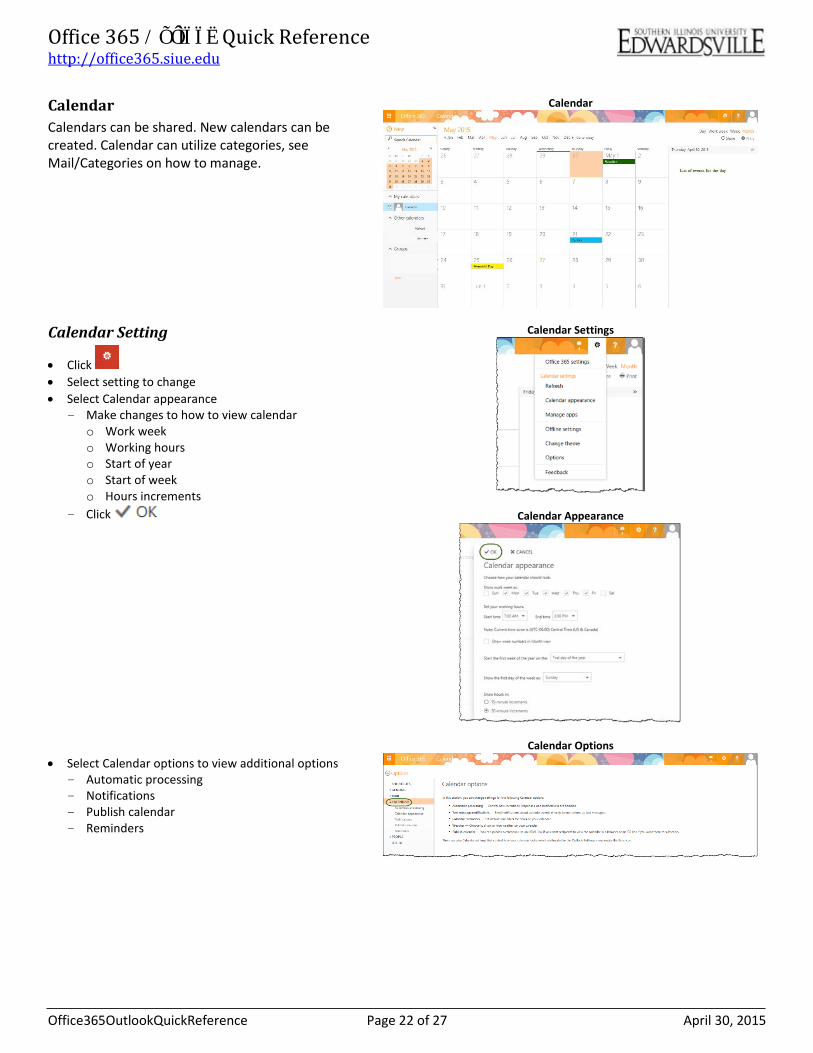
Calendar Calendars can be shared. New calendars can be created. Calendar can utilize categories, see Mail/Categories on how to manage.
Calendar
Calendar Setting
• Click • Select setting to change • Select Calendar appearance
- Make changes to how to view calendar o Work week o Working hours o Start of year o Start of week o Hours increments
- Click • Select Calendar options to view additional options
- Automatic processing - Notifications - Publish calendar - Reminders
Calendar Settings
Calendar Appearance
Calendar Options
Office365OutlookQuickReference Page 22 of 27 April 30, 2015
Office 365 /ÕÔÌÏÏË Quick Reference http://office365.siue.edu
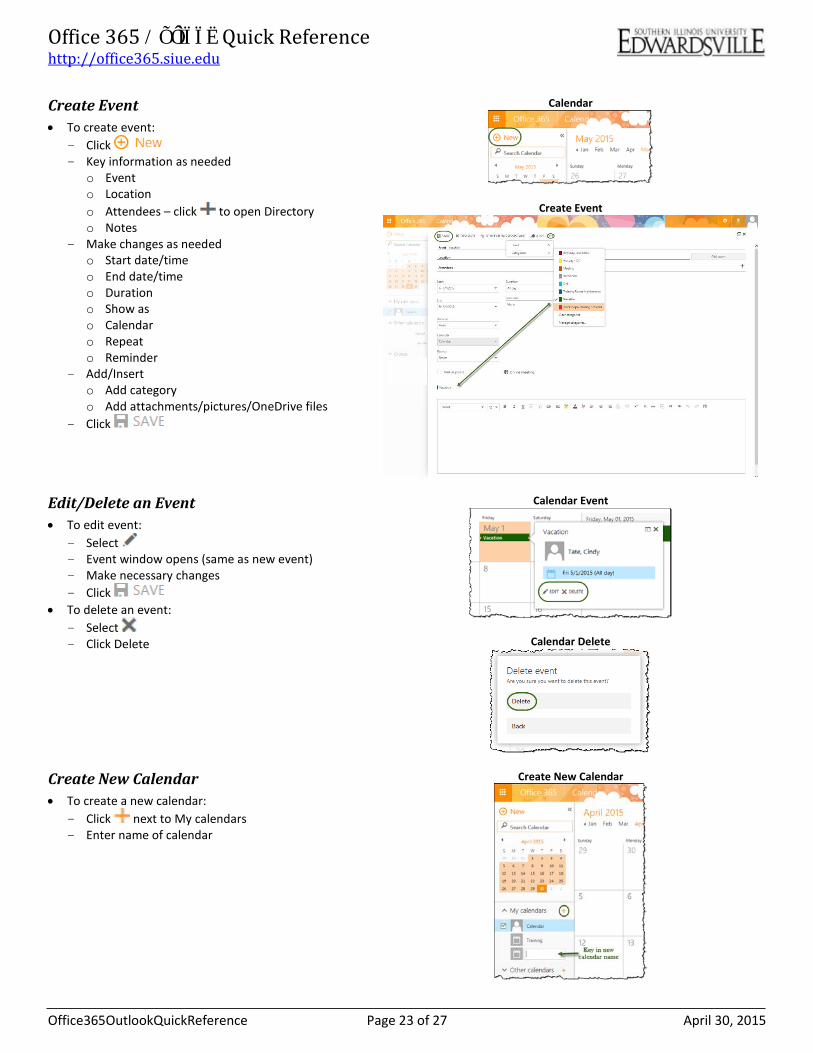
Create Event • To create event:
- Click - Key information as needed
o Event o Location o Attendees – click to open Directory o Notes
- Make changes as needed o Start date/time o End date/time o Duration o Show as o Calendar o Repeat o Reminder
- Add/Insert o Add category o Add attachments/pictures/OneDrive files
- Click
Calendar
Create Event
Edit/Delete an Event • To edit event:
- Select - Event window opens (same as new event) - Make necessary changes - Click
• To delete an event: - Select - Click Delete
Calendar Event
Calendar Delete
Create New Calendar • To create a new calendar:
- Click next to My calendars - Enter name of calendar
Create New Calendar
Office365OutlookQuickReference Page 23 of 27 April 30, 2015
Office 365 /ÕÔÌÏÏË Quick Reference http://office365.siue.edu
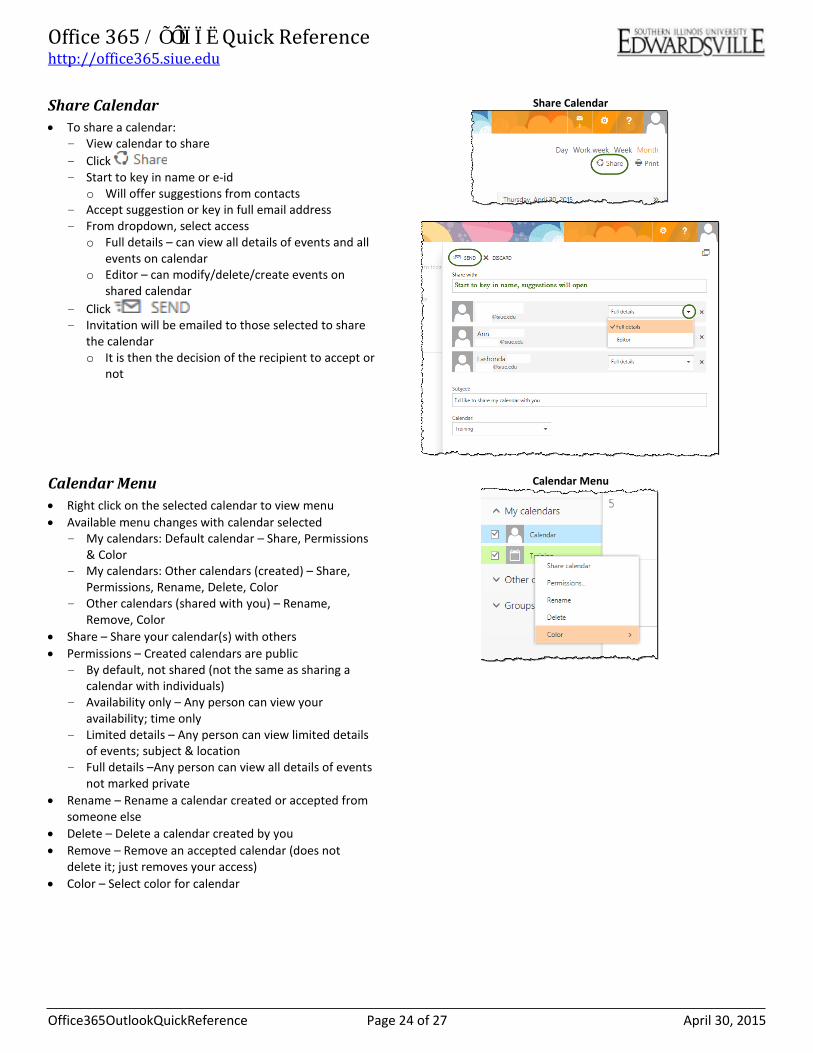
Share Calendar • To share a calendar:
- View calendar to share - Click - Start to key in name or e-id
o Will offer suggestions from contacts - Accept suggestion or key in full email address - From dropdown, select access
o Full details – can view all details of events and all events on calendar
o Editor – can modify/delete/create events on shared calendar
- Click - Invitation will be emailed to those selected to share
the calendar o It is then the decision of the recipient to accept or
not
Share Calendar
Calendar Menu • Right click on the selected calendar to view menu • Available menu changes with calendar selected
- My calendars: Default calendar – Share, Permissions & Color
- My calendars: Other calendars (created) – Share, Permissions, Rename, Delete, Color
- Other calendars (shared with you) – Rename, Remove, Color
• Share – Share your calendar(s) with others • Permissions – Created calendars are public
- By default, not shared (not the same as sharing a calendar with individuals)
- Availability only – Any person can view your availability; time only
- Limited details – Any person can view limited details of events; subject & location
- Full details –Any person can view all details of events not marked private
• Rename – Rename a calendar created or accepted from someone else
• Delete – Delete a calendar created by you • Remove – Remove an accepted calendar (does not
delete it; just removes your access) • Color – Select color for calendar
Calendar Menu
Office365OutlookQuickReference Page 24 of 27 April 30, 2015

Office 365 /ÕÔÌÏÏË Quick Reference http://office365.siue.edu
Accept Calendar Share Request • An email will be sent to you to accept a request to share
another person’s calendar • Click • After a short time, your calendar will open with the new
accepted shared calendar in Others
Email to Share Calendar
Calendar List
Office365OutlookQuickReference Page 25 of 27 April 30, 2015

Office 365 /ÕÔÌÏÏË Quick Reference http://office365.siue.edu
Tasks Tasks is a place to track items/projects that you do not necessarily want on your calendar. Create Task • After signing into Office 365, to open Tasks, select
- If at another Office 365 app, click • Click • Complete fields as needed • Click to attach files • Click
Tasks
Create Task
Edit Task • Select task to edit • Click to edit • Make changes as needed • Click
Task Menu
Edit Task
Office365OutlookQuickReference Page 26 of 27 April 30, 2015
Office 365 /ÕÔÌÏ Quick Reference http://office365.siue.edu
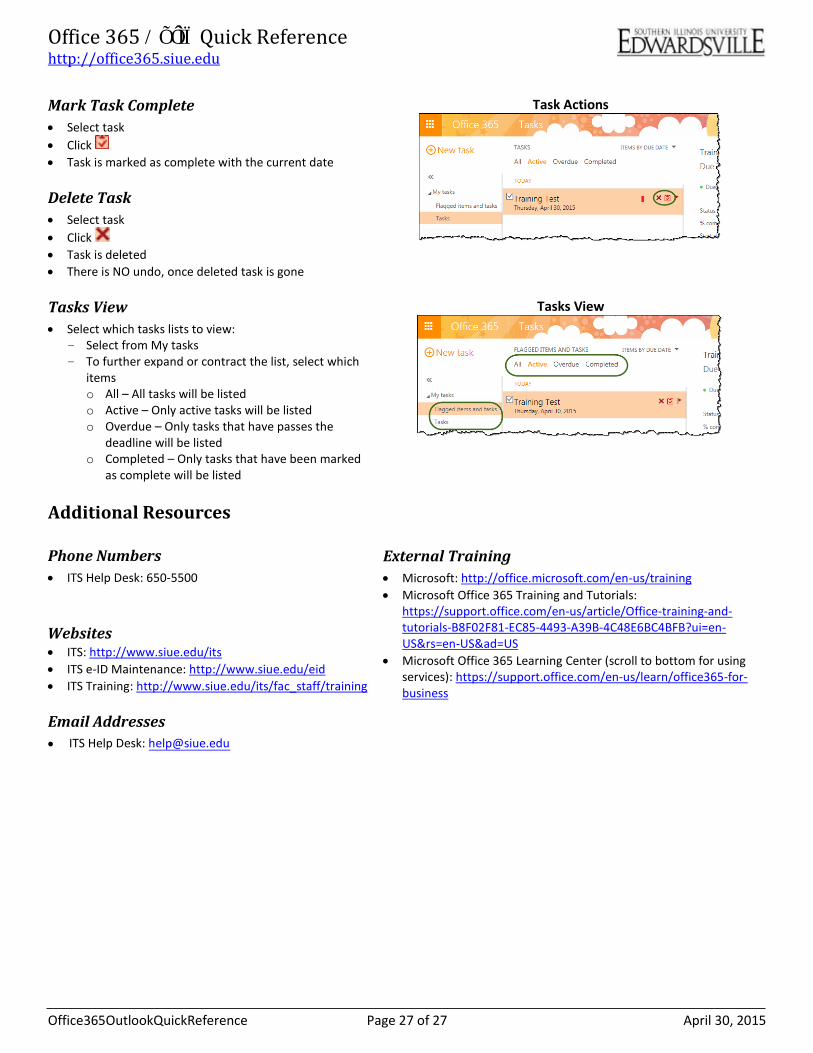
Mark Task Complete • Select task • Click • Task is marked as complete with the current date Delete Task • Select task • Click • Task is deleted • There is NO undo, once deleted task is gone
Task Actions
Tasks View • Select which tasks lists to view:
- Select from My tasks - To further expand or contract the list, select which
items o All – All tasks will be listed o Active – Only active tasks will be listed o Overdue – Only tasks that have passes the
deadline will be listed o Completed – Only tasks that have been marked
as complete will be listed
Tasks View
Additional Resources Phone Numbers • ITS Help Desk: 650-5500
Websites
• ITS: http://www.siue.edu/its • ITS e-ID Maintenance: http://www.siue.edu/eid • ITS Training: http://www.siue.edu/its/fac_staff/training Email Addresses
• ITS Help Desk: [email protected]
External Training • Microsoft: http://office.microsoft.com/en-us/training • Microsoft Office 365 Training and Tutorials:
https://support.office.com/en-us/article/Office-training-and-tutorials-B8F02F81-EC85-4493-A39B-4C48E6BC4BFB?ui=en-US&rs=en-US&ad=US
• Microsoft Office 365 Learning Center (scroll to bottom for using services): https://support.office.com/en-us/learn/office365-for-business
Office365OutlookQuickReference Page 27 of 27 April 30, 2015