please note that the illustrations, colors and fonts may not be … · 2019-07-10 · please note...
TRANSCRIPT


Model
Serial No.
Purchase Date
SPECIAL MESSAGE SECTIONPRODUCT SAFETY MARKINGS: Yamaha electronic prod-ucts may have either labels similar to the graphics shownbelow or molded / stamped facsimiles of these graphics onthe enclosure. The explanation of these graphics appears onthis page.Please observe all cautions indicated on this page and thoseindicated in the safety instruction section.
ENVIRONMENTAL ISSUES: Yamaha strives to produceproducts that are both user safe and environmentallyfriendly.We sincerely believe that our products and the productionmethods used to produce them, meet these goals. Inkeeping with both the letter and the spirit of the law, we wantyou to be aware of the following:
BATTERY NOTICE: This product MAY contain a smallnonrechargeable battery which (if applicable) is soldered inplace. The average life span of this type of battery isapproximately five years. When replacement becomesnecessary, contact a qualified service representative toperform the replacement.
WARNING: Do not attempt to recharge, disassemble, orincinerate this type of battery. Keep all batteries away fromchildren. Dispose of used batteries promptly and asregulated by applicable laws. Note: In some areas, theservicer is required by law to return the defective parts.However, you do have the option of having the servicerdispose of these parts for you.
DISPOSAL NOTICE: Should this product becomedamaged beyond repair, or for some reason its useful life isconsidered to be at an end, please observe all local, state,and federal regulations that relate to the disposal ofproducts that contain lead, batteries, plastics, etc.
NOTICE: Service charges incurred due to lack of knowledgerelating to how a function or effect works (when the unit isoperat ing as designed) are not covered by themanufacture's warranty, and are therefore the owner'sresponsibility.Please study this manual carefully and consult your dealerbefore requesting service.
NAME PLATE LOCATION: The graphic below indicates thelocation of the name plate. The model number, serialnumber, power requirements, etc., are located on this plate.You should record the model number, serial number, andthe date of purchase in the spaces provided below andretain this manual as a permanent record of your purchase.
CAUTION: TO REDUCE THE RISK OFELECTRIC SHOCK, DO NOT REMOVE
COVER (OR BACK). NO USER-SERVICEABLEPARTS INSIDE. REFER SERVICING TO
QUALIFIED SERVICE PERSONNEL.
CAUTIONRISK OF ELECTRIC SHOCK.
DO NOT OPEN
See the name plate for graphic symbol markings.
92-469-➀
IMPORTANT NOTICE: All Yamaha electronic products aretested and approved by an independent safety testinglaboratory in order that you may be sure that when it isproperly installed and used in its normal and customarymanner, all foreseeable risks have been eliminated. DO NOTmodify this unit or commission others to do so unlessspecifically authorized by Yamaha.Product performance and/or safety standards may bediminished. Claims filed under the expressed warranty maybe denied if the unit is/has been modified. Implied warrantiesmay also be affected.
SPECIFICATIONS SUBJECT TO CHANGE: The informationcontained in this manual is believed to be correct at the timeof printing. However, Yamaha reserves the right to change ormodify any of the specifications without notice or obligationto update existing units.
The exclamation point within theequilateral triangle is intended to alertthe user to the present of importanto p e r a t i n g a n d m a i n t e n a n c e(servic ing) instruct ions in theliterature accompanying the product.
The lightning flash with arrowheadsymbol within the equilateral triangleis intended to alert the user to thepresence of uninsulated "dangerousvo l tage" w i th in the product 'senclosure that may be of sufficientmagnitude to constitute a risk ofelectrical shock.

Congratulations!
You are the proud owner of a fine electronic organ, Electone EL-37. The Yamaha EL-37 Electone
combines the most advanced AWM tone generation technology with state-of-the-art digital electronics
and features to give you stunning sound quality with maximum musical enjoyment.
In order to make the most of the Electone and extensive performance potential, we urge you to read the manual thoroughly while trying out the
various features described. Keep the manual in a safe place for later reference.
1

Main FeaturesYour Yamaha Electone is packed with many sophisticated functions. Yet it is amazingly easy to use.
The main features are briefly described here so that you can quickly understand the capabilities of yourElectone.
Included among the main features are:
Astoundingly True-to-life SoundsThe new AWM (Advanced Wave Memory) tone generation technologies combined with authentic touchresponse for individual instrument voices, make this Electone a truly expressive musical instrument.
High-quality Digital EffectsElectone voices can also be enhanced with a full range of high-quality digital effects, including Tremolo (forreproducing the sound of a rotating speaker), Reverb, and Flanger and Delay. (See page 27.)
Dynamic Rhythm PatternsThe Rhythm section of the Electone features authentic drum and percussion sounds, used by expert rhythmprogrammers in creating a total of 38 rhythm patterns, ranging across all styles of music. (See page 30.) AKeyboard Percussion function is also provided for playing the realistic percussion sounds from the Lowerkeyboard and Pedalboard. (See page 39.)
Comprehensive Automatic AccompanimentThe Electone is also equipped with various automatic accompaniment functions, including Auto Bass Chord,Accompaniment and Melody On Chord. (See pages 36, 40.)
Sophisticated Rhythm Pattern and Rhythm Sequence ProgrammingThe Rhythm Pattern Program and Rhythm Sequence Program let you use the realistic Keyboard Percussionsounds, along with additional percussion sounds on the upper keyboard, to create and record your own rhythmpatterns, then combine them (and the preset rhythms, if you wish) to make complete automatic rhythm tracks.(See page 68.)
Wide Variety of Registration MenusThe Electone is equipped with convenient Registration Menus that allow you to instantly change all settings forthe entire instrument in real time, as you play! The EL-37 has 120 registrations available on disk. (See page 9.)
Recording of Performances with the Music Disk RecorderThe EL-37 also features a Music Disk Recorder for recording your performances. The recording is completelydigital and is stored to disk, which means that no matter how many times you play back the recording, it willalways sound exactly the same as the original performance. (See page 48.)
2
Turning the Electone off erasesall panel settings you havemade. When the Electone is
turned on, Basic Registration 1 isautomatically selected. If you havemade panel settings you wish to keep,save them to Registration Memorybefore turning the Electone off.

1. Quick Introductory Guide
2. Voice Sections
3. Voice Controls and Effects
4. Rhythm, Accompanimentand Percussion
5. Registration Memory
6. Music Disk Recorder
7. Rhythm Pattern Programming andRhythm Sequence Programming
8. Footswitches and Knee Lever
9. Pitch Controls
10. MIDI Controls
11. Accessory Jacks and Controls
12. Appendix
Table of ContentsPanel Layout . . . . . . . . . . . . . . . . . . . . . . . . . . . . . . . . . . . . . . . . . . . . . . . . . . . . . . . . . .41. Quick Introductory Guide . . . . . . . . . . . . . . . . . . . . . . . . . . . . . . . . . . . . . . . . . . . . .6
Getting Started . . . . . . . . . . . . . . . . . . . . . . . . . . . . . . . . . . . . . . . . . . . . . . . . . . . . . . . . . . . . . . . . . . . . .6Playing Your Electone . . . . . . . . . . . . . . . . . . . . . . . . . . . . . . . . . . . . . . . . . . . . . . . . . . . . . . . . . . . . . . .7
Basic Registrations . . . . . . . . . . . . . . . . . . . . . . . . . . . . . . . . . . . . . . . . . . . . . . . . . . . . . . . . . . . . . . . . . . .7Registration Menu Disk . . . . . . . . . . . . . . . . . . . . . . . . . . . . . . . . . . . . . . . . . . . . . . . . . . . . . . . . . . . . . . . .9Registration Menu List . . . . . . . . . . . . . . . . . . . . . . . . . . . . . . . . . . . . . . . . . . . . . . . . . . . . . . . . . . . . . . .11
Using the LCD Display . . . . . . . . . . . . . . . . . . . . . . . . . . . . . . . . . . . . . . . . . . . . . . . . . . . . . . . . . . . . . .142. Voice Sections . . . . . . . . . . . . . . . . . . . . . . . . . . . . . . . . . . . . . . . . . . . . . . . . . . . .17
Selecting Voices from the Panel . . . . . . . . . . . . . . . . . . . . . . . . . . . . . . . . . . . . . . . . . . . . . . . . . . . . . .17Selecting Additional Voices—Dotted Buttons and User Voices . . . . . . . . . . . . . . . . . . . . . . . . . . . .19Voice Menus . . . . . . . . . . . . . . . . . . . . . . . . . . . . . . . . . . . . . . . . . . . . . . . . . . . . . . . . . . . . . . . . . . . . . .21
3. Voice Controls and Effects . . . . . . . . . . . . . . . . . . . . . . . . . . . . . . . . . . . . . . . . . . .22Voice Controls . . . . . . . . . . . . . . . . . . . . . . . . . . . . . . . . . . . . . . . . . . . . . . . . . . . . . . . . . . . . . . . . . . . .22
Voice Condition Page 1 . . . . . . . . . . . . . . . . . . . . . . . . . . . . . . . . . . . . . . . . . . . . . . . . . . . . . . . . . . . . . . .231 Touch Tone . . . . . . . . . . . . . . . . . . . . . . . . . . . . . . . . . . . . . . . . . . . . . . . . . . . . . . . . . . . . . . . . . . . . . .232 Volume . . . . . . . . . . . . . . . . . . . . . . . . . . . . . . . . . . . . . . . . . . . . . . . . . . . . . . . . . . . . . . . . . . . . . . . . . .23Voice Condition Page 2 . . . . . . . . . . . . . . . . . . . . . . . . . . . . . . . . . . . . . . . . . . . . . . . . . . . . . . . . . . . . . . .243 Feet . . . . . . . . . . . . . . . . . . . . . . . . . . . . . . . . . . . . . . . . . . . . . . . . . . . . . . . . . . . . . . . . . . . . . . . . . . . . .244 Effect . . . . . . . . . . . . . . . . . . . . . . . . . . . . . . . . . . . . . . . . . . . . . . . . . . . . . . . . . . . . . . . . . . . . . . . . . . .24Voice Condition Page 3 . . . . . . . . . . . . . . . . . . . . . . . . . . . . . . . . . . . . . . . . . . . . . . . . . . . . . . . . . . . . . . .255 Vibrato . . . . . . . . . . . . . . . . . . . . . . . . . . . . . . . . . . . . . . . . . . . . . . . . . . . . . . . . . . . . . . . . . . . . . . . . . .25
Effects . . . . . . . . . . . . . . . . . . . . . . . . . . . . . . . . . . . . . . . . . . . . . . . . . . . . . . . . . . . . . . . . . . . . . . . . . . .271 Tremolo/Chorus . . . . . . . . . . . . . . . . . . . . . . . . . . . . . . . . . . . . . . . . . . . . . . . . . . . . . . . . . . . . . . . . . . .272 Symphonic/Celeste . . . . . . . . . . . . . . . . . . . . . . . . . . . . . . . . . . . . . . . . . . . . . . . . . . . . . . . . . . . . . . . .273 Delay and Flanger . . . . . . . . . . . . . . . . . . . . . . . . . . . . . . . . . . . . . . . . . . . . . . . . . . . . . . . . . . . . . . . . . .284 Reverb . . . . . . . . . . . . . . . . . . . . . . . . . . . . . . . . . . . . . . . . . . . . . . . . . . . . . . . . . . . . . . . . . . . . . . . . . . .295 Sustain . . . . . . . . . . . . . . . . . . . . . . . . . . . . . . . . . . . . . . . . . . . . . . . . . . . . . . . . . . . . . . . . . . . . . . . . . . .296 Glide . . . . . . . . . . . . . . . . . . . . . . . . . . . . . . . . . . . . . . . . . . . . . . . . . . . . . . . . . . . . . . . . . . . . . . . . . . . . .29
4. Rhythm, Accompaniment and Percussion . . . . . . . . . . . . . . . . . . . . . . . . . . . . . . .30Rhythm Patterns . . . . . . . . . . . . . . . . . . . . . . . . . . . . . . . . . . . . . . . . . . . . . . . . . . . . . . . . . . . . . . . . . . .30Fill In Patterns . . . . . . . . . . . . . . . . . . . . . . . . . . . . . . . . . . . . . . . . . . . . . . . . . . . . . . . . . . . . . . . . . . . . .32Auto Variation and Percussion Volume . . . . . . . . . . . . . . . . . . . . . . . . . . . . . . . . . . . . . . . . . . . . . . . .33Dotted Buttons . . . . . . . . . . . . . . . . . . . . . . . . . . . . . . . . . . . . . . . . . . . . . . . . . . . . . . . . . . . . . . . . . . . .33Rhythm Menus . . . . . . . . . . . . . . . . . . . . . . . . . . . . . . . . . . . . . . . . . . . . . . . . . . . . . . . . . . . . . . . . . . . .35Accompaniment Controls . . . . . . . . . . . . . . . . . . . . . . . . . . . . . . . . . . . . . . . . . . . . . . . . . . . . . . . . . . .35Automatic Accompaniment—Auto Bass Chord . . . . . . . . . . . . . . . . . . . . . . . . . . . . . . . . . . . . . . . . .36Keyboard Percussion . . . . . . . . . . . . . . . . . . . . . . . . . . . . . . . . . . . . . . . . . . . . . . . . . . . . . . . . . . . . . . .39Melody On Chord . . . . . . . . . . . . . . . . . . . . . . . . . . . . . . . . . . . . . . . . . . . . . . . . . . . . . . . . . . . . . . . . . .40
5. Registration Memory . . . . . . . . . . . . . . . . . . . . . . . . . . . . . . . . . . . . . . . . . . . . . . . .42Storing Registrations . . . . . . . . . . . . . . . . . . . . . . . . . . . . . . . . . . . . . . . . . . . . . . . . . . . . . . . . . . . . . . .42Registration Shift . . . . . . . . . . . . . . . . . . . . . . . . . . . . . . . . . . . . . . . . . . . . . . . . . . . . . . . . . . . . . . . . . .44Resetting the Registration Memory Buttons (Power On Reset) . . . . . . . . . . . . . . . . . . . . . . . . . . . .47
6. Music Disk Recorder . . . . . . . . . . . . . . . . . . . . . . . . . . . . . . . . . . . . . . . . . . . . . . . .48Precautions . . . . . . . . . . . . . . . . . . . . . . . . . . . . . . . . . . . . . . . . . . . . . . . . . . . . . . . . . . . . . . . . . . . . . . .48Formatting a Disk . . . . . . . . . . . . . . . . . . . . . . . . . . . . . . . . . . . . . . . . . . . . . . . . . . . . . . . . . . . . . . . . . .50Recording . . . . . . . . . . . . . . . . . . . . . . . . . . . . . . . . . . . . . . . . . . . . . . . . . . . . . . . . . . . . . . . . . . . . . . . .51Recording Registrations (and Bulk Data) . . . . . . . . . . . . . . . . . . . . . . . . . . . . . . . . . . . . . . . . . . . . . . .56Recalling Recorded Registrations (and Bulk Data) . . . . . . . . . . . . . . . . . . . . . . . . . . . . . . . . . . . . . . .57Replacing Registrations . . . . . . . . . . . . . . . . . . . . . . . . . . . . . . . . . . . . . . . . . . . . . . . . . . . . . . . . . . . .57Playback . . . . . . . . . . . . . . . . . . . . . . . . . . . . . . . . . . . . . . . . . . . . . . . . . . . . . . . . . . . . . . . . . . . . . . . . .58Other Functions . . . . . . . . . . . . . . . . . . . . . . . . . . . . . . . . . . . . . . . . . . . . . . . . . . . . . . . . . . . . . . . . . . .61Messages on the M.D.R. LED Display . . . . . . . . . . . . . . . . . . . . . . . . . . . . . . . . . . . . . . . . . . . . . . . . .67
7. Rhythm Pattern Programming and Rhythm Sequence Programming . . . . . . . . . .68Outline of Rhythm Programming Operation . . . . . . . . . . . . . . . . . . . . . . . . . . . . . . . . . . . . . . . . . . . .68Panel Controls—Rhythm Pattern Program and Rhythm Sequence Program . . . . . . . . . . . . . . . . . .69Rhythm Pattern Programming . . . . . . . . . . . . . . . . . . . . . . . . . . . . . . . . . . . . . . . . . . . . . . . . . . . . . . . .69Programming Rhythm Sequence . . . . . . . . . . . . . . . . . . . . . . . . . . . . . . . . . . . . . . . . . . . . . . . . . . . . .81Saving Rhythm Pattern and Rhythm Sequence Data to Disk . . . . . . . . . . . . . . . . . . . . . . . . . . . . . .88Recalling Rhythm Pattern and Rhythm Sequence Data from Disk . . . . . . . . . . . . . . . . . . . . . . . . . .88
8. Footswitches and Knee Lever . . . . . . . . . . . . . . . . . . . . . . . . . . . . . . . . . . . . . . . .89Footswitch Control . . . . . . . . . . . . . . . . . . . . . . . . . . . . . . . . . . . . . . . . . . . . . . . . . . . . . . . . . . . . . . . . .89Knee Lever . . . . . . . . . . . . . . . . . . . . . . . . . . . . . . . . . . . . . . . . . . . . . . . . . . . . . . . . . . . . . . . . . . . . . . .90
9. Pitch Controls . . . . . . . . . . . . . . . . . . . . . . . . . . . . . . . . . . . . . . . . . . . . . . . . . . . . .9210. MIDI Controls . . . . . . . . . . . . . . . . . . . . . . . . . . . . . . . . . . . . . . . . . . . . . . . . . . . . . .9311. Accessory Jacks and Controls . . . . . . . . . . . . . . . . . . . . . . . . . . . . . . . . . . . . . . . .9512. Appendix . . . . . . . . . . . . . . . . . . . . . . . . . . . . . . . . . . . . . . . . . . . . . . . . . . . . . . . . .96
Troubleshooting . . . . . . . . . . . . . . . . . . . . . . . . . . . . . . . . . . . . . . . . . . . . . . . . . . . . . . . . . . . . . . . . . . .96Specifications . . . . . . . . . . . . . . . . . . . . . . . . . . . . . . . . . . . . . . . . . . . . . . . . . . . . . . . . . . . . . . . . . . . . .98MIDI Specifications . . . . . . . . . . . . . . . . . . . . . . . . . . . . . . . . . . . . . . . . . . . . . . . . . . . . . . . . . . . . . . . . .99MIDI Implementation Chart . . . . . . . . . . . . . . . . . . . . . . . . . . . . . . . . . . . . . . . . . . . . . . . . . . . . . . . . .103Index . . . . . . . . . . . . . . . . . . . . . . . . . . . . . . . . . . . . . . . . . . . . . . . . . . . . . . . . . . . . . . . . . . . . . . . . . . .104
3

4
Panel Layout
BAR/BEAT
TEMPO
TEMPO
LOWER
KEYBOARDPERCUSSION
SYNCHROSTART
REVERB SUSTAIN
UPPER(KNEE)
LOWER(KNEE)
PEDAL
ORGAN PIANO GUITAR VIBRA-PHONE
COSMIC TUTTI
STRINGS BRASS CLARI-NET
SAXO-PHONE
CHORUS HARMO-NICA
HORN
LEAD VOICE
VIOLIN FLUTE
OBOE TRUM-PET
TOLOWER
MARCH WALTZ SWING BOUNCE SLOWROCK
TANGO LATIN 1 LATIN 2 8 BEAT 16 BEAT
USER 1 USER 2 USER 3 USER 4 A B
USER 5 USER 6 USER 7 USER 8 C
VOLUME
MAX
MIN
VOLUME
VOLUMEVOLUME
VOLUME
PEDAL VOICE
ELEC.BASS
CONTRABASS
TUBAORGANBASS
TOLOWER
D
PEDAL
INTRO.ENDING
START
FILL IN
DATACONTROL
RHYTHM
LOWER KEYBOARD VOICE
UPPER KEYBOARD VOICE
1
2
ORGAN PIANO GUITAR VIBRA-PHONE
COSMIC TUTTI
STRINGS BRASS CLARI-NET
SAXO-PHONE
CHORUSMAX
MIN
1
2
MAX
MIN
1
MAX
MIN
MAX
MIN
1
MAX
MIN
SEQ. SEQ.
SEQ. SEQ.
1 2
3 4
1
2
BASICREGIST.
1
2
3
4
5

5
VOICEDISPLAY
FOOTSW.
REGIST.SHIFT
PITCHMIDI
EFFECT A.B.C.M.O.C.
TREMOLO(FAST)
MASTER VOLUME
PAUSE STOP PLAY SONG SELECT RECORD
UPPER LOWER PEDAL CONTROL UPPER LOWER PEDAL CONTROL
CUSTOM PLAY
SHIFT
POWERRECORD PLAY
FORMAT
SONGREPEAT
FROM SONG DEL.SONG COPY
TO
MUSIC DISK RECORDER- TEMPO +
PATTERN
SEQUENCE
CLEAR CHANGE
PRESET
USER SET INS. DEL. CLEAR
PAGE
DISPLAY SELECT
3 3
DATACONTROL
ACCENTINSTRUMENTQUANTIZERHYTHM
PROGRAM
0
0 5 6 7 8
1 2 3 4

6
1. Quick Introductory G
uide
1. Quick Introductory GuideWhether you are an advanced Electone performer or have never touched an electronic keyboard inyour life, we recommend that you take the time to go through this basic section. It shows you in thesimplest possible manner how to start playing your Electone. The basic operations and functions thatyou learn in this section will also be important when you later use the Electone’s more advancedfeatures.
Getting Started
1. Plug the power cord in to an appropriateelectrical outlet.
2. Turn on the Electone by pressing the POWERswitch
When you turn on the Electone, the following displays will appear insuccession on the LCD:
This last display, Voice Display, shows the currently assigned voice settingsfor each voice section of the instrument, with the abbreviation for each voicesection beside the voice name: Upper (£), Lower (¢), Lead (¢™), andPedalboard (¡).
Turning the Electone off erases all panel settings you have made. When the Electone is turned on, BasicRegistration 1 is automatically selected. If you have made panel settings you wish to keep, save them toRegistration Memory (see page 42.) before turning the Electone off. You can, however, restore the panelsettings that were made before the Electone was last turned off. In doing this, first be careful NOT to pressany panel buttons (excepting those in Basic Registration) after you turn the Electone back on. Then, torestore the previous settings, hold down the M (Memory) button and press the D (Disable) button.
£Strings ¢™Violin¢Strings ¡ContBass
YAMAHA Electone
POWER
Yamaha products aremanufactured specifically forthe supply voltage in the area
where they are to be sold. If you shouldmove, or if any doubt exists about thesupply voltage, please consult with aqualified technician.
7
1. Quick Introductory G
uide
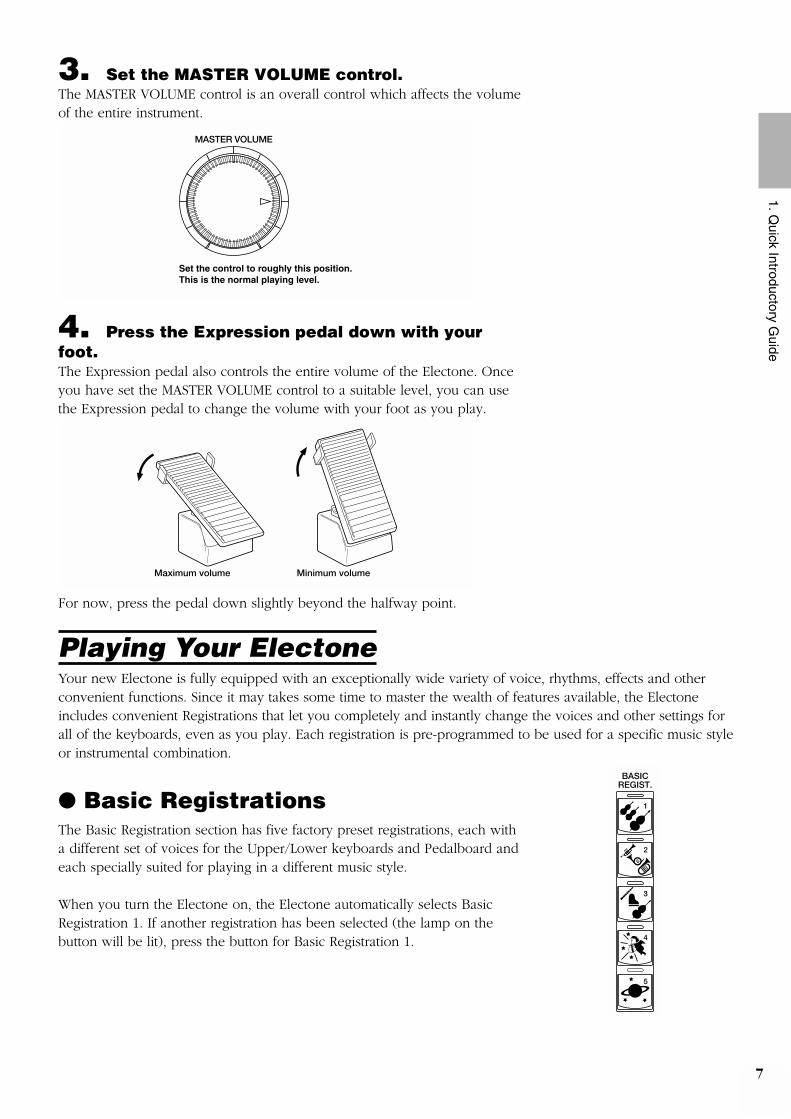
3. Set the MASTER VOLUME control.The MASTER VOLUME control is an overall control which affects the volumeof the entire instrument.
4. Press the Expression pedal down with yourfoot.The Expression pedal also controls the entire volume of the Electone. Onceyou have set the MASTER VOLUME control to a suitable level, you can usethe Expression pedal to change the volume with your foot as you play.
For now, press the pedal down slightly beyond the halfway point.
Playing Your ElectoneYour new Electone is fully equipped with an exceptionally wide variety of voice, rhythms, effects and otherconvenient functions. Since it may takes some time to master the wealth of features available, the Electoneincludes convenient Registrations that let you completely and instantly change the voices and other settings forall of the keyboards, even as you play. Each registration is pre-programmed to be used for a specific music styleor instrumental combination.
● Basic RegistrationsThe Basic Registration section has five factory preset registrations, each witha different set of voices for the Upper/Lower keyboards and Pedalboard andeach specially suited for playing in a different music style.
When you turn the Electone on, the Electone automatically selects BasicRegistration 1. If another registration has been selected (the lamp on thebutton will be lit), press the button for Basic Registration 1.
Maximum volume Minimum volume
MASTER VOLUME
Set the control to roughly this position.This is the normal playing level.
BASICREGIST.
1
2
3
4
5

8
1. Quick Introductory G
uide
Try playing the melody line of following piece of music on the UpperKeyboard, using the indicated registration.
Now, try out the rest of the Basic Registrations with the following music examples. Press the appropriate buttons to select the registrations. Each music example has been chosen to best suit its companion registration.

9
1. Quick Introductory G
uide
The chart below lists the voices that have been set for the Upper/Lower keyboards and Pedalboard in each ofthe five Basic Registrations.
● Registration Menu DiskIn addition to the Basic Registrations, many more registrations are available on your Electone; supplied as theMusic Disk Recorder data in the included Registration Menu Disk 1 and Disk 2. These registrations includevoice and rhythm selections and have been specially created to suit a variety of music styles. With the varietyof registrations available, you’re certain to find the right registration that perfectly suits any style of music youplay.
To select registrations from the Registration Menu Disk:
1. Put the Registration Menu Disk (with the labelof the disk facing upward and the sliding shutterfacing forward) into the Disk slot, located just underthe Music Disk Recorder at the right side of theElectone.Once you've securely inserted the disk into the slot, the LCD Display on thepanel will automatically change to show the available Registration Menus.
2. From the display that appears, first press thePage [>] button to select the various menu “pages” ofregistrations available on the disk...
...then, select the desired registration from each menu.
The bottom left Data Control buttons step through the various selections,while the top left Data Control buttons are used to jump ahead or back byten selections.
9 :BRASS1
Jump back ten numbers.
Selects previous number.
Jump ahead ten numbers.
Selects next number.
PAGE
Basic Registration 1 Basic Registration 2 Basic Registration 3 Basic Registration 4
Strings 1Upper Keyboard voice
Lower Keyboard voice
Pedal voice
Strings 1
Contrabass
Brass
Horn
Tuba Contrabass
Piano
Flute Cosmic 1
Cosmic 2
Cosmic 2
Basic Registration 5
Synth. Brass
Cosmic 3
Synth. Bass
See page 11 for the completelist of the Registration Menus.
The Registration Menu Diskdoes not operate when theRHYTHM PROGRAM buttons
are on.
NOTE
NOTE

3. Finally, call up the selected registration byselecting SET in the display.The message “Completed...!!” briefly appears on the display.
You can now play the registration.If you wish, try out some of the other selections by repeating the above steps.
If you’ve selected the registration with a rhythm set, press the START buttonin the Rhythm section.
Pressing the START button starts up a rhythm pattern appropriate to themusic style you have selected. (To turn the pattern off, press the STARTbutton again.)
You can also adjust the tempo of the rhythm to your liking by turning theTEMPO dial, as indicated in the illustration below.
How to Return to the Registration Menu Display:If you unintentionally change the display by pressing a button on the panel,you can return to the display of the Registration Menu by pressing the PLAYbutton in the Music Disk Recorder section.
<REGIST DISK> ¡19 :BRASS1 [SET]
Pressing any of these buttons selects SET.
10
1. Quick Introductory G
uide
You can use the AutomaticAccompaniment (A.B.C.)function. See page 36 for more
information on the A.B.C. function.
NOTE

11
1. Quick Introductory G
uide
● Registration Menu List
Sound Image
Page 1No. LCD Display Upper Keyboard Voice Lead Voice Lower Keyboard Voice Pedal Voice Rhythm (Tempo)
1 STRINGS1 Orchestra Strings Violin Horn Contrabass
2 STRINGS2 Pop Strings Strings Whistle Strings Pizzicato Bass
3 STRINGS3 Chamber Strings Strings Violin Strings Pizzicato Bass
4 STRINGS4 Solo Violin Violin Strings Contrabass
5 STRINGS5 Pops Orchestra 1 Strings Harpsichord Strings Elec. Bass
6 STRINGS6 Pizzicato Strings Pizzicato Strings — Pizzicato Strings Pizzicato Strings
7 STRINGS7 Pops Orchestra 2 Strings Trumpet Brass Pizzicato Bass
8 STRINGS8 Strings Ensemble Strings Strings (16') Strings Contrabass
9 BRASS1 Marching Band Brass Trombone Brass Tuba
10 BRASS2 Solo Trumpet Trumpet Horn Tuba
11 BRASS3 Big Band 1 Brass Saxophone Trombone Pizzicato Bass
12 BRASS4 Solo Trombone — Trombone Saxophone Pizzicato Bass
13 BRASS5 Big Band 2 (Saxophone
Ensemble)Saxophone Saxophone (8') Piano Pizzicato Bass
14 BRASS6 Jazz Combo 1 (Trumpet) Trumpet Elec. Bass Pizzicato Bass
15 BRASS7 Dixieland
—
—
—
—
—
Clarinet Piano Pizzicato Bass
16 BRASS8 Fusion Saxophone Saxophone Elec. Piano Elec. Bass (16')
—
—
—
—
8Beat 1 (115)
—
Polka (130)
—
March (120)
—
Swing 1 (168)
Swing 2 (125)
Swing 1 (136)
Bossanova 2 (160)
Dixie (96)
16Beat 3 (80)
Sound Image
Page 2No. LCD Display Upper Keyboard Voice Lead Voice Lower Keyboard Voice Pedal Voice Rhythm (Tempo)
1 LEAD1
2 LEAD2
3 LEAD3
4 LEAD4
5 LEAD5
6 LEAD6
7 LEAD7
8 LEAD8
9 DECAY1
10 DECAY2
11 DECAY3
12 DECAY4
13 DECAY5
14 DECAY6
15 DECAY7
16 DECAY8
—
—
—
Polka (115)
8Beat 1 (78)
—
Tango 1 (120)
Bossanova 2 (150)
—
—
Dixie (90)
16Beat 3 (78)
Bossanova 1 (140)
Samba 1 (125)
Slow Rock 1 (72)
8Beat 3 (130)
Woodwind Ensemble Oboe Flute Clarinet Bassoon (8')
Solo Flute — Flute Pizzicato Strings Contrabass
Solo Oboe — Oboe Strings Contrabass
Polka — Clarinet Harmonica Pizzicato Bass
Whistle — Whistle Elec. Piano Elec. Bass
Harmonica — Harmonica Strings Contrabass
Tango Harmonica Harmonica (16') Strings Pizzicato Bass
Jazz Organ Jazz Organ Jazz Organ (4') Jazz Organ (8') Organ Bass
Acoustic Piano Piano — Piano Pizzicato Bass
Elec. Piano Elec. Piano — Elec. Piano Elec. Bass
Honky Tonk Piano Piano — Piano Piano
Jazz Guitar Elec. Bass Elec. Bass Strings Elec. Bass
Marimba Marimba — Piano Elec. Bass
Fantasy 1 Vibraphone (4') Whistle Strings Elec. Bass
Elec. Guitar Elec. Guitar — Elec. Piano Elec. Bass
Oriental Harpsichord Harpsichord Strings Contrabass
* The numbers in the parentheses indicate that the "feet" settings for the assigned voice are different from the default.* As for the registrations assigned with rhythm, the Fingered is selected for the A.B.C. function and both Lower and Pedal Memories are set to on.
Disk 1

12
1. Quick Introductory G
uide
Sound Image
Page 3
Page 4
No. LCD Display Upper Keyboard Voice Lead Voice Lower Keyboard Voice Pedal Voice Rhythm (Tempo)
1 SYNTH1
SYNTH12
SYNTH3
SYNTH4
SYNTH5
SYNTH6
SYNTH7
SYNTH8
Wind Synth.
Synth. Brass 1
Cosmic Sound
Synth. Brass 2
Fusion
Fantasy 2
Fantasy 3
Fantasy 4
—
—
Synth. Brass
Cosmic 2
Tutti 2
Cosmic 1 (8')
Cosmic 2
Cosmic 3
Cosmic 3
Clarinet (4')
Whistle
Brass
Elec. Guitar
Whistle
Marimba (4')
Whistle
Elec. Guitar
Elec. Guitar
Elec. Piano
Elec. Guitar
Elec. Piano
Cosmic 2
Elec. Piano
Cosmic 3
Elec. Bass (16')
Elec. Bass
Elec. Bass
Elec. Bass (16')
Elec. Bass (16')
Contrabass
Elec. Bass
Elec. Bass
8Beat 3 (150)
8Beat 1 (130)
8Beat 2 (120)
16Beat 3 (117)
16Beat Funk (120)
Dance Pop (125)
Bounce 1 (125)
2
3
4
5
6
7
8
—
No. LCD Display Rhythm Tempo Accompaniment Type Upper Keyboard Voice Lead Voice Pedal Voice
9 March 120 4 Brass Trumpet Tuba
10 Polka 110 4 Bassoon Flute (4') Pizzicato Bass
11 Country 112 1 —
—
Harmonica Pizzicato Bass (16')
12 Broadway 135 4 Vibraphone (4') Trumpet Pizzicato Bass
13 Waltz-1 105 4 Strings Strings (16') Pizzicato Bass (16')
14 Waltz-2 180 2 Strings Violin Pizzicato Bass
15 J. Waltz 140 4 Elec. Bass (16') Whistle Pizzicato Bass (16')
16 Bolero 136 1 Trumpet Pizzicato Bass (16')
No. LCD Display Rhythm Tempo Accompaniment Type Upper Keyboard Voice Lead Voice Pedal Voice
1 Swing-1 160 3 Brass Trumpet Pizzicato Bass
2 Swing-2 138 4 —
—
—
—
—
—
—
Clarinet Pizzicato Bass
3 J. Ballad 60 3 Trombone Pizzicato Bass
4 Dixie 108 4 Trumpet Tuba
5 Bounce-1 123 2 Guitar — Elec. Bass
6 Bounce-2 140 2 Clarinet Pizzicato Bass
7 Reggae1 132 4 Marimba — Elec. Bass
8 Reggae-2 120 4 Cosmic 2 Synth. Bass Elec. Bass (16')
9 Slow Rock-1 80 1 Elec. Guitar — Elec. Bass (16')
10 Slow Rock-2 74 1 Trumpet Elec. Bass (16')
11 Slow Rock-3 92 4 Saxophone Elec. Bass (16')
12 Tango-1 120 1 Harmonica Harmonica (16') Pizzicato Bass (16')
13 Tango-2 120 1 Strings
Harmonica
Violin Pizzicato Bass (16')
14 Tango-3 110 1 Harmonica (16') Elec. Bass (16')
15 Cha-Cha 126 4 Piano (16') Piano (4') Elec. Bass (16')
16 Rhumba 115 1 Trombone (8') Elec. Bass (16')
Page 5No. LCD Display Rhythm Tempo Accompaniment Type Upper Keyboard Voice Lead Voice Pedal Voice
1
2
3
4
5
6
7
8
9
10
11
12
13
14
Beguine 118 4 Strings Whistke Elec. Bass (16')
Mambo 100 4 Brass Saxophone Elec. Bass (16')
Samba-1 120 1 Saxophone Trumpet Elec. Bass (16')
Samba-2 112 1 Elec. Bass (16') Flute Elec. Bass (16')
Bossanova-1 103 1 — Flute Elec. Bass (16')
Bossanova-2 124 2 — Saxophone Elec. Bass (16')
8 Beat-1 100 3 Cosmic 2 Vibraphone (4') Elec. Bass (16')
8 Beat-2 117 2 Elec. Piano — Elec. Bass (16')
8 Beat-3 152 3 Elec. Guitar Elec. Guitar Elec. Bass (16')
Dance Pop 130 4 Vibraphone (4') Elec. Piano Elec. Bass (16')
16 Beat-1 85 4 — Flute Elec. Bass (16')
16 Beat-2 124 4 Synth. Brass Synth. Brass (16') Elec. Bass (16')
16 Beat-3 112 4 Brass Trumpet Elec. Bass (16')
16 Beat Funk 118 4 Elec. Guitar (8') Cosmic 3 Elec. Bass (16')
Sound ImageNo. LCD Display Upper Keyboard Voice Lead Voice Lower Keyboard Voice Pedal Voice Rhythm (Tempo)
15
16
Wedding
X'mas
Wedding
X'mas
Organ
Cosmic 2
Organ (4')
Vibraphone (4')
Organ
Strings
Organ (16')
Contrabass
—
—
Disk 1

13
1. Quick Introductory G
uide
Page 1No. LCD Display Sound Image Upper Keyboard Voice Lead Voice Lower Keyboard Voice Pedal Voice
1
2
3
4
5
6
7
8
9
10
Page 4No. LCD Display Rhythm Tempo Accompaniment Type Upper Keyboard Voice Lead Voice Pedal Voice
1
2
3
4
5
6
7
8
9
10
Disk 2
STRINGS1 Solo Violin — Violin Strings Contrabass
STRINGS2 Strings Ensemble Strings Strings (4') Horn Pizzicato Bass
STRINGS3 Pop Strings 1 Strings Vibraphone (4') Horn Contrabass
STRINGS4 Pop Strings 2 Strings Clarinet Strings Pizzicato Bass
STRINGS5 Symphonic Orchestra Tutti 1 Tutti 2 (16') Strings Contrabass
BRASS1 Trumpet Ensemble Brass Trumpet Brass Tuba
BRASS2 Solo Trumpet — Trumpet Trombone Tuba
BRASS3 Solo Trombone — Trombone Trombone Tuba
BRASS4 Brass Ensemble Trumpet Trombone Horn Tuba
BRASS5 Big Band Brass Trombone Saxophone Pizzicato Bass
Page 2No. LCD Display Sound Image Upper Keyboard Voice Lead Voice Lower Keyboard Voice Pedal Voice
1
2
3
4
5
6
7
8
9
10
LEAD1 Solo Flute 1 —
—
—
—
—
—
—
—
—
—
—
—
—
—
Flute Strings Contrabass
LEAD2 Solo Flute 2 Flute Clarinet Pizzicato Bass
LEAD3 Whistle Flute (4') Pizzicato Strings Pizzicato Bass
LEAD4 Flute Ensemble Flute Flute (4') Bassoon Pizzicato Bass
LEAD5 Pop Flute Vibraphone (4') Flute Strings Contrabass
LEAD6 Woodwind Ensemble 1 Bassoon Flute (4') Clarinet Pizzicato Bass
LEAD7 Solo Oboe Oboe Bassoon Pizzicato Bass
LEAD8 Woodwind Ensemble 2 Clarinet Bassoon Clarinet
LEAD9 Solo Clarinet Clarinet Horn Pizzicato Bass
LEAD10 Solo Saxophone Saxophone Strings Contrabass
Page 3No. LCD Display Sound Image Upper Keyboard Voice Lead Voice Lower Keyboard Voice Pedal Voice
1
2
3
4
5
6
7
8
9
10
DECAY1 Piano Piano Piano Piano
DECAY2 Harpsichord Harpsichord Strings Contrabass
DECAY3 Marimba Marimba Clarinet Pizzicato Bass
DECAY4 Music Box Vibraphone (4') Vibraphone (4') Vibraphone (4')
DECAY5 Classical Guitar Guitar Strings Pizzicato Bass
ORGAN1 Organ Organ Organ Organ Bass
ORGAN2 Jazz Organ Jazz Organ (8') Jazz Organ (8') Organ Bass
BANDONEON Bandoneon Harmonica Harmonica Strings Pizzicato Bass
SYNTH1 Cosmic Sound 1 Cosmic 2 Cosmic 1 Chorus Contrabass
SYNTH2 Cosmic Sound 2 Cosmic 3 Synth. Bass (8') Cosmic 3 Synth. Bass
March 120 4 Brass Trumpet Tuba
Broadway 135 4 Trombone (8') Saxophone (8') Pizzicato Bass
Waltz 105 4 Strings Strings (16') Pizzicato Bass
Swing 160 3 Brass Trumpet Pizzicato Bass
Slow Rock 80 3 Guitar Elec. Bass Elec. Bass (16')
Tango 127 3 Harmonica Harmonica (16') Pizzicato Bass (16')
Cha-Cha 126 4 Piano (16') Piano (4') Elec. Bass (16')
Samba 120 1 Saxophone Trumpet Elec. Bass (16')
8Beat 100 3 Cosmic 2 Vibraphone (4') Elec. Bass (16')
16Beat 74 4 Harmonica Harmonica Elec. Bass (16')
* The numbers in the parentheses indicate that the "feet" settings for the assigned voice are different from the default.* As for the registrations assigned with rhythm, the Fingered is selected for the A.B.C. function and both Lower and Pedal Memories are set to on.

Using the LCD DisplayThe many sophisticated functions of the EL-37 are shown and controlled from the LCD display. The LCD displaylets you see at-a-glance the current settings of the selected functions.This section introduces you to the control functions and conventions of the LCD display, allowing you tooperate your new Electone quickly and effectively.
1. First, call up the Voice Menu LCD display for thePiano voice of the Upper keyboard by pressing thePIANO button in the Upper Keyboard Voice section.
The following display will appear:
2. Press either one of the top right Data controlbuttons (as indicated below) to select the E. Pianovoice.
Data Control ButtonsThese buttons are used to select or adjust the settings shown on the display.Generally, each pair of buttons corresponds to the section of the displaydirectly next to it. In this example, the top right Data Control buttonscorrespond to the top right quarter of the display (E. Piano).
Harpsi.Piano E.Piano
The first character flashes to indicate the selected voice.
Harpsi.Piano E.Piano
ORGAN PIANO GUITAR VIBRA-PHONE
COSMIC TUTTI
STRINGS BRASS CLARI-NET
SAXO-PHONE
CHORUS HARMO-NICA
VOLUME
MAX
MIN
UPPER KEYBOARD VOICE
1
2
14
1. Quick Introductory G
uide

3. Let’s call up another display to see some of theother uses of the Data Control buttons. Press thePIANO button in the Upper Keyboard Voice sectiononce again (the same one you pressed in step #1above) to call up the Voice Condition display for thePiano voice.
The following display will appear:
You can change two different settings of the voice from this display: thetouch and volume.
4. First, let’s change the volume value. Press theleft button in the bottom right Data Control buttonpair (indicated below).Notice that the value of the volume decreases each time you press thebutton. Try also pressing the right button in this Data Control button pairand notice that the value increases.
5. Next, we’ll use the Page buttons. These buttonsare used to select (when available) the various“pages” of the display, the numbers of which appearat the top right of the LCD. Press Page [>] to selectpage 2 shown below.
FEET=PRE.EFFECT=PRE.<UPPER> ¡2
Indicates the currently selected page. PAGE
TOUCH=4 VOL.=24<UPPER> ¡1
Pressing this button decreases the value.
Pressing this button increases the value.
TOUCH=4 VOL.=24<UPPER> ¡1
ORGAN PIANO GUITAR VIBRA-PHONE
COSMIC TUTTI
STRINGS BRASS CLARI-NET
SAXO-PHONE
CHORUS HARMO-NICA
VOLUME
MAX
MIN
UPPER KEYBOARD VOICE
1
2
15
1. Quick Introductory G
uide
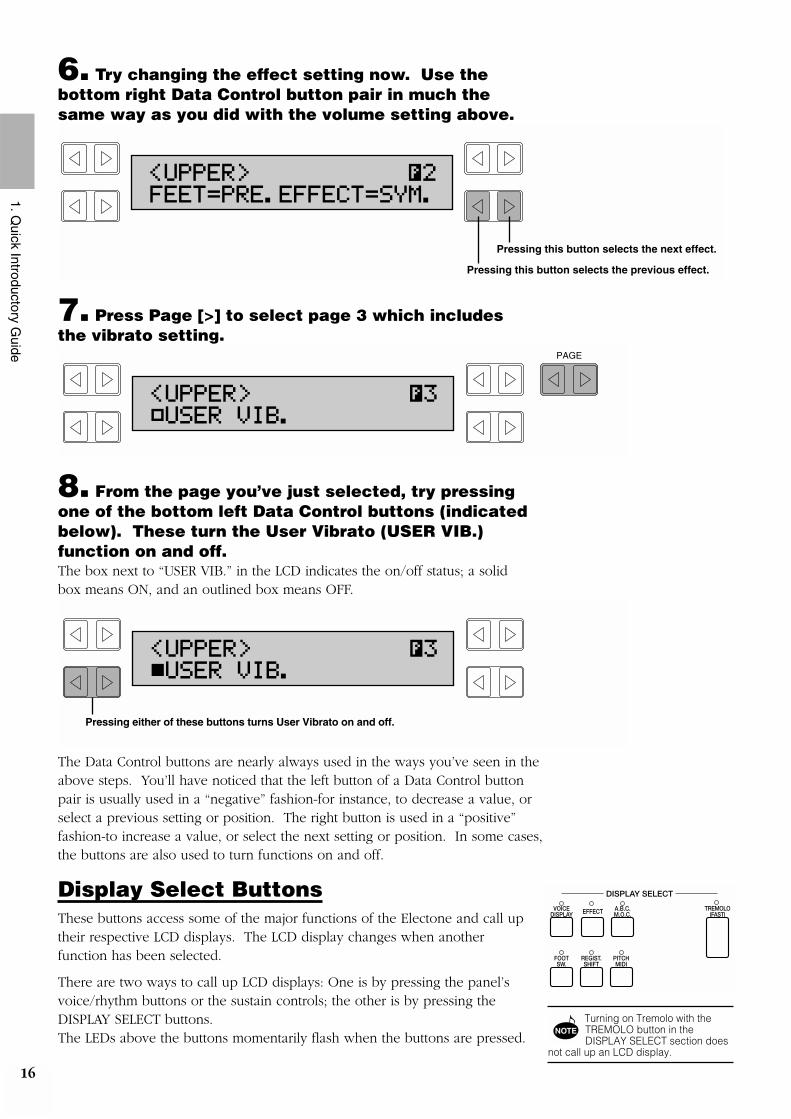
6. Try changing the effect setting now. Use thebottom right Data Control button pair in much thesame way as you did with the volume setting above.
7. Press Page [>] to select page 3 which includesthe vibrato setting.
8. From the page you’ve just selected, try pressingone of the bottom left Data Control buttons (indicatedbelow). These turn the User Vibrato (USER VIB.)function on and off. The box next to “USER VIB.” in the LCD indicates the on/off status; a solidbox means ON, and an outlined box means OFF.
The Data Control buttons are nearly always used in the ways you’ve seen in theabove steps. You’ll have noticed that the left button of a Data Control buttonpair is usually used in a “negative” fashion-for instance, to decrease a value, orselect a previous setting or position. The right button is used in a “positive”fashion-to increase a value, or select the next setting or position. In some cases,the buttons are also used to turn functions on and off.
Display Select ButtonsThese buttons access some of the major functions of the Electone and call uptheir respective LCD displays. The LCD display changes when anotherfunction has been selected.
There are two ways to call up LCD displays: One is by pressing the panel’svoice/rhythm buttons or the sustain controls; the other is by pressing theDISPLAY SELECT buttons. The LEDs above the buttons momentarily flash when the buttons are pressed.
„USER VIB.<UPPER> ¡3
Pressing either of these buttons turns User Vibrato on and off.
ŒUSER VIB.<UPPER> ¡3
PAGE
FEET=PRE.EFFECT=SYM.<UPPER> ¡2
Pressing this button selects the previous effect.
Pressing this button selects the next effect.
16
1. Quick Introductory G
uide
VOICEDISPLAY
FOOTSW.
REGIST.SHIFT
PITCHMIDI
EFFECT A.B.C.M.O.C.
TREMOLO(FAST)
DISPLAY SELECT
Turning on Tremolo with theTREMOLO button in theDISPLAY SELECT section does
not call up an LCD display.
NOTE

2. Voice Sections
The Electone has four voice sections: Upper Keyboard Voice, Lead Voice, Lower Keyboard Voice, andPedal Voice. All voices are playable from the Upper or Lower keyboards or Pedalboard.
Selecting Voices from the PanelSince selection of panel voices follows the same procedure throughout the various voice sections, instructionsfor only the Upper Keyboard Voice section are given here.
1. Select a voice from the Upper Keyboard Voicesection by pressing one of the Voice buttons in thatsection.
If, for example, you have selected the PIANO voice, the following displaywill appear:
Notice that several different voice names are shown on this display. These are variations of the basic Piano voice category.
To Select one of these voice variations.
2. Press one of the Data Control buttons thatcorresponds to the voice you wish to select.
Harpsi.Piano E.Piano
ORGAN PIANO GUITAR VIBRA-PHONE
COSMIC TUTTI
STRINGS BRASS CLARI-NET
SAXO-PHONE
CHORUS HARMO-NICA
VOLUME
MAX
MIN
UPPER KEYBOARD VOICE
1
2
ORGAN PIANO GUITAR VIBRA-PHONE
COSMIC TUTTI
STRINGS BRASS CLARI-NET
SAXO-PHONE
CHORUS HARMO-NICA
HORN
VOLUME
MAX
MIN
VOLUMELOWER KEYBOARD VOICE
UPPER KEYBOARD VOICE
1
2
ORGAN PIANO GUITAR VIBRA-PHONE
COSMIC TUTTI
STRINGS BRASS CLARI-NET
SAXO-PHONE
CHORUSMAX
MIN
1
2
LEAD VOICE
VIOLIN FLUTE
OBOE TRUM-PET
TOLOWER
VOLUME
VOLUME
PEDAL VOICE
ELEC.BASS
CONTRABASS
TUBAORGANBASS
TOLOWER
MAX
MIN
1
MAX
MIN
1
17
2. Voice S
ections
Some voice buttons have onlyone voice.NOTE

18
2. Voice S
ections
3. Set the volume for each voice section. There aretwo volume controls: Coarse and Fine.
Coarse: Use the VOLUME controls of each voice section on the panel toset the desired level for each voice. The controls have seven volumesettings, from a minimum of 0, or no sound, to a maximum of fullvolume.
Fine: Pressing the same panel voice button again calls up the VoiceCondition display.
Use the Data Control buttons that correspond to the Volume setting tochange the level of the desired voice. The relative level is indicated by anumeric value (from 0 – 24).
4. Now select voices for the Lower keyboard andPedalboard as you did for the Upper keyboard above.Also set the volumes of the voices.
Playing Lead And Bass Voices from the Lower Keyboard:The Electone has a special “To Lower” function that lets you assign Leador Bass voices to the Lower keyboard. Simply press the TO LOWERbutton on the voice section you wish to assign, and that voice will beplayable from the Lower keyboard.
About Voice Section Volumes:The Upper Keyboard and Lead voices (when not using the “To Lower”function) sound together in a layer, and the balance of the voices in thelayer is determined by the VOLUME controls of each section. In order tohear or audition one voice section, set the volume of the other voicesection to the minimum level.
LEAD VOICE
VIOLIN FLUTE
OBOE TRUM-PET
TOLOWER
VOLUME
MAX
MIN
1
VOLUMEPEDAL VOICE
ELEC.BASS
CONTRABASS
TUBAORGANBASS
TOLOWER
MAX
MIN
1
TOUCH=4 VOL.=24<UPPER> ¡1
Pressing this button decreases the value.
Pressing this button increases the value.
ORGAN PIANO GUITAR VIBRA-PHONE
COSMIC TUTTI
STRINGS BRASS CLARI-NET
SAXO-PHONE
CHORUS HARMO-NICA
VOLUME
MAX
MIN
UPPER KEYBOARD VOICE
1
2
Pressing a voice button oncecalls up that voice's Voice Menudisplay. Pressing it a second
time calls up the Voice Conditiondisplay (as shown in the illustration).Successive presses alternate betweenthe two displays.
NOTE
The Lead Voice and PedalVoice sounds one note at atime; when you simultaneously
press two or more keys, only the highestnote will sound.As for been Upper and Lower keyboardVoice voices, you can play up to 11notes simultaneously. (Total polyphoniccapacity is 11 notes at one time.)
NOTE
When the TO LOWER button isturned on, the Lead voices andPedal voices cannot be played
on the Upper keyboard and Pedalboard,respectively.
Turning the Electone off erasesall panel settings you havemade. When the Electone is
turned on, Basic Registration 1 isautomatically selected.If you have made panel settings youwish to keep, save them to RegistrationMemory (See page 42) before turningthe Electone off.You can, however, restore the panelsettings that were made before theElectone was last turned off. See page47 for more information.
About the Voice Display:You can return to the Voice Display which shows the currently selectedvoices on each keyboard by pressing the VOICE DISPLAY button in theDISPLAY SELECT section.
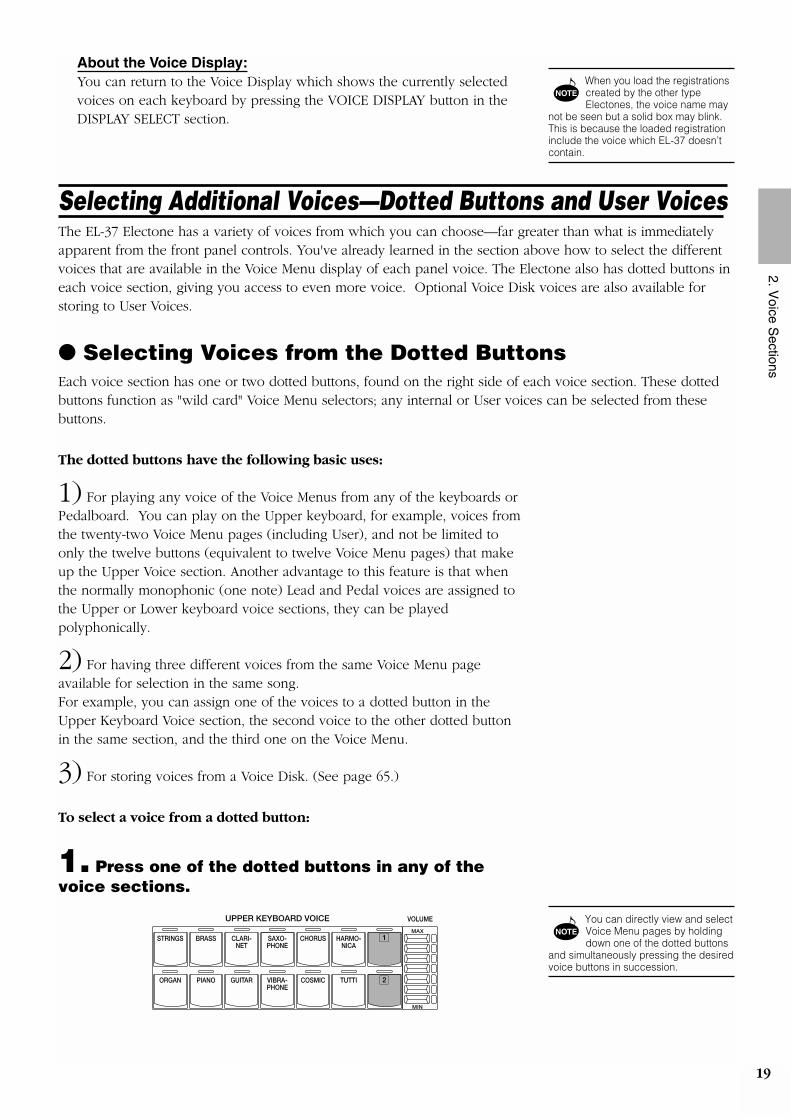
Selecting Additional Voices—Dotted Buttons and User VoicesThe EL-37 Electone has a variety of voices from which you can choose—far greater than what is immediatelyapparent from the front panel controls. You've already learned in the section above how to select the differentvoices that are available in the Voice Menu display of each panel voice. The Electone also has dotted buttons ineach voice section, giving you access to even more voice. Optional Voice Disk voices are also available forstoring to User Voices.
● Selecting Voices from the Dotted ButtonsEach voice section has one or two dotted buttons, found on the right side of each voice section. These dottedbuttons function as "wild card" Voice Menu selectors; any internal or User voices can be selected from thesebuttons.
The dotted buttons have the following basic uses:
1) For playing any voice of the Voice Menus from any of the keyboards orPedalboard. You can play on the Upper keyboard, for example, voices fromthe twenty-two Voice Menu pages (including User), and not be limited toonly the twelve buttons (equivalent to twelve Voice Menu pages) that makeup the Upper Voice section. Another advantage to this feature is that whenthe normally monophonic (one note) Lead and Pedal voices are assigned tothe Upper or Lower keyboard voice sections, they can be playedpolyphonically.
2) For having three different voices from the same Voice Menu pageavailable for selection in the same song. For example, you can assign one of the voices to a dotted button in theUpper Keyboard Voice section, the second voice to the other dotted buttonin the same section, and the third one on the Voice Menu.
3) For storing voices from a Voice Disk. (See page 65.)
To select a voice from a dotted button:
1. Press one of the dotted buttons in any of thevoice sections.
ORGAN PIANO GUITAR VIBRA-PHONE
COSMIC TUTTI
STRINGS BRASS CLARI-NET
SAXO-PHONE
CHORUS HARMO-NICA
VOLUME
MAX
MIN
UPPER KEYBOARD VOICE
1
2
19
2. Voice S
ections
When you load the registrationscreated by the other typeElectones, the voice name may
not be seen but a solid box may blink.This is because the loaded registrationinclude the voice which EL-37 doesn’tcontain.
NOTE
You can directly view and selectVoice Menu pages by holdingdown one of the dotted buttons
and simultaneously pressing the desiredvoice buttons in succession.
NOTE

2. Select one of the pages with the PAGE buttons.Each voice group appears in the LCD display when the page has been selected.
3. Select a voice from the display (PizzStrs, forexample).
Select the USER page when you wish to use a voice from a Voice Disk. (Seepage 65.)
USER 3 USER 4USER 1 USER 2 ¡US
Strings ¡1PizzStrs
PizzStrsStrings ¡1
20
2. Voice S
ections
The first character of theselected voice's name flashesto indicate that the voice has
been selected. As long as you do notselect a voice, this indication will notappear.
When you load the registrationscreated by the other typeElectones, the voice name may
not be seen but a solid box may blink.This is because the loaded registrationinclude the voice which EL-37 doesn’tcontain.
NOTE
NOTE

● Voice MenusThe following chart lists the voices available and their button/page assignment. The numbers shown in the listcorrespond to the page numbers shown in the display.
Strings ¡1PizzStrs
STRINGS (Upper/Lower)
Tutti1 Tutti2 ¡12
TUTTI (Upper/Lower)
Violin ¡2
VIOLIN (Lead)
Chorus ¡13
CHORUS (Upper/Lower)
ContBass PizzBass ¡3
CONTRABASS (Pedal)
Harmonic ¡14
HARMONICA (Upper)
Brass SynBrass ¡4
BRASS (Upper/Lower)
Organ JazzOrgn¡15
ORGAN (Upper/Lower)
Horn ¡5
HORN (Lower)
OrgBass ¡16
ORGAN BASS (Pedal)
TromboneTrumpet ¡6
TRUMPET (Lead)
Harpsi.Piano E.Piano ¡17
PIANO (Upper/Lower)
Tuba ¡7
TUBA (Pedal)
Guitar ¡18E.Guitar
GUITAR (Upper/Lower)
Flute ¡8Whistle
FLUTE (Lead)
MarimbaVibrphon ¡19
VIBRAPHONE (Upper/Lower)
Oboe Bassoon ¡9
OBOE (Lead)
SynBassE.Bass ¡20
ELACTRIC BASS (Pedal)
Clarinet ¡10
CLARINET (Upper/Lower)
Cosmic3Cosmic1 Cosmic2 ¡21
COSMIC (Upper/Lower)
Saxophon ¡11
SAXOPHONE (Upper/Lower)
USER 3 USER 4USER 1 USER 2 ¡US
21
2. Voice S
ections

22
3. Voice C
ontrols and Effects
3. Voice Controls and EffectsThe Electone is equipped with two general kinds of functions that can be used to change the sound ofthe voices: Voice Controls and Effects.
These are used to change various aspects of the voices, such as the volume or octave (footage), orenhance the sound of the voices, such as with Reverb, Tremolo, or Vibrato.
Each voice has been given certain factory-preset effect settings to best enhance its sound. However, youcan also change the effect to suit your preferences by using the controls described in this section.
Voice Controls/Effects ChartThis chart shows all of the Voice Controls and Effects for the various voice sections of the EL-37. A circle (Ø)indicates that the setting is available. The bottom of the chart shows the relevant LCD titles for each setting.
Voice Controls & Effects
Voice ControlsVoice Condition Pages
To select the Voice Condition pages for changing the settings: Choose avoice on the panel, then press that voice’s panel button twice. Use thePage buttons to change the pages.
For the Lead Voice example shown below, press the VIOLIN button in theLead Voice section twice. To call up the corresponding Upper Voiceexample, press the PIANO button in the Upper Keyboard Voice section twice.
LEAD VOICE
VIOLIN FLUTE
OBOE TRUM-PET
TOLOWER
VOLUME
MAX
MIN
1
ORGAN PIANO GUITAR VIBRA-PHONE
COSMIC TUTTI
STRINGS BRASS CLARI-NET
SAXO-PHONE
CHORUS HARMO-NICA
VOLUME
MAX
MIN
UPPER KEYBOARD VOICE
1
2
GlideTouchDepth
Vibrato
Delay,Depth,Flanger
FlangerDelaySymphonic/Celeste
Tremolo/Chorus
Feet(Octave)
VolumeFineSustainReverb
Ø
—
Ø
—
Ø
—
Ø
—
Ø
Ø
Ø
Ø
—
Ø
Ø
Ø
Ø
—
Ø
Ø
Ø
Ø
—
Ø
Ø
Ø
Ø
Ø
—
Ø
Ø
—
Ø
Ø
—
Ø
Ø
—
Ø
Ø
—
—
Ø
—
Ø
—
Ø
—
Ø
—
—
Ø
—
Ø
—
Ø
Ø
—
—
Ø
Ø
Ø
—
Ø
—
Upper/Lower
Lead
Pedal
ConditionLCD
Effect LCDRelatedLCDDisplay Sustain LCD
Foot SwitchLCD
TouchTone
(Initial/After)
*2 *2 *2
*2 *2 *2
*11 1 1
2 2 2
*1 After setting this, press Tremolo button on the panel. *2 After setting 1, adjust the parameter in 2.
There are some differencesbetween the functions in theLead and Upper/Lower voices.
Where appropriate, the differentdisplays are shown.
NOTE

23
3. Voice C
ontrols and Effects
Voice Condition Page 1
1Touch ToneThe Touch Tone function gives you expressive control over the volumeand timbre of a voice. Two types of keyboard touch affect this function:Initial Touch and After Touch. Range: 1-7
Initial TouchControls volume and timbre according to the velocity at which you strikethe keys. The harder you strike the keys, the greater the volume and thebrighter the timbre will become.
After TouchControls volume and timbre according to the pressure you apply to thekeys after playing them. The harder you press down on the keys, thegreater the volume and the brighter the timbre will become.
2VolumeFine adjustment of the voice volume. (Coarse volume settings are madewith the front panel VOLUME controls.) Range: 0-24
<LEAD> ¡1 TOUCH=4 VOL.=16
Decreases the volume.
Increases the volume.
<LEAD> ¡1 TOUCH=4 VOL.=16
Decreases the sensitivity.
Increases the sensitivity.
<LEAD> ¡1 TOUCH=4 VOL.=16
! "
<LEAD> ¡1 TOUCH=4 VOL.=24
! "
Some voices may not have aremarkable effect.NOTE
24
3. Voice C
ontrols and Effects
Voice Condition Page 2
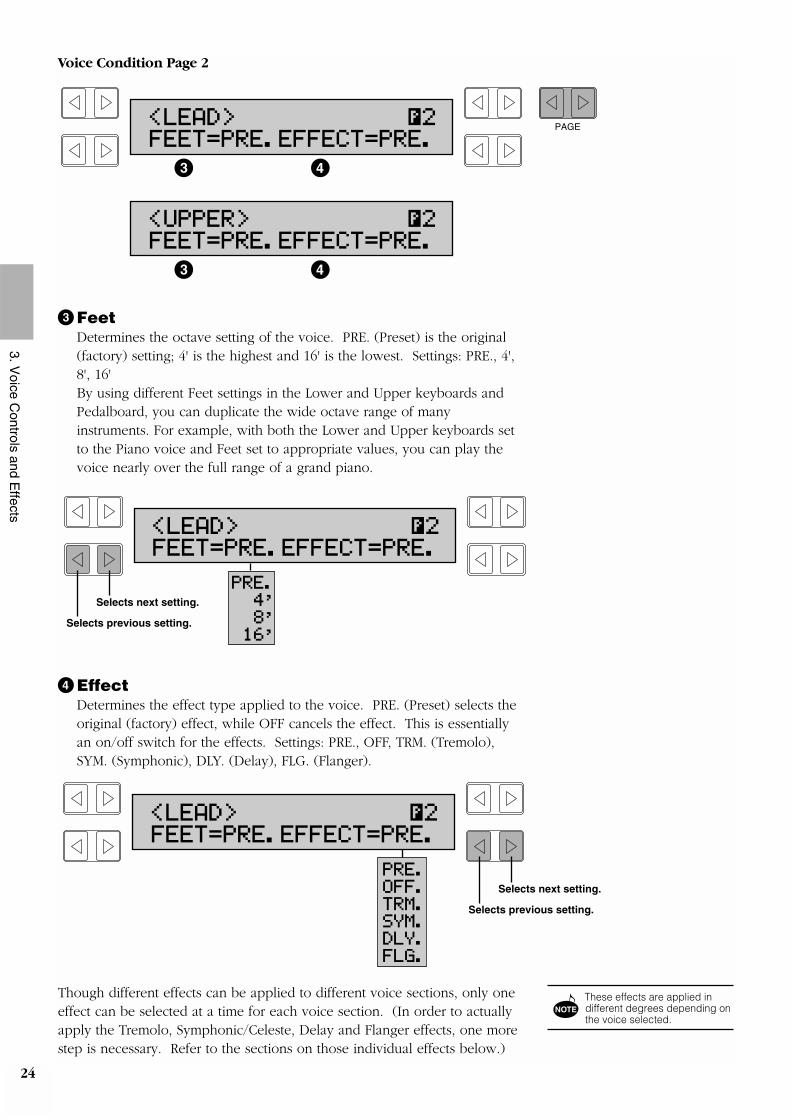
3FeetDetermines the octave setting of the voice. PRE. (Preset) is the original(factory) setting; 4' is the highest and 16' is the lowest. Settings: PRE., 4',8', 16'By using different Feet settings in the Lower and Upper keyboards andPedalboard, you can duplicate the wide octave range of manyinstruments. For example, with both the Lower and Upper keyboards setto the Piano voice and Feet set to appropriate values, you can play thevoice nearly over the full range of a grand piano.
4EffectDetermines the effect type applied to the voice. PRE. (Preset) selects theoriginal (factory) effect, while OFF cancels the effect. This is essentiallyan on/off switch for the effects. Settings: PRE., OFF, TRM. (Tremolo),SYM. (Symphonic), DLY. (Delay), FLG. (Flanger).
Though different effects can be applied to different voice sections, only oneeffect can be selected at a time for each voice section. (In order to actuallyapply the Tremolo, Symphonic/Celeste, Delay and Flanger effects, one morestep is necessary. Refer to the sections on those individual effects below.)
<LEAD> ¡2FEET=PRE.EFFECT=PRE.
PRE.OFF.TRM.SYM.DLY.FLG.
Selects previous setting.
Selects next setting.
<LEAD> ¡2FEET=PRE.EFFECT=PRE.
PRE.4'8'16'
Selects previous setting.
Selects next setting.
<LEAD> ¡2FEET=PRE.EFFECT=PRE.
PAGE
3 4
<UPPER> ¡2FEET=PRE.EFFECT=PRE.
3 4
These effects are applied indifferent degrees depending onthe voice selected.
NOTE

Voice Condition Page 3
5VibratoVibrato is an effect that periodically, or regularly, varies the pitch of avoice for a quavering sound. Used properly, it can make a voice soundricher and more natural.
Call up the Vibrato and Touch Vibrato settings on Voice Condition Page 3by using the Page buttons.
5 -1 User Vibrato (USER VIB.)When this is turned on, you can adjust the vibrato settings: Delay, Depthand Speed for Lead voices, and Depth for Upper/Lower voices.The Delay, Depth and Speed settings are set in the next page, VoiceCondition Page 3. The Delay, Depth and Speed settings are not displayedand cannot be adjusted unless USER VIB. has been turned on in thissetting.
5 -2 Touch Vibrato (T. VIB) (Lead Voice only)On/Off switch for the Touch Vibrato function. Touch Vibrato lets youapply vibrato to individual notes as you play them. While playing a key,press down harder on it to give the note vibrato. The harder you pressthe key down, the greater the vibrato will be.
Call up the User Vibrato settings on Voice Condition Page 4 by using thePage buttons.
<LEAD> ¡3ŒUSER VIB. ŒT.VIB.
PAGE
5 -1 5 -2Press either of these buttonsto turn on User Vibrato.
Press either of these buttonsto turn on Touch Vibrato.
<LEAD> ¡3ŒUSER VIB. ŒT.VIB.
PAGE
5 -1 5 -2
<UPPER> ¡3ŒUSER VIB
5 -1
25
3. Voice C
ontrols and Effects
The Pedal Condition display hasonly two pages.NOTE
Vibrato cannot be applied to thePedalboard voices.NOTE
The Delay, Depth and Speedsetting can be adjusted onlywhen the User Vib. on the Voice
Condition Page 3 is turned on.Only the Delay is available for the Upperand Lower keyboard voices.
NOTE

Voice Condition Page 4
1Delay (Lead Voice only)Determines the amount of time that elapses between the playing of a keyand the start of the vibrato effect (see diagram). Higher settings increasethe delay of the vibrato onset. Range: 0-7
2DepthDetermines the intensity of the vibrato effect (see diagram). Highersettings result in a more pronounced vibrato. Range: 0-7
3Speed (Lead Voice only)Determines the speed of the vibrato effect (see diagram). Range: 0-7
The following diagram graphically shows the vibrato effect and is relatedcontrols.
If User Vib. has not been turned on, the following display appears whenPage 3 is selected.
<UPPER>VIB. ¡4 PRESET VIBRATO
Delay
Vibrato Controls
Speed
Depth
Key On
<LEAD>VIB. DELAY=0¡4DEPTH=0 SPEED=0
PAGE
2 3
1
<UPPER>VIB. ¡4DEPTH=0
2
26
3. Voice C
ontrols and Effects
When you set the DEPTH to 0,the Touch Vibrato function willbe inactive.
NOTE

EffectsThe effects include the Tremolo, Symphonic, Delay and Flanger which should first be selected and turned onfor the specific voice section(s) on the Voice Condition page 2 above, and Reverb, Sustain and Guide.
1 Tremolo/ChorusTremolo recreates the rich, swirling sound of the popular rotating speaker effect. Just as with a conventionalrotating speaker, you can switch the effect on and off as you play. And like a motor-driven speaker, thecharacteristic tremolo effect gradually changes speed after it is switched. The Tremolo effect can be switched inreal time as you play with the TREMOLO (FAST) button on the panel.
Tremolo Operation
1) Select TRM. (Tremolo) in each Voice Condition display page 2.
2) Turn on Tremolo as you play with the panel Tremolo button.
When TREMOLO (FAST) button is turned on while the TRM. is selected ineach Voice Condition display, the rotation effect is fast (Tremolo); when off,it is slow (Chorus).
2 Symphonic/CelesteSymphonic simulates the effect of a large ensemble, while Celeste creates the effect of a gradually expandingsound.
Symphonic/Celeste Operation
1) Select SYM. (Symphonic) in each Voice Condition display Page 2.
2) Press the EFFECT button in the DISPLAY SELECT section, and call upthe Symphonic page 3 (Effect Page 3) by using the Page button. SelectSymphonic (or Celeste) by pressing any of the bottom Data Controlbuttons.
<SYMPHONIC> ¡3„Symphonic ŒCeleste
Use any of these Data Control buttons to select the Symphonic/Celeste settings.
PAGE
<UPPER> ¡2FEET=4' EFFECT=SYM.
Selectng SYM. (Synphonic/Celeste) forthe selected voice section.
27
3. Voice C
ontrols and Effects

28
3. Voice C
ontrols and Effects
3 Delay and FlangerDelay and Flanger are two unusual effects used often in contemporary music. Like Tremolo and Symphonic,the Delay and Flanger effects are set in two steps, from two different groups of display page: the VoiceCondition pages and the Effect pages.
Delay and Flanger Operation
1) Select DLY. (Delay) or FLG. (Flanger) in each Voice Conditiondisplay page 2.
2) Press the EFFECT button in the DISPLAY SELECT section, and use thePage buttons to select the corresponding pages.
Delay Page (Effect Page 1)Delay is a pronounced echo effect, with distinct delayed repeats of theoriginal sound.
1F.B. (Feedback)Determines the number of delayed repeats. Range: 0-100
2SPEEDDetermines the time between delayed repeats. Range: 0-100
3BAL. (Balance)Determines the volume of the delay effect, relative to the original sound.Higher settings produce a louder delay. Range: 0-100
Flanger Page (Effect Page 2)Flanger introduces a swirling, animated modulation effect to the sound.
1F.B. (Feedback)Controls the brightness and the metallic sound of the effect. Range: 0-100
2SPEEDDetermines the speed of the modulation. Range: 0-100
3DEP. (Depth)Determines the intensity of the effect. Range: 0-100
<FLANGER> F.B.=20 ¡2SPEED=47 DEP.=10
PAGE
2 3
1
<DELAY> F.B.=20 ¡1SPEED=25 BAL.= 5
PAGE
2 3
1
The Delay and Flanger effectsare available for the Upper,Lower and Lead Voice sections.
NOTE
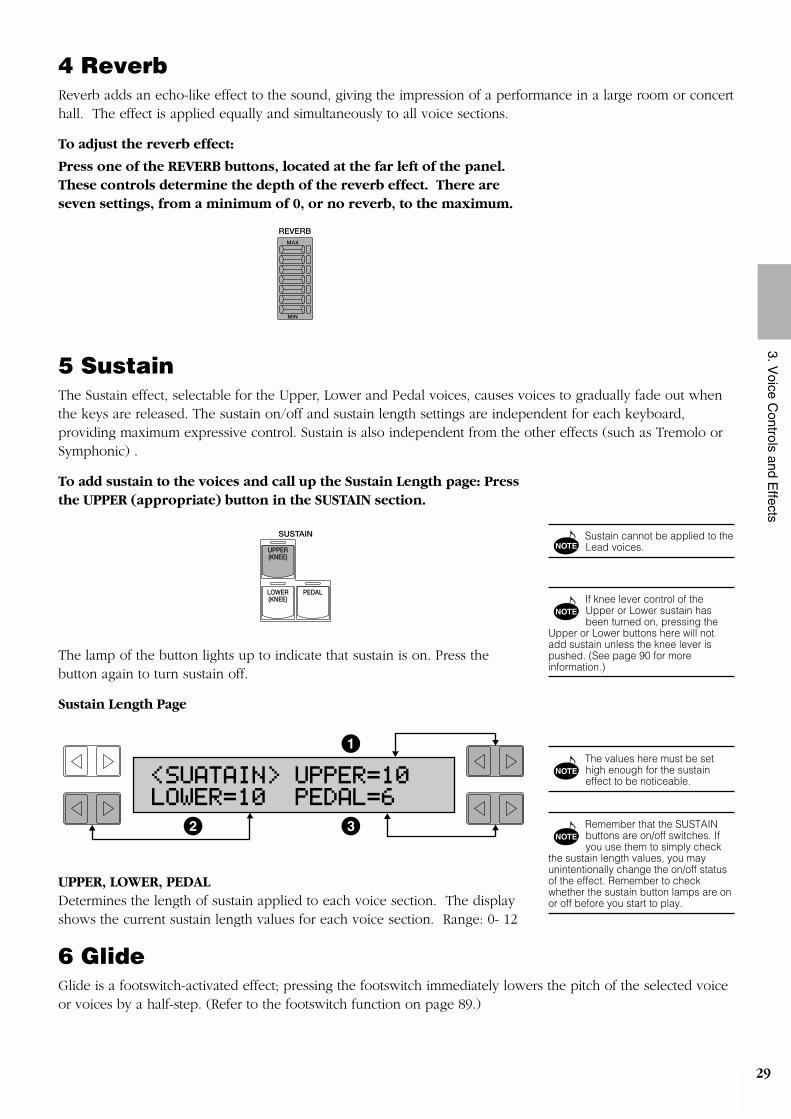
4 ReverbReverb adds an echo-like effect to the sound, giving the impression of a performance in a large room or concerthall. The effect is applied equally and simultaneously to all voice sections.
To adjust the reverb effect:
Press one of the REVERB buttons, located at the far left of the panel.These controls determine the depth of the reverb effect. There areseven settings, from a minimum of 0, or no reverb, to the maximum.
5 SustainThe Sustain effect, selectable for the Upper, Lower and Pedal voices, causes voices to gradually fade out whenthe keys are released. The sustain on/off and sustain length settings are independent for each keyboard,providing maximum expressive control. Sustain is also independent from the other effects (such as Tremolo orSymphonic) .
To add sustain to the voices and call up the Sustain Length page: Pressthe UPPER (appropriate) button in the SUSTAIN section.
The lamp of the button lights up to indicate that sustain is on. Press thebutton again to turn sustain off.
Sustain Length Page
UPPER, LOWER, PEDALDetermines the length of sustain applied to each voice section. The displayshows the current sustain length values for each voice section. Range: 0- 12
6 GlideGlide is a footswitch-activated effect; pressing the footswitch immediately lowers the pitch of the selected voiceor voices by a half-step. (Refer to the footswitch function on page 89.)
<SUATAIN> UPPER=10LOWER=10 PEDAL=6
2 3
1
SUSTAIN
UPPER(KNEE)
LOWER(KNEE)
PEDAL
REVERBMAX
MIN
29
3. Voice C
ontrols and Effects
If knee lever control of theUpper or Lower sustain hasbeen turned on, pressing the
Upper or Lower buttons here will notadd sustain unless the knee lever ispushed. (See page 90 for moreinformation.)
NOTE
Sustain cannot be applied to theLead voices.NOTE
The values here must be sethigh enough for the sustaineffect to be noticeable.
Remember that the SUSTAINbuttons are on/off switches. Ifyou use them to simply check
the sustain length values, you mayunintentionally change the on/off statusof the effect. Remember to checkwhether the sustain button lamps are onor off before you start to play.
NOTE
NOTE

30
4. Rhythm
, Accom
paniment and P
ercussion
4. Rhythm, Accompaniment and PercussionThe Rhythm features of the Electone use actual drum and percussion sampled sounds to automaticallyplay various rhythm patterns. Automatic Accompaniment functions are used with the rhythm patterns,providing appropriate and completely automatic accompaniment to match the style of the rhythmpattern selected. Moreover, the Electone has a Keyboard Percussion feature that allows you to playdrum and percussion sounds from the Lower keyboard and Pedalboard.
Rhythm PatternsTen different rhythm categories in various styles can be instantly selected from the front panel. The Electone hasmany more "hidden" rhythm patterns, however. A total of 38 rhythm patterns are available, and can be selectedby using the LCD display.
To select and play a rhythm pattern:
1. Choose a rhythm pattern by pressing one of theRhythm buttons in the Rhythm section on the panel.
To select a rhythm pattern from each category in the display, press the DataControl button corresponding to the rhythm you wish to play, as you do withthe voices. The first character of the selected rhythm pattern’s name flashes.(Refer to the Rhythm Menu list on page 35 for a list of available rhythms.)
2. Turn the rhythm on. You can use one of threebuttons to turn on the rhythm:
! STARTThis button does as its name indicates; the rhythm begins as soon as thebutton is pressed. To stop the rhythm, press this button again.
SYNCHROSTART
INTRO.ENDING
START
FILL IN
123
Country BroadwayMarch Polka
MARCH WALTZ SWING BOUNCE SLOWROCK
TANGO LATIN 1 LATIN 2 8 BEAT 16 BEAT
USER 1 USER 2 USER 3 USER 4 A B
USER 5 USER 6 USER 7 USER 8 C
VOLUME
D
RHYTHMMAX
MIN
SEQ. SEQ.
SEQ. SEQ.
1 2
3 4
1
2

31
4. Rhythm
, Accom
paniment and P
ercussion
" SYNCHRO STARTThis button puts the rhythm pattern in “stand-by”; the rhythm will startwhen you press a note on the Lower keyboard or Pedalboard. To stopthe rhythm, press this button again.
# INTRO. ENDINGPressing this button automatically plays a short introduction (of up toeight measures) before starting the actual rhythm pattern. First, press theINTRO. ENDING button, then the START or SYNCHRO START button toactually start the rhythm.While the introduction is playing, the TEMPO Display shows thecountdown to the first measure of the pattern. For example, if there is aneight-measure lead-in for a pattern in 4/4 time, the following displayappears:
Pressing the INTRO. ENDING button again while the pattern is being playedwill automatically add an ending phrase before stopping the rhythm.
LEAD INPressing the START button while holding down the INTRO. ENDING buttonautomatically plays a special one-measure Lead In, with a click on each beat,to cue you in to the beginning of the song.
3. Set the volume. Press the VOLUME controls tothe right of the Rhythm buttons to set the desiredlevel of the rhythm. The controls have seven volumesettings, from a minimum of 0, or not sound, to amaximum of full volume.Fine adjustments in the volume of the rhythm pattern can also be made fromthe Rhythm Condition page (See page 33).
4. Set the tempo.
! TEMPO DialFor adjusting the speed of the rhythm. Turn the dial clockwise to increasethe tempo, and counter-clockwise to decrease it.
BAR/BEAT
TEMPO
TEMPO
1 2
Tempo display:shows the current tempo.
BAR/BEAT
TEMPO
TEMPO
ABOUT SYNCHRO START:The Synchro Start feature functionsquite differently when Auto Bass Chordis turned on and AccompanimentMemory is turned off. The rhythm patternstarts when a key on the Lowerkeyboard is played, but thenimmediately stops when the key isreleased. To keep this from happening,turn the Memory function on. (Refer tothe A.B.C. section, page 36, for detailson Auto Bass Chord and Memory.)
When the Electone is turned on,the rhythm volume isautomatically set to 0.
The left footswitch can also beused to turn the rhythm off andon in the middle of a song.
However, it cannot be used to start therhythm at the beginning of a song. (Toassign the footswitch for rhythm control,See page 89.)
NOTE
NOTE

32
4. Rhythm
, Accom
paniment and P
ercussion
" TEMPO Display (BAR/BEAT Indicator)Shows the current tempo. (Displayed values are given in beats perminute, just as on a conventional metronome.) The tempo range is 40 to240 beats per minute.When the rhythm pattern begins playing, the TEMPO display changesfunction to a bar/beat indicator.
The number on the left indicates the current bar or measure and the oneon the right indicates the number of the beat in each bar. The beat indicatorlamp above the display also indicates the beats.
Fill In PatternsFill In Patterns are designed to be used as temporary and regular rhythmic breaks to spice up a repeatingrhythm pattern. Like the regular rhythm patterns, all Fill In patterns have been designed to perfectly match thebass and chord parts of the Automatic Accompaniment feature.
To use the Fill In patterns:
1. Select and play a rhythm pattern.
2. As you play the Electone along with the rhythmpattern, occasionally press the FILL IN button.
For best results, press the FILL IN button just at the beginning or the first beatof a measure.
SYNCHROSTART
INTRO.ENDING
START
FILL IN
BAR/BEAT
TEMPO
BAR/BEAT Indicator:shows the current position in the measures
When you turn the TEMPO Dialeven while the rhythm isplaying, the display momentarily
changes to show the current tempo.
NOTE
USING A FILL IN FOR THE START OFA SONG:Fill In patterns can also be used asintroductions; simply press the FILL INbutton before starting the rhythm withthe START or SYNCHRO STARTbuttons.
PLAYING PARTIAL FILL INPATTERNS:You can also start Fill In patternswithin a bar, in order to play only thefinal one or two beats of the Fill Inpattern and create additional rhythmicinterest. Since the Fill In feature is verysensitive to bar/beat boundaries, youshould be very careful to “play” theFILL IN button precisely on (or justslightly before) the beat that you wantthe Fill In pattern to begin.

33
4. Rhythm
, Accom
paniment and P
ercussion
Auto Variation and Percussion VolumeThese two settings are controlled from each rhythm’s Rhythm Condition pages. There are three RhythmCondition pages.
To select the Rhythm Condition pages:Choose a rhythm pattern, and press that pattern’s panel button again. (The button should be pressed onlyonce if the Rhythm display has already been called up; otherwise press the button twice.)
Rhythm Condition Page 1
1AUTO VARI. (Auto Variation)The Auto Variation function lets you set pattern variations to be playedautomatically. When set to on, Auto Variation automatically substitutesadditional pattern variations to make the rhythm more interesting andcomplex.
2VolumeFine adjustment of the overall volume of the rhythm patterns andKeyboard Percussion. Range: 0-24
Rhythm Condition Page 2 and 3 are described later in this section. (Seepage 36.)
Dotted ButtonsThe Rhythm section also has, like the voice sections, dotted buttons fromwhich rhythm patterns can be selected. These dotted buttons function as“wild card” rhythm pattern selectors; any of the rhythm patterns availablefrom the panel buttons, the Rhythm Menus or User rhythm can be selectedfrom these buttons.
<RHYTHM> ¡1ŒAUTO VARI. VOL.=16
Decreases the volume.These buttons turn the Auto Variation function on and off.
Increases the volume.
1 2
PAGE
MARCH WALTZ SWING BOUNCE SLOWROCK
TANGO LATIN 1 LATIN 2 8 BEAT 16 BEAT
USER 1 USER 2 USER 3 USER 4 A B
USER 5 USER 6 USER 7 USER 8 C
VOLUME
D
RHYTHMMAX
MIN
SEQ. SEQ.
SEQ. SEQ.
1 2
3 4
1
2
The Auto Variation function isnot applied to some of therhythm patterns.
NOTE
As with the Voice sections’dotted buttons, you can set twoor three rhythm patterns from
the same page to be selected fromdifferent buttons (one from the originalRhythm button, and the others from thedotted buttons).
NOTE

34
4. Rhythm
, Accom
paniment and P
ercussion
To select a rhythmpattern from a dotted button:
1. Press one of the dotted buttons on the right sideof the Rhythm section.
2. Select one of the pages with the Page buttons.
3. Select one of the rhythms by pressing one of theappropriate Data Control buttons.For example, select Dixie by pressing one of the bottom right Data Controlbuttons.
User PagesSelect the User pages when you wish to play rhythm patterns you’ve createdwith the Rhythm Pattern Program function. (See page 68.)
Swing1 Swing2J.Ballad Dixie
J.Ballad Dixie
PAGE
Swing1 Swing2
MARCH WALTZ SWING BOUNCE SLOWROCK
TANGO LATIN 1 LATIN 2 8 BEAT 16 BEAT
USER 1 USER 2 USER 3 USER 4 A B
USER 5 USER 6 USER 7 USER 8 C
VOLUME
D
RHYTHMMAX
MIN
SEQ. SEQ.
SEQ. SEQ.
1 2
3 4
1
2
While you scroll through thepages with the Page buttons,the originally selected rhythm
pattern will sound until you selectanother pattern with the Data Controlbuttons.
NOTE

Rhythm MenusThis chart lists all 38 of the rhythm patterns available on the Electone. The numbers in the chart correspond tothe page numbers shown in the display.
Accompaniment ControlsThe Accompaniment function here is independent of the A.B.C. accompaniment and works with the Rhythmsection to automatically add arpeggiated chords and other instrumental embellishments. The Accompanimentcontrols include the setting of the Accompaniment type and its volume.
To select the Accompaniment controls in the Rhythm Condition pages:
1. Press any one of the RHYTHM buttons on thepanel twice.
<RHYTHM> ¡1ŒAUTO VARI. VOL.=0
MARCH WALTZ SWING BOUNCE SLOWROCK
TANGO LATIN 1 LATIN 2 8 BEAT 16 BEAT
USER 1 USER 2 USER 3 USER 4 A B
USER 5 USER 6 USER 7 USER 8 C
VOLUME
D
RHYTHMMAX
MIN
SEQ. SEQ.
SEQ. SEQ.
1 2
3 4
1
2
MARCH LATIN 1
WALTZ LATIN 2
SWING 8 BEAT
BOUNCE 16 BEAT
SLOW ROCK USER
TANGO
Country BroadwayMarch Polka ¡1
Beguine MamboCha-cha Rhumba ¡7
J.Waltz BoleroWaltz 1 Waltz 2 ¡2
Bossa.1 Bossa.2Samba 1 Samba 2 ¡8
J.Ballad DixieSwing 1 Swing 2 ¡3
8Beat3 D.Pop8Beat1 8Beat2 ¡9
Reggae 1 Reggae 2Bounce 1 Bounce 2 ¡4
16Beat3 Funk16Beat1 16Beat2 ¡10
S.Rock3S.Rock1 S.Rock2 ¡5
USER1-C USER1-DUSER1-A USER1-B ¡U1
Tango 3Tango 1 Tango 2 ¡6
USER8-C USER8-DUSER8-A USER8-B ¡U8
35
4. Rhythm
, Accom
paniment and P
ercussion
When the Electone is turned on,the Accompaniment Volume isautomatically set to 0. Be sure
to set the Accompaniment Volume to theappropriate value when using theAccompaniment function.
Even if the AccompanimentType is changed, theIntro/Ending pattern remains the
same.
NOTE
NOTE

2. Once the Rhythm Condition Page 1 display(above) has been called up, use the Page buttons toselect Page 2.
Rhythm Condition Page 2
1TYPE (1-4)These settings provide types of rhythmic and melodic accompaniment,and become more complex according to the type number (Type 1 is thesimplest, Type 4 the most complex).
2VOL. (Volume)Determines the volume of the Accompaniment. The Accompaniment canbe turned off by setting this parameter to the minimum value. Range: 0-24
Automatic Accompaniment—Auto Bass ChordThe Auto Bass Chord (A.B.C.) function works with the Rhythm section of the Electone to automaticallyproduce chord and bass accompaniment as you play. It adds a entirely new dimension to your performance byeffectively putting a full backing band at your disposal. Depending on the feature or mode selected, you canplay anything from a single note to a full chord on the Lower key board and hear complete, rhythmical bassand chord accompaniment.
To select the A.B.C. function and call up Rhythm Condition Page 3:
1. Press any of the RHYTHM buttons twice to callup the Rhythm Condition pages.
2. Use the Page buttons to select Page 3, theA.B.C. & Memory page.
Rhythm Condition Page 3
<ABC> <MEMORY> ¡3Fingered ŒL ŒP
OFFSingleFingeredCustom
Turn the Pedalboard Memory (P) on and off.
Turn the Lower keyboard Memory (L) on and off.
"!
These buttons correspond to the bottom left of the LCD and let you step through the various A.B.C. modes.
PAGE
<ACCOMPANIMENT> ¡2 TYPE=1 VOL.=0
PAGE
Increases volume.Decreases volume.
Sets volume to maximum value.Sets volume to minimum value.
Selects the Accompaniment type.
21
36
4. Rhythm
, Accom
paniment and P
ercussion

37
4. Rhythm
, Accom
paniment and P
ercussion
Auto Bass Chord
1Mode: Off, Single, Fingered, Custom
OffCancels the Auto Bass Chord function.
Single (Single Finger mode)The Single Finger mode provides the fastest and easiest means to obtainmany different chord/bass combinations, by simply using one, or at most,two or three fingers to play the chords.
Refer to the chart below, Chords Recognized in the Single Finger Mode,for details on playing chords in this mode.
Fingered (Fingered Chord mode)The Fingered Chord mode automatically produces bass and chordaccompaniment for chords played in the Lower keyboard. It allows you touse a wider range of chord types than in the Single Finger mode. In theFingered Chord mode, you play all the notes of the chord while the AutoBass Chord function automatically selects the appropriate bass pattern andrhythmic accents.
Refer to the chart below, Chords Recognized in the Fingered Chord Mode,for details on playing chords in this mode.
Custom (Custom A.B.C. mode)The Custom A.B.C. mode is a slight variation on the Fingered Chordmode. It allows you to determine what bass notes will be played in theaccompaniment by playing a note on the Pedalboard along with thechords you play in the Lower keyboard.
2MemoryThe Memory function allows you to have the bass and chordaccompaniment continue even after you release your fingers from thekeyboard. Independent Memory settings are available for the Lowerkeyboard and Pedalboard, making it possible, for example, to have the basscontinue with the rhythm while the chord accompaniment “rests.” TheMemory function can also be used independently from the A.B.C. feature.
The bottom right Data Control button pair is used to control the Memoryfunction. The left button corresponds to the Lower keyboard, and theright button corresponds to the Pedalboard.
L (Lower)When Lower is set to on (solid box), the chord accompaniment of theLower Keyboard voices continues to play even after you release yourfingers from the Lower keyboard.
P (Pedal)When Pedal is set to on (solid box), the bass accompaniment of thePedalboard voices continues to play even after you release your fingersfrom the Lower keyboard.
The Auto Bass Chord functioncan also be selected from theA.B.C./ M.O.C. page. To select
the A.B.C./ M.O.C. page, press theA.B.C./ M.O.C. button in the DISPLAYSELECT section.
NOTE

38
4. Rhythm
, Accom
paniment and P
ercussion
Chords Recognized in the Single Finger Mode (Key of C)Major, minor, 7th and minor 7th chords can all be played in the Single Fingermode.
Major chords: Press the root of the chord (the note that corresponds to thechord’s name).
Minor chords: Simultaneously press the root and any one black key to theleft of it.
7th chords: Simultaneously press the root and any one white key to the left of it.
Minor 7th chords: Simultaneously press the root as well as any black keyand any white key to the left of it.
PLAYING SINGLE FINGER CHORDS WITHOUT RHYTHM:Auto Bass Chord is generally used with rhythm patterns to create fullrhythmic accompaniment, but it can also be used in the Single Finger modeto add full continuous chords to your performance without the use of therhythm. Simply leave the rhythm off in Single Finger mode, and play SingleFinger chords from the Lower keyboard.
Chords Recognized in the Fingered Chord Mode (Key of C)
C Cm C7 Cm7 Cmaj7
Cm maj7 C+5 C7+5 Cdim C7sus4
C-5Cm7-5 C7-5 C6 Cm6
Cm7
C7
Cm
C
Minor, 7th and minor 7thchords with black key roots(such as B� or G�) are played in
the same way as those with white keyroots.
NOTE
With Single Finger, the chordproduced will sound in thesame octave regardless of
where it is played on the Lowerkeyboard.
NOTE
If you forget to cancel theSingle Finger or FingeredChord accompaniment
functions, single notes that you play willsounded as continuous chords.
NOTE
F G A B C D E
G A B D E
Chord Roots on the Lower Keyboard

39
4. Rhythm
, Accom
paniment and P
ercussion
Keyboard PercussionThe various drum and percussion sounds (a total of 43 available) have been assigned to the Lower keyboardand pedalboard for you to play.
To play the Keyboard Percussion sounds :
1. Turn on the Keyboard Percussion function bypressing either or both the LOWER and PEDALbuttons in the KEYBOARD PERCUSSION section.(Keyboard Percussion switches for the Lowerkeyboard and Pedalboard can be used together orindependently as you wish.)
2. Set the volume.The volume of the percussion sounds is set together with that of the rhythmby using the VOLUME controls in the Rhythm section. Set the volume to thedesired level.
3. Turn off all the Lower and Pedal voices bysetting each voice’s volume to MIN.
4. Play some notes on the Lower keyboard andPedalboard. The various percussion sounds havebeen assigned to the keyboards as shown in thecharts below.
Percussion Assignments for the Lower Keyboard
Hand Clap
Agogo High
Agogo Low
Wood Block High
Wood Block Low
Cowbell
Triangle Open
Triangle Closed
Snare Drum Roll
Orchestra Snare DrumTom
1
Tom 2
Tom 3
Snare Brush Shot
Snare Brush Roll
Synth. Tom 1
Synth. Tom 2
Synth. Tom 3
Claves
Shaker
Cuica High
Cuica Low
Bongo High
Bongo Low
Conga High
Conga Low
Timbale High
Timbale Low
Castanet
Tambourine
Orchestra Cymbal 2
Orchestra Cymbal 1
Crash Cymbal
Ride Cymbal
Hi-hat Open
Hi-hat Closed
Snare Drum Rim
Snare Drum Light
Snare Drum Reverb
Snare Drum Heavy
Snare Drum Heavy
Bass Drum Light
Bass Drum Heavy
Concert Bass Drum
MARCH WALTZ SWING BOUNCE SLOWROCK
TANGO LATIN 1 LATIN 2 8 BEAT 16 BEAT
USER 1 USER 2 USER 3 USER 4 A B
USER 5 USER 6 USER 7 USER 8 C
VOLUME
D
RHYTHMMAX
MIN
SEQ. SEQ.
SEQ. SEQ.
1 2
3 4
1
2
LOWER
KEYBOARDPERCUSSION
PEDAL
Additional percussion soundsare available on the Upperkeyboard when using the
RHYTHM PATTERN PROGRAMfunction (See page 71).
NOTE

40
4. Rhythm
, Accom
paniment and P
ercussion
Percussion Assignments for the Pedalboard
Melody On ChordThe Melody On Chord (M.O.C.) feature automatically adds a harmony part to the melodies you play on theUpper keyboard. The harmony is derived from the chords you play on the Lower keyboard—or from thechords that are played for you, if you use Automatic Accompaniment.Melody On Chord has three different modes, each providing a different set of harmonies to accompany themelody played. The modes are selected from the A.B.C./M.O.C. page.
To select the M.O.C. function:
Press the A.B.C./M.O.C. button in the DISPLAYSELECT section.
VOICEDISPLAY
FOOTSW.
REGIST.SHIFT
PITCHMIDI
EFFECT A.B.C.M.O.C.
TREMOLO(FAST)
DISPLAY SELECT
Synth. Tom 1
Synth. Tom 2
Synth. Tom 3
Tom 1
Tom 2
Tom 3
Snare Brush Shot
Snare Brush Roll
Orchestra Cymbal 1
Crash Cymbal
Ride Cymbal
Hi-hat Open
Hi-hat Closed
Snare Drum Rim
Snare Drum Light
Snare Drum Reverb
Snare Drum Heavy
Bass Drum Heavy

41
4. Rhythm
, Accom
paniment and P
ercussion
1Type
OFFCancels the Melody On Chord function.
MOC Type 1Produces harmonies of up to two notes in a range close to the melodyplayed.
MOC Type 2Produces harmonies of up to three notes in a range close to the melodyplayed.
MOC Type 3Produces harmonies of up to four notes in a range relatively distant fromthe melody played.
2KneeOn/off switch for knee lever control over Melody On Chord operation.When this is on, pressing the knee lever to the right activates the MelodyOn Chord function. (Refer to Knee Lever Control, page 90.)
<MOC> ¡3 OFF ŒKNEE
OFFMOC TYPE1MOC TYPE2MOC TYPE3
21
Even when Melody On Chord ison, if the Upper keyboardvoices are set to 0, the function
will not sound.
NOTE

5. Registration MemoryRegistration Memory allows you to store virtually all the settings you make on the panel and LCD,providing a convenient way to instantly change all voice settings and rhythms while you're playing,with the simple touch of a single button on the Registration Memory panel. The buttons areconveniently located between the upper and lower keyboards for easy access while playing.
The following functions and settings cannot be memorized:• Registration Shift settings• Pitch/Transpose settings• Voice Disk voices• User rhythms in the Rhythm Pattern Program (except for User rhythms
currently assigned to the Dotted buttons)• Rhythm Sequences• MIDI settings
Storing RegistrationsNewly created registrations you make can be stored to the Registration Memory panel buttons. All registrationsin Registration Memory can also be saved to floppy disk for future recall.
To store registrations to the Registration Memory:
1. After creating your original registration, decidewhich numbered button you wish to store.
2. While holding down the M (Memory) button in theRegistration Memory section, press the numberedbutton to which you wish to store your registration.
When the registration is stored, the numbered button flashes momentarily.
To select registrations from Registration Memory:Simply press the numbered button that corresponds to the registration youwish to select.
USING THE D (DISABLE) BUTTON: Rhythm and automatic accompaniment patterns also change when you select different RegistrationMemory buttons. Pressing the D (Disable) button allows you to keep the same rhythm andaccompaniment patterns throughout all your registration changes, or make your own rhythm patternselections if you want to.
1 2 3 4 5 6 7 8 D.
1) While holding down M button... 2) ...press desired numbered button.
M
M 1 2 3 4 5 6 7 8 D.
42
5. Registration M
emory

To store all registrations to disk:
1. Insert a formatted disk into the disk slot underthe Music Disk Recorder (M.D.R.)Make certain that the disk is either blank or has data you can erase. If thedisk is new and unformatted, you will have to format it. Refer to theinstructions how to format a disk (See page 50).
2. Select a song number on the M.D.R. by using theSONG SELECT buttons.
There are 40 songs, or memory locations, available on a single disk.
3. While holding down the RECORD button on theM.D.R., press the M (Memory) button in RegistrationMemory.
This operation saves all 8 registrations in Registration Memory to one song.The other 39 available songs on the disk can be used for saving additionalbatches of 8 registrations.
PAUSE STOP PLAY SONG SELECT RECORD
UPPER LOWER PEDAL CONTROL UPPER LOWER PEDAL CONTROL
CUSTOM PLAY
SHIFT
RECORD PLAY
FORMAT
SONGREPEAT
FROM SONG DEL.SONG COPY
TO
MUSIC DISK RECORDERTEMPO +–
1 2 3 4 5 6 7 8 D.
2) ...press M button.
1) While holding RECORD button...
M
PAUSE STOP PLAY SONG SELECT RECORD
UPPER LOWER PEDAL CONTROL UPPER LOWER PEDAL CONTROL
CUSTOM PLAY
SHIFT
RECORD PLAY
FORMAT
SONGREPEAT
FROM SONG DEL.SONG COPY
TO
MUSIC DISK RECORDERTEMPO +–
43
5. Registration M
emory
See pages 56 and 57 for thedetails on saving/recallingregistrations to/from the M.D.R.
NOTE

Registration ShiftThe Registration Shift function allows you to change registrations, all the settings you make on the panel andLCD, without taking your hands from the keyboards. By using the right footswitch on the expression pedal, youcan step through the panel registrations in sequence, either in numeric order or in any order you specify.Registration Shift has two modes: Shift and User.
To select the Registration Shift functions:
Press the REGIST. SHIFT button in the DISPLAYSELECT section.
Registration Shift Mode Page
1OFFTurns off the Registration Shift assignment.
2SHIFTSelection of the Shift mode. In the Shift mode, each press of the rightfootswitch selects the Registration Memory buttons in their numericalorder. After the last preset is reached, the function “wraps around” to selectthe first button again. The numbered buttons light up as they are selected.
3USERSelection of the User mode. In the User mode, each press of the rightfootswitch selects registrations according to the order you specify.
There are two pages: Mode and Edit. (The Edit page can only be called upwhen the User mode has been selected.)Once you’ve selected the User mode, call up the Edit page by using the Pagebuttons.
<REGIST SHIFT>„OFF ŒSHIFT ŒUSER
PAGE
1 2 3
Use these Data Control buttons to select the various settings: OFF, SHIFT or USER.
VOICEDISPLAY
FOOTSW.
REGIST.SHIFT
PITCHMIDI
EFFECT A.B.C.M.O.C.
TREMOLO(FAST)
DISPLAY SELECT
44
5. Registration M
emory
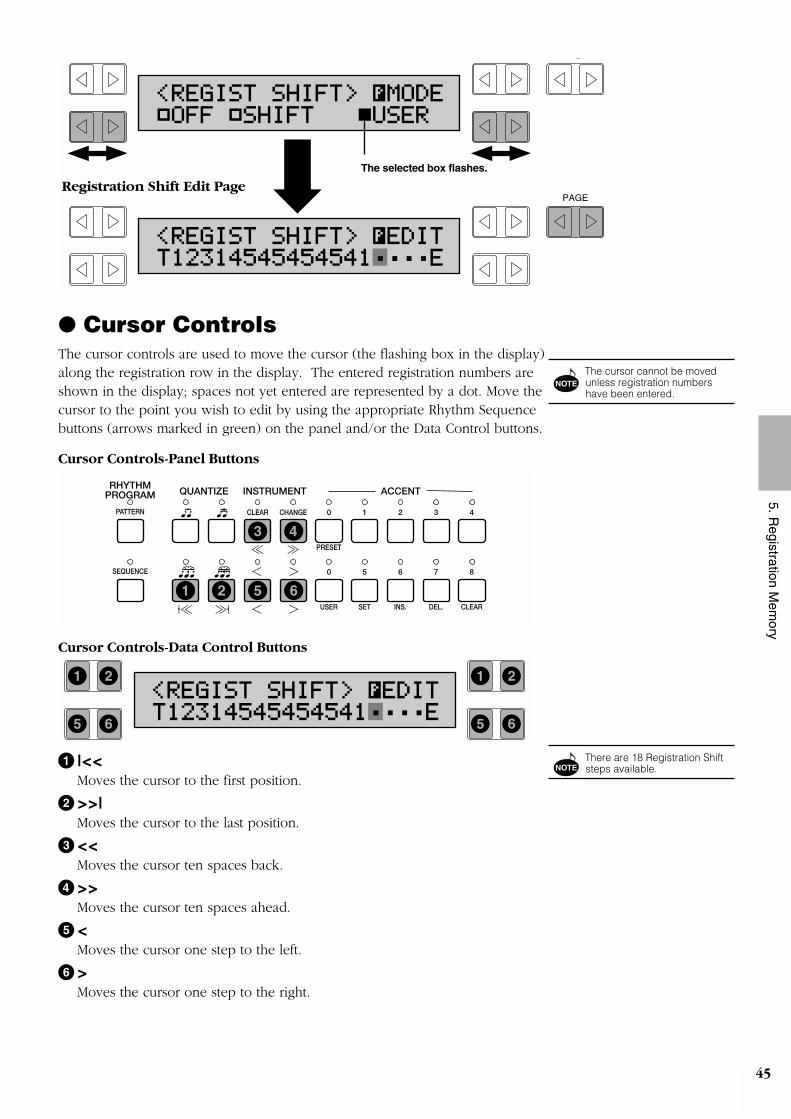
● Cursor ControlsThe cursor controls are used to move the cursor (the flashing box in the display)along the registration row in the display. The entered registration numbers areshown in the display; spaces not yet entered are represented by a dot. Move thecursor to the point you wish to edit by using the appropriate Rhythm Sequencebuttons (arrows marked in green) on the panel and/or the Data Control buttons.
Cursor Controls-Panel Buttons
Cursor Controls-Data Control Buttons
1 |<<Moves the cursor to the first position.
2>>|Moves the cursor to the last position.
3<<Moves the cursor ten spaces back.
4>>Moves the cursor ten spaces ahead.
5<Moves the cursor one step to the left.
6>Moves the cursor one step to the right.
<REGIST SHIFT> ¡EDITT12314545454541 E
1 2
5 6
1 2
5 6
PATTERN
SEQUENCE
CLEAR CHANGE
PRESET
USER SET INS. DEL. CLEAR
3 3
ACCENTINSTRUMENTQUANTIZERHYTHM
PROGRAM
0
0 5 6 7 8
1 2 3 4
1 2 5 6
3 4
<REGIST SHIFT> ¡MODEŒOFF ŒSHIFT „USER
G
<REGIST SHIFT> ¡EDITT12314545454541 E
PAGE
The selected box flashes.
Registration Shift Edit Page
45
5. Registration M
emory
The cursor cannot be movedunless registration numbershave been entered.
NOTE
There are 18 Registration Shiftsteps available.NOTE

● Data ControlsThe buttons in the Rhythm Sequence section described below are used to enterand delete registration numbers in the registration row. Move the cursor to thedesired position and edit the registration data.
1SETFor initially entering a registration number to a blank space in theregistration row, or for replacing a number at the current cursor position.To enter a number, press the desired Registration Memory button (theselected button will light), then press the SET button. After using SET toenter registrations, the cursor can be moved among the numbers.
2 INS. (Insert)For inserting a registration number just before the current cursor position.The new registration number is inserted at the cursor position and allother numbers to the right of the cursor are moved to accommodate thenew number. To perform the operation, first move the cursor to anumbered position. Then press the desired Registration Memory button(the selected button will light), and press the INS. button.
3DEL. (Delete)For deleting a registration number at the current cursor position. To deletethe unnecessary number, move the cursor to a numbered position andpress the Data Control button corresponding to DEL.
4CLEARFor erasing all current user Registration Shift settings. After selectingCLEAR, the following display appears:
<REGIST SHIFT> Clear [ OK ] [Cancel]
Select OK with any of these buttons to clear all data.
Select Cancel with any of these buttons to abort the operation.
PATTERN
SEQUENCE
CLEAR CHANGE
PRESET
USER SET INS. DEL. CLEAR
3 3
ACCENTINSTRUMENTQUANTIZERHYTHM
PROGRAM
0
0 5 6 7 8
1 2 3 4
1 2 3 4
46
5. Registration M
emory

Registration numbers cannot be entered beyond the Registration Shiftfunction’s capacity of 18. The following message momentarily appears whenthe 18 spaces have been filled:
First delete unnecessary registrations, then perform the operation again.
Resetting the Registration Memory Buttons (Power On Reset)All current settings including Registration Memories and User rhythms can be deleted at once by using thePower On Reset function. To do this:
1. Turn oft the power.
2. While holding down the top left Data Controlbutton, turn the power back on.
Turning the Electone off erases all panel settings you have made. When the Electone is turned on, BasicRegistration 1 is automatically selected. If you have made panel settings you wish to keep, save them toRegistration Memory before turning the Electone off. You can, however, restore the panel settings that weremade before the Electone was last turned off. In doing this, first be careful NOT to press any panel buttons(excepting those in Basic Registration) after you turn the Electone back on. Then, to restore the previoussettings, hold down the M (Memory) button and press the D (Disable) button.
POWER
<REGIST SHIFT> ¡EDIT Data Full...!!
47
5. Registration M
emory
Be careful when using thisoperation, since it erases allyour existing data. Always save
your important data to a floppy diskusing M.D.R. (See page 56) in advance.

6. Music D
isk Recorder
48
6. Music Disk RecorderThe Music Disk Recorder (M.D.R.) is a sophisticated recording device built into the Electone that letsyou record your performances and registration settings. The Music Disk Recorder not only records thenotes you play; it also remembers the voices and rhythms you select, the front panel controls you change,as well as all expression pedal, footswitch and knee lever positions, to reproduce your performanceexactly as you play it. Moreover, you can separately record different parts of your performance, buildingup a song part by part.
PrecautionsBe sure to handle floppy disks and treat the disk drive with care. Follow the important precautions below.
To eject a floppy disk:
Before ejecting the disk, be sure to confirmthat the M.D.R. is stopped (check if the LEDabove the STOP button in the M.D.R.section is lit and the LED below the disk slotis off). Press the eject button slowly as far as it willgo; the disk will automatically pop out.When the disk is fully ejected, carefullyremove it by hand.
Never attempt to remove the disk or turnthe power off during recording, reading andplaying back. Doing so can damage the diskand possibly the disk drive.
If the eject button is pressed too quickly, orif it is not pressed in as far as it will go, thedisk may not eject properly. The ejectbutton may become stuck in a half-pressedposition with the disk extending from thedrive slot by only a few millimeters. If thishappens, do not attempt to pull out thepartially ejected disk, since using force inthis situation can damage the disk drivemechanism or the floppy disk. To remove apartially ejected disk, try pressing the ejectbutton once again, or push the disk backinto the slot and then repeat the ejectprocedure.
Be sure to remove the floppy disk from thedisk drive before turning off the power. Afloppy disk left in the drive for extendedperiods can easily pick up dust and dirt thatcan cause data read and write errors.
Compatible Disk Type3.5" 2DD and 2HD type floppy disks can beused. A blank 2DD floppy disk has beenincluded with your Electone for you to recordyour performances.
Inserting/Ejecting FloppyDisks
To insert a floppy disk into the disk drive:
Hold the disk so that the label of the disk is facingupward and the sliding shutter is facing forward,towards the disk insertion slot. Carefully insert thedisk – shutter first – into the slot, slowly pushing itall the way in until it clicks into place and the ejectbutton pops out.
Floppy disk slot
LED (Lamp in-use) Eject button

49
6. Music D
isk Recorder
Cleaning the Disk DriveRead/Write Head● Clean the read/write head regularly. Thisinstrument employs a precision magnetic read/writehead which, after an extended period of use, willpick up a layer of magnetic particles from the disksused that will eventually cause read and write errors.
● To maintain the disk drive in optimum workingorder Yamaha recommends that you use acommercially-available dry-type head cleaning diskto clean the head about once a month. Ask yourYamaha dealer about the availability of proper head-cleaning disks.
Never insert anything but floppy disks intothe disk drive. Other objects may causedamage to the disk drive or floppy disks.
About the Floppy DisksTo handle floppy disks with care:
Do not place heavy objects on a disk orbend or apply pressure to the disk in anyway. Always keep floppy disks in theirprotective cases when they are not in use.
Do not expose the disk to direct sunlight,extremely high or low temperatures, orexcessive humidity, dust or liquids.
Do not open the sliding shutter and touchthe exposed surface of the floppy diskinside.
Do not expose the disk to magnetic fields,such as those produced by televisions,speakers, motors, etc., since magnetic fieldscan partially or completely erase data on thedisk, rendering it unreadable.
Never use a floppy disk with a deformedshutter or housing.
Do not attach anything other than theprovided labels to a floppy disk. Also makesure that labels are attached in the properlocation.
To protect your data (Write-protect Tab):To prevent accidental erasure of important data, slidethe disk’s write-protect tab to the “protect” position(tab open). If you attempt to modify the disk whenthe write-protect tab is set to “on” position, “Prot(Protected)” will appear on the LED display in theM.D.R. section indicating that the operation is notpossible.
Protect Off(tab closed: unlocked)
Protect On(tab open: locked)
Rear side
Shutter
Write-protect tab

50
6. Music D
isk Recorder
Formatting a DiskBefore recording a performance to your blank disk, the disk must first be formatted.
To format a disk:
1. Put the disk, label facing up, into thedisk drive (insertion slot).“Fort” will appear on the LED display indicating that the inserteddisk requires to be formatted.
2. While holding down the SHIFT button,press the FORMAT button.This step puts the format operation on stand-by, indicated by thedashes on the LED display and the flashing LED above theFORMAT button.
3. Press the FORMAT button again to beginformatting.The LED above the FORMAT button stays lit. The number "160"appears on the LED display and counts down to "001" as thedisk is being formatted. When formatting is completed,operation returns to the original STOP status.
About SHIFT button:You will find the SHIFT button (printed in green) at the top right side of the M.D.R. section. Some buttons inthe M.D.R. section have dual functions: the first function is printed in white above each button; the secondfunction is printed in green below each button. The SHIFT button is used to select the second functions bypressing each function button while holding down the SHIFT.
PAUSE STOP PLAY SONG SELECT RECORD
UPPER LOWER PEDAL CONTROL UPPER LOWER PEDAL CONTROL
CUSTOM PLAY
SHIFT
RECORD PLAY
FORMAT
SONGREPEAT
FROM SONG DEL.SONG COPY
TO
MUSIC DISK RECORDERTEMPO +–
PAUSE STOP PLAY SONG SELECT RECORD
UPPER LOWER PEDAL CONTROL UPPER LOWER PEDAL CONTROL
CUSTOM PLAY
SHIFT
RECORD PLAY
FORMAT
SONGREPEAT
FROM SONG DEL.SONG COPY
TO
MUSIC DISK RECORDERTEMPO +–
- - - -
PAUSE STOP PLAY SONG SELECT RECORD
UPPER LOWER PEDAL CONTROL UPPER LOWER PEDAL CONTROL
CUSTOM PLAY
SHIFT
RECORD PLAY
FORMAT
SONGREPEAT
FROM SONG DEL.SONG COPY
TO
MUSIC DISK RECORDERTEMPO +–
1 6 0
PAUSE STOP PLAY SONG SELECT RECORD
UPPER LOWER PEDAL CONTROL UPPER LOWER PEDAL CONTROL
CUSTOM PLAY
SHIFT
RECORD PLAY
FORMAT
SONGREPEAT
FROM SONG DEL.SONG COPY
TO
MUSIC DISK RECORDERTEMPO +–
0 1
If you format a disk that contains previouslyrecorded data, all data on the disk will beerased. To avoid inadvertently formatting a
disk after this step, press the STOP button.

Recording
(1) To record a song:
1. Set the desired registrations on theElectone.Make all the Electone settings necessary for the song you willrecord. This means entering the all registrations you will needfor the entire performance in the Registration Memory. Makesure also to select the registration that you will use at thebeginning of the song.
2. Put a formatted disk into the disk slot.
3. Use the SONG SELECT (G, H) buttonsto select the song number for recording.
4. Press the RECORD button.The RECORD lamp lights up and the PLAY and CUSTOM PLAYlamps begins blinking, indicating that the Music Disk Recorder isready to record.
5. Press the PLAY button.The PLAY lamp lights up and small bars flash across the LEDdisplay from left to right, indicating that the M.D.R. is reading theregistrations and other settings.
PAUSE STOP PLAY SONG SELECT RECORD
UPPER LOWER PEDAL CONTROL UPPER LOWER PEDAL CONTROL
CUSTOM PLAY
SHIFT
RECORD PLAY
FORMAT
SONGREPEAT
FROM SONG DEL.SONG COPY
TO
MUSIC DISK RECORDERTEMPO +–
0 1
PAUSE STOP PLAY SONG SELECT RECORD
UPPER LOWER PEDAL CONTROL UPPER LOWER PEDAL CONTROL
CUSTOM PLAY
SHIFT
RECORD PLAY
FORMAT
SONGREPEAT
FROM SONG DEL.SONG COPY
TO
MUSIC DISK RECORDERTEMPO +–
- -
If the selected song number already containsrecorded data, small bars ("--") appear at the leftpart of LED display and flash along with the song
number, warning you that the selected song numberalready contains recorded data. If you want to executerecording operation over the song number, press theRECORD button again. If you don't want, select anothersong number for recording or press the STOP button tocancel recording.
NOTE
PAUSE STOP PLAY SONG SELECT RECORD
UPPER LOWER PEDAL CONTROL UPPER LOWER PEDAL CONTROL
CUSTOM PLAY
SHIFT
RECORD PLAY
FORMAT
SONGREPEAT
FROM SONG DEL.SONG COPY
TO
MUSIC DISK RECORDERTEMPO +–
0 1
When a disk is first inserted, song number 01 isautomatically selected. The song numbers 01through 40 are available and up to 40 songs can
be stored on a disk. However, available song numbersmay be reduced depending on the amount of the songdata you have recorded.
NOTE
51
6. Music D
isk Recorder

52
6. Music D
isk Recorder
6. After numbers appear on the LEDdisplay of the M.D.R., begin playing.Once the setup operation in step #5 is complete, a number willappear on the LED display indicating that you can beginrecording your performance. The number also indicates theamount of memory left on the disk.
If you make a mistake during recording:
1) Press the PLAY button while the M.D.R. is stillrunning.This stops the recording and returns you to the starting point ofthe song. The letters "rE" (retry) appear on the left side of the LEDdisplay and the PLAY and CUSTOM PLAY LEDs start flashing,indicating that you can re-record the song.
2) Press PLAY again to begin re-recording the song.Re-recording starts from the beginning of the song and replacesthe previously recorded performance with the newly recordedperformance.
7. When you finish playing, press the STOPbutton.When the STOP button is pressed, both the RECORD and PLAYlamps go out, and recording is stopped.
8. To hear your newly recordedperformance, press the PLAY button.Playback will begin after a couple of seconds. For moreinformation on playback and other playback-related functions,see page 58.
PAUSE STOP PLAY SONG SELECT RECORD
UPPER LOWER PEDAL CONTROL UPPER LOWER PEDAL CONTROL
CUSTOM PLAY
SHIFT
RECORD PLAY
FORMAT
SONGREPEAT
FROM SONG DEL.SONG COPY
TO
MUSIC DISK RECORDERTEMPO +–
6 2 2
PAUSE STOP PLAY SONG SELECT RECORD
UPPER LOWER PEDAL CONTROL UPPER LOWER PEDAL CONTROL
CUSTOM PLAY
SHIFT
RECORD PLAY
FORMAT
SONGREPEAT
FROM SONG DEL.SONG COPY
TO
MUSIC DISK RECORDERTEMPO +–
The short time it takes to set up for recording isrecorded as well, causing a short pause beforeplayback of the song.
NOTE
PAUSE STOP PLAY SONG SELECT RECORD
UPPER LOWER PEDAL CONTROL UPPER LOWER PEDAL CONTROL
CUSTOM PLAY
SHIFT
RECORD PLAY
FORMAT
SONGREPEAT
FROM SONG DEL.SONG COPY
TO
MUSIC DISK RECORDERTEMPO +–
0 1
Be sure to remove the floppy disk from the diskdrive after the STOP lamp lights up and the LEDbelow the disk slot goes out.
When the available memory reaches "008" or less, thenumbers begin flashing to warn you. If this happens,stop recording before the display reaches "000."
NOTE
Never attempt to press the eject button or turn thepower off during recording, reading and playingback. Doing so can damage the disk and possibly
the disk drive. Be sure to remove the floppy disk from thedisk drive before turning off the power.

Outline of M.D.R. OperationThough the M.D.R. is as easy to operate as a cassette tape recorder, it is far move versatile. Since it recordsall Electone settings and control movements as well as the notes you play as digital data, it allows you muchmore flexibility and control than even the most sophisticated tape recorder. Basically, the M.D.R.independently records the following three types of data:
1) Registration data (including Bulk data)All registrations stored to the Registration Memory numbered buttons as well as the registration currently setto the panel, are recorded at the beginning of a song, before the actual recording of your performance. Bulkdata is also saved to the song with the Registration data. Bulk data includes: Registration Shift settings,Rhythm Pattern (User rhythms), Rhythm Sequence data and User voices.
2) Performance dataThe M.D.R. records your performance on the keyboards and pedalboard of the Electone exactly as you playit, even recording the strength at which you play the keys and how hard you press them down whileplaying. The various types of performance data-Upper, Lower, Pedal and Lead-are recorded to independent"tracks," so that you can change any one of them without affecting the others.
3) Control dataAll changes you make on the Electone during your performance are recorded in real time. These includeregistration changes, the use of the expression pedals, footswitches and knee lever.
(2) To record each part separately:You can also record the parts of your performanceindependently; for example, first recording the chords and bassto the song (using the Lower and Pedalboard), and after thatrecording the melody. This function also lets you recordkeyboard percussion and performance control data, such asregistration changes and expression pedal operation, separatelyfrom the other parts of the song.
1. Set up the M.D.R. for recording, as youdid in the section above.The first steps in recording parts separately are the same as fornormal recording on page 51:
1) Memorize all the registrations needed for yourperformance to the Registration Memory numberedbuttons, and set the registration that will be used at thebeginning of the song.
2) Insert a formatted disk.
3) Select the song number to which you will record yourperformance.
4) Press the RECORD button to make the Music DiskRecorder ready to record.
53
6. Music D
isk Recorder

54
6. Music D
isk Recorder
2. Select the parts for recording.Pressing the RECORD in the procedure 1) – 4) above turns onthe all parts' LEDs in the upper left row indicating that each partis ready to record. Press the RECORD buttons for each part in the upper left row toturn off the parts you don't want to record. For this example,press RECORD/UPPER. The PLAY/UPPER lamp in the upperright row lights up.
RECORD/UPPER – Records the performance data of the Upperkeyboard when turned on.
RECORD/LOWER – Records the performance data of the Lowerkeyboard when turned on.
RECORD/PEDAL – Records the performance data of thePedalboard when turned on.
RECORD/CONTROL – Records the Control data (see Outlineof M.D.R. Operation above) when turned on.
The LED lamps above the buttons indicate the record status ofthe parts.This example operation disables recording of the Upper part.
Separate recording for Lead and/or KeyboardPercussion part:Hold down the SHIFT button and simultaneously press theappropriate button in the top row in the procedure #2. above.The two buttons (indicated in the illustration at right) functionsas Keyboard Percussion selectors in the record mode.
RECORD/LEAD – Records the performance data of the Lead voicewhen turned on.
RECORD/K.PERC. – Records the performance data of KeyboardPercussion when turned on. (Keyboard Percussion can berecorded and played independent of the Rhythm patterns.)Holding down the SHIFT button in the record condition lets youselect these "hidden" functions. The lamps above each button willalso change to indicate the status of SHIFT-selected parts.
3. Press the PLAY button, and start playingafter numbers appear in the display.For this example, play the Lower keyboard and Pedalboard.
4. Press the STOP button when you arefinished with your performance to stoprecording. Now that you’ve recorded the firstparts of your performance.
PAUSE STOP PLAY SONG SELECT RECORD
UPPER LOWER PEDAL CONTROL UPPER LOWER PEDAL CONTROL
CUSTOM PLAY
SHIFT
RECORD PLAY
FORMAT
SONGREPEAT
FROM SONG DEL.SONG COPY
TO
MUSIC DISK RECORDERTEMPO +–
0 1
PAUSE
SHIFT
RECORD PLAY
(K.PERC.)(LEAD)(K.PERC.)(LEAD)
REM.MEM.
0 1
If you don't record the Lead and KeyboardPercussion parts separately, the Lead part willbe recorded as the Upper data and the
Keyboard Percussion part will be recorded as theLower/Pedal data.
NOTE

5. Press the RECORD button to set uprecording of the next part.In this case, the song (number) contains the performance data ofthe Lower and Pedal in addition to the registration and setupdata. The small bars ("��") appear at the left part of LED displayand flash along with the song number, warning you that theselected song number already contains recorded data.
6. Press the RECORD button again torecord another part. (Upper part.)The RECORD lamp lights up and the PLAY and CUSTOM PLAYlamps begin blinking, indicating that the Music Disk Recorder isready to record.
7. Press the RECORD buttons for each partin the upper left row to turn off the parts youhave already recorded. In this case, press RECORD/LOWER, RECORD/PEDAL andRECORD/CONTROL to turn off.
8. Press the CUSTOM PLAY button to startrecording of the new part or parts. (Upperpart.)Playback of the previously recorded parts starts immediately.The CUSTOM PLAY button is used here to record only the partsthat have been selected for recording, and play back only thoseparts that have been selected for playback. Since registrationdata has already been recorded with the first parts of the song,recording begins immediately.While you listen to the parts being played back, start playing themelody on the Upper keyboard.When the end of the recorded performance is reached, playbackis automatically stopped and the STOP status is resumed.
PAUSE STOP PLAY SONG SELECT RECORD
UPPER LOWER PEDAL CONTROL UPPER LOWER PEDAL CONTROL
CUSTOM PLAY
SHIFT
RECORD PLAY
FORMAT
SONGREPEAT
FROM SONG DEL.SONG COPY
TO
MUSIC DISK RECORDERTEMPO +–
- - 0 1
PAUSE STOP PLAY SONG SELECT RECORD
UPPER LOWER PEDAL CONTROL UPPER LOWER PEDAL CONTROL
CUSTOM PLAY
SHIFT
RECORD PLAY
FORMAT
SONGREPEAT
FROM SONG DEL.SONG COPY
TO
MUSIC DISK RECORDERTEMPO +–
0 1
PAUSE STOP PLAY SONG SELECT RECORD
UPPER LOWER PEDAL CONTROL UPPER LOWER PEDAL CONTROL
CUSTOM PLAY
SHIFT
RECORD PLAY
FORMAT
SONGREPEAT
FROM SONG DEL.SONG COPY
TO
MUSIC DISK RECORDERTEMPO +–
0 1
PAUSE STOP PLAY SONG SELECT RECORD
UPPER LOWER PEDAL CONTROL UPPER LOWER PEDAL CONTROL
CUSTOM PLAY
SHIFT
RECORD PLAY
FORMAT
SONGREPEAT
FROM SONG DEL.SONG COPY
TO
MUSIC DISK RECORDERTEMPO +–
6 1 0
The CUSTOM PLAY button is used to play backthe specified track(s).NOTE
The length of a subsequently recorded partcannot exceed the length of the previouslyrecorded parts. If you want to change the song
length, first delete the existing song (see Song Delete onpage 64.) and record again.
NOTE
55
6. Music D
isk Recorder
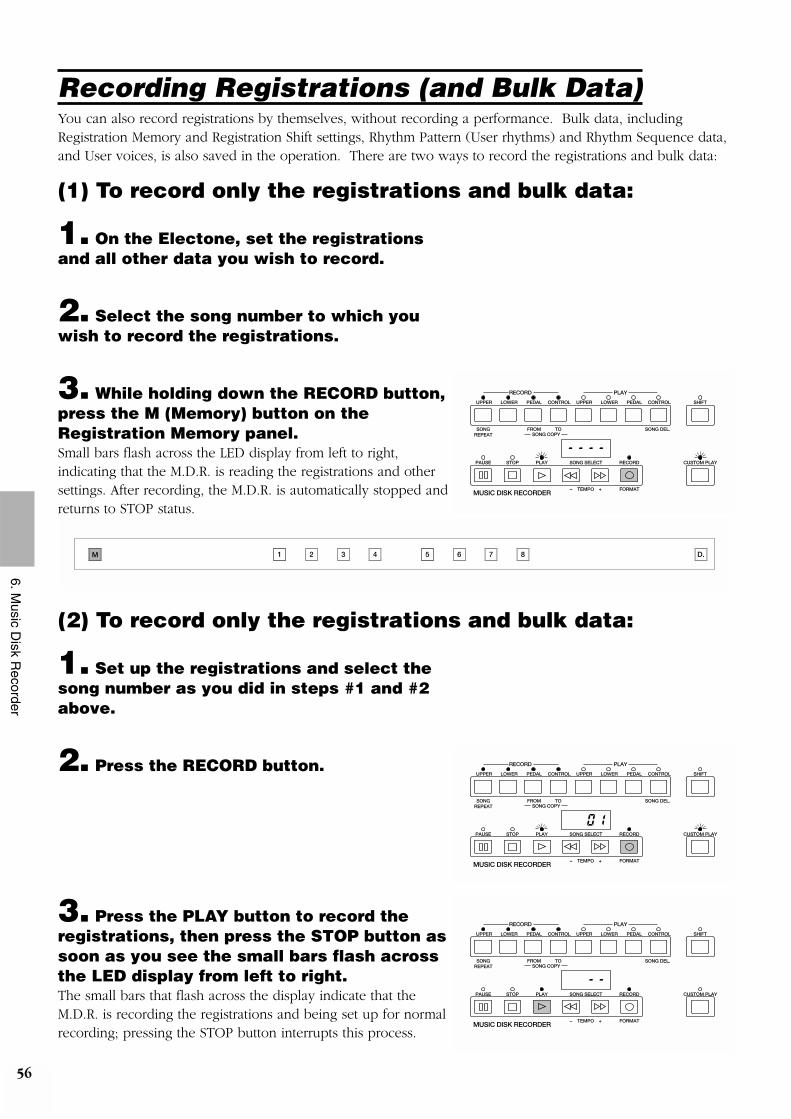
56
6. Music D
isk Recorder
Recording Registrations (and Bulk Data)You can also record registrations by themselves, without recording a performance. Bulk data, includingRegistration Memory and Registration Shift settings, Rhythm Pattern (User rhythms) and Rhythm Sequence data,and User voices, is also saved in the operation. There are two ways to record the registrations and bulk data:
(1) To record only the registrations and bulk data:
1. On the Electone, set the registrationsand all other data you wish to record.
2. Select the song number to which youwish to record the registrations.
3. While holding down the RECORD button,press the M (Memory) button on theRegistration Memory panel.Small bars flash across the LED display from left to right,indicating that the M.D.R. is reading the registrations and othersettings. After recording, the M.D.R. is automatically stopped andreturns to STOP status.
(2) To record only the registrations and bulk data:
1. Set up the registrations and select thesong number as you did in steps #1 and #2above.
2. Press the RECORD button.
3. Press the PLAY button to record theregistrations, then press the STOP button assoon as you see the small bars flash acrossthe LED display from left to right.The small bars that flash across the display indicate that theM.D.R. is recording the registrations and being set up for normalrecording; pressing the STOP button interrupts this process.
M 1 2 3 4 5 6 7 8 D.
PAUSE STOP PLAY SONG SELECT RECORD
UPPER LOWER PEDAL CONTROL UPPER LOWER PEDAL CONTROL
CUSTOM PLAY
SHIFT
RECORD PLAY
FORMAT
SONGREPEAT
FROM SONG DEL.SONG COPY
TO
MUSIC DISK RECORDERTEMPO +–
0 1
PAUSE STOP PLAY SONG SELECT RECORD
UPPER LOWER PEDAL CONTROL UPPER LOWER PEDAL CONTROL
CUSTOM PLAY
SHIFT
RECORD PLAY
FORMAT
SONGREPEAT
FROM SONG DEL.SONG COPY
TO
MUSIC DISK RECORDERTEMPO +–
- -
PAUSE STOP PLAY SONG SELECT RECORD
UPPER LOWER PEDAL CONTROL UPPER LOWER PEDAL CONTROL
CUSTOM PLAY
SHIFT
RECORD PLAY
FORMAT
SONGREPEAT
FROM SONG DEL.SONG COPY
TO
MUSIC DISK RECORDERTEMPO +–
- - - -

Recalling Recorded Registrations(and Bulk Data)The registrations (and bulk data) recorded to song numbers in the above operation can be loaded back to theElectone by simply selecting the appropriate song number and pressing the PLAY button. When the operationhas been completed, the M.D.R. returns to STOP status.
The M.D.R. also makes it possible to use more than the 8 Registration Memory registrations in a performance –without having to alter the current panel settings. This would come in handy when performing several songs insuccession that use more than 8 registrations.
To do this:
1. First record the registrations you needinto several song numbers on the M.D.R.before the performance. (You should alsotry to record them in the order that you'll usethem, if possible.)
2. During the performance, after all 8registrations from a certain song numberhave been used, select the next songnumber and press the PLAY button on theM.D.R. This replaces all 8 registrations inRegistration Memory with the new ones fromthe selected song number.
3. By repeating the above steps, you canrun through an entire performance withouthaving to change the panel settings.
Replacing RegistrationsThe M.D.R. also lets you change the registrations of an existing song without changing the performance data.The procedure is the same as that of Recording Registrations mentioned in the previous page.
57
6. Music D
isk Recorder

58
6. Music D
isk Recorder
PlaybackYou can play back your recorded performance by simply pressing the PLAY button. Registrations and other datawill be recalled to the Electone.
(1) To play back a song:
1. Select the number of the song you wishto play back by using the SONG SELECTbuttons.
2. Press the PLAY button.The PLAY lamp lights up and small bars move across the display,indicating that the M.D.R. is resetting registrations on theElectone.
3. Playback of the song begins after theElectone data is reset and the song time isshown on the M.D.R.'s display.Playback automatically stops at the end of a song. You can,however, stop playback in the middle of a song by pressing theSTOP button.
If you have recorded the Lead part separately:Turn on the Lead part for playback by holding down the SHIFTbutton and simultaneously pressing the appropriate button inthe PLAY section (as shown in the illustration on the right).
PAUSE STOP PLAY SONG SELECT RECORD
UPPER LOWER PEDAL CONTROL UPPER LOWER PEDAL CONTROL
CUSTOM PLAY
SHIFT
RECORD PLAY
FORMAT
SONGREPEAT
FROM SONG DEL.SONG COPY
TO
MUSIC DISK RECORDERTEMPO +–
0 1
PAUSE STOP PLAY SONG SELECT RECORD
UPPER LOWER PEDAL CONTROL UPPER LOWER PEDAL CONTROL
CUSTOM PLAY
SHIFT
RECORD PLAY
FORMAT
SONGREPEAT
FROM SONG DEL.SONG COPY
TO
MUSIC DISK RECORDERTEMPO +–
- - -
PAUSE STOP PLAY SONG SELECT RECORD
UPPER LOWER PEDAL CONTROL UPPER LOWER PEDAL CONTROL
CUSTOM PLAY
SHIFT
RECORD PLAY
FORMAT
SONGREPEAT
FROM SONG DEL.SONG COPY
TO
MUSIC DISK RECORDERTEMPO +–
0 0:0 5
Never turn off the power switch when a floppy diskis still engaged in the M.D.R. disk drive slot. Alsodo not press the Eject button during recording or
playback.
PAUSE
SHIFT
RECORD PLAY
(K.PERC.)(LEAD)(K.PERC.)(LEAD)
REM.MEM.
0 1

(2) To play back the selected part(s):You can also play back the selected parts of your recordedperformance, while other parts are temporarily turned off. Thisfunction is especially useful for playing a single part, such as themelody, over previously recorded accompaniment parts.
To select specific parts for playback:
1. Select the number of the song to beplayed back.
2. Set the parts you wish to mute to OFF,by pressing the appropriate PLAY button.The LED of the selected part should be off.Make sure to turn on the parts you wish to play back.
3. Press the PLAY button.First the registration and other data are read, then playback ofthe performance starts (excepting the parts that were turnedoff in step #2).
4. Now perform your new part or partsover the playback parts.When the end of the recorded performance is reached, playbackis automatically stopped and the STOP status is resumed.
PAUSE STOP PLAY SONG SELECT RECORD
UPPER LOWER PEDAL CONTROL UPPER LOWER PEDAL CONTROL
CUSTOM PLAY
SHIFT
RECORD PLAY
FORMAT
SONGREPEAT
FROM SONG DEL.SONG COPY
TO
MUSIC DISK RECORDERTEMPO +–
0 1
PAUSE STOP PLAY SONG SELECT RECORD
UPPER LOWER PEDAL CONTROL UPPER LOWER PEDAL CONTROL
CUSTOM PLAY
SHIFT
RECORD PLAY
FORMAT
SONGREPEAT
FROM SONG DEL.SONG COPY
TO
MUSIC DISK RECORDERTEMPO +–
0 1
PAUSE STOP PLAY SONG SELECT RECORD
UPPER LOWER PEDAL CONTROL UPPER LOWER PEDAL CONTROL
CUSTOM PLAY
SHIFT
RECORD PLAY
FORMAT
SONGREPEAT
FROM SONG DEL.SONG COPY
TO
MUSIC DISK RECORDERTEMPO +–
- - -
59
6. Music D
isk Recorder

(3) To repeat playback of a songor songs:This feature allows you to repeatedly play back either all songson a disk or only one specific song.
1. Select the song number you wish to playback.If you wish to play back all songs on a disk, select the first songthat will be played back. The others will follow in order.
2. Hold down the SHIFT button andsimultaneously press the SONG REPEATbutton.The lamps above SHIFT and SONG REPEAT light up, and "ALL"appears on the LED display.
3. To repeatedly playback all songsstarting with the selected song:Press the PLAY button.
Playback will begin from the song selected and repeatindefinitely. To stop playback, press the STOP button.
3. To repeatedly playback only theselected song:
3.-1 Again hold down the SHIFT button andsimultaneously press the SONG REPEAT button."SinG" appears on the LED display to indicate that a single songwill be repeatedly played back.
3.-2 Press the PLAY button to begin playback of the song.Playback of the song selected will begin and repeat indefinitely.To stop playback, press the STOP button.
60
6. Music D
isk Recorder
PAUSE STOP PLAY SONG SELECT RECORD
UPPER LOWER PEDAL CONTROL UPPER LOWER PEDAL CONTROL
CUSTOM PLAY
SHIFT
RECORD PLAY
FORMAT
SONGREPEAT
FROM SONG DEL.SONG COPY
TO
MUSIC DISK RECORDERTEMPO +–
0 1
PAUSE STOP PLAY SONG SELECT RECORD
UPPER LOWER PEDAL CONTROL UPPER LOWER PEDAL CONTROL
CUSTOM PLAY
SHIFT
RECORD PLAY
FORMAT
SONGREPEAT
FROM SONG DEL.SONG COPY
TO
MUSIC DISK RECORDERTEMPO +–
PAUSE STOP PLAY SONG SELECT RECORD
UPPER LOWER PEDAL CONTROL UPPER LOWER PEDAL CONTROL
CUSTOM PLAY
SHIFT
RECORD PLAY
FORMAT
SONGREPEAT
FROM SONG DEL.SONG COPY
TO
MUSIC DISK RECORDERTEMPO +–
0 0 0 1
PAUSE STOP PLAY SONG SELECT RECORD
UPPER LOWER PEDAL CONTROL UPPER LOWER PEDAL CONTROL
CUSTOM PLAY
SHIFT
RECORD PLAY
FORMAT
SONGREPEAT
FROM SONG DEL.SONG COPY
TO
MUSIC DISK RECORDERTEMPO +–
0 0 0 1
PAUSE STOP PLAY SONG SELECT RECORD
UPPER LOWER PEDAL CONTROL UPPER LOWER PEDAL CONTROL
CUSTOM PLAY
SHIFT
RECORD PLAY
FORMAT
SONGREPEAT
FROM SONG DEL.SONG COPY
TO
MUSIC DISK RECORDERTEMPO +–
Repeated Playback is not possible if a disk containstwo types of songs: one with separately recordedlead voice data and the other without it.
NOTE

Other Functions
(1) Custom PlayIf you want to play back the song without resetting theregistrations and other data, press the CUSTOM PLAY button.This displays the song time and starts playback immediately.
(2) PauseIf you want to temporarily stop playback of the song or songs,press the PAUSE button. To resume playback from the point atwhich the song was paused, press the PAUSE button again.
(3) Fast Forward and Fast ReverseDuring playback, these buttons function as fast forward and fastreverse buttons, much like those of a tape recorder. Press [H]to advance to a later point in the song or press [G] to return toan earlier position. While either of these buttons is held down,playback stops and the song time is advanced or reversedaccordingly. Hold down the button until the desired song timeis shown. When the button is released, playback is paused. Toresume playback from the point you've advanced or reversed to,press the PLAY button.
0 0 0 0
If you hold down the SHIFT and press CUSTOMPLAY, all data, except for that of Rhythm PatternProgram and Rhythm Sequence, will be loaded and
played back.
NOTE
PAUSE STOP PLAY SONG SELECT RECORD
UPPER LOWER PEDAL CONTROL UPPER LOWER PEDAL CONTROL
CUSTOM PLAY
SHIFT
RECORD PLAY
FORMAT
SONGREPEAT
FROM SONG DEL.SONG COPY
TO
MUSIC DISK RECORDERTEMPO +–
1 1 0
PAUSE STOP PLAY SONG SELECT RECORD
UPPER LOWER PEDAL CONTROL UPPER LOWER PEDAL CONTROL
CUSTOM PLAY
SHIFT
RECORD PLAY
FORMAT
SONGREPEAT
FROM SONG DEL.SONG COPY
TO
MUSIC DISK RECORDERTEMPO +–
0 0 0 1
Fast Forward and Fast Reverse operate at five timesthe normal playback speed.NOTE
61
6. Music D
isk Recorder

62
6. Music D
isk Recorder
(4) Changing the TempoYou can change the tempo of the song as the song is playing onthe M.D.R. by holding down the SHIFT button and pressing theTEMPO + or TEMPO - button. (The Tempo dial on the Electonepanel cannot be used to change the tempo on the Music DiskRecorder.)Each press of the button slows down or speeds up the tempo bya small amount. Changing the tempo does not change the pitchof the music.To restore the original recording tempo of a song, hold downthe SHIFT button and simultaneously press both TEMPO buttons.
PAUSE STOP PLAY SONG SELECT RECORD
UPPER LOWER PEDAL CONTROL UPPER LOWER PEDAL CONTROL
CUSTOM PLAY
SHIFT
RECORD PLAY
FORMAT
SONGREPEAT
FROM SONG DEL.SONG COPY
TO
MUSIC DISK RECORDERTEMPO +–
When tempo is changed, the LED display indicatesthe change as a percentage of the original recordingtempo (100). Values less than 100 indicate a slower
tempo; values greater than 100 indicate a faster tempo.
NOTE
Tempo changes remain in effect even throughchanges in song number. If you have changed thetempo in one song, you should perform the above
step to restore the original tempo before playing anothersong. Turning the power switch off and on again alsorestores the original tempo.
NOTE
Indicates faster tempo
Indicates original tempo
Indicates slower tempo
PAUSE STOP PLAY SONG SELECT RECORD
UPPER LOWER PEDAL CONTROL UPPER LOWER PEDAL CONTROL
CUSTOM PLAY
SHIFT
RECORD PLAY
FORMAT
SONGREPEAT
FROM SONG DEL.SONG COPY
TO
MUSIC DISK RECORDERTEMPO +–

(5) Song CopyThis function lets you copy the data recorded at one songnumber to another song number.
To use the Song Copy function:
1. Select the song number to be copiedwith the SONG SELECT buttons.
2. While holding down the SHIFT button,press the SONG COPY FROM button.The song number to be copied from appears at the left of theLED display.
3. While holding down the SHIFT button,press the SONG COPY TO button.The M.D.R. automatically searches for an empty song number tocopy the data to, and displays that number at the right side ofthe display. The RECORD lamp will start flashing indicating thatthe M.D.R. is ready to copy. If all songs numbers containrecorded data, "FULL" appears on the LED display. In this case,you should erase one of the songs on the disk by using the SongDelete function (see below).
4. Use the SONG SELECT buttons to selecta destination song number for copying.Follow this step if you wish to select a different destination songnumber than the one displayed. The M.D.R. will display onlythose song numbers that have no data.
5. Press the RECORD button to executethe Song Copy function.The RECORD lamp stops flashing and remains lit, indicating thatthe Song Copy function is in process.The LED display shows the "size" of the song in numbers, andcounts down as the data is being copied. When the displayshows "000", the song has been completely copied.
63
6. Music D
isk Recorder
If the specified song number has no recorded data,the M.D.R. automatically searches for and selectsthe next song that contains recorded data.
NOTE
PAUSE STOP PLAY SONG SELECT RECORD
UPPER LOWER PEDAL CONTROL UPPER LOWER PEDAL CONTROL
CUSTOM PLAY
SHIFT
RECORD PLAY
FORMAT
SONGREPEAT
FROM SONG DEL.SONG COPY
TO
MUSIC DISK RECORDERTEMPO +–
0 1 - -
PAUSE STOP PLAY SONG SELECT RECORD
UPPER LOWER PEDAL CONTROL UPPER LOWER PEDAL CONTROL
CUSTOM PLAY
SHIFT
RECORD PLAY
FORMAT
SONGREPEAT
FROM SONG DEL.SONG COPY
TO
MUSIC DISK RECORDERTEMPO +–
0 1 0 2
The message "FULL" may appear when the availablememory is short.
If you want to abort the operation, press STOPbutton.NOTE
NOTE
PAUSE STOP PLAY SONG SELECT RECORD
UPPER LOWER PEDAL CONTROL UPPER LOWER PEDAL CONTROL
CUSTOM PLAY
SHIFT
RECORD PLAY
FORMAT
SONGREPEAT
FROM SONG DEL.SONG COPY
TO
MUSIC DISK RECORDERTEMPO +–
0 1 6

64
6. Music D
isk Recorder
(6) Song DeleteYou can delete a song on disk by performing this function.
To use Song Delete:
1. Use the SONG SELECT buttons to selectthe number of the song you wish to delete.
2. While holding down the SHIFT button,press the SONG DEL. button.The letters "dL" appear on the left side of the LED display, nextto the selected song number. RECORD lamp flashes to indicatethat the M.D.R. is ready to delete the song. If you wish to, youcan still select a different song number in this step by using theSONG SELECT buttons.
3. Press the RECORD button to executethe Song Delete function.The RECORD lamp stops flashing and remains lit, indicating thatthe Song Delete function has begun.When the Song Delete function is completed, the STOP status isautomatically resumed.
(7) Checking the Remaining MemoryWhile playback is stopped, you can check the amount ofmemory available for additional recording. To do this,simultaneously hold down the SHIFT button and the PAUSEbutton (indicated in the illustration at the right as REM. MEM.:Remaining Memory). The maximum amount of memory is 620for 2DD disks and 1240 for 2HD disks.
(8) Registration Menus and Voice DisksThe M.D.R. also allows you to select registrations and voicesfrom disks. For more information about Registration Menus, seepage 9; for more on Voice Disks, see below.
PAUSE STOP PLAY SONG SELECT RECORD
UPPER LOWER PEDAL CONTROL UPPER LOWER PEDAL CONTROL
CUSTOM PLAY
SHIFT
RECORD PLAY
FORMAT
SONGREPEAT
FROM SONG DEL.SONG COPY
TO
MUSIC DISK RECORDERTEMPO +–
d L 0 4
PAUSE
SHIFT
RECORD PLAY
(K.PERC.)(LEAD)(K.PERC.)(LEAD)
REM. MEM.
5 4 0
If you want to abort the operation, press STOPbutton.NOTE

65
6. Music D
isk Recorder
(9) Voice Disk (Optional)The M.D.R. also lets you use voices from optional Voices Disks.You can play these voices and save them to User memory forfuture recall.
To select voices from the disk and save them to Usermemory:
1. Insert the optional Voice Disk into theDisk slot under the Music Disk Recorder.The following display appears, prompting you to select the voicegroup (Upper, Lower, Lead or Pedal).
2. Press one of the panel voice buttons inthe voice section in which you wish to usethe new voice.After you’ve pressed a panel voice button, the Voice Disk's voicename will appear on the LCD.
3. Select the desired voice by using theleft DATA CONTROL buttons.
Pressing the bottom left buttons steps through the voicenumbers; pressing the top left buttons jumps ten numbers backor forward. The name of each voice appears on the display withthe number.Refer to the list included with your Voice Disk for voice namesand numbers. You can audition the voices as you select themby playing them on the appropriate keyboard.
<VOICE DISK> 1 :Strings1 [SAVE]
Selects next number.
Use these to save the voice (see next step).
Selects previous number.
Jumps ahead ten numbers.Jumps back ten numbers.
<VOICE DISK> 1 :Strings1 [SAVE]
Voice number Voice name
<VOICE DISK>Select a Group...!!

66
6. Music D
isk Recorder
4. To save the selected voice, press one ofthe right DATA CONTROL buttonscorresponding to SAVE in the display.The following display showing User voices 1– 4 appears.
5. Select the User number to which youwish to save the voice, and press thecorresponding DATA CONTROL button.
6. The following display appears,prompting you for confirmation of theoperation. Select "OK" to actually assign thevoice to the specific User number, or"CANCEL" to abort the operation.
When the voice has been assigned, a "Completed...!!" messageappears.
(10) Copy ProtectSome of the Disks available for the Electone are purposelyprotected from being copied or erased. You cannot save thedata to another floppy disk. If you try to load data from such a"copy-protected" disk to the Electone, a "Protected Disk" (Pr##)message will appear on the LED display. The data cannot besaved to the disk.
Save To USER 1 [ OK ] [Cancel]
These select "Cancel"These select "OK"
To USER 1 USER 2 USER 3 USER 4
If you eject the Voice Disk from the M.D.R., the voiceyou assigned will be lost from the User number.NOTE

67
6. Music D
isk Recorder
Messages on the M.D.R. LED Display
No disk is installed. Install a disk.
1)The installed disk is write-protected, so the Record, Song Copy, andSong Delete jobs cannot be performed. Set the disk's Write-protect tab toOFF. (See page 49.)
2)If you are using a copy-protected playback-only disk, this message mayappear when you attempt the Record, Song Copy, or Song Deleteoperations.
The installed disk is not formatted. Format the disk. (See page 50.)
1)The disk's memory capacity is full, so the Record or Song Copyoperation cannot be performed. Use another formatted disk.
2)Data is already recorded at all song numbers, so the Song Copyoperation cannot be performed. Press the STOP button, then delete anyunnecessary songs.
None of the song numbers contain recorded data, so the Song Copyoperation cannot be performed. Press the STOP button.
An error occurred because the disk was removed during recording orplayback. Press the STOP button, and replace the disk, then start theoperation over again.
The installed disk cannot be played back on the M.D.R. Press the STOPbutton, then insert a compatible disk.Recording cannot be performed because too much data was received atonce. Press the STOP button.The disk is defective and cannot be formatted. Press the STOP button,then insert another disk.An error occurred during the transmission or reception of data. Press theSTOP button.
You are trying to record to the song number which already containsrecorded data. Select the other blank song number by pressing theSONG SELECT buttons. * "XX" indicates a song number (01 through 40).
When you insert the "copy-protected" disk to the Electone, this messagewill appear on the LED display. You cannot overwrite or save thechanges. * "XX" indicates a song number (01 through 40).
In the case of Voice Disk operation, an incompatible Voice Disk has beeninserted.
Display Description of the Messages
XX *
XX *

7. Rhythm Pattern Programming and Rhythm Sequence Programming
The EL-37 includes powerful Rhythm Program functions: the Rhythm Pattern Program and the RhythmSequence Program. The Rhythm Pattern Program allows you to record your own original rhythmpatterns using the high-quality percussion sounds of the Electone. The Rhythm Sequence Program letsyou connect your original rhythm patterns together with the Preset rhythm patterns to create completerhythm tracks, which you can automatically play back during your performance.
Outline of Rhythm Programming OperationThe following is a brief outline of the steps necessary in programming your own rhythm patterns and rhythmsequences.
68
7. Rhythm
Pattern P
rogramm
ing and Rhythm
Sequence P
rogramm
ing
● Rhythm Pattern Program
● Rhythm Sequence Program
Press the PATTERN button to call up the Rhythm Pattern Program and select the Rhythm Program pages.
Set the Beat and Quantize values.
Select the Edit page to record percussion sounds and program the pattern.
(Optional) Select the Accompaniment page to determine which accompaniment pattern will be used with your newly created rhythm.
Save your new rhythm pattern to memory.
Press the SEQUENCE button to call up the Rhythm Sequence Program for connecting rhythm patterns together in sequence to create songs.
(Optional) Finally, save all the User rhythm data you’ve created in a floppy disk.
Save your new rhythm sequences to the Sequence buttons. (No actual saving procedure is necessary since the rhythm sequences you program will automatically be saved to the selected Sequence button.)

Panel Controls—Rhythm Pattern Program andRhythm Sequence ProgramThe functions of the Rhythm Pattern Program and Rhythm Sequence Program are controlled from the DataControl buttons and a special set of buttons to the right of the DISPLAY SELECT section. The PATTERN andSEQUENCE buttons are used to select those respective programming functions. The other buttons differ inoperation depending on the programming mode. The labels above the buttons indicate the functions of theRhythm Pattern Program, while those below indicate the functions of the Rhythm Sequence Program.
Detailed explanations of these buttons are given below in the instructionsthat pertain to them.
Rhythm Pattern ProgrammingThe Rhythm Pattern Program works with the Keyboard Percussion feature to let you use any of 75 differentpercussion sounds in creating your own rhythm patterns. Up to 16 separate rhythm "tracks" are provided in asingle pattern for each instrument part, and up to 40 patterns—eight User numbers, each with five variations—can be memorized.
● programming Rhythm PatternsTo call up the Rhythm Pattern Program function and select theRhythm Program pages:
1. Press and hold down the PATTERN button in theRHYTHM PROGRAM section. The LED of the buttonlights and the display prompts you to select a rhythmpattern.
PATTERN
SEQUENCE
RHYTHMPROGRAM
PATTERN
SEQUENCE
CLEAR CHANGE
PRESET
USER SET INS. DEL. CLEAR
3 3
ACCENTINSTRUMENTQUANTIZERHYTHM
PROGRAM
0
0 5 6 7 8
1 2 3 4
69
7. Rhythm
Pattern P
rogramm
ing and Rhythm
Sequence P
rogramm
ing
Pressing the PATTERN buttonhere also automatically stopsthe rhythm patterns and rhythm
sequences.
Use of the playback andrecording functions on theMusic Disk Recorder
automatically cancels the RhythmProgramming/Rhythm Sequencingoperations.
NOTE
NOTE

2. While holding down the PATTERN button, selecta preset rhythm pattern to be copied to the RhythmPattern Program. Releasing the PATTERN buttonwithout selecting a rhythm loads a blank pattern tothe Programmer.
Copying a preset rhythm lets you make changes to an existing rhythmpattern, saving your time if you want to program a rhythm that is similar toan existing preset pattern. Two measures of the selected rhythm pattern willbe copied to the Rhythm Pattern Program.
Loading a blank rhythm pattern allows you to create your own rhythmpattern from scratch.
COPYING A PATTERN FROM THE RHYTHM MENUS: You can also copy a specific rhythm pattern from among the choices in a Rhythm Menu. To do this, pressthe desired panel Rhythm button, then select the desired pattern with the Data Control buttons—BEFOREcalling up the Rhythm Pattern Program and performing steps #1 and #2 above. The specified rhythm will becopied once you execute steps #1 and #2.
Copying the Fill Ins and Endings:The similar procedure can be used with the FILL IN and INTRO. ENDING buttons for copying Fill In andEnding patterns. Select the rhythm to which the desired Fill In or Ending belongs beforehand. Then pressthe FILL IN or INTRO. ENDING button while holding down the PATTERN button.
70
7. Rhythm
Pattern P
rogramm
ing and Rhythm
Sequence P
rogramm
ing
When preset rhythm patternsare copied to the RhythmPattern Program, the copied
patterns may differ in volume from theoriginal patterns.
NOTE
The User rhythm you havecreated can also be copied tothe Rhythm Pattern Program.
You can edit it again and improve it.
Some Ending patterns consistsof more than two measures. Ifyou copy such a pattern, only
the first two measures can be copiedbut the rest cannot be copied.
The Intro. patterns cannot becopied.NOTE
NOTE
NOTE

Guiro Short
Guiro Long
Cowbell 2
Tom 1
Tom 2
Tom 3
Tom 4
Snare Brush Shot 2
Tom Brush Shot 1
Tom Brush Shot 2
Tom Brush Shot 3
Tom Brush Shot 4
Noise Percussion
Scratch
Cabasa
Conga Slide
Conga Slap
Conga Muffled
Orchestra Cymbal M
ute
Cymbal for M
arch
Cymbal Brush Shot
Crash Cymbal M
ute
Crash Cymbal 2
Ride Cymbal Cup
Ride Cymbal 2
Hi-hat Closed(Pedal)1
Hi-hat Closed(Pedal)2
Snare Drum Accent1
Snare Drum Accent2
Snare Drum Rim
2
Snare Drum Reverb 2
Synth. Snare Drum
Bass Drum for M
arch
Bass Drum(Attack)
Synth. Bass Drum
Hand Clap
Agogo High
Agogo Low
Wood Block High
Wood Block Low
Cowbell 1
Triangle Open
Triangle Close
Snare Drum Roll
Orchestra Snare DrumTom
1
Tom 2
Tom 3
Snare Brush Shot 1
Snare Brush Roll
Synth. Tom 1
Synth. Tom 2
Synth. Tom 3
Claves
Shaker
Cuica High
Cuica Low
Bongo High
Bongo Low
Conga High
Conga Low
Timbale 1 High
Timbale 1 Low
Castanet
Tambourine
Orchestra Cymbal 2
Orchestra Cymbal 1
Crash Cymbal 1
Ride Cymbal 1
Hi-hat Open
Hi-hat Closed
Snare Drum Rim
1
Snare Drum Light
Snare Drum Reverb 1
Snare Drum Heavy
Snare Drum Heavy
Bass Drum Light
Bass Drum Heavy
Concert Bass Drum
● Rhythm Programming Percussion Sounds—Upper and Lower KeyboardsThe Rhythm Programmer has a total of 75 different percussion sounds thatare assigned to the keys of the Upper and Lower keyboards, as shown in thefollowing chart.
Assigned to the Upper Keyboard (35 types)
71
7. Rhythm
Pattern P
rogramm
ing and Rhythm
Sequence P
rogramm
ing
Assigned to the Lower Keyboard (43 types)
Tom 1, 2 and 3 on the Upperand Lower keyboards are thesame.
Percussion sounds on the Lowerkeyboard are the same as inKeyboard Percussion.
The sounds of the Upper keyboard canbe used only in Rhythm PatternProgramming.
NOTE
NOTE

● Step Write and Real Time Write Operation There are two different methods you can use to program rhythm patterns: Step Write and Real Time Write. StepWrite allows you to enter percussion sounds as individual note values. As a method, it is very similar to writingdown the notes on a sheet of music paper; each note is entered one at a time, and though you can hear eachindividual note entered, you cannot actually hear the pattern playing as you create it. Real Time Write on theother hand, is similar to using a multitrack tape recorder; you can hear previously recorded parts of the patternas you record new parts on top.
Each method has its own advantages and uses. Step Write is good for precision and for entering percussionsounds whose note placement and rhythmic value has been determined, such as a bass drum that plays everybeat in a measure. Real Time Write is best for capturing the "feel" of a rhythm, because it allows you to actuallyplay the pattern as you are creating it. Which method you use depends partly on the type of rhythm you intendto create and partly on your own personal preference. You can even switch between the two methods inediting to create a single rhythm pattern by the use of both methods. A typical use for this would be to programthe basic beats of a rhythm with Step Write, then using Real Time Write to add percussion accents andembellishments.
● Selecting Step Write or Real Time Write Operation Step Write and Real Time Write can be selected from the Edit page. Which mode of operation is selecteddepends on the play status of the rhythm pattern. If the rhythm is stopped, Step Write is automatically selected.If the rhythm is playing, Real Time Write is selected. Simply press the START button in the Rhythm section onthe panel to start or stop the rhythm pattern and switch between the two modes
● Setting the Beat and Quantize Values Before recording a pattern, you should set the Beat and Quantize values. These determine the basic timingsettings of the pattern. Beat is controlled from the BEAT page, and Quantize is set from the QUANTIZE buttonson the panel.
BEAT Page—Step Write
1BeatThis determines the time signature used for the rhythm pattern, and isselected in the BEAT page. (The BEAT page is automatically displayedwhen the Rhythm Pattern Program has been called up and a rhythmpattern has been selected.) Available time signatures are 4/4, 3/4 and 2/4.
2Remaining MemoryThis indicates the amount of memory available for storing rhythmpatterns. Remaining memory is expressed as a percentage: 100% indicatesthe maximum amount of memory available, and 0% indicates that there isno more memory available. (Remaining memory is also displayed in theEDIT page and the SAVE page.)
<PATTERN> 100% ¡BEAT „4/4 Œ3/4 Œ2/4
1
2
Use the bottom Data Control buttons to select the time signature.
Remaining memory
72
7. Rhythm
Pattern P
rogramm
ing and Rhythm
Sequence P
rogramm
ing
In Real Time Write, the timesignatures are not displayed.Beat can be changed only when
the rhythm pattern is stopped.
NOTE

● Entering Percussion Sounds to a Rhythm PatternPercussion sounds can be entered by either Step Write or Real Time Write from the EDIT page. Select the EDITpage with the Page buttons. The Step Write version of the EDIT page is automatically called up if the rhythmpattern is stopped, and Real Time Write is called up if the pattern is running.
QuantizeQuantize determines the resolution for entering percussion sounds to a pattern. Since Step Writeoperations involve advancing in "steps" along regularly spaced points in a measure, Quantize lets you sethow many points there will be in the measure, In Step Write, since you can only enter notes to thosepoints, the more points there are in a measure, the more leeway you have in entering notes.
Quantize functions in generally the same way in Real Time Write operation in that it determines theresolution of the pattern. Used with Real Time Write, however, it allows you to automatically "correct" thetiming of the notes as you play them, according to the specified Quantize resolution. Use the QUANTIZEbuttons on the panel (shown below) to set the Quantize value.
Quantize values are shown above the buttons as note values and represent fractions of a measure; thus,the eighth note ( ) means that there will be eight points or divisions in the measure.
● Editing with Step WriteTo enter sounds with Step Write:
1. From the EDIT page of Step Write, use the stepforward and step reverse controls (shown below) toadvance or reverse the rhythm clock to the point atwhich you wish to enter the percussion sound.
PATTERN
SEQUENCE
CLEAR CHANGE
PRESET
USER SET INS. DEL. CLEAR
3 3
ACCENTINSTRUMENTQUANTIZERHYTHM
PROGRAM
0
0 5 6 7 8
1 2 3 4
Eighth note
Eighth note triplet
Sixteenth note
Sixteenth note triplet
73
7. Rhythm
Pattern P
rogramm
ing and Rhythm
Sequence P
rogramm
ing

EDIT Page—Step Write
1Step Forward and Step Reverse ControlsEach press of the corresponding Data Control buttons advances orreverses the rhythm clock by one step. The size of a single step isdetermined by the Quantize value on the panel.
Step Forward and Step Reverse are also controllable from the panelbuttons, as shown below.
2Jump Forward and Jump Reverse ControlsEach press of the corresponding Data Control buttons advances orreverses the rhythm clock in one-beat jumps.
3Rhythm ClockDisplays the current position in the pattern, according to the measure,beat, and number of clicks. A click is the smallest division of a pattern,and one beat is made up of 24 clicks.
The rhythm clock advances up to two measure and loops back to thebeginning of the rhythm (1.1.1).
4TrackDisplays the number of the rhythm track and the instrument recorded toit. Use the bottom right Data Control buttons to step through the tracks.(See step #2 below; also see Change function, page 76.)
PATTERN
SEQUENCE
CLEAR CHANGE
PRESET
USER SET INS. DEL. CLEAR
3 3
ACCENTINSTRUMENTQUANTIZERHYTHM
PROGRAM
0
0 5 6 7 8
1 2 3 4
Step ReverseStep Forward
1
<PATTERN> 100% ¡BEAT1.1. 1 1:Ride Cym1
3
Track number andinstrument name
ClickBeatMeasure
Step Forward
Jump Forward
Step Reverse
Jump Reverse
These buttons are used to stepthrough the instrument tracknumber (left to decrease, right toincrease).
4
2
1
74
7. Rhythm
Pattern P
rogramm
ing and Rhythm
Sequence P
rogramm
ing
When using the RhythmPattern Program, the buttonson the panel function according
to the indications printed above eachbutton in while.
NOTE
You can return to the BEATpage in the middle of editingand change the time signature
and/or the Quantize value.
NOTE

2. Select the percussion sound you wish to enter.
There are two ways to select percussion sounds in the Step Write mode:
Press the key on the Upper or Lower keyboard that corresponds to the sound. The instrument name automatically appears at the bottom right of the LCD when the key is pressed. The selected instrument is automatically assigned to an available empty rhythm track.
or
Use the bottom right Data Control buttons corresponding to the instrument name to step through theavailable sixteen rhythm tracks.The name of the instrument currently assigned to the selected track is displayed at the bottom right of theLCD. (Since this method allows you to select only from among the assigned instruments, use the Changefunction described on page 76 to change instrument assignments.)
3. Use the ACCENT buttons on the panel to enterthe sound to the selected point.
These buttons are used to actually enter or record the instrument and determineits volume or Accent level. Press the button that corresponds to the Accent levelyou wish to set; the instrument is then automatically inserted at that Accentlevel to the selected position in the pattern (shown in the rhythm clock). AnAccent value of 0 is the minimum, or a rest, and 8 is the maximum.
PRESET
USER SET INS. DEL. CLEAR
ACCENT
0
0 5 6 7 8
1 2 3 4
75
7. Rhythm
Pattern P
rogramm
ing and Rhythm
Sequence P
rogramm
ing
You can return to the Beat pagein the middle of editing andchange the time signature.
NOTE
You can record and up tosixteen different instrumentsounds in a single rhythm
pattern, with each instrument occupyingone of the sixteen available tracks. TheRhythm Pattern Program has polyphoniccapacity for playing up to eight soundssimultaneously. Instruments can only beentered if there are empty tracksremaining. If all sixteen tracks havebeen used, no subsequently selectedinstruments can be heard or recorded.
NOTE

● Clear and Change The Rhythm Pattern Program is made up of sixteen individual tracks, eachcapable of recording a different instrument. The Clear function is used todelete the entire contents of an instrument track, while Change is used toassign a different instrument to an already occupied track.
ClearThe Clear function is used to erase an instrument from the rhythm pattern.All instances of the selected instrument, irrespective of which tracks theyoccupy, will be erased from the pattern.
There are two ways to use Clear:
One way is to press the key on the keyboard corresponding to the instrument you wish to erase, whilesimultaneously holding down the CLEAR button. (A short “beep” sound indicates that the instrument hasbeen erased.)You can erase all of the sounds on all recorded tracks of the pattern by holding down the CLEAR buttonand simultaneously pressing the lowest key (C1) on the Lower keyboard. Be careful not to do thisinadvertently since all sounds will be instantly and permanently erased.
or
The other way is to press, then release the CLEAR button on the panel (in Step Write operation only).The following display appears, prompting confirmation of the operation:
ChangeThe Change function allows you to reassign the instrument of a selected track.
To change an instrument assignment:
1. Select the track’s instrument that you want tochange from the EDIT page by using thecorresponding Data Control buttons.
2. Simultaneously hold down the CHANGE button onthe panel and press the key on the Upper or Lowerkeyboard that corresponds to the instrument.
<PATTERN> 99% ¡EDIT1.3. 1 1:Ride Cym1
Track number and instrument name.
Use these buttons to select the instrument.
<PATTERN> Ride Cym1Clear [OK] [Cancel]
Select OK with any of these buttons to clear all data. A “completed” message momentarily appears on the LCD.
Select Cancel with any of these buttons to abort the operation and return to the original Edit display.
76
7. Rhythm
Pattern P
rogramm
ing and Rhythm
Sequence P
rogramm
ing

● Editing with Real Time WriteTo enter sounds with Real Time Write:
1. From the BEAT/EDIT page, start the rhythmpattern by pressing the START button.
2. While the rhythm pattern is running, play thepercussion sounds from the Upper and/or Lowerkeyboards.A metronome is provided for rhythmic reference. Listen to the metronomeclick as you play the sounds, using it as a guide to keep in time and tempo.The pattern will automatically repeat (or “loop”) every two measures.
The metronome can be turned on and off from the Real Time Write EDIT page (shown below).
Edit Page—Real Time Write
Metronome (METRO.)Turns the metronome click on or off. When set to ON, the metronome sounds on each beat of themeasure (for example, three times per measure in 3/4 time) to serve as a rhythmic guide whenprogramming patterns.The metronome can be turned on or off while a rhythm pattern is playing. The metronome isautomatically set to ON when a blank pattern has been selected, and is set to OFF when an existingpattern is copied.
Each instrument sound is recorded and automatically assigned to a separatetrack as you play it. All events of a single sound are assigned to the sametrack; for example, if you alternately play a hi-hat sound with a snare drum,all notes of the hi-hat will be recorded to one track and all notes of the snaredrum to another track.
3. When you’ve finished entering instruments to thepattern, stop it by pressing the START button again, orby selecting the ACC. (Accompaniment) or SAVE pages.
USING THE CLEAR FUNCTION IN REAL TIME WRITE:As in Step Write, the Clear function is used to erase an instrument from the rhythm pattern. However, themethod of the operation is slightly different. Hold down the CLEAR button, and simultaneously press thekey on the keyboard corresponding to the instrument you wish to erase. All instances of the selectedinstrument, irrespective of which tracks they occupy, will be erased from the pattern.
You can erase all of the sounds on all recorded tracks of the pattern by holding down CLEAR andpressing the lowest key (C1) on the Lower keyboard. Be careful not to do this inadvertently since allsounds will be instantly and permanently erased.
<PATTERN> 100% ¡EDITReal Time „METRO.
77
7. Rhythm
Pattern P
rogramm
ing and Rhythm
Sequence P
rogramm
ing
All of the instrument and trackrecording limitations describedin Step Write apply to Real Time
Write as well. (See note in Editing withStep Write on page 75.)
NOTE

● Selecting Accompaniment PatternsThis function of the Rhythm Pattern Program allows you to use one of theElectone’s Accompaniment patterns with your original rhythm pattern. Youcan select the Accompaniment pattern that best matches the rhythm patternthat you have created.
To select an appropriate Accompaniment pattern for your newlycreated rhythm pattern:
1. Select the ACC. (Accompaniment) page with thePage buttons
2. Select the desired rhythm group by pressing aRhythm button on the panel; select the rhythm typeby using the Data Control buttons on both sides ofthe LCD.
3. Try to audition the Accompaniment type. You can also audition the Accompaniment type and set its volume from theRhythm Condition page. Call up this display by pressing the correspondingrhythm button once again.
<PATTERN> ¡ACC. TYPE=1 VOL.=0
Decreases the volume.Selects the Accompaniment type. Increases the volume.
Sets volume to minimum value.Sets volume to maximum value.
<PATTERN> ¡ACC. March
Selects rhythm pattern (right buttons select next pattern, left buttons select previous one).
<PATTERN> ¡ACC. March
PAGE
78
7. Rhythm
Pattern P
rogramm
ing and Rhythm
Sequence P
rogramm
ing
If a rhythm pattern is started inthe ACC. page, theAccompaniment will also be
heard. However, both the rhythmpattern and the Accompaniment willautomatically be stopped when youleave the page.
You cannot save theAccompaniment type or thevolume setting here.
NOTE
NOTE

● Saving Rhythm PatternsTo save a newly created rhythm pattern to a User pattern number:
1. Select the Save page with the Page buttons. The current rhythm pattern, if playing, will automatically be stopped whenthis page is selected.
2. Using the appropriate Data Control buttons,select both the User number and variation type towhich you wish to save the newly created rhythmpattern.Keep in mind that you cannot save a rhythm pattern by selecting only a Usernumber; you must also select a variation type-A, B, C, D, or FILL (Fill In).Including the Fill In patterns, up to 40 different rhythm patterns (8 Usernumbers x 5 variations) can be saved.
3. Use any of the Data Control buttons to the rightof the LCD (corresponding to “SAVE”) to actuallyexecute the save operation.
When the pattern has been saved, the following display appears momentarily:
When the pattern cannot be saved because of lack of available memoryspace, the following display appears:
<PATTERN> 0% ¡SAVEData Full [Confirm]
<PATTERN> 80% ¡SAVESave Completed...!
<PATTERN> 100% ¡SAVEUSER1-A [SAVE]
Use any of these buttons to execute the save.
<PATTERN> 100% ¡SAVEUSER1-A [SAVE]
These buttons select the variation type.
These buttons select the User number.
<PATTERN> 100% ¡SAVEUSER1-A [SAVE]
PAGE
79
7. Rhythm
Pattern P
rogramm
ing and Rhythm
Sequence P
rogramm
ing

Press any of the right Data Control buttons (corresponding to “Confirm”) toreturn to the original Save display.
You should periodically save your rhythm pattern as you are making it andcheck the amount of remaining memory. If the rhythm pattern currently beingedited cannot be saved because of a lack of memory space, erase some of theless necessary percussion sounds with the Clear function, and try saving thepattern again.
● Quitting the Rhythm Pattern Programming FunctionsYou can exit the Rhythm Pattern Program from any of its display pages.
To do this:
1. Press the PATTERN button in the RHYTHMPROGRAM section once again.If a rhythm pattern is playing, it will automatically be stopped. The followingdisplay will appear, prompting confirmation of the operation.
2. Select “OK” to leave the Rhythm Pattern Program,or “Cancel” to abort the operation and return to theprevious display.
● Playing User Rhythm PatternsThe User rhythm patterns you have created in the Rhythm Pattern Program can be selected and played from thepanel Rhythm controls.
To play User rhythm patterns:
1. Press one of the dotted buttons in the Rhythmsection.
2. Select the USER page with the Page buttons.
USER 1-A USER 1-B¡U1USER 1-C USER 1-D
PAGE
MARCH WALTZ SWING BOUNCE SLOWROCK
TANGO LATIN 1 LATIN 2 8 BEAT 16 BEAT
USER 1 USER 2 USER 3 USER 4 A B
USER 5 USER 6 USER 7 USER 8 C
VOLUME
D
RHYTHMMAX
MIN
SEQ. SEQ.
SEQ. SEQ.
1 2
3 4
1
2
<PATTERN> Edit End [ OK ] [Cancel]
80
7. Rhythm
Pattern P
rogramm
ing and Rhythm
Sequence P
rogramm
ing
The Power On Reset function(See page 47) can be used todelete all User rhythm patterns
from memory.
NOTE
If you leave the RhythmPattern Program withouthaving edited a pattern, this
display will not appear.
NOTE
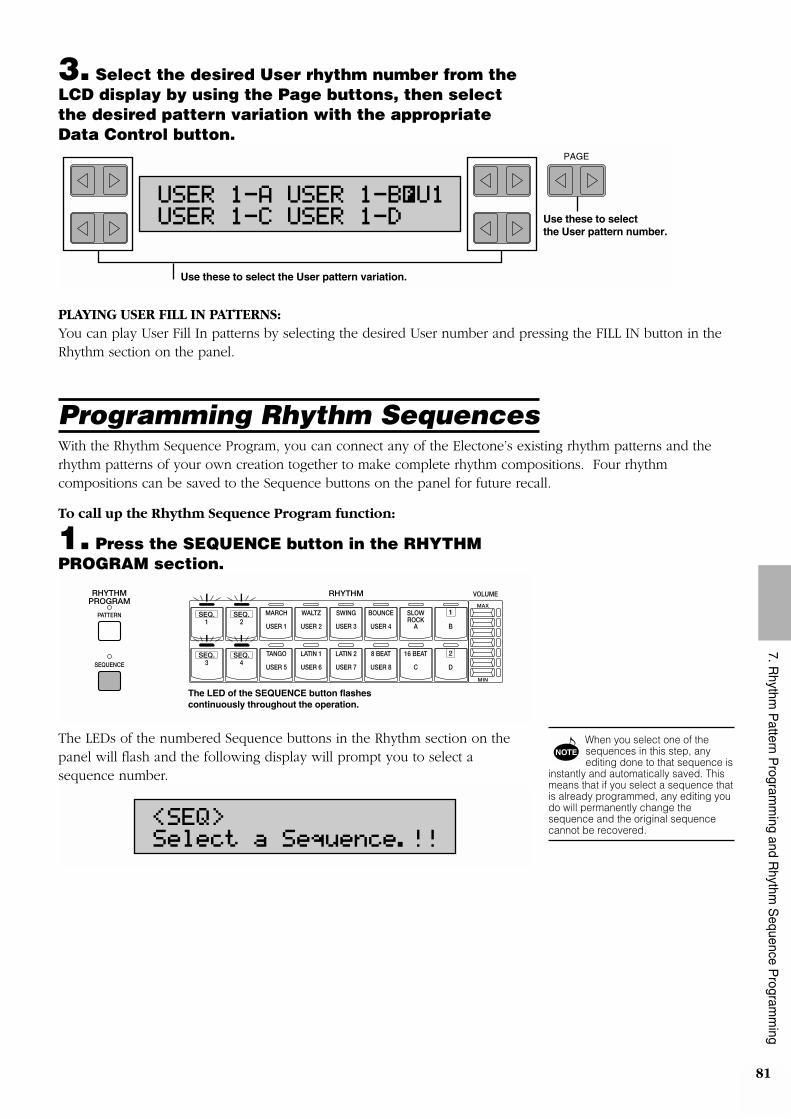
3. Select the desired User rhythm number from theLCD display by using the Page buttons, then selectthe desired pattern variation with the appropriateData Control button.
PLAYING USER FILL IN PATTERNS:You can play User Fill In patterns by selecting the desired User number and pressing the FILL IN button in theRhythm section on the panel.
Programming Rhythm SequencesWith the Rhythm Sequence Program, you can connect any of the Electone’s existing rhythm patterns and therhythm patterns of your own creation together to make complete rhythm compositions. Four rhythmcompositions can be saved to the Sequence buttons on the panel for future recall.
To call up the Rhythm Sequence Program function:
1. Press the SEQUENCE button in the RHYTHMPROGRAM section.
The LEDs of the numbered Sequence buttons in the Rhythm section on thepanel will flash and the following display will prompt you to select asequence number.
<SEQ>Select a Sequence.!!
MARCH WALTZ SWING BOUNCE SLOWROCK
TANGO LATIN 1 LATIN 2 8 BEAT 16 BEAT
USER 1 USER 2 USER 3 USER 4 A B
USER 5 USER 6 USER 7 USER 8 C
VOLUME
D
RHYTHMMAX
MIN
SEQ. SEQ.
SEQ. SEQ.
1 2
3 4
1
2
PATTERN
SEQUENCE
RHYTHMPROGRAM
The LED of the SEQUENCE button flashes continuously throughout the operation.
USER 1-A USER 1-B¡U1USER 1-C USER 1-D
PAGE
Use these to select the User pattern variation.
Use these to select the User pattern number.
81
7. Rhythm
Pattern P
rogramm
ing and Rhythm
Sequence P
rogramm
ing
When you select one of thesequences in this step, anyediting done to that sequence is
instantly and automatically saved. Thismeans that if you select a sequence thatis already programmed, any editing youdo will permanently change thesequence and the original sequencecannot be recovered.
NOTE

2. Press one of the numbered Sequence buttons tocall up the Rhythm Sequence display.
In this display, different rhythm patterns (both Preset rhythm patterns and Userrhythm patterns that you created with the Rhythm Pattern Program) can beentered in sequence along the pattern row in the bottom of the display. Enteredpatterns are indicated by a number/letter code in the LCD.
Up to three-character code indicates the type and number of the rhythmpattern. The preset rhythm patterns of the Electone are indicated by a two-digit number (i.e., [06] or [08]). User patterns are indicated by the “U” prefixas well as a letter suffix representing the type-A,B,C,D, and F (Fill In).Examples of these include [U3C] and [U8F]. The preset patterns also mayhave a letter suffix: “I” indicates Intro, “F” indicates Fill In, and “E” indicatesEnding (i.e., [01I], [20F], and [15E])
To program a rhythm sequence:
1. Select the type of rhythm pattern you wish toenter, Preset or User, from the corresponding buttonson the panel.
PATTERN
SEQUENCE
CLEAR CHANGE
PRESET
USER SET INS. DEL. CLEAR
3 3
ACCENTINSTRUMENTQUANTIZERHYTHM
PROGRAM
0
0 5 6 7 8
1 2 3 4
<SEQ> 1:USER 1-A Top • • • • Pattern Row
MARCH WALTZ SWING BOUNCE SLOWROCK
TANGO LATIN 1 LATIN 2 8 BEAT 16 BEAT
USER 1 USER 2 USER 3 USER 4 A B
USER 5 USER 6 USER 7 USER 8 C
VOLUME
D
RHYTHMMAX
MIN
SEQ. SEQ.
SEQ. SEQ.
1 2
3 4
1
2
82
7. Rhythm
Pattern P
rogramm
ing and Rhythm
Sequence P
rogramm
ing
Any rhythm pattern currentlyplaying will automatically bestopped when you call up the
Rhythm Sequence Program function.Also, use of the Music Disk Recorderautomatically cancels Rhythm Sequenceoperations.
NOTE

2. Select the desired rhythm pattern by pressing theappropriate button in the panel Rhythm section, thenpress the SET button on the panel to enter the pattern.(Refer to the Rhythm Pattern Number Table below for alist of the rhythm patterns and their numberassignments.)
When PRESET is selected in step #1 above, the Rhythm buttons are used toselect the Preset rhythm names printed at the top of each button. When USERis selected, however, these buttons function according to the User numbersand letters printed at the bottom. Select the User pattern by pressing one ofthe numbered buttons (1-8), then a lettered button (A, B, C, or D) or FILL(for User Fill In).
MARCH WALTZ SWING BOUNCE SLOWROCK
TANGO LATIN 1 LATIN 2 8 BEAT 16 BEAT
USER 1 USER 2 USER 3 USER 4 A B
USER 5 USER 6 USER 7 USER 8 C
VOLUME
D
RHYTHMMAX
MIN
SEQ. SEQ.
SEQ. SEQ.
1 2
3 4
1
2
1) Press one of the rhythm button...
2) ...then select SET.
PATTERN
SEQUENCE
CLEAR CHANGE
PRESET
USER SET INS. DEL. CLEAR
3 3
ACCENTINSTRUMENTQUANTIZERHYTHM
PROGRAM
0
0 5 6 7 8
1 2 3 4
83
7. Rhythm
Pattern P
rogramm
ing and Rhythm
Sequence P
rogramm
ing
When using the RhythmSequence Program, the buttonson the panel function according
to the indications printed below eachbutton in green.
NOTE
You can program the rhythmsequence a measure at a time.Every user rhythm consists of
two measures. If you want to programtwo-measure User rhythms, you arerequired to enter it twice, for the firstmeasure and the second measure.
When entered, the first measure isdisplayed normally and the secondmeasure is displayed with the R in anegative box at top right corner of theLCD. (The indicates that the patternnumber at the current cursor position isthe second measure.)
The rhythm patterns can be divided intofour groups: Normal such as [01] and[U1A], Intro, Fill In and Ending. Whenchanging the type, for example, fromNormal to Fill In and Fill In to Normalwhile programming a rhythm sequence,the first measure of the newly selectedtype will always be selected and follow.However, when the same type continueseven though you change the rhythm, forexample, from [06] to [U1Al, the secondmeasure may succeed the sequence.That means some of the User rhythmsinserted in a rhythm sequence maybegin from its second measure.
To keep this from happening and beginthe newly selected rhythm from the firstmeasure, insert a different type, Fill In,before using the new rhythm pattern.
A maximum of 120 patterns canbe entered to a singlesequence.
NOTE
R

Rhythm Pattern Number Table
3. If you wish to enter a Fill In, Intro, or Endingpattern, hold down the appropriate rhythm controlbutton on the panel (INTRO. ENDING or FILL IN) andsimultaneously press the SET button
ABOUT ENTERING INTRO AND ENDING PATTERNS: Pressing the INTRO. ENDING button when at the first position in thepattern row automatically enters an Intro pattern there. Pressing theINTRO. ENDING button at any other position in the row enters an Endingpattern.
4. Use the cursor controls (on the panel or thecorresponding Data Control buttons) to move thecursor along the pattern row in the display andselect the position at which patterns will be entered.
<SEQ> -:USER 6-A F
Current MeasureCurrently selected rhythm pattern nameand variation.
Pattern Row
TOP U6F U1A U1A U1A
SYNCHROSTART
INTRO.ENDING
START
FILL IN
PRESET
USER SET INS. DEL. CLEAR
ACCENT
0
0 5 6 7 8
1 2 3 4
1) While holding down INTRO. ENDING or FILL IN... 2) ...press SET.
01040608101115181920
March 1Polka CountryBroadway Waltz 1Waltz 2Jazz WaltzBolero Swing 1Swing 2
Jazz BalladDixielandBounce 1Bounce 2 Reggae 1Reggae 2 Slow Rock 1Slow Rock 2Slow Rock 3 Tango 1
Tango 2Tango 3 Cha-chaRhumba Beguine MamboSamba 1Samba 2Bossanova 1 Bossanova 2
8 Beat 18 Beat 28 Beat 3 Dance Pop 16 Beat 116 Beat 216 Beat 316 Beat Funk
01F01I01E
March 1 Fill-inMarch 1 Intro.March 1 Ending
U1AU1BU1CU1DU1F
User 1-AUser 1-BUser 1-CUser 1-DUser 1-Fill-in
25262829313233343536
37383940414244454748
5051525559606164
Fill-in/Intro./Ending User
84
7. Rhythm
Pattern P
rogramm
ing and Rhythm
Sequence P
rogramm
ing
Any existing pattern data thatfollows an Ending pattern isautomatically deleted.
NOTE
An Intro or Fill In pattern enteredto the first position is notregistered as a measure, and
the current measure display shows adash (—), even though a pattern hasbeen entered.
NOTE

Cursor Controls on the Panel
Cursor Control with the Data Control Buttons
5. Use the data controls on the panel (SET, INS., DEL.,CLEAR) to enter or erase pattern numbers in thepattern row.
Data Controls
1RESET/USERDetermines the type of rhythm pattern, Preset or User. (See step #1 above.)
2SETFor initially entering a pattern number to an empty position in the patternrow, or for replacing a pattern at the cursor position. (See steps #2 and #3above.)
PATTERN
SEQUENCE
CLEAR CHANGE
PRESET
USER SET INS. DEL. CLEAR
3 3
ACCENTINSTRUMENTQUANTIZERHYTHM
PROGRAM
0
0 5 6 7 8
1 2 3 4
1 2 3 4 5
<PATTERN> ¡ACC. TYPE=1 VOL.=0
1
1 Sift the cursor to the beginning of the sequence.
2 Sift the cursor to the end of the sequence.
3 Sift the cursor one step back.
4 Sift the cursor one step forward.
3
2
4
1
3
2
4
PATTERN
SEQUENCE
CLEAR CHANGE
PRESET
USER SET INS. DEL. CLEAR
3 3
ACCENTINSTRUMENTQUANTIZERHYTHM
PROGRAM
0
0 5 6 7 8
1 2 3 4
Shifts the cursor back by 10 measures.
Shifts the cursor forward by 10 measures.
Shifts the cursor one step forward.Shifts the cursor one step back.
Shifts the cursor to the end of sequence.Shifts the cursor to the beginning of the sequence.
85
7. Rhythm
Pattern P
rogramm
ing and Rhythm
Sequence P
rogramm
ing

3 INS. (Insert)For inserting a pattern number before the current cursor position. Thenew pattern is entered to the cursor position and all other patterns to theright of the cursor are moved to accommodate the new number. Theoperation is the same as for SET (see steps #2 and #3 above).
4DEL. (Delete)For deleting a pattern number at the current cursor position.
5CLEARFor erasing all patterns entered to the selected sequence. After selectingCLEAR, the following display appears:
Select “OK” to clear the currently selected rhythm sequence, or “Cancel” toabort the operation and return to the previous display.
When patterns can no longer be entered to the sequence because of lack ofavailable memory space, the following display momentarily appears:
If this happens, use the Delete button to erase selected patterns, or use theClear button to erase all patterns in the sequence.
AUDITION:You can play the rhythm sequence at any time while you are editing or programming it by moving thecursor to the point at which you wish to begin playback and pressing the Rhythm START button.
ABOUT USING REGISTRATIONS WITH THE RHYTHM SEQUENCE PROGRAM:The rhythm patterns (Rhythm Menu) assigned to the sequence can be changed during editing byselecting different registrations. This allows you to create a registration that contains the specific rhythmpatterns that you will use in a given sequence, and call up that registration when editing the sequence.The type of Accompaniment used with the rhythm patterns also depends on the selected registration.
● Quitting the Rhythm Sequence FunctionTo quit the Rhythm Sequence Program:Press the SEQUENCE button in the RHYTHM PROGRAM section once again.(The LED of the button will turn off.)
<SEQ>120:March1 Data Full...!!
<SEQ> All Clear ? [ OK ] [Cancel]
86
7. Rhythm
Pattern P
rogramm
ing and Rhythm
Sequence P
rogramm
ing

● Playing Rhythm SequencesTo play any of the rhythm sequences you have created:Press the appropriate Sequence button on the panel, then press the rhythmSTART button.
When one of the four rhythm sequences is playing, each programmed rhythmpattern that plays is indicated by the lit LED on the Rhythm panel button.
When a Preset rhythm pattern is playing, the current pattern button's LED is lit:
When a User rhythm pattern is playing, the LEDs of the two pattern buttons(User number and type) are lit:
MARCH WALTZ SWING BOUNCE SLOWROCK
TANGO LATIN 1 LATIN 2 8 BEAT 16 BEAT
USER 1 USER 2 USER 3 USER 4 A B
USER 5 USER 6 USER 7 USER 8 C
VOLUME
D
RHYTHMMAX
MIN
SEQ. SEQ.
SEQ. SEQ.
1 2
3 4
1
2
MARCH WALTZ SWING BOUNCE SLOWROCK
TANGO LATIN 1 LATIN 2 8 BEAT 16 BEAT
USER 1 USER 2 USER 3 USER 4 A B
USER 5 USER 6 USER 7 USER 8 C
VOLUME
D
RHYTHMMAX
MIN
SEQ. SEQ.
SEQ. SEQ.
1 2
3 4
1
2
SYNCHROSTART
INTRO.ENDING
START
FILL IN
MARCH WALTZ SWING BOUNCE SLOWROCK
TANGO LATIN 1 LATIN 2 8 BEAT 16 BEAT
USER 1 USER 2 USER 3 USER 4 A B
USER 5 USER 6 USER 7 USER 8 C
VOLUME
D
RHYTHMMAX
MIN
SEQ. SEQ.
SEQ. SEQ.
1 2
3 4
1
2
87
7. Rhythm
Pattern P
rogramm
ing and Rhythm
Sequence P
rogramm
ing

● Playing All Sequences In OrderYou can also have up to all four rhythm sequences automatically play inorder, one after the other.
To do this:
1. Press the desired Sequence buttons, makingsure that their LEDs are all lit.
2. Press the START button.
The rhythm sequences start from the lowest number and play in orderautomatically to the highest number. (For example, if you press Sequencebuttons 4, 2 and 1 in that order, the sequences will be played back in theirnumeric order: 1, 2, then 4.) This function effectively allows you to make along rhythm sequence that exceeds the 120-pattern memory limit of a singlesequence.
Saving Rhythm Pattern and Rhythm SequenceData to DiskOnce you have created your own rhythm patterns and rhythm sequences, you’ll want to save them to disk.Doing so allows you to free up memory in the Electone for creating additional rhythm patterns and sequences.Also, the User rhythm patterns and sequences you’ve saved to disk can be loaded back to the Electone anytime.
Rhythm Pattern and Rhythm Sequence data is included in the bulk data that is saved when you recordregistrations to disk. Refer to the section Recording Registrations, page 56, for instructions.
Recalling Rhythm Pattern and RhythmSequence Data from DiskThe Rhythm Pattern and Rhythm Sequence data saved to disk as part of bulkdata, can instantly be loaded back to the Electone. Refer to the sectionRecalling Recorded Registrations, page 57, for instructions.
SYNCHROSTART
INTRO.ENDING
START
FILL IN
MARCH WALTZ SWING BOUNCE SLOWROCK
TANGO LATIN 1 LATIN 2 8 BEAT 16 BEAT
USER 1 USER 2 USER 3 USER 4 A B
USER 5 USER 6 USER 7 USER 8 C
VOLUME
D
RHYTHMMAX
MIN
SEQ. SEQ.
SEQ. SEQ.
1 2
3 4
1
2
88
7. Rhythm
Pattern P
rogramm
ing and Rhythm
Sequence P
rogramm
ing
When loading your originalRhythm Program data back tothe Electone, be sure to stop the
rhythm pattern if it is playing. Loadingcannot be executed when a rhythmpattern is running.
NOTE

8. Footswitches and Knee LeverThese leg- and foot-operated controls allow you to turn on and execute various performance functionswithout taking your hands from the keyboards.
Footswitch ControlThe Electone has two footswitches on the expression pedal that can be used to control various functions. Theright footswitch is used for the Registration Shift functions (See page 44). The left footswitch can be set tocontrol one of the following functions: Glide, rhythm stop, rhythm ending, and rhythm Fill In. Assignments ofthe functions are made in the Footswitch pages.
To select the Footswitch pages:Press the FOOT SW. button in the DISPLAY SELECT section.
Three modes are available: OFF, RHYTHM, and GLIDE. Select the desiredmode with the top right or top left Data Control buttons.
● OFFCancels left footswitch control.
● RHYTHMSelection of left footswitch control over rhythm functions. When this ischosen, the following display appears:
Select one of the three Rhythm Control functions from this display.Pressing the footswitch executes the corresponding function:
<FOOT SW>MODE:RHYTHM„STOP ŒENDING ŒFILL
Use any of these Data Control buttons to select the three settings, STOP, ENDING or FILL.
<FOOT SW>MODE:OFF
Use any of these Data Control buttons to select the footswitch mode.
VOICEDISPLAY
FOOTSW.
REGIST.SHIFT
PITCHMIDI
EFFECT A.B.C.M.O.C.
TREMOLO(FAST)
DISPLAY SELECT
89
8. Footsw
itches and Knee Lever

1STOPFunctions as an off/on switch for the rhythm pattern in the middle ofrhythm playback.
2ENDINGSwitches the rhythm to the Ending pattern, after which the rhythm isstopped.
3FILL (Fill In)Switches the rhythm to the Fill In pattern.
● GLIDESelection of footswitch control over Glide. Pressing the footswitchimmediately lowers the pitch of the selected voice or voices by a halfstep. When the Glide setting is chosen, the following display appears:
The Glide function can be applied to any one or all of the voice sections shownin the display: Lead, Upper, and Lower. Select the desired voice section(s).
Knee LeverThe knee lever, located on the underside of the keyboard panel, can be usedto turn the following functions on and off: Melody On Chord and the Sustaineffect.
● Sustain To select knee lever control over Sustain:Make sure that the Upper and/or Lower Sustain effect panel controls havebeen turned on; otherwise, the knee lever will have no effect.
To use the knee lever:Fold the knee lever down and press it to the right with your knee when youwant to have sustain.
When the knee lever is vertical:The sustain effect is cancelled.
When the knee lever is continuously pressed to the right:The sustain effect is on.
When the knee lever is folded up:The sustain effect is applied constantly, as long as the front panel sustainbuttons are on.
<FOOT SW>MODE:GLIDE„LEAD ŒUPPER ŒLOWER
Selects LEAD. Either of these selects LOWER.Selects UPPER.
90
8. Footsw
itches and Knee Lever
When using the footswitch tocontrol Glide, be careful to keeppressing the footswitch for as
long as you want Glide to remain ineffect.
When the Glide function isapplied, Vibrato is not effective. NOTE
NOTE
(ON)
(ON)
(OFF)

● Melody On ChordTo select knee lever control over Melody On Chord:Press the A.B.C./M.O.C. button in the DISPLAY SELECT section and use thePage buttons to select the M.O.C. page (Page 2). Then set the KNEE controlto ON, and select one of the modes.
<MOC> ¡2 MOC TYPE1 ŒKNEE
91
8. Footsw
itches and Knee Lever
If the KNEE is set to ON, theMelody On Chord cannot beapplied without using the knee
lever.
NOTE

9. Pitch ControlsThere are two pitch-related controls on the Electone: Transpose and Pitch. Transpose allows you tochange the key of the instrument and Pitch lets you finely adjust the tuning.
These features make it easy to change the key of a song to accommodate a vocalist's range or toprecisely match the tuning of another instrument. The Pitch controls are located on the Pitch page.
To select the Pitch page (Page 1):Press the PITCH/MIDI button in the DISPLAY SELECT section.
TRNS. (Transpose)Determines the coarse pitch setting of all the voices, and is adjustable in half-steps (semitones). Range: -6–+6 (one octave)
PITCHDetermines the fine pitch setting of all the voices.Range: 438.8Hz–444.5Hz (Ca. a quarter semitone)
<TRANS.> <PITCH> ¡1 0 A=440.0Hz
Increases the Transpose value.Decreases the Transpose value.
Increases the Pitch value.Decreases the Pitch value.
VOICEDISPLAY
FOOTSW.
REGIST.SHIFT
PITCHMIDI
EFFECT A.B.C.M.O.C.
TREMOLO(FAST)
DISPLAY SELECT
92
9. Pitch C
ontrols
The default Pitch is 440.0Hz(=A3).
The pitch changes cannot berecorded to the Music DiskRecorder.
NOTE
NOTE

10. MIDI ControlsMIDI (Musical Instrument Digital Interface) is a kind of communication system for electronic musicalinstruments. It is built into most every modern digital musical instrument and allows differentinstruments to “talk” to each other and control each other’s functions. For example, the Upperkeyboard of your Electone could be used to play sounds on a connected synthesizer. In anotherapplication, a rhythm machine can be programmed to play its rhythm patterns in perfectsynchronization with the tempo set on the Electone.
To use the MIDI functions you must, of course, have a second MIDI device (such as a synthesizer orrhythm machine), and a set of MIDI cables. Connect the MIDI cables as shown in the illustration below:The MIDI IN/OUT terminals are located on the left underside of the Electone keyboard.
All MIDI functions are controlled from Page 2 and Page 3 of the PITCH/MIDI pages.
To select the MIDI pages:Press the PITCH/MIDI button in the DISPLAY SELECT section, and selectPage 2 and Page 3 with the Page buttons.
Page 2—Output Channels
This determines the channels over which MIDI information will betransmitted. The Upper keyboard can be set to send over channels 1 or 4,while the Lower keyboard can send over 2 or 5. The Pedalboardautomatically sends over channel 3. The MIDI receive channel of MIDIdevice should match the numbers set here.
<MIDI OUT> ¡2UPPER=CH1 LOWER=CH2
These select the MIDI channel for Upper keyboard.
These select the MIDI channel for Lower keyboard.
INOUT
IN OUT
EL-37Synthesizer
orRhythm Machine
93
10. MID
I Controls
When using another MIDIdevice to play the Electone’svoices, you must set the MIDI
transmit channel(s) of the connecteddevice to match the receive channel(s)of the Electone. The MIDI receivechannels of the Electone areautomatically set to the following values:
Upper: 1Lower: 2Pedal: 3
NOTE
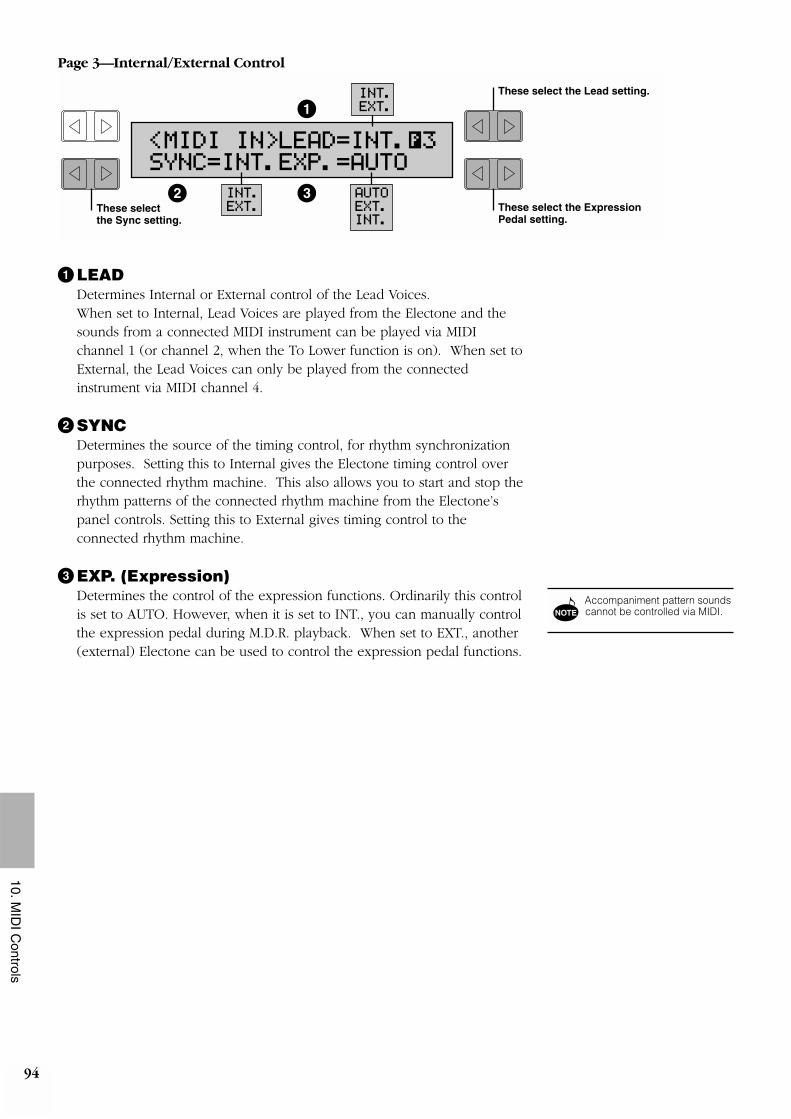
Page 3—Internal/External Control
1LEADDetermines Internal or External control of the Lead Voices. When set to Internal, Lead Voices are played from the Electone and thesounds from a connected MIDI instrument can be played via MIDIchannel 1 (or channel 2, when the To Lower function is on). When set toExternal, the Lead Voices can only be played from the connectedinstrument via MIDI channel 4.
2SYNCDetermines the source of the timing control, for rhythm synchronizationpurposes. Setting this to Internal gives the Electone timing control overthe connected rhythm machine. This also allows you to start and stop therhythm patterns of the connected rhythm machine from the Electone’spanel controls. Setting this to External gives timing control to theconnected rhythm machine.
3EXP. (Expression)Determines the control of the expression functions. Ordinarily this controlis set to AUTO. However, when it is set to INT., you can manually controlthe expression pedal during M.D.R. playback. When set to EXT., another(external) Electone can be used to control the expression pedal functions.
<MIDI IN>LEAD=INT.¡3SYNC=INT.EXP.=AUTO
These select the Lead setting.
These select the Expression Pedal setting.
These select the Sync setting.
INT.EXT.
AUTOEXT.INT.
INT.EXT.1
32
94
10. MID
I Controls
Accompaniment pattern soundscannot be controlled via MIDI.NOTE

11. Accessory Jacks and ControlsOn the left underside of the Electone keyboard is a separate panelequipped with various input/output terminals, the functions of whichare described below.
1RHYTHM IN (Phone; L/R)This pair of phone jacks are for connection to an external rhythm machine.The sound of the connected device is mixed with the sound of the Electoneand played through the Electone’s speaker system. The volume of the rhythm machine can be controlled by the Expressionpedal of the Electone.
2AUX. IN (RCA; L/R)This pair of RCA pin jacks are for connection to an external stereo soundsource, such as a cassette deck or home audio system. The sound of theconnected device is mixed with the sound of the Electone and playedthrough the Electone’s speaker system. Adjust the level by using the control(s) on the connected device.
3AUX. OUT (RCA; L/R)This set of stereo outputs (RCA pin jacks) is for connection to externalamplification/speaker systems. Typically, they are for direct connection toa home audio system or cassette deck.
4HEADPHONESFor connection of a stereo headphone set. When headphones are connectedto this jack, sound to the Electone’s built-in speaker system is automaticallycut off, allowing you to play without disturbing others.
AUX.IN
AUX.OUT
R L
R LRHYTHMIN
HEADPHONES
1
3
2
4
95
11. Accessory Jacks and C
ontrols

12. AppendixTroubleshootingPlease note that the appearance of any of following phenomena does not indicate a mechanical failure of theElectone.
12. Appendix
96
Problem
GENERAL OPERATION
Some of the LEDs in the DISPLAY SELECT section do not light.
No sound is produced from the Electone’s speakers.
A cracking noise is sometimes heard.
Interference from radio, TV, or other sources occurs.
The sound of the Electone causes surrounding objects to resonate.
The Electone panel does not function normally or the content of the memorized data has changed.
VOICES/RHYTHMS
When too many keys are pressed, not all of the notes sound.
When playing a Pedal voice from the Lower keyboard (using the To Lower function), pressing the Lower keyboard’s Sustain button does not turn on Sustain.
The sound is too soft, despite the volume being set to the maximum.
Switching voices causes the volume to change, despite their having identical volume settings.
When keys on the Lower keyboard or Pedalboard are pressed, the sounds of percussion instruments are also heard.
Only one sound is heard when two notes of the Lead or Pedal voices are simultaneously played.
The Pedal voices do not sound, even though the volume is properly set.
Possible Cause and Solution
The LEDs of on/off buttons [RHYTHM PROGRAM and TREMOLO (FAST)] are lit when those functions are turned on. The LEDs of other function’s buttons momentarily flash when the functions are selected.
The plug of the cable from the speaker unit is disconnected. Refer to the separate “Assembly Instructions,” and reconnect the plug securely.
Noise may be produced when either an electrical appliance is turned on or off, or an electric power tool (such as drill) is used in the proximity of the Electone. If this occurs, plug the Electone into an electrical outlet located as far as possible from the device that seems to be the source of the problem.
This is caused by the proximity of a high-power broadcasting station or amateur ham radio setup.
Because the Electone is capable of producing powerful bass sounds, resonance may be caused in surrounding objects, such as cabinets or glass windows. To avoid this, relocate the objects or lower the Electone’s volume.
This happens very rarely. Occasionally, power surges and spikes due to electrical storms or other reasons may cause the Electone to malfunction and/or alter the contents of memorized data. If this happens, perform the Power On Reset operation to reset the Electone. (See page 47.)
Total polyphonic capacity (notes sounding for both Upper and Lower Keyboards) is 11 notes.
Even though the Pedal voice is being played from the Lower keyboard, it is still a Pedal voice; turn the Sustain on with the Pedal Sustain button. (See page 29.)
Check all of the volume controls, making sure that they are set to suitable levels: the panel Volume controls for each voice section, the Master Volume dial, and the Expression Pedal.
The volume of certain voices may seem lower than that of others. Adjust the balance of the sound with the Volume control within the appropriate Voice Condition display.
The keyboard Percussion function has been turned on. When not using the function, be sure to furn it off. (See page 39.)
For practical performance reasons, the Electone has been designed so that one note of the Lead or Pedal voices can be played at a time. If several keys are pressed at once, only the highest note will be sounded (highest-note priority).
The Single Finger or Fingered Chord mode of Auto Bass Chord is on. Turn off the mode in the display. (See page 36.)

12. Appendix
97
Problem
VOICES/RHYTHMS
While an Intro./Ending pattern is automatically playing, the Lower keyboard does not produce any sound, even when the keys are played.
During use of the Rhythm Pattern Program, no sound is produced even when you play a certain percussion sound.
EFFECTS
The Tremolo effect cannot be heard, even when the TREMOLO (FAST) button in the DISPLAY SELECT section is on.
ACCOMPANIMENT AND OTHER FUNCTIONS
Despite its volume being set to a suitable level, the Accompaniment cannot be heard.
The pitch in the Single Finger mode does not change, even when pressing different keys of the keyboard.
The harmony notes of the Melody On Chord function cannot be heard.
REGISTRATION MEMORY
Certain functions have not been memorized to Registration Memory.
MUSIC DISK RECORDER
Recording or playback cannot be performed.
A total of 40 songs cannot be recorded.
Recording is stopped before the performance is finished, or the Song Copy function cannot be executed.
In addition to a recorded performance on the Upper and/or Lower keyboards, a performance using a Lead voice cannot be recorded or played back.
The rhythm does not start at the beginning of a recording, or stops in the middle of the performance.
The notes of the recording are “stuck” and sound continuously.
Possible Cause and Solution
Since the Accompaniment chords play automatically one after another, the Lower keyboard is designed not to produce any sound during the play of an Intro./Ending pattern.
If percussion sounds have been recorded to all 16 rhythm tracks, no subsequently selected instruments can be heard or recorded. If necessary, erase one of the tracks and play the sound.
Tremolo must be selected first in the Voice Condition display. (See page 27.)
The rhythm has not been started. Be sure to use Accompaniment together with the rhythm.
Single Finger mode will only produce notes when played within a fixed octave interval on the Lower keyboard. If notes with the same letter name are pressed outside of that range, the chords that are sounded will share the same pitch.
The Upper keyboard has been set to sound only Lead voices. Increase the volume of the Upper voices.
Transposition and Pitch control data, among others, cannot be memorized (except as song data). (See page 42.)
1) Problems in recording or playback may be caused by improper operation of the M.D.R. Refer to the LED Display Messages chart on page 67.2) The PLAY or RECORD section buttons for selecting parts may be turned off. Turn on the appropriate PLAY or RECORD buttons.
If some song numbers contain a large amount of recorded data, the disk may not have enough available memory left to record the normal maximum of 40 songs.
The amount of recorded data on the disk is close to the maximum limit. Either use another disk or delete the data of any unnecessary song number. (See page 64.)
1) When recording, you forgot the following operation: press the RECORD button, then hold down the SHIFT button while you press the UPPER button (selecting Lead).2) During playback, you forgot to set the LEAD PLAY button to on.
The M.D.R. is designed so that the rhythm cannot be started at the very beginning of a recording. If you wish to use the rhythm, start it after the available memory display appears on the M.D.R. display.
During playback, you removed the disk by pressing the EJECT button. Whenever you wish to stop playback, always press the STOP button.

Specifications
12. Appendix
98
3
KEYBOARD Keyboards
Touch Tone
VOICE Tone Generation
Upper /Lower Keyboard
Lead (Upper)
Pedalboard
Voice Display
MELODY ON CHORD
EFFECT/CONDITION Digital Reverb
Sustain
Tremolo/Chorus
Symphonic/Celeste
Vibrato
Delay/Flanger
Feet
Glide
RHYTHM Rhythms
Variations
Others
RHYTHM PROGRAM Pattern Program
Rhythm Sequence
KEYBOARD PERCUSSION
ACCOMPANIMENT Auto Bass Chord
Accompaniments
REGISTRATION MEMORY
BASIC REGISTRATION
REGISTRATION MENU
MUSIC DISK RECORDER
FOOTSWITCH
KNEE LEVER
LCD DISPALY
OTHER CONTROLS
OTHER FITTINGS
OPTIONAL ACCESSORIES
SOUND SYSTEM Power Amplifiers
Speakers
DIMENSIONS (Width x Depth x Height)
WEIGHT
Specifications and desciptions in this Owner's Manual are for information purposes only.Yamaha Corp. reserves the right to change or modify products or specifications at any time without prior notice.
As specifications, equipment or options may not be the same in every locale, please check with your Yamaha dealer.
Upper: 49 keys (C – C), Lower: 49 keys (C – C), Pedal: 20 keys (C – G)
Initial/After (Upper, Lead, Lower)
New AWM
Strings, Pizz. Strings; Organ, Jazz Organ; Brass, Synth. Brass; Piano, Elec. Piano, Harpsichord; Clarinet; Guitar,
Elec. Guitar; Saxophone; Vibraphone, Marimba; Chorus; Cosmic 1, 2, 3; Tutti 1, 2; [Upper] Harmonica; [Lower] Horn;
User 1-4; Volume Fine
Violin; Oboe, Bassoon; Flute, Whistle; Trumpet, Trombone; User 1-4;
To Lower; Volume Fine
Contrabass, Pizz. Bass; Organ Bass; Elec. Bass, Synth. Bass; Tuba; User 1-4; To Lower; Volume Fine
Upper, Lower, Lead, Pedal
Mode: Off, MOC 1, 2, 3; Knee: On/Off
Depth
Upper (Knee), Lower (Knee), Pedal: Length
Upper, Lead, Lower, Pedal; Tremolo (Fast)/Chorus
Symphonic/Celeste (Upper, Lead, Lower, Pedal)
Upper/Lower: Preset/User (Depth); Lead: Preset/User (Delay, Depth, Speed); Touch Vibrato
Upper, Lead, Lower; Delay: Speed, Feedback, Balance; Flanger: Speed, Feedback, Depth
Upper, Lead, Lower, Pedal: Preset/4'/8'/16'
Upper, Lower, Lead
March, Polka, Country, Broadway; Waltz 1, 2, Jazz Waltz, Bolero; Swing 1, 2, Jazz Ballad, Dixie; Bounce 1, 2, Reggae 1, 2;
Slow Rock 1, 2, 3; 8 Beat 1, 2, 3, Dance Pop; Tango 1, 2, 3; Mambo, Cha-cha, Rhumba, Beguine; Samba 1, 2,
Bossanova 1, 2; 16 Beat 1, 2, 3, Funk; User 1-8 (A-D); Volume Fine
Fill-In; Intro. Ending; Lead In; Auto Variation: On/Off
Start; Synchro Start; Tempo; Bar/Beat LED; Volume
On/Off; Step Write/Real Time Write; Beat (4/4, 3/4, 2/4); Quantize ( , , , , Off); Metronome (On/Off);
Edit: Instruments 1-16 (Change, Clear; Cursor); Accent Level 0-8; 75 Percussion Sounds; Accompaniment Select;
Save: User 1-8 (A-D, Fill-In); Remaning Memory
On/Off; Sequence 1-4; 120 Poitions (Bar); Cursor Controls; Data: Preset/User (Set, Insert, Delete, Clear)
On/Off: Lower, Pedal; 43 Sounds
Mode: Off; Single Finger; Fingered Chord; Custom ABC; Memory: Lower/Pedal
Type 1, 2, 3, 4
M/To Disk, 1-8; Disable Button; Mode: Off; Shift; User (18 Positions; Cursor Controls; Data: Set, Insert, Delete, Clear)
1 – 5
120 (Provided in the Included Disks)
Play/Record: Upper, Lower, Pedal, Lead, Keyboard Percussion, Control; Pause; Stop; Song Select; Song Repeat;
Song Delete; Song Copy: From/To; Tempo; Shift; Format; Custom Play; Remaining Memory; LED Display; Eject
[Left] Mode: Off; Rhythm (Stop, Ending, Fill-In); Glide (Upper, Lower, Lead); [Right] Regist. Shift Mode: Off, Shift, User
On/Off: Sustain (Upper, Lower); MOC
20 x 2 Characters
Power On/Off; Exp. Pedal; Pitch Control; Transpose; Master Volume; Display Select; Data Controls; Page;
MIDI (Output; Upper, Lower; Int./Ext.: Lead, Sync., Exp.)
Registration Menu Disk x 2; 3.5" Floppy Disk; Matching Bench; Keyboard Cover/Music Stand; MIDI In/Out; Headphone Jack;
Rhythm In (Phone; R/L); Aux In/Out (RCA; R/L)
Voice Disks; Registration Menu Disk; 3.5" Floppy Disks; HPE-170 Headphones
30W
20 cm; 5 cm: Monitor x 2
109 cm x 52 cm x 99 cm *With Keyboard Cover Closed
70 Kg
3

12. Appendix
99
MIDI Specifications
■ Channel Messages
Code (Hexadecimal) Message Transmit Receive Remarks
8n nn (Note No.) 00-7F Note OFF ˛ CH 1 UK
˛ CH 2 LK
˛ CH 3 PK
˛ (CH 4)* LEAD
˛ CH 15 Keyboard Percussion
9n nn (Note No.) 00 Note OFF
01-7F ON CH 1** CH 1 UK
CH 2*** CH 2 LK
CH 3**** CH 3 PK
˛ (CH 4)* LEAD
˛ CH 15 Keyboard Percussion
Bn 04 00-7F 2nd Expression Pedal ˛ ˛ CONTROL
BF 0B 00-7F Expression Pedal CH 16 CH 16 CONTROL
Bn 40 00 SustainOFF
7F ON ˛ ˛ UK
˛ ˛ LK
˛ ˛ PK
Bn 7B 00 All Notes OFF ˛ ˛ UK
˛ ˛ LK
˛ ˛ PK
˛ ˛ LEAD
˛ ˛ CONTROL
Cn nn (Regist. No.) Program Change ˛ CH 1 UK
˛ CH 2 LK
˛ CH 3 PK
CH 16 CH 16 CONTROL
Dn 00-07 After Touch CH 1** CH 1 UK
CH 2*** CH 2 LK
˛ ˛ PK
˛ (CH 4)* LEAD
* Received only when in the Ext. mode.
** Can be changed to CH4.
*** Can be changed to CH5.
**** The velocity is fixed to 40H in the Note ON mode.
■ System Realtime Messages
Code Function Transmit Receive Remarks
F8 Clock Ø Ø*
FA Start Ø Ø
FC Stop Ø Ø
FE Active Sensing Ø Ø
FF Reset ˛ Ø
* Received only when in the Ext. mode

System Exclusive MessagesElectone Common Messages
■ Bulk Dump Related Messages
Code Messages Transmit Receive
F0 43 70 70 00 ...(Data)*... F7 Bulk Dump data ˛ Ø
01 F7 Request-to-Send Voice parameter data ˛ Ø
02 F7 Request-to-Receive Voice parameter data ˛ Ø
F0 43 70 70 10 F7 Request-to-Send all RAM data ˛ Ø
11 Request-to-Send all Registration memory data ˛ Ø
12 Request-to-Send R.S.P. data ˛ Ø
14 Request-to-Send User pattern data ˛ Ø
15 Request-to-Send User pattern data ˛ Ø
16 Request-to-Send User Voice data ˛ Ø
F0 43 70 70 20 F7 Request-to-Receive all RAM data ˛ Ø
21 Request-to-Receive Registration memory data ˛ Ø
22 Request-to-Receive R.S.P. data ˛ Ø
24 Request-to-Receive User pattern data ˛ Ø
25 Request-to-Receive User pattern data ˛ Ø
26 Request-to-Receive User Voice data ˛ Ø
F0 43 70 70 30 F7 Request-to-Send Model ID data ˛ Ø
F0 43 70 70 38 7F F7 Bulk Dump Acknowledge Ø ˛
00 Bulk Dump Unacknowledge Ø ˛
(Data)* = Exclusive data
■ Control Change
Code Messages Transmit Receive
F0 43 70 70 40 45 7F F7 LEFT FOOTSWITCH ON Ø Ø
00 OFF Ø Ø
47 7F F7 KNEE LEVER ON Ø Ø
00 OFF Ø Ø
48 7F F7 FILL IN ON Ø Ø
00 OFF Ø Ø
4B 7F F7 INTRO./ENDING ON Ø Ø
00 OFF Ø Ø
50 Tl* Th** F7 TEMPO Ø Ø
*l=Low byte **h=High byte
■ MDR-Related Status
Code Messages Transmit Receive
F0 43 70 70 70 01 F7 PLAY Start ˛ Ø
02 Stop ˛ Ø
03 RECORD Start ˛ Ø
04 Stop ˛ Ø
05 FF Start ˛ Ø
06 Stop ˛ Ø
09 Rhythm Pointer Reset ˛ Ø
■ Others
Code Messages Transmit Receive
F0 43 70 70 78 SC NC F7 Bar signal Ø Ø
12. Appendix
100

■ EL Series Common Messages
Code Messages Transmit Receive
F0 43 70 78 00 ...(Data)*... F7 Bulk Dump data Ø Ø
01 F7 Request-to-Send Voice parameter data ˛ Ø
02 Request-to-Receive Voice parameter data ˛ Ø
F0 43 70 78 10 F7 Request-to-Send all RAM data ˛ Ø
11 Request-to-Send all Registration memory data ˛ Ø
12 Request-to-Send R.S.P. data ˛ Ø
14 Request-to-Send User pattern data ˛ Ø
15 Request-to-Send User pattern data ˛ Ø
16 Request-to-Send User voice data ˛ Ø
F0 43 70 78 20 F7 Request-to-Receive all RAM data ˛ Ø
21 Request-to-Receive all Registration memory data ˛ Ø
22 Request-to-Receive R.S.P. data ˛ Ø
24 Request-to-Receive User pattern data ˛ Ø
25 Request-to-Receive User pattern data ˛ Ø
26 Request-to-Receive User voice data ˛ Ø
F0 43 70 78 41 ...(Data)*... F7 Panel Switch Event data** Ø Ø
F0 43 70 78 42 ...(Data)*... F7 Current Registration data Ø Ø
(Data)* = Exclusive data
** Refer to the Panel Operation Messages
■ Model-Specific Messages
Code Messages Transmit Receive
F0 43 70 3D* 00 ...(Data)... F7 Bulk Dump data ˛ Ø
00 F7 Mpdel ID data Ø ˛
01 Request-to-Send Voice parameter data ˛ Ø
02 Request-to-Receive Voice parameter data ˛ Ø
F0 43 70 3D* 10 F7 Request-to-Send all RAM data ˛ Ø
11 Request-to-Send all Registration Memory data ˛ Ø
12 Request-to-Send R.S.P. data ˛ Ø
14 Request-to-Send User pattern data ˛ Ø
15 Request-to-Send User pattern data ˛ Ø
16 Request-to-Send User voice data ˛ Ø
F0 43 70 3D* 20 F7 Request-to-Receive all RAM data ˛ Ø
21 Request-to-Receive Registration data ˛ Ø
22 Request-to-Receive R.S.P. data ˛ Ø
24 Request-to-Receive User pattern data ˛ Ø
25 Request-to-Receive User pattern data ˛ Ø
26 Request-to-Receive User voice data ˛ Ø
“3D”* is the ID code of EL-37.
■ Electone/Single Keybord Common Messages
Code Messages Transmit Receive
F0 43 73 01 02 F7 Request for Internal Clock mode ˛ Ø
03 Request for External Clock mode ˛ Ø
12. Appendix
101

■ Panel Operation Messages
Functions Switches Code Data Remarks
Selector UK Voices 02 00-0D SW No.
LK Voices 03 00-0D SW No.
LEAD 06 00-04 SW No.
PK Voice 07 00-04 SW No.
Rhythm 0B 00-0B SW No.
Volume UK Voices 12 00-7F Volume data
LK Voices 13 00-7F Volume data
LEAD 16 00-7F Volume data
PK Voice 17 00-7F Volume data
Rhythm 1A 00-7F Volume data
Reverb 1B 00-7F Depth data
To Lower Lead 36 00-01 00=OFF 01=ON
PK Voice 37 00-01 00=OFF 01=ON
Sustain UK 50 00-01 00=OFF 01=ON
LK 51 00-01 00=OFF 01=ON
PK 52 00-01 00=OFF 01=ON
Keybord Percussion LK 5B 00-01 00=OFF 01=ON
PK 5C 00-01 00=OFF 01=ON
Disable Disable 5F 00-01 00=OFF 01=ON
Tremolo (Fast) Tremolo 60 00-01 00=Chorus 01=Tremolo*
Rhythm Sequence Program 1 61 00-01 00=OFF 01=ON
2 62 00-01 00=OFF 01=ON
3 63 00-01 00=OFF 01=ON
4 64 00-01 00=OFF 01=ON
* Even if the 1:00 Chorus is received, Tremolo (Fast) will be turned OFF.
12. Appendix
102

MIDI Implementation Chart
12. Appendix
103
TransmitFunction Receive Remarks
Basic Channel
Note Number
Velocity
After Touch
Pitch Bend
Control Change
Program Change
System Exclusive
SystemCommon
System Real Time
Aux Messages
Notes
Mode
DefaultChanged
Note ONNote OFF
Key'sCh's
14
11
64
True Voice
ClockCommands
Local ON/OFFAll Notes OFFActive SenseReset
Song PositionSong SelectTune
1, 2, 3, 164, 5
Ø 9nH, v=0-127˛
˛Ø
˛˛Ø
˛
Ø 0-7, 112-116************************
˛˛˛
ØØ
˛˛Ø˛
*
**
***
****
CH 1: 48-96, CH2: 36-84, CH3: 36-55
CH15: 36-127, Others: 36-96
CH1: UK, CH2: LK, CH3: PK, CH4: LEAD,
CH15: Keyboard Percussion, CH16: CONTROL
The Note ON velocity is fixed to 40H in the PK’s transmit mode.
Mode 3˛************************
36-96 *************************
Ø
Mode 1: OMNI ON, POLYMode 3: OMNI OFF, POLY
˛
1, 2, 3, 15, 164
Ø 9nH, v=0-127Ø 8nH,
˛Ø
˛˛Ø (Received only in
External mode)˛
Ø 0-7, 112-1160-7, 112-116
˛˛˛
ØØ
˛˛Ø˛
Mode 3˛˛
36-96 **
Ø
˛
Modulation Wheel2nd Expression PedalExpression Pedal
Sustain Pedal
v=0 (OFF)****
Refer to MIDI Specifications
FAH, FCH(Received only in External mode)
Ø : YES˛ : NO
Range
Mode 2: OMNI ON, MONOMode 4: OMNI OFF, MONO
DefaultMessagesAltered
***

AA.B.C. (Auto Bass Chord) ............................36Accent (Rhythm Pattern) ..............................75Accompaniment............................................35Accompaniment (Rhythm Pattern) ..............78After Touch ..................................................23Auto Variation ..............................................33Automatic Accompaniment..........................36Aux In/Out....................................................95
BBalance (Delay) ............................................28Bar/Beat Indicator ........................................32Basic Registrations..........................................7Beat (Rhythm Pattern)..................................72
CCeleste ..........................................................27Chord ................................................36, 37, 38Chorus (Slow) ..............................................27Clear (Registration) ......................................46Clear (Rhythm Sequence) ............................76Control (M.D.R.) ..........................................54Custom (Custom A.B.C.) ..............................37Custom Play (M.D.R,) ..................................61
DData Control Buttons................................9, 14Delay ............................................................28Delay (Vibrato) ............................................26Delete (Registration) ....................................46Delete (Rhythm Sequence) ..........................86Depth (Flanger) ............................................28Depth (Vibrato) ............................................26Disable (D) Button ......................................42Display Select................................................16Dotted Button (Rhythm) ..............................33Dotted Button (Voice)..................................19
EEdit (Registration) ........................................44Edit (Rhythm Pattern)..............................73-75Effects ............................................................27Eject (Disk) (M.D.R.) ....................................48Ending (Intro. Ending) ................................31Expression (MIDI Control) ..........................94Expression Pedal ............................................7
FF.B. (Feedback; Delay/Flanger) ..................28Feet (Octave) ................................................24Fill In ............................................................32Fingered (Fingered Chord) ..........................37Flanger ..........................................................28Footswitch (Glide)........................................90Footswitch (Left)......................................89-90Footswitch (Rhythm) ....................................89Footswitch (Right) ........................................44Format (M.D.R.) ............................................50
GGlide..............................................................90
HHeadphones..................................................95
IInitial Touch..................................................23Insert (Registration) ......................................46Insert (Rhythm Sequence)............................86Instrument Change (Rhythm Pattern)..........76Instrument Clear (Rhythm Pattern)..............76Intro. Ending ................................................31
KKeyboard Percussion....................................39Knee (M.O.C.) ........................................40, 91Knee (Sustain) ..............................................90Knee Lever ....................................................90
LLCD Display ..................................................14Lead (MIDI Control) ....................................94Lead In ..........................................................31Lead Voice ....................................................17Lower Keyboard Voices ..............................17
MM.D.R. (Music Disk Recorder) ....................48M.O.C. (Melody On Chord) ........................40Master Volume................................................7Memory (Lower/Pedal) ................................37Memory (M) Button (Registration Memory) ......42Metronome....................................................77MIDI ..............................................................93Music Disk Recorder ....................................48
OOutput Channel (MIDI)................................93
PPage Buttons ............................................9, 15Pause (M.D.R.) ..............................................61Pedal Voices..................................................17Percussion................................................39-40Percussion Volume ......................................39Pitch ..............................................................92Play (M.D.R.)............................................58-60Power On Reset............................................47Power Switch ..................................................6
QQuantize........................................................72
RReal Time Write (Rhythm Pattern) ..............72Record (M.D.R.) ......................................51-55Registration (Shift/User) ..............................44Registration Memory ....................................42Registration Menu......................................9-13Registration Menu Disk ..................................9Remaining Memory (M.D.R.) ......................64Remaining Memory (Rhythm Pattern) ........72Retry (M.D.R.) ..............................................52Reverb ..........................................................29Rhythm..........................................................30Rhythm Condition Page ..............................33Rhythm In ....................................................95Rhythm Menu ..............................................35Rhythm Pattern Programming ................68-81Rhythm Sequence Programming ............81-88
sSave (Rhythm Program) ..............................79Set (Registration) ..........................................46Set (Rhythm Sequence) ................................85Shift (M.D.R.) ..........................................50, 54Shift (Registration) ........................................44Single (Single Finger) ..................................37Song Copy (M.D.R.) ....................................63Song Delete (M.D.R.) ..................................64Song Repeat (M.D.R.) ..................................60Song Select (M.D.R.) ....................................51Speed (Delay/Flanger) ................................28Speed (Vibrato) ............................................26Start Button ..................................................30Step Write (Rhythm Pattern) ..................72-76Stop (M.D.R.) ....................................50, 52, 54Sustain ..........................................................29Sustain Length ..............................................29Symphonic ....................................................27Sync (MIDI Control) ....................................94Synchro. Start ................................................31
TTempo (M.D.R.)............................................62Tempo (Rhythm) ....................................31-32Tempo Dial ..................................................31Tempo Display ............................................32To Lower ......................................................18Touch Tone ..................................................23Touch Vibrato ..............................................25Transpose......................................................92Tremolo ........................................................27Tremolo (Fast) ..............................................27Type (Accompaniment) ..............................36
UUpper Keyboard Voices ..............................17User (Registration)........................................44User Rhythm ..........................................33, 80User Voice................................................19-20
vVibrato......................................................25-26Voice Condition Pages ............................22-26Voice Disk................................................65-66Voice Display....................................17, 18, 20Voice Menu ..................................................21Volume Coarse ............................................18Volume Fine ..........................................18, 23
WWrite Protect (M.D.R.) ..................................49
12. Appendix
104
Index

PLEASE KEEP THIS MANUAL
IMPORTANT SAFETY INSTRUCTIONSINFORMATION RELATING TO PERSONAL INJURY, ELECTRICAL SHOCK, AND FIRE HAZARD
POSSIBILITIES HAS BEEN INCLUDED IN THIS LIST.
WARNING- When using any electrical or electronic product,basic precautions should always be followed. Theseprecautions include, but are not limited to, the following:
1. Read all Safety Instructions, Installation Instructions,Special Message Section items, and any AssemblyInstructions found in this manual BEFORE making anyconnections, including connections to the main supply.
2. Main Power Supply Verification: Yamaha products aremanufactured specifically for the supply voltage in the areawhere they are to be sold. If you should move, or if any doubtexists about the supply voltage in your area, please contactyour dealer for supply voltage verification and (if applicable)instructions. The required supply voltage is printed on thename plate. For name plate location, please refer to thegraphic found in the Special Message Section of this manual.
3. This product may be equipped with a polarized plug (oneblade wider than the other ). If you are unable to insert the pluginto the outlet, turn the plug over and try again. If the problempersists, contact an electrician to have the obsolete outletreplaced. DO NOT defeat the safety purpose of the plug.
4. Some electronic products utilize external power suppliesor adapters. DO NOT connect this type of product to anypower supply or adapter other than one described in theowners manual, on the name plate, or specificallyrecommended by Yamaha.
5. WARNING: Do not place this product or any otherobjects on the power cord or place it in a position whereanyone could walk on, trip over, or roll anything over power orconnecting cords of any kind. The use of an extension cord isnot recommended! IF you must use an extension cord, theminimum wire size for a 25' cord (or less) is 18 AWG. NOTE:The smaller the AWG number,the larger the current handlingcapacity. For longer extension cords, consult a localelectrician.
6. Ventilation: Electronic products, unless specificallydesigned for enclosed installations, should be placed inlocations that do not interfere with proper ventilation. Ifinstructions for enclosed installations are not provided,it mustbe assumed that unobstructed ventilation is required.
7. Temperature considerations: Electronic products shouldbe installed in locations that do not significantly contribute totheir operating temperature. Placement of this product close toheat sources such as; radiators, heat registers and otherdevices that produce heat should be avoided.
8. This product was NOT designed for use in wet/damplocations and should not be used near water or exposed torain. Examples of wet /damp locations are; near a swimmingpool, spa, tub, sink, or wet basement.
9. This product should be used only with the componentssupplied or; a cart ,rack, or stand that is recommended by themanufacturer . If a cart, rack, or stand is used, please observeall safety markings and instructions that accompany theaccessory product.
10. The power supply cord (plug) should be disconnectedfrom the outlet when electronic products are to be left unusedfor extended periods of time. Cords should also bedisconnected when there is a high probability of lighteningand/or electrical storm activity.
11. Care should be taken that objects do not fall and liquidsare not spilled into the enclosure through any openings thatmay exist.
12. Electrical/electronic products should be serviced by aqualified service person when:
a. The power supply cord has been damaged; orb. Objects have fallen, been inserted, or liquids have
been spilled into the enclosure through openings; orc. The product has been exposed to rain; ord. The product does not operate, exhibits a marked
change in performance; ore. The product has been dropped, or the enclosure of the
product has been damaged.
13. Do not attempt to service this product beyond thatdescribed in the user-maintenance instructions. All otherservicing should be referred to qualified service personnel.
14. This product, either alone or in combination with anamplifier and headphones or speaker/s, may be capable ofproducing sound levels that could cause permanent hearingloss. DO NOT operate for a long period of time at a highvolume level or at a level that is uncomfortable. If youexperience any hearing loss or ringing in the ears, you shouldconsult an audiologist.IMPORTANT: The louder the sound, the shorter the timeperiod before damage occurs.
15. Some Yamaha products may have benches and/oraccessory mounting fixtures that are either supplied as a partof the product or as optional accessories. Some of these itemsare designed to be dealer assembled or installed. Pleasemake sure that benches are stable and any optional fixtures(where applicable) are well secured BEFORE using. Benchessupplied by Yamaha are designed for seating only. No otheruses are recommended.
92-469-2

Yamaha CorporationInternational Marketing GroupP.O.Box1, Hamamatsu, JapanPhone: 81(country code)-53-460-2317Fax: 81-53-456-8872, 1109
M.D.G., EMI Division, ©Yamaha Corporation 1996VV03690 607MWCP5.2-01A0 Printed in Japan