processing an interdepartmental transfer via ipayment · processing an interdepartmental transfer...
TRANSCRIPT

1 | P a g e
Processing an Interdepartmental Transfer via iPayment
What is an Interdepartmental Transfer (IDT)? An Interdepartmental Transfer is an invoice, a bill, or a charge to another unit within the same agency is the selling unit. IDT’s cannot cross system members. Must be AgriLife Research buying and selling to AgriLife Research. Same for AgriLife Extension Service.
iPayment is accessible via SSO. iPayment is accessible using the following web browsers: Internet Explorer, Mozilla Firefox, Chrome, and Safari.
However, Mozilla Firefox and Chrome are preferred by most users for the most effective functionality within iPayment. Pop blockers must also be turned off.
Attachments must be added to files at time of entry. After the files are balanced and closed attachments may no longer be added. Transactions must be voided and re-entered to add the attachments.
Pop blockers must also be turned off.
iPayments is be accessible via SSO.

2 | P a g e
Selecting the iPayments button will redirect the user to another page displaying the options of Cashiering or Admin Center. Access to either of these locations within the iPayments program is dependent upon the user security access type.
The Cashiering Module is where users will go to process transactions for deposits, Interdepartmental Transfers (IDTs), and/or AR invoices.
The Admin Center Module is where users will go to run reports and view details for transactions.
Workgroup/Unit Logon Screen
A user may be granted access to more than one workgroup (unit) and/or more than one system member. If so, the user is required to specify which department is needed. If the user is only granted access to one department, this step is skipped.

3 | P a g e
4 | P a g e
Create a CORE File or Manage Existing Files
Upon selecting the workgroup/unit in which to submit an IDT, the user will be presented with an option to create a CORE file or to manage existing files.
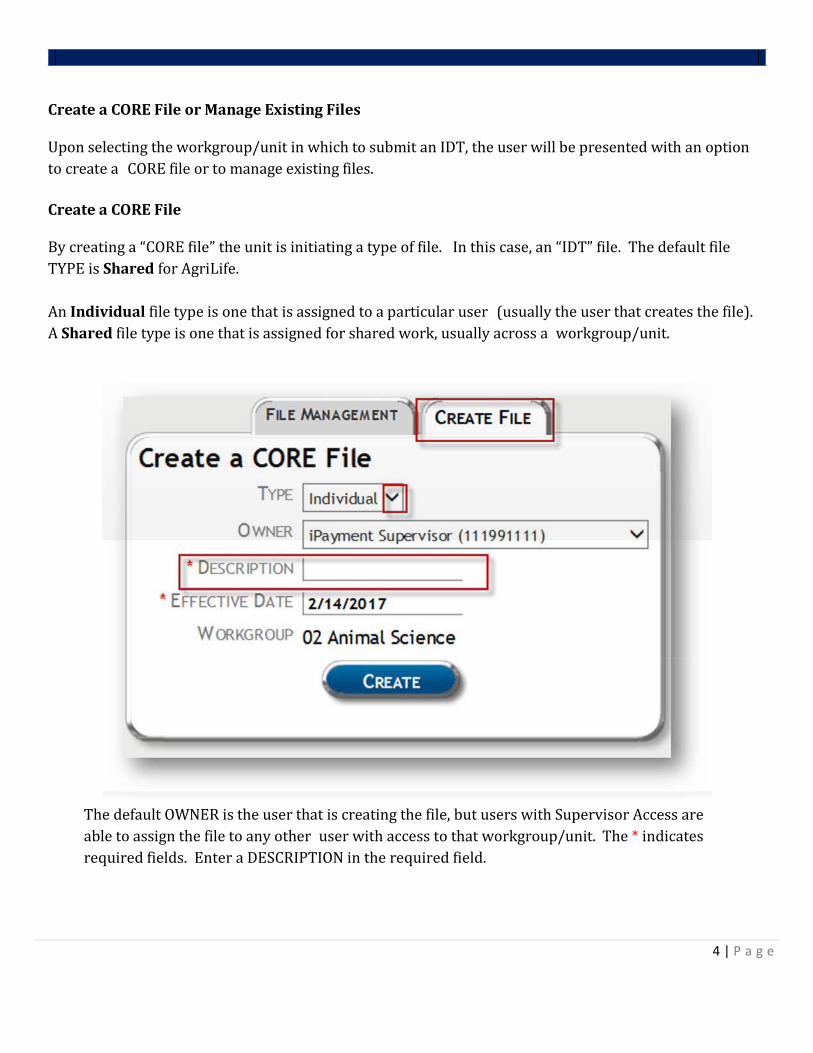
Create a CORE File
By creating a “CORE file” the unit is initiating a type of file. In this case, an “IDT” file. The default file TYPE is Shared for AgriLife. An Individual file type is one that is assigned to a particular user (usually the user that creates the file). A Shared file type is one that is assigned for shared work, usually across a workgroup/unit.
The default OWNER is the user that is creating the file, but users with Supervisor Access are able to assign the file to any other user with access to that workgroup/unit. The * indicates required fields. Enter a DESCRIPTION in the required field.
5 | P a g e
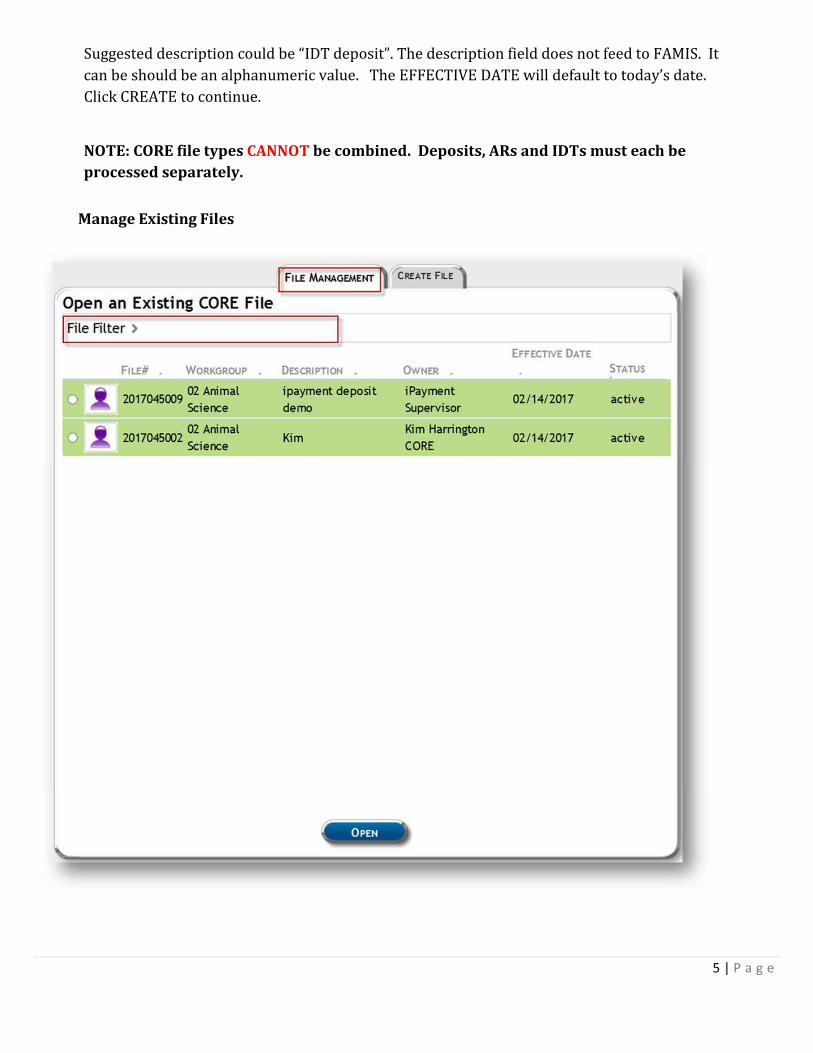
Suggested description could be “IDT deposit”. The description field does not feed to FAMIS. It can be should be an alphanumeric value. The EFFECTIVE DATE will default to today’s date. Click CREATE to continue.
NOTE: CORE file types CANNOT be combined. Deposits, ARs and IDTs must each be processed separately.
Manage Existing Files

6 | P a g e
When a CORE File is created, but closed prior to being balanced, the file will be displayed on the File Management tab. This tab will only display the files created today. To view files that were opened previously, click File Filter >. The File Filter > option will allow the user to select specific criteria to find active files from previous dates. In the example below the File From Date was modified to 02/01/2017 which pulled 4 additional files for review. To continue, select the file and click OPEN.
7 | P a g e
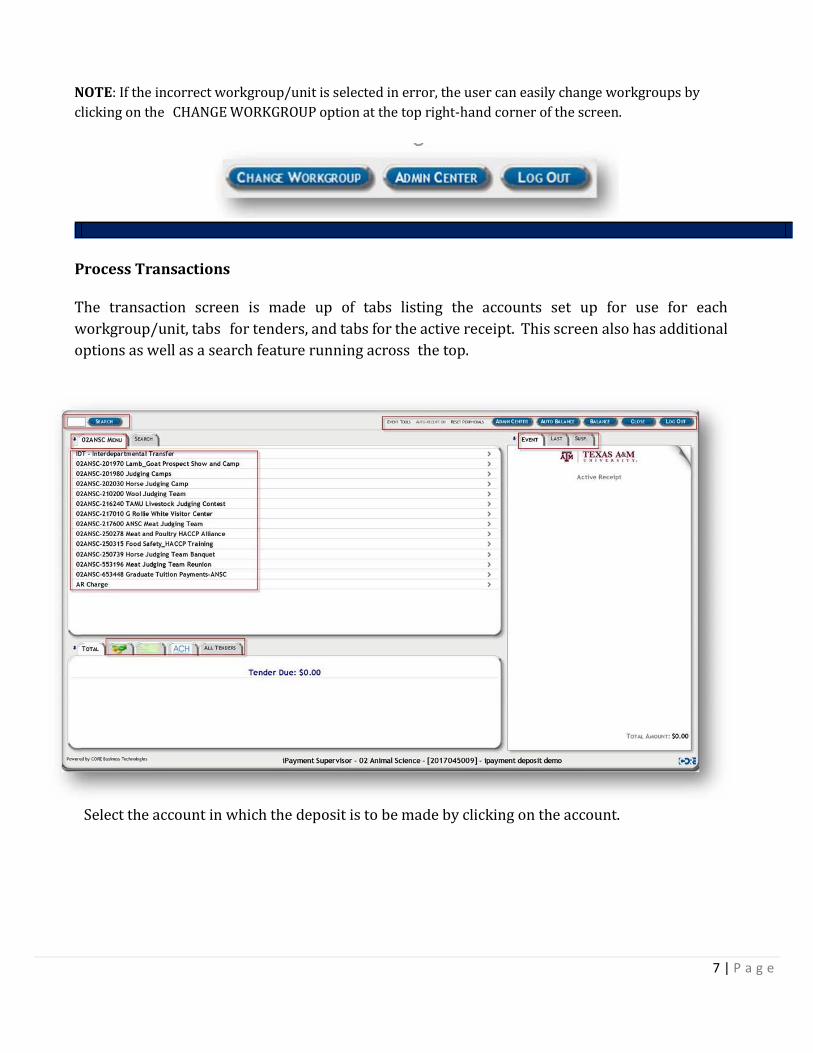
NOTE: If the incorrect workgroup/unit is selected in error, the user can easily change workgroups by clicking on the CHANGE WORKGROUP option at the top right-hand corner of the screen.
Process Transactions
The transaction screen is made up of tabs listing the accounts set up for use for each workgroup/unit, tabs for tenders, and tabs for the active receipt. This screen also has additional options as well as a search feature running across the top.
Select the account in which the deposit is to be made by clicking on the account.

8 | P a g e
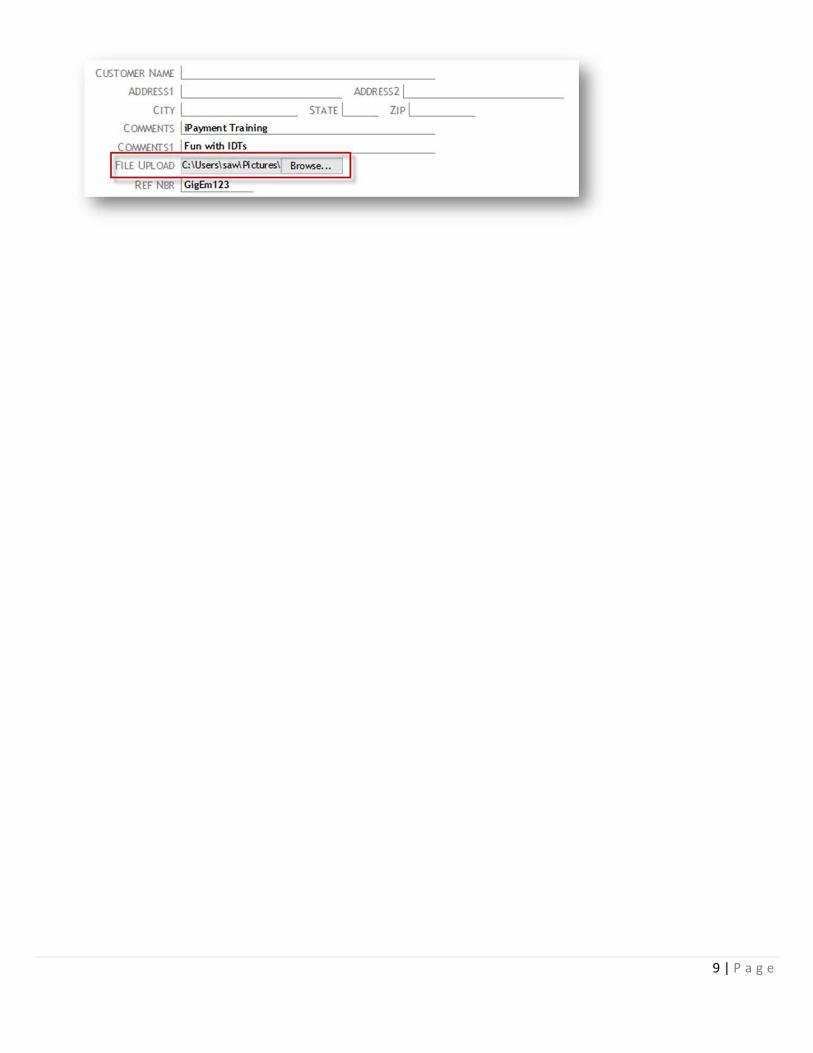
There are several optional fields listed at the top of the screen. Each of these options is a searchable field in the iPayment System. Each of these fields when used, will display on the receipt generated for the customer with the exception of the File Upload field. The customer name and address fields are usually left blank when creating an IDT. Both comments fields pull to the receipt. Type in comments meaningful to the customer and the unit. Do not add the File Upload at this time. Please note the REF NBR field does not allow the use of spaces.
Use the FILE UPLOAD to attach backup documentation for the IDT after allocations have been selected. See Allocations on page 9. Users can attach documents with the following file extensions: .pdf, .xls, .docx, .jpeg, .png, and .txt. Please do not attach documents containing confidential information. An example of what users may upload would be an email or document providing approval to charge the account in question for the IDT.
9 | P a g e

10 | P a g e
IDT –Interdepartmental Transactions
There are three different IDT scenarios of which users should be aware. Scenario 1 is a one to one transaction. Scenario 2 is a one to many transactions. Scenario 3 is a many to many transactions. Each of these scenarios are described in detail below.
IDT SCENARIO 1‐ One to One This scenario involves one selling account and one buying account for one item or service. This scenario is the most common scenario for an IDT.
Once the selling account is selected, the user will be presented with the list of allocations available for that account. Below are the Allocations available for this account. The description is editable. However, the description here will not be the description that will display in FAMIS. Enter the AMOUNT and or QUANTITY. Since an IDT is being processed, sales tax should not be charged. When an amount is entered, the SELECTED section will automatically flag a check mark. Once the information is entered, the user can opt to click VALIDATE ALLOCATIONS. This will check each account selected for available budget, object code matching, account flags, and support account flags.
Click CONTINUE.

11 | P a g e
The information entered now pulls to the Active Receipt on the right side of the screen.
Click CONTINUE.
Review the information. To view the details, click the >. If anything is incorrect, click the trash can to Void the entry and start over or Void the entire receipt by clicking the Void Event at the bottom of the receipt. Click on the icon to display the attached backup.
If this is the incorrect backup, the transaction will have to be voided and re-entered with the correct backup added. If everything is correct, it is now time to “tender the Event. Select IDT- Interdepartmental Transfer at the top of the menu. Do not change the CAMPUS CODE. This field is defaulted to the correct campus code and should not be altered. IDTs cannot cross system members.

12 | P a g e
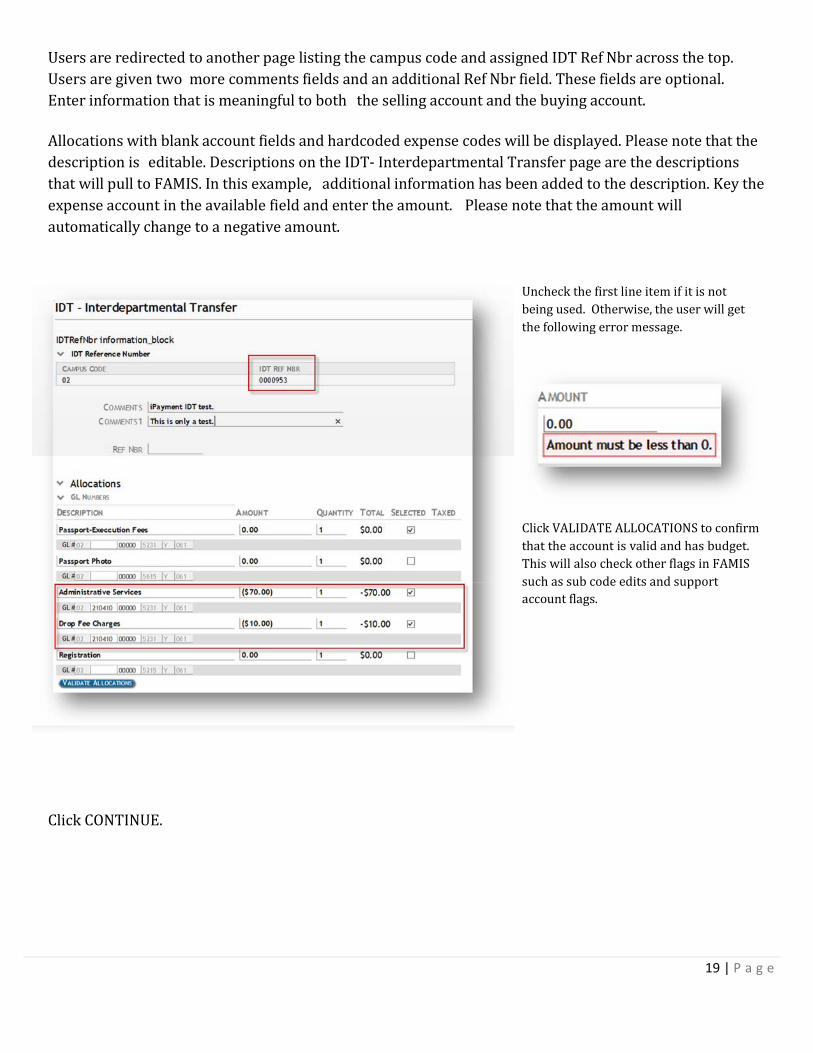
Users are redirected to another page listing the campus code and assigned IDT Ref Nbr across the top. Users are given two more comments fields and an additional Ref Nbr field. These fields are optional. Enter information that is meaningful to both the selling account and the buying account.
Allocations with blank account fields and hardcoded expense codes will be displayed. Please note that the description is editable. Descriptions on the IDT- Interdepartmental Transfer page are the descriptions that will pull to FAMIS. In this example, the registrant’s name has been added to the description. Key the expense account in the available field and enter the amount. Please note that the amount will automatically change to a negative amount.

13 | P a g e
Click VALIDATE ALLOCATIONS to confirm that the account is valid and has budget. This will also check other flags in FAMIS such as sub code edits and support account flags. Click CONTINUE.

14 | P a g e
At that point a status bar will display on the screen.
You will then be prompted to print the receipt.
The receipt listed on the right side of the screen will no longer have ‘Active Receipt’ at the top.
It will have CORE Business Technologies, the agency brand, the agency name, and ‘Receipt’.
It will also include the IDT Ref Nar and any optional field that had information keyed to it as well as the icon for attached
backup.
It will also display the buying account allocations.
At this point an email notification is sent to both the selling and buying account. FAMIS screen 860 has a field labeled iPay IDT Email/ID that is used to direct these emails.
Once all of the IDTs have been created, the file must be balanced. Please proceed to Depositing and Balancing Files on page 19.

15 | P a g e
IDT SCENARIO 2‐ One to Many This scenario involves one selling account and multiple buying account for one type of item or service. This scenario is the second most common scenario for an IDT.
Once the selling account is selected, the user will be presented with the list of allocations available for that account. Below are the Allocations available for this account. The description is editable. However, the description here will not be the description that will display in FAMIS. Enter the AMOUNT and or QUANTITY. Since an IDT is being processed, sales tax should not be charged. When an amount is entered, the SELECTED section will automatically flag a check mark. Once the information is entered, the user can opt to click VALIDATE ALLOCATIONS. This will check each account selected for available budget, object code matching, account flags, and support account flags.
Click CONTINUE. Then Select IDT- Interdepartmental Transfer.
Do not change the CAMPUS CODE. This field is defaulted to the correct campus code and should not be altered.
IDTs cannot cross over to other agencies.
Click CONTINUE.

16 | P a g e
Users are redirected to another page listing the campus code and assigned IDT Ref Nbr across the top. Users are given two more comments fields and an additional Ref Nbr field. These fields are optional. Enter information that is meaningful to both the selling account and the buying account.
Allocations with blank account fields and hardcoded expense codes will be displayed. Please note that the description is editable. Descriptions on the IDT- Interdepartmental Transfer page are the descriptions that will pull to FAMIS. In this example, additional information has been added to the description. Key the expense account in the available field and enter the amount. Please note that the amount will automatically change to a negative amount.
Click CONTINUE.
Uncheck the first line item is if it not being used. Otherwise, the user will get the following error message.
Click VALIDATE ALLOCATIONS to confirm that the account is valid and has budget. This will also check other flags in FAMIS such as sub code edits and support account flags.

17 | P a g e
At that point a status bar will display on the screen.
You will then be prompted to print the receipt.
The receipt listed on the right side of the screen will no longer have ‘Active Receipt’ at the top.
It will have CORE Business Technologies, the agency brand, the agency name, and ‘Receipt’.
It will also include the IDT Ref Nbr and any optional field that had information keyed to it as well as the icon for attached backup.
It will also display the buying account allocations.
At this point an email notification is sent to both the selling and buying account. FAMIS screen 860 has a field labeled iPay IDT Email/ID that is used to direct these emails.
Once all of the IDTs have been created, the file must be balanced. Please proceed to Depositing and Balancing Files on page 19.

18 | P a g e
IDT SCENARIO 3‐ Many to Many This scenario involves one selling account and buying account for more than one type of item or service. This scenario is the least common scenario for an IDT.
Once the selling account is selected, the user will be presented with the list of allocations available for that account. Below are the Allocations available for this account. The description is editable. However, the description here will not be the description that will display in FAMIS. Enter the AMOUNT and or QUANTITY. Since an IDT is being processed, sales tax should not be charged. When an amount is entered, the SELECTED section will automatically flag a check mark. Once the information is entered, the user can opt to click VALIDATE ALLOCATIONS. This will check each account selected for available budget, object code matching, account flags, and support account flags.
Click CONTINUE. Then Select IDT- Interdepartmental Transfer.
Do not change the CAMPUS CODE. This field is defaulted to the correct campus code and should not be altered.
IDTs cannot cross over to other agencies.
Click Continue.
19 | P a g e
Users are redirected to another page listing the campus code and assigned IDT Ref Nbr across the top. Users are given two more comments fields and an additional Ref Nbr field. These fields are optional. Enter information that is meaningful to both the selling account and the buying account.
Allocations with blank account fields and hardcoded expense codes will be displayed. Please note that the description is editable. Descriptions on the IDT- Interdepartmental Transfer page are the descriptions that will pull to FAMIS. In this example, additional information has been added to the description. Key the expense account in the available field and enter the amount. Please note that the amount will automatically change to a negative amount.
Click CONTINUE.
Uncheck the first line item if it is not being used. Otherwise, the user will get the following error message.
Click VALIDATE ALLOCATIONS to confirm that the account is valid and has budget. This will also check other flags in FAMIS such as sub code edits and support account flags.

20 | P a g e
At that point a status bar will display on the screen.
You will then be prompted to print the receipt.
The receipt listed on the right side of the screen will no longer have ‘Active Receipt’ at the top.
It will have CORE Business Technologies, the agency brand, the agency name, and ‘Receipt’.
It will also include the IDT Ref Nbr and any optional field that had information keyed to it as well as the icon for attached backup.
It will also display the buying account allocations.
At this point an email notification is sent to both the selling and buying account. FAMIS screen 860 has a field labeled iPay IDT Email/ID that is used to direct these emails.
Once all of the IDTs have been created, the file must be balanced. Please proceed to Depositing and Balancing Files on page 19.

21 | P a g e
Depositing and Balancing Files‐ USER ACCESS
Once all of the IDTs have been created, the file must be balanced. Persons with USER access can enter IDTs. At this point, persons with USER access have completed all of the steps in which they have access. Click Close and then Log Out.
Depositing and Balancing Files‐ SUPERVISOR ACCESS
Once all of the IDTs have been created, the file must be balanced.
The Depositing and Balancing screen will default to the users UIN and display the Tender Summary by Bank. Note that there are no tenders listed and no deposit amount.
Notice that the summary of IDTs no longer displays. To view the details of this IDT, Click EXIT.

22 | P a g e
This will take you back to the home page listing your menus of accounts. Click EVENT TOOLS which is the first option listed in the top right corner of the page.
This will take you to the SEARCH screen. The File ID will default to the file in which the user is currently logged.
Click SEARCH.

23 | P a g e
This will take you to a new screen that will list each receipt in the file and allow you to click on each one to view the details.
Users can view the backup documentation by clicking on the icon. The account and object code and customer details are included on this page. If the information is incorrect, users can void this invoice at this point by clicking VOID. Users can also reprint the receipt from this location. To go back to Depositing and Balancing screen, click EXIT.

24 | P a g e
This will take you back to the home page. If there is only one invoice in this file, the user can select Auto balance. If there is more than one event, Click BALANCE.
This will take you back to the Depositing and Balancing Screen. Change the UIN to All. Click BALANCE and
CLOSE.

23 | P a g e
Users should then be presented with a Management Report and a message that the File Update is Complete.
Click OK. You will get a message that the File is balanced. Click OK and then EXIT. Users will then be re-routed to the File Management/Create File Screen. Users should now review the IDT in FAMIS.
24 | P a g e
Reviewing the IDT in FAMIS
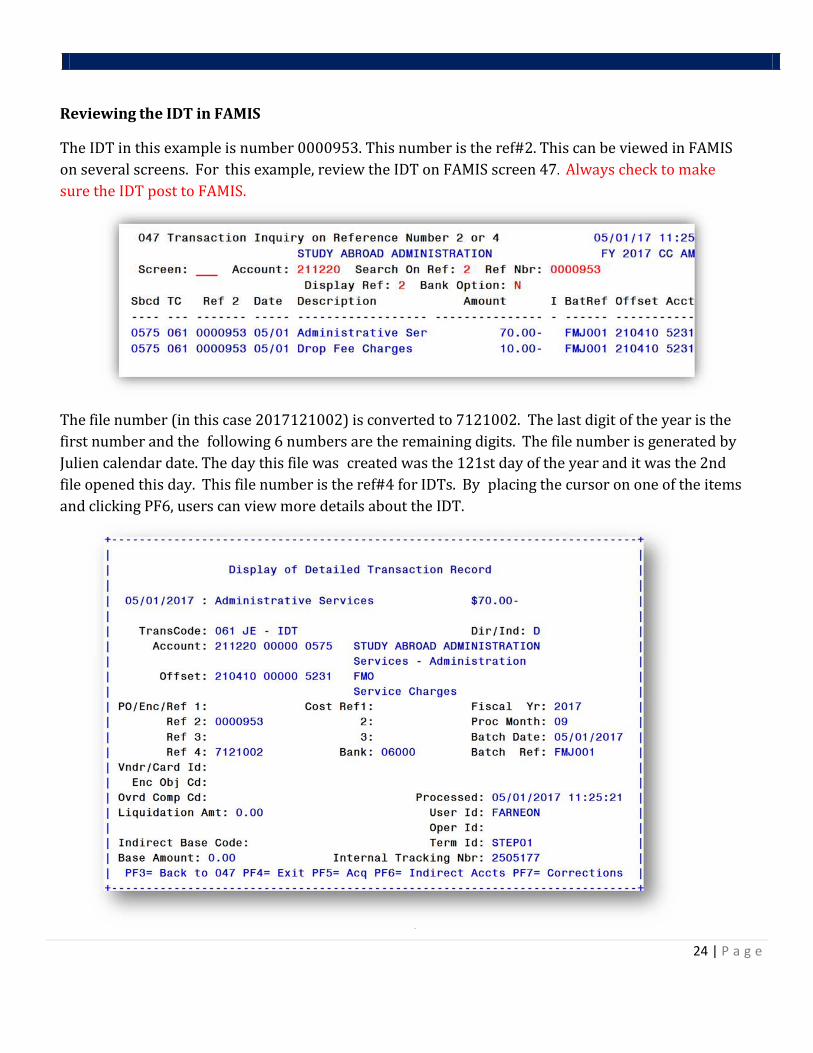
The IDT in this example is number 0000953. This number is the ref#2. This can be viewed in FAMIS on several screens. For this example, review the IDT on FAMIS screen 47. Always check to make sure the IDT post to FAMIS.
The file number (in this case 2017121002) is converted to 7121002. The last digit of the year is the first number and the following 6 numbers are the remaining digits. The file number is generated by Julien calendar date. The day this file was created was the 121st day of the year and it was the 2nd file opened this day. This file number is the ref#4 for IDTs. By placing the cursor on one of the items and clicking PF6, users can view more details about the IDT.

25 | P a g e
Corrections to IDTs
o iPayment payfile has NOT been balanced
– IDT transactions can be voided and/or recalled and edited prior to being marked as balanced.
o iPayment payfile HAS been balanced
– Verify IDT has posted to FAMIS before initiating IDT correction. Check screen 47 in FAMIS. Please be specific for types of corrections indicated below. Changing revenues codes: Unit initiates a DCR changing the revenue code. The
DCR will route for approval.
Changing expense codes: Unit initiates a DCR changing the expense code. The DCR will route for approval.
Changing buying accounts: Unit initiates a DCR changing the account and/or support account. The DCR will route for approval.
Changing selling accounts: Unit initiates a DCR changing the account and/or support account. The DCR will route for approval.
Changing the amount: Request amounts to increased/decreased by submitting request to [email protected] . Be specific in request to include IDT ref#, both account numbers, both support account numbers, both revenue codes and expense codes and amount. Include justification statement as to why amount is changing. Be clear as to what the new IDT total should be. Unit signatory required.
Cancelling an IDT: Request that the IDT be voided entirely by submitting a request to [email protected] including justification for cancellation. The IDT ref #, account number, support account number, revenue code, and amount will need to be provided. Total amount of IDT cancellation should be stated clearly. Unit signatory required.
Acknowledgement Texas A&M AgriLife wishes to acknowledge and thank Texas A&M University FMO for allowing the agencies to adapt and utilize their training materials for the iPayment implementation.