reactive ruffled controlled drop...
TRANSCRIPT
Reactive Ruffled
Controlled Drop Flower
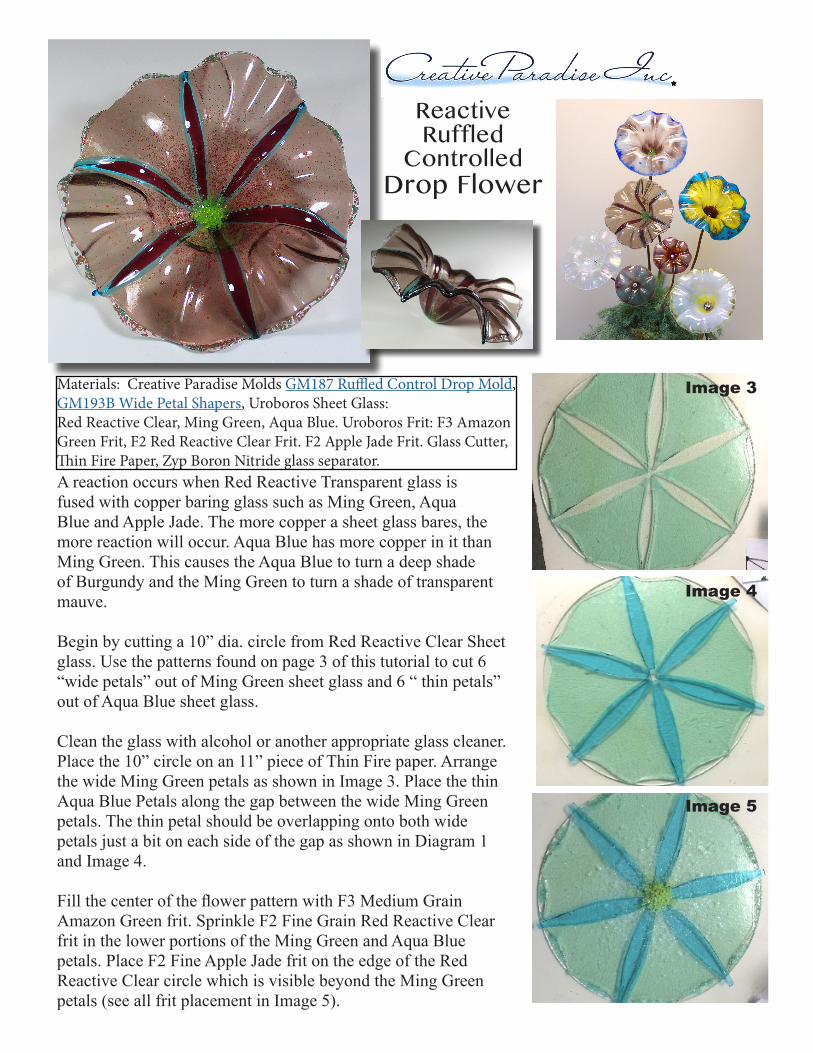
A reaction occurs when Red Reactive Transparent glass is fused with copper baring glass such as Ming Green, Aqua Blue and Apple Jade. The more copper a sheet glass bares, the more reaction will occur. Aqua Blue has more copper in it than Ming Green. This causes the Aqua Blue to turn a deep shade of Burgundy and the Ming Green to turn a shade of transparent mauve.
Begin by cutting a 10” dia. circle from Red Reactive Clear Sheet glass. Use the patterns found on page 3 of this tutorial to cut 6 “wide petals” out of Ming Green sheet glass and 6 “ thin petals” out of Aqua Blue sheet glass.
Clean the glass with alcohol or another appropriate glass cleaner. Place the 10” circle on an 11” piece of Thin Fire paper. Arrange the wide Ming Green petals as shown in Image 3. Place the thin Aqua Blue Petals along the gap between the wide Ming Green petals. The thin petal should be overlapping onto both wide petals just a bit on each side of the gap as shown in Diagram 1 and Image 4.
Fill the center of the flower pattern with F3 Medium Grain Amazon Green frit. Sprinkle F2 Fine Grain Red Reactive Clear frit in the lower portions of the Ming Green and Aqua Blue petals. Place F2 Fine Apple Jade frit on the edge of the Red Reactive Clear circle which is visible beyond the Ming Green petals (see all frit placement in Image 5).
Materials: Creative Paradise Molds GM187 Ruffled Control Drop Mold, GM193B Wide Petal Shapers, Uroboros Sheet Glass:Red Reactive Clear, Ming Green, Aqua Blue. Uroboros Frit: F3 Amazon Green Frit, F2 Red Reactive Clear Frit. F2 Apple Jade Frit. Glass Cutter, Thin Fire Paper, Zyp Boron Nitride glass separator.
Image 3
Image 4
Image 5
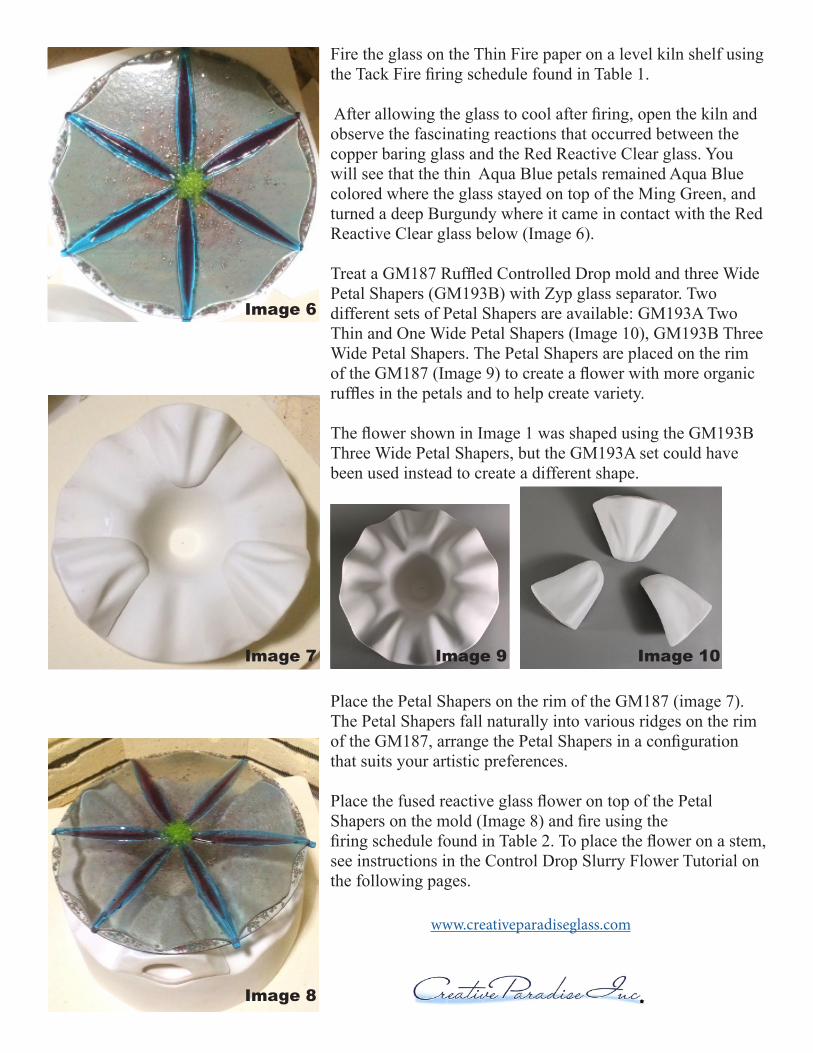
Fire the glass on the Thin Fire paper on a level kiln shelf using the Tack Fire firing schedule found in Table 1.
After allowing the glass to cool after firing, open the kiln and observe the fascinating reactions that occurred between the copper baring glass and the Red Reactive Clear glass. You will see that the thin Aqua Blue petals remained Aqua Blue colored where the glass stayed on top of the Ming Green, and turned a deep Burgundy where it came in contact with the Red Reactive Clear glass below (Image 6).
Treat a GM187 Ruffled Controlled Drop mold and three Wide Petal Shapers (GM193B) with Zyp glass separator. Two different sets of Petal Shapers are available: GM193A Two Thin and One Wide Petal Shapers (Image 10), GM193B Three Wide Petal Shapers. The Petal Shapers are placed on the rim of the GM187 (Image 9) to create a flower with more organic ruffles in the petals and to help create variety.
The flower shown in Image 1 was shaped using the GM193B Three Wide Petal Shapers, but the GM193A set could have been used instead to create a different shape.
Image 6
Image 7
Image 8
Image 9 Image 10
Place the Petal Shapers on the rim of the GM187 (image 7). The Petal Shapers fall naturally into various ridges on the rim of the GM187, arrange the Petal Shapers in a configuration that suits your artistic preferences.
Place the fused reactive glass flower on top of the Petal Shapers on the mold (Image 8) and fire using the firing schedule found in Table 2. To place the flower on a stem, see instructions in the Control Drop Slurry Flower Tutorial on the following pages.
www.creativeparadiseglass.com
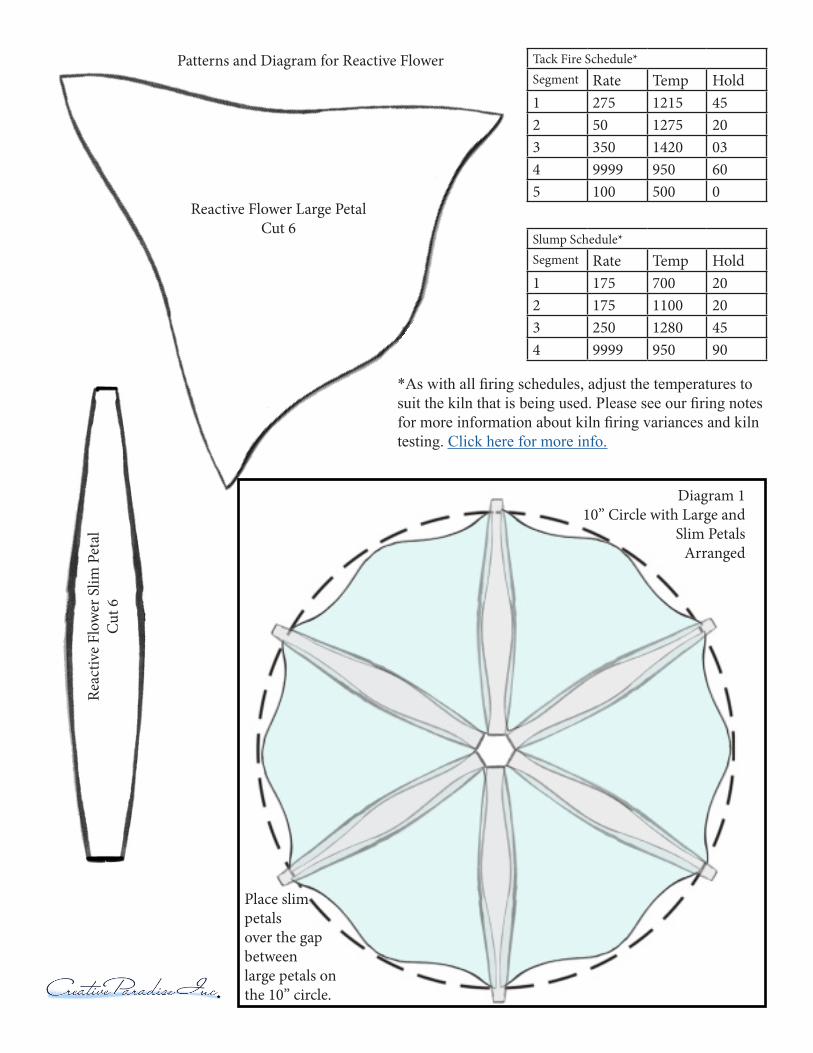
Reactive Flower Large PetalCut 6
Reac
tive
Flow
er S
lim P
etal
Cut 6
Place slim petals over the gapbetween large petals on the 10” circle.
Diagram 1 10” Circle with Large and
Slim PetalsArranged
Patterns and Diagram for Reactive Flower
Slump Schedule*Segment Rate Temp Hold1 175 700 202 175 1100 203 250 1280 454 9999 950 90
Tack Fire Schedule*Segment Rate Temp Hold1 275 1215 452 50 1275 203 350 1420 034 9999 950 605 100 500 0
*As with all firing schedules, adjust the temperatures to suit the kiln that is being used. Please see our firing notes for more information about kiln firing variances and kiln testing. Click here for more info.
Frit SlurryControlled
Drop Flower
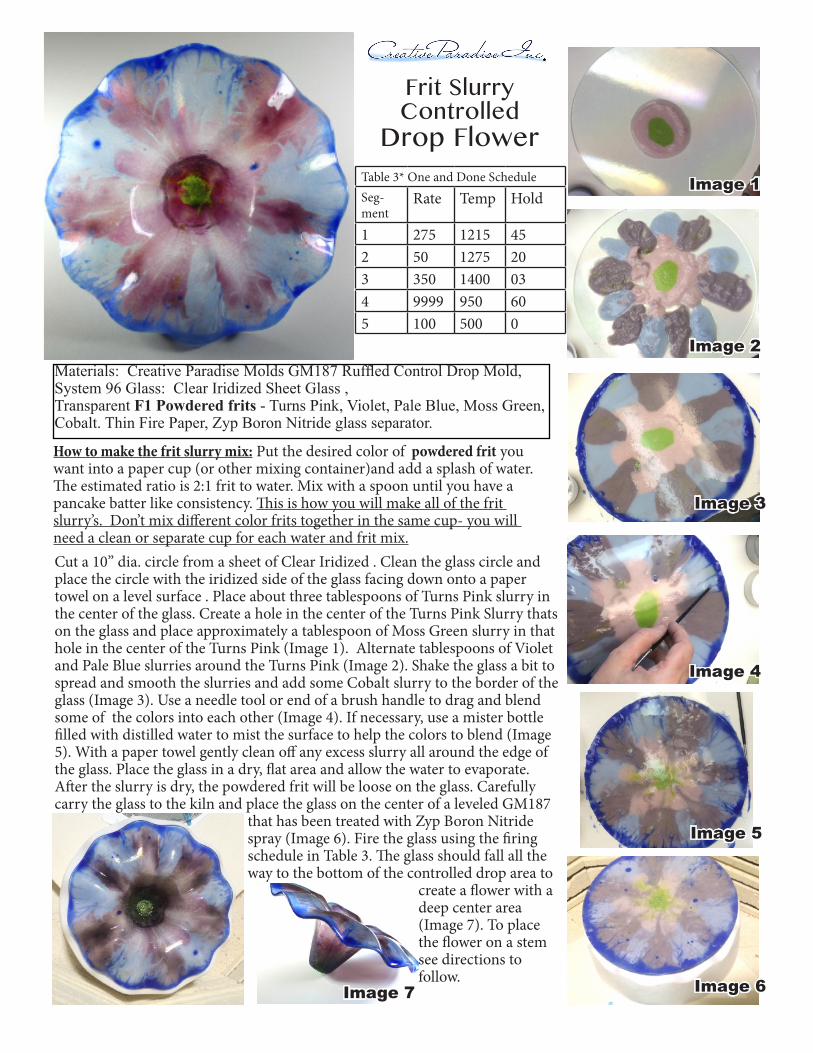
Materials: Creative Paradise Molds GM187 Ruffled Control Drop Mold, System 96 Glass: Clear Iridized Sheet Glass , Transparent F1 Powdered frits - Turns Pink, Violet, Pale Blue, Moss Green, Cobalt. Thin Fire Paper, Zyp Boron Nitride glass separator.
How to make the frit slurry mix: Put the desired color of powdered frit you want into a paper cup (or other mixing container)and add a splash of water. The estimated ratio is 2:1 frit to water. Mix with a spoon until you have a pancake batter like consistency. This is how you will make all of the frit slurry’s. Don’t mix different color frits together in the same cup- you will need a clean or separate cup for each water and frit mix.Cut a 10” dia. circle from a sheet of Clear Iridized . Clean the glass circle and place the circle with the iridized side of the glass facing down onto a paper towel on a level surface . Place about three tablespoons of Turns Pink slurry in the center of the glass. Create a hole in the center of the Turns Pink Slurry thats on the glass and place approximately a tablespoon of Moss Green slurry in that hole in the center of the Turns Pink (Image 1). Alternate tablespoons of Violet and Pale Blue slurries around the Turns Pink (Image 2). Shake the glass a bit to spread and smooth the slurries and add some Cobalt slurry to the border of the glass (Image 3). Use a needle tool or end of a brush handle to drag and blend some of the colors into each other (Image 4). If necessary, use a mister bottle filled with distilled water to mist the surface to help the colors to blend (Image 5). With a paper towel gently clean off any excess slurry all around the edge of the glass. Place the glass in a dry, flat area and allow the water to evaporate.After the slurry is dry, the powdered frit will be loose on the glass. Carefully carry the glass to the kiln and place the glass on the center of a leveled GM187
that has been treated with Zyp Boron Nitride spray (Image 6). Fire the glass using the firing schedule in Table 3. The glass should fall all the way to the bottom of the controlled drop area to
create a flower with a deep center area (Image 7). To place the flower on a stem see directions to follow.
Table 3* One and Done ScheduleSeg-ment
Rate Temp Hold
1 275 1215 452 50 1275 203 350 1400 034 9999 950 605 100 500 0
Image 1
Image 2
Image 3
Image 4
Image 5
Image 6Image 7
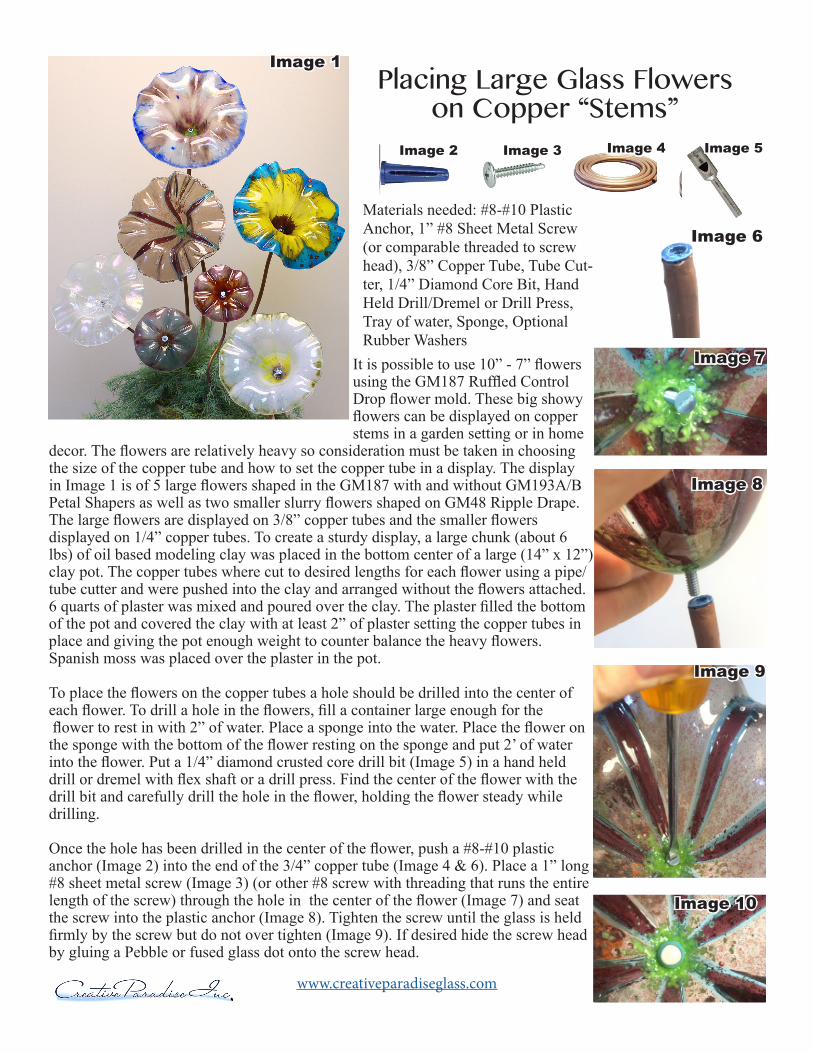
Placing Large Glass Flowers on Copper “Stems”
It is possible to use 10” - 7” flowers using the GM187 Ruffled Control Drop flower mold. These big showy flowers can be displayed on copper stems in a garden setting or in home
decor. The flowers are relatively heavy so consideration must be taken in choosing the size of the copper tube and how to set the copper tube in a display. The display in Image 1 is of 5 large flowers shaped in the GM187 with and without GM193A/B Petal Shapers as well as two smaller slurry flowers shaped on GM48 Ripple Drape. The large flowers are displayed on 3/8” copper tubes and the smaller flowers displayed on 1/4” copper tubes. To create a sturdy display, a large chunk (about 6 lbs) of oil based modeling clay was placed in the bottom center of a large (14” x 12”) clay pot. The copper tubes where cut to desired lengths for each flower using a pipe/tube cutter and were pushed into the clay and arranged without the flowers attached. 6 quarts of plaster was mixed and poured over the clay. The plaster filled the bottom of the pot and covered the clay with at least 2” of plaster setting the copper tubes in place and giving the pot enough weight to counter balance the heavy flowers. Spanish moss was placed over the plaster in the pot.
To place the flowers on the copper tubes a hole should be drilled into the center of each flower. To drill a hole in the flowers, fill a container large enough for the flower to rest in with 2” of water. Place a sponge into the water. Place the flower on the sponge with the bottom of the flower resting on the sponge and put 2’ of water into the flower. Put a 1/4” diamond crusted core drill bit (Image 5) in a hand held drill or dremel with flex shaft or a drill press. Find the center of the flower with the drill bit and carefully drill the hole in the flower, holding the flower steady while drilling.
Once the hole has been drilled in the center of the flower, push a #8-#10 plastic anchor (Image 2) into the end of the 3/4” copper tube (Image 4 & 6). Place a 1” long #8 sheet metal screw (Image 3) (or other #8 screw with threading that runs the entire length of the screw) through the hole in the center of the flower (Image 7) and seat the screw into the plastic anchor (Image 8). Tighten the screw until the glass is held firmly by the screw but do not over tighten (Image 9). If desired hide the screw head by gluing a Pebble or fused glass dot onto the screw head.
Materials needed: #8-#10 Plastic Anchor, 1” #8 Sheet Metal Screw (or comparable threaded to screw head), 3/8” Copper Tube, Tube Cut-ter, 1/4” Diamond Core Bit, Hand Held Drill/Dremel or Drill Press, Tray of water, Sponge, Optional Rubber Washers
Image 1
Image 2 Image 3 Image 4 Image 5
Image 6
Image 7
Image 8
Image 9
Image 10
www.creativeparadiseglass.com