smartsystems foundation installation guideapps.intermec.com/downloads/eps_man/932-015.pdf · ii...
TRANSCRIPT

SmartSystems Foundation
Installation Guide

ii SmartSystems Foundation Installation Guide
Intermec Technologies Corporation
Worldwide Headquarters6001 36th Ave.W.Everett, WA 98203U.S.A.
www.intermec.com
The information contained herein is provided solely for the purpose of allowing customers to operate and service Intermec-manufactured equipment and is not to be released, reproduced, or used for any other purpose without written permission of Intermec Technologies Corporation.
Information and specifications contained in this document are subject to change without prior notice and do not represent a commitment on the part of Intermec Technologies Corporation.
© 2009–2013 by Intermec Technologies Corporation. All rights reserved.
The word Intermec, the Intermec logo, Norand, ArciTech, Beverage Routebook, CrossBar, dcBrowser, Duratherm, EasyADC, EasyCoder, EasySet, Fingerprint, i-gistics, INCA (under license), Intellitag, Intellitag Gen2, JANUS, LabelShop, MobileLAN, Picolink, Ready-to-Work, RoutePower, Sabre, ScanPlus, ShopScan, Smart Mobile Computing, SmartSystems, TE 2000, Trakker Antares, and Vista Powered are either trademarks or registered trademarks of Intermec Technologies Corporation.
There are U.S. and foreign patents as well as U.S. and foreign patents pending.

ContentsSmartSystems Foundation Installation Guide . . . . . . . . . . . . . . . . . . . . . . . . . . . . . . . . . . . . . . . 5
Installation Requirements . . . . . . . . . . . . . . . . . . . . . . . . . . . . . . . . . . . . . . . . . . . . . . . . . . . . . . . . . 5Hardware Requirements . . . . . . . . . . . . . . . . . . . . . . . . . . . . . . . . . . . . . . . . . . . . . . . . . . . 5Software Requirements . . . . . . . . . . . . . . . . . . . . . . . . . . . . . . . . . . . . . . . . . . . . . . . . . . . . 5UDP and TCP Port Definitions . . . . . . . . . . . . . . . . . . . . . . . . . . . . . . . . . . . . . . . . . . . . 6Download SQL Server . . . . . . . . . . . . . . . . . . . . . . . . . . . . . . . . . . . . . . . . . . . . . . . . . . . . . 7Install .NET Framework 3.5. . . . . . . . . . . . . . . . . . . . . . . . . . . . . . . . . . . . . . . . . . . . . . . . 7
SmartSystems Installation Types . . . . . . . . . . . . . . . . . . . . . . . . . . . . . . . . . . . . . . . . . . . . . . . . . . . 8
Install SmartSystems On a Local Database . . . . . . . . . . . . . . . . . . . . . . . . . . . . . . . . . . . . . . . . . . 8Install SQL Server 2008 On a Local PC. . . . . . . . . . . . . . . . . . . . . . . . . . . . . . . . . . . . . . 9Install SQL Server 2012 On a Local PC. . . . . . . . . . . . . . . . . . . . . . . . . . . . . . . . . . . . . 15Install SmartSystems On a Local PC . . . . . . . . . . . . . . . . . . . . . . . . . . . . . . . . . . . . . . . 19
Install SmartSystems On a Remote Database . . . . . . . . . . . . . . . . . . . . . . . . . . . . . . . . . . . . . . . 21Install SQL Server 2008 On a Remote PC . . . . . . . . . . . . . . . . . . . . . . . . . . . . . . . . . . 22Install SQL Server 2012 On a Remote PC . . . . . . . . . . . . . . . . . . . . . . . . . . . . . . . . . . 27Configure SQL Server to Accept Remote Connections. . . . . . . . . . . . . . . . . . . . . . . 33Install SmartSystems In a Remote PC. . . . . . . . . . . . . . . . . . . . . . . . . . . . . . . . . . . . . . 35
Troubleshoot Installation Problems . . . . . . . . . . . . . . . . . . . . . . . . . . . . . . . . . . . . . . . . . . . . . . . 37Troubleshoot Validation Problems . . . . . . . . . . . . . . . . . . . . . . . . . . . . . . . . . . . . . . . . 40
Contact Product Support . . . . . . . . . . . . . . . . . . . . . . . . . . . . . . . . . . . . . . . . . . . . . . . . . . . . . . . . . 41
SmartSystems Foundation Installation Guide iii

iv SmartSystems Foundation Installation Guide

SmartSystems Foundation Installation Guide SmartSystems™ Foundation gives you a consistent and centralized platform so that you can easily manage and monitor your deployed Intermec devices, such as mobile computers, printers, RFID readers, and other peripheral and network devices.
Use this guide to help you install this software:
• SmartSystems Foundation
• ScanNGo
• Remote Viewer
• Software Bundle Wizard
• Reporting Services
Installation RequirementsThis section explains the minimum hardware, software, and port requirements for SmartSystems.
Hardware RequirementsYour PC needs to have a:
• 2 GHz or faster processor
• 2 GB RAM
Software RequirementsYour PC needs to have:
• One of the following operating systems:
• Windows XP Professional with SP3
Note: To continue receiving updates for Windows XP, make sure you have Service Pack 3 (SP3) installed. Support for Windows XP with SP3 ends on April 8, 2014. If you are using Windows XP with SP3 after support ends, you need to upgrade your operating system to a newer operating system (such as Windows 8) to ensure you receive important security updates.
SmartSystems Foundation Installation Guide 5

• Windows 7 Professional, Enterprise, or Ultimate (32 or 64-bit)
• Windows 8
• Windows Server 2003 R2 or SP2 (32=bit)
• Windows Server 2008 Enterprise
• Windows Server 2008 R2 with SP1
• Windows Server 2012
• Microsoft SQL Server 2008 R2
• Microsoft SQL Server 2012
• Microsoft Internet Explorer 6.01 SP1 or later
• Microsoft ActiveSync 4.5 or later (for Windows XP and Server)
• Microsoft Windows Mobile Device Center (for Windows 7)
• Microsoft .NET Framework 3.5 and 4 (full install)
• Windows Powershell 1.0
• Windows Installer 4.5
UDP and TCP Port DefinitionsThe ports used in SmartSystems are all inbound ports. Use the following table to help you identify what UDP and TCP ports are used by SmartSystems.
Note: Cisco Discovery is not supported on 64-bit operating systems.
UDP and TCP Port Descriptions
Port Protocol Description
UDP 161 Required for SNMP.
UDP 162 Required for the Trap port.
UDP 197 Required for the Upgrade Server.
UDP 1434 Required for SQL Database Discovery.
UDP 1758-1768 Required for Multicast File Transfer Protocol
UDP 8791 Required for the Upgrade Process.
6 SmartSystems Foundation Installation Guide

Download SQL ServerIntermec recommends you download one of the following SQL Server versions:
• SQL Server 2008 R2 Express with Advanced Services
• SQL Server 2012 Express with Advanced Services
Install .NET Framework 3.5Before you install SmartSystems, make sure .NET Framework 3.5 is installed. If it is not installed, go to www.microsoft.com to download it. If you are using Windows Server 2012, .NET Framework 3.5 is already installed, but you need to enable it.
UDP 8792 Required for the Upgrade Monitor Online Status.
UDP 49111 Required for IQueue Discovery.
UDP 52316 Required for the Remote Viewer.
TCP 1901 Required for the Remote Viewer.
TCP 49152-65535 Required for Remote Viewer.
TCP 8789 Required for HTTP.
TCP 27000-27009 Required for the License Server.
TCP 62241 Required for IQueue Messaging.
UDP and TCP Port Descriptions (continued)
Port Protocol Description
SmartSystems Foundation Installation Guide 7

To enable .NET Framework 3.5 on Windows Server 20121 In the Server Manager, select Add roles and features.
2 Click Next until you reach Features and select .NET Framework 3.5 Features (Installed).
3 Follow the on-screen instructions to install .NET Framework 3.5.
SmartSystems Installation TypesThere are two ways to install SmartSystems:
• Install SmartSystems on a local database. For more information, see the next section.
• Install SmartSystems on a remote database. For more information, see “Install SmartSystems On a Remote Database” on page 21.
Install SmartSystems On a Local DatabaseWhen you install SmartSystems on a local database, you install SmartSystems and SQL Server on the same PC. To do this, you must:
• install SQL Server 2008 or SQL Server 2012 on a local PC.
• install SmartSystems on a local PC.
8 SmartSystems Foundation Installation Guide

Install SQL Server 2008 On a Local PC1 Download and run the SQL Server .exe file.
2 From the navigation menu, select Installation.
3 Select New installation or add features to an existing installation.
4 If any setup support rules do not pass, correct the failure and click Re-run.
5 When all the rules are checked, click Next.
6 Read the license terms, and select I accept the license terms.
SmartSystems Foundation Installation Guide 9

7 Click Next.
10 SmartSystems Foundation Installation Guide

8 Select Database Engine Services.
9 If you are planning to use SmartSystems Reporting Services, select Reporting Services.
10 Click Next.
11 Select Named instance and type Intermec2008.
12 Click Next.
SmartSystems Foundation Installation Guide 11

13 For the SQL Database Engine, select NT AUTHORITY\NETWORK SERVICE as the Account Name.
Or, if the computer is in a work group or not on a domain, select NT AUTHORITY\SYSTEM.
14 Click Next.
Note: Intermec recommends that you select this account name so that you can use the default authentication settings. For more information about Service Accounts for SQL Server services, click Help.
12 SmartSystems Foundation Installation Guide

15 Select Windows authentication mode.
16 To add yourself as an administrator click Add Current User.
17 (Optional) Add more SQL Server Administrators:
a Click Add.
b In the Enter the object name to select text box, type a user name.
c Click OK.
d Click Next.
SmartSystems Foundation Installation Guide 13

18 If you selected Reporting Services, the Reporting Services Configuration screen appears. Select Install, but do not configure the report server, and then click Next.
19 Install SmartSystems. For more information, see “Install SmartSystems On a Local PC” on page 19.
14 SmartSystems Foundation Installation Guide

Install SQL Server 2012 On a Local PC1 Download and run the SQL Server .exe file.
2 From the navigation menu, select Installation.
3 Select New installation or add features to an existing installation.
4 If any setup support rules do not pass, correct the failure and click Re-run.
SmartSystems Foundation Installation Guide 15

5 When all the rules are checked, click Next.
6 Read the license terms, and select I accept the license terms.
7 Click Next.
8 Select Database Engine Services.
9 If you are planning to use SmartSystems Reporting Services, select Reporting Services.
10 Click Next.
16 SmartSystems Foundation Installation Guide

11 Select Named instance and type Intermec2012.
12 Click Next.
13 When the Server Configuration screen appears, click Next.
14 Select Windows authentication mode.
SmartSystems Foundation Installation Guide 17

15 To add yourself as an administrator click Add Current User.
16 Click Advanced.
17 Click Find Now. The search results appear at the bottom of the screen.
18 Select SYSTEM from the list of users, and click OK. SYSTEM is added to the list of SQL Server Administrators.
19 (Optional) Add more SQL Server Administrators:
a Click Add.
b In the Enter the object name to select text box, type a user name.
c Click OK.
18 SmartSystems Foundation Installation Guide

d Click Next.
20 If you selected Reporting Services, the Reporting Services Configuration screen appears. Select Install only, and then click Next.
21 When the Error Reporting screen appears, click Next.
22 Install SmartSystems. For help, see the next section.
Install SmartSystems On a Local PC1 Download SmartSystems from the Intermec website at
www.intermec.com/smartsystems.
2 Make sure Microsoft .NET Framework 3.5 is installed.
3 Double-click the SmartSystems .exe file. The SmartSystems Installer checks to see if you have Microsoft .NET Framework 4.0 installed. If it is not installed, follow the prompts to install .NET Framework 4.0.
Note: If you installed .NET Framework 4 as part of Windows Update you may have downloaded a subset of the full installation. If that is the case, SmartSystems prompts you to download and install the full version of .NET Framework 4.0.
SmartSystems Foundation Installation Guide 19

4 In the drop-down list, select the database server that you created, or click Browse to see a list of available databases.
5 Click OK.
6 When the Precheck screen appears, the SmartSystems Installer runs system checks to determine if your PC meets the minimum requirements:
• If there are any warnings, view the details. You can choose to skip or fix any warnings. For more information, see “Troubleshoot Installation Problems” on page 37.
• If there are any errors, you must fix them before you can continue with the SmartSystems installation. For more information, see “Troubleshoot Installation Problems” on page 37.
After you have fixed your warnings and errors, click Next.
7 Select I accept the terms of the license agreement and click Next.
8 Select the installation destination and click Next. SmartSystems installs on your PC.
Note: Program Files (x86) is displayed in English, regardless of the language running on the operating system.
20 SmartSystems Foundation Installation Guide

9 When the Software Bundle Wizard Installation screen appears, click Next.
10 When the Software Bundle Wizard is installed, click Finish.
11 Select Yes, I want to restart my computer now, and click Finish.
Install SmartSystems On a Remote DatabaseWhen you install SmartSystems on a remote database, you instal SmartSystems on one PC, and SQL Server on another. When you do this, SmartSystems accesses SQL Server through your network to manage your devices.
• On the SQL Server PC:
• install a SQL Server 2008 or 2012
• configure SQL Server to accept remote connections.
• Install SmartSystems
I f you have an existing installation of SQL Server, Intermec reccomends you install a new instance of SQL Server according to this installation guide for SmartSystems to function remotely.
SmartSystems Foundation Installation Guide 21

Install SQL Server 2008 On a Remote PC1 Make sure that both PCs are in the same domain.
2 Download and run the SQL Server .exe file.
3 From the navigation menu, select Installation.
4 Select New installation or add features to an existing installation.
Note: Remote databases in a workgroup are not supported. You need to install and configure a SQL Server instance from a remote computer in the same domain as the computer you install SmartSystems Foundation on.
22 SmartSystems Foundation Installation Guide

5 If any setup support rules do not pass, correct the failure and click Re-run.
6 When all the rules are checked, click Next.
7 Read the license terms, and select I accept the license terms.
8 Click Next.
SmartSystems Foundation Installation Guide 23

9 Select Database Engine Services.
10 If you are planning to use SmartSystems Reporting Services, select Reporting Services.
11 Click Next.
12 Select Named instance and type Intermec2008.
13 Click Next.
24 SmartSystems Foundation Installation Guide

14 For the SQL Database Engine, select NT AUTHORITY\NETWORK SERVICE as the Account Name.
Or, if the computer is in a work group or not on a domain, select NT AUTHORITY\SYSTEM.
15 Click Next.
Note: Intermec recommends that you select this account name so that you can use the default authentication settings. For more information about Service Accounts for SQL Server services, click Help.
SmartSystems Foundation Installation Guide 25

16 Select Windows authentication mode.
17 To add yourself as an administrator click Add Current User.
18 (Optional) Add more SQL Server Administrators:
a Click Add.
b In the Enter the object name to select text box, type a user name.
c Click OK.
d Click Next.
19 If you selected Reporting Services, the Reporting Services Configuration screen appears. Select Install, but do not configure the report server, and then click Next.
26 SmartSystems Foundation Installation Guide

20 Configure SQL Server to accept remote connections. See “Configure SQL Server to Accept Remote Connections” on page 33.
Install SQL Server 2012 On a Remote PC1 Make sure that both PCs are in the same domain.
2 Download and run the SQL Server .exe file.
SmartSystems Foundation Installation Guide 27

3 From the navigation menu, select Installation.
4 Select New installation or add features to an existing installation.
5 If any setup support rules do not pass, correct the failure and click Re-run.
6 When all the rules are checked, click Next.
28 SmartSystems Foundation Installation Guide

7 Read the license terms, and select I accept the license terms.
8 Click Next.
9 Select Database Engine Services.
10 If you are planning to use SmartSystems Reporting Services, select Reporting Services.
11 Click Next.
SmartSystems Foundation Installation Guide 29

12 Select Named instance and type Intermec2012.
13 Click Next.
14 When the Server Configuration screen appears, click Next.
30 SmartSystems Foundation Installation Guide

15 Select Windows authentication mode.
16 To add yourself as an administrator click Add Current User.
17 Click Advanced.
18 Click Find Now. The search results appear at the bottom of the screen.
19 Select NETWORK SERVICE from the list of users, and click OK. NETWORK SERVICE is added to the list of SQL Server Administrators.
20 (Optional) Add more SQL Server Administrators:
a Click Add.
SmartSystems Foundation Installation Guide 31

b In the Enter the object name to select text box, type a user name.
c Click OK.
d Click Next.
21 If you selected Reporting Services, the Reporting Services Configuration screen appears. Select Install only, and then click Next.
22 Configure SQL Server to accept remote connections. See “Configure SQL Server to Accept Remote Connections” on page 33.
32 SmartSystems Foundation Installation Guide

Configure SQL Server to Accept Remote Connections1 On your SQL Server PC, select Start > Programs > Microsoft
SQL Server 2008 or 2012 > Configuration Tools > SQL Server Configuration Manager.
2 Double-click SQL Server Network Configuration.
3 Select Protocols for Intermec2008 or 2012.
4 Right-click TCP/IP and select Enable.
SmartSystems Foundation Installation Guide 33
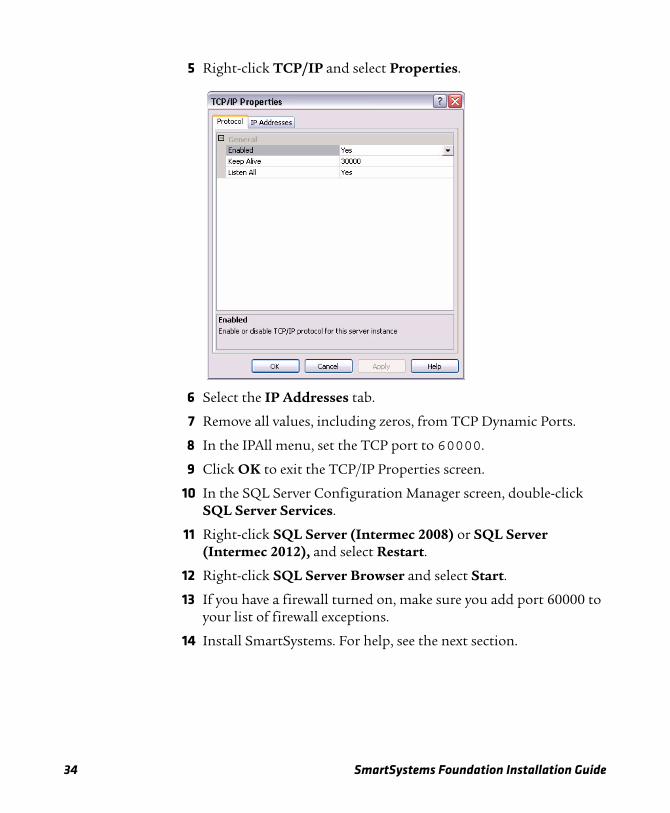
5 Right-click TCP/IP and select Properties.
6 Select the IP Addresses tab.
7 Remove all values, including zeros, from TCP Dynamic Ports.
8 In the IPAll menu, set the TCP port to 60000.
9 Click OK to exit the TCP/IP Properties screen.
10 In the SQL Server Configuration Manager screen, double-click SQL Server Services.
11 Right-click SQL Server (Intermec 2008) or SQL Server (Intermec 2012), and select Restart.
12 Right-click SQL Server Browser and select Start.
13 If you have a firewall turned on, make sure you add port 60000 to your list of firewall exceptions.
14 Install SmartSystems. For help, see the next section.
34 SmartSystems Foundation Installation Guide

Install SmartSystems In a Remote PC1 On the PC you plan on installing SmartSystems, log in to the same
user account that you used when you installed SQL server.
2 If you are using Windows XP SP3, enable SQL discovery over TCP:
a Click Start > Run.
b Type cliconfg.exe. The SQL Server Client Network Utility appears.
c Select TCP/IP from the Disabled protocols box and click Enable.
d Click OK to save your changes.
3 If you have a firewall turned on, make sure you add port 60000 to your list of firewall exceptions.
4 On the PC you where you are installing SmartSystems, download SmartSystems from the Intermec website at www.intermec.com/smartsystems.
5 Double-click the SmartSystems .exe file.
6 The SmartSystems Installer checks to see if you have Microsoft .NET Framework 4.0 installed. If it is not installed, follow the prompts to install .NET Framework 4.0.
7 In the drop-down list, select the database server that you created.
Note: If you installed .NET Framework 4 as part of Windows Update you may have downloaded a subset of the full installation. If that is the case, SmartSystems prompts you to download and install the full version of .NET Framework 4.0.
SmartSystems Foundation Installation Guide 35

8 Click OK.
9 When the Precheck screen appears, the SmartSystems Installer runs system checks to determine if your PC meets the minimum requirements.
• If there are any warnings, view the details. You can choose to skip or fix any warnings. For more information, see “Troubleshoot Installation Problems” on page 37.
• If there are any errors, you must fix them before you can continue with the SmartSystems installation. For more information, see “Troubleshoot Installation Problems” on page 37.
After you have fixed your warnings and errors, click Next.
10 When the Welcome screen appears, click Next.
11 Select I accept the terms of the license agreement and click Next.
12 Select the installation destination and click Next. SmartSystems installs on your PC.
13 When the Software Bundle Wizard is installed, click Finish.
Note: On some foreign language operating systems, Program Files (x86) is displayed in English instead of the language the operating system is currently running.
36 SmartSystems Foundation Installation Guide

14 Return to the PC where you are installing SmartSystems on, select Yes, I want to restart my computer now and click Finish.
Troubleshoot Installation ProblemsUse this section to troubleshoot any validation problems that you may have during the Precheck phase of the SmartSystems Foundation installation process.
Problems with Precheck Items
Precheck Item Details Solution
Processor Speed If you do not have the minimum processor speed requirements, a warning appears.
SmartSystems requires a minimum processor speed of 2 GHz. Install SmartSystems on a PC with a processor speed of 2 GHz or faster.
System Memory If you do not have the minimum system memory requirements, a warning appears.
SmartSystems requires a minimum memory size of 2 GB of RAM. Install SmartSystems on a PC with 2 GB of RAM or more.
Intermec Software Software conflict found. Uninstall the “I-Gistics Application Server” to proceed.
Uninstall the I-Gistics Application Server.
User Permission The current user does not have permission to create new Windows groups.
Install SmartSystems with another user account that has sufficient permissions to create new Windows groups.
The current user does not have permission to add users to Windows groups.
Install SmartSystems with another user account with that has sufficient permissions to add users to Windows groups.
The current user does not have the “sysadmin” server role. Provide “sysadmin” role to continue with SmartSystems installation.
Provide the current user with the “sysadmin” role. For help, see http://archive.msdn.microsoft.com/addselftosqlsysadmin.
SmartSystems Foundation Installation Guide 37

Domain Group Policy Windows event log service is disabled by Group Policy. Some SmartSystems log messages will not be available.
Enable the Windows event log service to view the logs generated by the SmartSystems console.
Windows firewall is configured to not allow exceptions by Group Policy. Windows firewall exceptions are required for SmartSystems functionality.
Configure Windows firewall to allow exceptions by Group Policy. SmartSystems requires certain network ports to be opened in order for it to function correctly.
Security Accounts Manager service is disabled by Group Policy. SmartSystems requires this service in order to function.
Enable the Security Accounts Manager service so that SmartSystems functions correctly.
Windows Firewall Windows firewall is off. If it is turned on, be aware that exceptions are required for SmartSystems functionality.
Leave Windows firewall off to ensure SmartSystems functionality. If you leave Windows firewall on, exceptions are required for SmartSystems to function.
Windows firewall is on and is configured to not allow exceptions. Exceptions are required for SmartSystems functionality.
Turn off Windows firewall. If you leave Windows firewall on, exceptions are required for SmartSystems to function.
Windows firewall is remotely administered by Group Policy. Check with the administrator to ensure that the Group Policy settings will not interfere with SmartSystems operation.
Contact your network administrator to determine if the Group Policy will affect SmartSystems.
Windows firewall is configured to not allow exceptions by Group Policy. Windows firewall exceptions are required for SmartSystems functionality.
Exceptions are required in order for SmartSystems to function.
UDP or TCP port conflicts and generates an error.
You need to fix any port conflicts you may have in order for SmartSystems to function.
Third-Party Firewalls Third-party firewalls that are installed and enabled generates a warning.
Disable the third-party firewall and do not block any ports that SmartSystems uses.
Problems with Precheck Items (continued)
Precheck Item Details Solution
38 SmartSystems Foundation Installation Guide

Anti-Malware Products Anti-malware products that are installed and enabled generates a warning.
Any anti-malware products that are installed and enabled may block SmartSystems installation or run-time actions. Disable or uninstall these products to remove this warning.
Network If an ethernet or wired connection is disconnected a warning appears.
Make sure that you have either an ethernet or wired connection, and that it is connected to your network.
Local Area Connection failed to ping to the default gateway.
This warning notifies the user that a network issue was detected and the computer failed to ping the default gateway. Fix this warning to ensure that SmartSystems works properly.
Remote Database Using a remote database in a workgroup is not supported. Please choose a database instance from the local computer or from a remote computer that is in the same domain as the local computer.
Make sure that you are not trying to use a remote database in a workgroup.
Problems with Precheck Items (continued)
Precheck Item Details Solution
SmartSystems Foundation Installation Guide 39

Troubleshoot Validation ProblemsWhen you are installing SmartSystems, a pre-check log file is created. This file is used to help you or Product Support troubleshoot your SmartSystems installation.
Pre-Check Log File
The pre-check log file displays:
• the date and time you started the SmartSystems installation.
• the pre-check item being processed.
• whether the pre-check item passed or failed.
• the details of the pre-check items. This information contains details of why a pre-check item has passed or failed, and any error messages that may have been generated.
To view the pre-check log file1 Browse to the \SSTemp directory.
2 Click Installation Precheck.log. The pre-check log file opens.
40 SmartSystems Foundation Installation Guide

Contact Product SupportIf you cannot find the answer to your problem in the Troubleshoot Installation Problems section, you can visit the Intermec technical knowledge base (Knowledge Central) at intermec.custhelp.com to review technical information or to request technical support. If you still need help after visiting Knowledge Central, you may need to call Product Support.
To talk to an Intermec Product Representative, call:
1-800-755-5505
Before you can call Intermec Product Support, make sure you have the following information ready:
• Operating system version
• SQL Server version
• Precheck log file
SmartSystems Foundation Installation Guide 41

Worldwide Headquarters6001 36th Avenue WestEverett, Washington 98203U.S.A.tel 425.348.2600fax 425.355.9551www.intermec.com
© 2013 Intermec Technologies Corporation. All rights reserved.
SmartSystems Foundation Installation Guide
*932-015-005* P/N 932-015-005