table-based web site layout
TRANSCRIPT

Web Publishing Basics 3
Table-based Web Site Layout
Jeff Pankin
Information Services and Technology

Page 1
Table of Contents Table of Contents ........................................................................................ 1
Course Objectives ....................................................................................... 2
Create a Site Definition ............................................................................... 3
Define a Site in Dreamweaver versions through CS4 ........................................ 3
Add Remote Info to a Site Definition versions through CS4 ............................... 4
Define in Site in Dreamweaver versions CS5 and later ..................................... 5
Add Remote Info to a Site Definition versions through CS4 ............................... 6
The Dreamweaver CS4 Interface ................................................................. 7
Panels are groups of icons which activate menu choices ................................... 7
The Content Area ........................................................................................ 8
The Document Toolbar ................................................................................. 9
Screen Refresh ........................................................................................... 9
The Properties Panel .................................................................................. 10
The Tag Selector bar ................................................................................. 10
Working with Cascading Style Sheets in the CSS Panel ............................. 11
To Create a Style ...................................................................................... 12
To Edit a Style .......................................................................................... 13
Style Types .............................................................................................. 13
To Apply a Class Style ................................................................................ 14
To Remove a Class Style ............................................................................ 15
Class Styles in Code and Tag Selector Bar .................................................... 15
Working with Tables ................................................................................. 16
To Insert a Table in the Design View ............................................................ 16
Formatting Tables with the Properties Panel. ................................................ 17
Tables Practice .......................................................................................... 17
Using a Table for Page Layout ................................................................... 18
To Merge Cells .......................................................................................... 18
Add Elements to the Page Layout .............................................................. 19
Add Links to the Navigation ........................................................................ 20
Add a Title ................................................................................................ 21
Using a Template to Create a Consistent Look .......................................... 22
Upload Your Files ...................................................................................... 23
Web Publishing Basics 3 – html code for index.html ....................................... 24
Web Publishing Basics 3 – css code ............................................................. 25
Resources ................................................................................................. 26
Copyright © 2012 by Massachusetts Institute of Technology. All Rights Reserved.

Page 2
Course Objectives
1. Create tables for data and page layout.
2. Create a template for consistent look and feel.
3. Assemble a working website with navigation.
4. Use the CSS panel to format content with styles.
5. Examine MIT websites to identify HTML elements.
6. Review MIT and non-MIT resources for help and further learning.
Page 3
Create a Site Definition
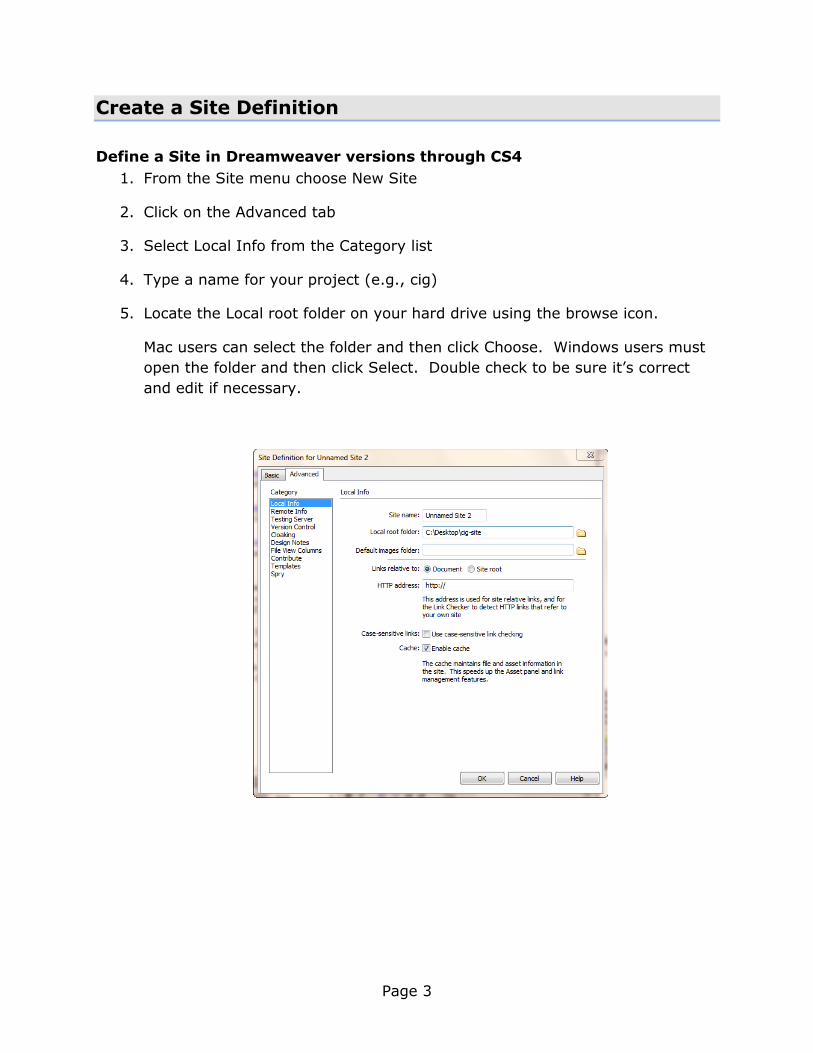
Define a Site in Dreamweaver versions through CS4
1. From the Site menu choose New Site
2. Click on the Advanced tab
3. Select Local Info from the Category list
4. Type a name for your project (e.g., cig)
5. Locate the Local root folder on your hard drive using the browse icon.
Mac users can select the folder and then click Choose. Windows users must
open the folder and then click Select. Double check to be sure it’s correct
and edit if necessary.
Page 4
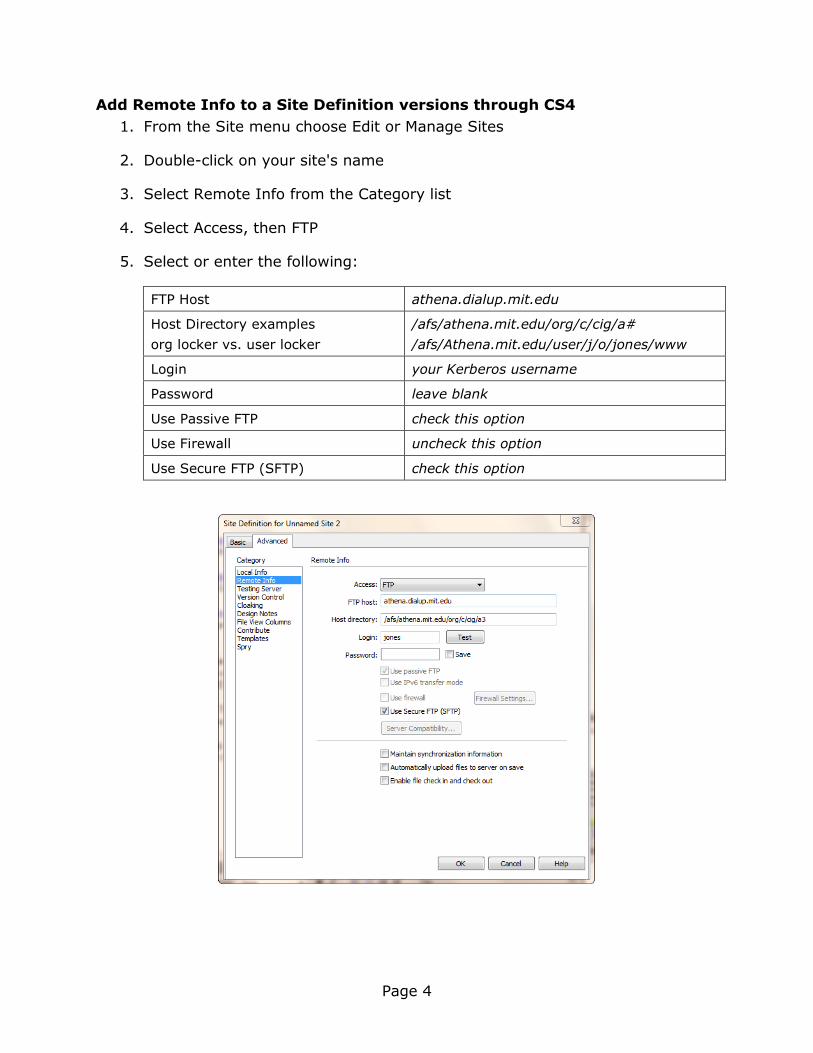
Add Remote Info to a Site Definition versions through CS4
1. From the Site menu choose Edit or Manage Sites
2. Double-click on your site's name
3. Select Remote Info from the Category list
4. Select Access, then FTP
5. Select or enter the following:
FTP Host athena.dialup.mit.edu
Host Directory examples
org locker vs. user locker
/afs/athena.mit.edu/org/c/cig/a#
/afs/Athena.mit.edu/user/j/o/jones/www
Login your Kerberos username
Password leave blank
Use Passive FTP check this option
Use Firewall uncheck this option
Use Secure FTP (SFTP) check this option

Page 5
Define in Site in Dreamweaver versions CS5 and later
1. From the Site menu choose New Site
2. Type a name for your project (e.g., cig)
3. Locate the Local Site Folder on your hard drive using the browse icon.
Mac users can select the folder and then click Choose. Windows users must
open the folder and then click Select. Double check to be sure it’s correct
and edit if necessary.

Page 6
Add Remote Info to a Site Definition versions through CS4
1. From the Site menu choose Edit or Manage Sites
2. Double-click on your site's name
3. Select Servers from the category list
4. Double click your server name or click the + to create one
5. Select or enter the following:
Server Name e.g., cig
Connect Using Choose SFTP from the pop-up
SFTP Address athena.dialup.mit.edu
Username your Kerberos username
Password leave blank
Root Directory
examples of org locker vs. user locker
/afs/athena.mit.edu/org/c/cig/a#
/afs/Athena.mit.edu/user/j/o/jones/www
Web URL leave as is – it will be adjusted based on
Root Directory info

Page 7
The Dreamweaver CS4 Interface
Panels are groups of icons which activate menu choices
the Insert panel (top) includes icons to insert elements (e.g., images, tables,
Editable Regions)
the Properties panel (bottom) is a contextual menu of formatting attributes
the side panel area (right) holds multiple panels which share the right area –
open and close them by double-clicking the panel name
Page 8
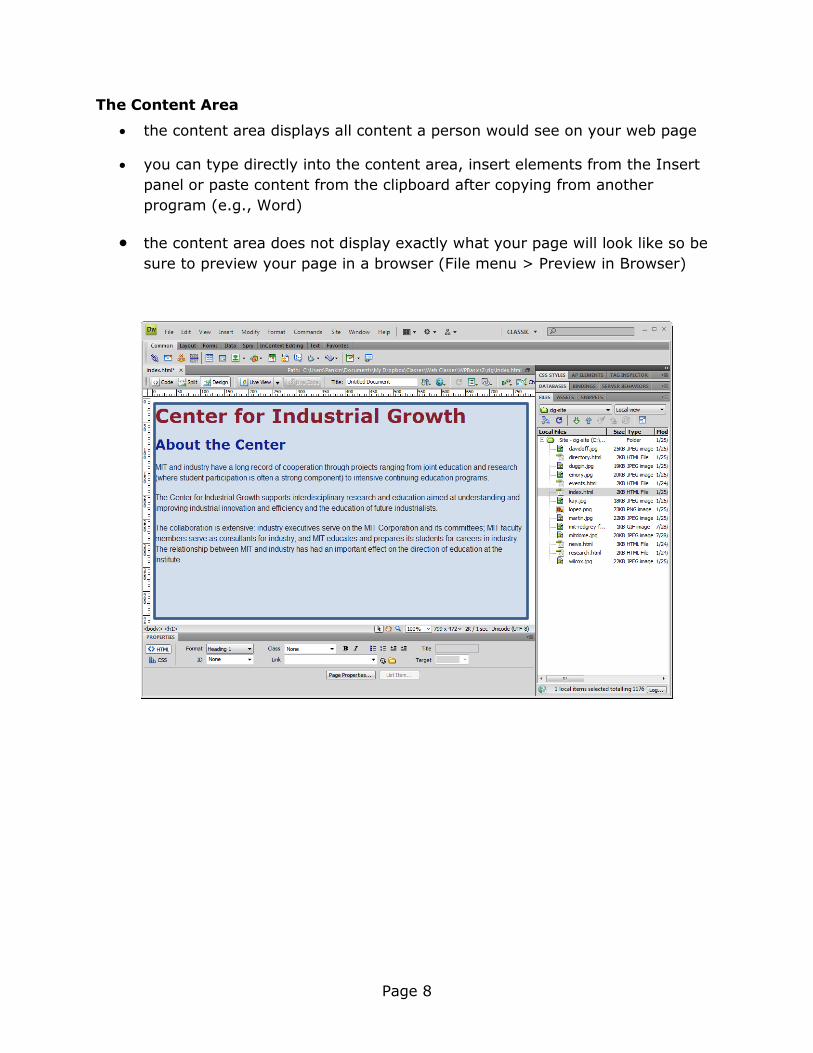
The Content Area
the content area displays all content a person would see on your web page
you can type directly into the content area, insert elements from the Insert
panel or paste content from the clipboard after copying from another
program (e.g., Word)
the content area does not display exactly what your page will look like so be
sure to preview your page in a browser (File menu > Preview in Browser)

Page 9
The Document Toolbar
the three buttons on the left display the html code in the Code view, the
content in the Design view or both in the Split view
you can add a title which will appear in the window bar at the top of the web
browser and will be the text used when the page is bookmarked
you can turn visual aids on or off (e.g., rulers, table width notification)
Screen Refresh
To refresh your panels and toolbars to their original placement do the following.
Windows and Mac: Windows menu > Workspace Layout > Classic
switch views add a window title turn on/off visual aids

Page 10
The Properties Panel
With the cursor located within text these options are available on the Properties
Panel.
With an image selected these options are available on the Properties Panel.
The Tag Selector bar
The tag selector is a thin strip located between the bottom of the content area
and Properties panel on the left side of the screen. The tags listed enclose the
content. You can click a tag name to select all the content enclosed within the
tags.
The cursor is located in the body within some blockquoted paragraph content which is also bold.

Page 11
Working with Cascading Style Sheets in the CSS Panel
Styles are used for formatting and page layout. A style definition contains three
parts: a selector, a property and a value.
selector property value
h1 {color: navy}
Working with Styles in the CSS Panel
You can create, edit and delete styles through the CSS panel. Close the Files panel
to allow more room in the panel area for the CSS panel.
Click the ALL button to see all of your
styles listed.
Click a style to view its properties in
the area below. You can also delete
(Delete key)or rename (click a
second time) a style.
See the properties and values for a
selected style. Click a value to make
a change.
Click on these icons:
chain: to link to a stylesheet
plus: to add a new style
pencil: to edit the selected style
trash: to delete the selected style

Page 12
To Create a Style
1. Click the icon at the bottom of the CSS Panel to open the New CSS Rule
box
2. Choose the selector type from the drop down list (Class is the default)
3. Enter the selector name (an html tag or for a class style, a name you choose)
4. Select the location where the rule will be saved
5. Choose New Style Sheet File, Save in the cig folder, name the stylesheet
cig-styles.css. Note: this only done if the stylesheet doesn't exist.
Page 13
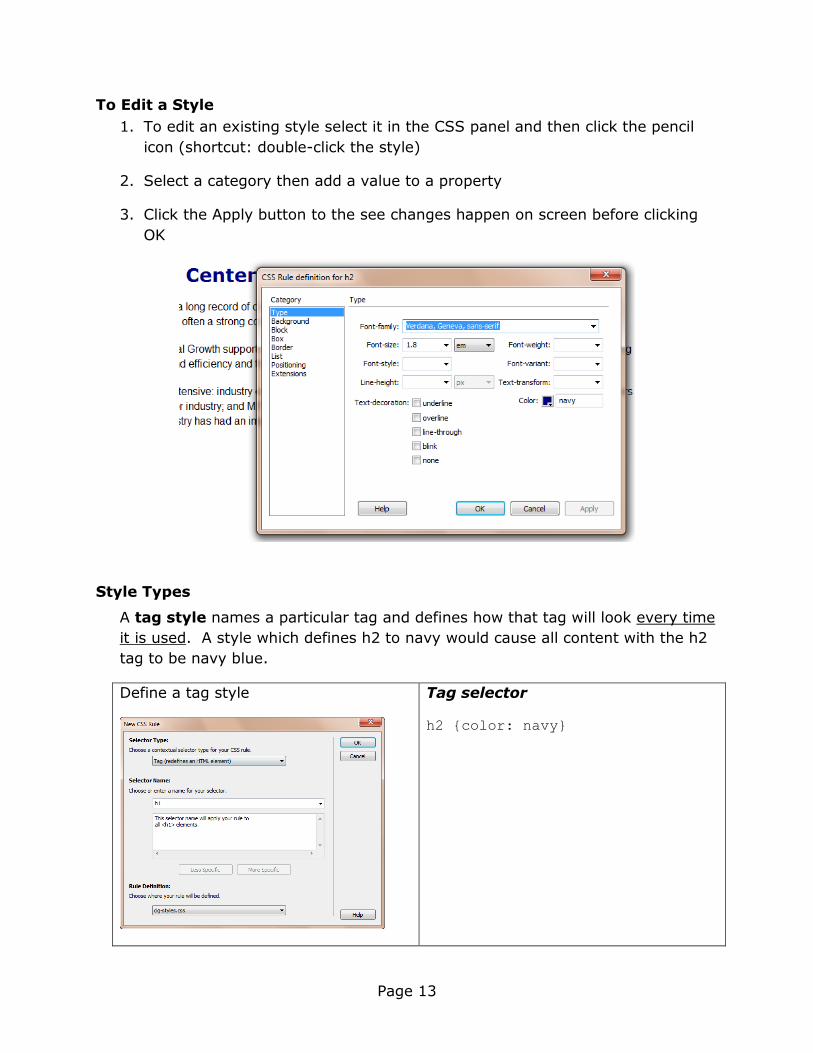
To Edit a Style
1. To edit an existing style select it in the CSS panel and then click the pencil
icon (shortcut: double-click the style)
2. Select a category then add a value to a property
3. Click the Apply button to the see changes happen on screen before clicking
OK
Style Types
A tag style names a particular tag and defines how that tag will look every time
it is used. A style which defines h2 to navy would cause all content with the h2
tag to be navy blue.
Define a tag style
Tag selector
h2 {color: navy}

Page 14
A class style uses a name which you choose instead of a tag name. Class styles
are defined in a similar way to tag styles but they are applied in a different way.
With the class style .color-it we can make any text navy.
Note the selector name is not a tag but a name you choose (.color-it). It
begins with a period and may not have any spaces.
Define a class style
Class selector
.color-it {color: navy}
To Apply a Class Style
Once a class style is defined you must apply it. It is not applied automatically like a
tag style.
1. Select the content which to be styled
2. Locate the desired class style in the Class pop-up list on the Properties panel
and select the style name

Page 15
To Remove a Class Style
1. Select the content which has the class style already applied
2. Open the Class pop-up list on the Properties panel and select None
You can also Rename or Attach a Stylesheet from this pop-up.
Class Styles in Code and Tag Selector Bar
Tag Selector Bar
Code View
<h1>The <span class="color-
it">MIT</span> Center for Industrial
Growth</h1>
Tag Selector Bar
Code View
<p class="color-it">MIT and
Industry have joint research and
education programs. </p>

Page 16
Working with Tables
These are the html tags for tables
Tag Description
table The table tag encloses the rows and columns of the table and
the content in each cell.
tr The tr tag marks the rows of the table. There will be one set of
tr tags for each row.
td Within each table row td tags mark the beginning and end of
each cell. td tags represent the columns in a table.
th The th tag creates a header row in the top row of the table.
The th tag replaces the td tags in the first row.
To Insert a Table in the Design View
1. From the Insert menu choose Table.
2. Make selections and click OK

Page 17
Table Attributes
Attribute Description
cellspacing="2" Adds space between cells
cellpadding="10" Adds space (margin) inside cells.
border="1" Adds a border. Use border="0" to remove a border.
width="200px" Determines the width of the table. Use pixels or %.
Note: You can accomplish these same things with styles.
Formatting Tables with the Properties Panel.
If a table is selected these are the choices.
If a td is selected you will see these options.
To change a td to a th click the Header box.
You can also create and edit tables from the Insert and Modify menus.
Tables Practice
1. Create a 7 x 2 table in the directory.html document. Move the people info
into the cells on the right. Insert their images in the cells on the left.
2. Format the table to have a background color and to align to the top. What
type of style selector will you use?
3. Use Modify menu/Table/Insert Rows or Columns to add a row for the title.
4. Use merge cells (see next page) to make one cell which stretches across
both columns. Add Staff Directory to the top cell.

Page 18
Using a Table for Page Layout
A 3 row 2 column table can be shaped into a container for a web page.
Starting with this
We can merge the two top cells.
And the two bottom cells.
To Merge Cells
select the two cells
the Properties panel will have some additional choices
click the unlabeled icon to merge cells

Page 19
Add Elements to the Page Layout
The MIT Center For Industrial Growth
Home
Directory
Events
Research
News
Contact Us
About the Center
MIT and industry have a long record of cooperation through projects
ranging from joint education and research (where student
participation is often a strong component) to intensive continuing
education programs.
The Center for Industrial Growth supports interdisciplinary research
and education aimed at understanding and improving industrial
innovation and efficiency and the education of future industrialists.
The collaboration is extensive: industry executives serve on the MIT
Corporation and its committees; MIT faculty members serve as
consultants for industry; and MIT educates and prepares its
students for careers in industry. The relationship between MIT and
industry has had an important effect on the direction of education at
the Institute.
Exercise:
1. Make desired adjustments to any font-family, size, or color properties.
2. Insert the Dome image in the header and the MIT footer image at the
bottom.
3. Create a style named layout-table to apply to this particular table which sets
the width to be 770px. Center the table by adding the properties below from
the Box category to the layout-table style.
margin-left: auto
margin-right: auto
4. Create a style named nav-td to apply to the navigation block (td) which sets
the width to 125px and sets the vertical-align property (Block category) to
top.
5. Add any final embellishments to the content, headings, table or particular
areas of the table. Experiment and then Undo (Edit menu) if you don't like
the change. You may need to be in the .css file to undo style changes!

Page 20
Add Links to the Navigation
1. Create a mailto: link for Contact Us. Have it go to [email protected].
2. Create a link from the navigation area for each of the navigation links to the
files index.html, directory.html, events.html, research.html, and news.html.
Use the point to file tool.
3. Save your index page, preview in browser and test the links. Don't worry
about the way the other pages look just make sure they open properly. Use
the browser back button to go back to the index page after testing each link.
Page 21
Add a Title
A title which is stored in the head of the document html is important to add for
three reasons.
1. The name will be visible at the top of the browser window outside of the
content
2. The name is used as bookmark text
3. Titles are important information collected by search engines
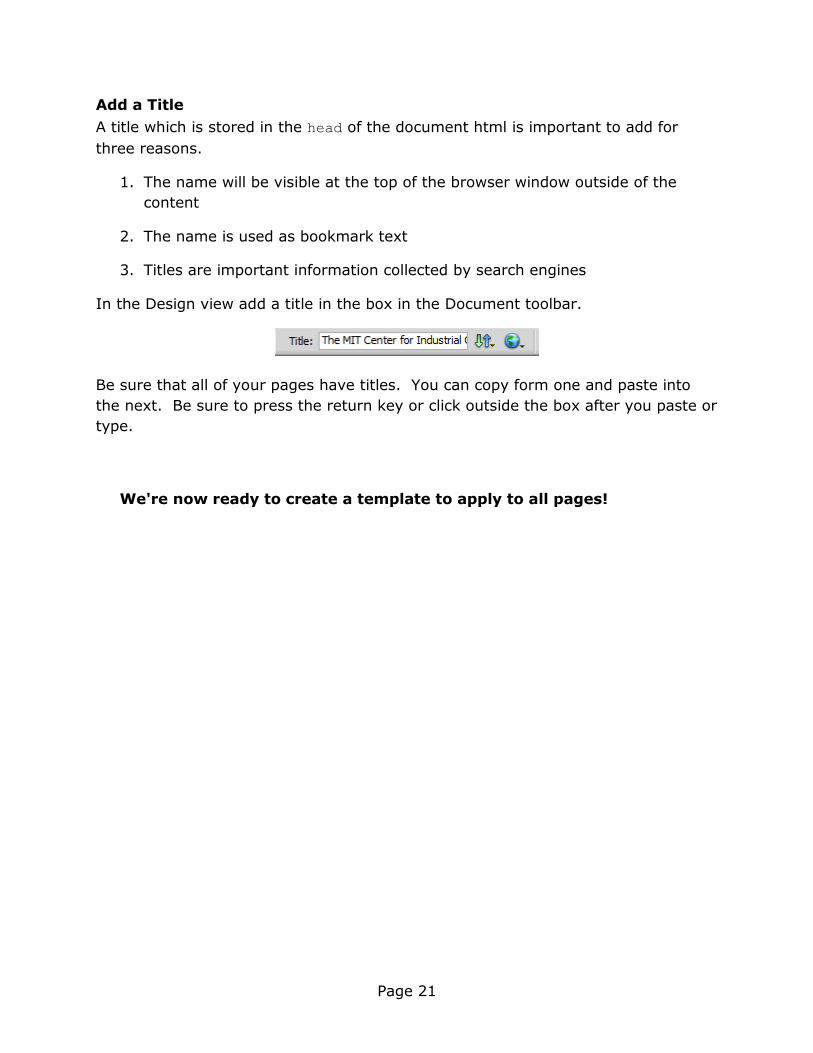
In the Design view add a title in the box in the Document toolbar.
Be sure that all of your pages have titles. You can copy form one and paste into
the next. Be sure to press the return key or click outside the box after you paste or
type.
We're now ready to create a template to apply to all pages!

Page 22
Using a Template to Create a Consistent Look
Our index page has all the formatting and menu links we need on every page. We can use this page as a template.
1. Close all files but leave the index.html file open. From the File menu choose
Save as and name the new document template.html.
You now have the file template.html open and the index page is safely closed.
2. Carefully remove all the text from the content section (About the Center).
Save the template.html again.
3. Open the research document.
4. Copy the contents of the research document and paste them into the
empty content table cell of the template document, the table cell you just
cleared.
5. Close the research document.
6. Return to the template.html document and from the File menu choose
Save as and name the new document research.html – say yes to
overwriting the old research document.
7. Close the research.html document and open the template.html document.
8. Repeat this process with the other documents.

Page 23
Upload Your Files
Connect to your site locker, upload your files and view in your browser
1. Click the Expand/Collapse tool to see files on your computer and on the
server in a split screen.
2. Click on the Connect icon on the toolbar. It looks like a plug.
3. Select your files from the local folder (right column) then click the upload
button.
4. Click Yes when asked to upload dependent files.
Note: To restore the default screen arrangement click on Window then Workspace
Layout, and choose Classic.
For more complete details on site definition, uploading and downloading files see
the appropriate sections of the Web Maintenance Essentials course
documentation.

Page 24
Web Publishing Basics 3 – html code for index.html
<!DOCTYPE html PUBLIC "-//W3C//DTD XHTML 1.0 Transitional//EN"
"http://www.w3.org/TR/xhtml1/DTD/xhtml1-transitional.dtd">
<html xmlns="http://www.w3.org/1999/xhtml">
<head>
<meta http-equiv="Content-Type" content="text/html; charset=utf-8" />
<title>The MIT Center for Industrial Growth</title>
<link href="cig-styles.css" rel="stylesheet" type="text/css" />
</head>
<body>
<table border="1" cellpadding="10" cellspacing="1" class="layout-table">
<tr>
<td colspan="2"><h1><img src="images/mitdome.jpg" width="90" height="68"
alt="mit dome" /> The <span class="color-it">MIT</span> Center for Industrial
Growth</h1></td>
</tr>
<tr>
<td class="nav-td"><p><a href="index.html">Home</a></p>
<p><a href="directory.html">Directory</a></p>
<p><a href="events.html">Events</a></p>
<p><a href="research.html">Research</a></p>
<p><a href="news.html">News</a></p>
<p><a href="mailto:[email protected]">Contact Us</a></p></td>
<td>
<h2>About the Center</h2>
<p>MIT and industry have a long record of cooperation through projects
ranging from joint education and research (where student participation is
often a strong component) to intensive continuing education programs. </p>
<p>The Center for Industrial Growth supports interdisciplinary research
and education aimed at understanding and improving industrial innovation and
efficiency and the education of future industrialists.</p>
<p>The collaboration is extensive: industry executives serve on the MIT
Corporation and its committees; MIT faculty members serve as consultants for
industry; and MIT educates and prepares its students for careers in industry.
The relationship between MIT and industry has had an important effect on the
direction of education at the Institute.</p></td>
</tr>
<tr>
<td colspan="2"><img src="images/mit-redgrey-footer1.gif" width="334"
height="36" alt="mit logo" /></td>
</tr>
</table>
</body>
</html>
Page 25
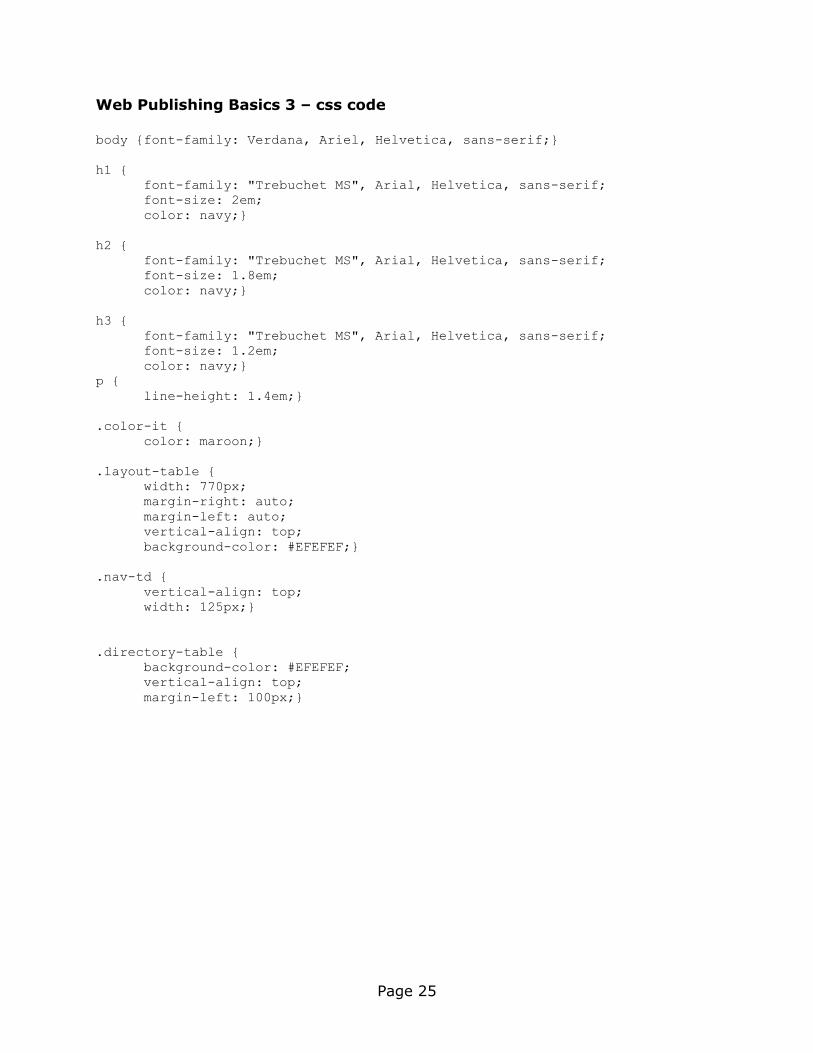
Web Publishing Basics 3 – css code
body {font-family: Verdana, Ariel, Helvetica, sans-serif;}
h1 {
font-family: "Trebuchet MS", Arial, Helvetica, sans-serif;
font-size: 2em;
color: navy;}
h2 {
font-family: "Trebuchet MS", Arial, Helvetica, sans-serif;
font-size: 1.8em;
color: navy;}
h3 {
font-family: "Trebuchet MS", Arial, Helvetica, sans-serif;
font-size: 1.2em;
color: navy;}
p {
line-height: 1.4em;}
.color-it {
color: maroon;}
.layout-table {
width: 770px;
margin-right: auto;
margin-left: auto;
vertical-align: top;
background-color: #EFEFEF;}
.nav-td {
vertical-align: top;
width: 125px;}
.directory-table {
background-color: #EFEFEF;
vertical-align: top;
margin-left: 100px;}

Page 26
Resources
1. MIT Legal and Policy Guidelines for the Use of Web Space
ist.mit.edu/services/web/reference/requirements/legal-and-policy-guidelines
2. MIT Software Downloads
ist.mit.edu/services/software/available-software
3. TSM Backup Service
ist.mit.edu/services/backup/tsm
4. Web Publishing reference pages at MIT
ist.mit.edu/services/web/reference
5. MIT IS&T Help Desk & Support
ist.mit.edu/support
6. Departmental Consulting and Application Development (DCAD)
ist.mit.edu/dcad
7. IS&T Training Resources
ist.mit.edu/services/training
lynda.mit.edu
8. Athena User Accounts
ist.mit.edu/support/accounts
9. MIT Graphic Identity (colors, logos)
web.mit.edu/graphicidentity

Page 27
Books
Dreamweaver CS4 (or CS5) The Missing Manual - David Sawyer McFarland,
2006, O'Reilly Media, Inc.
Spring into HTML and CSS -Molly E. Holzschlag, 2005, Addison Wesley
Head First HTML with CSS & XHTML - Eric Freeman and Elisabeth Freeman, 2005, O'Reilly Media, Inc.
CSS The Definitive Guide - Eric A. Meyer, 2006, O'Reilly Press
Eric Meyer on CSS: Mastering the Language of Web Design - Eric A. Meyer, 2002, New Riders
Web Sites at MIT
Web Resources at MIT – ist.mit.edu/services/web
MIT DCAD - Departmental Consulting and Application Development
- ist.mit.edu/dcad
Lynda.com - lynda.mit.edu
Web Publishing Training Classes and Resources
- ist.mit.edu/services/training/webpublishing
Web Sites outside of MIT
A List Apart - www.alistapart.com
HTML Dog - www.htmldog.com
W3C Schools - www.w3schools.com
Web Monkey – www.webmonkey.com
YouTube - www.youtube.com