the games factory - glorious trainwrecks
TRANSCRIPT

The Games Factory Manual Update February 6th 2000 The following document is the original Europress© “The Games Factory” manual that shipped with the CD-ROM version of the program. The wonderful people at Europress have allowed us to distribute this document. Thank you Europress! A couple notes before you read the manual.
1. Please do not ask Europress with questions involving “The Games Factory” 2. Clickteam has taken responsibility for supporting all past, current and future users. You
can reach our support forums at www.clickteam.com 3. The installation instructions in the manual refer to the CD-ROM version of TGF. The
download version is very easy to install. Please email [email protected] if you have any problems installing the program.
Changes/additions:
1. “Selling your game” page #297 You will need to purchase a copy of “The Games Factory Pro” from Clickteam and agree to the terms of the “TGF PRO” runtime agreement. Note: “TGF PRO” will be released soon. Check Clickteam.com for information on its availability.
2. “Save as internet game”
This is a feature introduced after the TGF manual was produced. Save as internet game produces a “Vitalized” file. This Vitalized file can be embedded into a web page and accessed by modern versions of the major web browsers. For more information visit the Clickteam web site.
3. The updated version of “The Games Factory” available from Clickteam allows the user to add extension to the runtime. More information about adding, using or creating extensions can be found at the Clickteam.
Happy Creating, Francois, Yves, and the rest of Clickteam

ContentsChapter 1. Credits .............................................................................................................................................12. Introduction, The Editor Screens - An Overview.............................................................................33. Installing The Games Factory..........................................................................................................74. Tutorial 1 - Spacebattle .................................................................................................................115. Tutorial 2 - Pointblank....................................................................................................................346. Tutorial 3 - Pulverise......................................................................................................................51
Part 1.....................................................................................................51Part 2.....................................................................................................54
7. Tutorial 4 - Sub Mission.................................................................................................................62Part 1.....................................................................................................62Part 2.....................................................................................................66Part 3.....................................................................................................67
8. Tutorial 5 - Kung Fu.......................................................................................................................70Part 1.....................................................................................................70Part 2.....................................................................................................73Part 3.....................................................................................................76Part 4.....................................................................................................80
9. The Menu Bar....................................................................................................................................File .....................................................................................................................84
New .......................................................................................................85Open .....................................................................................................85Save ......................................................................................................85Save as... ..............................................................................................85General Setup .......................................................................................85Game Setup ..........................................................................................87View Examples......................................................................................94Exit ........................................................................................................94
Edit.....................................................................................................................94Undo......................................................................................................94Redo......................................................................................................94Cut.........................................................................................................94Copy......................................................................................................95Paste .....................................................................................................95Delete....................................................................................................95Unselect ................................................................................................95
THE GAMES FACTORY 1
SECTION HEADING
THE GAMES FACTORY V
CONTENTS
Games factory contents 2/6/00 8:10 PM Page 1

Select all................................................................................................95Editor Preferences ................................................................................96Level Setup .........................................................................................101
Objects.............................................................................................................103Show Objects ......................................................................................103Hide Objects........................................................................................103Pick Objects from a game...................................................................103Save game as a library .......................................................................103
Window ............................................................................................................104Cascade ..............................................................................................104Tile ......................................................................................................104Arrange ...............................................................................................104
Run ..................................................................................................................105Help..................................................................................................................105
10. The Toolbar ...............................................................................................................................10511. The Storyboard Editor ...............................................................................................................11012. The Level Editor ........................................................................................................................11713. The Event Editor........................................................................................................................127
EventsActive Object .......................................................................................130Special Object .....................................................................................137Timer Object........................................................................................142Storyboard Object ...............................................................................142Create Object ......................................................................................144Mouse Pointer and Keyboard Object ..................................................146Player Object.......................................................................................150Sound Object ......................................................................................141Question and Answer Object ..............................................................152Counter Object ....................................................................................153High Score Object...............................................................................154Edit Object...........................................................................................154AVI Object ...........................................................................................156QuickTime Object................................................................................156MPEG Object ......................................................................................158FLI / FLC Object..................................................................................159 CD Audio Object .................................................................................160 MCI Object ..........................................................................................161Picture Object......................................................................................162Button Object ......................................................................................163
ActionsActive Object .......................................................................................165
2 THE GAMES FACTORY
SECTION HEADING
VI THE GAMES FACTORY
CONTENTS
Games factory contents 2/6/00 8:10 PM Page 2

THE GAMES FACTORY 3
SECTION HEADING
Special Object .....................................................................................175Sound Object ......................................................................................177Storyboard Object ...............................................................................179Create Object ......................................................................................184Mouse Pointer .....................................................................................185Player Object.......................................................................................186Text Object..........................................................................................187 Question and Answer Object ..............................................................188 Counter Object ....................................................................................189High Score Object ..............................................................................189Edit Object...........................................................................................191AVI Object ...........................................................................................193QuickTime Object................................................................................193MPEG Object ......................................................................................194FLI / FLC Object..................................................................................196CD Audio Object .................................................................................197MCI Object ..........................................................................................197INI Objects ..........................................................................................199Picture Objects....................................................................................201Button Objects.....................................................................................202Mixer Objects ......................................................................................204
13.b. The Expression Editor ............................................................................................................205List of functions ...................................................................................207Active Object .......................................................................................207Special Object .....................................................................................209Storyboard Object ...............................................................................210Create Object ......................................................................................210Mouse Pointer Object .........................................................................211Player Object.......................................................................................211Text Object..........................................................................................211Question and Answer Object ..............................................................247Counter Object ....................................................................................249High Score Object ...............................................................................213Edit Object...........................................................................................212AVI Object ...........................................................................................214QuickTime Object................................................................................263MPEG Object ......................................................................................215FLI / FLC Object ................................................................................ 216CD Audio Object .................................................................................217MCI Object ..........................................................................................218INI Object ............................................................................................219Picture Object......................................................................................220
THE GAMES FACTORY VII
CONTENTS
Games factory contents 2/6/00 8:10 PM Page 3

Button Object ......................................................................................221Mixer Object ........................................................................................222
14. The Objects ...............................................................................................................................223Active Object .......................................................................................232Backdrop Object..................................................................................240Quick Backdrop Object .......................................................................240Text Object..........................................................................................243Question and Answer Object ..............................................................247Counter Object ....................................................................................249Score Object .......................................................................................251Lives Object ........................................................................................253High Score Object...............................................................................255 Edit Object...........................................................................................257AVI Object ...........................................................................................261QuickTime Object................................................................................263MPEG Object ......................................................................................263FLI / FLC Object..................................................................................266CD Audio Object .................................................................................268MCI Object ..........................................................................................269INI Objects ..........................................................................................271Picture Object......................................................................................272Button Object ......................................................................................274Mixer Object ........................................................................................276
15. The Animation Editor .................................................................................................................27716. The Picture Editor......................................................................................................................28717. The Step-Through-Editor ...........................................................................................................29218. Saving your games as Standalone software.............................................................................29619. Index ..........................................................................................................................................298
4 THE GAMES FACTORY
SECTION HEADING
VIII THE GAMES FACTORY
CONTENTS
Games factory contents 2/6/00 8:10 PM Page 4

The Games Factoryy wasprogrammed and designed by:François Lionet & Yves Lamoureux.
Copyright © 1996 François Lionet & Yves Lamoureux. World rights reserved. No part of thissoftware may be reproduced, stored in a retrieval system, photocopied or transmitted in any form -electronic, mechanical, magnetic or any other way - without the prior and written consent ofFrançois Lionet & Yves Lamoureux. While every care has been taken in the preparation of thesoftware, the publishers cannot be held responsible for any errors or omissions.
THE GAMES FACTORY 1
CREDITS
2 THE GAMES FACTORY
CREDITS
Construction of The GamesFactoryy was greatly assisted bythe following people:
Extension Objects created by: Philippe Paquet and Yves Lamoureux.
Graphic artwork created by: Nolan Worthington and Etrange Libellules.
The Games Factory was managed by: Richard Vanner.
The Games Factory manual was written by: Ian Young, assisted by Philip Chapman,Richard Vanner and Lee Bamber.
The example games were created by: Lee Bamber, Nolan Worthington and Merlyn Lear.
The tutorial games were written by: Lee Bamber.
Help files written by: Stephen Hill.
Box design: Julian Marshall and Nolan Worthington.
Box artwork by: Bill Worthington.
Sound & Music by: Mel Croucher, Ian Waugh and Darren Ithell.
Manual Designed and Typeset by: Mark Nolan
Copyright © 1996 Europress Software Ltd, Adlington Park, Macclesfield SK10 4NP, UK. Worldrights reserved. No part of this manual may be reproduced, stored in a retrieval system,photocopied or transmitted in any form - electronic, mechanical, magnetic or any other way- without the prior and written consent of Europress Software Ltd. While every care has been takenin the preparation of this manual, the publishers cannot be held responsible for any errors oromissions.

Welcome to TheGames Factory!The Games Factory is the very latest easy to use games creator from Europress software. Itrepresents state-of-the-art animated graphics and sound, multimedia functions and fabulousgame-structuring routines that makes it very quick and easy to produce your own games ofstunning quality with no programming experience whatsoever! Whether its platform games, mazegames, shoot-’em-ups or graphic adventures, The Games Factory makes it easy! You don’t evenhave to make the characters for your games, The Games Factory has huge graphics librariescontaing literally thousands of different characters and backdrops ready made for your games.
For those who really want to be creative, though, you can make your own animated characters,backdrops and even record your own sound effects, making a game completely unique.
This manual will take you step-by-step through five tutorial games, from the most basic games to afully fledged beat-’em-up with amazing graphics. By the time you finish creating the tutorial gamesyou will be fully competent in all the major features of The Games Factory, fully skilled to createvirtually any game you desire.
Should you be an experienced user of Klik & Play already, and you want to get stuck straight intothe game creation, the rest of the manual will detail all the functions of all the objects, including ahost of new options that will make games creation easier than ever before.
Don’t forget that you also have the extensive Help files on hand at any time for handy hints anddescriptions.
Using This ManualTo get the best out of this manual, it is heavily recommended that you read the following overviewsof the functions of the different Editor screens, and read the introduction pages of each of thechapters.Most of this manual describes the parameters for each different type of object. It is important tounderstand that everything that you can do within The Games Factory is related to an object. Youhave Player objects for Lives and Scores, CD Objects for playing music from a CD player, Soundobjects for playing music and samples.Each one of these objects can be changed in several ways, almost always done by selecting onan object with the right mouse button.
THE GAMES FACTORY 3
WELCOME

In the Level Editor, you get all the initial options for the objects. These are described in great detailin the ‘Objects’ chapter.
In the Event Editor, you choose all the Events and Actions that can happen to an object, such as‘Play a sample’, ‘Destroy’, ‘Collides with...’, ‘Lives =0’, etc, etc.
Each Object is listed in the ‘Objects’ chapter, with its icon below the heading, and a picture of themenu that you will get when you click on it with the right mouse button on the first page. Thisformat is carried on into the Event Editor, so for a quick list of the menu, just go to the first page ofthat object’s topic.
The EditorsIn order to simplify your games creation, The Games Factory divides the creation process intoseveral different stages. This is done by the use of the ‘Editor’ screens. Each Editor screen allowsyou to manipulate the characters of your game in a different way. One will allow you to decidewhich characters to put on the screen and how to animate them, another will allow you to addmusic and movement. Some of the functions overlap, so look out for the ‘Handy Hints’ along theway.You can move very quickly and easily from one editor screen to the next simply by clicking on therelevant icon from the toolbar at the top of each editor screen. Don’t worry if you cannot rememberwhat each one looks like straight away. As you move the mouse pointer over the icons a text-balloon will appear underneath the mouse pointer, telling you what each one is.
Below is a brief description of the functions of each of the editor screens. These functions aredescribed in more detail in the chapters relating to them.
4 THE GAMES FACTORY
THE EDITORS – AN OVERVIEW

Storyboard Editor
Most games are composed of several different levels, and this screen allows you to add levels toyour game, copy levels and to change the order of the levels by moving them around. This is alsowhere you decide on the size of your playing area, adding and editing professional looking fadingin and out of each level, plus using passwords to enter each level.Note that until you have created a level, the only way to move out of this screen is by clicking inthe ‘Thumbnail’ (so called because it shows a tiny screen shot of that screen) with the right mousebutton, and select in the ‘Edit this level’ option. There is more detailed information in the chapter‘The Storyboard Editor’ on page 112 but it is recommended that you at least read the summaries ofeach of the Editors before you go straight into your games creation!
Level Editor
The Level editor is the initial ‘Blank Page’ of each of your levels. It displays your play area and iswhere you decide to put background objects and the main characters of your game. It is from this screen that you have access to the libraries of all the different objects that you canuse, and is also where you can create your own animated objects, text and other object types.Basically, all the objects that you want to play with have to be placed on this screen first beforeyou can start manipulating them.It is also here that you change the animation of objects, their movement and change the basicsetup of all your objects. You will frequently find that before you can manipulate an object from theEvent Editor you must make sure that it is set up correctly on this screen.For more information on the Level Editor, got to page 117, but we do recommend that you finishthis chapter at least before doing so!
THE GAMES FACTORY 5
THE EDITORS – AN OVERVIEW

Event Editor
This is where your game will really come to life. Once you become experienced with The GamesFactory you will find that this editor is where you will spend most of your time. It is here that youdecide all the events in your game, e.g. What happens when the alien collides with the spaceship?What happens when your hero eats the hot porridge?All of these events are defined here and you decide which actions to apply to them; which soundto play, create an explosion or destroy an object, add to the score, subtract a life, or evencomplicated events like changing the direction of the evil cowboys chasing after your hero whenhe picks up a gun. This is a very large chapter, so some knowledge of how to move around it is useful. The firstportion of this chapter is essential, as it explains the differences between the Events and theActions. All the objects are listed in the same order throughout this chapter, for their Events,Actions and Functions. Functions are called up using the Expression Editor.
Step Through EditorThe Step Through Editor can be very useful for the inexperienced Games Factory user. You canhave the Step Through Editor detect all the possible Events that can happen in your game and putthem into the Event Editor. More experienced users will find that it will ‘overload’ them withconditions. For a lot of games you will want nothing at all to be done for most of the Events. It willrun your game step-by-step and stop it every time an Event occurs, and then ask you whichactions you want to put to that Event. Bear in mind, though, the number of Events that are possiblein your games is usually very large indeed, even with a very simple game. It is thus best used onlyinitially to help you in the construction of your Event grid when using the Event Editor. Don’t worry,these terms are explained fully later in the manual!
6 THE GAMES FACTORY
THE EDITORS – AN OVERVIEW

Installing TheGames FactoryWINDOWS 95 USERSWindows 95 users can install the 32 bit version of The Games Factory to their machine. To do thissimply reset your machine and insert The Games Factory CD into your CD ROM drive.
If you have not installed The Games Factory previously then it will automatically install when yourun Windows 95.
If you have installed The Games Factory before, or you have not reset your computer, (werecommend that you do) then use the following procedure;
Double-click on the ‘My Computer’ icon from your Windows desktop. When you are presented with the ‘My Computer’ dialogue box, click on the pull-down button nextto the text-box ‘My Computer’. This will pull-down a list of all the available drives for your PC. Select the CD ROM icon from thelist.You will now be presented with a list of the contents of the CD. Look down the list for a file called‘Setup.exe’. Double-click on this to start the installation.
Windows 3.x usersUsers of Window 3.x can install the 16 bit version of The Games Factory.First, reset your computer and insert The Games Factory CD into your CD ROM drive.Now double-click on the Main icon from your Windows desktop. From here double-click on the FileManager icon.
From the File Manager select the CD ROM drive from the list of drives on the toolbar.The window in the centre of the screen should now display the contents of the CD.Look for a file in the right of the window called ‘Setup.exe’. Double-click on this to start theinstallation.
THE GAMES FACTORY – INSTALLATION 7
INSTALLATION

The Installation
The following procedure is very similar for both the 16 and 32 bit versions. The screen shots are allfrom the 32 bit version. Where applicable the differences are described.
You will now be presented with a screen that asks if you have already installed The Games Factoryand if you want to modify the settings. Click ‘Next’ at the bottom of the screen.
The next screen asks if you want to install either Video for Windows or a QuickTime video driver forshowing AVI and QuickTime compatible video clips. Unless you want to install one of the drivers,click ‘Next’.
The next screen asks you to type in your full name. When you have done so, click ‘Next’.
At the top of the next screen are two tick-boxes, one for the 16 bit version and one for the 32 bitversion. If you are running Windows 95 on your machine, you can install the 32 bit version. Thetick-box will be filled already. If you are running Windows 3.x then the 16 bit tick-box will be filled.
8 INSTALLATION – THE GAMES FACTORY
INSTALLATION

Below this are three radio-buttons, asking how complete an installation you want to perform. Theminimal installation places as little as possible of the contents of the CD into your PC, but becauseit runs from the CD, it will slow down the running of the program a little.
Normal installation installs everything except the object libraries and sound files onto your PC. Thisradio-button will be filled by default, and is the normal option, as it does not take up too muchmemory, but still runs the program quickly. Note you will need to have the CD in your drive whenyou run the program.
The Full installation installs the main program and all the graphics and sound libraries from the CDonto your PC. This allows for the fastest running of the program, but it does take up a very largeamount of hard disk space and this is undesirable for many people.
For 32 bit (Windows 95) users, there is a tick-box for ‘Direct X’, which is Microsoft’s own graphicsdriver. Unless you specifically don’t want to install Direct X, place a check-mark in the button byclicking with the mouse pointer. Should you experience problems using Direct X you shouldchange the graphics driver. See ‘General Setup’ on page 85 after installation.
THE GAMES FACTORY – INSTALLATION 9
INSTALLATION

For 16 bit (Windows 3.x) users there is a tick-box for ‘Win G’, which is Microsoft’s own graphicsdriver. Unless you specifically don’t want to install Win G, place a check-mark in the button byclicking with the mouse pointer. Should you experience problems using ‘Win G’ you should changethe graphics driver. See ‘General Setup’ on page 85 after installation.
At the bottom of this screen is the file name that The Games Factory will use.Unless you specifically want to enter a different name, click the ‘Next’ button.You will then be told that the directory does not already exist, and asked if you want to create it.Click on the ‘OK’ button to proceed.
Now wait while The Games Factory installs.
When it is finished installation, click on the ‘Return to Windows’ button to return to Windows. Nowyou can double-click on The Games Factory icon to run the program!
We recommend that you look through the examples that we have laid on for you after you have firstloaded up The Games Factory.To view these, click on the ‘File’ heading at the top left of the screen, then click on the ‘Viewexamples’ option. You can then select whether you want to look at the tutorial games, the fantasticgames ‘Zeb’, ‘Lobotomy’ and ‘Magicians Lair’, or the advanced techniques.
10 INSTALLATION – THE GAMES FACTORY
INSTALLATION

The TutorialGamesThis section of the manual is dedicated to taking you on a step-by-step mission to construct fivetutorial games, from a very basic, one-level shoot-’em-up, to a platform game complete with highscores, music, scrolling scenery and animated characters that will really show you how easy it is tocreate games of stunning quality. It is recommended that you occasionally refer to parts of the main manual though, as this will giveyou more information on the background of some of the objects and operations. This will not benecessary for the construction of the tutorial games, but it will help you learn your way around themanual, useful for when you embark upon your own gaming construction. It is assumed that before starting on this section that you have successfully installed The GamesFactory to your hard drive. If you have not done this, please turn to ‘Installation’ on page 7 tocorrectly install The Games Factory to your machine.
Loading SpacebattleSelect the ‘Open’ option from the ‘File’ menu at the top of the screen, then look for the ‘tutorial’directory on your CD ROM drive.Within the ‘tutorial’ directory look for the ‘01space’ sub-directory. Now look for the directory ‘tutorial’and within this look for the file ‘01 space.gam’. Open this file.
Tutorial Game 1SpacebattleSpacebattle is the first of the tutorial games and will show you the very basics of creating gameswith The Games Factory. Even so, a lot of the procedures that you will be using for this game arebasic to all games and extremely useful.This tutorial will help teach you some of the different functions of the different Editor screens andhow they relate to each other. You will also get a basic introduction into the use of the pull-downmenus at the top of each Editor screen.Perhaps most importantly, though, is the step-by-step creation of different events and actions inthe Event Editor, and how this affects how the game is played.Although a very basic game, you can always add further features to this game to make it far more
THE GAMES FACTORY – TUTORIAL 1 11
TUTORIAL INTRODUCTION

complex - changing the movement paths, adding sound, power-ups, high score tables. It isrecommended that you work your way through all the other tutorials or the relevant sections of themanual before doing this, though.
Important Note!For those of you who have not used ‘Windows’ software before, it is important to note that when wetalk of ‘Selecting’ an object, that means moving the mouse pointer over the object and clicking theleft mouse button. When the right button is to be used, you will be told specifically.
Spacebattle – The Storyboard EditorOnce you have loaded in the Spacebattle game, you will be presented with a Storyboard Editorscreen that looks like this;
Starting from the top of the screen, we shall describe the various features of the Storyboard Editorscreen. Note that a lot of the features are the same for all of the Editor screens, but what theyactually perform on each Editor screen can be quite different.At the top right is the Window Manipulation icon. By clicking on this you can maximize or minimizethe size of the window displaying The Games Factory, or exit The Games Factory. Note that theStoryboard Editor is a window within The Games Factory window, and it has its own windowmanipulation icon immediately beneath The Games Factory’s.
On the very top of the screen is the The Games Factory heading bar. This displays the currentgame name, in this case ‘Space.gam’. Next to this is the name of the current Editor screen,‘Storyboard Editor’
Below this is the pull-down menu bar. From here you can save your games, change the size of thescreen, change preferences, access the Help pages and customize your display. This isdescribed in detail in the chapter ‘Menu bar’ on page 84.
Below the menu bar is The Games Factory toolbar. From here you can very quickly and easilymove around the Editor screens by clicking on their icons, save games, cut and paste objects orevents, plus test running your games. All the different icons are described in the ‘Toolbar’ chapter
12 TUTORIAL 1 – THE GAMES FACTORY
SPACEBATTLE TOUR – THE STORYBOARD EDITOR

on page 110.
On the main window area of the Storyboard Editor is where each level is displayed in summary. Bydefault a ‘Thumbnail’, or very small screen shot of that level is displayed immediately next to thenumber of that level.Next to the thumbnail are the comments for that level, the title of the level and the password. Tochange these, simply click on the text that you want to change with the left mouse button. You canthen change / add a title or password.
Underneath the comments are several ‘buttons’;
This denotes a multimedia level, which is what all your levels will be by default. If you wereto make your level an animation frame, this icon would change.
You can add a fade-in transition to your level by using this icon.
You can add a fade-out transition to your level using this icon.
This is where you can select the size of your play area. The play area can bemuch larger than the screen size if you want, then you can scroll around it using
a scroll function. Scrolling is dealt with on page 180 and in the later tutorials. By selecting on thenumbers you can enter your own sizes via the keyboard, or by clicking on the monitor icon youcan pick one of the pre-determined sizes that The Games Factory has to offer.
Right, now that you’ve got a general idea of what all the different features are on the StoryboardEditor screen are, let’s go and look at how we put all the objects on the screen. Don’t worry if youhave questions about the Storyboard Editor, we are coming back to it soon, and you can alwaysturn to the ‘Storyboard Editor’ chapter on page 112 for detailed information.
Spacebattle – The Level EditorTo get into the Level Editor when you first load a game, or start a new one, you need to click insidethe ‘Thumbnail’ of the level display with the right mouse button, then from the menu that producesselect the ‘Edit this level-Level editor’ option. This will then take you to the Level Editor.Note that once you have been into the Level Editor or the Event Editor once using this method, allyou have to do is click on the icons on the toolbar to move through the different Editor screensinstead.Now you are in the Level Editor, let’s have a look around.
THE GAMES FACTORY – TUTORIAL 1 13
SPACEBATTLE TOUR – LEVEL EDITOR

You will notice that the toolbar is exactly the same as on the Storyboard Editor screen, only nowyou can access the object libraries via the ‘Level Objects’ window in the toolbar.Notice also that you can see all of the objects that have been used to create ‘Spacebattle’ on theirown Object Window on the left hand side of the screen. Not all of the objects fit inside that window, so there is a scroll bar to look through them. Trylooking through the contents. You will also find a ‘Score’ object at the bottom of the library. Whenyou are making a very large level you will need to get used to scrolling through the window to viewall of your objects.(You can also change the window to a ‘Moveable Window’ from the Menu bar at the top of thescreen, using the ‘Objects-Display objects in a moveable window’ option. For more information turnto the chapter ‘Menu Bar’, but be sure to carry on here if you do!)
If you move your mouse pointer over the objects in the object window a ‘Handy hint’ will show youthe name of each object. You could now select one of the objects with the left mouse button andthen place it anywhere on the screen. Try it! When you have tried placing a few objects on the screen, select them with the left mouse buttonand use the <Delete> key to erase them. You must do this before you carry on with the tutorialotherwise it will change what you find in the other Editor screens.
14 TUTORIAL 1 – THE GAMES FACTORY
SPACEBATTLE TOUR – LEVEL EDITOR

Try also moving the mouse pointer over the objects that have already been placed on the screen.You can move them around by selecting on them with the left mouse button and ‘dragging’ themaround by holding the left mouse button down.
Now, go to the scroll bars at the side of the screen, and try moving around the play area usingthem. You will notice that there is a grey area which is the edge of the play area. Any objectsplaced here will not be shown on the screen when you play your game, but it can be a useful‘holding area’ for placing objects in a level, which you can then move onto the play area later on,by using the Event Editor.
Note: You must have an object placed on the screen on the Level Editor screen before you canmanipulate it in the Event Editor, the exceptions being when you create or shoot an object from theEvent Editor.
Now let’s have a look at the menu options for each object. Different types of object have differentmenus, as you’ll come to learn.
Try pressing the right mouse button when you have the mouse pointer over the ‘Space Backdrop’object. Have a look through all the different options, but don’t change anything. Now try it over anyof the other objects on the screen. We shall be using these menus in a later tutorial.
Right, now that we’ve had a quick tour around The Games Factory’s more basic features, let’shave a look at what the game plays like!To be sure that you have made no changes to the game at all, re-load the game. To do this, clickon the ‘File’ menu at the top of the screen, then select the ‘Open’ option. Now re-load Spacebattle,right click in the thumbnail, select the ‘Level Editor’ option.
Look at the top right of the Toolbar. There are several control buttons there which control thetesting of your game. For now we are just going to use the Play / pause button and the restartbutton .
The controls for the game are Left / Right (cursor keys) and fire is the <Ctrl> key.Now click on the Play button. To stop the action, click on it again. When you want to finish playing,be sure to use the restart button to reset everything.
THE GAMES FACTORY – TUTORIAL 1 15
SPACEBATTLE TOUR – LEVEL EDITOR

Spacebattle – The Event Editor
To get into the Event Editor, simply click on the icon on the toolbar at the top of the screen. You should now be presented with a screen that looks like this;
In the Event Editor is where you decide upon the action and strategy in your games creation,where you add sound, explosions, move onto the next level, display Hi Score tables, the list isalmost endless! The Events and Actions are described in the Event Editor chapter, but we shall begoing into some detail about how to create the Event lines used in ‘Spacebattle’ here.
In addition to the menu bar and toolbar, the Event Editor basically consists of one horizontal line, whichcontains the icons of all the level’s objects. It also has a vertical column of grey ‘Event’ lines. Look below the heading ‘Start of Game Actions’ and youwill notice that next to each Event line, there is a grid of boxes, each box lining up with an objects icon.For example, you can insert an Event that reads, ‘(Active object X) collides with (Active object Y)’. Younow have an Event. What you would then want to do would be to decide upon an Action to assign to thatEvent. If Active object X was a bullet that you fired, and Active object Y was an alien, you might want to‘Destroy (Active object Y). ‘We shall discuss how to insert Events and Actions in a moment.You can see the horizontal line at the top of the Event Grid. It looks like this in ‘Spacebattle’;
16 TUTORIAL 1 – THE GAMES FACTORY
SPACEBATTLE TOUR – THE EVENT EDITOR

‘All the events’ is the heading for the vertical column, which is where you insert all the Events. Weshall describe this after talking you through the icons held in the horizontal bar.The icons at the right of the bar refer to all the level’s objects. Shown here are all of the objects(except backdrop) that have been placed onto the play area. You can see the alien objects here,as well as the players ship and the missile. It will also show any object that you use as bullets orcreate from within the Event Editor, even if they are not already on the play area. Shooting objectsis described later in the chapter, in step 36.The first six icons denote Game Objects, and are always on the event grid by default. They are, inorder;● Special object. Performs special functions when an Event occurs.● Sound object. Plays sound or music.● Storyboard object. Moves you around the different levels of your game.● Create object. Allows you to place a new object on the screen.● Mouse and Keyboard object. Lets you interact with the mouse and keyboard.● Player object. Allows you to change lives and scores.
Now, before we go any further, use the vertical scroll buttons on the right side of the screen tomove down through the Events until you can see Event number 21 just appearing on the bottom ofthe screen. You should now have a screen that looks like the one overleaf;
THE GAMES FACTORY – TUTORIAL 1 17
SPACEBATTLE TOUR – THE EVENT EDITOR

You can now see three Event lines within the group ‘Start of Game Actions’, the green commentline, and the two actual Events.Below this you can see the group ‘Main Game’, which is so large that it doesn’t fit onto the screen.Now you can see what the heading ‘All the events’ relates to. It refers to all the Events that arelisted down the left hand side of the screen. You can also see that there is a grid with vertical columns that correspond to the objects displayedon the bar at the top of the Event grid. In some of the boxes of the grid there are ‘check-marks’.These mean that an Action has been inserted in that box.For example, look at Event line number 9. If you move your mouse pointer over the check-mark onthis Event line you can see a ‘Handy Hint’ text box that says ‘Destroy’. Event number 9 reads ‘Startof level’, so, at the start of the level, destroy the missile object.This ensures that they are all removed from the play area before you start your game, and that theonly missiles on the screen will be the ones you fire from the spaceship.Have a look through the other Events, move your mouse pointer over the check-marks so that youcan see which Actions are associated with which objects. The comments above each set of Eventdescribes what each Event line does, too.
18 TUTORIAL 1 – THE GAMES FACTORY
SPACEBATTLE TOUR – THE EVENT EDITOR

Right, let’s have a go at reproducing one of the Event lines.We are going to produce a copy of Event line number 9. There is a very easy way of copyingEvents, but we are not going to use that here. We are going to go step-by-step to show you how tocreate your own Event lines.
1. To create a new Event line, move the mouse pointer directly over the text ‘New condition’ ofEvent line number 10. ‘New condition’ means that this line is completely empty. Notice that it hasno grid next to it.2. Now, click on the text with the right mouse button.You will now have a dialogue box that looks like this;
3. If you move your mouse pointer over each object you will be shown what each one is via the‘Handy Hint’ text balloon.4. Now, click on the ‘Storyboard controls’ icon with the right mouse button. You will pull-down amenu. 5. Click on the ‘Start of level’ option with the left mouse button.You will now be taken back to the Event grid, and event number 10 will read ‘Start of level’. You’vecreated your first Event!
Now all you need to do is put in an Action.1. Go across the empty check-boxes on line number 10 until you get to the box underneath theicon of the missile.2. Click in the empty box with the right mouse button. You will then be presented with a menu of allthe things to do to the missile object.3. Now move down the menu and using the left mouse button, click on the ‘Destroy’ option. Youwill then be taken back to the Event grid and Event line 10 should look exactly the same as Eventline number 9. Well done!
THE GAMES FACTORY – TUTORIAL 1 19
SPACEBATTLE – MAKING IT YOURSELF – STARTING

Creating Spacebattle Yourself
Note: It is assumed that for this part of the tutorial especially, that you are actually sat in front ofyour PC with the game Spacebattle already loaded.
Okay, now you’ve had a ‘guided tour’ around how Spacebattle was made, let’s have a go atmaking it yourself.First of all we’ll need a ‘blank page’ to work with.1. Go to the ‘File’ heading on the menu bar at the top of the screen. Select the ‘New’ option.Games Factory will ask you if you want to save the changes that you have made to ‘Spacebattle’.We already have it safe on disk, so click the ‘No’ option.
2. You will now be asked to select a playfield size. We want something that fills the screen, so clickon the ‘640 by 480’ size, then click ‘OK’.
3. You will now be taken to the Storyboard Editor, with an empty level 1 display. To enter a namefor the level, click on the ‘Untitled’ text within the level 1 display, and enter a name, then press<Return>.Click inside the empty ‘Thumbnail’ with the right mouse button. From the menu produced click onthe ‘Edit this level’ option, then the ‘Level Editor’ option. You will then be taken to an empty LevelEditor screen, ready for you to place your objects on.
4. To place the objects on the screen, go to the ‘Level objects’ text box on the toolbar at the top ofthe screen, and click on the pull-down button at the side of the text.
5. Now, look through all the different object libraries until you get to one called ‘(Tutorial) SPACEBATTLE’. Click on this.6. You will now have all the objects from this library displayed in the Object window down the lefthand side of the screen. You will notice that there are large icons within this window. These denotethe type of object, for example;
denotes Active objects.
denotes Backdrop objects.
denotes Storyboard objects. In this case a Score object.
20 TUTORIAL 1 – THE GAMES FACTORY
SPACEBATTLE CREATION – LEVEL EDITOR

Try moving your mouse pointer over the different objects in the window. A ‘Handy Hint’ text box willtell you what each one is called.Before we place the Active objects of our game onto the play area, we are going to put abackdrop into place, align it perfectly with the edges of the screen, then ‘lock’ it into place so itcannot be selected or moved whilst we are putting all the other objects onto the play area.
Placing the backdrop and locking it in place
7. To place the backdrop onto the screen, go to the object window and click on the backdropicon, called “Space Battle Backdrop”, using the left mouse button.
8. Now move the mouse pointer over the play area, anywhere will do, then press the left mousebutton again.This places the backdrop object onto the play area. Note that when the backdrop object and thesize of the play area are identical, The Games Factory will automatically align the backdrop objectto fit.
9. We are now going to stop the backdrop object being selected every time you click on it with themouse. This will make it far easier when you start putting other objects on the play area.
Go to the toolbar at the top of the screen and click on the preferences icon with the left mousebutton. (You can learn more about preferences from the Menu Bar chapter on page 84. Lookunder the option ‘Edit-Editor preferences)
10. Now you will be presented with a dialogue box. Under the ‘Lock objects’ heading, look for‘Backdrop’. There will be an empty check-box. Click in the check-box with the left mouse button. Itwill now be filled with a small ‘X’.Now click on the ‘OK’ button.Now when you try clicking on the backdrop object, you cannot! As you saw from the differentoptions in the preferences dialogue box, you can lock lots of different types of object into place. Tounlock the backdrop object, click on the preferences icon and then click in the ‘Backdrop object’radio-button again.
Placing the main characters neatly onto the screen
Now that we have a nice backdrop for our game, we are going to place Active objects onto theplay area, the Aliens, the bullet and the main characters spaceship.
So, before we put the object 5 onto the screen, we are going to put a grid on the screen that wecan use to align the Aliens neatly, rather than somewhat haphazardly using the mouse.
11. Go to the preferences icon again, at the top of the screen. Click on this using the left
THE GAMES FACTORY – TUTORIAL 1 21
SPACEBATTLE CREATION – LEVEL EDITOR

mouse button. Now when you are presented with the Preferences dialogue box, click on thesecond ‘Layer’, called ‘Grid’, with the left mouse button.You will now be shown the second layer of the preferences screen.
12. Look for the heading ‘Square size’. You will see that both the size and height are set to 32,which means that the grid is composed of lots of squares 32 pixels wide by 32 pixels high.We are going to leave the height alone, but we want to change the width to a smaller number,allowing us to horizontally line up the aliens a little more finely.So, click on the actual numbers in the ‘Width’ box using the left mouse button. Now, using thecursor and <Delete> key, erase the numbers in the box and type in ‘10’.
13. Now go towards the bottom of the dialogue box where there are two radio-buttons. Go to the‘Snap-to’ radio-button and click in the empty box with the left mouse button. This means that anyobject you place on the screen will ‘snap’ to the grid. We are not too bothered about looking at thegrid for this game, so leave the ‘Show grid’ box empty. It does not interact with the Editor screens inany way apart from to show the grid when you are on the Level Editor screen.Now click the ‘OK’ box at the bottom of the dialogue box to take you back to the Level Editor screen.
Placing Objects on the screen usingthe left and right mouse buttonsNow we are ready to actually start placing the objects on the screen, which will be nice and neatbecause we have enabled the grid.
To place objects onto the screen, first go to the object window and select the object you want,using the left mouse button. You can then move the mouse pointer to wherever you want thatobject to be placed on the screen. You can now either click with the left mouse button, whichplaces a single copy down, or use the right button, which allows you to place multiple copies downwithout having to return to the object shelf every time you want to place an object.
So, now you know the difference between placing the objects using the left and right keys, let’s layout a wave of aliens!
14. Go to the object window and click on the ‘Big Alien’ with the left mouse button.
15. Now move the mouse pointer over the play area. Let’s start at the top left of the screen andstart placing our Aliens there. Notice that the object jumps about as you move it. This is the effectof having the grid ‘snap’ enabled.Select the place that you want to place the first alien, but don’t press any buttons yet. Don’t placeit too close to the edge of the screen, otherwise it will disappear off the screen when you play thegame. Note that you can still scroll around the display area using the scroll bars even when youare ‘carrying’ an object.
22 TUTORIAL 1 – THE GAMES FACTORY
SPACEBATTLE CREATION – LEVEL EDITOR
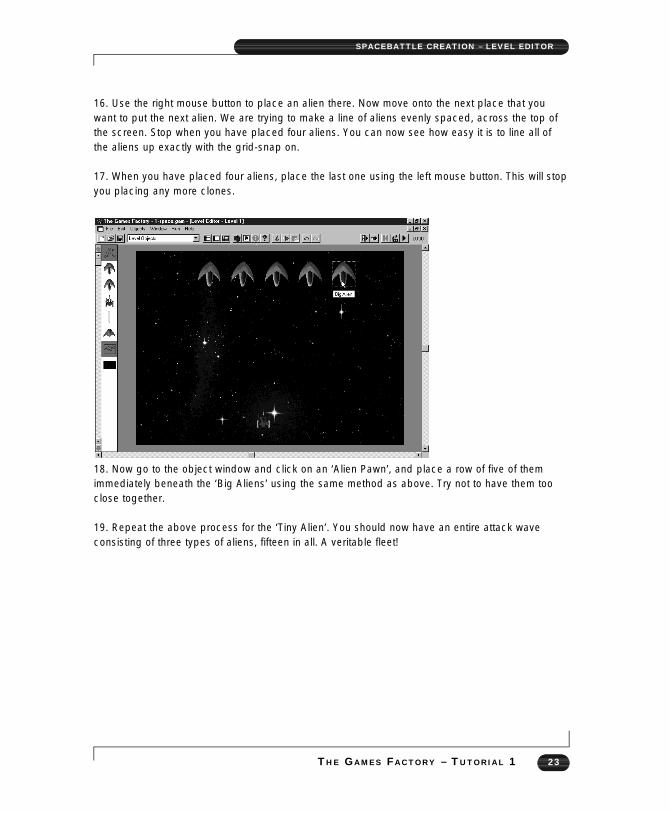
16. Use the right mouse button to place an alien there. Now move onto the next place that youwant to put the next alien. We are trying to make a line of aliens evenly spaced, across the top ofthe screen. Stop when you have placed four aliens. You can now see how easy it is to line all ofthe aliens up exactly with the grid-snap on.
17. When you have placed four aliens, place the last one using the left mouse button. This will stopyou placing any more clones.
18. Now go to the object window and click on an ‘Alien Pawn’, and place a row of five of themimmediately beneath the ‘Big Aliens’ using the same method as above. Try not to have them tooclose together.
19. Repeat the above process for the ‘Tiny Alien’. You should now have an entire attack waveconsisting of three types of aliens, fifteen in all. A veritable fleet!
THE GAMES FACTORY – TUTORIAL 1 23
SPACEBATTLE CREATION – LEVEL EDITOR

20. The next stage is to place our hero, the ‘Players ship’ object, onto the bottom of the play area.Place him just slightly above the bottom of the screen.
21. Now place the bullet, ‘Missile’, anywhere on the screen. When we use the Event Editor, we aregoing to remove any missiles from the display when the level first starts, so we are only placing iton the screen so that it will appear in the Event Editor.
22. Now scroll through the object window until you find a ‘Score’ object. Place that on the bottomof the screen, out of the way of everything else.
To save you the complication of having to define the movements for all the different objects in thisfirst tutorial, we have done it already. If you want to learn about movement right now, turn to theObjects chapter and look up ‘Active objects-Movement’. We will be covering movement in latertutorials, though. You can look at how the movement of each object was created, however, by rightmouse clicking on the object, then select the ‘Movement-Edit movement’ option. The aliensmovement was defined as a path, which you will be able to see.
You can have a look at what you’ve done so far, in action, by clicking on the button on thetoolbar at the top of the screen. Remember to press it again to pause the game, then use the button to reset the game.
You should have a field of aliens moving around the screen smoothly, and you should be able tomove the spaceship from left to right by using the cursor keys.
24 TUTORIAL 1 – THE GAMES FACTORY
SPACEBATTLE CREATION – LEVEL EDITOR
Now that we have the basic objects on the screen, we need to add some actions, sound, etc.To do all this you need to go to the Event Editor.But, before we do this, let’s save the work that we have done.Go to the ‘File’ text on the menu bar at the top of the screen. Click on it using the left mousebutton. Now click on the ‘Save as...’ option.You will now be presented with a file selector. Select the disk drive that you want to save to. Nowtype in the name that you want to save it as. If you are using Windows 3.1, this can be up to 8letters long, and must always have ‘.gam’ after it, denoting this as a game file. Windows 95 allowsyou file names with up to 256 characters. To keep things nicely ordered, enter the name ‘Space1’,then click ‘Save’.
You can also load up The Games Factory version of the game so far. Look in the directory‘gametuts’, then for the sub-directory ‘01space’, then ‘tutorial’, then ‘spacetu1’.
Once you have safely saved your work, click on the button on the toolbar. This will take you tothe Event Editor.
Making Spacebattle Events and ActionsThe Event Editor is where your gaming really comes to life. You have seen how easy it is to placeyour objects on the screen, but now you want to fire missiles, destroy aliens, add sound andchange the score.
Step by step, we are going to take you through creating a complete set of Events that bringsSpacebattle to life. A lot of what you will learn in this chapter is basic to all games creation usingGames Factory, and will not be repeated elsewhere, so reading this chapter is a must before youhead on.
To start with, before we even create Events, we are going to show you how to create ‘Comment’lines, which do nothing other than provide you with notes to refer to in the Event Editor. AlthoughSpacebattle is a very simple game and presents no problem for the experienced user to find theirway around in, writing comments in the Event Editor is a very good habit to get into for when youstart writing longer, complicated games.We are also going to show you how to define ‘Groups’ of Events, which again make your Eventediting far easier to follow, and allow you to simplify your game writing.
So, enough of this merry banter, let us make a start on the Events!
THE GAMES FACTORY – TUTORIAL 1 25
SPACEBATTLE CREATION – EVENT EDITOR

Creating a Group of Events
The first thing we are going to do is to create a group of Events called ‘Start of Game Actions’.
23. To do this, right-mouse button click on the number 1 of the ‘New condition’ line.Now, select the ‘Insert’ option from the menu, then the ‘A group of events’ option from that menu.
24. You will now have a dialogue box asking you to enter in the name of the group. Type in the text“Start of Game Actions”. When you have done this make sure that the radio-button ‘Active whenframe starts’ is filled. It will be filled by default, but check it anyway. When you are happy with thename entered, either press <Return> or click on the ‘OK’ button.
25. You should now have a group called ‘Start of Game Actions’. Event line number 2 will beindented slightly, denoting it as being within that group. We are now going to make Event linenumber 2 a ‘Comment’.
Creating a Comment line26. Now right-mouse click on the number 2 of Event line number 2. Select the ‘Insert’ option, thenthe ‘A comment’ option.
27. You now have a dialogue box where you can select the font, colour and background colour ofyour text. We are going to use the standard font, but write in white, so...(i) Click on the ‘set font colour’, then click on the white square. Then click the ‘OK’ button.(ii) Click on the ‘set back colour’, then select dark green, then ‘OK’. Now click in the top left of the empty text box. Now you can type in the words that you want toappear in the Comment.Enter the text, “Before the game starts, destroy the missile in the frame to make sure only themissiles fired from the ship are used in the game.”Now click ‘OK’.You will now have a comment with a green background and white letters. If you have made amistake, you can edit your comment line by right mouse clicking on the text of the comment, thenselect the ‘Edit comment’ option.
Creating an Event LineRight, time to get down to the nitty-gritty of your games creation!
28. We are going to insert an Event ‘Start of level’, which means that when it is the start of the level,all the Actions associated with this Event line will be performed.
26 TUTORIAL 1 – THE GAMES FACTORY
SPACEBATTLE CREATION – MAKING AN EVENT LINE

This Event is going to be within the group ‘Start of Game Actions’.So, click on the text ‘New condition’ of Event line number 3 with the right mouse button.
29. You will now be presented with a dialogue box titled ‘New Condition’ with the sub-heading‘Double click on the object to test’. Move your mouse pointer over the ‘Storyboard controls’ icon,(The ‘Handy Hint’ text will tell you which one it is as you move your mouse pointer over the objects)and either double-left click, or single right click on it. This will produce a menu from the object.Select the ‘Start of level’ option with the left mouse button.
30. You will now have an Event line number 3 that reads ‘Start of level’. You can now insert anAction.
Save Your GameBefore you go any further, save your game so far.
So, click on the ‘File’ menu at the top of the screen, then select the ‘Save as...’ option.Now under the ‘File name’ text box, enter the name you want to use. To keep things nicelyordered, enter the name ‘Space2’, then click ‘Save’.
You can also load up The Games Factory version of the game so far. Look in the directory‘gametuts’, then for the sub-directory ‘01space’, then ‘tutorial’, then ‘spacetu2’.
Adding Actions to Event Lines We are now going to insert an Action into Event line number 3, to destroy the missile.
Destroying Objects31. Right-mouse click in the empty box below the missile icon, on line number 3. This will producea large menu of all the different possible Actions that you could do to the missile.
32. Select the ‘Destroy’ option with the left mouse button. You will now have a complete Event linethat will destroy the missiles at the very start of the level, within the group ‘Start of Game Actions’.
Now it’s time to start adding the rest of the Events. These are not going to be described in as greatdetail, as it is assumed that you will have learnt how to perform the more basic functions. They willbe referenced by number to previous steps, though, so if you get stuck you can see how previoussteps were achieved.
33. Create a Group called ‘Main Game’. Use Event line number 5 to do this. See step # 23 formore information.
THE GAMES FACTORY – TUTORIAL 1 27
SPACEBATTLE CREATION – DESTROYING OBJECTS

34. Now insert a Comment using Event line number 6. The text of the comment is “When the userpresses the SHIFT KEY, shoot a missile”. See step # 26 for more information.
Testing the keyboard for a specific key depression35. We are now going to create an Event ‘Upon pressing “Shift”’. To do this, right click on the ‘Newcondition’ text of Event line number 7. Now use the right mouse button to select the ‘Mouse pointerand keyboard’ icon. Select the ‘Keyboard’ option from this menu, then the ‘Upon pressing a key’option. You will now be asked to press the key that you want to associate your actions with. So, press the<Shift> key. You will now be taken back to the Event Editor screen, with an Event line that reads‘Upon pressing “Shift”’.
Shooting an object36. Now that you’ve made your Event line to test when the <Shift> key has been pressed, youneed to actually shoot something when it is pressed.(i) Go to the empty box that lies directly underneath ‘Players ship’ and on the same line as Eventline number 7. Click in it with the right mouse button. Now select the ‘Shoot an Object...’ optionfrom the menu produced.(ii) You will now be presented with a dialogue box displaying all the Active objects from the currentlevel. We want to use the ‘Missile’ object as our bullet, so select that, then click ‘OK’.(iii)You will now be asked to select a speed and direction for the bullet.By default the speed is 100, which is very fast. Use the mouse to move the pointer to 50.(iv) Now you want to select the direction to fire in, which is always up. To do this select in the‘Shoot in selected directions’ button. (v) You can now select the direction that you want to fire the bullet in from the direction ‘Clockface’. You can select / un-select directions by clicking on the black buttons around the clock face.Make sure you have just one arrow pointing straight up. Note that if you have more than onedirection showing, Games Factory will select out of those directions at random.Now press all the ‘OK’ buttons to take you back to the Event Editor screen.You should now have a complete Event line, so that when you press the <Shift> key, a missile isfired up the screen.
Save Your GameBefore you go any further, save your game so far.
So, click on the ‘File’ menu at the top of the screen, then select the ‘Save as...’ option.Now under the ‘File name’ text box, enter the name you want to use. To keep things nicelyordered, enter the name ‘Space3’, then click ‘Save’.
You can also load up The Games Factory version of the game so far. Look in the directory‘gametuts’, then for the sub-directory ‘sound’, then ‘tutorial’, then ‘spacetu3’.
28 TUTORIAL 1 – THE GAMES FACTORY
SPACEBATTLE CREATION – SHOOTING AN OBJECT
Adding sound effects37. Now to add a little extra to the action, we are going to add a noise to the action of firing a missile. (i) Right mouse click in the empty box beneath the ‘Sound’ icon on Event line number 7.(ii) Now select the ‘Play sample’ option from the menu produced. You will then be taken to a fileselector.(iii) First, you have to select the correct drive to look in. If you have done a normal installation, all ofGames Factory’s noises are kept on the CD. Make sure the drive is set to your CD drive. You canclick on the button under the ‘Drives’ heading to pull down a list of the drives available.(iv) Now look down the list of directories (use the scroll bars) until you find one called ‘samples’.Double-click on this with the left mouse button.(v) Now look down this list until you find ‘weapons’. Double-click on it.(vi) You will now have a list of all the noises contained within the directory ‘weapons’.(vii) Scroll through the list of all the noises until you get to one called ‘phaser03.wav’. Select it oncewith the left mouse button.(viii) Now press the ‘Play’ button on the right of the dialogue box. You can preview the noises usingthis button. You can always select another sample and preview that using the ‘Play’ button, or evenmove to another sound directory. Simply double click back on the ‘samples’ directory, then chooseanother sound directory.(ix) When you are happy with the sound that you want to play every time a missile is fired, click the‘OK’ button.
38. Create a Comment on line 8 containing the text “For every missile that exists in the game, alwaysmove them up 10 pixels at a time.” See step #26 for more information.
39. Create an Event ‘Always’ on line 9. To do this, right mouse select on the ‘New Condition’ text, thenright mouse select on the ‘Special’ object, and from the ‘Always / Never’ option select the ‘Always’option. See step #28 for more information on creating Events.
Moving an object by changing its coordinates40. Now insert an Action on the ‘Always’ event line (number 9), beneath the ‘Missile’ icon. Select inthe empty box with the right mouse button. From the menu produced select the ‘Position’ option. (i) From this menu select the ‘Set Y coordinate’.(ii) Now press the ‘Edit’ button. This will take you to another Expression Editor.(iii) Now press the ‘Retrieve data from an object’ button.(iv) Now right-mouse select the missile from the objects displayed.(v) When you select the missile it will produce a menu. Select the ‘Position’ option.(vi) From the menu that this produces, select the ‘Y coordinate’ option.(vii) You will now have the text ‘Y(“MISSILE”)’ in the text box of the Expression Editor. Withoutchanging this text, add on ‘-10’ to the end of the text, so that you have an expression that reads‘Y(“MISSILE”)-10’. This means that every time Games Factory cycles through the Event Editor it willalways subtract 10 from the Y coordinate of the Missile. Press the ‘OK’ buttons to take you back tothe Event Editor.
THE GAMES FACTORY – TUTORIAL 1 29
SPACEBATTLE CREATION – ADDING SOUND EFFECTS

This method of movement is actually somewhat redundant in this game, as we are already firing itat speed 50. It does show you that you can move objects around quite easily by changing theircoordinates. Also, you may want an object to move faster than the maximum speed allowed byGames Factory normally, which is speed 100. To make it go faster than this, you would have itmoving at maximum speed and manipulate its coordinates.
41. Now insert a Comment on Event line 10 that reads “When the missile leaves the top of thescreen, it is not needed any more, so destroy it.” See step # 26 for more information.
Testing the position of an Object42. Now insert an Event on line 11 to test the position of the missile.(i) Right click on the ‘New condition’ and select the missile from the dialogue box. (ii) Select the ‘Position-Test position of “Missile”’ option.(iii) You will now have a dialogue box that allows you to test the position of the missile in several differentways. Move the mouse pointer over the different buttons and have a look at all the options available.(iv) Click on the button ‘Is the object outside?’. Note that from here you could select more than onebutton. You can un-select a button by clicking on it again.(v) When you have just got the button ‘Is the object outside?’ depressed, click the ‘OK’ button totake you back to the Event Editor.You will now have an Event line that reads ‘(Missile) is out of the play area’.
43. Now insert an Action to destroy the missile, on the same Event line. See steps #31 and # 32.
44. Now insert the Comment “If a missile strikes another missile, destroy it.” (Right mouse buttonon the number 12, select ‘Insert-Comment’). See step # 26 for more information.
45. Now insert an Event ‘Collision between (Missile) and (Missile)’ on line 13.(i) Right click on the ‘New condition’ text, right click on the Missile object, select the ‘Collisions-Another object’ option from the menu.(ii) Select the Missile from the dialogue box with the left mouse button, then press ‘OK’.You will now have an Event line as described above.So, if you are very fast on the keyboard and fire out missiles too fast, they will run into one anotherand destroy each other.
46. Now insert an Action to destroy the missile. Look at steps 43, 32 and 31 for more information,or copy the Action from one of the other Event lines by left mouse clicking and holding on one ofthe ‘Destroy’ tick-marks, then dragging it into the empty box beneath the Missile icon, on the Eventline ‘Collision between (Missile) and (Missile). You could add a sound here, see step # 37 abovefor more details.
Save Your GameBefore you go any further, save your game so far.
30 TUTORIAL 1 – THE GAMES FACTORY
SPACEBATTLE CREATION – TESTING POSITION

So, click on the ‘File’ menu at the top of the screen, then select the ‘Save as...’ option.Now under the ‘File name’ text box, enter the name you want to use. To keep things nicelyordered, enter the name ‘Space4’, then click ‘Save’.
You can also load up The Games Factory version of the game so far. Look in the directory‘gametuts’, then for the sub-directory ‘01space’, then ‘tutorial’, then ‘spacetu4’.
47. Insert a comment “If the missile strikes any of the Aliens in the game, destroy both the missileAND the alien.” See step # 26 for more information. Make sure this is on line 14.
48. Now insert an Event on line 15, ‘Collision between (Missile) and (Big Alien)’. Right click on the‘New condition’ text, then right click the Missile, select the ‘Collisions-Another object’ option. Nowselect the ‘Big Alien’ object. See step 45 for more information.
49. Insert an Event ‘Collision between (Missile) and (Alien Pawn) on line 16. See above for moreinformation.
50. Insert an Event ‘Collision between (Missile) and (Tiny Alien) on line 17. See above for moreinformation.
51. Now insert a sound action on line 15. Pick something appropriate for an explosion. (Rightmouse in the empty box under the sound icon, select the ‘Play sample’ option, look on the CDROM drive, look in ‘Samples-Impacts’. See step # 37 above.
52. Now copy the sound action into the lines 16 an 17. Left mouse click and hold on the tick-markon line 15 and drag it into the empty sound boxes on line 16, then do the same for line 17. You willnow have that sound being played every time a missile collides with any of the aliens.
53. Now insert an Action ‘Destroy’ into the empty box under the missile on line 15. (Right click inthe box, select the ‘Destroy’ option.)54. To save a lot of time, drag the ‘Destroy’ action, using the left mouse button, into all the emptyboxes beneath the missile, for when the missile collides with an alien.
55. You can now drag the ‘Destroy’ action into the boxes under each alien. Make sure that it is theBig Alien that is destroyed when a missile collides with a Big Alien, and not one of the others! Ifyou make a mistake you can select a check-mark and then press the <Delete> key.So, on the line where the missile collides with the Alien Pawn, put the ‘Destroy’ action in the columndirectly under the Alien Pawn. Do the same for the Tiny Alien, on the line where the missile collideswith Tiny Alien. The Events should look something like the screen shot below. Make sure that youare not accidentally destroying one of the other objects by mistake, that is, ensure the ‘Destroy’actions are in the correct columns.
THE GAMES FACTORY – TUTORIAL 1 31
SPACEBATTLE CREATION – COLLISIONS

Save Your GameBefore you go any further, save your game so far.
So, click on the ‘File’ menu at the top of the screen, then select the ‘Save as...’ option.Now under the ‘File name’ text box, enter the name you want to use. To keep things nicelyordered, enter the name ‘Space5’, then click ‘Save’.
You can also load up The Games Factory version of the game so far. Look in the directory‘gametuts’, then for the sub-directory ‘01space’, then ‘tutorial’, then ‘spacetu5’.
Changing the score56. Now we want to add to the score every time one of the Missiles hits one of the Aliens. Tochange the score, right-click in the empty box underneath the Player 1 object, on line 15. Selectthe ‘Score’ option, then the ‘Add to score’ option.You can now choose how much you are going to add to the score when a Big Alien is destroyed.To keep it the same as the Games Factory version, enter 100, using the keyboard or the slidercontrols to enter the numbers. Then press ‘OK’.
57. Do the same as the above for the Alien Pawn (add 10 to the score) and the Tiny Alien (add 50to the score).58. Now insert a Comment on Event line 18 that reads “Check the area above the player’s shipwhere the aliens move. When no more aliens are within this area, the player must have destroyedthem and the game is complete.” See step # 26 for more information.
Comparing the number of objects in a zone to a number59. Now we are going to insert an Event to end the game when all the aliens have been destroyed.To do this we are going to test if there are any objects in a zone on the play area.(i) Right mouse click on the ‘New condition’ text of line 19.(ii) Right mouse click on the ‘New Objects’ icon.(iii) Select the ‘Compare to number of objects in a zone’ option. You will now be taken to a ‘Zonesetup’ screen.(iv) Select in the first box, ‘Horizontal’. Place a 0 in here. Now go to the next box on that line, ‘to’,click in there and type in 640.
32 TUTORIAL 1 – THE GAMES FACTORY
SPACEBATTLE CREATION – CHECKING IN A ZONE

(v) Now click in the first box on the next line down, ‘Vertical’. Enter a 0 in here.(vi) Now enter the figure 320 in the last box, ‘to’. You should have the four boxes filled as follows-”’0’ to ‘640’, then underneath, ‘0’ to ‘320’”. If you have done this successfully, click ‘OK’.(vii) You will now be taken to a dialogue box where you can enter a number which you arecomparing to the number of objects in the zone that you just defined. In the top of the dialogue box are several radio-buttons, which is where you decide how you aregoing to compare the number. By default it is ‘Equal’. This is the comparison that we want to use,because when the number of objects is equal to zero, we want to end the game.So, make sure the ‘Equal’ radio-button is filled.(viii) Now you can enter the number you want to compare. In this case it is 0, so make sure the textbox at the bottom of the dialogue box has a ‘0’ in it. You can change it by using the slider, or byselecting in the text box and entering the numbers directly.When you are happy that you have the comparison set to ‘Equals 0’, press the ‘OK’ button.You will now have an Event line that reads ‘Number of objects in zone (0,0) to (640,320) = 0’.
60. We are now going to insert an Action to finish the game. On line 19, go to the empty boxunderneath the ‘Storyboard controls’ icon.(i) Right mouse click in here.(ii) From the menu produced, select the ‘End the game’ option.
That’s it! You now have Spacebattle ready to play!
Save Your GameBefore you go any further, save your game so far.
So, click on the ‘File’ menu at the top of the screen, then select the ‘Save as...’ option.Now under the ‘File name’ text box, enter the name you want to use. To keep things nicelyordered, enter the name ‘Space6’, then click ‘Save’.
You can also load up The Games Factory version of the game so far. Look in the directory‘gametuts’, then for the sub-directory ‘01space’, then ‘tutorial’, then ‘spacetu6’.
To give your version of Spacebattle a try, click on the icon. Click on it again to pause theaction.
THE GAMES FACTORY – TUTORIAL 1 33
SPACEBATTLE CREATION – CHECKING IN A ZONE

Tutorial Game 2Pointblank!It is assumed that before you embark upon this tutorial that you have successfully completed thefirst tutorial, and that you are comfortable with the conventions used in the first tutorial game. Asbefore, we are going to take you on a ‘guided tour’ of Pointblank, so that you can see what we aregoing to be creating, then you will be taken on a step-by-step guide to creating your own version.Slightly less time will be spent explaining the exact mechanics of producing the game, as much ofthis was done in the first tutorial, but there will be more information on how certain steps can beused in your own games.
Loading PointblankSelect the ‘Open’ option from the ‘File’ menu at the top of the screen, then look for the ‘gametuts’directory on your CD ROM drive.Within the ‘gametuts’ directory look for the ‘02pointb’ sub-directory. Now look for the directory‘tutorial’ and within this look for the file ‘1-pointb.gam’. Open this file.
Pointblank – The Storyboard EditorWhen you have loaded Pointblank you will have a Storyboard Editor screen that looks very similarto the one for Spacebattle, and all the same options are available.Before we move on to the Level Editor, though, we are going to have a look at some of thepreferences available here.
Try clicking on the preferences icon with the left mouse button.You will be presented with a dialogue box which allows you to change the ‘Density’ of the displayvia the slider. Try moving it, then click ‘OK’ and see the difference it has made to the display. Clickback on the preferences icon to change it again.You can also change which information is included in the Level displays by clicking in the ‘Displaytop bar’ and ‘Display comment(s)’ tick points. Change these, then click the ‘OK’ button to see thechanges.
When you are happy that you know how the preferences on the Storyboard Editor work, go to theLevel Editor. Remember that the first time you load a game or start a new one, you must rightselect on the ‘Thumbnail’ of that level. Do this, select the ‘Edit this level’ option, then the ‘LevelEditor’ option. This will take you to the Level Editor of Pointblank.
34 TUTORIAL 2 – THE GAMES FACTORY
POINTBLANK TOUR – STORYBOARD
Pointblank – The Level EditorYou can now look around the play area of Pointblank and see how it was created.Move the mouse pointer over the different objects on the play area to see what they are via theHandy Hints.When the game is running, all the gangsters are going to be hidden from view, then at randomthey are going to emerge from hiding, which is going to be the only time that you can shoot them,using the mouse to move the cross-hairs over them, then pressing the left mouse button to fire atthem.Normally, Active objects will appear in front of backdrop objects, so to hide the Gangstersproperly, we are going to place an Active object, the ‘Mask’ object, in front of them. This preventsthem from being shot whilst they are hiding. The ‘Mask’ fits exactly into the background, so it is notobvious when the game runs that there is another object on the screen.
Pointblank – The Event EditorTo enter the Event Editor, click on the icon on the toolbar at the top of the screen.
You will now be able to look through all of the Events used to make the game actions forPointblank.Scroll through the Events and move you mouse pointer over the check-marks in the boxes to seethe Actions that are associated with the Events.
You can see that Groups are used extensively in this game. This actually makes it far easier tocontrol the game, by deactivating and activating certain groups when the game starts and ends.For example, there is a group ‘Level Won’ that is inactive until the player wins the game, when it isactivated, and all the others are deactivated.
You can ‘close’ a group by double-clicking on it. Try doing this to all the groups and you will beable to see how they can make it far easier to move around the Event grid.You should be able to see all the groups on the screen at once. Double click on them to see all theEvents that are contained within them.
Now that you have had a look around, have a play of the game before we go and re-create it. Thistime use the ‘Run Game’ button on the toolbar at the top of the screen.If you want to exit the game before the game has finished, press <Alt> and <F4> together.
When you have done finished playing, click on the icon on the toolbar. Select the ‘640 by480’ play area size, then click ‘OK’.
THE GAMES FACTORY – TUTORIAL 2 35
POINTBLANK CREATION – LEVEL & EVENT EDITOR

Making Pointblank Yourself
Level EditorTo get into the Level Editor from the Storyboard Editor, click in the empty ‘Thumbnail’ with the rightmouse button, select the ‘Edit this level’ then ‘Level Editor’ options.
1. Now, go to the Level Objects tool on the toolbar. Click on the button at the side of this to pulldown a list of all the object libraries. Select the library called ‘(Tutorial) POINTBLANK’You can now see all the objects used to create Pointblank in the object window down the left handside of the screen.
2. First of all we are going to place the backdrop object onto the screen. Select it then place itanywhere in the play area. Because it is exactly the same size as the play area it will align itselfautomatically.
3. Now select on the Gangster, then, using the right mouse button, place copies of him in thewindow part of the door on the bottom, with his waist at exactly the same height as the bottom ofthe window edge.
4. Place another copy of him, using the right button, in the window at the top left, again makingsure that his waist is at window height.
5. Place another in the third window from the left, using the right mouse button.
6. Place the fourth and fifth in the window at the top right, using the right mouse button, and placethe sixth behind the low wall on the very far left of the play area, using the right mouse button.
7. Put the last in the large window on the ground floor, using the left mouse button.You should now have a gangster in every window except the one that is second from the left onthe top floor.
8. Now you can place the ‘Mask’ object in front of the gangsters. Be careful to line it up with thebackdrop perfectly. It should cover up the legs of the gangsters at their waist level. The mask is tostop you being able to shoot the gangsters when they are hiding, because they will be ‘behind’ anActive object, the ‘Mask’.
Changing the view of objectsYou could have placed the mask on the screen before the gangsters, then placed the gangstersover the top of the mask. If you had it this way, the gangsters legs would not be hidden by themask.To change this you could have changed the ‘View’ of either the gangsters, or of the mask. It would
36 TUTORIAL 2 – THE GAMES FACTORY
POINTBLANK CREATION – LEVEL EDITOR

be quicker to change the image of the mask than to change the view of every gangster.(i) To do this, you would right select on the ‘Mask’ object. This will produce a menu.(ii) Select the ‘View’ option.(iii) Now select the ‘To front’ option. This will place the ‘Mask’ object ‘in front’ of all the other objectson the screen.
9. Now we are going to place the object that we are going to use as the cross-hairs of our gunonto the play area. Go to the object window and select the ‘Cross Hair’ object. Place it anywhereon the screen. It does not matter where you place it as we are going to hide them at the verybeginning of the level, before giving it the same coordinates as the mouse pointer, then making itvisible.
10. Now select the ‘Countdown’ object and place this on the play area in a place that you will beable to see readily, but not so as to interfere with the gangsters.
11. Now place the ‘Good Shooting’ object on the far left of the play area, at about the same heightas the waist of the gangster in the far left window, just outside the wall of the building.
12. Place the ‘Live Ammo’ on the bottom left of the play area. This is the display for the number ofbullets that you have left.
13. Now place the ‘Score’ object on the play area near the ‘Countdown’ object. This will displayyour score.
You should now have a screen that looks something like this;
THE GAMES FACTORY – TUTORIAL 2 37
POINTBLANK CREATION – LEVEL EDITOR‘

14. Before we proceed, we are going to change the game setup. It is important to do this as someof the objects that we are using need to have their initial values changed. We also want to hide themouse pointer and the Menu bar that is normally displayed when you do a full run of your gameusing the ‘Run Game’ button.(i) Select the ‘File’ menu heading at the top of the screen.(ii) Select the ‘Game setup’ option from this menu.(iii) On the first ‘layer’ of the dialogue box you can enter a name for your game in the ‘Title’ textbox, then your name underneath in the ‘Author’ text box.(iv) Now go to the ‘Window’ layer by selecting on its tab at the top of the dialogue box.(v) Now make sure that all of the tick-boxes are un-selected, i.e. that they are all empty. This willstop the menu bar and heading being displayed when you run your game.(vi) When you have done that, select the Players tab. In the ‘Lives’ box at the bottom right, changethe ‘Initial’ setting to 15. You can enter the numbers in directly by selecting in the text box, thenusing the <Delete> key to clear the box, then enter 15.(vii) Now change the ‘Maximum’ value to 15 also.(viii) Now click the ‘OK’ button.
If you are satisfied that you have placed all the game objects onto the play area the way you want,go to the Event Editor. Select its icon from the toolbar at the top of the screen to do this.
Pointblank–The Event EditorBefore you go any further, save your game so far. We are going to save the game every 10 steps,so if you encounter a problem you can always revert to a previous version of the game and tryagain.
So, click on the ‘File’ menu at the top of the screen, and then select the ‘Save as...’ option.Make sure that the drive is set to your hard drive.Double click on the ‘gfactory’ directory. This means your game will be placed in that directory.Now under the ‘File name’ text box, enter the name you want to use. To keep things nicelyordered, enter the name ‘point-1’, then click ‘Save’.
You can also load up The Games Factory version of the game so far. Look in the directory‘gametuts’, then for the sub-directory ‘02pointb’, then ‘tutorial’, then ‘pointut1’.
We are now going to insert all of the Events and Actions to bring your game to life, add soundeffects, a timer countdown, score, bullets counter and an end message.
15. The first thing we are going to do is insert an Event ‘Start of level’, then put in some actions.Right click on the ‘New condition’ text of Event line number 1.Right click on the ‘Storyboard’ icon, then select the ‘Start of level’ option from it’s menu.
38 TUTORIAL 2 – THE GAMES FACTORY
POINTBLANK CREATION – EVENT EDITOR

Playing Music16. Next we are going to insert an Action to play some music at the start of the level. We are alsogoing to add four actions to deactivate groups of actions, but as we have not yet created thesegroups, The Games Factory will not let us deactivate them yet.(i) Right mouse click in the empty box directly beneath the ‘Sound’ icon. Select the ‘Play and loopmusic’ option. You will then be presented with a file selector. If you have done a normal installationof The Games Factory, the sound files will be on your CD ROM drive. If you did a full installation,then all the files will be on the internal hard drive of your computer.You are looking for a directory called ‘Midi’, and then within this you are looking for a file called‘melripp1’. When you have selected this, click the ‘OK’ button. You will now be asked to enter thenumber of times you want the music to loop, which is 99 times. Either enter these numbers indirectly by selecting within the text box, or click on the slider buttons. When you have entered thenumber 99, click on the ‘OK’ button.You will now have a check-mark under the sound icon. If you move your mouse pointer over it willread ‘Play music melripp1 99 times’.
Inserting a Group17. Now we are going to create a group called ‘Start of Game Actions’. Right click on the number2, select ‘Insert’ then ‘A Group of events’. Type in ‘Start of Game Actions’, then click ‘OK’.
Inserting a Comment18. We are now going to place Events within this group. Make sure that each Event line that youinsert a new condition on is indented from the left. This denotes that specific Event line as beingwithin the group directly above.Insert a Comment on line number 3 that reads ‘When each game starts, make sure the player gets15 bullets. As the player will lose if all the bullets are used, it is fitting we should use the playersLIVES COUNT to store our bullet count.’To insert a comment, right click on the number of the Event line, then select the ‘Insert’ option, thenthe ‘A Comment’ option. To make the comments stand out, you can change the text andbackground colour.
Inserting an Event19. Insert an Event ‘Always’ on line number 4. Right click on the ‘New condition’ text, right selectthe Special object, then from the ‘Always / Never’ option, select the ‘Always’ option.
Setting Lives20. Now insert the Action ‘Set number of lives to 15’. Right click in the box under the Player 1object, on line 4. Select the ‘Number of lives’ option, then the ‘Set number of lives’ option. You cannow enter the number in the text box, or use the slider. When it is set to 15, click ‘OK’.
Comment21. Insert a comment ‘When the game starts, the mouse pointer and cross hairs should not be
THE GAMES FACTORY – TUTORIAL 2 39
POINTBLANK CREATION – PLAYING MUSIC

seen. These will eventually be made visible when the level starts.’ on line 5. See step 18 above forinformation on how to create a Comment.
Inserting an ‘Always’ Event22. Insert an Event ‘Always’ on line 6. (Right click on ‘New condition’, right click the ‘Special’object, select the ‘Always’ option.)
Hiding the Mouse pointer23. On the same line insert the action ‘Hide windows mouse pointer’. To do this right mouse clickin the empty box beneath the ‘Mouse pointer and Keyboard’ icon and then select the ‘Hidewindows mouse pointer’ option.
Making an object invisible24. Insert another action on line 6 to make the cross hairs invisible. To do this right click in the boxunder the ‘Cross Hairs’ object and select the ‘Visibility’ option, then the ‘Make object invisible’option.
Inserting an ‘Always’ Event25. Insert an Event ‘Always’ on line 7. We are going to activate and deactivate some of the groupshere, but as explained earlier, you cannot do this until you have created those groups.
Save Your GameBefore you go any further, save your game so far.
So, click on the ‘File’ menu at the top of the screen, and then select the ‘Save as...’ option.Now under the ‘File name’ text box, enter the name you want to use. To keep things nicelyordered, enter the name ‘point-2’, then click ‘Save’.
You can also load up The Games Factory version of the game so far. Look in the directory‘gametuts’, then for the sub-directory ‘02pointb’, then ‘tutorial’, then ‘pointut2’.
Inserting a Group of Events26. Insert a group of events called ‘Start of Level Actions’ on line 9. Note that you must create thisgroup on a line that is not indented. When you have done this line 8 should be empty, and stillwithin the group ‘Start of Game Actions’.
Inserting a Comment27. Now insert a comment on line 10, ‘The level waits for 1.5 seconds before hiding all thegangsters, making visible the cross-hairs and activating the main game loop. In order to createsome urgency, the time limit is set to 30 seconds.’ (Right click on the number, select the ‘Insert-AComment’ options. Enter the text, select ‘OK’.
40 TUTORIAL 2 – THE GAMES FACTORY
POINTBLANK CREATION – INSERTING ALWAYS EVENTS

Reading the Timer28. Now insert an Event on line 11, ‘Timer is greater than 1”-50’. To do this right click on the ‘Newcondition’ text and right select on the ‘Timer’ object. Select the ‘Is the timer greater than a certainvalue?’ option. Now you can enter in the time. By default the value is 1 second, so you only needto change the ‘1/100’ box. Select in it and enter the number 50. Now select ‘OK’.
Changing an animation sequence29. Insert an Action ‘Change animation to hiding’ under the Gangsters icon on line 11. Right clickin the box, select the ‘Animation’ option, then the ‘Change’ option, then the ‘Animation sequence’option.From the dialogue box that this produces, select the ‘Hiding’ option. Now click on ‘OK’.
Making the Crosshairs Reappear30. Insert another Action on line 11, ‘Reappear’ under the Cross Hairs icon. Right click in the boxand then from the menu select the ‘Visibility’ option, then the ‘Make object reappear’ option. Then insert an Action to set the counter to 30. Right click in the empty box under the ‘Countdown’object on line 11, then select the ‘Set counter’ option. You will now be presented with a dialoguebox where you can either enter the numbers directly in the text box, or use the buttons on theslider to change the number. Make sure that the value entered is 30, then click ‘OK’.
Inserting a Group31. Insert a group called ‘Main game’. Note that you must do this on line 13, which is outside of thegroup ‘Start of Level Actions’. If you used line 12, which is indented, then you would put a groupwithin a group, which Games Factory will not allow.To insert a group, right click on the number of the line (13), select the ‘Insert-A group of events’options, type in the text, click ‘OK’.
Inserting a Comment32. Insert a comment on line 14 that reads ‘The main game group controls all the events that occurwithin the game itself.’ (Right click on the number, ‘Insert-A comment’, type in the text, ‘OK’.
Inserting a Comment33. Insert another comment, preferably in a different colour, ‘The CROSS HAIRS must follow themouse pointer throughout the game. Even though the mouse pointer has been hidden, it stillmoves about the screen as though it were visible. By taking the mouse pointers X and Ycoordinates, we can make the cross hairs follow the movement of the mouse pointer.’
Inserting an ‘Always’ Event34. Insert an Event ‘Always’ on the next Event line. (Number 16.)
THE GAMES FACTORY – TUTORIAL 2 41
POINTBLANK CREATION – READING THE TIMER

Making an object follow the mouse pointer35. Insert an Action on line 16 to set the coordinates of the cross hairs to be the same as the mouse.(i) Right click on the empty box under the Cross Hairs object, on line 16.(ii) Select the ‘Position’ option.(iii) Select the ‘Set X coordinate...’ option.(iv) Now press the ‘Edit’ button.(v) Now press the ‘Retrieve data from an object’ button.(vi) Now right mouse select the ‘Mouse pointer and Keyboard’ object.(vii) Now select the ‘Current X position of the mouse’.You should now have an action under the Cross Hairs object that reads ‘Set position to Xmouse’.To set the Y coordinate to be the same as the mouse, do the following;Right click on the filled box under the Cross Hairs object, on line 16.(ii) Select the ‘Position’ option.(iii) Select the ‘Set Y coordinate...’ option.(iv) Now press the ‘Edit’ button.(v) Now press the ‘Retrieve data from an object’ button.(vi) Now right mouse select the ‘Mouse pointer and Keyboard’ object.(vii) Now select the ‘Current Y position of the mouse’, then click ‘OK’.This will set the Cross Hairs object to follow the movement of the mouse pointer exactly.
Save Your GameBefore you go any further, save your game so far.
So, click on the ‘File’ menu at the top of the screen, and then select the ‘Save as...’ option.Now under the ‘File name’ text box, enter the name you want to use. To keep things nicelyordered, enter the name ‘point-3’, then click ‘Save’.
You can also load up The Games Factory version of the game so far. Look in the directory‘gametuts’, then for the sub-directory ‘02pointb’, then ‘tutorial’, then ‘pointut3’.
Inserting a Comment36. Insert a Comment on line 17, ‘Every second, deduct 1 from the counter that holds the time limit.’
Testing the Timer37. Now insert an Event ‘Every 1”-00’. Right click on the ‘New Condition’ text of line number 18,then right select the Timer object, then select the ‘Every’ option. Make sure the time entered is 1second, then click the ‘OK’ button.
Changing the value of the counter38. Insert the Action ‘Subtract 1 from Counter’. Right click in the box under the ‘Countdown’ object,select the option ‘Subtract from Counter’. Now enter the number 1 in the text box of the ExpressionEditor produced, then click ‘OK’.
42 TUTORIAL 2 – THE GAMES FACTORY
POINTBLANK CREATION – THE MOUSE POINTER

Inserting a Comment39. Insert a Comment on line 19, ‘Every 2 seconds, select ONE of the many GANGSTER objectsfrom the game and if that gangster is currently hiding, run its APPEAR FROM HIDING animation.’(Right click on the number, select the ‘Insert-A Comment’ options, etc.,.)
Testing the Timer Every 2 seconds40. Insert an Event, ‘Every 2”-00’. Right click on the ‘New Condition’ text of line number 20, thenright select the Timer object, then select the ‘Every’ option. Make sure the time entered is 2seconds, then click the ‘OK’ button.
Adding a Condition to a Timer Event41. Now add a Condition to the above Event. To do this, right select on the text ‘Every 2”-00’ andselect the ‘Insert’ option.Now right select the Gangster object, and select the ‘Pick or Count’ option, then the ‘Pick“GANGSTER” at random’ option.
Adding a Further Condition42. Now add a further Condition to line number 20, ‘“GANGSTER” animation Hiding is playing’. Todo this, right Click on any of the texts of line 20, select the ‘Insert’ option.Now right select the Gangster, then select the ‘Animation’ option. Now select the ‘Which animationof “GANGSTER” is playing’ option.Now select the ‘Hiding’ animation from the list in the dialogue box. Then click the ‘OK’ box. You will now have three Conditions all on one Event line. You should move the Event ‘Every 2”-00’to the top of this Event line, so that The Games Factory will only go through the rest of theConditions once every 2 seconds. This will help to speed up your game play slightly, especially ifyou had many Event lines like this.
If you, for example, you had placed the Condition ‘Pick one of ‘GANGSTER’ at the top, then TheGames Factory would go through the actions of picking a gangster before looking at the otherConditions.
THE GAMES FACTORY – TUTORIAL 2 43
POINTBLANK CREATION – ADDING CONDITIONS TO EVENTS

Changing an Animation sequence43. Now insert an Action into line number 20, ‘Change animation sequence to Appear from Hiding.’To do this, right click in the box under the Gangster object on line 20, then select the ‘Animation’option, then the ‘Change’ option, then the ‘Animation sequence...’ option.From the dialogue box produced select the ‘Appear from Hiding’ animation, then click ‘OK’.
Inserting a Comment44. Now insert a Comment on line 21, ‘Four times a second, select ONE of the many GANGSTERobjects from the game and if that gangster is currently hiding, run its APPEAR FROM HIDINGanimation.’ (Right click on the number 21, select the ‘Insert-A Comment’ options, etc.)
Testing the Timer45. Now insert an Event on line 22, ‘Every 00”-25’. To do this right click on the ‘New condition’ text,then right select the Timer object, select the ‘Every’ option from its menu. Make sure that the timeentered is 25 hundredths of a second, then press ‘OK’.
Save Your GameBefore you go any further, save your game so far.
So, click on the ‘File’ menu at the top of the screen, and then select the ‘Save as...’ option.Now under the ‘File name’ text box, enter the name you want to use. To keep things nicelyordered, enter the name ‘point-4’, then click ‘Save’.
You can also load up The Games Factory version of the game so far. Look in the directory‘gametuts’, then for the sub-directory ‘02pointb’, then ‘tutorial’, then ‘pointut4’.
Picking a Gangster at random46. Now insert a Condition to line 22, ‘Pick one of (Gangster). To do this right select on the text‘Every 00”25’ of line 22, select the ‘Insert’ option, then right select the Gangster object, and selectthe ‘Pick or count’ option from its menu, then the ‘Pick “GANGSTER” at random’ option.
Testing which animation is playing47. Now insert a further Condition to line 22, ‘“GANGSTER” animation Stopped is playing’. To dothis, right select on either of the Condition texts on line 22, select the ‘Insert’ option, then rightselect the Gangster object, from its menu select the ‘Animation option’. Now select the ‘Which animation of “GANGSTER” is playing?’ option. From the dialogue boxproduced select the ‘Stopped’ animation, then click ‘OK’.
Changing the Animation sequence48. You can now insert an Action into line 22 to hide the Gangster that has been picked. Rightclick in the empty box on line 22, underneath the Gangster object. From its menu select the‘Animation’ option, then the ‘Change option, then the ‘Animation sequence’ option. From thedialogue box select the ‘Hiding’ animation, then click ‘OK’.
44 TUTORIAL 2 – THE GAMES FACTORY
POINTBLANK CREATION – CHANGING AN ANIMATION SEQUENCE
Inserting a Comment49. Insert a Comment on line 23, ‘If the player manages to click the mouse pointer (appearing as across-hair) on a gangster, destroy the gangster and add 10 points to the score.’
Testing the mouse to see if it is clicked on a Gangster50. Now insert an Event on line 24, ‘User clicks with left mouse button on “GANGSTER”. To do this,right click on the ‘New condition’ text of line 24, then right select the ‘Mouse pointer and keyboard’object. Select the ‘The mouse’ option, then the ‘User clicks on an object’. You will now be taken toa dialogue box. Make sure that there are tick marks in the ‘Left button’ and ‘Single click’ radio-buttons, then press ‘OK’.Now select the Gangster object, then click ‘OK’.
Inserting Sound51. Now insert 2 sound actions on line 24. Right select in the empty box under the ‘Sound’ object,select the ‘Play sample’ option. You will now be presented with a file selector. If you have done anormal installation, the sound files are on your CD ROM drive, on the Games Factory CD. Makesure the ‘Drives’ is set to your CD ROM drive.Now look for the directory ‘samples’.Within ‘samples’, look for the sub-directory ‘weapons’. It is from here that we are going to select thenoise for the gun being fired. Try the file ‘gun3.wav’. You can preview the sound by press the ‘Play’ button. Then click the ‘Open’button.Now insert a second noise, the scream of the Gangster.To insert a further Action in the same check-box, left click in the box you want to add an Action to.So, left click under the ‘Sound’ object again, then right select the ‘New action’ option. Select the‘Play sample’ option. Now, look again in ‘samples’, but this time look in the sub-directory ‘human’. Look for the file‘screamm1.wav’. Try playing it a few times. If you are happy with your selection, click the ‘OK’boxes until you are returned to the Event Editor.
Changing the Score52. You are now going to change the score at the same time as you destroy a gangster, so thatevery time the user clicks on Gangster, not only are you going to play a gun sample and a screamsample, but you add to the score, and destroy the gangster.To do this, right click in the empty check-box underneath the ‘Player 1’ object. From the menuproduced, select the ‘Score’ option, then the ‘Add to score’ option. Here you can enter the score invia the keyboard by clicking within the text box, or you can click on the slider. You can add anyscore you like, but we are going to add 10 to the score. When you are happy that you have thescore entered correctly, click on the ‘OK’ button.
Destroying a Gangster52.b. Now right select in the empty check-box underneath the Gangster object. From the menu
THE GAMES FACTORY – TUTORIAL 2 45
POINTBLANK CREATION – TESTING THE MOUSE POINTER

produced select the ‘Destroy’ option.
Deducting a life (bullet)53. Now, add an Action to deduct a life from Player 1. This means that Player one has used abullet when he hits a Gangster. To do this, left click in the box underneath the Player 1 object,where you just inserted the action to add to their score.Right select the ‘New action’ option, then select the ‘Number of lives’ option, then the ‘Subtractfrom Number of Lives’ option. Now enter the number 1 into the text box, or use the slider buttons tochange the value. When you have correctly set this value to 1, click the ‘OK’ buttons to return youto the Event Editor.
Inserting a Comment54. Insert a Comment on line 25, ‘When the player presses the left button and misses, deduct 1 lifeand play the sample ‘gun04.wav’. The sound condition makes sure that these actions are notrepeated very rapidly.’
Testing the mouse to see if the left button has been clicked55. Now insert an Event on line 26 to check whether the user has clicked the left mouse button. Weare then going to add a condition to this, so the Actions associated with this line will only takeplace if a sound is not playing, i.e. if the player has not hit a Gangster.So, right select the ‘New condition’ text of line 26 and select the ‘Mouse pointer and keyboard’object, then select the ‘The mouse’ option, then the ‘User clicks’ option. Then make sure that the‘Left button’ and ‘Single click’ radio-buttons are filled, then click ‘OK’.
Save Your GameBefore you go any further, save your game so far.
So, click on the ‘File’ menu at the top of the screen, and then select the ‘Save as...’ option.Now under the ‘File name’ text box, enter the name you want to use. To keep things nicelyordered, enter the name ‘point-5’, then click ‘Save’.
You can also load up The Games Factory version of the game so far. Look in the directory‘gametuts’, then for the sub-directory ‘02pointb’, then ‘tutorial’, then ‘pointut5’.
Testing to see if no samples are already being played.That is, to make sure that the user has not already just killed aGangster56. Insert a Condition to line 26 to check that no samples are being played. To do this right selecton the text of line 26 and select the ‘Insert’ option. Then right select on the ‘Sound’ object. Choosethe ‘Samples’ option, then select the ‘Is a sample not playing?’ option.
46 TUTORIAL 2 – THE GAMES FACTORY
POINTBLANK CREATION – DEDUCTING A LIFE

Playing a sample and deducting a life57. Now you can insert Actions into line 26 to play a sample and to deduct 1 from Player 1’s lives,i.e. one bullet.First, right click in the empty box under the ‘Sound’ object and select the ‘Play sample’ option.Look in the directory ‘samples’ then in the sub-directory ‘weapons’. From here select the sample‘gun04.wav’.Now, right click in the empty box under the ‘Player 1’ object and select the ‘Lives’ option, then the‘Subtract from number of lives’ option. Set the Expression Editor value to 1, then click ‘OK’.
Inserting a Comment58. Insert a Comment on line 27, ‘If ALL the gangsters in the building have been destroyed, the playerhas completed the level. Reveal the ‘Good Shooting’ message and activate the ‘Level Won’ group.
Testing to see if all the Gangsters have been shot59. Insert the Event ‘Last “GANGSTER” has been destroyed’ on line 28. Right select the ‘newcondition’ text, then right select the Gangster object, then select the ‘pick or count’ option, thenselect the ‘Have all “GANGSTER” been destroyed?” option.
Playing some ‘Victory’ music and displaying the text “GoodShooting”60. As previously outlined, we cannot activate or deactivate a group until it has been created, sowe will insert the Action to activate the ‘Level Won’ group after it has been created. For now you can insert several Actions on line 28. First, insert an action to play some music.Right select under the ‘Sound’ object, select the ‘Play Music’ option, then look in the ‘midi’ directoryand select the ‘mrcool.mid’ file.Now insert an Action to display the text ‘Good Shooting’.Right select under the object ‘Good Shooting’, then select the ‘Display text...’ option.You will now be presented with a position selector. Enter 0 into the X coordinate box and 64 intothe Y coordinate box, then click ‘OK’.
Inserting a Comment61. Now insert a comment onto line 29, ‘There are two ways in which the player can lose the game.The bullets could run out or the time limit could have expired. In each case, the Game Lost groupmust be activated.’
62. Insert an Event on line 30, right click on the text ‘New condition’, then select the ‘Player 1object’, then select the ‘Compare to players number of lives’ option. Now, make sure that the valueis 0, and that the ‘Equals’ radio-button is filled. Now click then ‘OK’ button.
Inserting sound63. Now insert a ‘Sound’ action on line 29. Play a piece of music that you feel is appropriate tolosing the game.
THE GAMES FACTORY – TUTORIAL 2 47
POINTBLANK CREATION – PLAYING A SAMPLE

Comparing the value of the Countdown object to a number 64. Insert an Event on line 31. Click on the line’s text, then select the ‘Countdown’ object. Thenselect the ‘Compare the counter to a value’ option. Make sure the value it is being compared to is0, then make sure that the ‘Equals’ radio-button is filled.
Copying an Action65. Now left click and drag the music Action from line 30 down into line 31. This copies that SoundAction onto line 31.
Save Your GameBefore you go any further, save your game so far.
So, click on the ‘File’ menu at the top of the screen, and then select the ‘Save as...’ option.Now under the ‘File name’ text box, enter the name you want to use. To keep things nicelyordered, enter the name ‘point-6’, then click ‘Save’.
You can also load up The Games Factory version of the game so far. Look in the directory‘gametuts’, then for the sub-directory ‘02pointb’, then ‘tutorial’, then ‘pointut6’.
Inserting a Group66. On line 33, insert a group ‘Level Won’. Note that this must go on this line so that it falls outsideof the group “Main Game”. If you were to place it on line 32, The Games Factory would be unableto run your game.
Inserting a Comment67. On line 34, insert a Comment, ‘When the congratulations music has finished, RESTART THELEVEL which keeps the score and allows the player to play again with all the gangsters back asthey were at the start of the level.’
Testing to see if no music is playing68. Insert an Event on line 35. Right select the line, then select the ‘Sound’ object, then the ‘Musics’option, then the ‘Is a music not playing?” option.
Restarting the current level69. Now insert an Action on line 35. Right select under the ‘Storyboard’ object, then select the‘Restart the current level’ option.
Inserting a Group70. Now insert a group, ‘Game Lost’, on line 37.
48 TUTORIAL 2 – THE GAMES FACTORY
POINTBLANK CREATION – COMPARING THE COUNTER

Inserting a Comment71. Now insert a Comment on line 38, ‘When the game lost sound has ended, RESTART THEGAME to clear the score and begin the entire game from the very start.’
Copying an Event72. Copy an Event on to line 39. Left mouse click and hold on the ‘No sample is playing’ text of line35 and drag it into line 39. This will copy that Event.
Restarting the game73. Now insert an Action on line 39 to restart the game. Right click in the box under the‘Storyboard’ object, then select the ‘Restart game’ option.
Save Your GameBefore you go any further, save your game so far.
So, click on the ‘File’ menu at the top of the screen, and then select the ‘Save as...’ option.Now under the ‘File name’ text box, enter the name you want to use. To keep things nicelyordered, enter the name ‘point-7’, then click ‘Save’.
You can also load up The Games Factory version of the game so far. Look in the directory‘gametuts’, then for the sub-directory ‘02pointb’, then ‘tutorial’, then ‘pointut7’.
Inserting all the Actions to Activate / Deactivate the groups74. That’s almost it. All we need to do now is go back and insert all the Actions to activate /deactivate the groups, now that we have created them all.So, go to line 1, right click in the box under the ‘Special’ object, select the ‘Group of events’ option,then the ‘Deactivate’ option. You will then be taken to a dialogue box where you can select thegroups that you want to deactivate. First of all pick the ‘Start of level actions’ group, then click ‘OK’.Now you need to insert the rest of the actions into the same check-mark. To do this, left click onthe check-mark. This will produce a dialogue box which lists all the actions from within that check-mark. You also have a ‘New action’. Right select on this. You will see the same menu produced aswhen you first right selected under the ‘Special’ object. Select the ‘Group of events’ option, thenthe ‘Deactivate’ option. Now select the group ‘Main Game’. You will now be able to deactivate the groups ‘Level won’ and ‘Game Lost’ using the methodabove.
Now go to line 7 and insert the Actions, ‘Deactivate group’, ‘Start of game actions’ and ‘Activategroup’, ‘Start of level actions’. So, right click under the ‘Special’ object, select ‘Group of events’,then ‘Deactivate’, then “Start of game actions”, then ‘OK’. Then left click the check-mark, then rightclick ‘New actions’, then ‘Group of events’, then ‘Activate’, then “Start of level actions”, then ‘OK’.
THE GAMES FACTORY – TUTORIAL 2 49
POINTBLANK CREATION – ACTIVATING/DEACTIVATING GROUPS

Now go to line 11 and insert the Actions ‘Deactivate group “Start of level actions”’ and ‘Activategroup “Main Game”’.
Go to line 28 and insert the Actions ‘Deactivate group “Main Game”’ and ‘Activate group “LevelWon”’.
Go to line 30 and insert the Actions ‘Deactivate group “Main Game”’ and ‘“Activate group “GameLost”’. Now copy these actions into line 31 by left click and holding on the check-mark, thendragging it into line 31.
There, that really is it, and your own version of ‘Pointblank’ should be ready to play!
Save Your GameDon’t forget to save your work before you carry on. Save it as ‘Pointfin’.
Hit the ‘Run Game’ button, and have a good play! Note that the menu bar is no longer displayed,so to quit the game you have to use the keyboard shortcut <Alt> + <F4>.
Have fun!
50 TUTORIAL 2 – THE GAMES FACTORY
POINTBLANK CREATION – THE END

Tutorial Game 3 Pulverise‘Pulverise’ is a version of the arcade classic ‘Asteroids’. This tutorial is divided into two parts, oneto deal with the movement of the ship, and another to deal with the creation of the asteroids.
So, let’s go and load up ‘Pulverise’ version one.
Select the ‘Open’ option from the ‘File’ menu at the top of the screen, then look for the ‘gametuts’directory on your CD ROM drive.Within the ‘gametuts’ directory look for the ‘03pulver’ sub-directory. Now look for the directory‘tutorial’ and within this look for the file ‘1-pulver.gam’. Open this file.
When you are presented with the Storyboard Editor for this screen, before proceeding into theother Editor screens, have a look in the ‘Game setup’ option. To do this go into the ‘File’ menu atthe top of the screen, select the ‘Game setup’ option, then select the ‘Windows’ layer of thisdialogue box. Notice which options are enabled and which are disabled.
Now go to the Level Editor. To do this, right select within the ‘Thumbnail’ of the level 1 display, thenchoose the ‘Edit this level’ option, then the ‘Level editor’ option.
Pulverise part 1 – The Level EditorRight then, let’s have a look around the Level Editor.
We are mainly going to have a look at the ‘Pulvercraft’, which is the players spaceship. It has beenmanipulated in several ways from the Level Editor. We shall have a tour around these differentchanges, with an explanation as to why this was done.
Movement of the Pulvercraft
First, let’s have a look at the movement of the pulvercaft.Right click on the Pulvercraft. This will produce a menu. Select ‘Movement’.From the ‘Movement’ menu select the ‘Edit movement’. Do not use the ‘Change movement’ option.
Now you can see all the settings that were used to move the craft around. As you can see if you lookat the title of the dialogue box, it has a ‘Race car’ type movement. this means that the left and rightkeys will rotate the object, and the forward and reverse will accelerate / brake or reverse the
THE GAMES FACTORY – TUTORIAL 3 51
PULVERISE TOUR PART 1 – LEVEL EDITOR

movement of the object.You can see that the speed has been set quite low; if it were too high then the craft would be difficultto control. The acceleration is set high, making it fast to get out of the way of careering asteroids, butthe deceleration is quite low, making it drift fairly realistically. Having this set to zero would give you anendless drifting motion. You can change this if you want to make the craft more difficult to control.
Now have a look on the ‘Rotation’ layer of the dialogue box. You can see that the number of differentdirections is set to 32, making for very smooth-looking rotation. You must remember to add directionsto the animations if the number of different directions that the object can move in is higher than thenumber of different animation directions. We will discuss how this was done in a moment.The ‘Rotation speed’ is set quite high, meaning that the turning rate of the craft is quick.
Now look at the layer ‘Initial direction’. This simply decides which direction the craft will point in initially.
Animation of the Pulvercraft
When you have finished looking around the movement of the Pulvercraft, click the ‘Cancel’ buttonto leave the settings as they were, or ‘OK’ if you want any changes you have made to be imposedon the Pulvercraft.
Now, select the ‘Edit Animations...’ option from the Pulvercraft’s menu.
This will take you to the ‘Animation Editor’ of the Pulvercraft. Initially, the Pulvercraft only had onedirection, and therefore only one animation associated with it.To make it move in 32 directions, the ‘Movement’ menu option was changed, as outlined above.This, however, would result in the ‘craft moving in 32 directions, but always looking like it waspointing up! Not good!So, to have 32 different pictures, one for every direction, the Animation Editor was used.The first step was to create 32 directions in the Animation Editor. To do this, the radio-button ‘32’was filled under the heading ‘Number of different directions’. This would then create 31 emptyframes, ready to be filled.
To quickly and easily fill these frames with 32 different directions, the button was used, whichautomatically rotates your initial frame by just the right amount to fill all the different directionframes. Easy!
Now let’s go and have a look at how we put the Pulvercraft into an Object group. Not to beconfused with Event groups, Object groups allow you to greatly simplify your Event Editing. Forexample, in Spacebattle, instead of having a separate Event line for each alien to be destroyedwhen a bullet hit it, it would be far easier to put all the aliens in a group called ‘Baddies’, and thenhave an Event line that checks to see if the group ‘Baddies’ has collided with a bullet instead.
52 TUTORIAL 3 – THE GAMES FACTORY
PULVERISE TOUR PART 1 – LEVEL EDITOR

So, ‘OK out of the Animation Editor, and select the ‘Object preferences...’ from the Pulvercraft’smenu. The first layer allows you to add the Pulvercraft to a group by using the ‘Add’ button. Youcan see all the groups that an object belongs to in the window. If you move your mouse pointerover the icon in the window, you can see that it is in the group ‘Neutral’. You could delete this byselecting it and then clicking on the ‘Delete’ button. When you have finished looking around thePreferences dialogue box, click the ‘Cancel’ button to exit without making any changes.
Now let’s go and have a look in the Event Editor.
Pulverise part 1 – The Event EditorWe are only going to have a brief tour around the Event Editor before trying to reproduce it forourselves. Notice that all the main groups for the game have already been produced, meaning thatthey can be activated or deactivated already. When it is time for you to make this game foryourself, we are going to make the groups first, then place the Events in afterwards. We shall notbe using line numbers anymore, but using group names and asking you to place Events andActions in certain groups. Remember, to place an Event into a group, just right click on theindented ‘New condition’ line at the bottom of each group.
Have a look around and notice how the movement of the craft is started, and that already thegroup neutral is going to be ‘Wrapped’ around the play area when it leaves it. All the boulders aregoing to be in the group neutral as well, so you can see already that it only takes one Event line towrap all the objects in a group around the screen, instead of testing each object in turn, andhaving separate ‘Wrap’ actions for each one.
Notice also that the group ‘Get ready’ turns itself off as soon as it sets the ship in motion, which willprevent this from happening again in the game.
There are also actions to destroy the missile when it goes off the screen, not to ‘Wrap’ that as well.
Now that you have had a brief tour around, run the game (don’t forget to use <Alt> + <F4> toescape) and see how it all fits together. Use the cursor keys to control the rotation andacceleration / deceleration of the ship, and the <Ctrl> key to fire.Notice that there are no asteroids yet, just the ship. The second part of the tutorial controls themovement of the asteroids, explosion, etc.When you have finished playing with part one, load up part two of this tutorial.
Select the ‘Open’ option from the ‘File’ menu at the top of the screen, then look for the ‘gametuts’directory on your CD ROM drive.Within the ‘gametuts’ directory look for the ‘03pulver’ sub-directory. Now look for the directory‘tutorial’ and within this look for the file ‘2-pulver.gam’. Open this file.
THE GAMES FACTORY – TUTORIAL 3 53
PULVERISE TOUR PART 1 – EVENT EDITOR

Pulverise part 2 – The Level Editor
Now you can see all the different objects in position as they will appear when you first start playingthe game. Notice, however, that you cannot see the ‘BULLET’ object, or the ‘BOULDER(TINY)’ onthe play area, and yet they are on the ‘Level objects’ library. This is because they have been‘created’ via the Event Editor. The bullet was created by having the Pulvercraft ‘Shoot an object..’and then using the option from this, to look in other libraries. The bullet was picked from anotherlibrary, and then Games Factory automatically placed it on the ‘Level Objects’ library.The tiny boulder was created in a similar way, but using the ‘Create objects’ action, again in theEvent Editor.Now go and have a look in the Event Editor to see how this looks.
Pulverise part 2 – The Event EditorNow have a look around here at all the different Actions. Let’s start at line 16. Here you can seehow the levels are going to get increasingly harder, the higher the score, the faster the asteroidsare going to be moving.
Now look at line 23. Here you can see that all the asteroids have been put into the group ‘Bad’ fromtheir ‘Object preferences..’ option in the Level Editor. (Right click on them in the Level Editor to showthis option.) Instead of testing each asteroid individually, the group is tested to see if it collides withthe Pulvercraft, meaning only one Event line is used, instead of one for every type of asteroid.
Read the Comment below this, which describes the ‘splitting’ of the large boulders into smallerones. Move the mouse pointer over all of the check-marks to see how this was done.
Have a look through all the Event lines, and note how the use of Object groups has reduced thenumber of Event lines. If there were several more types of boulders, you can see how much easierit is to manipulate a group from the Event Editor, instead of writing an Event line for every singleone of the object types.
When you are happy that you have a rough understanding of how the game works, play the gameusing the ‘Run Game’ button (don’t forget to use + to exit) and then select the ‘File’ menu headingfrom the top of the screen, then ‘New’. Set the play area size to 640 by 480.You are now going to make Pulverise yourself.
54 TUTORIAL 3 – THE GAMES FACTORY
PULVERISE TOUR PART 2 – LEVEL & EVENT EDITOR

Creating PulveriseThe Level Editor
All the objects that you need to create Pulverise are in the object library ‘(Tutorial) PULVERISE’.Click on the button next to the ‘Level objects’ text on the toolbar at the top of the screen to have alook through all the different object libraries. When you have selected ‘(Tutorial) PULVERISE’ all theobjects will be displayed in the object window on the left of the screen.
1. Select the object ‘Backdrop object 1’ and place it onto the play area.
2. Now select the ‘Pulvercraft’ object and place it in the middle of the play area.
3. Now Select a ‘Boulder(Big)’ from the object window, then place three copies using the rightmouse button, and place the fourth using the left mouse button. Space them out towards thecorners of the play area.
4(a). Now place the ‘Score 1’ object onto the play area, preferably somewhere near the bottom ofthe play area. It must be easily visible, but not interfere too much with the action.
4(b). Place the ‘Warping to next zone’ object anywhere onto the play area.
In order to save you a lot of time, all of the objects have already had their movements andanimations completed. They have also been assigned to the groups that are going to be used inthe Event Editor. You can have a look at what has been changed by right clicking on them. Alwaysuse the ‘Cancel’ button to escape out of the dialogue boxes that you open, in order to keep thesettings as they are.
Now click on the icon to take you to the Event Editor.
The Event EditorTo speed up your games creation and to make you to start thinking for yourselves, instead of inprevious tutorials where every single step was outlined, the steps are going to be abbreviated intosingle words.
For example, instead of saying ‘Now insert an Event on line 22, ‘Every 00”-25’. To dothis right click on the ‘New condition’ text, then right select the Timer object,select the ‘Every’ option from its menu. Make sure that the time entered is 25hundredths of a second, then press ‘OK’, this will now become;‘Insert Event: Timer, Every 0.25 seconds’.
THE GAMES FACTORY – TUTORIAL 3 55
PULVERISE CREATION – LEVEL & EVENT EDITOR

A similar format will be used for Actions. For example, instead of saying ‘Now, add an Actionto deduct a life from Player 1. This means that player one has used a bulletwhen he hits a Gangster. To do this, left click in the box underneath the Player1 object, where you just inserted the action to add to their score.Right select the ‘New action’ option, then select the ‘Number of lives’ option,then the ‘Subtract from Number of Lives’ option. Now enter the number 1 intothe text box, or use the slider buttons to change the value. When you havecorrectly set this value to 1, click the ‘OK’ button.’
This will become;
‘Insert Action: Player 1, Lives, -1’.
Where appropriate, the specific line will be mentioned.
So let’s make a start!
The following will deactivate all the groups, except “Start of Level Actions” to stop their Events andActions occurring.5. Insert Event: Storyboard, ‘Start of level’.
6. Insert a Group “Start of level Actions”.
7. Insert a Group “Get Ready”.
8. Insert a Group “Main Game”.
9. Insert a Group “Game Lost”.
10. Insert a Group “Level Won”.
11. Insert Actions to Event line 1: Special, deactivate groups “Get Ready”, (left click to insert moregroups...) “Main Game”, “Game Lost”, “Level Won”.
Save Your GameBefore you go any further, save your game so far.
So, click on the ‘File’ menu at the top of the screen, and then select the ‘Save as...’ option.Now under the ‘File name’ text box, enter the name you want to use. To keep things nicelyordered, enter the name ‘pulv-1’, then click ‘Save’.
56 TUTORIAL 3 – THE GAMES FACTORY
PULVERISE CREATION – EVENT EDITOR

You can also load up The Games Factory version of the game so far. Look in the directory‘gametuts’, then for the sub-directory ‘03pulv’, then ‘tutorial’, then ‘pulvtut1’.
The following stops the Pulvercraft from moving and then deactivates itself at the same time asactivating the group “Get Ready”.12. Within the Group “Start of Level Actions”, insert the Event: Special, ‘Always’.
13. To this Event line insert the Actions;(i) Special, deactivate group “Start of Level Actions” and activate group “Get Ready”.(ii) Pulvercraft, Movement, ‘Stop’.
The group “Get Ready” simply starts the Pulvercraft moving, and sets the speed of the bigboulders relative to the score. The higher the score, the faster they will move!14. Within the Group “Get Ready” insert the Event: Timer, ‘is the timer greater than 2 seconds’.
15. On the same Event line insert the Actions;(i) Special, Deactivate group “Get Ready” and activate group “Main Game”.(ii) Pulvercraft, Movement, ‘Start’. (iii) Pulvercraft, (left button to insert another action) Movement, ‘Set speed to 10’.
16. Now insert an Event: Special, ‘Always’ on the next line.
17. Insert an Action: Big Boulder, Movement, Set Speed to, ‘5+’, Edit, Retrieve data from an object,Player 1, Score, Current value, ‘/25’. So the text in the Expression Editor should read‘5+score(“PLAYER 1”)/25’.
18. All Events from here on until specified otherwise are within the group “Main Game”.This Event tests the keyboard for the <Ctrl> key being pressed.Insert the Event: Mouse and Keyboard, Keyboard, Upon pressing a key, <Ctrl>.
These Actions fire a bullet from the Pulvercraft and play a sound sample.19. On this line insert the Actions;(i) Sound, Play sample, samples, weapons, phaser04.wav’.(ii) Pulvercraft, Shoot an Object..., a library, (Tutorial) PULVERISER, “Bullet”, ‘Use the direction ofPULVERCRAFT, at speed 75.
Save Your GameBefore you go any further, save your game so far.
THE GAMES FACTORY – TUTORIAL 3 57
PULVERISE CREATION – SETTING BOULDER SPEED

So, click on the ‘File’ menu at the top of the screen, and then select the ‘Save as...’ option.Now under the ‘File name’ text box, enter the name you want to use. To keep things nicelyordered, enter the name ‘pulv-2’, then click ‘Save’.
You can also load up The Games Factory version of the game so far. Look in the directory‘gametuts’, then for the sub-directory ‘03pulv’, then ‘tutorial’, then ‘pulvtut2’.
This Event tests for if the Pulvercraft collides with any of the boulders and the Action belowdestroys it.20. Insert the Event: Pulvercraft, Collisions, Another object, ‘Group.Bad’.
21. On the same Line insert the Action: Pulvercraft, ‘Destroy’.
This tests for when a bullet strikes a Boulder(Big).22. Insert an Event: Bullet, Collisions, Another object, ‘Boulder(Big)’.
These Actions destroy the Boulder(Big) that a bullet has hit, and also creates 2 Boulders(Tiny), onein the same place, one at X-Y coordinates 20,20 relative to the Boulder(Big). It also plays asample.23. Onto this line insert the Actions;(i) Sound, Play a sample, samples, weapons, ‘Explode3.wav’.(ii) Create, Create object, a library, (Tutorial) PULVERISER, “BOULDER(TINY)”, Relative to:,BOULDER(BIG), X: 0, Y: 0.(iii) Left click to insert another Action into Create, Create object, “BOULDER(TINY)”, Relative to:,BOULDER(BIG), X: 20, Y:20.(iv) Player 1, Score, Add to Score, ‘10’.(v) Bullet, ‘Destroy’.(vi) Boulder(Big), ‘Destroy’.(vii) Boulder (Tiny), Direction, Select Direction, (Select 5 different directions on the clock face. Oneof these will be then be picked at random to decide the direction of the tiny boulders. Try toinclude an upwards, downwards, leftwards and rightwards direction to make the results as randomas possible.)
This Event tests for when the bullet strikes a Boulder(Tiny) and the Action underneath destroys it,and plays a sample.24. Insert an Event: Bullet, Collisions, Another object, ‘Boulder (Tiny)’.
25. Onto this line insert the Actions:(i) Sound, Play a sample, samples weapons, ‘explode2.wav’.(ii) Player 1, Score, Add to Score, ‘5’.(iii) Bullet, ‘Destroy’.(iv) Boulder(Tiny), ‘Destroy’.
58 TUTORIAL 3 – THE GAMES FACTORY
PULVERISE CREATION – SPLITTING BOULDERS

This Event test if the player or any of the boulders leave the play area. If they do, then they are‘Wrapped’ around the play area.26. Now insert an Event: Group.neutral, Position, Test position of “Group Neutral”, (‘Leaves the playarea’. To do this select all of the ‘Leaves in...’ buttons.).
27. On this line insert the Action: Group.neutral, Movement, ‘Wrap around Play Area’.
Save Your GameBefore you go any further, save your game so far.
So, click on the ‘File’ menu at the top of the screen, and then select the ‘Save as...’ option.Now under the ‘File name’ text box, enter the name you want to use. To keep things nicelyordered, enter the name ‘pulv-3’, then click ‘Save’.
You can also load up The Games Factory version of the game so far. Look in the directory‘gametuts’, then for the sub-directory ‘03pulv’, then ‘tutorial’, then ‘pulvtut3’.
To stop you getting shot by your own bullets, they are destroyed if they leave the play area insteadof wrapped.28. Now insert an Event: Bullet, Position, Test position of “Bullet”, (‘Leaves the play area’).
29. On the same line insert the Action: Bullet, ‘Destroy’.
This tests to see if you have destroyed all the boulders.30. Insert an Event: Group. Bad, Pick or count, ‘Compare to the number of “Group.Bad” objects’,‘Equal to’, ‘0’.
This group of Actions deactivates the “Main Game” group and activates the “Game Won” group. Itdisplays the text object ‘Warping to next zone”. It also plays a sample and destroys all remnants ofthe group “Bad”.31. On the same Line insert the Actions:(i) Special, deactivate group “Main Game” and activate group “Level Won”. Use the left button toinsert the second Action in the same place.(ii) Sound, play a sample, samples, weapons, ‘explode3.wav’(iii) Group.Bad, ‘Destroy’.(iv) Warping to next zone..., Display text..., at X=161 and Y=180.
Save Your GameBefore you go any further, save your game so far.
So, click on the ‘File’ menu at the top of the screen, and then select the ‘Save as...’ option.Now under the ‘File name’ text box, enter the name you want to use. To keep things nicely
THE GAMES FACTORY – TUTORIAL 3 59
PULVERISE CREATION – TESTING POSITION

ordered, enter the name ‘pulv-4’, then click ‘Save’.
You can also load up The Games Factory version of the game so far. Look in the directory‘gametuts’, then for the sub-directory ‘03pulv’, then ‘tutorial’, then ‘pulvtut4’.
This Event tests to see if the Pulvercraft has been destroyed. if it has, it deactivates the group“Main Game” and sends you to the group “Game Lost”.32. Now insert an Event: Pulvercraft, Pick or count, ‘Have all “Pulvercraft” been destroyed?’.
33. On this Event line insert the Actions:(i) Special, deactivate group “Main Game” and activate group “Game Lost”.(ii) Sound, Play a sample, samples, weapons, ‘explode3.wav’.(iii) Group.Bad, ‘Destroy’.
The following Event and Condition waits three seconds after the last sample finished playingbefore sending you back to the start of the game, which automatically resets your score.34. The following Event is to go within the group “Game Lost”.Insert the Event: Timer, Every, ‘3 seconds’.Now insert a Condition into this line. Right click on the text, select ‘Insert’.Now insert the Condition: Sound, Samples, ‘Is a sample not playing?’.
35. On this line insert the Action: Storyboard, ‘Restart the game’.
The following Event and Condition waits three seconds after the last sample finished playingbefore sending you back to the start of the level, which will keep your score the same. It also playsa sample of music to signify this.37. The following Event is to go within the group “Level Won”.Insert the Event: Timer, Every, ‘3 seconds’.Now insert a Condition into this line. Right click on the text, select ‘Insert’.Now insert the Condition: Sound, Samples, ‘Is a sample not playing?’.
38. On this line insert the Actions:(i) Sound, Play a sample, samples, fantasy, ‘scifi09.wav’.(ii) Storyboard, ‘Restart current level’.
Okay, that’s it! Before you give it a try, don’t forget to save your wonderful game!
When you’ve done that, all you need to do is press the ‘Run Game’ button, and away you go!
If you have encountered any troubles during your game creation, don’t forget that you can veryquickly and easily drag Actions around, or delete them.
60 TUTORIAL 3 – THE GAMES FACTORY
PULVERISE CREATION – TESTING FOR LOST GAME

Try playing different samples instead of the ones specified, just to get a feel of creating foryourself, or try going into the Level Editor and editing the movement of the Pulvercraft, just to seethe differences that can be made.
THE GAMES FACTORY – TUTORIAL 3 61
PULVERISE CREATION – THE END
Tutorial 4 SubmissionBy now you should really be getting a feel for the different Editor screens and their purpose. Youcan already see that most of your game action is created in the Event Editor, and that the otherEditor screens set up the look of your games, and some of the movements, but it is via the EventEditor that the players interact with your game.
Now it’s time to take you on a tour of some fairly complex game creation techniques.‘Submission’ is a submarine race game which, although fairly simple in terms of game play, usessome fairly fancy techniques to achieve the end result.
Before we go any further, let’s load it up and start to have a look around.
Go to the ‘File’ menu heading at the top of the screen, select the ‘Open’ option. Now look in thedirectory ‘gametuts’ and then look in the sub-directory ‘04submis’ then look for the directory‘tutorial’ and then there are three parts to this tutorial, ‘1-submis.gam’, then ‘2-submis.gam’, andalso ‘3-submis.gam’.
Load up part one of this tutorial, ‘1-submis.gam’.
Storyboard Editor – Submission part 1Let’s have a look around the Storyboard Editor, and see the changes that have been made here,as well as looking into the various preferences that have been changed.
First, go up to the ‘File’ menu, and select the ‘Game setup’ option. You can see on the first layer ofthis dialogue box the author and title of the game. You can see that the panic key has beenenabled. This means that if you hit during the game, The Games Factory will take you back to theWindows screen, leaving the game to run in the background. Very useful if you are not supposedto be playing games and your boss walks into the room!
Now look on the next layer, ‘Window’. There have been some significant changes from the defaultsettings made here. These have a dramatic effect on the final look of the game when it is run.
The first line is ‘Maximised on boot up’ which maximises the window used to display the gamewhen it is first loaded. That is, as in any Windows application, The Games Factory uses a windowto display your game. Having this option turned on will stretch the window out to fill the screen tothe very edge. Note that you will not be able to change the dimensions of the window using themouse pointer when this option is enabled.
62 TUTORIAL 4 – THE GAMES FACTORY
SUBMISSION PART 1 – STORYBOARD
‘Resize display to fill current window size’ will fill whatever window size you are using with the gamedisplay. If you disable the option ‘Maximised on boot up’ option when you use this option then you willbe able to shrink or stretch the window used to display your game using the mouse pointer to ‘grab’the edges of the window. Note that when the window is large this option can dramatically slow downthe game action due to the complicated nature of the calculations necessary to resize the display.
‘Full screen at start’ is for use on the 16 bit version only. It was designed specifically for use with the320 by 200 graphics mode that is supported by the 16 bit version. Note that changing this option will have no effect when used with any other window sizes, only on the320 by 200. It allows very fast game play of a low resolution that still fills the screen.Notice at the top of this layer the size of the window has been changed to 320 by 200, which meansthat only an area 320 by 200 will be shown on the screen. By enabling the ‘Full screen at start’ you‘expand’ this small chunk of the play area to fill the screen.When you go back to the Storyboard Editor, have a look at the size of the play area and note that it isin fact larger than the size of the screen. The ‘Window’ preference being set to 320 by 200 means thatonly a window 320 by 200 will be shown from this play area, and ‘Full screen at start’ means this isexpanded out to fill the screen.This is a very important feature of The Games Factory and can be used to change the way yourgames are displayed.
For 32 bit users to achieve the same effect as the ‘Full screen at start’ has on the 16 bit version, theyshould enable the ‘Maximised on boot up’ and ‘Resize display to fill current window size’. This willmake the window being used to display the game fill the screen to the edge. Then the display isresized to fit this larger window.Note that if you maximised the window without resizing the display, then the screen would show achunk of the play area 320 by 200, surrounded by black.
Whilst having a look around this layer, notice that the ‘Heading’ and ‘Game to include menu bar’options have been disabled. this means that when your game is run there will be no menu heading atthe top of the screen, and no heading telling what the game is. Only the actual play area window willbe displayed. Notice that the only way to escape from a game when these options are turned off is touse the + keys. The mouse pointer is hidden via the Event Editor.
No other changes have been made to the default settings, so you can ‘OK’ your way out of thisdialogue box.
Now have a good look around the level 1 display of ‘Submission’.
The main thing to note is the play area size. It is 2560 by 480, a long horizontal strip. This has beendone because one of the things we are going to do in Submission is to scroll the screen around themain character, so we need a long screen for it to scroll along.Now let’s have a look in the Level Editor.
THE GAMES FACTORY – TUTORIAL 4 63
SUBMISSION PART 1 – STORYBOARD
Level Editor – Submission part 1
As you have done in previous tutorial games, run your mouse pointer over the different objects onthe screen to see what they are. Not all of the objects that we are going to use are on this screenyet - they are being saved for later tutorials.
Move your mouse pointer over the backdrop object ‘Slime floor’ and right click on it. Select themenu option ‘Obstacle’ and note that the ‘No’ has a tick next to it. This means that Active objectscannot collide with it. This is the ‘Water’ that our submarine is going to move through.
By contrast, have a look at the ‘Obstacle’ menu option of any of the other backdrop objects andnotice that the ‘Yes’ has a tick next to it. This means that Active objects can collide with them.
Now go and find the submarine object, ‘Craft’. It is on the far left of the play area, which is wherethe race starts from.Right click on the ‘Craft’ to show the menu options.Have a look in the option ‘Movement’ then ‘Edit movement’. Note that the ‘Eight direction’movement is being used. The maximum speed is set quite low and the deceleration is set quitehigh, making the object slow, and slows down quickly, just like a real submarine. To make the craftreasonably responsive, the acceleration is set quite high, though.
Continue having a look around the menu options of all the different objects on this screen, but donot change anything. Then, have a look in the object window at all the different Active objects. Note that here are 2 different walls, but they look exactly the same. One is going to beindestructible, the other you will be able to shoot out of the way in the game. Having 2 objects that look exactly the same was done by placing the first on the play area, andthen from its menu, selecting the ‘New object’ option, making the second object an Active object,then selecting its ‘Edit name and icon’ option to change its name. Apart from that they areidentical, the other differences in the way they behave are all done in the Event Editor.
Now have a look through all the other objects in the object window. You can see that thebackground has been made out of many different objects, placed individually onto the screen.Using The Games factory’s many different libraries, you will be able to the same thing to createsimilar backgrounds or platforms.
At the very bottom of the object library is the ‘Counter’ object, which is used to display the time left,and also a ‘Lives’ object, which in this case is used to keep count of the number of torpedoes theplayer has left.
When you are finished having a look around the Level Editor, move onto the Event Editor byclicking on its icon from the toolbar.
64 TUTORIAL 4 – THE GAMES FACTORY
SUBMISSION PART 1 – LEVEL EDITOR
Event Editor – Submission part 1
One of the first things that you will notice is that there are lots of objects displayed across the topof the Event grid, so many, in fact, that you may have to scroll through them using the scroll bar atthe base of the screen. You can make them all fit onto the screen, however, by clicking on the‘Preferences’ icon on the toolbar, and then selecting the ‘Display’ layer of the dialogue box, thenmoving the ‘Number of events on the screen’ slider to ‘High’. Try experimenting with this slider untilyou are happy with the result.
Now read through all the comments in the Event grid. These will fairly clearly explain what hasbeen done at each stage, but there is more detail in this chapter. The first actual Event line that we come to looks very simple, and is in fact very easy to do, butwhat it achieves used to take hours of extensive programming. Now it can be done in just one line!This Event line makes the rest of the screen scroll about the Craft object when it is moved, so theCraft will always be in the centre of the screen and the play area moves instead. To do this, the ‘Centre horizontal position in the playfield’ and ‘Centre vertical position in theplayfield’ options were selected from the Storyboard Actions, and the ‘Retrieve data from an object’button was used to retrieve the X and Y coordinates of the ‘Craft’ object, assigning those values tothe screen scrolling actions.
Lines 11 and 14 simply set all the values that are going to be used in the game and plays somemusic.
Line 18 makes the counter decrease in value by 1 for every second that passes. This was done bycreating an Event line ‘Every 1”00’, then selecting the ‘Subtract from Counter’ option, and settingthe value to 1.
Line 20 moves the ‘Mine’ objects by making their Y values the same as the Y value of the craft.This will mean that they are always ‘in the way’ and the player has to shoot them in order to getpast them.This was done by selecting the ‘Position’ option of the Mine, then the ‘Set Y coordinate’, option,and then the ‘Retrieve data from an object’ button was used to retrieve the Y coordinate from the‘Position’ option of the Craft.
Use the ‘Play’ button on the top right of the toolbar to see how all of these events and actions fittogether.
Okay, if you’ve managed to digest that comfortably, let’s break off a slightly larger chunk and diveinto part 2!
THE GAMES FACTORY – TUTORIAL 4 65
SUBMISSION PART 1 – EVENT EDITOR

Level Editor – Submission part 2
There has been only one change in the Level Editor compared to part one, but it is a verysignificant change.
Look in the object window for an object called the ‘Real Collider’. This is the object that is actuallygoing to be tested for collisions instead of the Craft object. The reason for this is that the Craftobject has some fairly complex animations that include leaving a stream of bubbles behind it . The problem is that a collision would be detected if any part of the Craft collided with anythingelse, including the bubbles. Obviously this would not be very realistic, so an Active object wascreated that has an outline shape that matches that of the Craft object. The ‘Real Collider’ is thenmade invisible, and given the same X and Y coordinates as the Craft, via the Event Editor. Pretty nifty stuff, huh? Let’s see how that looks in the Event Editor.
Event Editor – Submission part 2The first thing to note is the change in line 11. There have been 2 additional groups created, “LostRace” and “Won Race”. These groups perform groups of actions when the race is either won orlost. They are deactivated here to stop their actions being performed during the game.Then, when the game is won or lost, one of the two groups is activated and the “Main Game”group will be deactivated.You can see that this very much simplifies your game creation. Rather than having a condition onall the lines for “Lost Race” that test to see if the game has been lost, the group is simplydeactivated, then activated when needed.Also on this line is the Action to make the Real Collider invisible.
The next significant new line is line 23. This is where the Real Collider is given exactly the sameposition as the Craft. To do this, after setting up an Event ‘Always’ (Special object) the ‘Position’option from the Real Collider was selected, then the ‘Select position’ option. Then the position wasset to be at 0,0, relative to the Craft.
Line 25 is where the game can be lost. The Event line detects if a collision has occurred betweenthe Real Collider and the background. To set this line up, after right selecting on the ‘Newcondition’ text and right selecting the Real Collider, it’s menu option ‘Collisions’ was selected, thenthe option ‘Backdrop’ was selected.Then the “Main Game” group is deactivated, to stop the game carrying on, and the “Lost Race”group is activated.An explosion sample is also played on this line.The players control is taken away from them here, and the Craft object is destroyed.Because the group “Main Game” is deactivated here, all the lines hereafter will be ignored whenthe game is lost, and only the lines in the group “Lost Race” will be active.
66 TUTORIAL 4 – THE GAMES FACTORY
SUBMISSION PART 2 – LEVEL & EVENT EDITOR

The next line, (27) is the one that controls when the game is won. To give the game a true raceflavour, only the X coordinate of the ‘Finishing Post’ has to be passed in order to win, making it atrue ‘Finishing line’.To create this line, the ‘Position’ option of the Craft object was selected, then the ‘Compare Xposition to a value’ option. Then the X position of the Finishing Post was retrieved via the ‘Retrievedata from an object’ button. This was compared using the comparison ‘Greater than’.Then, on this line the “Main Game” group is deactivated and the group “Game Won” is activated.To stop the player moving any further the players control is ignored.
The “Lost Race” group, at this stage, merely waits 4 seconds and then restarts the game, whichresets the score.
The “Game Won” group waits 1 second then restarts the level, which does not reset the score. Italso adds 2 to the value of the score. The score is not going to be used to display the score, butwill be used to subtract from the time at the beginning of the game, so each time you win you haveless and less time to reach the end.
Now run this version of Submission and see how the craft collides with obstacles and how the won/ lost game sections work.
Right, now let’s have a look at the last part of this tutorial which gives you a finished, running racegame!
Level Editor – Submission part 3Again, no huge differences here, but the change is still very important. If you look in the objectwindow and on the play area you will see a new object, ‘Ammo’. This is going to be used toreplenish your stock of torpedoes, without which you would be unable to get past the variousmines and walls.
You also need, of course, a torpedo to shoot things with.
Something that is not immediately apparent is that several of the objects have been placed intogroups. The groups are ‘Group.Bad’ and ‘Group.Neutral’. Find out which belong to which groupsby right clicking on them on the play area, then selecting their ‘Object preferences’ menu. This willshow you which groups they belong to.
THE GAMES FACTORY – TUTORIAL 4 67
SUBMISSION PART 3 – LEVEL EDITOR

Event Editor – Submission part 3
Again, it’s line number 11 that has the first changes. This time it’s just to destroy all Torpedoobjects that might be left on the play area before the game begins.
Line 14 now adds a neat little start to the game. Whilst the music is being played, it moves theCraft down and along, as though it has just been launched into the water. As soon as the musicthat was played from line 11 has finished, this line plays another sample, then deactivates thegroup “Start of Race Actions”, which stops the craft being moved any further. It also launches youinto the main game by activating the group “Main Game”.
Line 23 is the next one to look at. If the number of lives (torpedoes) is greater than 0 and the keyis pressed, then all the actions on this line will be performed. This line was created by first of all creating the Event ‘Upon pressing the key’. Then the Condition‘Number of lives >0’ was inserted by right clicking on the ‘Upon pressing the key’ text. Then the‘Insert’ option was selected, and the Player 1 object was tested by selecting its ‘Compare to theplayer’s number of lives’ option.The actions associated with this were to play a sample, and then to create a torpedo just in front ofthe Craft. Note that the torpedo is not fired out, and is in fact stationary when it is first created. Itneeds an Event line to accelerate it placed elsewhere in the “Main Game” group. The reason thatthe torpedoes movement was controlled in this way was to create a realistic effect of the torpedoslowly accelerating as though it really were under water.In addition to the above actions, 1 is subtracted from the players number of lives (torpedoes) tosignify that a torpedo has been used up.
Line 25 is where the Torpedoes are accelerated up to a maximum speed of 50. This was done byselecting the Torpedo objects ‘Movement’ menu, then its ‘Compare speed of “TORPEDO” to avalue’ option. This was compared with the value 50, using the comparison ‘Less than’.The action to set it’s direction was placed in the check box first. The action to increase it’s speedwas inserted afterwards by left clicking in the box, right selecting the ‘New action’ text, then the‘Movement’ option, then the ‘Set speed’ option. Its own speed was then retrieved using the‘Retrieve data from an object’ button, then ‘+5’ was added onto the end of the expression. So, thespeed of the object is set to the speed of itself, +5.
Line 28 is where the torpedoes are destroyed if they collide with the background. This isassociated with a sound sample.
Line 30 is where anything belonging to the ‘Group.Neutral’ is destroyed when hit by the torpedo.
Line 32 is where the torpedo strikes the indestructible wall. The wall changes appearance, butdoes not get destroyed. The torpedo is destroyed and a sample is played.
68 TUTORIAL 4 – THE GAMES FACTORY
SUBMISSION PART 3 – EVENT EDITOR
Line 33 is where a hole is blasted through the weak wall. The object is not completely destroyed,but the animation is changed to ‘CREATE HOLE’, the torpedo is destroyed and a sound sample isplayed.
Line 38 controls the actions that ‘collect’ the crate of torpedoes. This is done simply by adding 2 tothe number of lives and destroying the crate when the ‘Real Collider’ collides with the ‘Ammo’object.
Line 40 tests the ‘Countdown’ object. If the value of the counter is zero, then the game has beenlost. The associated actions deactivate the “Main Game” group and players controls, as well asplaying a sample and activating the group “Lost Race”.
Line 42 is where the game is lost if the Real Collider hits any of the backdrop objects. The sameactions are performed as on line 40, with the addition of destroying the Craft object.
Line 44 tests to see if the Real Collider hits any of the other Active objects that belong to the‘Group.Neutral’, which includes the walls, both Weak and Indestructible, any of the Mine objects orBoulder objects.
That’s pretty much it. Hopefully by now you can understand how this game was constructed aswell as why it was constructed in this way.
If there are any points you are finding it difficult to understand, it can be very helpful to try and re-create an Event line on a spare ‘New condition’ line. You can always delete it afterwards. You canalso have a ‘look around’ most of the Actions and Events by right clicking on them and selectingthe ‘Edit’ option. Note that you cannot edit some of the very simple actions, such as ‘Destroy’.
THE GAMES FACTORY – TUTORIAL 4 69
SUBMISSION PART 3 – EVENT EDITOR

Tutorial 5 Kung FuWelcome to the last of the tutorial games. This game could be based on any of the arcade fightinggames and will really show you how to construct a fairly complex game, including many hiddenvalues such as players energy levels, number of hits, etc.
You are very much encouraged to experiment with changes to these games to see what effectthey have and to explore all the menu options of the objects as they appear on the Level Editorscreen. You can try changing counter values and lives values, even change the appearance of thecharacters.
The Games Factory already has libraries full of fighter characters, so once you have learnt how tocreate a realistic fighting game by working your way through this tutorial, you can very quickly andeasily create your own using these ready-made Active objects.
Without further ado, let’s load up part one of the Kung Fu tutorial.
Select the ‘Open’ option from the ‘File’ menu at the top of the screen, then look for the ‘gametuts’directory on your CD ROM drive.Within the ‘gametuts’ directory look for the ‘05kungfu’ sub-directory. Now look for the directory‘tutorial’ and within this look for the file ‘1-kungfu.gam’. Open this file.
Have a look at the Storyboard Editor screen, and notice that as in Submission we are going to usea play area larger than the screen size. Again, this is because we are going to scroll around theplay area, centring the screen about our hero.
Three are no other special changes here, but have a look at the ‘Game preferences’ option fromthe ‘File’ heading at the top of the screen, and notice that on the ‘Window’ layer of this dialoguebox, we are again not going to display the menu bar or title bar when the game is run.
Let’s go and have a look at the Level Editor of part one of this tutorial.
Level Editor – Kung Fu part 1Unlike in Submission, here we are using just 4 very large backdrop objects that the maincharacters are not going to collide or interact with. The backdrop is placed on the screen merely to‘set the scene’ for the game, a dark city street, full of menace and brooding.
70 TUTORIAL 5 – THE GAMES FACTORY
KUNG FU PART 1 – LEVEL EDITOR

Have a look around the large play area by using the scroll bars at the sides of the screen. Move overto the far right of the play area to see where the main character, ‘Hero’, has been placed. We have notyet given him any movement, which you can see if you right click on him and select the ‘Movement’option. Instead of there being an option to ‘Edit movement’, meaning that a movement style has beenselected for him, you will see there is only a ‘Select movement’ option. We shall be adding hismovement later.
Now have a look around the rest of the play area. Along the bottom of the screen there is a ‘Health’ object. This is going to be used to increase thehealth level of our hero, which is going to be decreased every time he gets hit by any of the baddies.
Note that we have used this object as the icon used to denote his health level in the top left of thescreen, in the ‘Lives 1’ object. You should have a look in the ‘Object preferences’ option of this objectto see how it is prevented from being scrolled around with the rest of the play area. Right select on theobject, select the ‘Object preferences; option, then have a look on the ‘Extra’ layer, and then lookunder the ‘Scrollings’ heading. Note that the check-box ‘Follow the playfield’ is un-checked. This isnormally checked by default. So, to keep things like score and lives objects in view at all times, youmust un-check this box on those objects that you want to remain stationary.
If you have a further look around the left of the play area, using the mouse pointer, you will find a Textobject which is going to be used to display several different paragraphs. You can have one text objectdisplay several different paragraphs by using its ‘Edit Data Strings’ option. Right click on the Textobject, then select this option to have a look at how this was done. You can see that only this object isgoing to be used to display the texts for the beginning of the game, as well as for the end of the gameand the Victory text.
Right, time to move on to the Event Editor.
Event Editor – Kung Fu part 1The first line that we see is line number 7, which gets the game ready to start.This line deactivates the “Main Game” group, to stop the game starting until several other Actionshave been performed. It also plays a sample of music and displays the paragraph number 1 of thetext object.In addition it hides the windows mouse pointer to prevent this from being displayed whilst thegame is running.
The next thing to note is the group “Start of Level Actions”. This further sets up the game, plus itperforms a neat trick with the display on line 10.The way this works is to set the X coordinate of the centre of the display to the same of the centreof the screen, +18.
THE GAMES FACTORY – TUTORIAL 5 71
KUNG FU PART 1 – EVENT EDITOR

It does this by reading the X of the left of the playfield and adding 320. As the screen is 640 pixelswide, this centres the display in the middle of the screen. If we left the line like this, the screenwould not scroll at all, so we add 18 to this. This means that every time the group “Start of LevelActions” is cycled through, the screen is centred in the left of the playfield, 320 pixels from the leftedge, +18, so the screen will be scrolled 18 pixels at a time toward the right. Try changing thenumber 18 to a larger number, then running the program. The screen will then be scrolled farfaster. If you made it less than 18, it would be slower.To really understand this process, left click on the check-mark and then select the ‘New action’with the right mouse button. Now select the ‘Scrollings’ option, then the ‘Centre horizontal positionin playfield’ option. now click on the ‘Edit’ button, then the ‘Retrieve data from an object’ button.From the dialogue box produced, right select the ‘Storyboard’ object, and select the ‘Playfield’option, then select the ‘X coordinate of left visible edge’ option.You should now have an Expression that reads ‘X Left Playfield’. Now add the text ‘+320+18’ tothis, then click ‘OK’.
That’s one of the new, harder things to learn out of the way, let’s carry on!
The next line simply waits 2 seconds and then erases the text of the text box. Note that this is quitedifferent from destroying the object. It is still on the playfield, but invisible.
Line 14 stops the further rightward scrolling of the screen by deactivating the “Start of GameActions” group when the X value of the left of the screen is 360 less then the X value of the herocharacter. You must be very careful when using this event as The Games Factory will always stopscrolling when the edge of the play area is reached anyway. Thus, if you had the hero too close to the right edge of the screen, the scroll would be stoppedbefore the left edge of the screen was within 320 pixels of the hero, and all the associated actions,such as deactivating the group “Start of Game Actions”, would never happen.
Now let’s have a look at the group “Main Game”, which at the moment only contains 1 Event line.
This is a very simple line, but very significant. It horizontally centres the display about the Xcoordinate of the hero character. This was done by constructing the Event line ‘Always’ (SpecialEvent) and then inserting the Action by right selecting in the Storyboard column and selecting the‘Scrollings’ option, then ‘Centre horizontal position of window in playfield’, then pressing the ‘Edit’,then ‘Retrieve data from an object’ buttons. Then the X position of the Hero was retrieved by rightselecting him from the dialogue box produced, then selecting the ‘Position’ option, then the ‘Xcoordinate’ option. It is worth noting that if you already know the exact syntax of an Expression,you can enter that directly into the Expression Editor rather than using the ‘Retrieve data from anobject’ button all the time.
Now use the ‘Play’ button to run the game to see how all of this combines. If you use the ‘RunGame’ button, don’t forget that you will have to use + to exit the game.
72 TUTORIAL 5 – THE GAMES FACTORY
KUNG FU PART 1 – EVENT EDITOR

In part 2 of this tutorial there have been no changes to The Storyboard Editor or the Level Editor.There have been, however, some very significant changes made to the Event Editor.
Select the ‘Open’ option from the ‘File’ menu at the top of the screen, then look for the ‘gametuts’directory on your CD ROM drive.Within the ‘gametuts’ directory look for the ‘05kungfu’ sub-directory. Now look for the directory‘tutorial’ and within this look for the file ‘2-kungfu.gam’. Open this file.
Event Editor – Kung Fu part 2The second part of the Kung Fu Event editor is where the game really starts to come to life, addingmovement to the main character, as well as making him kick and punch.
Before we get that far, however, take another look at line 8. There is now an Action to set thenumber of lives to 5. Remember, we are actually going to use the lives object as a counter for theHero’s health level.
Let’s have a look now at how we control the main characters movement and animation’s. There aresome fairly complex conditions that control all of this. They have been put in place to stop thecharacter jumping from one animation sequence to another mid-way through. Have a look at line number 22. All the animation changes and movement changes that areassociated with this event line can only be performed when the character is either standing orwalking. Rather than have one event line to test if the character is performing the walking animationand another event line to test if the standing animation is playing, we simply test to see if no otheranimations are playing, such as the kicking or punching animation, etc., etc.
To do this we insert the ‘Negate’ option once we have inserted an Event or Condition. Thischanges the logic of a line, and reverses it.For example, look on line 22. The first Condition is ‘Repeat while left key is pressed’. By placing theNegate in front of this Condition, the logic of this line now becomes ‘Repeat while left key is notpressed’. By the same virtue, the line that reads ‘“HERO” animation instep is playing’ becomes ‘“HERO”animation instep is not playing’ The Negate function is denoted by the red cross placed in front of the Condition.
Making the Hero stand moodily and caste about when he is not moving
So, let’s have a thorough look at line 22. This is used to play the characters ‘Standing’ animationwhen he is not walking, kicking, punching, or falling. Rather than test separately to see if thewalking animations are playing, which would happen every time the player moved, we test to see ifthe keyboard controls are not being pressed.
THE GAMES FACTORY – TUTORIAL 5 73
KUNG FU PART 2 – THE NEGATE OPTION

(i) First of all, the keyboard is tested to see if the left arrow key is not pressed. To do this, first of allwe insert the Event ‘Repeat while “Left Arrow” is pressed’. (Right click on ‘New Condition’, rightclick on ‘Mouse and Keyboard’, ‘Repeat while key is pressed’, press the “Left Arrow” key.) Now, right click on the text ‘Repeat while “Left Arrow” is pressed and select the ‘Negate’ optionfrom the menu produced. You will now have a negated Event line.
(ii) To add the second keyboard Condition, use exactly the same procedure, only press the rightcursor key when you are prompted to press a key. Obviously, insert this condition on the sameEvent line.
(iii) Now let’s see how we tested to see if any significant animations are playing.Right click on the text, ‘X Repeat while “Right Arrow” is pressed’, ‘Insert’, then right select the‘Hero’ from the dialogue box produced. Then the select the ‘Animation’ option, then the ‘Which animation of “HERO” is playing?’ option.Choose the ‘instep’ option, then ‘OK’.
(iv) Now a ‘Negate’ was placed in front of the Condition ‘“HERO” animation instep is playing’.
(v) The above two steps were repeated for the animations ‘mid punch’ and ‘Falling’, placing a‘Negate’ in front of them each time.
So, by the end of all this, you have an Event line that tests to see if nothing significant is happeningto the main character. If all these Conditions are true, then the Action ‘Change Animation sequenceto Stopped’ will be performed. So if the player does not move the main character, and he is notmid-way through kicking and punching or falling, then his mean and moody ‘Stopped’ animationwill be played.
Making the Hero move left and right
The ‘Negate’ option is used in a very similar way to decide when the Hero can move or not. He willbe moved when either the left or right cursor keys is depressed, and there are no significantanimations playing. This is to stop him being moved mid-punch or kick, or when he is falling down.
The main thing to note here is that rather than change the Hero’s speed, we are going to move himby changing his X coordinate. The reason that we are changing his movement by this method isbecause if we used his internal speed settings, then every time he performed an Action such askicking, punching, falling or standing still, we would have to insert an Action to ‘Stop’ him. By only changing his X coordinate when a key is pressed, he will automatically stop moving whenthe direction keys are not being pressed.To make sure that he faces in the correct direction, the Action to change his direction to left whenthe left cursor key is pressed is inserted, and to change his direction to right when the right key is
74 TUTORIAL 5 – THE GAMES FACTORY
KUNG FU PART 2 – MAKING THE HERO MOVE

pressed. We also have to make sure that his ‘Walking’ animation is playing here. If this Action were notinserted then his ‘Stopped’ animation would keep on playing whilst he were being moved.Somewhat unrealistic!
Making the Hero Kick
Line 27 is where we make our Hero kick. He can perform a kick either when he is walking orstanding still, so we only test to see if he is not kicking, punching or falling already. Note that thedirection of the kick has already been decided by setting his direction in the previous Event lines.To make him perform a kick we simply change his animation sequence to ‘instep’. To add a littlelife to the action, we also play the sample ‘kungfu-1’.
Making the Hero Punch
Line 29 is where we make our Hero punch. As with kicking, he can only kick when he is not in themiddle of doing anything else. We simply insert the Action ‘Change animation sequence to ‘midpunch’, as well as the sound Action ‘Play sample ‘kungfu-2’.
Letting the Hero ‘Pick-up’ health points
To allow the Hero character to ‘pick-up’ health points we simply test to see if he collides with any ofthe Health objects scattered about the play area. When he does, we add 3 to his number of lives,and than destroy the Health object.
Now use the ‘Play’ button to run the game to see how all of this combines. If you use the ‘RunGame’ button, don’t forget that you will have to use <ALT> + <F4> to exit the game.
Now we are ready to look at the third part of our tutorial, where we are going to have some‘baddies’ for our hero to fight against.
Select the ‘Open’ option from the ‘File’ menu at the top of the screen, then look for the ‘gametuts’directory on your CD ROM drive.Within the ‘gametuts’ directory look for the ‘05kungfu’ sub-directory. Now look for the directory‘tutorial’ and within this look for the file ‘3-kungfu.gam’. Open this file.
Again, there are no significant changes to the Storyboard Editor, so let’s go straight to the LevelEditor.
THE GAMES FACTORY – TUTORIAL 5 75
KUNG FU PART 2 – MAKING THE HERO KICK AND PUNCH

Level Editor – Kung Fu part 3
The only real change made in the Level Editor has been the addition of the ‘Baddies’ characters.Have a look around the play area to see where they have been placed, and then have a look attheir preferences by right clicking on one of them.Notice that they belong to the ‘Group.Bad’, which will make handling certain aspects of theirbehaviour easier in the Event Editor.
Well, that’s it for the Level Editor, let’s get back to the Event Editor and see what we are going todo with this new character and how he is going to interact with our Hero!
Event Editor – Kung Fu part 3The first thing of significance to note is on line 8, where we set all the values for the start of thegame.In addition to all the previous values, move the mouse pointer over the check-mark under the‘Enemy Fighter’ to view the actions that have been inserted there.‘Set alterable value A to 8’ is used to set the energy level for each fighter.‘Set alterable value C to 400’ is used to count how long the fighter has been knocked unconsciousfor.
Testing to see if the Hero has landed a kick on an Enemy Fighter
The next Event line that has been changed is line 31. This is where the Hero strikes an EnemyFighter with a kick. To make the reaction as realistic as possible, only animation frames 2,3 or 4 willhave any effect upon the Enemy Fighter, i.e. when the kick is fully extended. To do this, theanimation ‘level’ of the Hero is tested to see if it is greater than 1 and less than 5.The next pair of Conditions test to see if the Enemy Fighter is performing any animations ofconsequence. The Enemy Fighter can only be struck when he is not Falling or Disappearing. The last pair of Conditions test to see that the Enemy is on the left of the fighter by checking if hisX coordinate is less than that of the Hero character, and that the Hero is facing the Enemy Fighterby testing the Hero’s direction.When all of these Conditions are satisfied at the same time, then the sample ‘impact12’ is played,the Enemy Fighters health has 3 subtracted from it (alterable value A) and his animation sequenceis changed to Falling.
All of the above Conditions were copied into a new Event line (32), changing only the Conditionsthat read the Enemies X value in relation to the Hero, and changing the Condition that reads theHero’s direction to give a new Event line that test to see if an Enemy Fighter has been struck by akick when they are on the other side of the Hero and the Hero is facing them.
76 THE GAMES FACTORY
KUNG FU PART 3 – LANDING A KICK

Testing to see if the Hero landed a punch on an Enemy Fighter
All the above Conditions were copied into 2 separate Event lines, one for each direction, changingthe Condition that read the players Animation sequence from ‘instep’ to ‘mid punch’. Then theAction ‘Subtract 3 from alterable value A’ was edited so that only 1 was subtracted from alterablevalue A, meaning that the kicks that land on the Enemy Fighters are 3 times more damaging thanthe punches that are landed.
Testing to see if the Enemy Fighters’ health is so low that they becomeunconscious
Line 36 tests to see if the health value (alterable value A) of any of the Enemy Fighters is less than0, and that they are not already lying down. If both these conditions are satisfied then the sample‘whuah’ is played, and their lying down (‘Disappearing’) animation is played.
If the Enemy Fighter is further away than 30 pixels and within 320 pixels, havethem ‘lock-on’ to the Hero character and start walking toward him
This is tested by seeing if the Enemy Fighter’s X value is less than the Hero’s X value, minus 30.So, if the Hero’s X value was 400 and the Enemy Fighters was 369, then we subtract 30 from theHero’s X value to make it 370, we can see that 369 is less than 370, so this Condition would besatisfied. Had the fighter been any closer, e.g. had an X value of 390, then his X value would have beengreater then that of the Hero’s, after 30 had been subtracted.
The next Condition tests to see if the Enemy Fighter is within visual range to the left of the Herocharacter.For example, if the Enemy Fighter has an X value of 200 and the Hero has an X value of 500, andthen we are subtracting 320 from the Hero’s X value so it becomes 180. 200 is greater then 180 therefore this Condition would be satisfied.
The next 5 Conditions simply test to make sure that the Enemy Fighter is not already involved indoing something else by testing to see that no other animations are being played.
When all the above Conditions are satisfied, then the following Actions are performed to the EnemyFighter;(i) His direction is changed to face the right.(ii) His X value is increased by 2, moving him 2 pixels to the right.(iii) His animation sequence is changed to ‘Walking’.So, for all the time that an Enemy fighter lies between 320 and 30 pixels to the left of the Hero and
is not performing an animation of note, he will be moved 2 pixels to the right and his animation will
THE GAMES FACTORY – TUTORIAL 5 77
KUNG FU PART 3 – LANDING A PUNCH

be changed to ‘Walking’, and he will be turned to face the right.
Making the Enemy Fighter attack the Hero if they are within 50 pixels to the leftof the Hero and a random number generated between 0 and 10, is 0.
The first Condition of this line simply test to see if the Enemy Fighter has an X coordinate that isless than that of the Hero, i.e. they are to the left of the Hero.The second condition tests to see if the Enemy fighter is no further than 50 pixels from the left ofthe Hero.These two Conditions combine so that only when the Enemy fighter is to the left and no further than50 pixels away will the possibility of an attack be launched.
The next Condition tests to see if the animation of the Enemy Fighter is the ‘Walking’ animation, i.e.that they are not doing anything else already.
The last Condition generates a random number between 0 and 10, and then immediately tests tosee if that number is 0. This generates a 1 in 10 chance that the Enemy Fighter will attack everytime they are within 50 pixels of the Hero.
If all of these Conditions are satisfied, then the direction is set to be in the direction of the Hero,which may be necessary if the Hero has just walked past the Enemy Fighter, and then theanimation of the Enemy Fighter is changed to ‘mid punch’.A sound sample, ‘Arrow3’, is also played here.
The next two Event lines, numbers 43 and 45, perform exactly the same Actions as lines 39 and41, except they are related to when the Enemy Fighter is on the RIGHT of the Hero. Have a lookthrough and notice the differences in the logic of the Conditions that deal with the X coordinates ofthe Enemy Fighter and the Hero, and that the direction that the Enemy Fighter is sent in is to theleft, not to the right.
Testing when the ‘Group.Bad’ has managed to hit the Hero
Here we test to see if any of the ‘Group.Bad’ have managed to score a hit on the Hero characterwhilst he is not recoiling from a hit already.
The first Condition tests that the ‘Group.Bad’ is playing it’s ‘mid punch’ animation, i.e. that they arepunching the Hero.
The next line tests if it is the dangerous part of the punching animation that is being played, i.e.when the arm of the Enemy Fighter is extended.
78 TUTORIAL 5 – THE GAMES FACTORY
KUNG FU PART 3 – MAKING THE ENEMY ATTACK

The third Condition tests to see if the ‘Group.Bad’ is overlapping the Hero, and the last Conditionchecks to see if the Hero characters ‘Falling’ animation is not already playing.
If all of the Conditions are satisfied at the same time, then the following Actions are performed;(i) The sound sample ‘whip02’ is played.(ii) 1 is subtracted from Player 1’s lives.(iii) The animation sequence of the Hero is changed to the ‘Falling’ animation.
Detecting if all the Player’s lives are used, and ending the game if they are
This line simply test the Player 1 object to see if the number of lives is 0.If it is, then it performs the following Actions;(i) Deactivates the “Main Game” group to prevent the game carrying on.(ii) Activates the group “Game Lost” to end the game.(iii) Changes the animation of the Hero character to one where he lies fallen on the ground.
Using a variable as a counter
Line 51 tests to see if the ‘Disappearing’ animation of the Enemy Fighter is playing. If it is, then add1 to the value of that fighters alterable value B, which is used as a ‘count-up’ timer. Note there isno specific time reference, 1 is added to the value every time The Games Factory cycles throughthe Events.
Line 53 tests to see if value B is greater then value C. C is 400 initially, so it will take 401 cyclesthrough the Event grid before value B is greater than value C. The time that this takes is used asthe ‘stunned’ period that the Enemy Fighters lie on the ground for after they have been knockedout.When B is greater than C, the following Actions take place;(i) Alterable value A is set to 1. This means that a fighter that has been knocked out can only take1 more hit before being knocked unconscious again.(ii) Alterable value B is set to 0. This resets the internal ‘timer’ of that fighter.(iii) Alterable value C is increased by 200. This means that they will stay on the ground for 200more cycles the next time that they are knocked out.(iv) The animation sequence is changed to ‘Bouncing’, which flips the fighter back onto their feet.
Now use the ‘Play’ button to run the game to see how all of this combines. If you use the ‘RunGame’ button, don’t forget that you will have to use + to exit the game.
Okay, we’re now ready to look at the last part of this tutorial game.
Select the ‘Open’ option from the ‘File’ menu at the top of the screen, then look for the ‘gametuts’directory on your CD ROM drive.
THE GAMES FACTORY – TUTORIAL 5 79
KUNG FU PART 3 – TESTING THE NUMBER OF LIVES

Within the ‘gametuts’ directory look for the ‘05kungfu’ sub-directory. Now look for the directory‘tutorial’ and within this look for the file ‘4-kungfu.gam’. Open this file.
Level Editor – Kung Fu part 4Let’s have one last look around the Level Editor and see the final changes that have been made tothe game.If you look in the object window you can see that there are three new Active objects, the ‘Drop-Enemy’, which actually looks like a lobster! And there is also the ‘End-O-Level Enemy’ plus the‘Trigger-Jumping-Enemy’ objects.
The ‘Drop-Enemy’ is actually going to be invisible for most of the game, so it does not actuallymatter what it looks like. It is simply a trigger for making an Enemy Fighter appear to jump out of awindow.
The object that will trigger the Enemy to jump out of the window is the ‘Trigger-Jumping-Enemy’object. When the game is played, this is also going to be invisible, and is placed some distanceabove the Hero’s head, and is given the same X coordinate as the Hero in the Event Editor, so itwill follow his movement perfectly. If you scroll across the play area you will be able to see where ithas been placed. You will also be able to see where all of the ‘Drop-Enemy’ objects have beenplaced.So, as the Hero walks across the screen, the invisible ‘Trigger-Jumping-Enemy’ will collide with the‘Drop-Enemy’ objects. Then, via the Event Editor, we are going to make an ‘Enemy Fighter’ appearto jump out of the window and land right next to the Hero, ready to fight.
Now have a look at the far left of the screen where the ‘End-O-Level Enemy’ has been placed ontothe play area. Have a look at his object preferences and see which group he belongs to. (Rightclick on him, then select the ‘Object preferences...’ option, and select the ‘Object handling’ layer ofthis dialogue box.)
When you have done this and are happy that you understand the changes made, click on theEvent Editor’s icon at the top of the screen to take you to the last changes made in the EventEditor.
Event Editor – Kung Fu part 4Setting initial values and making the collision triggers invisibleAgain, it is line 8 that has the first changes made. Move the mouse pointer across the check-marksto see what they are.There is now a group “Game Won” which is deactivated here. The only way that this group can be
80 TUTORIAL 5 – THE GAMES FACTORY
KUNG FU PART 4 – LEVEL & EVENT EDITOR

activated is by reducing the energy level (alterable value A) of the ‘End-O-Level Enemy’ to 0, whichis tested later in the Event grid.
If you have a look under the columns for the ‘Drop-Enemy’ and the ‘Trigger-Jumping-Enemy’, youcan see that they are both made invisible here.
Under the ‘End-O-Level Enemy’ is the Action to set his alterable value A to 10. This means that hisenergy level is higher than that of the other fighters to start with, but not only that, when he is hit bythe Hero, we are not going to deduct as many energy points, making him very hard to knock out.
Testing to see if the Hero has kicked the ‘End-O-Level Enemy’
Line 38 is where we test to see whether the Hero has managed to hit the ‘End-O-Level Enemy’ witha kick. To make it even harder to knock him out, only kicks are going work against him.So, the first Condition tests to see if the Hero is overlapping the ‘End-O-Level Enemy’.The next tests to see if the Hero’s kicking animation (‘instep’) is playing.The third Condition tests to see which frame of animation it is that is playing when the Herooverlaps the ‘End-O-Level Enemy’. Only those frames where the kick is fully extended will actuallyharm the ‘Enemy.The last three lines of Conditions check that the ‘End-O-Level Enemy’ is not already performing ananimation of note.
Now have a look at the Actions that have been inserted on this Event line. The first is to play the sample‘impact12’The next two are to play the animation ‘falling’ and to subtract only 1 point from the ‘End-O-LevelEnemies’ alterable value A. Note that for all the other enemies 3 points are deducted when a kick lands.
Testing the ‘End-O-Level Enemy’ to see if they have lost all their energy points
The next Event line is where the ‘End-O-Level Enemy’ is tested to see if his energy level hasreached 0. Notice that this Event line comes immediately after he may have had his last energypoint deducted. This was done to prevent any more game actions occurring after the Hero hasfinished off the ‘Enemy.The first Condition simply tests to see if the alterable value A of the ‘End-O-Level Enemy’ is lessthan or equal to 0.The second tests to see if the ‘disappearing’ animation sequence is already playing.If both these Conditions are satisfied, then the following actions will be performed;(i) The group “Main Game” is deactivated to stop any further game actions from being performed.(ii) The group “Game Won” is activated.(iii) The sample ‘zing05’ is played.(iv) The ‘End-O-Level Enemy’ has his animation sequence changed to ‘disappearing’.(v) The text ‘Victory’ is displayed.
THE GAMES FACTORY – TUTORIAL 5 81
KUNG FU PART 4 – TESTING ENEMY

Making the ‘End-O-Level Enemy’ attack
Line 42 is where the ‘End-O-Level Enemy’ attacks. This is done very simply with two Conditions.The first tests that he is not already punching, the second tests the timer every 1.5 seconds.If both these Conditions are satisfied, then the following Actions are performed;(i) The sample ‘arrow02’ is played.(ii) The ‘End-O-Level Enemy’ has his animation sequence changed to ‘mid-punch’.
Note that there is no need to have separate Event lines to test if the ‘End-O-Level Enemy’ strikesthe Hero. This has already been done on line 52, because all of the enemies belong to the‘Group.Bad’.
Controlling the invisible triggers to make an ‘Enemy Fighter’jump out of a window
Now have a look at Event line 60. This is where the invisible ‘Trigger-Jumping-Enemy’ object ismade to follow the X coordinate of the Hero. This is done by using the Event ‘Always’ and theninserting the Action ‘Set X position to X(“Hero”)’. Wherever the Hero goes, the invisible object willfollow. We have not manipulated the Y coordinate at all, so that will stay exactly the same as whenit was placed onto the play area on the Level Editor screen.
Line 62 tests to see if the invisible trigger object has collided with the invisible ‘Drop-Enemy’object. If it has, then the sample ‘drumskin’ is played.The ‘Drop-Enemy’ is also made visible at this stage.Now, here’s the clever part. Although the ‘Stopped’ animation of the ‘Drop-Enemy’ looks like alobster, any other animation can be inserted into its other animation sequences. We have insertedan animation that looks like an Enemy Fighter falling, into the ‘Drop-Enemy’ objects ‘Falling’animation sequence.So, an object that looks like an Enemy Fighter falling will suddenly appear at the window when theHero walks underneath a window that has an invisible ‘Drop-Enemy’ placed there.Now all we need to do is have them actually fall, i.e. move them down the screen, and then turnthe ‘Drop-Enemy’ into an actual Enemy Fighter.
This is done on line 64. We simply test to see if the ‘Falling’ animation of the ‘Drop-Enemy’ isplaying. If it is, then the following Actions will be performed;(i) The Y position is incremented by 16 pixels every time The Games Factory cycles through theEvent grid.(ii) The ‘Drop-Enemy’ is made to reappear. Note that this is done after the action to change theanimation sequence, so the player will only ever see the ‘Falling’ animation of the ‘Drop-Enemy’.
The next Event line tests to see if the ‘Drop-Enemy’ has reached the ground. The first condition
82 TUTORIAL 5 – THE GAMES FACTORY
KUNG FU PART 4 – INVISIBLE TRIGGERS

tests to see if its animation ‘Falling’ is playing, and the next tests to see if the Y coordinate of the‘Drop-Enemy’ is greater than that of the Hero.If both these Conditions are satisfied, then the following Actions are performed;(i) The sample ‘drun19’ is played.(ii) A real enemy, an ‘Enemy Fighter’ is shot at speed 0, in no direction. This has the effect ofcreating an Enemy Fighter at exactly the same coordinates as the ‘Drop-Enemy’.(iii) To further add to the illusion that the ‘Drop-Enemy’ was actually an Enemy Fighter all along, the‘Drop-Enemy’ is destroyed at exactly the same instant as the Enemy Fighter is created.(iv) The next Action sets the Y position of the new Enemy Fighter to be 15 pixels to the left of theHero, with anywhere between 0 and 3 pixels added to this value.
The final line that has been changed lies within the group “Game Won”. All this does is restart thegame. Now, if you have worked your way through all the tutorial games you should feel competent to startmaking your own games.
Before you do, though, try changing the tutorial games. Here are some example ideas;(i) Try changing the initial value of the alterable value A of the enemies to make them easier orharder to knock out.(ii) Try adding a score object to the game. You could change the score every time the Hero lands apunch or kick, or scores a knockout.(iii) In the “Game Won” group, substitute the action ‘Restart Level’ for the action ‘Restart Game’. If youare going to use a score object, this will prevent the score from being reset when the game is won.(iv) Try changing the values of A and C when the game is won each time to make it harder and harderto knock out the fighters.(v) Try creating a whole new level using the many backdrop objects The Games Factory has to offer.You could make an immense playfield with many fighters.
These are just a few ideas, we’re sure you’ve got loads more. Don’t be afraid to experiment with thetutorial games, try making changes throughout them, in the Level Editor as well as in the Event Editor.Read the Picture Editor chapter and Animation Editor chapter to learn how to change individualanimation frames.
There are also loads more examples on the Games Factory CD. Look in the Event Editor chapter. Atthe end of every Event and Action for a given object there is a file pathway for you to look up anexample from the CD.
There is also the huge reference section of this manual to extract detailed information about eachEditor screen, as well as all the menu options available for all of the objects in all of the Editor screens.
Above all, experiment and play, get an idea in your head, and then go and create it!
THE GAMES FACTORY – TUTORIAL 5 83
KUNG FU PART 4 – THE END

The Menu BarYou will notice that along with almost all other Windows software, The Games Factory has a menubar across the top of the screen. By clicking on these menu headings you will pull down a list ofmenu options.Some of these options are exactly the same for all the Editor screens, but most are slightly differentin what they achieve on each Editor screen.This chapter will discuss all the different menu options and how they relate to each Editor screen.Note that this chapter contains information on ‘General setup’ and ‘Game setup’ which you will findinvaluable in changing the look of your finished games, not to mention setting up keyboard controland joystick control. Both of these options can be found in the File menu option, which begins onpage 85.
The different menu options will be discussed in the order as they appear on the screen;
● ‘File’ – Starting overleaf● ‘Edit’ – page 94● ‘Objects’ – 103● ‘Window’ – page104● ‘Run’ – page 105● ‘Help’ – page 105
Within each heading the effects of each option on each Editor screen will discussed in thefollowing order;
● Storyboard Editor● Level Editor● Event Editor
84 THE MENU BAR – THE GAMES FACTORY
INTRODUCTION

File
The ‘File’ menu heading contains all the options relating to saving and loading your games fromdisk, as well as two ‘Setup’ options. Note that all the options have exactly the same functions on allthe Editor screens.
‘New’ will give you a completely ‘blank page’ to work with. Note that if you have already beenworking on a game, The Games Factory will erase this from memory unless you save it to disk. Youwill be prompted to save your work when you select this option.
‘Open’ will load in a game previously saved onto disk. You might have to specify the drive thatyou wish to load the game in from. By default The Games Factory will look on the hard drive (Cdrive) first.
‘Save’ will save your game with whatever it’s current name is. When you first save a game, itis best to use the ‘Save as...’ option, then whenever you have made any major changes use the ‘Save’ option. If you do not specify a name for your game before you save it then The Games Factory will give ita default name. Also, this option will save to the last disk drive used, by default the hard drive.
‘Save as...’ allows you to give your game a specific name for it to be saved as, as well asspecifying the disk drive that it is saved to.
‘General Setup’ will take you to a dialogue box with 2 layers.
The first layer of the screen is ‘General’, there are several tick boxes. Clicking in these turns thatoption on or off.
‘Show handy hints’ attaches a text balloon to the mouse pointer so that when you move the
THE GAMES FACTORY – THE MENU BAR 85
FILE – GENERAL SETUP

mouse pointer over an icon you will be shown what that icon is. For those learning their wayaround it is best to leave this function on.
‘Show status line’ displays a text line at the bottom of the screen which will display things likemouse coordinates and handy hints.
‘Use a small font in dialogs’ means that The Games Factory will use small text in all thedialogue boxes that are used. Normally on.
‘Ask user size of playfield when starting new game’ means that The Games Factory willask you to choose the size of the playfield for your new game when you use the ‘New’ option fromthe ‘File’ menu. If you have this option turned off, then by default The Games Factory will choose640 x 480.
‘Allow picture and animation frames to be stored externally’ means that instead ofloading animation and picture frames into the main game file structure, they can be kept on diskuntil they are needed. Note that if you have this option on and write a game that requires a certainpicture from floppy disk, then the game will not run without that floppy disk.
‘Undo levels’ is the number of times that you can ‘Undo’ something that you have changedwithin The Games Factory.
On the second layer, ‘Graphics and Sounds’, you will be presented with a screen that lookslike this;
By clicking in the tick boxes you can turn the relevant option on or off.
Under the heading ‘Graphics driver mode’ you have several options.
86 THE MENU BAR – THE GAMES FACTORY
FILE – GENERAL SETUP
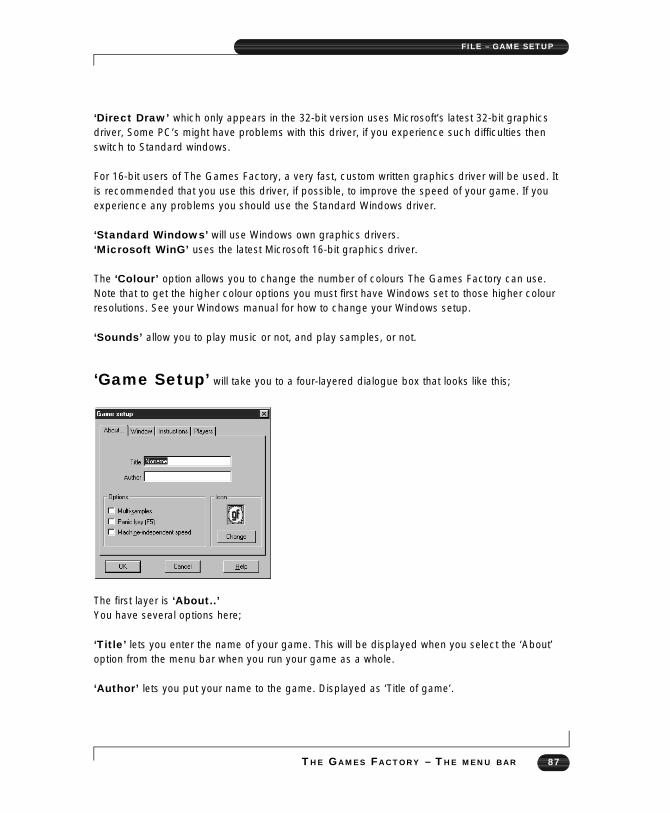
‘Direct Draw’ which only appears in the 32-bit version uses Microsoft’s latest 32-bit graphicsdriver, Some PC’s might have problems with this driver, if you experience such difficulties thenswitch to Standard windows.
For 16-bit users of The Games Factory, a very fast, custom written graphics driver will be used. Itis recommended that you use this driver, if possible, to improve the speed of your game. If youexperience any problems you should use the Standard Windows driver.
‘Standard Windows’ will use Windows own graphics drivers.‘Microsoft WinG’ uses the latest Microsoft 16-bit graphics driver.
The ‘Colour’ option allows you to change the number of colours The Games Factory can use.Note that to get the higher colour options you must first have Windows set to those higher colourresolutions. See your Windows manual for how to change your Windows setup.
‘Sounds’ allow you to play music or not, and play samples, or not.
‘Game Setup’ will take you to a four-layered dialogue box that looks like this;
The first layer is ‘About..’You have several options here;
‘Title’ lets you enter the name of your game. This will be displayed when you select the ‘About’option from the menu bar when you run your game as a whole.
‘Author’ lets you put your name to the game. Displayed as ‘Title of game’.
THE GAMES FACTORY – THE MENU BAR 87
FILE – GAME SETUP

‘Multi-samples’ will mix the music and sound samples together when they are played. Note thatit takes a moment to do this, so you may well want this option turned off for fast games. The 16 bitversion can mix upto 4 channels of sound but the 32 bit version can mix 8. There is a slight delayin mixing in the 16 bit version.
‘Panic Key (F5)’ -enabling this gives you a panic key (F5) that takes you out of The GamesFactory directly to the Windows desktop. It still leaves The Games Factory running in thebackground, but turns off the sound and minimizes the display. Great for if your boss walks inunexpectedly!
‘Machine-independent speed’ will make your game run at the same speed no matter what PCit is played on. Note that to make your game run fast on a low specification PC The Games Factoryhas to cut corners such as having less smooth animation and movement.
‘Icon change’
When you save a game in The Games Factory a standard icon is used to represent your game,however you can change this icon. If you wish to change the icon, simply select the ‘Change’button and you will be presented with the following dialogue box.
88 THE MENU BAR – THE GAMES FACTORY
GAME SETUP – ICON CHANGE

This editor contains all the features of the Picture Editor and works in exactly the same way, seepage 287 for more details.
The next level of the dialogue box is ‘Window’. Again, you have several tick-boxes that will alter thelook and behaviour of your game.
‘Maximized on boot-up’ maximises the window used to display the game when it is firstloaded. That is, as in any Windows application, The Games Factory uses a window to display yourgame. Having this option turned on will stretch the window out to fill the screen to the very edge.Note that you will not be able to change the dimensions of the window using the mouse pointerwhen this option is enabled.
‘Resize display to fill current window size’ will fill whatever window size you are usingwith the game display. If you disable the option ‘Maximised on boot up’ option when you use thisoption then you will be able to shrink or stretch the window used to display your game using themouse pointer to ‘grab’ the edges of the window. Note that when the window is large this optioncan dramatically slow down the game action due to the complicated nature of the calculationsnecessary to resize the display.
‘Full screen at start’ is for use on the 16 bit version only. It was designed specifically for usewith the 320 by 200 graphics mode that is supported by the 16 bit version. Note that changing this option will have no effect when used with any other window sizes, only onthe 320 by 200. It allows very fast game play of a low resolution that still fills the screen.Notice at the top of this layer the size of the window has been changed to 320 by 200, whichmeans that only an area 320 by 200 will be shown on the screen. By enabling the ‘Full screen atstart’ you ‘expand’ this small chunk of the play area to fill the screen.
These three options are a very important feature of The Games Factory and can be used tochange the way your games are displayed.
‘Heading’ displays a heading at the top of the screen when the game is run, showing the nameof the game.
‘Heading when maximized’ will show the heading when the window for the game ismaximized. You must have the ‘Heading’ option enabled to enable this function.
‘Game to include menu bar’ displays the menu bar when the game is run. Having thisswitched off hides the menu bar. Associated with the ‘Edit menu’ button, described below.
‘Menu displayed on boot up’ is only available when the ‘Game to include menu bar’ option isturned on. If this is turned off then the menu will only be displayed when you make it visible via theEvent Editor.
THE GAMES FACTORY – THE MENU BAR 89
FILE – GAME SETUP – MENU SETUP – WINDOW

The ‘Edit Menu’ optionIn some games you may want to use a menu bar and the mouse pointer to make decisions oraccess game functions. The Games Factory already has a menu bar for use in your games, whichcan be shown or hidden from the above options, as well as during your game from the EventEditor. See pages 176 for information on how to display menu options, and how to perform actionswhen they are selected.The ‘Edit menu’ button takes you to another dialogue box where you can Edit existing menuoptions, or create new ones.
This button resets all the menu options to their default settings.
This button allows you to load a menu that you have already saved from disk.
This button allows you to save your menu onto disk.
This will display a separator in th pull-down menu.
This button allows you to enter a new menu heading or option. You simple insert the text thatyou want into the text box. You change its status from Menu heading to an option by using the‘Move option right’ button, descibed below.
90 THE MENU BAR – THE GAMES FACTORY
FILE – GAME SETUP – MENU SETUP
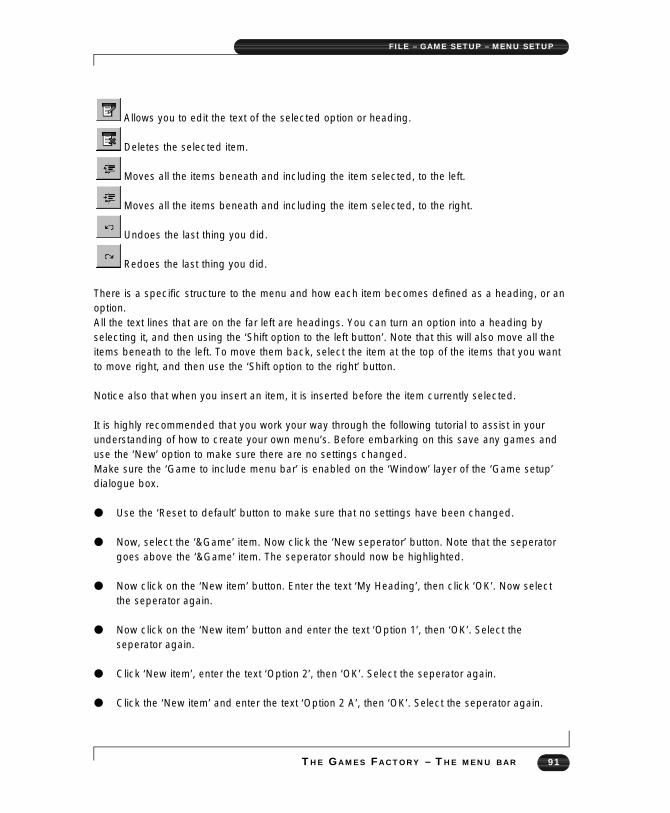
Allows you to edit the text of the selected option or heading.
Deletes the selected item.
Moves all the items beneath and including the item selected, to the left.
Moves all the items beneath and including the item selected, to the right.
Undoes the last thing you did.
Redoes the last thing you did.
There is a specific structure to the menu and how each item becomes defined as a heading, or anoption.All the text lines that are on the far left are headings. You can turn an option into a heading byselecting it, and then using the ‘Shift option to the left button’. Note that this will also move all theitems beneath to the left. To move them back, select the item at the top of the items that you wantto move right, and then use the ‘Shift option to the right’ button.
Notice also that when you insert an item, it is inserted before the item currently selected.
It is highly recommended that you work your way through the following tutorial to assist in yourunderstanding of how to create your own menu’s. Before embarking on this save any games anduse the ‘New’ option to make sure there are no settings changed. Make sure the ‘Game to include menu bar’ is enabled on the ‘Window’ layer of the ‘Game setup’dialogue box.
● Use the ‘Reset to default’ button to make sure that no settings have been changed.
● Now, select the ‘&Game’ item. Now click the ‘New seperator’ button. Note that the seperatorgoes above the ‘&Game’ item. The seperator should now be highlighted.
● Now click on the ‘New item’ button. Enter the text ‘My Heading’, then click ‘OK’. Now selectthe seperator again.
● Now click on the ‘New item’ button and enter the text ‘Option 1’, then ‘OK’. Select theseperator again.
● Click ‘New item’, enter the text ‘Option 2’, then ‘OK’. Select the seperator again.
● Click the ‘New item’ and enter the text ‘Option 2 A’, then ‘OK’. Select the seperator again.
THE GAMES FACTORY – THE MENU BAR 91
FILE – GAME SETUP – MENU SETUP

● Click the ‘New item’ and enter the text ‘Option 2 B’, then ‘OK’.
● Now select ‘Option 1’ and then press the ‘Shift item to the right’ button. Note that everythingbeneath this item is shifted to the right.
● Now select the item ‘Option 2 A’ and shift that to the right also. If we left this as it was, then allthe other headings, ‘&Game’ etc, would become options within the heading ‘My Heading’. Wecan restore them by shifting them to the left again
● So, select the ‘&Game’ item, and then press the ‘Shift item to the left’ button twice. Note howall the items underneath are also moved 2 columns to the left.
● Now click all the ‘OK’ buttons to take you back to the Storyboard Editor.
● Now try running the game using the ‘Run Game’ button. You will now have the heading ‘MyHeading’ at the top left. When you click on it you wil pull down ‘Option 1’ and ‘Option 2’.‘Option 2’ will have a small arrow attached and clicking on it will pull down options ‘Option 2A’ and ‘Option 2 B’.
The next level of the ‘Game options’ dialogue box is the ‘Instructions’ layer. From this layer you candecide upon the contents of the ‘Help-How to use’ dialogue box when you run your game.That is, when you run your game with the menu bar displayed and you choose the ‘Help’ heading,and then choose the ‘How to use’ option you will be presented with a dialogue box. It is from the‘Instructions’ layer that you can decide what text to put into that dialogue box. An example isshown;
When you click on the pull-down button at the side of the ‘Instructions’ text box you will be asked
92 THE MENU BAR – THE GAMES FACTORY
FILE – GAME SETUP – INSTRUCTIONS

to choose the format of text file you wish to use. You can select either a standard .txt file, a writedocument or a Windows help file. You can then select a file from disk to be displayed in thedialogue box, or you can write your own by using the ‘Edit’ button. This will then present you with ablank dialogue box which you can then write into. When you are happy with the text you simplysave it onto disk.
The next layer of the ‘Game Setup’ menu is ‘Players’. This allows you to change the keys used fordirection, as well as the setup of joysticks.This is what the screen looks like on the ‘Players’ level;
Under the ‘Control of each player’ heading is a grid that represents the device by which eachplayers character will be controlled. Each player has a vertical column assigned to them. Asdefault, all the players are assigned keyboard control, and all use the cursor keys and the ‘Shift’and ‘Control’ keys. Obviously if you have more than one player in a game at a time, you are goingto want them to either be using different joysticks or different keyboard controls.
To change the control of Player 1, simply go to the vertical column for player one and tick in thehorizontal column to correspond with the keyboard, or joystick 1 or 2.If you tick in either of the joystick columns, The Games Factory will automatically assign that playermovement to correspond with the joystick movements.
Note that when you click on one of the Keyboard options, you will be presented with a keyboardsetup dialogue box like this;
In order to change the key that moves your player, press the relevant button. You will then beasked to press a key, which is the key that will then be used for that direction.
THE GAMES FACTORY – THE MENU BAR 93
FILE – GAME SETUP – PLAYERS

For example, to change the key that moves player 1 ‘up’ to the ‘A’ key, click on the “Up” buttonfrom the above dialogue box. Then, when your are asked to press a key, press the ‘A’ key. Nowyou will see that next to the button instead of ‘Up Arrow’ you will see ‘A’, like this;
The ‘Score’number boxes allow you to set the initial values for the score objects. You can also setthe maximum and minimum values.
The ‘Lives’ number boxes allow you to set the initial values for the lives objects. You can also setthe maximum and minimum values.
View ExamplesThis simply lets you play examples of what can be done using The Games Factory. The examplesare on the CD ROM and give you a chance to view what the more experienced user will be able toachieve using The Games Factory.You will have the choice to play Zeb, Lobotomy, Magicians Lair or any of the tutorial games.You can also load up the advanced techniques here.
ExitSimply exits you from The Games Factory back to the previous Windows application. You will beprompted to save your game if you have made any changes to it since you last saved it.
EditMost of the options from the ‘Edit’ heading have a very similar function on all the Editor screens,but what they actually do on each Editor screen can be quite different.For example, the ‘Copy’ option will copy a selection into the clipboard. If you use it on the LevelEditor it will copy an object, but if you used it on the Event Editor it would copy Events, and if youuse it on the Storyboard Editor it will copy an entire level, including all the objects from that level,all the Events and Actions. Where applicable, the differences will be explained.
UndoSimply undoes your last change. Note that you must ‘do’ something before you can ‘Undo’ it. Youcan keep on ‘Undoing’ steps up to 50 times.
Redo‘Redoes’ anything that you have just ‘Undone’
Cut‘Cuts’ a selection into the clipboard. Note that whatever you have ‘Cut’ will be removed from itsoriginal location completely into the clipboard, unlike the ‘Copy’ option. By pressing the ‘Shift’ key
94 THE MENU BAR – THE GAMES FACTORY
EDIT MENU

as well you can select more than one thing at a time.
● Using Cut from the Storyboard Editor allows you to cut levels out and move them to a newlocation.
● Using Cut from the Level Editor allows you to cut an object and then go to either anotherlevel, or even another game, and place it there.
● Using Cut from the Event Editor allows you to cut Events and transfer them to another level,or another game. Note that if you copy Events to another Level or game, all the objects iconswill be replaced by a little ‘Bomb’ icon unless those objects already exist in the level or gamethat you are transferring to. You can change the ‘Bombs’ to the new objects by right mousebutton selecting on the ‘Bombs’.
● Use the ‘Paste’ option to put your selection into place
CopyDoes exactly the same as ‘Cut’, but it leaves the original selection behind, moving a copy of theoriginal selection. Use the ‘Paste’ option to put your copy into place.
PasteWill take whatever selection is on the clipboard and ‘Paste’ it wherever you have selected with themouse pointer. Note that you cannot do things like ‘Copy’ a selection of events and ‘Paste’ theminto the Level Editor screen.
DeleteWill delete the current selection.
UnselectRemoves the current items from the selection set. Often easier to click on ‘empty’ space with themouse pointer. When this is not possible you can use the ‘Unselect’ option.
Select allWill select all objects / events etc., from the current Editor screen, ready for ‘Cutting’, ‘Copying’ or‘Deleting’, etc.If you use this option on the Storyboard Editor screen, all the Levels will be selected.If you use this option on the Level Editor screen, all the objects will be selected.Using this option from the Event Editor screen selects all the Events and Actions.
THE GAMES FACTORY – THE MENU BAR 95
EDIT – CUT, COPY & PASTE

Editor Preferences
Allows you to set preferences for each Editor screen, such as how many Events are displayed onthe Event Editor, what information is included on the Storyboard Editor.Each Editor screen has entirely different preferences, so this option is split into headingsaccording to the Editor screens. So, first we have;
Storyboard Editor preferences
‘Density’ allows you to change the size of the ‘Thumbnail’ and associated text for each level.Having a low density will show a large ‘Thumbnail’, but not allow many levels to be shown on thescreen at once, whereas having the density high will show minimal information for each level and atiny ‘Thumbnail’, but will allow a very high number of levels to be viewed on the screen at once.
‘Display top bar’ simply displays a bar above the Levels, describing ‘Number of level’,‘Thumbnail’ and ‘Comments’.
‘Display comment(s)’ displays the title of the level, the password, play area size and the iconsfor adding fade ins / outs. Having this option turned off will only show the ‘Thumbnail’ for that level.
96 THE MENU BAR – THE GAMES FACTORY
EDIT – EDITOR PREFERENCES – STORYBOARD

Level Editor Preference
‘Lock Objects’ locks the relevant object in place on the play area, and prevents them frombeing selected by the mouse or manipulated in any way on the Level Editor screen. This can be avery useful feature when you start to get a lot of objects on the screen, particularly if you are tryingto select a small, Active object, say, and you end up selecting the Backdrop object behind itinstead. To stop this from happening you would ‘Lock’ all the backdrops into place.When a tick box is filled, it means that set of object is locked into place. You can ‘unlock’ them byclicking in the box again.
‘Edit mode’ selects whether you want to edit the game screen, or if you want to add to the fade-in or fade-out transitions. You can place an Active object on the fade-in and then move it around togradually display the screen underneath. A fairly advanced feature.
‘Animate active objects’ animates active objects when you place them onto the Level Editorscreen. Can be useful to preview an animation or to show when you have changed the animationfor 2 similar looking objects.
‘Create automatic icons’ means that The Games Factory will create an icon for any newobjects that you create by shrinking an image of the object. Having this option turned off results inThe Games Factory not changing the appearance of the icon even if you change the appearanceof that object.‘Show coordinates’ shows the coordinates of the mouse pointer on the status line at the
THE GAMES FACTORY – THE MENU BAR 97
EDIT – EDITOR PREFERENCES – LEVEL EDITOR
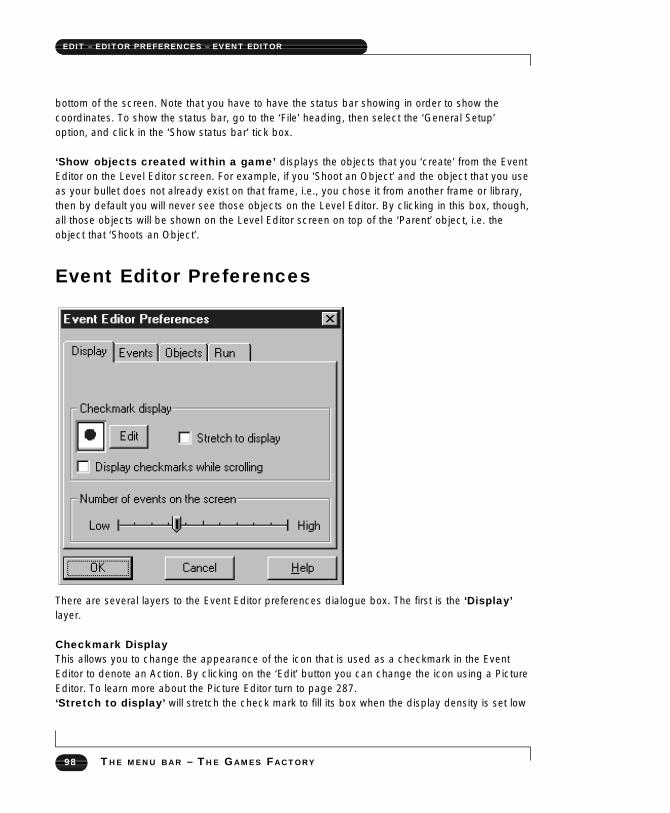
bottom of the screen. Note that you have to have the status bar showing in order to show thecoordinates. To show the status bar, go to the ‘File’ heading, then select the ‘General Setup’option, and click in the ‘Show status bar’ tick box.
‘Show objects created within a game’ displays the objects that you ‘create’ from the EventEditor on the Level Editor screen. For example, if you ‘Shoot an Object’ and the object that you useas your bullet does not already exist on that frame, i.e., you chose it from another frame or library,then by default you will never see those objects on the Level Editor. By clicking in this box, though,all those objects will be shown on the Level Editor screen on top of the ‘Parent’ object, i.e. theobject that ‘Shoots an Object’.
Event Editor Preferences
There are several layers to the Event Editor preferences dialogue box. The first is the ‘Display’layer.
Checkmark DisplayThis allows you to change the appearance of the icon that is used as a checkmark in the EventEditor to denote an Action. By clicking on the ‘Edit’ button you can change the icon using a PictureEditor. To learn more about the Picture Editor turn to page 287.‘Stretch to display’ will stretch the check mark to fill its box when the display density is set low
98 THE MENU BAR – THE GAMES FACTORY
EDIT – EDITOR PREFERENCES – EVENT EDITOR
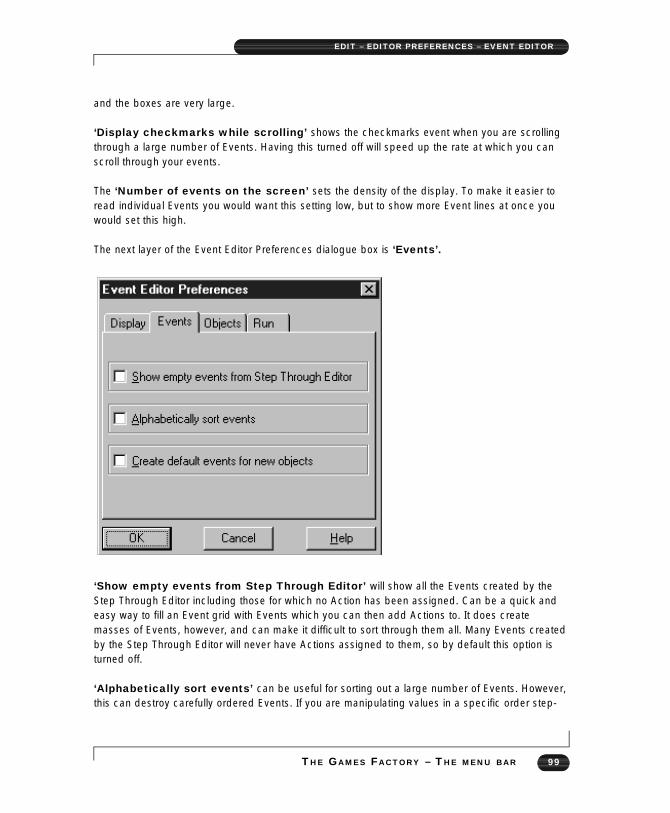
and the boxes are very large.
‘Display checkmarks while scrolling’ shows the checkmarks event when you are scrollingthrough a large number of Events. Having this turned off will speed up the rate at which you canscroll through your events.
The ‘Number of events on the screen’ sets the density of the display. To make it easier toread individual Events you would want this setting low, but to show more Event lines at once youwould set this high.
The next layer of the Event Editor Preferences dialogue box is ‘Events’.
‘Show empty events from Step Through Editor’ will show all the Events created by theStep Through Editor including those for which no Action has been assigned. Can be a quick andeasy way to fill an Event grid with Events which you can then add Actions to. It does createmasses of Events, however, and can make it difficult to sort through them all. Many Events createdby the Step Through Editor will never have Actions assigned to them, so by default this option isturned off.
‘Alphabetically sort events’ can be useful for sorting out a large number of Events. However,this can destroy carefully ordered Events. If you are manipulating values in a specific order step-
THE GAMES FACTORY – THE MENU BAR 99
EDIT – EDITOR PREFERENCES – EVENT EDITOR

by-step, this option can ruin the logic of your Events. It is generally useful for ordering masses ofEvents that do not matter which order they run in.
‘Create default events for new objects’ will automatically create empty Event lines for newobjects. For example, if you created a ‘Bouncing ball’ type object and had this option on, TheGames Factory will automatically create the following events;
This can be handy at first, but as you get more experienced you will find that it can ‘clog up’ theEvent Editor with a lot of often irrelevant events.The next layer of the Event Editor Preferences dialogue box is ‘Objects’;
100 THE MENU BAR – THE GAMES FACTORY
EDIT – EDITOR PREFERENCES – EVENT EDITOR

From here you can decide by what method The Games Factory displays your objects on the EventEditor screen. ‘Object’s icon’ means that the icon for that object will be used.‘Objects name’ will use the name of the object instead, or as well as, the objects icon. Note thatyou must have one of these tick boxes filled. The Games Factory will not let you have none filled.
The next layer of the Event Editor Preferences dialogue box is ‘Run’;
‘Run frame with fades in and out’ will run the fades for your frame when you use the ‘Run game’button. Note that the fades will not be used when you just use the ‘Play’ button.
Level setupThe options under this heading allow you to change the look and behaviour of each level of yourgame. There are 2 layers to the ‘Level setup’ dialogue box. The first is the ‘Options’ layer.
THE GAMES FACTORY – THE MENU BAR 101
EDIT – LEVEL SETUP

‘Title of this level’ allows you to enter a name for that level of your game. Simply click withinthe text box with the mouse pointer to enable you to write in text.
Below this are several tick boxes. The relevant option will be enabled when they are filled.
‘Display this title during game’ will display the title that you have given to that level whenyour game is run.
‘Grab desktop at start’ will use the Windows desktop as the backdrop for your game.Everywhere that is transparent on your level will have the desktop showing through.
‘Keep display from previous level’ uses your previous level as a backdrop for your currentlevel. The previous level will be shown where there is a transparent area on your current screen.Note that the animation’s from the previous level will be frozen, and that it is treated astransparency. You could not collide with any objects from the previous level as it is beingdisplayed as a transparency.
‘Handle background collisions even in invisible playfield’ will force The Games Factoryto work out collisions that occur with backdrop objects even when those collisions occur well offthe visible area of the screen. For example, if you have a platform game and the play area is muchlarger than the screen, The Games Factory would normally only calculate the collisions that arevisible, even when collisions are occurring off screen. This makes game play fast, but not 100%accurate. By having this option turned on, The Games Factory will calculate all the collisions thatoccur on the entire playfield at once, even those that are a long way from the visible part of theplay area.
You can change the password and play area size here, as well as from the Storyboard Editor.
The second layer of the ‘Frame setup’ dialogue box is the ‘Palette’ layer. The current palette isdisplayed on this layer of the dialogue box. The only option you have here is to ‘Load’ anotherpalette. To do this, click on the ‘Load’ button. You will then be taken to a File Selector dialoguebox. This allows you to load in a palette from disk. This function can be useful if you are creating specific scenes for your games and you do not wantto be limited to the standard Games Factory colours. Say, for instance, one of your scenes was adesert scene, you would not really want purples, greens and greys, but you would probably wantabout 100 shades of light brown! If you created a palette using an art package, then saved it ontodisk as a PCX file, you could load in that palette to create the colours for that level. You could dothe same for a forest scene, say, which you would want lots of different shades of green.
102 THE MENU BAR – THE GAMES FACTORY
EDIT – LEVEL SETUP

Objects
The ‘Objects’ heading allows you to change the way objects are displayed on each Editor screen.Note that this heading is not available to use on the Storyboard Editor or the Event Editor, only onthe Level Editor.The ‘Objects’ heading allows you to change how the object library is displayed, save your objectsas a library, useful if you have spent hours creating fantastic animation’s, or loading in objects fromanother game.
‘Show Objects’ is further split down to;‘In a moveable window’ displays the objects from the library in a window that you can move aroundthe screen, and allows you to change the size of the window with the left mouse button, very usefulwhen you have a very large object library and you want to be able to view them all at once. Simplyclick and hold down the left mouse button on the edges of the box to ‘drag’ the sizes of the box tothe size you want.
‘In a fixed window’ is on by default, and displays the objects from a library in a thin window downthe left hand side of the screen with scroll buttons to view through the contents. Is less intrusive onthe display than having the objects in a moveable window.
‘Hide Objects’ simply hides the current object library.
‘Pick objects from a game’ allows you to load in all the objects from another game that youhave saved on disk, and to use them as a library.
‘Save game as a library’ allows you to save just the objects from your game onto disk as anObject library.
THE GAMES FACTORY – THE MENU BAR 103
OBJECTS – SHOW/HIDE

WindowThe ‘Window’ heading allows you to dramatically change the way The Games Factory displays theEditor screens. You can have all the different Editor screens displayed at once in their ownwindows, which you can then move around the screen and resize. Can be useful for when yourgames construction gets complicated. The options contained within this heading have the sameeffect on all the Editor screens.
Note: to turn any of the following options off again, simply double click on the bar at the top of anEditor Screens window.
‘Cascade’ arranges the editor screens as a cascade of windows. You will be able to see the titlebars of the non-selected screens ‘behind’ the window you have selected. Clicking in the title bar ofanother window will bring that window to the front of the ‘cascade’.
‘Tile’ arranges the Editor screens in windows side-by-side across the screen. You will only beshown a vertical ‘slice’ of that screen, but you can scroll the ‘slice’ from left to right using the scrollbars.
‘Arrange’ allows you to move the windows around the screen in any arrangement; side-by-side,overlapping, etc., etc.
Clicking on the relevant title below these options will select that Editor screen. If you have any ofthe above options turned on, you will notice that the title bar of that screen will becomehighlighted, making that window ‘Active’. It is often easier to simply click within the window that youwant to make it ‘Active’, though.
104 THE MENU BAR – THE GAMES FACTORY
WINDOW

If you have the above options turned off (as default) clicking on one of the names will take you tothat Editor screen. It is often easier to click on the icons on the toolbar at the top of the screen.
RunThe ‘Run’ heading allows you to perform the same actions as the ‘Run Game’, ‘Run Level’, ‘Play’,‘Pause’ and ‘Restart’ icons from the toolbar at the top of the screen.
HelpThe ‘Help’ title takes you to the The Games Factory help pages via a number of different methods.If ever you get stuck and need a very quick reference, the Help pages are always there. You caneither click on the ‘Help’ title, or press F1 to get you into the Help files. If you click on the Helpicon, the pointer changes to the Help icon and you can then click on an object that you wantinformation on. The following pages describe how to get about once you are in the Help system.
How to move around the Help pagesBefore you move onto reading the following options, you will need to know how to move around theHelp pages in order to make the most of them. Reading this first could save you a lot of time goinground in circles!
The help pages layoutWhen you have a heading that contains many chapters and sub-chapters, the Help pages will bedivided into two windows, one to display the actual text of the Help files, the other to help younavigate your way around the substantial pages of information, known here as the ‘Find Topics’window.
We shall concentrate mainly on how to navigate your way quickly and easily through the differenttopics via the ‘Find Topics’ window.Note that you can click on the layer tabs at the bottom of the ‘Find Topics’ screen, or use thebuttons on the top of the text display box to change which layer you are viewing of the ‘Find topics’window.
‘Navigate’ corresponds to the ‘Contents’ layer, ‘Search’ to the ‘Index’ layer and ‘Glossary’ to the‘Tables’ layer.The other buttons are defined on page 108
THE GAMES FACTORY – THE MENU BAR 105
RUN & HELP – HOW TO

ContentsThe ‘Contents’ layer looks like this;
In the text box are listed all the topics within a particular heading, by default. This is known as a‘Tree’, so called because it resembles a family-tree diagram. This screen shot was taken from the‘Editors’ help pages. The icons next to each topic tell you something about what is going to becontained within that topic.The icon denotes a single page of text. By clicking on this icon, that page of text will bedisplayed in the window on the right of the screen.The icon denotes a very large topic and that this is the ‘Root’ of that topic, and that many sub-topics are contained within that heading. By clicking on it all the sub-topics will be listed. Notethere can be further headings containing many pages of text within a Root Topic;
106 THE MENU BAR – THE GAMES FACTORY
HELP – CONTENTS & HOW TO
Note that the has changed and pulled down a list of text pages and sub-topics. You can viewthe pages within a sub-topic by clicking on its icon. You will then be able to read the individualpages from that sub-topic by clicking on the relevant icon.
On the top of the ‘Contents’ layer there are three buttons;
‘Open’ displays a selected topic, sub-topic or page.‘abSort’ sorts the topics alphabetically. You will be presented with a list of all the topics inalphabetical order, starting from any topic you had selected.Note that when you are in the alphabetical sort mode, that the button changes to ‘Tree’. Thismeans that if you select a topic and then click on this button, you will be shown the ‘Tree’ for thattopic.The ‘print’ button will print the current Help pages.
FindThe next layer of the ‘Find Topics’ window is the ‘Find’ layer. From here you can select subjects tolook up. All the options are listed in alphabetical order. Select the words you want to look up byclicking on them with the left mouse button, then pressing the ‘And, or ‘ Or’ buttons.
For example, if you selected ‘Actions’ and ‘Events’ you would be shown all the topics that involvedActions and Events.Alternatively, by clicking in the text box at the top of the list, you can directly enter your own wordsto use for the search, including ‘and’ / ‘or’.
When you are happy with what you want to search for, you can either use the key, or press the ‘Result’ button. You will then be presented with one or more topic headings,
which you can then select with the left mouse button to be displayed in the text display window onthe right of the screen. Note that when you have pressed the ‘Result’ button, it changes to ‘Find’, which will take you backto the find pages.
IndexThe next layer of the ‘Find Topics’ window is the ‘Index’ layer. This simply lists the index to the Help pages in alphabetical order. You can select a topic to lookup either by entering it in as text, or selecting it from the list using the left mouse button, then eitherpress the return key or use the ‘Result’ button to view those pages. Use the ‘Print’ button to printthem out onto paper.
THE GAMES FACTORY – THE MENU BAR 107
HELP – CONTENTS – FIND & INDEX

TablesThe next layer of the ‘Find Topics’ window is the ‘Tables’ layer. This shows a glossary of termsused by The Games Factory. By selecting one of the glossary terms you will pull down a text boxdefining that term.
Using the buttons on the text box
changes the layer of the ‘Find topics’ window to the ‘Contents’ layer. Shows you a‘Family-tree’ type diagram of the help topics. See the ‘Contents’ heading above for moreinformation.
changes the layer of the ‘Find topics’ window to the ‘Index’ layer. Shows you an indexof the Help pages. See the ‘Index’ heading above for more information.
changes the page being displayed to the previous page that was displayed.
produces another window which lists all the pages that you have displayed in the textwindow, i.e. the ‘History’ of your Help usage. You can select a page from here and it will be re-displayed.
changes the layer of the ‘Find topics’ window to the ‘Tables’ layer. See the ‘Tables’heading above for more information.
The and buttons take you forwards and backwards through the Helppages, starting from the page you have selected using the other Help options outlined above. Notethat these buttons do not go to the previous topic that you selected, but go in numerical order fromthe page you are on. To go back to a previous topic use either the ‘Back’ or ‘History’ buttons,described immediately above.
108 THE MENU BAR – THE GAMES FACTORY
HELP – TABLES – GLOSSARY

The Help Options menuWhen you click on the ‘Help’ heading you will pull down a menu that looks like this;
‘General’ takes you to the general overview of The Games Factory, including some handy hintsand a brief description of what The Games Factory can do.
‘Editors’ takes you to the Help pages for the Editor screens.
‘Objects’ takes you to the help pages for the Objects.
‘Actions, conditions and functions’ takes you to the Help pages that will list all the availableActions, conditions and functions for different object types.
‘Using Help’ takes you to Help pages to teach you how to use the Help pages!
‘Technical support’ Describes the support facilities that are available should you beencountering any technical difficulties.
‘About The Games Factory’ Describes the version of The Games Factory that you are using,as well as the credits for the development team of The Games Factory.
THE GAMES FACTORY – THE MENU BAR 109
HELP MENU

The ToolbarThe Toolbar exists on all of the Editor screens and has broadly similar functions on each of them. Itlies at the top of the screen just below the window heading.
Note that not all of the icons are active; some, in fact, are mutually exclusive. For example, youcannot restart a frame until you have played it, nor can you play a frame unless it is paused orrestarted. You can only Cut or Copy something once you have selected it, and you can only Pastesomething after you have Cut or Copied it.A lot of the functions of the toolbar are replicated by the pull-down menus. The toolbar is supposedto be a short cut to using the menus.We shall discuss each of the icons in turn, starting at the left of the toolbar.
New. This re-sets The Games Factory as completely blank. You will be prompted to save anyun-saved work.
Open. This allows you to load in a game from disk.
Save. Saves the current game to disk.
Storyboard Editor icon. Takes you to the Storyboard editor.
Level Editor icon. Takes you to the Level Editor. Note that you must click in an empty frameon the Storyboard Editor to take you to the Level Editor when you are starting with a
completely blank game.
Event Editor Icon. Takes you to the Event Editor. Note that you must click in an empty frameon the Storyboard Editor to take you to the Event Editor when you are starting with a
completely blank game.
The Create icon. Has different functions depending on which Editor screen you are on. Whenon the Storyboard Editor it allows you to decide on the type of level you are creating, e.g.
pictures or animation’s. When used on the Level Editor it allows you to create your own objects.When used on the Event editor, allows you to create a new line, group of events or comment. Seethe relevant Editor chapters for more information.
110 THE TOOLBAR – THE GAMES FACTORY
USING THE TOOLS

The Preferences icon. Has the same function as the Editor Preferences option from the pull-down menu. See Editor Preferences on page 96
The Information icon. Tells you how much memory is being used by the various differentparts of your the Games Factory game.
The Help icon calls up a pointer Help. Changes the mouse pointer to a question mark, andthen when you place it over an object and click with the left mouse button, The Games
Factory will call up the Help pages related to that object.
The Cut icon. Cuts a selection into the clipboard. See the ‘Edit-Cut’ option from the Menu barchapter on page 94 for more information.
The Copy icon. Copies a selection into the clipboard. See above for more details.
The paste icon. Pastes a selection from the clipboard. See above for more details.
The Run Game icon. Runs your game as a complete entity, re-sizing the screen whereapplicable, displaying the game menu bar, going from level to level as a fully working game.
The Run Level icon. Runs the level you are working on as though it were a finished game,complete with menu bar etc.
The Restart Icon. Stops the game running and resets the timer to zero.
The Step Through Icon takes you to the Step Through Editor.
The Play icon. Allows you to play your game to test movement, collisions, sound etc. This isintended as a ‘minimal run’ and will not re-size the screen, produce a menu bar or mouse
pointer. Because of this, though, it is very fast to be entered into and exited from. Especially usefulfor testing Shoot’-em-up-games. Note also that it only plays your current level and that the iconchanges to a ‘Pause’ symbol whilst your game is being run. You cannot make any changes to yourgame whilst it is paused, you have to restart your game to do that.
THE GAMES FACTORY – THE TOOLBAR 111
USING THE TOOLS

The StoryboardEditorThe Storyboard Editor is the initial editor that you will be presented with upon loading The GamesFactory. It is from here that you would normally load up a game that you wanted to work upon,although you can actually do this from any of the Editor screens.It is from the Storyboard Editor that you decide upon the initial look of each of your levels, insertingnew levels, changing the numerical order of the levels, adding passwords and titles.From here you can copy a whole level, ready to changed in subtle ways, or go into one level, ‘Cut’out a list of Events’, move to another level and ‘Paste’ them into the Event Editor for that level.
When you first load up The Games Factory, this is what the top of the Storyboard Editor screen willlook like;
At the top of the screen is the name of the game you are currently working on. ‘Game1.gam’ is thedefault name that The Games Factory gives to a game that has not been given a name already. Below this are the pull-down menus. These are discussed in detail on page 84.Below this is the Toolbar, which uses icons for many of the functions from the menu bar, plusseveral more functions that are not in the menu bar. Note that many of these are de-highlightedand therefore not available. That is because many of them relate to doing something with a currentselection. Until you have created a level and / or selected something, you will not be able to usethem. See the ‘Toolbar’ chapter on page110 for more information on the function of each of theicons on the toolbar.
On the main window of the Storyboard Editor is where all the different levels of your game aredisplayed. The number of each level is displayed down the left hand side of each level. By defaultyou are shown a tiny screen-shot of that level, called a ‘Thumbnail’, next to the number of thatlevel.
112 THE STORYBOARD EDITOR – THE GAMES FACTORY
INTRODUCTION

Next to the Thumbnail are the comments for that level.
In this area are displayed the title for that level, and the password. They will remain empty bydefault.
TitleYou can add or edit a level’s title by simply clicking on the ‘Title’ text. You then enter the name ofthe level using the keyboard.
PasswordTo add or change the password to a level is equally as easy as changing the Title. Simply click onthe ‘Password’ text and then enter the password you want to be used to enter that level.
Underneath the comments are several ‘buttons’;
Type of LevelThis denotes the type of level. By default all your levels will display this icon, whichdenotes them as a game level. If you were to make your level an animation frame, thisicon would change.
Fade In TransitionYou can add a fade-in transition to your level by using this icon. The fades are in the‘Fades’ directory.
Fade Out TransitionYou can add a fade-out transition to your level using this icon in a similar way to the fade-in transitions. See above.
Play Area Size SelectionThis is where you can select the size of your play area. The play area is thesize of the area that your characters are going to be moving around on. Itcan be much larger than the actual screen area, and you can in fact
change the amount of the play area being shown, using the ‘File-Game Setup-Window’ option. Thiscan be useful for making scrolling games; you would have a very large play area, much larger thanwould fit on the screen, then you could move the view of that area around, creating a ‘Scrolling’effect.To change the size of the play area you can either select on the ‘Monitor’ icon, from which you canselect any of the pre-determined sizes The Games Factory has to offer, or you enter your ownsizes directly by clicking on the numbers of the screen size and then changing them via thekeyboard.
THE GAMES FACTORY – THE STORYBOARD EDITOR 113
STORYBOARD EDITOR

Adding a Level to your Game
There are many different ways to add a new level to your game from the Storyboard Editor, butthey all have the same end result, that is, producing a new, numbered level at the end of all yourcurrent levels. If you then want to move that level around, you can simply click on it and ‘drag’ it tothe position you want.
Method 1Simply click on the number text of the empty level with the left mouse button. Or, click on the‘More...’ text with the right mouse button.From the list of icons pulled down, select the icon. You will then have an entirely new, blanklevel.
Method 2You can also add another level by clicking on the icon from the toolbar at the top of thescreen.Then select the icon.
Method 3The third method does not create a blank level, but copies a level you have already created intoanother level, including all the objects, actions and events.Simply click on the level that you want to copy with the left mouse button, then, holding the buttondepressed, ‘drag’ that level over the ‘More..’ text and release the mouse button.You can, of course, use this method when you first load up The Games Factory and make multiplecopies of the blank first level. You will then have many levels ready for you to fill.
Copying Events or ObjectsYou can Cut, Copy or Paste events or objects from the relevant Editor screens to the same Editorscreens on another level via the Storyboard Editor. Once you have Cut or Copied a selection intothe clipboard, you can then Paste them into another level by going to the Storyboard Editor screen,selecting the level that you want to Paste your selection into, go into the relevant Editor screen andthen Paste your selection there.Note: If you are copying Events, you must paste them into the Event Editor of the next screen. Thesame with objects, they can only be copied to and from the Level Editors.If you copy Events from one level to another that relate to objects that do not exist on the new level, all the icons for those objects will be replaced by ‘Bomb’ icons. You can then change these to the objects from that level by selecting on them in the Event Editorscreen.
114 THE STORYBOARD EDITOR – THE GAMES FACTORY
ADDING A LEVEL

Making a Slide Show Using the Storyboard EditorYou do not have to use The Games Factory for just games creation. You can also manipulatepictures to make a slide show, controlled by clicking one of the mouse buttons.
To have each level displaying just a picture, click on the create icon , then select the PictureIcon.
You can then place the mouse pointer over an empty frame that you want to have as a pictureframe. Once you have done this you will be asked to select your picture from disk. You areprompted as to the different file types you are allowed to load in as pictures.When you have decided upon a picture to load in, you will have a level display that looks like this;
Notice that instead of the game level icon in the bottom left of the comments box, there is now apicture icon.
MusicNext to this is a ‘Note’ icon. By clicking on this you can add music to the level from The GamesFactory’s ‘Midi’ files.
Time DelayNext to this is a clock symbol. This shows the time that level will be shown before being movedonto the next frame. To change the time delay simply click on the numbers of the clock with the leftmouse button and enter in the time delay via the keyboard.
Slide Show controllerJust like a real slide show, you can flick between the frames using the buttons on the mouse. Thefirst icon where the left mouse button is highlighted, controls what happens to the levels when youuse the left mouse button.To decide which level you want to jump to when you press the left mouse button, click on thepicture of the two frames, next to the highlighted mouse. This will pull down a menu, from which
THE GAMES FACTORY – THE STORYBOARD EDITOR 115
MAKING A SLIDE SHOW

you can choose an option. The same procedure is used to decide what to do when the rightmouse button is used.
Adding an Animation FrameIn a very similar way to making a slide show using pictures inserted into the levels, you can insertan animation frame into a level and use that to provide you with an animated slide show. Almostexactly the same procedure is used to create a picture level, except that you click on theanimation icon instead of the picture icon when you have clicked on the create icon. The animationicon looks like this;
Note that you can only load in animation files, i.e. FLI or FLC files. Apart from this, the animationlevels are treated in exactly the same way as the picture levels.
116 THE STORYBOARD EDITOR – THE GAMES FACTORY
ADDING AN ANIMATION FRAME

The Level Editor
You can get to the Level Editor screen by clicking on the icon when you are using the othereditor screens, or from the Storyboard Editor by selecting a particular level, then the ‘Edit Frame’option.The Level Editor is the initial place for your games creation. It is here that you decide on yourbackground, platforms, ladders etc, and it is also here that you place all the baddies and goodiesthat you want in your game. It is also through this screen that you access basic movementcontrols, as well as the animation of your main characters.You must place an object on this screen first before you can assign an event to it in the EventEditor screen, or perform any other manipulations on it.It is from this screen that you can create text for headings, question objects for adventure games,or counter objects, which can be displayed or hidden. You will find counter objects extremelyuseful for deciding all sorts of different conditions, defining movement or energy levels.
Placing objects on the screenThe play areaThis is the area you will actually be using for your game, the overall “background” for your game. Ifit is too large to fit on the Level Editor screen, you can move around it using the scroll bars at thesides of the screen. You can change the size of your play area from the Storyboard Editor.To move around using the scroll bars you can either click on the arrows at the end of each scrollbar, or grab the central slider and move that around using the mouse.
The grey area of the screen surrounding the play area can be used for storing objects so that theywill appear in the Event Editor but not necessarily on the play area when the game is first run.
Object LibrariesThe Games Factory already has thousands of different objects ready made for you to play with,backgrounds, goodies and baddies, spaceships and tiles. These are kept in their own ObjectLibraries. Generally, you will find objects grouped together by type.
In order to open an object library, select on the at the top of the screen. This pulls
2 GIG INT (1):GAME FACTORY:GAME FACTORY:GAME FACTORY MANUAL:Level editor section :Leveled.tif
Translation Error.2 GIG INT (1):GAME FACTORY:GAME FACTORY:GAME FACTORY MANUAL:Level editor section :Leveled.tif
THE GAMES FACTORY – THE LEVEL EDITOR 117
INTRODUCTION

down a list of all the different libraries. If you select one, its contents will be displayed on theObject Shelf. If it is very large you may well need to scroll through it in order to view all its contents.
Handy Hint!To get a better view of the objects in each library, you can go to the ‘Objects’ pull-down menu atthe top of the screen, then select the ‘Show objects’ - ’In a moveable window’ option. This will pull-down a window (The Object shelf) which you can stretch out to fit in all the objects of a library atonce.
The Object Shelfbasically, this is the holding place for all the objects in a given library. It has some useful features
to help you decide on the objects that you are going to be using in your game. Each type of objecthas a heading describing its type, e.g. Active objects. This is denoted by a specific icon, outlinedbelow.
denotes all the Active Objects on the object shelf.
denotes all the Backdrop Objects on the object shelf.
denotes all the Game objects, such as text, counters, high score tables and other specialobjects.
It is from the object shelf that you select the objects to use in your game. There are two ways ofdoing this;
Using the left mouse buttonBy using the left mouse button you can select any object from the Object Shelf and that object willbe placed onto the playfield just once.
Using the right mouse buttonIf you use the right mouse button to place objects on the screen you will end up with clones of theoriginal object.
Deleting ObjectsTo delete an object, simply select it and then press the “Delete” key. To delete a group of objects,simply drag a box around them and press “Delete”.Note: In order to stop the background being selected when you throw a box around objects, youcan go to the “Edit” menu from the toolbar and by using the “Lock Objects” option, stop anydifferent group of objects from being selected. (See overleaf, ‘Problems selecting animatedobjects’.)
118 THE LEVEL EDITOR – THE GAMES FACTORY
OBJECT SHELF

Level ObjectsOnce you have placed an object on the screen, it will also be on your own “Level Objects” library.This is useful if you are using several objects from several different libraries; every time you selectone it will be stored on the Level Objects library.
Problems selecting animated objectsSometimes with small or ‘whispy’ animated objects it can be hard to select them without selectingthe background, particularly if the animation moves around a lot.To get around this, use the ‘Edit’ pull down menu (bar at the top of the screen), then select the‘Editor preferences’ option. You can then ‘lock’ a selection of objects in place while you selectother objects. You will find that this comes in very useful when the screen starts to get a littlecrowded!
THE GAMES FACTORY – THE LEVEL EDITOR 119
PREFERENCES

Placing objects on a gridYou can place your objects very precisely using a background grid for the objects to “snap” to,very useful for Pac-man type games or platforms. To display a grid, select the “Edit” menu fromthe bar at the top of the screen, then select the “Preferences” option.Go to the ‘Grid’ page.
Snap toWill ‘snap’ any object to the grid in use, only allowing them to be placed on the play area along thelines of the grid.
120 THE LEVEL EDITOR – THE GAMES FACTORY
PLACING OBJECTS ON A GRID

Show gridDisplays the grid on the screen. You can change the colour of the grid using the palette.
OriginChooses a point for the origin of the grid, allowing you to move the whole grid. If you have selectedan object before entering the Editor preferences screen, you can use that object as the point oforigin of the whole grid by clicking on the ‘Selected object coordinates’.
Square sizeChanges the square size of the grid. Again, if you have selected an object before entering theEditor preferences, you can use the size of that object to select the size of the grid by clicking onthe ‘Selected object dimensions’ box.
Creating new objectsIt is from the Level editor that you can create new objects, such as counters, text, new backdropsetc, by using the icon. This will then take you to a menu where you can decide on the type ofobject to create. For more detail on the individual objects, go to the Objects chapter on page 223.
See over for ‘Multimedia’ layer.
THE GAMES FACTORY – THE LEVEL EDITOR 121
CREATING NEW OBJECTS

Grabbing objects from another game
If you like the look of objects from another game, or if you spent a long time creating a particularobject from another game and you want it in your current game, you can grab it from that game, aslong as the game is on disk. Simply go to the ‘Objects’ pull down menu (bar at the top of thescreen), then choose the ‘Pick objects from a game’ option.This then takes you to a screen where you can select the game you want. You must specify thecorrect drive for this. As an example, try grabbing the objects from one of the tutorial games thatare supplied on the CD. You must specify the CD drive to do this, then chose the game from thewindow on the left.
122 THE LEVEL EDITOR – THE GAMES FACTORY
GRABBING OBJECTS FROM ANOTHER GAME

Testing your Level
Note: You can use all of these buttons from the Storyboard editor, Level editor, the Step througheditor and the Event editor.
You can test the level at any time using the ‘Video’ player buttons on the top right of the screen.These allow you to test a level, or run a level as a complete game.
Run Game
This will run the whole game from level one onwards. Normally only used when you are nearcompletion of your entire game.
Run Frame
This button runs just the frame that you are currently working on, but as though it were beingplayed as a game. Normally used when you are close to finishing a Level.
Restart
When you have used the Play and Pause button, re-sets everything to its original position andvalue.
Step Through editor
Takes you to the Step through editor. It will run your game as normal, but when an event occurs(collision, going off screen, being destroyed etc, etc,) it will pause the game and ask you what youwant to happen when that event occurs. For example, if there is a collision, do you want to play asample, destroy an object, change the score etc.Can be very useful for the inexperienced as it will fill the Event editor with events which you canadd actions to later. However, can be very time consuming as frequently a lot of events will occurthat you want absolutely nothing done about, but the Step through editor will pause the gameevery time an event, no matter how small, occurs. For more information go to the chapter StepThrough Editor on page 292.
THE GAMES FACTORY – THE LEVEL EDITOR 123
TESTING YOUR LEVEL
Play / pause
Will normally be displayed as the play icon unless you are ‘playing’ a level, when it is shown as the‘pause’ icon. Differs from the ‘Run Game’ and ‘Run level’ buttons in that it will allow you to veryquickly test new conditions that you add to a game, pausing it at a very particular point andexamine what is happening. If you have paused a game and wish to continue modifiying it, it isbest to use the ‘Restart’ button after pausing the game.
124 THE LEVEL EDITOR – THE GAMES FACTORY
TESTING YOUR LEVEL

The Event EditorThe Event Editor is what allows you to really decide what goes on in your games. It is here that you can define alien movement, assign noises and effects, change scores and livesplus several other special functions.
Everything that can happen in your game can be represented by an EVENT.For example, ‘Bullet collides with Alien’.You then decide what happens when a particular event line occurs.This is called an ACTION. For example, you could insert the Action ‘Destroy’ to the example above.You insert this in the box that lies on the line ‘Bullet collides with Alien’, directly underneath the iconof the object you want to destroy.You can also add CONDITIONS to your Events, which limit the Events.For example, if you had an Event ‘Bullet collides with Alien’, you could add the Condition, ‘andAliens health value is 0’ then do...If this were used in the example above, then the alien would be destroyed if a bullet collided with itand the aliens health value was 0.
Before you go to the Event Editor screen, try placing a bat, ball and brick onto the screen from theTutorial (Bat & Ball) object library. When you have done this, go to the Event Editor screen, whichshould now look like this, with the top of the Event grid at the top of the screen
Note that all the Active Objects you placed on the Level Editor are now displayed on the top of theEvent Grid, and down the left hand side of the screen is space for all the events. Number 1 shouldbe ìNew Conditionî. The New Condition box is where you decide on an event, e.g. ‘Collisionbetween bat and ball’. You then decide on an Action to be assigned to this event. You do that byclicking on the tick box underneath the character you want to change, on the same horizontal lineas your Event.As an example, click on the ‘New Condition’ box. You will then be presented with an ‘Object totest’ dialogue box. Now you can select the object that has an Event happen to it.
THE GAMES FACTORY – THE EVENT EDITOR 125
INTRODUCTION

Now, when you right click (or double left click) on the ball, you will get a whole list of options, likethis;
Select the ‘Collisions’ option. Then select the ‘Another Object’ option. You will then be asked toselect the object the ball collides with from another dialogue box. Select the Bat, then ‘OK’.Now you should have a Event line that reads like this;
You can actually read this as follows;‘(When there is a) Collision between the ball and the bat (do the following Actions...)’
You can then insert an Action by clicking under the column of the object that you want somethingto happen to. If you now go to the vertical column under the ball and click it, you will be presentedwith a screen that list all the Actions that happen with that Event. Now, click the ‘New Action’ textand you will be presented with the menu headed ‘Movement’.(See below.) Click on this andanother menu headed ‘Stop’ will appear, as below.
You should then select the ‘Bounce’ option, then select ‘OK’ to go out to the Event Editor screen.Now you should see the tick box filled, and if you move the mouse pointer over the tick box, it
126 THE EVENT EDITOR – THE GAMES FACTORY
EVENT EDITOR – INTRODUCTION

should be flagged ‘Bounce’. So, when the ball collides with the bat, the ball bounces. You could have selected several optionsfrom the Balls’ menu, like changing its visibility, direction or speed, or even all of them at once.Now you have felt your way around the basic structure of the Event Editor, we shall explore thevarious different features in more detail. If you feel you need more worked examples, simply go tothe Tutorial games on pages 11.
EventsImportant!
Editing EventsAll the Events of the game are listed down the left hand side of the Event grid, as described earlierin this chapter, and are contained in their own numbered box. You can have more than oneCondition in an Event. For example, a plain event would be ‘When ball collides with bat’ do...You can add a Condition to this by using the right mouse button and clicking the text of the Eventyou want to add to. Then select the ‘Insert’ option. This will let you add your new Condition.
Negating Events / ConditionsSomething very important that you can do to your Events or Conditions is insert a ‘Negate’ functionin front of them, which reverses the functioning of the line.For example, if you had an Event line that was ‘If Counter Object = 0, then...’ and you inserted a‘Negate’ in front of it, then the Event logic would be ‘If the Counter Object is not = 0 then...’To insert a negate, you first need to insert your Event or Condition onto an Event line, then rightselect on it and choose the ‘Negate’ option. The Negate function is denoted by a red cross in frontof the Event or Condition.
Getting around the Event Editor screenWhen you start to add large numbers of events and actions, it can be difficult to see what is goingon, not to mention that not all of your games events and actions may fit on the screen at the sametime. You can move the display around by using the scroll bars at the side of the screen. Thevertical scroll bar will simply scroll upwards and downwards through the list of events. The left and right scroll bars will actually scroll left and right through all the different objects thatyou have in your game. In many games you may well have many different Active objects, whichwill be displayed across the top of the screen. If they will not fit on the screen, then The GamesFactory will let you scroll the whole Event grid to change your view. The Event lines will remainstationary, so you will always know which Event line you are on.
THE GAMES FACTORY – THE EVENT EDITOR 127
EDITING EVENTS – NEGATING & NAVIGATION

You can display only the events and actions related to an object by clicking on its icon at the topof the Event Editor screen. By doing this you can get a far clearer view of the action and eventsrelated to one object at a time. You can reverse this simply by clicking on that object again.
Grouping EventsYou can group events together with a heading to make your games construction far easier tofollow, as well as cutting down on the screen space needed to view your events. For example, you can select a group of events and put them under the heading, ‘Alien movement’,or ‘Screen scrolling control’.You can do this by selecting the numbered part of a ‘New condition’ line with the right mousebutton. Then select the ‘Insert’ option, which will pull down a further menu.Select the ‘A group of events’ option. You will then be presented with a dialogue box like this;
Here you can enter the name of the group, this will be displayed at the top of the group.
‘Active when frame starts’ means that the group of Events will be active upon starting the frame. Byde-selecting this option all the events and actions within that group will not happen until you makethat group active. You can do this from the ‘Special Actions’ object. See Special Actions, on page176.‘Global to entire application’ means that all the events within that group will be copied into everyframe of your game. If you are going to use the same movement for your hero on every level, this
128 THE EVENT EDITOR – THE GAMES FACTORY
GROUPING EVENTS

can save you time re-writing events.You can also copy all the events by using the Storyboard Editor screen. See page 110 for moreinformation.
Once you have typed in a title, select the ‘OK’ button. You will now have an Event line that containsonly text. If you move your mouse pointer over the group you will see that it is flagged by the text‘Double click to open / close group’Before you can do that, though, you must put in the events that you want in that group. Togenerate an event you simply click on the ‘New Condition’ box below the group title.You can repeat this process as many times as you like. See the Tutorial games for many examples.
Page IndexAs the number of different objects is so large, we have included this page reference to help youfind your way around all the different Events and Actions.
Object type Event ActionActive Page 130 Page 165Special Page 137 Page 175Sound Page 141 Page 177Timer Page 142 N/AStoryboard Page 143 Page 179Create Page 144 Page 184Mouse & Keyboard Page 146 Page 185Player 1-4 Page 150 Page 186Text N/A Page 187Question & Answer Page 152 Page 188Counter Page 153 Page 189High Score Page 154 Page 189Edit Page 154 Page 191AVI & QuickTime Page 156 Page 193MPEG Page 158 Page 194FLI / FLC Page 159 Page 196CD Audio Page 160 Page 197MCI Page 161 Page 197INI N/A Page 199Picture Page 162 Page 201Button Page 163 Page 202Mixer N/A Page 204
Active object events
THE GAMES FACTORY – THE EVENT EDITOR 129
EVENT EDITION PAGE INDEX

In addition to the information here you can look for the examples on the CD ROM.Look for the directory ‘minituts’, then ‘active’, then ‘events’. There are several examples here, whichare identified by their file name. You will be prompted to look up each example where applicable.You should look at the Event Editor of each of these to see how it was done.
The following menu is the first menu that you will see when you select a new condition from anactive object;
Collisions
As
briefly outlined previously, lets you decide upon an action to happen when there is a collision. Asyou have already decided upon the first object, all you have to do is decide upon the secondobject, the one the first collides with. You can assign this to be a group of objects if you like, byselecting the groups’ icon. This is where it can be very useful to assign all aliens to be ‘Baddies’using their ‘Object preferences’. (Level Editor screen.) For example, you could have a group called‘Bullets’ and a group called ‘Baddies’ and whenever they collide, decide on one or more actions,e.g. destroy Bullet, destroy Baddy, play an explosion noise. If you have many different bullets andmany different this will save you having to write out a condition for every single collision.Look up on the CD: Minituts\Active\Events\Active01, Active02Movement
130 THE EVENT EDITOR – THE GAMES FACTORY
ACTIVE – EVENTS – COLLISIONS
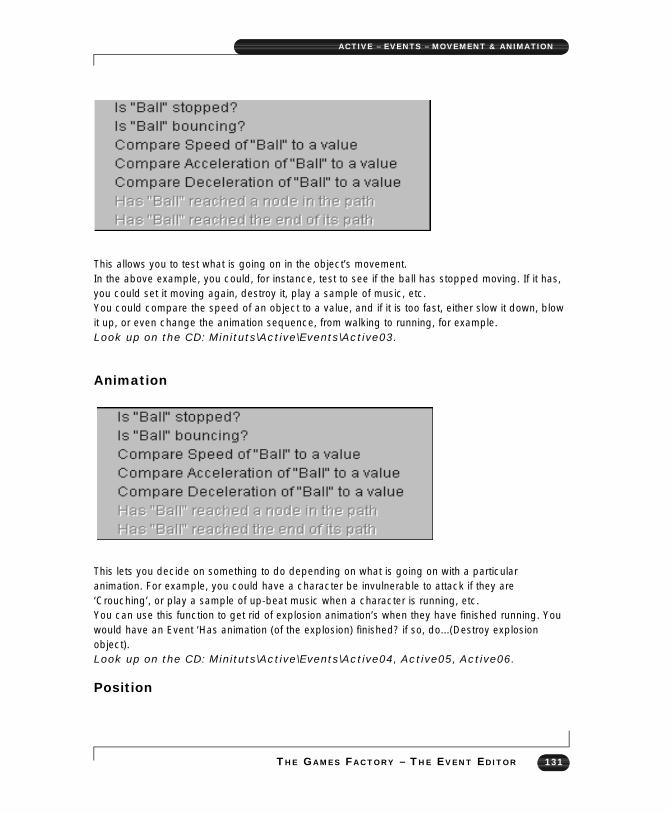
This allows you to test what is going on in the object’s movement.In the above example, you could, for instance, test to see if the ball has stopped moving. If it has,you could set it moving again, destroy it, play a sample of music, etc.You could compare the speed of an object to a value, and if it is too fast, either slow it down, blowit up, or even change the animation sequence, from walking to running, for example.Look up on the CD: Minituts\Active\Events\Active03.
Animation
This lets you decide on something to do depending on what is going on with a particularanimation. For example, you could have a character be invulnerable to attack if they are‘Crouching’, or play a sample of up-beat music when a character is running, etc.You can use this function to get rid of explosion animation’s when they have finished running. Youwould have an Event ‘Has animation (of the explosion) finished? if so, do...(Destroy explosionobject). Look up on the CD: Minituts\Active\Events\Active04, Active05, Active06.
Position
THE GAMES FACTORY – THE EVENT EDITOR 131
ACTIVE – EVENTS – MOVEMENT & ANIMATION

Look up on the CD: Minituts\Active\Events\Active07, Active08, Active09
Test position’
This is one of The Games Factory’s more useful features from the Event Editor screen. It lets youkeep track of the objects as they fly around the screen, and decide what to do when they go offthe edge of the screen. In a ‘Breakout’ type of game for example, you could test to see if the ballexits on the top and sides of the screen, then make it bounce back again, but if it leaves at thebottom of the screen you would want to destroy the ball and subtract 1 from the players lives, then
132 THE EVENT EDITOR – THE GAMES FACTORY
ACTIVE – EVENTS – TEST POSITION

create a new ball in the middle of the playing area. (Done in the appropriate Action columns.)As you can see above, a text balloon has been called up ‘Enters in the right?’ There are similar textballoons displayed for each of the other icons, so don’t worry if you can’t remember what each onemeans, you’ll be told as you go along. If you were to select the ‘Leaves in the right?’ option, thenyou would have a condition that read, ‘(If) Active object [X] leaves in the right (Then do...)’
‘Test coordinates’Comparing the X and Y values can be very useful indeed for ‘Invisible zones’ on the screen that ifthe player goes over, will set off an Action or movement.
You can have the X or Y compared to a specific number by typing the number directly into the‘Choose expression to compare with’, or you can compare it to that of another object. For example,‘Is Y coordinate of ball greater than or equal to that of the bat?’You can select the coordinates of a specific object by selecting the ‘Edit’ box from the abovescreen, then when you are presented with the screen to edit the expression, select the ‘Retrievedata from an object’ box. You will then be shown a window with all the Level objects in, and thenbe asked to chose one. See also ‘Expression Editor’ on page 205Look up on the CD: Minituts\Active\Events\Active10
Direction
You can ask to compare the direction of an object to a specific direction, or the direction ofanother object. So, for example, ‘is Active object [X] in direction (up), etc., or, ‘is Active object [X]in direction of Active object [Z]. You will be presented with a ‘Clock-face’ direction selector if youare selecting a specific direction. If you want to compare the direction to that of another object,
THE GAMES FACTORY – THE EVENT EDITOR 133
ACTIVE – EVENTS – TEST COORDINAION & DIRECTION

select on the ‘1+1’ button, then the ‘Edit’ buttons until you get to the ‘Retrieve data from anotherobject’ button. You should read the chapter Expression Editor for more information. See page 205Look up on the CD: Minituts\Active\Events\Active11
Visibility
Checks on the current state of visibility of an object. e.g. ‘is Active object [X] visible?’ then, forexample, it can be hit by bullets, etc.Look up on the CD: Minituts\Active\Events\Active12
Pick or Count
‘Pick [X] at random’ will choose one of those particular active objects, at random. You canthen assign an action to happen to it when it has been picked. Note: This function is best usedwith the timer function to slow down the rate at which objects are picked. For example;
This can be done by inserting a timer event. Once you have set up the event to pick an object atrandom, select on that event with the right mouse button, then select the ‘Insert’ option. You canthen select the timer, then select the ‘Every’ option. This will take you to a screen where you decideon the time elapsed. When you have finished you will end up with a condition that looks like thatshown above.Look up on the CD: Minituts\Active\Events\Active13
134 THE EVENT EDITOR – THE GAMES FACTORY
ACTIVE EVENTS – VISIBILITY & PICK OR COUNT

Handy Hint!‘Have all [X] been destroyed’ will let you decide upon an action. Particularly useful fordeciding the end of a level. For example, you could have a test like ‘Have all (Group Baddies) been destroyed’ attached to theaction ‘Go to next level’ etc.Look up on the CD: Minituts\Active\Events\Active14
‘Compare to the number of [X] objects’ lets you compare the number of a type of object toa specific value. For example, you could test to see if there were more than ten baddies on the screen. If so, don’tallow any more on the screen. Or, you could compare the number of goodies and baddies, andwhen one is greater or less than the other, have an Action occur.See Expression Editor’ on page 205Look up on the CD: Minituts\Active\Events\Active15
‘Test for no [X] objects in a zone’ will test to see if there are any [X] objects in a portion ofthe screen. You can choose the size and placement of the zone using the ‘Zone Setup’ editor,shown below. You can resize the pick box using the left mouse button on the pick points on thesides of the box.
Look up on the CD: Minituts\Active\Events\Active16
‘Compare to the number of [X] objects in a zone’ lets you do the same as above, butyou can decide on the number of objects. You use a ‘Zone setup’ editor identical to that shownabove.
THE GAMES FACTORY – THE EVENT EDITOR 135
ACTIVE – EVENTS – PICK OR COUNT

Values
Each Active object has its own set of internal variables, a fixed value, plus many internal ‘flags’.You can compare the variables to a value, or to the internal variables of another object.See ‘Expression Editor’ on page 205Look up on the CD: Minituts\Active\Events\Active17
Handy Hint!The flags option can be very useful indeed. A flag is a ‘switch’ within an object that can either beon or off. Each flag is assigned its own number, so you can read or change a flag by its number.For example, to have a direction change button in a game, all you would need to do would be tohave the direction decided by reading whether a flag was on or off.You could then ‘Toggle’ that particular internal flag, i.e. if the flag is on, turn it off and vice versa.You could do this when a key is pressed.The whole Event would look like this;
Then, elsewhere in the game, you would have an Event to read the internal flag 0, and change themovement accordingly.
136 THE EVENT EDITOR – THE GAMES FACTORY
ACTIVE – EVENTS – VALUES

Special object events
In addition to the information here you can look for the examples on the CD ROM.Look for the directory ‘minituts’, then ‘special’, then ‘events’. There are several examples here, whichare identified by their file name. You will be prompted to look up each example where applicable.You should look at the Event Editor of each of these to see how it was done.
You will notice that the icon for ‘Special’ occurs in the ‘Object to test’ window. If you select it youwill be presented with a menu that looks like this;
This menu will allow you to perform a variety of special functions that do not occur elsewhere.
Refer to the ‘Expression Editor’ (page 205) chapter for more information on how to define valuesthat you will use for the following functions.
‘Compare to a global value’ allows you to read the value of a global variable. A globalvariable is one which occurs throughout all the levels of the game. By using this function you cancompare the value of a global variable to either a number or an expression (like the X-coordinateof an Active object, for example).Look up on the CD: Minituts\Special\Events\Specie01
‘Compare two general values’ allows you to compare two variables or values. You could forexample use it to compare the X-coordinate values of two different Active objects.Look up on the CD: Minituts\Special\Events\Specie02
THE GAMES FACTORY – THE EVENT EDITOR 137
SPECIAL – EVENTS – COMPARE
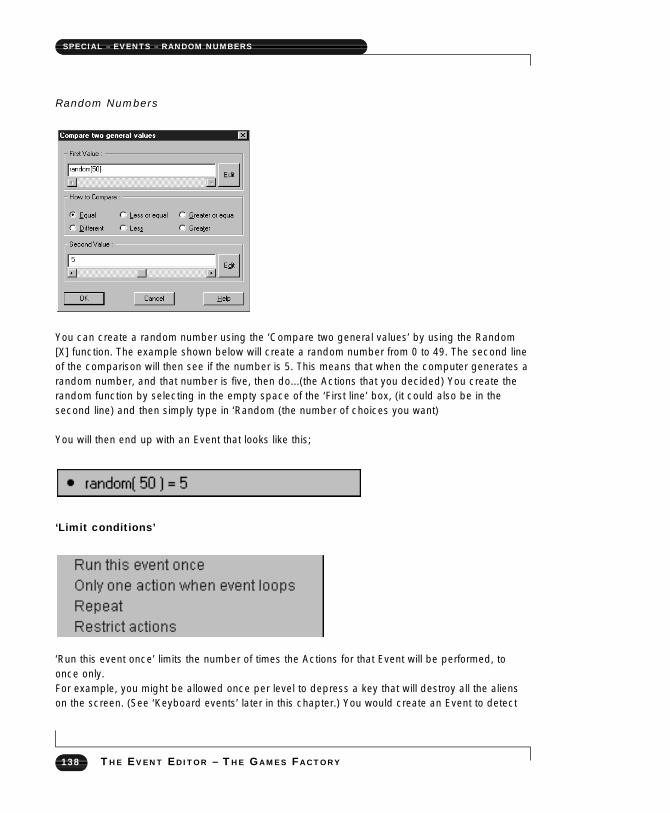
Random Numbers
You can create a random number using the ‘Compare two general values’ by using the Random[X] function. The example shown below will create a random number from 0 to 49. The second lineof the comparison will then see if the number is 5. This means that when the computer generates arandom number, and that number is five, then do...(the Actions that you decided) You create therandom function by selecting in the empty space of the ‘First line’ box, (it could also be in thesecond line) and then simply type in ‘Random (the number of choices you want)
You will then end up with an Event that looks like this;
‘Limit conditions’
‘Run this event once’ limits the number of times the Actions for that Event will be performed, toonce only. For example, you might be allowed once per level to depress a key that will destroy all the alienson the screen. (See ‘Keyboard events’ later in this chapter.) You would create an Event to detect
138 THE EVENT EDITOR – THE GAMES FACTORY
SPECIAL – EVENTS – RANDOM NUMBERS

when that key is pressed, then insert the ‘Run this event once’ condition, then in the action column,destroy the group ‘Aliens’. See the chapter ‘Objects-Object preferences’ on page 226 to learn howto group objects.
Only one action when event loops’ means that the Actions will only be performed once even if theEvent loops continuously.
‘Repeat’ will repeat the Actions either a set number of times, or you can enter an expression, e.g.Random(5) will repeat the actions anywhere between one and five times. See the Expression Editorchapter on page 205 for more information.‘Restrict actions’ will perform a given set of actions after a given period of time, very similar to the‘Every’ condition. The main difference is that this condition performs the Actions immediately andsequences subsequent executions from when the actions were initially performed. Look up on the CD: Minituts\Special\Events\Specie06, Specie07, Specie08,Specie09.‘Always / Never’ allows you to choose between Always and Never. So if you chose Always followedby an Action, The Games Factory will always do that Action.For example, if you want to centre the play area around your hero, so that when he moves the playarea scrolls around him but he stays central on the screen, you would use ‘Always’- (Centre play areaaround Active Object [X]). To see how to centre the play area go to ‘Storyboard Actions-Scrolling’ onpage 180By selecting the Never option it forbids The Games Factory to do the actions associated with aparticular Event line. This is useful when you want to temporarily disable an Event line without deletingit for good. You would insert the ‘Never’ condition to an existing Event line, test the game, and thenremove it afterwards.Look up on the CD: Minituts\Special\Events\Specie05
‘Group of events’ Checks to see if a group of events is active or not. Normally, all groups are activeby default, but you can make them inactive via the ‘Special Actions’ function. See page 175 for moreinformation on Special Actions, and see page 128 for information on how to create groups of events.Look up on the CD: Minituts\Special\Events\Specie03
‘Has an option been selected’ reads whether or not a menu option has been selected from themenu bar at the top of the game’s screen. Note that you are only presented with a menu when you arerunning the game as a whole using the ‘Run Game as finished’ button. You cannot test it from the‘Play’ button.
THE GAMES FACTORY – THE EVENT EDITOR 139
SPECIAL – EVENTS – ALWAYS/MENU OPTION

There are several menu options displayed by default, on the menu bar at the top of the screen whenyou run your game. This function allows you to decide upon an action to do if one of these menu itemsis selected with the mouse pointer. You can change the look and contents of the menu items via the‘File-Game preferences’ option, which can be accessed on any of the Editor screens via the menu barat the top of the screen. The set-up and editing of the menu’s is discussed in more detail in thechapter ‘Menu bar options-Game setup’ on page 90.
When you select this function you will be asked to select a menu option. What this means is for you toselect the menu option that you want to attach an Action to. You will be asked to click in the largebutton labelled ‘Click here’.. When you do this all the menu options will be shown, allowing you toselect the one you want to attach an Action to. The following picture shows that one of the options fromthe ‘Application’ menu is about to be selected.
If you had selected the ‘New’ option, you would end up with an Event line like this;
You could then go across the event grid and assign an Action to this event.Look up on the CD: Minituts\Special\Events\Specie04
140 THE EVENT EDITOR – THE GAMES FACTORY
SPECIAL – EVENTS – MENU/SOUND EVENTS

Sound object events
In addition to the information here you can look for the examples on the CD ROM.Look for the directory ‘minituts’, then ‘sound’, then ‘events’. There are two examples here, whichare identified by their file name. You will be prompted to look up each example where applicable.
You should look at the Event Editor of each of these to see how it was done.
This allows you to decide upon an action depending on whether or not there are any samples ormusic being played. When you click on the sound icon from the ‘Object to test’ window, you willpull down a menu ‘Samples / Music’. This lets you test whether it is a sound sample that is playing,or a music sample.By selecting ‘Music’ for example, you will be asked to choose between the two option shownbelow;
The ‘Is a music not playing?’ option will test to see if any music is not playing at that time. If itisn’t, then do...Look up on the CD: Minituts\Sound\Events\Sounde01
The ‘Is a specific music not playing?’ option will test to see if a specific, named piece ofmusic is not playing.The same applies to the sample options, only it tests whether a sample is not playing. This functioncould be useful for playing two tunes, one after the other. You could have some music playedonce (see Special functions-limit conditions, previous topic) and then test to see when it endedand then play another music sample.Look up on the CD: Minituts\Sound\Events\Sounde02
THE GAMES FACTORY – THE EVENT EDITOR 141
SOUND – EVENTS

Timer object events
In addition to the information here you can look for the examples on the CD ROM.Look for the directory ‘minituts’, then ‘timer’, then ‘events’. There are severalexamples here, which are identified by their file name. You will be prompted to lookup each example where applicable.
You should look at the Event Editor of each of these to see how it was done.
This allows you to choose an Action dependent upon the timer. The timer runs from zero from eachlevel. You could choose to do an action every ten seconds, for example, or to do an action after acertain time period was up.When you select the Timer object from the ‘Object to test’ screen, you will be given a pull-downmenu like this;
As briefly outlined in the ‘Handy hint’ below, the ‘Every’ option allows you to do an actionrepeated every [X] amount of time.
Handy Hint!To make an on-screen clock, all you would have to do would be to place a counter on-screen(Level editor) and then use the timer event ‘Every (1 second)’, to add 1 to the value of the counter.This will give you an event line like this;
‘Is the timer equal to a certain value’ tests to see when the timer reaches a time [X]. If itdoes, then do... Useful for ending a level after a certain time. Note that this will only do an actiononce when applied to a fixed value.Look up on the CD: Minituts\Timer\Events\Timere01
‘Is the timer less than a certain value’ tests to see if a time has been reached. If it hasn’t,
142 THE EVENT EDITOR – THE GAMES FACTORY
TIMER EVENTS

do... Note that this will rapidly repeat doing all the associated Actions until that time has beenreached.Look up on the CD: Minituts\Timer\Events\Timere02
‘Is the timer greater than a certain value’ also tests to see if a certain time has beenreached, but note that this option will keep on doing all its’ associated actions once the time hasbeen reached. For example, if you set this function up as follows; ‘Is the timer greater than tenseconds’ then after ten seconds all the associated actions would keep on occurring after tenseconds had elapsed.Look up on the CD: Minituts\Timer\Events\Timere03
‘User has left computer since’ checks to how along it has been since the user (you) movedthe mouse or depressed a key. If it has been longer than the time you specify, then this can beused to start a demo rolling when there’s no user activity for example.You may well need to add the Special event ‘Run this action only once when event loops’ to stopthe actions associated with this timer function from being repeated endlessly. See ‘Special events-limit conditions’ earlier in this chapter.Look up on the CD: Minituts\Timer\Events\Timere04
Storyboard object events
In addition to the information here you can look for the examples on the CD ROM.Look for the directory ‘minituts’, then ‘story’, then ‘events’. There are two examples here.You should look at the Event Editor of each of these to see how it was done.
Allows you to decide on an action when it is the beginning of a level, the end of a level, or the endof the game.Look up on the CD: Minituts\Story\Events\Storye01, Storye02
THE GAMES FACTORY – THE EVENT EDITOR 143
SPECIAL – EVENTS – STORYBOARD – EVENTS

Create object events
In addition to the information here you can look for the examples on the CD ROM.Look for the directory ‘minituts’, then ‘newobj’, then ‘events’. There are several examples here,which are identified by their file name. You will be prompted to look up each example whereapplicable.
You should look at the Event Editor of each of these to see how it was done.
Allows you to select an action depending on several different object parameters, listed below;
‘Pick an object at random’ will pick an Active object at random and then do the actions thatyou decide to it, e.g. destroy it, move it, set its position, etc. It’s important to note that the objectpicked by The Games Factory must have actions assigned to it, otherwise nothing will happen.Look up on the CD: Minituts\Newobj\Events\Newobje01
‘Pick a random object in a zone’ will pick an Active object at random within a zone that youdecide the size and position of. If you select this or any of the other zone options you will bepresented with a Zone editor like this;
144 THE EVENT EDITOR – THE GAMES FACTORY
CREATE – EVENTS – PICK – ZONE/RANDOM

This allow you to decide on the size and position of the zone on the play area that you want toselect your objects from.Look up on the CD: Minituts\Newobj\Events\Newobje02
‘Pick all objects in a zone’ will trigger off actions to all the objects in a zone that you setup.See above for Zone setup.Look up on the CD: Minituts\Newobj\Events\Newobje03
‘Pick objects with reference to their value’ will read specified internal values of objects. Ifthat specified value is equal to the one you want, then that object will be selected. For example, ifthe internal flag (0) of the objects is on, then all those objects will be selected and have [X] actions(for this example ‘Destroy’) done to them. See below for an example of what this will look like on anevent line.
Look up on the CD: Minituts\Newobj\Events\Newobje04
‘Compare to total number of objects’ checks to see what the total number of objects is andcompares that to a value. For example, ‘If the total number of objects is greater then four, then do...’Look up on the CD: Minituts\Newobj\Events\Newobje05
‘Compare to number of objects in a zone’ does the same as the condition outlined above,but restricts the area to a zone which you decide upon. You could use this to test whether or not a‘room’ is full, for example, by making the zone fit the ‘room’. See the ‘Zone setup’, conditionsabove.Look up on the CD: Minituts\Newobj\Events\Newobje06
‘Test for no objects in a zone’ tests to see if there are no objects in a zone that you decideupon. If there are no objects in that zone, then do...Look up on the CD: Minituts\Newobj\Events\Newobje07
THE GAMES FACTORY – THE EVENT EDITOR 145
CREATE – EVENTS – ZONE
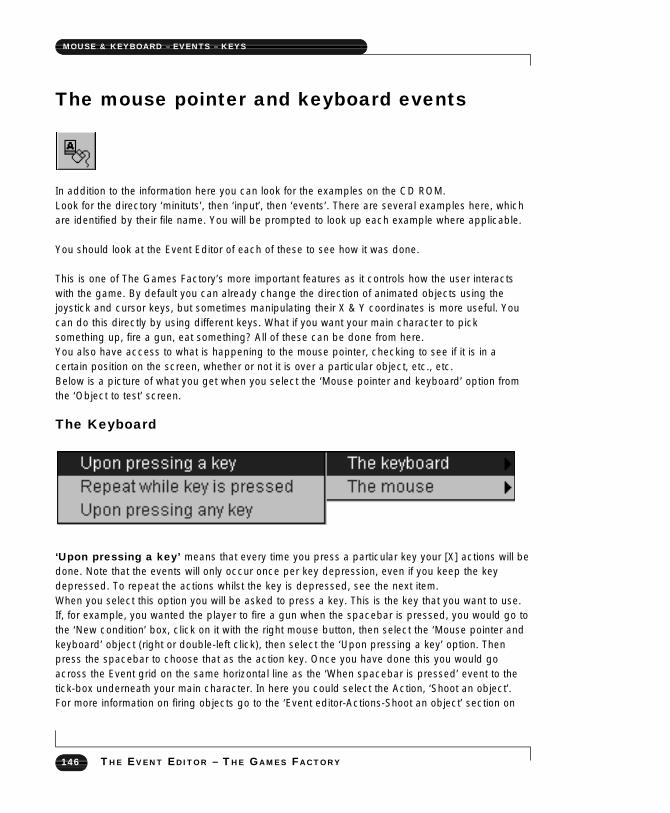
The mouse pointer and keyboard events
In addition to the information here you can look for the examples on the CD ROM.Look for the directory ‘minituts’, then ‘input’, then ‘events’. There are several examples here, whichare identified by their file name. You will be prompted to look up each example where applicable.
You should look at the Event Editor of each of these to see how it was done.
This is one of The Games Factory’s more important features as it controls how the user interactswith the game. By default you can already change the direction of animated objects using thejoystick and cursor keys, but sometimes manipulating their X & Y coordinates is more useful. Youcan do this directly by using different keys. What if you want your main character to picksomething up, fire a gun, eat something? All of these can be done from here.You also have access to what is happening to the mouse pointer, checking to see if it is in acertain position on the screen, whether or not it is over a particular object, etc., etc.Below is a picture of what you get when you select the ‘Mouse pointer and keyboard’ option fromthe ‘Object to test’ screen.
The Keyboard
‘Upon pressing a key’ means that every time you press a particular key your [X] actions will bedone. Note that the events will only occur once per key depression, even if you keep the keydepressed. To repeat the actions whilst the key is depressed, see the next item.When you select this option you will be asked to press a key. This is the key that you want to use.If, for example, you wanted the player to fire a gun when the spacebar is pressed, you would go tothe ‘New condition’ box, click on it with the right mouse button, then select the ‘Mouse pointer andkeyboard’ object (right or double-left click), then select the ‘Upon pressing a key’ option. Thenpress the spacebar to choose that as the action key. Once you have done this you would goacross the Event grid on the same horizontal line as the ‘When spacebar is pressed’ event to thetick-box underneath your main character. In here you could select the Action, ‘Shoot an object’.For more information on firing objects go to the ‘Event editor-Actions-Shoot an object’ section on
146 THE EVENT EDITOR – THE GAMES FACTORY
MOUSE & KEYBOARD – EVENTS – KEYS

page 171. When you have done this you will end up with an Event line that looks something likethis;
Look up on the CD: Minituts\Input\Events\Inpute01
‘Repeat while key is pressed’ will keep on repeating those actions as long as that key isheld down, useful for shooting things rapidly, but not for picking objects up!Look up on the CD: Minituts\Input\Events\Inpute02
‘Upon pressing any key’ will do all [X] actions when any key is depressed. Useful on gameintroduction screens. For example, when any key is pressed, move onto the next level.Look up on the CD: Minituts\Input\Events\Inpute03
THE GAMES FACTORY – THE EVENT EDITOR 147
MOUSE &KEYBOARD – EVENTS – ANY KEY/MOUSE IN A ZONE

The mouse pointer
When you select the ‘mouse’ option, you will be presented with another menu, like that below.
‘Check for mouse pointer in a zone’ tests to see if you have moved the mouse pointer overa particular part of the screen. You decide on the size and position of that zone. You will be presented with a zone editor like that overleaf;
When the mouse pointer is in that zone, the associated actions that you assign to that event willoccur. You do not have to click either of the mouse’s buttons to activate this event. Note that youmay well have to limit this event from continuously performing the actions by inserting a Specialcondition to run only once when the event loops. See ‘Editing events’ at the beginning of thischapter and ‘Special object events-limit conditions’ on page 138.Look up on the CD: Minituts\Input\Events\Inpute04
‘Check for mouse pointer over an object’ checks to see if the mouse pointer is over anobject. As with the condition above this function will repeat the associated actions endlessly unlessyou insert a Special object condition. See above item for references.Look up on the CD: Minituts\Input\Events\Inpute05
148 THE EVENT EDITOR – THE GAMES FACTORY
MOUSE – EVENTS – CLICKS IN ZONE
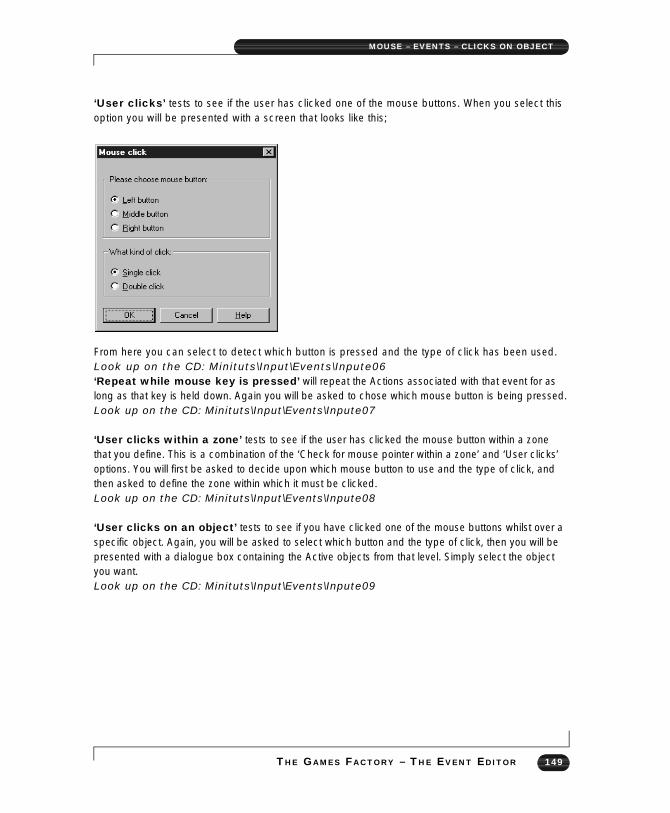
‘User clicks’ tests to see if the user has clicked one of the mouse buttons. When you select thisoption you will be presented with a screen that looks like this;
From here you can select to detect which button is pressed and the type of click has been used.Look up on the CD: Minituts\Input\Events\Inpute06‘Repeat while mouse key is pressed’ will repeat the Actions associated with that event for aslong as that key is held down. Again you will be asked to chose which mouse button is being pressed.Look up on the CD: Minituts\Input\Events\Inpute07
‘User clicks within a zone’ tests to see if the user has clicked the mouse button within a zonethat you define. This is a combination of the ‘Check for mouse pointer within a zone’ and ‘User clicks’options. You will first be asked to decide upon which mouse button to use and the type of click, andthen asked to define the zone within which it must be clicked.Look up on the CD: Minituts\Input\Events\Inpute08
‘User clicks on an object’ tests to see if you have clicked one of the mouse buttons whilst over aspecific object. Again, you will be asked to select which button and the type of click, then you will bepresented with a dialogue box containing the Active objects from that level. Simply select the objectyou want.Look up on the CD: Minituts\Input\Events\Inpute09
THE GAMES FACTORY – THE EVENT EDITOR 149
MOUSE – EVENTS – CLICKS ON OBJECT

Player object events
In addition to the information here you can look for the examples on the CD ROM.Look for the directory ‘minituts’, then ‘player’, then ‘events’. There are several examples here, whichare identified by their file name. You will be prompted to look up each example where applicable.
You should look at the Event Editor of each of these to see how it was done.
This group of events lets you test what is happening to the players. Each player is denoted by thejoystick icon and the relevant number in the top right hand corner.Within this group you can test joystick controls, compare the players score to a number or variable,compare a players number of lives to a number or variable, or doing something when the player’slives reaches zero, like end the game. When you select one of the player objects from the ‘Objectto test window’ you will be presented with a menu like this;
‘Joystick’ allows you to test what is happening with a players joystick controls.There are two options within this. ‘Read joystick state’ will read the current joystick state and do theactions once every time the joystick is moved to that state, whereas ‘Repeat while joystick is pressed’will repeat the actions for as long as the joystick is in that state. Both options will bring up the followingoptions screen;
150 THE EVENT EDITOR – THE GAMES FACTORY
PLAYERS – EVENTS

You select the direction by clicking on the black squares and the relevant fire button in the tick-boxes.On the picture above no choices have been made.Look up on the CD: Minituts\Player\Events\Playre01, Playre02
‘Compare to a players score’ will bring up an Expression Editor that will let you decide on anaction when the players score reaches a certain level.For example, when the players score passes 10,000, you could move up their number of lives by one.Look up on the CD: Minituts\Player\Events\Playre03
‘Compare to players number of lives’ will bring up an Expression Editor that lets you comparethe number of lives to a specific number, or variable. For example, you could have a warning message appear when the player is down to his last life.See the Expression Editor chapter on page 205 for more information.Look up on the CD: Minituts\Player\Events\Playre04
‘When players lives reaches 0’ means that an action will be done when all the players lives areused up. It is a simpler version of the option above. Normally used to end the game and go to adifferent screen, such as a high score table. See page 225 for how to set up high score tables.Look up on the CD: Minituts\Player\Events\Playre05
THE GAMES FACTORY – THE EVENT EDITOR 151
PLAYERS – EVENTS – JOYSTICKS

Question and Answer Object Events
In addition to the information here you can look for the examples on the CD ROM.Look for the directory ‘minituts’, then ‘question’, then ‘events’. There are several examples here,which are identified by their file name. You will be prompted to look up each example whereapplicable.
You should look at the Event Editor of each of these to see how it was done.
These are used to ask the player a question and retrieve an answer. The answers are retrievedwhen the player selects an answer ‘button’ on the Question and Answer object. So you must havea question and answer object already placed in the play field - done from the Level Editor.To bring up the Event options available, right mouse click on a ‘New Condition’, then right mouseclick on the Q / A icon that you want to test, from the ‘Object to test’ dialogue box. You will then bepresented with a menu that looks like this;
‘Is
the answer correct’ tests whether the answer was correct. If it was, do...Look up on the CD: Minituts\Question\Events\Queste01
‘Is the answer false’ tests to see if the wrong answer was given. If it was, do...Look up on the CD: Minituts\Question\Events\Queste02
‘Is the answer equal to a certain value’ asks to see if the number of the answer (i.e. wasanswer number [X] given?) is equal to a numerical value. This can be a set number, or a valueretrieved from an expression. See the Expression Editor chapter on page 205 for more information.Look up on the CD: Minituts\Question\Events\Queste03
152 THE EVENT EDITOR – THE GAMES FACTORY
QUESTION – EVENTS – CORRECT/FALSE/NUMBER

Counter Object Events
In addition to the information here you can look for the example on the CD ROM.Look for the directory ‘minituts’, then ‘counter’, then ‘events’ then ‘counte01’You should look at the Event Editor of this to see how it was done.
Reading counter objects is one of The Games Factory’s most useful game creation features. Youcan read the values of counters to decide on alien movement, speed, energy levels, or for yourplayer’s health, object store, food supply, speed, temperature, in fact anything that you want tocount the value of.They are so useful that you will probably find yourself using many different counters in your games.In order to make it easier to distinguish between them, you can change the name and icon of eachone from the Level Editor by right mouse clicking on them. For more detail on this turn to page 249of the Objects chapter.To access the Counter’s events, right mouse click on a ‘New Condition’ and then right mouse clickon the Counter from the ‘Object to test’ dialogue box. You will then be presented with one optiononly - ‘Compare counter to a value’. Selecting this will bring up the following dialogue box;
You can then choose the way you wish to compare the value of the counter, (greater than, lessthen, etc.) and the value you want to compare it to. You can enter a fixed value either by enteringthe numbers directly, or by using the slider.This value can also be an expression, that is, a mathematical function, or a value retrieved fromanother object, like its speed, direction, internal flag, etc., etc. See the Expression Editor chapteron page 205 for more information.
THE GAMES FACTORY – THE EVENT EDITOR 153
COUNTER – EVENTS

High Score Object Events
In addition to the information here you can look for the examples on the CD ROM.Look for the directory ‘minituts’, then ‘hiscore’, then ‘events’. There are two examples here, whichare identified by their file name. You will be prompted to look up each example where applicable.
You should look at the Event Editor of each of these to see how it was done.
High Score objects are used to display not only your previous best score, but those of your friends,so you can add an exciting competitive edge to your games. No more lying about the score yougot in your games, it’s up there on the High Score table, or you didn’t do it!You can choose the options available as events for your High Score object by right mouse clickingon a ‘New Condition’ then right mouse clicking on the High Score object from the ‘Object to test’dialogue box. You will then be presented with the following menu;
‘Has a player a High Score’ tests to see if a player has managed to get onto the High Scoretable. You may want to play a fancy tune if they have, for example.Look up on the CD: Minituts\Hiscore\Events\Hiscoe01
‘Is visible’ tests to see if the High Score table is visible. If it is, then do...Look up on the CD: Minituts\Hiscore\Events\Hiscoe02
Edit Object Events
In addition to the information here you can look for the examples on the CD ROM.Look for the directory ‘minituts’, then ‘edit’, then ‘events’. There are several examples here, whichare identified by their file name. You will be prompted to look up each example where applicable.
154 THE EVENT EDITOR – THE GAMES FACTORY
HIGH SCORE – EVENTS/EDIT–EVENTS

You should look at the Event Editor of each of these to see how it was done.
Edit Objects are used for entering and retrieving text from the player. You can choose the optionsavailable as events for your Edit object by right mouse clicking on a ‘New Condition’ then rightmouse clicking on the Edit object from the ‘Object to test’ dialogue box. You will then be presentedwith the following menu;
‘Has entry zone just been modified?’ tells you if the player changes something in the Editbox. If they have, do...Look up on the CD: Minituts\Edit\Events\Edite01
‘Does entry zone have input focus?’ asks if the edit zone has been selected by the user. If ithas, do...Look up on the CD: Minituts\Edit\Events\Edite02
‘Is entry zone enabled?’ tests if the zone can be selected by the user. You can disable an Editbox, making it inaccessible to the user. This tests if the Edit box is enabled.Look up on the CD: Minituts\Edit\Events\Edite03
‘Is entry zone visible?’ tests to see if the object is visible on the screen. If it is, do...Look up on the CD: Minituts\Edit\Events\Edite04
‘Is undo information available?’ tells you if the undo option is available, i.e. you can performthe function ‘Undo’ on whatever you have just done.Look up on the CD: Minituts\Edit\Events\Edite05
‘Is text a number’ asks if the text is a whole number. If it is, do...Look up on the CD: Minituts\Edit\Events\Edite06
‘Is text selected?’ asks if the player has highlighted some text with the mouse. If they have, do...
THE GAMES FACTORY – THE EVENT EDITOR 155
EDIT – EVENTS – ENTRY ZONE

AVI Object Events
AVI objects are used to play video clips within a game. You can choose the options available asevents for your AVI object by right mouse clicking on a ‘New Condition’ then right mouse clickingon the AVI object from the ‘Object to test’ dialogue box. You will then be presented with thefollowing menu;
The ‘Collisions’, ‘Movement’, ‘Position’ and ‘Direction’ are all handled in a similar way to that ofActive objects. See the ‘Active Objects Events’ on page 130 for more information on these options.Note also that QuickTime objects share almost all of these options.
‘Is AVI at start position’ tests if your Video for Windows object is at the beginning. You coulduse this condition to play a piece of music, run a music clip from the CD, or start a complexanimation sequence in the background when the Video for Windows object begins.
‘Is AVI at end position’ tests if your Video for Windows object is at the end. You could use thiscondition for loading another video sequence, wait for a command from the user, move to the nextframe, or stop the background music when the Video for Windows object ends, etc., etc.
‘Mouse clicks within the AVI window’ tests if the user has clicked in the video viewingwindow. If so, do...
‘Compare to current frame position’ tests if the video sequence has reached a specificframe. If so, do...
156 THE EVENT EDITOR – THE GAMES FACTORY
AVI – EVENTS – FRAME POSITIONS/MOUSE CLICKED
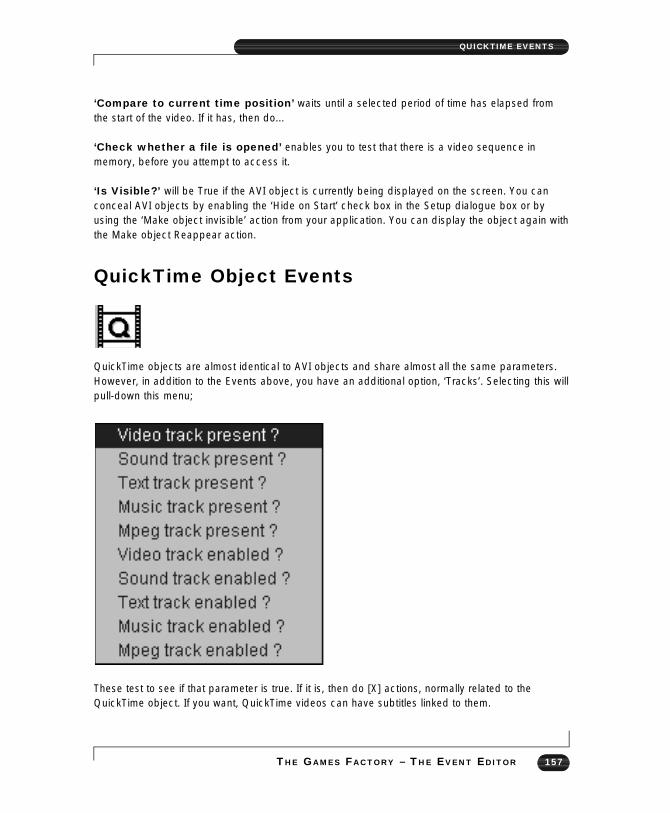
‘Compare to current time position’ waits until a selected period of time has elapsed fromthe start of the video. If it has, then do...
‘Check whether a file is opened’ enables you to test that there is a video sequence inmemory, before you attempt to access it.
‘Is Visible?’ will be True if the AVI object is currently being displayed on the screen. You canconceal AVI objects by enabling the ‘Hide on Start’ check box in the Setup dialogue box or byusing the ‘Make object invisible’ action from your application. You can display the object again withthe Make object Reappear action.
QuickTime Object Events
QuickTime objects are almost identical to AVI objects and share almost all the same parameters.However, in addition to the Events above, you have an additional option, ‘Tracks’. Selecting this willpull-down this menu;
These test to see if that parameter is true. If it is, then do [X] actions, normally related to theQuickTime object. If you want, QuickTime videos can have subtitles linked to them.
THE GAMES FACTORY – THE EVENT EDITOR 157
QUICKTIME EVENTS

MPEG Object Events
Motion Picture Expert Group objects are used to play video clips using special MPEG drivers. Youwill need either an MPEG card fitted to your machine, or a software MPEG card emulator installed.You will then be able to play MPEG files.This is the menu that you will be presented with when you right click on the ‘New condition’ textand select an MPEG object from the ‘Object to test’ window.
‘Collisions’ detects if there is a collision between an MPEG object and another object on theplay area in the same way as for Active Objects. For more detail look up Active Object Events,Collisions, on page 1.
‘Movement’ allows you to read the current state of movement of an MPEG object, again in muchthe same way as for an Active object. See Active Object Events, Movement, on page 131.
‘Position’ will test the position of the MPEG object in much the same way as for an Active object.See Active Object Events, Position, on page 132.
‘Direction’ tests to see if the MPEG is facing a particular direction. You can select the direction itis being tested with using a ‘Clock-face’ direction selector.
158 THE EVENT EDITOR – THE GAMES FACTORY
MPEG – EVENTS

‘Is MPEG at start position’ tests to see if the MPEG sequence is a at frame number 1.
‘Is MPEG at end position’ tests to see I the MPEG sequence is on the last frame.
‘Mouse clicks within the MPEG window’ tests to see if the user clicks a mouse buttonwhilst the mouse pointer lies within boundaries of the window being used to display the MPEG.
‘Compare to current frame’ tests the current frame number of the MPEG sequence to anumber or expression. You could compare it to the value of a counter, or a players score, or just aparticular number.
‘Compare to current time value’ tests the current time value of the MPEG sequence to aparticular time. You can choose the time in minutes, seconds and hundredths of a second, andwhether or not to compare it is as being less than or greater than the value you enter.
‘Check whether a file is open’ tests to see if an MPEG file has been opened.
‘Is visible’ test to see if the MPEG is currently visible. If it is, do...
FLI / FLC Objects Events
FLC / FLI objects are used for displaying animations within your game. They can be treated inmany ways like Active objects. You can choose the options available as events for your FLI / FLCobject by right mouse clicking on a ‘New Condition’ then right mouse clicking on the FLI / FLCobject from the ‘Object to test’ dialogue box. You will then be presented with the following menu;
THE GAMES FACTORY – THE EVENT EDITOR 159
FLI/FLC – EVENTS

For ‘Collisions’, ‘Movement’, ‘Position’ and ‘Direction’ see Active Objects Events on page 130.
‘Compare to current frame’ allows you to compare the current frame number to a value. Thiscan be a specific number, or it can be an expression. See the Expression Editor chapter on page205 for more information.
‘End of animation’ checks to see if the animation has finished. If it has, do...
‘Is the FLI animation running?’ checks to see if the animation is running at that moment. If itis, do...
‘Is the FLI animation paused?’ checks to see if the animation is paused. If it is, do...
‘Is the FLI animation invisible’ checks to see if the animation is invisible. If it is, do [x], likemake it visible, for example.
‘Is the FLI animation visible’ checks that the animation is visible. If it is, do...
‘User clicks within FLI animation’ checks to see if the user has placed the mouse pointerwithin an FLI object while the animation is running. You could use this to detect if the user hascorrectly selected a frame, or by extracting the coordinates of the mouse pointer as well, check theposition of the mouse pointer also. See the Expression Editor chapter on how to retrieve valuesfrom objects.
CD Audio Object Events
CD Audio objects are used to play tracks from an audio CD whilst your game is running. You couldtherefore use it for moody background music for your game.You can choose the options available as events for your CD Audio object by right mouse clickingon a ‘New Condition’ then right mouse clicking on the CD Audio object from the ‘Object to test’dialogue box. You will then be presented with the following menu;
160 THE EVENT EDITOR – THE GAMES FACTORY
CD – EVENTS

‘Compare to time position’ compares the current elapsed playing time to a value. This canbe a specific value, e.g. 2mins 10secs.
‘Compare to track’s elapsed time’ – as above but only the time value of the current track.
MCI Object Events
In addition to the information here you can look for the examples on the CD ROM.Look for the directory ‘minituts’, then ‘mci’, then ‘events’, then ‘Mcie01’.You should look at the Event Editor of this to see how it was done.
These are used to control multimedia devices. You can choose the options available as events foryour MCI object by right mouse clicking on a ‘New Condition’ then right mouse clicking on the MCIobject from the ‘Object to test’ dialogue box. You will then be presented with the following menu;
‘Compare to returned number / string’ compares a returned number / string to a value,such as a CD track number / name, or an expression.
For example, you could enter the text ‘Play C:\samples\comic\ping.wav’ into the Expression Editorof an MCI, it would play the file ‘ping.wav’ from the directory ‘comic’, from the sub-directory‘samples’. Note that these are fictitious file names, just used for example purposes only.
THE GAMES FACTORY – THE EVENT EDITOR 161
MCI – EVENTS

Picture Object Events
In addition to the information here you can look for the examples on the CD ROM.Look for the directory ‘minituts’, then ‘picture’, then ‘events’. There are two examples here, whichare identified by their file name. You will be prompted to look up each example where applicable.
You should look at the Event Editor of each of these to see how it was done.
Picture objects are used for displaying pictures loaded in from disk. They can be used for slideshows, or as backdrops, loaded in as and when required. You can choose the options available asevents for your Picture object by right mouse clicking on a ‘New Condition’ then right mouseclicking on the Picture object from the ‘Object to test’ dialogue box. You will then be presentedwith the following menu;
‘A picture is loaded’ tests to see if your picture object has loaded in a picture from disk. If ithas, do...Look up on the CD: Minituts\Picture\Events\Pictue01
‘Is visible?’ tests to see if your picture object is visible. It can be made invisible initially from its‘Setup’ menu option (Level Editor screen) or via its Actions.Look up on the CD: Minituts\Picture\Events\Pictue02
162 THE EVENT EDITOR – THE GAMES FACTORY
PICTURE – EVENTS

Button Object Events
In addition to the information here you can look for the examples on the CD ROM.Look for the directory ‘minituts’, then ‘button’, then ‘events’. There are two examples here, whichare identified by their file name. You will be prompted to look up each example where applicable.
You should look at the Event Editor of each of these to see how it was done.
Button objects are used to provide a ‘button’ that the user can ‘press’ using the mouse pointer.You can use them for the user to enter choices in an adventure game, changing a CD track, orchoosing a level to go to. When you right select a Button object from the ‘Object to test?’ dialoguebox, you will be presented with a menu that looks like this;
‘Box checked’ tests to see if there is a check-mark in that particular button. Note that onlycertain types of button can have check-marks placed in them.
‘Box clicked’ tests to see if the user has clicked on the button with the mouse pointer. If theyhave, do...Look up on the CD: Minituts\Button\Events\Button01
‘Is visible?’ tests to see if the button object is visible. If it is, do...Look up on the CD: Minituts\Button\Events\Button02
THE GAMES FACTORY – THE EVENT EDITOR 163
BUTTON – EVENTS

ActionsOnce you have decided upon an Event, you want to decide what to do when that Event occurs.When you press the fire button on the joystick, do you fire an object, or pick something up? Whenyour bullets hit the aliens, do they destroy them, or reduce their energy? Do you play a soundsample when your hero falls off a cliff, and change his animation so that he flails his arms and legsaround? All these are decided upon by deciding what Actions to assign to your Events. Theprevious chapter dealt with all the possible Events, this will deal with all the Actions. We shall startwith the Active objects actions first, dealing with special actions later.To place an Action to a particular event and a particular object, you look down the left hand side ofthe screen to find the event that you want, follow this horizontally across the screen until you get tothe object that you want to have an Action happen to.
In the example shown above an Action has been inserted into the tick box associated with the ‘Jet’active object. This means that whenever the space bar is pressed, that Action will occur to thatobject.
There are two ways to place an Action in the relevant tick-box, the fastest is by using the rightmouse button, which will instantly pull down a menu of choices. You can do it with the left mousebutton, which will present you with an Object actions dialogue box. You add a new action byclicking the ‘New action’ text.Both ways will produce the same menu options, but using the right mouse button avoids using thedialogue box. It can be handy to use the dialogue box instead, when you already have manyactions already assigned to the same tick-box, as it will list them at the same time and allow you tochange the order in which they are triggered.You can view all of the actions assigned to a particular tick-box simply by moving the mousepointer over the tick box. The actions will be shown in a box underneath.
Edit / Deleting Actions
To edit or delete an action, select the tick-box with the right mouse button, then the relevant choice(edit / delete). If there is more than one Action associated with a given Event, then you will beshown them as a list, and asked to choose one to edit / delete.
164 THE EVENT EDITOR – THE GAMES FACTORY
ACTIONS

Active objects Actions
In addition to the information here you can look for the examples on the CD ROM.Look for the directory ‘minituts’, then ‘active’, then ‘actions’. There are several examples here, whichare identified by their file name. You will be prompted to look up each example where applicable.You should look at the Event Editor of each of these to see how it was done.
Primary Menu
The primary menu is where you decide on the type of action you are going to assign to an event.
We will deal with these in order throughout this chapter.Movement-see below.Animation-see page 167Position-see page 169Direction-see page 170Visibility-see page 171Shoot an object..-see page 171Destroy-see page 173Values-see page 173Flags-see page 174
MovementNote: You will only be allowed to change the movement of an object in the Event Editor if you havealready set the movement up in the Level Editor. If you want to have an objects movement decided
THE GAMES FACTORY – THE EVENT EDITOR 165
ACTIVE – ACTIONS – MOVEMENT

entirely from the Event editor, simply give the object a Bouncing ball movement, then set all theparameters to zero. This will give you a ‘blank page’ to work with.
By entering the movement option, you will be presented with another menu, like this;
Note that not all the options are always available. For example, you may have an event line ‘Test to seeif object leaves play area’ and therefore the option ‘wrap around play area’ will not be available. Youcan only ‘Reverse’ objects with a path-type movement.
You can only wrap an object around the play are if it leaves the play area. It will soon become commonsense which actions you can apply to a given object or event. The event associated with the abovemenu was ‘Test to see if object leaves play area’, hence you can select ‘Wrap around play area’.‘Stop’ simply stops the object from moving.
‘Start’ simply starts the object moving in its previous manner.
‘Set Speed...’ sets the speed of the object. This can be to a specific value or to an expression. Seethe Expression Editor chapter on page 205.Look up on the CD: Minituts\Active\Actions\Activa01
‘Set maximum speed’ puts a speed limit on an object, perhaps to slow it down. Note this value canalso be set to either a fixed value or to an expression.
‘Wrap around play area’ will bring an object around to the other side of the screen if it exits on oneside. If it leaves at the top it will reappear at the bottom, at the left edge it will reappear on the right.
‘Bounce’ imposes a bounce function to the object. Does not necessarily reverse its direction. If youhave a high randomisation setting for a Bouncing ball movement, it could spring off anywhere.
‘Reverse’ as mentioned above can only be used when applied to an object with a path-typemovement. Simply reverses the movement mid-path.
166 THE EVENT EDITOR – THE GAMES FACTORY
ACTIVE – ACTION – MOVEMENT – STOP

Animation
This action menu lets you change what is happening to an object’s animation.
‘Stop’ simply stops an object’s animation from playing, which ever frame it is on.
‘Start’ re-starts an object’s animation from what ever frame it was stopped on.
‘Change’ pulls down the following menu;
‘Animation sequence’ allows you to change an animation sequence to another one by its name.You can only choose one that has animation frames assigned to it.For example, you could change an animation from ‘Walking’ to ‘Running’ when an object’s speedexceeds a certain amount. You would construct an Event line ‘If speed of Active Object [X] =>50,then (Action: Change animation to ‘Running’).
THE GAMES FACTORY – THE EVENT EDITOR 167
ACTIVE – ACTIONS – ANIMATION – STOP/START
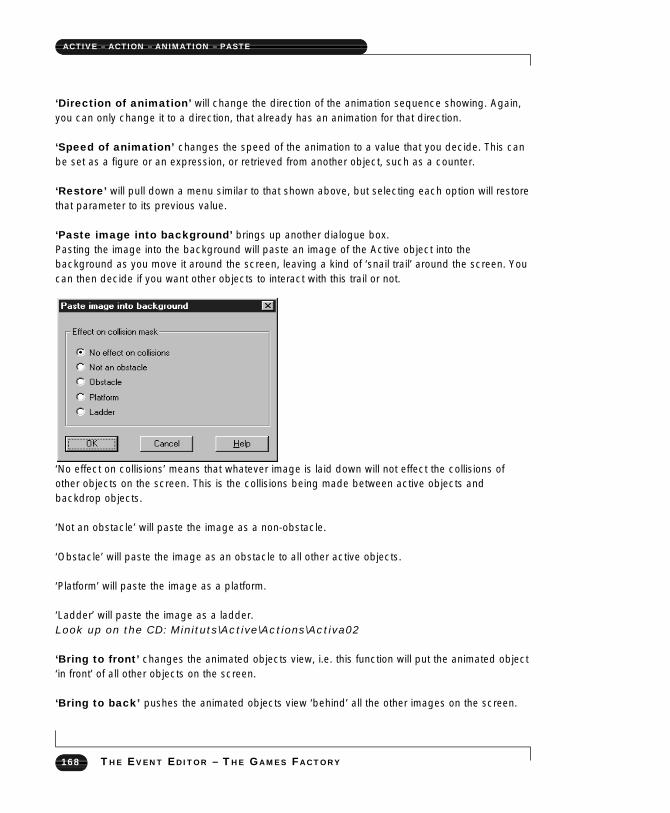
‘Direction of animation’ will change the direction of the animation sequence showing. Again,you can only change it to a direction, that already has an animation for that direction.
‘Speed of animation’ changes the speed of the animation to a value that you decide. This canbe set as a figure or an expression, or retrieved from another object, such as a counter.
‘Restore’ will pull down a menu similar to that shown above, but selecting each option will restorethat parameter to its previous value.
‘Paste image into background’ brings up another dialogue box.Pasting the image into the background will paste an image of the Active object into thebackground as you move it around the screen, leaving a kind of ‘snail trail’ around the screen. Youcan then decide if you want other objects to interact with this trail or not.
‘No effect on collisions’ means that whatever image is laid down will not effect the collisions ofother objects on the screen. This is the collisions being made between active objects andbackdrop objects.
‘Not an obstacle’ will paste the image as a non-obstacle.
‘Obstacle’ will paste the image as an obstacle to all other active objects.
‘Platform’ will paste the image as a platform.
‘Ladder’ will paste the image as a ladder.Look up on the CD: Minituts\Active\Actions\Activa02
‘Bring to front’ changes the animated objects view, i.e. this function will put the animated object‘in front’ of all other objects on the screen.
‘Bring to back’ pushes the animated objects view ‘behind’ all the other images on the screen.
168 THE EVENT EDITOR – THE GAMES FACTORY
ACTIVE – ACTION – ANIMATION – PASTE
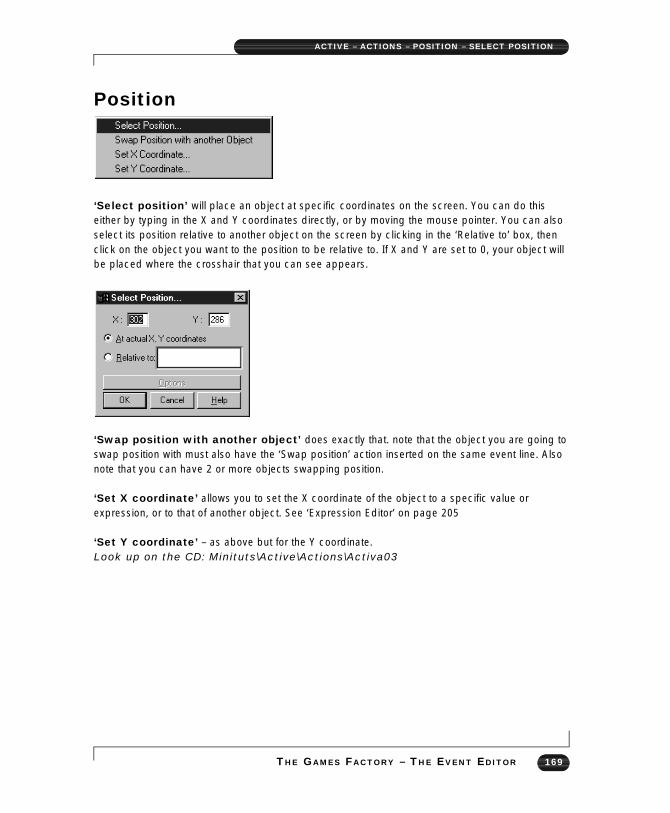
Position
‘Select position’ will place an object at specific coordinates on the screen. You can do thiseither by typing in the X and Y coordinates directly, or by moving the mouse pointer. You can alsoselect its position relative to another object on the screen by clicking in the ‘Relative to’ box, thenclick on the object you want to the position to be relative to. If X and Y are set to 0, your object willbe placed where the crosshair that you can see appears.
‘Swap position with another object’ does exactly that. note that the object you are going toswap position with must also have the ‘Swap position’ action inserted on the same event line. Alsonote that you can have 2 or more objects swapping position.
‘Set X coordinate’ allows you to set the X coordinate of the object to a specific value orexpression, or to that of another object. See ‘Expression Editor’ on page 205
‘Set Y coordinate’ – as above but for the Y coordinate.Look up on the CD: Minituts\Active\Actions\Activa03
THE GAMES FACTORY – THE EVENT EDITOR 169
ACTIVE – ACTIONS – POSITION – SELECT POSITION

Direction
‘Select direction’ allows you to select a specific direction using a direction ‘clock-face’.Look up on the CD: Minituts\Active\Actions\Activa04
‘Look in the direction of’ lets you select a direction from either the coordinates that you typein or specify with the mouse, or that of another object.
Handy Hint!This function can be very useful as the basis for defining the movement of objects that follow eachother round the screen. You would enter the object that you wanted to chase after in the ‘Relativeto’ box, then make sure the X and Y coordinates were set to 0. Note that this will mean that if thereare no obstacles in the way that you would be followed unerringly by that object. You could linkthis to a Timer Event (See page 142) to make it follow less ‘aggressively’. For example, set a timer event to ‘Every 2 seconds’ (Look in the direction of [X]).
170 THE EVENT EDITOR – THE GAMES FACTORY
ACTIVE – ACTIONS – DIRECTION

Visibility
‘Make object invisible’ does exactly that. It still exists on the screen, but is no longer visible.
‘Make object reappear’ re-shows an invisible object.
‘Flash object’ will flash an object on and off at a rate that you can choose.
Shoot an objectFairly fundamental to Shoot-’em-up games, allows you to select the objects that you want to use asbullets, the direction for them to be shot in and their speed. You can use any Active object as a bullet, including objects from other levels and games.
Once you have fired your bullet you could add a further event line to ‘Look in the direction of’ tocreate your own guided missiles!When you choose the ‘Shoot an object’ option you will be presented with the following dialoguebox;
This is where you choose the object that you want to use as your bullet.You can either choose from the objects in the dialogue box, or from another frame of your game.You do this by pressing the direction buttons either side of the ‘This frame’ text with the mousepointer.
THE GAMES FACTORY – THE EVENT EDITOR 171
ACTIVE – ACTIONS – VISIBILITY/SHOOT

‘Other games’ means that you can grab an object from another game, as long as you have itsaved on disk.
‘A library’ lets you look through all the object libraries The Games Factory has to offer, and chooseyour bullet from one of them.
Once you have chosen the object that you want to use as your bullet, you will be asked to selectthe direction in which you want it to be fired. You will be presented with a dialogue box like this;
From here you can select the speed of the object using the slider at the top.Underneath you have several choices for the direction that you want to fire the object in.
‘Use the current direction of [X]’ will read the current direction value of the object you are firingfrom, and impose that direction to the bullet.
‘Shoot in selected directions’ allows you to select a specific direction using the direction ‘clock-face’. Note that if you select more than one direction here, The Games Factory will choosebetween the directions you have selected at random.
Handy Hint!‘Shoot in direction of’ allows you to fire the bullet to either a specific coordinate on the screen, or inrelation to another Active object. See ‘Direction’, previous topic. This is very useful for defining the aiming of the bullets of your baddies. You would simply selectthe direction to be in the direction of the hero’s character and when the baddies fired their bulletsthey would always be fired in the hero’s direction.
172 THE EVENT EDITOR – THE GAMES FACTORY
ACTIVE – ACTIONS – SHOOT AN OBJECT

Destroy
Removes the object from the game screen. Does not just make it invisible, but removes it entirely.Note that many animated objects have a ‘Destroy’ animation associated with them, such as anexplosion. If there is such an animation associated with an active object, when it is ‘destroyed’ thisanimation will automatically be played before the object is removed.Look up on the CD: Minituts\Active\Actions\Activa05
Values
Allows you to manipulate the internal values A, B and C of that object. This can be done to aspecific number or to an expression. For more information on expressions, see the ‘ExpressionEditor’ chapter on page 205.
‘Set value’ sets that variable to a specific value or expression.
‘Add to value’ adds to the value of that variable by a specific number or expression.
‘Subtract from value’ subtracts from the value of that variable by a specific number or expression.
‘Spread a number’ assigns a number to each of one of the duplicates of that active object, starting
THE GAMES FACTORY – THE EVENT EDITOR 173
ACTIVE – ACTIONS – DESTROY/VALUES

with the number that you specify. For example, if you were to place ten of one type of object on thescreen and then spread Alterable value A from 1, if you read the value of A from each one, itwould be a number from 1 to 10, starting with the object that you first placed on the screen.
FlagsEach active object has a set of flags, called by a number. A flag is a ‘switch’ that can either be onor off. This option allows you to either turn a flag on or off, or to ‘toggle’ it, meaning that if it is on itwill be turned off, and vice versa. You will be asked to select which flag you are going to change. You do this by entering thenumber of that flag. An active object can have up to 32 flags.Flags can be used for all sorts of things, such as picking up objects, (If you have picked up Activeobject [X] then set flag#1 to on, etc.) status, (when Active object [X] has been hit by a bullet, setflag#2 to off, etc.).Look up on the CD: Minituts\Active\Actions\Activa06
174 THE EVENT EDITOR – THE GAMES FACTORY
ACTIVE – ACTIONS – FLAGS

Game Action Objects
These Objects allow for special Actions in your game, such as changing a level, playing a sound,or creating a new object, like an explosion. Note that these always exist on the top of the EventEditor screen, you do not have to create them via the Level Editor in order to manipulate them.
Special Actions
In addition to the information here you can look for the examples on the CD ROM.Look for the directory ‘minituts’, then ‘special’, then ‘actions’. There are several examples here,which are identified by their file name. You will be prompted to look up each example whereapplicable.You should look at the Event Editor of each of these to see how it was done.
The Special Actions perform actions that are not covered anywhere else
‘Execute an external program’ allows you to run an external program at the same time asyou are running your game. Useful if you want to link in .exe files that may have been created vialanguages like C, Basic or Pascal.Look up on the CD: Minituts\Special\Actions\Specia01
THE GAMES FACTORY – THE EVENT EDITOR 175
SPECIAL – ACTIONS – EXTERNAL PROGRAM/GROUPS
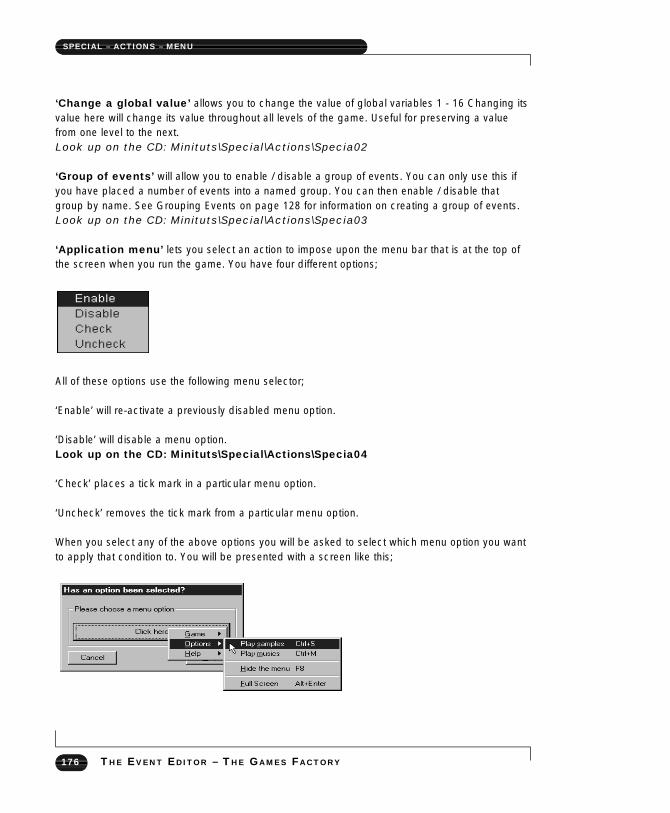
‘Change a global value’ allows you to change the value of global variables 1 - 16 Changing itsvalue here will change its value throughout all levels of the game. Useful for preserving a valuefrom one level to the next.Look up on the CD: Minituts\Special\Actions\Specia02
‘Group of events’ will allow you to enable / disable a group of events. You can only use this ifyou have placed a number of events into a named group. You can then enable / disable thatgroup by name. See Grouping Events on page 128 for information on creating a group of events.Look up on the CD: Minituts\Special\Actions\Specia03
‘Application menu’ lets you select an action to impose upon the menu bar that is at the top ofthe screen when you run the game. You have four different options;
All of these options use the following menu selector;
‘Enable’ will re-activate a previously disabled menu option.
‘Disable’ will disable a menu option. Look up on the CD: Minituts\Special\Actions\Specia04
‘Check’ places a tick mark in a particular menu option.
‘Uncheck’ removes the tick mark from a particular menu option.
When you select any of the above options you will be asked to select which menu option you wantto apply that condition to. You will be presented with a screen like this;
176 THE EVENT EDITOR – THE GAMES FACTORY
SPECIAL – ACTIONS – MENU

Sound Actions
In addition to the information here you can look for the examples on the CD ROM.Look for the directory ‘minituts’, then ‘sound’, then ‘actions’. There are several examples here,which are identified by their file name. You will be prompted to look up each example whereapplicable.You should look at the Event Editor of each of these to see how it was done.
This allows you to play sound or music when a particular Event occurs. You need to select a soundfrom the many files The Games Factory has to offer, but don’t worry too much, as you can previewthe sound before you decide on it.Note that if you have done a normal install, The Games Factory will need to access the sound andmusic files from the CD drive, so you must specify your CD ROM drive, and then look for‘Samples’. You will then be presented with several different libraries of sounds. When you selectone, its contents will be displayed down the left hand side of the screen, which can be scrolledthrough if they are very large. If you select a sound file you can ‘Play Sound’ before clicking the‘OK’ button, which will play that sound every time the particular event occurs (you can also justdouble click on a sound to preview it)..If you are playing a music sample, you will need to look in the ‘Midi’ directory.
THE GAMES FACTORY – THE EVENT EDITOR 177
SOUND ACTIONS

By selecting the ‘Uninterruptable’ button, you can make that sample or music non-interruptable byany other sample.
‘Edit sound’ allows you to manipulate the sound sample using the ‘Sound recorder; editor. You canchange the speed of the sound, add echo, as well as cutting parts from the sample or mixing withother sound files.
‘New sound’ allows you to add your own sound effects to your games using the microphone inleton your PC. You can manipulate these sounds using the ‘Sound recorder’ editor also.The initial menu that you will be presented with for the Sound Actions (right select in the tick-boxunder the Sound icon) looks like this;
‘Play sample’ will play a sample of music once.Look up on the CD: Minituts\Sound\Actions\Sounda01
‘Play music’ will play a piece of music once.Look up on the CD: Minituts\Sound\Actions\Sounda02
‘Play and loop sample’ will play a sample repeatedly.Look up on the CD: Minituts\Sound\Actions\Sounda03
‘Play and loop music’ will play a piece of music repeatedly.Look up on the CD: Minituts\Sound\Actions\Sounda04
‘Stop any sample playing’ stops all samples from playing at a particular moment in yourgame.
‘Stop any music playing’ any piece of music being played at a particular moment in yourgame.
178 THE EVENT EDITOR – THE GAMES FACTORY
SOUND – ACTIONS – PLAY SAMPLE/MUSIC
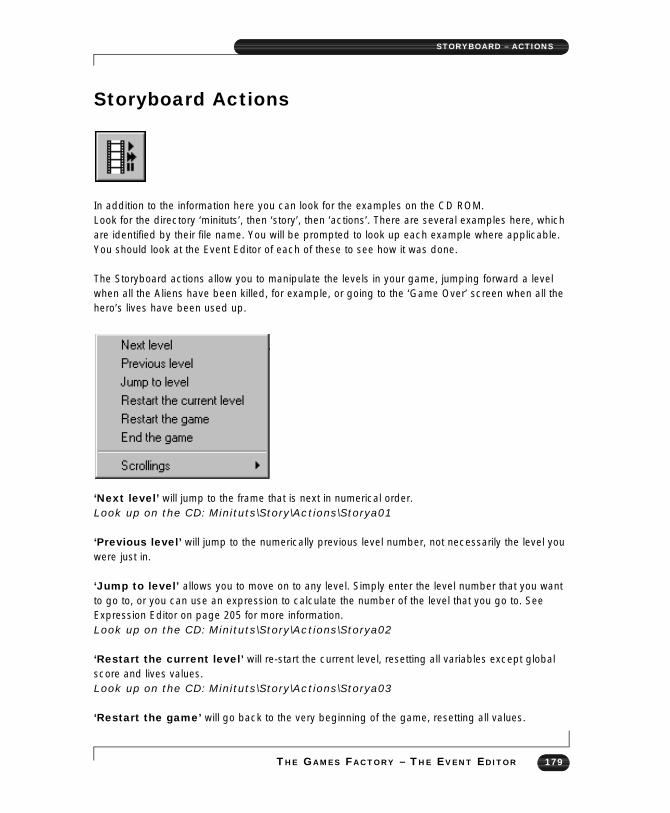
Storyboard Actions
In addition to the information here you can look for the examples on the CD ROM.Look for the directory ‘minituts’, then ‘story’, then ‘actions’. There are several examples here, whichare identified by their file name. You will be prompted to look up each example where applicable.You should look at the Event Editor of each of these to see how it was done.
The Storyboard actions allow you to manipulate the levels in your game, jumping forward a levelwhen all the Aliens have been killed, for example, or going to the ‘Game Over’ screen when all thehero’s lives have been used up.
‘Next level’ will jump to the frame that is next in numerical order.Look up on the CD: Minituts\Story\Actions\Storya01
‘Previous level’ will jump to the numerically previous level number, not necessarily the level youwere just in.
‘Jump to level’ allows you to move on to any level. Simply enter the level number that you wantto go to, or you can use an expression to calculate the number of the level that you go to. SeeExpression Editor on page 205 for more information.Look up on the CD: Minituts\Story\Actions\Storya02
‘Restart the current level’ will re-start the current level, resetting all variables except globalscore and lives values.Look up on the CD: Minituts\Story\Actions\Storya03
‘Restart the game’ will go back to the very beginning of the game, resetting all values.
THE GAMES FACTORY – THE EVENT EDITOR 179
STORYBOARD – ACTIONS

Look up on the CD: Minituts\Story\Actions\Storya04
‘End the game’ halts the game entirely, and will take you back to an Editor screen from TheGames Factory.Look up on the CD: Minituts\Story\Actions\Storya05
‘Scrolling’
For many games that you will be creating you will probably find it necessary to scroll around theplay area. One of the easiest ways to do this is by selecting a very large play area from theStoryboard Editor screen, then using the ‘Scrollings’ option from the Storyboard Actions menu inthe Event Editor screen. If you are going to have a scrolling style the same all the way through your application, it would bea good idea to define an Event as ‘Always’, (see Special Events, page 137) for more information)and to put it in a group that is Global to the whole application. (See Editing Events on page 127)for more information.)
As an example, we shall take you step by step through scrolling, from a completely new game, toa scrolling system that would be applied to all the different levels of your game.
Step One● Firstly start from scratch by selecting the ‘New’ option form the File menu.
● From the Storyboard Editor screen, select the X dimension of the play area, (The first of the twonumbers that define the play area size) using the left mouse button.
● Enter 2550 as the size of the X dimension. This will give you a play area width of 2550 pixels.Note that this does not fit on the screen, but that you will view a small area in the middle of this.By moving the view point around you can scroll around the play area.
● Make sure the Y dimension is set to 480, which is a fairly standard height for most of theBackdrop objects The Games Factory has already in the object libraries.
180 THE EVENT EDITOR – THE GAMES FACTORY
STORYBOARD – ACTION – SCROLLING

Now go to the Level Editor of that frame.
Step Two● Go to the ‘Object libraries’ and scroll through until you find the library ‘Space: Backdrops’.
● Select any four of the backdrops and place them on the play area so that they cover it entirely.This is going to be the background that you will scroll around.
● Next, go to the object library ‘Games: Space Walkers’ and select the man in the space suitwith a jet pack on. Place him anywhere on the starfield.
● Once he is placed on the starfield, select on him with the right mouse button and choose‘Movement-Change Movement’ from the menu.
● Choose the ‘Eight Directions’ icon, then ‘OK’ all the way out of the Movement Editor. For moreinformation on movement, turn to page 232
● If you left the spaceman as he was now, you could move him around the starfield using thecursor keys, but the background would stay stationary.
Step Three● Now go to the Event Editor screen. Select on the number part of the ‘New Condition’ line with the
right mouse button. Select the ‘Insert-A group of events’ option.
● Now type in the name of the group into the text box. For this example use the text ‘Scrollcontrol’. Do not use the <RETURN> key when you have finished typing in the name.
● Next, click in the ‘Global to the entire application’ box. This will make this group of events occurin every frame of your game, even the levels that you have not yet constructed. Now select the‘OK’ button.
● When you have done this you should have a large grey bar with ‘Scroll Control’ on it, andunderneath, indented slightly, event No. 2, with No. 3 normally laid out beneath.
THE GAMES FACTORY – THE EVENT EDITOR 181
STORYBOARD – ACTION – SCROLLING

Step Four● Now select on the ‘New condition’ text of event No. 2 with the left mouse button.
● Select the icon. From its menu, select ‘Always’. This means that the Actions associated with thisEvent will always be performed. Event line No. 2 should now have the text ‘Always’
● Now go to the empty tick box along this line that lies directly under the ‘Storyboard’ icon.
● Select in the tick box with the right mouse button, then select the ‘Scrollings’ option.
● Select the Centre window position in playfield’ option from the menu.
● You will then be presented with a dialogue box like that shown above. You want the screen to becentred about your spaceman, so select in the ‘Relative to:’ box. Then select the spaceman’s icon.
● Now change the X and Y coordinates to 0. This means that the screen will be centred at 0distance from the spaceman.
● ‘OK’ all the way out and you should now have an Event grid that looks like this;
182 THE EVENT EDITOR – THE GAMES FACTORY
STORYBOARD – ACTION – SCROLLING

● This means that throughout all of your levels the group ‘Scroll Control’ will exist, and that it willalways centre the display around the spaceman.
● Now press the ‘Play’ icon on the top right of the screen, and you will be able to scroll about thestarfield using the cursor keys, with the spaceman staying central in the screen.
Scrolling options
Centre window position in playfield’ will centre the playfield about a specific X, Ycoordinate, or that of an Active object. See above tutorial for more information.
Centre horizontal position of window in playfield’ will centre the horizontal position ofthe playfield about a specific value. This can be a set number, or, more usefully, by using theExpression Editor, you could retrieve the X coordinate of an object, and centre it around that.When you get to the dialogue box to enter the number, select the ‘Edit’ option, then the ‘Retrievedata from an object’ option, then select the object, then its X coordinate. You would then have aplayfield that scrolled horizontal but not vertically, useful for ‘Defender’ type games.
‘Centre vertical position of window in playfield’ does exactly the same as the functiondescribed above, except in the vertical instead of the horizontal.
THE GAMES FACTORY – THE EVENT EDITOR 183
STORYBOARD – ACTION – SCROLLING OPTION

Create New Object Actions
In addition to the information here you can look for the example on the CD ROM.Look for the directory ‘minituts’, then ‘newobj’, then ‘actions’, then ‘newobja01’.You should look at the Event Editor of this to see how it was done.
This action allows you to create a new object at a specific point on the screen. This action is veryuseful for displaying an explosion when two objects collide, for example. There are no options tothis function, only the selection of the point where you are going to place the new object, and theselection of the object that you are going to place.You can choose the object you wish to create from a dialogue box containing all the objects forthat particular level, or from a library, or from another game.
You can either choose from the objects in the dialogue box, or from another frame of your game.You do this by pressing the direction buttons either side of the ‘This frame’ text with the mousepointer.
‘Other Games’ means that you can grab an object from another game, as long as you have itsaved on disk.
‘A library’ lets you look through all the object libraries The Games Factory has to offer, and chooseyour new object from one of them.
Once you have selected the object you want to create, you select its position using the ‘Selectposition’ editor.
184 THE EVENT EDITOR – THE GAMES FACTORY
CREATE – NEW ACTIONS – OBJECTS
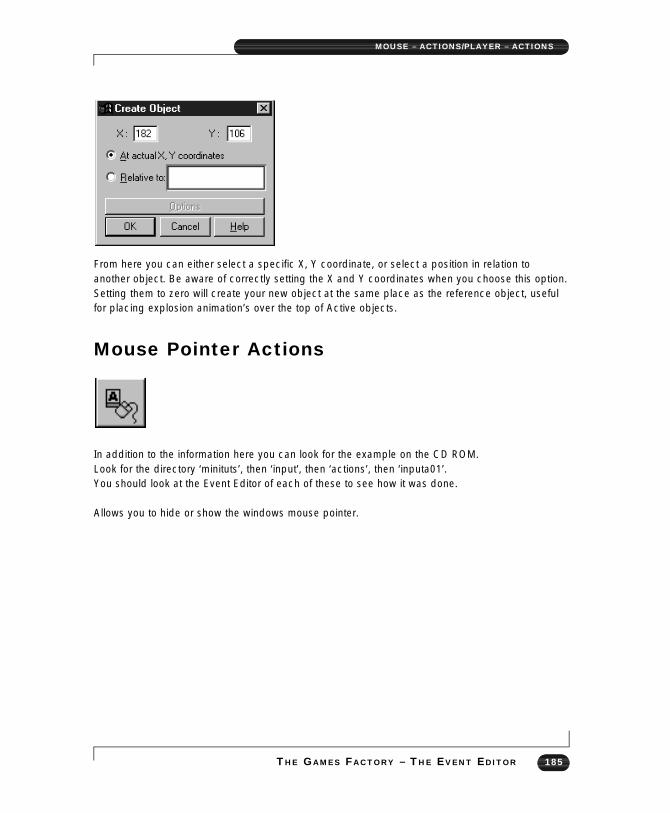
From here you can either select a specific X, Y coordinate, or select a position in relation toanother object. Be aware of correctly setting the X and Y coordinates when you choose this option.Setting them to zero will create your new object at the same place as the reference object, usefulfor placing explosion animation’s over the top of Active objects.
Mouse Pointer Actions
In addition to the information here you can look for the example on the CD ROM.Look for the directory ‘minituts’, then ‘input’, then ‘actions’, then ‘inputa01’.You should look at the Event Editor of each of these to see how it was done.
Allows you to hide or show the windows mouse pointer.
THE GAMES FACTORY – THE EVENT EDITOR 185
MOUSE – ACTIONS/PLAYER – ACTIONS

Player Actions
In addition to the information here you can look for the examples on the CD ROM.Look for the directory ‘minituts’, then ‘player’, then ‘actions’. There are two examples here, whichare identified by their file name. You will be prompted to look up each example where applicable.You should look at the Event Editor of each of these to see how it was done.
This object allows you to change values that are applied to each player, such as lives and score.You have three options;
‘Score’ allows you to alter a players score. You can add, subtract or set the score.You can do this to a specific value or an expression. See Expression Editor on page 205Look up on the CD: Minituts\Player\Actions\Playa01
‘Number of lives’ allows you to change the number of lives a player has. Note that the gamewill not automatically end when the number of lives reaches 0’ you must insert an Event to end thegame when the number of lives reaches 0, if that is what you want to happen. The number of livescan be manipulated in the same way that the score can.
‘Player control’ enables or disables a players controls. Disabling them will mean that TheGames Factory will ignore any keyboard or joystick commands made by that player until control isrestored. This is useful when you want to create a game ‘pause’ mode and want to stop the playermoving his hero.
Note that you can define which keys are used for each control in the ‘File-Game setup’ menu fromany of the Editor screens. (Situated at the top of each screen) For more information on Game setupsee page 93Look up on the CD: Minituts\Player\Actions\Playa02
186 THE EVENT EDITOR – THE GAMES FACTORY
PLAYER – ACTIONS

Text Object Actions
In addition to the information here you can look for the examples on the CD ROM.Look for the directory ‘minituts’, then ‘text’, then ‘actions’. There are several examples here, whichare identified by their file name. You will be prompted to look up each example where applicable.You should look at the Event Editor of each of these to see how it was done.This action allows you to change parameters that are applied to your text objects. These are;
‘Display text...’ will display your text object at a specific location. You can either enter in thecoordinates directly, use the mouse pointer, or have it in relation to another object, say, justunderneath an object, for example.Look up on the CD: Minituts\Text\Actions\Texta01
‘Erase text...’ simply erases the text box from the screen.Look up on the CD: Minituts\Text\Actions\Texta02
‘Flash text...’ will flash on and off your text at a specific rate, in a particular place. You will be askedto choose its position, as in ‘Display text...’ above, then asked to set the time delay, which can be a settime or an expression. See the Expression Editor chapter on page 205 for more information.Look up on the CD: Minituts\Text\Actions\Texta03
‘Set colour of text...’ does exactly that, from a range of 16 colours.Look up on the CD: Minituts\Text\Actions\Texta04
‘Set paragraph’ allows you to choose to display a paragraph by its number. In this way you can useone text object to display lots of different texts without having to use lots of text objects. To set themany texts use the “Edit Data Strings” option from the level editor (see page 243).Look up on the CD: Minituts\Text\Actions\Texta05
THE GAMES FACTORY – THE EVENT EDITOR 187
TEXT ACTIONS
‘Next paragraph’ displays the next paragraph by numerical order.Look up on the CD: Minituts\Text\Actions\Texta06
‘Previous paragraph’ displays the numerically previous paragraph. Not necessarily the last one tobe shown.Look up on the CD: Minituts\Text\Actions\Texta07
‘Alterable string’ allows you to display an alterable string in the text box. You can enter an alterablestring via an Edit Object, then set text to the value of the alterable string using the Text Objectsexpression Editor from the ‘Change Alterable string’ to the value of the Text Object contents.Look up on the CD: Minituts\Text\Actions\Texta08
‘Change alterable string’ sets the alterable string to a value, like the text from an Edit box, oryou can enter a set text directly into the Expression Editor. Make sure that the text is entirely withinquote marks (“For example”).Look up on the CD: Minituts\Text\Actions\Texta09
Question and Answer Object Actions
In addition to the information here you can look for the example on the CD ROM.Look for the directory ‘minituts’, then ‘question’, then ‘actions’, then ‘questa01’.You should look at the Event Editor of this to see how it was done.
These actions allow you to perform actions to your Question and Answer Objects. When you selecton the tick-box under the Q / A icon, you can choose to ‘Ask the Question’. This means that if theQ / A object was invisible by default, The Games Factory will display the object and await aresponse. You then use other events to check the user’s response to the question, see page 152.
188 THE EVENT EDITOR – THE GAMES FACTORY
QUESTION – ACTIONS
Counter Object Actions
In addition to the information here you can look for the examples on the CD ROM.Look for the directory ‘minituts’, then ‘counter’, then ‘actions’. There are several examples here,which are identified by their file name. You will be prompted to look up each example whereapplicable.You should look at the Event Editor of each of these to see how it was done.
By using this option you can change your Counter objects. For all three possible actions you caneither enter a set number, or an expression. See the chapter Expression Editor on page 205 formore details.
‘Set Counter’ will set your counter to a specific value, or expression.Look up on the CD: Minituts\Count\Actions\Counta01
‘Add to counter’ will add to the counter by a set value or expression.Look up on the CD: Minituts\Count\Actions\Counta02
‘Subtract from counter’ will subtract from the counter by a specific value or expression.Look up on the CD: Minituts\Count\Actions\Counta03
High Score Object Actions
In addition to the information here you can look for the examples on the CD ROM.Look for the directory ‘minituts’, then ‘hiscore’, then ‘actions’. There are several examples here, whichare identified by their file name. You will be prompted to look up each example where applicable.You should look at the Event Editor of each of these to see how it was done.
Allows you to change your High Score table in a number of ways.
THE GAMES FACTORY – THE EVENT EDITOR 189
COUNTER – ACTIONS

‘Ask for a players name’ will allow you to assign a name to players 1-4.Look up on the CD: Minituts\Hiscore\Actions\Hiscoa01
‘Reset’ will reset the values in the High Score table.‘Change one name’ allows you to change a name in the High Score table, identified by it’snumerical rank. You would enter the rank by number, then the name that you want to change it too,remembering to enter the name within quote marks. You will be reminded by a double quote mark.(“”)Look up on the CD: Minituts\Hiscore\Actions\Hiscoa02‘Change one score’ allows you to change one of the scores in the High Score table. Again, it isidentified by its rank in numerical order.Look up on the CD: Minituts\Hiscore\Actions\Hiscoa03
‘Position’ allows you select the position of the High Score table by its X and Y coordinates, orseparately horizontally and vertically. You can also set its position in relation to another object. See theExpression Editor chapter on page 205 for more information.Look up on the CD: Minituts\Hiscore\Actions\Hiscoa04
‘Visibility’ allows you to make the High Score table visible or invisible. You may want to make yourHigh Score object invisible at the start of the level, making it visible when your hero has been killed andachieved a High Score, rather than keeping your High Score table on a different level.Look up on the CD: Minituts\Hiscore\Actions\Hiscoa05
‘Destroy’ does not just make your High Score table invisible, but completely removes it from the playarea.Look up on the CD: Minituts\Hiscore\Actions\Hiscoa06
190 THE EVENT EDITOR – THE GAMES FACTORY
HIGH SCORE – ACTIONS

Edit Objects Actions
In addition to the information here you can look for the examples on the CD ROM.Look for the directory ‘minituts’, then ‘edit’, then ‘actions’. There are several examples here, whichare identified by their file name. You will be prompted to look up each example where applicable.You should look at the Event Editor of each of these to see how it was done.
‘Files’ - From within the Files option, there is a further menu.
‘Load text file’ allows you to load a text file from disk.Look up on the CD: Minituts\Edit\Actions\Edita01
‘Load text file via a file selector’ will ask the player which text file they want to load in by displayinga file selector on screen.Look up on the CD: Minituts\Edit\Actions\Edita02
‘Save text file’ allows you to save text to disk.
‘Save text file via a selector’ asks the user where they want to save the text file.
‘Edition’By selecting the Edition option you will pull down a further menu.
‘Set text’ allows you to set the text to a specific string variable.Look up on the CD: Minituts\Edit\Actions\Edita03
THE GAMES FACTORY – THE EVENT EDITOR 191
EDIT – ACTIONS

‘Block’ allows you to Cut, Copy and Paste text.
‘Undo’ allows you to undo the previous user action within the Edit object.
‘Control’By selecting the Control option you will pull down a further menu.
‘Limit text size’ allows you to put a limit on the number of characters in the text.
‘Focus’ is an on / off switch for that Edit object, which directs input from the keyboard to that Editobject or not
‘Enabled’ is an on / off switch for enabling / disabling an Edit object.Look up on the CD: Minituts\Edit\Actions\Edita04
‘Read only’ is an on / off switch that stops you writing into an Edit object.‘Force text modified flag’ is a switch that forces the ‘Modified’ flag to be on or off irrelevant to userinput. This means that for the modified flag to be on the user must have edited the contents of theEdit object at some point. Forcing the modified flag off, will change the way future conditionsdetect for this flag, and will be fooled into thinking no change has been made.
‘Aspect’ allows you to set a font or background colour via a selector.Look up on the CD: Minituts\Edit\Actions\Edita05
‘Position’ allows you to select the position of the Edit object.Look up on the CD: Minituts\Edit\Actions\Edita06
‘Size’ allows you to set the horizontal and / or the vertical size of the Edit object. Look up on the CD: Minituts\Edit\Actions\Edita07
‘Visibility’ changes the visibility of the Edit object.Look up on the CD: Minituts\Edit\Actions\Edita08
‘Destroy’ removes the Edit object from the play area.Look up on the CD: Minituts\Edit\Actions\Edita09
192 THE EVENT EDITOR – THE GAMES FACTORY
EDIT – ACTIONS

AVI Object Actions
You can change your AVI object using the following options;
‘Movement’, ‘Position’, ‘Visibility’ and ‘Destroy’ are all defined in the Active Object Actions on page 165.
‘Play’ allows you to play your AVI Forwards, backwards, step by step, play a new file, or play anew file via a file selector that will allow the user to select the file.
‘Stop’ stops the AVI from running.
‘Pause’ pauses the AVI.
‘Resume’ re-plays the AVI from a paused position.
‘Set AVI Play Position to’ sets the AVI to the beginning, end, to a frame number or timeposition.
‘Size’ allows you to change the horizontal and / or the vertical size of your AVI object.
THE GAMES FACTORY – THE EVENT EDITOR 193
AVI – ACTIONS

QuickTime Objects
All the options for QuickTime objects are the same as for AVI Objects except that you also havethe options ‘Volume’, which allows you to set the volume, and ‘Tracks’ which allows you to enable /disable the relevant tracks. The options are listed below;
MPEG Object Actions
From these options you can change the movement and position of your MPEG objects, as well asthe MPEG frame sequence.
‘Movement’ gives you the same options for movement as Active object. See Active ObjectActions, Movement, on page 165.
‘Position’ allows you to set the position of your MPEG on the play area in the same way as forActive Objects. See Active Object Actions, Position, on page 165.
‘Play’ allows you to change the way in which your MPEG is currently playing. Selecting this optionwill pull down a further menu;
194 THE EVENT EDITOR – THE GAMES FACTORY
QUICKTIME OBJECTS

‘Forward’ plays the sequence of frames in a normal, forwardly sequenced manner.
‘Backward’ plays the frames in reverse order.
‘Step by step’ will play one frame at a time, dependant upon that event line. For example, to have a step-by-step run through the frames, you could insert an Event to test when akey is pressed, and then insert the Action to play the MPEG ‘Set by Step (in frames) and enter a valueof one into the Expression Editor produced. This will allow the user to advance the sequence by oneframe at a time every time that particular key is pressed.
‘A new file’ will play a new file. You will be asked to select your new file from a new file selector in theEvent Editor.
‘A new file via a selector’ produces a file selector on screen during game time for the user to select thenew file from.
‘Stop’ simply stops the MPEG playing. Note that when ‘Frame mode’ is off it does not stop the timereference from running. If it were stopped, then resumed, it would start from a new frame in thesequence relevant to how long the sequence had been stopped for.
‘Pause’ pauses the MPEG sequence as well as the time reference.
‘Resume’ starts a paused or stopped sequence.
‘Set MPEG play position to...’ allows you to set the position of the MPEG to either the beginning orend of the sequence. It also allows you to set it to a specific frame number or time reference. Thesequence will then be played from that position using whichever play mode you have specified.
‘Size’ allows you to change the horizontal and / or vertical size of the display of the MPEG to a specificnumber of pixels high or wide.
‘Visibility’ allows you to make the MPEG invisible or visible. It is visible by default.
‘Destroy’ removes the MPEG completely from the play area.
THE GAMES FACTORY – THE EVENT EDITOR 195
MPEG – ACTIONS – PLAY/VIA A SELECTOR

FLI / FLC Object Actions
From these options you can change your FLI / FLC objects;
Note that all the options except the ‘Animation’ are virtually identical to that of Active objects.
‘Animation’ will pull down a further menu;
196 THE EVENT EDITOR – THE GAMES FACTORY
FLI/FLC – ACTIONS

CD Audio Object Actions
Using the CD Actions you can change the tracks being played from your CD, etc., etc.You will be presented with the following menu;
As you can see, the menu options are all fairly self-explanatory. Each option will do exactly what itsays to the CD player, except the ‘Destroy’ option, of course, which merely removes the CD objectfrom the play area, not blowing up part of your PC!You could use these Actions to create your own track selector in a game, or to play some moodymusic as a background to an Adventure game.
MCI Object Actions
MCI objects give you a general way of controlling a device or animation system from within The GamesFactory. You’ll be able to use these devices directly from your games providing you’ve installed anappropriate driver from the Windows Control panel. For example, one common use of an MCI object is to play samples externally of the Games Factory,
THE GAMES FACTORY – THE EVENT EDITOR 197
CD – ACTIONS – MCI – ACTIONS

which means large or numerous ‘.wav’ files are not stored in memory all at once. Another could be toplay a Midi file from Level 1 and still here it in Frame 7, as all MCI Actions perform external controls ofWindows devices.The available actions are:
‘Send a command’ this will send a single string to the Media Control Interface using established MCIsyntax. All commands must be in lower case and should be in quotes as you enter them into the MCI’sExpression Editor.
‘Destroy’ simply removes the object from the play area.
You can enter your commands using the standard the “MCI” instruction set. In order to communicatewith the MCI device, you’ll need to obey a few simple rules. Each line should be entered into a separate‘Send a command’ action from the MCI object’s action menu.You’ll also need to define the appropriate MCI objects in the Frame Editor, and enter the device names into the box provided.For example, to play a CD, you would specify the device as ‘cdaudio’ from its ‘Setup’ menu (LevelEditor), and then as an Action you would select the ‘Send a command’ option and enter the text ‘“playcdaudio”’, making sure that it is within quotes and in lower case only. To change the track to a number,enter the text ‘“play cdaudio from (X)’”, where X is the track number.As MCI commands are so diverse we cannot feasibly cover them here, and recommend that youconsult a Windows manual for more information.
198 THE EVENT EDITOR – THE GAMES FACTORY
EXAMPLE COMMAND STRINGS
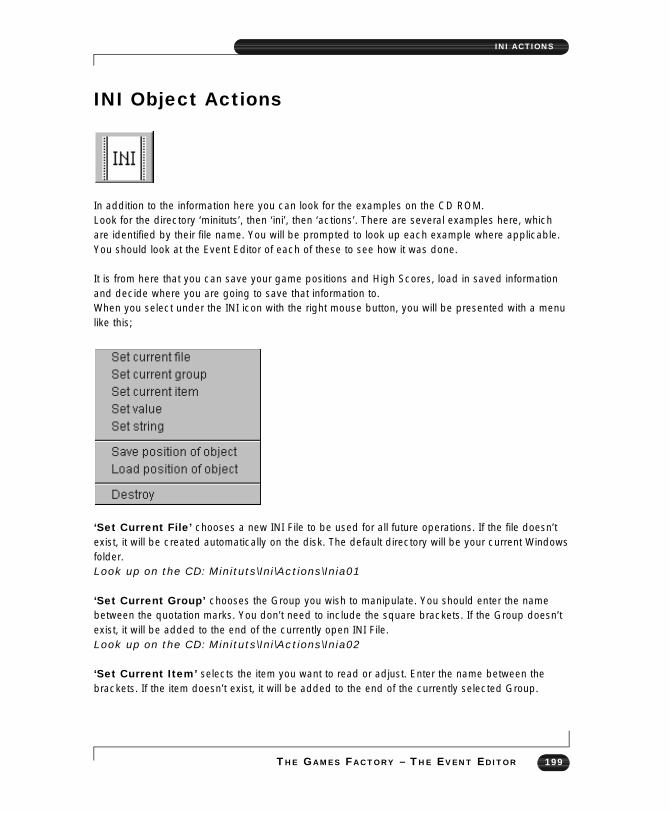
INI Object Actions
In addition to the information here you can look for the examples on the CD ROM.Look for the directory ‘minituts’, then ‘ini’, then ‘actions’. There are several examples here, whichare identified by their file name. You will be prompted to look up each example where applicable.You should look at the Event Editor of each of these to see how it was done.
It is from here that you can save your game positions and High Scores, load in saved informationand decide where you are going to save that information to.When you select under the INI icon with the right mouse button, you will be presented with a menulike this;
‘Set Current File’ chooses a new INI File to be used for all future operations. If the file doesn’texist, it will be created automatically on the disk. The default directory will be your current Windowsfolder.Look up on the CD: Minituts\Ini\Actions\Inia01
‘Set Current Group’ chooses the Group you wish to manipulate. You should enter the namebetween the quotation marks. You don’t need to include the square brackets. If the Group doesn’texist, it will be added to the end of the currently open INI File.Look up on the CD: Minituts\Ini\Actions\Inia02
‘Set Current Item’ selects the item you want to read or adjust. Enter the name between thebrackets. If the item doesn’t exist, it will be added to the end of the currently selected Group.
THE GAMES FACTORY – THE EVENT EDITOR 199
INI ACTIONS

‘Set Value’ saves a number in the currently chosen Group and Item.For example:‘Set Current Group to [X]’ will move to the Group [X]
‘Set Current Item to “first_value”’ will go to the Item called ‘first_value’
‘Set Item value to 3’ will produce “first_value=3”
The text lines would look like this:(Group)[X] first_value=3Look up on the CD: Minituts\Ini\Actions\Inia03
‘Set String’ saves a line of text into the previously chosen Group and Item.Before using this feature, you should pick the Group with ‘Set Current Group’.You can now choose an Item you’d like to change with ‘Set Current Item’.Finally, you can enter the text with the ‘Set String’ action. For example;
Set string value to “High There”
Supposing you wanted to set Item “name” in Group “[User]” to “Linda” You’d use the actions:
Set Current Group to “user”Set Current Item to “name”Set string value to “Linda”
The resulting File would look like this:
[user]name=LindaLook up on the CD: Minituts\Ini\Actions\Inia04
‘Save Position of object’ stores the current coordinates of an object in the current Group. You’ll be asked to choose the object as you are entering the action. You don’t needto bother with the “Item name”, as it’s set up automatically. The Games Factory will generate it byadding “pos.” to the object name.Look up on the CD: Minituts\Ini\Actions\Inia05
‘Load Position of object’ copies a saved object position from the INI File and moves the object to the stored coordinates.You’ll be asked to choose an object to be loaded when you enter this action. This object should
200 THE EVENT EDITOR – THE GAMES FACTORY
INI ACTIONS

have the same name as an object you’ve previously saved in the “INI” File.
‘Destroy’ turns off the INI object, and deactivates it from your game.Look up on the CD: Minituts\Ini\Actions\Inia06
Picture Object Actions
In addition to the information here you can look for the examples on the CD ROM.Look for the directory ‘minituts’, then ‘picture’, then ‘actions’. There are several examples here,which are identified by their file name. You will be prompted to look up each example whereapplicable.You should look at the Event Editor of each of these to see how it was done.
When you select under the Picture icon with the right mouse button, you will be presented with amenu like this;
‘New picture’ selects a new picture to be displayed. You select this via a file selector.Look up on the CD: Minituts\Picture\Actions\Pictua01‘New picture via a selector’ allows the game player to select a new picture via a file selector.Look up on the CD: Minituts\Picture\Actions\Pictua02
‘Image resize on’ enables the image to be sized to the size you select in the Level Editor.Look up on the CD: Minituts\Picture\Actions\Pictua03
‘Image resize off’ displays the Picture object in its default size.
THE GAMES FACTORY – THE EVENT EDITOR 201
PICTURE – ACTIONS

‘Visibility’ allows you to make the Picture object either Invisible or visible.Look up on the CD: Minituts\Picture\Actions\Pictua04
‘Destroy’ removes the Picture object from the play area.Look up on the CD: Minituts\Picture\Actions\Pictua05
Button Object Actions
In addition to the information here you can look for the examples on the CD ROM.Look for the directory ‘minituts’, then ‘button’, then ‘actions’. There are several examples here,which are identified by their file name. You will be prompted to look up each example whereapplicable.You should look at the Event Editor of each of these to see how it was done.
From here you can perform Actions to your Button objects, changing their look, the contents of thetext they contain, even their size.When you right select under the Button object, you will be presented with a menu that looks likethis;
‘Change text’ allows you to change the text that is within a button object. Make sure that all thetext you enter is within double-quote marks (“TEXT”).Look up on the CD: Minituts\Button\Actions\Buttoa01
‘Highlight’ makes the button object highlighted. It is highlighted by default.Look up on the CD: Minituts\Button\Actions\Buttoa02
‘Dehighlight’ makes the button object de-highlighted, or ‘greyed-out’.
202 THE EVENT EDITOR – THE GAMES FACTORY
BUTTON – ACTIONS

‘Set radio button’ is only available for Radio-Buttons. Within this you can Change Text, Select aRadio Button and Enable / Disable a Radio button.Look up on the CD: Minituts\Button\Actions\Buttoa03
‘Select position’ allows you to select the position of a button using a ‘Zone setup’ Editor, or toenter in the X and Y coordinates directly.Look up on the CD: Minituts\Button\Actions\Buttoa04
‘Size’ allows you to set the size of your button object.Look up on the CD: Minituts\Button\Actions\Buttoa05
‘Visibility’ lets you make the button visible / invisible.
‘Destroy’ removes the button object from the play area.Look up on the CD: Minituts\Button\Actions\Buttoa06
THE GAMES FACTORY – THE EVENT EDITOR 203
BUTTON – ACTIONS

Mixer Object Actions
In addition to the information here you can look for the examples on the CD ROM.Look for the directory ‘minituts’, then ‘mixer’, then ‘actions’. There are two examples here, which areidentified by their file name. You will be prompted to look up each example where applicable.You should look at the Event Editor of each of these to see how it was done.
Using the Mixer Actions, you can change the volume output to your speakers, either the volumeused when you play samples, when you use the internal FM synthesizer to play ‘Midi’ files, or theSquare wave synthesizer.
When you right select under the Mixer Object, you will be presented with a menu that looks likethis;
The ‘Change wave’ options control the volume that samples are played through your speakers.‘Left and right’ controls the overall volume, the others their respective volumes.Look up on the CD: Minituts\Mixer\Actions\Mixera01
The ‘Change FM synthesizer’ option changes the volumes at which Midi files are played.Look up on the CD: Minituts\Mixer\Actions\Mixera02
The ‘Change square wave synthesizer’ option changes the volumes at which Square wavesynthesizer files are played.
‘Destroy’ removes the object from the play area.
204 THE EVENT EDITOR – THE GAMES FACTORY
MIXER ACTIONS

The ExpressionEditorIf you have already read through all the Events and Actions in this chapter, you will have noticed areferral to this chapter whenever a numerical value has to be selected. The Expression Editor is what really gives you the ability to do very complex gaming using verysimple Event lines. By using the Expression Editor you can read values such as a players score,internal values, flags, animation sequences, in fact any value that an object possesses.You can, of course, just enter specific values, but it is the ability to retrieve data from objects thatreally makes the Expression Editor so useful.Each object has various different types of data that can be retrieved, known here as Functions.The available functions are listed toward the end of this chapter. The descriptions are kept fairlybrief as many are self explanatory, e.g., ‘X-coordinate’ or ‘Y-coordinate’.There are several levels to the Expression Editor, depending on the values that you want to use. Ifyou only want to enter a number, or you know the exact text to enter, you can enter it into the textbox of the initial dialogue box, which looks like this;
In this case placing a number in the text box would set one of the alterable values to that number.By pressing the ‘Edit’ button you can go to a further dialogue box which looks like this;
THE GAMES FACTORY – THE EXPRESSION EDITOR 205
EXPRESSION EDITOR – INTRODUCTION

From this dialogue box you can check the syntax of your expression using the ‘Check’ box, or, ifyou select the ‘Retrieve data from an object’ button, you can retrieve a value from an object.If you select this you will be able to retrieve virtually any information that you want from an object,its direction, position, coordinates, animation, flags, values, speed, etc.As mentioned before, if you know the exact text to type in, you can type that into the text boxinstead of having to select the object, then select the value that you want to retrieve.
Example
For this example we are going to set the X coordinate of an object to be the same as that ofanother object upon pressing a key.
First of all you must have at least two Active objects places on the play area. You do this from theLevel Editor screen.Once you have done this, go to the Event Editor screen and set up an Event to test when a key ispressed, use the spacebar for this example.
Now you have an Event, you need to assign an Action to that Event.
● Click in the empty tick box with the right mouse button, under the first of your Active objects.● Select the ‘Position’ option.● From that menu select ‘Set X coordinate...’● When you do this you will be taken to the first dialogue box of the Expression Editor.● Now, you want to retrieve the X value of another Active object, so, select the ‘Edit’ option, which
will take you to the second level of the Expression Editor.● Click on the ‘Retrieve data from an object’ button.● You will now be asked to select the object that you want to retrieve data from.● Select the other object with the right mouse button.● From the menu displayed select the ‘Position’ option.● From this menu select the ‘X coordinate’ option.● You should now have an Expression that reads something like ‘X(“Object Z”)’● This means that the X value of the first object will be set to the X value of Object Z.● Press all the ‘OK’ buttons to place this Action in the tick box.● Now when you move the mouse pointer over that Action it should read something like;● ‘Set X position to X(“Active object Z”)’
You could have retrieved any of the values from object Z and made that the new X coordinate ofthe first object.
You could, for example, when using the ‘Special Events-Compare two general values’ event,compare the coordinates of two objects, or maybe compare the “Energy” values of two fighters inan adventure game to decide upon a winner. The possibilities are literally endless!
206 THE EXPRESSION EDITOR – THE GAMES FACTORY
EXPRESSION EDITOR – WORKED EXAMPLE

Object Functions
As mentioned above, each object has its own Functions. That is, a set of variables that can beread using the Expression Editor.Only certain Actions require entering into an Expression Editor, those requiring a value to beentered. The following pages list all the available variables, or Functions, that you can retrieve froman object using the ‘Retrieve data from an object’ button when using the Expression Editor. Seeabove for how to enter into the Expression Editor.
Active Object FunctionsAll the variables that can be retrieved from an Active object are listed below. You will be presentedwith the menu below after you have selected your Active object from the ‘Object to test’ via the‘Retrieve data form an object’ button.
From this menu you can select the general type of information that you want to retrieve. These arelisted below, the text on the left is what will actually be written in the Expression Editor (The GamesFactory does this for you, although you can enter it in as text if you like) and on the right is a verybrief description of the variable.
MovementSpeed(“object”) Speed of the object.Acc(“object”) AccelerationDec(“object”) Deceleration
PositionX(“object”) X coordinateY(“object”) Y coordinateX Left(“object”) X-Coordinate of left edgeX Right(“object”) X-Coordinate of right edgeY Top(“object”) Y-Coordinate of top edgeY Bottom(“object”) Y-Coordinate of bottom edge
THE GAMES FACTORY – THE EXPRESSION EDITOR 207
ACTIVE – FUNCTIONS

AnimationDir(“object”) Current direction valueImage(“object”) Current frame
CountNumber(“object”) Number of objects on the playfield
ValuesValue A(“object”) Retrieve Alterable Value AValue B(“object”) Retrieve Alterable Value BValue C(“object”) Retrieve Alterable Value CFixed(“object”) Retrieve Fixed ValueFlag(“object”, value) Retrieve an Internal Flag
Timer Object FunctionsThis is the primary menu that you will be presented with when you select the Timer Object from the‘Object to test’ dialogue box produced from the ‘Retrieve data from an object’ button of theExpression Editor;
From this menu you can select the information that you want to retrieve. These are listed below, thetext on the left is what will actually be written in the Expression Editor (The Games Factory doesthis for you, although you can enter it in as text if you like) and on the right is a very briefdescription of the variable.
timer Timer Count in 1/1000 since start of framehours Timer count, hoursseconds Timer count, secondshundreds Timer count, 1/100 valueminutes Timer count, minutes
208 THE EXPRESSION EDITOR – THE GAMES FACTORY
ACTIVE – TIMER – FUNCTIONS

Special Object Functions
This is the primary menu that you will be presented with when you select the Special Object fromthe ‘Object to test’ dialogue box produced from the ‘Retrieve data from an object’ button of theExpression Editor;
From this menu you can select the general type of information that you want to retrieve. These arelisted below, the text on the left is what will actually be written in the Expression Editor (The GamesFactory does this for you, although you can enter it in as text if you like) and on the right is a verybrief description of the variable.
Generate a random numberRandom Generate random number
Retrieve a global valueGlobal Value(identifier) Retrieve a Global Value
Convert number to string Str$(value) Convert a string to a number
Convert string to numberVal(“value”) Convert a number to a string
Filenamesappdrive$ Application drive nameappdir$ Application directoryapppath$ Application path nameappname$ Application filename
THE GAMES FACTORY – THE EXPRESSION EDITOR 209
SPECIAL – FUNCTIONS

Storyboard Object Functions
This is the primary menu that you will be presented with when you select the Special Object fromthe ‘Object to test’ dialogue box produced from the ‘Retrieve data from an object’ button of theExpression Editor;
From this menu you can select the general type of information that you want to retrieve. These arelisted below, the text on the left is what will actually be written in the Expression Editor (The GamesFactory does this for you, although you can enter it in as text if you like) and on the right is a verybrief description of the variable.
Current number of frameframe Current number of frame
Current number of players playingplayers Current number of players playing
PlayfieldWidth Width of the play area Height Height of the play areaX Left Playfield X coordinate of left visible edge X Right Playfield X coordinate of right visible edge Y Top Playfield Y coordinate of bottom visible edgeY Bottom Playfield Y coordinate of top visible edge
Create Object FunctionsThere is only one Function available from this object, and that is the ‘Number of objects on theplayfield’. The text on the left is what will actually be written in the Expression Editor (The GamesFactory does this for you, although you can enter it in as text if you like) and on the right is a verybrief description of the variable.
nobjects Total number of objects
210 THE EXPRESSION EDITOR – THE GAMES FACTORY
STORYBOARD/CREATE – FUNCTIONS

Mouse and Keyboard Functions
There are only two Functions available from the Mouse and Keyboard object. These are listedbelow. The text on the left is what will actually be written in the Expression Editor (The GamesFactory does this for you, although you can enter it in as text if you like) and on the right is a verybrief description of the variable.
Xmouse Current X position of the mouseYmouse Current Y position of the mouse
Player FunctionsThere are only two Functions available from the Player object. These are listed below. The text onthe left is what will actually be written in the Expression Editor (The Games Factory does this foryou, although you can enter it in as text if you like) and on the right is a very brief description of thevariable.
frame Current number of frameplayers Current number of players playing
Text Object FunctionsThis is the primary menu that you will be presented with when you select the Text Object from the‘Object to test’ dialogue box produced from the ‘Retrieve data from an object’ button of theExpression Editor;
From this menu you can select the general type of information that you want to retrieve. These arelisted below, the text on the left is what will actually be written in the Expression Editor (The GamesFactory does this for you, although you can enter it in as text if you like) and on the right is a verybrief description of the variable.
Paragraph(“object”) Current number of paragraph
THE GAMES FACTORY – THE EXPRESSION EDITOR 211
MOUSE, PLAYER, TEXT – FUNCTIONS

String$(“object”) Alterable StringParagraph$(“object”,p) Text of a ParagraphValue(“text string”) Converts string to a numerical value
Counter Object FunctionsThere is only one Function available from counter objects and that is to retrieve its current value.
Edit Object FunctionsThis is the primary menu that you will be presented with when you select the Text Object from the‘Object to test’ dialogue box produced from the ‘Retrieve data from an object’ button of theExpression Editor;
From this menu you can select the general type of information that you want to retrieve. These arelisted below, the text on the left is what will actually be written in the Expression Editor (The GamesFactory does this for you, although you can enter it in as text if you like) and on the right is a verybrief description of the variable.
Edit Text$(“Object”) Get textEdit Select$(“Object”) Get selectionEdit X Pos(“Object”) Get X positionEdit Y Pos(“Object”) Get Y positionEdit X Size(“Object”) Get X sizeEdit Y Size(“Object”) Get Y size
212 THE EXPRESSION EDITOR – THE GAMES FACTORY
COUNTER, EDIT – FUNCTIONS

High Score Object Functions
This is the primary menu that you will be presented with when you select the Hi Score Object fromthe ‘Object to test’ dialogue box produced from the ‘Retrieve data from an object’ button of theExpression Editor;
From this menu you can select the general type of information that you want to retrieve. These arelisted below, the text on the left is what will actually be written in the Expression Editor (The GamesFactory does this for you, although you can enter it in as text if you like) and on the right is a verybrief description of the variable.
High Score(“object”,slot) High Score valueHigh Score name$(“object”,slot) High Score nameHigh Score X pos(“object”) X Position of High Score tableHigh Score Y pos(“object”) Y Position of High Score table
THE GAMES FACTORY – THE EXPRESSION EDITOR 213
HIGH SCORE – FUNCTIONS
AVI Object Functions
This is the primary menu that you will be presented with when you select an AVI Object from the‘Object to test’ dialogue box produced from the ‘Retrieve data from an object’ button of theExpression Editor;
From this menu you can select the general type of information that you want to retrieve. These arelisted below, the text on the left is what will actually be written in the Expression Editor (The GamesFactory does this for you, although you can enter it in as text if you like) and on the right is a verybrief description of the variable.
MovementSpeed(“object”) Speed Acc(“object”) AccelerationDec(“object”) Deceleration
PositionX(“object”) X coordinateY(“object”) Y coordinateX Left(“object”) X-Coordinate of left edgeX Right(“object”) X-Coordinate of right edgeY Top(“object”) Y-Coordinate of top edgeY Bottom(“object”) Y-Coordinate of bottom edge
214 THE EXPRESSION EDITOR – THE GAMES FACTORY
AVI – FUNCTIONS

Special Video for Windows functionsVideo Frame(“object”) Current frame numberVideo Time(“object”) Total number of framesVideo Time(“object”) Current time positionVideo Total Time(“object”) Total timeLast Error(“object”) Last error numberVideo X Size(“object”) Horizontal sizeVideo Y Size(“object”) Vertical size
MPEG Object FunctionsThis is the primary menu that you will be presented with when you select an AVI Object from the‘Object to test’ dialogue box produced from the ‘Retrieve data from an object’ button of theExpression Editor;
You can test MPEG clips for a range of information. This information can be used as part of anevent to trigger a series of actions in your application. Therefore, you can start a video playingwhen the video reaches a selected frame, or stop the clip at particular points in the sequence.
From the above menu you can select the general type of information that you want to retrieve.These are listed below, the text on the left is what will actually be written in the Expression Editor(The Games Factory does this for you, although you can enter it in as text if you like) and on theright is a very brief description of the variable.
THE GAMES FACTORY – THE EXPRESSION EDITOR 215
MPEG – FUNCTIONS

MovementSpeed(“object” Speed Acc(“object”) AccelerationDec(“object”) Deceleration
PositionX(“object”) X coordinateY(“object”) Y coordinateX Left(“object”) X-Coordinate of left edgeX Right(“object”) X-Coordinate of right edgeY Top(“object”) Y-Coordinate of top edgeY Bottom(“object”) Y-Coordinate of bottom edge
Special MPEG functionsVideo Frame(“object”) Current frame numberVideo Total Frames(“object”) Total number of framesVideo Time(“object”) Current time positionVideo Total Time(“object”) Total timeLast Error(“object”) Last error numberVideo X Size(“object”) Horizontal sizeVideo Y Size(“object”) Vertical size
FLI / FLC Object FunctionsThis is the primary menu that you will be presented with when you select an FLI / FLC Object fromthe ‘Object to test’ dialogue box produced from the ‘Retrieve data from an object’ button of theExpression Editor;
From this menu you can select the general type of information that you want to retrieve. These arelisted below, the text on the left is what will actually be written in the Expression Editor (The GamesFactory does this for you, although you can enter it in as text if you like) and on the right is a verybrief description of the variable.Movement
216 THE EXPRESSION EDITOR – THE GAMES FACTORY
FLI/FLC – FUNCTIONS

Speed(“object”) Speed Acc(“object”) AccelerationDec(“object”) Deceleration
PositionX(“object”) X coordinateY(“object”) Y coordinateX Left(“object”) X coordinate of left edgeX Right(“object”) X coordinate of right edgeY Top(“object”) Y coordinate of top edgeY Bottom(“object”) Y coordinate of bottom edge
Special FLI FunctionsCurrent Frame(“object”) Number of Current Frametotal Frames(“object”) Number of Frameswidth(“object”) Width of Animationheight(“object”) Height of AnimationFrame duration(“object”) Frame duration
CD Audio Object FunctionsThis is the primary menu that you will be presented with when you select a CD Object from the‘Object to test’ dialogue box produced from the ‘Retrieve data from an object’ button of theExpression Editor;
From this menu you can select the general type of information that you want to retrieve. These arelisted below, the text on the left is what will actually be written in the Expression Editor (The GamesFactory does this for you, although you can enter it in as text if you like) and on the right is a verybrief description of the variable.
THE GAMES FACTORY – THE EXPRESSION EDITOR 217
CD AUDIO – FUNCTIONS

Track(“object”) Number of current trackMaxtrack(“object”) Number of tracksPosInTrack(“object”) Position in current trackTrack Length(“object”) Length of current track Position(“object”) Position in disc (1/1000s)Length(“object”) Length of disc(1/1000s)Last Error(“object”) Last error number
MCI Object FunctionsThis is the primary menu that you will be presented with when you select an MCI Object from the‘Object to test’ dialogue box produced from the ‘Retrieve data from an object’ button of theExpression Editor;
From this menu you can select the general type of information that you want to retrieve. These arelisted and described below underneath each menu heading.
Return Value
The Return value function returns the result of the last MCI operation called from your application. The value depends on the type of command you’ve called. In a CD audio object, you could read the total playing time or the number of tracks. In a AVI, you could read the current frame.The command can be one of the following:
readyleft/right volume outputcurrent trackdisk space driveforwardlengthlength track numbermedia presentnumber of tracks
218 THE EXPRESSION EDITOR – THE GAMES FACTORY
MCI – FUNCTIONS

pause modepositionposition track numberspeedstart positiontime format window visible
Return String
Return String reads a string of characters from the selected MCI device. This string might represent anything from the current filename, to the name of an instrument.
Last error number
Last error number reads the last error number generated by the MCI device. A value of zero means that there are no errors. Any other number indicates a problem.
INI Object FunctionsThis is the primary menu that you will be presented with when you select an INI Object from the‘Object to test’ dialogue box produced from the ‘Retrieve data from an object’ button of theExpression Editor;
From this menu you can select the type of information that you want to retrieve. These are listedbelow underneath their menu headings.
Get Value
THE GAMES FACTORY – THE EXPRESSION EDITOR 219
INI – FUNCTIONS

Usage: Value of(“object”)
Reads a value from the current position. You’ll need to choose the [Group] and Item first.
Get stringUsage: String of$(“object”)
Reads a line of text from the current File position. You can move to the appropriate line with the Set Current Group and Set Current Item actions.
Picture Object FunctionsThis is the primary menu that you will be presented with when you select Picture Object from the‘Object to test’ dialogue box produced from the ‘Retrieve data from an object’ button of theExpression Editor;
From this menu you can select the type of information that you want to retrieve. These are listedbelow, the text on the left is what will actually be written in the Expression Editor (The GamesFactory does this for you, although you can enter it in as text if you like) and on the right is a verybrief description of the variable.
Get picture name
picture name$(object,”string”)Get picture nameThis function reads the full path name of the currently loaded file. It can now be copied into an alterable string, or saved in an “INI file” using an “INI” object.Get X, Y variables
220 THE EXPRESSION EDITOR – THE GAMES FACTORY
PICTURE – FUNCTIONS

x original of(“object”) Get picture original x sizey original of(“object”) Get picture original y sizex screen of(“object”) Get picture screen x sizex screen of(“object”) Get picture screen y size
Button Object FunctionsThis is the primary menu that you will be presented with when you select a Button Object from the‘Object to test’ dialogue box produced from the ‘Retrieve data from an object’ button of theExpression Editor;
‘Value of set Radio button’ retrieves the numerical order of the Radio-button that you haveclicked on. For example, if you had a Radio-button object with 5 buttons, the first button would be 0, thesecond would be 1 and so on. This function retrieves that number.
‘X position of Button’ retrieves the X coordinate of the Button object.
‘Y position of Button’ retrieves the Y coordinate of the Button object
‘X Size of Button’ retrieves the X size of the Button object.
‘Y Size of Button’ retrieves the Y size of the Button object.
THE GAMES FACTORY – THE EXPRESSION EDITOR 221
BUTTON – FUNCTIONS

Mixer Object Functions
This is the primary menu that you will be presented with when you select a Mixer Object from the‘Object to test’ dialogue box produced from the ‘Retrieve data from an object’ button of theExpression Editor;
‘Wave left volume’ retrieves the current volume setting that samples are played at through theleft speaker channel.
‘Wave right volume’ retrieves the current volume setting that samples are played at throughthe right speaker channel.
‘Midi FM synthesizer left volume’ retrieves the current volume setting that Midi files areplayed at through the left speaker channel.
‘Midi FM synthesizer right volume’ retrieves the current volume setting that Midi files areplayed at through the right speaker channel.
‘Midi square wave synthesizer left volume’ retrieves the current volume setting that Midisquare wave files are played at through the left speaker channel.
‘Midi square wave synthesizer right volume’ retrieves the current volume setting that Midisquare wave files are played at through the right speaker channel.
222 THE EXPRESSION EDITOR – THE GAMES FACTORY
MIXER FUNCTIONS

The ObjectsAll the Objects that are going to be used in a game must first be placed onto the play area in theLevel Editor screen before you can do anything with them. There are several exceptions, however,the ‘Restricted Objects’. These are the Special, Sound, Storyboard, Creation, Mouse / Keyboardand Player 1-4 objects, which are always in existence, and are always on the Event Editor screenand cannot be deleted.
The object libraries contain mainly Backdrop, Quick Backdrop and Active Objects. They aresituated on the toolbar at the top of the screen;
By clicking on the pull-down button at the side of the icon you can display / hide a list of all theobject libraries. In The Games Factory the list is so extensive that the scroll buttons may have to beused for you to reach the library you require.Bear in mind that once you have selected and placed an object on your play area it will always bein the ‘Frame Objects’ library, stored at the top of the list. This includes all the objects that youcreate, such as Counters, Text and Question objects, not just the games characters. Most of thesecan be created using the ‘Create Object’ icon at the top of the screen.
Summary of types of ObjectsActive objects. The main moving characters of the game. Can be manipulated in a variety ofways, moved around and animated. (See page 232)
Backdrop objects. Used to set the scene for games. Can be defined to be an obstacle or not.(See page 240)
Quick Backdrop objects.Can be used to provide more scenery, or as building blocks,platforms etc. (See page 240)
Text objects. Used to put text up on the screen. (See page 243)
Question and Answer objects. For asking the player a question and selecting an answer.(See page 247)
Counter objects. Used for a very wide range of different tasks. Expressed as a number, can bedisplayed on screen or hidden. Useful for energy levels, status, direction controls etc. (See page 249)
THE GAMES FACTORY – THE OBJECTS 223
SUMMARY OF OBJECTS

Score Objects. Used for displaying a players score. (See Page 251)
Lives Objects. Used for displaying the number of ‘Lives’ a player has. (See Page 253)
High Score Object. Displays a High Score table. (See Page 255)
Edit Objects. Can be used for entering player’s name, passwords, etc. (See Page 257)
AVI Objects. Used to contain Video clips within your game. (See Page 261)
QuickTime Objects. Very similar to AVI objects, but plays video clips stored in Apple’sQuickTime format. (See Page 263)
MPEG Objects. Used for playing MPEG supported video. Note: You must have an MPEG cardand drivers to use this object. (See Page 263)
FLI / FLC Objects. Used for playing animated sequences from FLC files. (See Page 266)
CD Audio Objects. Allows you to play audio CD’s. (See Page 268)
MCI Objects. One of the main functions is to play various different files in your game. A fairlyadvanced feature. (See Page 269)
INI Objects. Normally used to provide initialisation information for a game, but can be used tostore information like player’s position, score etc. (See Page 271)
Picture objects. Can be used to display a picture on the screen. A wide variety of pictureformats can be displayed. (See Page 272)
Button objects. Are used to place a ‘Button’ on the screen which the player can then click onwith the mouse pointer, either to ‘press’ the button, or place a Check-mark. (See Page 274)
Mixer objects. Used to change the volumes of the audio channels in The Games Factory. (SeePage 276)
224 THE OBJECTS – THE GAMES FACTORY
SUMMARY OF OBJECTS

Common parameters for most objects
Almost all of the objects can be changed in the ways described in the following paragraphs. Somecan be changed in all the ways, some only one. The above menu was taken from an Active object,but the following options are open to many of the objects. There is a menu for each objectunderneath each heading. All of these parameters can be changed from the Level Editor screenwhen you select your object with the right mouse button. Some can be changed as the game isplayed, from the Event Editor.
View
Basically, this will allow you to ‘move’ the objects on the Level Editor screen to be displayed ‘in-front’ of, or ‘behind’ one-another. This can be very useful if you are building a complexbackground, such as a forest scene, where you may want put an object on the screen, behindsomething else. Normally The Games Factory will put the last object to be placed on the screen ‘infront’ of all the others.
Handy Hint! With Active Objects you can access this function from the Event Editor, so that you can put anActive Object ‘in front’ or ‘behind other objects in the middle of a game.See ‘Event Editor-Active Object Actions-Animation’ on page 168 for more information on how to dothis.
THE GAMES FACTORY – THE OBJECTS 225
COMMON PARAMETERS – VIEW

Object Preferences
All the different types of object can have various different preferences assigned to them, changingthe way that they behave and appear.
All Except Backdrop Objects
By clicking on your object with the right mouse button and then selecting the ‘Object preferences’menu item, you will be presented with a screen that looks like this;
As you can see, there are three layers to this screen. We will deal with ‘Object handling’ first.Starting from the top of the dialogue box, the first thing that you can see is the tick box for makingthe object global to the whole application. This means that this object will exist on all the levels ofyour game and will be stored on the ‘Frame objects’ library of each Level Editor screen. It alsomeans that all the parameters that you assign to that object will be carried through to each level,such as its movement.
Handy Hint!Below this is the heading for the ‘Object qualifiers’.This is a very useful function indeed and can save you hours of time in the Event Editor.What this does is it assigns an object to one or more groups. For example, you can have severaldifferent objects and call them all ‘Bullets’ and another group of objects called ‘Goodies’. Then, inthe Event Editor, instead of having a separate event for each individual bullet and goody, youcould just say “If the Group ‘Bullets’ collides with the group ‘Goodies’, do.....”When you go into the object qualifiers you will be presented with a screen like this;
226 THE OBJECTS – GAMES FACTORY
COMMON PARAMETERS – PREFERENCES – GROUPS

This dialogue box displays the many different groups that there are available for you to put thatparticular object into. An object can belong to more than one group.For example, you can have a group ‘Bullets’, and have Goodies Bullets and Baddies Bullets. Oneparticular bullet would belong both to the group ‘Bullets’ and to either the ‘Goodies’ group or the‘Baddies’ group also.There is a scroll bar at the side of the window as there are so many different groups for you tochoose from. Once you have chosen your group it will be displayed on the first ‘Object Qualifiers’ screen.
Now let’s move on to the ‘Extra’ functions.
Under the ‘Scrollings’ heading we have the ‘Follow the playfield’ tick box. This means that unlessotherwise changed, the object will be scrolled when the playfield is scrolled. Having this turned offmeans the object will stay still even when the playfield is moved around, handy for things like scoreand life displays, which you want to stay in the same position on the screen all the time.
SECTION HEADING
THE GAMES FACTORY – THE OBJECTS 227
COMMON PARAMETERS – PREFERENCES – EXTRA

The next box down will inactivate an object if it strays too far from the game playing area. This canbe useful if you are going to have a lot of objects flying around on and off the screen. It can speedup your games by deactivating all objects that are not going to come back onto the play area.
The display method, when left as default (off), will display your object as normal, but changing tobackground will merge it with the current background, making it faster to be displayed. You cannotdo this to Active objects.
Collision detection will adjust between fine and box (only shown as on or off respectively). Usingbox detection uses the box around the Active object to determine whether or not there has been acollision. By using fine, The Games Factory will look at the edge of the ‘Solid’ area of an object anduse that to determine whether or not a collision has been made.The example below demonstrates the difference.
In this picture, a collision would only be detected if another object collided with the solidparts of the object, the actual structure of the star.
In this picture, a collision would be detected if there was a collision with the imaginary boxthat surrounds the image, which in some cases would look unrealistic.
Advanced Object Preferences
The ‘Background’ options allow you to save the background as an Active object is moved overit, or to wipe it with colour. The reason that you may want to do this is that in very fast ‘Shoot `emups’ with many different Active objects whizzing around the screen, not having to replace the
SECTION HEADING
228 THE OBJECTS – THE GAMES FACTORY
COMMON PARAMETERS – PREFERENCES – EXTRA

background as an object is moved over it can dramatically speed up a game.
When the tick box in the ‘Save Background’ switch is filled, The Games Factory will re-display thebackground as an object is moved over it. With the tick box off, it will either leave a trail of partsfrom the Active object, or...‘Wipe with colour’ wipes the trail of an Active object with a specific colour. In space shoot `em upsthis could be black. This means that a black trail would be left by an Active object as it movedaround, but if the background was black anyway it would be invisible. Or you could use thisfunction to leave a ‘Snail trail’ around the screen of the colour that you are wiping with.
‘Ink Effect’ gives you a wide range of effects to play with. Using this function you can makeghostly figures barely visible, ones that only appear when they pass over a background object,plus some that will result in some fairly psychedelic colour changes.By pressing the pull-down button at the side of the text box you select your ink effect. Note that the% box will only be activated when you select the ‘Semitransparent’ option.
‘Transparent colour’ draws the object as normal, and draws the background of that object with anormal transparent colour. The default setting.
‘Opaque’ means that the areas normally transparent on the object will be displayed as an opaquecolour, normally black. This is slightly faster for The Games Factory to do.
‘Semitransparent’ draws your figure with ‘translucent ink’. You can change the density of the ink bychanging the percentage transparency. The higher the number the more transparent will be yourimage. You can create an excellent ‘Ghost’ effect using this function. But beware, this effect takesthe processor a long time to produce and can slow down your game.
‘Inverted’ inverts the colours that your object is drawn with. Note that it does this by colour as wellas shade. You can end up with some unexpected results, so exercise some caution with this andthe following ink effects.
‘Xor’ will invert your objects colours, but re-invert them over a black background. Can result in veryinteresting colours when passed over the top of other colours.
‘And’ results in your object being invisible over a black background and unchanged over a whiteone. Again, results in some fairly fantastic colour changes when it interacts with other colours.
‘Or’ results in your object only being normally visible over a black background, and completelyinvisible over a white one. Again, interacts psychedelically with other colours.
‘Memory’You can change the way The Games Factory stores the information about objects in various ways
SECTION HEADING
THE GAMES FACTORY – THE OBJECTS 229
COMMON PARAMETERS – ADVANCED PREFERENCES

by changing these tick-boxes. You may find that if you do a very large game indeed, an awful lotof memory is used, which may not be desirable.So, The Games Factory will let you load in information only as and when it is needed. Normally, atthe start of a game all the information about all the characters will be loaded in; all the animationframes, preferences, etc.You can change this using the following functions.
‘Load on call’ will only load in animation frames to memory when it is required in the game. Beforean animated character is displayed on screen, the animation frames associated with that characterwill not be stored.Note: This can slow down action games noticeably as The Games Factory will have to pause thegame for a fraction of a second as it loads in the animation frames. This function is most useful inadventure games where memory is at a premium and such momentary pauses would gounnoticed. Note also that those frames will stay in memory once loaded unless ‘Discarded afteruse’.
‘Discarded after use’ discards all information not needed about a character once that character isremoved from the screen. Normally used in conjunction with ‘Load on call’ to save memory. Alsominutely slows down game play, so best used in slow paced games which have lots of animatedcharacters.
‘Destroy object if too far from playfield’ removes an object from the display list. When used inconjunction with ‘Discard after use’ and ‘Load on call’ will remove the animation frames of thatcharacter from memory. Note that this function is normally on by default, so if a character wandersoff screen too far, The Games Factory does not have to keep on displaying that character. This isuseful if you have many animated objects flying around, when it would become difficult to displayall the objects both on and off screen. By turning this option off your objects will be permanently somewhere off the screen until youdecide to destroy them via the Event Editor.
Edit name and iconNormally, The Games Factory has a name and icon already for each object in the object libraries.Also, if you were to create your own object, The Games Factory would make an icon for that objectusing a small version of the graphic for that object, and would assign names in numerical order,e.g. ‘Active Object 1’, or ‘Counter Object 15’When you start getting complex game play you may well find it easier to keep track of all yourdifferent characters if you name them yourself as well as making up your own icons for them.For example, the icons for counter objects are all the same, yet you may be using many countersin your game. Changing the appearance of the icon will help you greatly to keep track of themboth on the Level Editor screen and particularly on the Event Editor screen. Assigning your own
SECTION HEADING
230 THE OBJECTS – THE GAMES FACTORY
COMMON PARAMETERS – – EDIT NAME & ICON

names to them will help you even more.You may well have two different Active objects that use exactly the same animation frames, andwhose icons are identical, yet they perform two entirely different functions. It would be far easier tokeep track of them with different icons and names.
For more detail on the actual mechanics of changing the icon, go to the ‘Picture Editor’ chapter onpage 287.
ResizeAllows you to resize your object by using pick-points on a box drawn around the object. Byselecting and holding a pick-point, you can drag the box to the size that you want the object. WithActive objects you also have the option to enter the size change as a percentage ratio directly.
AlignWith this function you can precisely align your Object. You can push it up against the left hand orright hand edge of the playfield, or centre it horizontally from the ‘Horizontally’ option.If multiple objects are selected you can align objects in rows and columns.
SECTION HEADING
THE GAMES FACTORY – THE OBJECTS 231
COMMON PARAMETERS – RESIZE/ALIGN

Active Objects
Note: Only the options related specifically to Active objects are described below. All the other optionsavailable are described in the heading ‘Common parameters for most objects’ on page 225.
Active Objects are used as the main characters of your games. These are the characters thatyou can control, either using the mouse or keyboard, or having the computer control them. Youcan also make your active objects animated, making them run, jump or whatever you decide.
Active objects are denoted by the icon on the object shelf (Level Editor Screen). Try grabbingone and dragging it onto the screen.You can also create your own by clicking on the new object icon on the tool bar at the top ofthe screen (Level Editor).Once you have done this you can change the options by selecting on the object with the rightmouse button.
MovementTo change an objects movement from the Level Editor, select the object using the right mousebutton, then select the ‘Movement’ option from its pull-down menu and then ‘Select Movement’.
Player Controlled MovementMouse ControlledThis assigns your object to exactly follow the movement of the mouse. Notice that when you call thisoption your object will be surrounded by a box which represents the limits of movement of your object.You can make this stretch or shrink by grabbing the pick points with your mouse and dragging them
SECTION HEADING
232 THE OBJECTS – THE GAMES FACTORY
ACTIVE OBJECTS – MOVEMENT

around. Note this box takes its position from the object, not the screen, so if you move your object to anew position on the Level Editor screen, you may well need to edit this box again.
The following movement parameters are used for several of the movements, so they have beensummarised here.
‘Speed’ Sets the maximum speed your object will be able to move at.
‘Acceleration’ Sets the rate at which your object will reach its maximum speed. If your objectwas a car, for example, you may want the acceleration quite high. If it were a “heavier” object, likean elephant, you would want it set quite low.
‘Deceleration’ Affects the rate at which your object slows down. Having a high value will stopyour object quickly when you release the key to move it. Having it set low will result in a verygradual slowing down, as though the object were really heavy, like an oil tanker.
‘Initial Direction’ Allows you to decide what the first direction will be of the object. If you selectmore than one direction, the computer will select one direction at random.
‘Moving at start’ Toggles whether or not you want your object to be moving at the start of a game.
‘Try Movement’ Tests your movement on the screen. Use the <Esc> key, or select the “Stop”icon to take you back to the direction editor.
Eight Direction MovementsThis movement provides you with the classic eight different directions that are used by a joystick.You can also use the cursor keys to control this movement. There are several basic controls.Speed, acceleration and deceleration have been described above.
‘Possible directions’ allows you to select or un-select the number of directions your object can move in.
To select or un-select a direction simply click on the relevant box. Possible directions are shownby having an arrow pointing to that box. In the example above the only possible direction thatobject could move in would be right.
SECTION HEADING
THE GAMES FACTORY – THE OBJECTS 233
ACTIVE OBJECT – MOVEMENT & DIRECTION

SECTION HEADING
Race Car
This simulates a birds-eye view of a cars’ movement, thus there are controls for steering, brakingand accelerating. These are;
Accelerator Up arrow Joystick UpBrake Down arrow Joystick DownTurn Left Left Arrow Joystick LeftTurn Right Right Arrow Joystick Right In addition to speed, acceleration and deceleration settings, there are;
‘Enable Reverse movement’ Gives your object reverse gears. With it turned off, you can onlyhave forward movement.
‘Directions’ Lets you decide how many different directions it is possible for the vehicle to movein. Selecting 4 will only give you left, right, up and down, 32 the smoothest possible directionchanges.
Note: You can easily create all the different animations needed for each direction by using theAnimation Editor. (See Page 241)
‘Rotating Speed’ Sets the rate of turn. Having a high value will allow tight corners to be turned,having it low reduces the cornering ability.
Platform MovementThis movement is used mainly to define platform game-type movement, i.e. characters who walkalong a platform on the screen viewed from the side.They are controlled by the cursor keys or the joystick.In addition to the usual Acceleration, Deceleration and Speed, there are a large number of controlspeculiar to Platform movement.See ‘Backdrop objects-Obstacles’ on page 241 to see how to go about making platforms andladders out of backdrop objects.
Note: You must still test for a collision with a backdrop platform object otherwise your activeobject will fall through the platform.
‘Gravity’ Like it suggests, selects the effect of gravity. A high setting will have your object fallrapidly, allowing only short jumps.
‘Jump Strength’ Selects the jumping power of your character. Changing the gravity will also
234 THE OBJECTS – THE GAMES FACTORY
ACTIVE OBJECT – MOVEMENT – RACE CAR/PLATFORM

affect this parameter.
‘Jump Controls’ Used to change the control system for jumps.
‘No Jump’ Turns the jumping off.
‘Up Left/Right arrow’ Makes the object jump when both the ‘Up’ arrow and either the left orright cursor keys are pressed.
‘Button 1’ Uses fire button one or the “Shift” key to control the jump.
‘Button 2’ Uses the second fire button or the “Control” key to activate a jump.
Computer Controlled MovementsThese movements are used to move around the other objects in your game, from a simplebouncing ball to an attack wave of aliens.
‘Bouncing Ball’ Is normally used to produce an object that will bounce around the screen,mimicking the movement of a bouncing ball. However, by changing a lot of the parameters andusing the Event Editor, this movement can be used to control the movement of a host of Aliens, orplatform Baddies that will chase you around.
‘Speed’ Speed is set as for all the other types of movement.
‘Ball Deceleration’ When this is set to zero, the ball will keep on bouncing around forever.Increasing this value gradually slows your object down until it eventually grinds to a halt.
‘Bounce Randomiser’ As the name suggests, makes the bounces more random in theirdirection by having this control set high.
‘Bounce Security’ This jiggles your objects around to stop them getting stuck in corners, but asa result the rebound effects are made slightly more random.
SECTION HEADING
THE GAMES FACTORY – THE OBJECTS 235
ACTIVE OBJECT – MOVEMENT – COMPUTER

Path Movement
Sets your object moving on a pre-determined path that you define. For example, a patrolling guard whowalks a set distance then turns around, or has a pre-set walk around a corridor.
Path Editor
You can see that there are six different buttons for you to define your movement, plus the speed barwhich changes the speed which that object moves along it’s path.A Path-type movement is entered using your mouse to define the path.
‘New Line’ This function will add a single line to your movement. Note: If you already have amovement defined, New Line will be added at the end of this by default, unless you insert it bychoosing the insertion point with the mouse.
‘Tape Mouse’ Allows you to set a very complex path movement. By holding down the leftmouse button and dragging it around the screen you set the movement you want. Note that thisfunction will change the speed of the object depending on how fast you move the mouse around.
‘Pause’ Stops your object at its current position for a pause that you define.
‘Loop the Movement’ This will run whatever movement you have defined over and over.Note that it will re-position the object to its original starting position to continue the loop, so try andensure that your path finishes at the objects start point, or it will ìjumpî around the screen.
‘Reverse at End’ Simply reverses an objects movement and sends it back along the originalpath, backwards.
‘Reposition Object at End’ Replaces your object to its original starting position when it hascompleted the movement.
‘Try Movement’ Allows you to try the movement before finally deciding upon it.
SECTION HEADING
236 THE OBJECTS – THE GAMES FACTORY
ACTIVE OBJECTS – MOVEMENT – PATH

Editing a path
Once you have added a movement to your object, you can edit it very easily afterwards from theLevel Editor by selecting the object, then select the ìEdit Movementî option.This will present you with the Path Editor again. You can select individual points of the movement,or whole sections by dragging a box around them. You can then manipulate these selected piecesby either deleting them, or using the Cut, Copy & Paste from the Edit menu. (Drop-down menu atthe top of the screen).You can simply drag one of the points that you select using the left mouse button.
Inserting a conditionBy using the right mouse button on one of the points, you can insert one of the previously definedconditions at any point along a path e.g. set a pause, tape mouse, new line etc.
SECTION HEADING
THE GAMES FACTORY – THE OBJECTS 237
ACTIVE OBJECT – MOVEMENT – EDITING A PATH

Bouncing Ball Movement
The Bouncing Ball movement is normally used to provide a ball-like movement that will bounce offother obstacles on the screen.However, by setting all the parameters to zero, you will have a movement ‘blank page’ which youcan then manipulate entirely from the Event Editor, useful for Baddies movements.When you first enter the ‘Ball movement setup’, you will be presented with a three layered dialoguebox. You can change the layer being shown by clicking on its text.
Movement‘Speed’ sets the maximum speed which your object can move at.
‘Deceleration’ sets the rate at which your bouncing object will slow down. Having this option set tozero will bounce your object around endlessly.
‘Moving at start’ will set off the movement in one of the directions you choose (see below) rightfrom the start of the game. Having it set off means that the object will remain stationary until it isbumped into by another object.
SECTION HEADING
238 THE OBJECTS – THE GAMES FACTORY
ACTIVE OBJECT – COMPUTER – BALL MOVEMENT
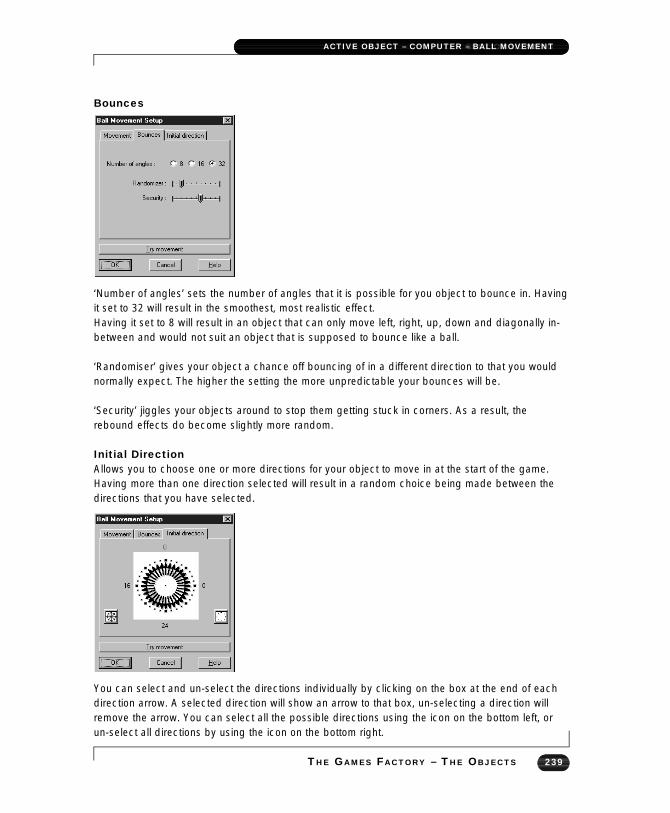
SECTION HEADING
Bounces
‘Number of angles’ sets the number of angles that it is possible for you object to bounce in. Havingit set to 32 will result in the smoothest, most realistic effect.Having it set to 8 will result in an object that can only move left, right, up, down and diagonally in-between and would not suit an object that is supposed to bounce like a ball.
‘Randomiser’ gives your object a chance off bouncing of in a different direction to that you wouldnormally expect. The higher the setting the more unpredictable your bounces will be.
‘Security’ jiggles your objects around to stop them getting stuck in corners. As a result, therebound effects do become slightly more random.
Initial DirectionAllows you to choose one or more directions for your object to move in at the start of the game.Having more than one direction selected will result in a random choice being made between thedirections that you have selected.
You can select and un-select the directions individually by clicking on the box at the end of eachdirection arrow. A selected direction will show an arrow to that box, un-selecting a direction willremove the arrow. You can select all the possible directions using the icon on the bottom left, orun-select all directions by using the icon on the bottom right.
THE GAMES FACTORY – THE OBJECTS 239
ACTIVE OBJECT – COMPUTER – BALL MOVEMENT

Backdrop Objects and
Quick Backdrop Objects
Note: Only the options related specifically to Backdrop objects are described below. All the otheroptions available are described in the heading ‘Common parameters for most objects’ on page225.All the following parameters apply to both Backdrop and Quick Backdrop objects, except thatQuick Backdrop objects can be constructed without using the Picture Editor, if their appearance isgoing to be relatively simple. How to do this is discussed at the end of the this topic on page 242.
Backdrop objects are normally used to ‘set the scene’ in games. Provides a backdrop for yourplayers to move over, or even to interact with.
You cannot move backdrop objects or change their appearance when the game is playing, as youcan with Active objects, but you can change their position on the screen, their size, shape andcolour from the Level Editor.
You can either select one of the many Backdrop objects from an object library or create you own
Backdrop and Quick Backdrop objects using the icon from the toolbar at the top of the LevelEditor screen.
Most of the changes that you make to the actual appearance of the backdrop object are doneusing the Picture Editor (see page 287). You only use this when you have selected ‘Mosaic’ whenusing a Quick Backdrop object. All the others are done from the main menu that you pull down when you select the backdropobject from the Level Editor screen.You will be presented with a menu like this;
SECTION HEADING
240 THE OBJECTS – THE GAMES FACTORY
BACKDROP OBJECTS

SECTION HEADING
‘Obstacle’ You can change the way that other objects on the screen will interact with a backdropby turning on or off the menu options here. There are four options;
‘No’ means that the backdrop object will not be an obstacle to Active objects. You will not be ableto detect a collision with an Active object with this option turned on.
‘Yes’ means that it will be possible to detect a collision with an Active object. You must test for acollision with a backdrop in the Event Editor and insert a ‘Stop’ action
‘Platform’ means that the backdrop object will act as a platform for Active objets controlled byplatform-type movement. Not the same as ‘Obstacle’ because you will not be able to detect acollision from an Active object that has been assigned a platform-type movement.
‘Ladder’ will treat the backdrop object as a ladder when you are using a platform-type movement.For those animated objects that have a relevant animation sequence, the animation willautomatically be changed when they are climbing a ladder. If not, you could change the animationvia the Event Editor. See ‘Active-Actions-Animation’ on page 167
‘Edit Picture’ allows you to change the appearance of the backdrop object using the PictureEditor. To learn more about the Picture Editor turn to page 287
‘New Object’ is available for both Backdrop Objects as well as Active objects, and means thatyou can produce another object that looks exactly the same as the original object, only it exist aseither a Backdrop, Quick Backdrop or an Active object. You can then place this object on theLevel Editor screen and although it looks exactly the same as the original Backdrop, it takes on all
THE GAMES FACTORY – THE OBJECTS 241
BACKDROP OBJECTS – OBSTACLE/NEWOBJECT

SECTION HEADING
the qualities of whichever object type that you selected it to be.‘New Quick Backdrop Object’ is only available from the menu of a Quick Backdrop object. Itproduces a clone of the original, but with a different name, one up in numerical order. Forexample, if you created a Quick Backdrop object and it was the first one that you had produced inthat game, The Games Factory would call it ‘Quick Backdrop 1’. If you cloned that object using thismethod, even though it would take on all the same parameters as the original object, it would becalled ‘Quick Backdrop 2’.Note that this differs from using the right mouse button to lay down multiple copies of the sameobject. Using that method results in producing genuine clones with the same name. If you made achange to one, that change would occur to all of them.
‘Resize’ allows you to resize your object by using the pick-points on the box shown around theobject.
‘Align’ will correctly align your Backdrop object. You can push it up against the left hand or righthand edge of the playfield, or centre it horizontally from the ‘Horizontally’ option.You can align it against the top, bottom or centre it vertically using the ‘Vertically’ option from themenu.
Special Options for Quick Backdrop Objects
The reason that there are two different types of backdrop object is that for many purposes it is onlynecessary to produce a block of colour, or gradient of colour.For example, to produce a plain black backdrop, it is very easy to simply select a block colour fora quick backdrop and then stretch it to fit the screen rather than go into the picture Editor and fill apicture. For simple structures like platforms and ladders they are very quick to be produced.
You have several options within the Quick Backdrop Editor.
242 THE OBJECTS – THE GAMES FACTORY
BACKDROP OBJECT – QUICK BACKDROP OPTION

‘Solid’ will fill your object with a solid colour, selected from the palette.‘Mosaic’ will take you to the Picture Editor. See page 287 for more information.
‘Gradient’ will produce a smooth gradient from one colour to another. To use this function, tick inthe ‘Gradient’ tick-box with the left mouse button, then the ‘From’ button. Now choose your firstcolour from the palette. Then select the ‘To’ button, then select the second colour from the palette.You will be presented with a smooth graduation of colour from one to another. You can change theorientation of the gradation using the ‘Vertical’ and ‘Horizontal’ buttons.
‘Pattern’ uses a cross-hatch to grade the colours from one to another rather than smoothly fadingthe colour.
Text Objects
Note: Only the options related specifically to Text objects are described below. All the other optionsavailable are described in the heading ‘Common parameters for most objects’ on page 225.
Text objects are used to put text up on the screen. You can use them for instructions, comments,end of game displays or just about anything where you need to place text on the screen. There aresome texts already in the object libraries, but you really want to be making your own. To do thisselect the icon from the toolbar at the top of the Level Editor screen, then click on the text icon.(Shown above.)The mouse pointer will be replaced with a cursor. You place this cursor at the place that you wantthe text to start.
SECTION HEADING
THE GAMES FACTORY – THE OBJECTS 243
TEXT OBJECT

You will also have a dialogue box which is where you select your fonts, size and colour of text, aswell as the justification style you want to use.
Selecting a font, size and colour
Clicking on the font icon will take you to a dialogue box where you can choose the size, style andfont that you want to use for the text in your text object.
To change the parameters simply click on each text box. All the text boxes have scroll bars so thatyou can view all the options available. The ‘Sample’ box will give you a preview of the style youhave chosen.
‘The colour selector’ This is merely a shortcut to changing the colour of the text via the ‘Font
SECTION HEADING
244 THE OBJECTS – THE GAMES FACTORY
TEXT OBJECT – FONT, SIZE & COLOUR

Editor’, and brings up a palette for you to choose the text colour from.
‘Left Alignment’ When you have more than one line of text, this option will align it all so that allthe lines start evenly from the left-most margin.
‘Centre Align’ This will align all the text centrally, so the length of the lines will be mirrored abouta central line.
‘Right Align’ Aligns all your text to butt-up against the right margin.
‘Import’ This allows you to load up .txt files and place them into your text object from disk.
Once you have places your text object onto the play area, you will be able to right click on it toproduce it’s menu. All the other options have already been discussed, the ‘Setup’ option wasdescribed above. The following page describes the function of the ‘Edit Data Strings...’ option.This option allows you to have one Text object used to display several different paragraphs of text.When you select this option you will be presented with a dialogue box like this;
SECTION HEADING
THE GAMES FACTORY – THE OBJECTS 245
TEXT OBJECT – IMPORT

This screen shot was taken with three paragraphs entered, ‘One paragraph’, ‘And another’, ‘Andthe last one’.You can ‘Edit’ or ‘Clear’ the selected paragraph, or change its order using the up and down arrowson the right of the dialogue box.You add more paragraphs using the ‘Add’ button, which then takes you to a text box where youenter in the text for your new paragraph.Note that on the left of each paragraph is number. This number is used to identify the paragraphwhen you display it in the Event Editor. For example, an Action you could insert under the Text object on the Event grid would be ‘Displayparagraph 1’, which in this case would display ‘One paragraph’ on the play area during a game.
SECTION HEADING
246 THE OBJECTS – THE GAMES FACTORY
TEXT OBJECT – IMPORT
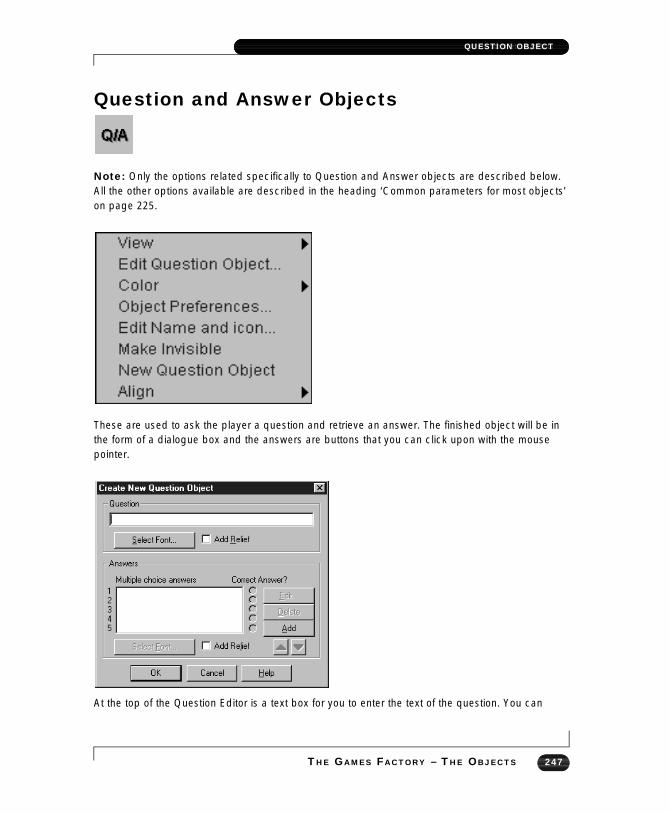
Question and Answer Objects
Note: Only the options related specifically to Question and Answer objects are described below.All the other options available are described in the heading ‘Common parameters for most objects’on page 225.
These are used to ask the player a question and retrieve an answer. The finished object will be inthe form of a dialogue box and the answers are buttons that you can click upon with the mousepointer.
At the top of the Question Editor is a text box for you to enter the text of the question. You can
SECTION HEADING
THE GAMES FACTORY – THE OBJECTS 247
QUESTION OBJECT

select the font of the text used here by clicking the ‘Select Font...’ button.You can also have the question text ‘raised’ by clicking in the ‘Add Relief’ box.
Underneath this is a text box where your answers are displayed. To put in the text of an answer,click the ‘Add’ button. This takes you to another text box where you can type in the text of youranswer. You can keep on adding answers until you are satisfied that you have enough answers tochoose from.To choose which answer is the correct one, select in one of the ‘Correct Answer?’ tick boxes. Thiscan then be read from the Event Editor.
SECTION HEADING
248 THE OBJECTS – THE GAMES FACTORY
QUESTION OBJECT

Counter Objects
Note: Only the options related specifically to Counter objects are described below. All the otheroptions available are described in the heading ‘Common parameters for most objects’ on page 225.
Counter objects can be placed on the screen using the icon on the toolbar at the top of theLevel Editor screen, then selecting the Counter Object icon.They can be hidden, to count special values to help decide direction, timers, etc., or shown, torepresent power levels, speed, temperature, etc.
To stop a displayed counter being moved around the screen with the play area, go to the ‘Objectpreferences-Scrollings-Follow the playfield’ option, and turn it off.
Select the counter with the right mouse button after you have placed it on the play area to pulldown a menu, now select “Edit Counter...”. You will be presented with a dialogue box like this;
SECTION HEADING
THE GAMES FACTORY – THE OBJECTS 249
COUNTER OBJECT

Here you can select the initial value of the counter, the minimum that it can ever reach, and themaximum value it can reach. You can change these by selecting in the relevant text boxes.By default the counters are ‘Hidden’ which means that they are not visible when you run yourgame.To show the other options use the button at the side of the ‘Hidden’ text. This will pull down all theavailable options.
‘Numbers’ will display your counter as numbers. You can change the style and colour of thenumbers using the ‘Import new font’ button, or change the appearance of each individual numberby using the right mouse button to select the number that you want to change. You can then usethe Picture Editor to change the appearance of the numbers. For more information on using thePicture Editor turn to page 287
‘Vertical Bar’ will display your counter as a vertical bar that changes in length with the value ofthe counter. Note that the scale of the bar is worked out on the difference between the minimumand maximum possible values, so if you have a minimum of 0 and a maximum of 100 and thevalue of the counter is 10, the bar will be one-tenth its maximum length. You can change theappearance of the bar in a similar way to editing a Quick Backdrop object.
‘Horizontal Bar’- as ‘Vertical Bar’ but horizontal.
‘Animation’ will display a frame of animation for a different counter value.For example, if you have ten frames of animation, and the minimum value of the counter is 0 andthe maximum 100, then when its value is between 0 and 9, the first frame of animation will beshown. If the value was between 50 and 59, then the fifth frame of animation will be shown.You will then be presented with a string of empty frames ready for you to insert your animationpictures. By selecting a frame with the right mouse button you can alter each frame using thePicture Editor. See page 287 for more information on the Picture Editor.
SECTION HEADING
250 THE OBJECTS – THE GAMES FACTORY
COUNTER OBJECT

Score Objects
Note: Only the options related specifically to Score objects are described below. All the other optionsavailable are described in the heading ‘Common parameters for most objects’ on page 225.
To stop a Score object being moved around the screen with the play area, go to the ‘Objectpreferences-Scrollings-Follow the playfield’ option, and turn it off. Select the Score object with theright mouse button after you have placed it on the play area to pull down a menu to do this.
Score objects are normally used to display a players score. You can create a score object byusing the icon from the toolbar on the Level Editor screen.You can then place your object anywhere on the play area.
To change which player the Score object relates to, select on the Score object with the rightmouse button, then the ‘Player’ option. You can then choose which of the four players you wantthat particular score object to relate to.
You can change the appearance of the numbers being displayed by selecting the ‘Edit Score...’option from the score objects pull-down menu. When you do this you will be presented with anumber editor like this;
SECTION HEADING
THE GAMES FACTORY – THE OBJECTS 251
SCORE OBJECT

SECTION HEADING
You can edit the individual frames by selecting them with the right mouse button. You can also useCut, Copy and Paste from the ‘Edit’ menu at the top of the Number Editor.To change the font size and colour, select the ‘Font’ button. This will take you to a Font Editordialogue box where you can select the size and style, as well as the colour of the font that youwant to use.
You also have the option to import a new font from disk using the ‘Import’ button.
252 THE OBJECTS – THE GAMES FACTORY
SCORE OBJECT

Lives Objects
Note: Only the options related specifically to Lives objects are described below. All the other options
available are described in the heading ‘Common parameters for most objects’ on page 225.
To stop a Lives object being moved around the screen with the play area, go to the ‘Objectpreferences-Scrollings-Follow the playfield’ option, and turn it off. Select the Lives object with theright mouse button after you have placed it on the play area to pull down a menu to do this.
Lives objects are normally used to display the number of ‘Lives’ that a player has left.
You can create a new Lives object by selecting on the icon at the top of the Level Editorscreen.‘Player’ allows you to assign the Lives object to players 1, 2, 3 or 4.
When you select the ‘Edit lives...’ option, you will be presented with a dialogue box like this;
From here you can decide upon the look of the objects that are used to show the number of lives aplayer has left.
By selecting the button next to the text box, you will pull-down the following options;
SECTION HEADING
THE GAMES FACTORY – THE OBJECTS 253
LIVES OBJECT – PLAYER

‘Picture’ will display a picture for the object that you use. See the Picture Editor chapter on page287 for more information on how to draw your own pictures.
‘Numbers’ will display the number of lives as a number. You can change the look of the numbersusing the Number Editor. See ‘Score Objects-Number Editor’ from the previous topic for moreinformation.
‘Pick image from object’ allows you to use an object already made up, either from one of TheGames Factory’s extensive object libraries, or from another game.
This dialogue box shows ‘Vehicles: Tank 1’. You could then choose one of these objects and thatwould be used as the Lives character.
SECTION HEADING
254 THE OBJECTS – THE GAMES FACTORY
LIVES OBJECT – PICTURE

High Score Objects
Note: Only the options related specifically to High score objects are described below. All theother options available are described in the heading ‘Common parameters for most objects’ onpage 225.
You can create a new High Score object by selecting on the icon at the top of the Level Editorscreen.
High Score objects are used to display a table of high scores for your game. You can change theappearance of the table, as well as the names that are shown in it to start with, as well as the initialscores. You may want to make it fairly difficult to get onto the High Score table at all by having theinitial scores set quite high.
When you create a new High Score object, you will be asked to decide how it is set-up from thisdialogue box;
SECTION HEADING
THE GAMES FACTORY – THE OBJECTS 255
HIGH SCORE OBJECT
You have several options open to you.
‘Total number of names’ changes the length of the table. The higher the number, the morenames that you will be able to fit onto your High Score table.
‘Length of a name’ sets the maximum length for a name to be displayed on the table.The ‘Options’ tick-boxes toggle each option on or off.
‘Show name before score’ will show the name in front of the score. Having this option offmeans that the scores will be displayed down the left hand side of the table instead.
‘Hide on start of level’ will make the High Score table invisible when the level is first started.You can then make it visible after an Event has occurred from the Event Editor.
‘Check on start of level’ tests the table at the start of the level. Whenever the player moves toa new level, the table will be updated automatically.‘Don’t display scores’ means that only when a player has reached the lowest level of the HighScore table will a score be displayed.
‘Font’ allows you to select the font that the scores and names are displayed in. Beware that youdo not choose so large a font that not all the scores can be displayed at once.
‘Scores’ allows you to set the initial scores. This ensures that the table will not be empty the firsttime that you use it, and means that a player will have to reach a minimum score before they canget onto the table.
SECTION HEADING
256 THE OBJECTS – THE GAMES FACTORY
HIGH SCORE OBJECT - SETUP

Edit Objects
Note: Only the options related specifically to Edit objects are described below. All the other optionsavailable are described in the heading ‘Common parameters for most objects’ on page 225.
You can create a new Edit object by selecting on the icon at the top of the Level Editorscreen.
Edit objects make it possible to retrieve information from the users playing your games. By default,the Edit object is displayed as a single line. You can use these objects to enter codes, passwords,etc.You can also display them in a rectangular box to allow for multiple lines of text using the ‘Multiline’option from the ‘Setup’ option.After the user has entered some text, you can cut, copy or paste the text into another Edit object,or the Windows clipboard.
Once you have placed the object on the Level Editor screen, you can select the ‘Setup’ optionfrom its pull down menu by using the right mouse button.The Setup option enables you to define the settings for your Edit objects in the Level Editor.Display the text in any colour, and any of the available True Type fonts. You can also hide yourEdit object in the background for future use.
To change the parameters of your Edit object, select on it with the right mouse button, then selectthe ‘Setup’ option from the menu. This will take you to a screen that looks like this;
SECTION HEADING
THE GAMES FACTORY – THE OBJECTS 257
EDIT OBJECT

The Scrolling optionsThe Scrolling options are used to add horizontal or vertical scroll bars to your edit zone.
Select in the ‘Horizontal scroll bar’ tick-box to add a horizontal scroll bar to the bottom of the Editbox. The player can drag a slider left or right to scroll through the contents.
Select in the ‘Vertical scroll bar’ check box to add a vertical scroll bar to the right side of the Editbox. The player can drag a slider up or down to scroll through the text.
‘Horizontal Autoscroll’ is used when you’re displaying text which is too wide to fit into the currentediting area. Once this check box is enabled, The Games Factory will scroll your text to the leftwhenever the user moves the cursor past the edge of the zone. The user will always be able to see thecurrently edited text on the screen. If this feature is disabled, the cursor will stop when it reaches theright-hand side of the Edit zone.
‘Vertical Autoscroll’ automatically scrols the text up when the user moves the cursor past thebottom of the editing area. If this check box is disabled, the cursor will stop when it reaches the lastvisible line.
Note: You can only use the Autoscroll feature if you’re displaying your text over several lines, using the“Multiline” feature.
PropertiesThe Properties options change the way the Edit object will work on the screen.
SECTION HEADING
258 THE OBJECTS – THE GAMES FACTORY
EDIT OBJECT – SETUP

‘Multiline’ By default, your Edit zone will be displayed on a single line. This makes it easy to create editing areasfor your dialogue boxes. You can define your dialogue box using a number of different Edit zones. Eachobject can read a separate piece of information into your game such as a name, password, or a searchcommand.If you want to display larger amounts of information, you can enable the ‘Multiline’ check-box. This feature arranges your text in a rectangular box on the screen. You could use it todisplay the pages of a story, the text in an encyclopaedia, or the product details in an advertisement.You could also create editing windows to enter free-form comments or notes from the user.
Note: Multiline mode doesn’t change the size of the display area. You’ll need to set the size separately using the Resize option from the objects pull-down menu in the Level Editor.
‘Tab Stop’The Tab Stop option lets you move around the Edit objects using the TAB and SHIFT + TAB keys, just like a standard Windows dialogue box. If the Tab Stop check box is enabled, theuser can press the TAB key to jump directly to the next line. Press SHIFT + TAB will move the userbackwards through the available Edit zones. The zones are arranged in the same order they werecreated in the Frame Editor. So, the first zone created will be the top of the list, and the last zonecreated will be at the bottom.
Note: You can only use the Tab Stop feature for SINGLE lines. This option won’t be available if you’re using Multiline mode.
‘Password’The Password feature provides a simple way of entering private information such as passwords or credit card details. The password feature hides the user’s entries, replacing eachletter with a star (*).
Note: The Password feature has no effect on the actual text. It just changes the way that the textis displayed on the screen. Read the password protected lines directly from your game using the‘Get text’ action from the Event Editor screen. The Password option is not compatible with theMultiline feature. It’s only available if you’re displaying your zone as a single line.
‘Border’ adds a thin border line around the Edit zone.
‘Hide on start’ conceals the Edit zone at the start of the current level. You can display the Editobjects again using the ‘Make object Reappear’ action, or make it invisible again with ‘Make objectInvisible’.
‘Read only’ limits the Edit objects to a text display and stops the user from editing its contents.
SECTION HEADING
THE GAMES FACTORY – THE OBJECTS 259
EDIT OBJECT – SETUP – MULTILINE
The Control buttonsThe Control buttons are used to set the style and appearance of the text and to choose a colourfor the background areas.
Click the ‘Select Font’ button to display a standard font selector to choose the colour, size,style, and type of your text. The Games Factory lets you display your text in any True Type fontand in any colour.
Click the ‘Background button’ to choose a background colour for your text. All Windows colours can either be a “Solid” colour or a mixture of two shades or a “composite” shade. If youchose a “composite” shade, only a single colour will be shown in the display area.
CasesThe Case options enable you to change the way the text will be displayed in the Edit zone.
‘No modifications’ shows the text exactly as it was originally entered by the user.
‘Uppercase’ automatically converts the Edit zone’s contents into CAPITAL letters.
If you typed in a line such as: “Hello world”, it would be automatically changed to “HELLOWORLD”.
This feature is very useful because it forces the user’s commands into a standard format. Supposing you wanted to test for an instruction such as “Attack”. The user could type thiscommand into an Edit object. You could now read it into your application with the ‘Get Text’function, and test its contents using the ‘Compare two general’ values condition. Unfortunately, the user might type the instruction as “Attack”, “attack”, or “ATTACK”. This meansyou’d need THREE tests for each possible command. You could avoid this by enabling theUppercase check box in the Setup dialogue box. This text would be automatically converted into the same format so you’d only have complete one test to check for “ATTACK”.
Lowercase forces the text to displayed in lower case letters. Taking the previous example, the line“Hello World”, would be changed to “hello world”.
SECTION HEADING
260 THE OBJECTS – THE GAMES FACTORY
EDIT OBJECT – CONTROL

AVI Objects
Note: Only the options related specifically to AVI objects are described below. All the otheroptions available are described in the heading ‘Common parameters for most objects’ on page225.
You can create a new AVI object by selecting on the icon at the top of the Level Editor screen.
AVI objects, or ‘Video for Windows’ objects can be used to add professional looking moviesequences to your Games Factory games. These sequences are displayed in their own “Viewingwindow” that can be moved around the screen.Actions and conditions are available from the Event Editor so that you can fast forward, freezeframe, or jump to a new position in your clip.
Video for Windows or AVI files can be played on practically any Windows computer. You’ll be ableto display your sequences in anything from 16 to 16 million colours (providing you’ve got anappropriate driver installed). The video will be smoother if you’ve got a little extra memory and alocal bus video card. But you can get acceptable effects on even the most limited hardware.Video for Windows objects require the Video for Windows driver before you can use them. If youdon’t already have this driver, you can install it during The Games Factory setup.
Video clips can be taken from a range of sources. You can create your own using a Video Captureboard or display existing files from a PD library or CD-ROM. You can also edit your clips into aprofessional video sequence using a commercial software package like ‘Adobe Premier’.
Selecting on the AVI object with the right mouse button will pull down a menu. Selecting the ‘Setup’option will display the ‘Setup AVI’ dialogue box:
SECTION HEADING
THE GAMES FACTORY – THE OBJECTS 261
AVI OBJECT
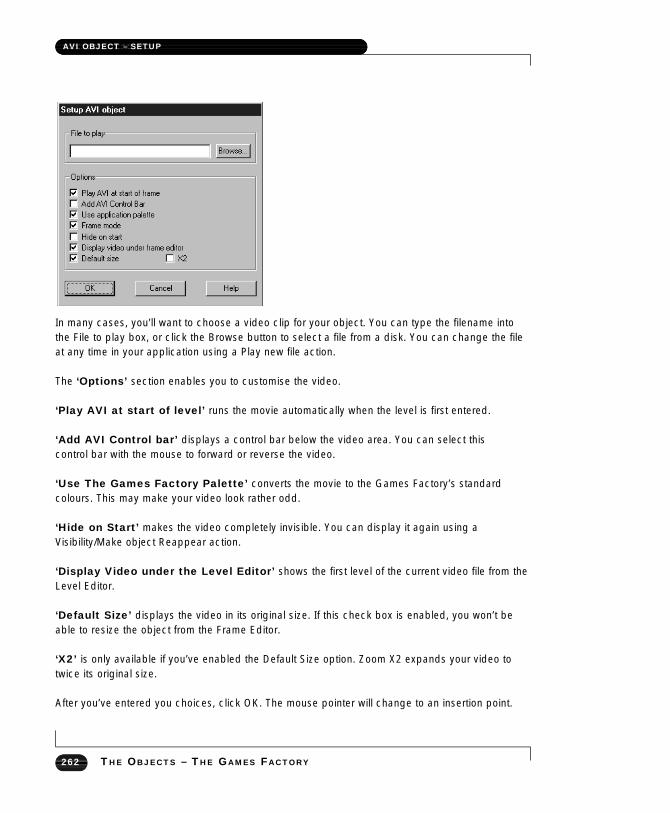
In many cases, you’ll want to choose a video clip for your object. You can type the filename intothe File to play box, or click the Browse button to select a file from a disk. You can change the fileat any time in your application using a Play new file action.
The ‘Options’ section enables you to customise the video.
‘Play AVI at start of level’ runs the movie automatically when the level is first entered.
‘Add AVI Control bar’ displays a control bar below the video area. You can select this control bar with the mouse to forward or reverse the video.
‘Use The Games Factory Palette’ converts the movie to the Games Factory’s standardcolours. This may make your video look rather odd.
‘Hide on Start’ makes the video completely invisible. You can display it again using a Visibility/Make object Reappear action.
‘Display Video under the Level Editor’ shows the first level of the current video file from theLevel Editor.
‘Default Size’ displays the video in its original size. If this check box is enabled, you won’t beable to resize the object from the Frame Editor.
‘X2’ is only available if you’ve enabled the Default Size option. Zoom X2 expands your video totwice its original size.
After you’ve entered you choices, click OK. The mouse pointer will change to an insertion point.
SECTION HEADING
262 THE OBJECTS – THE GAMES FACTORY
AVI OBJECT – SETUP

Click on the place on the play-area to drop the AVI object into place. If you haven’t enabled the‘Default size’ check box, you can adjust the playback window with the ‘Resize’ option from theobject’s menu.
Quick Time Objects
Note: Only the options related specifically to Quick Time objects are described below. All theother options available are described in the heading ‘Common parameters for most objects’ onpage 225.
You can create a new Quick Time object by selecting on the icon at the top of the LevelEditor screen.
Quick Time objects are virtually identical to AVI Objects and can be manipulated in the same way.See ‘AVI Objects’ (above) for more details.
MPEG Objects
Note: Only the options related specifically to MPEG objects are described below. All the otheroptions available are described in the heading ‘Common parameters for most objects’ on page225.
You can create a new MPEG object by selecting on the icon at the top of the Level Editorscreen.The only option that is specific to MPEG objects is its ‘Setup’ option. Note that the ‘Movement’option is identical to that of Active objects.
SECTION HEADING
THE GAMES FACTORY – THE OBJECTS 263
QUICKTIME/MPEG OBJECTS

You call up the objects ‘Setup’ option by right selecting it when it is already on the play area. It isautomatically produced when you first try to create it.You will then be shown a dialogue box like this;
In the ‘File to play’ text box you enter the drive name and file pathway of the file that you want toplay. Alternatively, you can click on the ‘Browse’ button and produce a file selector and then selectyour file to play from this.
Under the ‘Options’ heading there are several tick-boxes which will enable / disable theseoptions;
‘Play MPEG at start of frame’ will automatically start playing the MPEG sequence when thatframe (level) first starts. It would be useful to have this turned off if you wanted to start thesequence when something specific happens in your game, like the hero reaching the end of alevel, or having them turning on a virtual TV!
‘Add MPEG control bar’ adds a ‘slider’ control bar, much like a scroll bar, at the bottom of theMPEG window which you can then move forwards and backwards to control the position of theMPEG sequence. A play / pause button is also displayed.
‘Use Games Factory palette’ enforces The Games Factory palette to be used by the MPEGobject rather than it’s own colours.‘Frame mode’ stops the time reference at the same time as the sequence is stopped. So, if youwere to ‘Stop’ the MPEG, then ‘Resume’ it with this option on, it would simply pause the sequence,and carry on from where it was stopped.If this option is disabled though, then the time reference will carry on running. Say, for instance,that the sequence was ‘Stopped’ for 2 seconds, and then ‘Resumed’, the frame it would resumefrom would be from 2 seconds further along the sequence.
SECTION HEADING
264 THE OBJECTS – THE GAMES FACTORY
MPEG OBJECT – SETUP

‘Hide on start’ simply makes the MPEG object invisible at the start of the level. It can then bemade visible via actions in the Event Editor.
‘Default size’ displays the MPEG at the size it was created in. Having this option on allows you toenable the ‘x2’ box which doubles the size of the MPEG display.
SECTION HEADING
THE GAMES FACTORY – THE OBJECTS 265
MPEG OBJECT – HIDE ON START

FLI / FLC Objects
Note: Only the options related specifically to FLI /FLC objects are described below. All the otheroptions available are described in the heading ‘Common parameters for most objects’ on page 225.
You can create a new FLI / FLC object by selecting on the icon at the top of the Level Editorscreen.
When you first create the object, or choose the ‘Select an animation’ from its menu (Pulled down byselecting on it with the right mouse button) you will be presented with the following dialogue box;
SECTION HEADING
266 THE OBJECTS – THE GAMES FACTORY
FLI/FLC OBJECT

It is from here that you select which animation to load in from disk. The Games Factory already hassome animations on the CD under the ‘examples-media’ headings.
FLI objects run Autodesk compatible ‘FLI’or ‘FLC’ Animations directly from one of your levels in TheGames Factory.You can use FLI objects as an animated background for your games. They are perfect for theintro. before a game begins. You can also move them around the screen like an Active object, andtest them using a wide variety of conditions and functions.
Check the Object help for detailed information about the available movement options:FLI’s are similar to Active objects. They both generate their displays using a series of still pictures,or Animation Frames. These Frames are flashed onto the screen in sequence, creating a smoothillusion of movement.The Games Factory CD contains a number of these animations for your use. Look at “Libs/Anims”directory for a list of the available animations. You can treat them in a similar way to Active objects, and many of the parameters are very similar.However, they are normally much larger and take up considerably more memory space. You canchange the way that they are handled from the objects menu. Select the ‘Setup...’ option. You willthen be presented with a dialogue box like this one;
‘Play from disk’ will play the file from disk rather than loading it into memory. This can result in afairly slow animation, but it does save a lot of memory space.
‘Loop’ will loop the playing of the animation continuously.
‘Skip frames if machine not fast enough’ does exactly that. On very slow machines, or ifyou are loading the image in from CD ROM, the animation may well be slow. To get around thisyou can skip frames to speed up the animation. Note that each object has its own time scale, so ifyour machine is fast enough already, changing this number will not make any difference to thespeed of the animation, and The Games Factory will not skip any of the animation frames.
SECTION HEADING
THE GAMES FACTORY – THE OBJECTS 267
FLI/FLC – SELECT ANIMATION

CD Audio Objects
Note: Only the options related specifically to CD Audio objects are described below. All the otheroptions available are described in the heading ‘Common parameters for most objects’ on page 225.
You can create a new CD Audio object by selecting on the icon at the top of the Level Editor screen.CD audio objects add a professional touch to your Games Factory Games. You can include superbsound effects, real speech, or CD quality music. Don’t worry if you can’t create your own CDs.(Recordable CD-ROM’s are still quite rare!) You can still have a lot of fun producing your ownjukeboxes, creating disco effects, or playing your favourite song for the background music in your game.
To change the CD Object parameters, select on the object with the right mouse button and choose‘Setup...’ from the menu. You will be presented with a dialogue box like this;
‘Open CD Drive at start of level’ activates your CD driver the moment your frame starts, anddeactivates when it finishes. If you disable this check box, you’ll force The Games Factory to resetthe CD. This lets you read files from the CD-ROM when the CD is not playing an audio track.
‘Play CD track [1] at start of level’ will begin your CD playing from the specified tracknumber when your game starts. Enter a new track number to start the CD playing at a differenttrack.
‘Stop CD track at end of level’ will stop the CD Audio system from playing at the end of thelevel.
SECTION HEADING
268 THE OBJECTS – THE GAMES FACTORY
CD AUDIO OBJECT – SETUP

MCI Objects
Note: Only the options related specifically to MCI objects are described below. All the other optionsavailable are described in the heading ‘Common parameters for most objects’ on pag 225 .
You can create a new MCI object by selecting on the icon at the top of the Level Editor screen.Media Control Interface (MCI) is a standard way of controlling any multimedia device connected to a personal computer. MCI objects let you use this Media Control Interface directly from your Click & Create applications. MCI objects work in the background, using the Windows multi-tasking system. They are completely independent from the rest of your The Games Factory game.If you used an MCI object to play a large sound sample directly from the “.WAV” files on the disc,these samples would continue to play even when The Games Factory moves to a new frame, orexits from the game. You can play music from a CD, from beginning to end, without the slightestinterruption, Run a “QuickTime” or “AVI movie file” in its own revisable Window and control externaldevices such as “MIDI sequencers” or “MPEG cards”.The MCI object doesn’t appear on the screen. It works in the background so you can sendcommands to any media device currently running under Windows. The MCI object also lets youread information from any device used by The Games Factory.MCI enters your instructions using command strings. These strings are in plain English, so they’renot hard to use, even for a non programmer. The only complication, is that you have to usecomplicated looking device names.Before using these commands, it’s worth noting that The Games Factory also provides a range ofobjects for playing AVI files, QuickTime movies, or CD audio tracks directly. These offer a simplealternative to the MCI system.
SECTION HEADING
THE GAMES FACTORY – THE OBJECTS 269
MCI OBJECT – SETUP

If you select on the MCI object with the right mouse button and select the ‘Setup...’ option, you willbe presented with a dialogue box that looks like this;
‘Device name’This box assigns your MCI object to the selected device. The name should be entered in lowercase letters only. The Games Factory will test that you’ve entered a valid name before using thedevice. If you make a mistake, the commands will be ignored.
‘Options’Some MCI devices required you to enter additional information when you pause the display:‘Pause command’ enters the Pause options.‘Resume command’ enters the Resume options.
‘Open MCI Device Driver at start of level’ - by default, your MCI object will be activatedthe moment your level starts, and deactivated when it finishes. If you disable this option, the MCIdevice will need to be re-initialised before each command, using a separate ‘Open’ instruction inyour game, from the Event Editor. This process will be slower but you can use it when you want to control several devices at a time.
‘Close MCI Device Driver at end of level’If this check box is enabled, the device driver will close when the game reaches the end of a level.
SECTION HEADING
270 THE OBJECTS – THE GAMES FACTORY
MCI OBJECT – SETUP

INI Objects
Note: Only the options related specifically to INI objects are described below. All the other optionsavailable are described in the heading ‘Common parameters for most objects’ on page 225 .
You can create a new INI object by selecting on the icon at the top of the Level Editor screen.When you have done this you can enter the ‘Setup...’ option by clicking on the object with the rightmouse button and selecting the ‘Setup...’ option from the menu.
INI objects are vitally important to your Games Factory application even though they don’t actuallyappear when the application is run. INI objects save and load values into an “INI” file on the disc.They can be used to store configuration details and keep track of a player’s progress in a game.INI Files provide a simple way of saving your information for future use. You can use them to:
Save the player’s status in an adventureStore the current level in an arcade game, with the player’s score and lives valuesHold the settings of a screen saverKeep track of the current application directoryEnter the name and address of the current user
INI Files are divided into sections called ‘Groups’. Here are some examples:
[This is a Group][Here’s another one][Hero’s position]
As you can see, the names are surrounded by square brackets. These brackets are added automatically by The Games Factory.Each ‘Group’ has its own set of ‘Items’. These ‘Items’ can be loaded with either a number, sometext, or the current screen coordinates of an object. The contents of these items can be read from the disk when they’re needed or changed at anytime in your game.All the functions of INI files are accessed from the Event Editor. See page 199 for more details.
SECTION HEADING
THE GAMES FACTORY – THE OBJECTS 271
INI OBJECT

Picture Objects
Note: Only the options related specifically to Picture objects are described below. All the other optionsavailable are described in the heading ‘Common parameters for most objects’ on page 225.
You can create a new Picture object by selecting on the icon at the top of the Level Editorscreen.Picture objects provide an easy way of adding images to your application. Each picture object canbe loaded with a file in either: “BMP”, “DIB”, “RLE”, “PCX”, “LBM”, or “IFF” formats.The Picture will be displayed in its own window on the playfield. You can set the position of thewindow in the Level Editor. When you add a Picture Object to your application, the picture will bedisplayed as an “envelope” on the screen. This envelope sets the physical limits of the image. Ifthe picture is larger than the envelope, the image will be resized to fit into the area.You can change the size of the area using the “Resize” option from the object’s pop-up menu. You can also let the user adjust the size during the application. See the “Picture resize” option in the Setup dialogue box. You can enter the ‘Setup...’ option by clicking on the object with the right mouse button andselecting the ‘Setup...’ option from the menu.You will then be presented with a dialogue box that looks like this;
SECTION HEADING
272 THE OBJECTS – THE GAMES FACTORY
PICTURE OBJECT – SETUP

Click the file box to type in the name of an image to be loaded from the disk. If you’d prefer tochoose the file from a directory, click the Browse button to display the selector.‘Picture Resize’ allows you to resize the picture via the Level Editor. With this tick-box off, theobject will be fixed in its current size.
‘Hide on start’ makes your picture invisible at the start of the level. You can make it visible atany time via the Event Editor using the ‘Show’ function.
SECTION HEADING
THE GAMES FACTORY – THE OBJECTS 273
PICTURE OBJECT – SETUP

Button Objects
As there are no Button objects already in The Games Factory’s object libraries, you will always becreating your own, using the ‘Create’ icon from the toolbar at the top of the screen.You will be presented with a setup dialogue box that looks like this;
At the top left of this dialogue box is the type of Button object you want to create.
‘Text push button’ will create a Button object that contains text which ‘stands-out’ from thescreen, and can be ‘pressed-in’ by clicking on it with the mouse pointer.
‘Bitmap push button’ allows you to draw your own Button. If you selected this option instead ofthe ‘Button text’ heading you would be shown a ‘Bitmaps’ heading, with three choices, each ofwhich will take you to a Picture Editor so that you can decide on the look of your button. See page287 for more information on the Picture Editor.The three choices are;‘Normal’ allows you to decide what the button looks like in its normal state, i.e. not pressed ordisabled.‘Pressed’ allows you to decide how your button will look when it is pressed with the mouse pointer.‘Disabled’ lets you change the look of your button when it is disabled.Note that you cannot select a font with this type of button, nor type in text, as the whole look of thebutton is decided via the Picture Editor for that button.
‘Checkbox’ will create a Button object that will contain a check-mark that can be placed /removed by clicking in the box with the mouse pointer.
‘Radio button’will create a Button object that normally has several options to it, associated witha line of text. When you click on one option, it turns any others off, and by the same virtue, you can
BUTTON OBJECT – SETUP
274 THE OBJECTS – THE GAMES FACTORY

only turn off an option by clicking on another.
‘Example’ displays an example of what your button will look like.
‘Background’ changes the colour of the background of your buttons. Only available with‘Checkbox’ and ‘Radio’ buttons.
‘Select font’ allows you to select the font you are going to use for any of the text that you use foryour buttons.
‘Options’ allows you to set the status of the button when it is first displayed.‘Dehighlighted at start’ will dehighlight the button by default, and make it disabled. You would thenhave to enable it via an Action performed via the Event Editor.‘Hide on start’ hides the button object initially. Note that you cannot select on it whilst it is invisible.You can make it visible by performing an Action upon the button via the Event Editor.‘Text left of button’ displays the text associated with a button on the left of the button instead of theright. Only available to ‘Checkbox’ and ‘Radio’ buttons.
‘Button text’ is not available for ‘Bitmap’ buttons. You can directly enter the text that you want tobe associated with a button in here. Simply select in the box with the mouse pointer to change thetext. When you are creating a ‘Radio’ button object, however, this box will display the textassociated with each different radio-button. You can use the ‘Add’ option to add another radio-button option to your object.Use the ‘Edit’ option to change the text of a particular button option, ‘Delete’, to delete it. You mustselect the option you want to change / delete, using the left mouse button. It will then behighlighted in your Windows highlight colour.
When you have setup you button object, you can then place it on the play area by clicking the ‘OK’button at the bottom of the dialogue box, then place it using the left mouse button.All the other options available are described in the heading ‘Common parameters for most objects’on page 225. You can access these by right-clicking on the button object once it has been placedon the play area. The menu looks like this;
SECTION HEADING
THE GAMES FACTORY – THE OBJECTS 275
BUTTON OBJECT – SETUP

Mixer Objects
There are only two options available for the Mixer objects on the Level Editor, ‘Edit name and icon’and ‘Align’, which are both discussed in the ‘Common parameters for most objects’ on page 225.
Mixer objects are used to change the left / right volumes of samples and Midi tracks whilst they arebeing played through your speakers. Virtually all of the options available to you for Mixer objectsare accessed via the Event Editor, on page 204.
SECTION HEADING
276 THE OBJECTS – THE GAMES FACTORY
MIXER OBJECT

Animation EditorIn order to edit or create an animated object, you must be in the Level Editor screen, and you musthave either picked an object from the object shelf and placed it in the play area, or be creating anActive object using the ‘New Object’ tool on the toolbar at the top of the screen.
Note: only Active objects can be animated from the Animation editor.
First we shall deal with editing an Active object that already exists. This will also show you most ofthe steps required to create your own animated object.
Select the object that you want to edit (on the Play Area of the Level Editor screen) by using theright mouse button. This will pull down a menu of options for that object. Move the pointer to the‘Edit animations...’ option and click the left mouse button. You should now have a screen that looks something like this;
You can use this screen to change the name of your animation, preview what it looks like when yourun it all together, create different animations depending on the direction your character is movingin, or different animations if you character is climbing, running, etc.
SECTION HEADING
THE GAMES FACTORY – ANIMATION EDITOR 277
INTRODUCTION

Important note; To ‘select’ all the frames of an animation, use the ALT+A keyboard shortcut.This will allow you to move or delete a whole sequence of animation in one go. Let’s explore this screen a bit more.
Animation SpeedTo the top right are the controls for the speed of the animation as well as the number of times it willrepeat the total animation loop before it stops. You can select ‘Looping’ by moving the ‘Repeat’slider below 1, which will repeat the animation sequence endlessly. You can also change whichframe number it loops back to in the ‘Loops back to Frame’ box, which could be used for a mangetting up from a crouched position, then running away, the first couple of frames being croucheddown, then looping the animation back to the running sequence only.
Note that for some animations there are two sliders for the control of speed. There are only twocontrols for when the object would normally be moving e.g. the ‘Walking’ animation of a character.If the character was ‘Stopped’ then there would only be one slider, which controls the speed of theanimation regardless of movement.
Minimum speed controls the speed when the character is not moving. Setting this to zero willhalt the animation when the character is not moving, having it set higher will have the animationrunning all of the time, which may well look unrealistic if your character is running frantically withoutmoving!
Maximum speed controls the maximum rate of the animation when the character is at fullspeed. Note that the rate of animation will be proportional to the speed of the character, in between the ‘Minimum’ and ‘Maximum’ settings. To create a realistic running actionyou may well need to change the ‘Maximum’ setting to a similar value as a characters speedacross the screen.For example, if you were to set a characters movement speed high and the animation speed low, itwould appear as though they were being ‘dragged’ across the screen, if you had the animationspeed high and the actual movement speed low, it would look as though they were trying to runfast on an icy floor.
Animation DirectionThe control for which animation plays when your character moves in a particular direction issituated in the ‘Direction’ box. You can select a direction by using the mouse to click on one of thebuttons on the arrow ‘clock face’.
SECTION HEADING
278 ANIMATION EDITOR – THE GAMES FACTORY
ANIMATION SPEED

Note: An easy way to create several different directions from one animation is to click the icon. This may may well turn your objects upside down for some of the directions but you cancorrect this using the controls outlined below.
You can select the total number of different directions by clicking on one of the buttons.Obviously, the higher the number of different directions the smoother will be the turning effect,particularly useful for race-car movement, but 4 different directions will be fine for a platformcharacter.
You can ‘manually’ fill the other directions using Cut, Copy and Paste from the Edit pull-down menu(on the Animation Editor). It is recommended that you use Copy and Paste, otherwise you willsimply move one frame to another location rather than copying it.
Manipulation Icons
These icons are used to manipulate all the frames of the animation being displayed on theAnimation Editor screen, so some care must be excercised when using them, except the ‘ViewAnimation’ icon which merely previews the whole sequence for you.(Described below.)
Horizontal Flip
The horizontal flip reverses all the images from left to right. Great for turning your characters toface the other way. Note that both the Action Point and Hot Spot will also be moved.
SECTION HEADING
THE GAMES FACTORY – ANIMATION EDITOR 279
ANIMATION DIRECTION
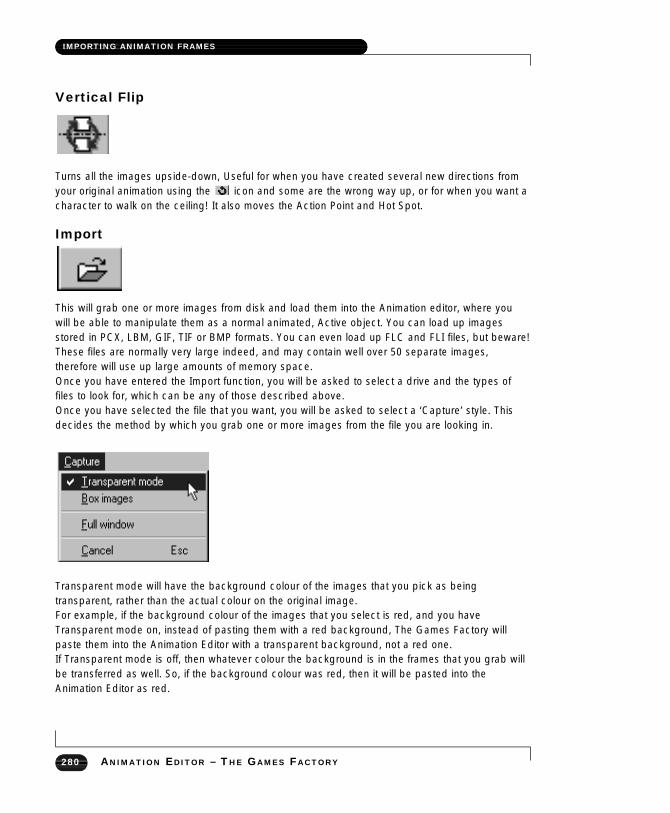
Vertical Flip
Turns all the images upside-down, Useful for when you have created several new directions fromyour original animation using the icon and some are the wrong way up, or for when you want acharacter to walk on the ceiling! It also moves the Action Point and Hot Spot.
Import
This will grab one or more images from disk and load them into the Animation editor, where youwill be able to manipulate them as a normal animated, Active object. You can load up imagesstored in PCX, LBM, GIF, TIF or BMP formats. You can even load up FLC and FLI files, but beware!These files are normally very large indeed, and may contain well over 50 separate images,therefore will use up large amounts of memory space.Once you have entered the Import function, you will be asked to select a drive and the types offiles to look for, which can be any of those described above.Once you have selected the file that you want, you will be asked to select a ‘Capture’ style. Thisdecides the method by which you grab one or more images from the file you are looking in.
Transparent mode will have the background colour of the images that you pick as beingtransparent, rather than the actual colour on the original image.For example, if the background colour of the images that you select is red, and you haveTransparent mode on, instead of pasting them with a red background, The Games Factory willpaste them into the Animation Editor with a transparent background, not a red one.If Transparent mode is off, then whatever colour the background is in the frames that you grab willbe transferred as well. So, if the background colour was red, then it will be pasted into theAnimation Editor as red.
SECTION HEADING
280 ANIMATION EDITOR – THE GAMES FACTORY
IMPORTING ANIMATION FRAMES

Box Images grabs all of the images that are within boxes, within the selection area that you definewith the mouse, and will paste each boxed image into its own animation frame, in order from topleft to bottom right.If, for example, there are ten boxed images on the screen, and you drag a selection area thatcompletely encloses nine of them, but only half crosses the tenth, only nine of the images will betaken. If box mode were off, one image comprising the entire contents of the selection area wouldbe taken and pasted into only one animation frame.
Full Window will grab the whole area inside the ‘Capture’ window (not just inside your selectionarea) and paste that into your animation frame. Note this only produces one frame of animationcomprising the entire contents of the window.If, however, you have Box Images on at the same time, all the boxed images in the window will begrabbed and treated as separate frames of animation.
Create different directionsAs briefly outlined above, allows you to quickly and easily create many different directions fromonly one animation direction. Be aware though, if you have several animation frames and 32different directions, you will be using a lot of memory space. Also, it literally just turns your objectaround, so if you start with an object that faces to the right, when it is rotated to the left it will beupside-down.
Right, let’s get on with drawing a frame of animation and then copying it out to fill several frames!
Creating / Editing a single frame of animation (Level Editor)Now try selecting an Active object with the right mouse button, then enter the ‘Edit Animations’option. When you are presented with the ‘Animation Editor’ screen click on the middle of framenumber one with the right mouse button. This will pull down a menu. Select the ‘Edit Frame’ option.This then takes you to the drawing screen, or ‘Picture Editor’ for the animation. Here you decide thecolour, size and shape of your animation frame. To learn more about this you can go to the PictureEditor chapter, on page 287. Don’t forget to come back, though!
In the picture editor you can modify each frame individually to suit your own requirements. To saveyou laboriously copying each frame out, you can go back to the animation editor and use thefollowing commands, which are select from the menu produced when you right click on the frameyou want to modify.
Adding animation framesThe key to animation is to create several frames that are slightly different to one another, that whenrun quickly together give the impression of movement. Should you be starting from scratch, or
SECTION HEADING
THE GAMES FACTORY – ANIMATION EDITOR 281
IMPORTING ANIMATION FRAMES

using one initial frame, it is far easier to copy each frame and then modify it as you go along than itis to draw the whole thing out for each frame.If you look at the Vehicle animation you can see how this is done.First of all, click on the first frame of your animation with your right mouse button, and select the‘Insert’ option. This will insert a direct copy of your first frame into frame number two.You can also do the same thing using the left mouse button. Simply select the image that you wantto copy with the left mouse button, hold the button down, then drag the image to the frame youwish it to be copied to (in this case frame number two) and let go of the button. You can now enter the Picture Editor for that frame and modify it slightly, and when you are happy,insert a copy of that frame into frame three, which you can then modify further, continuing theprocess until you are happy with it. You can check on your progress at any time by using the icon.
Resize ZoomThe Resize Zoom option allows you to automatically create several frames of animation that willgradually shrink or grow in relation to the frame that you start off with. When you select the ResizeZoom option you will be presented with a dialogue box that looks like this;
Under the ‘Original Size’ is displayed the size of the frame that you are zooming from.
Under the ‘Final Size’ heading you can select the size of the frame that you want to end up with.You can either enter in the actual size of the X and Y dimensions of the final frame, i.e. the numberof pixels wide and high that the final frame will be,or you can enter in a percentage ratio. For
SECTION HEADING
282 ANIMATION EDITOR – THE GAMES FACTORY
RESIZE ROOM

example, 50% would shrink that particular dimension by half.Note that when the ‘Proportional’ tick box is filled and you change any of the values, then the otherdimension will be changed proportionally. For example, if you changed the width to 50%, then theheight would also be changed by 50%.With the ‘Proprotional’ tick box off, you can change the dimensions independently.
The ‘Number of frames’ allows you to select how many frames are going to be used to grow /shrink the object. The higher the number, the smoother the effect will be.
‘Insert before current frame’ will grow / shrink the object before the current frame.For example, if you had selected the first frame of an animation, and you were shrinking it by half,and you were using ten frames to do so, and you inserted them before the current frame, thenwhen you had finished the process, the first frame would be the smallest, getting gradually biggerover the next ten frames until you arrived back at the original frame.If you did exactly the same process, but left this option off, then the ten frames following the initialframe would become gradually smaller and smaller, until they reached the one that was half thesize of the original.
RotateThe Rotate option can be used to insert several frames of animation that gradually rotate eitherclockwise or counterclockwise from the initial frame. You can choose the number of frames used toperform the rotation, ranging from 4 to 32. Obviously, the higher the number of frames used, thesmoother the rotation effect will be. The rotation frames will be inserted after the initial frame.
MorphingThe Morphing function allows you to change one frame into another, allowing for stunningtransformations. You can use this function to smoothly upgrade your spaceships, rather thanclumsily have them change appearance, or have creature transformations in adventure games.You may well have seen advanced versions of this technique in Hollywood movies. Now you cando it on your PC!
To ‘Morph’ an object, you first of all need an object to start with, which must be an Active object,plus the object which you want to end up with, which must also be an Active object.
The easiest way to do this is to select your second (destination) object first, enter the animationeditor, select the frame you want, then ‘Copy’ it using the Edit function from the animation editor(top left), then exit the animation editor.
Now, select the first (start) object, enter the animation editor for that object, and ‘Paste’ the
SECTION HEADING
THE GAMES FACTORY – ANIMATION EDITOR 283
MORPHING

finishing frame after the the frame you want first. You may well have to enter the Edit mode and un-select the ‘Remove all’ option, which will remove all previous animation frames if you try to paste anew frame into that animation sequence.
Note: This function works best when there is only one frame for the original object. If there aremore than one, delete the redundant frames so that you are only left with the start frame and thefinish frame. You can leave part of the original animation if you want, but bear in mind that themorphing part of the animation will not start until the original animation has run. This can also use alot of memory.When you have done this, select the first (start) frame with the right mouse button, then select the‘Morphing’ option. You will then be presented with a screen that looks like this;
SECTION HEADING
284 ANIMATION EDITOR – THE GAMES FACTORY
MORPHING

Using this editor screen you can select the number of frames used to ‘Morph’ from the originalframe to the final one. This is done by selecting in the “No. Images” box. The more frames that youhave, the smoother and more realistic the end result will be. However, this will also be timeconsuming and uses a lot of memory. By default The Games Factory uses 10 frames, which is acompromise between smoothness of the effect, and speed of execution. You can also choose thedefinition of the change in the grid box at the top of the Editor.(By default set to 5X5). Having ahigher number here will raise the number of fine changes that are made in between each frame,although again be aware that a very high definition combined with a large object will take a longtime to do, and may use up lots of memory.
The icon actually starts the whole process off. When it has finished you will be presented with awhole new animation strip, ‘morphing’ smoothly from the first image to the last.
Use of the GridYou can change the colour of the grid using the icon, which you may well find very usefuldepending on the colour of the images that you are changing.The grid is used to define common points between the two images that you want to move. The gridis composed of a number of ‘elastic bands’ that you can stretch to fit various strategic points onthe objects that you are morphing. For example, if you were to morph from one face to another, you would stretch the grid so thateach point corresponds to an eye, nose, edge of mouth etc. Make sure that the same grid point onthe other object is used to correspond to the same feature.
For example, if the point one from the left and one from the top is placed on the eyebrow on thefirst object, the very same grid point (one from the left, one from the top) must be used on theeyebrow of the second object, even if it means stretching the point right across the image window.Try to ensure that you do not get grid points ‘crossing over’ each other, as this will spoil the effectalso.
SECTION HEADING
THE GAMES FACTORY – ANIMATION EDITOR 285
MORPHING

Setting the Hot Spot of an objectThe Hot Spot is an invisible handle used to drag your images around on the screen. It is used as areference for the X, Y coordinates of your object. Each image can have its own seperate Hot Spot.As a default, when you create a new Active object the hot spot is automatically positioned at thetop left corner of each image. You can, however, move it anywhere you like. You can show the HotSpot by going to the ‘Options’ heading and select the ‘Show-Hot Spot’.Try to position it centrally if your object is going to have several different directions, otherwise it will‘jump’ when you change direction.
Setting the Action Point of an objectThis is the point where things like bullets are fired from objects. If, for example, you had a largespaceship with a gun mounted aboard, you would want to set the Action Point to the end of thebarrel of the gun. This means that this is where your bullet would first appear. You can show the Action Point by going to the ‘Options’ heading and select the ‘Show-ActionPoint’.
SECTION HEADING
286 ANIMATION EDITOR – THE GAMES FACTORY
HOT SPOT & ACTION POINT

SECTION HEADING
The Picture EditorThe Picture Editor is used for creating your own animation, background objects, icons and Quickbackdrop objects. Because many of the features are identical for all these types of objects, theyare summarised in one chapter here.
In the centre of the screen is the area you will be drawing / editing on. If the area is to large to fit inthis screen, you can either scroll around it, or zoom in or out using the zoom control buttons. (Onthe left, x1, x2, x4 & x8)
To the right of this is the palette, which allows you to pick and choose the colours you draw with.
The Colour barsThese allow you to select whether you draw with a transparency, or solid colour. You can draw witha normal colour by selecting in the palette, to draw with the transparency click on the‘Transparency’ box. When you do this the colour box wording will change to ‘Draw with trans.’ Thiswill allow you to remove parts of the object and make them transparent, rather like an eraser. Thetransparent areas are denoted by a specific colour, normally green-blue, but you can change thisusing the ‘Options’ menu at the top of the Picture editor.Anything that you decide as being transparent will ‘show through’ that area, very useful for leaflesstrees, or large animated objects that have gaps in the structure. Anything in the background will beseen through the transparent areas.
THE GAMES FACTORY – THE PICTURE EDITOR 287
INTRODUCTION
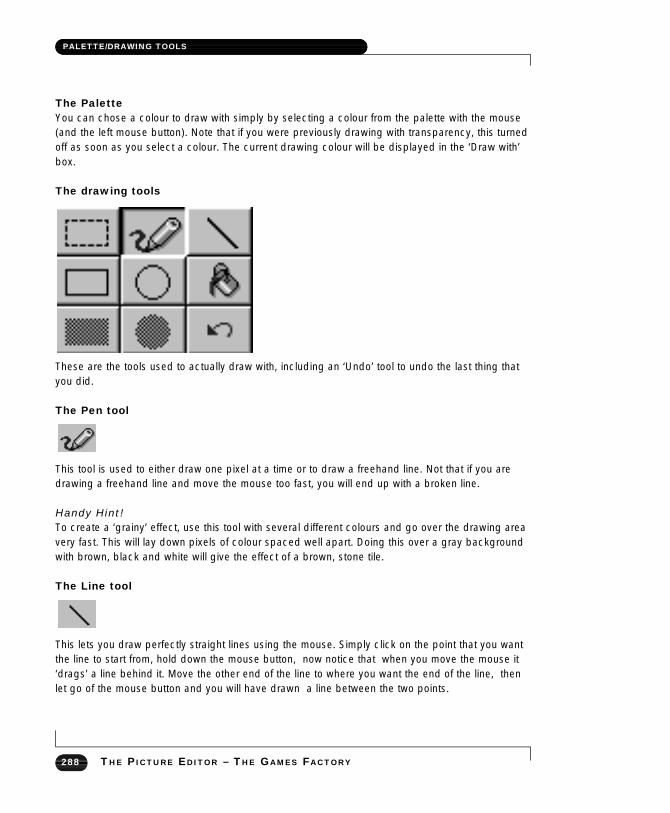
The PaletteYou can chose a colour to draw with simply by selecting a colour from the palette with the mouse(and the left mouse button). Note that if you were previously drawing with transparency, this turnedoff as soon as you select a colour. The current drawing colour will be displayed in the ‘Draw with’box.
The drawing tools
These are the tools used to actually draw with, including an ‘Undo’ tool to undo the last thing thatyou did.
The Pen tool
This tool is used to either draw one pixel at a time or to draw a freehand line. Not that if you aredrawing a freehand line and move the mouse too fast, you will end up with a broken line.
Handy Hint!To create a ‘grainy’ effect, use this tool with several different colours and go over the drawing areavery fast. This will lay down pixels of colour spaced well apart. Doing this over a gray backgroundwith brown, black and white will give the effect of a brown, stone tile.
The Line tool
This lets you draw perfectly straight lines using the mouse. Simply click on the point that you wantthe line to start from, hold down the mouse button, now notice that when you move the mouse it‘drags’ a line behind it. Move the other end of the line to where you want the end of the line, thenlet go of the mouse button and you will have drawn a line between the two points.
SECTION HEADING
288 THE PICTURE EDITOR – THE GAMES FACTORY
PALETTE/DRAWING TOOLS

The Rectangle and Filled Rectangle tools
These tools allow you to draw rectangles and squares more easily than by trying to construct themof 4 separate lines. The principle is the same as that for the line command. After selecting the iconyou want, place the pointer at the place you want the top left corner to be, press and hold downthe mouse button then drag the rectangle to the shape you want.Using the same procedure using the filled rectangle icon will do exactly the same, except that itwill produce a solid rectangle of the colour you have selected.
The Ellipse and Filled Ellipse tools
These tools allow you to create ellipses and circles, both filled and empty. In order to use them,select the icon you want, then place the mouse pointer at the place you want as the centre of thecircle. Holding down the mouse button, move the pointer away from the centre of the circle. Youwill notice that an ellipse is drawn out in proportion with how far you move the pointer from thecentre point, moving sideways from the centre will stretch out the ellipse horizontally, moving it up(or down) from the centre will stretch it out vertically.
The Fill tool
The fill icon fills an area with a solid block of colour. The area to be filled should be completelyenclosed. If there is a gap of even only one pixel, the colour will ‘leak’ out into other areas of yourframe.
The Undo tool
This is used to undo the last step that you performed. It will only undo the last thing you did,though. Pressing it again will undo what you have undone, in effect re-doing it!
The Selection tool
SECTION HEADING
THE GAMES FACTORY – THE PICTURE EDITOR 289
DRAWING TOOLS

This defines a rectangular block which can be cut or copied from your image. When it is selected,you can move the mouse where you want the top left corner of your block and then drag a boxdown around the area you want. If you make a mistake, click once on another part of your imageand try again.
Once you have selected a block you can save it into memory using the ‘Cut’ option from the Editmenu. (Top left of the Picture Editor.) The original area will be replaced with a block of thetransparent colour.
Using the ‘Copy’ image will do the same thing without affecting the original image.
After you have grabbed your area, you can now copy it onto the image using the ‘Paste’command. This provides you with a rectangular box which can be used to position your block overthe image. You can fix it in place with a single click of the mouse button.
Horizontal flip
Reverses your image from left to right, just like a mirror.
Vertical flip
Turns the whole image upside down.
Rotate
Allows you to rotate the whole image very finely. When you select this function you will be asked toselect an angle to rotate the image to. The arrow will point to the current direction. Simply click anew direction on the clock face then select ‘OK’ and the image will be turned by the angle youhave specified.
SECTION HEADING
290 THE PICTURE EDITOR – THE GAMES FACTORY
DRAWING/ROTATION TOOLS

Clear
This will blank the image window, ready for you to start from scratch.
Shrink
The shrink function removes any unnecessary transparent border areas from the image, reducingits size. This is very useful for saving memory and will speed up your game by removing overlylarge images, trimming them to the minimum required.
Import
Loads an image from disk. For more detail see ‘Import’ under the Animation Editor on page 280.
SECTION HEADING
THE GAMES FACTORY – THE PICTURE EDITOR 291
DRAWING/ROTATION TOOLS

The StepThrough EditorThe Step Through Editor can be very useful for testing your games. The Games Factory will tell youevery time an Event occurs that you have not already defined in the Event Editor. Until you ‘findyour feet’ using the Event Editor, it can make constructing an Event grid very easy. Every time yourun your game using the Step Through Editor, The Games Factory will stop the action when a newEvent occurs, tell you what that Event is, then give you the option of adding an Action to thatEvent. You don’t have to write out a new Event line, simply select which object that you want tochange.To enter the Step Through Editor, simply select on the icon at the top of the screen. Note thatin order to do anything at all, you must have at least one Active object on the screen.In this example, objects were placed on to the playfield from the ‘Vehicles: Tank 1’ library. Whenthe Step through button was selected Tank 1a moved around the screen until it collided with tank1b, and the following dialogue box was then displayed.
SECTION HEADING
292 THE STEP THROUGH EDITOR – THE GAMES FACTORY
STEP THROUGH EDITOR

The current Event that has been detected is displayed in the text box at the top of the GameControl Panel. In this case the event that has been detected is that the ball has collided with abrick, and from this dialogue box you can decide on the Actions to associate with the event.
Simply click on the relevant object that you want to ‘change’, then you will be presented with amenu of options to do to that object. When you select one, The Games Factory will make an Eventline in the Event Editor describing the Event and the Action that you have just decided upon.
In this example an appropriate action to perform would be to play a music sample when the twoobjects collide.
For a complete description of all the Actions that you can perform on an Object, turn to that Objectheading in the Event Editor chapter, within the Actions sub-chapter.
If you cannot immediately see the object that you want to ‘change’, use the mouse pointer on thescroll buttons at either side of the scroll bar to move through the objects.
You can add further Actions by clicking on the objects on the scroll bar. In this way you can veryeasily create new Event lines, however, it can be difficult to do things like manipulate Actionsdepending upon hidden values such as Flags or internal values. For the most part, you will need toconstruct Event lines in the Event Editor to do this.
SECTION HEADING
THE GAMES FACTORY – THE STEP THROUGH EDITOR 293
STEP THROUGH EDITOR

In this example, an action has been created whereby the tank 1a is destroyed when tank 1bcollides with it.
All the actions that you have chosen are summarized in the text box at the bottom of the GameControl Panel. By selecting on the text of an Event from this text box, you can delete it by draggingit into the trashcan at the bottom of the Game Control Panel, or by clicking on it with the rightmouse button.
In addition to the controls described above, you also have the Event Control buttons at the verybottom of the Game Control Panel. These allow you to look through all the Events that have so faroccurred, then add or delete actions to them.
Event Control ButtonsClicking on this button will take you to the first Event to happen using the Step ThroughEditor. You can then add, edit or delete the Actions that you have associated with thatEvent.
This will move you to the previous Event, which you can then edit.
SECTION HEADING
294 THE STEP THROUGH EDITOR – THE GAMES FACTORY
STEP THROUGH EDITOR

This will move you onto the next Event, which you can then edit. Note that you can only usethis button after you have been looking at a previous Event.
This button moves you to the last Event to be produced by the Step Through Editor, whichyou can then edit. Note that you can only use this button if you have been looking at aprevious Event.
SECTION HEADING
THE GAMES FACTORY – THE STEP THROUGH EDITOR 295
STEP THROUGH EDITOR

Saving your Games asStandalone SoftwareWhen you perform a ‘Save’ or ‘Save as...’ using The Games Factory, you are actually just savingdata which The Games Factory uses to create your game.In other words, you need to be running The Games Factory before you can run these games, theywill not run on their own. When you save as a standalone, you can choose to save your game as just an executable file, oras a discrete application, i.e. you could save it on to floppy disk and run it as a game on amachine that does not have The Games Factory installed. Note that some Active object files arevery large and may even use an entire disk just for the data for that object, so beware, if you areusing a lot of complex sound and graphics, you may need a lot of floppy disks! The GamesFactory does compress the data so considerably less space is required on disk than just astraightforward save.
When you choose the ‘Save game as standalone’ option you will be shown a warning about sellingyour games. You are prohibited from selling any game or program created by you either as an independentproduct or as Shareware.Once you have read this information you will be shown a special file selector;
SECTION HEADING
296 SAVING AS STANDALONE – THE GAMES FACTORY
STANDALONE GAMES

In the top left is the text box for you to enter the file name for your game to be saved as, the textbox on the right is the drive and directory you wish it to be saved in.
At the bottom are the ‘Options’ for the way your game will be saved. By default, The GamesFactory will simply save your game as an executable file.
If you enable the ‘Save with installer’ box then your game will be saved as a complete entity thatdoes not require The Games Factory to run, complete with installation files.You will then have a file ‘setup.exe’ saved with your game. When you run this it will install yourgame to your machine, complete with name and icon.
‘Protect game’ prevents anybody using The Games Factory from editing your game. With thisoption enabled you cannot gain access to the different Editor screens for that game. Be careful notto overwrite unprotected versions of your game with a protected version as you will not be able tomake changes to your game afterwards.
You can now save your games to give to your friends and family. You can make unlimited copies,but you are prohibited from making any financial advantage.
Selling your games
If you wish to sell your games, you are advised that you should purchase ‘Corel Click & Create’,available from the Corel Corporation.Click & Create is a sister product to The Games Factory, and you can run games you have createdwith The Games Factory on Corel’s Click & Create.The purchase of Click & Create includes a licence to sell your games as standalones.You should contact either your local software dealer, or contact Corel directly at;
Internet: http:\\www.corel.com\click&create
Addresses:
Customer ServiceCorel Corporation, c/o UCA&L, 49 B Bracken Road, Sandyford Industrial Estate, Sandyford, Dublin,Ireland
Corporate Headquarters: Corel Corporation, 1600 Carling Avenue, Ottawa, Ontario, Canada, K1Z 8R7
In North America Phone: 1-800-77COREL (772-6735)Outside of North America: (353) 1-706-3912
STANDALONE GAMES
THE GAMES FACTORY – SAVING AS STANDALONE 297

Saving as a Screen SaverYou can also save your games as a screen saver. This is subject to the same restrictions as savingas a standalone.
The Games Factory will save your game so that you can then select it from the ‘Desktop’ of yourWindows program as your screen saver.
In Windows 3.x you can go to the ‘Main’ icon, then the ‘Control Panel’, then the ‘Desktop’ setup.
In Windows 95 you can go to the ‘Start’ icon, then the ‘Control Panel’ option, then ‘Display’, then‘Screen saver’.
Europress Web SiteIf you are on the Internet you can contact the development team directly. We would be veryinterested to hear from you, whether you want the latest handy hints, general help, or to show usyour games. The Games Factory is always undergoing further development, so if you want the latest news, we’llkeep you posted on new object and sound libraries, links with other developers, and gametutorials and ideas etc.
The address is;
http:\\www.europress.co.uk,
Or email us at : [email protected]
Hope to hear from you soon!
SECTION HEADING
298 SAVING AS STANDALONE – THE GAMES FACTORY
STANDALONE GAMES

SECTION HEADING
THE GAMES FACTORY 299
NOTES

A Acceleration
See Active Object Events, Movement:
Actions. ........................................................................................130
Active Objects
Active Object Actions:
Animation:
Stop ..................................................................167
Start ..................................................................167
Change.............................................................167
Restore .............................................................168
Paste image......................................................168
Bring to front.....................................................168
Bring to back....................................................168
Destroy: .....................................................................173
Direction:
Select direction.................................................170
Look in the direction of.....................................170
Flags:
Set on ...............................................................174
Set off ...............................................................174
Toggle ..............................................................174
Movement:
Stop ..................................................................166
Start ..................................................................166
Set Speed.........................................................166
Set Maximum Speed ........................................166
Wrap Around Play Area....................................166
Position:
Select Position ..................................................169
Swap Position with another Object ..................169
Set X Coordinate ..............................................169
Set Y Coordinate ..............................................169
Shoot an object
Values........................................................................173
Visibility:
Make Object Invisible.......................................171
Make Object Reappear....................................171
Flash Object ....................................................171
Active Object Events:
Animation..........................................................131
Collisions ..........................................................130
Movement .........................................................131
Pick or Count ....................................................134
Position .............................................................132
Values...............................................................136
Adding an Action.........................................................................164
Always. See Special Object Actions .................................................
Animation. See Active object; Actions, Events, Animation Editor, FLC
/FLI Objects
Animation Editor
Editing frames. See Picture Editor
AVI Actions .......................................................194
AVI Events ........................................................157
B Backdrop objects ........................................................................240
Bouncing Ball Movement:............................................................238
Button Objects ..........................................................................274
Button Object Actions..................................................................163
Button Object Events...................................................................202
C Capture Menu..............................................................................280
CD Audio Objects........................................................................268
CD Audio Actions ........................................................................197
CD Audio Events .........................................................................160
Collisions......................................................................................130
Compare two general values. See Special Object Events .........137
Conditions....................................................................................130
Counter Object ............................................................................249
Counter Object Actions ...............................................................189
Counter Object Events ................................................................153
Create Object Actions .................................................................184
Create Object Events ..................................................................144
Creating Objects:
Level Editor.Look under the object you want to create.
Event Editor. See Create Object Actions.
Cut .................................................................................................94
300 THE GAMES FACTORY
INDEX
INDEX

D Deceleration. See Active Objects, Movement
Destroy.........................................................................................173
E Editor preferences: ........................................................................96
Eight Direction Movement ...........................................................233
Ending a game:
Using the Alt+F4 keys.....................................................
Using the Storyboard Object ....................................179
Event Editor .....................................................................
Events:
Creating.....................................................................125
Editing .......................................................................127
Grouping ...................................................................128
Expressions .................................................................................205
F File .................................................................................................84
Flags .....................................................................................136,174
FLI / FLC Object
FLI / FLC Object Actions .............................................................196
FLI / FLC Object Events ..............................................................159
G Games. See Zeb, Lobotomy and Magicians Lair. ........................94
Game setup ...................................................................................87
General setup ................................................................................85
Grid. See Editor preferences, Level Editor....................................96
Grouping Events ..........................................................................128
Grouping Objects ........................................................................226
H Help .............................................................................................105
High Score Objects .....................................................................225
High Score Actions......................................................................189
High Score Events .......................................................................154
I Importing:
Animation ..................................................................280
Menus..........................................................................90
Objects .....................................................................122
Pictures .....................................................................115
J Jumping to a Level. See Storyboard Actions, Jump to level. ....179
Justification ..................................................................................245
K Keyboard Events. ........................................................................146
L Ladders........................................................................................241
Leaving a game. Use Alt+F4.........................................................50
Level Editor ..................................................................................117
Levels:
Creating.....................................................................114
Copying.....................................................................114
Jumping to. See Storybourd Actions. .............................
Libraries:
Level Object ................................................................................119
Saving your game objects as a library .....................103
Lives.............................................................................................253
M MCI Objects.................................................................................269
MCI Object Actions .....................................................................197
MCI Object Events.......................................................................161
Menu Bar .......................................................................................84
Mixer Objects ..............................................................................276
Mixer Object Actions ...................................................................204
Morphing. See Animation Editor..................................................283
Mouse Movement ........................................................................232
Mouse Pointer and Keyboard Events..........................................146
Mouse Pointer Actions.................................................................185
Moving between Editor screens. See Toolbar
Movement ....................................................................................232
MPEG Objects .............................................................................163
MPEG Object Actions..................................................................194
MPEG Object Events ...................................................................158
THE GAMES FACTORY 301
INDEX

N Negate .........................................................................................127
Never. See Special Object Actions ...................................................
O Objects:
Creating Objects:
In a Game. See Create Object Actions.
In the Level Editor ............................................121
Grabbing objects:
From another Level ..........................................114
From another Game .........................................122
Open ..............................................................................................85
P Paste ..............................................................................................95
Path Movement ............................................................................236
Picture Objects ............................................................................272
Picture Object Actions.................................................................201
Picture Object Events ..................................................................162
Play ..............................................................................................111
Player Control. See Game setup
Playing a Sample. See Sound Object Actions.
Playing Music. See Sound Object Actions or CD Audio Actions
Platforms. .....................................................................................241
Platform Movement ......................................................................234
Position:
Select position...........................................................169
By coordinates ..........................................................169
Preferences:
Event Editor .................................................................98
Game...........................................................................87
Level Editor .................................................................97
Object........................................................................225
Storyboard...................................................................96
Q Question and Answer Objects ....................................................247
Quickbackdrop Objects ..............................................................240
QuickTime Objects ......................................................................263
QuickTime Object Actions...........................................................194
QuickTime Object Events ............................................................157
R Race car movement ....................................................................234
Random:
Creating a random number ......................................138
Picking an Object at random....................................134
Redo ..................................................................................................
Resizing objects ...................................................................225,231
Resize zoom ................................................................................282
Retrieving data from an object. See the Expression Editor ........205
Rotate:
Animation frames ...............................................281,283
Active Objects...........................................................234
Run Game ...................................................................................111
Run Level .....................................................................................111
S Save ...............................................................................................85
Save as.. ........................................................................................85
Score Objects ..............................................................................251
Scrolling .......................................................................................180
Shooting an object.......................................................................171
Show Objects:
In a moveable window ..............................................103
In a fixed window ......................................................103
Snap. See Grid
Sound Object Actions..................................................................177
Sound Object Events...................................................................141
Special Object Actions: ...............................................................175
Special Object Events: ................................................................137
Standalone:
Game.............................................................................?
Screen saver....................................................................................?
Storyboard Editor.........................................................................112
Storyboard Object Actions: .........................................................179
302 THE GAMES FACTORY
INDEX
T Text Objects ................................................................................243
Text Object Actions: ....................................................................187
Timer Object Events ....................................................................142
Toolbar.........................................................................................110
Tutorials:
1 - Spacebattle............................................................11
2 - Pointblank ..............................................................34
3 - Pulverise ................................................................51
4 - Sub Mission ...........................................................62
5 - Kung Fu .................................................................70
V Values ...................................................................................136,173
View ......................................................................................168.225
Visibility .................................................................................171,229
W Window arrangement ..................................................................104
Writing text. See Text Objects.
Z Zones:
Number of objects in a zone. See Active Object Events,
Pick or CountCheck for mouse pointer in a zone. See .
Mouse Pointer and Keyboard Events
THE GAMES FACTORY 303
INDEX