uca mobile for blackberry user guide, rls 4.0 - edocs - mitel
TRANSCRIPT

UC Advanced Mobile for BlackBerry
i
MITEL
Unified Communicator Advanced ®
UC Advanced Mobile for BlackBerry® User Guide, Release 4.0

UC Advanced Mobile for BlackBerry User Guide
ii
Notice
The information contained in this document is believed to be accurate in all respects but is not warranted by Mitel Networks™ Corporation (MITEL®). The information is subject to change without notice and should not be construed in any way as a commitment by Mitel or any of its affiliates or subsidiaries. Mitel and its affiliates and subsidiaries assume no responsibility for any errors or omissions in this document. Revisions of this document or new editions of it may be issued to incorporate such changes.
No part of this document can be reproduced or transmitted in any form or by any means - electronic or mechanical - for any purpose without written permission from Mitel Networks Corporation.
If you have any questions or comments regarding this manual or other technical documentation, contact the Mitel Technical Publications Department (USA) at:
Mitel® and Unified Communicator® Advanced are registered trademarks of Mitel Networks Corporation.
All other trademarks mentioned in this document are the property of their respective owners, including Mitel Networks Corporation. All rights reserved.
© 2009 - 2011, Mitel Networks Corporation
UC Advanced Mobile for BlackBerry User Guide
Table of Contents
Introduction ................................................................................................................ 2
Getting Started ........................................................................................................... 2
Installing the Application.................................................................................................... 2
Using the Setup Wizard....................................................................................................... 3
Logging In the First Time.................................................................................................... 5
Main Interface ............................................................................................................. 6
Dynamic Status.................................................................................................................... 8
Changing Your Dynamic Status......................................................................................................... 9
Editing Custom Text........................................................................................................................... 9
Call History......................................................................................................................... 10
Corporate Contacts ........................................................................................................... 11
Messages............................................................................................................................ 13
OfficeLink ........................................................................................................................... 14
Main Menu................................................................................................................. 16
Settings ..................................................................................................................... 17
Location Manager .............................................................................................................. 18
Creating New Locations................................................................................................................... 19
Enabling Bluetooth........................................................................................................................... 21
Setting Bluetooth Priorities .............................................................................................................. 22
Corporate Locations ........................................................................................................................ 23
Location Update Notifications .......................................................................................................... 24
Scheduler ........................................................................................................................... 25
Account Options................................................................................................................ 26
Preferences ........................................................................................................................ 27
UC Server Connection Settings .............................................................................. 29
Secure Connections................................................................................................. 30
Upgrades................................................................................................................... 32
Upgrading the Operating System..................................................................................... 32
Upgrading the Application................................................................................................ 32
1

UC Advanced Mobile for BlackBerry User Guide
Introduction
UC Advanced Mobile for BlackBerry is a mobile device client application that provides automatic Dynamic Status updates based on your current location. In addition, the client provides access to messages, Corporate Contacts, call logs, and the OfficeLink feature.
Getting Started
This section of the document provides information to get you started using the UC Advanced Mobile for BlackBerry application.
Installing the Application
As a new user, you should receive a welcome email with a specific section indicating the URL to download and install the application over the air. Using your BlackBerry mobile device browser, input the URL and you are presented with a download screen.
UC Advanced Mobile for BlackBerry Download Screen
2

UC Advanced Mobile for BlackBerry User Guide
Using the Setup Wizard
When running the application for the first time or after an upgrade, it is necessary to accept the EULA. After accepting, the setup wizard will guide you through connecting to the UC Server and some initial settings.
Setup Wizard Welcome Screen
3

UC Advanced Mobile for BlackBerry User Guide
Using the setup wizard, enter the FQDN of the UC Server along with your username and password. You may then use the “Test Connection” button to make sure the settings are correct. If your UC Advanced is connected using an MBG, it will be necessary to use the “secure connection” option to connect. For this option, the certificate should have already been installed while browsing to the download URL. If asked to accept a certificate, you must approve it in the device’s keystore. If you are unfamiliar with this process, please contact your system administrator as this process can cause device data loss if done incorrectly.
Setup Wizard Credentials
After verifying the server credentials, you will be presented with a few initial options. At this screen, you may select if you wish to use the “Scheduler”, select location provides, and unit preference.
Setup Wizard user options
4
UC Advanced Mobile for BlackBerry User Guide
Logging In the First Time
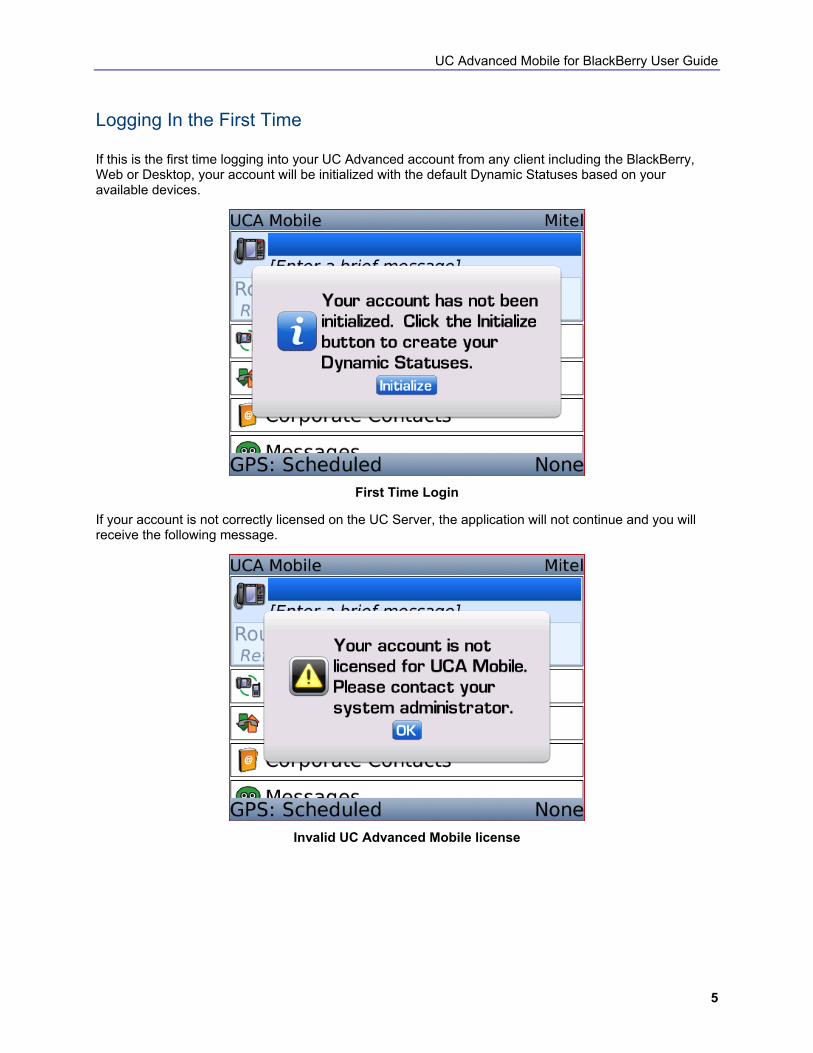
If this is the first time logging into your UC Advanced account from any client including the BlackBerry, Web or Desktop, your account will be initialized with the default Dynamic Statuses based on your available devices.
First Time Login
If your account is not correctly licensed on the UC Server, the application will not continue and you will receive the following message.
Invalid UC Advanced Mobile license
5

UC Advanced Mobile for BlackBerry User Guide
Main Interface
At this point, you will be presented with the main screen of the application. From this screen, you should see your current status along with the call routing associated with that status.
This screen allows you to access the other main features including:
Change Status – Click on current status to select a different status.
Enter Brief Message – Click on brief message to edit current brief message.
Dynamic Status – Add, delete and edit Dynamic Statuses.
Call History – Access call history for missed, received, and dialed calls.
Corporate Contacts – Access corporate contact information.
Messages – View and play NuPoint received voice mail messages.
Place OfficeLink Call – Allows users to place calls from their PBX owned devices including desk phone, softphone, and compatible outside devices (mobile, etc).
Settings – Access to Location and user settings for the application.
6

UC Advanced Mobile for BlackBerry User Guide
The bottom bar of the main screen will indicate the user’s location and GPS scheduler status. This field will indicate one of the following:
Off – Location finder is not scheduled. This option may be enabled under user options.
Connected – The GPS is currently connected and searching locations.
BT Searching – The application is performing a Bluetooth® search for known UC Advanced locations.
Scheduled – The location finder is scheduled to run according to the specified settings indicated in the “Scheduler”.
UC Advanced Mobile for BlackBerry Main Screen
7

UC Advanced Mobile for BlackBerry User Guide
Dynamic Status
Selecting “Dynamic Status” from the main screen or the main menu allows the user to view and manage the Dynamic Status settings.
Dynamic Status List
By selecting any of the Dynamic Statuses, the user can edit the Name of the status, the custom text and the call routing.
Dynamic Status Edit Screen
8

UC Advanced Mobile for BlackBerry User Guide
Changing Your Dynamic Status
From the main screen, you can click on your current status to present a selection of your Dynamic Statuses to change to. After selecting a status, the main screen will update with the new status and routing information.
Changing Dynamic Status
Editing Custom Text
You can edit the brief message that other UC Advanced user’s view in the web and desktop clients directly from the main screen of the application. Simply, click on the line below the Dynamic Status name that either indicates to “Enter a brief message” or has the current brief message.
Editing Custom Text
9

UC Advanced Mobile for BlackBerry User Guide
Call History
Selecting “Call History” from the main screen allows you to view and return calls quickly for missed, received, and dialed calls.
Call History: Missed Calls
From the Call Log screens, you may quickly return a call or view a UC Advanced contact. Returning a call to internal extensions requires the use of UC Advanced OfficeLink or BlackBerry smart dialing.
Call History return call
10

UC Advanced Mobile for BlackBerry User Guide
Corporate Contacts
From the main screen, you may select “Corporate Contacts” to quickly view and contact all corporate contacts stored on the UC Server.
Corporate Contacts
Using the “Search” bar, you may quickly find any contact in the UC Advanced corporate directory.
Contact Search
11

UC Advanced Mobile for BlackBerry User Guide
Clicking on individual contact allows you to quickly access information about that contact. From the details screen, you may quickly call or email the contact.
Contact details
12

UC Advanced Mobile for BlackBerry User Guide
Messages
When a new voicemail message is detected, the home screen icon will indicate a new message. Accessing the message list or accessing the message through another method will cause the indication to be removed. The application checks for new and read voicemails in the background every 15 minutes.
From the “Messages” Screen, you may quickly view your NuPoint Voice Mail messages.
Viewing Voice Mail Messages
You can call voice mail, play the message over the speaker, delete the message or refresh the list from the menu. You set your UC Advanced Voicemail PIN to match your NuPoint PIN by selecting “Change Mailbox PIN”.
Voice Mail Menu
13

UC Advanced Mobile for BlackBerry User Guide
OfficeLink
OfficeLink allows you to place calls from any of your PBX owned compatible devices. These devices will show up in the “Call Using” selection. To use “OfficeLink” functionality to place calls fro your BlackBerry, your mobile device number must be logged into an EHDU on the MCD system that is your main desk phone DN or a member or your MCD PRG (Personal Ring Group). The OfficeLink functionality allows you to place an internal or external call by having the phone system place a call to your mobile device and once answered, place a call to the desired destination.
Office Link Dialing
14

UC Advanced Mobile for BlackBerry User Guide
The OfficeLink functionality is available from the UC Advanced Corporate contacts list, the Call history windows as well as your device’s native address book.
OfficeLink from UC Advanced contacts
15

UC Advanced Mobile for BlackBerry User Guide
Main Menu
From the Main Menu, you can perform the following additional functions:
Update Status – refreshes your current status, routing and brief text by contacting the UC Server. This option is useful if you change your status using multiple clients (Desktop, Web, etc.)
Current Location – Provides GPS specific information including information relating to distance from defined locations. Won’t show Bluetooth locations.
Start/Stop GPS – Manually start or stop the GPS. While the GPS is connected, the application will search for locations and update the Dynamic status appropriately.
BT Location Search – Perform a manual Bluetooth location search. This search will check paired and discoverable Bluetooth devices.
Setup Wizard – Run the setup wizard.
Main Menu
16
UC Advanced Mobile for BlackBerry User Guide
Settings
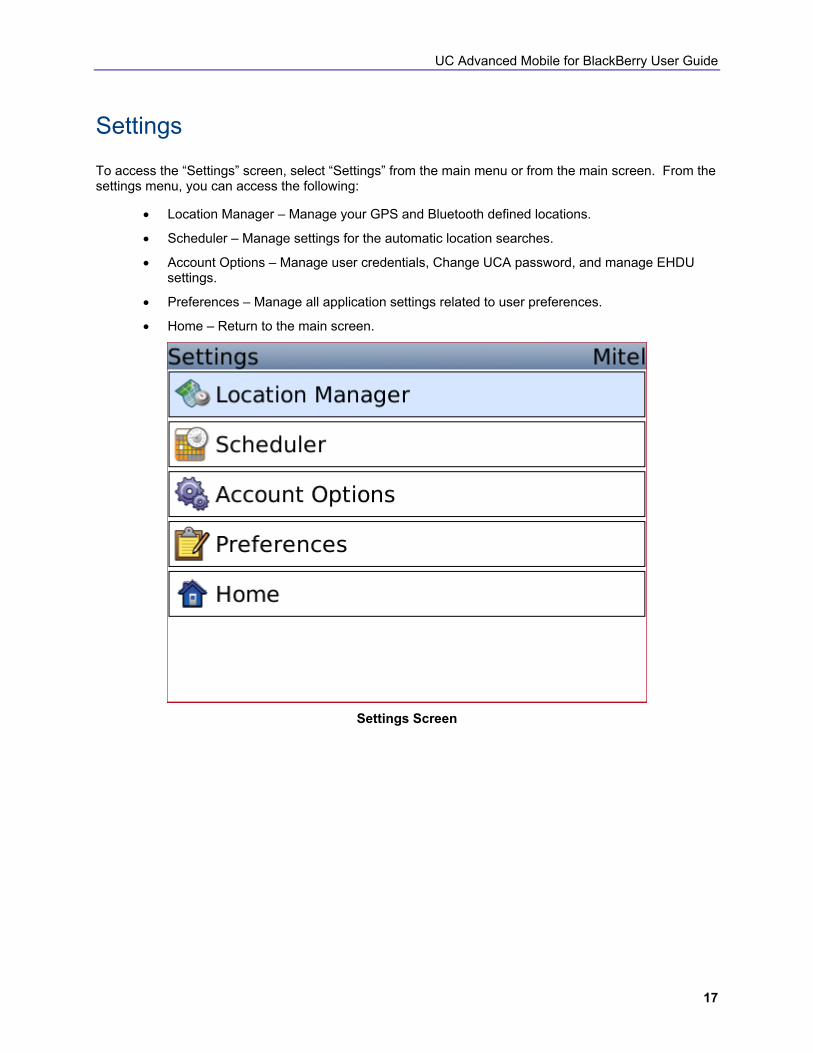
To access the “Settings” screen, select “Settings” from the main menu or from the main screen. From the settings menu, you can access the following:
Location Manager – Manage your GPS and Bluetooth defined locations.
Scheduler – Manage settings for the automatic location searches.
Account Options – Manage user credentials, Change UCA password, and manage EHDU settings.
Preferences – Manage all application settings related to user preferences.
Home – Return to the main screen.
Settings Screen
17

UC Advanced Mobile for BlackBerry User Guide
Location Manager
The Location Manager allows you to create and delete locations based on GPS and /or Bluetooth markers that will automatically change your Dynamic Status. From the Location Manager menu, you may:
Set Bluetooth Priorities – indicate which locations take priority when more the one Bluetooth marker is in view.
Add new locations – Setup name and location markers for the new location.
Edit locations – Change settings for previously defined locations.
Delete locations – remove the locations.
Hide Locations – Choose to not display the location. This item is useful for corporate controlled locations that cannot be deleted.
Show On Map – use the user specified mapping application to show the location. This location must be a GPS defined location.
Location Manager Menu
18

UC Advanced Mobile for BlackBerry User Guide
Creating New Locations
By selecting “New Location”, you may create a new location. If this is going to be a GPS coordinate based location, you will need to have started the GPS from the main menu. You may create the location and come back later and re-mark it once the GPS is connected. You may also use the BlackBerry Maps application where available to create UC Advanced locations without starting the GPS.
Creating a new location
If you have enabled using Bluetooth from the Options, you will have the ability to add Bluetooth markers at this screen. If you are going to use Bluetooth locations, you will want to enable the Bluetooth option using your device’s options menu. If the device’s Bluetooth option is not enabled, the UC Advanced application will ask you if you wish to enable it. However, after a device reboot, the option will be disabled and require asking the user again.
Adding a Bluetooth marker
19

UC Advanced Mobile for BlackBerry User Guide
The Bluetooth search within the application will display any discoverable devices within range during the search. It will also display any paired devices during the search. If the paired devices are not on, it will simply display “Paired device”.
Bluetooth Marker search
Bluetooth devices
20

UC Advanced Mobile for BlackBerry User Guide
After selecting a Bluetooth device, it will show up in the marker list. You may add or delete additional markers to this location.
Bluetooth marker list
Enabling Bluetooth
The application requires that Bluetooth be enabled on the BlackBerry device. If the user has selected to use Bluetooth from within the options, and Bluetooth is not enabled on the device, the user will be prompted to enable it. Following device resets the user will be prompted again after restarting the application. To avoid the repeated prompt, the use may enable Bluetooth using the devices “Manage Connections” application.
21

UC Advanced Mobile for BlackBerry User Guide
Setting Bluetooth Priorities
By selecting “Bluetooth Priorities” from the Location manager screen, you may set the priorities of all defined locations that include at least one Bluetooth marker. If the application detects that you are located in more than one location based on detected Bluetooth devices, it will use these priorities to determine the location to select.
Bluetooth Priority List
Bluetooth Priorities menu
22

UC Advanced Mobile for BlackBerry User Guide
Corporate Locations
The UCA system Admin or users that are flagged as Mobile Administrators may create, delete and edit corporate locations that are stored on the UCA server and automatically available to all users. These locations are marked with the building corporate icon in the location list screen. Mobile administrators may create a new location and check the box next to “Corporate Location” to create a new corporate location. Any user who modifies the status for this new location in their client, will now use that location.
New Corporate Location
23

UC Advanced Mobile for BlackBerry User Guide
Location Update Notifications
From the device’s “Sounds” application, select “Edit Profiles”. For each of your device’s profiles, you may set the UC Advanced notification. Select the profile you wish to setup and then expand the “Other menu”. From the menu, select UC ADVANCED to setup the notification. This notification will fire anytime your status changes because of a location change. To turn off the notification (for LED notifies), you need to just access the main screen of the application.
You may also setup how you want your UC ADVANCED Voicemail notifications to alert. Accessing the Voicemail message screen will de-activate the notification. Accessing the message from another client including the desktop device, UC ADVANCED Desktop Client or UC ADVANCED Web Client will deactivate the notification.
Edit UC Advanced Notifications
UC Advanced Notification
24

UC Advanced Mobile for BlackBerry User Guide
Scheduler
From the settings menu, you may select “Scheduler” to setup automatic location checks using both GPS and Bluetooth markers. Using the scheduler, you may:
Enable GPS Scheduler – indicates whether or not the application will perform automatic GPS and Bluetooth location searches at the scheduled intervals.
Starting/Ending times – Indicates the time of day in which the application will perform the automated searches.
Location Check Interval – The time between automatic location checks.
GPS Timeout – The time to attempt to connect to the GPS before timing out.
Weekdays only – indicates if the automatic searches should only be performed on weekdays.
The scheduler screen also provides information about the last search attempt, the last successful GPS connection and the next scheduled search.
GPS Scheduler
25

UC Advanced Mobile for BlackBerry User Guide
Account Options
From the Account Options screen, you may set the following settings:
Connection Settings – Provides details for the user credentials, UC Server FQDN and security settings.
My Dynamic Extensions – Edit the label and number for any EHDU devices in your ring group.
From the Account Options menu, you may set the following settings:
Test Connection – Allows you to verify the UC server and credentials settings.
Change My Password – Update your UCA password.
Send Diagnostics – create an email with attachments including user settings and diagnostic information.
Account Options
26

UC Advanced Mobile for BlackBerry User Guide
Preferences
From the Preferences screen, you may set the following settings:
Location Providers – Indicates which location providing services to enable.
Location Settings – Indicates the units, map application and storage location for UC Advanced defined locations. The “Allow Status Updates During Calls” –flag determines if you would like the application to attempt to update your status while you are on a call. If your mobile provider does not allow simultaneous data and voice connections, this flag should be disabled. When disabled, any scheduled location check will be delayed to immediately following the voice call as long as the current time still falls within the scheduled period.
Options for Location Settings
Unknown region – Allows you to indicate which dynamic status to switch to when entering an unknown location.
27

UC Advanced Mobile for BlackBerry User Guide
Preferences, which include:
o Language – Set you language preference. UC Advanced will default to the device selected language if available from the UC Advanced supported languages.
o Use Hot Keys – This flag specifies if you want to enable “hot keys” from the main screen. The hot keys are shortcuts to the following items:
H – Call History
C – Corporate Contacts
V – Visual Voice Mail
O - Options
Hold G – enable/disable Scheduler
o Allow Status Updates During Calls – This flag allows the user to specify whether or not the carrier that the device is on allows data connections during phone calls. If not set, the application will delay location checks and Voice Mail checks until phone calls end.
o Detect BT Connections – This flag indicates if the application will initiate a Bluetooth location search when it detects a Bluetooth device connects of disconnects. Note – This functionality is only available on some devices and searches may be initiated for other operations.
o Show Peered Contacts – This flag indicates if the user would like to download and show UCA peered contacts in the corporate contacts screen.
User Settings
28

UC Advanced Mobile for BlackBerry User Guide
UC Server Connection Settings
When you change the UC Server address, a few additional steps may be necessary. User locations are references using a Dynamic Status ID that is specific to the UC Server and account. If you change servers, it will be necessary to use the location manager to set the Dynamic Status for each Location as they will now reference “unknown”. The following screen indicates this action is necessary.
Unknown Status
UC Advanced Corporate contacts are saved on device memory and will still be references the old UC Server’s corporate contact list. It is necessary to select “Refresh Contacts” after changing the server address. It is also recommended that the application be restarted following the server change to make sure correct account information is pulled from the server.
29

UC Advanced Mobile for BlackBerry User Guide
Secure Connections
The Use Secure Connection option is presented in the setup wizard after you download and install the UC Advanced Mobile for BlackBerry client application. It is also available from the UC ADVANCED Mobile for BlackBerry Options screen.
To configure a secure connection:
1. From your BlackBerry mobile device, enable the Use Secure Connection option from one of the following in the UC Advanced Mobile for BlackBerry client:
Setup wizard
Options screen (main menu – Options)
A dialog box appears prompting you to confirm that you want to configure a secure connection.
2. If your system administrator has instructed you to configure a secure connection, select Yes.
3. If necessary, select Test Connection. The client application attempts to connect to the server using a secure connection. A dialog box informs you that the server's certificate is not trusted.
4. Select Trust Certificate. If you have never created a password for the key store on your device, you are prompted to enter one. If you have created a password for the key store, skip to step 6.
5. Enter a key store password in the two boxes, and then select OK.
6. When prompted, enter your key store password to allow the client application access to your Handheld Key Store.
NOTE: Use a password that you will not forget. Entering an incorrect password 10 times will delete all personal data from the device and restore it to a default state!
7. When prompted, select OK to allow the client application access to your Trusted Key Store.
NOTE: A dialog box may appear indicating that the certificate could not be added to the Trusted Key Store. Select OK to dismiss the dialog box.
The Connection Successful message appears.
8. Press the BlackBerry End/Power key to return to the device's home page screen
30

UC Advanced Mobile for BlackBerry User Guide
At this point, the UC Server’s SSL certificate is in the device’s key store. However, you must complete the following procedure to configure the certificate as trusted.
1. Navigate to the BlackBerry device Options screen and select Security Options.
2. Select Certificates from the Security Options menu.
3. From the Certificates screen, scroll down the page to locate the UC Server certificate, as indicated by the UC Server Fully Qualified Domain Name (FQDN). The UC Server certificate will have a red x next to the FQDN indicating that the certificate is not trusted.
4. Highlight the UC Server certificate and press the BlackBerry Menu key.
5. Select Trust.
6. If you are prompted for your key store password again, enter it and select OK.
7. Return to the UC Advanced Mobile for BlackBerry application.
8. Exit the application and save the changes.
9. Select Update Status from the application's main menu.
NOTE: Entering an incorrect password 10 times will delete all personal data from the device and restore it to a default state!
31

UC Advanced Mobile for BlackBerry User Guide
Upgrades
This section describes operating system and application updates.
Upgrading the Operating System
Occasionally, it may be necessary to upgrade the OS on your mobile device. After a major OS upgrade, it may be necessary to re-enter your credentials and settings. The locations are stored in the device’s file system and are restored if the OS upgrade is done properly using BlackBerry Desktop Manager.
NOTE: Consult your mobile service provider for BlackBerry mobile operating system upgrades.
Upgrading the Application
If you are upgrading the application from a previous version including the UC Advanced Dynamic Location 3.1 application, you will be presented with the EULA again and must accept before proceeding. If you are upgrading from version 3.1, the application ICON may have moved back into the “downloads” folder on your device. After an upgrade, your locations and settings are restored.
From the main menu, you can select “About”. The “About” screen provides version information along with the ability to check for application updates from the menu.
About screen
32
