unit iii • biotechnology and animals 3 reproductive
TRANSCRIPT
Animal
Reproductive Techniques
Unit III • Biotechnology and Animals
3
Lesson 3 Animal Reproductive Techniques 261
Biotechnology is applied to animal reproductionto improve livestock, control the sex of offspring,produce more uniform lines of animals, and in-crease the reproductive rate of desirable animals.Older techniques such as freezing sperm, artifi-cial insemination, and the use of hormones havemade animal breeding more efficient. More recentadvances such as semen sexing, in-vitro fertiliza-tion, and embryo transfer have increased controlover animal reproduction as well as the quantityand quality of offspring. These techniques aredrastically accelerating the genetic improvementand uniformity of animal herds.
Frozen SemenSemen is a suspension of sperm cells, called sper-matozoa, in fluids manufactured by accessoryglands of the male reproductive tract. Since 1953,companies have been able to freeze the semen ofa particular animal or breed of animals and shipit to breeders for artificial insemination. Frozensemen is also the primary source of sperm for in-vitro fertilization. Frozen sperm can be kept forlong periods (some has remained viable for morethan 30 years), and shipped anywhere in theworld. The ability to freeze and transport semenhas reduced the need to bring males and femalestogether to breed swine, horses, cattle, sheep,goats, dogs, and many other domestic animals. Ithas also increased the number of offspring a singlemale may sire. A single high quality bull may nowproduce thousands of calves per year, whereas inan average year in the field, a typical bull pro-
duces only about 30. The use of frozen sperm ex-tends the breeding season, and extends produc-tion of offspring beyond the animal’s lifetime.During the past 50 years, the proportion of live-stock sired by a relatively few highly selectedmales has risen dramatically. The result is thatlivestock herds are rapidly becoming more geneti-cally uniform and more productive.
The freezing technique, called cryopreservation,freezes live sperm in a mixture, called an extender,containing compounds which prolong cell life.The extender consists of nutrients, proteins, anti-biotics, electrolytes, and chemicals called cryo-protectants which protect cells from damage dur-ing freezing and thawing. Semen is mixed withextender solution, packaged in plastic straws, andfrozen in liquid nitrogen at -196½ C. (- 320½ F.).Straws usually contain 0.5 ml, about one dose forartificially inseminating a female or for use in in-vitro fertilization.
Frozen sperm has some important disadvantages.Its fertility varies drastically among individualanimals. For example, nearly a third of stallionsproduce sperm that does not freeze well at all.Frozen semen has a short lifetime after thawing,so its use requires breeders to pinpoint thefemale’s time of ovulation. For species other thancattle, artificial insemination conception rates aresignificantly lower with frozen semen than withfresh semen.
Unit III • Biotechnology and Animals
262 Lesson 3 Animal Reproductive Techniques
Semen evaluation
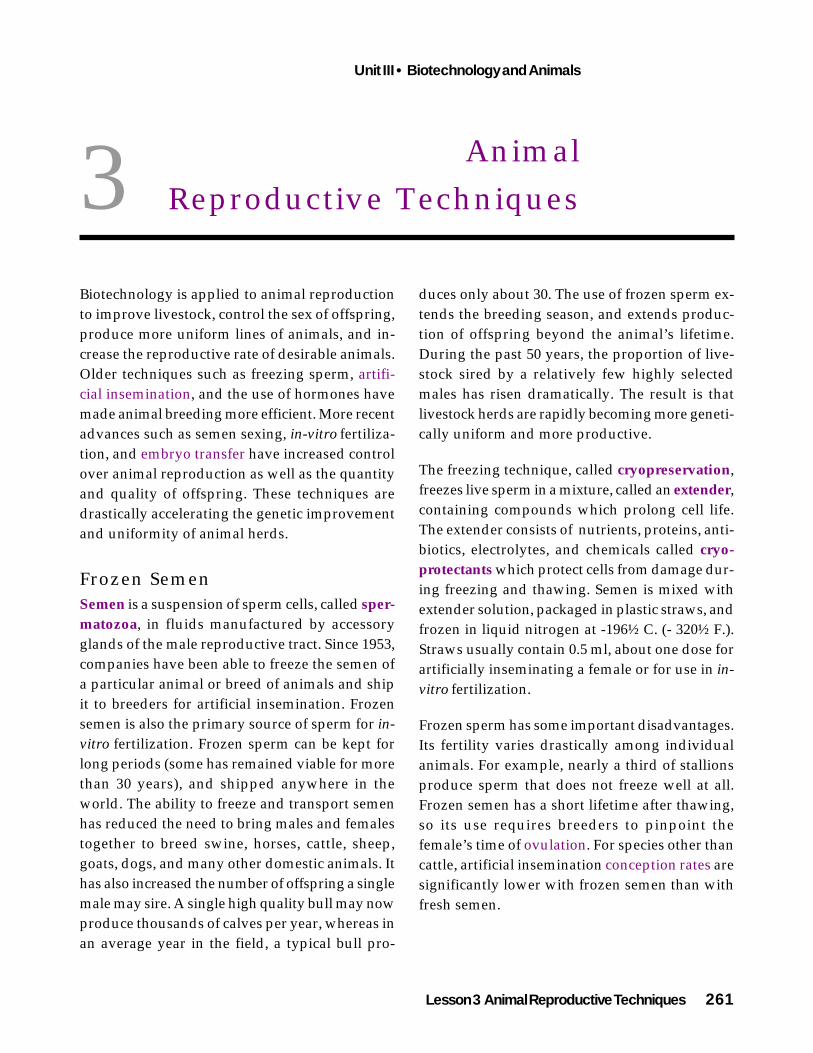
Before semen is frozen, the best sperm must beselected for freezing. Sperm used for artificial in-semination (AI) and in-vitro fertilization must becapable of inducing conception, or competent.Semen samples are evaluated for competency onat least three characteristics.• The cells must be motile, or able to swim. Mo-tile cells must be able to move and make progress,a quality called progressive motion. Laboratoryfertilization techniques require a concentration ofmore than 1 million motile sperm per ml.• Cells must have normal structure, or morphol-ogy. For sperm cells, normal morphology includesa normally shaped head and tail, and just one ofeach. For most purposes, more than 70% of livesperm must have normal morphology.
Before freezing, and just prior to artificial insemi-nation (AI) or in-vitro fertilization (IVF), techni-cians use a swim-up to select the most motilesperm. A swim-up gives the best swimming cellsa chance to swim out of the semen sample. Theswim-up is conducted in a small test tube. Thesemen sample is gently layered under a solutionthat supports spermatozoa. Semen is heavier thanthe solution, so the sample remains in place. Ac-tively swimming sperm, however, swim up outof the sample. After an hour of incubation at 39½C. (102½ F.), the strongest swimmers have movedinto the liquid. The top fraction containing mo-tile sperm is removed, leaving slow or dead onesbehind. Motile sperm in it are concentrated byspinning in a centrifuge. After a swim-up, thesample is evaluated under a microscope to be surethat enough sperm are alive, and that they ap-pear normal.
Semen SexingNationwide, about a quarter of dairy and beefcattle are culled each year due to poor produc-tion, injury, or age, and herds must be replen-ished. Without a way to control the sex of calves,half are of lower value. Male dairy calves produceno milk and are poor meat producers, and femalebeef calves are poor milk and meat producers. Thecost of a cow carrying a less-valuable calf to termcould be avoided by determining the sex of em-bryos and keeping only the desired sex, but em-bryo sexing is time-consuming and expensive. Abetter solution is to control the sex of calves beforeinsemination by using sperm that produce mostlyone sex. Such “sexed” semen is now available. Itproduces calves that are more than 90% one sex.Sexed semen is still too expensive to be practical,and problems with low conception rates and poorfreezing characteristics have yet to be solved. Thetechnology is rapidly advancing, however, andfrozen semen suppliers may be able to provideaffordable sexed semen within a decade.
Side view
Top view8µ4µ
1µ
Normal Cattle Sperm Morphology
• The sample as a whole must have a sufficientproportion of live sperm cells, called the live/deadratio. To be used for AI, a semen sample must havea minimum of 10-20% live sperm. Most vendorsprovide samples with a much higher ratio, around50%.
Swim up
After freezing and thawing, about half of thesperm in a good semen sample are dead. Afterthawing, competent cells must be separated fromdead or weak ones. Most straws are frozen withabout 20 million motile sperm per dose so thatthey contain at least 10 million motile sperm perdose after thawing.
Unit III • Biotechnology and Animals
Lesson 3 Animal Reproductive Techniques 263
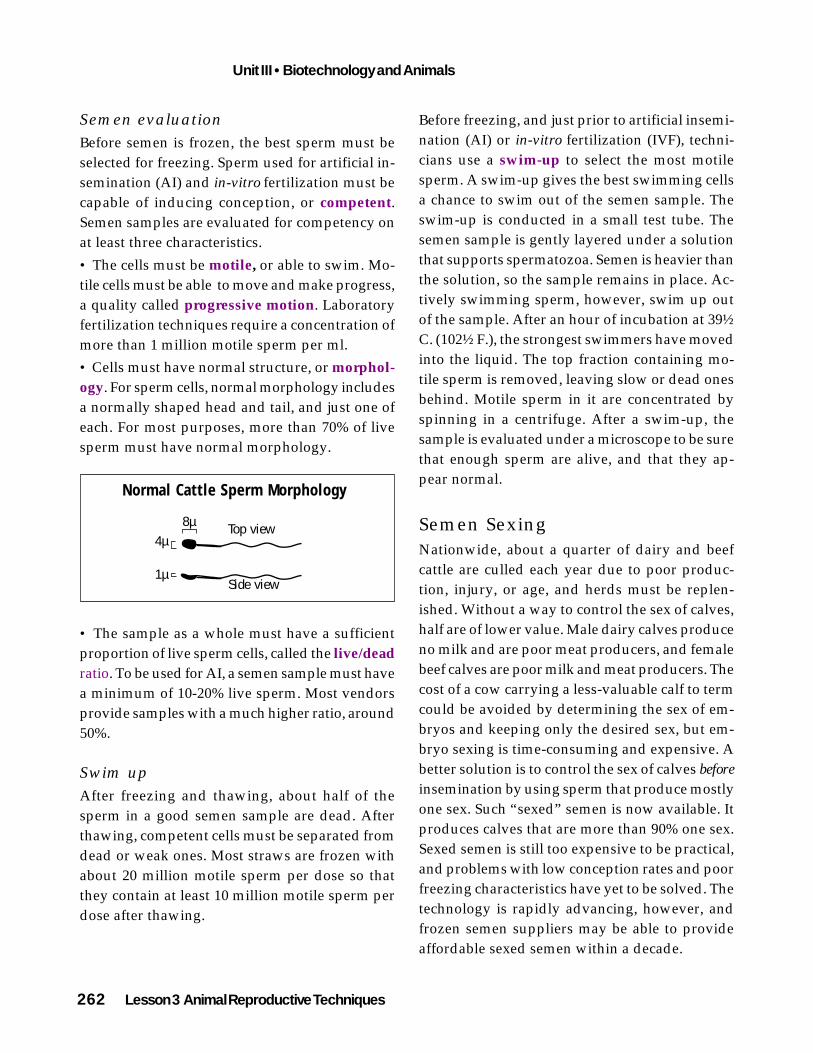
Semen sexing is based on the principle that spermbearing x-chromosomes produce female off-spring, and those with y-chromosomes producemales. A dose of sperm containing predominantlyx-chromosomes will produce mostly females. Adose containing mostly y-chromosomes will pro-duce mostly males. In cattle, x-chromosomesperm have about 3-4% more DNA than y-chro-mosome carriers, enough difference to sort spermby DNA content.
In 1992, the USDA’s Agricultural Research Ser-vice patented a technique to spot differences be-tween sperm cells with x- and y-chromosomes,and to sort the cells accordingly. The technique,called flow cytometry, dyes sperm DNA withfluorescent dye. Cells with x-chromosomes fluo-resce and scatter light differently from those withy-chromosomes. Lasers and light detectors mea-
sure the difference, and the information directsthe machine to rapidly sort the cells. Early cellsorters produced about 400,000 sexed sperm perhour with about 90% accuracy. In 1999, the num-bers were already higher, and some researchersbelieve that a tenfold increase is possible. Newinsemination procedures using as few as 200,000sexed sperm have induced cows to conceive at arate of about 50% (with more than 90% of calvesthe predicted sex), making smaller numbers ofsexed sperm useful. Given the pace of innovationsin flow cytometry and artificial insemination, thecost of sexing semen could drop to $10 per dose,the cost at which it would become practical.
Artificial InseminationArtificial insemination (AI) is the placement ofsemen in the uterus of a female without directcontact with a male. AI was originally developedsix hundred years ago for horse breeding inArabia. Then, as now, the technique was used toincrease the number of offspring that a male withdesirable traits could sire. Semen that would haveinseminated one mare during mating was dividedinto several packets and used with several mares.Before the advent of cryopreservation, the pack-ets could not be stored and had to be used imme-diately. Since the introduction of frozen semen inthe early 1950’s, the technique has become muchmore valuable and common, especially in thedairy and beef industries.
AI and frozen semen have increased the calf pro-duction of a single bull by more than a thousandtimes. Today, most cows in a herd may be insemi-nated by just a few bulls selected for superiorityin a few key traits. For dairy cattle, the traits in-clude high milk production, ease of calving, ges-tation time, and gentle temperament. For beefcattle, the emphasis is on male traits such asgrowth rate, feed conversion efficiency, and meat
Semen Sexing with Flow Cytometry
Dyed semen sample
Cells with X-chromosomesscatter light and fluoresce differently than cells with Y-chromosomes
Detector tells system to electrically charge drops with sperm with X-chromosomes
One sperm per drop
LaserLight
Detector
Y
Y
YX
X
XCharged
plateattractscharged
drops
Cells withX-chromosomes
Cells withY-chromosomes
X

Unit III • Biotechnology and Animals
264 Lesson 3 Animal Reproductive Techniques
quality. In addition to increasing the number ofcalves a superior bull may sire, AI also reducesexposure to genital diseases.
Breeders using AI try for a high conception rate.Conception rate is the number of conceptions perattempt at AI. Early in their training, technicianstypically have rates well below 50%, and later ongood rates are in the 60-75% range (average isabout 65%). In the field, cattle instinctively matewithin a short 12-hour window in the cow’s 21-day reproductive cycle. AI technicians lack theinstincts to time insemination, and so must care-fully time the event by observing animals for signsof estrus, or “heat.” When cows first come intoheat, their vulva are red, swollen, and moist, thecow stands and bellows, smells other cows, andtries to ride other cows. At this stage, however,the cow will not stand to be mounted by a bull.About eight hours later, the cow will stand to beridden during a 12-18 hour stage known as“standing heat.” AI should be conducted duringstanding heat, if possible.
To precisely time AI, breeders also use severalalternatives to ordinary observation. To pinpointthe optimum time for AI, they may monitor hor-mone levels involved in ovulation. Hormone lev-els in the cow’s urine are monitored with special-ized test strips similar to drug store pregnancytests. The strips are an immunoassay technologydesigned to detect the specific hormones involvedin ovulation. Another technique, called estrussynchronization, does not leave the timing tonature. Breeders using this technique inject manycows in the herd with hormones that control thereproductive cycle. The result is that large groupsof cows ovulate at once. AI is then used to breedall of the cows, so that all of the calves are bornnine months later within a brief time period. Thesynchronization also makes the AI process muchmore efficient. A side effect of the hormone treat-ment is that cows’ puberty may be advanced by5-6 months, allowing cows to become pregnantearlier and shortening the time between genera-tions. The process increases the number of calvesa cow may have in her lifetime, accelerating therate of genetic improvement.
Once the breeder decides that a cow is ready tobreed, artificial insemination is relatively quickand straightforward. Frozen semen is thawed ata steady rate to minimize damage, and placed atthe end of a long tube which is used for insemi-nation. The technician inserts the tube into thecow’s vagina, and using a hand in the cow’s rec-tum, guides the tube through the cervix to the tipof the uterus. When the tube enters the tip of theuterus, the technician presses a plunger whichslowly releases the semen. The whole process maytake five to ten minutes.
Superovulation
In livestock breeding, frozen semen, semen sex-ing, and AI all make superior males more pro-ductive, and accelerate genetic improvement. To
Trans-rectal Artificial Insemination of a Cow
Rectum
InseminatingTube
VaginaUterus
Cervix
Unit III • Biotechnology and Animals
Lesson 3 Animal Reproductive Techniques 265
further speed rate of genetic improvement, thenumber of offspring from superior females is alsobeing increased. Increased female productivity isachieved through superovulation, a hormonalprogram that releases abnormally large numbersof eggs each estrous cycle.
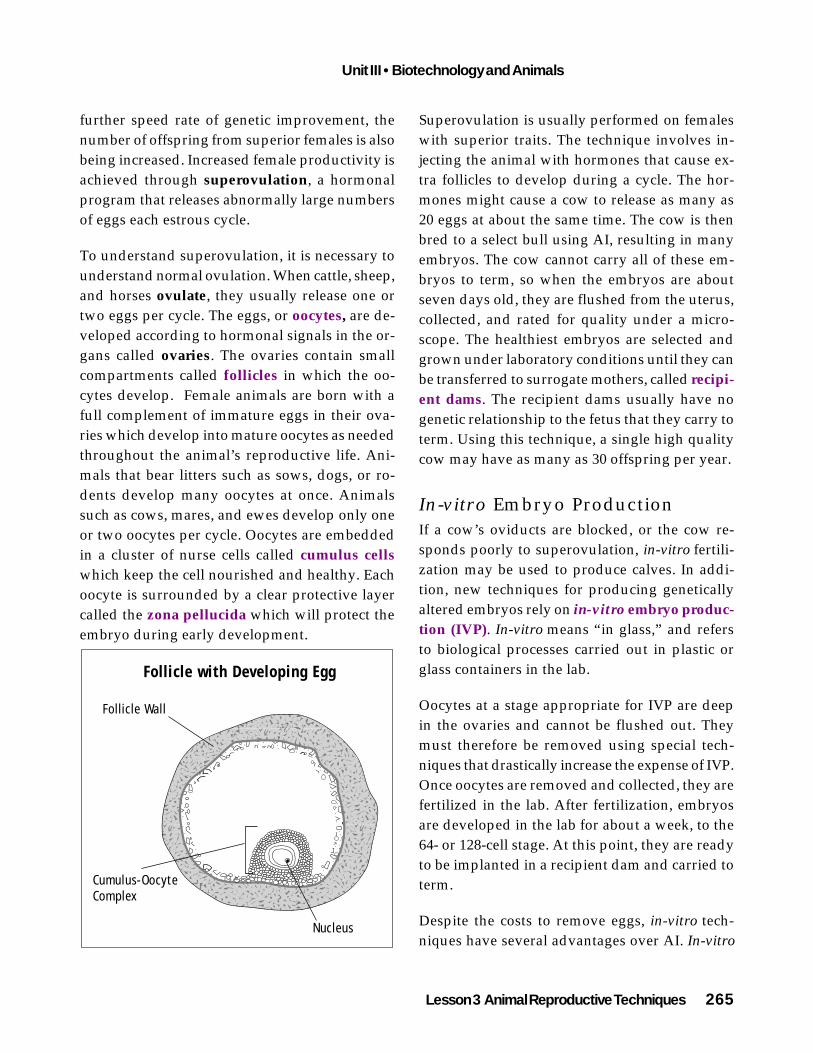
To understand superovulation, it is necessary tounderstand normal ovulation. When cattle, sheep,and horses ovulate, they usually release one ortwo eggs per cycle. The eggs, or oocytes, are de-veloped according to hormonal signals in the or-gans called ovaries. The ovaries contain smallcompartments called follicles in which the oo-cytes develop. Female animals are born with afull complement of immature eggs in their ova-ries which develop into mature oocytes as neededthroughout the animal’s reproductive life. Ani-mals that bear litters such as sows, dogs, or ro-dents develop many oocytes at once. Animalssuch as cows, mares, and ewes develop only oneor two oocytes per cycle. Oocytes are embeddedin a cluster of nurse cells called cumulus cellswhich keep the cell nourished and healthy. Eachoocyte is surrounded by a clear protective layercalled the zona pellucida which will protect theembryo during early development.
Superovulation is usually performed on femaleswith superior traits. The technique involves in-jecting the animal with hormones that cause ex-tra follicles to develop during a cycle. The hor-mones might cause a cow to release as many as20 eggs at about the same time. The cow is thenbred to a select bull using AI, resulting in manyembryos. The cow cannot carry all of these em-bryos to term, so when the embryos are aboutseven days old, they are flushed from the uterus,collected, and rated for quality under a micro-scope. The healthiest embryos are selected andgrown under laboratory conditions until they canbe transferred to surrogate mothers, called recipi-ent dams. The recipient dams usually have nogenetic relationship to the fetus that they carry toterm. Using this technique, a single high qualitycow may have as many as 30 offspring per year.
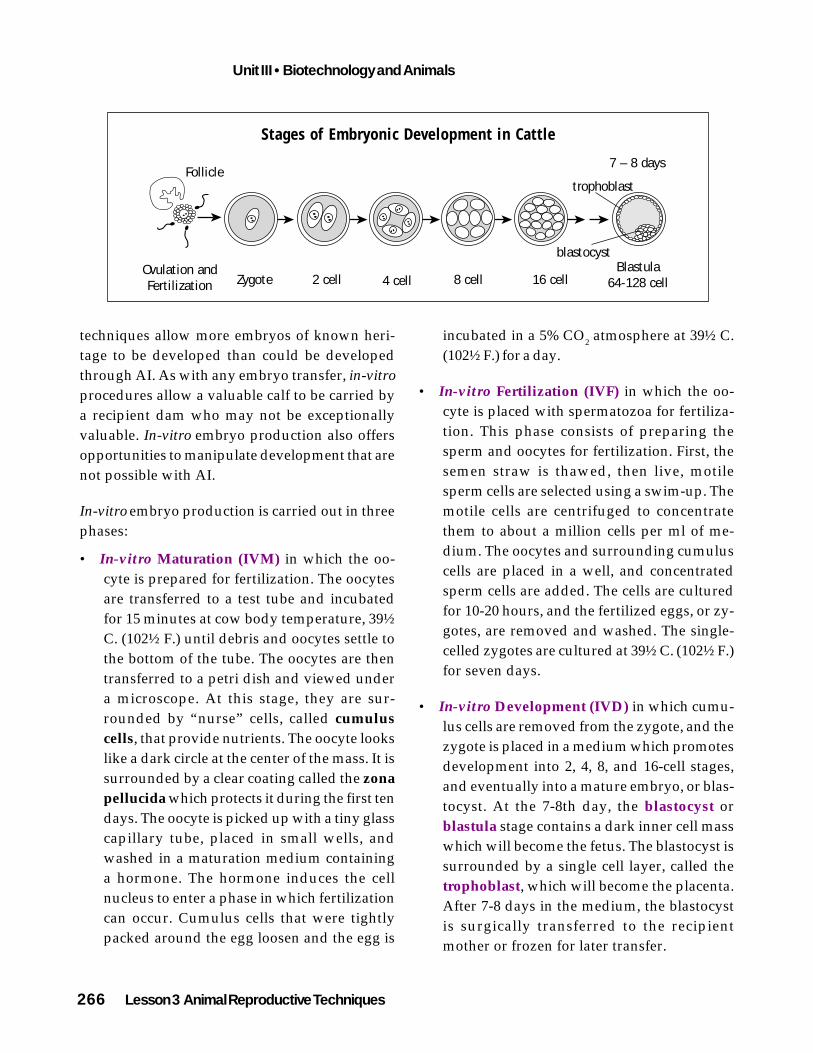
In-vitro Embryo ProductionIf a cow’s oviducts are blocked, or the cow re-sponds poorly to superovulation, in-vitro fertili-zation may be used to produce calves. In addi-tion, new techniques for producing geneticallyaltered embryos rely on in-vitro embryo produc-tion (IVP). In-vitro means “in glass,” and refersto biological processes carried out in plastic orglass containers in the lab.
Oocytes at a stage appropriate for IVP are deepin the ovaries and cannot be flushed out. Theymust therefore be removed using special tech-niques that drastically increase the expense of IVP.Once oocytes are removed and collected, they arefertilized in the lab. After fertilization, embryosare developed in the lab for about a week, to the64- or 128-cell stage. At this point, they are readyto be implanted in a recipient dam and carried toterm.
Despite the costs to remove eggs, in-vitro tech-niques have several advantages over AI. In-vitro
���������
yyyyyyyyy
������yyyyyy
Follicle with Developing Egg
Follicle Wall
Cumulus-Oocyte Complex
Nucleus
Unit III • Biotechnology and Animals
266 Lesson 3 Animal Reproductive Techniques
techniques allow more embryos of known heri-tage to be developed than could be developedthrough AI. As with any embryo transfer, in-vitroprocedures allow a valuable calf to be carried bya recipient dam who may not be exceptionallyvaluable. In-vitro embryo production also offersopportunities to manipulate development that arenot possible with AI.
In-vitro embryo production is carried out in threephases:
• In-vitro Maturation (IVM) in which the oo-cyte is prepared for fertilization. The oocytesare transferred to a test tube and incubatedfor 15 minutes at cow body temperature, 39½C. (102½ F.) until debris and oocytes settle tothe bottom of the tube. The oocytes are thentransferred to a petri dish and viewed undera microscope. At this stage, they are sur-rounded by “nurse” cells, called cumuluscells, that provide nutrients. The oocyte lookslike a dark circle at the center of the mass. It issurrounded by a clear coating called the zonapellucida which protects it during the first tendays. The oocyte is picked up with a tiny glasscapillary tube, placed in small wells, andwashed in a maturation medium containinga hormone. The hormone induces the cellnucleus to enter a phase in which fertilizationcan occur. Cumulus cells that were tightlypacked around the egg loosen and the egg is
incubated in a 5% CO2 atmosphere at 39½ C.(102½ F.) for a day.
• In-vitro Fertilization (IVF) in which the oo-cyte is placed with spermatozoa for fertiliza-tion. This phase consists of preparing thesperm and oocytes for fertilization. First, thesemen straw is thawed, then live, motilesperm cells are selected using a swim-up. Themotile cells are centrifuged to concentratethem to about a million cells per ml of me-dium. The oocytes and surrounding cumuluscells are placed in a well, and concentratedsperm cells are added. The cells are culturedfor 10-20 hours, and the fertilized eggs, or zy-gotes, are removed and washed. The single-celled zygotes are cultured at 39½ C. (102½ F.)for seven days.
• In-vitro Development (IVD) in which cumu-lus cells are removed from the zygote, and thezygote is placed in a medium which promotesdevelopment into 2, 4, 8, and 16-cell stages,and eventually into a mature embryo, or blas-tocyst. At the 7-8th day, the blastocyst orblastula stage contains a dark inner cell masswhich will become the fetus. The blastocyst issurrounded by a single cell layer, called thetrophoblast, which will become the placenta.After 7-8 days in the medium, the blastocystis surgically transferred to the recipientmother or frozen for later transfer.
Stages of Embryonic Development in Cattle
Ovulation and Fertilization Zygote 2 cell 4 cell 8 cell 16 cell
Blastula64-128 cell
Follicle
blastocyst
trophoblast
7 – 8 days

Unit III • Biotechnology and Animals
Lesson 3 Animal Reproductive Techniques 267
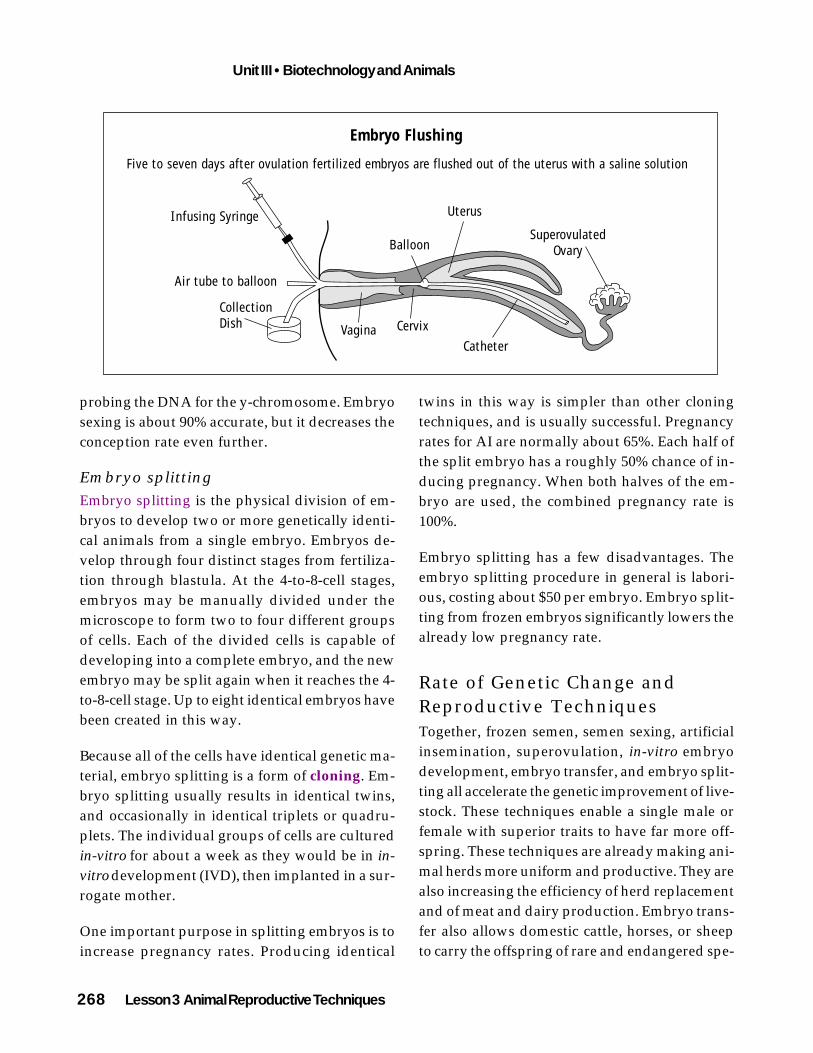
Embryo transfer from the reproductive tract of ananimal involves producing large numbers of eggsby using hormones to induce superovulation, andartificially inseminating. About seven days afterinsemination, the embryos are flushed out of theuterus with a saline wash solution. A catheter in-troduces the solution into the uterus, washing theembryos out and into a filter. Once captured, theembryos are examined under a microscope andrated for viability and stage of growth.
Embryo transfer from IVP uses a similar techniqueto flush eggs from the animal’s uterus before fer-tilization. The eggs are examined and evaluated,and placed in a dish for fertilization in-vitro. Theprocess follows the steps of in-vitro embryo pro-duction (IVP) described above.
No matter which technique is used to obtain theembryos, they are cultured for about seven daysbefore being implanted in surrogate mothers. Atthis stage, the best embryos may be frozen inmuch the same way that semen is frozen, or theymay be implanted immediately.
Embryo transfer may be used with a variety ofanimals, but the technology is most appropriatefor cattle because their reproductive tract is largeenough for embryos to be implanted non-surgi-cally. Smaller animals such as sheep and swinerequire surgical implantation.
Although freezing the embryos offers long termstorage and transportability, the pregnancy ratefrom frozen embryos is low, about 10%. Even withthis low rate, however, transfer of frozen embryoscurrently produces about 50,000 calves annually.Most of these mature into breeding stock. Embryotransfer costs between $500 and $1,000 per calf.
One advantage offered by embryo transfer is theability to sex embryos before transfer. Sexing in-volves removing a few cells from the embryo and
Embryo TransferEmbryo transfer is the transfer of a developingembryo into a female that will carry it through allof the stages of development to birth. Embryosfor transfer may be obtained in two differentways, 1) from the reproductive tract of an animal,usually following superovulation and artificialinsemination or 2) from in-vitro embryo produc-tion (IVP).
In-Vitro Embryo Production
Fertilization
Development
Incubate at 39ºC for 10–20 hours.
Incubate in medium that promotes development for 7 days.
oocyte
zona pellucida
cumulus cells
Maturation of Oocytes
Incubate in wells at 39ºC for 24 hours.
Atmosphere of 5% CO2 with hormones in medium.
Add sperm.
Remove cumulus cells.
Embryos develop to blastula stage.
Unit III • Biotechnology and Animals
268 Lesson 3 Animal Reproductive Techniques
probing the DNA for the y-chromosome. Embryosexing is about 90% accurate, but it decreases theconception rate even further.
Embryo splitting
Embryo splitting is the physical division of em-bryos to develop two or more genetically identi-cal animals from a single embryo. Embryos de-velop through four distinct stages from fertiliza-tion through blastula. At the 4-to-8-cell stages,embryos may be manually divided under themicroscope to form two to four different groupsof cells. Each of the divided cells is capable ofdeveloping into a complete embryo, and the newembryo may be split again when it reaches the 4-to-8-cell stage. Up to eight identical embryos havebeen created in this way.
Because all of the cells have identical genetic ma-terial, embryo splitting is a form of cloning. Em-bryo splitting usually results in identical twins,and occasionally in identical triplets or quadru-plets. The individual groups of cells are culturedin-vitro for about a week as they would be in in-vitro development (IVD), then implanted in a sur-rogate mother.
One important purpose in splitting embryos is toincrease pregnancy rates. Producing identical
twins in this way is simpler than other cloningtechniques, and is usually successful. Pregnancyrates for AI are normally about 65%. Each half ofthe split embryo has a roughly 50% chance of in-ducing pregnancy. When both halves of the em-bryo are used, the combined pregnancy rate is100%.
Embryo splitting has a few disadvantages. Theembryo splitting procedure in general is labori-ous, costing about $50 per embryo. Embryo split-ting from frozen embryos significantly lowers thealready low pregnancy rate.
Rate of Genetic Change andReproductive TechniquesTogether, frozen semen, semen sexing, artificialinsemination, superovulation, in-vitro embryodevelopment, embryo transfer, and embryo split-ting all accelerate the genetic improvement of live-stock. These techniques enable a single male orfemale with superior traits to have far more off-spring. These techniques are already making ani-mal herds more uniform and productive. They arealso increasing the efficiency of herd replacementand of meat and dairy production. Embryo trans-fer also allows domestic cattle, horses, or sheepto carry the offspring of rare and endangered spe-
Embryo Flushing
Infusing Syringe
Air tube to balloon
CollectionDish
CatheterVagina
SuperovulatedOvary
Uterus
Five to seven days after ovulation fertilized embryos are flushed out of the uterus with a saline solution
Cervix
Balloon

Unit III • Biotechnology and Animals
Lesson 3 Animal Reproductive Techniques 269
Terms
artificial insemination (AI) – the placement ofsemen in the uterus of a female without di-rect contact with a male.
blastocyst or blastula stage – the 64-128 cell stageof embryo development when a shell of cellsthat will become the placenta forms around adark inner mass of cells that will become thefetus. The blastocyst usually forms at the 7-8th day.
cloning – development of genetically identicalcells or groups of cells from a single parentcell; production of offspring genetically iden-tical to the donor organism.
competent – in referring to gamete (sperm andegg) cells, competent cells are capable of form-ing a viable zygote, or fertilized cell which willbecome an embryo.
conception rate – the ratio of number of concep-tions per attempt at AI. Conception is the suc-cessful implantation of a viable embryo butnot necessarily a completed pregnancy.
cryopreservation – a technique for preserving liv-ing tissue or cells through freezing and thaw-ing.
cryoprotectant – a chemical which protects cellsfrom damage during freezing and thawing.
cumulus cells – a cluster of cells that providenutrients and protection to oocytes.
embryonic stem cells – in the blastocyst stage ofan embryo, rudimentary cells with the capac-ity to become any or all of the types of cells inthe full-grown animal. These cells are impor-tant in a variety of new techniques of biotech-nology.
embryo splitting – the physical division of asingle embryo into two or more groups of cells
cies, thereby preserving rare animals. Horses, forexample, have carried zebra embryos to term.
The benefits of uniformly productive animals areobvious, but increased uniformity may alsopresent new problems. As a population of animalsbecomes more genetically uniform, it becomesmore vulnerable to new epidemics. Also, as mi-nor breeds of livestock die out, the diverse geneticstock needed to breed in traits dwindles. The in-creasing uniformity of the national herds mayrequire greater attention to maintaining minorbreeds.
Embryo Splitting
Ovulation and Fertilization
Zygote
Embryo
Embryo is split
Unit III • Biotechnology and Animals
270 Lesson 3 Animal Reproductive Techniques
which develop into genetically identical em-bryos and eventually organisms.
embryo transfer – the transfer of a developingembryo into a female that will carry it throughthe stages of development to birth.
estrus synchronization – a hormonal program inwhich many cows in a herd are induced tocome into estrus, or “heat,” during the sametime period. The cows in the herd are injectedwith hormones to synchronize their reproduc-tive cycles.
extender – compounds which prolong spermato-zoa life before, during, and after cryopre-servation, usually containing nutrients, pro-teins, antibiotics, electrolytes, andcryoprotectants.
flow cytometry – a technique for distinguishingdifferences among cells and physically sort-ing them according to the differences. In thecase of sexing sperm cells, the technique de-tects x- and y-chromosome carrying spermcells and sorts them accordingly.
follicle – a small compartment in an ovary inwhich oocytes develop.
in-vitro development (IVD) – the final phase ofin-vitro embryo production, prior to implan-tation, in which the zygote is incubated in amedium which promotes developmentthrough the 2, 4, 8, and 16-cell stages, andeventually into a mature embryo.
in-vitro embryo production (IVP) – the creationand development of viable embryos from theunion of oocytes and spermatozoa outside thereproductive tracts of animals. Embryos pro-duced in this way are implanted in surrogatemothers.
in-vitro fertilization (IVF) – the second phase ofin-vitro embryo production in which the oo-cyte is placed with spermatozoa and fertilizedto become a zygote.
in-vitro maturation (IVM) – the first phase of in-vitro embryo production in which the oocyteis prepared for fertilization.
live/dead ratio – the proportion of live sperm cellsto dead ones in a semen sample. To be usedfor AI, a semen sample must have a minimumof 10-20% live sperm. Most vendors providesamples with a much higher ratio, around50%.
morphology – the form or structure of an organ-ism. In reference to sperm cells, normal mor-phology includes a normally shaped head andtail, and just one of each. For AI and in-vitrofertilization, more than 70% of live spermmust have normal shape.
motile – in spermatozoa, the capacity for directed(progressive) motion. In doing a swim-up,more than 85% of spermatozoa in the clearfraction should be motile. In-vitro fertilizationrequires a concentration of more than 1 mil-lion motile sperm per ml.
oocyte – mature female gamete, or egg cell.
ovulation – the release of one or more oocytesfrom the follicle.
progressive motion - the ability of spermatozoato move and make forward progress.
recipient dam – a surrogate mother in which anembryo from another animal is implanted.Recipient dams may or may not have a ge-netic relationship to the fetus they carry.
semen – a suspension of sperm cells in protectiveand nutrient fluids manufactured by acces-sory glands of the male reproductive tract.
spermatozoa – sperm cells.
superovulation – a hormonal program that causesproduction and release of an abnormally largenumber of eggs in each reproductive cycle.
Unit III • Biotechnology and Animals
Lesson 3 Animal Reproductive Techniques 271
swim-up – a technique conducted in a test tubeused to select motile sperm. The techniqueincubates a semen sample beneath a liquidlayer. After one hour, the liquid farthest fromthe sample contains the strongest swimmers,and is collected.
totipotent – the capacity of a single cell to becomeany or all of the cell types of a mature organ-ism.
trophoblast – in a developing embryo, a singlecell layer encasing a dark mass of cells at thecenter. Later in development, the trophoblastwill become the placenta.
zona pellucida – a clear protective coating aroundthe oocyte which protects it during early de-velopment.
Sources and Resources
Hafez, E. S. E, 1993. Reproduction in Farm Ani-mals, 6th ed. Philadelphia: Lea & Febiger.
Sauer, Mark V. (Ed.), 1998. Principles Of Oo-cyte And Embryo Donation. New York:Springer.
Trounson, A. O. and D. K.Gardner, 1993.Handbook of in Vitro Fertilization. LewisPublishers, Inc.
Wolf, D. P., 1988. In Vitro Fertilization and Em-bryo Transfer: A Manual of Basic Techniques.New York: Plenum Publishing Corp.
University sites on the Internet
Cameron University Department of Agriculture,Embryo Transfer work – www. cameron.edu/academic/science/agriculture/Embryo.
Colorado State University, home page of GeorgeSeidel, Professor of Animal Reproduction andBiotechnology – www.cvmbs.colostate.edu/physio/seidel.html.
Equine Research Center – www.erc.on.ca/freeze.htm. Article on Frozen Semen for horsebreeding.
Hungary’s Agricultural Biotechnology Center –www.abc.hu/institutes/animal. “Test TubeCalf” website contains an excellent detailedpictorial tour of IVF techniques.
North Carolina State University – Dr. CharlotteE. Farin’s lectures on animal reproductivetechniques may be downloaded as Power-Point files. www.cals.ncsu.edu/course/ans220/Farin/ans220.html.
Roslin Institute – www.ri.bbsrc.ac.uk. Informa-tion about Scotland’s Roslin Institute onbreeding research, links to other sites.
Industry sites on the Internet
ABS Global – www.absglobal.com. Vendor ofanimal reproductive services, links to othersites.
TeacherWorksheet
Teacher Worksheet Unit III • Activity 3-1
272 Lesson 3 Animal Reproductive Techniques
About this Activity
Reproductive techniques such as AI and in-vitrofertilization rely on obtaining and properly pre-paring male and female gametes. This activitycombined with Activity 3-2 provides first-handexperience with preparing both types of gametes.The combined activities demonstrate differencesand similarities between gametes, including ori-gins, size, and appearance. This activity demon-strates a technique for evaluating frozen semen.
Sperm used for artificial insemination and in-vitrofertilization must be competent, or capable of in-ducing conception. Three characteristics of a se-men sample assure competency: 1) a high propor-tion of spermatozoa able to move and makeprogress, called motility, 2) a high proportion ofspermatozoa with normal form or morphology,and 3) a high proportion of live sperm cells in thesample, called the live/dead ratio.
To measure motility, students will conduct aswim-up using half of the 0.5 ml of semen frozenin a straw. A swim-up is the standard techniquefor concentrating motile sperm. Students willthaw a straw of frozen bull sperm and layer halfof the sample under one ml of warmed 0.6 %Ovum Culture Medium (OCM) in a small tube.OCM supports spermatozoa as well as ova. Thetechnique gives the best-swimming spermatozoatime to distinguish themselves by outswimmingweaker ones up through the OCM in the tube.After 30-45 minutes, students will draw off twosamples, one from the top clear layer, and onefrom a fuzzy layer just above the semen sample.Students will compare the two samples under a
microscope. If the semen sample was carefullylayered under the OCM, the top fraction will con-tain mostly motile cells, and the sample from thefuzzy layer will contain a larger proportion ofdamaged and poorly-swimming cells.
During the 45 minutes while the swim-up is un-der way, students will evaluate morphology andestablish a live/dead ratio by viewing the sampleon pre-warmed slides under a microscope. Evensmall fluctuations in temperature will producedeformities in the cells which compromise com-petency, so it is critical that constant temperaturebe maintained using a water bath and a simpleglass warming plate that students will make. Asslides cool on the stage of the microscope, changesin morphology and motility will be obvious evenover 20 minutes. Students should graph thesechanges as part of the activity. Live/dead ratio isestimated using a simple staining technique whichpreferentially stains cells that are already dead atthe moment of staining.
Objectives
• describe male gametes’ size, appearance, andorigin
• apply proper techniques in semen evaluation
Related Skill Standards
• collect and process specimens
• identify and quantify microorganisms andcells
• perform bioassays
• use cryogenic techniques
SemenEvaluation
Activity 3-1
Unit III • Activity 3-1 Student Worksheet
Lesson 3 Animal Reproductive Techniques 273
Time Required
2 class periods
Background Reading
Be sure the class has read and discussed Lesson3, Animal Reproductive Techniques.
Materials/Equipment
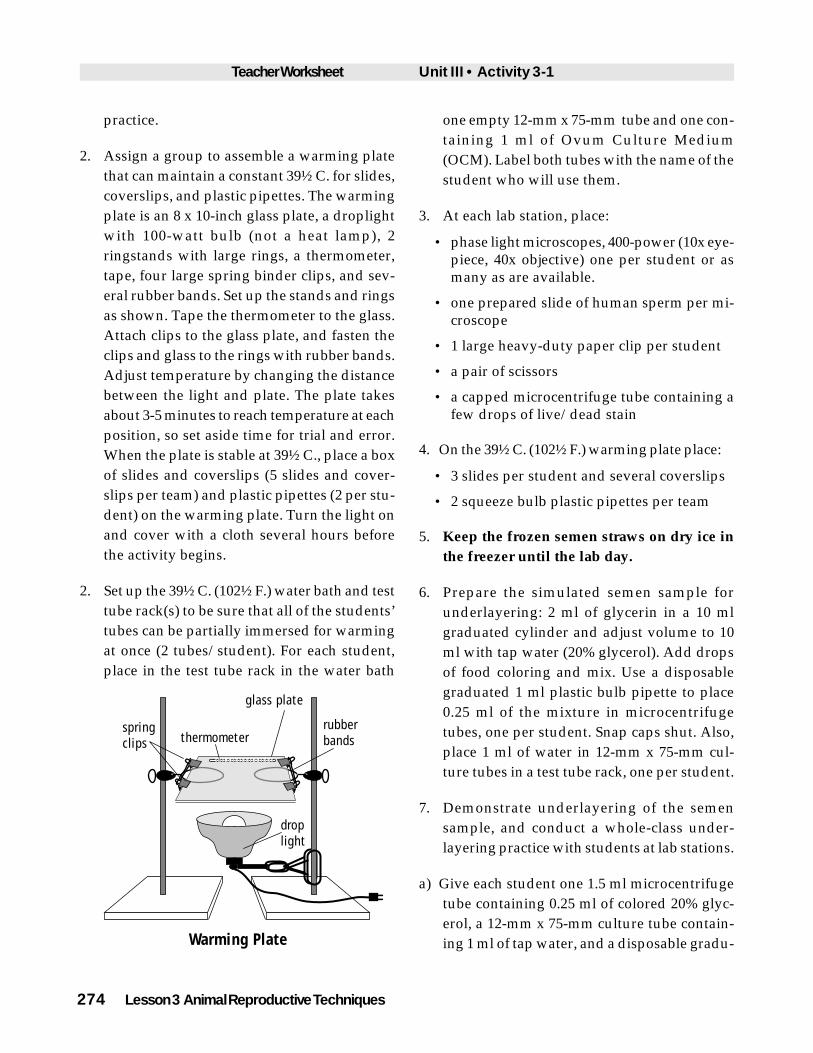
• for the whole class, one warm plate made witha droplight, a 100 watt lightbulb, tworingstands, four large binder spring clips, anassortment of rubber bands, an 8 x 10-inchglass plate, tape, and a thermometer which canread 39½ C. (102½ F.). Directions follow.
• for the whole class, one 39½ C. (102½ F.) waterbath with test tube racks that fit into it andhold two 12-mm x 75-mm tubes per student.If you lack a water bath, students may use athermometer to manually keep flowing hottap water at 39½ C. (102½ F.), but this is tediousand difficult. During the swim-up it is criticalthat temperature be constant. Set water levelin the bath so that tubes do not float out of therack and water does not flood the tubes if theyare weighted. Alternatively, small styrofoamfloats may be made to float the rack.
• 1 phase light microscope per team, 100, 200,400-power (10x eyepiece, with 10x, 20x, and40x objectives)
• prepared slides of human sperm (Carolina Bio-logical Supply # 31-6590)
• 5 microscope slides and coverslips per team
• 4 squeeze bulb plastic pipettes per team
• 2 frozen semen straws (on dry ice) per team
• one pair of scissors per team
• 1 large heavy duty paper clip per student
• 1 small test tube rack per team
• 3 polypropylene culture tubes 12-mm x 75-mmper student
• 0.25 ml 20% colored glycerol solution per stu-dent
• 1 empty microcentrifuge tube per student.
• 20 ml Ovum Culture Medium (Carolina Bio-logical Supply # 13-9802).
• live/dead stain (Carolina Biological Supply #13-9801)
• bull semen straws on dry ice (Carolina Bio-logical Supply # 13-9800)
• glycerin from the drugstore
Suppliers
Carolina Biological Supply, 1-800-334-5551,www.carolina.com .
Agtech, Inc. 800-367-4016 for Live/dead stain Item# J326S
PETS Co. 800-735-9215 for Ovum Culture MediumItem # 06002117-1)
Pharmacy for Glycerol
Teacher/Student Pre-Lab Preparation
1. Set up lab teams of 2-3 students each. One teamcan assemble the warming plate, one can setup the water bath, one can supply the lab sta-tions, and one can set up the underlayering
Teacher Worksheet Unit III • Activity 3-1
274 Lesson 3 Animal Reproductive Techniques
practice.
2. Assign a group to assemble a warming platethat can maintain a constant 39½ C. for slides,coverslips, and plastic pipettes. The warmingplate is an 8 x 10-inch glass plate, a droplightwith 100-watt bulb (not a heat lamp), 2ringstands with large rings, a thermometer,tape, four large spring binder clips, and sev-eral rubber bands. Set up the stands and ringsas shown. Tape the thermometer to the glass.Attach clips to the glass plate, and fasten theclips and glass to the rings with rubber bands.Adjust temperature by changing the distancebetween the light and plate. The plate takesabout 3-5 minutes to reach temperature at eachposition, so set aside time for trial and error.When the plate is stable at 39½ C., place a boxof slides and coverslips (5 slides and cover-slips per team) and plastic pipettes (2 per stu-dent) on the warming plate. Turn the light onand cover with a cloth several hours beforethe activity begins.
2. Set up the 39½ C. (102½ F.) water bath and testtube rack(s) to be sure that all of the students’tubes can be partially immersed for warmingat once (2 tubes/student). For each student,place in the test tube rack in the water bath
one empty 12-mm x 75-mm tube and one con-taining 1 ml of Ovum Culture Medium(OCM). Label both tubes with the name of thestudent who will use them.
3. At each lab station, place:
• phase light microscopes, 400-power (10x eye-piece, 40x objective) one per student or asmany as are available.
• one prepared slide of human sperm per mi-croscope
• 1 large heavy-duty paper clip per student
• a pair of scissors
• a capped microcentrifuge tube containing afew drops of live/dead stain
4. On the 39½ C. (102½ F.) warming plate place:
• 3 slides per student and several coverslips
• 2 squeeze bulb plastic pipettes per team
5. Keep the frozen semen straws on dry ice inthe freezer until the lab day.
6. Prepare the simulated semen sample forunderlayering: 2 ml of glycerin in a 10 mlgraduated cylinder and adjust volume to 10ml with tap water (20% glycerol). Add dropsof food coloring and mix. Use a disposablegraduated 1 ml plastic bulb pipette to place0.25 ml of the mixture in microcentrifugetubes, one per student. Snap caps shut. Also,place 1 ml of water in 12-mm x 75-mm cul-ture tubes in a test tube rack, one per student.
7. Demonstrate underlayering of the semensample, and conduct a whole-class under-layering practice with students at lab stations.
a) Give each student one 1.5 ml microcentrifugetube containing 0.25 ml of colored 20% glyc-erol, a 12-mm x 75-mm culture tube contain-ing 1 ml of tap water, and a disposable gradu-
springclips thermometer
glass plate
droplight
Warming Plate
rubberbands
Unit III • Activity 3-1 Teacher Worksheet
Lesson 3 Animal Reproductive Techniques 275
ated 1 ml plastic bulb pipette.
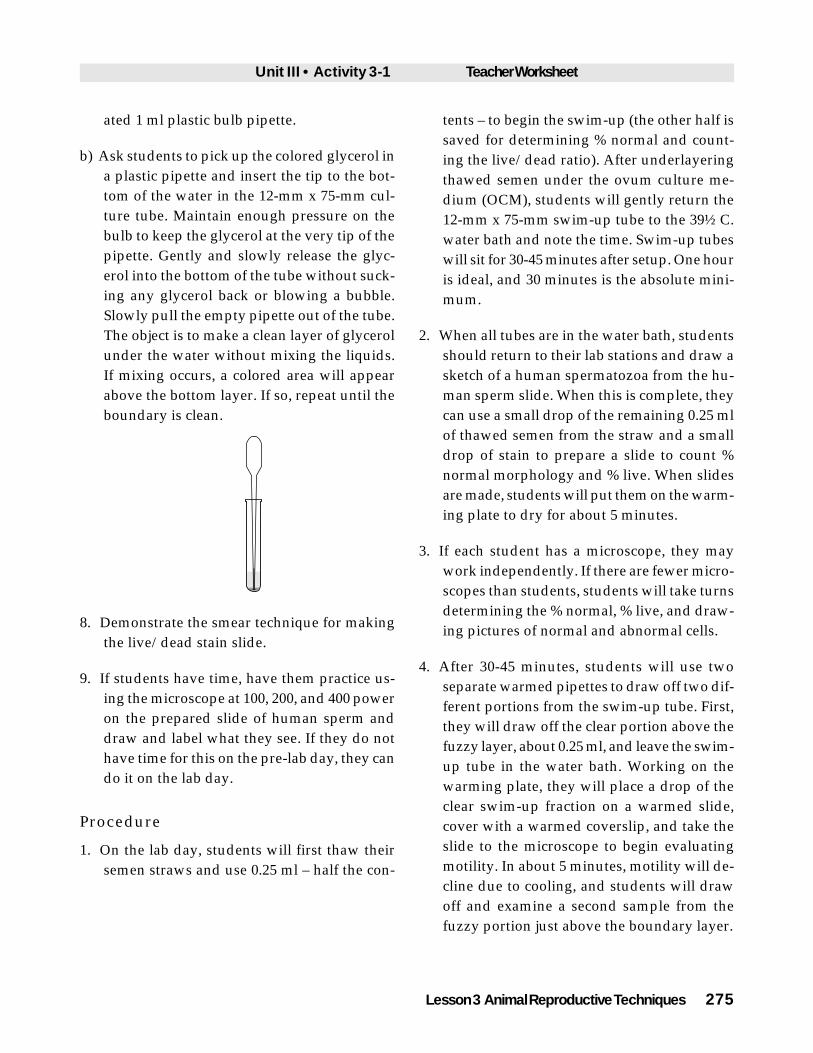
b) Ask students to pick up the colored glycerol ina plastic pipette and insert the tip to the bot-tom of the water in the 12-mm x 75-mm cul-ture tube. Maintain enough pressure on thebulb to keep the glycerol at the very tip of thepipette. Gently and slowly release the glyc-erol into the bottom of the tube without suck-ing any glycerol back or blowing a bubble.Slowly pull the empty pipette out of the tube.The object is to make a clean layer of glycerolunder the water without mixing the liquids.If mixing occurs, a colored area will appearabove the bottom layer. If so, repeat until theboundary is clean.
8. Demonstrate the smear technique for makingthe live/dead stain slide.
9. If students have time, have them practice us-ing the microscope at 100, 200, and 400 poweron the prepared slide of human sperm anddraw and label what they see. If they do nothave time for this on the pre-lab day, they cando it on the lab day.
Procedure
1. On the lab day, students will first thaw theirsemen straws and use 0.25 ml – half the con-
tents – to begin the swim-up (the other half issaved for determining % normal and count-ing the live/dead ratio). After underlayeringthawed semen under the ovum culture me-dium (OCM), students will gently return the12-mm x 75-mm swim-up tube to the 39½ C.water bath and note the time. Swim-up tubeswill sit for 30-45 minutes after setup. One houris ideal, and 30 minutes is the absolute mini-mum.
2. When all tubes are in the water bath, studentsshould return to their lab stations and draw asketch of a human spermatozoa from the hu-man sperm slide. When this is complete, theycan use a small drop of the remaining 0.25 mlof thawed semen from the straw and a smalldrop of stain to prepare a slide to count %normal morphology and % live. When slidesare made, students will put them on the warm-ing plate to dry for about 5 minutes.
3. If each student has a microscope, they maywork independently. If there are fewer micro-scopes than students, students will take turnsdetermining the % normal, % live, and draw-ing pictures of normal and abnormal cells.
4. After 30-45 minutes, students will use twoseparate warmed pipettes to draw off two dif-ferent portions from the swim-up tube. First,they will draw off the clear portion above thefuzzy layer, about 0.25 ml, and leave the swim-up tube in the water bath. Working on thewarming plate, they will place a drop of theclear swim-up fraction on a warmed slide,cover with a warmed coverslip, and take theslide to the microscope to begin evaluatingmotility. In about 5 minutes, motility will de-cline due to cooling, and students will drawoff and examine a second sample from thefuzzy portion just above the boundary layer.
Teacher Worksheet Unit III • Activity 3-1
276 Lesson 3 Animal Reproductive Techniques
5. Students will evaluate motility under the mi-croscope to estimate the fraction of motilesperm in both the clear and fuzzy fractions.The motility estimates in the clear fractionshould be more than 85%, and in the fuzzyfraction about 50%. Students should recordtheir evaluation numbers and observations intheir lab notebooks. If they have time, studentscan learn a lot about effects of temperature andtime by graphing the change in motility overabout 10 minutes’ time.
Answer Keyto Thought/Reflection Questions
1. What would you predict are characteristics ofcells at the top of the clear fraction of the swim-up?
ANSWER: The cells that make it to the top arethe healthiest and fastest swimmers and prob-ably also those that happened to be at the topof the semen sample in the tube.
2. What would happen if the swim-up were al-lowed to go for a longer time?
ANSWER: Students could try it and find out.After about an hour, the clear fraction beginsto contain more cells with partial motility.
3. What difficulties did you have in counting theprogressively motile cells? How can you makeyour motility observations more accurate?
ANSWER: Students are likely to have diffi-culty counting rapidly moving cells at highermagnifications. It is difficult to hold a mentalsnapshot of 10 cells when some of the mov-ing ones are gone and others are movingthrough by the time you finish the count.
Related Activities
An simple experiment can be conducted using thisactivity as a foundation. Students might make a
hypothesis based on the following observationand question. Bovine body temperature is 39½ C.,and this is assumed to be the optimum tempera-ture for bull sperm motility, morphology, andlive/dead ratio. Bull sperm can live at a widerange of temperatures but are damaged by tem-perature changes. Are there temperatures aboveor below 39½ C. that improve bull sperm motilityand live:dead ratio? What are the effects of chang-ing temperature up and down? Several warmingplates with thermometers at different distancesfrom a 100 watt lamp can provide a simple wayto observe samples at different temperatures. Stu-dents should generate the hypothesis, design theexperiment, gather data, and interpret results ac-cording to the steps outlined in Appendix B.
StudentWorksheet
Unit III • Activity 3-1 Student Worksheet
Lesson 3 Animal Reproductive Techniques 277
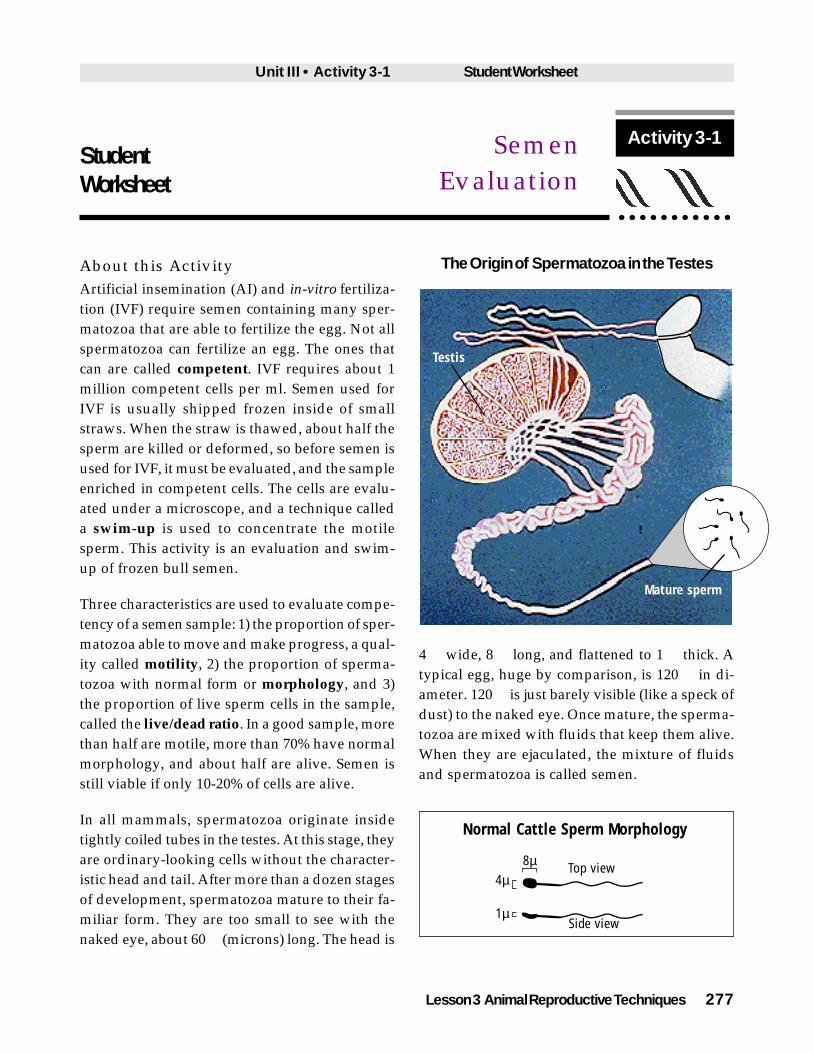
About this Activity
Artificial insemination (AI) and in-vitro fertiliza-tion (IVF) require semen containing many sper-matozoa that are able to fertilize the egg. Not allspermatozoa can fertilize an egg. The ones thatcan are called competent. IVF requires about 1million competent cells per ml. Semen used forIVF is usually shipped frozen inside of smallstraws. When the straw is thawed, about half thesperm are killed or deformed, so before semen isused for IVF, it must be evaluated, and the sampleenriched in competent cells. The cells are evalu-ated under a microscope, and a technique calleda swim-up is used to concentrate the motilesperm. This activity is an evaluation and swim-up of frozen bull semen.
Three characteristics are used to evaluate compe-tency of a semen sample: 1) the proportion of sper-matozoa able to move and make progress, a qual-ity called motility, 2) the proportion of sperma-tozoa with normal form or morphology, and 3)the proportion of live sperm cells in the sample,called the live/dead ratio. In a good sample, morethan half are motile, more than 70% have normalmorphology, and about half are alive. Semen isstill viable if only 10-20% of cells are alive.
In all mammals, spermatozoa originate insidetightly coiled tubes in the testes. At this stage, theyare ordinary-looking cells without the character-istic head and tail. After more than a dozen stagesof development, spermatozoa mature to their fa-miliar form. They are too small to see with thenaked eye, about 60 � (microns) long. The head is
4 � wide, 8 � long, and flattened to 1 � thick. Atypical egg, huge by comparison, is 120 � in di-ameter. 120 � is just barely visible (like a speck ofdust) to the naked eye. Once mature, the sperma-tozoa are mixed with fluids that keep them alive.When they are ejaculated, the mixture of fluidsand spermatozoa is called semen.
Side view
Top view8µ4µ
1µ
Normal Cattle Sperm Morphology
SemenEvaluation
Activity 3-1
The Origin of Spermatozoa in the Testes
Testis
Mature sperm

Student Worksheet Unit III • Activity 3-1
278 Lesson 3 Animal Reproductive Techniques
In evaluating a semen sample for morphology,many abnormalities are possible, but 12 abnor-malities are most common. For example, if yoursample does not remain at a constant tempera-ture after thawing, you will see a high proportionof coiled, shoehook, and bent cells. These cells arenot capable of progressive motion.
Another important element of evaluation is theproportion of live cells in the sample. Live anddead cells can be separated visually using a “live/dead” stain that does not color intact outer cellmembranes. Cell death is usually marked by rup-ture of the cell membrane, so cells with brokenmembranes let the stain in and turn blue or black.Cells that are live when the stain is applied re-main white or gray.
In this activity, you will thaw a straw of frozenbull sperm and concentrate the competent cellsusing a swim-up. You will also evaluate the cells’morphology and establish a live/dead ratio bypreparing a microscope slide and viewing it un-der a microscope. Be sure to have your lab note-books to record the activity.
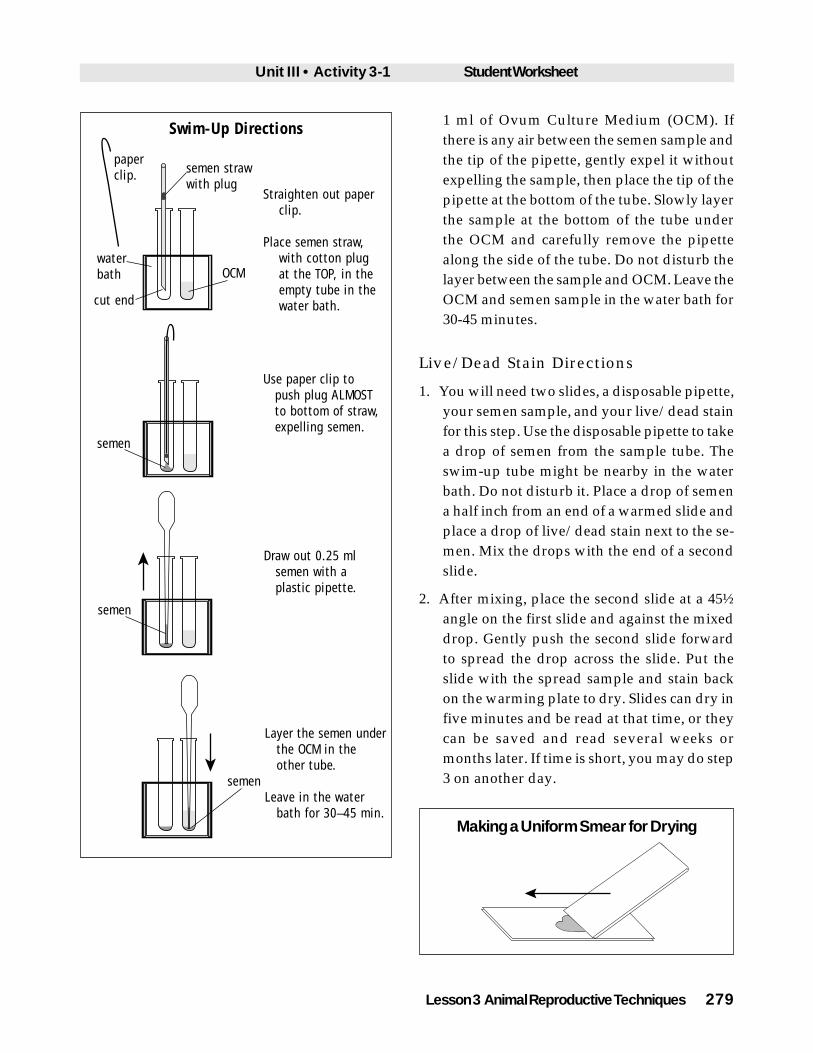
Swim-Up Directions
1. Each team member locate the empty tube withhis or her name on it in the water bath.Straighten the large heavy-duty paperclipleaving the small bend on one end.
2. Take the semen straw off of dry ice and placeit in the 39½ C. water bath for 45 seconds. Af-ter 45 seconds, hold the straw at the end withthe cotton plug and use scissors to cut off thetip of the tube opposite the plug. Place thestraw, cut end first, in the empty tube in thewater bath. Use the straightened paperclip topush the cotton plug most of the way throughthe straw, expelling the semen into the tube.Do not push the plug all the way through. Thecotton should remain in the straw. Discard thestraw, paperclip, and cut tip.
3. At the rack of tubes in the water bath, use agraduated disposable plastic pipette to draw0.25 ml of the semen sample from your tube.Move the pipette to your tube (resting in thetest tube rack in the water bath) that contains
Head
Relative Sizes of Sperm and EggFrom Different Species
Tail
MiddlePiece
Bull Boar Ram Horse Man
Abnormal Sperm Morphologies
Coiled Shoehook Bent Immature CrookedTail
Gianthead
Smallhead
Tailless Twin head
Twin tail
Shorttail
Unit III • Activity 3-1 Student Worksheet
Lesson 3 Animal Reproductive Techniques 279
1 ml of Ovum Culture Medium (OCM). Ifthere is any air between the semen sample andthe tip of the pipette, gently expel it withoutexpelling the sample, then place the tip of thepipette at the bottom of the tube. Slowly layerthe sample at the bottom of the tube underthe OCM and carefully remove the pipettealong the side of the tube. Do not disturb thelayer between the sample and OCM. Leave theOCM and semen sample in the water bath for30-45 minutes.
Live/Dead Stain Directions
1. You will need two slides, a disposable pipette,your semen sample, and your live/dead stainfor this step. Use the disposable pipette to takea drop of semen from the sample tube. Theswim-up tube might be nearby in the waterbath. Do not disturb it. Place a drop of semena half inch from an end of a warmed slide andplace a drop of live/dead stain next to the se-men. Mix the drops with the end of a secondslide.
2. After mixing, place the second slide at a 45½angle on the first slide and against the mixeddrop. Gently push the second slide forwardto spread the drop across the slide. Put theslide with the spread sample and stain backon the warming plate to dry. Slides can dry infive minutes and be read at that time, or theycan be saved and read several weeks ormonths later. If time is short, you may do step3 on another day.
Swim-Up Directions
Straighten out paper clip.
Place semen straw, with cotton plug at the TOP, in the empty tube in the water bath.
Use paper clip to push plug ALMOST to bottom of straw, expelling semen.
Draw out 0.25 ml semen with a plastic pipette.
OCM
paper clip. semen straw
with plug
semen
semen
Layer the semen under the OCM in the other tube.
Leave in the water bath for 30–45 min.
water bath
cut end
semen
Making a Uniform Smear for Drying
Student Worksheet Unit III • Activity 3-1
280 Lesson 3 Animal Reproductive Techniques
3. View the dried slide under the microscope at200 and 400 power. Count 10 different groupsof 10 cells and count the number in each groupthat have head and tail abnormalities. Recordall 10 observations in your lab notebook andadd the number of cells with abnormalities inall 10 groups (# abnormal out of 100 or % ab-normal cells). Next, again count 10 differentgroups of 10 cells to determine the number ofsperm out of 100 that were alive (white orgray) when the stain was applied (% livesperm). If you have time, count the percent-age of cells with bent, coiled, and shoehooktail abnormalities. A high proportion of cellswith these abnormalities indicates erratic tem-perature changes.
4. Pick a good cell to draw, and sketch it in yourlab notebook, identifying head, middle piece,and tail.
Motility Evaluation Directions
In a carefully layered swim-up, the top fractionand the fuzzy layer just above the sample are verydifferent. The top fraction should contain mostlymotile cells, and the fuzzy layer should containmore damaged cells.
1. After 30-45 minutes, working at the water bath,use a warmed disposable pipette to draw off0.75 ml of the clear portion above the fuzzylayer in the swim-up tube. Keep the pipettetip just beneath the surface as you slowly drawin fluid. Leave the swim-up tube in the waterbath when you finish and go immediately tothe warming plate.
2. At the warming plate, place a generous dropof the clear swim-up fraction on a warmedslide and cover with a warmed coverslip.Place the covered slide on your palm, gentlycup the other hand over it to keep it warm,and go to the microscope.
3. At the microscope, immediately begin evalu-ating motility. A motility assessment is an es-timate of the fraction of sperm in the samplethat are progressively motile. Count cells asprogressively motile only if they move andmake forward progress. Cells that just swimin circles are not progressively motile. Beginby looking at 100 power (the 10x objective),and estimate over the whole field the fractionyou think is able to make progress in one di-rection. Is it 1/4 of cells? 1/2? 3/4? Recordyour estimate in your lab notebook. Next, shiftthe microscope to 200 or 400 power. Pickgroups of 10 sperm, count the number that aremotile, and record it in your lab notebook.Repeat this 10 times with different groups of10 cells. Cooling reduces motility after 5 min-utes, so try to finish all your observations 5minutes from the time you began. If you have10 minutes, count as many groups of 10 as youcan, record the time of each observation, andgraph changes in % motility over time.
4. After you finish step 3, return to the water bathand repeat steps 1-3, this time drawing off afew drops of the fuzzy portion above thesample boundary layer. If you take fluid tooclose to the boundary layer, you will get de-bris that will obscure your view.
Thought/Reflection Questionsto Answer in the Lab Notebook
1. What would you predict are characteristics ofcells at the top of the clear fraction of the swim-up?
2. What would happen if the swim-up were al-lowed to go for a longer time?
3. What difficulties did you have in counting theprogressively motile cells? How can you makeyour motility observations more accurate?
TeacherWorksheet
Unit III • Activity 3-2 Teacher Worksheet
Lesson 3 Animal Reproductive Techniques 281
About this Activity
Half of In-vitro Embryo Production (IVP) relieson obtaining and properly preparing female ga-metes, or oocytes. Oocytes may be obtained fromcows through Transvaginal Oocyte Recovery(TVOR) or they may taken from cow ovaries ob-tained from an abattoir (oocytes remain alive inovary tissue up to 11 hours after the mother hasdied). Teachers may collect cow ovaries at no costfrom an abattoir, or order them preserved inNovalsan from Carolina Biological Supply. Thisactivity requires about 15 cow ovaries for the classto collect from 30-100 oocytes. Students will ex-amine each ovary to find follicles and, hopefully,a corpus luteum, an orange-yellow structure onthe ovary that secretes progesterone during preg-nancy. After an oocyte is ovulated, the folliclebecomes a corpus luteum.
Students working through this activity will col-lect cumulus-oocyte complexes (COCs) from ova-ries, place them in plates as would be done for in-vitro embryo production, and examine them un-der a dissecting microscope. Students will alsocollect cumulus cells (granulosa cells) for the DNAextraction activity in Lesson 4, and examine boththe oocytes and cumulus cells. Like sperm cells,oocytes must be competent, or capable of fertili-zation. Students will find the 2 - 10 mm follicleson ovaries that are likely to contain the most com-petent oocytes. Cumulus cells are also of interestboth for their biological function in protecting andnourishing oocytes, and for their use as donors ofnuclei in nuclear transfer and cloning. Finally, theclass will combine their 30-100 collected oocytes.
They will also collect about half a dozen micro-centrifuge tubes each containing 50 - 100 �l ofgranulosa cells. The oocytes and granulosa cellswill be frozen and saved for DNA extraction inLesson 3-4.
This activity requires students to wear rubbergloves and to use a tuberculin syringe with a largeneedle. The needle is short bevel, and not unsafe,but students should be carefully instructed in itsuse, and the teacher should demonstrate an oo-cyte extraction. After students locate 2 - 10 mmfollicles, they will insert the needle and removesmall amounts of follicular fluid.
Objectives
• describe female gametes’ size, appearance, andorigin
• apply techniques used in in-vitro embryo pro-duction
• obtain and examine oocytes from ovaries.
Related Skill Standards
• collect and process specimens
• identify and quantify microorganisms andcells
• perform bioassays
Time Required
Two 50-minute class periods
Activity 3-2OocytePreparation
Teacher Worksheet Unit III • Activity 3-2
282 Lesson 3 Animal Reproductive Techniques
Background Reading
Be sure the class has read and discussed Lesson3, Animal Reproductive Techniques.
Materials/Equipment
• 1 cow ovary/student in a container (CarolinaBiological Supply # 22-8940 - 15 ovaries)
• rubber gloves (one pair/student)
• calibrated (0.25 ml graduations) dropping pi-pettes (Carolina Biological Supply #21-4551).(one/student)
• marker pens for labeling plates and tubes(one/student)
• Becton Dickinson 1 ml tuberculin syringes with0.1 ml graduations (one/student)
• Becton Dickinson 18 G 11/2 short bevel syringeneedles (one/student)
• 24 inch sheet of chemex plastic-backed labbench paper (one/team)
• one microcentrifuge 13,000 rpm, (Carolina Bio-logical Supply # 21-4070)
• seven microcentrifuge tubes for the whole class
• two 35 mm petri dishes for the whole class
• 60 mm petri dishes (three/team)
• two 20-ml bottles of Ovum Culture Medium(Carolina Biological Supply # 13-9802)
• 12-mm x 75-mm polypropylene tubes (one/team) and a small chunk of styrofoam to serveas a stand.
• barbeque tongs (one/team)
• one bottom-lit stereo dissecting microscope(one/team)
• a box of toothpicks (for the pipetting practicesession)
Suppliers
Carolina Biological Supply – 1-800-334-5551,www.carolina.com
Pharmacy for Becton Dickinson tuberculin sy-ringes and 18-gauge needles
Abattoir for cow ovaries if not ordered from Caro-lina Biological
Teacher/Student Pre-Lab Preparation
1. At each lab station, lay out gloves, tongs, smalland large petri dishes, lab bench paper (plas-tic side down), syringes and needles, and adissecting microscope.
2. Practice using the dissecting microscope withpetri dishes. Ask students to find an eyebrowhair placed on the dish, to focus on print on apiece of paper, etc.
3. Have students practice using the squeeze pi-pette under the dissecting microscope to pickup cells. Place about 5 ml of water in a petridish, use a toothpick to scrape off some cheekcells, and scrape the cells into the water in thedish. Have students practice finding cells un-der the microscope and picking them up in apipette with a minimum of water.
4. Demonstrate handling the syringe and needle.Assemble the syringe and capped needle bypressing them together. Hold the needle baseonto the syringe with a thumbnail and removethe needle cap. Hold the assembled needle andsyringe in the hand, palm up, thumb underthe plunger. Place the needle tip in water anduse thumb to push the plunger out to draw influid. Demonstrate drawing water through theneedle into the syringe, and ask students atlab stations to assemble needles, remove caps,and practice drawing in water from a petridish 0.2 ml at a time. Ask students to capneedles when finished.
Unit III • Activity 3-2 Teacher Worksheet
Lesson 3 Animal Reproductive Techniques 283
5. Prepare two 35 mm petri dishes for the wholeclass. Label one “COCs,” the other “cumuluscells.” Put 1 ml OCM in each and cap. Thesewill be collection plates for the whole class.
6. At each lab station, place:
• pairs of rubber gloves (one/student)
• one permanent marker for labeling petridishes and tubes
• disposable plastic squeeze pipette (one/stu-dent)
• 1 ml tuberculin syringe and syringe needle(one/student)
• a 24-inch sheet of plastic-backed lab benchpaper (or plastic-backed disposable tablecloth)
• three 60 mm petri dishes
• Ovum Culture Medium (OCM) in a 12-mmx 75-mm tube. Label OCM. (6 ml/team)
• one set of barbeque tongs
• one stereo dissecting microscope (must bebottom-lit).
Procedure
1. Students lay out the lab bench paper (plasticside down, paper side up) glove up, then as-semble needles, but leave caps on needles.
2. Students at each lab station label two of the60-mm petri dishes, one “COCs” and one “cu-mulus cells.” They will leave the third dishunlabeled and place all three dishes on the labbench paper. They will use the graduatedsqueeze pipet to move 2 ml of OCM from theOCM tube into each of the three 60-mm dishes.
3. Distribute ovaries to teams, one ovary per stu-dent, and let students use barbeque tongs toremove the ovaries from your container andplace them on the lab bench paper.
4. Help students identify follicles as small darkblister-like areas. The best follicles for oocyteextraction are 2 mm - 10 mm.
5. The teacher demonstrates assembling the sy-ringe and needle, and aspirating (sucking) anegg from a follicle. Insert the needle into a fol-licle 2 mm - 10 mm in diameter. Move theneedle around inside the follicle while con-tinuously drawing out the plunger. Drawabout 0.1 ml per mm of follicle diameter (5mm follicles yield about 0.5 ml of fluid). Con-tinue aspirating follicles until the syringe isnearly full or you run out of follicles. Depositthe fluid in an unlabeled petri dish with OCM.
6. Students will continue aspirating follicles anddepositing the fluid in their team’s unlabeled60 mm petri dish until all eligible follicles (2-mm - 10-mm) are aspirated.
7. Under the dissecting microscope, students willsearch for COCs. They will use the plastic pi-pette to pick up COCs and place them withminimal fluid into the dish labeled COCs.When all the oocytes are in the dish, studentswill pick up cumulus cells and place themwith minimal fluid in the other dish labeled“cumulus cells.”
8. All teams will use plastic pipettes collect thewhole class’ oocytes in one “class” 35 mm dishmarked “COCs.” The class should collect from30 - 100 COCs. When all COCs are in the COCdish, teams will move cumulus cells to one 35mm dish marked “cumulus cells.” The classshould collect about six times as many cumu-lus cells as COCs.
9. Assign a student to move all of the COCs fromthe class oocyte dish into a 1.5-ml micro-centrifuge tube labeled “COCs.” Assign otherstudents to apportion all of the cumulus cellsto six more microcentrifuge tubes labeled “cu-mulus cells.” When the class finishes, one

Teacher Worksheet Unit III • Activity 3-2
284 Lesson 3 Animal Reproductive Techniques
microcentrifuge tube will contain the col-lected oocytes, and six will contain the col-lected cumulus cells. Cap all seven tubes andspin them in a centrifuge at 2000 rpm for 30seconds. Slowly and gently pour off superna-tant leaving 50 �l in the tube.
50 �l in a microcentrifuge tube looks about likethis:
Place the seven capped tubes in the freezer andfreeze at -20½ F. DNA will be extracted fromthe frozen oocytes and cumulus cells in theactivity in lesson 3-4.
Answer Key to Student Questions
1. Why do you think (make a guess) that follicles2-10 mm in diameter tend to contain the mostcompetent oocytes?
ANSWER: Oocytes in follicles smaller than 2mm tend to be immature, and therefore notcompetent to be fertilized. Oocytes in follicleslarger than 10 mm are often in a degenerativephase in which they are not competent to befertilized.
2. Why move the syringe needle around insidethe follicle while slowly drawing out theplunger?
ANSWER: The COC could be attached to theinner wall anywhere inside the follicle. Mov-ing the needle may help dislodge the COC,and continuous aspiration while moving theneedle directly sucks from more locationsaround the inner wall.
3. Describe any difficulties you encountered incollecting or observing oocytes.
ANSWER: Students might have some diffi-culty finding the COCs amid the debris be-cause they may not have seen COCs in thepast. Separating cumulus cells from the oo-cyte requires a very steady hand to manipu-late the squeeze pipette under the microscope.
Related Activities
Students will gain important skills by repeatingthis activity as an experiment. They could try, forexample, to extract from the small follicles (<2mm). They can get a good overview of the pro-cess by going to the Agricultural BiotechnologyCenter of Hungary’s “Test Tube Calf” website atthe menu page: http//www.abc.hu/institutes/animal/IVF/AFOMENU.HTML. Clicking on“evaluation of oocytes” and “oocyte collection”will provide a visual review of some of the stepsin this activity. Students may then go through“IVM I” and “IVM II,” “fertilization in-vitro,” and“cultivation in-vitro” to see and read about thenext steps in IVF after collection of oocytes.
StudentWorksheet
Unit III • Activity 3-2 Student Worksheet
Lesson 3 Animal Reproductive Techniques 285
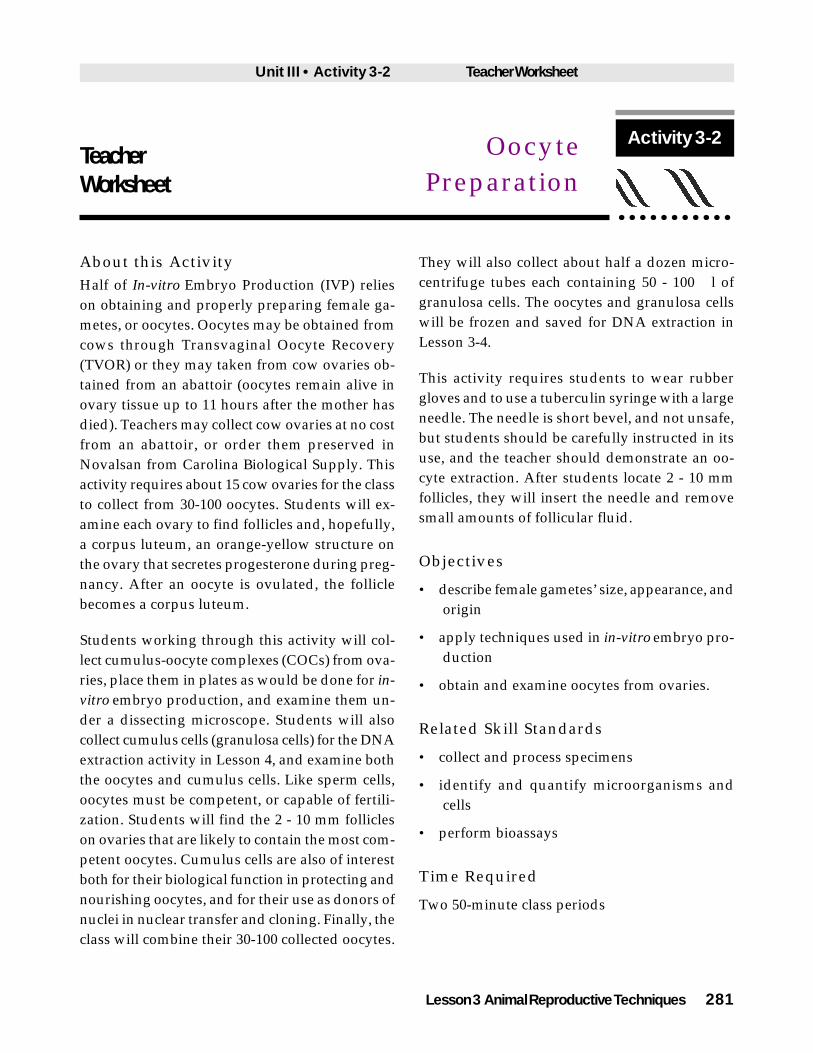
About this ActivityIn-vitro Embryo Production (IVP) requires care-ful preparation of oocytes. Oocytes, like spermcells, must be competent, or capable of fertiliza-tion. In this activity, you will collect cumulus-oo-cyte complexes (COCs) from follicles on the sur-face of an ovary. The bodies you will collect arecalled COCs because consist of oocytes sur-rounded by small cumulus cells. Cumulus cellsare “nurse” cells which protect and nourish theegg. Cumulus cells are also of interest for theiruse as donors of nuclei in nuclear transfer andcloning.
You will use a large-bore syringe to suck (aspi-rate) the COCs out of the follicles and place themin a petri dish. This procedure is exactly whatwould be done for in-vitro embryo production.Once the COCs are in the petri dish, you will beable to examine them under a dissecting micro-scope. When you have examined them, you willcollect them for DNA extraction to be conductedin another activity.
Oocytes develop in follicles, small blister-likestructures on the surface of ovaries. The largeround object in the picture below is a follicle. Thesmall round object inside it is a cumulus-oocytecomplex attached inside the follicle membrane.The needle you will use, inserted into a folliclethe size shown in the magnified picture below,would be about the diameter of your finger. Onthe outer surface of the ovary, you may also seean orange-yellow structure called a corpus lu-teum. The follicle becomes a corpus luteum after
the oocyte is ovulated. The corpus luteum secretesprogesterone and other hormones during preg-nancy. Be sure you have your lab notebook forrecording this activity.
Directions
1. Lay out lab bench paper (plastic side down,paper side up). Put on gloves. Assembleneedles, but leave caps on them.
2. Use the marker to label one 60-mm petri dish“COCs.” Label another dish “cumulus cells.”Leave the third unlabeled, and place all threeon lab bench paper. Use the squeeze pipet tomeasure 2 ml of OCM from the tube into eachdish.
3. Your teacher will distribute ovaries, one perstudent. Use barbeque tongs to remove an
Activity 3-2OocytePreparation
Follicle Wall
Needle
Cumulus-Oocyte ComplexOocyte
Collecting a COC
Student Worksheet Unit III • Activity 3-2
286 Lesson 3 Animal Reproductive Techniques
ovary from the container and place it on thelab bench paper.
4. Find follicles. Follicles are small, dark blister-like areas. The best follicles for oocyte extrac-tion are 2 mm - 10 mm - about this size:
Also look for a corpus luteum, a yellow-or-ange lump slightly larger than the follicles. Afollicle becomes a corpus luteum after the eggis ovulated. The corpus luteum secretesprogesterone and other hormones necessaryfor pregnancy.
6. Assemble the syringe and needle. Hold thesyringe in your hand palm up. Leave theneedle capped and push it onto the end of thesyringe. You might need to hold the needleon the syringe with your thumb as you pulloff the needle cap.
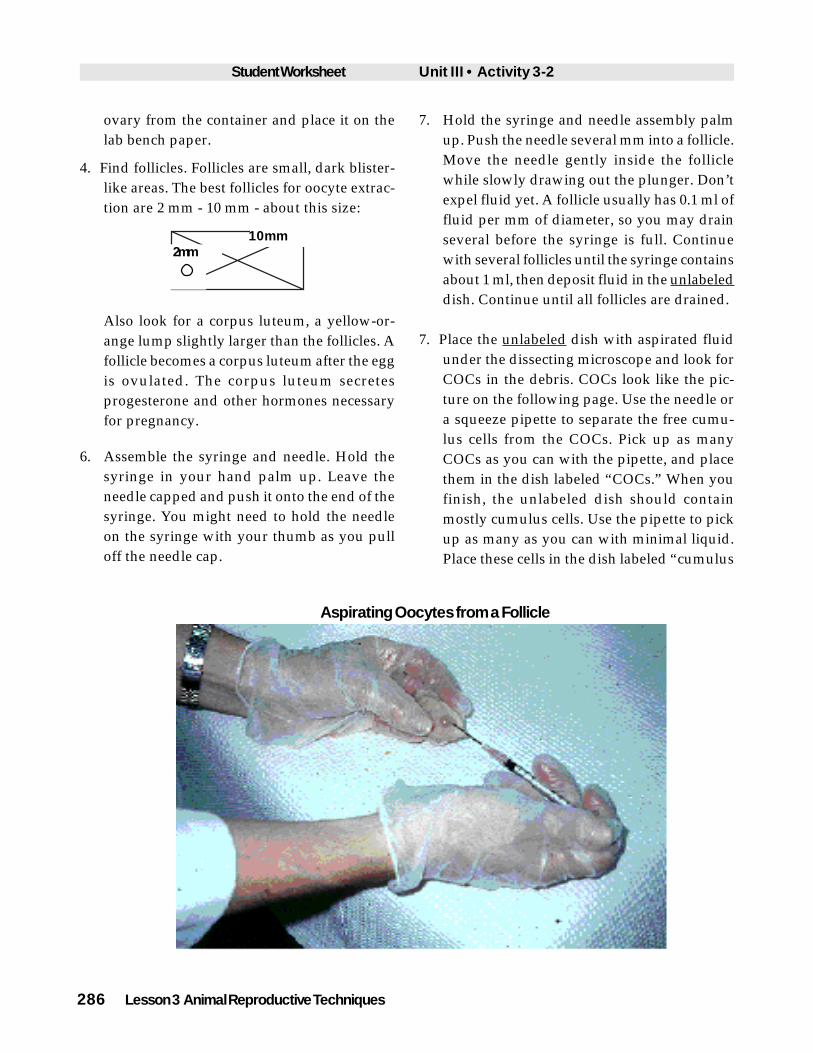
7. Hold the syringe and needle assembly palmup. Push the needle several mm into a follicle.Move the needle gently inside the folliclewhile slowly drawing out the plunger. Don’texpel fluid yet. A follicle usually has 0.1 ml offluid per mm of diameter, so you may drainseveral before the syringe is full. Continuewith several follicles until the syringe containsabout 1 ml, then deposit fluid in the unlabeleddish. Continue until all follicles are drained.
10mm2mm
7. Place the unlabeled dish with aspirated fluidunder the dissecting microscope and look forCOCs in the debris. COCs look like the pic-ture on the following page. Use the needle ora squeeze pipette to separate the free cumu-lus cells from the COCs. Pick up as manyCOCs as you can with the pipette, and placethem in the dish labeled “COCs.” When youfinish, the unlabeled dish should containmostly cumulus cells. Use the pipette to pickup as many as you can with minimal liquid.Place these cells in the dish labeled “cumulus
Aspirating Oocytes from a Follicle
Unit III • Activity 3-2 Student Worksheet
Lesson 3 Animal Reproductive Techniques 287
cells.” In your lab notebook, sketch the COCsand an oocyte with cumulus cells removed.Also record the number of oocytes you col-lected, the number of ovaries used by yourteam, and the number of oocytes your teamcollected.
8. Two labeled 35 mm petri dishes containing 1ml of OCM have been prepared for the wholeclass. Assign someone from your team to usethe plastic pipette to transfer COCs from yourteam’s “COCs” dish to the whole-class COCsdish. Take minimal liquid with each transfer.The class should collect from 30 - 100 COCsfrom 15 ovaries. Repeat for cumulus cells,transferring all of your cumulus cells to thewhole-class “cumulus cells” dish with mini-mal fluid. You should get about six times asmany cumulus cells as COCs.
9. Label one 1.5-ml microcentrifuge tubes“COCs” and six 1.5-ml tubes “cumulus cells.”Move the collected COCs from into the COCstube and cap. Likewise, distribute the class’collection of cumulus cells evenly into the six
“cumulus cells” tubes and cap. Spin the tubesin a centrifuge at more than 2000 rpm for 30seconds. Gently pour off the supernatant leav-ing only 50 �l of cells in the bottom of thetubes. Freeze the tubes at -20½ F. in the freezer.DNA will be extracted from the frozen eggsin the activity in Lesson 3-4.
Thought/Reflection Questions to Answer in the Lab Notebook
1. Why do you think (make a guess) that follicles2-10 mm in diameter tend to contain the mostcompetent oocytes?
2. Why move the syringe needle around insidethe follicle while slowly drawing out theplunger?
3. Describe any difficulties you encountered incollecting or observing oocytes.
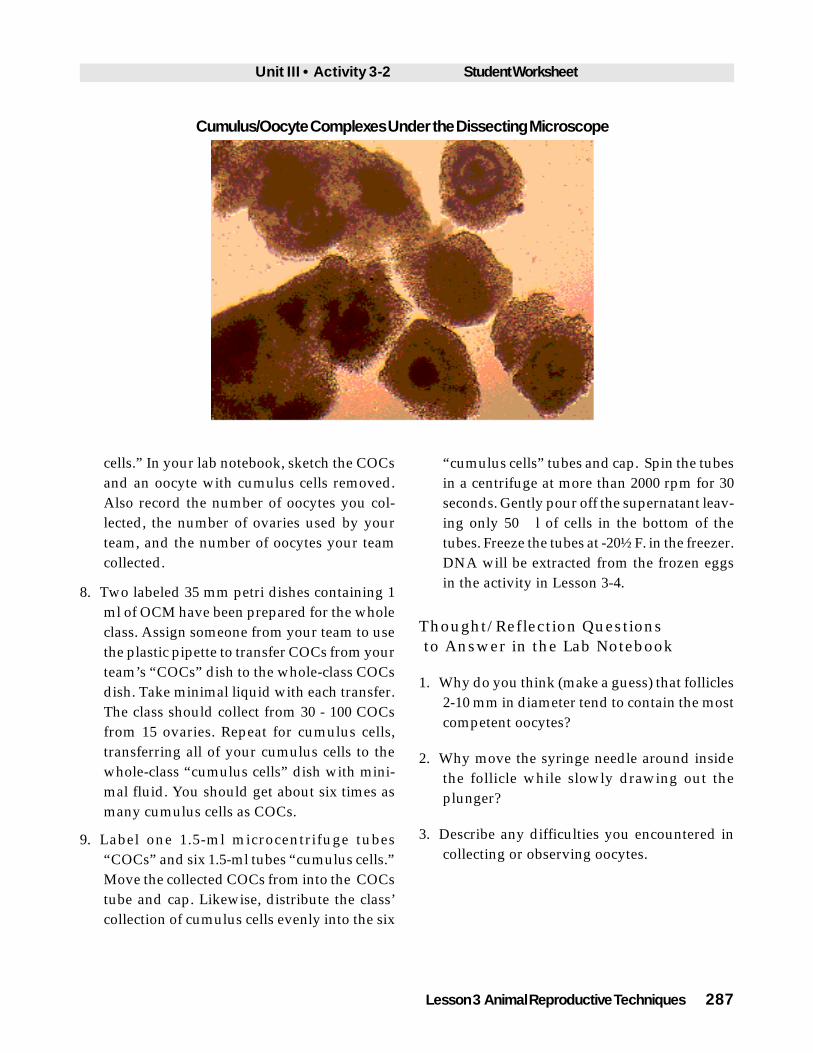
Cumulus/Oocyte Complexes Under the Dissecting Microscope