uputstvo zа rukovаnje instruction manual · 6. kombinovani ključ 13/19 7. uputstvo za rukovanje...
TRANSCRIPT

Instruction Manual Original Instruction Manual
EK7300 EK7301
Important: Read this instruction manual carefully before putting the Power Cut into operation and strictly observe the
safety regulations! Keep this instruction manual!
Uputstvo zа rukovаnjeOriginаlno uputstvo zа rukovаnje
Važno: Pročitаjte pažljivo ova uputstvа zа rukovаnje pre nego što uključite Power Cut i strogo se
pridržavajte uputstava zа bezbednost!Čuvаjte ova uputstvа!

Thank you for purchasing a MAKITA product! Congratulations on choosing a MAKITA Power Cut cutoff saw! We are confident that you will be satisfied with this modern piece of equipment. Like our chain saws, the MAKITA Power Cuts feature specially designed high-performance engines with outstanding power-to-weight ratios, for heavy-duty yet lightweight tools. Other advantages of the MAKITA Power Cuts: • Sturdy construction and high reliability. • Maintenance-free electronic ignition, hermetically sealed to
protect against dust and moisture. • Vibration damping with the MAKITA 2-mass system (D2M) for
tireless working even when guiding the Power Cut by hand. • Five-stage air-filter system for reliable working even under
very dusty conditions. • Two options for mounting the cutter attachment: Either cen-
trally, for good balance when guiding the unit manually, or on the side, for fiush cuts along walls or curbsides or horizontally directly above the ground.
• Extensive range of resin-bonded and diamond grit cutting discs, trolley with dust catcher, and systems for supplying water to the disc.
The following industrial property rights apply: US 08510690, SE 95027298, SE 95027306, IT 95000653, IT 95000654, GBM 9412558, GBM 9412559. We want you to be satisfied with your MAKITA product. In order to guarantee the optimal function and performance of your Power Cut and to ensure your personal safety we would request you to perform the following: Read this instruction manual carefully before putting the Power Cut into operation for the first time, and strictly observe the safety regulations! Failure to observe these precautions can lead to severe injury or death!
EU Conformity Declaration The undersigned, Tomoyasu Kato, as authorized by MAKITA Corporation, declare that the MAKITA machines, Type: (395) Power Cut EK7300, EK7301 manufactured by MAKITA Corporation, 3-11-8 Sumiyoshi-Cho, Anjo, Aichi, 446-8502 Japan, conforms to the basic safety and health requirements of the applicable EU Directives: EU Machinery Directive 2006/42/EG, EU EMC Directive 2004/108/ EG, Outdoor Noise Directive 2000/14/EG. The most important standards applied to properly meet the re-quirements of the above EU Directive were: EN 19432, CISPR 12, EN ISO 14982, DIN EN 61000-4. The conformity assess-ment procedure 2000/14/EG was performed per Annex V. The measured noise level (Lwa) is 114 dB(A). The guaranteed noise level (Ld) is 115 dB(A). The technical documentation is on file at MAKITA International Europe Ltd., Michigan Drive, Tongwell, Milton Keynes, Bucks, MK15 8JD, England. Anjo, 4.12.2011 for MAKITA Corporation
Tomoyasu Kato Managing Director
Table of contents Page Packing ................................................................................ 2 Delivery inventory .............................................................. 3 Symbols ............................................................................... 3
SAFETY PRECAUTIONS Intended use ................................................................... 4
General precautions ....................................................... 4 Protective equipment ...................................................4-5 Fuels / Refuelling ............................................................ 5 Putting into operation ...................................................... 5 Cutting discs ................................................................... 6 Kickback and lock-in ....................................................... 7 Working behavior / Method of working ............................ 7 Always observe the following when using synthetic resin cutting discs ............................................. 8 Cutting metal ................................................................... 8 Cutting masonry and concrete .....................................8-9 Transport and storage ..................................................... 9
Maintenance ................................................................. 10 First aid ......................................................................... 10 Disposal and environmental protection ......................... 10
Technical data ................................................................... 11 Denomination of components ......................................... 12
PUTTING INTO OPERATION Mounting the cutting disc ............................................... 13 Tightening the V-belt / Checking V-belt tension ............ 14 Fuels / Refuelling .....................................................14-15 Starting the engine ........................................................ 16
Cold-starting ................................................................. 17 Warm-starting ............................................................... 17
Stop engine ................................................................... 17 Adjusting the carburetor .................................................. 18
MAINTENANCE Changing the V-belt ...................................................... 19 Cleaning the protection hood ........................................ 20 Cleaning / changing the air filter ..............................20-21 Replacing the spark plug .............................................. 22 Replacing the suction head .......................................... 22 Replacing the starter cable ........................................... 23 Replacing the return spring ........................................... 24 Replacing / cleaning the spark arrester screen ............. 26 Instructions for periodic maintenance ........................... 28
Cutting attachment in central / side position ................. 25 Repositioning the cutting attachment .......................25-26
SPECIAL ACCESSORIES Diamond cutting discs, trolley, water tank and pressure water system............................................ 27
Service, spare parts and guarantee ................................ 28 Troubleshooting ............................................................... 29 Extract from spare parts list .......................................30-31
Accessories .................................................................. 31
Packing Your MAKITA Power Cut is packed in a cardboard box to pr e-vent shipping damage. Cardboard is a basic raw material and is consequently reuseable or suitable for recycling (waste paper recycling).
2
Zahvaljujemo vam se na kupovini MAKITINOG proizvoda!Čestitаmo vam na izboru MAKITA Power Cut testere za otsecanje! Uvereni smo da ćete da budete zadovoljni sa ovom modernom napravom. Kao naše lančane testere, MAKITA Power Cut se odlikuju sa posebno konstruisanim pogonom sa visokim performansama, sa odličnim stepenom u odnosu snaga - težina, za teške i lagane alate. Останати предности на МАКИТА Power Cuts: • Prilagodljiva konstrukcija i visoka pouzdanost. • Elektronsko paljenje bez potrebe za održavanje, hermetički
zatvoren uređaj čime je zaštićen od prašine i vlage. • Prigušene vibracije sa MAKITA - sistemom sa 2 mase (D2M) za rad
bez umora kada se Power Cut vodi sa rukom. • Petostepeni sistem za prečišćavanje vazduha za pouzdan rad u
uslovima velike prašine. • Dve mogućnosti za montiranje brusog kamena: u srednji položaj, za
dobar balans kod ručnog ili bočnog sečenja, za bočna sečenja po dužini zidova ili ivičnjaka ili kod direktnog sečenja u pod.
• Velika paleta sintetičkih i dijamantskih brusnih diskova, kolica za sakupljanje prašine i sistem za snabdevanje diska vodom.
Zastupljena su sledeća industrijska prava: US 08510690, SE 95027298, SE 95027306, IT 95000653, IT 95000654, GBM 9412558, GBM 9412559. Mi želimo da budete zadovoljni sa vašim MAKITA proizvodom. U cilju garantovanja optimalnih funkcija i performansi Power Cut-a i obezbeđivanju lične bezbednosti od Vas tražimo da se pridržavate sledećeg: Pročitajte pažljivo ovo uputstvo pre nego što prvi put pustite Power Cut u rad i pažljivo sledite propise za bezbednost! Pogrešno razumevanje ovih propisa može da dovede do ozbiljnih povreda i smrti!
EU Deklaracija za saobraznostPotpis Tomoyasu Kato, kao ovlašćenog od MAKITA Corporation, potvrđuje da MAKITA mašina,Tip: (395) Power Cut EK7300, EK7301 proizvedena u MAKITA Corporation, 3-11-8 Sumiyoshi-Cho, Anjo, Aichi, 446-8502 Japan, je saobrazna sa osnovnim bezbednosnim i zdravstvenim potrebama prema navodima u Propisima EU: EU Mašinski Propisi 2006/42/EG, EU EMC Propisi 2004/108/ EG, Propisi za spoljnu buku 2000/14/EG. Najvažniji standardi se primenjuju na način da zadovoljavaju potrebe prema sledećim propisima EU: EN 19432, CISPR 12, EN ISO 14982, DIN EN 61000-4. Procedura za procenu saobraznosti 2000/14/EG je izvedena prema Aneksu V. Izmereno nivo buke (Lwa) is 114 dB(A). Garantovano nivo buke (Ld) is 115 dB(A). Tehnička dokumentacija se nalazi u arhivi u MAKITA International Europe Ltd., Michigan Drive, Tongwell, Milton Keynes, Bucks, MK15 8JD, England.
Anjo, 4.12.2011 for MAKITA Corporation
Sadržaj Stranica
Pakovanje........................................................................................ 2 Sadržina isporuke........................................................................... 3 Simboli ............................................................................................ 3 BEZBEDNOSNA UPOZORENJANamena ......................................................................................... 4 Opšta upozorenja.............................................................................. 4 Zaština oprema ............................................................................4-5 Goriva/punjenje................................................................................. 5 Puštаnje u rаd ................................................................................. 5 Diskovi zа sečenje............................................................................. 6 Povratni udarac i trzanje..................................................................... 7 Ponašanje u poslu /Metod rada ........................................................7 Uvek da se pridržavate sledećem kada koristite diskove za otsecanje od sintetičkih smola....................................................8 Sečenje metala............................................................................... 8 Sečenje maltera i betona ........................................................8-9 Transport i skladišćenje................................................................... 9 Održavanje....................................................................................10 Prva pomoć.....................................................................................10 Briga i zaštita životne sredine .................................................... 10 Tehnički podaci.............................................................................. 11 Opis sastavnih delova ..................................................................12
PUŠTАNJE U RАD Montiranje diska za sečenje.............................................................13 Zatezanje klinastog kajša/ Provera zategnutosti kajša....................14 Goriva/punjenje ..........................................................................14-15 Startovanje motora..........................................................................16 Hladno startovanje...........................................................................17 Toplo startovanje.............................................................................17 Zaustavljanje motora........................................................................17 Podešavanje kаrburаtora.............................................................18
ODRŽAVANJEIzmena klinastog kajša....................................................................19 Čišćenje zaštitnog poklopca............................................................20 Čišćenje / izmena filtera za vazduh..............................................20-21 Izmena svećice ...............................................................................22 Izmena usisne glave .....................................................................22 Izmena užeta za startovanje........................................................23 Zamena povratne opruge................................................................24 Zamena/ čišćenje sita za zadržavanje varnice........................... 26 Uputstva za periodično održavanje.................................................28 Pribor za sečenje u centralni/bočni položaj................................ 25 Premeštanje pribora za sečenje.............................................25-26
SPECIJALNI DODACIDijamantski diskovi za sečenje, kolica za vođenje, rezervoar
za vodu i vodeni sistem pod pritiskom..............................................27
Servis, rezervni delovi i garancija................................................28 Dijagnoza kvarova.........................................................................29 Izvod iz liste rezervnih delova.........................................30-31 Pribor.....................................................................................31
PakovanjeVaš MAKITA Power Cut je upakovan u kartonsku kutiju čime je zaštićen od oštećenja prilikom transporta. Karton je osnovna sirovina i prema tome može ponovo da se upotrebi ili da se reciklira (recikliranje stare hartije).
Delivery inventory
6 5 4 3 2 1
1. Power Cut 2. Cutting disc (not in the general scope of delivery. Country-specific) 3. Adapter ring 20/25.4 (not in the general scope of delivery. Country-specific) 4. Screwdriver (for carburetor adjustment) 5. Offset screwdriver 6. Universal wrench 13/19 In case one of the parts listed should not be included in the 7. Instruction manual (not shown) delivery inventory, please consult your sales agent.
Symbols You will notice the following symbols on the Power Cut and in the Instruction Manual:
Read instruction manual and follow the warning- and safety precautions!
Particular care and caution!
Forbidden!
Wear helmet and eye, respiratory and hearing protection!
Wear protective gloves!
Wear respiratory protection!
Hazardous dust and/or gas emission!
Fire hazard from fi ying sparks!
No smoking!
No open fire!
Direction of cutting wheel rotation
Warning: the max. peripheral speed of the cutting disc is 80 m/s!
Cutting disc dimensions
Never use circular saw blades!
Combination switch Choke, Start/Stop (I/O)
Starting procedure (Press decompression valve, Engine - manual start)
Stop engine!
Warning! Kickback!
Fuel and oil mixture
First aid
Recycling
CE - Marking
3
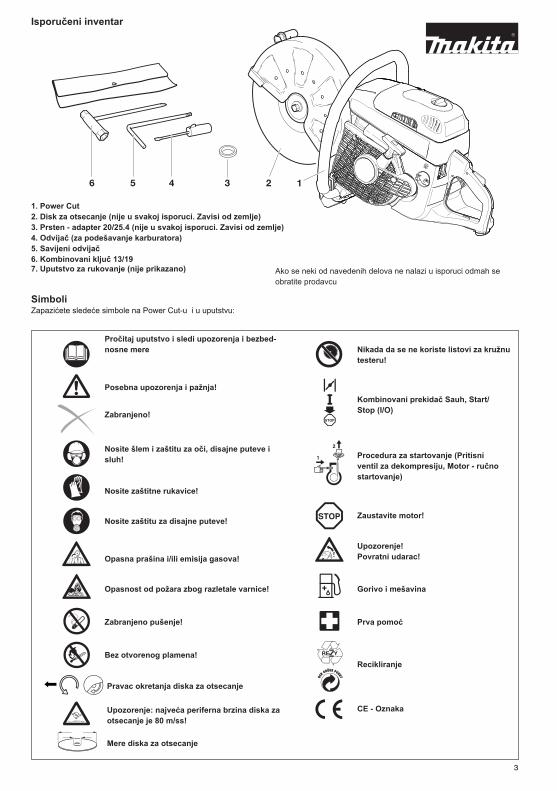
1. Power Cut 2. Disk za otsecanje (nije u svakoj isporuci. Zavisi od zemlje) 3. Prsten - adapter 20/25.4 (nije u svakoj isporuci. Zavisi od zemlje) 4. Odvijač (za podešavanje karburatora)5. Savijeni odvijač6. Kombinovani ključ 13/197. Uputstvo za rukovanje (nije prikazano) Ako se neki od navedenih delova ne nalazi u isporuci odmah se
obratite prodavcu
SimboliZapazićete sledeće simbole na Power Cut-u i u uputstvu:
Pročitaj uputstvo i sledi upozorenja i bezbed-nosne mere
Posebna upozorenja i pažnja!
Zabranjeno!
Nosite šlem i zaštitu za oči, disajne puteve i sluh!
Nosite zаštitne rukаvice!
Nosite zaštitu za disajne puteve!
Opasna prašina i/ili emisija gasova!
Opasnost od požara zbog razletale varnice!
Zabranjeno pušenje!
Bez otvorenog plamena!
Pravac okretanja diska za otsecanje
Upozorenje: najveća periferna brzina diska za otsecanje je 80 m/ss!
Mere diska za otsecanje
Nikada da se ne koriste listovi za kružnu testeru!
Kombinovani prekidač Sauh, Start/Stop (I/O)
Procedura za startovanje (Pritisni ventil za dekompresiju, Motor - ručno startovanje)
Zaustavite motor!
Upozorenje!Povratni udarac!
Gorivo i mešavina
Prva pomoć
Recikliranje
CE - Oznaka
Isporučeni inventаr

SAFETY PRECAUTIONS Intended use Power Cut Use the Power Cut cutoff saw outdoors only, for trimming and cutting suitable materials, using cutting discs rated for this machine. Improper use: Never use the cutoff saw cutting discs for grinding or sanding (us-ing the side of the cutting disc to remove material). The disc can break! Never use the Power Cut with saw blades, cutter blades, brushes etc. Unauthorised users: Persons unfamiliar with the Instruction Manual, children, young people, and persons under the infiuence of alcohol, drugs or medi-cations must not use the Power Cut.
General precautions - The operator MUST read this instruction manual to ensure
safe operation (even if you already have experience in us-ing cutoff saws). It is important to be familiar with the opera-tion of this particular cutoff saw. Users insuffi ciently informed will endanger themselves as well as others due to improper handling.
- Let only persons who have experience in using cutoff saws work with this unit. When letting another person use the Power Cut, this instruction manual must be provided along with it.
- First-time operators should ask a specialist to instruct them in working with gasoline-powered cutoff saws.
- Children and persons under 18 years of age must not be allowed to use this Power Cut. Persons over the age of 16 years may, however, use the Power Cut for the purpose of being trained as long as they are under the supervision of a qualified trainer.
- Working with the Power Cut requires high concentration. - Operate the Power Cut only if you are in good physical condition.
If you are tired, your attention will be reduced. Be especially careful at the end of a working day. Perform all work calmly and carefully. The user has to accept liability for others.
- Never work while under the infiuence of alcohol, drugs, medica-tion or other substances which may impair vision, dexterity or judgement.
- A fire extinguisher must be available in the immediate vicinity when working in easily infiammable vegetation or when it has not rained for a long time (danger of fire).
- Asbestos and other materials that can release toxins may be cut only with the necessary safety precautions and after notification of the proper authorities and under their supervision or that of a person appointed by them.
- The use of dust-reduction devices is urgently recommended (see Accessories, pressure water tank, water tank).
Protective equipment - In order to avoid head, eye, hand or foot injuries as well as
to protect your hearing the following protective equipment must be used during operation of the Power Cut:
- The kind of clothing should be appropriate, i. e. it should be tight-fitting but not be a hindrance. Clothing in which grains of material can accumulate (trousers with cuffs, jackets and trousers with wide-open pockets, etc.) must not be worn, particularly when cutting metal.
- Do not wear any jewellery or clothing that can get caught or distract from the operation of the Power Cut.
- It is necessary to wear a protective helmet whenever working with the Power Cut. The protective helmet (A) is to be checked in regular intervals for damage and is to be replaced after 5 years at the latest. Use only approved protective helmets.
- The helmet visor (B) protects the face from dust and material grains. In order to prevent injuries to eyes and face, always
wear protective goggles (C) or visor when using the Power Cut.
- To prevent hearing damage, always wear suitable personal hearing protection. (ear muffs (D), ear plugs, etc.). Octave brand analysis upon request.
- When dry-cutting dust-producing materials such as stone or concrete, always wear approved respiratory protection (E).
- Work gloves (F) of tough leather are part of the required work kit of the Power Cut and must always be worn when working with the Power Cut.
1
2
3
4
4
BEZBEDNOSNE MERENamenaPower Cut Koristite Power Cut testeru isključivo napolju, za sečenje i otsecanje odgovarajućih materijala, koristeći diskove koji su namenjeni za ovu mašinu. Nedozvoljeno korišćenje:Diskovi za otsecanje ne smeju da se koriste za brušenje ili šmirglanje (korišćenjem bočne strane diska). Disk može da se slomi! Power Cut nikada da ne koristite sa listovima za testeru, reznim listovim, četkama itd. Neovlašćeni korisnici:Lica koja nisu upoznata sa uputstvom za rukovanje, deca, mlada lica i lica pod dejstvom alkohola, droga ili lekova ne smeju da rukuju sa Power Cut-om.
Opšte mere predostrožnosti- Rukovaoc MORA da pročita ovo uputstvo za rukovanje
da bi obezbedio siguran rad (važi i ako imate iskustva sa korišćenjem testera za otsecanje). Važno je da budete upoznati sa radom sa ovom posebnom testerom za otsecanje. Nedovoljno informisani korisnici zagroziće sebe kao i druge, zbog nepravilnog rukovanja.
- Dozvolite da sa ovom mašinom rukuju samo ona lica koja imaju iskustva sa korišćenjem testera za otsecanje. Kada dozvolite drugim licima da rukuju sa Power Cut-om morate da im obezbedite i uputstvo za rukovanje.
- Početnici moraju da se konsultuju sa stručnim licima da bi se upoznali sa radom sa benzinskom testerom za otsecanje.
- Deca i lica ispod 18 godina ne smeju da koriste Power Cut. Lica starija od 16 godina smeju da rukuju sa Power Cut-om, kao sa sredstvom za obuku, ali samo pod nadzorom kvalifikovanog nastavnika.
- Rad sa Power Cut-om zahteva visoku koncentraciju. - Radite sa Power Cut-om samo kada ste u dobrom psihičkom stanju.
Ako ste umorni, vaša pažnja će da bude smanjena. Budite posebno pažljivi pre kraja radnog dana. Sve radove izvodite smireno i pažljivo. Rukovaoc je odgovoran za druge.
- Nikada da se ne radi pod dejstvom alkohola, droga, lekova ili drugih supstanci koje mogu da naruše vid, veštinu ili razum.
- Aparat za gašenje požara mora da bude dostupan u neposrednoj blizini, kada radite u lako zapaljivoj vegetaciji ili ako duže vreme nije padala kiša (opasnost od požara).
- Azbest ili drugi materijali koji mogu da proizvode otrove mogu da se seku samo sa neophodnim sigurnosnim merama i posle obaveštavanja nadležnog organa i pod njihovim nadzorom ili pod nadzorom lica imenovanog od njih.
- Posebno se preporučuje korišćenje dodatka za sakupljanje prašine (vidi dodaci, rezervoar za vodu).
Zaštitna oprema- Da bi izbegli povrede glave, očiju, ruku ili stopala kao i da
zaštitite sluh, potrebno je da koristite sledeću zaštitnu opremu kada koristite Power Cut:
- Odeća treba da bude odgovarajuća odn. da bude stegnuta, ali da ne steže. Odeća u koju može da se skupi otpadni materijal (pantalone sa manžetnama, jakna i pantolone sa širokim džepovima i sl.) ne sme da bude istrošena, posebno kada sečete metal.
- Ne nosite nakit ili odeću koja može da bude zahvaćena ili može da vam skrene pažnju od Power Cut-a.
- Neophodno je da se nosi zaštitni šlem kada se radi sa Power Cut-om. Zaštitni šlem (A) redovno da se kontroliše i svakih 5 godina da se zameni sa novim. Koristite šlemove sa proverenim kvalitetom.
- Zaštita za lice (B) štiti lice od prašine i od otpadaka. Za zaštitu očiju uvek da nosite zaštitne nočare (C).
- Za zaštitu sluha koristite odgovarajuću zaštitu (antifone (D), tampone itd.). Na zahtev napravite analizu zvuka.
- Kod suvog sečenja materijala koji proizvode prašinu, kao kamen ili beton, uvek da koristite respiratornu zaštitu (E).
- Zaštitne rukavice (F) od debele kože su deo potrebnog radnog kompleta od Power Cut-a i da se nose uvek kada se radi sa Power Cut-om.

- Always wear safety shoes or boots (G) with steel toes, non-skid soles, and leg protectors when working with the Power Cut. Safety shoes equipped with a protective layer provide protection against cuts and ensure a secure footing.
- Always wear a work suit (H) of tough material with sufficient fiame-retardant qualities whenever working with the cutoff saw.
Fuels / Refuelling - Go to a safe, level place before refuelling. Never refuel while
on scaffolding, on heaps of material, or in similar places! - Switch off the engine before refuelling the Power Cut. - Do not smoke or work near open fi res (6). - Let the engine cool down before refuelling. - Fuels can contain substances similar to solvents. Eyes and skin
should not come in contact with mineral oil products. Always wear protective gloves when refuelling (not the regular work gloves!). Frequently clean and change protective clothes. Do not breathe in fuel vapors. Inhalation of fuel vapours can be hazardous to your health.
- Do not spill fuel. If a spill occurs, clean off the Power Cut im-mediately. Fuel should not come in contact with clothes. If your clothes have come in contact with fuel, change them at once.
- Ensure that no fuel oozes into the soil (environmental protection). Use an appropriate base.
- Refuelling is not allowed in closed rooms. Fuel vapors will ac-cumulate near the fi oor (explosion hazard).
- Ensure to fi rmly tighten the screw cap of the fuel tank. - Before starting the engine, move to a location at least 3 meters
(approx. 3 1/4 yards) from where you fuelled the Power Cut (7), but not within the extended swing range of the cutting disc (direction of sparks).
- Fuel cannot be stored for an unlimited period of time. Buy only as much as will be consumed in the near future.
- When making up the gasoline/oil mixture, always put the oil in the mixing container fi rst, and then the gasoline.
- Use only approved and marked containers for the transport and storage of fuel.
- Keep fuel away from children!
Putting into operation - Do not work on your own. There must be someone around
in case of an emergency (within shouting distance). - Observe all anti-noise regulations when working in residential
areas. - Never use the Power Cut near infi ammable materials or
explosive gases! The Power Cut can create sparks leading to fi re or explosion!
- Make sure that all persons within 30 meters (33 yards), such as other workers, are wearing protective gear (see "Protective Equipment") (8). Children and other unauthorized persons must remain more than 30 meters away from the working area. Keep an eye out for animals as well (9).
- Before starting work the Power Cut must be checked for perfect function and operating safety according to the pre-scriptions. In particular, make sure that the cutting wheel is in good condition(replace immediately if torn, damaged or bent), the cutting wheel is properly mounted, the protective hood is locked in place, the hand guard is properly mounted, the V-belt has the proper tension, the throttle moves easily and the half-throttle lock button functions properly, the grips are clean and dry, and the combination switch functions properly (Start/Stop (I/O) switch, choke).
- Start the Power Cut only after complete assembly and inspec-tion. Never use the Power Cut when it is not completely as-sembled.
5
6
3 meters
7
30 m
= wearing Protective Equipment8
9
5
- Uvek kada radite sa Power Cut-om da nosite zaštitne cipele (G) sa čeličnom kapom, sa đonovima koji se ne kližu i sa zašitom za noge. Zaštitna obuća sa zaštitnim slojem štiti od posekotina i obezbeđuje sigurnu osnovu.
- Uvek kada radite sa Power Cut-om da nosite radnu odeću (H) od tvrdog materijala, koji je otporan na gorenje.
Gorivo / punjenje- Pre punjenja goriva izberite sigurnu i ravnu površinu. Nikada da ne
točite gorivo sa merdevina, na natrupani i razbacani materijal i slično!
- Isključite motor pre točenja goriva. - Ne pušite ili ne radite u blizini otvorenog plamena (6). - Pre točenja goriva da se ohladi motor. - Gorivo može da sadrži supstance slične rastvaračima. Oči i koža ne
smeju da dođu u dodir sa mineralnim produktima. Uvek da nosite zaštitne rukavice kada točite gorivo (ne obične radne rukavice). Redovno da čistite i menjate zaštitnu odeću. Ne udišite isparenja od goriva. Udisanje isparenja može da izazove ozbiljne bolesti.
- Ne rasturajte gorivo. Ako se gorivo rasturi odmah da očistite Power Cut. Gorivo da ne dođe u dodir sa odećom. Ako se to desi, odmah zamenite odeću.
- Pazite da gorivo ne isteče na tlo (zaštita okoline). Upotrebite odgovarajuću podlogu.
- Ne točite gorivo u zatvorenu prostoriju. Isparenja od goriva se talože na pod (opasnost od eksplozije).
- Dobro zatvorite poklopac rezervoara. - Pre startovanja mašine premestite se na drugo mesto, udaljeno
najmanje 3 m od mesta točenja (7), ali ne u okviru dometa diska (pravac varnica).
- Gorivo ne može da se čuva neograničeno vreme. Kupujte količinu goriva koju možete da potoršite za kratko vreme.
- Kada pravite mešavinu benzin/ulje, u rezervoar prvo sipajte ulje, a zatim benzin.
- Gorivo čuvati i transportovati u kanistre koji su za tu namenu. - Čuvajte gorivo da nije dostupno deci!
Puštаnje u rаd - Ne rаdite sаmi. U slučаju opаsnosti dа imа nekog u blizini (nа
udaljenosti dа možete dа go pozovete). - Pridržavajte se propisima za buku kada radite u stambenim
oblastima. - Nikada da ne koristite Power Cut u blizini zapaljivih materijala
ili eksplozivnih gasova. Power Cut proizvodi varnice koje izazivaju požar!
- Uverite se da nose zaštitnu opremu sva lica u blizini od 30 m kao i ostali radnici (vidi „Zaštitna oprema”) (8). Deca i nekvalifikovana lica da budu udaljena više od 30 m od radnog prostora. Isto važi i za životinje (9).
- Pre posla proverite stanje Power Cut-a i postupajte prema propisima za zaštitu pri radu. Posebno proverite stanje brusnog diska (istrošeni, oštećeni ili iskrivljeni disk odmah zameniti), njegovo ispravno montiranje, da li je štitnik zabravljen na njegovom mestu, ispravno montiranje štitnika za ruku, zategnutost klinastog kajša, lako pomeranje ručice za gas, jesu li drške čiste i suve i ispravno funkcionisanje kombinovanog prekidača (Start/Stop (I/O), sauh).
- Power Cut može da se startuje samo posle kompletne provere i montaže. Power Cut da se ne pušta u rad ako nije kompletno montiran.
3 metara
nosite zaštitnu opremu

Cutoff discs - The protection hood must always be on! Change discs only
with the engine off! - There are two basic types of cutoff discs:
- For metal (hot cutting) - For masonry (cold cutting)
NOTE: When using diamond cutoff discs, always make sure to observe the "direction of rotation" markings. Diamond discs should only be used for cutting masonry/brick/ concrete etc. - Cutoff discs are intended only for radial loading, i.e. for cutting.
Do not grind with the sides of the cutting disc! This will break the disc (10)!
Caution! Never change direction (turning radius less than 5 meters / 5 1/2 yards), exert lateral (sideways) pressure, or tip the Power Cut during cutting (11)! - Use a cutting disc only for cutting the materials it is intended
for. The proper type of disc must be used, for either metals or masonry.
- The arbor hole of the cutting disc must be an exact fit with the arbor or shaft. If the arbor hole is larger, it must be fitted with an adapter ring (available as an accessory).
- The cutting disc must be rated for freehand cutting at up to 4370 rpm or 80 m/sec for 350 mm discs, 5100 rpm or 80 m/sec for 350 mm discs. Use only cutting discs that comply with EN 12413, EN 13236.
- The disc must be free of defects (12). Do not use defective cut-ting discs.
Always tighten the cutting disc mounting bolt to a torque of 30 Nm. Otherwise, the cutting disc can twist. - Before starting the cutting disc, make sure you have a steady
footing. - Put the Power Cut into operation only as described in this instruc-
tion manual (13). Always place your left foot in the rear handle and grasp the other handle firmly (with thumb and fi ngers). Other starting methods are not allowed.
- When starting the Power Cut it must be well supported and securely held. The cutting disc must not be touching anything.
- If the cutting disc is new, test it by running it at least 60 seconds at top speed. When doing this, make sure that no persons or body parts are in the extended swing range of the disc, in case it is defective and fi ies apart.
- When working with the Power Cut always hold it with both hands. Take the back handle with the right hand and the tubu-lar handle with the left hand. Hold the handles tightly with your thumbs facing your fingers.
- CAUTION: When you release the throttle lever the disc will keep spinning for a short period of time (free-wheeling effect).
- Continuously ensure that you have a safe footing. - Hold the Power Cut such that you will not breathe in the exhaust
gas. Do not work in closed rooms or in deep holes or ditches (danger of poisoning by fumes).
- Switch off the Power Cut immediately if you observe any changes in its operating behavior.
- Switch off the engine before inspecting the V-belt tension or tightening it, replacing the cutting wheel, repositioning the cutter attachment (side or middle position) or eliminating faults (14).
- Turn off the engine immediately and check the disc if you hear or feel any change in cutting behaviour.
- Turn off the Power Cut when taking a break or stopping work (14). Place the unit in such a way that the disc is not touching anything and cannot endanger anyone.
- Do not put the overheated Power Cut in dry grass or on any infiammable objects. The muffier is very hot (danger of fire).
- IMPORTANT: After wet cutting, first turn off the water feed and then let the disc run at least 30 seconds, to fiing off the remaining water and prevent corrosion.
10
11
13
12
min. 5 m
14
● Maintenance ● Refuelling ● Changing cutoff discs ● Repositioning the cutting attachment ● Stopping work ● Transport ● Putting out of function
6
Diskovi za otsecanje
- Štitnik uvek da bude montiran. Diskovi se menjaju samo kada je motor isključen!
- Postoje dva osnovna tipa diskova za otsecanje:- za metale (toplo sečenje)- za beton (hladno sečenje)ZABELEŠKA:Kada koristite dijamantske diskove za otsecanje uvek da zapazite „pravac okretanja”. Dijamantski diskovi su namenjeni samo za sečenje maltera/cigle/betona itd.- Diskovi za otsecanje su namenjeni samo za radijalno opterećenje, npr.
za sečenje. Nemojte da brusite po strani diska Tako ćete da polomite disk (10)!
Pažnja!- Ne menjajte pravac (rezni luk manji od 5 m), ne pritiskajte bočno
ili ne podižite Power Cut za vreme sečenja (11)!- Koristite disk samo za sečenje materijala za koje je namenjen. Morate
da koristite pravi tip diska kako za metal tako i za zidove.- Nasadni otvor diska mora tačno da odgovara prečniku vretena. Ako
je nasadni otvor veći mora da upotrebite prsten za prilagođavanje (dostupen je u priboru).
- Disk mora da bude namenjen za slobodno sečenje pri brzini od 4370 o/min ili 80 m/s, za prečnik od 350 mm, 5100 o/min ili 80 m/s, za prečnik od 300 mm. Koristite samo diskove koji odgovaraju EN 12413, EN 13236.
- Disk mora da bude potpuno ispravan (12). Ne koristite neispravne diskove.
Uvek da pritežete vijke za pritezanje diska sa momentom od 30 Nm. U suprotnom disk će da oscilira.- Pre startovanja diska zauzmite stabilni položaj.- Pustite Power Cut isključivo na način koji je opisan u uputstvu (13).
Levo stopalo postavite na zadnju dršku, a krivu dršku obuhvatite sa drugom rukom (sa palcem i prstima). Druge metode nisu dozvoljene.
- Kada počinjete sa poslom čvrsto držite Power Cut. Pri tome disk ne sme da dodiruje ni u šta.
- Ako je disk nov, ispitajte ga sa radom u prazno, sa najvećom brzinom, u vreme do 60 s. Za toa vreme u blizini da nema ljudi ili bilo kakvih delova.
- Kada radite sa Power Cut-om držite ga sa obe ruke. Sa desnom rukom držite za zadnju dršku, a sa levom za krivu dršku. Drške da budu obuhvaćene sa palcem i sa prstima.
- PAŽNJA: Kada otpustite ručicu za gas disk nastavlja da se vrti još kratko vreme (efekat slobodnog okretanja).
- Stalno proveravajte da li imate stabilnu podlogu.- Držite Power Cut tako da ne udišete izduvne gasove. Ne radite u
zatvorene prostorije (opasnost od trovanja).- Isključite Power Cut odmah ako primetite bilo kakve nepravilnosti
u toku posla.- Isključite motor pre proveravanja zategnutosti ili pre zatezanja
klinastog kajša, kada menjate diskove, kada menjate položaj dodataka (spoljni ili srednji položaj) ili kada otklanjate kvarove (14).
- Isključite motor i proverite disk ako čujete ili osetite bilo kakvu promenu u procesu.
- Isključite Power Cut kada pravite pauzu ili kada ste prestali da radite (14). Odložite mašinu tako da disk ni u šta ne dodiruje ili da ne može niko da je koristi.
- Ne ostavljajte Power Cut u suvu travu ili na zapaljive objekte. Prigušivač je mnogo topao (opasnost od požara).
- VAŽNO: Posle mokrog sečenja, prvo zaustavite vodu a zatim ostavite disk da radi oko 30 s, čime se cedi ostatak vode i eliminiše se opasnost od korozije.
OdržavanjeTočenje gorivaIzmena diskovaPremeštanje pribora za sečenjeZaustavljanje poslaTransportPrestanak sa radom

Kickback and lock-in - When working with the Power Cut there is a danger of kickback
and lock-in. - Kickback occurs when the top of the cutting disc is used for
cutting (15). - This causes the Power Cut to be thrown back toward the user
with great force and out of control. Risk of injury! To prevent kickback, observe the following:
- Never cut with the section of the cutting disc shown in fi gure 15. Be especially careful when reinserting the disc into cuts that have already been started!
- Lock-in occurs when the cut narrows (crack, or workpiece under stress).
- This causes the Power Cut to suddenly jump forward, out of control and with great force. Risk of injury! To prevent lock-in, observe the following:
- When reinserting the disc into previous cuts, have the Power
15
Cut running at top speed. Always cut at top speed. - Always support the workpiece so that the cut is under tension
(16), so that the cut does not press together and jam the cutting disc as it proceeds through the material.
- When starting a cut, apply the disc to the workpiece with care. Do not just shove it into the material.
- Never cut more than one piece at a time! When cutting, make sure that no other workpiece comes into contact.
Working behavior / Method of working - Before starting work, check the work area for any hazards
(electrical wires, infiammable substances). Clearly mark the work area (for example with warning signs or by cordoning off the area).
- When working with the Power Cut hold it firmly by the front and rear handles. Never leave the Power Cut unattended!
- Use the Power Cut at high speed as far as possible (see “Tech-nical Data”).
- Only use the Power Cut during good light and visibility periods.
16
Be aware of slippery or wet areas, and of ice and snow (risk of slipping).
- Never work on unstable surfaces. Make sure that there are no obstacles in the working area, risk of stumbling. Always ensure that you have a safe footing.
- Never cut above your shoulder height (17). - Never stand on a ladder to cut (17). - Never use the Power Cut while standing on scaffolding. - Do not lean over too far when working. When putting down and
picking up the Power Cut, do not bend over from the waist, but instead bend in the knees. Save your back!
- Guide the Power Cut in such a way that no part of your body is within the extended swing range of the disc (18).
- Use cutting discs only for the materials for which they are de-signed!
- Use cutting discs only for the materials for which they are de-signed. Do not use the Power Cut to lift up and shovel away pieces of material and other objects.
17
Important! Before cutting, remove all foreign objects, such as rocks, gravel, nails etc. from the cutting area. Otherwise, such objects can be fiung away by the disc with great speed. Injury hazard!
- When cutting workpieces down to length use a fi rm support. If necessary, secure the workpiece from slipping, but do not steady it with your foot or allow another person to hold it.
- When cutting round items, always secure them against rota-tion.
- When guiding the Power Cut by hand, use the side mounting position of the cutter attachment only when actually necessary. Otherwise, always use the central position. This gives the unit a better balance, for reduced operator fatigue.
18
7
Povratni udarac i trzanje - Kada radite sa Power Cut-om postoji opasnost od povratnog udarca
ili trzanja. - Povratni udarac nastaje kada se seče vrhom diska (15). - Ovo izaziva da se Power Cut sa velikom silom, bez kontrole, pokrene
u pravcu rukovaoca. Opasnost od povreda! Za izbegavanje povratnog udarca pridržavajte se sledećeg:
- Nikada ne secite sa delom prikazanim na slici 15 Posebno pazite kada disk postavljate u rez koji je bio prekinut!
- Trzanje nastaje kada se rez stesni (kod pojave riseva ili ako je komad napregnut).
- Ova izaziva da Power Cut iznenada otskoči napred, bez kontrole i sa velikom silom. Opasnost od povreda! Za izbegavanje trzanja pridržavajte se sledećeg:
- Kada disk postavljate u prethodno isečen žljeb, Power Cut da radi sa najvećom brzinom. Uvek secite sa najvećom brzinom.
- Radni komad da se postavlja da bude pod naponom (16), da se ne bi spojili otsečeni delovi i da zaglave disk pri otsecanju.
- Na početku sečenja, sa diskom pažljivo zasecite radni komad. Nemojte naglo da uđete u materijal.
- Nikada ne secite više komada odjednom! Kada sečete vodite računa da ne dodirujete drugi komad.
Ponašanje u poslu /Metod rada - Pre rada proverite radnu okolinu (električni kabli, zapaljivi materijali).
Jasno označite okolinu (npr. sa znacima upozorenja ili sa natpisom za zabranu prolaženja).
- Držite Power Cut čvrsto za prednju i za zadnju dršku. Nikada da ne ostavljate Power Cut bez nadzora!
- Koristite Power Cut sa što je moguće većom brzinom (vidi „Tehnički podaci”).
- Koristite Power Cut samo u uslovima dobre vidljivosti. Pazite na klizave i vlažne površine, led ili sneg (opasnost od klizanja).
- Ne radite na nestabilnim površinama. Uverite se da nema prepreka u radnom prostoru, opasnost od spoticanja. Uvek da obezbedite sigurnu podlogu.
- Ne secite iznad visine ramena (17).- Ne stojite na merdevine dok sečete (17).- Nemojte da koristite Power Cut stojeći na skeli.- Nemojte previše da se naginjete. Kada podižete ili spuštate Power
Cut nemojte da se saginjete, već kleknite na kolena. Čuvajte leđa!- Vodite Power Cut na taj način delovi tela da se ne nalaze u liniji
diska (18).- Sa diskom secite samo one materijale za koje je disk namenjen!- Koristite disk samo za materijale za koje je namenjen. Ne koristite
Power Cut za podizanje ili za guranje komada i delovi.
Važno! Pre sečenja, iz radne oblasti otstranite strane predmete kao kamenje, čakal, eksere itd. U suprotnom ovi delovi mogu da polete sa velikom brzinom. Opasnost od povreda!- Kod uzdužnog sečenja pritegnite komad. Ako je potrebno obezbedite
komad od klizanja, ali nikako sa nagazivanjem ili da ga pridržava drugo lice.
- Kružne komade obavezno da pritegnete da ne bi provrteli.- Kod ručno vođenog Power Cut-a, samo u slučaju potrebe, upotrebite
dodatak za vođenje. Inače uvek da koristite centralni položaj. Ovo omogućuje bolju ravnotežu i smanjuje umor.

When using synthetic resin cutting discs, always ob-serve the following:
CAUTION: - Synthetic resin cutting discs can absorb moisture. This
moisture can cause the disc to become unbalanced at high speed. This imbalance can cause the disc to break.
- Do not cool resin cutting discs with water or other fiuids. - Do not expose resin cutting discs to high humidity or
rain!
Do not use resin cutting discs past their use-by date (expira-tion date)! The date (quarter and year) is stamped on the disc's arbor ring.
EXAMPLE: 04 / 2014 This cutting disc can be used through the end of the fourth quarter of 2014, if properly stored and correctly used. Cutting metals IMPORTANT! Always wear approved respiratory protection! Materials that can release toxic substances may be cut only after notifying the proper authorities and under their supervi-sion or that of a person appointed by them. CAUTION! The rapid rotation of the cutting disc heats metal and melts it at the point of contact. Swing the guard as far down as pos-sible (19) in order to direct the stream of sparks forward, away from the operator (fi re hazard). - Determine the cut line, mark the cut and apply the disc to the
material at moderate speed, to cut a guide groove before going to top speed and applying more pressure to the Power Cut.
- Keep the disc straight and vertical. Do not tip it, as this can break it.
- The best way to get a good, clean cut is to pull or move the Power Cut back and forth. Do not simply press the disc into the material.
- Thick round stock is best cut in stages (20). - Thin tubing and pipes can be cut with a simple downward
cut. - Cut large-diameter pipes as for round stock. To prevent tipping
and for better control, do not let the disc sink too deeply into the material. Instead, always cut shallow around the whole piece.
- Worn discs have a smaller diameter than new discs, so that at the same engine speed they have a lower effective circumfer-ential speed and therefore do not cut as well.
- Cut I-beams and L-bars in steps; see Figure 21. - Cut bands and plates like pipes: along the wide side with a long
cut. - When cutting material under stress (supported material or mate-
rial in structures), always make a notch in the thrust (pressure) side, and then cut from the tension side, so that the disc does not lock in. Secure cutoff material from falling!
CAUTION! If there is a chance that the material is under stress, be pre-pared for it to kick back. Make sure you can get out of the way if you have to! Be particularly careful in scrap-metal yards, junkyards, at ac-cident sites, and with haphazard piles of material. Precariously balanced pieces or pieces under stress can act in unpredictable ways, and may slide, jump out, or burst. Secure cutoff material from falling! Always exercise extreme caution and use only equipment that is in perfect working order. Observe the accident-prevention rules and regulations of your employer and/or insurance organization.
Cutting masonry and concrete IMPORTANT! Always wear approved respiratory protection! Asbestos and other materials that can release toxic sub-stances may be cut only after notifying the proper authorities and under their supervision or that of a person appointed by them. When cutting prestressed and reinforced concrete piles, follow the instructions and standards of the respon-sible authorities or the builder of the structural member. Reinforcement rods must be cut in the prescribed sequence and in accordance with applicable safety regulations.
NOTE: Mortar, stone, and concrete develop large quantities of dust during cutting. To increase the lifetime of the cutting disc (by cooling), to improve visibility, and to avoid excessive dust creation, we strongly recommend wet cutting instead of dry cutting.
19
20
21
8
Kada koristite diskove za otsecanje od sintetičkih smola pazite na sledeće:
PAŽNJA:- Diskovi za otsecanje od sintetičkih smola imaju osobinu
da apsorbuju vlagu. Apsorbovana vlaga izaziva neuram-noteženost pri velikim brzinama. Ovo izaziva lomljenje diska.
- Ne hladite diskove sa vodom ili sa drugom tečnošću.- Ne izlažite diskove na vlagu ili na kišu!- Diskove za otsecanje od sintetičkih smola ne koristite posle
roka za korišćenje! Propisani rok (kvartal i godina) je napisan na prstenu na nasadnom otvoru diska.
PRIMER: 04 / 2014Ovaj disk za otsecanje može da se koristi do kraja 4 kvartala 2014 godine, ako je propisno skladišćen i pravilno korišćen.
Sečenje metalaVAŽNO!Uvek da nosite propisanu masku za disanje!Materijali koji mogu da proizvedu otrovne supstance mogu da se seku samo posle izveštavanja nadležnih organa i pod njihovim nadzorom ili pod nadzorom lica imenovanog od njih.
PAŽNJA!Velike brzine diskova zagrevaju metal i tope ga u tačku dodira. Spustite štitnik što je moguće niže (19), da bi usmerili razletalu varnicu nasuprot rukovaoca (opasnost od požara).- Odredite i označite liniju sečenja i sa smanjenom brzinom diska
prodrite u materijal, da bi isekli osnovni rez, pre nego što povećate brzinu i primenite veći pritisak na Power Cut.
- Držite disk pravo i vertikalno. Nemojte da ga okrećete da ga ne bi slomili.
- Najbolji način da dobijete dobar, čisti rez je da gurate ili da vučete Power Cut nazad ili napred. Nemojte samo da pritiskate disk u materijal.
- Velike kružne komade secite postepeno (20).- Tanke cevi secite sa vertikalnim posmacima.- Cevi sa velikim prečnicima seku se kao i veliki kružni komadi. Za
izbegavanje izvijanja i za bolju kontrolu ne dozvolite da disk potone duboko u materijal. Uvek da sečete po obimu radnog komada.
- Istrošeni diskovi imaju manji prečnik od novih i s time i manju perifernu brzinu pri istom broju obrtaja motora. Zbog toga oni ne seku dobro.
- I- nosače i L-profile secite postepeno; vidi crtež 21.- Čelične trake i ploče secite kao i cevi; po dužini široke strane sa
dugačkim rezovima.- Kada sečete napregnute materijale (opterećeni ili ugrađeni
materijali) prvo zasecite klin sa zbijene strane (pritisnute), a zatim secite sa istegnute strane, čime disk neće da se zaglavi. Otpadni materijal obezbedite od padanja!
PAŽNJA!Ako postoji opasnost da je materijal napregnut, budite spremni za povratni udarac. Budite spremni da ga izbegnete, kada se pojavi!Budite pažljivi i imajte na umu da mogu da se pojave razletali otpaci od metala. Neizvesno balansirani ili napregnuti komadi mogu da krenu u neočekivanom pravcu i mogu da proklize, da otskoče ili da naprsnu. Obezbedite otsečene materijale od padanja. Radite sa velikom pažnjom i koristite opremu koja je u odličnom radnom stanju.
Primenjujte pravila za izbegavanje nesreća i propise od poslodavca i/ili od osiguravajućih kompanija.
Sečenje maltera i betona
VAŽNO!Uvek da koristite respiratornu zaštitu!Azbest ili drugi materijali koji mogu da proizvedu otrovne supstance mogu da se seku samo posle izvešća nadležnih organa i pod njihovim nadzorom ili pod nadzorom lica imenovanog od njih. Kada sečete prednapregnute ili ojačane armirane betonske šipke, sledite uputstva i standarde nadležnih organa ili graditelja strukture. Armirane šipke moraju da se seku po propisanom redosledu i prema bezbednosnim propisima.
ZABELEŠKA:Malter, kamen i beton, dok se seku, proizvode veliku količinu prašine. Da bi povećali trajnost diska (sa hlađenjem), da bi poboljšali vidljivost i da bi izbegli intenzivno izdvajanje prašine, preporučujemo da koristite mokro umesto suvog sečenja.

In wet cutting, the disc is wetted at an equal rate on both sides by a trickle of water. MAKITA offers the right accessories for all wet cutting applications (see also "SPECIAL ACCESSORIES"). - Remove foreign objects such as sand, stones and nails found
within the working area. Caution: Watch out for electric wires and cables!
The rapid rotation of the cutting disc at the point of contact throws fragments out of the cut groove at high speed. For your safety, swing the protection hood down as far as pos-sible (23), so that material fragments are thrown forward, away from the operator. - Mark the cut, and then make a groove about 5 mm (just under
1/5") along the entire length of the planned cut. This groove will then guide the Power Cut accurately guring the actual cutoff.
NOTE: For long, straight cuts we recommend using a trolley (24, see also "SPECIAL ACCESSORIES"). This makes it much easier to guide the unit straight. - Perform the cut with a steady back-and-forth motion. - When cutting slabs to size, you need not cut through the entire
material thickness (creating unnecessary dust). Instead, simply make a shallow groove, and then knock off the excess material cleanly on a fiat surface (25).
CAREFUL! When cutting into lengths, cutting through material, making cutouts, etc., always make sure to plan the direction and sequence of cuts in such a way that the disc does not get jammed by the cut-off piece, and that no persons can be injured by falling pieces. Transport and storage - Always turn off the Power Cut when transporting it or
moving it from place to place on a site (26). - Never carry or move the unit with the engine on or the
disc moving! - Carry the unit only by the tubular (middle) handle with the cut-
ting disc pointing behind you (26). Avoid touching the exhaust muffier (burn hazard!)
- When moving the Power Cut over longer distances, use a wheelbarrow or wagon.
- When transporting the Power Cut in a vehicle, make sure it is securely positioned in such a way that no fuel can leak out. Always remove the cutting disc before transporting the unit in a vehicle.
- The Power Cut should be stored safely in a dry place. It must not be left outdoors! Always dismount the cutting disc before storage. Keep the Power Cut away from children.
- Before long-term storage and before shipping the Power Cut, follow the instructions in the chapter on "Periodic care and maintenance". ALWAYS empty the fuel tank and run the carburetor dry.
- When putting cutting discs in storage, be careful to: • Clean and dry them well. CAUTION: Do NOT clean synthetic
resin cutting discs with water or other fiuids! • Store them lying down fiat. • Avoid dampness, freezing temperatures, direct sunshine,
high temperatures and temperature fiuctuations, as these can cause breakage and splintering.
• Before re-using a resin cutting disc, make sure of the use-by (expiration) date (quarter and year, stamped on the arbor ring). If this date has been exceeded, do NOT use the cutting disc.
- Always check new cutting discs or cutting discs that have been in storage to make sure that they are free of defects and before the first cut test-run the tool at top speed for at least 60 seconds. Keep body parts and people well away out of range of the direction of the cutting disc during this test.
23
24
25
26
9
Kod mokrog sečenja disk je ravnomerno mokar sa obe strane. MAKITA nudi odgovarajuće dodatke za sve vrste mokrog sečenja (vidi „DODATNI PRIBOR”).- Otstranite strane predmete kao pesak, kamenčiće i eksere koji su
se našli u radnoj oblasti. Pažnja: Pazite na električne kable i žice!Velika brzina diska za otsecanje, na mestu dodira, izbacuje komade otsečenog materijala. Za vašu bezbednost spustite štitnik, što je moguće niže (23) i na taj način otpaci će da lete dalje od rukovaoca.- Obeležite sečenje i zatim napravite žljeb oko 5 mm po dužini
planiranog sečenja. Ovaj žljeb će dalje da vodi Power Cut do potpunog otsecanja.
ZABELEŠKA:Za dugačka i prava sečenja preporučujemo korišćenje kolica za vođenje (24, vidi “DODATNI PRIBOR”). Ona olakšava pravo vođenje.- Sečenje izvodite napred i nazad.- Kada sečete table, nije potrebno da se seče kroz celu debljinu
(nepotrebno stvaranje prašine). Umesto toga, napravite uzdužni žljeb i zatim, na ravnu ploču, sa udarcima sa čekićem polomite deo koji se seče (25).
PAŽLJIVO!
Kada sečete po dužini, kada prosecate i sl. obavezno označite pravac sečenja i utvrdite redosled i način sečenja, da ne bi došlo do povrede prilikom zaklinjavanja diska ili prilikom razletanja otpada.
Trаnsportovanje i sklаdištenje
- Prilikom transportovanja ili promene radnog mesta, isključite Power Cut (26).
- Ne nosite ili ne prenosite mašinu sa uključenim motorim ili sa diskom koji vrti!
- Nosite mašinu samo za krivu dršku (srednju) sa diskom okrenutim iza vas (26). Ne dodirujte prigušivač zvuka (opasnost od opekotina!)
- Prilikom prenošenja Power Cut-a na veća rastojanja koristite kolica.- Prilikom transportovanja Power Cut-a u vozilo, postavite ga u
bezbedan položaj tako, da ne isteče gorivo. Uvek da vadite disk za sečenje pre transportovanja u vozilo.
- Power Cut odlagati u suvu prostoriju. Ne smete da ga ostavljate napolju. Demontirajte disk za sečenje. Power Cut mora da bude nedostupen za decu.
- Pre odlaganja na duži period ili pre transportovanja, pročitajte uputstva za „Periodično negovanje i održavanje”. UVEK da izpraznite rezervoar za gorivo i da osušite karburator.
- Prilikom skladišćenja Power Cut-a zapazite sledeće:• Očistite ga i osušite ga. PAŽNJA: NE ČISTITE diskove od
sintetičkih smola sa vodom ili sa drugom tečnošću!• Odložite ga na ravnu površinu• Izbegavajte vlagu, niske temperature, direktne sunčeve zrake,
visoke temperature i promene temperature jer one izazivaju lomljenje ili pucanje.
• Pre upotrebe sintetičkih diskova vodite računa za rok upotrebe (kvartal i godina, označeno na prstenu od nasadnog otvora). Ako je rok istekao NE koristite diskove.
- Proverite nove ili skladišćene diskove da nisu oštećeni i pre prvog sečenja pustite ih da rade sa najvećom brzinom u prazno, oko 60 s. Delovi tela ili prisutna lica da ne budu u pravcu diska.

Maintenance - Before performing maintenance work switch off the Power
Cut (27) and pull out the plug cap. - Always check the Power Cut before using it to make sure that
it is in good working order. In particular, make sure that the cutting disc is properly mounted. Make sure that the cutting wheel is undamaged and suitable for the job it will be used for.
- Operate the Power Cut only at a low noise and emission level. For this ensure the carburetor is adjusted correctly.
- Clean the Power Cut regularly. - Check the fuel tank cap regularly for good sealing.
Observe the accident prevention instructions issued by trade associations and insurance companies. NEVER make any modifications to the Power Cut! You will only be putting your own safety at risk! Perform only the maintenance and repair works described in the instruction manual. All other work must be carried out by MAKITA Service. Use only original MAKITA spares and accessories. The use of non-MAKITA spares, accessories, or cutting discs increases the risk of accident. We cannot accept any respon-sibility for accidents or damage occurring in association with the use of cutting discs or accessories other than original MAKITA.
First aid For the event of a possible accident, please make sure that a first aid kit is always immediately available close by. Immediately replace any items used from the first aid box. When calling for help, give the following information: - Place of the accident - What happened - Number of injured people - Kind of injuries
- Your name!
NOTE Individuals with poor circulation who are exposed to excessive
27
SERVICE 28
29 vibration may experience injury to blood vessels or the nervous system. Vibration may cause the following symptoms to occur in the fin-gers, hands or wrists: ”Falling asleep” (numbness), tingling, pain, stabbing sensation, alteration of skin colour or of the skin. If any of these symptoms occur, see a physician!
Disposal and environmental protection Be mindful of the environment! Dispose of worn-out or defective cutting discs in accordance with your local disposal regulations. To protect unusable cutting discs from misuse, destroy them before disposal. When the Power Cut is worn out or damaged beyond repair, have it disposed of or recycled in an environmentally sound manner. If necessary, consult your local authorities.
10
Održavanje- Pre održavanja isključite Power Cut (27) i izvucite kabl za
svećice.- Proverite Power Cut pre korišćenja da bi se uverili u ispravno radno
stanje. Posebno proverite pravilno montiranje diska. Uverite se da disk nije oštećen i da je sposoban za rad.
- Radite sa Power Cut-om sa niskom galamom i emisijom gasova. U tom cilju karburator mora da bude pravilno podešen.
- Čistite Power Cut redovno.- Proverite zaptivnost poklopca rezrevoara.
Sledite propise za izbegavanje nesreća prema propisima trgovskih organizacija i osiguravajućih kompanija. NIKADA da ne pravite izmene na Power Cut-u! Tako narušavate ličnu bezbednost!!Radite samo ona održavanja i popravke koje su opisane u ovim uputstvima. Sve druge poslove izvodite u ovlašćenom servisu MAKITE.Koristite samo originalne delove i pribor od MAKITE. Sa korišćenjem delova, opreme ili diskova koji nisu od MAKITE povećavate opasnost od nesreća. Ne prihvatamo nikakvu odgovornost za nesreće ili štete izazvane korišćenjem delova koji nisu originalni.
Za eventualne nesreće, u vašoj blizini mora da imate kutiju za prvu pomoć. Svaki upotrebljeni deo iz kutije odmah da popunite sa novim.
Kada tražite pomoć, trebа dа dаte sledeće informаcije:
- Mesto nesreće- Šta se desilo- Broj povređenih- Vrsta povrede- Vаše ime!
ZABELEŠKA Vibracije mogu da izazovu sledeće simptome zbog vibracija prstiju, ruku ili ručnih zglobova: „uspavljivanje” delova tela, bolove, drhtanje, promenu boje kože ili promene na koži.Ako se pojavi neki od ovih simptoma odmah da potražite lekarsku pomoć
Briga i zaštita životne sredinePazite na životnu sredinu! Odlaganje iskorišćenih ili pokvarenih diskova treba da bude prema lokalnim propisima za odlaganje otpada. Da ne bi došlo do pogrešne upotrebe, polomite diskove pre nego što ih bacite. Kada je Power Cut iskorišćen ili ne može da se popravi zbog oštećenja, odložite ga prema uputstvima za zaštitu životne sredine. Ako treba konsultujte lokalne vlasti.
SERVIS
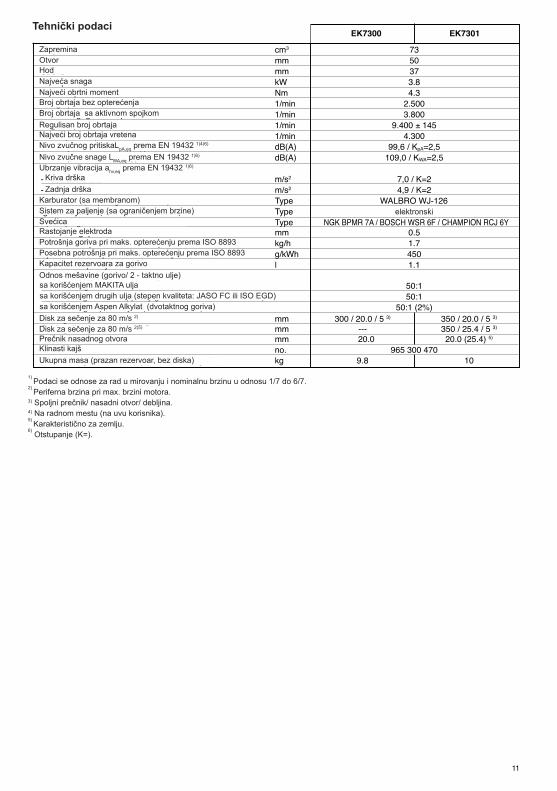
Technical data EK7300 EK7301
Displacement cm3 73 Bore mm 50 Stroke mm 37 Max. power kW 3.8 Max. torque Nm 4.3 Idling speed 1/min 2.500 Clutch engagement speed 1/min 3.800 Engine speed limitation 1/min 9.400 ± 145 Max. spindle speed 1/min 4.300 Sound pressure level LpA, eq per EN 19432 1) 4) 6) dB(A) 99,6 / KpA=2,5 Sound power level LWA, eq per EN 19432 1) 6) dB(A) 109,0 / KWA=2,5 Vibration acceleration ahv, eq per EN 19432 1) 6)
- Tubular handle m/s2 7,0 / K=2 - Rear handle m/s2 4,9 / K=2 Carburetor (diaphragm carburetor) Type WALBRO WJ-126 Ignition system (with speed limitation) Type electronic Spark plug Type NGK BPMR 7A / BOSCH WSR 6F / CHAMPION RCJ 6Y Electrode gap mm 0.5 Fuel consumption at max. load per ISO 8893 kg/h 1.7 Specific consumption at max. load per ISO 8893 g/kWh 450 Fuel tank capacity l 1.1 Mixture ratio (fuel/two-stroke oil) - when using MAKITA oil 50:1 - when using other oils (quality grade: JASO FC or ISO EGD) 50:1 - when using Aspen Alkylat (two-stroke fuel) 50:1 (2%) Cutting disc for 80 m/sec. 2) mm 300 / 20.0 / 5 3) 350 / 20.0 / 5 3)
Cutting disc for 80 m/sec. 2) 5) mm --- 350 / 25.4 / 5 3)
Arbor diameter mm 20.0 20.0 (25.4) 5)
V-belt no. 965 300 470 Overall weight (tanks empty, without cutting disc) kg 9.8 10
1) Data apply to idle and rated speed operation at a ratio of 1/7 to 6/7. 2) Circumference speed at max. engine speed. 3) Outside diameter / arbor hole / thickness. 4) At the workplace (at user's ear). 5) Country-specific. 6) Uncertainty (K=).
11
1) Pоdаci sе оdnose zа rаd u mirovanju i nоminalnu brzinu u оdnоsu 1/7 dо 6/7.
2) Pеrifеrnа brzinа pri max. brzini mоtora.
3) Spoljni prеčnik/ nаsаdni otvor/ dеbljina. 4) Nа rаdnom mestu (nа uvu korisnika). 5)
Kаrаkteristično zа zеmlju.6) Otstupanje (K=).
Tehnički podаci
ZapreminaOtvorHodNajveća snagaNajveći obrtni momentBroj obrtaja bez opterećenjaBroj obrtaja sa aktivnom spojkomRegulisan broj obrtajaNajveći broj obrtaja vretenaNivo zvučnog pritiskaLpA,eq prema EN 19432 1)4)6)
Nivo zvučne snage LWA,eq prema EN 19432 1)6)
Ubrzanje vibracija ahv,eq prema EN 19432 1)6)
Kriva drškaZadnja drška
Karburator (sa membranom)Sistem za paljenje (sa ograničenjem brzine)SvećicaRastojanje elektrodaPotrošnja goriva pri maks. opterećenju prema ISO 8893Posebna potrošnja pri maks. opterećenju prema ISO 8893Kapacitet rezervoara za gorivoOdnos mešavine (gorivo/ 2 - taktno ulje)sa korišćenjem MAKITA uljasa korišćenjem drugih ulja (stepen kvaliteta: JASO FC ili ISO EGD)sa korišćenjem Aspen Alkylat (dvotaktnog goriva)Disk za sečenje za 80 m/s 2)
Disk za sečenje za 80 m/s 2)5)
Prečnik nasadnog otvoraKlinasti kajšUkupna masa (prazan rezervoar, bez diska)
elektronski
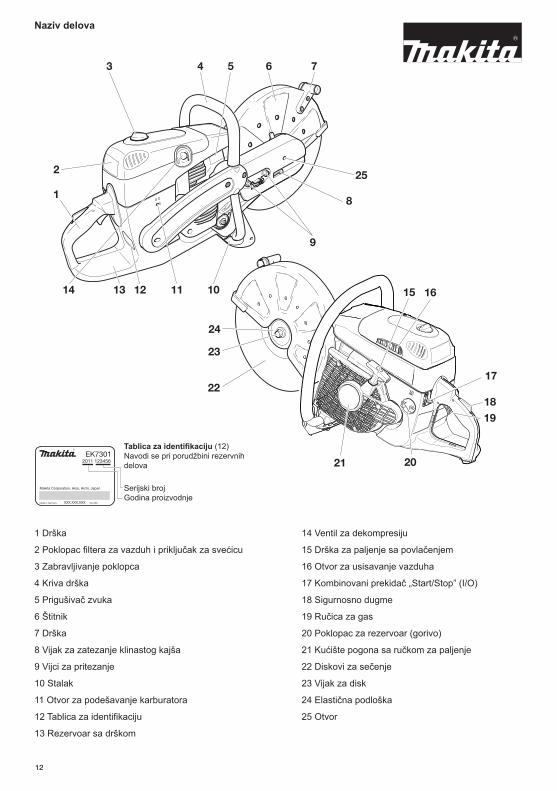
Denomination of components
3 4 5 6 7
2
1
14 13 12 11 10
24
23
22
Identifi cation plate (12)EK7301
2011 123456 Indicate when ordering spare parts
Makita Corporation, Anjo, Aichi, Japan Serial number Year of manufacture
Made in Germany XXX.XXX.XXX Typ XXX
1 Handle 2 Filter cover for air fi lter and spark plug cap 3 Cover lock
4 Tubular handle 5 Muffier
6 Protection hood 7 Grip 8 V-belt tension adjusting screw 9 Retaining nuts10 Stand
11 Carburetor adjustment opening12 Identifi cation plate13 Fuel tank with handle
25
8
9
15 16
17
18 19
21 20
14 Decompression valve 15 Starter grip16 Air intake17 Combination switch ·Choke, Start/Stop (I/O)”18 Safety locking button19 Throttle lever20 Tank cap (fuel)21 Starter housing with starter 22 Cutting disc23 Disc bolt24 Spring washer25 Hold opening
12
Nаziv delova
Tablica za identifikaciju (12)Navodi se pri porudžbini rezervnih delova
Serijski brojGodina proizvodnje
1 Drška
2 Poklopac filtera za vazduh i priključak za svećicu
3 Zabravljivanje poklopca
4 Kriva drška
5 Prigušivač zvuka
6 Štitnik
7 Drška
8 Vijak za zatezanje klinastog kajša
9 Vijci za pritezanje
10 Stalak
11 Otvor za podešavanje karburatora
12 Tablica za identifikaciju
13 Rezervoar sa drškom
14 Ventil za dekompresiju
15 Drška za paljenje sa povlačenjem
16 Otvor za usisavanje vazduha
17 Kombinovani prekidač „Start/Stop” (I/O)
18 Sigurnosno dugme
19 Ručica za gas
20 Poklopac za rezervoar (gorivo)
21 Kućište pogona sa ručkom za paljenje
22 Diskovi za sečenje
23 Vijak za disk
24 Elastična podloška
25 Otvor

PUTTING INTO OPERATION
CAUTION: Always turn off the engine and pull off the spark plug cap before doing any work on the Power Cut! Always wear protective gloves!
CAUTION: Start the Power Cut only after complete assembly and inspection.
Place the spring washer (8) on the arbour and insert the screw (9) and tighten by hand. Turn the disc slowly until the stop hole of the V-belt pulley is visible in the cutting arm cover (10). Insert the Allen key (2) as far as it will go. The shaft is now blocked. Tighten the screw with the combination wrench (1)
NOTE: Tighten the screw firmly (30 ± 2 Nm), as otherwise the cutting wheel may slip during cutting.
Mounting the cutting disc Inspect the disc for damage. See SAFETY INSTRUCTIONS, Page 6. Unscrew screw (9) and remove the spring washer (8). Place the cutting disc (5) on the arbour (7). Hinweis: The arbor hole of the cutting disc must be an exact fit with the arbor or shaft. If the arbor hole is larger, it must be fitted with an adapter ring (*).
Make sure the cutting disc is installed so it turns in the right direction, if a direction is marked on the disc.
Sequence
For the the following work, use the assembly tools included with delivery: 1. 13/19 AF combination wrench 2. Allen key 3. Carburetor adjustment screwdriver 4. Adapter ring (not in the general delivery inventory)
Place the Power Cut on a stable surface and carry out the fol-lowing assembly steps:
13
PUŠTАNJE U RАD
PAŽNJA: U bilo kakvoj intervenciji oko Power Cut-a isključite motor i izvucite kabl iz svećice. Nosite zaštitne rukavice!
PAŽNJA: Startujte Power Cut tek kada bude kompletno sklopljen i proveren.
Za poslove koji slede treba da koristite sledeće alate iz isporuke: 1. 13/19 AF kombinovani ključ 2. Ugaoni odvijač3. Odvijač za podešavanje karburatora4. Prsten za prilagođavanje (nije uvek u isporuci)
Postavite Power Cut na stabilnu podlogu i postupite na sledeći način:
Odvrnite vijak (9) i otstranite elastičnu podlošku (8). Postavite disk za otsecanje (5) na nasad (7). Zabeleška: Nasadni otvor na disku mora da odgovara otvoru ili vretenu. Ako je nasadni otvor veći upotrebite prsten za prilagođavanje (*).
Uverite se da je disk montirаn tаko dа se vrti u ispravnom pravcu, аko je pravac oznаčen nа disku.
Proverite disk da nije oštećen.Vidi UPUTSTVA ZA BEZBEDNOST, str. 6.
Montiranje diska za otsecanjesekvenca
Postаvite elаstičnu podlošku (8) na nаsаdni otvor i vijak (9) pritegnite rukom. Polako okrenite sve disk dok otvor nа remenici ne bude vidljiv kroz poklopac (10). Postаvite ugaoni ključ (2) što dalje. Vreteno je blokirаno. Uz pomoć kombinovanog ključa (1) pritegnite vijak
ZABELEŠKA: Pritegnite vijak jako (30 ± 2 Nm), jer u suprotnom disk može dа provrti.
Tightening the V-belt / Checking V-belt tension
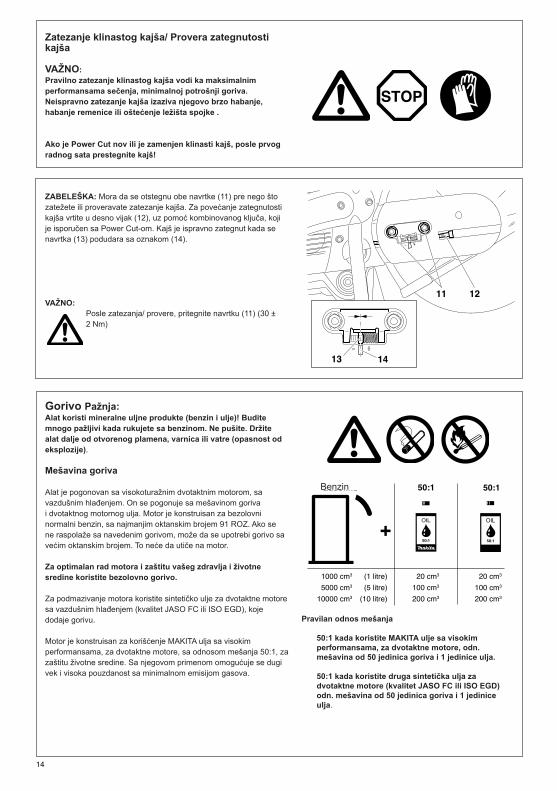
IMPORTANT: Exact V-belt tension is essential for maximum cutting per-formance with minimum fuel consumption. Improper V-belt tension will result in premature wear to the V-belt and V-belt wheel or damage to the clutch bearing. If the Power Cut is new or the V-belt has been replaced, retighten the V-belt after the first hour of operation!
NOTE: The two fastening nuts (11) must be loosened before tightening the V-belt or checking the tension. To increase the belt tension, turn the tightening screw (12) to the right (clockwise) with the combination wrench included with the Power Cut. The belt tension is correctly adjusted when the nut (13) is cen-tred on the mark (14).
IMPORTANT: After tightening/inspection, make certain to tighten the fastening nuts (11) (30 ± 2 Nm).
Fuels Caution: This tool uses mineral-oil products (gasoline and oil). Be especially careful when handling gasoline. Do not smoke. Keep tool well away from open fi ames, spark, or fire (explosion hazard).
Fuel mixture This tool is powered by a high-performance air-cooled two-stroke engine. It runs on a mixture of gasoline and two-stroke engine oil. The engine is designed for unleaded regular gasoline with a min. octane value of 91 ROZ. In case no such fuel is available, you can use fuel with a higher octane value. This will not affect the engine.
In order to obtain an optimum engine output and to protect your health and the environment use unleaded fuel only.
To lubricate the engine, use a synthetic oil for two-stroke air-cooled engines (quality grade JASO FC or ISO EGD), which has to be added to the fuel. The engine is designed for the use of MAKITA high-performance two-stroke engine oil at a mixture ratio of only 50:1 to protect the environment. In addition, this ensures a long service life and reliable operation with minimum exhaust emissions.
1000 cm3 (1 litre) 20 cm3 20 cm3
5000 cm3 (5 litre) 100 cm3 100 cm3
10000 cm3 (10 litre) 200 cm3 200 cm3
Gasoline 50:150:1
+
The correct mixture ratio: 50:1 when using MAKITA high-performance two-stroke
engine oil, i. e. mix 50 parts gasoline with 1 part oil.
50:1 When using other synthetic two-stroke engine oils (quality grade JASO FC or ISO EGD), i. e. mix 50 parts gasoline with 1 part oil.
14
Zatezanje klinastog kajša/ Provera zategnutosti kajša
VAŽNO: Pravilno zatezanje klinastog kajša vodi ka maksimalnim performansama sečenja, minimalnoj potrošnji goriva. Neispravno zatezanje kajša izaziva njegovo brzo habanje, habanje remenice ili oštećenje ležišta spojke .
Ako je Power Cut nov ili je zamenjen klinasti kajš, posle prvog radnog sata prestegnite kajš!
ZABELEŠKA: Mora da se otstegnu obe navrtke (11) pre nego što zatežete ili proveravate zatezanje kajša. Za povećanje zategnutosti kajša vrtite u desno vijak (12), uz pomoć kombinovanog ključa, koji je isporučen sa Power Cut-om. Kajš je ispravno zategnut kada se navrtka (13) podudara sa oznakom (14).
VAŽNO:Posle zatezanja/ provere, pritegnite navrtku (11) (30 ± 2 Nm)
Gorivo Pažnja: Alat koristi mineralne uljne produkte (benzin i ulje)! Budite mnogo pažljivi kada rukujete sa benzinom. Ne pušite. Držite alat dalje od otvorenog plamena, varnica ili vatre (opasnost od eksplozije).
Mešavina goriva
Alat je pogonovan sa visokoturažnim dvotaktnim motorom, sa vazdušnim hlađenjem. On se pogonuje sa mešavinom goriva i dvotaktnog motornog ulja. Motor je konstruisan za bezolovni normalni benzin, sa najmanjim oktanskim brojem 91 ROZ. Ako se ne raspolaže sa navedenim gorivom, može da se upotrebi gorivo sa većim oktanskim brojem. To neće da utiče na motor.
Za optimalan rad motora i zaštitu vašeg zdravlja i životne sredine koristite bezolovno gorivo.
Za podmazivanje motora koristite sintetičko ulje za dvotaktne motore sa vazdušnim hlađenjem (kvalitet JASO FC ili ISO EGD), koje dodaje gorivu.
Motor je konstruisan za korišćenje MAKITA ulja sa visokim performansama, za dvotaktne motore, sa odnosom mešanja 50:1, za zaštitu životne sredine. Sa njegovom primenom omogućuje se dugi vek i visoka pouzdanost sa minimalnom emisijom gasova.
Pravilan odnos mešanja
50:1 kada koristite MAKITA ulje sa visokim performansama, za dvotaktne motore, odn. mešavina od 50 jedinica goriva i 1 jedinice ulja.
50:1 kada koristite druga sintetička ulja za dvotaktne motore (kvalitet JASO FC ili ISO EGD) odn. mešavina od 50 jedinica goriva i 1 jedinice ulja.
Benzin

MAKITA high-performance two-stroke engine oil (50:1) is available in the following sizes to suit your individual require-ments: 100 ml order number 980 008 606 1 l order number 980 008 607
NOTE: For preparing the fuel-oil mixture fi rst mix the entire oil quantity with half of the fuel required, then add the remaining fuel. Shake the fi nished mixture thoroughly before pouring it into the tank. Caution: Open the tank cap carefully, as pressure might have built up inside! It is not wise to add more engine oil than specifi ed to ensure safe operation. This will only result in a higher production of combustion residues which will pollute the environment and clog the exhaust channel in the cylinder as well as the muffi er. In addition, fuel consumption will rise and performance will decrease.
The Storage of Fuel Fuels have a limited storage life. Fuel and fuel mixtures age through evaporation, especially at high temperatures. Aged fuel and fuel mixtures can cause starting problems and damage the engine.Purchase only that amount of fuel, which will be consumed over the next few months. At high temperatures, once fuel has been mixed it should be used up in 6-8 weeks. Store fuel only in proper containers, in dry, cool, secure locations!
AVOID SKIN AND EYE CONTACT Mineral oil products degrease your skin. If your skin comes in contact with these substances repeatedly and for an extended period of time, it will dry out. Various skin deseases may result. In addition, allergic reactions are known to occur. Eyes can be irritated by contact with oil. If oil comes into your eyes, immediately wash them with clear water. If your eyes are still irritated, see a doctor immediately!
Refuelling IMPORTANT: FOLLOW THE SAFETY PRECAUTIONS! Be careful and cautious when handling fuels. The engine must be turned off and cooled down! Carefully clean the area around the fuel-tank fi ller neck to keep dirt from getting in the tank. Place the unit on its side on an even surface. Unscrew the tank cap and fi ll tank with fuel mixture. Take care to avoid spilling. Screw the tank cap back on hand-tight. Clean screw cap and tank after refuelling. Never start or op-erate the Power Cut in the same place as it was fuelled!
If fuel gets on your clothing, change clothes immediately.
Fuel mixture
15
MAKITA dvotaktno motorno ulje sa visokim performansama (50:1) nalazi se u sledećem pakovanju:100 ml br. porudžbine 980 008 606 1 l br. porudžbine 980 008 607
ZABELEŠKA: Za pravljenje mešavine celi sadržaj ulja sipajte u pola sadržaja goriva i izmešajte, a zatim dodajte ostatak goriva. Promućkajte sadržaj pre nego što sipate u rezervoar. Pažnja: Poklopac rezervoara pažljivo otvorite, za izađe gas pod pritiskom!
Besmisleno je da se povećava količina ulja u mešavini. Na taj način samo se povećava količina nesagorenih gasova, zagađuje se životna sredina i zapušiće se izlazni kanali od cilindra i od prigušivača, a povećaće se potrošnja goriva.
Skladišćenje gorivaGorivo ima ograničeno trajanje. Gorivo i mešavina stare preko isparenja, posebno na visokim temperaturama. Staro gorivo i mešavina izazivaju probleme pri startovanju i kvare motor. Kupujte količinu goriva koju možete da potrošite za nekoliku meseci. Na visokim temperaturama, izmešano gorivo mora da se potroši za 6 – 8 nedelja. Skladirajte gorivo samo u odgovarajućim posudama i čuvajte ga na suvom, hladnom i sigurnom mestu!
IZBEGAVAJTE KONTAKT SA KOŽOM I OČIMA Mineralni uljni produkti odmašćuju kožu. Ako vaša koža, ponavljano duži period, dolazi u kontakt sa ovim supstancama počeće da se suši. Može da dođe do različitih bolesti kože. Mogu da se dobiju alergijske reakcije. Kontakt očiju sa uljem vodi ka iritaciji. U slučaju da ulje dospe u oči, operite oči sa čistom vodom. Kod stalne iritacije očiju potražite hitnu lekarsku pomoć!
PunjenjeVAŽNO: SLEDITE UPUTSTVA ZA BEZBEDNOST! Budite obazrivi kada radite sa gorivom! Motor da se ugasi i da se ohladi!
Pažljivo očistite oko rezervoara da ne bi u njega dospela bilo kakva prljavština. Postavite alat na ravnu podlogu. Odvrnite poklopac rezervoara i sipajte mešavinu. Pazite da ne prosipate okolo.Pritegnite poklopac rukom.
Posle točenja goriva očistite poklopac rezervoara! Ne startujte Power Cut na mesto gde ste točili gorivo!
Ako je gorivo isteklo na odeću, odmah da promenite odeću.
Mešavina goriva
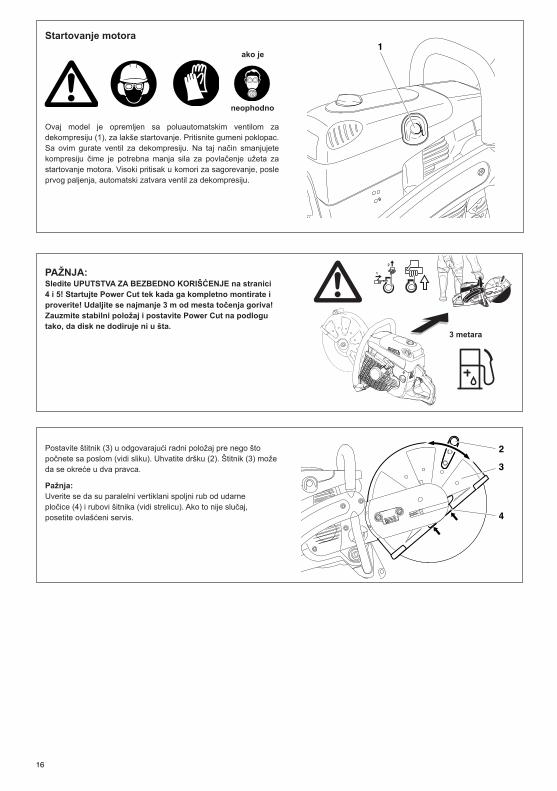
Starting the engine if
necessary
This model is fi tted with a semiautomatic decompression valve (1) to make starting easier. Press the rubber cover until you can feel it engage. This pushes in the deompression valve behind it. This in turn reduces the compression, so that it takes less force to pull the starter cord to accelerate the engine to its starting speed. The high pressure in the combustion chamber after the first ignition automatically closes the decompression valve.
CAUTION: Observe the SAFETY INSTRUCTIONS on page 4 and 5! Start the Power Cut only after complete assembly and inspection! Move at least 3m away from the place where you fuelled the Power Cut. Make sure you have a good footing, and place the Power Cut on the ground in such a way that the cutting disc is not touching anything.
3 meters
Move the protective hood (3) into the proper position for the work you intend to do (see illustration). Grasp the grip (2). The hood (3) can swing in both ways within its range of motion.
Caution: Always make sure that the straight outer edge of the impact plate (4) and the edge of the hood are parallel (see arrows). If this is not the case, take the tool to a service centre.
16
Ovaj model je opremljen sa poluautomatskim ventilom za dekompresiju (1), za lakše startovanje. Pritisnite gumeni poklopac. Sa ovim gurate ventil za dekompresiju. Na taj način smanjujete kompresiju čime je potrebna manja sila za povlačenje užeta za startovanje motora. Visoki pritisak u komori za sagorevanje, posle prvog paljenja, automatski zatvara ventil za dekompresiju.
PAŽNJA: Sledite UPUTSTVA ZA BEZBEDNO KORIŠĆENJE na stranici 4 i 5! Startujte Power Cut tek kada ga kompletno montirate i proverite! Udaljite se najmanje 3 m od mesta točenja goriva! Zauzmite stabilni položaj i postavite Power Cut na podlogu tako, da disk ne dodiruje ni u šta.
Stаrtovаnje motora
ako je
neophodno
Postavite štitnik (3) u odgovarajući radni položaj pre nego što počnete sa poslom (vidi sliku). Uhvatite dršku (2). Štitnik (3) može da se okreće u dva pravca.
Pažnja: Uverite se da su paralelni vertiklani spoljni rub od udarne pločice (4) i rubovi šitnika (vidi strelicu). Ako to nije slučaj, posetite ovlašćeni servis.
3 metara

6 5
8
9
Cold start (Choke)
Warm start
Engine off
Cold starting: Grasp front handle fi rmly with one hand and press the Power Cut against the ground. Place left toe in the rear handguard. Push the combination switch (6) up (choke position). This will automatically activate the half-throttle lock. NOTE: If the Power Cut is mounted on the trolley, do not operate the gas lever (throttle) on the side of the trolley! Pull the starter cable out slowly until you feel resistance (piston is now just before top dead center). Press in the decompression valve (5). Pull starter cable quickly and fi rmly, until you hear the first ignition, but to a max. of 3-5 pulls! Important: Do not pull the starter cable out more than about 50 cm / 20”, and guide it back slowly by hand (instead of letting it snap back). Press in the decompression valve (5). Move the combination switch (6) to the middle “I” position. Again pull the starter cable quickly and fi rmly. As soon as the engine is running, grasp the rear handle (the safety lock switch (8) will be depressed by the palm of your hand) and tap the throttle (9). The half-throttle lock will be disengaged and the engine will run in idle.
Warm starting: As described above for cold starting, but before starting push the combination switch (6) up (Choke position) and then right away back to the middle “I” position. This is only to engage the half-throttle lock. If the engine doesn't start after 2 or 3 pulls, repeat the entire starting procedure as described for cold starting.
Do not leave switch (6) in the choke position when hot starting!
Stopping the engine Push the combination switch (6) down to position .
17
6
Hladno startovanje: Uhvatite prednju dršku sa jednom rukom i pritisnite Power Cut na podlogu. Pritisnite sa nogom zadnji štitnik za ruke. Gurnite kombinovani prekidač (6) na gore (položaj za sauh). Toa će automatski da aktivira polu gas. ZABELEŠKA: Ako je Power Cut postavljen na kolica za vođenje, ne rukujte sa ručicom za gas sa strane kolica! Povucite polako uže za startovanje, dok ne osetite otpor (ovo je položaj neposredno pre gornje mrtve tačke). Pritisnite ventil za dekompresiju (5). Brzo i snažno povucite uže za startovanje, dok ne čujete prvo varničenje, ali najviše 3-5 povlačenja. Važno: Ne vucite uže više od 50 cm, a nazad ga vraćajte polako, držeći ga u ruci. Pritisnite ventil za dekompresiju (5). Postavite kombinovani prekidač (6) u srednji položaj „I”. Ponovo povucite uže brzo i snažno. Odmah nakon startovanja motora, uhvatite zadnju dršku (bezbednosni prekidač (8) će da bude pritisnut sa dlanom) i pritisnite ručicu za gas (9). Blokiranje na pola gasa je namenjeno da motor radi na prazno.
Toplo startovanje:Kao što je opisano za hladno startovanje, ali pre startovanja pritisnite kombinovani prekidač (6) na gore (sauh položaj) i zatim nazad u „I” položaj. Ovo je samo za aktiviranje polu gasa. Ako se motor ne startuje posle 2-3 povlačenja, ponovite postupak za startovanje, kao što je opisano za hladno startovanje.
Ne ostavljajte prekidač (6) u položaj za sauh pri toplom startovanju!
Hladan start (Sauh)
Topao start
Isključen motor
Isključivanje motoraPritisnite kombinovani prekidač (10) na dole, u položaj:

For correct adjustment of the idling speed the following steps must be carried out:
Start the engine and run it until it is warm (about 3 - 5 minutes).
Adjusting the carburetor
NOTE: The grinding parts are equipped with an electronic ignition to limit the speed. At the factory the idling speed has been set to approx. 2500 rpm, but the running-in process of a new engine may require slight readjustment of the idling speed. Adjustments to the adjusting screws (L) and (H) may only be made by an authorised MAKITA service centre. Accor-dingly, the holes for the two screws are sealed shut.
Adjust the carburetor with the screwdriver (1, Order No. 944 340 001) included with the Power Cut. It has a lug that helps with adjustment.
Readjust the idling speed. If the cut-off disc is still turning when the engine is running, unscrew the adjusting screw of the throttle valve (2) until the cut-off disc is no longer turning. When the engine is left running at idling speed, tighten the screw a little.
Switch off the engine
18
Za ispravno podešavanje brzine u prazno sledite postupak:
Motor se startuje i ostavlja se da se zagreje (oko 3 - 5 min).
ZABELEŠKA: Mašina je opremljena sa elektronskim paljenjem za ograničenje brzine. Fabrički brzina u prazno je podešena na oko 2.500 o/min, ali kod novog motora ovo podešavanje može da se poremeti u toku rada. Podešavanje sa vijcima (L) i (H) sme da pravi samo ovlašćeni MAKITIN servis. Zbog toga su otvori na oba vijka zapečaćeni.
Podešavanje kаrburаtora
Podesite karburator sa isporučenim odvijačem (1, br. porudžbine 944 340 001). On ima jezičak koji pomaže prilikom podešavanja.
Ponovno podešavanje brzine u prazno. Ako se disk vrti dok motor radi, odvrnite vijak za podešavanje (2) od ventila za gas dok disk ne prestane da se vrti. Kada motor radi na prazno, pritegnite malo vijak.
Isključivanje motora

MAINTENANCE
CAUTION: Before doing any work on the Power Cut turn off the engine, remove the cutting disc, pull the plug cap off the spark plug and wear protective gloves! CAUTION: Start the Power Cut only after complete assembly and inspection.
SERVICE
IMPORTANT: Because many of the parts and assemblies not mentioned in this Instruction Manual are vital to the safety of the unit, and because all parts are subject to a certain amount of wear and tear, it is important for your own safety that you have the unit checked and maintained regularly by a MAKITA service center.
IMPORTANT: If the cutting wheel breaks during cutting, the Power Cut must be repaired by a MAKITA service centre before being used again!
Changing the V-belt Loosen nuts (3).
(6).
NOTE:
Loosen the tightening screw (1) (counter-clockwise) until the end of the screw (2) is visible in the gap. Unscrew the nuts (3) and remove the cover (4). Remove the screws (5) and (7) and remove the side piece
Screw (5) is longer than screws (7). Make sure to put them back in the right places during reas-sembly!
Unscrew the screws (8) and remove the crankcase housing cover (9). Remove the old belt (10) or belt pieces. Clean out the inside of the drive arm with a brush. Put in a new V-belt.
NOTE: Reassemble the crankcase housing cover (9), side piece (6) and cover (4) in the reverse order. To tighten the V-belt see ”Tightening the V-belt / Checking V-belt tension”.
19
SERVIS
ODRŽAVANJE
PAŽNJA: Kod bilo kakvog posla oko Power Cut-a, isključite motor, izvadite disk, izvadite poklopac za svećicu i nosite zaštitne rukavice!
PAŽNJA: Startujte Power Cut tek kada bude kompletno sklopljen i proveren.
VAŽNO: S obzirom da su mnogi delovi i sklopovi, koji nisu opisani u ovom uputstvu, važni za bezbednost uređaja i svi delovi su podložni na habanje i trošenje, za vašu bezbednost je važno redovno da kontrolišete uređaj u MAKITIN servis.
VAŽNO: Ako se disk slomi za vreme rada, pre nego što se ponovo upotrebi Power Cut mora da se popravi u MAKITINOM servisu!
Izmena klinastog kajša
Odvrnite navrtke (3). (6). Odvrnite vijak (1), dok kraj vijka (2) ne bude vidljiv kroz procep. Odvrnite navrtku (3) i izvadite poklopac (4).Otstranite vijke (5) i (7) i otstranite bočni deo
ZABELEŠKA:
Vijak (5) je duži od vijka (7). Vodite računa kada montirate da ih vratite na svoje mesto
Odvrnite vijak (8) i otstranite poklopac kućišta krivaje (9). Otstranite stari kajš (10). Sa četkom očistite unutrašnjost kućišta. Postavite novi kajš.
ZABELEŠKA: Montirajte poklopac kućišta krivaje (9), bočni deo (6) i poklopac (4), po obratnom redosledu. Za zatezanje kajša vidite „Zatezanje klinastog kajša/ Provera zategnutosti kajša”.

Cleaning the protection hood Over time, the inside of the protective hood can become caked with material residue (especially from wet cutting), which if allowed to accumulate can hinder the free rotation of the cut-ting disc. For this reason the hood must be cleaned out from time to time. Take off the cutting wheel with spring washer and remove the accumulated material from inside the hood with a strip of wood NOTE: To install the cutting wheel see ”Mounting the cuttingor similar implement. wheel”. Clean the shaft and all removed parts.
Cleaning / changing the air filter
Turn the cover lock (11) counterclockwise to release it, and carefully remove the filter cover (12). There is a gasket (15) between the filter cover (12) and the hood (14).
Remove screws (13) and take off the cover (14). Clean the gasket (15) with a brush, and check for damage.
Take the pre-fi lter (foam, 17) out of the fi lter cover. Pull the air filter insert (paper cartridge, 18) out of the cover. Remove the inner fi lter (16) from the intake opening.
Note: Do not allow dirt to get into the carburetor! Switch the combination switch to ”Choke” or cover the carbure-tor with a clean cloth.
20
Čišćenje štitnikaUnutrašnji deo štitnika se puni sa prljavštinom (posebno kod mokrog sečenja), koja otežava okretanje diska. Iz tog razloga štitnik treba povremeno čistiti.
Izvadite disk sa elastičnom podloškom i otstranite nakupljeni materijal iz unutrašnjosti štitnika uz pomoć drvene letve. Očistite vreteno i sve izvađene delove.
ZABELEŠKA: Za postavljanje diska pogledajte „Montiranje diska za sečenje”.
Čišćenje / izmena filtera za vazduh
Okrenite dugme za zabravljivanje poklopca (11), da bi se olabavilo i pažljivo izvadite poklopac filtera (12). Između poklopca filtera (12) i štitnika (14) nalazi se zaptivka (15).
Otstranite vijke (13) i izvadite poklopac (14). Očistite zaptivku (15) uz pomoć četke i proverite je da nije oštećena.
Iz poklopca filtera izvadite pretfilter (sunđerasti materijal, 17). Iz poklopca izvucite uložak od vazdušnog filtera (papirni umetak 18). Iz usisnog voda izvadite unutrašnji filter (16).
Zabeleška: Ne dozvolite da upadne prljavština u karburator! Postavite kombinovani prekidač u položaj „Sauh” ili pokrijte karburator sa čistom krpom.

CAUTION: Turn off the engine before cleaning the air filter! Never clean out the air filter with compressed air! Do not clean the pre-filter and inner filter with fuel. The service life of the engine depends on the condition and regular maintenance of the filter elements. Failure to perform maintenance and cleaning at the prescribed intervals will cause increased wear inside the engine! If the air filter becomes damaged, replace immediately! Pieces of cloth or large dirt particles can destroy the engine! Do not work in dusty conditions when it can be avoided! The fine dust generated when dry-cutting concrete and stone is hazardous to the health of the operator and also shortens the service life of the engine. Whenever possible, wet-cut with water when working in concrete and stone, to bind the dust.
Pre-filter (dry foam, serial execution) Pre-filter (foam with air-fi lter oil)
If the pre-fi lter (1, Order No. 395 173 080) is dirty, wash Clean or replace (when cutting with high dust amounts): it out in lukewarm water with standard dishwashing liquid • Daily or MAKITA filter cleaner (Order No. 980 008 627). If using or at least every MAKITA filter cleaner, proceed as described after the text • 4 operating hours, or section "Cleaning". • 8 tank fi llings, or Let the pre-filter dry thoroughly. • 8 litres fuel mixture.
NOTE: The pre-fi lter must be cleaned daily, or several times Clean or replace (when cutting wet, or when cutting steel): daily if working under dusty conditions. If cleaning is not • weekly possible on-site, have spare pre-filters on hand. Replace the or at least every pre-filter at least every 25 operating hours. • 25 operating hours, or To improve filtration effectiveness, the pre-filter can be wet- • 50 tank fi llings, or ted with air-filter oil. Before adding air-filter oil, carefully • 55 litres fuel mixture. wash the filter with air-filter cleaner. Filter maintenance of Cleaning: Cleaning: Rinse off coarse dirt in running water. oiled air filter as described on the right side. To insert the pre-filter in the filter cover, position it so it fits Knead a capful MAKITA filter cleaner (Order No. 980 008 627) the space in the cover and then press it in (5). The pre-filter into the foam material of the pre-filter (1, Order No. 395 173 must fit completely and cover all parts of the fi lter space, 090) until it suds up well. without leaving any spaces unfiltered. Rinse out pre-filter thoroughly in running water.
Let the pre-filter dry thoroughly. In order to ensure full filtration effectiveness, air-filter oil must be used with the pre-filter. Wet the pre-filter with a capful (about 20 ccm) of MAKITA air-fi lter oil (Order No. 980 008 628, biodegradable). Knead the pre-filter to evenly distribute the oil. Then squeeze out any excess oil.
NOTE: If using other air-filter oils, follow the manufacturer's instructions. If cleaning is not possible on-site, have spare pre-fi lters on hand (Order No. 395 173 090). To insert the pre-fi lter in the filter cover, position it so it fi ts the space in the cover and then press it in (5). The pre-fi lter must fit completely and cover all parts of the filter space, without leaving any spaces unfiltered.
Inner filter Wash out the dirty inner fi lter (3, Order No. 395 173 020) in lukewarm soapy water with regular dishwashing liquid or MAKITA filter cleaner (Order No. 980 008 627). Let the inner filter dry thoroughly.
Air fi lter insert (paper cartridge)
The air filter insert (2, Order No. 395 173 010) filters the intake air through a very fi ne paper filter lamella system. For the rea-son the cartridge must never be washed. Clean the air filter insert once a week. To clean the air filter insert, spread it out slightly and carefully tap it against a clean surface. Replace the air filter insert every 100 operating hours. Replace it immediately if there is a drop in power, drop in speed, or smoke in the exhaust. Before installing the filter system, check the intake opening to make sure no dirt particles have fallen in. If they have, remove them.
21
PAŽNJA: Isključite motor pre čišćenja filtera! Ne čistite sa komprimovanim vazduhom! Ne čistite pretfilter i unutrašnji filter sa benzinom. Životni vek motora zavisi od stanja i redovnog održavanja elemenata filtera. Nepravilno održavanje i neredovno čišćenje izazvaće habanje u unutrašnjosti motora! Ako se filter ošteti, odmah ga zameniti! Komadi tkanine ili velike čestice prljavštine mogu da pokvare motor! Ne radite u prašljivoj sredini ako može da se izbegne! Fina prašina se stvara kada izvodite suvo sečenje betona i kamena i ugrožava zdravlje rukovaoca i smanjuje trajnost motora. Kada je moguće koristite mokro sečenje.
Pretfilter (sunđer sa uljem za filter za vazduh)
Ako je pretfilter (1. br. porudžbine 325 173 080) prljav operite ga u toploj vodi sa MAKITINIM sredstvom za čišćenje (br. porudžbine 980 008 627). Kada koristite MAKITINO sredstvo za čišćenje, postupite prema uputstvima „Čišćenje”.Pretfilter dobro osušiti.ZABELEŠKA: Pretfilter čistiti jednom dnevno, ili više puta ako radite u prašljivim uslovima. Ako je čišćenje nemoguće iz različitih razloga, onda stavite rezervni pretfilter. Pretfilter zamenite posle 25 radnih sati.Da bi se povećao efekat filtriranja, na pretfilter nanesite ulje za filter za vazduh. Održavanje filtera je opisano na desnoj strani. Za postavljanje pretfiltera u poklopac filtera postavite ga tako da nasedne u poklopac i pritisnite ga (5). Pretfilter mora kompletno da nalegne i da pokrije sve delove od prostora za filter, da ne bi ostao neki deo nefiltriran
Pretfilter (sunđer sa uljem za filter za vazduh)
Čišćenje ili zamena (sečenje u uslovima velike prašine): • Dnevnoili svakih• 4 radnih sati, ili • 8 punjenja goriva, ili • 8 litara mešavine.
Čišćenje ili zamena (mokro sečenje ili sečenje čelika)• nedeljnoili svakih• 25 radnih sati, ili • 50 punjenja goriva, ili• 55 litara mešavine. Чистење: Čišćenje: Grubu prljavštinu oprati sa vodenim mlazom. Izgmečite sunđerasti materijal pretfiltera sa 1 poklopcem MAKITINOG sredstva za čišćenje (br. porudžbine 980 008 627) (1, br. porudžbine 395 173 090) dok se dobro ne nasapunja.Operite pretfilter temeljno pod mlazom vode. Zatim ga dobro osušite.
Za potpunu efikasnost filtriranja, ulje za filter mora da se koristi sa pretfilterom. Na pretfilter sipajte 1 poklopac (20 cm3) MAKITINOG ulja za filter (br. porudžbine 980 008 628, organsko). Izgmečite pretfilter da bi se ulje rasporedilo. Iscedite višak ulja.
ZABELEŠKA: Ako koristite drugo ulje za filter, sledite uputstva od proizvođača. Ako je čišćenje nemoguće iz raznih razloga, upotrebite rezervni filter (br. porudžbine 395 173 090). Za postavljanje pretfiltera u poklopac filtera, postavite ga tako da nasedne u poklopac i pritisiete ga (5). Pretfilter mora kompletno da nalegne i da pokrije sve delove od prostora za filter, da ne bi ostao neki deo nefiltriran.
Unutrašnji filterOperite isprljani unutrašnji filter (3, br. porudžbine 395 173 020) sa toplom vodom i sa MAKITINIM sredstvom za čišćenje (br. porudžbine 980 008 627).Zatim ga dobro osušite.
Umetak za vazdušni filter (papirni umetak) Umetak za filter (2, br. porudžbine 395 173 010) pročišćuje vazduh kroz fini sistem papirnih lamela. Zbog toga umeci ne smeju da se peru. Jednom nedeljno očistite umetak za filter. Da bo očistili umetak za filter nežno ga protresite i udarajte ga o čistu površinu. Umetak za filter se menja svakih 100 radnih sati. Odmah ga zamenite ako primetite smanjenje snage, brzine ili dim u odvod. Pre montiranja sistema za filtriranje proverite otvor za usisavanje da nije isprljan. Ako je prljav očistite ga.
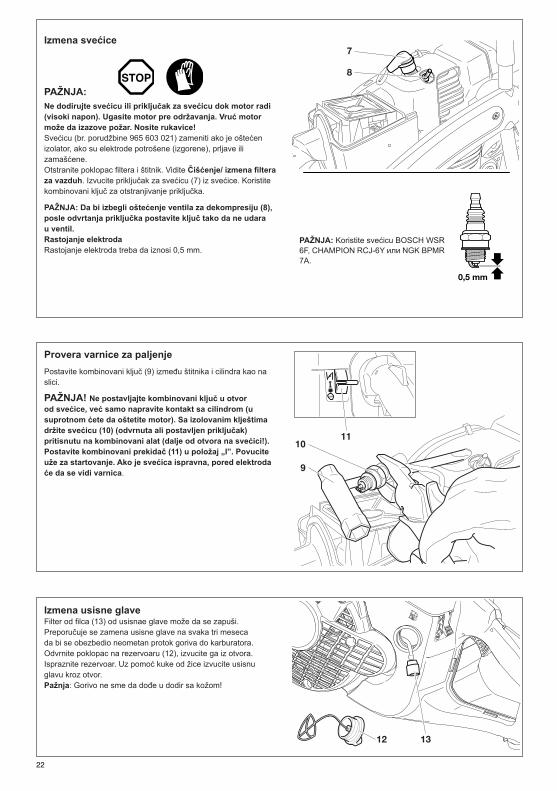
Replacing the spark plug
CAUTION: Do not touch the spark plug or plug cap if the engine is running (high voltage). Switch off the engine before starting any maintenance work. A hot engine can cause burns. Wear protective gloves! The spark plug (Order No. 965 603 021) must be replaced in case of damage to the insulator, electrode erosion (burn) or if the electrodes are very dirty or oily. Remove the fi lter cover and hood. See Cleaning / changing the air filter. Pull the plug cap (7) off the spark plug. Use only the combination wrench supplied with the saw to remove the spark plug.
CAUTION: To prevent damage to the decompression valve (8), when unscrewing the spark plug position the combina-tion tool in such a way that it does not impact the valve. Electrode gap The electrode gap must be 0.5 mm.
Checking the ignition spark Insert the combination tool (9) between the ventilation hood and cylinder only as shown in the illustration.
CAUTION! Do not insert the combination tool into the spark plug hole, but make contact only with the cylinder (otherwise you may damage the engine). Using insulated pliers, hold the spark plug (10) (unscrewed but with the plug cap on) against the combination tool (away from the spark plug hole!). Switch the combination switch (11) to ”I”. Pull the starter cable hard. If the function is correct, an ignition spark must be visible near the electrodes.
Replacing the suction head The felt fi lter (13) of the suction head can become clogged. It is recommended to replace the suction head once every three months in order to ensure unimpeded fuel fi ow to the carburetor. Unscrew the tank cap (12), pull the retainer out of the open-ing. Empty fuel tank. Use a wire hook to pull the suction out of the tank opening for replacement. Caution: Do not allow fuel to come into contact with skin!
7
8
CAUTION: Use only BOSCH WSR 6F spark plug, CHAMPION RCJ-6Y or NGK BPMR 7A.
0,5 mm
12 13
22
Izmena svećice
Ne dodirujte svećicu ili priključak za svećicu dok motor radi (visoki napon). Ugasite motor pre održavanja. Vruć motor može da izazove požar. Nosite rukavice!Svećicu (br. porudžbine 965 603 021) zameniti ako je oštećen izolator, ako su elektrode potrošene (izgorene), prljave ili zamašćene. Otstranite poklopac filtera i štitnik. Vidite Čišćenje/ izmena filtera za vazduh. Izvucite priključak za svećicu (7) iz svećice. Koristite kombinovani ključ za otstranjivanje priključka.
PAŽNJA: Da bi izbegli oštećenje ventila za dekompresiju (8), posle odvrtanja priključka postavite ključ tako da ne udara u ventil. Rastojanje elektrodaRastojanje elektroda treba da iznosi 0,5 mm.
PAŽNJA:
PAŽNJA: Koristite svećicu BOSCH WSR 6F, CHAMPION RCJ-6Y или NGK BPMR 7A.
Provera varnice za paljenjePostavite kombinovani ključ (9) između štitnika i cilindra kao na slici.
PAŽNJA! Ne postavljajte kombinovani ključ u otvor od svećice, već samo napravite kontakt sa cilindrom (u suprotnom ćete da oštetite motor). Sa izolovanim klještima držite svećicu (10) (odvrnuta ali postavljen priključak) pritisnutu na kombinovani alat (dalje od otvora na svećici!). Postavite kombinovani prekidač (11) u položaj „I”. Povucite uže za startovanje. Ako je svećica ispravna, pored elektroda će da se vidi varnica.
Izmena usisne glave Filter od filca (13) od usisnae glave može da se zapuši. Preporučuje se zamena usisne glave na svaka tri meseca da bi se obezbedio neometan protok goriva do karburatora. Odvrnite poklopac na rezervoaru (12), izvucite ga iz otvora. Ispraznite rezervoar. Uz pomoć kuke od žice izvucite usisnu glavu kroz otvor.Pažnja: Gorivo ne sme da dođe u dodir sa kožom!

Replacing the starter cable
1814
15 Remove four screws (14). Remove starter housing (15). Insert a small screwdriver through the cooling slits on the back of the starter housing. Push aside the tabs (16) slightly and
16 carefully remove the air guide (17) from the starter housing (15). Proceed in the order (A - B - C - D). If replacing a starter cable that has not come apart, it will fi rst be necessary to de-tension the return spring on the
17cable drum. To do this, pull the starter grip all the way out of the starter housing. Hold the cable drum fi rmly with one hand, and with the other guide the starter cable into the recess (24) and hold it. Now carefully let the cable drum turn counter-clockwise until the return spring is completely de-tensioned. Remove all pieces of cable (18).
Thread in a new starter cable (dia 4.0 mm, length 1000 mm) as shown (don't forget the disc (19)) and knot both ends.
Pull knot (20) into the cable pulley (21).
CAUTION: Do not let the knots or the cable ends protrude from the outside of the cable pulley.
Pull knot (22) into the cable grip (23).
Guide the cable into the recess (24) on the cable drum and use the cable to turn the drum two turns in the direction shown by the arrow. Holding the cable drum in your left hand, straighten out the twist in the cable with your right hand, pull the cable tight, and hold. Release the cable drum. The drum´s spring force will now wind the cable around the drum. Repeat three times. The starter grip must be upright on the starter housing. NOTE: With the cable pulled all the way out, it must still be possible to turn the pulley another 1/4 turn against the return spring.
CAUTION! Injury hazard! When you pull out the starter cable hold the
24 starter handle fi rmly. It will whip back if the cable pulley is released by accident.
Install the air guide (17) in reverse order. Make sure that the 17 tabs (16) click back into the starter housing.
When putting the starter housing back on, it may be necessary to pull the starter handle slightly until the starting mechanism engages.
16
23
Odvrnite četiri vijka (14). Otstranite kućište (15). Postavite mali odvijač kroz žljebove za hlađenje sa zadnje strane kućišta. Gurnite malo bočne izdatke (16) i pažljivo izvadite vazdušni vod (17) iz kućišta (15).Zapazite redosled (A -B -C -D).Ako se menja uže za startovanje, koje se nije vratilo, prvo treba da se otpusti povratna opruga na bubnju. U ovom cilju do kraja povucite ručku za startovanje. Sa jednom rukom čvrsto držite bibanj za uže, a sa drugom postavite uže u žljeb (24) i držite ga. Pažljivo okrećite bubanj u levo dok se povratna opruga ne rastereti. Otstranite uže za startovanje (18).
Zamena užeta za startovanje
Namotajte novo uže (ø4,0 mm, 1000 mm dužina), kao što je prikazano (ne zaboravite disk (19)) i napravite čvor na oba kraja. Provucite čvor (20) u bubanj (21). PAŽNJA: Čvor odnosno kraj užeta sme da izađe iz bubnja. Provucite uže (22) u dršku od užeta (23).
Postavite uže u žljeb (24) od bubnja i sa užetom okrenite bubanj za dva okretaja u pravcu strelice. U levoj ruci držite bubanj, sa desnom rukom nataknite uže i zategnite ga i držite ga.Otpustite bubanj. Sila opruge od bubnja namotaće uže oko bubnja. Ponovite tri puta. Ručka mora da stoji vertilkalno u odnosu na kućište. ZABELEŠKA: Sa potpuno izvučenim užetom, bubanj treba da može da se okrena za još ¼ kruga.
PAŽNJA! Opasnost od povreda! Kada izvučete uže za startovanje jako da držite ručku za startovanje. Uže se brzo vraća ako se slučajno otpusti bubanj. Postavite vazdušni vod (17) po obratnom redosledu. Uverite se da izdaci (16) zabravljuju u kućište. Kada postavite kućište startera može da treba da povučete ručku za startovanje dok se ne aktivira startni mehanizam.

Replacing the return spring
Remove the starter housing (see “Replacing the starter cable”). Take the air guide off the starter housing (see “Replacing the starter cable”). De-tension the return spring on the cable drum (see “Replacing the starter cable”). Take off circlip (1) (circlip pliers, see “Accessories”). Remove the cable pulley (2). Evenly lever the return spring (4) out of the catch using a screw-driver or similar tool. Be extremely careful - the return spring is under tension and can pop out of its housing! CAUTION! Injury hazard! Wear eye protection and work gloves when performing this work!
Replacement return springs are delivered already tensioned in the housing. CAREFUL - the spring can pop out. If it does, it can be put back in as shown in the diagram (observe the direction of rotation). Before installing the new return spring (4) in the starter hous-ing, grease it lightly with multipurpose grease, Order No. 944 360 000. Then position it and press it until the tabs (5) engage in the slots. Do not grease the cable drum (2) or bearing journal! Turn the cable pulley slightly when putting it back on, until you hear it catch. Put the circlip back on. Wind on the starter cable (see above under “Replacing the starter cable”). Reinstall the air guide (see above under “Replacing the starter cable”) When putting the starter housing back on, it may be necessary to pull the starter handle slightly until the starting mechanism engages.
5
2 4
1
24
Izvadite kućište (vidi „Zamena užeta za startovanje”). Odvojite vazdušni vod od kućišta (vidi „Zamena užeta za startovanje”). Otpustite i vratite oprugu u bubanj (vidi „Zamena užeta za startovanje ”). Izvadite zegerov prsten (1) (klješta za zegerov prsten, vidi „Pibor”). Otstranite bubanj (2). Istovremeno držite povratnu oprugu (4) pomoću odvijača ili sličnog alata. Budite pažljivi - povratna opruga je pod naponom i može da izleti iz kućišta! PAŽNJA! Opasnost od povreda! Kod ovog zahvata obavezno da nosite zaštitne naočare i rukavice!
Povratna opruga je napregnuta. PAŽNJA – opruga može da otskoči. Ako se to desi ona može da se vrati kao što je prikazano na crtežu (pazite na pravac okretanja!). Pre postavljanja nove povratne opruge (4), namažite je sa više namenskom mašću, br. porudžbine 944 360 000. Postavite oprugu i pritisnite je dok izdaci (5) ne upadnu u žljebove. Ne podmazujte bubanj (2) i rukavac ležišta! Okrenite malo bubanj kada ga vraćate, dok ne čujete da je zahvaćen. Postavite zegerov prsten. Namotajte uže za startovanje (vidi „Zamena užeta za startovanje“). Montirajte vazdušni vod (vidi „Zamena užeta za startovanje”). Kada vraćate kućište treba da se povuče ručica za startovanje dok se ne aktivira zatezni mehanizam.
Zamena povratne opruge

Cutting attachment in central / side position NOTE: The Power Cut is delivered with the cutting attachment mounted in the middle position (1). For cutting up against ob-stacles, such as curbs or walls, the cutting attachment can be mounted to one side (2). Use this position only when actually necessary, and afterwards return the cutting attachment to the middle position
In this position the Power Cut has better balance, is easier to guide, and is not as fatiguing for the operator.
Repositioning the cutting attachment
Loosen nuts (5). Loosen the tightening screw (3) (counter-clockwise) until the end of the screw (4) is visible in the gap. Unscrew the nuts (5) and remove the cover (6).
8 9
10 11
12
Use the combination tool (8) to lever out the stop pin (9) as shown in the illustration, until the protective hood (11) can be turned.
NOTE: The turn stop (7) is deactivated when the stop pin (8) is removed. This permits the hood (11) to be turned farther than the turn stop (7).
Unscrew the grip (10) and turn the protective hood (11) as shown in the illustration. Disengage the V-belt (12) and remove the cutting attach-ment.
25
Pribor za sečenje u centralni/bočni položaj
ZABELEŠKA: Power Cut se isporučuje sa priborom za sečenje montiranim u centralni položaj (1). Za sečenje po preprekama kao što su ivičnjaci ili zidovi, pribor za sečenje može da se montira sa strane (2). Koristite ovaj položaj samo kada je neophodno i odmah po završenom poslu vratite pribor u centralni položaj. U ovaj položaj Power Cut ima bolju ravnotežu i lakše vođenje i manji je zamor rukovaoca.
Otstegnite navrtkie (5).Otstegnite vijak (3) sve dok se kraj vijka (4) ne vidi kroz žlleb. Odvrnite navrtke (5) i izvadite poklopac (6).
Premeštanje pribora za sečenje
Uz pomoć kombinovanog alata (9) izvucite čiviju (8), kao što je prikazano na slici, dok štitnik (11) ne može da se okrene.
ZABELEŠKA: Graničnik okretanja (7), je deaktiviran kada je izvađena čivija (8). Tako se onemogućuje okretanje štitnika (11) preko graničnika okretanja (7).
Odvrnite ručicu (10) i okrenite štitnik (11) kao što je prikazano na slici. Otpustite klinasti kajš (12) i izvadite pribor za sečenje.
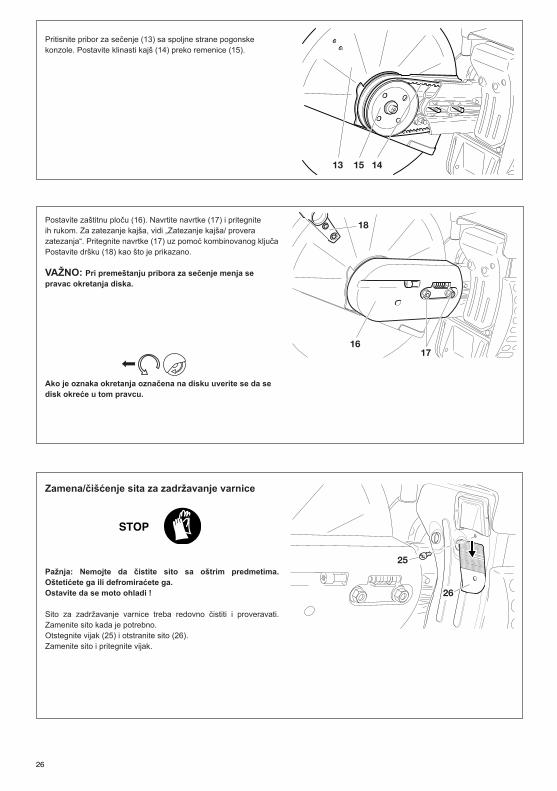
Press the cutting attachment (13) onto the drive arm in the side position. Guide the V-belt (14) over the V-belt pulley (15).
13 1415
Put the guard plate (16) on. Screw on nuts (17) and tighten by hand. To tighten the V-belt see ”Tightening the V-belt / Checking V-belt tension”. Tighten the nuts (17) firmly with the combination wrench. Replace the grip (18) as shown.
IMPORTANT: When you reposition the cutting attachment, the direction of rotation of the cutting wheel changes.
If a rotation direction is marked on the cutting disc, make sure the disc turns in the right direction.
1617
18
Replacing/cleaning the spark arrester screen
Caution: Do not use sharp or pointed objects for screen cleaning. Damaged or misformed screen wires may re-sult.
Let cool the engine down for sure!
The spark arrester screen should be checked and cleaned regulary. Replace spark arrester screen when needed.
Loosen the screw (25) and remove the spark arrester screen (26).
Reassembly the spark arrester screen and tighten the screw.
25
26
26
Pritisnite pribor za sečenje (13) sa spoljne strane pogonske konzole. Postavite klinasti kajš (14) preko remenice (15).
Postavite zaštitnu ploču (16). Navrtite navrtke (17) i pritegnite ih rukom. Za zatezanje kajša, vidi „Zatezanje kajša/ provera zatezanja“. Pritegnite navrtke (17) uz pomoć kombinovanog ključaPostavite dršku (18) kao što je prikazano.
VAŽNO: Pri premeštanju pribora za sečenje menja se pravac okretanja diska.
Ako je oznaka okretanja označena na disku uverite se da se disk okreće u tom pravcu.
Zamena/čišćenje sita za zadržavanje varnice
Pažnja: Nemojte da čistite sito sa oštrim predmetima. Oštetićete ga ili defromiraćete ga.Ostavite da se moto ohladi !
Sito za zadržavanje varnice treba redovno čistiti i proveravati. Zamenite sito kada je potrebno.Otstegnite vijak (25) i otstranite sito (26).Zamenite sito i pritegnite vijak.
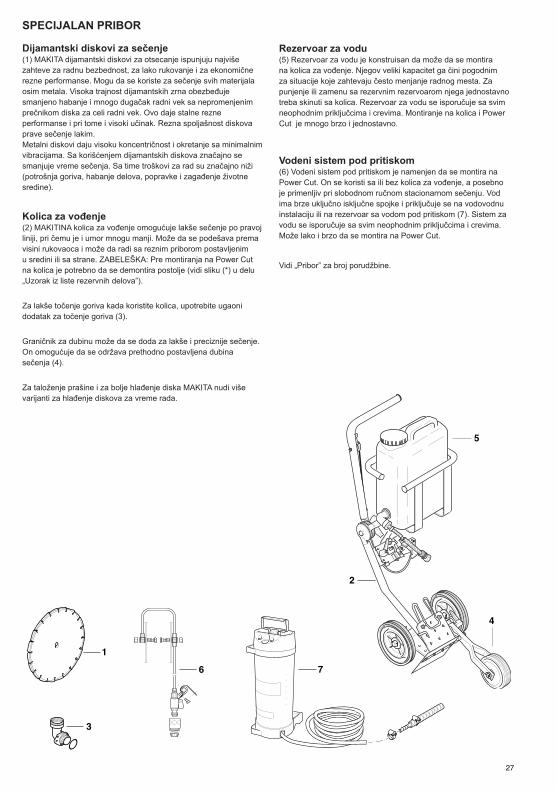
SPECIAL ACCESSORIES
Diamond cutting discs (1) MAKITA diamond cutting discs meet the highest demands in working safety, ease of operation, and economical cut-ting performance. They can be used for cutting all materials except metal. The high durability of the diamond grains ensures low wear and thereby a very long service life with almost no change in disc diameter over the lifetime of the disc. This gives consistent cutting performance and thus high economy. The outstanding cutting qualities of the discs make cutting easier. The metal disc plates give highly concentric running for minimal vibration during use. The use of diamond cutting discs reduces cutting time sig-nificantly. This in turn leads to lower operating costs (fuel consumption, wear on parts, repairs, and last but not least environmental damage).
Guide trolley (2) The MAKITA guide trolley makes it much easier to do straight cuts, while simultaneously enabling almost untiring working. It can be adjusted for the operator´s height, and can be operated with the cutting attachment mounted in the middle or on the side. NOTE: Before mounting the Power Cut on the guide trolley, it will be necessary to remove the stand (see illustration (*) in the chapter “Extract from the spare parts list”).
For easier refuelling when using the trolley, we recommend adding an angled tank fi ller neck (3). A depth limiter can be added for still easier and more accurate cutting. It makes it possible to maintain a precise predetermined cut depth (4).
To keep down dust and for better cutting-disc cooling, MAKITA offers several options for wetting the disc during operation.
Water tank (5) The water tank is designed to be mounted on the guide trol-ley. Its high capacity makes it especially suitable for situations involving frequent site changes. For filling or for fast changing to reserve tanks, the tank can be simply lifted off the trolley. The water tank comes with all necessary connections and hoses. Mounting to the trolley and Power Cut are very fast and simple.
Mains/pressure water system (6) The mains/pressure water system is designed to be mounted on the Power Cut. It can be used with or without the trolley, but is especially suitable for applications involving hand-held, stationary cutting. The water line has a fast-release connection, and can be fed either from a mains supply or from a pressure tank (7). The water system comes with all necessary connections and lines. It can be quickly and easily mounted on the Power Cut.
See “Accessories” for order number.
5
2
4
1
6 7
3
27
SPECIJALAN PRIBOR
Dijаmаntski diskovi zа sečenje(1) MAKITA dijamantski diskovi za otsecanje ispunjuju najviše zahteve za radnu bezbednost, za lako rukovanje i za ekonomične rezne performanse. Mogu da se koriste za sečenje svih materijala osim metala. Visoka trajnost dijamantskih zrna obezbeđuje smanjeno habanje i mnogo dugačak radni vek sa nepromenjenim prečnikom diska za celi radni vek. Ovo daje stalne rezne performanse i pri tome i visoki učinak. Rezna spoljašnost diskova prave sečenje lakim.Metalni diskovi daju visoku koncentričnost i okretanje sa minimalnim vibracijama. Sa korišćenjem dijamantskih diskova značajno se smanjuje vreme sečenja. Sa time troškovi za rad su značajno niži (potrošnja goriva, habanje delova, popravke i zagađenje životne sredine).
Kolica za vođenje (2) MAKITINA kolica za vođenje omogućuje lakše sečenje po pravoj liniji, pri čemu je i umor mnogu manji. Može da se podešava prema visini rukovaoca i može da radi sa reznim priborom postavljenim u sredini ili sa strane. ZABELEŠKA: Pre montiranja na Power Cut na kolica je potrebno da se demontira postolje (vidi sliku (*) u delu „Uzorak iz liste rezervnih delova”).
Za lakše točenje goriva kada koristite kolica, upotrebite ugaoni dodatak za točenje goriva (3).
Graničnik za dubinu može da se doda za lakše i preciznije sečenje. On omogućuje da se održava prethodno postavljena dubina sečenja (4).
Za taloženje prašine i za bolje hlađenje diska MAKITA nudi više varijanti za hlađenje diskova za vreme rada.
Rezervoar za vodu(5) Rezervoar za vodu je konstruisan da može da se montira na kolica za vođenje. Njegov veliki kapacitet ga čini pogodnim za situacije koje zahtevaju često menjanje radnog mesta. Za punjenje ili zamenu sa rezervnim rezervoarom njega jednostavno treba skinuti sa kolica. Rezervoar za vodu se isporučuje sa svim neophodnim priključcima i crevima. Montiranje na kolica i Power Cut je mnogo brzo i jednostavno.
Vodeni sistem pod pritiskom (6) Vodeni sistem pod pritiskom je namenjen da se montira na Power Cut. On se koristi sa ili bez kolica za vođenje, a posebno je primenljiv pri slobodnom ručnom stacionarnom sečenju. Vod ima brze uključno isključne spojke i priključuje se na vodovodnu instalaciju ili na rezervoar sa vodom pod pritiskom (7). Sistem za vodu se isporučuje sa svim neophodnim priključcima i crevima. Može lako i brzo da se montira na Power Cut.
Vidi „Pribor” za broj porudžbine.
Instructions for periodic maintenance To ensure long life, prevent damage and ensure the full functioning of the safety features the following maintenance must be per-formed regularly. Guarantee claims can be recognized only if this work is performed regularly and properly. Failure to perform the prescribed maintenance work can lead to accidents! Users of the Power Cut must not perform any maintenance work not described in this Instruction Manual. All such work must be carried out by a MAKITA service centre.
Page
General Entire Power Cut Clean exterior, check for damage. In case of damage, have repaired by a qualified service centre immediately
Cutting disc Clutch Protection hood
Inspect regularly for damage and wear. Have inspected at a service center. Clean, Check position (impact plate)
6
16
Before each start Cutting disc Inspect for damage and make sure the cutting wheel is right for the job
6
V-belt Protective hood Combination switch, Safety locking button,
Check V-belt tension Adjust position Functional check Functional check
14
Throttle lever Tank cap
Functional check Check for tightness
17
Every day Air filter Clean (if necessary more frequently); pre-filter (foam) maintenance as described above under Cleaning / changing the air filter 20-21
Idle speed Check (cutting disc must not turn on idle) 18
Every week Starter housing Clean to ensure proper air cooling 12 Starter cable Check for damage 23 V-belt Check V-belt tension, inspect for damage and wear 14, 19
Air filter insert Clean, replace after 100 operating hours 21 Spark plug Check and replace if necessary 22
Muffier Check tightness of mounting 12 Spark arrester screen Screws and nuts
Clen and replace if necessary Check their condition and that they are fi rmly secured.
26
Every 3 months Suction head Fuel tank
Replace Clean
22
Annually Entire Power Cut Check at an authorized service centre
Storage Entire Power Cut
Cutting disc Fuel tank Carburetor
Clean exterior, check for damage. In case of damage, have repaired by a qualified service centre immediately Remove and clean Empty and cleanRun empty
13
Service, spare parts and guarantee Maintenance and repair The maintenance and repair of modern cutoff saws and their safety-related components requires qualified technical training and a workshop equipped with special tools and testing devices. We therefore recommend that you consult a MAKITA service centre for all work not described in this instruction manual. The MAKITA service centres have all the necessary equipment and skilled and experienced personnel, who can work out cost-effective solutions and advise you in all matters. To find your local distributor, please visit www.makita-outdoor.com Spare parts Reliable long-term operation, as well as the safety of your Power Cut, depend among other things on the quality of the spare parts used. Use only original MAKITA parts, marked
Only original parts are from the same production line as the original unit and therefore ensure the highest possible quality of materi-als, dimensions, functioning and safety. Only original spare parts and accessories guarantee the highest quality in material, dimensions and function. Original spare parts and accessories can be obtained from your local dealer. He will also have the spare part lists to determine the required spare part numbers, and will be constantly informed about the latest improvements and spare part innovations. Please bear in mind that if parts other than original MAKITA spare parts are used, this will automatically invalidate the MAKITA product guarantee. We will furthermore not accept any liability damages arising from the use of non-MAKITA spare parts. 28
Uputstva za periodično održavanjeDa bi se obezbedio dugi radni vek, redovno da se sprečavaju oštećenja i da se obezbeđuje kompletno funkcionisanje bezbednosnih funkcija. Garancija se priznaje samo ako su ove aktivnosti izvođene redovno i pravilno. Neispunjavanje propisanih zahvata za održavanje može da dovede do nesreće!Korisnik lančane testere ne sme da izvodi održavanja koja nisu opisana u uputstvu. Sve te zahvate mora da izvodi ovlašćeni MAKITIN servis
Stranica
Servis, rezervni delovi i garancijaOdržavanje i popravljanjeOdržavanje i popravljanje modernih testera za otsecanje i njihovih komponenti sme da izvodi kvalifikovano stručno lice, u radionici koja je opremljena sa specijalnim alatima i aparatima za ispitivanje. Za sve poslove koji nisu opisani u uputstvu za rukovanje preporučujemo da konsultujete MAKITIN servis. MAKITINI serivisi imaju potrebnu opremu i stručan i iskusan personal koji je u stanju da pronađe optimalno rešenje i da vam da savet. Da pronađete lokalnog distributera posetite www.makita-outdoor.com Rezervni deloviPouzdanost i sigurnost vašeg Power Cut-a zavisi od kvaliteta ugrađenih rezervnih delova. Koristite samo originalne MAKITA delove označene sa
Samo originalni delovi se proizvode na istoj proizvodnoj liniji gde se proizvode i mašine i time se garantuje najveći mogući kvalitet materijala, mera, funkcije i sigurnosti. Samo originalni rezervni delovi i pribor garantuju visoki kvalitet materijala, dimenzija i funkcije. Originalni rezervni delovi i pribor se kupuju kod lokalnog distributera. On ima listu rezervnih delova prema kojoj može da utvrdi broj dela i stalno je informisan za sva poboljšanja delova. Imajte u obzir da sa korišćenjem delova koji nisu originalni od MAKITE gubi se važnost garancije. Ne prihvatamo štete koje su nastale zbog korišćenja delova koji nisu originalni od MAKITE.
Instructions for periodic maintenance To ensure long life, prevent damage and ensure the full functioning of the safety features the following maintenance must be per-formed regularly. Guarantee claims can be recognized only if this work is performed regularly and properly. Failure to perform the prescribed maintenance work can lead to accidents! Users of the Power Cut must not perform any maintenance work not described in this Instruction Manual. All such work must be carried out by a MAKITA service centre.
Page
General Entire Power Cut Clean exterior, check for damage. In case of damage, have repaired by a qualified service centre immediately
Cutting disc Clutch Protection hood
Inspect regularly for damage and wear. Have inspected at a service center. Clean, Check position (impact plate)
6
16
Before each start Cutting disc Inspect for damage and make sure the cutting wheel is right for the job
6
V-belt Protective hood Combination switch, Safety locking button,
Check V-belt tension Adjust position Functional check Functional check
14
Throttle lever Tank cap
Functional check Check for tightness
17
Every day Air filter Clean (if necessary more frequently); pre-filter (foam) maintenance as described above under Cleaning / changing the air filter 20-21
Idle speed Check (cutting disc must not turn on idle) 18
Every week Starter housing Clean to ensure proper air cooling 12 Starter cable Check for damage 23 V-belt Check V-belt tension, inspect for damage and wear 14, 19
Air filter insert Clean, replace after 100 operating hours 21 Spark plug Check and replace if necessary 22
Muffier Check tightness of mounting 12 Spark arrester screen Screws and nuts
Clen and replace if necessary Check their condition and that they are fi rmly secured.
26
Every 3 months Suction head Fuel tank
Replace Clean
22
Annually Entire Power Cut Check at an authorized service centre
Storage Entire Power Cut
Cutting disc Fuel tank Carburetor
Clean exterior, check for damage. In case of damage, have repaired by a qualified service centre immediately Remove and clean Empty and cleanRun empty
13
Service, spare parts and guarantee Maintenance and repair The maintenance and repair of modern cutoff saws and their safety-related components requires qualified technical training and a workshop equipped with special tools and testing devices. We therefore recommend that you consult a MAKITA service centre for all work not described in this instruction manual. The MAKITA service centres have all the necessary equipment and skilled and experienced personnel, who can work out cost-effective solutions and advise you in all matters. To find your local distributor, please visit www.makita-outdoor.com Spare parts Reliable long-term operation, as well as the safety of your Power Cut, depend among other things on the quality of the spare parts used. Use only original MAKITA parts, marked
Only original parts are from the same production line as the original unit and therefore ensure the highest possible quality of materi-als, dimensions, functioning and safety. Only original spare parts and accessories guarantee the highest quality in material, dimensions and function. Original spare parts and accessories can be obtained from your local dealer. He will also have the spare part lists to determine the required spare part numbers, and will be constantly informed about the latest improvements and spare part innovations. Please bear in mind that if parts other than original MAKITA spare parts are used, this will automatically invalidate the MAKITA product guarantee. We will furthermore not accept any liability damages arising from the use of non-MAKITA spare parts. 28
Opšte
Pre svakog puštanja u rad
Dnevno
Nedeljno
Na svaka 3 meseca
Skladišćenje
Godišnje
Unutrašnjos Power Cut-a Disk za otsecanjeSpojkaŠtitnik
Disk za otsecanje
Klinasti kajšŠtitnikKombinovani prekidač,Sigurnosno dugme, Ručica za gasPoklopac rezervoara
Filter za vazduh
Brzina bez opterećenja
Kućište startera
Uže za startovanje
Klinasti kajš
Umetak za filter
Svećica
Prigušivač zvuka
Sito za zadrž. varnice
Vijci i navrtkeUsisna glava
Rezervoar za gorivo
Unutrašnjos Power Cut-a Disk za otsecanje
Rezervoar za gorivo
Karburator
Unutr. Power Cut-a
Spoljno čišćenje i provera oštećenja. U slučaju oštećenja odmah popravite u ovlašćeni servis
Demontiranje, pražnjenje i čišćenjeIspraznite
Provera u ovlašćeni servis
Zamena
Čišćenje
Čišćenje za strujanje vazduha bez smetnji
Provera oštećenja
Kontrola zategnutosti, oštećenja ili istrošenosti
Čišćenje i zamena posle 100 radnih sati
Kontrola i po potrebi zamena
Provera zaptivanja pri montiranju
Čišćenje i zamena po potrebi
Provera stanja i pritezanje
Čišćenje (ako je potrebno i češće); održavanje sunđerastog pretfiltera prema uputstvima za čišćenje i zamena filtera
Kontrola (disk ne sme da se vrti u radu na prazno)
Proveravanje oštećenja i ispravno montiranje diska
Kontrola zategnutosti kajšaPodešavanje položajaProvera funkcijeProvera funkcijeProvera funkcijeKontrola zaptivnosti
Spoljno čišćenje, provera od oštećenja. U slučaju oštećenja odmah da interveniše ovlašćeni servisRedovno da se proverava od oštećenja ili trošenja.Da se proveri u servisni centar. Čišćenje i provera položaja. (udarna ploča)
Guarantee MAKITA guarantees the highest quality and will therefore reimburse all costs for repair by replacement of damaged parts resulting from material or production faults occurring within the guarantee period after purchase. Please note that in some countries particular guarantee conditions may exist. If you have any questions, please contact your salesman, who is responsible for the guarantee of the product. Please note that we cannot accept any responsibility for damage caused by:
• Disregard of the instruction manual.
• Non-performance of the required maintenance and cleaning.
• Incorrect carburetor adjustment.
• Normal wear and tear.
• Obvious overloading due to permanent exceeding of the upper performance limits.
• The use of other than original MAKITA cutting discs.
• Use of force, improper use, misuse or accidents.
• Damage from overheating due to dirt on the fan housing.
• Work on the Power Cut by unskilled persons or inappropriate repairs.
• Use of unsuitable spare parts or parts which are not original MAKITA parts, insofar as they have caused the damage.
• Use of unsuitable or old oil.
• Damage related to conditions arising from lease or rent contracts.
• Damages caused by disregarding loose outer bolted connections.
Cleaning, servicing and adjustment work is not covered by the guarantee. All repairs covered by the guarantee must be performed by a MAKITA service centre.
Troubleshooting
Malfunction System Observation Cause
Cutting disc does not start turning Clutch Engine runs Damage to clutch
Cutting disc runs in idle Carburetor, clutch V-belt
Cutting disc runs Incorrect idle speed, blocked clutch Belt has insufficient tension, V-belt is worn
Engine does not start or only with difficulty
Ignition system
Fuel supply
Compression system
Mechanical malfunction
Ignition spark
No ignition spark
Fuel tank is filled
Inside
Outside Starter does not engage
Malfunction in fuel supply system, com-pression system, mechanical malfunction. Switch on STOP, fault or short-circuit in the wiring, plug cap or spark plug defective. Choke in wrong position, carburetor defective, suction head dirty, fuel line bent or interrupted. Cylinder base packing ring defective, radial shaft packings defective, cylinder or piston rings defective Spark plug does not seal. Spring in starter broken, broken parts inside the engine.
Warm start difficulties Carburetor Fuel tank is filled Wrong carburetor adjustment. Ignition spark
Engine starts, but dies immediately
Fuel supply Fuel tank is filled Wrong idling adjustment, suction head or carburetor dirty. Tank venting defective, fuel line interrupted, cable defective, STOP switch defective. Decompression valve dirty
Insufficient power Several systems may be involved simultaneously
Engine is idling Air filter dirty, wrong carburetor adjustment, muffier clogged, exhaust channel in cylinder clogged, spark arrester screen clogged
29
Garancija MAKITA garantuje najviši kvalitet i preuzima sve troškove za popravljanje i zamenu oštećenih delova, kao rezultat greške u materijalu ili u proizvodnji, a koje su nastale u garantnom periodu. U različnim zemljama postoje i različni uslovi garancije. Ako imate bilo kakvih pitanja kontaktirajte vašeg prodavca, koji je odgovoran za garanciju vašeg proizvoda. Vodite računa da garanciju ne možemo da prihvatimo u sledećim uslovima: • Ako nije postupano prema uputstvima za korišćenje . • Zbog nepridržavanja pravilima za održavanje i čišćenje. • Zbog pogrešnog podešavanja karburatora.• Kod normalnoh habanja i trošenja. • Pri dugotrajnom i redovnom preopterećenju u gornjim granicama. • Zbog korišćenja diskova koji nisu od MAKITE. • Zbog korišćenja sile, nestručnog rukuvanja, grešaka ili nesrećnog slučaja. • Zbog šteta od pregrevanja ili zbog previše prljavog otvora na kućištu. • Ako su sa Power Cut-om rukovala nestručna lica ili su ga popravljala neovlašćena lica. • Ako se koriste neodgovarajući rezervni delovi ili delovi koji nisu od MAKITE a izazvali su oštećenje. • Zbog korišćenja neodgovarajućeg ili starog ulja. • Zbog kvarova koji su nastali u slučaju lizinga ili pozajmljivanja. • Zbog kvarova koji su nastali zbog otpuštanja navojnih veza.
Čišćenje, servisiranje i podešavanje nisu obuhvaćeni sa garancijom. Sve popravke koje se izvode u garantnom roku mora da zvode MAKITINI servisi.
Dijagnoza kvarova
Kvar Sistem Posmatranje Uzrok
Disk za sečenje ne vrti
Disk za sečenje vrti u radu na prazno
Poteškoće pri toplom
startovanju
Motor se startuje ali odmah se gasi
Nedostatak snage
Motor ne startuje ili sa poteškoćom
Motor radiSpojka Oštećenje spojke
Karburator,
spojkaklinasti kajš
Karburator
Snabdevanje sa gorivom
Istovremeno je zahvaćeno više sistema
Sistem za paljenje
Snabdevanje sa gorivom Sistem za kom-presiju
Mehanički kvar
Pogrešna brzina na prazno, spojka je blokiranaKajš je nedovoljno zategnut ili istrošen
Prljav filter za vazduh, pogrešno podešen karburator, zapušen prigušivač, kanal za odvod gasova, sito za zadržavanje varnice
Pogrešno podešavanje praznog režima, isprljan karburator ili usisna glava. Pokvarena ventilacija rezervoara, prekinut vod za gorivo, kvar na kablu, kvar na STOP prekidaču. Prljav ventil za dekompresiju
Pogrešno podešen karburator. Varnica za paljenje
Poremećeno snabdevanje sa gorivom, sistem za kompresiju, mehaničko poremećenje. Prekidač u STOP položaj, kvar ili kratak spoj u kablovima, pokvareni priključak ili svećica. Sauh je u pogrešnom položaju, kvar na karburatoru, isprljana glava za usisavanje, dovod goriva je precvikan ili prekinut. Kvar na zaptivaču cilindra, oštećeni su radijalni zaptivači na vretenu, prstenu cilindra ili klipu
Svećica ne zaptiva. Startna opruga je napukla, oštećeni delovi u motoru.
Disk za sečenje vrti
Rezervoar za gorivo je pun
Rezervoar za gorivo je pun
Motor radi na prazno
Varnica za paljenje
Nema varnice za paljenje
Rezervoar za gorivo je punUnutrašnjost uređaja
Spoljašnost uređajaStarter ne radi
Extract from the spare parts list EK7300 Use only original MAKITA parts. For repairs and EK7301replacement of other parts, see your MAKITA service centre.
19
29 30 * 28
31 32 22
30
Uzorak iz liste rezervnih delovaKoristite samo originalne delove iz MAKITE. Za popravljanje i zamenu drugih delova, obratite se u MAKITIN servis.

Extract from the spare parts list EK7300 Use only original MAKITA parts. For repairs and EK7301replacement of other parts, see your MAKITA service centre.
Pos. MAKITA-No. Qty. Denomination Synthetic resin cutting disc
1 966 121 150 1 Cutting disc for steel, dia. 300/20 mm 966 141 150 1 Cutting disc for steel, dia. 350/20 mm 966 144 150 1 Cutting disc for steel, dia. 350/25,4 mm
1 966 121 120 1 Cutting disc for masonry, dia. 300/20 mm 966 141 120 1 Cutting disc for masonry, dia. 350/20 mm 966 144 120 1 Cutting disc for masonry, dia. 350/25,4 mm
3 994 280 250 1 Hex screw M8x25 4 965 300 470 1 V-belt 5 963 601 122 1 Suction head 6 010 114 091 1 Tank cap, compl. (fuel) 8 395 173 020 1 Inner filter 9 395 173 010 1 Air filter insert (paper cartridge) 10 395 173 080 1 Pre-fi lter (foam) 11 965 603 021 1 Spark plug 12 122 164 010 1 Starter cable ø 4,0x1000 mm 13 001 161 020 1 Starter grip 14 181 163 050 1 Return spring in housing 15 923 208 004 2 Hexagonal nut M8 16 941 719 140 1 Universal wrench SW 13/19 17 940 827 000 1 Offset screwdriver T27 18 944 340 001 1 Screwdriver (carburetor) 19 395 174 140 1 Spark arrester screen
Accessories (not delivered with the Power Cut)
Diamond cutting disc 22 966 221 021 1 Concrete Standard, dia. 300/20 mm 22 966 321 020 1 Concrete DiaDuran, dia. 300/20 mm 22 966 221 011 1 Asphalt Standard, dia. 300/20 mm 22 966 321 010 1 Asphalt DiaDuran, dia. 300/20 mm
22 966 241 021 1 Concrete Standard, dia. 350/20 mm 22 966 341 020 1 Concrete DiaDuran, dia. 350/20 mm 22 966 241 011 1 Asphalt Standard, dia. 350/20 mm 22 966 341 010 1 Asphalt DiaDuran, dia. 350/20 mm
22 966 244 021 1 Concrete Standard, dia. 350/25,4 mm 22 966 344 020 1 Concrete DiaDuran, dia. 350/25,4 mm 22 966 244 011 1 Asphalt Standard, dia. 350/25,4 mm 22 966 344 010 1 Asphalt DiaDuran, dia. 350/25,4 mm
- 394 228 121 1 Adapter ring, dia. 20/25,4 mm
24 395 114 300 1 Angle fuel-tank filler neck, cpl. 25 957 394 355 1 Guide trolley DT2000 cpl. 26 957 802 600 1 Pressure water tank, cpl. 27 394 365 102 1 Mains water connection, cpl. 28 394 114 271 1 Stand with rollers, complete (but without items 29, 30, 31) 29 394 114 240 2 Bushing 30 394 114 230 2 Roller 31 908 006 355 2 Star-head screw 32 909 905 165 4 Star-head screw - 949 000 035 1 Combined can (for 5l fuel, 2.5l oil) - 980 008 627 1 Filter cleaner (0.5l) - 980 008 628 1 Air-filter oil (1.0l) 10 395 173 090 1 Pre-filter (foam oiled)
31
Uzorak iz liste rezervnih delovaKoristite samo originalne delove iz MAKITE. Za popravljanje i zamenu drugih delova, obratite se u MAKITIN servis.
Poz. MAKITA бр. Kol. Opis1 966 121 150 1 Disk za sečenje čelika, ø300/20 mm 966 141 150 1 Disk za sečenje čelika, ø350/20 mm 966 144 150 1 Disk za sečenje čelika, ø350/25,4 mm 1 966 121 120 1 Disk za sečenje maltera, ø300/20 mm 966 141 120 1 Disk za sečenje maltera, ø350/20 mm 966 144 120 1 Disk za sečenje maltera, ø350/25,4 mm 3 994 280 250 1 Šestostrani vijak M8x25 4 965 300 470 1 Klinasti kajš 5 963 601 122 1 Usisna glava6 010 114 091 1 Poklopac rezervoara za gorivo 8 395 173 020 1 Unutrašnji filter9 395 173 010 1 Umetak za filter za vazduh (papirni patron)10 395 173 080 1 Pretfilter (sunđer) 11 965 603 021 1 Svećica12 122 164 010 1 Uže za startovanje ø 4,0x1000 mm 13 001 161 020 1 Ručka za paljenje sa povlačenjem 14 181 163 050 1 Povratna opruga u kućište15 923 208 004 2 Šestostrana navrtka M8 16 941 719 140 1 Univerzalan ključ SW 13/19 17 940 827 000 1 Ugaoni odvijač T27 18 944 340 001 1 Odvijač (karburator) 19 395 174 140 1 Sito za zadržavanje varnice
Pribor (nije u isporuci Power Cut-a)
Dijamantski disk za sečenje
22 966 221 021 1 Beton standard, ø300/20 mm 22 966 321 020 1 Beton dia - duran, ø300/20 mm 22 966 221 011 1 Asfalt standard, ø300/20 mm 22 966 321 010 1 Asfalt dia - duran, ø300/20 mm22 966 241 021 1 Beton standard, ø350/20 mm 22 966 341 020 1 Beton dia - duran, ø350/20 mm 22 966 241 011 1 Asfalt standard, ø350/20 mm 22 966 341 010 1 Asfalt dia - duran, ø350/20 mm22 966 244 021 1 Beton standard, ø350/25,4 mm 22 966 344 020 1 Beton dia - duran, ø350/25,4 mm 22 966 244 011 1 Asfalt standard, ø350/25,4 mm 22 966 344 010 1 Asfalt dia - duran, ø350/25,4 mm- 394 228 121 1 Adapter - prsten, ø20/25,4 mm24 395 114 300 1 Ugaoni priključak za rezervoar25 957 394 355 1 Кolica za vođenje DT2000.26 957 802 600 1 Rezervoar za vodu pod pritiskom27 394 365 102 1 Priključci za vodu28 394 114 271 1 Stalak na točkove, komplet (ali bez delova 29, 30, 31)29 394 114 240 2 Čaura30 394 114 230 2 Točak31 908 006 355 2 Imbus vijak32 909 905 165 4 Vijak sa zvezdastom glavom- 949 000 035 1 Kombinovani kanistar (za 5l goriva, 2.5l ulja)- 980 008 627 1 Čistač filtera (0.5l)- 980 008 628 1 Ulje za filter (1.0l) 10 395 173 090 1 Pretfilter

To find your local distributor, please visit www.makita-outdoor.com
MAKITA Corporation Specifications subject to change without notice 3-11-8 Sumiyoshi-Cho Anjo, Aichi
Form: 995 704 566 (12.11 GB) 446-8502 Japan
Da bi pronašli lokalnog distributera, posetite stranu www.makita-outdoor.com
Karakteristike podležu izmenama bez najavljivanja