U.S. INTEREST SECTION HAVANA, CUBA - State. INTEREST SECTION HAVANA, CUBA September 2013 . I am going to concentrate during this presentation on the Department of State’s new …
I am going to concentrate during this presentation on the Department of State’s new DS-160 online visa application form. Because it’s such a significant change from our previous application forms, we want to show as many people as possible how it works to ensure that applicants have as few problems using it as possible.
• Online DS-160 nonimmigrant visa (NIV) application form
• Replaced the following forms: − DS-156 “Nonimmigrant Visa Application” − DS-157 “Supplemental Nonimmigrant Visa Application” − DS-158 “Contact Information and Work History for Nonimmigrant Visa
Applicant”
• Mandatory for new applications as of May 31st, 2010
Background
Presenter
Presentation Notes
With demand for U.S. visas continuing to increase worldwide, the Bureau of Consular Affairs is committed to using new technologies to improve the efficiency and accuracy of the visa application process. The DS-160 NIV application takes advantage of new technologies to better serve our visa applicants. The U.S. State Department's Bureau of Consular Affairs developed the DS-160 web-based nonimmigrant visa (NIV) application to incorporate all existing NIV applications into one interactive, online form. It replaces the three forms that made up the Electronic Visa Application Form (EVAF). Use of the new form is mandatory beginning March 1, 2010. Applicants may use it as an option starting in February.
Advantages to Applicants •One form instead of three •Completely online – nothing to fill out by hand •Family and group feature – no need to fill in
identical data more than once •Save feature – don’t need to complete all at once •Frequent applicants can save application for reuse •Print only a single confirmation page
Presenter
Presentation Notes
The new DS-160 should prove advantageous for most visa applicants, and customer service surveys at posts that have piloted it indicate greater applicant satisfaction with the DS-160 than with its predecessor. Since there’s only one form instead of three, the likelihood of collecting all required information accurately the first time is improved, saving applicants the trouble of having to return to the U.S. Consulate for successive interviews because information they forgot one form. Because the form is web-based, and has extensive help features, the information entered is more likely to be accurate. And having an applicant’s data ahead of the interview gives us the ability to pre-process and pre-screen a case, which should reduce processing delays. There’s a family and group feature that pre-populates a number of fields and will save time when multiple several people are applying at once. Unlike the previous form, you can save an application to your hard drive and return to finish it later. This will also allow you to save time completing subsequent applications. And you only print out a single page to bring with you to the interview.
Make Appointment • At Call Center in Mexico • Referrals • Diplomats and Employees • Officials cases MINREX
Complete Form •Online at https://ceac.state.gov/genniv/
Interview • At Embassy • Fingerprint
Pick Up Visa • Day when notified
Pay Fee •At Consular Section
Only the application form has changed – Other parts of the process remain the same
Presenter
Presentation Notes
I want to emphasize that at this point only the application form is being changed. The rest of the application process remains the same.
Address where you will stay in the U.S.: Phone number(s): Present Work/Education/Training Primary Occupation: Previous Work/Education/Training Additional Work/Education/Training (Dates) Declare the countries to where applicant has traveled the last five years.
- Father's and mother’s and spouse’s Surnames and Given names: - Date(s) of Birth: - Address where you the applicant will stay in the U.S.: -Phone number(s):
US CONTACT -Contact Address, Phone Number and Email Address:
PREVIOUS US TRAVEL
-Previous travel dates of arrival in the US
Step 1 – Accessing the Application • Go to
https://ceac.state.gov/genniv
• Read the instructions and press “Start Application”
Presenter
Presentation Notes
You can also access the DS-160 through the Bureau of Consular Affairs public website “travel.state.gov”. I recommend you read the instructions carefully before beginning your application.
• Choose the Embassy or Consulate where you will apply.
• The upload photo feature is mandatory. Anyway, all applicants should bring an extra photo to their interview.
IF THE CHOSEN SELECTION IS WRONG , THE INFORMATION IN THE DS-160 WILL BE SENT TO A DIFFERENT DATABASE.
Presenter
Presentation Notes
You will normally apply in your country of residence. One new feature of the DS-160 is that applicants themselves upload photos into their applications. While it may seem a hassle in the beginning, it will avoid the common problem of discovering at the time of your interview that your photo does not meet the standards. You should save a digital photo or scan a printed photo to your computer before filling in the application. Photos should be a .jpg file less than 1 mb in size. Further details on photo standards can be found at http://travel.state.gov/visa/guide/guide_3877.html.
Step 3 – Fill In The Form • Complete all questions carefully
and accurately.
• Inserting wrong information or leaving required items blank will only delay your application.
Presenter
Presentation Notes
Filling in your personal data is relatively straightforward. There is quite a bit of explanatory information in the right-hand column to help you through if a question is not clear.
Saving an Application • If you can’t finish in one sitting,
you can save the application to your hard drive and continue later
• Press “Save” at the bottom of any
data entry page
• Press “Save Application to File”
• Press “Save” and navigate to the place you want to save your application
Presenter
Presentation Notes
As I mentioned, one big advantage of the DS-160 is that you can save it to your hard drive and return to finish it at a later time.
THE INFORMATION PROVIDED IN THESE FIELDS WILL BE PRINTED ON THE VISA.
Retrieving a Saved Application
• Browse to a saved application file
• Press “Upload Data”
Presenter
Presentation Notes
Retrieving a saved application is also easy.
Tips
• If a question doesn’t apply to you, you must check the “Does Not Apply” box
• Answer fully and include as much detail as you can
• Be especially careful with the yes/no questions near the end – misrepresenting the facts can make you ineligible to receive a visa ever
Presenter
Presentation Notes
A few things to look out for: Many questions may not apply to you, but you have to check the “Does Not Apply” box. If a question doesn’t have a “Does Not Apply” box and isn’t grayed out, you must answer it. It’s in your interest to include as much detail as you can. For example, including work and mobile numbers will help us get in touch with you before and after your interview if any questions arise. Be especially carefully to read and answer carefully the “Yes/No” questions near the end of the application. Intentionally misrepresenting material facts can subject you to a life-long ineligibility to receive a visa.
FIELDS THAT DETERMINE IF ADDITIONAL QUESTIONS WILL BE REQUIRED.
THESE FIELDS ARE FREQUENTLY IGNORED OR LEFT BLANK.
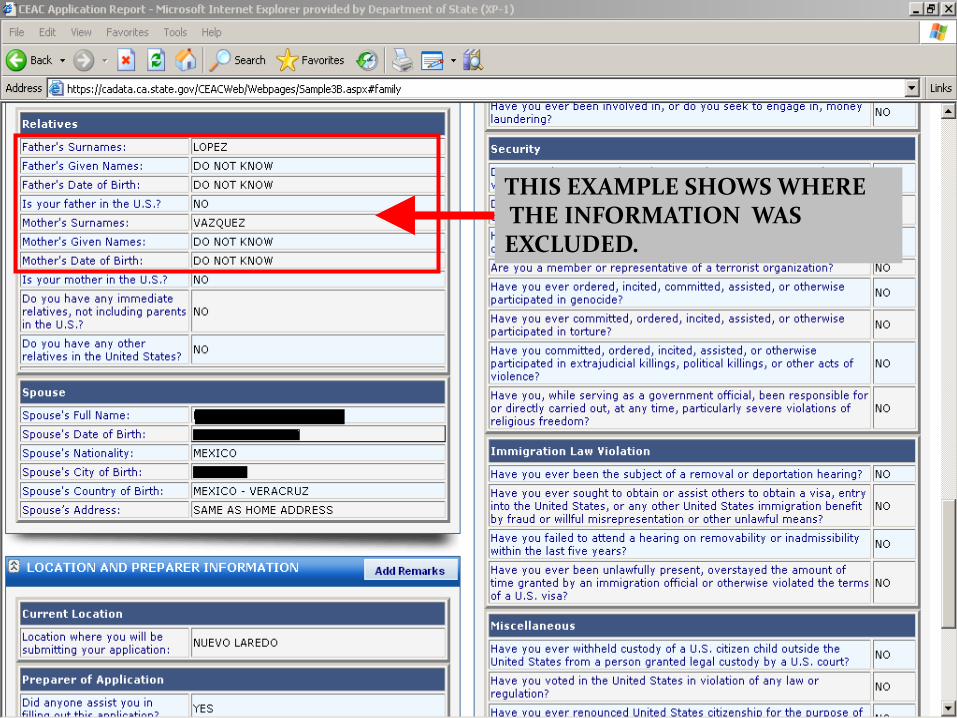
THIS EXAMPLE SHOWS WHERE THE INFORMATION WAS EXCLUDED.
MONTHLY SALARY AMOUNT AND SPECIFIC JOB DUTIES SHOULD BE STATED.
IT IS VERY HELPFUL FOR APPLICANTS TO SPECIFY AS MANY CONTACT PHONE NUMBERS AS POSSIBLE.
DO NOT FORGET TO PROVIDE THE CONTACT PHONE NUMBERS; IT IS VERY IMPORTANT.
EXAMPLE WHERE INFORMATION IS FREQUENTLY EXCLUDED.
NOT BEING HONEST WHEN ANSWERING THESE QUESTIONS COULD RESULT IN A PERMANENT INELIGIBILITY
Step 4 – Reviewing Your Application
• You have an opportunity to review
and edit all your answers before submitting your application
• Check carefully that everything is correct – it’s impossible to make changes later
Presenter
Presentation Notes
Before submitting your application you have an opportunity to correct any part of it. I suggest you look over all your answers carefully – you can’t make any changes once you submit the application. (If you do discover a mistake after submitting it, mention it when you come to the Embassy for your interview.)
Step 5 – Submitting Your Application
• Once you submit your application,
you can’t change it
• Pressing “Sign and Submit Application” constitutes your electronic signature, certifying that all the answers on the application are true
Presenter
Presentation Notes
As I said, once you submit your application you can’t change it. Note also on this page you must indicate if someone other than the applicant himself is completing the application. Inserting your passport number and pressing the button constitutes a legal electronic signature. Doing so certifies under penalties of perjury that all answers are correct to the best of your knowledge and belief, to the same extent as a physical signature on a paper form.
Step 6 – Printing Your Confirmation Page
• Print the confirmation page
• You only need to bring the printed
confirmation sheet to the interview
• You can print the entire application for your own records if you wish
• You can e-mail the confirmation to someone else (e.g., if you are completing the application for another person)
Presenter
Presentation Notes
You only need to bring the printed confirmation page with you to the Embassy. Please make sure the printed copy is legible – especially the bar code. You can print the entire application for your own records if you wish. You can also e-mail the confirmation to someone.
IT IS VERY IMPORTANT TO STATE IF THE APPLICATION WAS FILLED OUT BY A DIFFERENT PERSON OTHER THAN THE APPLICANT.
Step 7 – Printing Your Confirmation Page (cont.)
• This is what the confirmation page
looks like.
• We recommend to bring a photo with you to the interview.
Presenter
Presentation Notes
If your photo did not meet the standards when you tried to upload it, this is what your confirmation page will look like. As I mentioned before, you will need to bring a photo with you to the interview.
The DS-160 replaces only the application forms. Other items are still required
• Students: I-20
• Exchange Visitors: DS-2019
• Diplomats and Officials: Diplomatic Note
And most applicants still need evidence of ties to their place of residence
Presenter
Presentation Notes
A quick reminder: The DS-160 only replaces the old application forms. You may still need to bring other forms or items with you to the interview, depending on what you intend to do in the U.S. For example, students still need the I-20 form, and exchange visitors the DS-2019. Diplomats and officials still need a diplomatic note. And most visa applicants need to provide evidence they do not intend to stay illegally in the U.S. You can get further information on visa requirements from our website.
Tips Save often Save your work. Once you start the online form, save your work often because the form will time-out (close) approximately every 20 minutes. Save it to your computer, where you can retrieve it. The form can take as long as 90 minutes to complete. • Be thorough and specific. • Only use “do not know” or “does not apply”, if true. Use explanation fields as appropriate. • Be honest; ask applicant more questions if needed. • Ensure photo meets quality standards (50X50 mm, facing the camera and with the white background. The photo should not be older than six months). • Confirmation page should have a clearly printed bar code. • Advise applicants to bring old passports to the interview.