utorsubmit for instructors for...turnitin enabled assignments will only accept 1 file per student....
TRANSCRIPT

Prepared by: Last Updated: May 26, 2016 UTM Information & Instructional Technology Services (IITS) Page 1 of 22
UTORSubmit for Instructors
Table of Contents 1. General Information ........................................................................................................................ 2
2. Your Dashboard ............................................................................................................................... 2
3. Using Turnitin.com........................................................................................................................... 4
4. Creating an Assignment ................................................................................................................... 5
a. Step 1 .......................................................................................................................................... 5
File Limitations ................................................................................................................................ 5
Enabling Turnitin.com Integration .................................................................................................... 6
b. Step 2 .......................................................................................................................................... 7
c. Step 3 ........................................................................................................................................ 10
5. Editing an Assignment.................................................................................................................... 11
6. Viewing Submissions ...................................................................................................................... 11
Turnitin Scores .................................................................................................................................. 12
Sorting the Submission List ................................................................................................................ 12
Downloading the Submission List ....................................................................................................... 12
Other Options on the Submission List Page ........................................................................................ 12
7. Downloading Student Submission Files ...................................................................................... 13
8. Using the Advanced Download Option ....................................................................................... 15
9. Uploading Results/Feedback Files .............................................................................................. 16
10. Viewing the Turnitin.com Report ............................................................................................... 17
11. Viewing Submission Details ........................................................................................................ 18
12. Setting Extensions or Exceptions ................................................................................................ 19
13. Viewing Your Class List ............................................................................................................... 21
14. Managing Teaching Assistants .................................................................................................... 21
15. Getting Help .............................................................................................................................. 22

Prepared by: Last Updated: May 26, 2016 UTM Information & Instructional Technology Services (IITS) Page 2 of 22
1. General Information
UTORSubmit is an assignment submission system. It allows instructors to create assignments and collect files electronically from their students. Students can upload files to the web site to submit their completed assignments to their instructors.
UTORSubmit is also integrated with Turnitin.com, which can be activated by the instructor as needed. The use of Turnitin.com is set per assignment by the instructor creating the assignment.
Turnitin.com is an electronic resource that assists in the deterrence and detection of plagiarism. Instructors set up “virtual classes” to which students submit their assignments electronically. Each submitted paper is checked for textual similarity against resources stored in the Turnitin.com database and against billions of web pages (including on-line texts and journals). Instructors receive originality reports for all papers submitted through Turnitin which indicate the degree of textual similarity found in each assignment.
If you are a U.of T. instructor who is teaching a course in the current semester, you can access UTORSubmit at http://www.utm.utoronto.ca/submit. You will be required to login with your UTORid and password.
Browsers supported:
• Internet Explorer (IE) version 8, 9, 10 • Mozilla Firefox version 18 + • Chrome – latest release • Safari – latest release
2. Your Dashboard
Upon logging in, you will see your dashboard. At the top of your dashboard, you will see a dropdown selection for the session to load and a button for setting up your Turnitin.com profile under the Administrative Actions section.

Prepared by: Last Updated: May 26, 2016 UTM Information & Instructional Technology Services (IITS) Page 3 of 22
Below that, your dashboard will also list all the courses that you are teaching for the selected session.
Your course list comes from ROSI. If you are teaching a course and it does not show up in the list, please contact the administrative assistant in your department so that he/she can set you as the instructor for that course on ROSI.
If you are teaching a course and do not see the instructor dashboard, please contact [email protected].
The menu bar across the top of your dashboard may show you other roles that you have. If you are a TA for another course, then you may see the Teaching Assistant option. If you are a student in a course, then you may also see the Student option.
For each course in which you are an instructor, you have
• Course related actions such as o Creating assignments o Adding or removing UTORSubmit access for your TAs o Viewing your class list
• Assignment related actions for each assignment that you have created
The courses you are teaching are listed in alphabetical order. Assignments you create are listed by due date in chronological order.

Prepared by: Last Updated: May 26, 2016 UTM Information & Instructional Technology Services (IITS) Page 4 of 22
3. Using Turnitin.com
To use Turnitin.com, you must have a Turnitin.com account and your Turnitin.com account must be saved in your profile. You can get to your Turnitin profile through the Administrative Actions at the very top of your courses list on your dashboard.
Any assignments that you create, where you wish to use Turnitin, will automatically use the account that is saved in your Tii profile (Turnitin profile) in UTORSubmit.
Prepared by: Last Updated: May 26, 2016 UTM Information & Instructional Technology Services (IITS) Page 5 of 22
4. Creating an Assignment
Creating an assignment consists of 3 steps:
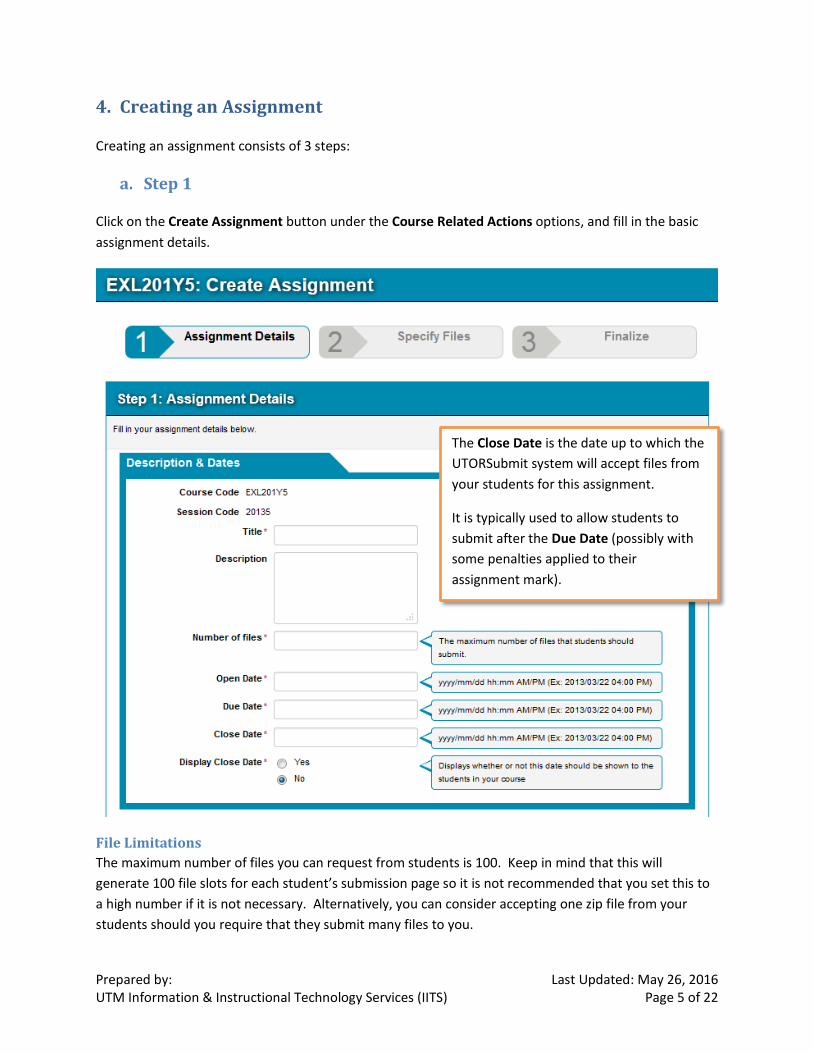
a. Step 1
Click on the Create Assignment button under the Course Related Actions options, and fill in the basic assignment details.
File Limitations The maximum number of files you can request from students is 100. Keep in mind that this will generate 100 file slots for each student’s submission page so it is not recommended that you set this to a high number if it is not necessary. Alternatively, you can consider accepting one zip file from your students should you require that they submit many files to you.
The Close Date is the date up to which the UTORSubmit system will accept files from your students for this assignment.
It is typically used to allow students to submit after the Due Date (possibly with some penalties applied to their assignment mark).
Prepared by: Last Updated: May 26, 2016 UTM Information & Instructional Technology Services (IITS) Page 6 of 22
UTORSubmit can accept submissions with a maximum total size of 30MB per upload. This means that if a student is uploading more than one file to an assignment, the total size of the files being uploaded must not exceed 30MB or the upload will fail.
The UTORSubmit for Students guide includes information, instructions and screenshots that you can give to your students to assist them when they upload their assignments to the UTORSubmit system.
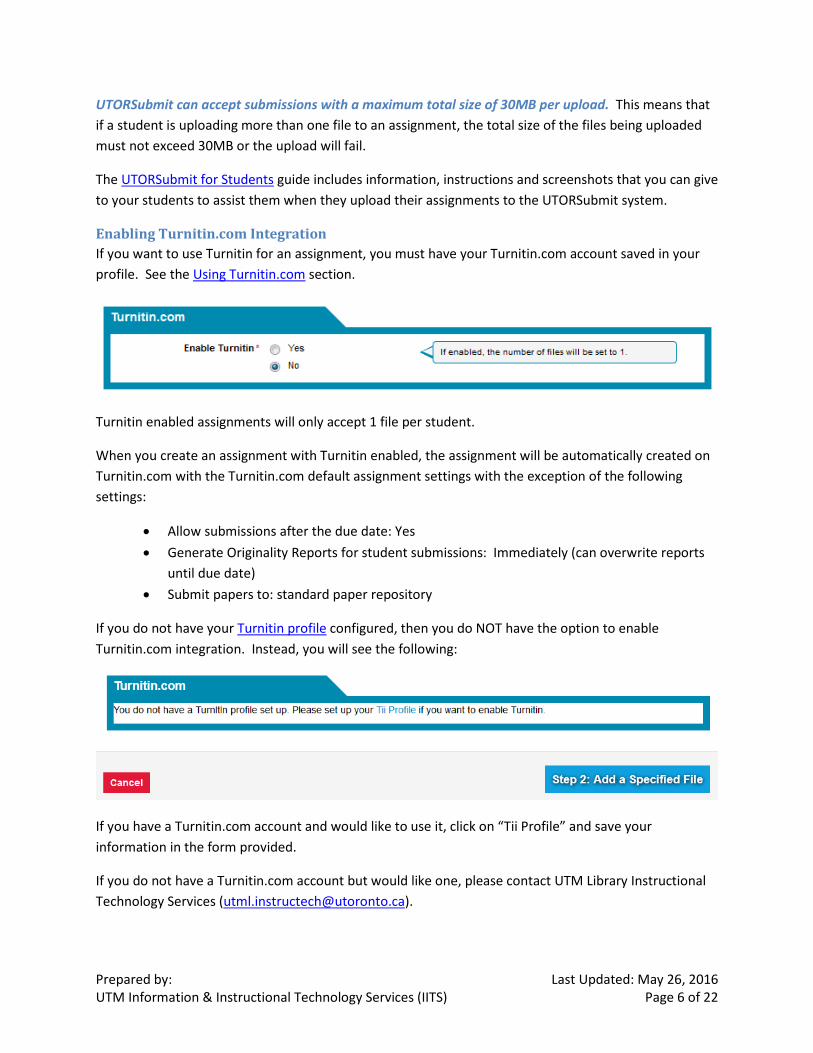
Enabling Turnitin.com Integration If you want to use Turnitin for an assignment, you must have your Turnitin.com account saved in your profile. See the Using Turnitin.com section.
Turnitin enabled assignments will only accept 1 file per student.
When you create an assignment with Turnitin enabled, the assignment will be automatically created on Turnitin.com with the Turnitin.com default assignment settings with the exception of the following settings:
• Allow submissions after the due date: Yes • Generate Originality Reports for student submissions: Immediately (can overwrite reports
until due date) • Submit papers to: standard paper repository
If you do not have your Turnitin profile configured, then you do NOT have the option to enable Turnitin.com integration. Instead, you will see the following:
If you have a Turnitin.com account and would like to use it, click on “Tii Profile” and save your information in the form provided.
If you do not have a Turnitin.com account but would like one, please contact UTM Library Instructional Technology Services ([email protected]).
Prepared by: Last Updated: May 26, 2016 UTM Information & Instructional Technology Services (IITS) Page 7 of 22
Important Note: If you have several Turnitin enabled assignments in UTORSubmit, please note if students have uploaded a Turnitin-enabled assignment through UTORSubmit for the first assignment, they may discover that they can bypass UTORSubmit and submit directly to Turnitin for subsequent assignments. To prevent students from bypassing submission through UTORSubmit, we recommend that submission instructions be provided to the students in your syllabus and in any assignment handouts so that the submission method you require is made clear to students. UTORSubmit will NOT have students’ submission records if the students submit directly to Turnitin.
Continue with the assignment creation by clicking on “Step 2: Add a Specified File”.
b. Step 2
In Step 2, you can add any specific rules that you may have for the filenames or the file types that your students should submit. If you do not add any rules to restrict the filenames or file types that you are accepting for this assignment, then students will be able to submit ANY filename or file type.

Prepared by: Last Updated: May 26, 2016 UTM Information & Instructional Technology Services (IITS) Page 8 of 22
You can use asterisk (*) to denote that students can use any full filename (for example: *.doc or *.docx) or any extension (for example: Report.*). Do NOT use asterisk (*) for partial filenames.
Please note that there may be more than one file extension for the same type of file.
For example JPEG files are most commonly saved as .jpg, but may also have the following extensions: .jpeg, .jpe, .jfif, and .jif.
If you wish to accept all jpg images, you will need to add 5 rules in total, one for each of the possible extensions.
Additionally, 2007 and 2010 Microsoft Office software adds an x to the file extension (e.g., for Word the file extension is docx, for Excel it is xlsx). Not all students have the most recent version of MS Office on their personal computers so you may want to consider accepting both versions (eg. .doc AND .docx extension). If you are being restrictive and only accepting .docx, you may want to point this out in class.
If a student submits a file that matches ANY of these rules, then the file is accepted.
In this example, you have allowed the student to submit any file with a .docx extension OR a file named summary.txt
Prepared by: Last Updated: May 26, 2016 UTM Information & Instructional Technology Services (IITS) Page 9 of 22
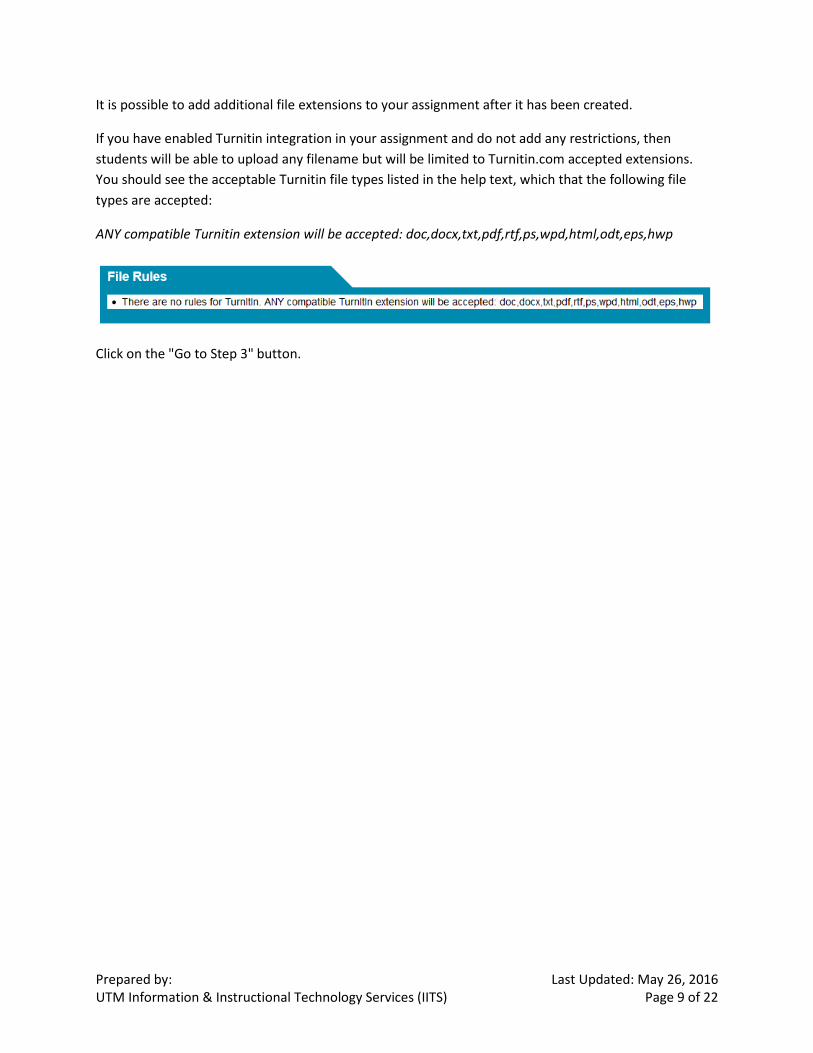
It is possible to add additional file extensions to your assignment after it has been created.
If you have enabled Turnitin integration in your assignment and do not add any restrictions, then students will be able to upload any filename but will be limited to Turnitin.com accepted extensions. You should see the acceptable Turnitin file types listed in the help text, which that the following file types are accepted:
ANY compatible Turnitin extension will be accepted: doc,docx,txt,pdf,rtf,ps,wpd,html,odt,eps,hwp
Click on the "Go to Step 3" button.

Prepared by: Last Updated: May 26, 2016 UTM Information & Instructional Technology Services (IITS) Page 10 of 22
c. Step 3
The final step is just to check the assignment details as you have created them. Click on the "Edit Details" button to make changes to the Assignment Details, and click on the "Edit Rules" button to make changes to the File Rules. Once you are done save the assignment by clicking on the "Save & Finish" button.
Remember to click on the "Save & Finish" button to create the assignment.
Verify your assignment details and rules to make any needed corrections.
Prepared by: Last Updated: May 26, 2016 UTM Information & Instructional Technology Services (IITS) Page 11 of 22
5. Editing an Assignment
You can edit an assignment using similar steps to those you used when you created the assignment. Changing any of the assignment details or rules will have NO effect on files that have already been submitted.
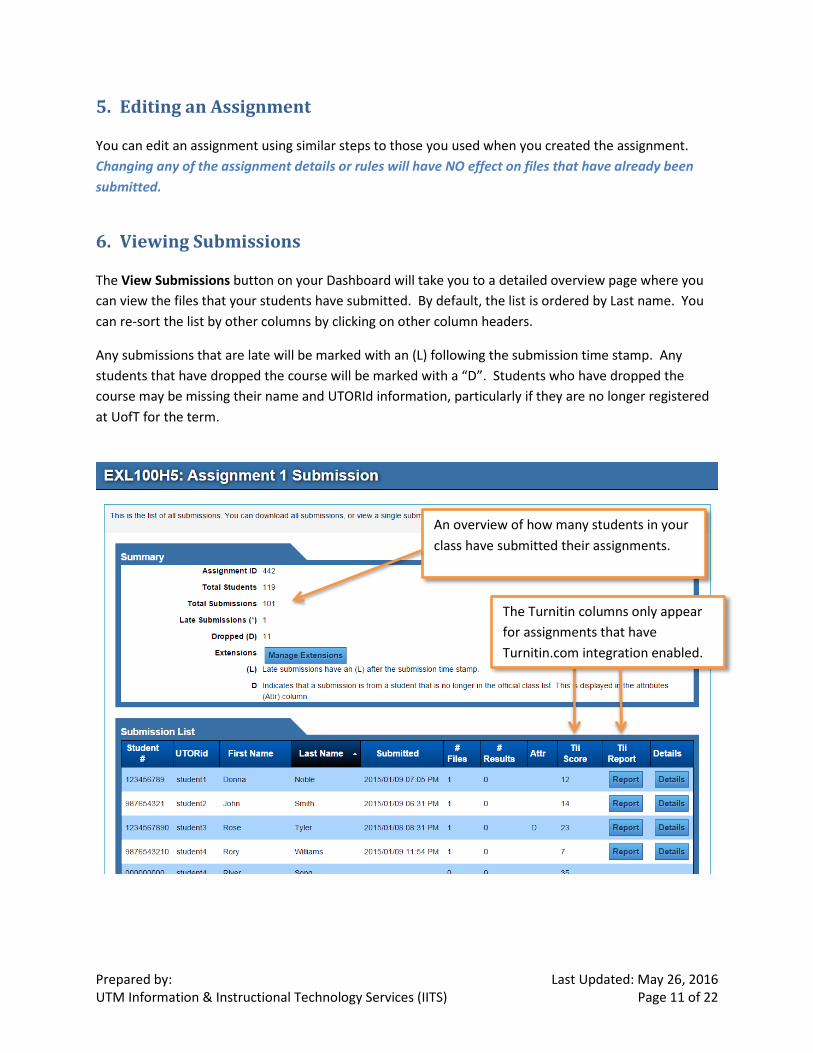
6. Viewing Submissions
The View Submissions button on your Dashboard will take you to a detailed overview page where you can view the files that your students have submitted. By default, the list is ordered by Last name. You can re-sort the list by other columns by clicking on other column headers.
Any submissions that are late will be marked with an (L) following the submission time stamp. Any students that have dropped the course will be marked with a “D”. Students who have dropped the course may be missing their name and UTORId information, particularly if they are no longer registered at UofT for the term.
The Turnitin columns only appear for assignments that have Turnitin.com integration enabled.
An overview of how many students in your class have submitted their assignments.

Prepared by: Last Updated: May 26, 2016 UTM Information & Instructional Technology Services (IITS) Page 12 of 22
Turnitin Scores
Types of information that can appear in the TII Score column:
• A numeric value which is the Turnitin score • Error – This means the student had technical difficulties when he/she was submitting the
assignment and the file was not successfully sent to Turnitin. • N/A – This means the file was successfully sent to Turnitin but we could not retrieve a Turnitin
score for this submission for one of the following reasons: o The score has not yet been generated on the Turnitin system. o There is a technical problem preventing us from retrieving the score from Turnitin.
• Opted out – This means the student opted out of automatically submitting the file to Turnitin.
Sorting the Submission List
The submission list is sorted by default in ascending order of Last name as highlighted by the column header. Sort the list by clicking on the column header of the column you wish to sort by.
Downloading the Submission List
At the bottom of the submission list, you have the option to download the submission list as an Excel file.
Other Options on the Submission List Page
See the Managing Exceptions, Viewing the Turnitin.com Report and Viewing Submission Details sections for the options that are presented in the assignment’s submissions overview shown above.
In the next three sections of the Viewing Submissions overview screen you have the option to:
• Download all the files submitted by your students (available in two different formats) (more details are provided in section 7 below);
• Download a subset of the files submitted by your students based on tutorial sections or lecture sections or submission date (available in two different formats) (more details are provided in section 8 below);
• Upload results or feedback files to the system for your students using the Upload Results "Browse" button (more details are provided in section 9 below.

Prepared by: Last Updated: May 26, 2016 UTM Information & Instructional Technology Services (IITS) Page 13 of 22
7. Downloading Student Submission Files
You have two options when downloading student submission files.
1. Zip all files together (no folders) Use this option to download all the submission into one zipped folder. Usually suitable when you are accepting only one file per student. Each file will be renamed to be prefixed with the student’s student number. Example:
submit_EXL100H5_20135.zip 987654320_Essay1.docx 987654321_janes_essay.docx
Prepared by: Last Updated: May 26, 2016 UTM Information & Instructional Technology Services (IITS) Page 14 of 22
987654322_essay 1.doc
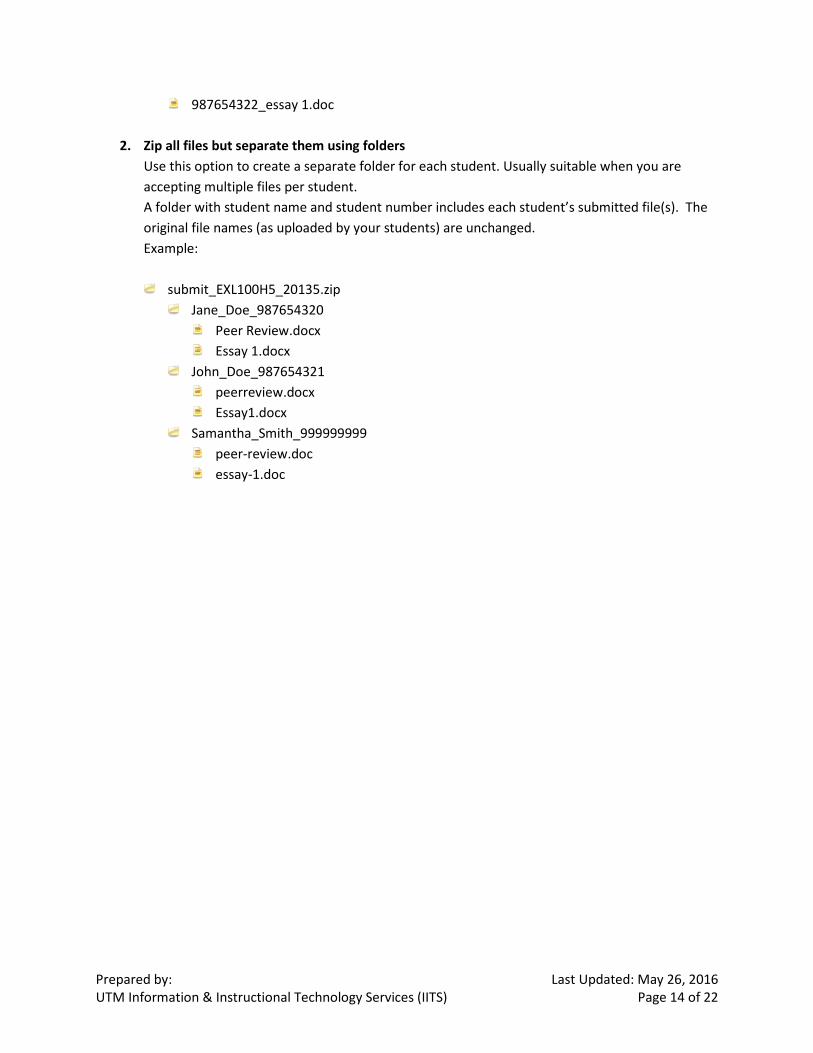
2. Zip all files but separate them using folders Use this option to create a separate folder for each student. Usually suitable when you are accepting multiple files per student. A folder with student name and student number includes each student’s submitted file(s). The original file names (as uploaded by your students) are unchanged. Example:
submit_EXL100H5_20135.zip Jane_Doe_987654320
Peer Review.docx Essay 1.docx
John_Doe_987654321 peerreview.docx Essay1.docx
Samantha_Smith_999999999 peer-review.doc essay-1.doc
Prepared by: Last Updated: May 26, 2016 UTM Information & Instructional Technology Services (IITS) Page 15 of 22
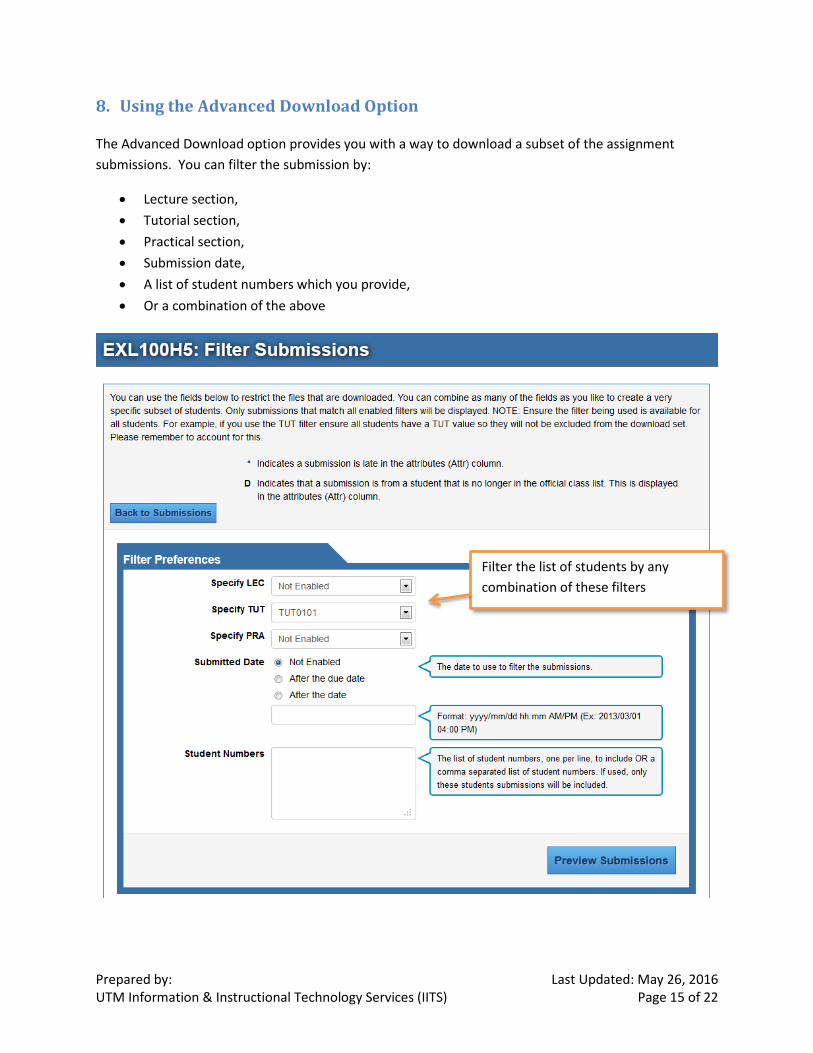
8. Using the Advanced Download Option
The Advanced Download option provides you with a way to download a subset of the assignment submissions. You can filter the submission by:
• Lecture section, • Tutorial section, • Practical section, • Submission date, • A list of student numbers which you provide, • Or a combination of the above
Filter the list of students by any combination of these filters

Prepared by: Last Updated: May 26, 2016 UTM Information & Instructional Technology Services (IITS) Page 16 of 22
Once when you click on Preview Submissions, you will be shown the number of students who match the filter criteria you have applied and a list of the individual students below. The zip file you download will ONLY include submissions by the students listed.
You have the same two options for the structure of the zip file that you download as described in Section 7 above.
9. Uploading Results/Feedback Files
Result files must be uploaded as a zip file in the same format in which you have downloaded them. See the expected file structure in the Downloading Student Submission Files section above.
• If you are using method #1 (a zip of all files together without folders), the file added to the zip must follow the format of studentNo_filename.ext to return the file to that particular student.
• If you are using method #2 (a zip file with a folder for each student), then you can add files directly to the student’s folders to return a file to that particular student.
You can even return files to students who did not submit provided you create the result/feedback file following one of the file naming conventions listed above.
Please exclude the student’s original files if you have NOT modified them. Returning the student’s original files may cause confusion if there is no feedback or markup added to it. Remember that the student can always retrieve his/her own original submitted file(s) through the UTORSubmit system.
When you upload a results zip file, you will be presented with the following screen, which shows you the status of the results files you have uploaded.
You may see a warning like the above if you have chosen to filter by a criterion (eg. tutorial section) but a student does NOT have / is not assigned to a tutorial section.

Prepared by: Last Updated: May 26, 2016 UTM Information & Instructional Technology Services (IITS) Page 17 of 22
Uploading a file with the same filename as one you have previously uploaded will overwrite and update the existing file. You can verify this by the Status and Message columns in the result upload confirmation screen.
Remember to click on the "Move files to student’s folder" button once you have verified that the upload will be processed correctly.
If you encounter an error, the most likely cause is a special character in the filename of either a file that your student submitted or a result file that you are returning to a student. Check to make sure filenames do not contain special characters.
10. Viewing the Turnitin.com Report
When clicking on the option to view the Turnitin.com report, you may see the following screen flash up on your monitor before you are redirected to the report. You should be automatically redirected to the report. If you are not automatically redirected, there is a "Generate Originality Report" button on this screen that can take you to the report.
You will then be redirected to the Turnitin.com’s originality report.
Hidden files, system files and other files included in the zip upload that are not part of the expected file structure will be ignored.

Prepared by: Last Updated: May 26, 2016 UTM Information & Instructional Technology Services (IITS) Page 18 of 22
11. Viewing Submission Details
Clicking on the "Details" button in the submission overview will bring you to the details for an individual student’s submission(s). On this submission details screen you can choose to view the file(s) that the student submitted or any result/feedback file(s) that you may have uploaded.

Prepared by: Last Updated: May 26, 2016 UTM Information & Instructional Technology Services (IITS) Page 19 of 22
12. Setting Extensions or Exceptions
Exceptions or extensions allow you to set a different due date for individual students. For example, you may want to add a different due date to accommodate students with disabilities.
In order to add an exception, you will need the student’s student number, which you can obtain from your class list. Click on the "Due Date Extension" button to change the due date(s) of an assignment for individual students as needed.
Click on the filename to view the file.

Prepared by: Last Updated: May 26, 2016 UTM Information & Instructional Technology Services (IITS) Page 20 of 22
Important Note: If you set a due date for a student that is later than the original assignment close date, and you have enabled Turnitin integration for the assignment, then the student may have problems automatically submitting to Turnitin.
This only applies if the student has submitted a file to UTORSubmit and to Turnitin prior to the assignment close date, and then tries to re-submit after the assignment close date. Turnitin.com distinguishes a first time submission from a re-submission and will only accept a first time submission for any submissions made after the assignment has closed.

Prepared by: Last Updated: May 26, 2016 UTM Information & Instructional Technology Services (IITS) Page 21 of 22
13. Viewing Your Class List
The class list is a convenience function so you can view the list of students who are officially enrolled in your class. This information comes from ROSI and is updated once every 24 hours. You can download the class list to an Excel spreadsheet if you need to annotate it for marks tracking or other purposes.
14. Managing Teaching Assistants
You can grant access to your TAs through the Manage TAs option under the Course Related Actions on your dashboard. You will need to know your TA’s UTORid in order to grant him/her access to the UTORSubmit system.

Prepared by: Last Updated: May 26, 2016 UTM Information & Instructional Technology Services (IITS) Page 22 of 22
Once you have added your TA to UTORSubmit, your TA can:
• View class submissions overview • View individual student’s submissions • View the Turnitin Score (the numeric score only, NOT the detailed report from Turnitin.com) • Download class submissions • Upload results/feedback files • View and download the class list
TAs cannot:
• Add/edit assignments • Add/remove due date exceptions or extensions • Add/remove other TAs from the course • View detailed Turnitin report
15. Getting Help
For technical support, please contact [email protected].
For instructional support, please contact UTM Library Instructional Technology Services [email protected].