v23 basic user guide - public.navy.mil in documents/sldcada-time... · distribution authorized to...
TRANSCRIPT

UNCLASSIFIED // FOR OFFICIAL USE ONLY
V23 Basic User Guide
Distribution authorized to U.S. Government Agencies only, to protect SLDCADA technical or operational data, computer software, and documentation information from automatic dissemination under the International Exchange Program or by other means (3 September 2004). Other requests for this document shall be referred to the Naval Sea Logistics Center Detachment Atlantic Corporate Systems Support Division, at 866-817-4332.

SLDCADA V23.03.01 Basic User Guide
August 2012 I
Table of Contents
TABLE OF CONTENTS ....................................................................................................................................... I
1. INTRODUCTION ....................................................................................................................................... 1
1.1 GETTING STARTED ......................................................................................................................................... 1 1.2 NAVIGATING SLDCADA ................................................................................................................................. 1
1.2.1 Navigation Instructions ......................................................................................................................... 1
2. ENTERING TIME AND ATTENDANCE .................................................................................................. 3
2.1 ENTERING IN TIME FOR CURRENT PAY PERIOD ................................................................................................ 3 2.2 FUTURE TIME AND ATTENDANCE ..................................................................................................................... 5 2.3 ENTERING PRIOR PAY CORRECTIONS .............................................................................................................. 6
3. OVERTIME AND LEAVE REQUESTS ...................................................................................................... 8
3.1 REQUESTING OVERTIME ................................................................................................................................. 8 3.2 REQUESTING LEAVE ........................................................................................................................................ 9
3.2.1 Viewing Leave Balance ....................................................................................................................... 10 3.2.2 Modifying Approved Leave Requests ................................................................................................ 11
4. REPORTS .................................................................................................................................................. 12
4.1 RUNNING A REPORT ..................................................................................................................................... 12

SLDCADA V23.03.01 Basic User Guide
April 2013 1
1. Introduction
Welcome to Version 23.03.01 (hereafter referred to as V23) of the Standard Labor Data
Collection and Distribution Application (SLDCADA), the Navy and Marine Corps standard for
collecting time and attendance. This document will outline the basic usage and operations of the
V23 system for the basic users of SLDCADA.
1.1 Getting Started
Before accessing SLDCADA review any local time and attendance policies, and verify that
account setup has been completed. If further assistance is needed contact a local SLDCADA
Administrator and inform them of the issues.
1.2 Navigating SLDCADA
SLDCADA navigation and usage is controlled through the Control Center, Menu Bar, and
Detail Area sections. The features of the Control Center and Menu Bar open different windows
within the Detail Area. The following image (Figure 1-1) outlines each of the sections within the
SLDCADA window. This section will outline how navigation through the SLCADA is
performed.
Figure 1-1 SLDCADA Window Sample
1.2.1 Navigation Instructions
Working in SLDCADA typically requires three actions, within the three sections. The following
steps outline how to set a date and perform a task.
1. In the Set Selected Date section of the Control Center, verify that the date entered is the
appropriate date or enter in the desired date. (Figure 1-2)

SLDCADA V23.03.01 Basic User Guide
April 2013 2
Figure 1-2 Working in SLDCADA Step 1
2. From the Menu Bar select the desired option. (Figure 1-3)
Quick Links can also be used to access certain features of the Menu Bar directly
Figure 1-3 Working in SLDCADA Step 2
3. Click in the Detail Area and perform any needed tasks. (Figure 1-4)
Figure 1-4 Working in SLDCADA Step 3

SLDCADA V23.03.01 Basic User Guide
April 2013 3
2. Entering Time and Attendance
The main purpose of SLDCADA is to collect time and attendance data. A user of SLDCADA
will enter in their time and attendance as instructed by their local SLDCADA Administrator.
This section will outline the steps required to enter in time and attendance.
2.1 Entering in Time for Current Pay Period
All time is entered and edited through the Time and Attendance screen. (Figure 2-1) This screen
also provides access to the Clock feature, allowing users to enter in and out times. The following
steps outline how to enter in time.
Figure 2-1 Time and Attendance Window
1. Verify that the PPE is set to the current pay period.
If the PPE is incorrect, select the Set to current pay period link
2. Open the Time and Attendance window via the Quick links or Menu Bar.
Quick Links
From within the Control Center click on the My Time and Attendance link
Menu Bar
Click on Labor and then Time and Attendance
3. Navigate through the window and input all required information.
Any item with a red asterisk * is a required field
Additional fields may be available and can be accessed by using the horizontal scroll
bar
Clicking on the Question Mark icon next to each field will display a reference list
pre-populated with options

SLDCADA V23.03.01 Basic User Guide
April 2013 4
Selecting the Generate Hours Checkbox will automatically
populate the time and attendance screen with the hours assigned from the
employees Tour of Duty
Labor information can be copied from one week to the next (or from Week 2 of the
previous pay period to Week 1 of the current one).
o Information such as the JON, Performing Shop, Sub Shop, Environmental
Hazard/Other Code, Night Differential and Type Hour Code may be copied from
Week 2 of the prior pay period by clicking on the Week 1
header bar (the same line that contains the week ending date for Week 1)
o To copy information from Week 1 to Week 2, click (on the
Week 2 header bar) to duplicate all of the information, or
to copy only specific rows (only rows highlighted by
the user)
o To select multiple rows, hold down the Ctrl key and click each individual row
If required, verify that all time has been entered in correctly and check the EVT
box .
o If a save is attempted without EVT being checked, a message will appear
prompting that EVT be checked or to continue to save (Figure 2-2)
Figure 2-2 EVT Not Checked Error
o If EVT verification is not required, the checkbox can be ignored and no error will
occur
4. Once all data has been entered click on the Save icon or press the F9 key.

SLDCADA V23.03.01 Basic User Guide
April 2013 5
2.2 Future Time and Attendance
The Future Time and Attendance screen provides the user, with the proper menu code and
access rights, the ability to create a future time and attendance records for themselves. These
records will generate time for the user when the conditions of the record are met. The
conditions for the records can be for a number of different reasons. Normally, a future time and
attendance record is made when the user will be out of the office for leave, training, or military
absence. Once a record is created, it may be modified, deactivated, or deleted.
Figure 2-3 Future Time and Attendance Screen
In order to perform any work on a Future Time and Attendance record, the following steps
must be performed:
1. Click on Labor Future Time and Attendance and the Future Time and Attendance
screen will open. (Figure 2-3)
2. When the screen opens it will display any current Future Time and Attendance records
that are available for that employee.
3. Perform any of the desired actions:
Creating
i. Click on the Add New Row icon or Insert New Row icon .
ii. Navigate through the row and input all required information.
Any item with a red asterisk * is a required field
Additional fields may be available and can be accessed by using the
horizontal scroll bar
Clicking on the Question Mark icon next to each field will display a
reference list pre-populated with options
Modifying
i. Select the desired row to change.
ii. Navigate through the row and make all desired changes to the Future Time and
Attendance record.
SLDCADA V23.03.01 Basic User Guide
April 2013 6
Activating/Deactivating
i. Locate the desired row to change.
ii. Click on the Activate checkbox to toggle it.
If the checkbox is checked the record is active and it will process when
conditions are met
If the checkbox is unchecked the record is inactive and will not process
Deleting
i. Select the desired row to delete.
ii. Once the row is highlighted, click on the Delete Row icon to delete the row.
4. Once all desired worked has been completed, click on the Save icon to save the
record.
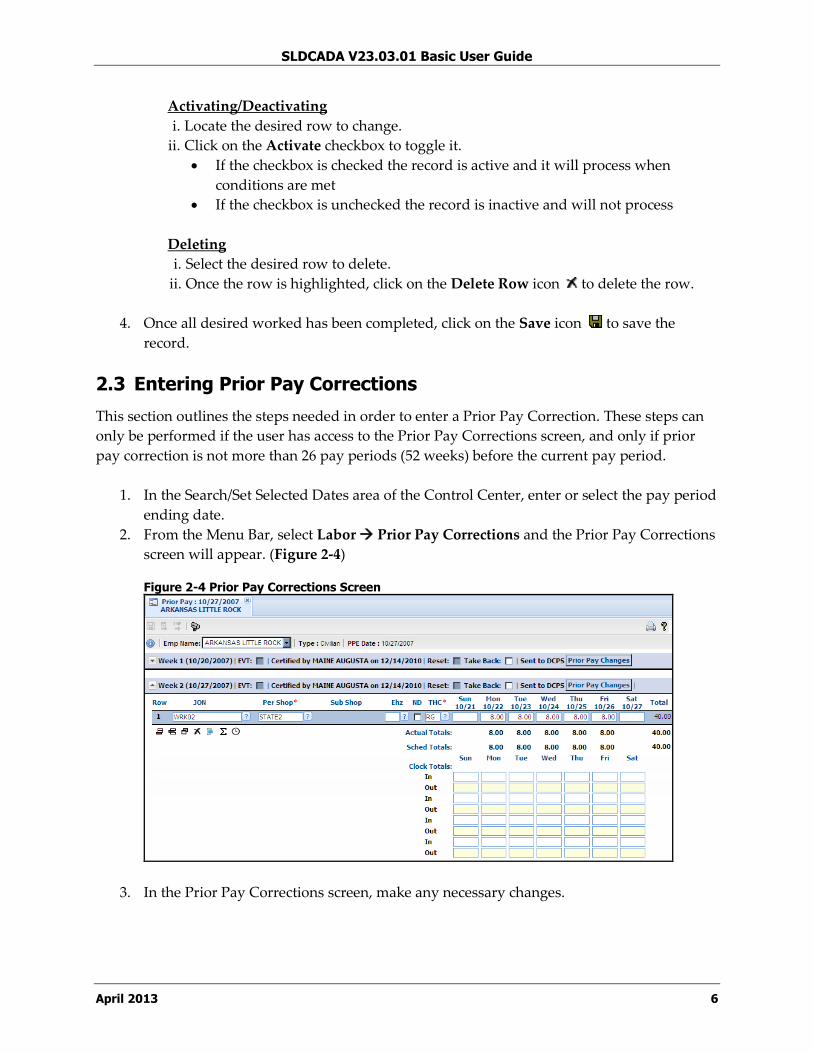
2.3 Entering Prior Pay Corrections
This section outlines the steps needed in order to enter a Prior Pay Correction. These steps can
only be performed if the user has access to the Prior Pay Corrections screen, and only if prior
pay correction is not more than 26 pay periods (52 weeks) before the current pay period.
1. In the Search/Set Selected Dates area of the Control Center, enter or select the pay period
ending date.
2. From the Menu Bar, select Labor Prior Pay Corrections and the Prior Pay Corrections
screen will appear. (Figure 2-4)
Figure 2-4 Prior Pay Corrections Screen
3. In the Prior Pay Corrections screen, make any necessary changes.

SLDCADA V23.03.01 Basic User Guide
April 2013 7
4. If required, verify that all time has been entered in correctly and check the EVT
box .
If a save is attempted without EVT being checked, a message will appear prompting
that EVT be checked or to continue to save (Figure 2-5)
Figure 2-5 EVT Not Checked Error
If EVT verification is not required, the checkbox can be ignored and no error will
occur
5. When all the changes are complete, click on the Save icon .
When the record is sent to DCPS, it overlays the previous record and could change
the pay.

SLDCADA V23.03.01 Basic User Guide
April 2013 8
3. Overtime and Leave Requests
This section outlines how to enter Overtime or Leave requests.
3.1 Requesting Overtime
The Overtime Request screen (Figure 3-1) is used to request authorization to work overtime
hours. The following instructions outline how to enter in an Overtime Request.
Figure 3-1 Overtime Request Window
1. Open the Overtime Request window via the Quick links or Menu Bar.
Quick Links
From within the Control Center click on the My Overtime Requests link
Menu Bar
Click on Labor and then Overtime Request
2. Click on the Add New Row icon to add a new record, if needed.
3. Navigate through the record and enter all required information.
Any item with a red asterisk * is a required field
Additional fields may be available and can be accessed by scrolling the horizontal
scroll bar
4. When the Overtime Request has been completed, click on the Save icon to save the
information and make it available for supervisor authorization.
5. Click on the E-mail icon to open an e-mail, so that a notification of the request can be
sent to the supervisor.

SLDCADA V23.03.01 Basic User Guide
April 2013 9
3.2 Requesting Leave
The Leave Request screen (Figure 3-2) is used to request leave within SLDCADA. The following
instructions outline how to enter in a Leave Request:
Figure 3-2 Leave Request Window
1. Open the Leave Request window via the Quick links or Menu Bar.
Quick Links
From within the Control Center click on the My Leave Requests link
Menu Bar
Click on Labor and then Leave Request
2. Click on the Add New Row icon to add a new record, if needed.
3. Navigate through the record and enter all required information.
Any item with a red asterisk * is a required field
Additional fields may be available and can be accessed by scrolling the horizontal
scroll bar
Note: The Recurrence field can be used to allocate a single day of the week or pay period
within the leave request. The leave request will then only be used on the specified day
until the stop date has passed, or the request no longer has hours remaining. Click on the
Question Mark icon and choose the day for the recurrence of the leave request.
4. When the Leave Request has been completed, click on the Save icon to save the
information and make it available for supervisor authorization.
5. Click on the E-mail icon to open an e-mail, so that a notification of the request can be
sent to the supervisor.

SLDCADA V23.03.01 Basic User Guide
April 2013 10
3.2.1 Viewing Leave Balance
In order to view leave balances, click on the More Information icon to expand the More
Information window. (Figure 3-3) The current leave balances for the employee will display.
Figure 3-3 Leave Balances Tab

SLDCADA V23.03.01 Basic User Guide
April 2013 11
3.2.2 Modifying Approved Leave Requests
Sometimes a Leave Request will need to be modified once it has already been approved by a
supervisor. In order for this to be performed, the user must first inform the supervisor that a
modification needs to occur and which Leave Request needs to be changed. The Leave Request
will need to be unapproved by the supervisor. When the request is unapproved, the user can
then perform the needed changes to the Leave Request. When the user finishes with the
changes they will then re-submit the Leave Request for approval. The following instructions
outline how to modify a Leave Request:
1. Contact the supervisor and inform them that a Leave Request needs to be changed.
The supervisor will need to locate and then un-approve the previously approved
Leave Request
2. Open the Leave Request window via the Quick links or Menu Bar.
Quick Links
From within the Control Center click on the My Leave Requests link
Menu Bar
Click on Labor and then Leave Request
3. Locate the Leave Request that needs to be modified and select it.
4. Navigate through the record and modify any information as needed.
Any item with a red asterisk * is a required field
Additional fields may be available and can be accessed by scrolling the horizontal
scroll bar
5. When the Leave Request has been modified, click on the Save icon to save the
information and make it available for supervisor authorization.
6. Click on the E-mail icon to open an e-mail, so that a notification of the request can be
sent to the supervisor.

SLDCADA V23.03.01 Basic User Guide
April 2013 12
4. Reports
Within V23 there are many different types of reports that can be run in order to retrieve
different types of information. For example many users have access to the Leave Balances report
while will show the remaining leave balances for the user. This section will outline how to run a
report, for more information on printing or saving reports see the V23 SUM.
Not all reports will be available to all users. For further assistance contact the local SLDCADA
Administrator.
4.1 Running a Report
The following steps outline how to open and run a report within SLDCADA V23.
1. From the Menu Bar, click on Reports and then select the desired report. (Figure 3-1)
Figure 4-1 Reports Menu
2. A report window will appear displaying the parameters for the selected report.
Figure 4-2 Report Window

SLDCADA V23.03.01 Basic User Guide
April 2013 13
3. Enter in any desired criteria into the Search criteria fields.
Clicking the refresh icon will reset the values within the report back to the values
that are highlighted within the Navigation Tree
Clicking the reset icon will clear all the values within the report and set dates back
to their defaults
To generate a more detailed or customized report, enter any desired parameters
within the Search Criteria Value fields
o To select all items for a field, leave the criteria field blank
o A red asterisk * next to a criteria field indicates that a value must be entered into
that field for the report to run successfully
o The question mark icon next to a criteria field indicates that a reference list is
available and clicking the question mark icon will display the reference list
with available values
Multiple values can be selected by holding the Ctrl key and clicking each
employee name
Multiple values can also be typed in manually, separated by a comma
o The calendar icon next to a field indicates that the value required is a date
and clicking the calendar icon will provide a calendar from which a date can
be selected
o The Criteria Count column displays the number of items that have been selected
o To have the report sort by a specific criteria, click on the radio button next to
the desired criteria
4. Click on the run report icon in the upper left hand corner of the screen.
5. The report will appear within Adobe Acrobat Reader as a PDF file.