virtual storage console for vmware vsphere 6 - netapp netapp storage that were previously managed...
TRANSCRIPT

Virtual Storage Console for VMwarevSphere 6.0
June 2016 | SL10277 Version 1.3.0

2 Virtual Storage Console for VMware vSphere 6.0 © 2016 NetApp, Inc. All rights reserved. NetApp Proprietary
TABLE OF CONTENTS
1 Introduction...................................................................................................................................... 4
1.1 Lab Objective and Agenda....................................................................................................... 4
1.2 Prerequisites.............................................................................................................................. 4
2 Lab Environment............................................................................................................................. 5
3 Lab Activities - non-VVOL features.............................................................................................14
3.1 Tour the VSC Dashboard Summary Page.............................................................................14
3.2 Storage Summary Page and Provision a Datastore............................................................ 18
3.3 Optimization and Migration.................................................................................................... 28
3.4 Show VSC Actions that can be Performed on VMs and Datastores.................................. 36
3.5 Viewing NetApp Information from Related Objects............................................................. 47
3.6 Surveying Storage Management Roles Packaged with the VSC........................................ 49
3.7 Rapid Cloning and Space Savings........................................................................................51
3.8 Space Reclamation..................................................................................................................65
3.9 Backing up VMs with the VSC...............................................................................................73
3.10 Restoring VMs with the VSC................................................................................................82
3.11 VASA Provider Integration..................................................................................................102
3.12 Additional Capabilities of the VSC in this lab.................................................................. 112
4 Lab Activities - VVOL specific features.................................................................................... 113
4.1 Use Datastore Provisioning Wizard for NAS Backed VVOL Creation.............................. 113
4.2 Use Datastore Provisioning Wizard for SAN Backed VVOL Creation.............................. 120
4.3 Create a VM Storage Policy................................................................................................. 127
4.4 Assign a VVOL to a Default Storage Policy....................................................................... 132
4.5 Review FlexVols in vSphere Interface.................................................................................134
4.6 Review FlexVols in OnCommand System Manager........................................................... 136
4.7 Deploy a VM from a Template to a VVOL........................................................................... 138
4.8 Perform a VM Snapshot........................................................................................................143

3 Virtual Storage Console for VMware vSphere 6.0 © 2016 NetApp, Inc. All rights reserved. NetApp Proprietary
4.9 Confirm Storage Efficiency Details on FlexVol.................................................................. 144
4.10 Run CLI command using the VP Control Panel............................................................... 149
4.11 Generate a file bundle to send to support........................................................................159
5 Lab Limitations............................................................................................................................ 161
6 References....................................................................................................................................162
7 Version History............................................................................................................................ 163

4 Virtual Storage Console for VMware vSphere 6.0 © 2016 NetApp, Inc. All rights reserved. NetApp Proprietary
1 IntroductionThis lab is designed to familiarize you with how the NetApp Virtual Storage Console plug-in to VMware vSphere6.0, and the NetApp vSphere API for Storage Awareness (VASA) Provider appliance work with VMware vCenterto simplify deployment and management of VMware Virtual Volumes (VVOLs). This integration enables theVMware web client and the Virtualization Administrator access to features and storage efficiencies that are uniqueto NetApp Storage that were previously managed manually and separately from the Storage infrastructure andVirtualziation infrastructure .
Virtual Volumes is a new integration and management framework that virtualizes SAN/NAS arrays, enabling amore efficient operational model that is optimized for virtualized environments and centered on the applicationinstead of the infrastructure. Virtual Volumes simplifies operations through policy-driven automation that enablesmore agile storage consumption for VMs and dynamic adjustments in real time, when they are needed. Itsimplifies the delivery of storage service levels to individual applications by providing finer control of hardwareresources and native array-based data services that can be instantiated with VM granularity.
1.1 Lab Objective and AgendaAfter completing this lab, you will be able demonstrate the full integration and ease of management available toNetApp Storage customers who also run VMware vSphere 6.0. This lab demonstrates the key components of theVVOL framework using the NetApp value additions. Additionally, it demonstrates how to deploy NetApp FlexibleVolumes (FlexVols) using a NetApp wizard fully integrated into the VMware vCenter web client. Lastly, you willbe able to demonstrate the VASA Provider interface, and perform some basic troubleshooting steps to examinethe API communication that occurs between the VMware software and the NetApp software through the VirtualStorage Console.
1.2 PrerequisitesIn order to use this lab successfully, the following are the recommended prerequisites:
• Familiarity with clustered Data ONTAP®.• Basic understanding of VMware Virtualization.

5 Virtual Storage Console for VMware vSphere 6.0 © 2016 NetApp, Inc. All rights reserved. NetApp Proprietary
2 Lab EnvironmentThe following illustration depicts the various components of this lab.
Figure 2-1:
The following tables contain host information that is used for this lab:
Table 1: Table 1: OS and IP addresses for the lab
Hostname Operating System Role/Function IP address
dc1 MS Windows 2008 R2 Domain Controller 192.168.0.253
jumphost MS Windows 2012 R2 Jump Host 192.168.0.5
vc1 MS Windows 2012 R2 VMware vCenter 6.0 Server 192.168.0.31
vasa Linux virtual appliance NetApp VASA Provider appliance 192.168.0.34
snapctr MS Windows 2012 R2 NetApp SnapCenter 1.1 Server 192.168.0.75
esx1 ESXi 6.0.0 Nested VMware Hypervisor 192.168.0.51
esx2 ESXi 6.0.0 Nested VMware Hypervisor 192.168.0.52
cluster1 Clustered Data ONTAP Cluster management IP 192.168.0.101
cluster1-01 Clustered Data ONTAP Cluster node 1 192.168.0.111

6 Virtual Storage Console for VMware vSphere 6.0 © 2016 NetApp, Inc. All rights reserved. NetApp Proprietary
Hostname Operating System Role/Function IP address
cluster1-02 Clustered Data ONTAP Cluster node 2 192.168.0.112
svm1 Clustered Data ONTAPStorage Virtual MachineManagement LIF
192.168.0.130
Svr2012-SQL1 Windows Server 2012nested VM (B&R/space relaimdemo)
192.168.0.91
RHEL1 Red Hat Ent. Linux nested VM (linux cloning demo) 192.168.0.61
W2K3 misaligned Win 2003nested VM (realistic alignmentdemo)
n/a
vmmisaligned misaligned MS-DOS nested VM (fast alignment demo) n/a
W2k8R2SVR-template
Windows 2008R2 template (windows cloning demo) n/a
RHEL60-template
Red Hat Ent. Linux template (large linux cloning demo) n/a
DEBIAN-SM-TEMPLATE
Debian Linux tempate (small linux cloning demo) n/a
Table 2: Table 2: User IDs and passwords
Hostname User ID Password Comments
domain DEMO\Administrator Netapp1! Domain Administrator
vc1 [email protected] Netapp1! Local vCenter Admin
cluster1 admin Netapp1! Cluster administrator
svm1 vsadmin Netapp1! SVM administrator
vasamaint or vpserver Netapp1!
Maintenence Admin andAdmin
rhel root Netapp1! linux root administrator
2 NetApp Featured Products
• Virtual Storage Console for VMware 6.2P1• VASA Provider virtual appliance 6.2• NFS Plug-in for VMware VAAI version 1.1.0-0• Clustered Data ONTAP 8.3.2• NetApp SnapCenter 1.1
2 Lab PreparationBecause of the complexity of the nested VMware components and timing related to provisioning, a post-provisioning script is necessary to prepare the enviornment for intial use. This script reconnects the nestedhypervisors to vCenter to essentially wake them up from their dormant state in order for vCenter (and VSC) tasksto work.
This lab uses a preparation script that automatically runs when you first log in to the lab. Please wait for the scriptto complete and the window to close before you proceed. After the script, the browser will auto-launch or you canclick on the vSphere Web Client shortcut on the desktop.

7 Virtual Storage Console for VMware vSphere 6.0 © 2016 NetApp, Inc. All rights reserved. NetApp Proprietary
Figure 2-2:
1. In the browser warning of "Your connection is not private," click on Advanced.
1
Figure 2-3:
2. Click on Proceed to vc1.demo.netapp.com (unsafe).

8 Virtual Storage Console for VMware vSphere 6.0 © 2016 NetApp, Inc. All rights reserved. NetApp Proprietary
2
Figure 2-4:
3. Use DEMO\Administrator as the User name.4. The password is Netapp1!.5. Click Login to proceed.

9 Virtual Storage Console for VMware vSphere 6.0 © 2016 NetApp, Inc. All rights reserved. NetApp Proprietary
34
5
Figure 2-5:
6. Click on Virtual Storage Console.

10 Virtual Storage Console for VMware vSphere 6.0 © 2016 NetApp, Inc. All rights reserved. NetApp Proprietary
6
Figure 2-6:
7. Click on Storage Systems.

11 Virtual Storage Console for VMware vSphere 6.0 © 2016 NetApp, Inc. All rights reserved. NetApp Proprietary
7
Figure 2-7:
8. Press Update All.

12 Virtual Storage Console for VMware vSphere 6.0 © 2016 NetApp, Inc. All rights reserved. NetApp Proprietary
8
Figure 2-8:
9. Click OK.
9
Figure 2-9:
10. Click OK.

13 Virtual Storage Console for VMware vSphere 6.0 © 2016 NetApp, Inc. All rights reserved. NetApp Proprietary
10Figure 2-10:
11. Click on the Home icon.
11
Figure 2-11:

14 Virtual Storage Console for VMware vSphere 6.0 © 2016 NetApp, Inc. All rights reserved. NetApp Proprietary
3 Lab Activities - non-VVOL featuresKey NetApp capabilities will be highlighted below. If you prefer to just focus on Virtual Volumes, skip to LabActivities - VVOL specific features on page 113
• Lab Activities examining features and functionality of NetApp Virtual Storage Console for VMware
• Tour the VSC Dashboard Summary Page on page 14• Storage Summary Page and Provision a Datastore on page 18• Optimization and Migration on page 28• Show VSC Actions that can be Performed on VMs and Datastores on page 36• Viewing NetApp Information from Related Objects on page 47• Surveying Storage Management Roles Packaged with the VSC on page 49• Rapid Cloning and Space Savings on page 51• Space Reclamation on page 65• Backing up VMs with the VSC on page 73• Restoring VMs with the VSC on page 82• VASA Provider Integration on page 102• Additional Capabilities of the VSC in this lab on page 112
3.1 Tour the VSC Dashboard Summary Page
In this activity you navigate through the dashboard to view the summary page for the NetApp Virtual StorageConsole plug-in to VMware vCenter. This plug-in provides seemless integration to perform storage related tasksspecific to NetApp storage from and to optimize VMware ESX host settings for use with NetApp storage.
1. Click on Virtual Storage Console.

15 Virtual Storage Console for VMware vSphere 6.0 © 2016 NetApp, Inc. All rights reserved. NetApp Proprietary
1
Figure 3-1:
2. Examine the charts and graphs integrated into the VMware UI, including NetApp specific storage details.3. Observe host settings status, then click on a bar in the chart to investigate further.

16 Virtual Storage Console for VMware vSphere 6.0 © 2016 NetApp, Inc. All rights reserved. NetApp Proprietary
2
3
Figure 3-2:
4. Highlight hosts by holding the Shift key, this would be how to apply host level recommended settings.5. Click xto exit.

17 Virtual Storage Console for VMware vSphere 6.0 © 2016 NetApp, Inc. All rights reserved. NetApp Proprietary
4
5
Figure 3-3:
6. Click on Storage Systems.

18 Virtual Storage Console for VMware vSphere 6.0 © 2016 NetApp, Inc. All rights reserved. NetApp Proprietary
6
Figure 3-4:
3.2 Storage Summary Page and Provision a Datastore
This activity illutrates the value add details that the VSC provides in the vCenter user interface, as well as use theintegration actions to provision a NetApp FlexVol volume as a VMware datastore using a simple wizard all fromthe vCenter UI.
1. Mouse over the icons to see the options available, and click the Update All button.2. Click on the Actions drop down to see the options available.3. Double-click on cluster1 to examine the cluster details further.

19 Virtual Storage Console for VMware vSphere 6.0 © 2016 NetApp, Inc. All rights reserved. NetApp Proprietary
123
Figure 3-5:
4. After reviewing the details available on the cluster summary, click on home icon.
4
Figure 3-6:
5. Click on Hosts and Clusters.

20 Virtual Storage Console for VMware vSphere 6.0 © 2016 NetApp, Inc. All rights reserved. NetApp Proprietary
5
Figure 3-7:
6. Right click on the demo.netapp.com datacenter.7. Examine the NetApp VSC options available at the datacenter level.

21 Virtual Storage Console for VMware vSphere 6.0 © 2016 NetApp, Inc. All rights reserved. NetApp Proprietary
6
7
Figure 3-8:
8. Select datacenter demo.netapp.com.9. Click on Actions to reveal the dropdown.10. Go to NetApp VSC options.11. Select Provision Datastore.

22 Virtual Storage Console for VMware vSphere 6.0 © 2016 NetApp, Inc. All rights reserved. NetApp Proprietary
9
Figure 3-9:
12. Name the datastore temp_datastore.13. Click Next.

23 Virtual Storage Console for VMware vSphere 6.0 © 2016 NetApp, Inc. All rights reserved. NetApp Proprietary
12
13
Figure 3-10:
14. Select the Storage system: cluster1.15. Select SVM: svm1.16. Click Next.
1415
16
Figure 3-11:

24 Virtual Storage Console for VMware vSphere 6.0 © 2016 NetApp, Inc. All rights reserved. NetApp Proprietary
17. Enter size of 10 GB.18. Select Aggregate: aggr1_01.19. Click Next.
1018
19
Figure 3-12:
20. Click Finish.

25 Virtual Storage Console for VMware vSphere 6.0 © 2016 NetApp, Inc. All rights reserved. NetApp Proprietary
20
Figure 3-13:
21. Click OK.
21Figure 3-14:
22. Right click the existing datastore nfs1.23. Navigate to the NetApp VSC to examine all the options available on an existing datastore.

26 Virtual Storage Console for VMware vSphere 6.0 © 2016 NetApp, Inc. All rights reserved. NetApp Proprietary
22
23
Figure 3-15:
24. Return to the Datastore tab under the navigation pane on the left, select the newly created datastorenamed: temp_datastore.
25. Click the Actions button to review a dropdown list.26. Navigate to NetApp VSC.27. Select Destroy.

27 Virtual Storage Console for VMware vSphere 6.0 © 2016 NetApp, Inc. All rights reserved. NetApp Proprietary
24 25
26
27
Figure 3-16:
28. Press OK.

28 Virtual Storage Console for VMware vSphere 6.0 © 2016 NetApp, Inc. All rights reserved. NetApp Proprietary
28
Figure 3-17:
3.3 Optimization and Migration
In this lab activity you scan VMs on a NetApp backed datstore to look for guest OS misalignment that affectsperformance. Additionally you use a wizard to perform a live migration to an optimized datastore that has an offsetto correct the misalignment in the VM.
1. Click the Home button.2. Click Virtual Storage Console.

29 Virtual Storage Console for VMware vSphere 6.0 © 2016 NetApp, Inc. All rights reserved. NetApp Proprietary
1
2
Figure 3-18:
3. Click on Optimization and Migration.4. Click Scan all.

30 Virtual Storage Console for VMware vSphere 6.0 © 2016 NetApp, Inc. All rights reserved. NetApp Proprietary
3
4
Figure 3-19:
5. Click OK.
5
Figure 3-20:
6. Click OK.
6Figure 3-21:
7. Select the datastore named nfs1.8. Add a check to the option Show only misaligned virtual machines.9. Select the VM named vm_misaligned_01.

31 Virtual Storage Console for VMware vSphere 6.0 © 2016 NetApp, Inc. All rights reserved. NetApp Proprietary
10. Click Migrate.
7
8
9
10
Figure 3-22:
11. To create an optimized datastore to correct the offset issue on the VM click New datastore.12. Click Next.

32 Virtual Storage Console for VMware vSphere 6.0 © 2016 NetApp, Inc. All rights reserved. NetApp Proprietary
11
12
Figure 3-23:
13. Name the new datastore temp_optimized.14. Click Next.
13
14
Figure 3-24:
15. Confirm cluster and SVM is cluster1 and svm1, respectively, then click Next.

33 Virtual Storage Console for VMware vSphere 6.0 © 2016 NetApp, Inc. All rights reserved. NetApp Proprietary
15
Figure 3-25:
16. Enter size of 10 GB.17. Select Aggregate: aggr1_01.18. Click Next.
1617
18
Figure 3-26:

34 Virtual Storage Console for VMware vSphere 6.0 © 2016 NetApp, Inc. All rights reserved. NetApp Proprietary
19. Click Finish.
19
Figure 3-27:
20. Click OK.
20Figure 3-28:
21. Click Refresh to see the new Datastore appear, and the task complete in Recent Tasks.

35 Virtual Storage Console for VMware vSphere 6.0 © 2016 NetApp, Inc. All rights reserved. NetApp Proprietary
21
Figure 3-29:
22. Click Scan selected, highlight the new datastore, and note that the VM is now functionally alignedwithout having to power it down.

36 Virtual Storage Console for VMware vSphere 6.0 © 2016 NetApp, Inc. All rights reserved. NetApp Proprietary
22
Figure 3-30:
3.4 Show VSC Actions that can be Performed on VMs and Datastores
In this activity you will explore the options added in by the NetApp VSC into the menus of the Templates, VMs,and perform a crash consistent backup of a VM.
1. Click the Home icon.2. Click Storage.

37 Virtual Storage Console for VMware vSphere 6.0 © 2016 NetApp, Inc. All rights reserved. NetApp Proprietary
1
2
Figure 3-31:
3. Select the datastore nfs1.4. Select the Related Objects tab.5. Click VM Templates.
3
4
5
Figure 3-32:
6. Right-click on theRHEL60-template.7. Navigate to NetApp VSC.8. Observe the options available which includes Create Rapid Clones, then click on the Virtual Machines
tab.

38 Virtual Storage Console for VMware vSphere 6.0 © 2016 NetApp, Inc. All rights reserved. NetApp Proprietary
6
7
8
Figure 3-33:
9. Right-Click on the VM named Svr2012-SQL1.10. Navigate to NetApp VSC.11. Select Schedule Backup.
Note: This required step is new with SnapCenter now managing the backup/restorefunctionality.

39 Virtual Storage Console for VMware vSphere 6.0 © 2016 NetApp, Inc. All rights reserved. NetApp Proprietary
9
10
11
Figure 3-34:
12. Enter name: backupschedule1 and description: demo backup schedule, then click Next.

40 Virtual Storage Console for VMware vSphere 6.0 © 2016 NetApp, Inc. All rights reserved. NetApp Proprietary
12
Figure 3-35:
13. Click Next.
13
Figure 3-36:
14. Click the checkbox next to the policy that is listed.15. Click Next.

41 Virtual Storage Console for VMware vSphere 6.0 © 2016 NetApp, Inc. All rights reserved. NetApp Proprietary
14
15
Figure 3-37:
16. Click Next.
16
Figure 3-38:
17. Click Finish.

42 Virtual Storage Console for VMware vSphere 6.0 © 2016 NetApp, Inc. All rights reserved. NetApp Proprietary
17
Figure 3-39:
18. Click OK.
18
Figure 3-40:
19. Return to the desktop of the jumphost, and launch the shortcut to SnapCenter.
Figure 3-41:
20. Login with credentials DEMO\Administrator and password Netapp1!.

43 Virtual Storage Console for VMware vSphere 6.0 © 2016 NetApp, Inc. All rights reserved. NetApp Proprietary
20
Figure 3-42:
21. Observe under the “Hosts” tab that SnapCenter sees vCenter's plug-in and it is active, then clickDatasets.
21
Figure 3-43:
22. Select the backup schedule previously created and observe the policy details. Select Resources.

44 Virtual Storage Console for VMware vSphere 6.0 © 2016 NetApp, Inc. All rights reserved. NetApp Proprietary
22
Figure 3-44:
23. Observe the VM is listed in the “Resources” tab for the backup schedule (dataset). Select Policies.
23
Figure 3-45:
24. Observe the policy backup settings being used by the VSC. Return to the VMware vCenter Web Client.

45 Virtual Storage Console for VMware vSphere 6.0 © 2016 NetApp, Inc. All rights reserved. NetApp Proprietary
24
Figure 3-46:
25. Similar information can be found at the VM by selecting Related Objects.26. Click Backup Jobs.
2526
Figure 3-47:
27. Similarly, you can navigate to Backup Jobsunder the Virtual Storage Console .
27
Figure 3-48:
28. Right-click on the VM named Svr2012-SQL1.29. Navigate to NetApp VSC.30. Click Backup Now.

46 Virtual Storage Console for VMware vSphere 6.0 © 2016 NetApp, Inc. All rights reserved. NetApp Proprietary
28
29
30
Figure 3-49:
31. Click OK.

47 Virtual Storage Console for VMware vSphere 6.0 © 2016 NetApp, Inc. All rights reserved. NetApp Proprietary
31
Figure 3-50:
32. Click OK.
32Figure 3-51:
33. Click the Refresh icon to see the backup now listed under “Related Objects”.
33
Figure 3-52:
3.5 Viewing NetApp Information from Related Objects
In this activity you will see some of the additional information panels added into the vCenter UI by the VSC to helpmanage and monitor storage resources.
1. Press the Home icon.2. Click on VMs and Templates.

48 Virtual Storage Console for VMware vSphere 6.0 © 2016 NetApp, Inc. All rights reserved. NetApp Proprietary
1
2
Figure 3-53:
3. Highlight the VM, Svr2012-SQL1.4. Press the Related Objects tab.5. Press Backups, observe that the backup create previously is now listed.
3
44
Figure 3-54:
6. Click on Datastores.7. Click on nfs1.8. Click on the Summary tab.9. Scroll down the summary tab page.10. Examine the NetApp panels (NetApp logo in lower left of panel) added by VSC to the summary tab of
datastore.

49 Virtual Storage Console for VMware vSphere 6.0 © 2016 NetApp, Inc. All rights reserved. NetApp Proprietary
6
7
8
910
Figure 3-55:
3.6 Surveying Storage Management Roles Packaged with the VSC
In this activity you examine the VSC specific roles that are populated into vCenter following an install of vCenterto allow for more granular control of privileges.
1. Click the Home icon.2. Click Administration.

50 Virtual Storage Console for VMware vSphere 6.0 © 2016 NetApp, Inc. All rights reserved. NetApp Proprietary
1
2
Figure 3-56:
3. Select Roles.4. See the VSC specific roles that have been added, select VSC Administrator.5. Click on Privileges to review the details assigned to the role.

51 Virtual Storage Console for VMware vSphere 6.0 © 2016 NetApp, Inc. All rights reserved. NetApp Proprietary
3
4
5
Figure 3-57:
3.7 Rapid Cloning and Space Savings
In this activity, you use the VSC to create multiple copies of FlexCloned virtual machines much quicker than anative VMware standard clone that takes advantage of space efficiency to provide a zero cost, no performanceimpacting clone operation. VMware linked clones offer quick and simple provisioning, but create a performancedegradation that can become very problematic. VMware standard full copy clones can be a disruptive operationthat takes time to complete and consumes more storage. FlexClone technology on NetApp clustered DataONTAP solves many of these business impacting challenges.
1. Click on Home > Virtual Storage Console (NetApp logo).

52 Virtual Storage Console for VMware vSphere 6.0 © 2016 NetApp, Inc. All rights reserved. NetApp Proprietary
1
Figure 3-58:
2. Click on Storage Systems.

53 Virtual Storage Console for VMware vSphere 6.0 © 2016 NetApp, Inc. All rights reserved. NetApp Proprietary
2
Figure 3-59:
3. Click on svm1.4. Navigate to the Related Objects tab.5. Click on NAS.6. Double-click on the datastore nfs1.

54 Virtual Storage Console for VMware vSphere 6.0 © 2016 NetApp, Inc. All rights reserved. NetApp Proprietary
3
45
6
Figure 3-60:
7. From the Summary tab examine the NetApp specific details that are presented by the VSC to vCenter.8. Examine the Deduplication Details and the Volume Space Saving figure.9. Press Start.

55 Virtual Storage Console for VMware vSphere 6.0 © 2016 NetApp, Inc. All rights reserved. NetApp Proprietary
7
8
9Figure 3-61:
10. Add a check to Scan Entire Volume.11. Press OK (optional, the deduplication scan may take some time, you may choose instead to skip).
10
11
Figure 3-62:
12. Press OK.
12Figure 3-63:
13. Minimize the browser, and launch the OnCommand System Manager.

56 Virtual Storage Console for VMware vSphere 6.0 © 2016 NetApp, Inc. All rights reserved. NetApp Proprietary
Figure 3-64:
14. Login with admin and Netapp1!, then press Sign In.
14
Figure 3-65:
15. Navigate to Storage Virtual Machines > cluster1 > svm1 > Storage > Volumes, click on nfs1.16. Go to the Storage Efficiency tab.17. Examine the Details pane to see if the status is active when it completes.18. Look in the Last Run Details pane; the timestamp should change. Examine the Deduplication
Savings figure.

57 Virtual Storage Console for VMware vSphere 6.0 © 2016 NetApp, Inc. All rights reserved. NetApp Proprietary
15
16
1718
Figure 3-66:
19. Return to vCenter, go to Home > VMs and Templates.

58 Virtual Storage Console for VMware vSphere 6.0 © 2016 NetApp, Inc. All rights reserved. NetApp Proprietary
19
Figure 3-67:
20. Find the RHEL60-template, right-click and go to NetApp VSC > Create Rapid Clones.

59 Virtual Storage Console for VMware vSphere 6.0 © 2016 NetApp, Inc. All rights reserved. NetApp Proprietary
20
Figure 3-68:
21. Select cluster1 as the Clone destination.22. Click Next.

60 Virtual Storage Console for VMware vSphere 6.0 © 2016 NetApp, Inc. All rights reserved. NetApp Proprietary
21
22
Figure 3-69:
23. Click OK to acknowledge the FC warning.
23Figure 3-70:
24. Press Next.

61 Virtual Storage Console for VMware vSphere 6.0 © 2016 NetApp, Inc. All rights reserved. NetApp Proprietary
24
Figure 3-71:
25. Change the Number of clones to 10.26. Click Enter, then Next.
25
26
Figure 3-72:
27. Click Next.

62 Virtual Storage Console for VMware vSphere 6.0 © 2016 NetApp, Inc. All rights reserved. NetApp Proprietary
27
Figure 3-73:
28. Click Next.
28
Figure 3-74:
29. Select nfs1.30. Click Next.

63 Virtual Storage Console for VMware vSphere 6.0 © 2016 NetApp, Inc. All rights reserved. NetApp Proprietary
29
30
Figure 3-75:
31. Click Finish.
31
Figure 3-76:
32. Click OK.

64 Virtual Storage Console for VMware vSphere 6.0 © 2016 NetApp, Inc. All rights reserved. NetApp Proprietary
32Figure 3-77:
33. Click Refresh to confirm the clones appear instantly.
33
Figure 3-78:
34. Return to System Manager, press Refresh.35. Examine the instant change to the Deduplication Savings.

65 Virtual Storage Console for VMware vSphere 6.0 © 2016 NetApp, Inc. All rights reserved. NetApp Proprietary
34
35
Figure 3-79:
3.8 Space Reclamation
In this activity you use the VSC to reclaim storage in the datastore that was previously locked by the guest OS ofthe Virtual Machine.
1. From Home > VMs and Templates.

66 Virtual Storage Console for VMware vSphere 6.0 © 2016 NetApp, Inc. All rights reserved. NetApp Proprietary
1
Figure 3-80:
2. Navigate to Svr2012-SQL1 > Summary tab.3. Note the Storage Usage figure of 19.49 GB.

67 Virtual Storage Console for VMware vSphere 6.0 © 2016 NetApp, Inc. All rights reserved. NetApp Proprietary
2
3
Figure 3-81:
4. Open Remote Desktop Connection Manager.
4
Figure 3-82:
5. Double-click on Svr2012-SQL1, (alternatively you could use the standard remote dekstop client on thejumphost, or you could use the vSphere vCenter Web Client console).
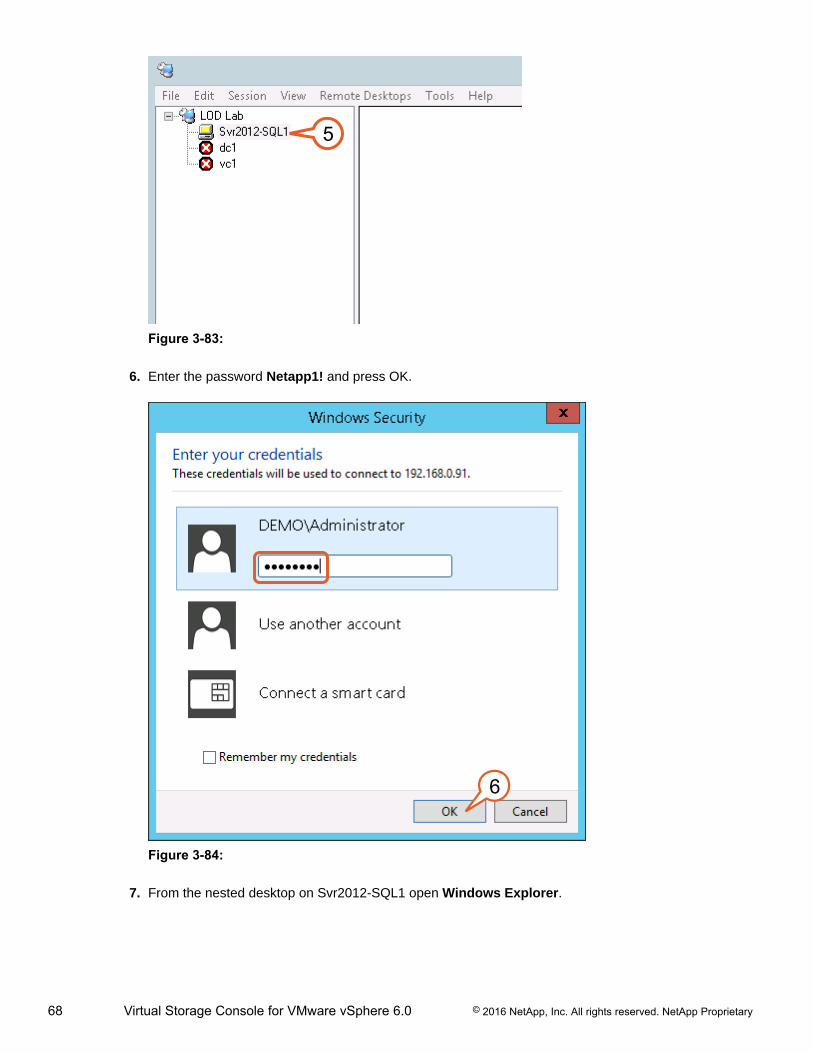
68 Virtual Storage Console for VMware vSphere 6.0 © 2016 NetApp, Inc. All rights reserved. NetApp Proprietary
5
Figure 3-83:
6. Enter the password Netapp1! and press OK.
6
Figure 3-84:
7. From the nested desktop on Svr2012-SQL1 open Windows Explorer.

69 Virtual Storage Console for VMware vSphere 6.0 © 2016 NetApp, Inc. All rights reserved. NetApp Proprietary
7
Figure 3-85:
8. Navigate to c:\, right-click and delete the folder named “__files to delete for space reclamation”.
8
Figure 3-86:
9. Right-click on Recycle Bin, select Empty Recycle Bin.

70 Virtual Storage Console for VMware vSphere 6.0 © 2016 NetApp, Inc. All rights reserved. NetApp Proprietary
9
Figure 3-87:
10. Click Yes.
10
Figure 3-88:
11. Return to vCenter browser session on the jumphost, right-click on the VM Svr2012-SQL1 > NetAppVSC > Reclaim Space.

71 Virtual Storage Console for VMware vSphere 6.0 © 2016 NetApp, Inc. All rights reserved. NetApp Proprietary
11
Figure 3-89:
12. Click OK.

72 Virtual Storage Console for VMware vSphere 6.0 © 2016 NetApp, Inc. All rights reserved. NetApp Proprietary
12
Figure 3-90:
13. Click Refresh every few seconds to see the Recent Tasks panel update.
13
Figure 3-91:

73 Virtual Storage Console for VMware vSphere 6.0 © 2016 NetApp, Inc. All rights reserved. NetApp Proprietary
14. After the space reclamation is completed, the VM will be powered back on and the “STORAGEUSAGE” figure in vCenter should now be 16.20 GB.
14
Figure 3-92:
3.9 Backing up VMs with the VSC
In this activity you will perform a VM backup using the VSC.
1. Navigate to VMs and Templates.

74 Virtual Storage Console for VMware vSphere 6.0 © 2016 NetApp, Inc. All rights reserved. NetApp Proprietary
1
Figure 3-93:
2. Right-click on Svr2012-SQL1 > NetApp VSC > Backup > Backup Now.
Note: In order for the backup to complete successfully you must have completed the backupschedule options.

75 Virtual Storage Console for VMware vSphere 6.0 © 2016 NetApp, Inc. All rights reserved. NetApp Proprietary
2
Figure 3-94:
Note: If prompted with an error, go back to the “Show VSC Actions . . .” section to create abackup schedule first before attempting a backup, then return to this section.
3. Click OK.

76 Virtual Storage Console for VMware vSphere 6.0 © 2016 NetApp, Inc. All rights reserved. NetApp Proprietary
3
Figure 3-95:
4. Click OK.
4Figure 3-96:
5. After confirming the backup is complete, locate the backup. Select the Related Objects tab.6. Click Backups.7. Right-click on the backup, and select Mount.
56
7
Figure 3-97:
8. Click OK.

77 Virtual Storage Console for VMware vSphere 6.0 © 2016 NetApp, Inc. All rights reserved. NetApp Proprietary
8
Figure 3-98:
9. Click OK.
9
Figure 3-99:
10. Click Refresh.11. Select nfs1(vsc-...).12. Go to the Manage tab.13. Click Files.14. Explore that the files exist under the folder Svr2012-SQL1.

78 Virtual Storage Console for VMware vSphere 6.0 © 2016 NetApp, Inc. All rights reserved. NetApp Proprietary
10
11
12
13
14
Figure 3-100:
15. Right-click on demo.netapp.com > NetApp VSC > Backup > Unmount Backup.

79 Virtual Storage Console for VMware vSphere 6.0 © 2016 NetApp, Inc. All rights reserved. NetApp Proprietary
15
Figure 3-101:
16. Select backupschedule1.17. Click OK.

80 Virtual Storage Console for VMware vSphere 6.0 © 2016 NetApp, Inc. All rights reserved. NetApp Proprietary
16
17
Figure 3-102:
18. Click OK.
18
Figure 3-103:

81 Virtual Storage Console for VMware vSphere 6.0 © 2016 NetApp, Inc. All rights reserved. NetApp Proprietary
19. Click OK.
19
Figure 3-104:
20. Click OK.
20
Figure 3-105:
21. Click Refresh.
21
Figure 3-106:

82 Virtual Storage Console for VMware vSphere 6.0 © 2016 NetApp, Inc. All rights reserved. NetApp Proprietary
3.10 Restoring VMs with the VSC
In this activity you will examine how the VM restore operation works when a VM is completed removed or in placeand when the VM is powered off vs. when the VM is powered on.
The first use case demonstration shows the ability to restore a VM from a backup that has been completelydeleted from active storage and removed from the vCenter Inventory. You can examine the steps to perform if aVM is mistakenly removed and needs to be restored, this also allows for an alternate use case when you needto bring up a copy of a VM for development or test without affecting the production VM by renaming it and eitherchanging the IP or keeping the virtual network adapter disconnected.
The second use case demonstration will be to leave the VM registered and powered on, then attempt the restore.The result will be the VSC Restore task will power off the VM, restore the files in under 90 seconds. From thatpoint you simply power on the VM and you have fully restored from a backup without deleting the VM. Thisapproach is a very safe alternative to VMware snapshots which can many times create performance issues,additionally adding a Guest OS power down before taking the backup provides an application consistent backupand an even more stable restore point.
1. Navigate to VMs and Templates.
1
Figure 3-107:
2. Right-click on Svr2012-SQL1, select ShutDown Guest OS.

83 Virtual Storage Console for VMware vSphere 6.0 © 2016 NetApp, Inc. All rights reserved. NetApp Proprietary
2
Figure 3-108:
3. Click Yes.

84 Virtual Storage Console for VMware vSphere 6.0 © 2016 NetApp, Inc. All rights reserved. NetApp Proprietary
3
Figure 3-109:
4. After a few seconds, click Refresh until the VM is powered off.
4
Figure 3-110:
5. Right-click on Svr2012-SQL1, go to All vCenter Actions > Delete from Disk.

85 Virtual Storage Console for VMware vSphere 6.0 © 2016 NetApp, Inc. All rights reserved. NetApp Proprietary
5
Figure 3-111:
6. Click Yes.

86 Virtual Storage Console for VMware vSphere 6.0 © 2016 NetApp, Inc. All rights reserved. NetApp Proprietary
6
Figure 3-112:
7. Navigate to Storage > nfs1 > Manage.8. Select Files, and observe that the folder for the VM is no longer present.
7
8
Figure 3-113:
9. Right-click on nfs1 > NetApp VSC > Restore.

87 Virtual Storage Console for VMware vSphere 6.0 © 2016 NetApp, Inc. All rights reserved. NetApp Proprietary
9
Figure 3-114:
10. Select the backup listed.11. Select the Backed-up entity Svr2012-SQL1.12. Click Next.

88 Virtual Storage Console for VMware vSphere 6.0 © 2016 NetApp, Inc. All rights reserved. NetApp Proprietary
10
11
12
Figure 3-115:
13. With the option selected for The entire virtual machine, click Next.
13
Figure 3-116:
14. Click Next.

89 Virtual Storage Console for VMware vSphere 6.0 © 2016 NetApp, Inc. All rights reserved. NetApp Proprietary
14
Figure 3-117:
15. Click Finish.
15
Figure 3-118:
16. Click OK.

90 Virtual Storage Console for VMware vSphere 6.0 © 2016 NetApp, Inc. All rights reserved. NetApp Proprietary
16Figure 3-119:
17. Return to the VMs and Templates, right click on the restored VM, select Power On.

91 Virtual Storage Console for VMware vSphere 6.0 © 2016 NetApp, Inc. All rights reserved. NetApp Proprietary
24
Figure 3-120:
18. Click OK.

92 Virtual Storage Console for VMware vSphere 6.0 © 2016 NetApp, Inc. All rights reserved. NetApp Proprietary
25
Figure 3-121:
19. If prompted with yellow “i” speech bubble, click on the VM Summary tab, click Answer Question...
26
Figure 3-122:
20. Select I Moved It21. Click OK (This completes the first use case demonstration).

93 Virtual Storage Console for VMware vSphere 6.0 © 2016 NetApp, Inc. All rights reserved. NetApp Proprietary
27
28
Figure 3-123:
22. Now right-click on Svr2012-SQL1, and while the VM is powered on go to NetApp VSC > Restore.

94 Virtual Storage Console for VMware vSphere 6.0 © 2016 NetApp, Inc. All rights reserved. NetApp Proprietary
29
Figure 3-124:
23. Select the backup you created earlier, sql-backupdemo1.24. Click Next.

95 Virtual Storage Console for VMware vSphere 6.0 © 2016 NetApp, Inc. All rights reserved. NetApp Proprietary
30
31
Figure 3-125:
25. Click Next.
32
Figure 3-126:
26. Click Finish.

96 Virtual Storage Console for VMware vSphere 6.0 © 2016 NetApp, Inc. All rights reserved. NetApp Proprietary
33
Figure 3-127:
27. Click OK.
34Figure 3-128:
28. Click Refresh a few times, note that the VSC powers off the VM after the restore.29. Right-click on the VM, and select Power On.

97 Virtual Storage Console for VMware vSphere 6.0 © 2016 NetApp, Inc. All rights reserved. NetApp Proprietary
35
36
Figure 3-129:
30. Click OK.
37
Figure 3-130:

98 Virtual Storage Console for VMware vSphere 6.0 © 2016 NetApp, Inc. All rights reserved. NetApp Proprietary
31. Note that the STORAGE USAGE is now 40+. You will reclaim space next.32. If prompted with yellow “i” speech bubble, click on the VM Summary tab, and click Answer
Question ....
37
38
Figure 3-131:
33. Select I Moved It.34. Click OK.

99 Virtual Storage Console for VMware vSphere 6.0 © 2016 NetApp, Inc. All rights reserved. NetApp Proprietary
40
41
Figure 3-132:
35. After the VM is powered on, right-click on the VM, NetApp VSC > Reclaim Space.

100 Virtual Storage Console for VMware vSphere 6.0 © 2016 NetApp, Inc. All rights reserved. NetApp Proprietary
42
Figure 3-133:
36. Click OK.

101 Virtual Storage Console for VMware vSphere 6.0 © 2016 NetApp, Inc. All rights reserved. NetApp Proprietary
43
Figure 3-134:
37. Note that the Storage Usage is now correct. This completes the second use case demonstration.
43
Figure 3-135:

102 Virtual Storage Console for VMware vSphere 6.0 © 2016 NetApp, Inc. All rights reserved. NetApp Proprietary
3.11 VASA Provider Integration
In this activity you will explore the value added benefits of using the NetApp vSphere API for Storage Awareness(VASA) Provider appliance with the VSC and vCenter to further integration of NetApp specific configurations andsettings through the use of the exposed API integrations between VMware and NetApp to unlock more NetAppstorage specific settings and features to vCenter.
1. Click on Home icon.2. Click on Virtual Storage Console.
1
2
Figure 3-136:
3. Click on Configuration.4. Click on Register/Unregister VASA Vendor Provider.

103 Virtual Storage Console for VMware vSphere 6.0 © 2016 NetApp, Inc. All rights reserved. NetApp Proprietary
3
4
Figure 3-137:
5. Note that there is already a VASA Vendor Provider regsitered with IP: 192.168.0.34.6. Click Cancel.
5
6
Figure 3-138:
7. Click VASA Provider for clustered Data ONTAP.

104 Virtual Storage Console for VMware vSphere 6.0 © 2016 NetApp, Inc. All rights reserved. NetApp Proprietary
7
Figure 3-139:
8. Click Storage Capability Profiles, to review the SCPs available to use.
8
Figure 3-140:
9. Select the Gold-Template SCP.

105 Virtual Storage Console for VMware vSphere 6.0 © 2016 NetApp, Inc. All rights reserved. NetApp Proprietary
10. Click Actions to see the options available to perform against existing SCPs.11. Click the Go Back navigation button labeled VASA Provider for …
9
10
11
Figure 3-141:
12. Click Storage Mapping.13. Select the datastore named: iscsi1 or nfs1.14. Click the Actions button.15. Click on Auto-generate.

106 Virtual Storage Console for VMware vSphere 6.0 © 2016 NetApp, Inc. All rights reserved. NetApp Proprietary
12
13
14
15
Figure 3-142:
16. Click OK.
16Figure 3-143:
17. Click the Refresh icon.18. Click StorageCapability Profiles, examine the SCP auto generated and based off the existing
datastore.

107 Virtual Storage Console for VMware vSphere 6.0 © 2016 NetApp, Inc. All rights reserved. NetApp Proprietary
17
18
Figure 3-144:
19. Click Storage Mapping.20. Right-Click on the iscsi1 or nfs1 datastore.21. Select the Assign matching profile.

108 Virtual Storage Console for VMware vSphere 6.0 © 2016 NetApp, Inc. All rights reserved. NetApp Proprietary
19
2021
Figure 3-145:
22. Click OK to select the one SCP listed.
22
Figure 3-146:
23. Click OK.

109 Virtual Storage Console for VMware vSphere 6.0 © 2016 NetApp, Inc. All rights reserved. NetApp Proprietary
23Figure 3-147:
24. Click on Settings to examine volume and aggregate alarm thresholds available through VASA provider.
24
Figure 3-148:
25. Click the Home icon.26. Click Storage.

110 Virtual Storage Console for VMware vSphere 6.0 © 2016 NetApp, Inc. All rights reserved. NetApp Proprietary
25
26
Figure 3-149:
27. Right-Click on the virtual datacenter, demo.netapp.com.28. Navigate to NetApp VSC, select Provision Datastore.

111 Virtual Storage Console for VMware vSphere 6.0 © 2016 NetApp, Inc. All rights reserved. NetApp Proprietary
27
28
Figure 3-150:
29. Observe SCPs are now available to provision new.30. Click Cancel.

112 Virtual Storage Console for VMware vSphere 6.0 © 2016 NetApp, Inc. All rights reserved. NetApp Proprietary
29
30
Figure 3-151:
3.12 Additional Capabilities of the VSC in this lab
SNAP DRIVE FOR WINDOWS INTEGRATION (More advanced):
RDP into Svr2012-SQL1 to explore SnapDrive integration with VSC (reference the SQL in VMware lab for moredetails)
SNAPMIRROR/SNAPVAULT DATA PROTECTION AWARENESS OF VSC (More advanced):
Build a new Storage Virtual Machine (SVM) on cluster1 and create volumes with a SnapMirror and/or SnapVaultrelationship with SVM1 (intra-cluster), then attempt a VSC backup and update the SM/SV as part of the backupoperation

113 Virtual Storage Console for VMware vSphere 6.0 © 2016 NetApp, Inc. All rights reserved. NetApp Proprietary
4 Lab Activities - VVOL specific featuresThis lab contains the following activities and tasks:
• Virtual Volumes (VVOL) Specific Activities
• Use Datastore Provisioning Wizard for NAS Backed VVOL Creation on page 113• Use Datastore Provisioning Wizard for SAN Backed VVOL Creation on page 120• Create a VM Storage Policy on page 127• Assign a VVOL to a Default Storage Policy on page 132• Review FlexVols in vSphere Interface on page 134• Review FlexVols in OnCommand System Manager on page 136• Deploy a VM from a Template to a VVOL on page 138• Perform a VM Snapshot on page 143• Confirm Storage Efficiency Details on FlexVol on page 144• Run CLI command using the VP Control Panel on page 149• Generate a file bundle to send to support on page 159
4.1 Use Datastore Provisioning Wizard for NAS Backed VVOL CreationVirtual volumes in vSphere enable hypervisors to offload storage related operations to the underlying storagelayer. When combined with a powerful and feature rich operating system like clustered Data ONTAP, the VirtualStorage Console allows management of storage related functionality from the vSphere Client to offload cloningoperations and storage creation eliminating overhead in the vSphere layer. This lab activity demonstrates how toset up virtual volume storage on the NFS protocol.
1. In the navigation pane, expand the datacenter, demo.netapp.com.2. Right-click on the datacenter, and scroll down to VASA Provider for clustered Data ONTAP >
Provision VVOL Datastore.

114 Virtual Storage Console for VMware vSphere 6.0 © 2016 NetApp, Inc. All rights reserved. NetApp Proprietary
1
2
Figure 4-1:
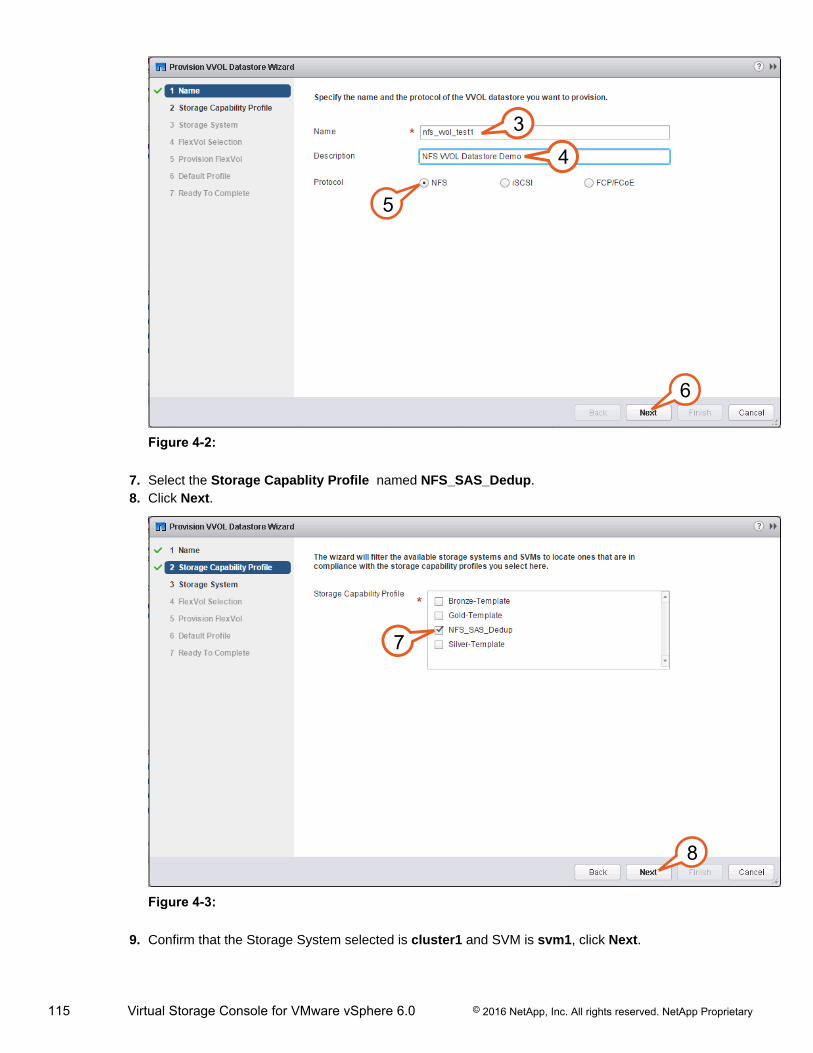
3. Enter Name: nfs_vvol_test1.4. Enter Description: NFS VVOL Datastore Demo.5. Select the Protocol NFS.6. Click Next.
115 Virtual Storage Console for VMware vSphere 6.0 © 2016 NetApp, Inc. All rights reserved. NetApp Proprietary
34
5
6
Figure 4-2:
7. Select the Storage Capablity Profile named NFS_SAS_Dedup.8. Click Next.
7
8
Figure 4-3:
9. Confirm that the Storage System selected is cluster1 and SVM is svm1, click Next.

116 Virtual Storage Console for VMware vSphere 6.0 © 2016 NetApp, Inc. All rights reserved. NetApp Proprietary
9
Figure 4-4:
10. Since there is no FlexVol created, click Next to create them in the following step.
10
Figure 4-5:
11. Click Add.12. Enter name nfs_vvol_fv1.

117 Virtual Storage Console for VMware vSphere 6.0 © 2016 NetApp, Inc. All rights reserved. NetApp Proprietary
13. Keep the Storage Capability Profile NFS_SAS_Dedup.14. Select Thin Provision.15. Enter 20GB for the size.16. Keep the aggregate: aggr1_01.17. Click OK.
1112
13
14 15
16
17
Figure 4-6:
18. Click Add again, and repeat the steps above to create nfs_vvol_fv2.

118 Virtual Storage Console for VMware vSphere 6.0 © 2016 NetApp, Inc. All rights reserved. NetApp Proprietary
18
Figure 4-7:
19. Click Next.
19
Figure 4-8:
20. Keep the Default Storage Capability set as NFS_SAS_Dedup.21. Click Next.

119 Virtual Storage Console for VMware vSphere 6.0 © 2016 NetApp, Inc. All rights reserved. NetApp Proprietary
20
21
Figure 4-9:
22. Review the screen for accuracy, then click Finish.
22
Figure 4-10:
23. Wait for FlexVol to finish provisioning.

120 Virtual Storage Console for VMware vSphere 6.0 © 2016 NetApp, Inc. All rights reserved. NetApp Proprietary
Figure 4-11:
24. Click OK to confirm completion.
24Figure 4-12:
25. Click on the Storage icon in the Navigation pane.
25
Figure 4-13:
4.2 Use Datastore Provisioning Wizard for SAN Backed VVOL CreationVirtual volumes in vSphere enables hypervisors to offload storage related operations to the underlying storagelayer. When combined with a powerful and feature rich operating system like clustered Data ONTAP the VirtualStorage Console allows management of storage related functionality from the vSphere Client to offload cloningoperations and storage creation eliminating overhead in the vSphere layer. This activity demonstrates how to setup virtual volume storage on the iSCSI protocol.
1. In the navigation pane, expand the datacenter, demo.netapp.com.2. Right-click on the datacenter and scroll down to VASA Provider for clustered Data ONTAP >
Provision VVOL Datastore.

121 Virtual Storage Console for VMware vSphere 6.0 © 2016 NetApp, Inc. All rights reserved. NetApp Proprietary
1
2
Figure 4-14:
3. Enter Name: iscsi_vvol_test1.4. Enter Description: iSCSI VVOL Datastore Demo.5. Select the Protocol iSCSI.6. Click Next.

122 Virtual Storage Console for VMware vSphere 6.0 © 2016 NetApp, Inc. All rights reserved. NetApp Proprietary
3
4
5
6
Figure 4-15:
7. Select the Storage Capablity Profile named iSCSI_SAS_Dedup.8. Click Next.
7
8
Figure 4-16:
9. Confirm that the Storage System selected is cluster1 and SVM is svm1, then click Next.

123 Virtual Storage Console for VMware vSphere 6.0 © 2016 NetApp, Inc. All rights reserved. NetApp Proprietary
9
Figure 4-17:
10. Since there is no FlexVol created, click Next to create them in the following step.
10
Figure 4-18:
11. Click Add.12. Enter name: iscsi_vvol_fv1.

124 Virtual Storage Console for VMware vSphere 6.0 © 2016 NetApp, Inc. All rights reserved. NetApp Proprietary
13. Keep the Storage Capability Profile iSCSI_SAS_Dedup.14. Select Thin Provision.15. Enter 20GB for the size.16. Keep the Aggregate: aggr1_01.17. Click OK.
11
12
13
14 1516
17
Figure 4-19:
18. Click Add again, and repeat the steps above to create iscsi_vvol_fv2.

125 Virtual Storage Console for VMware vSphere 6.0 © 2016 NetApp, Inc. All rights reserved. NetApp Proprietary
18
Figure 4-20:
19. Click Next.
19
Figure 4-21:
20. Keep the “Default Storage Capability” set as iSCSI_SAS_Dedup.21. Click Next.

126 Virtual Storage Console for VMware vSphere 6.0 © 2016 NetApp, Inc. All rights reserved. NetApp Proprietary
20
21
Figure 4-22:
22. Review the screen for accuracy, then click Finish.
22
Figure 4-23:
23. Wait for FlexVol to finish provisioning.

127 Virtual Storage Console for VMware vSphere 6.0 © 2016 NetApp, Inc. All rights reserved. NetApp Proprietary
Figure 4-24:
24. Click OK to confirm completion.
24Figure 4-25:
25. Click on the Refresh icon while on the Storage section in the Navigation pane.
25
Figure 4-26:
4.3 Create a VM Storage PolicyThrough the use of VMware Storage Policy Based Management Adminstrators define and optimize the virtualmachine provisioning process by provisioning datastores at scale and eliminating the need to provision virtualmachines on a case-by-case basis. This activity demonstrates how to create a Storage Policy for the NetAppbacked VVOLs.
1. From the Home location on the Navigation, click on VM Storage Policies.

128 Virtual Storage Console for VMware vSphere 6.0 © 2016 NetApp, Inc. All rights reserved. NetApp Proprietary
1
Figure 4-27:
2. Click on the icon with the small green plus + and a yellow scroll picture to create a new VM storagepolicy.
2
Figure 4-28:
3. Name the policy DEMO VM Storage Policy.4. Enter a description for the VM Storage Policy for Demonstration.5. Click Next.

129 Virtual Storage Console for VMware vSphere 6.0 © 2016 NetApp, Inc. All rights reserved. NetApp Proprietary
3
4
5
Figure 4-29:
6. Click Next.
6
Figure 4-30:
7. In the dropdown for Rules based on data services, select NetApp.clustered.Data.ONTAP.VP.vvol8. Select Add rule from the dropdown menu, and pick Profile Name.

130 Virtual Storage Console for VMware vSphere 6.0 © 2016 NetApp, Inc. All rights reserved. NetApp Proprietary
7
8
Figure 4-31:
9. Select both NFS_SAS_Dedup and iSCSI_SAS_Dedup.10. Click Next.
9
10
Figure 4-32:
11. Highlight the Compatible line, and the vols created in the previous steps should be listed below.

131 Virtual Storage Console for VMware vSphere 6.0 © 2016 NetApp, Inc. All rights reserved. NetApp Proprietary
12. Click Next.
11
12
Figure 4-33:
13. Click Finish.
13
Figure 4-34:

132 Virtual Storage Console for VMware vSphere 6.0 © 2016 NetApp, Inc. All rights reserved. NetApp Proprietary
4.4 Assign a VVOL to a Default Storage PolicyOnce the VVOL(s) and VM Storage Policy is created, the VVOL must be assigned to the Storage Policy. Thisactivity demonstrates performing this action.
1. Click on Refresh (white clockwise arrow) at the top of the Web Client UI.2. Click on Storage in the Navigation pane.3. Select a VVOL datastore created in a previous step in this guide.4. Click on the Manage tab on the right side of the page.5. Click the Settings button.6. Click on General in the menu for “Settings”.7. Click the Edit button to the right of the Default Storage Policy option.
12
3
4
56 7
Figure 4-35:
8. Select the DEMO VM Storage Policy.9. Click OK.
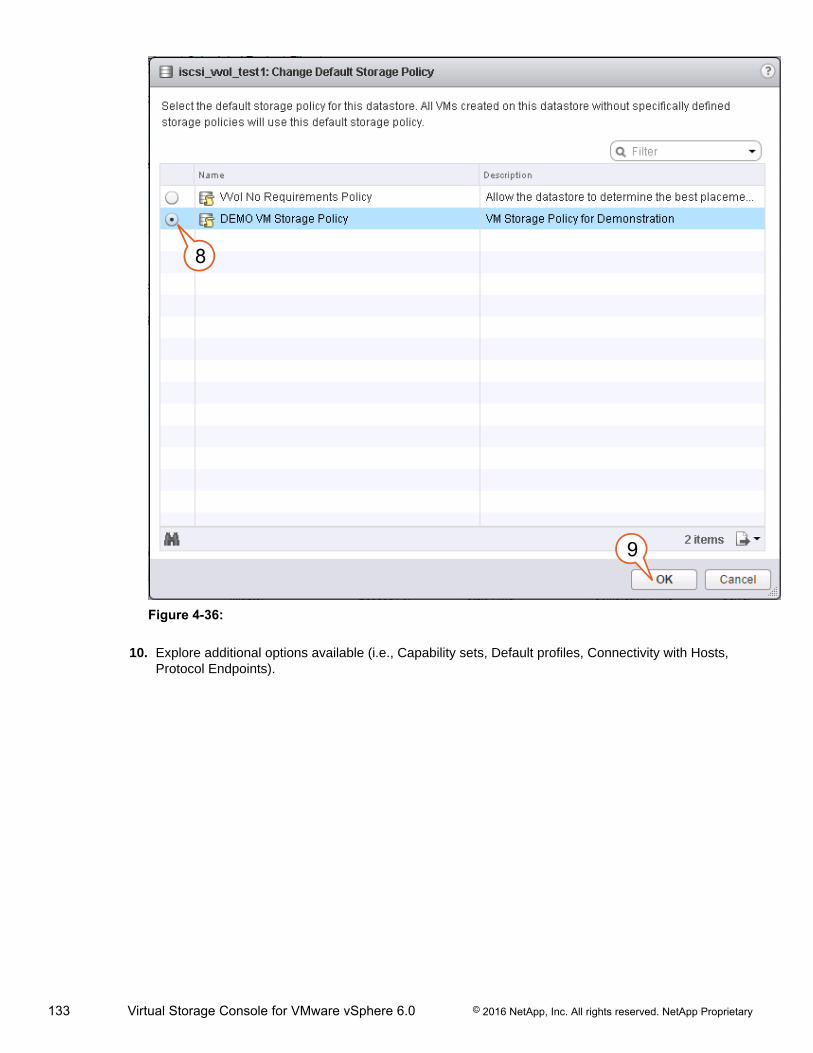
133 Virtual Storage Console for VMware vSphere 6.0 © 2016 NetApp, Inc. All rights reserved. NetApp Proprietary
8
9
Figure 4-36:
10. Explore additional options available (i.e., Capability sets, Default profiles, Connectivity with Hosts,Protocol Endpoints).

134 Virtual Storage Console for VMware vSphere 6.0 © 2016 NetApp, Inc. All rights reserved. NetApp Proprietary
Figure 4-37:
4.5 Review FlexVols in vSphere Interface1. Click on Refresh (white clockwise arrow) at the top of the Web Client UI.2. Click on Storage in the Navigation pane.3. Select a VVOL datastore created in a previous step in this guide.4. Click on the Related Objects tab on the right side of the page.5. Click the Backing Storage button.6. Observe the FlexVols that are associated to this VVOL, then double-click on one of the FlexVols.
1
2
3
45
6Figure 4-38:
7. Observe the storage details supplied to vCenter from the NetApp VASA Provider APIs, then click Enablein the “Deduplication Details” window.

135 Virtual Storage Console for VMware vSphere 6.0 © 2016 NetApp, Inc. All rights reserved. NetApp Proprietary
7
Figure 4-39:
8. Observe the settings enabled through the integration.
8
Figure 4-40:

136 Virtual Storage Console for VMware vSphere 6.0 © 2016 NetApp, Inc. All rights reserved. NetApp Proprietary
4.6 Review FlexVols in OnCommand System ManagerVMware Administrators use the Virtual Storage Console to manage NetApp storage creation that easily conformsto best practices, enables quick creation, and takes full advantage of the NetApp Flexible Volumes (FlexVols).This activity demonstrates the storage operations completed by the VSC.
1. From the jumphost, click the shortcut on the desktop called NetApp OnCommand System Manager.
Figure 4-41:
2. Enter the credentials, username admin, password Netapp1! .3. Click Sign In.
2
3
Figure 4-42:
4. Navigate to Storage Virtual Machines.5. Expand svm1.6. Expand Storage.7. Click Volumes.8. Observe the Flexible Volumes that were created with the Datastore Provisioning Wizard.

137 Virtual Storage Console for VMware vSphere 6.0 © 2016 NetApp, Inc. All rights reserved. NetApp Proprietary
4
7
8
Figure 4-43:
9. Examine the Namespace created for you.
9
Figure 4-44:
10. Examine the LUNs created for you.
10
Figure 4-45:
11. Examine the Export Policies created for you.

138 Virtual Storage Console for VMware vSphere 6.0 © 2016 NetApp, Inc. All rights reserved. NetApp Proprietary
11
Figure 4-46:
4.7 Deploy a VM from a Template to a VVOLUsing standard hypervisor based cloning on a standard datastore the hyperivsor and vCenter take on theoverhead for the cloning operation. When cloning on a VVOL backed by NetApp storage, the clone creationis offloaded to the storage and there is no overhead on the hypervisor of vCenter when the entire operation isoffloaded. This activity demonstrates how to deploy a VM from a template to a NetApp backed VVOL.
1. Navigate to VMs and Templates2. Right-click on DEBIAN-SM-TEMPLATE, select New VM from This Template…

139 Virtual Storage Console for VMware vSphere 6.0 © 2016 NetApp, Inc. All rights reserved. NetApp Proprietary
1
2
Figure 4-47:
3. Enter the name vvol-vm-demo.4. Click Next.

140 Virtual Storage Console for VMware vSphere 6.0 © 2016 NetApp, Inc. All rights reserved. NetApp Proprietary
3
4
Figure 4-48:
5. Highlight cluster1.6. Click Next.
5
6
Figure 4-49:

141 Virtual Storage Console for VMware vSphere 6.0 © 2016 NetApp, Inc. All rights reserved. NetApp Proprietary
7. From the VM Storage Policy drop down menu, select the previously created DEMO VM StoragePolicy.
8. Highlight the “Compatible” storage previously created named nfs_vvol_test1.9. Click Next.
7
8
9
Figure 4-50:
10. Check Power on virtual machine after creation.11. Click Next.

142 Virtual Storage Console for VMware vSphere 6.0 © 2016 NetApp, Inc. All rights reserved. NetApp Proprietary
10
11
Figure 4-51:
12. Click Finish.
12
Figure 4-52:

143 Virtual Storage Console for VMware vSphere 6.0 © 2016 NetApp, Inc. All rights reserved. NetApp Proprietary
4.8 Perform a VM SnapshotVMware based snapshots consume more storage and degrade performance on virtual machines. Using NetAppFlexClone-based snapshots on the VM takes full advantage of space efficiency offered by the NetApp Storage,and does not degrade performance on the VM when NetApp snapshots are used. This activity demonstrateshow easy a NetApp SnapShot can be taken on a VM using the VSC when running on a VVOL backed by NetAppstorage.
1. Right-click on the VM, vvol-vm-demo.2. Navigate to and select Snapshots > Take Snapshot ….
1
2
Figure 4-53:
3. Enter the name vvol-vm-demo-snapshot1, and description Snapshot of VM on VVOL demo.4. Click OK.

144 Virtual Storage Console for VMware vSphere 6.0 © 2016 NetApp, Inc. All rights reserved. NetApp Proprietary
3
4
Figure 4-54:
4.9 Confirm Storage Efficiency Details on FlexVolBecause the VM cloning is offloaded to the storage using FlexClone technology, and deployed on a NetAppFlexible Volume (FlexVol), all the storage efficiencies gained by using NetApp clustered Data ONTAP are realizedby vSphere. This activity examines those storage efficiencies.
1. With VM vvol-vm-demo click on Related Objects tab.2. Go to the Datastores option, and double click on nfs_vvol_test1.

145 Virtual Storage Console for VMware vSphere 6.0 © 2016 NetApp, Inc. All rights reserved. NetApp Proprietary
1
2
Figure 4-55:
3. Go to Backing Storage.4. Examine the data in the column “No. of VVOLs”.
3
4
Figure 4-56:
5. Open OnCommand System Manager and find the FlexVolume that increased, take note of the $ Usedand the Available Space.
6. Click on the Storage Efficiency tab, and take note of the Deduplication Savings figures.

146 Virtual Storage Console for VMware vSphere 6.0 © 2016 NetApp, Inc. All rights reserved. NetApp Proprietary
6
5
Figure 4-57:
7. Return to vCenter Web Client and select Take Snapshot ….

147 Virtual Storage Console for VMware vSphere 6.0 © 2016 NetApp, Inc. All rights reserved. NetApp Proprietary
7
Figure 4-58:
8. Perform another VM snapshot named vvol-vm-demo-snapshot2, click OK.

148 Virtual Storage Console for VMware vSphere 6.0 © 2016 NetApp, Inc. All rights reserved. NetApp Proprietary
8
Figure 4-59:
9. Return to OnCommand System Manager, after a refresh observe the Deduplication savings hasincreased.
10. However, the % Used and Available Space remains unchanged.11. (Optional) Repeat with snapshot 3+, and continue to see the same results.

149 Virtual Storage Console for VMware vSphere 6.0 © 2016 NetApp, Inc. All rights reserved. NetApp Proprietary
9
10
Figure 4-60:
4.10 Run CLI command using the VP Control PanelAt times, the VMware vSphere Web Client may not offer as much visiblity to the VASA Provider. NetApp offers auser interface to examine the API calls to the Storage, and to vCenter. This activity demonstrates some of the CLIfunctionality to the VASA Provider.
1. On the jumphost, open a browser tab and type in the URL: https://vasa.demo.netapp.com:9083
Figure 4-61:
2. Enter the credentials username vpserver, password Netapp1!.

150 Virtual Storage Console for VMware vSphere 6.0 © 2016 NetApp, Inc. All rights reserved. NetApp Proprietary
2
Figure 4-62:
3. Click the Operation listed as Right Now.
3
Figure 4-63:
4. Review the information listing API calls going to and from the VASA Appliance, then click Back.

151 Virtual Storage Console for VMware vSphere 6.0 © 2016 NetApp, Inc. All rights reserved. NetApp Proprietary
4
Figure 4-64:
5. Click the Operation listed as Statistics.

152 Virtual Storage Console for VMware vSphere 6.0 © 2016 NetApp, Inc. All rights reserved. NetApp Proprietary
5
Figure 4-65:
6. Review the counters and information, then click Back.
6
Figure 4-66:
7. Click the Operation listed as Inventory.

153 Virtual Storage Console for VMware vSphere 6.0 © 2016 NetApp, Inc. All rights reserved. NetApp Proprietary
7
Figure 4-67:
8. Review the Table of Contents, and explore some of the items listed in the topology, then clickContainerBean (2 items).

154 Virtual Storage Console for VMware vSphere 6.0 © 2016 NetApp, Inc. All rights reserved. NetApp Proprietary
8
Figure 4-68:
9. Review the details, then Back twice.

155 Virtual Storage Console for VMware vSphere 6.0 © 2016 NetApp, Inc. All rights reserved. NetApp Proprietary
9
Figure 4-69:
10. Click the Operation listed as Web based CLI Interface.
10
Figure 4-70:
11. On the new tab, select Available Commands.
Add screenshot

156 Virtual Storage Console for VMware vSphere 6.0 © 2016 NetApp, Inc. All rights reserved. NetApp Proprietary
11
Figure 4-71:
12. Review the list of commands that are available to execute, select container list.

157 Virtual Storage Console for VMware vSphere 6.0 © 2016 NetApp, Inc. All rights reserved. NetApp Proprietary
12
Figure 4-72:
13. Review the documentation on the command.

158 Virtual Storage Console for VMware vSphere 6.0 © 2016 NetApp, Inc. All rights reserved. NetApp Proprietary
13
Figure 4-73:
14. Return to the tab that contains the Command field and type container list.15. Click Execute.
14 15
Figure 4-74:
16. A list of the VVOL containers with their associated flexvols is returned.

159 Virtual Storage Console for VMware vSphere 6.0 © 2016 NetApp, Inc. All rights reserved. NetApp Proprietary
17. Explore by executing other commands, then click on Executed Commands for a history of thecommands you executed.
16
17
Figure 4-75:
18. Review the list of Executed Commands.
18
Figure 4-76:
4.11 Generate a file bundle to send to supportWhen troubleshooting VASA Provider related issues with vCenter, a support bundle can be extremely helpfulfor NetApp support to troubleshoot customer isssues. This lab activity demonstrates how easy it is to generate asupport bundle that you can send to assist in troubleshooting a support case.
1. Return to the URL: https://vasa.demo.netapp.com:90832. Click the Operation listed as Support.

160 Virtual Storage Console for VMware vSphere 6.0 © 2016 NetApp, Inc. All rights reserved. NetApp Proprietary
2
Figure 4-77:
3. Click Download to download a zip file that is ready to send, or upload to support.
3
Figure 4-78:

161 Virtual Storage Console for VMware vSphere 6.0 © 2016 NetApp, Inc. All rights reserved. NetApp Proprietary
5 Lab LimitationsThis lab has the following limitations:
• All of the servers and storage controllers presented in this lab are virtual devices. Consequently, anyoperation that involves moving large quantities of data will not exhibit performance representative ofreal systems.

162 Virtual Storage Console for VMware vSphere 6.0 © 2016 NetApp, Inc. All rights reserved. NetApp Proprietary
6 ReferencesFor more information about Virtual Storage Console for VMware 6.x see the following references:
• http://community.netapp.com/t5/Virtualization-and-Cloud/ct-p/virtualization-and-cloud• http://www.netapp.com/us/media/tr-4400.pdf

163 Virtual Storage Console for VMware vSphere 6.0 © 2016 NetApp, Inc. All rights reserved. NetApp Proprietary
7 Version History
Version Date Document Version History
Version 1.2.0 April 2016 Initial release
Version 1.3.0 June 2016 corrected components, removed unnessesary restore VMsteps

Refer to the Interoperability Matrix Tool (IMT) on the NetApp Support site to validate that the exactproduct and feature versions described in this document are supported for your specific environment.The NetApp IMT defines product components and versions that can be used to construct configurationsthat are supported by NetApp. Specific results depend on each customer's installation in accordancewith published specifications.
NetApp provides no representations or warranties regarding the accuracy, reliability, or serviceability of anyinformation or recommendations provided in this publication, or with respect to any results that may be obtainedby the use of the information or observance of any recommendations provided herein. The information in thisdocument is distributed AS IS, and the use of this information or the implementation of any recommendations ortechniques herein is a customer’s responsibility and depends on the customer’s ability to evaluate and integratethem into the customer’s operational environment. This document and the information contained herein may beused solely in connection with the NetApp products discussed in this document.
Go further, faster®
© 2016 NetApp, Inc. All rights reserved. No portions of this presentation may be reproduced without prior writtenconsent of NetApp, Inc. Specifications are subject to change without notice. NetApp and the NetApp logo areregistered trademarks of NetApp, Inc. in the United States and/or other countries. All other brands or products aretrademarks or registered trademarks of their respective holders and should be treated as such.