warhammer online official game guide - excerpt
DESCRIPTION
Warhammer is about one thing: War. The Prima guide has all the strategies, insights, and tips you need to leave a path of destruction in your wake. Will you master arcane forces? Deal death with blades and hammers? Or slay from afar with guns and bows? Our in-depth character sections will help you determine which character is best for you! This guide includes 336 pages packed with strategy, class info, and maps!TRANSCRIPT
The content of this guide is copyright protected. You may not modify, copy, publish, republish, transmit, sell, display or exploit in any way the content contained herein other than for your own personal use.
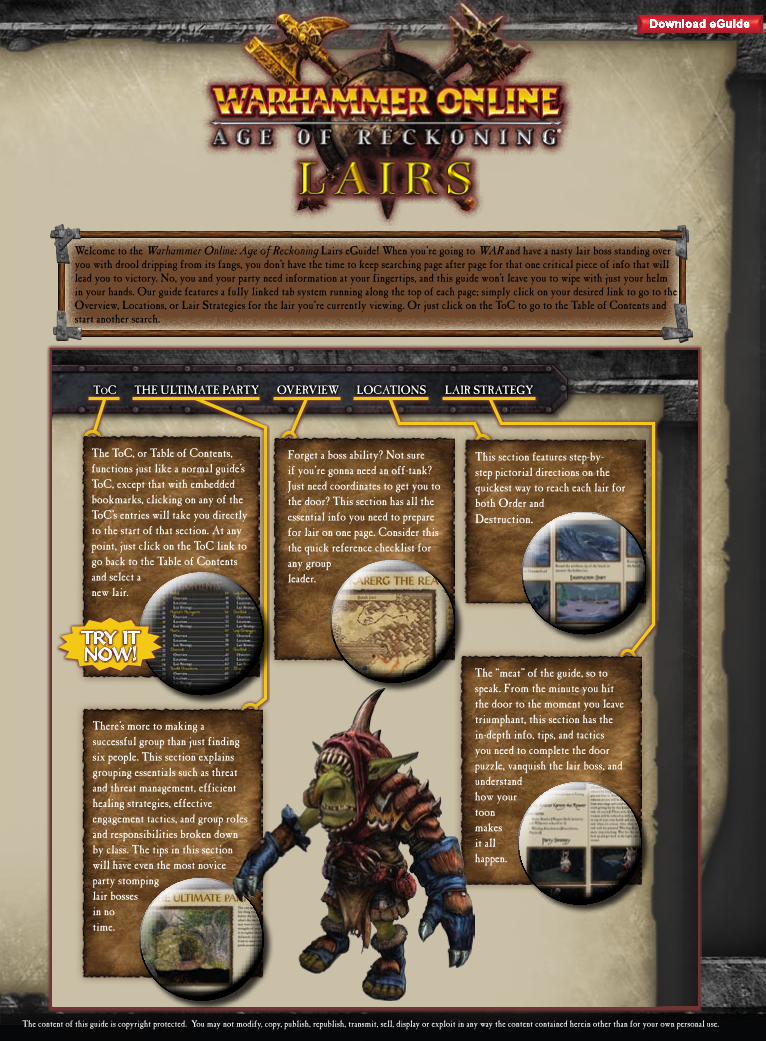
Toc LocATIoNS LAIr STrATegYoVerVIeWTHe ULTIMATe PArTY
The Toc, or Table of contents, functions just like a normal guide’s Toc, except that with embedded bookmarks, clicking on any of the Toc’s entries will take you directly to the start of that section. At any point, just click on the Toc link to go back to the Table of contents and select a new lair.
There’s more to making a successful group than just finding six people. This section explains grouping essentials such as threat and threat management, efficient healing strategies, effective engagement tactics, and group roles and responsibilities broken down by class. The tips in this section will have even the most novice party stomping lair bosses in no time.
Forget a boss ability? Not sure if you’re gonna need an off-tank? Just need coordinates to get you to the door? This section has all the essential info you need to prepare for lair on one page. consider this the quick reference checklist for any group leader.
This section features step-by-step pictorial directions on the quickest way to reach each lair for both order and Destruction.
The “meat” of the guide, so to speak. From the minute you hit the door to the moment you leave triumphant, this section has the in-depth info, tips, and tactics you need to complete the door puzzle, vanquish the lair boss, and understand how your toon makes it all happen.
TRY IT NOW!
Welcome to the Warhammer Online: Age of Reckoning Lairs eguide! When you’re going to WAR and have a nasty lair boss standing over you with drool dripping from its fangs, you don’t have the time to keep searching page after page for that one critical piece of info that will lead you to victory. No, you and your party need information at your fingertips, and this guide won’t leave you to wipe with just your helm in your hands. our guide features a fully linked tab system running along the top of each page; simply click on your desired link to go to the overview, Locations, or Lair Strategies for the lair you’re currently viewing. or just click on the Toc to go to the Table of contents and start another search.
6®
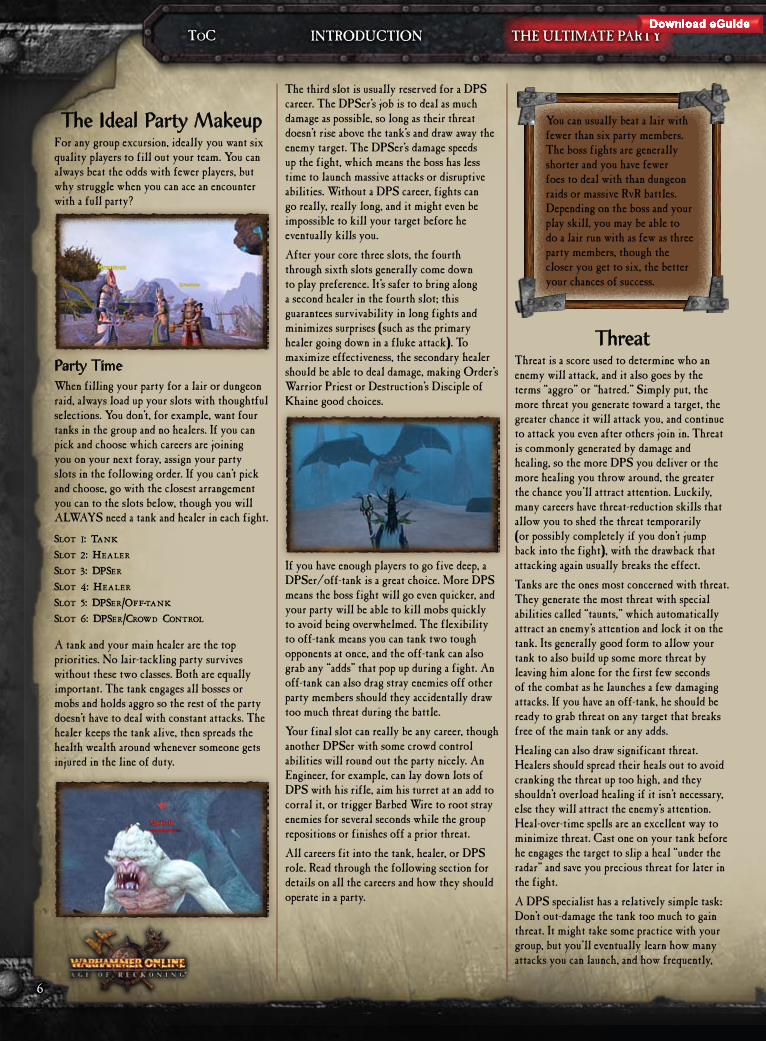
The ideal party makeupFor any group excursion, ideally you want six quality players to fill out your team. You can always beat the odds with fewer players, but why struggle when you can ace an encounter with a full party?
The third slot is usually reserved for a DPS career. The DPSer’s job is to deal as much damage as possible, so long as their threat doesn’t rise above the tank’s and draw away the enemy target. The DPSer’s damage speeds up the fight, which means the boss has less time to launch massive attacks or disruptive abilities. Without a DPS career, fights can go really, really long, and it might even be impossible to kill your target before he eventually kills you.After your core three slots, the fourth through sixth slots generally come down to play preference. It’s safer to bring along a second healer in the fourth slot; this guarantees survivability in long fights and minimizes surprises (such as the primary healer going down in a fluke attack). To maximize effectiveness, the secondary healer should be able to deal damage, making order’s Warrior Priest or Destruction’s Disciple of Khaine good choices.
party TimeWhen filling your party for a lair or dungeon raid, always load up your slots with thoughtful selections. You don’t, for example, want four tanks in the group and no healers. If you can pick and choose which careers are joining you on your next foray, assign your party slots in the following order. If you can’t pick and choose, go with the closest arrangement you can to the slots below, though you will ALWAYS need a tank and healer in each fight.
Slot 1: TankSlot 2: HealerSlot 3: DPSerSlot 4: HealerSlot 5: DPSer/Off-tankSlot 6: DPSer/Crowd Control
A tank and your main healer are the top priorities. No lair-tackling party survives without these two classes. Both are equally important. The tank engages all bosses or mobs and holds aggro so the rest of the party doesn’t have to deal with constant attacks. The healer keeps the tank alive, then spreads the health wealth around whenever someone gets injured in the line of duty.
If you have enough players to go five deep, a DPSer/off-tank is a great choice. More DPS means the boss fight will go even quicker, and your party will be able to kill mobs quickly to avoid being overwhelmed. The flexibility to off-tank means you can tank two tough opponents at once, and the off-tank can also grab any “adds” that pop up during a fight. An off-tank can also drag stray enemies off other party members should they accidentally draw too much threat during the battle.Your final slot can really be any career, though another DPSer with some crowd control abilities will round out the party nicely. An Engineer, for example, can lay down lots of DPS with his rifle, aim his turret at an add to corral it, or trigger Barbed Wire to root stray enemies for several seconds while the group repositions or finishes off a prior threat.All careers fit into the tank, healer, or DPS role. Read through the following section for details on all the careers and how they should operate in a party.
You can usually beat a lair with fewer than six party members. The boss fights are generally shorter and you have fewer foes to deal with than dungeon raids or massive RvR battles. Depending on the boss and your play skill, you may be able to do a lair run with as few as three party members, though the closer you get to six, the better your chances of success.
ThreatThreat is a score used to determine who an enemy will attack, and it also goes by the terms “aggro” or “hatred.” Simply put, the more threat you generate toward a target, the greater chance it will attack you, and continue to attack you even after others join in. Threat is commonly generated by damage and healing, so the more DPS you deliver or the more healing you throw around, the greater the chance you’ll attract attention. Luckily, many careers have threat-reduction skills that allow you to shed the threat temporarily (or possibly completely if you don’t jump back into the fight), with the drawback that attacking again usually breaks the effect.Tanks are the ones most concerned with threat. They generate the most threat with special abilities called “taunts,” which automatically attract an enemy’s attention and lock it on the tank. Its generally good form to allow your tank to also build up some more threat by leaving him alone for the first few seconds of the combat as he launches a few damaging attacks. If you have an off-tank, he should be ready to grab threat on any target that breaks free of the main tank or any adds.Healing can also draw significant threat. Healers should spread their heals out to avoid cranking the threat up too high, and they shouldn’t overload healing if it isn’t necessary, else they will attract the enemy’s attention. Heal-over-time spells are an excellent way to minimize threat. cast one on your tank before he engages the target to slip a heal “under the radar” and save you precious threat for later in the fight.A DPS specialist has a relatively simple task: Don’t out-damage the tank too much to gain threat. It might take some practice with your group, but you’ll eventually learn how many attacks you can launch, and how frequently,
Toc INTRoDUcTIoN THE ULTIMATE PARTY
11primagames.com
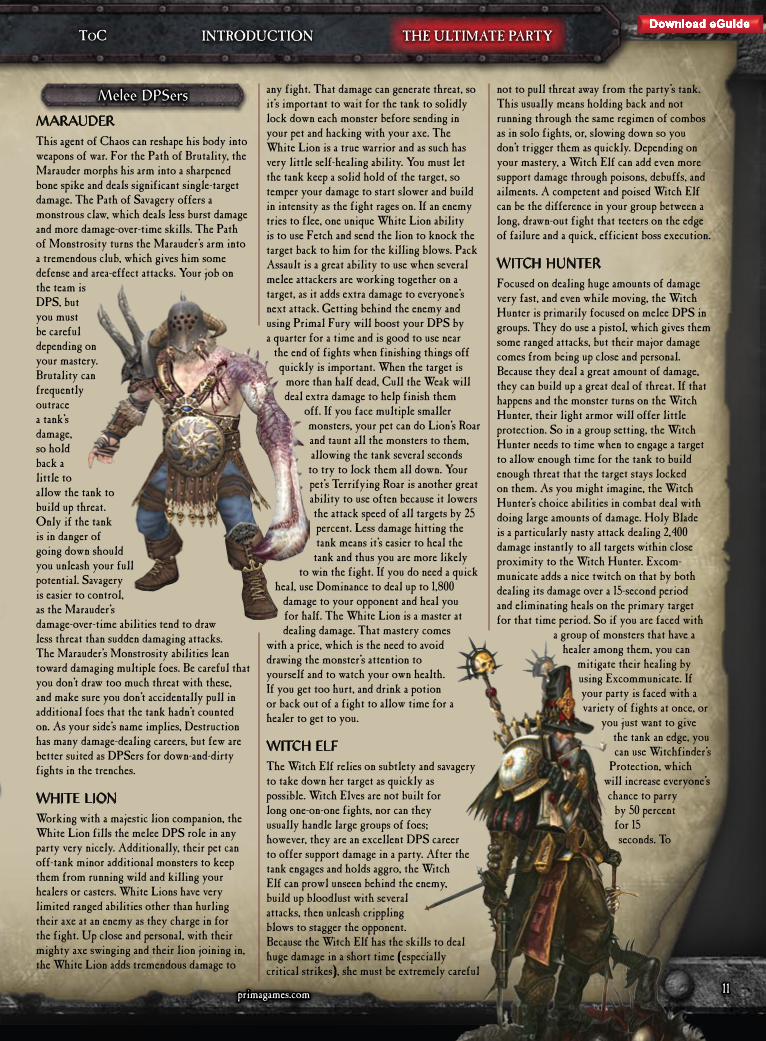
marauderThis agent of chaos can reshape his body into weapons of war. For the Path of Brutality, the Marauder morphs his arm into a sharpened bone spike and deals significant single-target damage. The Path of Savagery offers a monstrous claw, which deals less burst damage and more damage-over-time skills. The Path of Monstrosity turns the Marauder’s arm into a tremendous club, which gives him some defense and area-effect attacks. Your job on the team is DPS, but you must be careful depending on your mastery. Brutality can frequently outrace a tank’s damage, so hold back a little to allow the tank to build up threat. only if the tank is in danger of going down should you unleash your full potential. Savagery is easier to control, as the Marauder’s damage-over-time abilities tend to draw less threat than sudden damaging attacks. The Marauder’s Monstrosity abilities lean toward damaging multiple foes. Be careful that you don’t draw too much threat with these, and make sure you don’t accidentally pull in additional foes that the tank hadn’t counted on. As your side’s name implies, Destruction has many damage-dealing careers, but few are better suited as DPSers for down-and-dirty fights in the trenches.
WhiTe liOnWorking with a majestic lion companion, the White Lion fills the melee DPS role in any party very nicely. Additionally, their pet can off-tank minor additional monsters to keep them from running wild and killing your healers or casters. White Lions have very limited ranged abilities other than hurling their axe at an enemy as they charge in for the fight. Up close and personal, with their mighty axe swinging and their lion joining in, the White Lion adds tremendous damage to
any fight. That damage can generate threat, so it’s important to wait for the tank to solidly lock down each monster before sending in your pet and hacking with your axe. The White Lion is a true warrior and as such has very little self-healing ability. You must let the tank keep a solid hold of the target, so temper your damage to start slower and build in intensity as the fight rages on. If an enemy tries to flee, one unique White Lion ability is to use Fetch and send the lion to knock the target back to him for the killing blows. Pack Assault is a great ability to use when several melee attackers are working together on a target, as it adds extra damage to everyone’s next attack. Getting behind the enemy and using Primal Fury will boost your DPS by a quarter for a time and is good to use near
the end of fights when finishing things off quickly is important. When the target is
more than half dead, cull the Weak will deal extra damage to help finish them
off. If you face multiple smaller monsters, your pet can do Lion’s Roar and taunt all the monsters to them, allowing the tank several seconds to try to lock them all down. Your pet’s Terrifying Roar is another great ability to use often because it lowers the attack speed of all targets by 25 percent. Less damage hitting the tank means it’s easier to heal the tank and thus you are more likely
to win the fight. If you do need a quick heal, use Dominance to deal up to 1,800
damage to your opponent and heal you for half. The White Lion is a master at dealing damage. That mastery comes
with a price, which is the need to avoid drawing the monster’s attention to yourself and to watch your own health. If you get too hurt, and drink a potion or back out of a fight to allow time for a healer to get to you.
WiTCh elFThe Witch Elf relies on subtlety and savagery to take down her target as quickly as possible. Witch Elves are not built for long one-on-one fights, nor can they usually handle large groups of foes; however, they are an excellent DPS career to offer support damage in a party. After the tank engages and holds aggro, the Witch Elf can prowl unseen behind the enemy, build up bloodlust with several attacks, then unleash crippling blows to stagger the opponent. Because the Witch Elf has the skills to deal huge damage in a short time (especially critical strikes), she must be extremely careful
not to pull threat away from the party’s tank. This usually means holding back and not running through the same regimen of combos as in solo fights, or, slowing down so you don’t trigger them as quickly. Depending on your mastery, a Witch Elf can add even more support damage through poisons, debuffs, and ailments. A competent and poised Witch Elf can be the difference in your group between a long, drawn-out fight that teeters on the edge of failure and a quick, efficient boss execution.
WiTCh hunTerFocused on dealing huge amounts of damage very fast, and even while moving, the Witch Hunter is primarily focused on melee DPS in groups. They do use a pistol, which gives them some ranged attacks, but their major damage comes from being up close and personal. Because they deal a great amount of damage, they can build up a great deal of threat. If that happens and the monster turns on the Witch Hunter, their light armor will offer little protection. So in a group setting, the Witch Hunter needs to time when to engage a target to allow enough time for the tank to build enough threat that the target stays locked on them. As you might imagine, the Witch Hunter’s choice abilities in combat deal with doing large amounts of damage. Holy Blade is a particularly nasty attack dealing 2,400 damage instantly to all targets within close proximity to the Witch Hunter. Excom-municate adds a nice twitch on that by both dealing its damage over a 15-second period and eliminating heals on the primary target for that time period. So if you are faced with
a group of monsters that have a healer among them, you can
mitigate their healing by using Excommunicate. If your party is faced with a variety of fights at once, or
you just want to give the tank an edge, you can use Witchfinder’s
Protection, which will increase everyone’s chance to parry
by 50 percent for 15 seconds. To
melee dpsers
Toc INTRoDUcTIoN THE ULTIMATE PARTY
18®
Toc LocATIoNS LAIr STrATegyoVerVIeW
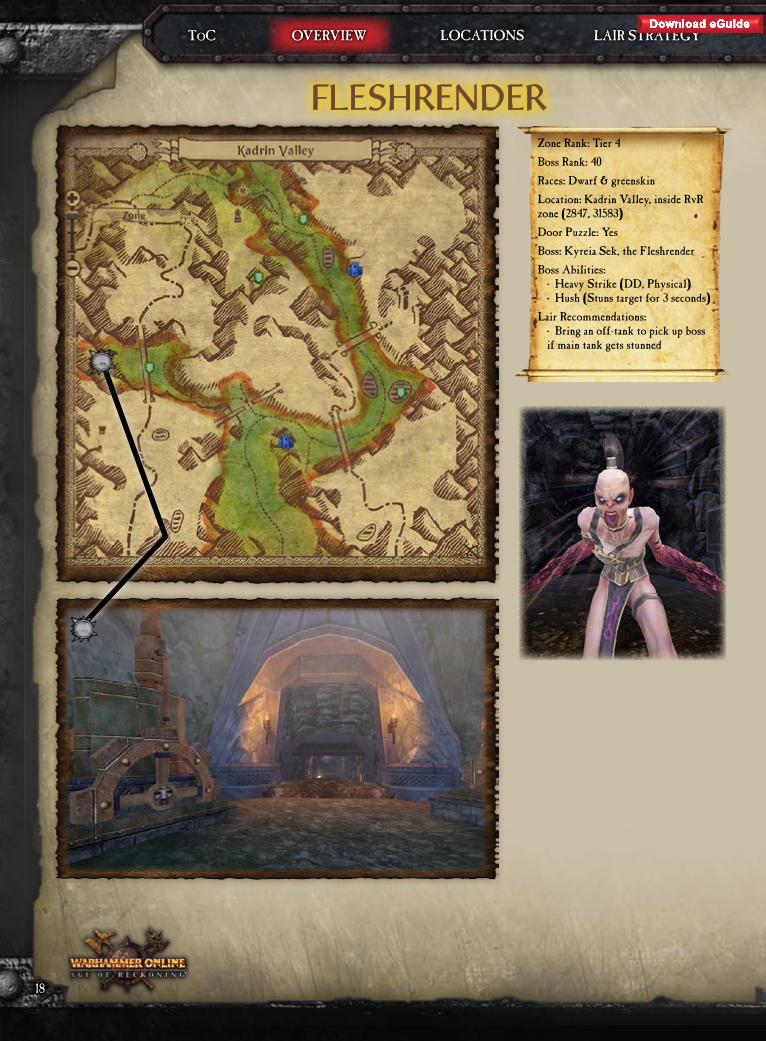
FleshrenderZone rank: Tier 4Boss rank: 40races: Dwarf & greenskinLocation: Kadrin Valley, inside rvr zone (2847, 31583)Door Puzzle: yesBoss: Kyreia Sek, the FleshrenderBoss Abilities:
• Heavy Strike (DD, Physical) • Hush (Stuns target for 3 seconds)
Lair recommendations: • Bring an off-tank to pick up boss if main tank gets stunned
19primagames.com
Toc oVerVIeW
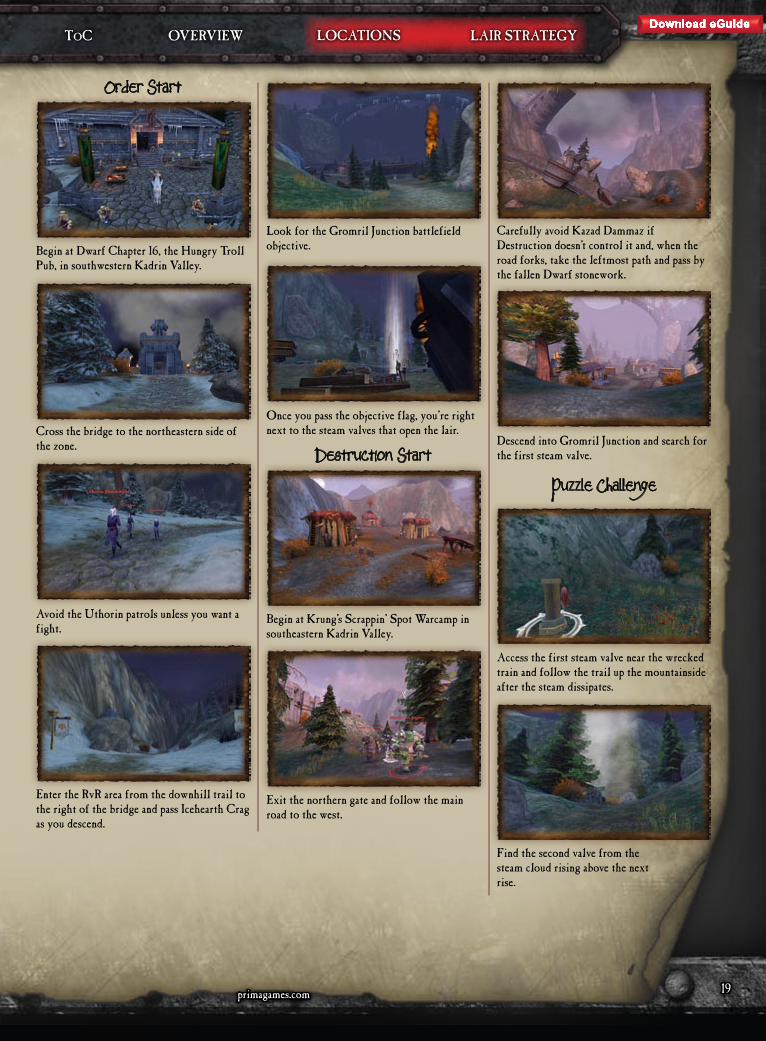
Order Start
Begin at Dwarf chapter 16, the Hungry Troll Pub, in southwestern Kadrin Valley.
cross the bridge to the northeastern side of the zone.
Avoid the Uthorin patrols unless you want a fight.
enter the rvr area from the downhill trail to the right of the bridge and pass Icehearth crag as you descend.
Look for the gromril Junction battlefield objective.
once you pass the objective flag, you’re right next to the steam valves that open the lair.
Destruction Start
Begin at Krung’s Scrappin’ Spot Warcamp in southeastern Kadrin Valley.
exit the northern gate and follow the main road to the west.
carefully avoid Kazad Dammaz if Destruction doesn’t control it and, when the road forks, take the leftmost path and pass by the fallen Dwarf stonework.
Descend into gromril Junction and search for the first steam valve.
Puzzle Challenge
Access the first steam valve near the wrecked train and follow the trail up the mountainside after the steam dissipates.
Find the second valve from the steam cloud rising above the next rise.
LocATIoNS LAIr STrATegy

20®
Toc LocATIoNSoVerVIeW
The third steam valve hides in the bushes near the lair entrance.
After you turn all the steam valves, the lair door finally opens.
Battle Against Fleshrender
Boss Abilities • Heavy Strike (DD, Physical) • Hush (Stuns target for 3 seconds)
Party Strategy
Proceed into the lair and spot Kyreia Sek on the far left side of the open cavern.
Kyreia is a rank 40 melee-type hero with dual mutated sword arms. Her embrace will leave you with no flesh, as her razor sharp arms strip it from your body.
Her Heavy Strike will hit a cloth wearer for approximately 1,500 health, while her disabling swing makes it hard for tanks to hold aggro. Make sure the tank takes these hits. Not only are they dangerous to less defensive party members, but they can build up threat quickly on another teammate, increasing the difficulty of the tank regaining the aggro. Any healers will be busy keeping the tank up, because she hits for approxi-mately 800–1,000 health even against a well-armored tank.
To engage Fleshrender, have everyone stand in the tunnel until the tank has built up some hate, then swarm her. Watch out for her Hush attack, which stuns a target for three seconds. The tank should be the person getting stunned. If the tank does get stunned, no new threat should be generated. everyone needs to be aware of when the tank is stunned and back off their attacks for those precious seconds. Let the tank get back in action and then engage again. It’ll be a DPS race, so flail away as quickly as you can. Drop her before she drops you.
LAIr STrATegy
24®
Toc LocATIoNS LAIr STrATegyoVerVIeW
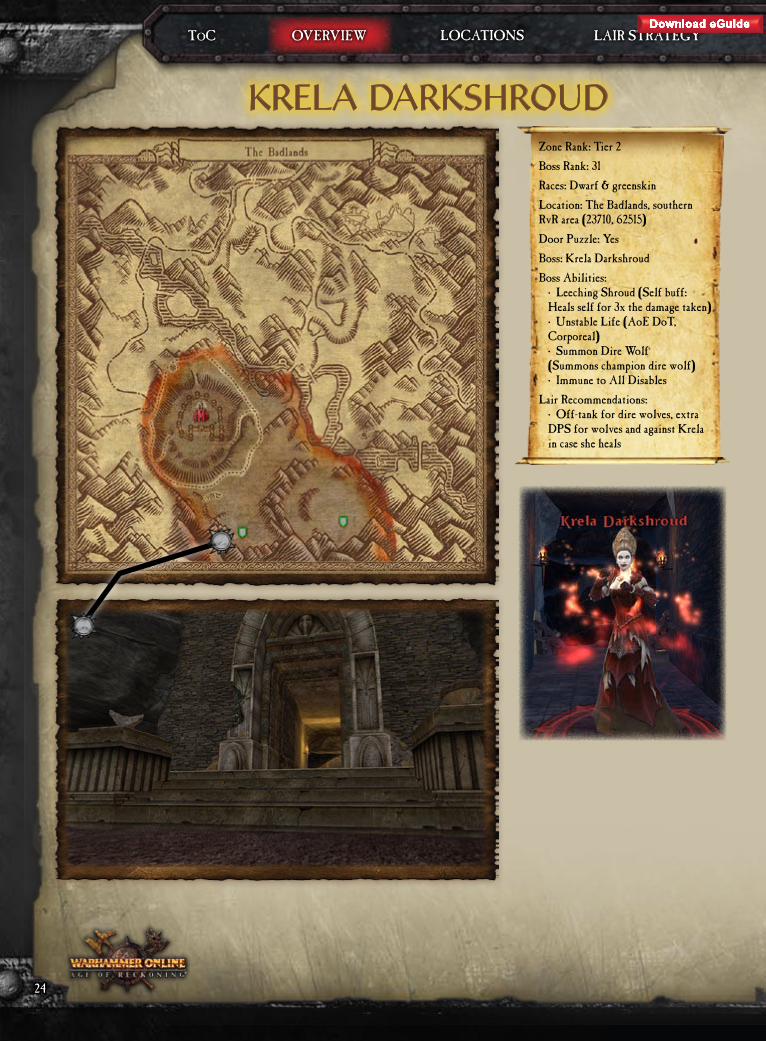
Krela DarKshrouDZone rank: Tier 2Boss rank: 31races: Dwarf & greenskinLocation: The Badlands, southern rvr area (23710, 62515)Door Puzzle: yesBoss: Krela DarkshroudBoss Abilities:
• Leeching Shroud (Self buff: Heals self for 3x the damage taken) • Unstable Life (Aoe DoT, corporeal) • Summon Dire Wolf (Summons champion dire wolf) • Immune to All Disables
Lair recommendations: • off-tank for dire wolves, extra DPS for wolves and against Krela in case she heals

25primagames.com
Toc oVerVIeW
Order Start
Begin at the order Warcamp, Dour guards, in the western Badlands.
Head south and hug the rim that winds around the crater surrounding Thickmuck Pit.
When you spot the large fossil deposit, veer off the road to the right and head up into the hills.
Look for a pass splitting the hills to higher ground.
on the plateau above, the goblin Artillery range battlefield objective shines as a landmark warning you that you are close.
Down the next slope past the goblin Artillery range rests Krela Darkshroud’s hidden mountain lair.
Destruction Start
Begin at Muggar’s choppa Warcamp in south-eastern Badlands.
Travel up the nearby hill in front of the main gate.
Follow the path around the mountains to the southwest and deeper into the rvr zone.
you can see the lair in the distance from your vantage point near the goblin Artillery battlefield objective.
Puzzle Challenge
Four plinths seal the lair door shut.
you must activate the four plinths in 30 seconds to enter. Facing the lair entrance, activate the first plinth on the left and work your way across to the other three quickly.
LocATIoNS LAIr STrATegy

26®
Toc LocATIoNSoVERVIEW
Have the tank grab aggro right away, and your healers need to keep the tank up. other careers might have to do a bit of maneuvering around the cavern to avoid Krela if she comes after you.
When all four plinths are active simulta-neously, the chamber door slides open.
Hurry inside. The chamber door remains open for only a minute.
Battle Against Krela Darkshroud
Boss Abilities • Leeching Shroud (Self buff: Heals self for
3x the damage taken) • Unstable Life (AoE DoT, corporeal) • Summon Dire Wolf (Summons champion
dire wolf) • Immune to All Disables (Immune to all
disables)
Party Strategy
Krela Darkshroud is a very formidable foe, and being dead a couple of centuries has not helped her sense of humor. She has a multitude of attacks and can summon a champion dire wolf to aid her in battle. Kill this wolf quickly unless it is summoned right at the end of the fight. If you are in the final 10 percent or so, just finish the boss. If not, have the tank keep the boss locked down and burn down the dire wolf. Ideally you could have an off-tank in this fight and pick up the wolf when it’s summoned. The wolf can also be tanked by a pet class with spot heals to keep the pet up. She can summon multiple wolves over time, so kill them as they are summoned to help prevent the healers or ranged damage from getting aggro.
Krela is usually in the center of the raised dais, and she will hit even the best outfitted for approximately 200–600 worth of health.
You are in for a battle. Krela Darkshroud uses Leeching Shroud (a buff placed on Krela for 15 seconds that causes all damage taken to be healed back to her for 3x the damage taken), and when Leeching Shroud is active, almost everyone should back off. only the tank should be attacking to maintain threat, and everyone else should be waiting for this effect to wear off. If you keep right on damaging, all you do is heal the boss back up. Look out for Unstable Life too (a damage-over-time that hits all melee characters around Krela for major corporeal damage). Ranged and healers need to remain at max range and avoid getting hit at all. Melee need to ensure they stay within range of the healer so they live through the DoT. If melee gets critically low on health and a potion isn’t available, the melee should step out of range of the AoE until a healer can get a heal off, then reengage. Krela is also immune to all disables. Her undead strength will tear huge rents in the strongest armor, so enter her lair at your own risk.
LAIR STRATEgY

PrIMA official game guideMike Searle
The Prima games logo is a registered trademark of random House, Inc., registered in the United States and other countries. Primagames.com is a registered trademark of random House, Inc., registered in the United States. Prima games is an imprint of random House, Inc.© 2009 games Workshop Limited. All rights reserved. games Workshop, Warhammer, Warhammer online, Age of reckoning, and all associated marks, names, races, race insignia, characters, vehicles, locations,
units, illustrations and images from the Warhammer world are either ®, ™ and/or © games Workshop Ltd 2000-2009. eA, the eA logo, Mythic entertainment, Mythic enter-tainment Logo, Public Quest and realm vs. realm are trademarks or registered trademarks of electronic Arts Inc. in the U.S. and/or other countries. All rights reserved. All other trademarks are the property of their respective owners.No part of this book may be reproduced or transmitted in any form or by any means, electronic or mechanical, including photocopying, recording, or by any information storage or retrieval system without written permission from electronic Arts Inc.Product Manager: Todd ManningAssociate Product Manager: Sean ScheubleDigital Product Manager: Lex Scheublecopyeditor: Asha JohnsonDesign: calibre grafixLayout: James KnightMap Design: In color DesignManufacturing: Suzanne goodwinPlease be advised that the eSrB ratings icons, “ec,” “e,” “e10+,” “T,” “M,” “Ao,” and “rP” are trademarks owned by the entertainment Software Association, and may only be used with their permission and authority. For information regarding whether a product has been rated by the eSrB, please visit www.esrb.org. For permission to use the ratings icons, please contact the eSA at esrblicenseinfo.com.Important:Prima games has made every effort to determine that the information contained in this book is accurate. However, the publisher makes no warranty, either expressed or implied, as to the accuracy, effectiveness, or completeness of the material in this book; nor does the publisher assume liability for damages, either incidental or consequential, that may result from using the information in this book. The publisher cannot provide any additional information or support regarding gameplay, hints and strategies, or problems with hardware or software. Such questions should be directed to the support numbers provided by the game and/or device manufacturers as set forth in their documentation. Some game tricks require precise timing and may require repeated attempts before the desired result is achieved.ISBN: 978-0-7615-6209-2
Mike SearleMike Searle remembers playing the simple yet addictive Missile command, and the days of Atari Adventure, where your square hero could end up in a hollow dragon stomach. His desire to play computer games into the wee hours of the morning really took hold when his parents made him play outside, instead of on the console, so the first chance he got, he bought a Pc to play the Ultima series, Doom, and countless others. Mike started working with Prima games in 2002 and has written more than 30 strategy guides, including Lord of the rings online: Shadows of Angmar, Jurassic Park: operation genesis, Dark Messiah: Might and Magic, Pirates of the Burning Sea, and several guides in the Tom Clancy’s ghost recon and Splinter cell series. He can’t wait for thought technology, so game controls can catch up with his brain and stop all that needless in-game dying. At least, that’s what he keeps telling himself about his FPS kill ratio.
We want to hear from you! e-mail comments and feedback to [email protected].
The Syndicate writers are:Sean Stalzer, President/ceo, Byron-James Alcid (Team Lead), chris & Brandi Massey,
christina & gary Morrow, glenn White (Team Lead), greg Bowling, Hunter Hoyt
(Team Lead), Ian Longley, James gray, Jennifer Bayne, Jeremy Dvorak, Jerry Davis, Jon
Fortner, Matt Wetzel, Michael &, Stephanie Bowling, Michelle Miller, randall Lekan ,
ron Wild (Team Lead), Scott D. Wampler, Terry Julian, Thomas Mcgarry
Visit The Syndicate® at www.LLTS.org.
L A I r S
Prima GamesAn Imprint of random House, Inc.3000 Lava ridge court, Suite 100roseville, cA 95661www.primagames.com
Special thanks to Asha Johnson, copyeditor and Bright Wizard extraordinare.
®
®