working with lists and libraries sharepoint 2013 - west …€¦ · · 2017-06-19working with...
TRANSCRIPT

Copyright 2016, Faculty and Staff Training, West Chester University. A member of the Pennsylvania State System of Higher Education. No portion of this
document may be reproduced without the written permission of the authors. For assistance, contact the IT Help Desk, x3350
Working with Lists and
Libraries
SharePoint 2013

1
Table of Contents Creating Custom Lists ................................................................................................................................... 2
Creating Columns ......................................................................................................................................... 3
Single Line of Text Column ..................................................................................................................... 3
Multiple Lines of Text Column ................................................................................................................ 4
Create a Column with Choices.................................................................................................................. 5
Create a Yes No Column .......................................................................................................................... 6
Create Columns that use Number Data Types .......................................................................................... 7
Create a Column that uses Currency ......................................................................................................... 8
Create a Colum for Date and Time ........................................................................................................... 9
Create a Calculated Column ................................................................................................................... 10
Create Columns that pull Data from other Sources ................................................................................ 11
Create a Column for Name Lookup ........................................................................................................ 11
Create a Lookup Column ........................................................................................................................ 12
Create a View in a List ............................................................................................................................ 15
Change the order of data entry for a List item ........................................................................................ 16
Working with Libraries ............................................................................................................................... 17
Creating Folders .......................................................................................................................................... 17
Moving documents into Folders ............................................................................................................. 18
Adding Columns ......................................................................................................................................... 19
Adding data to the New Columns ........................................................................................................... 20
Sorting Columns ..................................................................................................................................... 22
Creating a View in a Library ...................................................................................................................... 23
Changing Views ...................................................................................................................................... 25
Using Folders and Views Together ......................................................................................................... 26
Delete Views ........................................................................................................................................... 26
Group by View ........................................................................................................................................ 27
Version History ........................................................................................................................................... 28
Access the Version History for a file ...................................................................................................... 29
List and Library Permissions ...................................................................................................................... 31
Restrict access to a List ........................................................................................................................... 31
Remove groups or users you don’t want ................................................................................................. 32
Grant access to groups or individuals ..................................................................................................... 33
Reconfigure a list to inherit permissions ................................................................................................. 33

2
Creating Custom Lists
You need to create a list and the templates you have to choose from don’t fit your needs. Create a custom
list where you can create columns that meet your specifications.
We will demonstrate how to create a custom list using the following scenario: a recruiter in HR wants to
use a list that collects the names of potential new hires.
1. Go to the Settings Gear Icon.
2. From the drop down menu click on Add an App
3. Select Custom List.
4. Click on Advance Options.
5. Enter the name of the List.
6. Enter a description.
7. Click Create.
The default column for a list is Title. You can change the name of this column to something else to
repurpose it.
1. The list should automatically open after you click create.
2. If the ribbon does not appear automatically click on List on the Quick Launch bar.
3. Click on List Settings on the ribbon.
4. Scroll down the page to the Columns section and click on Title.
5. In the Column name box type in the new name.
6. Fill in a brief description of what the information in the column represents.
7. If the column is required to contain information select Yes, if not select No.
8. Enforce unique values, this prevents users from duplicating data. If some data to be entered is the
same accept the default of No.
9. Set a maximum number of characters.
10. The default value should be left as text.
11. Click Ok.

3
Creating Columns Before you create your columns make sure you know what type of data will be entered into the column.
There are 2 ways to create a column.
a. Click on List on the Quick Launch bar and select Create Column.
b. Or click on List Settings and scroll down to the Columns section and click on Create
column.
Single Line of Text Column 1. Click on Create Column from the List ribbon.
2. In the column name box enter the name of the column.
3. Select Single line of text from the type of information in this column is section.
4. Enter a description for the column.

4
5. Require that this column contains information, yes or no.
6. Enforce unique values, no.
7. Maximum number of characters.
8. Default value, text is the default.
9. Click Ok.
Multiple Lines of Text Column 1. Click on Create Column from the List ribbon.
2. Enter the column name.
3. Select Multiple lines of text from the type of information in this column is section.
4. Enter a description.
5. Require that this column contains information, yes or no.
6. Enter the number of lines for editing.
7. Specify the type of text to allow, plain is usually the default.
8. Append changes to existing text, the default is no.
9. Click Ok.

5
Create a Column with Choices 1. Click on Create Column from the List ribbon.
2. Enter the column name.
3. Select Choice from the type of information in this column is section.
4. Enter a description.
5. Require that the column contain information, yes or no.
6. Enforce unique values, default is no.
7. Remove enter choice #1, choice #2 and choice #3 in the Type each choice on a separate line box
and enter the three choices the user will choose from.
8. Display choices using Drop-Down Menu, Radio Buttons or Checkboxes (these allow multiple
selections).
9. Allow Fill-in choices, this would give the user the ability to fill in choices other than what is
available.
10. Enter a choice for the default value.
11. Click Ok.

6
Create a Yes No Column 1. Click on Create Column from the List ribbon.
2. Enter the column name.
3. Select Yes/No (check box) from the type of information in this column is section.
4. Enter a description.
5. Default value set to No so that there is no check in the checkbox. If the user checks the box then
Yes will appear in the list. If there is no check in the box, No will appear in the list.
6. Click Ok.

7
Create Columns that use Number Data Types 1. Click on Create Column in the List ribbon.
2. Enter the column name.
3. Select Number in the type of information in this column is section.
4. Enter the description.
5. Require that the column contain information.
6. Enforce unique values, yes or no.
7. Specify a minimum and maximum allowed value.
8. Select the number of decimal places to be displayed.
9. The default value is number.
10. Check off the Show as percentage box if the value should be a percent.
11. Click Ok.

8
Create a Column that uses Currency 1. Click on Create Column on the List ribbon.
2. Enter the column name.
3. Select Currency.
4. Enter a description.
5. Require that the column contain information, yes or no.
6. Enforce unique values, yes or no.
7. Specify a minimum and maximum value if needed.
8. Select number of decimal places.
9. Default value is Currency.
10. Select currency format.
11. Click Ok.

9
Create a Colum for Date and Time 1. Click on Create Column on the List Ribbon.
2. Enter the column name.
3. Select Date and Time.
4. Enter a description.
5. Require that the column contain information, yes or no.
6. Enforce unique values, yes or no.
7. Select Date and Time Format.
8. Select Display Format. Standard with display the date as mm/dd/yyyy. Selecting the Friendly
format will the display the date as text. For example depending on the date is could be something
such as 5 days from now or February 8.
9. Default value; do not enter if you want user to choose the date.
10. Click Ok.

10
Create a Calculated Column This type of column uses data from another column and math operators to create a new set of data. In this
example we will be calculating a signing bonus.
1. Click on Create Column on the List ribbon.
2. Enter the column name.
3. Select Calculated.
4. Enter a description.
5. Choose the column that the calculation will be based on, in this example we will calculate a
signing bonus. The potential employee will receive a $1000 for each year of experience.
6. Select a column from the Insert Column box; for this example we’ll use select Experience
(Years).
7. Click, add to formula.
8. To calculate multiplication enter an asterisk * after the column name in the Formula box.
9. Type the number that the field is to be multiplied by after the asterisk; in this example we use
1000. You have created a formula that reads: multiply the number of years in the Experience
column with 1000.
10. Select Currency.
11. Select the number of decimal places; for this example we will choose 0.
12. Select the currency format, the default should be U.S. currency.
13. Click Ok.

11
Create Columns that pull Data from other Sources This column is good for restricting the data that people can enter into a column. In this demonstration we
will create a Submitted by column. This column will contain the name of the employee recommending a
candidate for employment.
Create a Column for Name Lookup 1. Click on Create Column on the List ribbon.
2. Enter the column name.
3. Select Person or Group.
4. Enter a description.
5. Allow multiple selections, yes or no. Select no if you don’t want more than one person to
recommend the same candidate. In other words each potential candidate can be recommended by
one employee.
6. Allow selection of; for this example we will select People Only.
7. Choose from: select All Users.
8. Show field; accept the default or select from the drop down menu.
9. Click Ok.

12
Create a Lookup Column Creates a column that reaches out to another list within your SharePoint site. This column is going to pull
information from the other list and bring with it another column that we attach from that same list back to
the list you are adding the columns to. For this example we are going to add a Lookup column to the
Employee Recommendations list pulling information from the Positions list.
1. Click on Create Column on the List ribbon.
2. Enter the column name.
3. Select Lookup.
4. Enter a description.
5. Require that the column contain information, yes or no.
6. Enforce unique values, yes or no.
7. Get information from: here is where you will select which list you will be pulling information
from.
8. In this column: select the column that you would like to pull information from.
9. Add a column to show each of these additional fields:
10. Select Enforce relationship behavior, select Restrict delete. By selecting Restrict delete you will
prevent users from deleting items that have other items connected to it.

13
11. Click Ok.
12. Click Ok to the following window.
How Restrict Delete works: if you try to delete an item inside the Positions list that was added to the
Employee Recommendations list here is the error message that will appear:
The first window that appears is the standard Are you sure you want to delete…
Click Ok.
The following window will appear.
This tells you that you can’t delete the item.
Add information to the Lookup column.
1. In the add item or edit item window scroll down to the Desired Position field and select a position
from the drop down list.
2. Click Save.

14
Below is an example of how the Lookup columns appear in the list. The Lookup column, Desired
Position pulled the department information from the Positions list and placed it in the Desired Position
Department column.

15
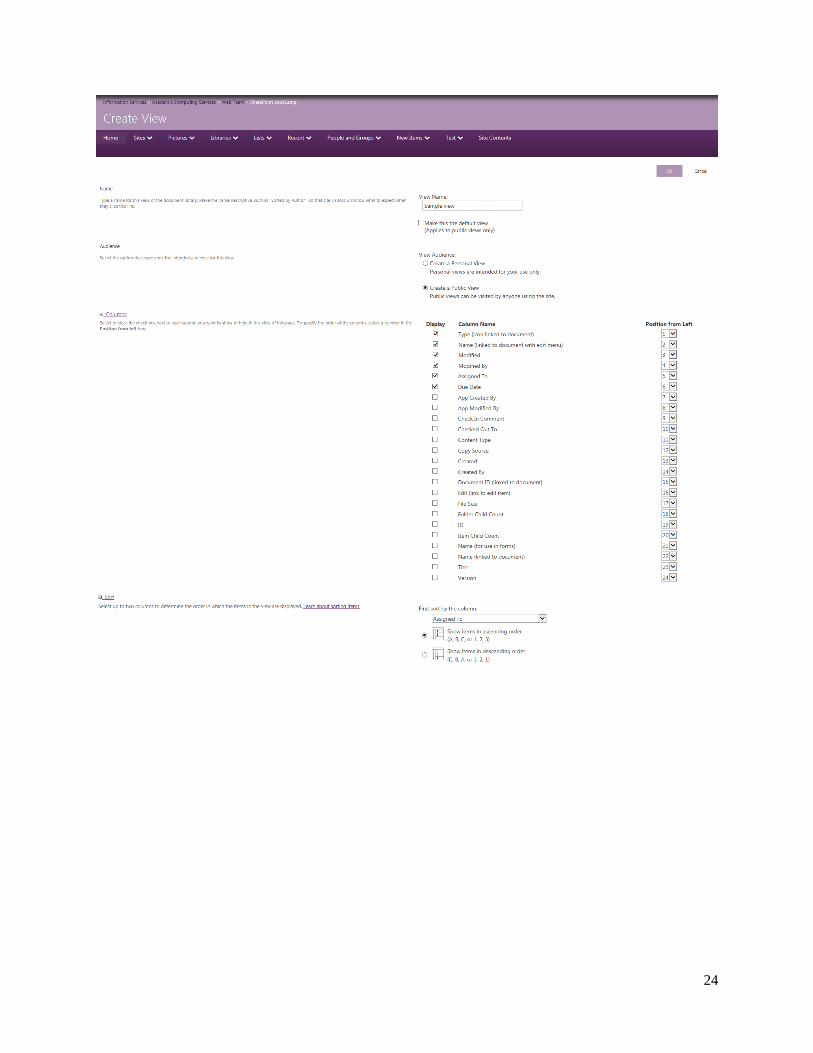
Create a View in a List We are going to create a view for the director of Human Resources.
1. Click on the List tab and select Create View.
2. Select Standard View from the Choose a view type window.
3. Give the view a name. We will call this View HR Director.
4. Do not select Make this the default view unless this will become the new view.
5. Select Create a Public View.
6. Uncheck the columns that you don’t want to have appear in the view.
7. Scroll down to the bottom of the page and click Ok.
8. To change the view for the list:
Open the list and click on the down arrow next to View HR Director in the navigation bar
and select All Items.

16
Change the order of data entry for a List item 1. Click on the List ribbon and select List Settings.
2. Scroll down and select Column ordering located under Columns.
3. Change the order of the fields by changing the number. When finished click Ok.

17
Working with Libraries
Creating Folders Folders can be created 2 ways; by using the ribbon or thorough the Open with Explorer option.
Using the ribbon to create a folder.
1. Click on the Files tab on the ribbon.
2. Click on New Folder.
3. Enter the name of the folder in the New Folder window.
4. Click Save.
5. The folder appears at the top of the list in the library.
Using Open with Explorer to create a folder.
1. Click on Open with Explorer on the Library ribbon.
2. If a windows security login window appears login with your WCU network username and
password.
3. Click on New folder located on the toolbar. The new folder will appear in the list.
4. Name the folder.

18
Moving documents into Folders Once you have created a folder how do you move the files into it? In SharePoint 2013 you can now click
and drag a file into the folder while in the library. Or you can move files using the explorer view.
1. Open the library.
2. Click and drag a selected file into the folder.
3. You can only drag one file at a time using this method.
4. To move multiple files into a folder open the library in explorer view.
5. A windows security login window will open. Login with your WCU network username and
password.
6. Select the file or files that you would like to store in the folder and drag them into the folder.

19
Adding Columns The definition of a column is a vertical set of data that spans down the library of files.
1. Click on the Library ribbon and select Library Settings.
2. Scroll down to the Columns section and click on Add from existing site columns.
3. Select the column you would like to add to the library, click the ADD button.
4. Click Ok.
5. In the example below the Assigned To column was selected from the list.

20
6. The column has been added.
Adding data to the New Columns You can add data to columns in a library two ways.
1. Hover over an item in the library and click on the ellipsis menu (…) to the right of the document
name.
2. Click on the ellipsis menu in the pop-out window to expand the menu.

21
3. Or select an item by clicking on it.
4. Click on Edit Properties on the Files ribbon.
5. The Edit dialog box opens.
6. A name can be added to the Assigned To field by typing the person’s username or clicking on the
address book and selecting it from there. If you type the person’s name make sure to click on the
check name icon to verify that the name is correct.
7. Add the due date. You can use the date picker to select the date.
8. Click Save when finished.

22
Sorting Columns Sort the Assigned to column.
1. Click on the drop down arrow next to Assigned To
2. Select A on Top or Z on Top depending on how you want to sort the column.
3. You can also filter the column by selecting a person’s name from the drop down list.
4. Column filtered by username.
5. To return the view to show all documents click on the down arrow next to Assigned To and click
on Clear Filter from Assigned To.

23
Creating a View in a Library A view is a predefined query that returns files based on criteria that you set.
We will demonstrate how to create a view for a specific date.
1. Click on the Library ribbon and select Create View.
2. Under Choose a view format select Standard View.
3. Give the view a name.
4. You can make this a default view by checking the box next to Make this the default view.
5. Select Create a Public View.
6. Scroll down to Sort and select Assigned To under the First sort by the column.
7. Scroll down to the Filter section.
8. Select Show items only when the following is true.
9. Select Due Date from the drop down list under Show the items when column.
10. In the box under is equal to, type in the specific date to be displayed in the view.
11. Click Ok.
24

25
The new view
Changing Views 1. Click on the Library ribbon.
2. Click on the down arrow next to the view located in the Mange Views group.
3. Select a different view.

26
Using Folders and Views Together When views are created for libraries that contain folders the view does not automatically include the files
in the folders as part of the view. To include files located in folders the view needs to be edited.
1. Click on Library Settings located on the Library ribbon.
2. Click on Modify View.
3. Scroll down to the Views section and click on the view to be edited.
4. The Edit View page opens.
5. Scroll down to the Folders section and expand Folders.
6. Show items inside folders will only show the files that adhere to the criteria in the current folder.
To change this select Show all items without folders.
7. Show all items without folders will show all files that adhere to the criteria regardless of which
folder it is in.
8. Click Ok.
Delete Views 1. Click on the Library ribbon and select Modify View.
2. Scroll down to the bottom of the page.
3. Click Delete.
4. Click Ok to the delete warning box.

27
Group by View Views can be created by grouping similar items in a column. We will demonstrate by grouping the
Assigned To column.
1. Click on the Library ribbon and select Library Settings.
2. You can access the view in 2 ways:
a. From the Library Settings page scroll down to the Views section and click on the view
that you would like to edit.
b. Or if the view is already displayed click on Modify View.
3. Scroll down to the Group By option and expand it.
4. You have the option to group by two columns (this example shows grouping by one column).
5. Select the column that you would like the grouping to start with from the First group by the
column drop down list.
6. Click Ok at the bottom of the page.
This example shows only one column grouping.

28
7. To group by a second column go to the Group By section on the Modify View page and select a
column from the Then group by the column drop down list.
8. Click Ok.
This example shows 2 column grouping.
1. To expand or collapse a group click on the column name.
Version History SharePoint gives you the ability to track version history. When you create a Library you have the option
to turn on versioning. If you did not enable that option when you created the library you can turn it on at
a later time.
Turn on Version History
1. Click on the Library ribbon and select Library Settings.
2. Under General Settings click on Versioning settings.

29
3. In the Document Version History section select Create major versions.
4. Check the Optionally limit the number of versions to retain box and enter a number.
5. If you would like documents to be required to be checked out before they can be edited select Yes
in the Require Check Out section.
6. Click Ok.
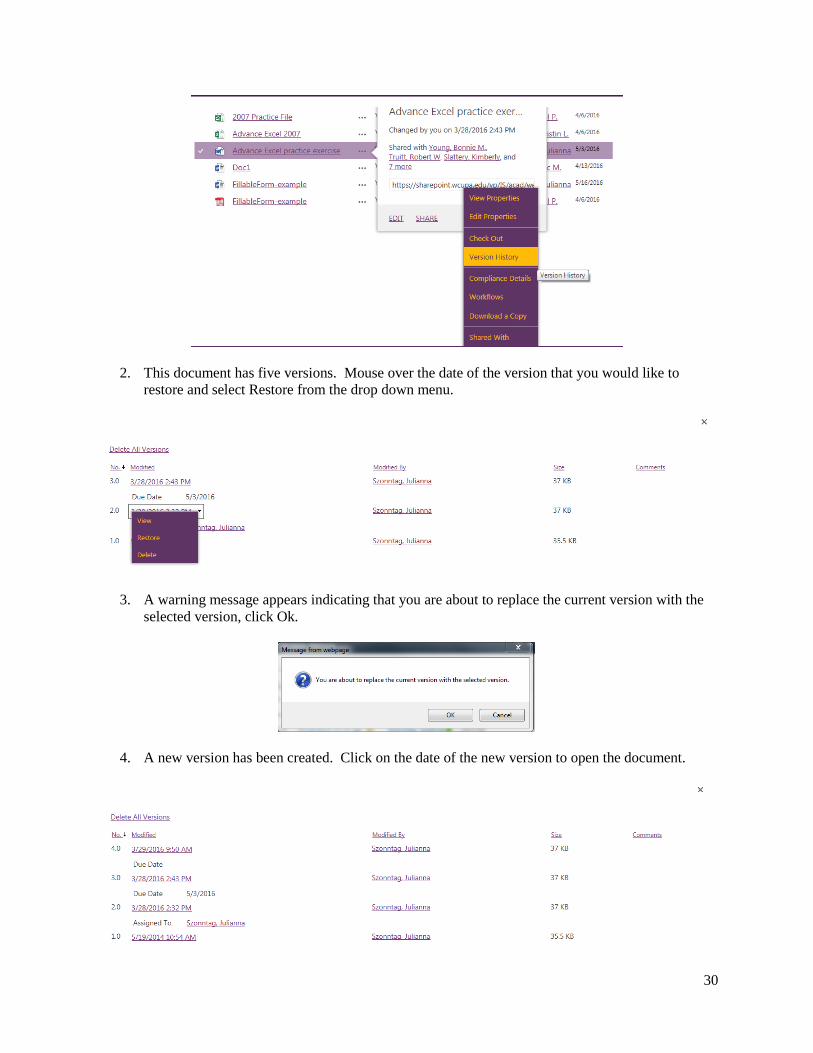
Access the Version History for a file 1. To access the version history of a file hover over the file, click on the ellipsis menu and select
Version History.
30
2. This document has five versions. Mouse over the date of the version that you would like to
restore and select Restore from the drop down menu.
3. A warning message appears indicating that you are about to replace the current version with the
selected version, click Ok.
4. A new version has been created. Click on the date of the new version to open the document.

31
5. You can delete individual versions or delete all the versions at once. Mouse over the date of the
document and select Delete from the drop down list or click on Delete All Versions at the top of
the list.
List and Library Permissions In some cases, your site might contain content only meant for certain users or groups. For example, if you
have a list on your site that contains sensitive data, you would need to restrict who could see it.
Restrict access to a List You can follow the same steps for a site, library, or individual item, working from their respective
permissions pages.
Break inheritance from the parent.
1. Access your site in the browser and open the list to which you want to restrict access.
2. On the ribbon, click the List Settings button. In a document library, Library Settings will appear
instead.
3. On the Settings page, under Permissions and Management, click Permissions for this list (or
Permissions for this document library in a library).
The permissions page for the list will open with a status bar across the top. The status bar explains that the
list inherits permissions from its parent site, with the parent site named. (Note that this status bar may also
show that people are waiting for your approval to access the list.)
5. To break permissions inheritance from the parent, click the Stop Inheriting Permissions button
in the ribbon.
6. Click OK if you’re prompted with a message stating that you’re about to create unique
permissions for the list. The message explains that changes made to the parent site’s permissions
will no longer affect this list.
Now the list is disconnected from the parent site. Here are a few important things to note:
The list still has the same permission settings that it did before. But now, instead of inheriting
permissions from the parent, it has its own copy of the parent’s permissions.
Changes that you make to the permissions settings for the parent site will not be inherited by this
list.
Changes to the permissions of this list will flow downstream to any item in the list that is not
uniquely secured.
The status bar for the list now reports “This list has unique permissions” and the ribbon buttons
have changed to include “Delete unique permissions”, “Grant permissions”, “Edit User
Permissions”, and “Remove User Permissions”.

32
Library 1 has broken permissions inheritance from the site collection root above it. Sub-site 1 still inherits
all the users and groups from the site collection root, but Library 1 has become a parent to all the items
inside its scope (its documents). When permissions inheritance is first broken, this library will have
permissions identical to the site collection root. However, the Site Owner, or anyone with sufficient rights
on the list, will be able to add and remove users and groups as needed. Library 1 is uniquely secured and
will require separate permissions management.
Remove groups or users you don’t want 7. Access your site in the browser and open the list to which you want to restrict access.
8. On the ribbon, click the List Settings button. In a document library, Library Settings will appear
instead.
9. On the Settings page, under Permissions and Management, click Permissions for this list (or
Permissions for this document library in a library).
10. In the Name section of the permissions page, select the checkboxes for the groups or users who
should not have access to this list.
11. Click Remove User Permissions.
The permissions page updates to show that the group or user no longer has permissions to the list.

33
Grant access to groups or individuals 1. While on the permissions page for the list, on the Edit tab, click the Grant Permissions button.
2. Type the name of the group or the individual you want to grant access to in the Select Users
dialog box.
3. Click on Show Options to show permission levels.
4. Click on the drop down arrow in the Select a permission level box to view all of the choices.
5. Select the permission level.
6. Uncheck the Send an email invitation if you do not wish to send an email.
7. Click Share.
Reconfigure a list to inherit permissions When you break permissions inheritance between a site, folder, list, library, list item, or document and its
parent, you can restore inheritance at any time.
1. Open the list for which you want to restore permissions inheritance.
2. On the ribbon, click the List Settings button. In a document library this will say Library
Settings.
3. On the Settings page, under Permissions and Management, click Permissions for this list (or
Permissions for this document library in a library).
4. On the list or library permission ribbon, click Delete unique permissions.
5. Click OK if prompted with a message stating that you are about to inherit permissions from the
parent web site. Notice that any custom permissions will be lost when you complete this action.
The status bar for the list now reports “This list inherits permissions from its parent.” The name of the
parent appears beside the updated status.

34
Notes: