ws290c + wt440h (warranty) - upmupm-marketing.com/manuals/ws290c_wt440h.pdf · setting the...
TRANSCRIPT

GETTING STARTED button placement
1
7
6
8
9
10
2
3
4
5
MIN/-/MIN: shows minimum temperature
& humidity; adjusts clock, alarm, date and
temperature alarm values
C/F: changes House Code and Channel Code;
selects °C or °F
SET: activates SET function
Table Stand
Battery Compartment
LCD Screen
ON/OFF: toggles between C and F, 12 and
24 hour format, Alarm 1 & 2 on and off, and bar
graph indoor and outdoor selection; scrolls
through temperature alarm settings (off/high/low)
° °
CHN: scrolls through remote channels (1 to 3);
adjusts time and date values
HOUR/+/MAX: shows maximum
temperature & humidity; adjusts clock,
alarm, date and temperature alarm values
SNOOZE/MODE: scrolls through Clock 1 & 2,
Alarm 1 & 2, Date and Temperature Alarm mode;
snooze for alarm 1
2
3
5
4
6
9
GETTING STARTED
Remove battery cover
Set up the transmitter(s) setting up the receiverbefore
Remove battery cover
2 AA size batteries (included)
2 AA size batteries (included)
setting up transmitter
1*
1
Temperature and humidity will appear and
on the LCD screenalternate
House code will blink for 8 seconds
2
2
3
3
4
5
67
8
910
Select House code (1-15) by pressing C/F
Press SET
Press SET
Channel code will blink for 8 seconds
Select Channel code (1-3) by pressing C/F
* If you have multiple transmitters for a single receiver,
set each transmitter to the House codesame
* If you have multiple transmitters for a single receiver,
set each transmitter to a Channel codedifferent
Setting the Temperature Alarm for the Local Temperature
Based on the and data collected from the remote
transmitter (Channel 1), the receiver will display the following weather
icons on the LCD screen.
temperature humidity The is an ideal feature to be used for greenhouses
and wine cellars, or any place that you require controlled temperature.
Once activated, the temperature alarm would sound when the room gets
too warm or too cold depending on your settings.
temperature alarm
WEATHER ICONSHISTORICAL TEMPERATURE BAR GRAPH
WS290C + WT440H
Wireless Weather StationOWNER’SMANUAL
setting up receiver
WS290C receiver
WT440H transmitter
11 Battery Cover
12 Wall Mount Bracket & Table Stand
%1
1
1
SET C/F
-A
A1
.5V
+-A
A1
.5V
+
59
13
4
7
6
8
10
11
2Insert batteries into compartment,
observing proper polarity
Insert batteries into compartment,
observing proper polarity; replace cover
Select temperature display in C or F by pressing C/F° °
Replace battery cover
Congratulations on your purchase of this
weather station set, WS290C + WT440H.
Please take the time to read and
understand this manual so you can begin
to enjoy the convenience and features this
product has to offer.
Main Display Unit WS290C:
* dual clock and dual alarm
* calendar (month/day/date)
* local temperature display
* receives and displays temperature and
humidity readings from up to 3 remote
transmitters via RF technology of 433MHz
* minimum and maximum temperature and
humidity memory
* temperature and humidity trend indicator
* temperature history (bar graph for past
12 hours)
* weather icons
* user-selectable C or F
* table stand or wall mountable
* battery type: 2 x AA
° °
FEATURES
Remote Transmitter WT440H
* drip-proof design with LCD screen
* temperature display in user-selectable
C or F
* humidity display
* transmission range: up to 40 metres in
open area
* table stand or wall mountable
* battery type: 2 x AA
° °
SET C/F
-A
A1
.5V
+-A
A1
.5V
+
87
12
11
11
12
3112
Indoor Bar Graph Outdoor Bar Graph
1
1
10
9
1
2
3
42
1
The bar graph lets you see the temperature trend over a period of 12 hours in
3-hour intervals. The left axis denotes the change in temperature in ±2 degrees.
The top axis denotes the time period broken into 3-hour intervals. The reference
point is at (0,0); where the current period is time zero and the change in
temperature is zero.
EXAMPLE: Bar Graph
1
2
3
How to read the bar graph?
About 12 hours agoThe temperature was approximately degrees
than the current temperature
4
cooler
About 9 hours agoThe temperature was approximately degrees
than the current temperature
2
cooler
About 6 hours ago
Within the last 3 hours
The temperature was approximately the
as the current temperature
same
The temperature was approximately degrees
than the current temperature
2
warmer
Selecting Indoor or Outdoor Bar Graph:
You can select to view the indoor or outdoor bar graph. The indoor bar graph is
based on the local temperature and the outdoor bar graph is based on the
remote (outdoor) temperature of Channel 1.
Toggle between the indoor and outdoor bar graph
by pressing in date mode.ON/OFF
If you have selected the indoor bar graph, the INDOOR symbol will appear on
the display. Otherwise, you have selected the outdoor bar graph.
Scroll to Date mode using .MODE
3
2
1
3
4
1
About Freeze Warning:
NOTE:
�
�
�
The SNOW icon will blink to warn of 'freezing'.
Activated when Channel 1's temperature is between -1.9°C and +2.9°C.
The SNOW icon will appear solid if and when Channel 1's temperature
falls below -1.9°C.
�
�
�
When you first set up the weather station set, the weather icon shown on
the display will be CLOUDY.
The weather icon is based solely on the temperature and humidity data
collected from the remote transmitter Channel 1.
If Channel 1’s slot is empty, the weather icon shown on the display will
always be CLOUDY.
SUNNY CLOUDY RAIN SNOWFREEZE
WARNING
OROR
<blinking snow>
TEMPERATURE ALARM
You can set the temperature alarm for the local temperature (main
receiver unit) and/or for one of the remote (outdoor) channels
separately.
UPPER TEMPERATURE LIMIT: warmIf the temperature gets too
and reaches the upper temperature limit, the alarm would sound.
LOWER TEMPERATURE LIMIT: coldIf the temperature gets too
and reaches the lower temperature limit, the alarm would sound.
Scroll to the local temperature alarm setting
mode by pressing .MODE
The Temperature Alarm symbol will appear
and the indoor temperature will be blinking.
Press or key to set the desired value for the
temperature limit.
+ -
Press to select the following settings:ON/OFF
UP ARROW UPPER TEMPERATURE LIMIT
LOWER TEMPERATURE LIMIT
TEMPERATURE ALARM DISABLED
DOWN ARROW
BLANK (NO ARROW)
PAGE 1 PAGE 2 PAGE 3
PAGE 10 PAGE 11 PAGE 12
2

Setting the Temperature Alarm for a Remote Channel WS290C Receiver
WT440H Remote Transmitter
When the Temperature Alarm Sounds
Synchronized!!!
1
1
1
2
2
3
4
WIRELESS TRANSMISSION WIRELESS TRANSMISSIONAutomatic Learn Function:
For optimal performance:
Manual Learn Function (Remote Signal Search):
The learn function starts automatically and runs for approximately
3 minutes when batteries are first installed in the receiver.
Press and hold for
3 seconds to start.
CHN
If a new remote transmitter is added or if signal is lost (outdoor readout
on the receiver is blinking), the learn function must be executed again.
Within these 3 minutes, the receiver will pick up the temperature and
humidity signals from the remote transmitter and display the reading.
Unit will beep to indicate that
learn function has started.
Channel symbol will blink and
unit will continue to beep as
each remote transmitter is detected.
1
3
Within 3 minutes, the temperature and humidity reading of the remote
transmitter will display on the receiver.
2
1
6
2
3
4
5
1
1
1
2
4
3
5
1
4
3
5
1
2
TEMPERATURE ALARM LOW BATTERY INDICATION
Place the receiver and remote transmitter side by side about 1 metre
apart, and allow the receiver and remote transmitter to synchronize
for 10 minutes before you place the remote transmitter outdoors.
Environmental factors and signals from other household devices, such
as remote entry controls, security systems, and computers, may
interfere with the wireless transmission of this product and cause
temporary reception loss. This is normal and does not affect the general
performance of this product. Stable reception will resume once the
interference ends.
The remote transmitter should be placed in a dry shaded area.
NOTE: Fog and mist will not harm the remote transmitter but
direct rain must be avoided.
Mount the remote transmitter upright avoiding metallic objects
and frames, such as window sills. Verify that there are no obstacles
like a transmission tower or steep hill that can cause interference
and blockage between the remote transmitter and receiver.
Place the receiver unit at least 2 metres away from any electrical
devices, such as your television set, computer, cordless phone, or
any radio controlled equipment.
Replace unit(s) with fresh batteries when the Low Battery Indicator
lights up. Refer to the LOW BATTERY INDICATION section.
You may need to reposition the remote transmitter to a different
location and/or closer to the receiver for the best transmission.
Scroll to the remote temperature alarm setting
mode by pressing .MODEReplace the batteries when the Low Battery Indication lights up on
the middle-right portion of the LCD screen on the WS290C receiver.
NOTE: After replacing the batteries, you will need to perform the
Setup and Learn Function procedures again. Refer to the GETTING
STARTED and WIRELESS TRANSMISSION sections.
Replace the batteries when the Low Battery Indication lights up on
the bottom-left corner of the LCD screen on the WT440H transmitter.
When the batteries are low on a transmitter, a Low Battery Indication
will also light up on the bottom-right corner of the LCD screen on the
WS290C receiver for that particular channel.
The Temperature Alarm symbol will appear
and the remote temperature will be blinking.
Press or key to set the desired value for the
temperature limit.
+ -
Press to select the following settings:ON/OFF
Press to select the desired remote channel
( , or ) that you wish the temperature alarm to be set on.
Only one channel can be selected.
CHN
1 2 3
UP ARROW UPPER TEMPERATURE LIMIT
LOWER TEMPERATURE LIMIT
TEMPERATURE ALARM DISABLED
DOWN ARROW
BLANK (NO ARROW)
2
The temperature alarm will sound when the actual temperature has
reached (or exceeded) the upper or lower temperature limit.
The temperature alarm has a distinctive tone different to that of
Alarm 1 or Alarm 2.
symbol will blink
Press ANY key to stop the temperature alarm. Or without interruption,
the temperature alarm will automatically stop after one minute.
TROUBLESHOOTING
Clock 1 Setting
Clock 2 Setting
1 4 5
2 6
32
Press and hold for 3 seconds to
enter the Clock Setting mode. You will hear
a beep. (The CLOCK1 symbol will appear and the time will blink).
MODE
Press to set the hour. Press to set the minute; and press
to set the second.
HOUR MIN CHN
Press during clock setting to change between 12 and 24 hour
display.
ON/OFF
Press twice or no key press for one minute will end clock setting.MODE
Press or key to change the hour (in one
hour increments/decrements relative to Clock 1).
+ -
Scroll to Clock 2 mode using
(The CLOCK2 symbol will appear).
MODE
Clock 2 Setting:
Clock 1 Setting:
A
B
C
A B
The remote (outdoor) readout on the receiver is
blinking.
The remote (outdoor) readout on the receiver is
blinking. The receiver will not detect or receive
the temperature and humidity data from the
remote transmitter, even after the Manual Learn
Function has been executed.
The temperature and humidity data on the
remote transmitter does not match the data
displayed on the receiver.
The temperature and humidity data on the
remote transmitter does not match the data
displayed on the receiver.
This may also be the result of a temporary loss of reception due
to interfering sources. Normal reception should resume once
the interference ends. Refer to the WIRELESS TRANSMISSION
section.
Re-synchronize the remote transmitter and receiver by pressing
and holding on the receiver for 3 seconds until a beep is
heard. The temperature and humidity data from the remote
transmitter will display on the receiver within 3 minutes. Refer to
the WIRELESS TRANSMISSION (Manual Learn Function) section.
CHN
Ensure the remote transmitter is away from any possible source of
interference and electrical disturbances. You may try to reposition
the remote transmitter in a different location and/or closer to the
receiver. The remote transmitter does have a maximum range of
40 metres, but any walls or windows the signal has to pass through
will reduce the distance. Due to the nature of the batteries,
extreme cold temperatures may also affect the transmission range.
Refer to the WIRELESS TRANSMISSION section and repeat the
Manual Learn Function with the remote transmitter in a new
location.
This may occur when you move the remote transmitter from one
environment to another. For example, when you bring the
transmitter from inside the warm house out to the cold exterior. In
such a case, there will be a big change in temperature. The
transmitter will record this change in temperature much quicker
than it is able to transmit the data to the receiver (which is done
once every minute). Therefore, you will temporarily get a
difference in reading between the remote transmitter and receiver.
The solution is to allow the remote transmitter some time to sit in
its new location to reach equilibrium. This may take several
minutes. Once the data is stable, the data displayed on the
remote transmitter should match that displayed on the receiver.
PROBLEM SOLUTION
PAGE 4 PAGE 5 PAGE 6
PAGE 13 PAGE 14 PAGE 15
4
C
CLOCK SETTING

Remote (Outdoor) Temperature and Humidity
Local (Indoor) Temperature
Selecting C or F Temperature Display° °
Min and Max Temperature & Humidity
Temperature and Humidity Trend
CALENDAR SETTING
TEMPERATURE & HUMIDITY DISPLAY
TEMPERATURE & HUMIDITY DISPLAY
*
*
If the Learn Function is performed successfully (refer to the WIRELESS
TRANSMISSION section), the remote (outdoor) temperature and humidity will
display in the bottom-right corner of the LCD screen.
Press to toggle between
Channels 1, 2 and 3.
CHN
The local (indoor) temperature will display instantly
after batteries are inserted into the receiver.
Toggle between C and F by pressing
in either Clock 1 or Clock 2 mode.
° °
ON/OFF
*
*
A
A
B
B
The trend indicator shows the trend of the temperature and humidity in
the past half-hour interval.
Example: The following indicates that the
temperature is rising.
Arrow Indicator
Rising Steady FallingTrend
Remote Temperature
Local Temperature
12
1
B
A
2 3
Calendar Setting
34
Scroll to Date mode using MODEPress to setHOUR/+/MAX month
Press to setMIN/-/MIN datePress to setCHN day
NOTE: The temperature and humidity
data will on the LCD screen.alternateRemote Humidity
Press in Clock 1 mode to display
minimum temperature and humidity
The MIN symbol will appear.
MIN
.
To return to normal temperature and
humidity display, press again.MIN
To return to normal temperature and
humidity display, press again.MAX
Press in Clock 1 mode to display
maximum temperature and humidity.
The MAX symbol will appear.
MAX
NOTE: Min/Max readings are automatically cleared daily at 00:00
B
A
%
MINIMUM
MAXIMUM
SPECIFICATIONS
WS290C - WEATHER STATION RECEIVER- Battery Type: 2 X 1.5V AA batteries
- Operating Temperature: -5
- Temperature Range:
-
°C °C
°C t °C
°C °C °C
Resolution: 0.1°C
to 50
-20 o 55
- Measurement Accuracy: Max. +/- 1 within measuring range of 0 to 40
WT440H - WEATHER STATION TRANSMITTER- Battery Type: 2 X 1.5V AA batteries
-
Temperature Range: -30
Operating Temperature: -20°C to 60°C
- °C to 70°C
- Temperature Resolution: 0.1°C for above -10°C / 1°C for below -10°C
- Measurement Accuracy: Max. +/- 1°C within measuring range of 0°C to 40°C
- Humidity Range: 25% to 90% RH (resolution 0.5%)
- Transmission Frequency: 433.92 MHz
- Transmission Range: up to 40 metres in open area
THIS DEVICE COMPLIES WITH PART 15 OF THE FCC RULES.OPERATION IS SUBJECT TO THE FOLLOWING TWO CONDITIONS:
1. THIS DEVICE MAY NOT CAUSE HARMFUL INTERFERENCE, AND2. THIS DEVICE MUST ACCEPT ANY INTERFERENCE RECEIVED,
INCLUDING INTERFERENCE THAT MAY CAUSE UNDESIRED OPERATION.
FCC COMPLIANCE
Scroll to Alarm 1 using .
The ALARM 1 symbol will appear.
MODE
Press ANY other key to stop the alarm. Or without
interruption, the alarm will automatically stop after
one minute.
ALARM SETTING
1
2
3
4
32
1
*
23456
5
6
1
123
4
Alarm 1 Setting
Clock Display
Clock Display
Press to setHOUR hour.
Press to setMIN minute.
Press to toggle alarm on and off.ON/OFF
When the alarm is set ON, the 'on' symbol will appear.
NOTE: Both Alarm 1 and Alarm 2 are based on the time set on Clock 1.
In the normal clock display, if the alarm is set ON, the
ALARM 1 symbol will also appear on the display.
Alarm 1 and Alarm 2 Setting:
To set Alarm 2, scroll to Alarm 2 using .
The ALARM 2 symbol will appear. Follow the same
steps as above to set. In normal clock display, if the alarm is set ON,
the ALARM 2 symbol will also appear on the display.
MODE
When the Alarm Sounds:
ALARM 1 or ALARM 2 symbol will blink.The crescendo alarm will gradually increase in loudness.Press to snooze the alarm for 5 minutes.
After that the alarm will sound again.
SNOOZE
4
LIMITED TWO-YEAR WARRANTYUPM warrants this product, excluding battery, to be free from defects in the materials or workmanship, under normal
use and service, for a period of two years from the date of purchase by the consumer.
If, at any time during the warranty period, the product is defective or malfunctions, UPM shall repair or replace it (at
UPM's discretion) within a reasonable period of time.
If the product is defective,
(i) return it, with a dated proof of purchase, to the retailer from which you purchased it, or
(ii) package it carefully, along with a dated proof of purchase and a short description of the malfunction, and mail it,
postage prepaid, to the following address:
UPM Marketing Inc.
Return Goods
Unit 10B - 250 Shields Court
Markham, Ontario
L3R 9W7
This warranty does not cover removal or reinstallation costs. This warranty shall not apply if it is shown by UPM that
the defect or malfunction was caused by damage which occurred while the product was in the possession of the
consumer.
UPM's sole responsibility shall be to repair or replace the product within the terms stated above. UPM SHALL NOT BE
LIABLE FOR ANY LOSS OR DAMAGE OF ANY KIND, INCLUDING ANY INCIDENTAL OR CONSEQUENTIAL DAMAGES
RESULTING, DIRECTLY OR INDIRECTLY, FROM ANY BREACH OF ANY WARRANTY, EXPRESS OR IMPLIED, OR ANY
OTHER FAILURE OF THIS PRODUCT. Some states do not allow the exclusion or limitation of incidental or
consequential damages, so this limitation may not apply to you.
THIS WARRANTY IS THE ONLY EXPRESS WARRANTY UPM MAKES ON THIS PRODUCT. THE DURATION OF ANY
IMPLIED WARRANTIES, INCLUDING THE WARRANTIES OF MERCHANTABILITY AND FITNESS FOR A PARTICULAR
PURPOSE, IS HEREBY LIMITED TO THE TWO YEAR DURATION OF THIS WARRANTY. Some states do not allow
limitations on how long an implied warranty lasts, so the above limitation may not apply to you.
This warranty gives you specific legal rights, and you may have other rights which may vary from state to state.
If you have any questions concerning this warranty, please write to:
UPM Marketing Inc.
Customer Service Department
Unit 10B - 250 Shields Court
Markham, Ontario
L3R 9W7
Or call 1-888-GO-TO-UPM (1-888-468-6876), Monday to Friday, from 9:00am to 5:00pm eastern.
(2)
CUSTOMER SUPPORT HOTLINE: 1-888-468-6876
PAGE 7 PAGE 8 PAGE 9
PAGE 16 PAGE 17
4

Réglage de l'alarme de température locale
L' est idéale pour les serres et caves à vin ou tout autreendroit qui exige une température contrôlée. Une fois activée, l'alarme detempérature sonnera quand la pièce devient trop chaude ou trop froide, selonle réglage.
alarme de température
1
2
3
4
2
1
3
4
ALARME DE TEMPÉRATURE
On peut régler l'alarme de température pour la température locale (pour lerécepteur principal) et/ou pour un des canaux extérieurs séparément.
LIMITE DE TEMPÉRATURE MAXIMALEchaude
: Si la température devient tropet atteint la limite maximale, l'alarme sonne.
LIMITE DE TEMPÉRATURE MINIMALEfroide
: Si la température devient tropet atteint la limite minimale, l'alarme sonne.
Faire défiler vers le mode du réglage de l'alarme detempérature locale en appuyant sur .MODE
Le symbole de l'alarme de température apparaîtraet la température intérieure clignotera.
Appuyez sur la touche ou pour établir la limite de température.+ -
Appuyez sur pour choisir les réglages suivants :ON/OFF
FLÈCHE VERS LE HAUT LIMITE DE TEMPÉRATURE MAXIMALE
LIMITE DE TEMPÉRATURE MINIMALE
ALARME DE TEMPÉRATURE DÉSACTIVÉE
FLÈCHE VERS LE BAS
BLANC (PAS DE FLÈCHE)
MISE EN ROUTE emplacement des touches
1
76
8910
2
3
4
5
MIN/-/MIN: montre la température etl'humidité minimale, règle l'horloge, lasonnerie'alarme, la date et l'alerte destempératures.
C/F: change les codes maison et des lescodes des chaînes; choisit C ou F.0 0
SET: active la fonction de réglage.
Support de table
Compartiment à piles
Écran ACL
ON/OFF: alterne entre C et F, horloge12 et 24 heures, sonnerie 1 et 2 marche-arrêt,et sélection de graphique à barres intérieur etextérieur; fait défiler les positions de l'alerte detempérature (off/high/low).
0 0
CHN: fait défiler les chaînes à distance (1 à 3); règle l'heure et la date.
HOUR/+/MAX: montre la température etl'humidité maximale, règle l'horloge, lasonnerie'alarme, la date et l'alerte destempératures.
SNOOZE/MODE: fait défiler par horloge 1 et 2, sonneriee 1 et 2, la date etl'alerte de température; sonnerie à répétition'alarme répétitif.
123
54
6
9
11 Couvercle des piles
12 Support de montage au mur etsupport de table
SET C/F
-A
A1
.5V
+-A
A1
.5V
+
87
12
11
1
10
9
PAGE 2
GRAPHIQUE À BARRES DES ANTÉCÉDENTS DE TEMPÉRATURE
Graphique à barres intérieur Graphique à barres extérieur
2
1
Le graphique à barres permet de voir la tendance de la température sur une périodede 12 heures à intervalles de 3 heures. L'axe de gauche indique les changements detempérature de ±2 degrés. L'axe supérieur indique la période de temps divisée enintervalles de 3 heures. Le point de référence est à (0,0) lorsque la période est àl'heure zéro et le changement de température à zéro.
EXEMPLE : Graphique à barres
12
3
Comment lire le graphique?
Il y a environ 12 heuresLa température était d'environ degrésque la température actuelle
4 plus fraîche
Il y a environ 9 heures La température était d'environ degrésque la température actuelle
2 plus fraîche
Il y a environ 6 heures
Au cours des troisdernières heures
La température était environ que latempérature actuelle
la même
La température était d'environ degrésque la température actuelle
2 plus chaude
Choix du graphique à barres intérieur ou extérieur :
On peut choisir de voir le graphique intérieur ou extérieur. Le graphique intérieurindique la température locale et le graphique extérieur, la température à distance(extérieure) du canal 1.
Faire basculer entre le graphique intérieur et extérieur en appuyant surdans le mode date.ON/OFF
Si on a choisi le graphique intérieur, le symbole INDOOR sera affiché, sans quoic'est qu'on a choisi le graphique extérieur.
Faire défiler jusqu'au mode date à l'aide de .MODE
3
PAGE 10
En se fondant sur les données de la température et de l'humidité recueillies del'émetteur (canal 1), le récepteura affichera les icônes météo suivantes surl'écran ACL.
ICÔNES MÉTÉO
Au sujet de l'avertissement de gel :
REMARQUE :
�
�
�
L'icône NEIGE clignotera pour avertir du gel.Activé quand la température du canal 1 est entre -1,9°C et +2,9°C.L'icône NEIGE ne clignetera plus si et quand la température du canal 1tombe en dessous de +2,9°C.
�
�
�
Quand on règle la station météo pour la première fois, l'icône météoaffichée sera NUAGEUX.L'icône météo est fondée seulement sur les données de la température et del'humidité recueillies de l'émetteur (canal 1).Si la voie du canal 1 est vide, l'icône météo affichée sera toujours NUAGEUX.
ENSOLEILLÉ NUAGEUX PLUIE NEIGEAVERTISSEMENT
DE GEL
OUOU
< >Neige clignotante
PAGE 11 PAGE 12
MISE EN ROUTE
Enlever le couvercle des piles
Installer l'émetteur le récepteuravant
Enlever le couvercle des piles
Piles de type AA (comprises)
2 piles de type AA (comprises)
installation de l'émetteur
1*
1
La température et l'humidité à l'écran ACLalterneront
Le code maison clignotera pendant 8 secondes
2
2
3
3
45
678910
Sélectionner le code maison (1-15) en appuyant sur C/F
Appuyer sur SET
Appuyer sur SET
Le code canal clignotera pendant 8 secondes
Sélectionner le code canal (1-3) en appuyant sur C/F
* Si on a plusieurs émetteurs pour un récepteur, régler chaqueémetteur au code maison.même
* Si on a plusieurs émetteurs pour un récepteur, régler chaqueémetteur à un code canal différent
installation du récepteur
%1
1
1
SET C/F
-A
A1
.5V
+-A
A1
.5V
+
59
13
4
7
6
8
10
11
2Insérer les piles dans leur compartiment enrespectant la polarité
Insérer les piles dans leur compartiment enrespectant la polarité. Replacer le couvercle.
Sélectionner C ou F pour la température en appuyant sur0 0 C/F
Replacer le couvercle des piles
1112
3112
1
PAGE 3
2
Station météo sans filWS290C + WT440H
MANUEL DUPROPRIÉTAIRE
WS290C - Récepteur
WT440H - Émetteur
Félicitations avec pour votre achat de cetensemble de station météo,WS290C +WT440H. Veuillez prendre letemps de lire et comprendre ce manuelpour pouvoir profiter pleinement de lacommodité et des avantages qu'offre ceproduit.
Appareil principal WS290C :horloge et alarme sonnerie doubles
icônes
calendrier (jour, mois, année)* affichage de la température locale* reçoit et affiche la température et
l'humidité de 3 émetteurs à distancegrâce à la technologie FR de 433MHz
* mémoire de température et d'humiditémaximale et minimale
* indicateur des tendances de latempérature et de l'humidité
* antécédents de température (graphiqueà barres des 12 dernières heures)
* météo* sélection de C ou F par l'utilisateur* support de table ou montage au mur* piles : 2 x AA
0 0
**
CARACTÉRISTIQUES
Émetteur à distance WT440H :* modèle étanche avec écran ACL* température en C ou F au choix de
l'utilisateur* affichage de l'humidité* portée d'émission : jusqu'à 40 mètres en
aire ouverte* piles : 2 x AA
0 0
1
PAGE 1

TRANSMISSION SANS FIL
Pour une performance optimale :
Placer le récepteur et l'émetteur côte à côte, à environ 1 mètre de distance,et laisser les deux appareil se synchroniser pendant 10 minutes avant deplacer l'émetteur à l'extérieur.
Les facteurs environnementaux et les signaux des autres appareils du foyer, telsque télécommandes, systèmes de sécurité et ordinateurs peuvent brouiller latransmission sans fil de ce produit et causer une perte de réception temporaire.C'est normal et cela n'affecte pas la performance générale de ce produit. Uneréception stable reprendra une fois que l'interférence se termine.
L'émetteur devrait être placé dans un endroit sec à l'ombre.REMARQUE: Le brouillard et la brume ne l'endommageront pas mais ondoit éviter le contact direct de la pluie.
Monter l'émetteur bien droit en évitant les objets et les cadres métalliquestels qu'allèges de fenêtre. Vérifier qu'il n'y a aucun obstacle comme une tourde transmission ou une colline escarpée qui puisse causer des interférenceset créer un blocage entre l'émetteur et le récepteur.
Placer le récepteur à au moins 2 mètres de tout appareil électrique tel quetéléviseur, ordinateur, téléphone sans fil ou équipement commandé parradio.
Remplacer les piles quand l'indicateur de piles faibles s'allume. Consulter lasection INDICATEUR DE PILES FAIBLES.
On peut avoir besoin de réinstaller l'émetteur ailleurs ou plus proche durécepteur pour une meilleure transmission.
PAGE 5
DÉPANNAGE
La lecture de l'émetteur (extérieur) sur lerécepteur clignote.
La lecture de l'émetteur (extérieur) sur lerécepteur clignote. Le récepteur ne détectepas et ne reçoit pas les données sur latempérature et l'humidité de l'émetteur, mêmeaprès avoir exécuté la fonction d'apprentissagemanuelle.
Les données température et humidité surl'émetteur ne correspondent pas à cellesaffichées sur le récepteur.
Les données température et humidité surl'émetteur ne correspondent pas à cellesaffichées sur le récepteur.
Ceci peut être le résultat d'une perte temporaire de réception dueà des sources de brouillage. Une réception normale devraitreprendre une fois que le brouillage se terminera. Consulter lasection TRANSMISSION SANS FIL.
Synchroniser à nouveau l'émetteur et le récepteur en appuyant sursur le récepteur pendant 3 secondes jusqu'à ce qu'on
entende un signal sonore. Les données sur la température etl'humidité de l'émetteur seront affichées sur le récepteur dans undélai de 3 minutes. Consulter la section TRANSMISSION SANS FIL(fonction d'apprentissage manuelle).
CHN
S'assurer que l'émetteur est loin de toutes sources possibles debrouillage et de perturbations électriques. On peut essayer dedéplacer l'émetteur dans un endroit différent et/ou plus proche durécepteur. L'émetteur a une portée maximale de 40 mètres, maiscette distance sera réduite si le signal doit traverser des murs oudes fenêtres. En raison de la nature des piles, des températuresfroides extrêmes peuvent aussi avoir une incidence sur la portéede transmission. Consulter la section TRANSMISSION SANS FILet exécuter de nouveau la fonction d'apprentissage manuelle avecl'émetteur dans un nouvel endroit.
Ceci peut se produire quand on déplace l'émetteur d'unenvironnement à un autre. Par exemple, quand on emportel'émetteur de l'intérieur d'une maison chaude à l'extérieur où il faitfroid. Dans ce cas, il y a un grand changement de la température.L'émetteur enregistrera ce changement beaucoup plus rapidementqu'il n'est en mesure de transmettre les données au récepteur (cequi a lieu toutes les minutes). Par conséquent, on auratemporairement une différence dans la lecture entre l'émetteur etle récepteur. La solution consiste à donner à l'émetteur le tempsde s'adapter à son nouveau milieu et d'atteindre un équilibre, cequi peut prendre plusieurs minutes. Une fois que les données sontstables, les données affichées sur l'émetteur devraientcorrespondre à celles affichées sur le récepteur.
PROBLÈME SOLUTION
PAGE 15
Synchronisation!!!1
1
1
2
2
3
4
TRANSMISSION SANS FILFonction d'apprentissage automatique :
Apprentissage manuel (recherche des signaux à distance) :
La fonction learn (apprentissage) s'exécute automatiquement pendantenviron 3 minutes lors de la première installation des piles dans le récepteur.
Appuyez sur pendant3 secondes.
CHN
Lorsqu'on ajoute un nouvel émetteur ou qu'on perd le signal (affichage extérieurclignotant sur le récepteur) la fonction d'apprentissage doit être répétée.
Pendant ces 3 minutes, le récepteur reçoit les signaux de température et d'humiditéde l'émetteur et les affiche.
Un signal sonore indique que lafonction d'apprentissage a débuté.
Le symbole Channel clignote etl'appareil indique la détection dechaque émetteur à distance.
1
3
Le récepteur affiche la température et l'humiditéde l'émetteur à distance en 3 minutes.
2
1
1
2
PAGE 4
4
Récepteur WS290C
Émetteur à distance WT440H
1
INDICATEUR DE PILES FAIBLES
Remplacer les piles lorsque l'indicateur de piles faibles s'allume aumilieu de l'écran ACL du récepteur WS290C.
REMARQUE : Après avoir remplacé les piles, on doit effectuer à nouveaules procédures de réglage et d'apprentissage. Se reporter aux sectionsMISE EN ROUTE et TRANSMISSION SANS FIL.
Remplacer les piles lorsque l'indicateur de piles faibles s'allume dansle coin inférieur gauche de l'écran ACL de l'émetteur WT440H.
Quand les piles sont faibles sur un émetteur, un indicateur de piles faibless'allume également dans le coin inférieur droit de l'écran ACL du récepteurWS290C pour ce canal particulier.
A
B
C
A B
PAGE 14
C
1
6
2
3
4
5
Réglage de l'Horloge 1
Réglage de l'Horloge 2
1 4 5
2 632
Appuyer sur pendant 3 secondes pourentrer dans le mode de réglage de l'horloge. Onentendra un signal sonore. (Le symbole CLOCK1apparaîtra et l'heure clignotera).
MODE
Appuyer sur pour régler les heures, sur pour régler les minuteset sur pour régler les secondes.
HOUR MINUTECHN
Appuyer sur durant le réglage de l'horloge pour changer l'affichageentre 12 et 24 heures.
ON/OFF
Appuyer sur deux fois ou n'appuyer sur aucune touche pendant uneminute pour mettre fin au réglage de l'horloge.
MODE
Appuyer sur ou pour changer l'heure (incréments/décréments d'une heurepar rapport à l'horloge 1)
+ -
Faire défiler vers le mode de l'horloge 2 à l'aidede . (Le symbole CLOCK2 apparaîtra).MODE
Réglage de l'horloge 2 :
Réglage de l'Horloge 1 :
PAGE 6
RÉGLAGE DE L'HORLOGE
Réglage de l'alarme de température pour un canal à distance
Lorsque l'alarme de température sonne
1
2
4
3
5
1
43
5
ALARME DE TEMPÉRATURE
Faire défiler vers le mode du réglage de l'alarme detempérature à distance en appuyant sur .MODE
Appuyez sur la touche ou pour établir la limite de température.+ -
Appuyez sur pour choisir les réglages suivants :ON/OFF
Appuyez sur pour choisir le canal à distance(1, 2 ou 3) pour lequel on veut régler l'alarme de température.On ne peut choisir qu'un canal.
CHN
2
L'alarme de température sonne lorsque la température actuelle atteint(ou dépasse) la limite de température maximale ou minimale.
L'alarme de température a un son distinct et différent de celui dessonneries 1 ou 2.
Appuyer sur N'IMPORTE QUELLE touche pour arrêter l'alarme detempérature ou bien elle s'arrêtera automatiquement après une minute.
PAGE 13
Le symbole de l'alarme de température apparaîtraet la température extérieure clignotera.
FLÈCHE VERS LE HAUT LIMITE DE TEMPÉRATURE MAXIMALE
LIMITE DE TEMPÉRATURE MINIMALE
ALARME DE TEMPÉRATURE DÉSACTIVÉE
FLÈCHE VERS LE BAS
BLANC (PAS DE FLÈCHE)
Le symbole clignotera.
SPÉCIFICATIONSRÉCEPTEUR MÉTÉO WS290C- Piles : 2 X 1.5V AA- Température de Opération fonctionnement : de -5 C à +50 C- Étendue de température : de -20 C à +55 C- Efficacité de mesure : max. +/- 1 C dans une étendue de mesure de 0 à 40 C- Résolution : 0,1 C
o o
o o
o o
o
ÉMETTEUR STATION MÉTÉO WT440H- Piles : 2 X 1.5V AA- Température de Opération fonctionnement : de -20 C à +60 C- Étendue de température : de -30 C à +70 C- Résolution de température de : 0,1 C au-dessus de -10 C et 1 C en-dessous
desous -10 C- Efficacité de mesure : max. +/- 1 dans une étendue de mesure de 0 à 40 C- Résolution Gamme d'humidité : de 25 à 90% (résolution de 0,5 %)- Fréquence de transmission : 433.92 MHz- Étendue Portée de transmission : jusqu'à 40 mètres en espace ouvert
o o
o o
o o
o
o
o
oC
CET APPAREIL SE CONFORME À LA PARTIE 15 DES RÈGLEMENTS DE LA FCC.SON FONCTIONNEMENT EST ASSUJETTI AUX DEUX CONDITIONS SUIVANTES :
CET APPAREIL NE PEUT PAS CAUSER DE BROUILLAGES PRÉJUDICIABLES; ETCET APPAREIL DOIT ACCEPTER TOUT BROUILLAGE REÇU, Y COMPRIS LESBROUILLAGES QUI PEUVENT CAUSER UN FONCTIONNEMENT NON DÉSIRÉ.
1.2.
FCC CONFORME GARANTIE LIMITÉE A DEUX ANSUPM garantit que ce produit, à l'exception des piles, est exempt de tout défaut matériel et de fabrication et qu'il est couvertpar une garantie limitée, dans des conditions normales d'usage et de service, pendant une période de deux (2) ans quicommence depuis la date de l'achat par le consommateur.
Si à n'importe quel moment durant la période de garantie, le produit est défectueux ou ne fonctionne pas correctement, UPMle réparera ou le remplacera (à la discrétion d'UPM) et ce dans une période raisonnable de temps.
Si le produit est défectueux(i) Retourner le, avec la preuve datée de l'achat, au revendeur où vous l'avez acheté, ou(ii) Emballer le soigneusement, avec la preuve datée de l'achat et une courte description du mauvais fonctionnement, et
envoyer le tout par poste, franc de port, à l'adresse suivante:
UPM Marketing Inc.Return GoodsUnit 10B - 250 Shields CourtMarkham, OntarioL3R 9W7
Cette garantie ne couvre pas les frais d'enlèvement ou de réinstallation. Cette garantie ne appliquera pas s'il est prouvé parUPM que le défaut ou le mauvais fonctionnement aurait été causé par un dommage qui s'est produit pendant que le produitétait en possession du consommateur.
La seule responsabilité d'UPM sera de réparer ou de remplacer le produit selon les termes mentionnés ci-dessus. UPM NEPOURRA EN AUCUN CAS ETRE TENU RESPONSABLE POUR LES PERTES OU DOMMAGES D'AUCUNE SORTE, YCOMPRIS LES DOMMAGES INDIRECTS OU CONSECUTIFS RESULTANT DIRECTEMENT OU INDIRECTEMENT, D'UNERUPTURE DE GARANTIE, EXPRESSE OU TACITE, OU D'UNE AUTRE DEFAILLANCE DE CE PRODUIT. Certains étatsn'autorisent pas l'exclusion ou la limitation de dommages indirect ou consécutifs, alors la limitation peut ne pas vous êtreapplicable.
UPM NE FAIT AUCUNE AUTRE GARANTIE QUE CELLE PRÉVUE DANS LA PRÉSENTE GARANTIE ET EXCLUEEXPRESSÉMENT TOUTE AUTRE GARANTIE SUR CE PRODUIT. LA DUREE DES GARANTIES TACITES, Y COMPRIS LESGARANTIES COMMERCIALES ET D'APTITUDE A UN EMPLOI PARTICULIER, EST CI-APRES LIMITEE A UNE DUREE DEDEUX ANS DE CETTE GARANTIE. Certains états n'autorisent pas des limitations sur la durée d'une garantie tacite, alors lalimitation ci-dessus peut ne pas vous être applicable.
Cette garantie vous donne des droits légaux particuliers, et vous pouvez avoir d'autres droits qui peuvent varier d'Etat à Etat.
Si vous avez des questions concernant cette garantie, veuillez écrire à:
UPM Marketing Inc.Customer Service DepartmentUnit 10B - 250 Shields CourtMarkham, OntarioL3R 9W7
Ou téléphoner au 1-888-GO-TO-UPM (1-888-468-6876), Lundi au Vendredi de 9:00 à 17:00 heures.
ASSISTANCE À LA CLIENTÈLE : 1-888-468-6876
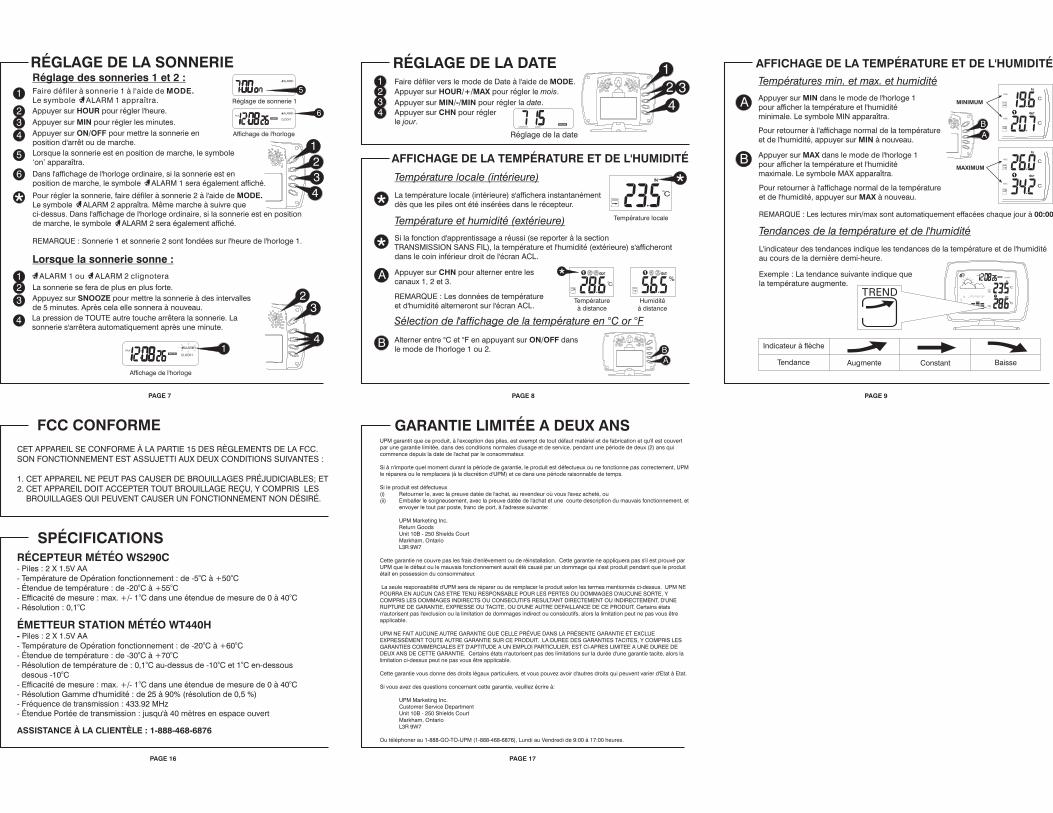
Températures min. et max. et humidité
Tendances de la température et de l'humidité
AFFICHAGE DE LA TEMPÉRATURE ET DE L'HUMIDITÉ
A
B
L'indicateur des tendances indique les tendances de la température et de l'humiditéau cours de la dernière demi-heure.
Exemple : La tendance suivante indique quela température augmente.
Indicateur à flèche
Augmente Constant BaisseTendance
Appuyer sur dans le mode de l'horloge 1pour afficher la température et l'humiditéminimale. Le symbole MIN apparaîtra.
MIN
Pour retourner à l'affichage normal de la températureet de l'humidité, appuyer sur à nouveau.MIN
Pour retourner à l'affichage normal de la températureet de l'humidité, appuyer sur à nouveau.MAX
Appuyer sur dans le mode de l'horloge 1pour afficher la température et l'humiditémaximale. Le symbole MAX apparaîtra.
MAX
REMARQUE : Les lectures min/max sont automatiquement effacées chaque jour à 00:00
BA
MINIMUM
MAXIMUM
PAGE 9
PAGE 16 PAGE 17
Température et humidité (extérieure)
Température locale (intérieure)
Sélection de l'affichage de la température en °C or °F
RÉGLAGE DE LA DATE
AFFICHAGE DE LA TEMPÉRATURE ET DE L'HUMIDITÉ
*
*
Si la fonction d'apprentissage a réussi (se reporter à la sectionTRANSMISSION SANS FIL), la température et l'humidité (extérieure) s'afficherontdans le coin inférieur droit de l'écran ACL.
Appuyer sur pour alterner entre lescanaux 1, 2 et 3.
CHN
La température locale (intérieure) s'affichera instantanémentdès que les piles ont été insérées dans le récepteur.
Alterner entre °C et °F en appuyant sur dansle mode de l'horloge 1 ou 2.
ON/OFF
*
*A
B
Températureà distance
Température locale
12
1
BA
2 3
Réglage de la date
34
Faire défiler vers le mode de Date à l'aide de .MODEAppuyer sur pour régler le .HOUR/+/MAX mois
Appuyer sur pour régler la .MIN/-/MIN date
Appuyer sur pour réglerle .
CHNjour
REMARQUE : Les données de températureet d'humidité alterneront sur l'écran ACL.
Humiditéà distance
%
PAGE 8
4Faire défiler à sonnerie 1 à l'aide deLe symbole ALARM 1 appraîtra.
MODE.
RÉGLAGE DE LA SONNERIE
1234
32
1
*
234
5
6
5
6
1
123
4
Réglage de sonnerie 1
Affichage de l'horloge
Affichage de l'horloge
Appuyer sur pour régler l'heure.HOURAppuyer sur pour régler les minutes.MINAppuyer sur pour mettre la sonnerie enposition d'arrêt ou de marche.
ON/OFF
Lorsque la sonnerie est en position de marche, le symbole‘on’ apparaîtra.
REMARQUE : Sonnerie 1 et sonnerie 2 sont fondées sur l'heure de l'horloge 1.
Dans l'affichage de l'horloge ordinaire, si la sonnerie est enposition de marche, le symbole ALARM 1 sera également affiché.
Réglage des sonneries 1 et 2 :
Pour régler la sonnerie, faire défiler à sonnerie 2 à l'aide deLe symbole ALARM 2 appraîtra. Même marche à suivre queci-dessus. Dans l'affichage de l'horloge ordinaire, si la sonnerie est en positionde marche, le symbole ALARM 2 sera également affiché.
MODE.
Lorsque la sonnerie sonne :
ALARM 1 ou ALARM 2 clignoteraLa sonnerie se fera de plus en plus forte.Appuyez sur pour mettre la sonnerie à des intervallesde 5 minutes. Après cela elle sonnera à nouveau.
SNOOZE
4
PAGE 7
La pression de TOUTE autre touche arrêtera la sonnerie. Lasonnerie s'arrêtera automatiquement après une minute.