xerox workcentre c2424 copier-printer user guide: loading ... · 60–120 g/m2 (16–32 lb. bond)...
TRANSCRIPT

WorkCentre® C2424 Copier-Printer
This chapter includes:
■ "Supported Media" on page 2-2■ "Loading Media in Tray 1" on page 2-7■ "Loading Media in Trays 2, 3, and 4" on page 2-13
Loading Media
Copyright © 2005 Xerox Corporation. All Rights Reserved.2-1
Supported Media
Supported MediaThis section includes:
■ "Tray and Media Usage Guidelines" on page 2-2■ "Duplex Automatic Document Feeder Guidelines" on page 2-3■ "Supported Papers, Transparencies, and Other Specialty Media" on page 2-4■ "Supported Envelopes" on page 2-5■ "Media Storage Guidelines" on page 2-6■ "Media that May Damage Your System" on page 2-6
Your system is designed to be used with a variety of paper types. Follow the guidelines in this section to ensure the best print and copy quality and to avoid jams.
For best results, use Xerox printing media specified for your WorkCentre C2424 Copier-Printer. They are guaranteed to produce excellent results with your system. For the most current information about Xerox printing media, go to www.xerox.com/office/c2424support.
CautionDamage caused by using unsupported paper, transparencies, and other specialty media is not covered by the Xerox warranty, service agreement, or Total Satisfaction Guarantee. The Total Satisfaction Guarantee is available in the United States and Canada. Coverage may vary outside these areas; please contact your local representative for details.
Tray and Media Usage GuidelinesThe system trays accommodate most sizes and types of paper, transparencies, or other specialty media.
■ Do not overload the paper tray. Do not load paper above the fill line on the inside of the paper guide.
■ Adjust the paper guides to fit the paper size. For Trays 2, 3, and 4, the paper guides click into place when they are adjusted correctly.
■ If excessive jams occur, use paper, transparencies, or other specialty media from a new package.
■ Custom size paper can be printed only from Tray 1.■ Xerox Professional Solid Ink Photo Paper, Xerox Professional Solid Ink Glossy Paper, and
Xerox Professional Solid Ink Trifold Brochures, can be printed from any tray, although they exceed the recommended weight guidelines for Trays 2–4.
■ Use Xerox Professional Solid Ink Transparencies; print quality may vary with other transparencies.
■ When printing photos, postcards, or brochures, some attention to stacking in the output tray may be required.
WorkCentre® C2424 Copier-Printer2-2
Supported Media
■ Use only paper envelopes. Do not use envelopes with windows, metal clasps, or adhesives with release strips.
■ Do not print CD labels in this system. ■ When using pre-punched paper, load the paper so that the holes are on the right side of the
tray. Adjust print and copy margins to accommodate the pre-punched holes.
Duplex Automatic Document Feeder GuidelinesThe document feeder accommodates original sizes from 114 x 140 mm (4.5 x 5.5 in.) to 216 x 356 mm (8.5 x 14.0 in.), with weights within the following range:
60–120 g/m2 (16–32 lb. Bond) (22–45 lb. Cover).
Follow these guidelines when loading originals into the document feeder:
■ Load originals faceup, so the top of the document enters first.■ Place only loose sheets of paper in the document feeder.■ Adjust the paper guides so they fit against the originals.■ Insert paper in the document feeder only when the ink on the paper is completely dry.
Use the glass rather than the document feeder to copy or scan the following types of originals:
■ Paper with paper clips or staples attached■ Paper with wrinkles, curls, folds, tears, or notches■ Coated or carbonless paper, transparencies, or items other than paper such as cloth or
metal■ Envelopes
Videos are available with instructions for using the document feeder. Videos are located on the User Documentation CD-ROM and at www.xerox.com/office/c2424support.
WorkCentre® C2424 Copier-Printer2-3
Supported Media
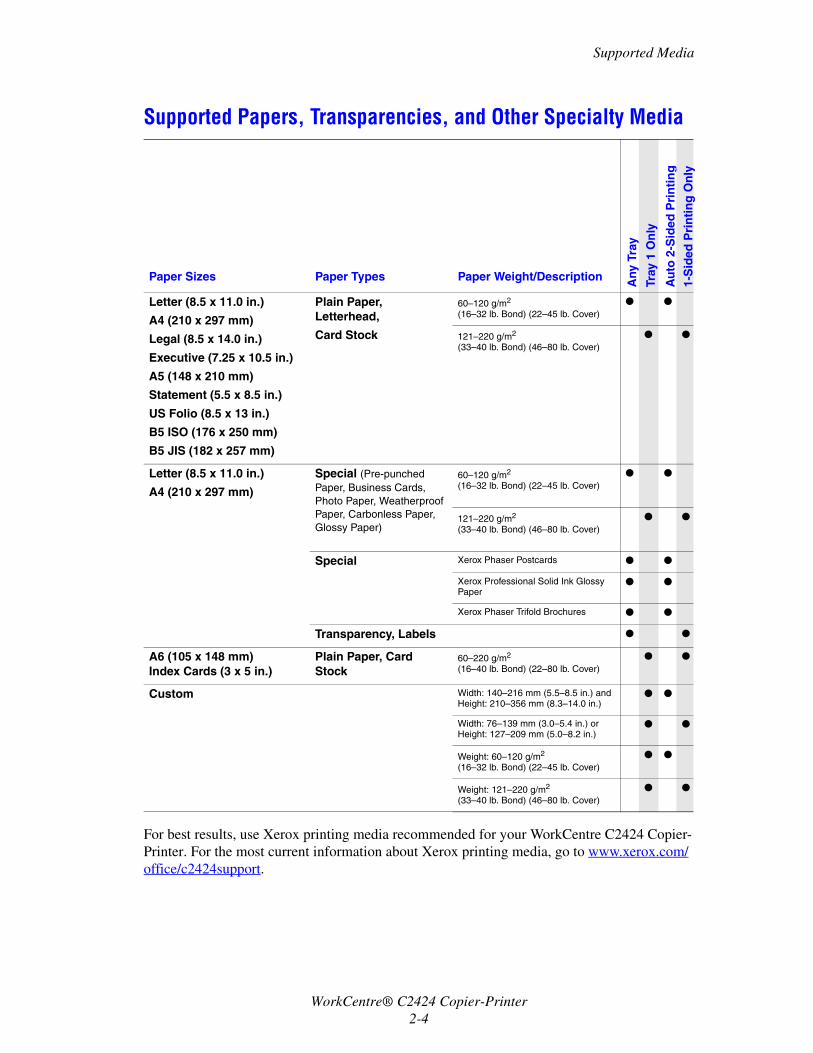
For best results, use Xerox printing media recommended for your WorkCentre C2424 Copier-Printer. For the most current information about Xerox printing media, go to www.xerox.com/office/c2424support.
Supported Papers, Transparencies, and Other Specialty Media
Any
Tra
y
Tray
1 O
nly
Au
to 2
-Sid
ed P
rin
tin
g
1-S
ided
Pri
nti
ng
On
ly
Paper Sizes Paper Types Paper Weight/Description
Letter (8.5 x 11.0 in.)
A4 (210 x 297 mm)
Legal (8.5 x 14.0 in.)
Executive (7.25 x 10.5 in.)
A5 (148 x 210 mm)
Statement (5.5 x 8.5 in.)
US Folio (8.5 x 13 in.)
B5 ISO (176 x 250 mm)
B5 JIS (182 x 257 mm)
Plain Paper, Letterhead,
Card Stock
60–120 g/m2 (16–32 lb. Bond) (22–45 lb. Cover)
● ●
121–220 g/m2 (33–40 lb. Bond) (46–80 lb. Cover)
● ●
Letter (8.5 x 11.0 in.)
A4 (210 x 297 mm)
Special (Pre-punched Paper, Business Cards, Photo Paper, Weatherproof Paper, Carbonless Paper, Glossy Paper)
60–120 g/m2 (16–32 lb. Bond) (22–45 lb. Cover)
● ●
121–220 g/m2 (33–40 lb. Bond) (46–80 lb. Cover)
● ●
Special Xerox Phaser Postcards ● ●
Xerox Professional Solid Ink Glossy Paper
● ●
Xerox Phaser Trifold Brochures ● ●
Transparency, Labels ● ●
A6 (105 x 148 mm)Index Cards (3 x 5 in.)
Plain Paper, Card Stock
60–220 g/m2 (16–40 lb. Bond) (22–80 lb. Cover)
● ●
Custom Width: 140–216 mm (5.5–8.5 in.) andHeight: 210–356 mm (8.3–14.0 in.)
● ●
Width: 76–139 mm (3.0–5.4 in.) orHeight: 127–209 mm (5.0–8.2 in.)
● ●
Weight: 60–120 g/m2 (16–32 lb. Bond) (22–45 lb. Cover)
● ●
Weight: 121–220 g/m2 (33–40 lb. Bond) (46–80 lb. Cover)
● ●
WorkCentre® C2424 Copier-Printer2-4
Supported Media
Supported Envelopes
NoteAll envelopes should be printed single-sided only. Use only paper envelopes. Do not use envelopes with windows, metal clasps, or adhesives with release strips. Some wrinkling and embossing may occur when printing envelopes. See Printing on the User Documentation CD-ROM for information on how to minimize these occurrences.
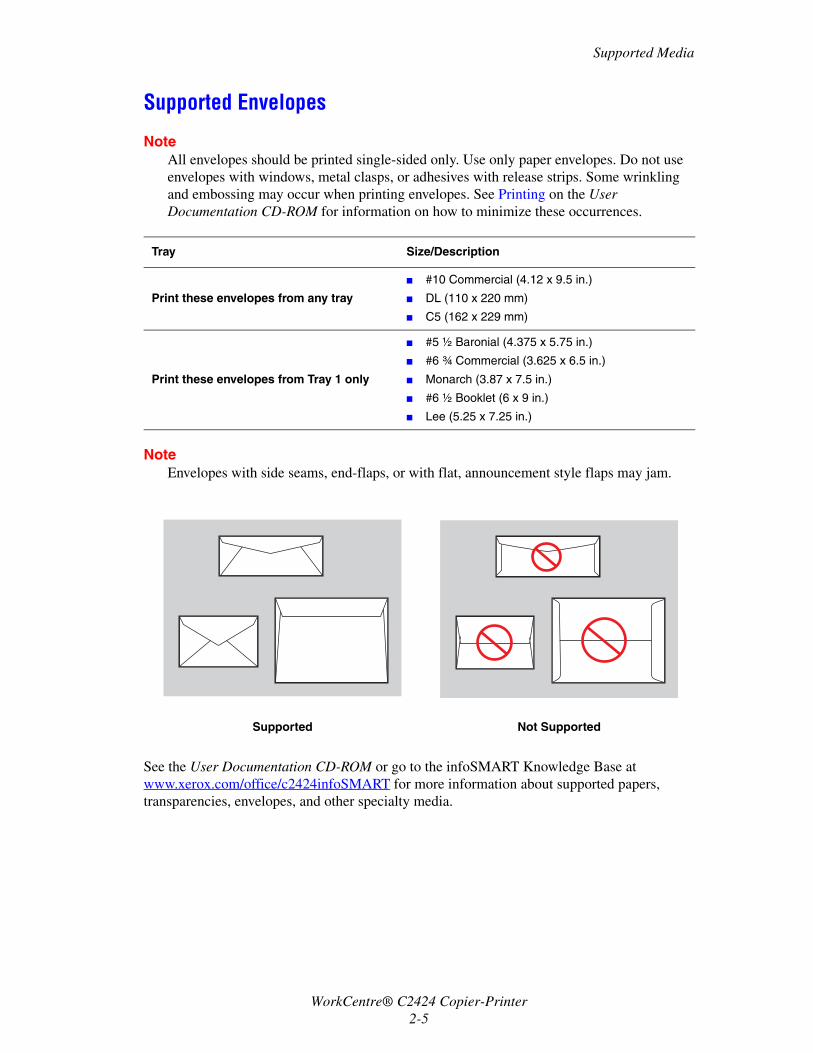
NoteEnvelopes with side seams, end-flaps, or with flat, announcement style flaps may jam.
See the User Documentation CD-ROM or go to the infoSMART Knowledge Base at www.xerox.com/office/c2424infoSMART for more information about supported papers, transparencies, envelopes, and other specialty media.
Tray Size/Description
Print these envelopes from any tray
■ #10 Commercial (4.12 x 9.5 in.)
■ DL (110 x 220 mm)
■ C5 (162 x 229 mm)
Print these envelopes from Tray 1 only
■ #5 ½ Baronial (4.375 x 5.75 in.)
■ #6 ¾ Commercial (3.625 x 6.5 in.)
■ Monarch (3.87 x 7.5 in.)
■ #6 ½ Booklet (6 x 9 in.)
■ Lee (5.25 x 7.25 in.)
Supported Not Supported
WorkCentre® C2424 Copier-Printer2-5
Supported Media
Media Storage GuidelinesProviding a good environment, and safe handling and storage conditions for your paper and other media contributes to optimum print quality.
■ Store paper in dark, cool, relatively dry locations. Most paper items are susceptible to damage from ultraviolet (UV) and visible light. UV radiation, which is emitted by the sun and fluorescent bulbs, is particularly damaging to paper items. The intensity and length of exposure to visible light on paper items should be reduced as much as possible.
■ Maintain constant temperatures and relative humidity.■ Avoid light, heat, and dampness.■ Avoid attics, kitchens, garages, and basements for storing paper. Inside walls are drier than
outside walls where moisture can collect. ■ Store paper flat. Paper should be stored on pallets, cartons, shelves, or in cabinets.■ Avoid having food or drinks in the area where paper is stored or handled.■ Do not open sealed packages of paper until you are ready to load them into the system.
Leave paper in the original packaging. For most commercial cut-size grades, the ream wrapper contains an inner lining that protects the paper from moisture loss or gain.
■ Some specialty media is packaged inside resealable plastic bags. Leave the media inside the bag until you are ready to use it; reinsert unused media in the bag and reseal it for protection.
Media that May Damage Your SystemYour system is designed to use a variety of media types for print and copy jobs. However, some media can cause poor output quality, increased paper jams, or damage to your system.
Unacceptable media for Trays 1–4 include:
■ Rough or porous media■ Plastic media■ Paper that has been folded or wrinkled■ Paper that has been photocopied■ Paper with staples inserted■ Envelopes with windows, metal clasps, or adhesives with release strips■ Padded envelopes■ CD labels
■ Media that is less than 60 g/m2 or more than 220 g/m2
WorkCentre® C2424 Copier-Printer2-6
Loading Media in Tray 1
Loading Media in Tray 1Use Tray 1 for a wide range of media including:
■ Plain paper■ Transparencies■ Card stock■ Labels■ Envelopes■ Some specialty media, such as photo paper, index cards, business cards, trifold
brochures, glossy paper, carbonless paper, and weatherproof paper.■ Custom size paper ranging from 76 x 127 mm (3.0 x 5.0 in.) to 216 x 356 mm
(8.5 x 14.0 in.).
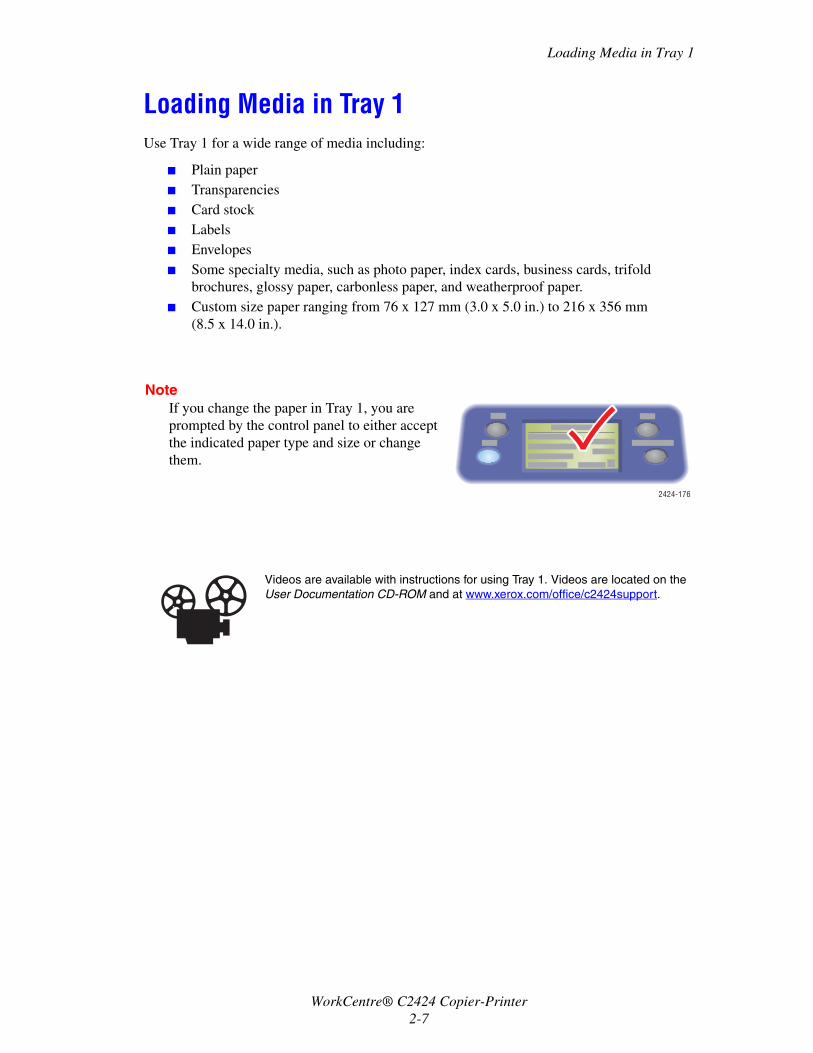
NoteIf you change the paper in Tray 1, you are prompted by the control panel to either accept the indicated paper type and size or change them.
Videos are available with instructions for using Tray 1. Videos are located on the User Documentation CD-ROM and at www.xerox.com/office/c2424support.
2424-176
WorkCentre® C2424 Copier-Printer2-7

Loading Media in Tray 1
To load paper or other media in Tray 1:
1. Open Tray 1 by pulling up and out on the handle.
2. Open the tray extension.
2424-006
2424-007
WorkCentre® C2424 Copier-Printer2-8

Loading Media in Tray 1
3. Insert the paper or other media into the tray.
■ Single-sided printing: Insert the side to be printed facedown with the top of page against the roller.
■ 2-sided printing: Insert side one faceup with the bottom of the page against the roller.
■ Pre-punched Paper: Load pre-punched paper with the holes next to the right paper guide.
CautionWhen using pre-punched paper, adjust print or copy margins to accommodate the holes. Printing over the holes may cause ink to transfer onto subsequent pages. A minimum margin of 19 mm (0.75 in.) is recommended.
2424-177
2424-182
WorkCentre® C2424 Copier-Printer2-9
Loading Media in Tray 1
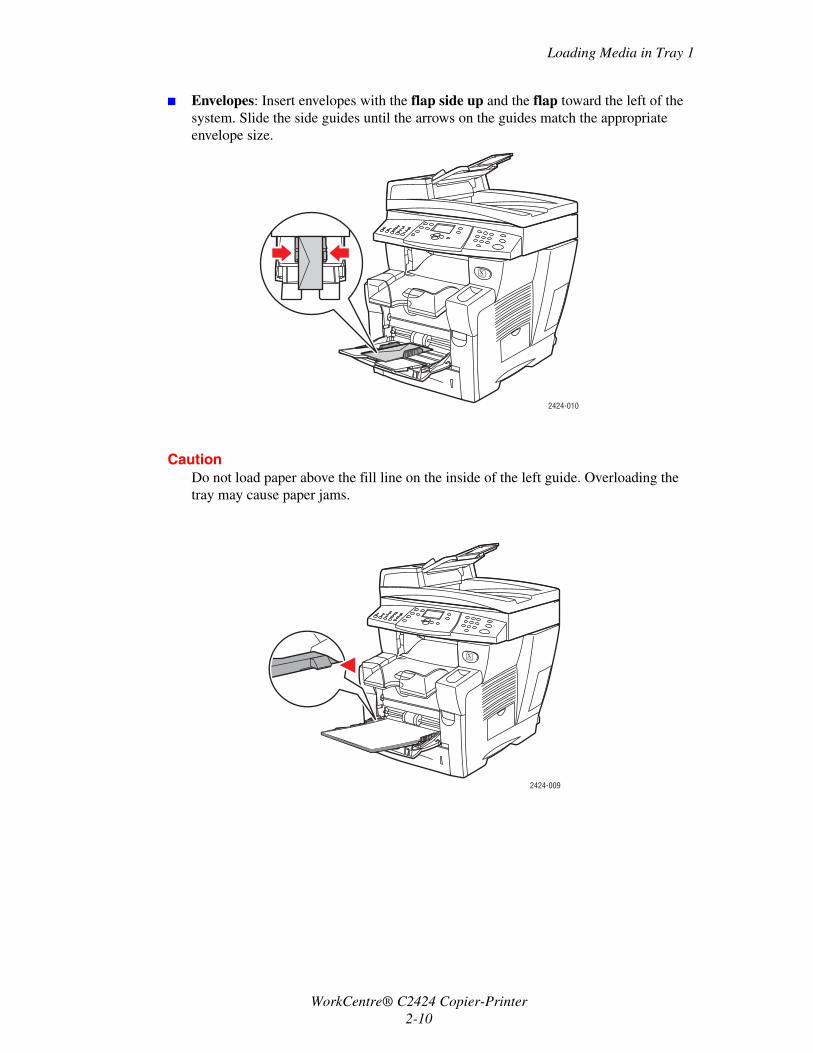
■ Envelopes: Insert envelopes with the flap side up and the flap toward the left of the system. Slide the side guides until the arrows on the guides match the appropriate envelope size.
CautionDo not load paper above the fill line on the inside of the left guide. Overloading the tray may cause paper jams.
2424-010
2424-009
WorkCentre® C2424 Copier-Printer2-10
Loading Media in Tray 1
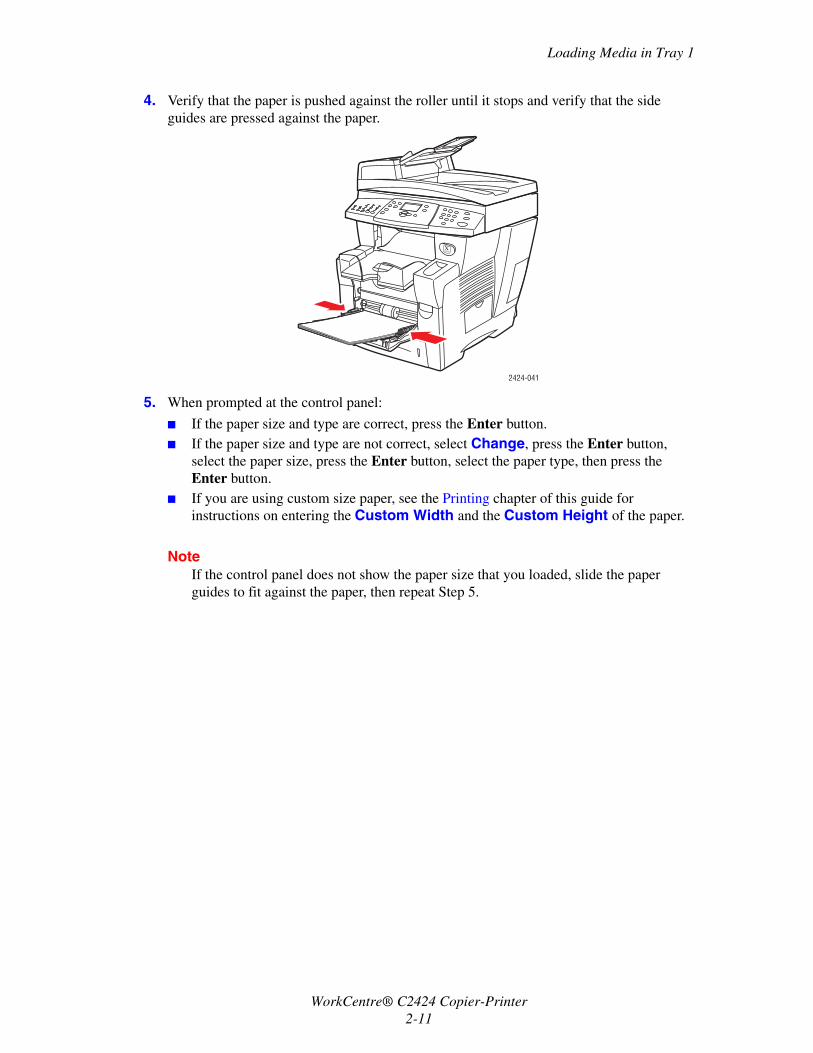
4. Verify that the paper is pushed against the roller until it stops and verify that the side guides are pressed against the paper.
5. When prompted at the control panel:
■ If the paper size and type are correct, press the Enter button.■ If the paper size and type are not correct, select Change, press the Enter button,
select the paper size, press the Enter button, select the paper type, then press the Enter button.
■ If you are using custom size paper, see the Printing chapter of this guide for instructions on entering the Custom Width and the Custom Height of the paper.
NoteIf the control panel does not show the paper size that you loaded, slide the paper guides to fit against the paper, then repeat Step 5.
2424-041
WorkCentre® C2424 Copier-Printer2-11
Loading Media in Tray 1
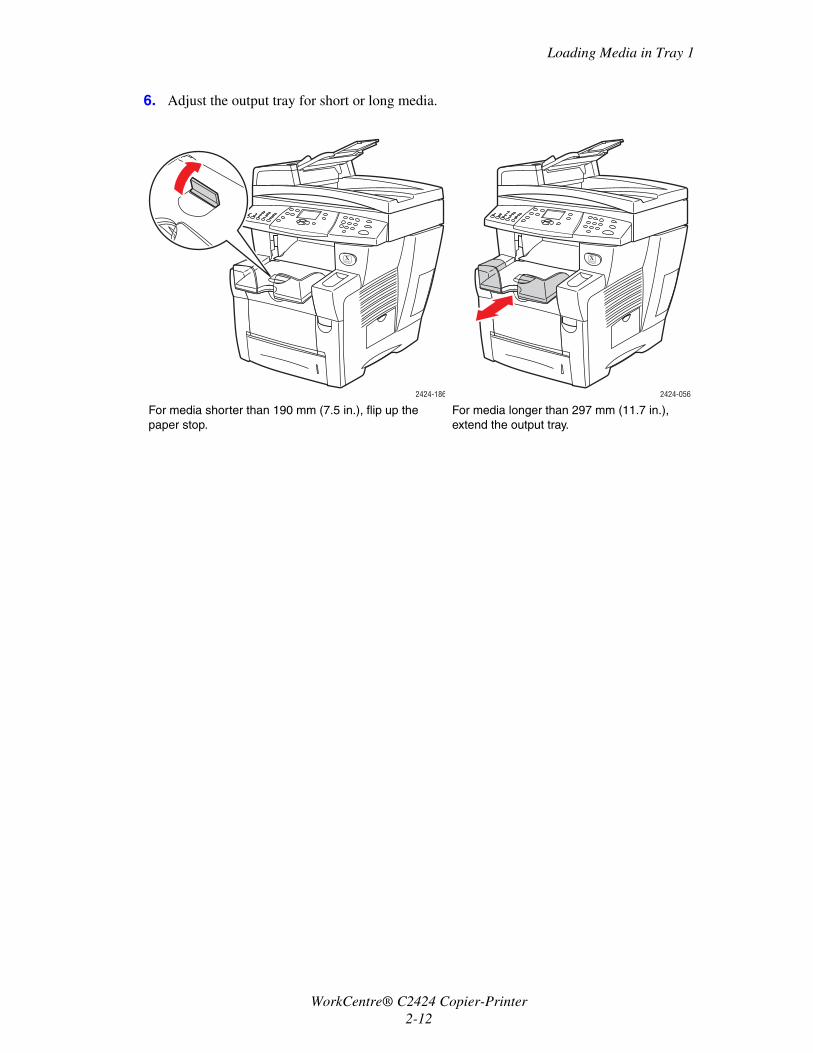
6. Adjust the output tray for short or long media.
For media shorter than 190 mm (7.5 in.), flip up the paper stop.
For media longer than 297 mm (11.7 in.), extend the output tray.
2424-186 2424-056
WorkCentre® C2424 Copier-Printer2-12

Loading Media in Trays 2, 3, and 4
Loading Media in Trays 2, 3, and 4Use Trays 2, 3, and 4 for a wide range of media including:
■ Plain paper■ Transparencies■ Labels■ #10 Commercial, DL, and C5 envelopes ■ Some specialty papers, such as Xerox Professional Solid Ink Photo Paper and Glossy
Paper, and Xerox Phaser Postcards, Trifold Brochures, and Weatherproof Paper.
To load paper or other media in Tray 2, 3, or 4:
1. Pull the tray completely out of the system.
2424-001
WorkCentre® C2424 Copier-Printer2-13

Loading Media in Trays 2, 3, and 4
2. If necessary, adjust the length and side paper guides to match the size of the paper.
■ Press the sides of the length guide, then slide the guide until the arrow on the guide matches the appropriate paper size and clicks into place.
■ Slide the side guides until the arrows on the guides match the appropriate paper size and the guides click into place.
NoteWhen the paper guides are adjusted correctly, there may be a small space between the paper and the guides.
3. Insert the paper into the tray.
■ Single-sided printing: Insert the side to be printed faceup with the top of the page toward the front of the tray.
■ 2-sided printing: Insert side one facedown with the top of the page toward the back of the tray.
Single-sided printing 2-sided printing
2424-094
2424-095 2424-096
WorkCentre® C2424 Copier-Printer2-14
Loading Media in Trays 2, 3, and 4
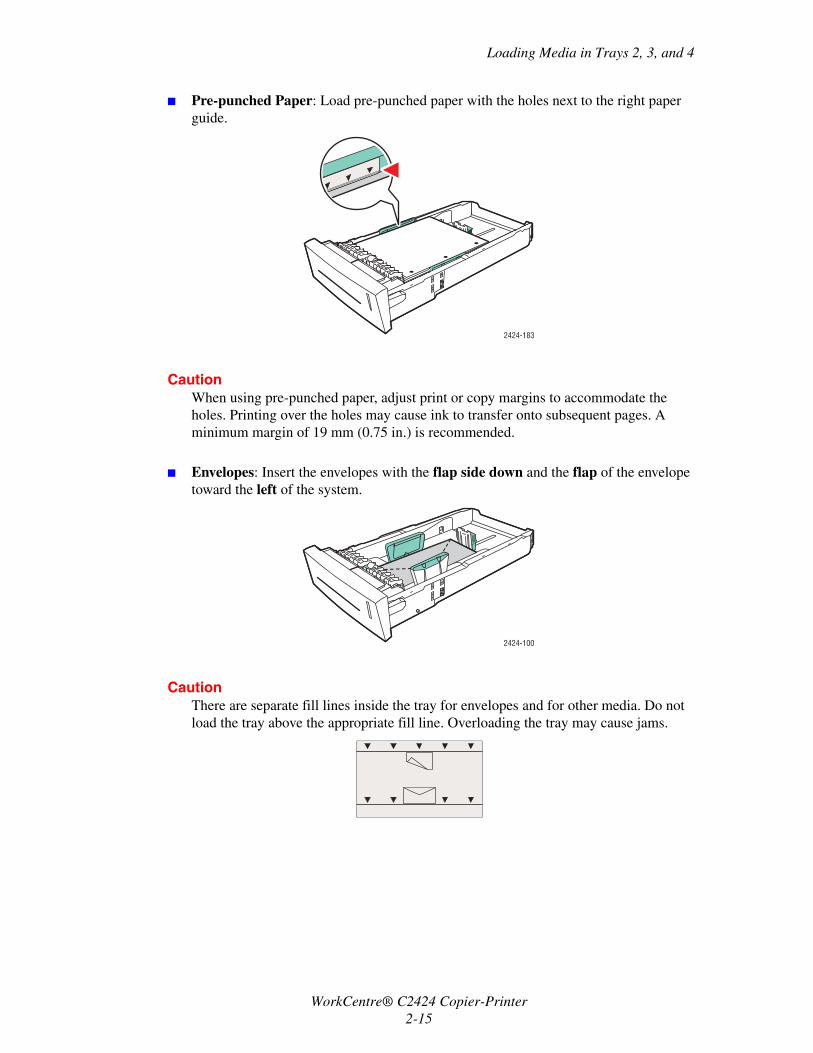
■ Pre-punched Paper: Load pre-punched paper with the holes next to the right paper guide.
CautionWhen using pre-punched paper, adjust print or copy margins to accommodate the holes. Printing over the holes may cause ink to transfer onto subsequent pages. A minimum margin of 19 mm (0.75 in.) is recommended.
■ Envelopes: Insert the envelopes with the flap side down and the flap of the envelope toward the left of the system.
CautionThere are separate fill lines inside the tray for envelopes and for other media. Do not load the tray above the appropriate fill line. Overloading the tray may cause jams.
2424-183
2424-100
WorkCentre® C2424 Copier-Printer2-15
Loading Media in Trays 2, 3, and 4
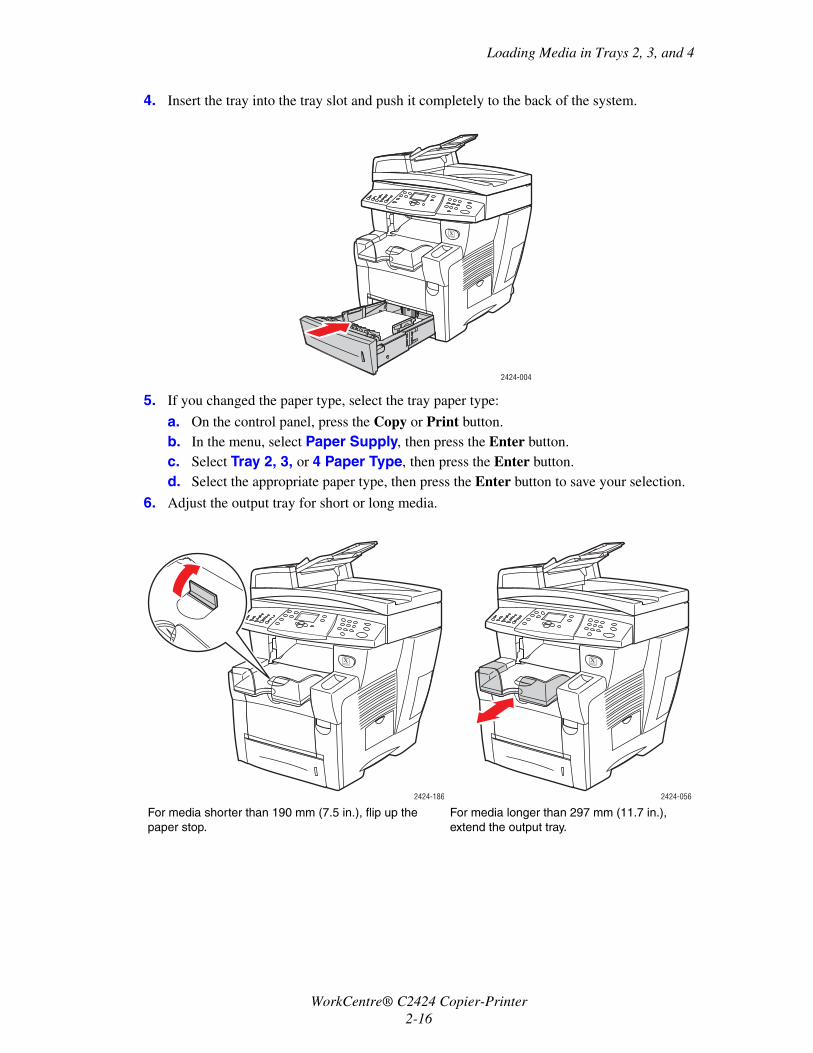
4. Insert the tray into the tray slot and push it completely to the back of the system.
5. If you changed the paper type, select the tray paper type:
a. On the control panel, press the Copy or Print button.b. In the menu, select Paper Supply, then press the Enter button.c. Select Tray 2, 3, or 4 Paper Type, then press the Enter button.d. Select the appropriate paper type, then press the Enter button to save your selection.
6. Adjust the output tray for short or long media.
For media shorter than 190 mm (7.5 in.), flip up the paper stop.
For media longer than 297 mm (11.7 in.), extend the output tray.
2424-004
2424-186 2424-056
WorkCentre® C2424 Copier-Printer2-16