00 garment construction -...
TRANSCRIPT

TextbookCLASS XI
Ga rmen t Construction
Shiksha Kendra, 2, Community Centre, Preet Vihar, Delhi-110 092 India
CENTRAL BOARD OF SECONDARY EDUCATION


Ga
rmen
t Con
struction
Textbook
GarmentConstruction
CENTRAL BOARD OF SECONDARY EDUCATION
in collaboration with
NATIONAL INSTITUTE OF FASHION TECHNOLOGY
CLASS
XI
Ga
rmen
t C
onst
ruct
ion
Text Book on Garment Construction Class XI
PRICE: `
First Edition 2013, CBSE, India
Copies:
Published By : The Secretary, Central Board of Secondary Education,
Shiksha Kendra, 2, Community Centre, Preet Vihar,
Delhi-110092
Design, Layout : Multi Graphics, 8A/101, WEA Karol Bagh, New Delhi-110005
Phone: 011-25783846
Printed By :
"This book or part thereof may not be reproduced byany person or agency in any manner."

Hkkjr dk lafo/ku
ewy dÙkZO;
mísf'kdk
Hkkx 4 d
51 d- ewy dÙkZO; & Hkkjr ds izR;sd ukxfjd dk ;g dÙkZO; gksxk fd og &
(d) lafo/ku dk ikyu djs vkSj mlds vkn'kksZa] laLFkkvksa] jk"Vªèot vkSj jk"Vªxku dk vknj djs_
([k)Lora=krk ds fy, gekjs jk"Vªh; vkanksyu dks izsfjr djus okys mPp vkn'kksZa dks ân; esa latks, j[ks vkSj mudk ikyu djs_
(x)Hkkjr dh izHkqrk] ,drk vkSj v[kaMrk dh j{kk djs vkSj mls v{kq..k j[ks_
(?k)ns'k dh j{kk djs vkSj vkg~oku fd, tkus ij jk"Vª dh lsok djs_
(Ä)Hkkjr ds lHkh yksxksa esa lejlrk vkSj leku HkzkrRo dh Hkkouk dk fuekZ.k djs tks /eZ] Hkk"kk vkSj izns'k ;k oxZ ij vk/kfjr lHkh
HksnHkko ls ijs gksa] ,slh izFkkvksa dk R;kx djs tks fL=k;ksa ds lEeku ds fo#¼ gSa_
(p)gekjh lkekfld laLÑfr dh xkSjo'kkyh ijaijk dk egÙo le>s vkSj mldk ijh{k.k djs_
(N)izkÑfrd i;kZoj.k dh ftlds varxZr ou] >hy] unh] vkSj oU; tho gSa] j{kk djs vkSj mldk lao/Zu djs rFkk izkf.kek=k ds izfr
n;kHkko j[ks_
(t)oSKkfud nf"Vdks.k] ekuookn vkSj KkuktZu rFkk lq/kj dh Hkkouk dk fodkl djs_
(>)lkoZtfud laifÙk dks lqjf{kr j[ks vkSj fgalk ls nwj jgs_
(×k)O;fDrxr vkSj lkewfgd xfrfof/;ksa ds lHkh {ks=kksa esa mRd"kZ dh vksj c<+us dk lrr iz;kl djs ftlls jk"Vª fujarj c<+rs gq, iz;Ru
vkSj miyfC/ dh ubZ mapkb;ksa dks Nw ys_1(V);fn ekrk&firk ;k laj{kd gS] Ng o"kZ ls pkSng o"kZ rd dh vk;q okys vius] ;FkkfLFkfr] ckyd ;k izfrikY; ds fy;s f'k{kk ds
volj iznku djsA
1ge] Hkkjr ds yksx] Hkkjr dks ,d lEiw.kZ ¹izHkqRo&laiUu lektoknh iaFkfujis{k yksdra=kkRed x.kjkT;º cukus ds fy,] rFkk
mlds leLr ukxfjdksa dks%
lkekftd] vkfFkZd vkSj jktuSfrd U;k;]
fopkj] vfHkO;fDr] fo'okl] /eZ
vkSj mikluk dh Lora=krk]
izfr"Bk vkSj volj dh lerk
izkIr djkus ds fy,
rFkk mu lc esa O;fDr dh xfjek2vkSj ¹jk"Vª dh ,drk vkSj v[kaMrkº
lqfuf'pr djus okyh ca/qrk c<+kus ds fy,
n<+ladYi gksdj viuh bl lafo/ku lHkk esa vkt rkjh[k 26 uoEcj] 1949 bZñ dks ,rn~}kjk bl lafo/ku dks vaxhÑr]
vf/fu;fer vkSj vkRekfiZr djrs gSaA1- lafo/ku (c;kyhloka la'kks/u) vf/fu;e] 1976 dh /kjk 2 }kjk (3-1-1977) ls ¶izHkqRo&laiUu yksdra=kkRed x.kjkT; ds LFkku ij izfrLFkkfirA
2- lafo/ku (c;kyhloka la'kks/u) vf/fu;e] 1976 dh /kjk 2 }kjk (3-1-1977) ls ¶jk"Vª dh ,drk ds LFkku ij izfrLFkkfirA
1- lafo/ku (N;klhoka la'kks/u) vf/fu;e] 2002 dh /kjk 4 }kjk (12-12-2002) lsa var% LFkkfirA
THE CONSTITUTION OF INDIA
PREAMBLE
1WE, THE PEOPLE OF INDIA, having solemnly resolved to constitute India into a [SOVEREIGN
SOCIALIST SECULAR DEMOCRATIC REPUBLIC] and to secure to all its citizens :
JUSTICE, social, economic and political;
LIBERTY of thought, expression, belief, faith and worship;
EQUALITY of status and of opportunity; and to promote among them all 2FRATERNITY assuring the dignity of the individual and the [unity and integrity of the Nation];
IN OUR CONSTITUENT ASSEMBLY this twenty-sixth day of November, 1949, do HEREBY ADOPT,
ENACT AND GIVE TO OURSELVES THIS CONSTITUTION.
THE CONSTITUTION OF INDIA
Chapter IV A
FUNDAMENTAL DUTIES
ARTICLE 51A
Fundamental Duties - It shall be the duty of every citizen of India-
(a) to abide by the Constitution and respect its ideals and institutions, the National Flag and the National Anthem;
(b) to cherish and follow the noble ideals which inspired our national struggle for freedom;
(c) to uphold and protect the sovereignty, unity and integrity of India;
(d) to defend the country and render national service when called upon to do so;
(e) to promote harmony and the spirit of common brotherhood amongst all the people of India transcending religious, linguistic and regional or sectional diversities; to renounce practices derogatory to the dignity of women;
(f) to value and preserve the rich heritage of our composite culture;
(g) to protect and improve the natural environment including forests, lakes, rivers, wild life and to have compassion for living creatures;
(h) to develop the scientific temper, humanism and the spirit of inquiry and reform;
(i) to safeguard public property and to abjure violence;
(j) to strive towards excellence in all spheres of individual and collective activity so that the nation constantly rises to higher levels of endeavour and achievement;
1(k) who is a parent or guardian to provide opportunities for education to his/her child or, as the case may be, ward between age of six and forteen years.
1. Subs, by the Constitution (Forty-Second Amendment) Act. 1976, sec. 2, for "Sovereign Democratic Republic” (w.e.f. 3.1.1977)
2. Subs, by the Constitution (Forty-Second Amendment) Act. 1976, sec. 2, for "unity of the Nation” (w.e.f. 3.1.1977)
1. Ins. by the constitution (Eighty - Sixth Amendment) Act, 2002 S.4 (w.e.f. 12.12.2002)
Ga
rmen
t Con
struction
Fashion design is the art of the application of design and aesthetics or natural beauty to clothing and
accessories. Fashion design is influenced by cultural and social latitudes, and has varied over time and
place. Fashion designers work in a number of ways in designing clothing and accessories. Some work
alone or as part of a team. They attempt to satisfy consumer desire for aesthetically designed clothing;
and, because of the time required to bring a garment onto the market, must at times anticipate
changing consumer tastes.
Fashion designers attempt to design clothes which are functional as well as aesthetically pleasing.
They must consider who is likely to wear a garment and the situations in which it will be worn. They
have a wide range and combinations of materials to work with and a wide range of colors, patterns and
styles to choose from. Though most clothing worn for everyday wear falls within a narrow range of
conventional styles, unusual garments are usually sought for special occasions, such as evening wear
or party dresses.
The knowledge of sewing gives a confident feeling when it is applied to the construction of garments.
The earlier method of sewing by hand is not applicable for all stages of garment making. Sewing
machines range from most basic having only simple lock stitch to the electronic machines that use
advanced computer technology having various functions like piping, binding, ruffling, pleating,
darning, hemming and even making buttonholes and attaching fasteners. One has to be familiar with
the characteristics of different types of machines for selecting appropriate machine, depending upon
the ability and requirements of the person.
Garment making is an introduction to the basic skill of sewing which is essential to convert the design
on paper into a garment. Garment making is one of the basic content of fashion designing. Proficiency
in the art of sewing is an essential pre-requisite in garment making. Therefore, it is necessary to know
the techniques of sewing for producing attractive garments with good fit. Garment making is thus a
technical accomplishment that requires knowledge of fabrics, principles of clothing construction and
skills involved in it. This depends on the ability to select the correct fabric, colour, design and
accessories to suit an individual occasion. The sewing technology will impart to the learners the
knowledge about sewing machine and its accessories, cutting, marking, sewing standards for stitch,
seam and thread. Sewing for the apparel industry focuses on the fundamental principles of garment
construction.
CBSE NIFT
Mr. Vineet Joshi, IAS, Chairman Mr. Prem Kumar Gera, IAS
Dr. Biswajit Saha (Associate Professor and Sr. Prof Banhi Jha, Dean (A)
Programme Officer)
Ms. Swati Gupta (Assistant Professor and
Assistant Programme Officer)
Anchor Contributors
Prof. Vandana Narang Content & Visuals
Prof. (Dr.) Anitha Mabel Manohar
Dr. M. Vasantha & Ms. Geetha Ramasamy
Preamble

Ga
rmen
t C
onst
ruct
ion
The Indian textile and fashion industry contributes substantially to its exports earnings. It
is also the second largest domestic employer after agriculture. The garment industry is
classified into organized and unorganized sectors catering to a diverse consumer segment.
The unorganized segment comprises small-scale readymade apparel stores, independent
fabric and tailoring shops etc. The organized sector comprises single-brand or multi-brand
retail outlets, designer boutiques etc. to cater to different strata of consumers. The domestic
apparel market is expected to grow @ 11% CAGR primarily driven by high value growth due
to organized and branded segment. The Indian textile and apparel trade is estimated at USD
662 billion in 2011 and is expected to grow at 5% CAGR by 2021.Employment in the Indian
textile and apparel sector stands at 45 million with an additional employment of 60 million in
allied sectors.
The Central Board of Secondary Education (CBSE) has taken the initiative of developing a
range of vocational courses in the areas of emerging interest of the students. In keeping with
this objective, the vocational course on Fashion Design Garment Technology (FDGT) for
students of Std XI and XII offers an option where the student can either move into higher
education or can enter into the fashion industry right after completion of secondary level of
education. This course is envisaged that it will not only inculcate knowledge but also the
related skills which are required by specific industry segments. The FDGT course combines
a gamut of theoretical with practical inputs in order to enable students to gain professional
competency education in the area of fashion design and garment technology.
The content of the subject is the outcome of consultative discussions among CBSE officials
and teachers, senior NIFT faculty members and alumni, industry members representing the
export and domestic garment sector including fashion designers.
The Board would like to place on record the support received from Shri P K Gera, IAS,
Director General NIFT and Sr. Prof Banhi Jha, Dean - Academic. We also acknowledge the
contribution of Sr. Prof Banhi Jha, Prof Vandana Narang - Project Anchor, Prof Anitha
Mabel Manohar and Ms Nayanika Thakur Mehta, Associate Professor NIFT for their time
and effort in developing the FDGT textbooks for Std XI. The contribution of the Dr.
BiswajitSaha, Associate Professor and Programme Officer, Vocational Education Cell,CBSE
and Ms. Swati Gupta, Assistant Professor and Assistant Programme Officer, Vocational
Education Cell, CBSE and other members of Vocational Education Cell, CBSE is also deeply
appreciated.
Any suggestions and feedback from the readers for improvement in the future editions of the
subject is welcome.
Shri Vineet Joshi, IAS
Chairman CBSE
Foreword
Ga
rmen
t Con
struction
Preamble
Foreword
Chapter–1 Introduction to Sewing Machine, its various parts 1
Chapter–2 Sewing Aids 8
Chapter–3 Maintenance of Sewing Machine 14
Chapter–4 Selection of Suitable Needle and Thread for various fabrics and
suitable stitch per inch (SPI) 19
Chapter–5 Seams and Seam Finishes 22
Content

Ga
rmen
t C
onst
ruct
ion

Ga
rmen
t Con
struction
1
Objectives:
At the end of the chapter, the students shall be able to:
Know about the different types of sewing machine
Know about various parts of sewing machine
A machine which controls the fabric with feeding devices, forms a perfect stitch is called a
Sewing Machine. A sewing machine is a machine used to stitch fabric and other materials
together with thread. Sewing machines were invented during the first Industrial Revolution
to decrease the amount of manual sewing work performed in clothing companies. Since the
invention of the first working sewing machine, generally considered to have been the work of
Thomas Saint in 1790 the sewing machine has vastly improved the efficiency and
productivity of fabric, clothing and needle industries.
The sewing machine was invented in stages:
1. English inventor Thomas Saint was the first to patent a design for a sewing
machine in 1790 but he did not advertise his invention. It was meant for leather
and canvas.
2. Josef Madersperger began developing the first sewing machine in 1807. He
presented the first working machine in 1814.
3. In 1830 Barthélemy Thimonnier, a French tailor, patented a sewing machine that
sewed straight seams using chain stitch.
4. Lockstitch sewing machine was invented by Walter Hunt in 1832. His machine
used an eye-pointed needle carrying the upper thread and a falling shuttle
carrying the lower thread. The curved needle moved through the fabric
horizontally, leaving the loop as it withdrew.
5. John Greenough patented the first sewing machine in the United States in 1842.
Elias Howe created his sewing machine in 1845, using a similar method to Hunt's,
except the fabric was held vertically.
]
]
1.1 Stages of Development of Sewing Machine:
Chapter 1
Introduction to Sewing Machine, its various parts

Ga
rmen
t C
onst
ruct
ion
2
6. The first electric machines were developed by Singer Sewing Co. and introduced in
1889. At first these were standard machines with a motor strapped on the side. As
more homes gained power, these became more popular and the motor was
gradually introduced into the casing.
The following are the categories of sewing machines:
1. Domestic sewing machine
2. Industrial sewing machine
Domestic sewing machines are designed for one person to sew individual dress while using a
single stitch type. Modern sewing machines are designed in such a way that the fabric easily
glides in and out of the machine without the hassle of needles and thimbles and other such
tools used in hand sewing, automating the process of stitching and saving time.
Industrial sewing machines are larger, faster, more complex, and more varied in their size,
cost, appearance, and task.
The following are the comparison between domestic and industrial sewing machines
1. The industrial machine is faster, stitching from 3000 to 6000
2. stitches per minute; the fastest domestic machine stitch no more than 1500 stitches per
minute
3. The basic industrial machine makes only a straight stitch; most domestic machines
make straight and zigzag stitches.
4. The presser foot on a power machine is raised and lowered with a knee lift of special foot
pedal. On domestic machines, it is generally operated manually using a lever at the
back of the needle bar.
5. The throat plate on many industrial machines may not be marked with frequently used
seam widths.
6. The presser foot has a narrow opening between two toes and holds the fabric more
firmly than the all-purpose, zigzag foot on the home sewing machine.
7. Automatic lubrication is done in industrial sewing machine whereas it is done
manually in domestic sewing machine.
Some machines can create embroidery-type stitches. Some have a work holder frame. Some
have a work feeder that can move along a curved path, while others have a work feeder with a
work clamp. Needle guards, safety devices to prevent accidental needle-stick injuries, are
often found on modern sewing machines.

Ga
rmen
t Con
struction
3
Sewing Machine
1.2 Parts and Functions of Sewing Machine
1. Machine Head
Thread guides
Thread spindle
Thread stand
Hand wheel
ReverseStitch Control
Power Switch
Motor
Knee Litt
Stand
Head
BedTable
Pan
Tool Drawer
Treadle
Thread spindle
Belt Cove
Thread Spindle
Pressure regulator Hand wheel
Thread retainer
Take-up lever
Thread guidesStitch length regulator
Needle thread tension assembly
Pressure foot
Arm
Reverse stitch control

Ga
rmen
t C
onst
ruct
ion
4
1. Arm : The horizontal part of the head that houses the drive shafts.
2. Pressure regulator: Control that regulates the amount of pressure on the
presser foot.
3. Hand wheel: The part that controls the motion of the machine manually
and electrically.
4. Thread retainer: A three - hole that applies a small amount of tension on
the thread so it will flow into the tension discs uniformly.
5. Take-up lever: The part that first loosens the top thread during the stitch
formation, then removes any slack to set or lock the stitch.
6. Thread guides: The parts that guide the thread from the thread cone to
the needle. They smooth the thread and protect it from abrasion.
7. Presser foot: A device that holds the fabric in place for stitching.
1. Thread guides: The parts that guide the thread from the thread cone to
the needle. They smooth the thread and protect it from abrasion.
2. Check spring: A small wire spring behind or at the top of the tension discs.
It provides a small amount of tension on the needle thread and acts as a
shock absorber. On some machines, the check spring is mounted separately.
3. Tension discs: Two concave discs that control the delivery of the upper
thread from the spool to the needle.
4. Slack thread regulator: A metal hook or bar near the tension discs.
2. Needle - Thread Tension Assembly
Thread guides
Check spring
Tension discs
Slack thread regulator
Ga
rmen
t Con
struction
5
There are three major types of sewing machines:
1) Mechanical sewing machines,
2) Electronic sewing machines,
3) Computerized sewing machines.
Mechanical sewing machines are less expensive and are the simplest type of sewing
machine in terms of build.
Electronic sewing machines became popular during 1970s. There are more features in
an electronic sewing machine than in a mechanical sewing machine.
Another type is the computerized sewing machine, which is very fast and easy to use.
Computerized sewing machines are similar to electronic sewing machines.
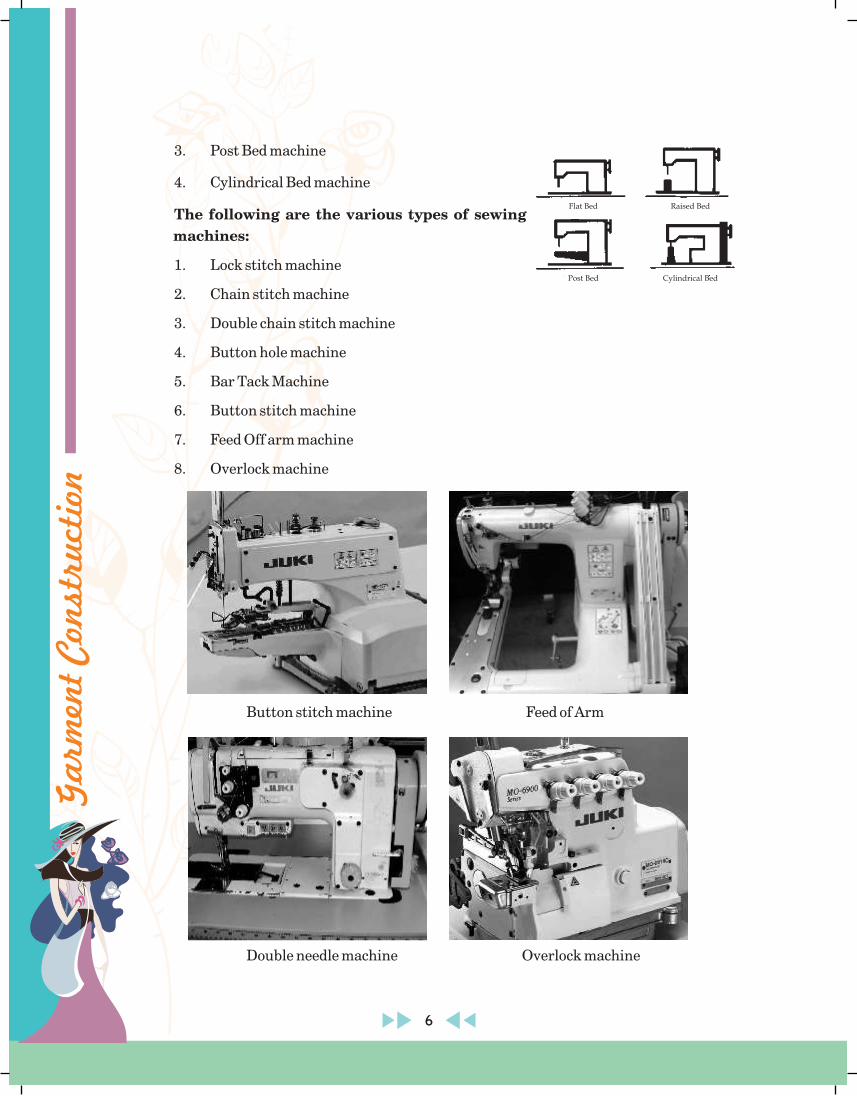
Types of sewing machine based on Bed are as follows:
1. Flat bed sewing machine (basic)
2. Raised Bed machine
1.3 Types of Sewing Machines
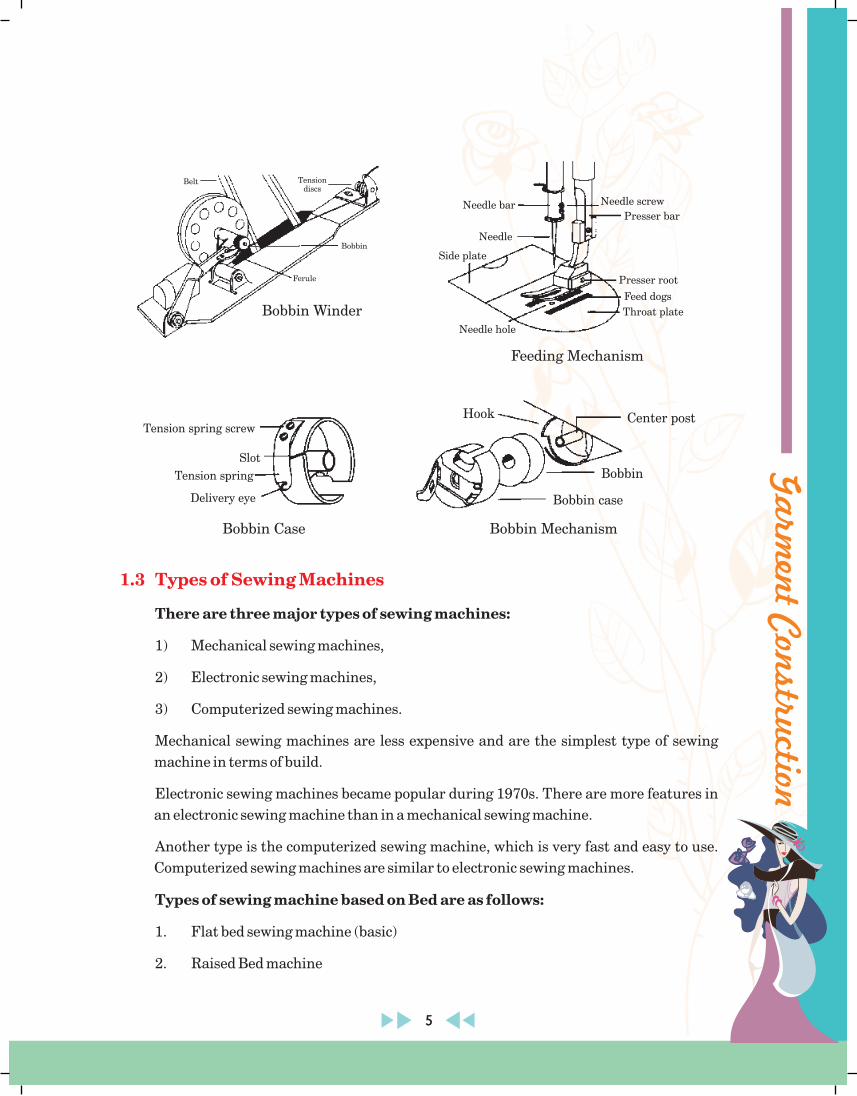
Bobbin Case
Bobbin Winder
Belt Tension discs
Bobbin
Ferule
Feeding Mechanism
Needle bar
Needle
Side plate
Needle hole
Needle screw
Presser bar
Presser root
Feed dogs
Throat plate
Tension spring screw
Slot
Tension spring
Delivery eye
Bobbin Mechanism
Hook Center post
Bobbin
Bobbin case
Ga
rmen
t C
onst
ruct
ion
6
3. Post Bed machine
4. Cylindrical Bed machine
The following are the various types of sewing
machines:
1. Lock stitch machine
2. Chain stitch machine
3. Double chain stitch machine
4. Button hole machine
5. Bar Tack Machine
6. Button stitch machine
7. Feed Off arm machine
8. Overlock machine
Button stitch machine Feed of Arm
Double needle machine Overlock machine
Flat Bed Raised Bed
Post Bed Cylindrical Bed
Ga
rmen
t Con
struction
7
Questions
1. What are the two sewing method ?
2. What is a lock stitch machine?
3. What is the function of pressure foot?
4. What are the difference between single needle and double needle lock stitch machine?
5. What are the difference between industrial sewing machine and domestic sewing
machine?
The importance of sewing, its role in apparel industry, the latest trend in apparel
Industries are illustrated in introduction chapter. It is a creative and interesting skill.
Knowledge on sewing give a confident feeling when it is applied to the construction of
garments. This part of the course introduces the students to the skills required for
converting fabrics into a sewn garment.
A machine which forms a perfect stitch is called a Sewing Machine. Stages of
development of sewing machine are explained in this chapter. Categories of sewing
machine are illustrated here.
SUMMARY

Ga
rmen
t C
onst
ruct
ion
8
General tools and sewing aids help us to enhance our sewing experience. If we have the right
tools then we get our work done quickly. All sewing aids, irrespective of type, have the same
primary objective to increase the effectiveness of sewing. Right tools will help us to make the
sewing more successful and enjoyable
At the end of the chapter, the students shall be able to:
Know about the different sewing aids available
Know its' uses
This plastic tape is 60" long with small metal tips on either end. Most tape measures
have imperial measurements on one side with the metric equivalent on the other.
Seam ripper helps to make opening the seam easy.
Objectives:
]
]
a) Tape measures
b) Seam ripper
Chapter 2
Sewing Aids
Ga
rmen
t Con
struction
9
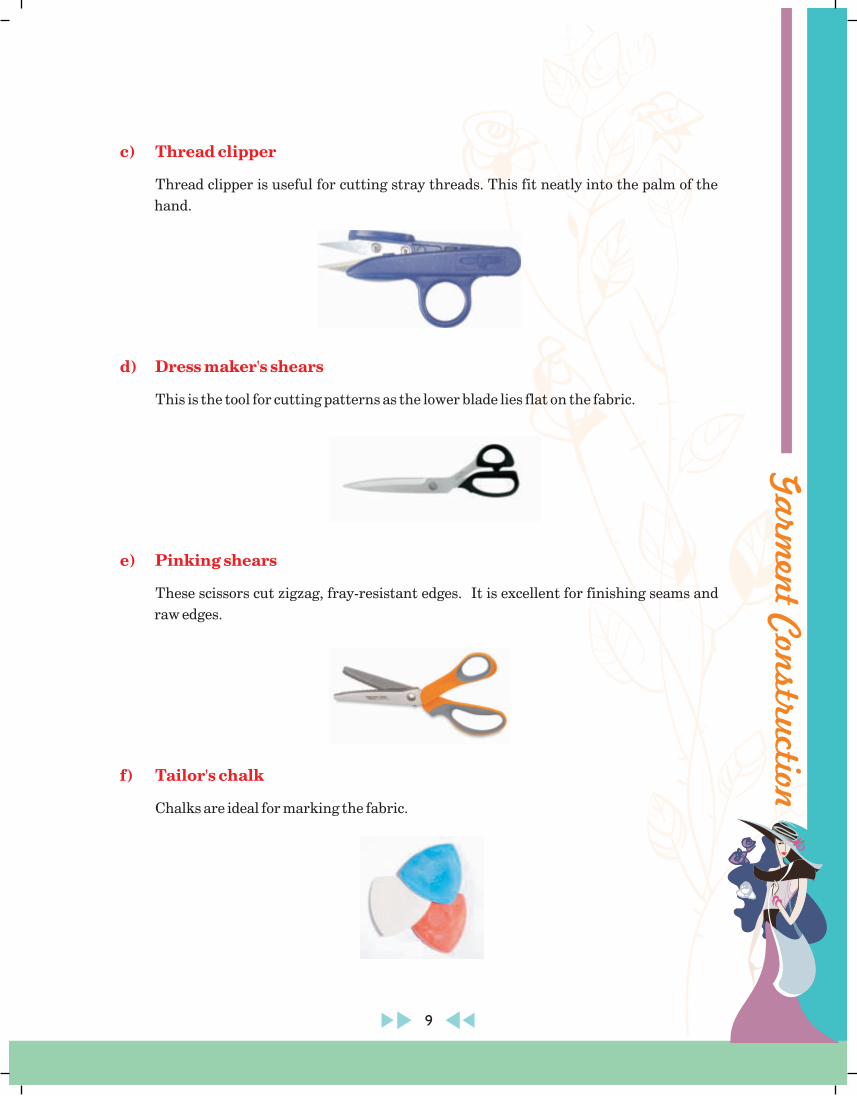
c) Thread clipper
d) Dress maker's shears
e) Pinking shears
f) Tailor's chalk
Thread clipper is useful for cutting stray threads. This fit neatly into the palm of the
hand.
This is the tool for cutting patterns as the lower blade lies flat on the fabric.
These scissors cut zigzag, fray-resistant edges. It is excellent for finishing seams and
raw edges.
Chalks are ideal for marking the fabric.

Ga
rmen
t C
onst
ruct
ion
10
g) Tracing wheel
h) Needle Threader
i) Thimble
j) Loop turner
Tracing wheel is used with dress maker's tracing paper to transfer pattern markings to
wrong side of fabric. We have to use this tool with extra care.
This tool makes it easy to thread needle of all kinds. The wire is inserted into needle eye.
It is used to protect the middle finger during hand sewing. These are available in
different sizes and hence we can try them on size before buying.
This tool is having a hook at one end and is used to turn tubing to the right side.
Ga
rmen
t Con
struction
11
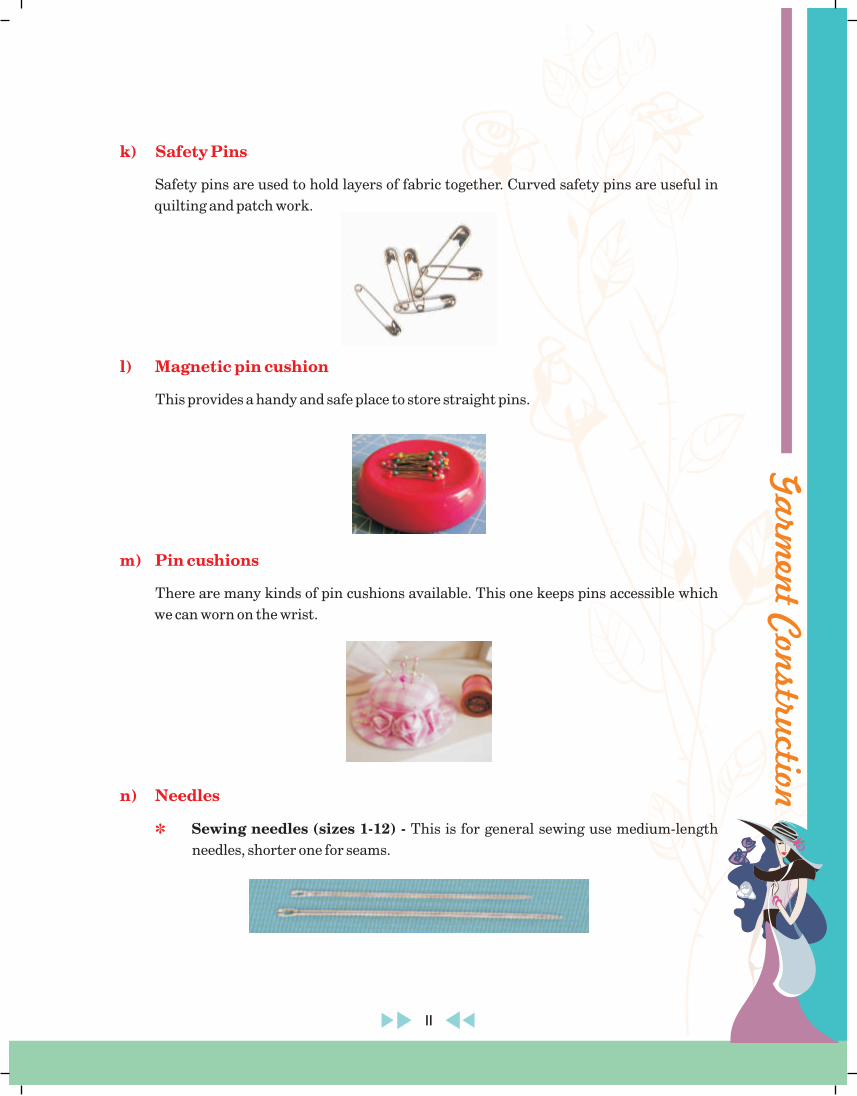
k) Safety Pins
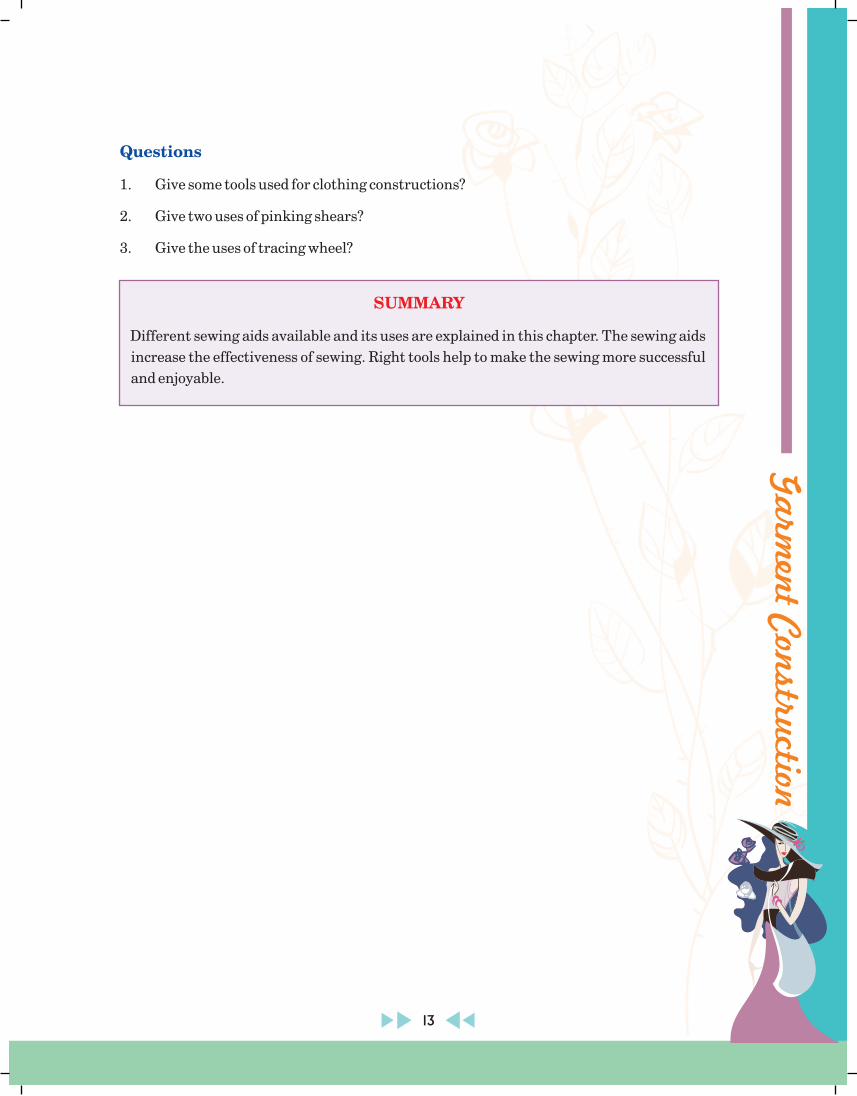
l) Magnetic pin cushion
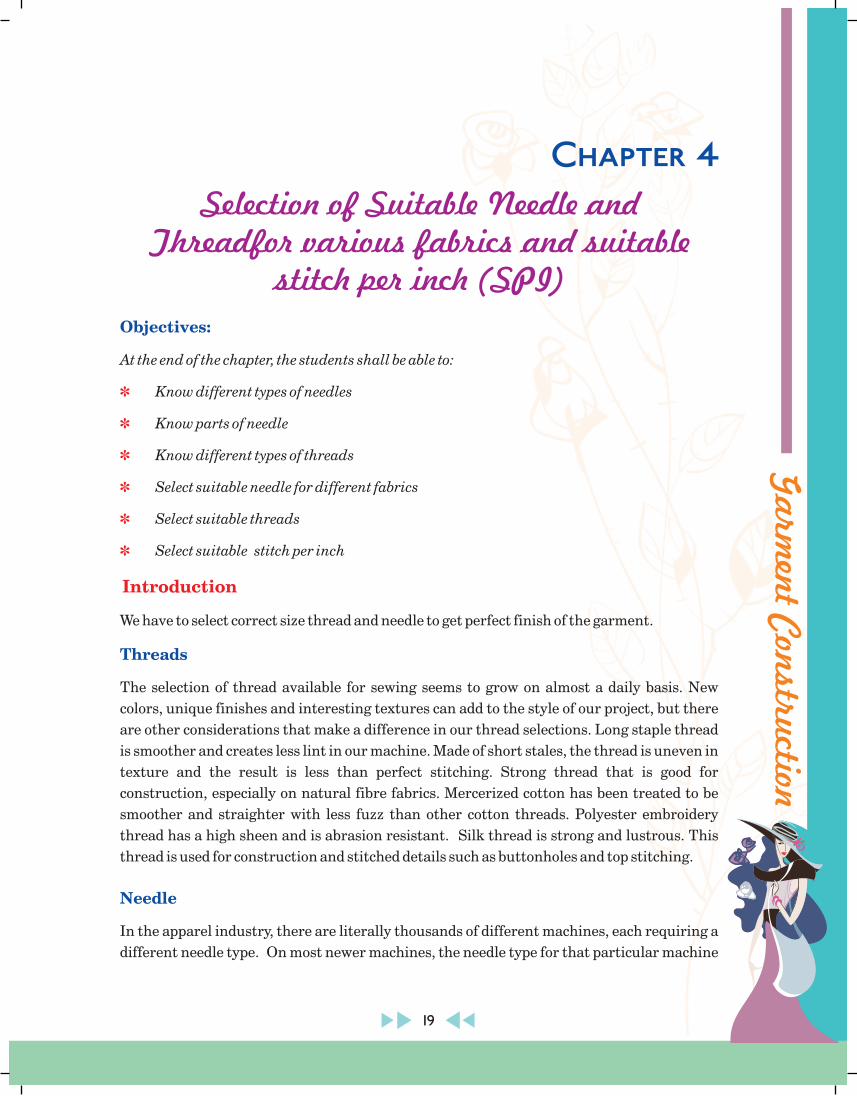
m) Pin cushions
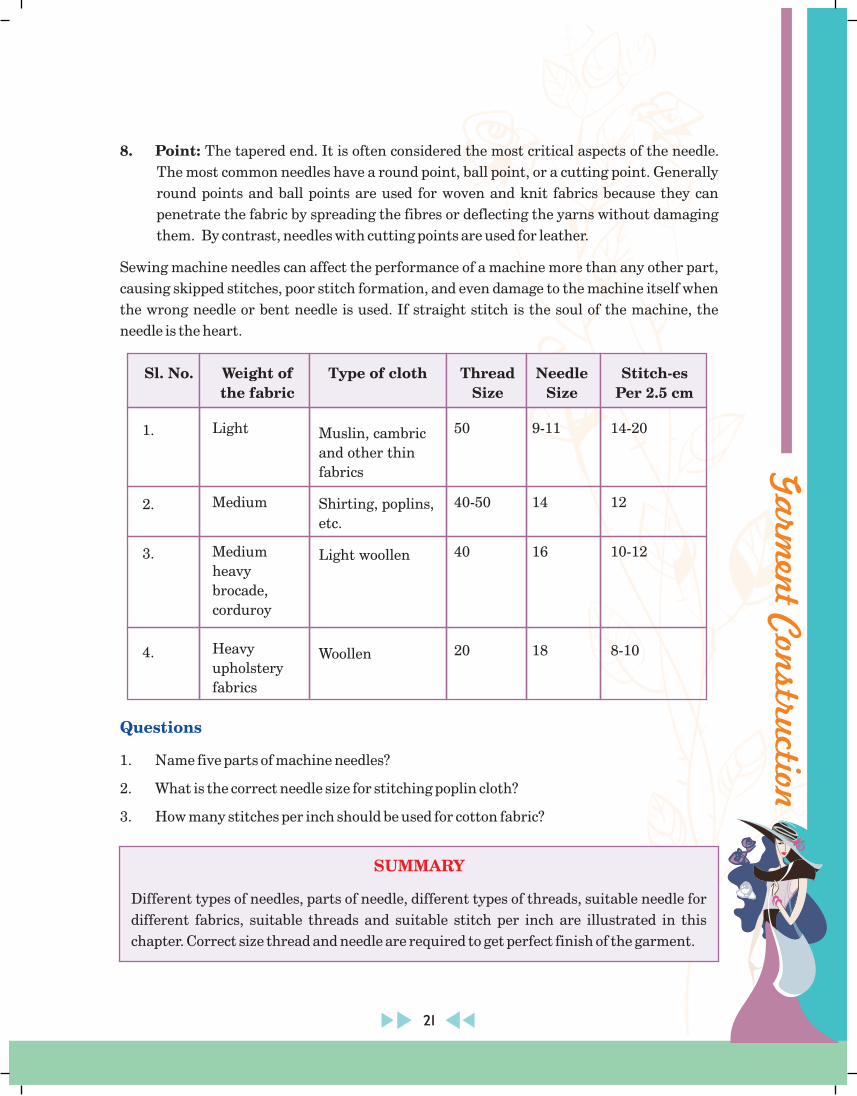
n) Needles
]
Safety pins are used to hold layers of fabric together. Curved safety pins are useful in
quilting and patch work.
This provides a handy and safe place to store straight pins.
There are many kinds of pin cushions available. This one keeps pins accessible which
we can worn on the wrist.
Sewing needles (sizes 1-12) - This is for general sewing use medium-length
needles, shorter one for seams.

Ga
rmen
t C
onst
ruct
ion
12
]
]
]
]
]
Tapestry needles (size 1-8) - these needles are heavy and blunt and are used
mainly for tapestry work.
Bodkins - these are used to thread ribbon, cord, or elastic through casings.
Machine needles - these are all available in various sizes and we have to see that
it is matched to the fabric.
Twin needles - it is used to sew narrow, parallel lines, or to make pin tucks.
Twin needles for stretch fabrics - a special twin needle is used for stretch
fabrics, especially for jersey.
Others - There are threads, bands, and buttons to suit every type of fabric. Choosing
the right ones make sewing easier
Ga
rmen
t Con
struction
13
Questions
1. Give some tools used for clothing constructions?
2. Give two uses of pinking shears?
3. Give the uses of tracing wheel?
Different sewing aids available and its uses are explained in this chapter. The sewing aids
increase the effectiveness of sewing. Right tools help to make the sewing more successful
and enjoyable.
SUMMARY

Ga
rmen
t C
onst
ruct
ion
14
Objectives:
Materials required:
Caution:
At the end of the chapter, the students shall be able to:
How to maintain the sewing machine
Know the materials for maintenance and repair
Take precautions during repair and maintenance
In the apparel industry, a clean, well - oiled machine is essential for safety and good
performance; the same is true in the class room. Machine maintenance is also important in
preventing stitching faults. In most planes, a quick cleaning is done by the operators once a
day, but the responsibility for the more through cleaning various from plant to plant. In some
factories, it is done by the operators on Saturday after noon. In others, it is done by a
mechanic.
When cleaning the machine, clean everything--the machine mechanism, machine table
and stand, your stools, work station area, and even your hands--to avoid soiling the
materials being sewn, prevent accidents, and avoid wear and damage to the machine.
These directions focus on the lockstitch machine, but they can easily be adapted for
other machine types.
1. Paintbrush (1/2" wide).
2. Clear sewing machine oil.
3. Soft disposable cloth or clean rag.
4. Screwdriver.
5. Sewing machine manual.
6. Air hose or industrial vacuum cleaner
Before cleaning any machine, turn off the machine and run it out.
]
]
]
3.1 Cleaning the Machine
Chapter 3
Maintenance of Sewing Machine

Ga
rmen
t Con
struction
15
1. Open the slide and remove the bobbin case, then remove the throat plate.
Occasionally remove the face plate from the left end of the head.
2. Brush or blow away any lint, dust, or loose threads in the area around the feed
dogs and rotary hooker shuttle. Do not use anything hard, such as a screwdriver
or scissor points, to remove the lint. When cleaning the overlock machine, open
the cloth plate and looper cover to blow out any lint in those areas. On the blind
stitch machine, open the plate to expose and clean the area around the spreader.
3. Turn the handwheel manually to expose any areas that might have been hidden
initially, brush again.
4. Carefully tilt the machine head back until the head rests on the post on the back of
the table.
5. Brush out any lint, dust, or threads in the lower part of the machine. Use a rag to
remove any lint on the machine's mechanism, excess oil in the pan, and if
appropriate, the oil pump screen.
6. If the machine is not self-oiling, consult the manual for oiling directions. If the
manual is not available, place one drop of oil on each moving part on the lower
mechanism.
7. Press the knee lift to the right and lower the machine head into position.
8. Replace all plates and screws
9. Oil the upper mechanism by placing a drop of oil in each oil hole.
10. Replace the bobbin case.
11. Check the needle to be sure it is clean and the eye is not clogged.
12. Replace the needle if necessary.
13. Wipe away any excess oil or dust on the head, machine bed, thread stand, motor,
table, and stand.
14. If there is lint between the tension discs and in the thread guides, use thread to
floss the tension discs and remove any lint.
15. If you have oiled the machine, sew on few scrabs to remove any excess oil.
16. Wash your hands after cleaning and oiling the machine.

Ga
rmen
t C
onst
ruct
ion
16
17. At the end of the day, put a piece of stitching patch under the foot, lower the foot,
cover the machine, and pick up any trash.
Oiling the machine and how frequently it is done varies from plant to plant. These
factors vary and frequently depend on machine requires manual oiling can be
accomplished, and the material being sewn. Generally, the machine should be oiled at
least once a day, preferably at the end of the day to avoid soiling the material. Oil more
frequently if needed.
1. Machine manual
2. Clear sewing machine oil
3. Soft disposable cloth or clean rag
Before oiling any machine is turned off and has been run out.
1. Read the directions for oiling in the machine manual.
2. Oil the machine using the directions as a guide. Inspect the condition of all visible
parts of the machine every time you oil it.
3. If a manual is not available, use these directions and oil after every eight hours of
operation. If the machine is self-oiling, change the pan oil when it looks cloudy or
once a year
4. Locate any oil holes. They are frequently identified by arrows or red or yellow
paint. Put one drop of oil into each hole. Too much oil will clog the machine. Turn
the hand wheel manually so that the oil will work its way between the parts.
5. If the machine has no oil holes, carefully tilt the machine head back.
6. Add oil if oil is on "Low--Add Oil" line.
7. Set the machine head back into the work table and return all tools to the drawer.
8. Wipe off all dust and excess oil from the machine or table; clean up any spilled oil
immediately.
9. Sew on a few fabric scraps to remove any excess oil.
3.2 Oiling the Machine
Materials required:
Caution:

Ga
rmen
t Con
struction
17
10. Wash your hands after oiling the machine.
11. Excess oil is a serious problem that can reduce profits.
3.3 Understanding the simple problems of sewing machine and the
solutions
Faults
The upper thread breaks (needle thread)
The lower thread breaks (bobbin thread)
Skipped stitches
Causes
a) The machine is not threaded in the right way
b) The tension of the upper thread is too tight
c) The needle is bent or dull
d) The cotton is too thick for the size of the needle
e) The upper thread is not the same size as the lower thread
f) The thread take-up spring is broken
a) The tension of the lower thread is too tight
b) Dirt, dust or small threads are in the bobbin case
c) Needle is bent or blunt
a) Needle and thread not matching
b) Thread take-up lever not threaded
c) Light pressure on presser foot
d) Incorrect setting of needle
Remedies
Thread the machine in the right way
Loosen the tension of the Upper thread
Put in a new needle
Use thinner cotton
Use the same size of sewing cotton for both the upper and the lower thread
Put in a new thread take-up Spring
Loosen the tension of thelower thread.
Clean the bobbin case.
Replace needle.
Use proper thread or needle.
Check threading order
Increase pressure on presser foot
Reset needle
Decrease stitch length
Replace needle

Ga
rmen
t C
onst
ruct
ion
18
Questions
1. How much oil would you apply to each oiling point?
2. What are the common machine trouble and their causes?
This chapter dealt with maintenance of sewing machine, materials required for
maintenance and repair and precautions to be taken during repair and maintenance. A
clean &well - oiled machine is essential for safety and good performance.
SUMMARY
Bunching of thread
Needle breaks
e) Stitch length is loo long for material
f) Needle point is blunt
g) Incorrect thread tension
h) Light pressure on pressure foot
i) Fabric is too sheer or soft
a) Upper and lower threads not drawn back under presser foot
b) Feed dog down
c) Needle not fully inserted into needle bar
a) Needle clamp screw is loose
b) pressure foot is loose
c) Pulling on fabric as you sew
Reset thread tension
Increase pressure on pressure foot
Use underlay of tissue paper
Draw both threads back under presser foot
Raise feed dog
Properly insert needle
Tighten needle clamp screw securelyReset pressure foot
Do not pull fabric, guide it gently
Ga
rmen
t Con
struction
19
Objectives:
Threads
Needle
At the end of the chapter, the students shall be able to:
Know different types of needles
Know parts of needle
Know different types of threads
Select suitable needle for different fabrics
Select suitable threads
Select suitable stitch per inch
We have to select correct size thread and needle to get perfect finish of the garment.
The selection of thread available for sewing seems to grow on almost a daily basis. New
colors, unique finishes and interesting textures can add to the style of our project, but there
are other considerations that make a difference in our thread selections. Long staple thread
is smoother and creates less lint in our machine. Made of short stales, the thread is uneven in
texture and the result is less than perfect stitching. Strong thread that is good for
construction, especially on natural fibre fabrics. Mercerized cotton has been treated to be
smoother and straighter with less fuzz than other cotton threads. Polyester embroidery
thread has a high sheen and is abrasion resistant. Silk thread is strong and lustrous. This
thread is used for construction and stitched details such as buttonholes and top stitching.
In the apparel industry, there are literally thousands of different machines, each requiring a
different needle type. On most newer machines, the needle type for that particular machine
]
]
]
]
]
]
Introduction
Chapter 4
Selection of Suitable Needle and Threadfor various fabrics and suitable
stitch per inch (SPI)

Ga
rmen
t C
onst
ruct
ion
20
is identified on the machine head. However, each needle
manufacturer identifies its needles in a different way;
and needles for the same type of system may have
several different names or numbers, depending on the
manufacturer.
Needles are of various types. Needle are selected
according to their application. The sizes mainly depend
on the structure of the fabric and the sewing threads
used. The needle size can be as small as 0.6 mm or 2.5
mm. The metric size (Nm) describes the diameter of the
needle blade in hundredths of a millimeter. If the needle
is too fine, it will abrade the thread, bend, break, affect
the loop formation, and cause skipped stitches. If it is too
coarse, it will damage the fabric, produce an
unattractive seam, cause the seam to pucker, affect the
loop formation, and cause skipped stitches. Generally
the best choice is the smallest size that will not skip stitches.
1. Butt: A small pyramid at the upper end of the shank. It is designed to make a single-
point contact with the hole in the needle bar.
2. Shank: The upper end of the needle that is held in the needle bar by the needle screw.
The shank is usually round, but it can have one or two flat sizes. Designed to support
and stabilize the needle blade, the diameter of the shank is usually larger than the
diameter of the blade.
3. Shoulder : The beginning of the shank just above the needle blade.
4. Blade: The thin section of the needle that extends from the shank to the eye. It is
easily bend and should be examined for straightens periodically.
5. Scarf: A small indentation above the eye that permits the hook or looper to pick up the
thread loop. On some needles, the scarf is elongated and / or deeper to ensure that the
needle thread loop will be large enough to prevent skip stitching.
6. Land: A small hump on the blade immediately above the eye. Used instead of a scarf
its purpose is to enable the needle thread to make a larger loop and form a stitch.
7. Eye: An opening in the needle blade at the lower end of the long groove that carries
thread into the material to the hook or looper to make a stitch. The size of the eye is
proportional to the diameter of the blade.
Sewing Machine needle
and parts
Shank
Shaft
Groove
Eye
Point
Flat Side Round Side
Shaft
Scarf
Point
Front View Side View
Ga
rmen
t Con
struction
21
8. Point: The tapered end. It is often considered the most critical aspects of the needle.
The most common needles have a round point, ball point, or a cutting point. Generally
round points and ball points are used for woven and knit fabrics because they can
penetrate the fabric by spreading the fibres or deflecting the yarns without damaging
them. By contrast, needles with cutting points are used for leather.
Sewing machine needles can affect the performance of a machine more than any other part,
causing skipped stitches, poor stitch formation, and even damage to the machine itself when
the wrong needle or bent needle is used. If straight stitch is the soul of the machine, the
needle is the heart.
1. Name five parts of machine needles?
2. What is the correct needle size for stitching poplin cloth?
3. How many stitches per inch should be used for cotton fabric?
Different types of needles, parts of needle, different types of threads, suitable needle for
different fabrics, suitable threads and suitable stitch per inch are illustrated in this
chapter. Correct size thread and needle are required to get perfect finish of the garment.
Questions
SUMMARY
Sl. No.
1.
2.
3.
4.
Weight of
the fabric
Light
Medium
Medium
heavy
brocade,
corduroy
Heavy
upholstery
fabrics
Type of cloth
Muslin, cambric
and other thin
fabrics
Shirting, poplins,
etc.
Light woollen
Woollen
Thread
Size
50
40-50
40
20
Needle
Size
9-11
14
16
18
Stitch-es
Per 2.5 cm
14-20
12
10-12
8-10

Ga
rmen
t C
onst
ruct
ion
22
British Standard 3870:1991 classifies seam constructions under eight headings. Typical
examples are shown.
The simplest way to define the seam is to get preliminary taste of what it is, though each one
of us is well familiar with it. A formal definition is a seam is the
application of a series of stitches or stitch types to one or several thickness of material for
parts of seams.
The choice of seam type is determined by aesthetic standards, strength, durability, comfort
in wear, convenience in assembly in relation to the machinery available, and cost BS 3870 :
Part 2 : 1191, referred to above, allows for eight different classes of seam, including some
where only one piece of fabrics is involved. Examples are the hem of a garment folded up on
Seam Type
Chapter 5
Seams & Seam Finishes
Class 1 – Super Imposed Seam Class 1 – Lapped Seam
Class 3 – Boud Seam Class 4 – Flat Seam
Class 5 – Decorative Seam Class 6 – Edge Neatening Seam
Sleeve Lace
Class 7 – Applied Seam
Waist Band
Skirt
Class 8 – Single Ply Construction
Ga
rmen
t Con
struction
23
itself and a raw edge, which has been neatened by means of stitches. This alters the
traditional concept of a seam as a joint between fabrics.
The British Standard divides stitched seams into eight classes according to the minimum
number of parts that make up the seam. These parts can be the main fabrics of the garment
or some addition item such as a lace, braid or elastic.
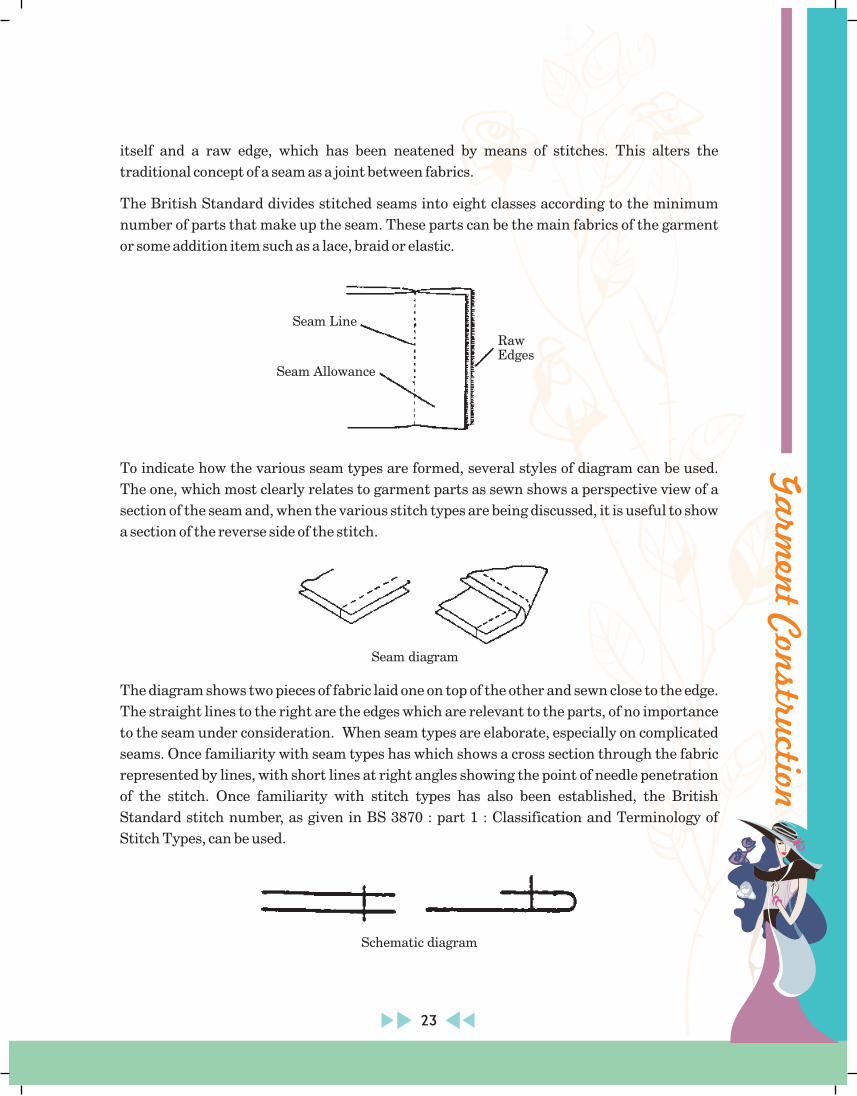
To indicate how the various seam types are formed, several styles of diagram can be used.
The one, which most clearly relates to garment parts as sewn shows a perspective view of a
section of the seam and, when the various stitch types are being discussed, it is useful to show
a section of the reverse side of the stitch.
The diagram shows two pieces of fabric laid one on top of the other and sewn close to the edge.
The straight lines to the right are the edges which are relevant to the parts, of no importance
to the seam under consideration. When seam types are elaborate, especially on complicated
seams. Once familiarity with seam types has which shows a cross section through the fabric
represented by lines, with short lines at right angles showing the point of needle penetration
of the stitch. Once familiarity with stitch types has also been established, the British
Standard stitch number, as given in BS 3870 : part 1 : Classification and Terminology of
Stitch Types, can be used.
Seam diagram
Schematic diagram
RawEdges
Seam Line
Seam Allowance
Ga
rmen
t C
onst
ruct
ion
24
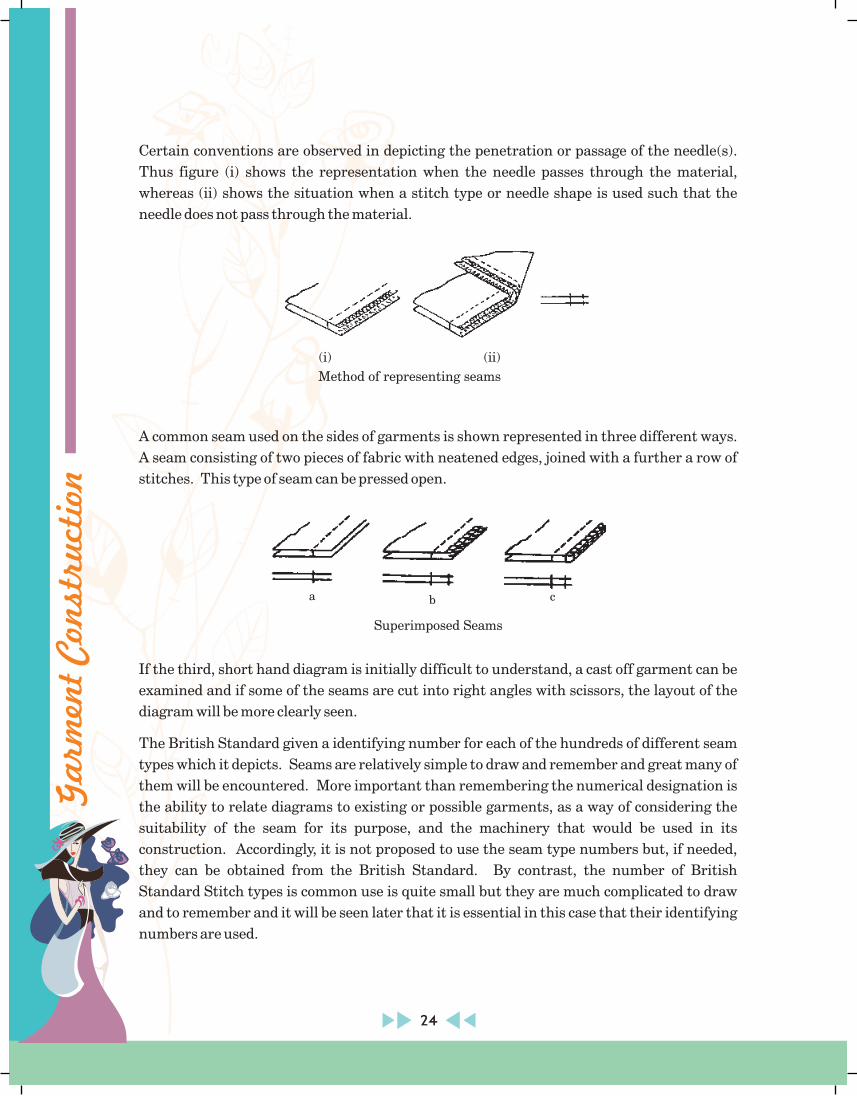
Certain conventions are observed in depicting the penetration or passage of the needle(s).
Thus figure (i) shows the representation when the needle passes through the material,
whereas (ii) shows the situation when a stitch type or needle shape is used such that the
needle does not pass through the material.
A common seam used on the sides of garments is shown represented in three different ways.
A seam consisting of two pieces of fabric with neatened edges, joined with a further a row of
stitches. This type of seam can be pressed open.
If the third, short hand diagram is initially difficult to understand, a cast off garment can be
examined and if some of the seams are cut into right angles with scissors, the layout of the
diagram will be more clearly seen.
The British Standard given a identifying number for each of the hundreds of different seam
types which it depicts. Seams are relatively simple to draw and remember and great many of
them will be encountered. More important than remembering the numerical designation is
the ability to relate diagrams to existing or possible garments, as a way of considering the
suitability of the seam for its purpose, and the machinery that would be used in its
construction. Accordingly, it is not proposed to use the seam type numbers but, if needed,
they can be obtained from the British Standard. By contrast, the number of British
Standard Stitch types is common use is quite small but they are much complicated to draw
and to remember and it will be seen later that it is essential in this case that their identifying
numbers are used.
(i) (ii)
Method of representing seams
Superimposed Seams
a b c

Ga
rmen
t Con
struction
25
Class 1 (Superimposed Seam)
]
]
]
Class 2 (Lapped Seam)
This seam is constructed with a minimum of two components and is the most widely used
seam construction in this class. Among others, safety stitched and French seams are covered
by this class.
This class is the commonest construction of seam and it has the following types.
Superimposed seam
French seam
Piped seam
French seams Piped seams
Lapped seams
The simplest seam type within the class is formed by superimposing the edge of one piece of
material on another. A variety of stitch types can be used on this type of seam, both for
joining the fabrics and for neatening the edges or for achieving both simultaneously.
The diagrams normally show the final version and it should be clear from the positions of the
needles and the folding of the fabric if it was constructed in one step or several. An example if
this is the type of superimposed seam known as French seam that is done in two stages.
As example of a superimposed seam with an additional component would be one that
contained an inserted piping and even her more than one construction is possible.
The simplest seam type in this class is formed by lapping two pieces of material as shown.
In practice, this simple seam is not common in clothing because it causes problems with raw

Ga
rmen
t C
onst
ruct
ion
26
edges and at least one of the edges must be neatened in a decorative manner. Where it is
commonly used is in the joining of panels in sails where a strong seam is achieved by using
two or three rows of zigzag stitching. Sail fabrics are very finely woven and fray very little.
Much more common on long seams on garments such as jeans and shirts is the so-called lap-
felled seam, sewn with two rows of stitches on a twin needle machine equipped with a folding
device. This provides a very strong seam in garments that will take a lost of wear though
there is a possibility that the thread on the Surface may suffer abrasion in areas which as
inside leg seams. The lap-felled seam is illustrated.
The type of raised, topstitched seam often used down skirt panels is also technically a lapped
seam although at the beginning of its construction it appears to be a super imposed seam. It
is often referred to as a welted or raised welted seam.
In this class, the seam consists of an edges of material, which is bound by another, with the
possibility of other components inserted into the binding.
The simplest version of this class is again unusual, as it cannot be constructed with self-
fabric binding because of the problem of raw edges. It can, however, be made with a binding,
which has been constructed, to a specific width. Figure (a) shows the simplest bound seam
while (b) shows a common version where the garment strips. A folding device turns the edges
under and wraps the strip over the edge of the main fabric. Bias cut strip would normally be
used, unless the fabric has an element of stretch. A bound seam is often used as a decorative
edge and the binding may continue off the edge of the garment to provide tie ends.
Class 3 (bound seam)
Lap Felled Seams
Welted Seam
Ga
rmen
t Con
struction
Bound Seams
a b
27
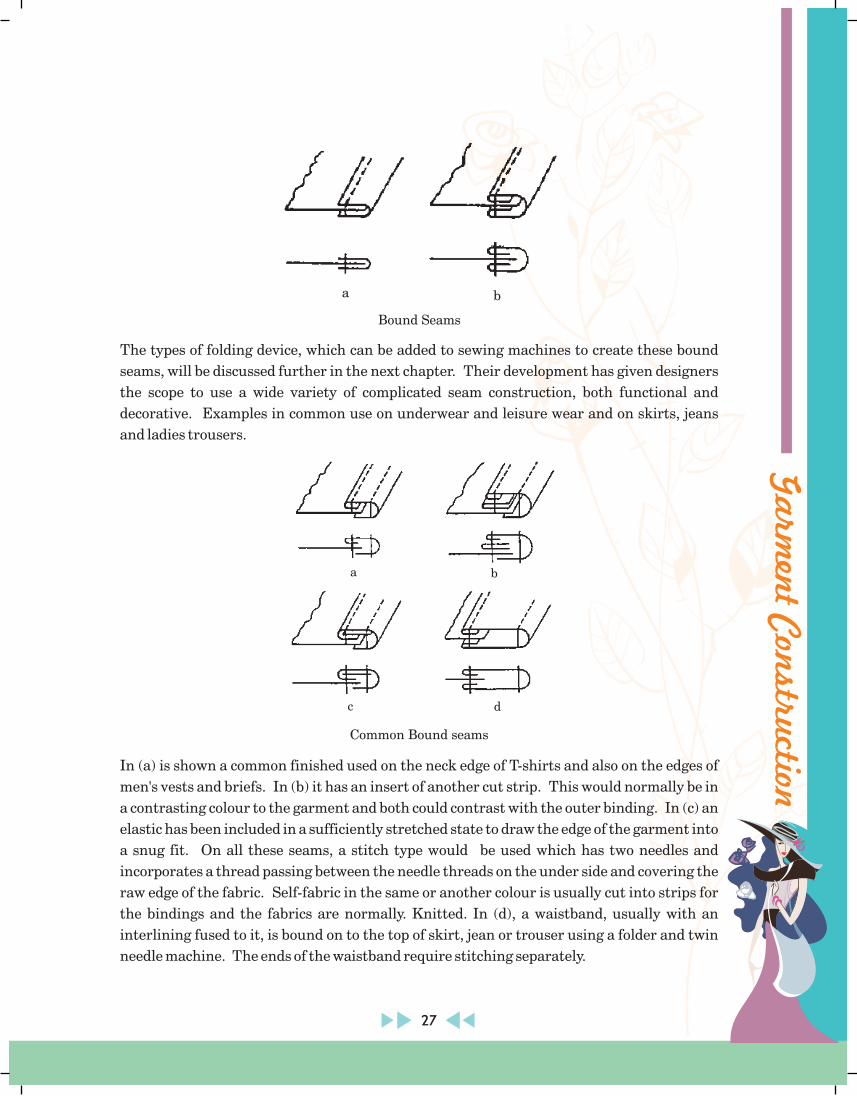
The types of folding device, which can be added to sewing machines to create these bound
seams, will be discussed further in the next chapter. Their development has given designers
the scope to use a wide variety of complicated seam construction, both functional and
decorative. Examples in common use on underwear and leisure wear and on skirts, jeans
and ladies trousers.
Common Bound seams
In (a) is shown a common finished used on the neck edge of T-shirts and also on the edges of
men's vests and briefs. In (b) it has an insert of another cut strip. This would normally be in
a contrasting colour to the garment and both could contrast with the outer binding. In (c) an
elastic has been included in a sufficiently stretched state to draw the edge of the garment into
a snug fit. On all these seams, a stitch type would be used which has two needles and
incorporates a thread passing between the needle threads on the under side and covering the
raw edge of the fabric. Self-fabric in the same or another colour is usually cut into strips for
the bindings and the fabrics are normally. Knitted. In (d), a waistband, usually with an
interlining fused to it, is bound on to the top of skirt, jean or trouser using a folder and twin
needle machine. The ends of the waistband require stitching separately.
a b
c d

Ga
rmen
t C
onst
ruct
ion
28
Class 4 (Flat Seams)
Class 5 (Decorative Stitching)
In this class, seams are referred to as flat seams because the fabric edges do not overlap.
They may be butted together without a gap and joined across by a stitch which has two
needles sewing into each fabric and covering threads passing back and front between these
needles on both sides of the fabric. Knitted fabrics are most commonly used because the
advantage of this seam is that it provides a join that is free from bulk in garments worn close
to the skin such as knitted underwear. The machine trims both fabric edges so that they
from a neat join. Alternatively, various zigzag stitches could sew back and froth between the
fabrics, which might the have a decorative gap between them. Examples of flat seams are
shown.
This is the first to the two classes of seam which, in the old British Standard, were not
regarded as seams at all and were given the name 'Stitching'. The main use of the seams is for
decorative sewing on garments where single or multiple rows of stitches are sewn through
one or more layers of fabric. These several layers can be folds of the same fabric. The
simplest seam in the class has decorative stitching across a garment panel. One row would
have little effect but multi needle stitching is common
Figure (a) shows twin-needle stitching with a ribbon laid under the stitches while (b) shows
four rows of stitches. This type of multineedle stitching has further decorative possibilities
if an attachment is added to the machine which lays embroidery threads back and front
under the stitches on the surface of the fabric..
Other possibilities, given the right folding devices, are pin tucks, often sewn in multiples,
and channel seams. There are shown in figure (c) and (d). This type of pin tuck is different
from the traditional version, which consist of a fold in the fabric sewn close to the edge.
When multiple, parallel tucks are required, the original method is slow and potentially
inaccurate in the version shown here, the folder ensures the tucks are parallels all the tucks
are sewn simultaneously. The tucks must, however, be set to face one way or the other and a
decision as to which must be made in relation to the design of the garment.
Flat Seams

Ga
rmen
t Con
struction
29
This is the other seam class that was called a edge stitching. Seam types in this class include
those where fabric edges are neatened by means of stitches (as opposed to finding with
another or the same fabric) as well as folded hem and edges. The simplest is the fabric edge
inside a garment which has been neatened with an over edge stitch, as shown.
In considering hems on the sleeves and lower edges of garment there are many possibilities
when the variety of stitch types that can be used in taken into account. A selection only is
given in Fig. and at this stage it is assumed that the reader can interpret the construction
through the use of the shorthand type of diagram only. The need to know the stitch typed
used, in order to appreciate fully the construction of the seam, should now become clear.
Numbers for stitch types, which might be used, have been included so that the diagrams can
be referred to again later when the reader is familiar with these numbers. In figure (a) is
typical of the hem no a dress or a pair of trousers in a woven fabric which has been neatened
Class 6 (Edge Neatening)
Decorative Seams
a b
c d
Edge neatening

Ga
rmen
t C
onst
ruct
ion
30
and then sewn up invisibly (blind stitched). In a knitted fabric the neatening might be
omitted. In (b), a folding device is used in the construction of the hem of a shirt or a skirt
lining: (c) and (d) show a method of folding an edge that is sometimes used on the buttonhole
front of a shirt. Two different constructions are possible, the first one requiring the sewing
to be done in two stages, the second one requiring a twin-needle machine. The remaining two
seam classed in the 1991 British Standard are an addition to the original standard, added in
the 1983 edition, to include seam types commonly seen in modern garment construction. No
general descriptive title has been given to either of them.
Seams in this class relate to the addition of separate items to the edge of a garment part.
They are similar to the lapped seam except that the added component has a definite edge on
both sides. Examples would be a band of lace attached to the lower edge of a slip (a), elastic
braid on the edge of a bra as in (b) and inserted elastic on the leg of a swimsuit as in (c).
An example where the additional item is self-fabric plus interlining is another versions of the
buttonhole band on a shirt, shown in Figure. This is another instance where, by using two
folders and a twin-needle machine, a complicated construction can be completed in one step.
Without such machinery, achieving a similar, let alone identical, result would be very
difficult.
The final seam class in the British Standard is another where only one piece of material need
be involved in constructing the seam. The commonest seam type in this class is the belt loop
a used on jeans, raincoats, etc. this is shown. Also included in this class are belts themselves
and two possible constructions for these are shown in (a) and (b).
Class 7
Class 8
ab
c d
Shirt buttonhole band
a b c
Ga
rmen
t Con
struction
31
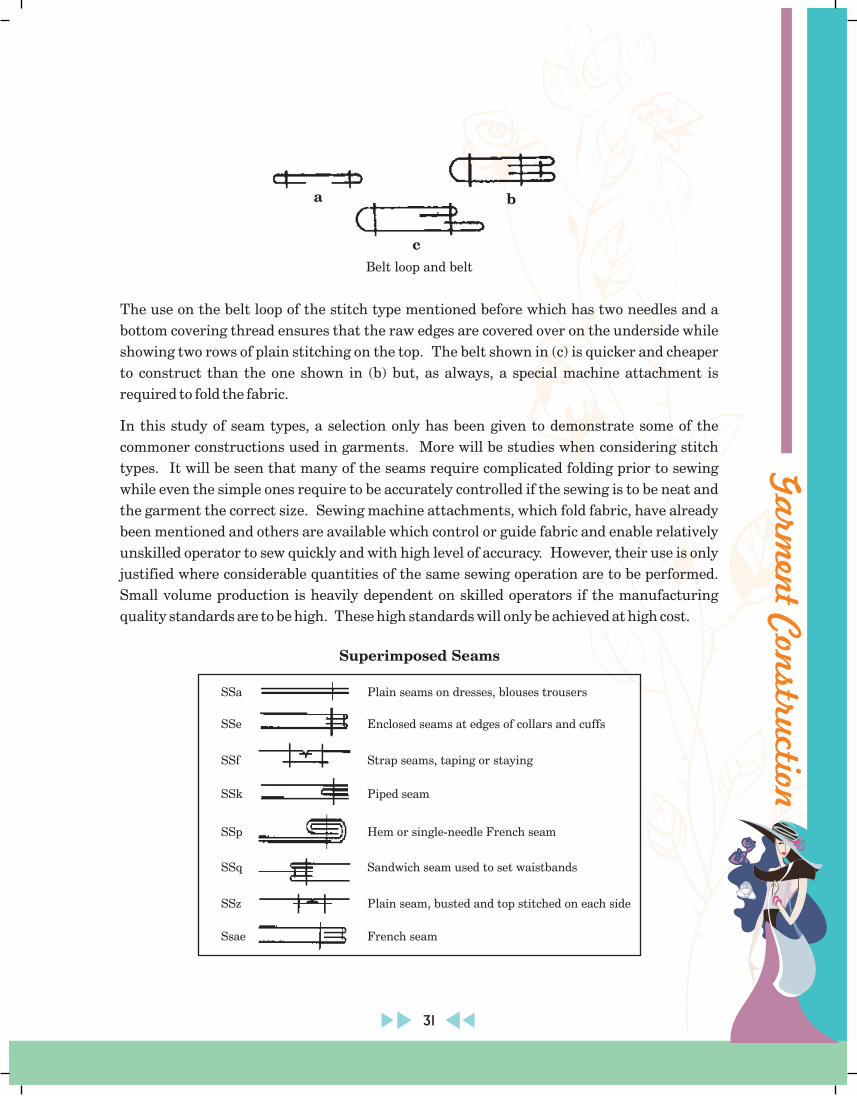
The use on the belt loop of the stitch type mentioned before which has two needles and a
bottom covering thread ensures that the raw edges are covered over on the underside while
showing two rows of plain stitching on the top. The belt shown in (c) is quicker and cheaper
to construct than the one shown in (b) but, as always, a special machine attachment is
required to fold the fabric.
In this study of seam types, a selection only has been given to demonstrate some of the
commoner constructions used in garments. More will be studies when considering stitch
types. It will be seen that many of the seams require complicated folding prior to sewing
while even the simple ones require to be accurately controlled if the sewing is to be neat and
the garment the correct size. Sewing machine attachments, which fold fabric, have already
been mentioned and others are available which control or guide fabric and enable relatively
unskilled operator to sew quickly and with high level of accuracy. However, their use is only
justified where considerable quantities of the same sewing operation are to be performed.
Small volume production is heavily dependent on skilled operators if the manufacturing
quality standards are to be high. These high standards will only be achieved at high cost.
Superimposed Seams
Plain seams on dresses, blouses trousers
Enclosed seams at edges of collars and cuffs
Strap seams, taping or staying
Piped seam
Hem or single-needle French seam
Sandwich seam used to set waistbands
Plain seam, busted and top stitched on each side
French seam
SSa
SSe
SSf
SSk
SSp
SSq
SSz
Ssae
Belt loop and belt
a b
c

Ga
rmen
t C
onst
ruct
ion
32
Questions
1. Explain seam?
2. Give two uses of bound seam?
3. How many seam types in class-1?
4. What are the factors consider in the seams to be used on any garment?
Seam is the application of a series of stitches or stitch types to one or several thickness of
material for parts of seams. Various types of seam and seam finishes are illustrated in this
chapter. The choice of seam type is determined by aesthetic standards, strength,
durability, comfort in wear, convenience in assembly in relation to the machinery
available.
SUMMARY
Seams for leathers and suedes (real of synthetic)
Lapped Seams
Side seams on better ments dress shirt
Set patch pockets, labels
Yoke/black seam men’s dress shirt
LSa
LSc
LSd
LSf
Bound Seams
Binding an edge with ribbon on leather
Binding an edge with blas binding, setting sleeve placket
Binding an edge with fabric (raw edge on bottom)
Binding an edge with fabric welting
Binding an edge with fabric
Flat Seams
Flat seams on sweat shirts and underwear
BSa
BSc
BSf
BSk
BSo
FSa

Ga
rmen
t Con
struction
Practical Manual
Garment Construction-1
Garment Construction-1
Ga
rmen
t C
onst
ruct
ion
PRACTICAL - 1
Develop Proficiency in use of Sewing Machine 36
PRACTICAL - 2
Stitching on Paper 37
PRACTICAL - 3
Basic Stitching Skills 39
PRACTICAL - 4
Develop Proficiency in Straight, Angular and Curved Seams 42
PRACTICAL - 5
Basic Hand Stitches 44
PRACTICAL - 6
Permanent Stitches 46
PRACTICAL - 7
Basic Machine Seams 55
PRACTICAL - 8
Fabric Manipulation: Darts 59
PRACTICAL - 9
Fabric Manipulation: Tucks - Plain Tucks 63
PRACTICAL - 10
Fabric Manipulation: Pleats 66
PRACTICAL - 11
Fabric Manipulation Gathers 68
PRACTICAL - 12
Fabrics Manipulation: Shirring 69
i
i
i
i
i
i
i
i
i
i
i
i
Contents
Ga
rmen
t Con
struction
35
Objectives:
i
i
i
i
i
Learning Outcome:
At the end of the practical, the students are able to
Proficient in use of sewing machine
Perform stitch lines of different shape on paper and fabric
Perform hand stitches- basting, hemming, etc
Perform basic machine seams and seam finishes
Fabric manipulation like darts, tucks, pleats, gathers, and shirring
After finishing the course, the students shall be able to
1. Know about sewing machine.
2. Know about various parts of sewing machine.
3. Know about various types of needle, thread.
4. Work proficiently on sewing machines.
5. Find out simple machine problems and rectify it.
6. Stitch different seams on the machine.
7. Finish edges with hand stitches.
8. Make gathers pleats and tucks on the fabric.
PRACTICAL
Ga
rmen
t C
onst
ruct
ion
36
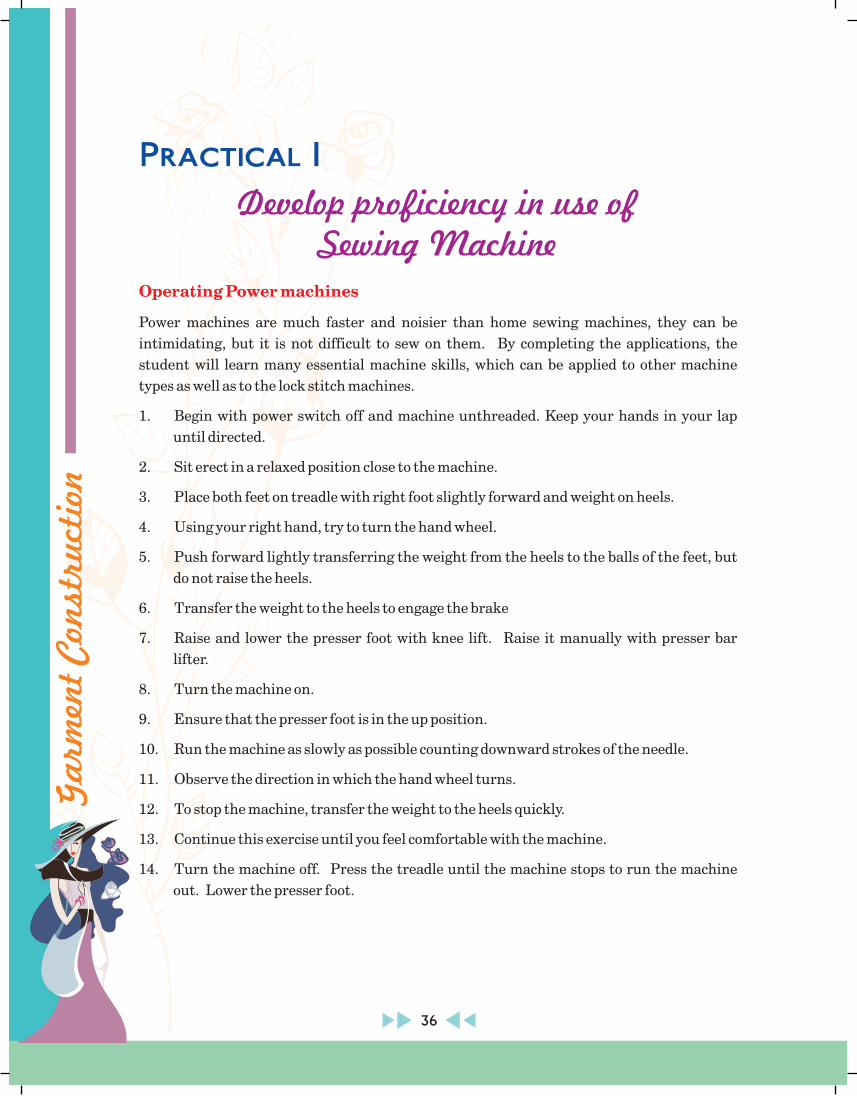
Operating Power machines
Power machines are much faster and noisier than home sewing machines, they can be
intimidating, but it is not difficult to sew on them. By completing the applications, the
student will learn many essential machine skills, which can be applied to other machine
types as well as to the lock stitch machines.
1. Begin with power switch off and machine unthreaded. Keep your hands in your lap
until directed.
2. Sit erect in a relaxed position close to the machine.
3. Place both feet on treadle with right foot slightly forward and weight on heels.
4. Using your right hand, try to turn the hand wheel.
5. Push forward lightly transferring the weight from the heels to the balls of the feet, but
do not raise the heels.
6. Transfer the weight to the heels to engage the brake
7. Raise and lower the presser foot with knee lift. Raise it manually with presser bar
lifter.
8. Turn the machine on.
9. Ensure that the presser foot is in the up position.
10. Run the machine as slowly as possible counting downward strokes of the needle.
11. Observe the direction in which the hand wheel turns.
12. To stop the machine, transfer the weight to the heels quickly.
13. Continue this exercise until you feel comfortable with the machine.
14. Turn the machine off. Press the treadle until the machine stops to run the machine
out. Lower the presser foot.
Practical 1
Develop proficiency in use of Sewing Machine

Ga
rmen
t Con
struction
37
In this, you will learn to control the treadle, brake and knee lift. This application will help
you to develop coordination and skill. For this application, you will have to stitch on paper as
given below.
1. Use knee lift to raise the presser foot to slide exercise paper-1 underneath.
2. Put the paper under presser foot so that top of exercise-1 is even with the heel of the
presser foot and the bulk of exercise is towards left. Lower the needle, now lower the
foot.
3. Use both hands to guide the paper while you stitch on the first
line. Keep your hands relaxed. The machine will feed the paper.
You only guide it. Practice stitching straight not fast.
4. Keep your fingers at a safe distance from needle. Do not move
your hands while stitching until you become more proficient at
the machine.
5. Examine your work. Repeat the application until all lines are
straight and parallel.
6. Repeat stitching on plain paper, using the edges of the presser
foot as a guide, begin with the outside edge of foot aligned with edge of paper.
1. The key to turning corners without dropping a stitch is stopping with the needle down
at the point where you are pivoting.
2. Position exercise paper-2 under the foot. Stitch on the first guideline, slowing as you
near the corner
3. Stop at the corner with needle down. If needle is up, use hand wheel to lower it on to the
paper. The needle will serve as a pivot when the work is turned to avoid dropping
stitches.
4. Use the knee lift to raise foot only enough to turn paper. Turn work as required for the
angle. Lower the foot and stitch to next corner.
Exercise from 1 to 5
Stitching Corners
Practical 2
Stitching on Paper
Exercise No.___ Date: _______
Student Name: Instructor Sign.
Ga
rmen
t C
onst
ruct
ion
38
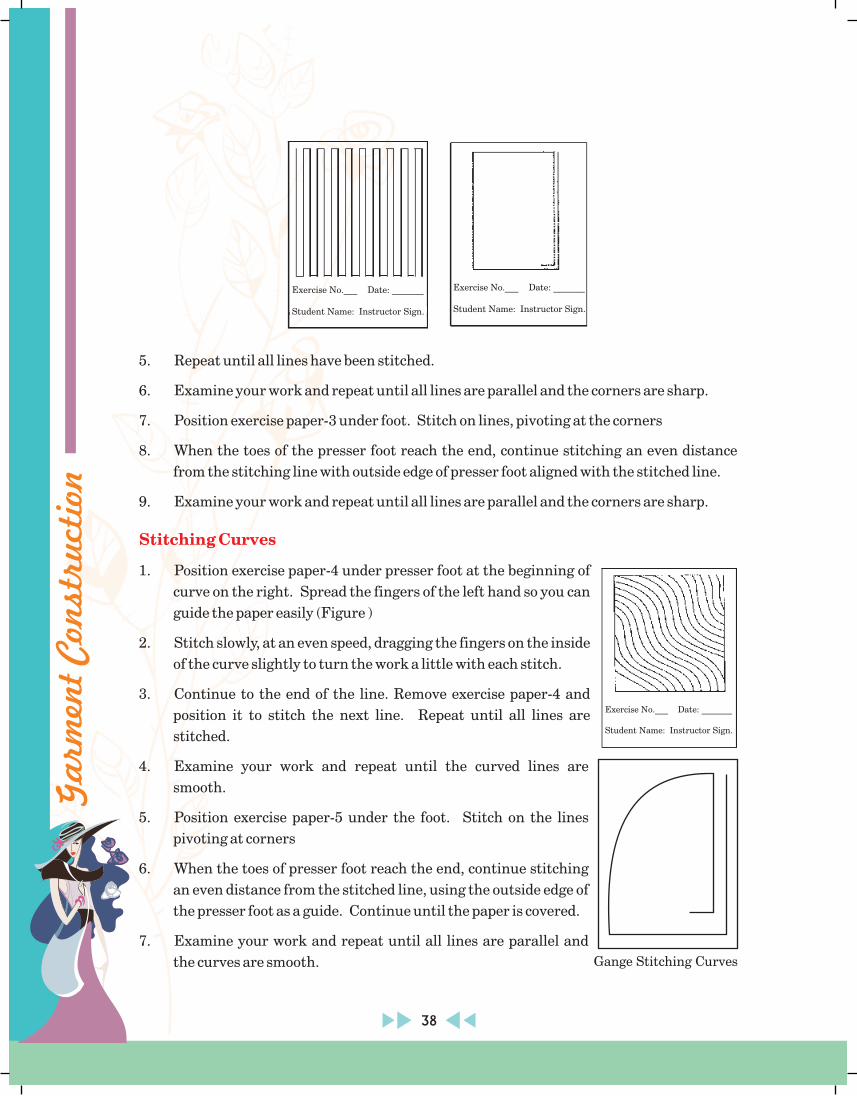
5. Repeat until all lines have been stitched.
6. Examine your work and repeat until all lines are parallel and the corners are sharp.
7. Position exercise paper-3 under foot. Stitch on lines, pivoting at the corners
8. When the toes of the presser foot reach the end, continue stitching an even distance
from the stitching line with outside edge of presser foot aligned with the stitched line.
9. Examine your work and repeat until all lines are parallel and the corners are sharp.
1. Position exercise paper-4 under presser foot at the beginning of
curve on the right. Spread the fingers of the left hand so you can
guide the paper easily (Figure )
2. Stitch slowly, at an even speed, dragging the fingers on the inside
of the curve slightly to turn the work a little with each stitch.
3. Continue to the end of the line. Remove exercise paper-4 and
position it to stitch the next line. Repeat until all lines are
stitched.
4. Examine your work and repeat until the curved lines are
smooth.
5. Position exercise paper-5 under the foot. Stitch on the lines
pivoting at corners
6. When the toes of presser foot reach the end, continue stitching
an even distance from the stitched line, using the outside edge of
the presser foot as a guide. Continue until the paper is covered.
7. Examine your work and repeat until all lines are parallel and
the curves are smooth.
Stitching Curves
Gange Stitching Curves
Exercise No.___ Date: _______
Student Name: Instructor Sign.
Exercise No.___ Date: _______
Student Name: Instructor Sign.
Exercise No.___ Date: _______
Student Name: Instructor Sign.
Ga
rmen
t Con
struction
39
Stitching is the most productive element in the assembly process and requires least amount
of time. Its success depends on the stitching skills of the operator. Each element can range
from simple to complex and each contributes to production costs.
Successful apparel production depends on accuracy at every step. With the space stitching
applications, you will learn to guide the fabric and stitch a specific distance from a line or an
edge, instead of stitching on a marked line.
1. Prepare 5 patterns for stitching parallel lines, parallel rows, concentric squares,
corners acute and obtuse angles, spirals as shown.
2. Set stitch length for 12 -SPI and lower the foot
3. Fold 1 muslin rectangle (5" x 11") in half cross wise and match the edges.
4. With the fold towards the foot, begin at the upper right hand corner and stitch ¼" from
the edge of fabric.
5. Stitch as indicated in the operation. When stitching along with edge, keep foot even
with the material. When stitching parallel lines, use the outside edge of the presser foot
as a guide and do not watch the needle.
6. At corners, stop with the needle down. Raise the foot and pivot. Lower the foot and
continue stitching until the cloth is covered with parallel lines spaced ¼" apart.
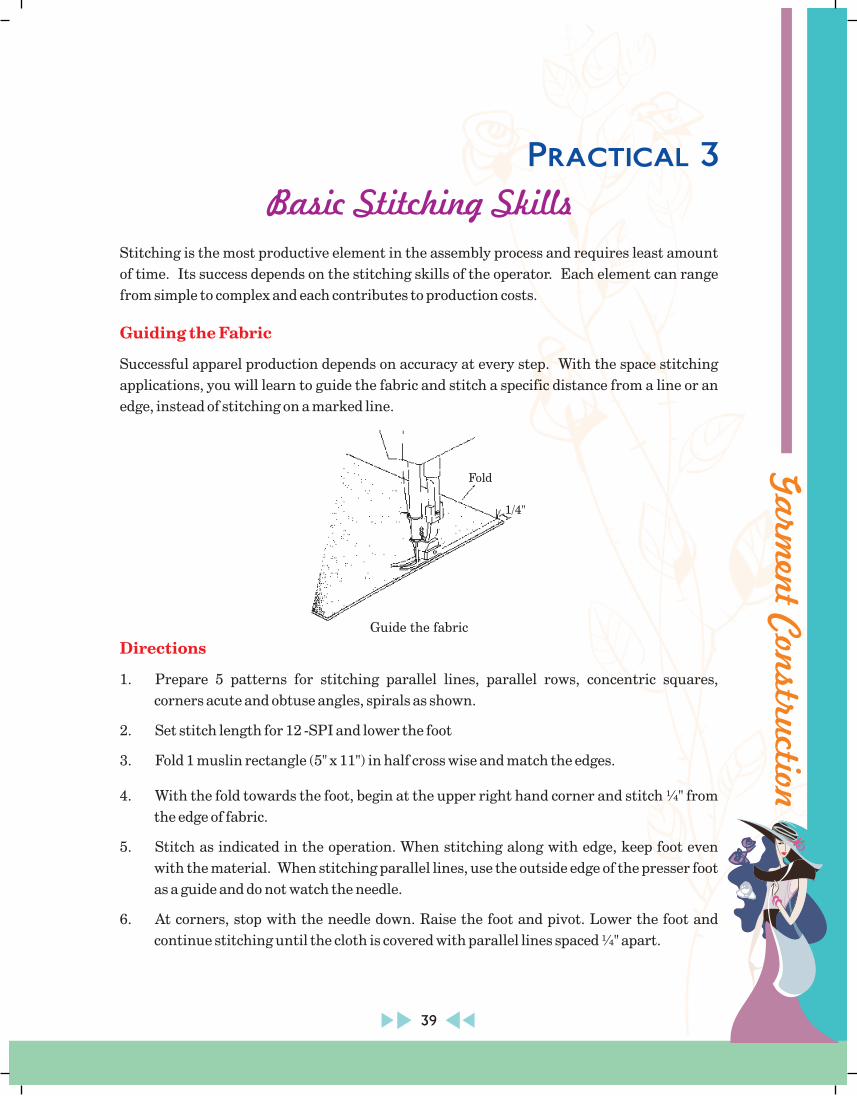
Guiding the Fabric
Directions
Practical 3
Basic Stitching Skills
Guide the fabric
Fold
1/4"

Ga
rmen
t C
onst
ruct
ion
Stitching Parallel Straight Lines
Stitching Concentric Squares
Stitching a Spiral
1. Fold one rectangle (5" x 11") in half crosswise, and
stitch the length of the edge. Prepare to stop quickly
when the toes reach the fabric edge.
2. Pivot 90 degrees and stitch ¼" along the edge. Stop
and pivot again.
3. Stitch the second row parallel to the first and ¼"
away.
1. Fold one large muslin rectangle (8" x 16") in half to
make a square. Stitch ¼" from the edge, stopping
with the needle down when the toes reach the fabric
edge.
2. Pivot 90 degrees and repeat to stitch the remaining
three sides. When stitching the fourth side, stop
when the toes reach the first stitched row.
3. Pivot and stitch the next row parallel to the first, and
¼" away. Continue until the cloth is covered with
concentric squares.
4. Repeat the exercise until you get a satisfactory sample.
1. Fold one large rectangle (8" x 16") in half to make a
square.
2. Place pattern on the square and chalk mark around
it.
3. Begin at right hand side and stitch around the
marked circle. Guide the work to stitch inside the
circle and ¼" away as shown.
4. Continue stitching concentric circles spaced ¼"
apart until you reach the centre.
40
Stitching parallel straight lines
Stitching Concentric squares
Stitching a spiral
Sightline
1/4"
Fold

Ga
rmen
t Con
struction
41
Back tack
Directions for making back tack
Back tacks are used to prevent the lock stitch chain from opening or unravelling at the
beginnings and ends of seams and at stress points and to hold two pieces of material, tape,
elastic, braid, buttons, or interlining together at a single or on a section less than 1" in length.
Back tacks are used instead of reverse stitch mechanism, for increased speed in production.
They are used on seams or areas that will not be crossed by another line of stitching.
1. Pick up and fold one muslin rectangle (5" x 11") in half cross wise and being at the fold
from the raw edge.
2. Stitch to the middle of the piece.
3. Raise the presser foot and needle, but do not press treadle. Then, using the fingers of
both the hands, pull the work towards you until you are at the beginning of the three
stitches. Release the knee lift and sew forward.
4. Release the knee lift and sew to the raw edge.
5. Continue stitching back tacks in the middle of the stitched lines until you can make
them easily. Then stitch them at the beginning and end of each line.
Back tack

Ga
rmen
t C
onst
ruct
ion
Straight seam
Curved seam
A straight seam is the one that occurs most often, in a well- made straight seam, the
stitching is exactly the same distance from the seam edge the entire length of the seam. In
most, a plain straight stitch is used. For stretchy fabrics, however, a tiny zigzag or special
machine stretch stitch may be used.
A curved seam required careful guiding as it passes under the needle so that the entire
seam line will be same even distance from the edge. To achieve better control, use a shorter
stitch length (15 per inch 1.5 mm) and slower machine speed.
42
Practical 4
Develop proficiency in straight, angular and curved seams
Straight seam
Curved seam

Ga
rmen
t Con
struction
43
Cornered seam
A cornered seam needs reinforcement at the angle to strengthen it. This is done by using
small stitches (15 to 20 per inch) on either side of the corner. It is important to pivot with
accuracy. When cornered seam are enclosed, as in a collar, the corners should be blunted so
that a better point results when the collar is turned.
Cornered seam

Ga
rmen
t C
onst
ruct
ion
Basic stitches are divided into constructive and decorative stitches. Constructive stitches are
further divided into temporary and permanent stitches.
Tacking or basting is a temporary stitch used for holding two or more layers of material
together before the permanent stitches are made. Usually this stitch is horizontal and is
worked from right to left. This is the only stitch which is started with a knot. For tacking, use
a contrasting colour thread so that it can be easily seen and removed. The length of stitches
will vary depending on the weight of the fabric and how securely the pieces have to be held
together. To end basting, make two stitches one on the top of another. There are several types
of basting stitches, four of which are explained below.
Hand basting (or tacking) is used to temporarily hold together two or more fabric layers
during fitting and construction.
is used on smooth fabrics and in areas that require close control, such as
curved seams, seams with ease, and set - in sleeves.
Even Basting: Short (about ¼ in (6mm) temporary stitches taken the same distance apart.
Working from right to left (or left to right, if you are left handed), take several evenly spaced
stitches onto the needle before pulling it through.
is used for general basting, for edges that require less control during
permanent stitching and for marking (marking stitches can be long and spaced far apart).
Temporary Stitches
Basting Stitches
Even basting
Uneven basting
44
Practical 5
Basic Hand Stitches
Even Basting
Uneven Basting

Ga
rmen
t Con
struction
45
Uneven basting: Like even basting, these are short temporary stitches , about ¼ in (6mm)
long, but taken about 1 in (2 or 3cm) apart.
consists of horizontal stitches taken parallel to each other, producing
diagonal floats in between. It is used to hold or control fabric layers within an area during
construction and pressing. Short stitches, taken close together give more control than do
longer stitches taken farther apart. The short diagonal basting is used to hold seam edges flat
during stitching or pressing: long diagonal basting is used for such steps as holding under
lining to garment fabric during construction.
Diagonal basting: Small stitches, taken parallel to each other, producing diagonal floats in
between. When making the stitches, the needle points from right to left (or left to right, for a
left hander) For greater control, take short stitches (1), spaced close together. Where less
control is needed, stitches can be made longer (2) with more space in between them.
is a temporary, uneven slip stitch that permits precise matching of plaids,
stripes, and some large prints at seam lines. It is also a practical way to baste intricately
curved sections, or to make fitting adjustments from the right side of the garment.
Slip basting: Crease and turn under one edge along its seam line. With right sides up, lay
the folded edge in position along the seam line of the corresponding garment piece, matching
the fabric design: pin working from right to left ( or left to right, if you are left - handed) and
using stitches ¼ in (6mm) in length, take a stitch through the lower garment section, then
take the next stitch through fold of upper edge. Continue to alternate stitches in this way,
removing pins as you go.
Diagonal basting
Slip basting
Diagonal Basting
Slip basting

Ga
rmen
t C
onst
ruct
ion
Running Stitch
A very short, even stitch used for fine seaming, tucking, mending, gathering, and other such
delicate sewing. The running stitch is like even basting except that the stitches are smaller
and usually permanent.
Working from right to left, weave the point of the needle in and out of the
fabric several times before pulling the thread through. Keep stitches and the spaces between
them small and even.
This is used to secure down a folded edge of material. Its most common use is for
hems. Hemming appears as small slanting stitches on the wrong side and horizontal stiches
on the right side. The stitches should be fine and spaced close enough to hold the hem
securely in place, yet far enough apart to be inconspicuous from the right side of the garment.
Before starting the hem, fasten the thread with several tiny stitches on the top of each other.
Finish off the hemming also with several stitches to fasten it securely.
This is used for hems, facings or folds where invisibility is more important
than strength. Fasten the thread beneath the hem, bringing the needle out through the edge
Running Stitch:
Hemming:
Slip stitching:
46
Practical 6
Permanent Stitches
Running Stitch
Hemming
Ga
rmen
t Con
struction
47
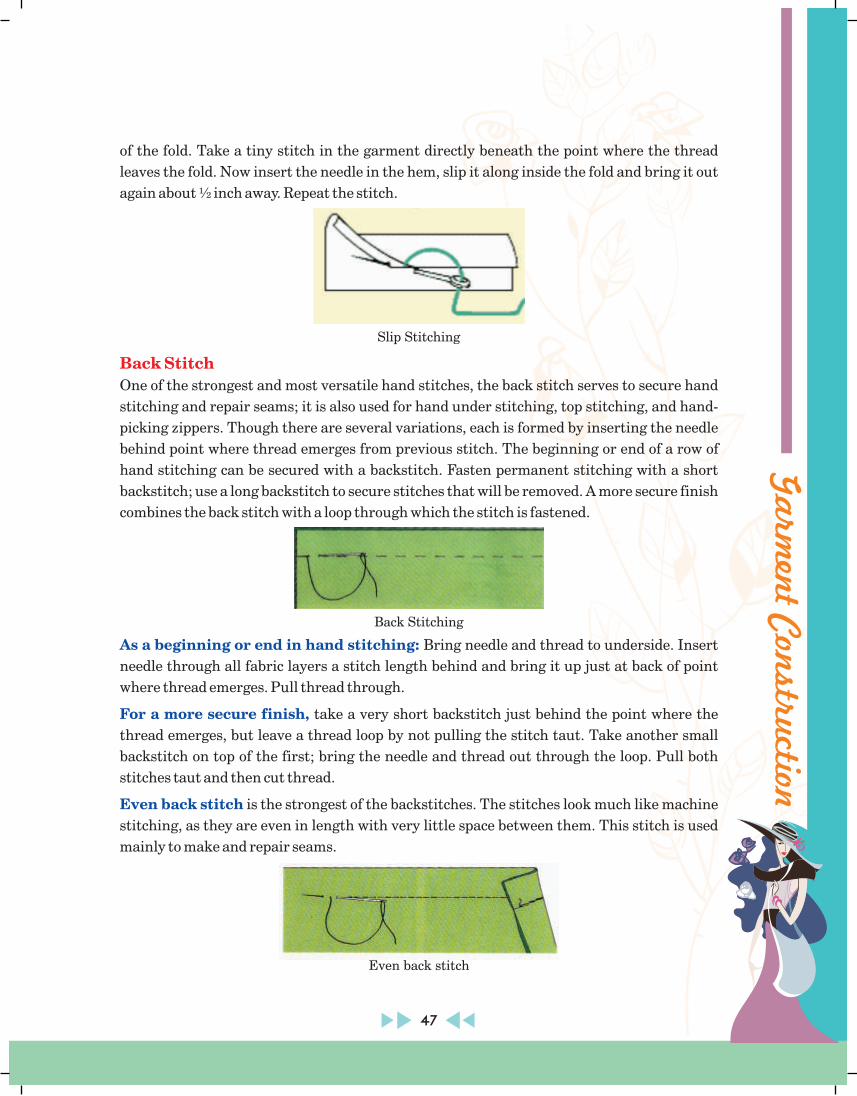
of the fold. Take a tiny stitch in the garment directly beneath the point where the thread
leaves the fold. Now insert the needle in the hem, slip it along inside the fold and bring it out
again about ½ inch away. Repeat the stitch.
One of the strongest and most versatile hand stitches, the back stitch serves to secure hand
stitching and repair seams; it is also used for hand under stitching, top stitching, and hand-
picking zippers. Though there are several variations, each is formed by inserting the needle
behind point where thread emerges from previous stitch. The beginning or end of a row of
hand stitching can be secured with a backstitch. Fasten permanent stitching with a short
backstitch; use a long backstitch to secure stitches that will be removed. A more secure finish
combines the back stitch with a loop through which the stitch is fastened.
Bring needle and thread to underside. Insert
needle through all fabric layers a stitch length behind and bring it up just at back of point
where thread emerges. Pull thread through.
take a very short backstitch just behind the point where the
thread emerges, but leave a thread loop by not pulling the stitch taut. Take another small
backstitch on top of the first; bring the needle and thread out through the loop. Pull both
stitches taut and then cut thread.
is the strongest of the backstitches. The stitches look much like machine
stitching, as they are even in length with very little space between them. This stitch is used
mainly to make and repair seams.
Back Stitch
As a beginning or end in hand stitching:
For a more secure finish,
Even back stitch
Slip Stitching
Back Stitching
Even back stitch
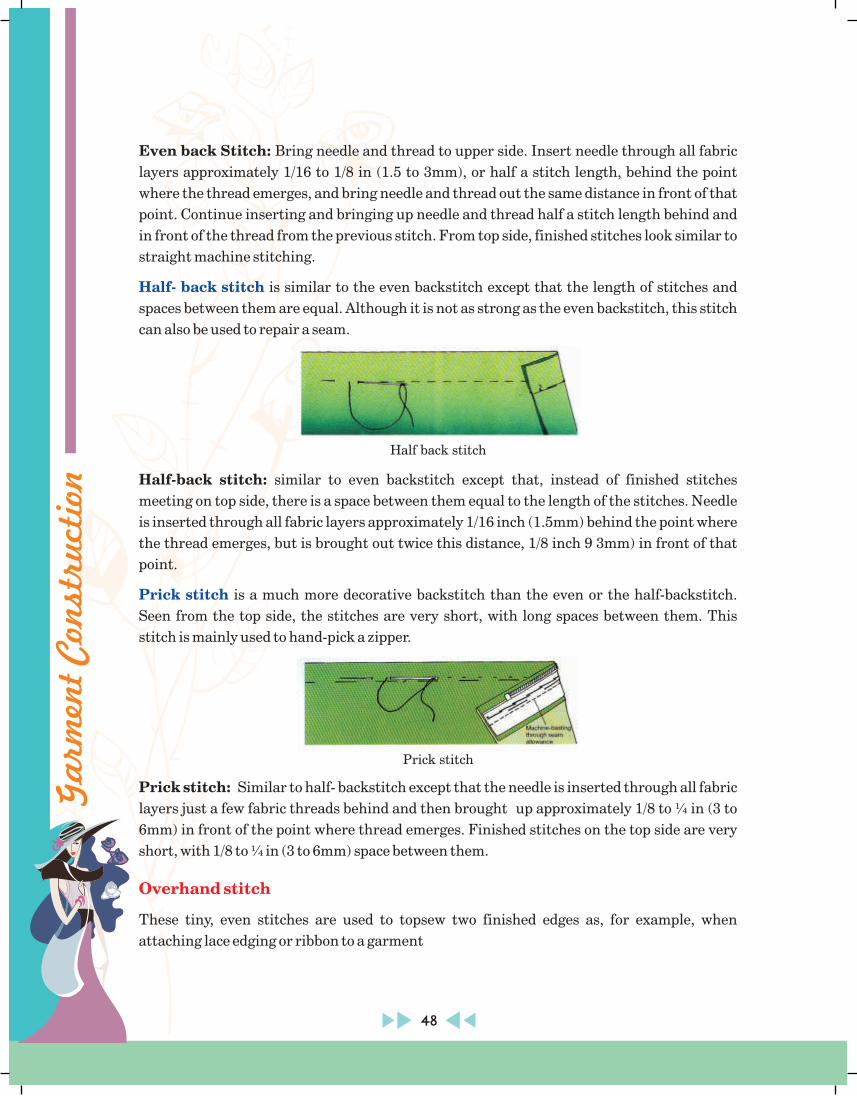
Ga
rmen
t C
onst
ruct
ion
Even back Stitch: Bring needle and thread to upper side. Insert needle through all fabric
layers approximately 1/16 to 1/8 in (1.5 to 3mm), or half a stitch length, behind the point
where the thread emerges, and bring needle and thread out the same distance in front of that
point. Continue inserting and bringing up needle and thread half a stitch length behind and
in front of the thread from the previous stitch. From top side, finished stitches look similar to
straight machine stitching.
is similar to the even backstitch except that the length of stitches and
spaces between them are equal. Although it is not as strong as the even backstitch, this stitch
can also be used to repair a seam.
Half-back stitch: similar to even backstitch except that, instead of finished stitches
meeting on top side, there is a space between them equal to the length of the stitches. Needle
is inserted through all fabric layers approximately 1/16 inch (1.5mm) behind the point where
the thread emerges, but is brought out twice this distance, 1/8 inch 9 3mm) in front of that
point.
is a much more decorative backstitch than the even or the half-backstitch.
Seen from the top side, the stitches are very short, with long spaces between them. This
stitch is mainly used to hand-pick a zipper.
Prick stitch: Similar to half- backstitch except that the needle is inserted through all fabric
layers just a few fabric threads behind and then brought up approximately 1/8 to ¼ in (3 to
6mm) in front of the point where thread emerges. Finished stitches on the top side are very
short, with 1/8 to ¼ in (3 to 6mm) space between them.
These tiny, even stitches are used to topsew two finished edges as, for example, when
attaching lace edging or ribbon to a garment
Half- back stitch
Prick stitch
Overhand stitch
48
Half back stitch
Prick stitch
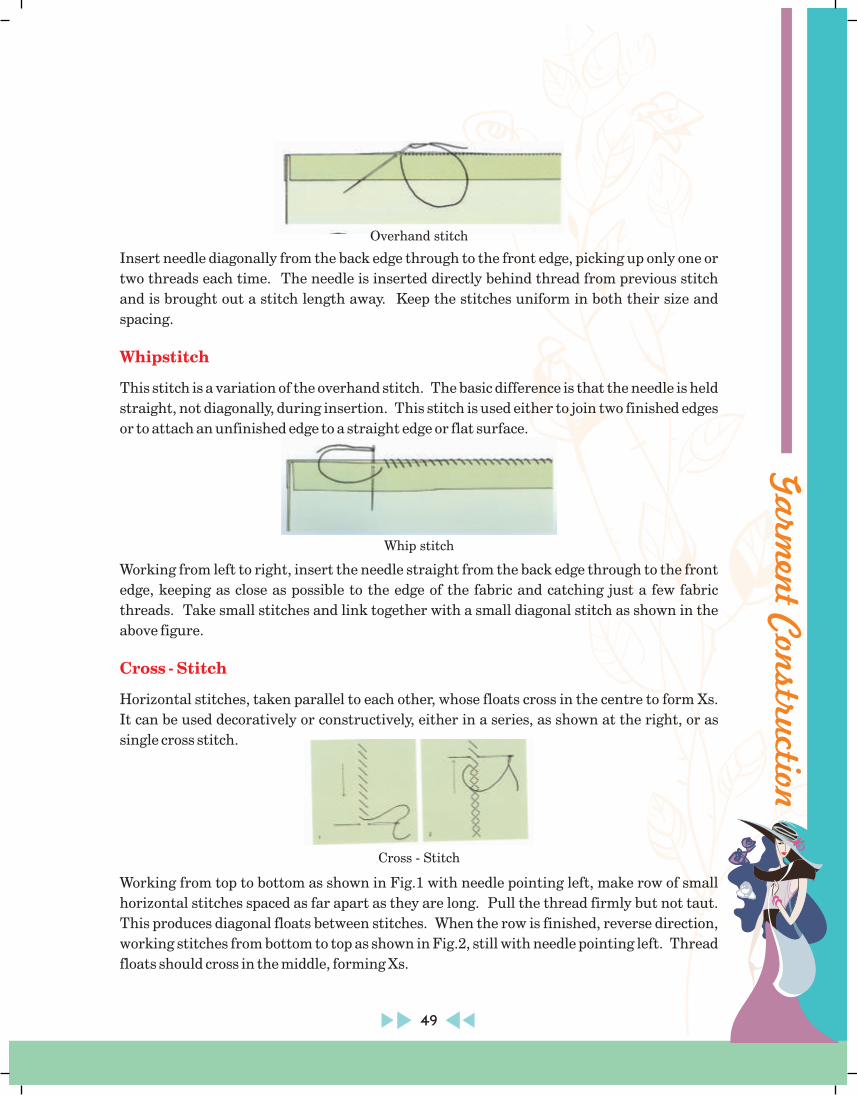
Ga
rmen
t Con
struction
49
Insert needle diagonally from the back edge through to the front edge, picking up only one or
two threads each time. The needle is inserted directly behind thread from previous stitch
and is brought out a stitch length away. Keep the stitches uniform in both their size and
spacing.
This stitch is a variation of the overhand stitch. The basic difference is that the needle is held
straight, not diagonally, during insertion. This stitch is used either to join two finished edges
or to attach an unfinished edge to a straight edge or flat surface.
Working from left to right, insert the needle straight from the back edge through to the front
edge, keeping as close as possible to the edge of the fabric and catching just a few fabric
threads. Take small stitches and link together with a small diagonal stitch as shown in the
above figure.
Horizontal stitches, taken parallel to each other, whose floats cross in the centre to form Xs.
It can be used decoratively or constructively, either in a series, as shown at the right, or as
single cross stitch.
Working from top to bottom as shown in Fig.1 with needle pointing left, make row of small
horizontal stitches spaced as far apart as they are long. Pull the thread firmly but not taut.
This produces diagonal floats between stitches. When the row is finished, reverse direction,
working stitches from bottom to top as shown in Fig.2, still with needle pointing left. Thread
floats should cross in the middle, forming Xs.
Whipstitch
Cross - Stitch
Overhand stitch
Whip stitch
Cross - Stitch

Ga
rmen
t C
onst
ruct
ion
Catch stitch Basting
Plain stitch
Heavy - duty basting
This stitch is similar to blind hemming using a catchstitch. When used to baste, the stitches
are more widely spaced, approximately ½ inch to ¾ inch and they are used to hold such
garment sections as a facing to a front section.
Work from left to right, with facing folded back and needle pointing left. Fasten thread in
facing. About ¾ inch to 2 inch to right, take a small stitch in the interfacing or underlining.
Pull needle and thread through. Take the next short stitch ½ inch to ¾ inch to the right in
the facing. Repeat sequence, allowing a slight slack between stitches.
Plain stitch is used for basting sections of light weight garments together. It is like the blind-
hemming stitch except that the stitches are spaced farther apart.
Work from right to left, with the facing folded back. Fasten thread in facing. Take one short
horizontal stitch ½ inch ahead in the interfacing or underlining; then, ½ to ¾ inch ahead of
this stitch, take another short horizontal stitch in facing. Pull needle and thread through
and repeat. Do not pull thread taut.
Heavy - duty basting is a very sturdy stitch that is used for joining areas of a heavy garment.
50
Catchstitch Basting
Plain stitch
Heavy - duty basting

Ga
rmen
t Con
struction
51
Work from bottom to top, with the facing folded back and the needle pointing from right to
left. Fasten thread in facing. Take a short stitch, catching only a few threads of interfacing or
underlining and then facing. Draw needle and thread through; take one or two more stitches
above first. Do not pull thread taut. Make the next and each succeeding set of stitches ¾ inch
to 2 inch above the set just completed.
A decorative stitch used to join two fabric sections, leaving a space in between. As a rule,
fagoting should be used only in those areas where there will be little strain, such as yoke
sections or bands near the bottom of a skirt or sleeve. The fabric edges must be folded back
accurately to maintain the position of the original seamline, which, after fagoting, should be
at the centre of the space between the folded edges.
Draw parallel lines on a paper to represent width of opening between the folded back fabric
edges. Fold each seamline back by half this measurement, then pin and baste each to paper
along parallel lines. Fasten thread and bring up through one folded edge. Carry thread
diagonally across opening and insert needle up through opposite fold; pull thread through.
Pass needle under thread, diagonally across opening, and up through opposite fold.
Continue in this way along entire opening, spacing stitches evenly. When finished, remove
paper and press seam.
This is the usual hand stitch for finishing raw edges to prevent them from fraying. In
general, the more the fabric frays, the deeper and closer together the overcast stitches should
be.
Fagoting stitch
Overcast stitch
Fagoting stitch
Overcast stitch
Ga
rmen
t C
onst
ruct
ion
Working from either direction, take diagonal stitches over the edge, spacing them an even
distance apart at a uniform depth.
This is traditionally an embroidery stitch. This stitch can also be used in garment
construction. It often serves to cover fabric edges decoratively. Another use is in construction
details. A bar tack is formed, for example, by working the stitch over threads.
Work from left to right, with the point of the needle and the edge of the work towards you.
The edge of the fabric can be folded under or left raw. Secure thread and bring out below
edge. For the first and each succeeding stitch, insert needle through fabric from right side
and bring out at edge. Keeping thread from previous stitch under point of needle, draw the
needle and thread through, forming stitch over edge. Stitch size and spacing can be the same
or varied.
A covering stitch used as a decorative finish and in the making of hand worked buttonholes.
Work from right to left, with point of needle toward you but edge of fabric away from you.
Fasten thread and bring out above the edge. For first and each succeeding stitch, loop thread
from previous stitch to left, then down to right. Insert needle from underside, keeping
looped thread under both point and eye of needle. Pull needle out through fabric, then away
from you to place the purl of the stitch on the fabric's edge. Stitch depth and spacing can be
large or small depending on fabric and circumstance.
Blanket stitch
Buttonhole stitch
52
Blanket stitch
Buttonhole stitch
Ga
rmen
t Con
struction
53
Hemming Stitches
Slant hemming
Vertical hemming stitch
Hemming Stitches are used to attach the hem to the garment fabric. Flat hemming stitches
pass over the hem edge to the garment.
Slant hemming is the quickest, but least durable, because so much thread is exposed and
subject to abrasion.
Fasten thread on wrong side of hem, bringing needle and thread through hem edge. Working
from right to left, take first and each succeeding stitch approximately ¼ to ? in (6 to 10mm) to
the left, catching only one thread of the garment fabric and bringing the needle up through
edge of hem.
This method produces long, slanting floats between stitches.
Vertical hemming stitch is a durable and stable method best suited to hems whose edges are
finished with woven or stretch-lace seam binding. Very little thread is exposed, reducing the
risk of fraying and breaking.
Stitches are worked from right to left. Fasten thread from wrong side of hem and bring
needle and
thread through hem edge, begin first and each succeeding stitch by catching only one thread
of garment fabric. Then direct the needle down diagonally to go through the hem edge
approximately ¼ to ? in (6 to 10mm) to the left. Short vertical floats will appear between the
stitches.
Slant hemming
Vertical hemming stitch

Ga
rmen
t C
onst
ruct
ion
Slipstitch
Even Slipstitch
This is an almost invisible stitch formed by slipping the thread under a fold of fabric.
Even Slipstitch is used to join two folded edges. It is a fast and easy way to mend a seam from
the right side.
Work from right to left. Fasten thread and bring needle and thread out thread one folded
edge. For the first and each succeeding stitch, slip needle through fold of opposite edge for
about ¼ in (6mm); bring needle out and draw the thread through. Continue to slip the needle
and thread through the opposite folded edges.
54
Even Slip stitch

Ga
rmen
t Con
struction
55
A seam is the join where two or more layers of fabric sewn together a short distance from the
edges. The fabric pieces are placed right sides together, matching the raw edges. Once the
seam is sewn, the seam allowances are pressed open or both pressed to one side, depending on
the garment. The most common type of seam is sewn with the straight stitch, but there are
specialised seams for particular fabrics and sewing techniques. Accuracy is important when
stitching seams. With practice, one can able to sew a seam with consistent seam allowances.
The following are the basic machine seams used for stitching or finishing various parts of the
garments:
1. Plain seam
2. Stitched and pinked seam
3. Double top stitched seam
4. Turned and stitch seam
5. French seam
6. Flat felled seam
7. Lapped seam
8. Hong - Kong seam
9. Mock French seam
10. Self bound seam
A plain seam is the most common type of machine-sewn seam. It is
used for light weight to medium weight fabrics.
Process:
Place the fabric pieces right sides together. Sew along the seam line,
back stitching about 1/4'' at the beginning and end of the seam. The
seam allowance usually requires some sort of seam finish to prevent
ravelling.
1. Plain Seam
Practical 7
Basic Machine Seams
Plain Seam
Ga
rmen
t C
onst
ruct
ion
2. Stitched and pinked seam
3. Double Top stitched seam
4. Turned and stitch seam
5. French seam
This method helps to minimise fraying.
Process:
Do the plain seam. Cut along the edge of seam allowance with pinking
shears
This method is good for knits, such as tricot or soft jersey, where edges
tend to curl.
Process:
Do the plain seam. Turn the raw edge under a small amount, press and
machine from the right side as close to the edge as possible. Machine a
second row 1/8'' from the first stitch.
This is a neat, tailored finish for light weight to medium weight fabric and
is suitable for unlined jacket.
Process:
Do the plain seam. Press open and stitch along edge of fold on both sides.
This bulky, self-neatened seam is suitable for thin and fraying fabrics.
Process:
It is stitched twice, once from the right side and once from the wrong side. With wrong
sides of fabric together, stitch 3/8'' from the edge. Trim seam allowance to 1/8''. Press
seam open. Fold right sides together, with stitched line exactly on edge of fold, and press
again. Stitch on the seam line which is now ¼'' from the fold. Press seam to one side
56
Stitched and pinked seam
Double top stitched seam
Turned and stitch seam
French seam
Ga
rmen
t Con
struction
57
6. Flat felled seam
7. Lapped seam
8. Hong Kong seam
i
i
i
It is very sturdy and so is often used for sports wear children wear.
Process:
Stitch on the seam line with wrong sides of fabric together. Press seam
open then to one side. Trim the inner seam allowance to 1/8''. Press
under the edge of outer seam allowance ¼''. Stitch this folded edge to
the garment. Take care while pressing seams in the same direction.
Lapped seams are typically used for bulky materials that do
not ravel, such as leather and felt.
Process:
Do over locking of the edge of the one fabric piece. Place both
fabrics together (over locked as well as other fabric) and do
plain seam. Single fold the over locked edge and do machine
stitch.
This is an alternative to the bias-bound finish and is suitable for heavy weight fabric.
Process:
Cut 1-1/2'' wide bias strips from light weight fabric that matches the garment
fabric.
Stitch the bias strip to seam allowance, ¼'' from the edge with right sides together.
Turn bias over the edge to the underside and press. Stitch in crevice of the first
stitching from right side. Trim the unfinished edges of the bias.
Flat felled seam
Lapped seam
Hong Kong seam

Ga
rmen
t C
onst
ruct
ion
9. Mock French seam
10. Self bound seam
This seam is used in place of the French seam especially in curves
where a French seam is difficult to execute.
Process:
Stitch on the seam line with right sides of the fabric together. Trim
seam allowances to ½''. Turn in the seam edges ½'' and press,
matching folds along the edge. Stitch these folded edges together.
Press seam to one side.
This seam is used in light weight fabrics that do not fray easily.
Process:
Do the plain seam. Trim one seam allowance to 1/8". Turn under the edge of the other
seam allowance 1/8" and press (1). Turn and press again, bringing the folded edge to
the seam line, so that the trimmed edge is now enclosed. Stitch close to fold (2) near to
first line of stitching.
58
Mock French seam
Self bound seam

Ga
rmen
t Con
struction
59
Darts are one of the most basic structural elements in dressmaking. They are used to build
into a flat piece of fabric a definite shape that will allow the fabric to conform to a particular
body contour or curve. Darts occur most often at the bust, the waist, and the hips; accuracy in
their position and fit is important if they are to gracefully emphasize the lines in these areas.
Precise marking of construction symbols is also important. Choose a marking method
suitable for the fabric. Stitching direction is from the wide end to the point. Backstitching
can be used as a reinforcement at the wide end but should not be used at the point.
1. Before removing pattern, transfer the markings to wrong side of fabric. Tailor's tacks
are shown here, but the method will depend on fabric being marked.
2. From wrong side, fold dart trough center; match and pin corresponding tailor's tacks
(or other markings). Baste, then remove tailor's tacks.
Plain Darts
Practical 8
Fabric Manipulation: Darts
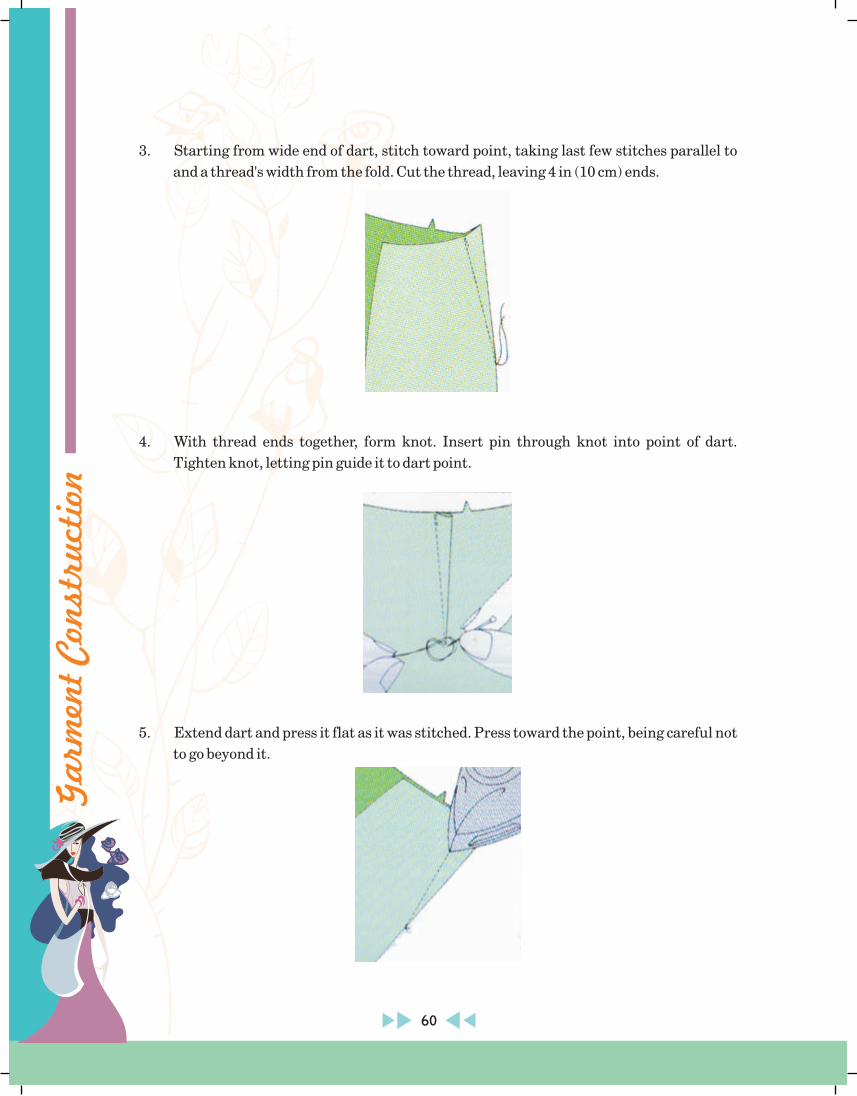
Ga
rmen
t C
onst
ruct
ion
3. Starting from wide end of dart, stitch toward point, taking last few stitches parallel to
and a thread's width from the fold. Cut the thread, leaving 4 in (10 cm) ends.
4. With thread ends together, form knot. Insert pin through knot into point of dart.
Tighten knot, letting pin guide it to dart point.
5. Extend dart and press it flat as it was stitched. Press toward the point, being careful not
to go beyond it.
60
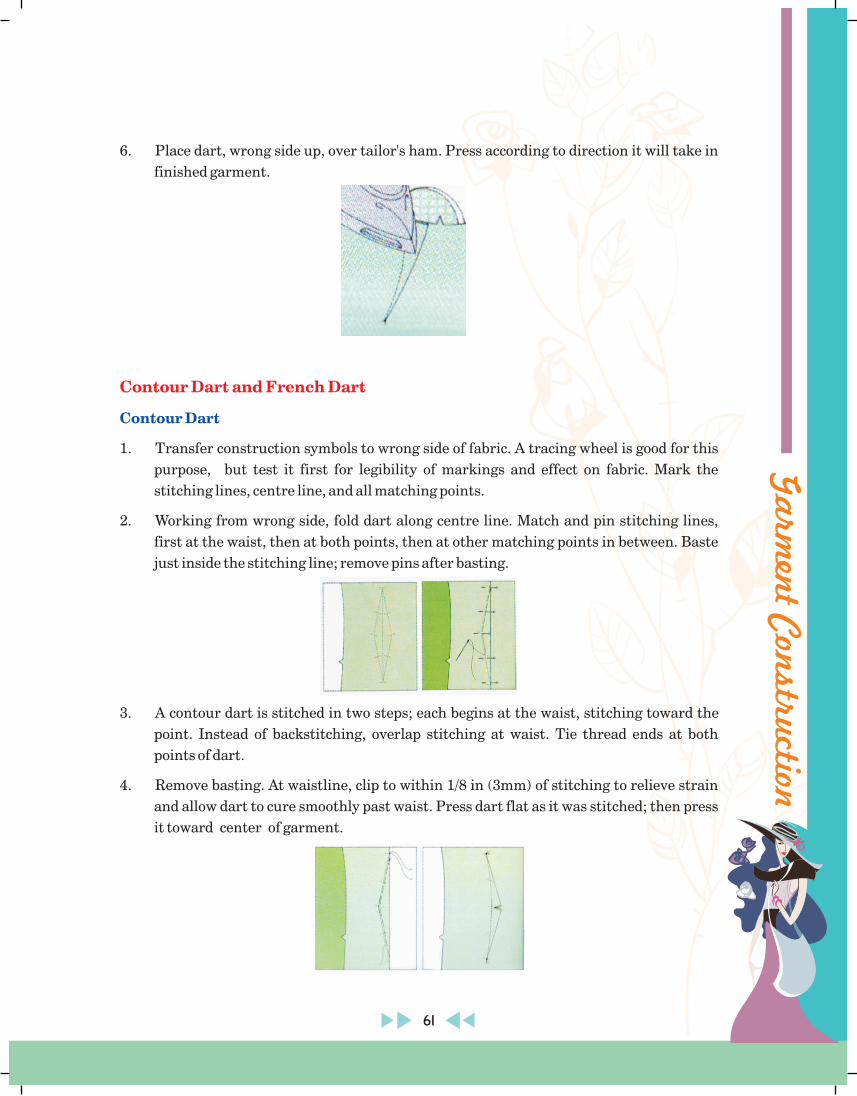
Ga
rmen
t Con
struction
61
6. Place dart, wrong side up, over tailor's ham. Press according to direction it will take in
finished garment.
1. Transfer construction symbols to wrong side of fabric. A tracing wheel is good for this
purpose, but test it first for legibility of markings and effect on fabric. Mark the
stitching lines, centre line, and all matching points.
2. Working from wrong side, fold dart along centre line. Match and pin stitching lines,
first at the waist, then at both points, then at other matching points in between. Baste
just inside the stitching line; remove pins after basting.
3. A contour dart is stitched in two steps; each begins at the waist, stitching toward the
point. Instead of backstitching, overlap stitching at waist. Tie thread ends at both
points of dart.
4. Remove basting. At waistline, clip to within 1/8 in (3mm) of stitching to relieve strain
and allow dart to cure smoothly past waist. Press dart flat as it was stitched; then press
it toward center of garment.
Contour Dart and French Dart
Contour Dart

Ga
rmen
t C
onst
ruct
ion
French Dart
1. Transfer pattern markings to wrong side of the fabric. Stay stitch 1/8 in (3mm) inside
each stitching line. Start each line of stay stitching from the seam line end of dart and
taper both to meet approximately 1 in (2.5 cm) from point of dart.
2. With right sides together, match and in stitching lines. You may need to ease the lower
edge to the upper edge to get the points to match accurately. Baste along the stitching
line, then remove pins.
3. Slash through the centre of the dart where the rows of stay stitching intersect. (This
will not be necessary on those French darts in which part or all of the centre portion is
removed when the garment section is cut out.)
4. Stitch dart from end to point, knotting thread. Remove basting and clip seam
allowances to relieve strain, letting dart curve smoothly. Press flat, then downward
over tailor's ham.
62
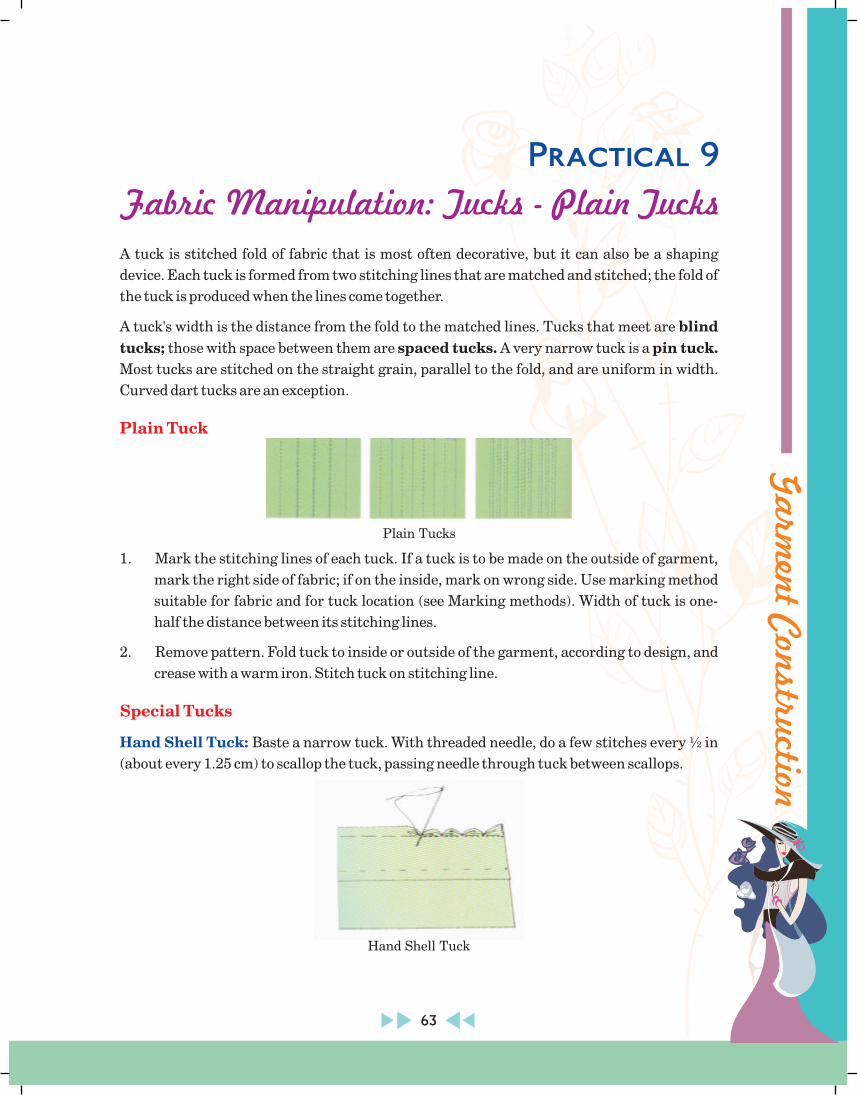
Ga
rmen
t Con
struction
63
A tuck is stitched fold of fabric that is most often decorative, but it can also be a shaping
device. Each tuck is formed from two stitching lines that are matched and stitched; the fold of
the tuck is produced when the lines come together.
A tuck's width is the distance from the fold to the matched lines. Tucks that meet are blind
tucks; those with space between them are spaced tucks. A very narrow tuck is a pin tuck.
Most tucks are stitched on the straight grain, parallel to the fold, and are uniform in width.
Curved dart tucks are an exception.
1. Mark the stitching lines of each tuck. If a tuck is to be made on the outside of garment,
mark the right side of fabric; if on the inside, mark on wrong side. Use marking method
suitable for fabric and for tuck location (see Marking methods). Width of tuck is one-
half the distance between its stitching lines.
2. Remove pattern. Fold tuck to inside or outside of the garment, according to design, and
crease with a warm iron. Stitch tuck on stitching line.
Baste a narrow tuck. With threaded needle, do a few stitches every ½ in
(about every 1.25 cm) to scallop the tuck, passing needle through tuck between scallops.
Plain Tuck
Special Tucks
Hand Shell Tuck:
Practical 9
Fabric Manipulation: Tucks - Plain Tucks
Plain Tucks
Hand Shell Tuck

Ga
rmen
t C
onst
ruct
ion
Machine Shell Tuck:
Corded, or Piped, Tuck:
Cross Tucks:
Baste a 1/8 in (3 mm) tuck. Set machine for the blind stitch. Place
tuck under foot with fold to left of needle so that the zigzag stitch will form over the fold and
scallop the tuck.
Fold the tuck positioning cord inside along the fold. Baste. Using
a zipper foot, stitch close to cord. Make sure that the size of the cord is right for the width of
the tuck.
Stitch all the lengthwise tucks and press them in one direction. Then stitch
the crossing set of tucks at right angles to the first, keeping the first set of tucks facing
downward.
64
Machine shell tuck
Corded or piped tuck
Cross Tucks

Ga
rmen
t Con
struction
65
Dart or Released Tucks
Dart tucks, sometimes also called released tucks, are used to control fullness and then
release it at a desired point, such as the bust or hips. They can be formed on the inside or
outside of the garment; fullness can be released at either or both ends. Sometimes the tuck is
stitched across the bottom. Dart tucks may be stitched on the straight grain, or, in some
instances, the stitching lines may be curved to build in a certain amount of shaping. Care
must be taken, especially when stitching lines are curved, to match them accurately.
Reinforce the stitches by tying threads or back stitching. Press carefully to avoid creasing
folds.
Dart or Released Tucks

Ga
rmen
t C
onst
ruct
ion
Pleats are open folds sewn into the fabric of a garment for various purposes, such as
providing shape and fullness. While useful in creating details, such as cuffs and collars, in
various kinds of garments, pleats are particularly useful in providing for variation in skirts.
There are five types of pleats: knife, inverted, box, accordion and sunburst
The knife pleat if folded in one direction. The intake of a knife pleat consists of two
parts: the pleat width (A1) and the pleat intake (1B).
When the pleat is folded, line 1 is folded over to meet on line B. The intake (1B) may be
exactly two times the size of the pleat width or it may be smaller. If the intake is equal to
the space, the pleats will match up exactly. If the intake is smaller than the space, the
pleat will not match up.
The fold line (2) is marked at the centre of the pleat intake (1B).
The inverted pleat is folded in two directions, with the folds meeting at the centre of the
pleat (B). The intake consists of two parts: 1B and 4B. A1 and C4 make up the pleat
space and 1B and 4B make up the pleat intake.
The fold lies (2) and (3) are marked at the centre of the pleat intake 1B and 4B. BC is
divided the same as AB.
Knife Pleat
i
i
i
Inverted Pleat
i
i
66
Practical 10
Fabric Manipulation: Pleats
Knife Pleat
Pleat width
A B1 2A
22
BB
11

Ga
rmen
t Con
struction
67
i
Box Pleat
When the pleat is folded, lines 1 and 4 are folded over to meet on line B.
The box pleat is constructed the same as the inverted pleat.
The box pleat is folded with the intake on the outside of the garment, matching line 2 to A and
line 3 to C.
Inverted Pleat
Pleat width Pleat width
A B C1 2 3 4
2 3B
A C41
Box Pleat
Pleat width
A B C1 2 3 4
A C
B
1
2 3
4

Ga
rmen
t C
onst
ruct
ion
Gathering is the process of drawing a given amount of fabric into a predetermined, smaller
area, along one or several basting lines, to create soft, even folds. Fabric is usually gathered to
one-half or one-third the original width.
Gathering most often occurs in garment at waistline, cuffs, or yoke, or as ruffles. Gathering
is done after construction seams have been stitched, seam-finished, and pressed. Because
gathers fall best on the lengthwise grain, the rows of basting should run across the grain.
Suitable stitch length for gathering vary from 6 to 12 stitches per inch, shorter for sheer or
light fabrics, longer for thick, heavy materials.
Adjust the machine for long stitch and loosen the upper tension slightly. Now work two rows
of machine stitches 1\4 inch apart as explained earlier. Distribute the fullness evenly by
pulling both bobbin threads together. Ruffles attachment or gathering foot can be used to
gather large sections of fabric.
Gathering by machine
68
Practical 11
Fabric Manipulation Gathers
Gathering

Ga
rmen
t Con
struction
69
Shirring is formed with multiple rows of gathering and is primarily a decorative way of
controlling fullness. In contrast to gathering, in which fullness is controlled within a seam,
the fullness in shirring is controlled over a comparatively wide span.
Lightweight fabrics and easy-care fabrics are the most appropriate for shirring. Voiles,
batistes, crepes, and jerseys are excellent choices.
Your pattern should specify the areas to be shirred; these can range from a small part to an
entire garment section. Rows of shirring must be straight, parallel, and equidistant. They
may be as close together as ¼ in (6 mm) or as far apart as an inch or so (2 or 3 cm), depending
on personal preference and pattern specifications. Width to be shirred is set by the pattern.
1. Stitch repeated rows of gathering stitches over section to be shirred, spacing rows an
equal distance apart. Gather each row separately by pulling on bobbin thread. Measure
first row when shirred. Make sure to gather all further rows to the same length.
2. Secure rows, after all have been gathered, by typing the thread ends on each row; then
place a line of machine stitching across the ends of all rows. If ends of shirred area will
not be stitched into a seam, enclose the thread ends in a small pin tuck.
Shirring
Practical 12
Fabric Manipulation Shirring
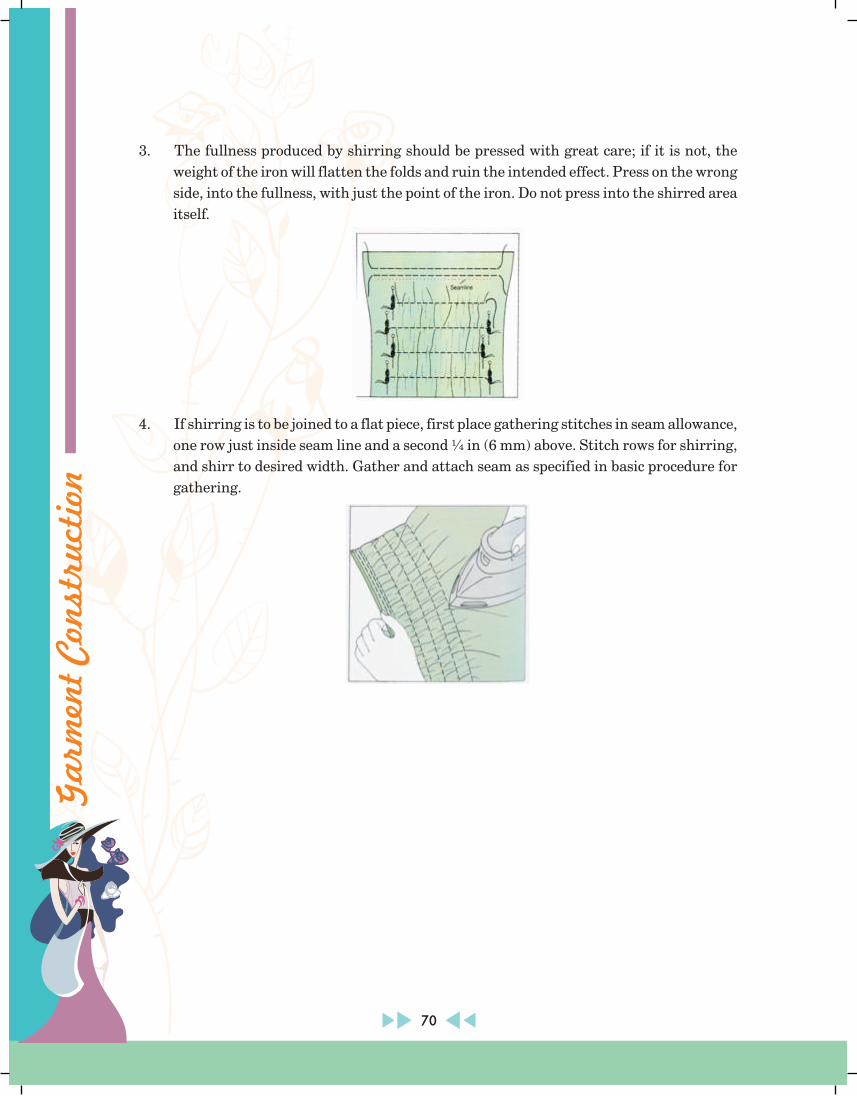
Ga
rmen
t C
onst
ruct
ion
3. The fullness produced by shirring should be pressed with great care; if it is not, the
weight of the iron will flatten the folds and ruin the intended effect. Press on the wrong
side, into the fullness, with just the point of the iron. Do not press into the shirred area
itself.
4. If shirring is to be joined to a flat piece, first place gathering stitches in seam allowance,
one row just inside seam line and a second ¼ in (6 mm) above. Stitch rows for shirring,
and shirr to desired width. Gather and attach seam as specified in basic procedure for
gathering.
70


Shiksha Kendra, 2, Community Centre, Preet Vihar, Delhi-110 092 India
CENTRAL BOARD OF SECONDARY EDUCATION