a complete course in dressmaking, (vol. 11, boys' clothes)
TRANSCRIPT

Jt 7
•C7*r _ l > '?*
Complete Counce in
\Drerj'irmhn<g
‘1'welveLessonj^ Lesson XI
Soys Clothes - The way to make boys’ clothes that a boy likes to wear. All the little tricks in tailoring the mannish little garments, blouses, shirts, trousers, knicker¬ bockers, sailor suits and underwear.
Irahet“DelVyse \never


A COMPLETE COURSE IN
DRESSMAKING
BY
ISABEL DeNYSE CONOVER
LESSON XI
HOW TO MAKE BOYS’ CLOTHES
NEW YORK
EDWARD J. CLODE

COPYRIGHT, 1921, 1922, BY
EDWARD J. CLODE
Entered at Stationers' Hall
c
t
c c
1 <
< < * ( <
I ©C1A6’J0^°-
PRINTED IN THE UNITED STATES OF AMERICA
JAN-4’23

LESSON XI
HOW TO MAKE BOYS’ CLOTHES
^^HETHER he is a two- or a four- or a six- or an eight- or a ten-year-old, dress him
like a real boy.
He will like the clothes that mother or auntie makes just as much as he does their cookies and jam and chocolate pudding— provided the clothes are as good a product as the cooking. Remember that he wants to look like other little boys. And after all, it’s just as easy to make the right kind of clothes for him as it is to make the wrong kind.
I heard a young mother say the other day that she didn’t like to make Johnny’s clothes because “They always looked homemade and his little playmates made fun of him.” Now I saw the clothes and the homemade look wasn’t half so much the fault of the making as it was the style. She tried to rush a little boy into big boy’s clothes. He looked just as guyable as an overgrown boy in a six-year-old suit.
[1]

A COMPLETE COURSE IN DRESSMAKING
Fig. (/) His first pants can be made like a romper
Fig. {2) Even if he is only afour- year-old, dress him boyishly
Size up your little boy and see the type of clothes he ought to wear.
If he is just two years old, a little smock and romper suit will make him seem boyish yet not too old for his age.
Chubby four-year-old boys look well in the button-over-the-blouse type of trousers.
When the boy starts to long out at six years, a sailor suit will not only please his heart but give him a real boy look.
Eight-year-old boys wear regulation Buster

HOW TO MAKE BOYS* CLOTHES
Brown blouses with their suits and separate trousers.
When he is ten years old it’s time to let him wear shirts.
Of course, the way you stitch and turn and finish the garments makes a difference, too. You can’t stitch the wrong style to look right but you can spoil the right style in the making. There is not so much leeway in making boys’ clothes as there is in making girls’.
[3]

A COMPLETE COURSE IN DRESSMAKING
When it’s a little boy’s blouse or trousers or piece of underwear you are running up,
keep to the standard rules for stitching and finishing boys’ clothes.
You have already learned most of the finishings that you need in making their clothes. This lesson will merely tell you where to apply them. I am not going into pattern making in boys’ clothes. You see it is just the same prin¬ ciples as you applied in making other gar¬ ments. If you want to make patterns, fit a good plain blouse and trouser pattern and use
Fig. (5) A regulation suit for the'^ ^ block. ten- or twelve-year-old boy
The garments which I am using as examples of the different finishes are standard styles that can be secured from any commercial pattern company.
14]

HOW TO MAKE BOYS’ CLOTHES
BLOUSES
The style of the blouse you are using may vary a little from the style shown in the lesson but the fin¬ ishing will be the same. You can use the following prob¬ lems as a handy book of reference in making any blouse.
First we will con¬ sider the Buster Brown blouse shown in Fig. 6. It’s the blouse the eight- and nine- year-old boy wears. If you make a half dozen of these at a time, you will save considerable goods and be able to fin¬ ish them quicker.
Most little boys like their Buster Brown’ blouses made of men’s shirting. Gray cham- j bray and linen makes nice blouses, too.
Cutting a Buster Brown Blouse: Diagram 7
Fig. (6) Little eight-year-old boys wear Buster Brown blouses
[5]

A COMPLETE COURSE IN DRESSMAKING
shows the pattern for a blouse such as the one sketched in Fig. 6 laid on the material which is folded double lengthwise.
If you are cutting several blouses at one time, make the layout on a piece of paper, fold the goods according to the layout and place one length of goods on top of another with the layout on the top. If you use a heavy pair of shears and cut with the points you can cut through several thicknesses of
Fig. (7) Diagram showing pattern for blouse placed on the goods
goods at once. Whenever possible, plan the children’s sewing so that you can cut and make several garments at one time.
Making the Buster Brown Blouse: If you have cut several blouses, run up the blouses in sections, that is finish all the hems, then all the shoulder seams etc. It is much quicker than completely making one blouse then taking up another.
It is always a good plan to do as much finishing as possible before closing the seams
[61

HOW TO MAKE BOYS’ CLOTHES
of the blouse. In this case, the front edges of the blouse can be hemmed before the seams are closed at the shoulder. If you are making the blouse with plain hems, stitch as shown in Fig. 8. A box-pleat takes up a wider allowance beyond the center-front. It would be stitched first as in Fig. 8 and then as in Fig. 9.
Boys’ garments are always given a tailored finish, so lap fell the shoulder seams. After the shoulder seams are closed, run a stitching around the neck to prevent stretching. A collar Fig. (<s)
will not go on neatly nor set smoothly when the fabric of the blouse is pulled the blouse
out of shape.
The easiest way of finishing the collar is to line it. Cut the lining a trifle smaller than the outside and hold the lining to the size to the outside in stitching it. (See Fig. 10.) Join
the collar to the neck before closing
Fig- (9) 4 time. °x'ciosing e Run a gather thread across the
[7]

A COMPLETE COURSE IN DRESSMAKING U lower edge of the sleeve, drawing it up to the size of the cuff. How¬ ever, do not join it to the cuff until after the sleeve is joined to the armhole and the sleeve and underarm seams closed.
Ftg'thfcoUaring Make a lap-felled seam in join¬ ing the sleeve to the armhole and
French seam the sleeve and underarm join¬ ings.
To make the band cuff, join the ends of the cuff and press the seams open. Slip the cuff over the right side of the sleeve and stitch, as shown in Fig. 14. Turn the sleeve wrong side out, turn under the free edge of the cuff a seam’s width, fold the cuff through the center and stitch a second time, as shown in Fig. 15.
If the blouse is to be worn with separate trousers, the bottom ought to be fin¬ ished with a casing and draw string inserted. (See Figs. 16 and 17.)
If the blouse is to be worn with buttoned-on trousers, finish the lower
trousers with a (7/) Sew the collar to the neck before joining the underarm seams
edge of the waistband.
[8]

HOW TO MAKE BOYS’ CLOTHES
Fig. (12) The first stitching in Fig. (ij) Thefde¬ facing the collar to the neck ing turned and
stitched in its finished position
Try on the blouse to make sure the fullness runs straight up and down. It ought not to drag toward the front or the back. After the waist is taken off, bring the center-fronts to¬ gether and make sure the underarm seams
Fig. {14) Joining the cuff to the sleeve
Fig. {iff) The cuff turned and stitched a second time
[9]

A COMPLETE COURSE IN DRESSMAKING
Fig. (16) Stitching the casing Fig. {17) The casing completed to the bottom oj the blouse and the draw string inserted
match. Turn under the edges of the waist¬ band a seam’s width, fold the waistband through the center and press. (See Fig. 18.) Insert the lower edge of the blouse between the two thicknesses of the waistband and stitch as shown in Fig. 19.
Sew buttons to the waistband at regular intervals, spacing them to match the button¬ holes in the trousers. (See Fig. 20.) Finish the front closing of the blouse with buttons and buttonholes.
Fig. (18) The waistband
[101

HOW TO MAKE BOYS’ CLOTHES
Outing Shirt: Any eight- or ten-year-old boy would welcome having an outing shirt, as shown in Fig. 21. You see, boys’ fashions are more sensible than they use to be. Not only little boys but also , young men wear outing band in place
shirts that have comfort¬ able V necks and short sleeves.
The material you use in such a shirt de¬ pends on when and where the boy will wear it. If it’s for rough and ready hard wear, make it of khaki cloth or denim. If it will have only ordinary wear, chambray or a cotton shirting will serve the purpose.
Making the Outing Skirt: If the shirt is made with a waistband to button to the top of the trousers, then the fronts are hemmed.
However, if the shirt is in coat style with tails like a man’s shirt, the fronts are faced at the clos¬ ing and the edges below hemmed
i r i
i
<s> ej
f i
«=»! •
i ,i ! ;!
e
Fig. (20) The waistband completed
[ii]

A COMPLETE COURSE IN DRESSMAKING
just like a man’s shirt. After the fronts are finished close the
shoulder seams, making lap-felled seams. Line the collar and face it to the neck.
[12]

HOW TO MAKE BOYS’ CLOTHES
Fig. (22) The cuff seam Fig. (23) The cuff stitched closed
Join the sleeves to the armholes with lap- felled seams and close the sleeve and under¬ arm seams. Here you can use either a lap- felled or French seam.
Close the seam in the cuff making an open seam. (See Fig. 22.) Turn the sleeve wrong side out and slip the cuff over the sleeve and stitch around the bottom as shown in Fig. 23. When the cuff is turned below the sleeve, it will look as in Fig. 24. Turn the sleeve right side out. (See Fig. 25.) Turn under the free edge of the cuff a seam’s width, fold it through the center and stitch, as shown in Fig. 26. Then turn the cuff into its . . ^ - finished position. turned
[13]

A COMPLETE COURSE IN DRESSMAKING
A Little Boy9s Smock: This brings us to the little fellow’s blouse. It’s my advise to make his blouse a smock. Wouldn’t almost any little boy look nice in a linen or chambray smock such as is shown in Fig. 27?
If he is just a little two-year-old boy, make his trousers like the bottom of a romper. If he’s older, he can have straight trousers with the smock.
f— .Z2
• - --—
Fig. (25) The sleeve turned right side out
Fig. (26) The cuff
stitched a second time
A yellow smock with blue linen collar and cuffs and blue linen trousers are attractive. All gray chambray or linen is also nice, working the smocking or shirring in bright tones to liven it up. A tan smock with brown trousers, collar and cuffs is becoming to the brown
[14]

HOW TO MAKE BOYS’ CLOTHES
eyed boy. This idea worked out in seersucker is especially good for very warm weather. For a winter suit have serge trousers and a white blouse.
Fig. (27) Smocks are nice for little boy s
Making the Smock: The first step is to finish the slashed closing at the neck. Do not cut the slash in the material until the facing is stitched in place. Mark the position of the slash at the center-front. (See Fig. 28.) Place the slash facing on the wrong side of the goods over the mark and stitch as shown in
[15]

A COMPLETE COURSE IN DRESSMAKING
Fig. 29. Then slash the goods between the stitchings and turn the facing through the slash onto the right side of the goods.
Turn under the outer edges of the facing a seam’s width. Press the facing and stitch as shown in Fig. 30.
slash marked Fig. (29) The facing at the center- stitched around
front slash mark
Fig- (30) The facing turned on to the right side and stitched in
■place
Next work the smocking at the side fronts or use just plain shirrings as in Fig. 31. You can work all sorts of pretty designs over the shirrings. Fig. 32 shows cross stitch worked
[16]

HOW TO MAKE BOYS’ CLOTHES
over the shirring. The shirring and em¬ broidery works up more quickly and is just as showy as the smocking.
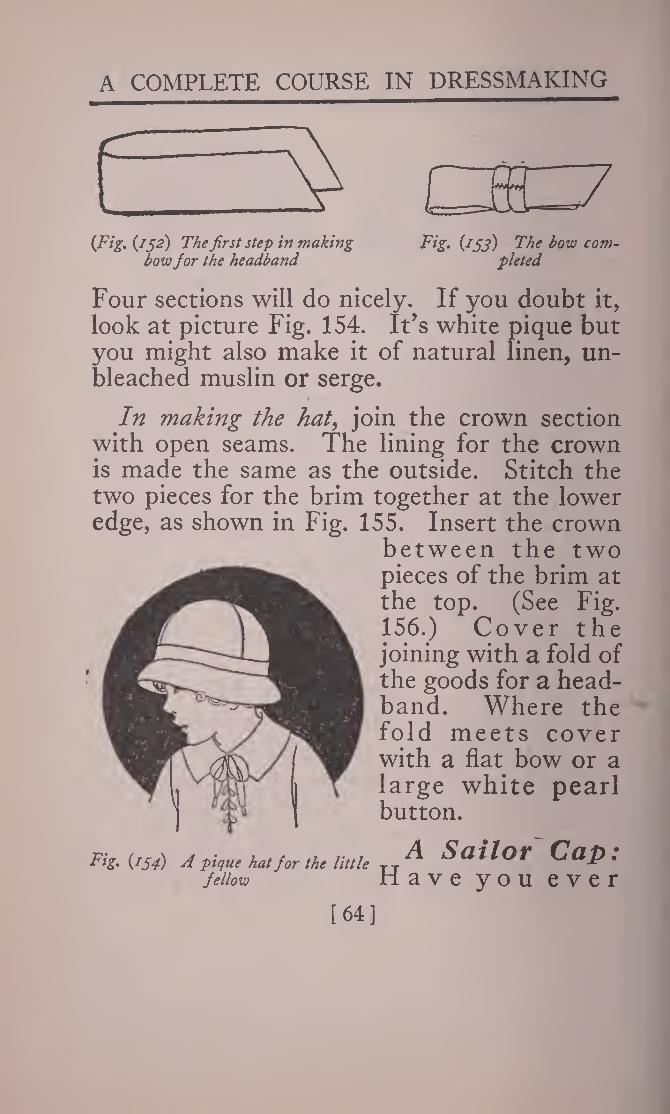
Double stitch the shoulder seams. Then line the collar and face it to the neck.
Lap-fell the sleeve to the armhole and close the sleeve and underarm joinings with French
Fig. (32) Cross stitches make an effective decora¬ tion on the shir¬
ring
Fig. (31) Shirr¬ ing can be used in place of
smocking
seams. Gather the lower edge of the sleeve and finish with band cuffs, as described in making the Buster Brown blouse.
Make a plain hem at the lower edge of the smock.
A Middy Blouse: One of the most popu¬ lar styles of sailor blouses is shown in Fig. 33.
[17]

A COMPLETE COURSE IN DRESSMAKING
You can’t make a mistake in choosing this regulation style for a six or eight-year-old boy.
A middy sailor blouse is always made in white or navy blue. You can take your
choice of material from cotton drill, jean cloth, linen, flannel or serge.
Making a Middy Blouse: The first thing to do is to stitch the yoke to the front. Turn under the lower edge a seam’s width and press
[18]

HOW TO MAKE BOYS’ CLOTHES
it. Lay the yoke on the front and stitch as shown in Fig. 34. Make a slashed pocket at the left side front. It ought to finish about two and one-half inches in width. Close the shoulder seams, making lap-felled seams.
Stitch the braid to the collar before lining the collar. It is a good plan to space the rows of braid just the width of the machine foot apart. Mark a line with tailors’ wax where the first row of braid is to be placed.. Space the other rows the width of the machine foot from it.
[19]

A COMPLETE COURSE IN DRESSMAKING
Do not attempt to baste the braid on. The braid must be held taut or it will not go on straight,
In turning the corners, stop the machine with the needle through the braid, raise the machine foot, change the position of the collar and turn the braid; then lower the foot and go on stitching.
Fig. (Ji) Lining the sailor collar
Stitch lining to collar as shown in Fig. 35. Cut off the seams to within a quarter of an inch of the stitching and clip the corners diagonally so they will not be bulky.
Face the collar to the neck. The Fig. 36 shows the facing and the collar stitched on the
[20]

HOW TO MAKE BOYS* CLOTHES
right side of the garment and Fig. 37, the fac¬ ing turned onto the wrong side of garment.
Braid top of shield and cuffs the same as collar. Join sleeves to armholes with lap-felled seams. Close the underarm seams. Here make French seams. Line the cuff and close ends of cuff as shown in Fig. 38. Stitch edge of cuff to sleeve. (See Fig. 39.) Turn the sleeve wrong side out, turn under the
[21]

A COMPLETE COURSE IN DRESSMAKING
Fig. (38) The cuff lined Fig. (?p) The cuff stitched to the sleeve
raw edge of the lining and fell it down or stitch by machine. (See Fig. 40.) Each time you turn the cuff, press it—smooth edges are easy to stitch.
Hem lower edge of blouse as shown in Fig. 41. Stitch lining to shield as shown in Fig. 42. Trim seams and turn shield right
Fig. i4o) Stitching cuff side out. Turn in raw lining to wrong side sleeve edges at opening and slip-
[22]

HOW TO MAKE BOYS’ CLOTHES
stitch across opening. (See Fig. 43.) Try on blouse and pin shield in position. Stitch shield to blouse along right side of collar. (See Fig. 44.) Sew buttons to left side of shield and make matching buttonholes in blouse under collar. (See Fig. 45.)
Sailor Overblouse: Another style of a
Fig. (42) Lining the shield Fig. (43) The shield completed
[23]

A COMPLETE COURSE IN DRESSMAKING
sailor blouse which a six- or eight-year-old boy might wear is shown in Fig. 46. Here the lower edge of the blouse is sewn to bands that lace at the sides.
This blouse also would be very practical, made of drill, linen, jean cloth, khaki cloth, serge or flannel. If the blouse is white, trim it
Fig. (44) The shield stitched Fig. (45) The shield buttoned to to the right side-front the left side-front
with white, blue or red braid. You can buy colored braid that is washable and will not fade. It is nice to have the laces at the sides match the braid in color.
If the blouse is made of blue serge or flannel to match the trousers, trim it with black or white braid.
[241

HOW TO MAKE BOY’S CLOTHES
Fig. (46) Sometimes sailor blouses have bands at the lower edge
Making the Sailor Over- blouse: The col¬ lar, shield and sleeves are made the same as the middy over¬ blouse.
In stitching the side seams, leave vents about four inches deep on either side and bind them. Gather the low¬ er edge of the blouse, front and back.
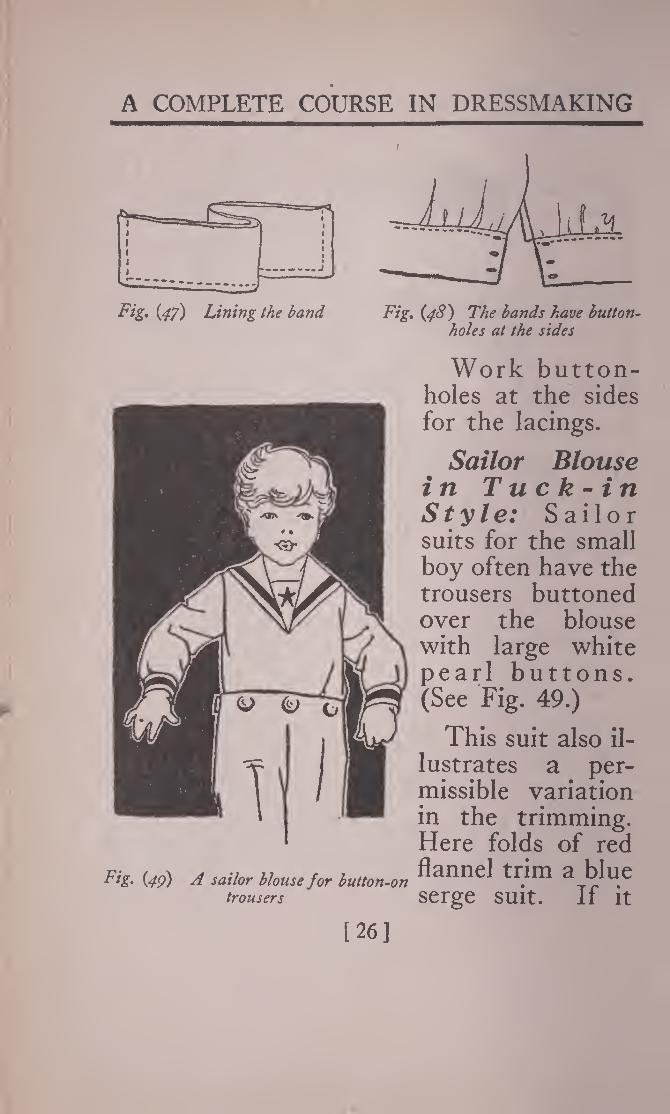
Stitch the band and the band lining to¬ gether as shown in Fig. 47. Turn the band right side out and press it. There will be two bands like this—one for the front and one for the back. In joining the band to the front, stitch one free edge to the lower edge of the blouse, then turn under the other free edge of the band three-eighths of an inch and stitch it over the raw edges. (See Fig. 48.)
[25]
A COMPLETE COURSE IN DRESSMAKING
Fig. (47) Lining the band Fig. (48) The bands have button¬ holes at the sides
Work button¬ holes at the sides for the lacings.
Sailor Blouse in Tuck-in Style: Sailor suits for the small boy often have the trousers buttoned over the blouse with large white pearl buttons. (See Fig. 49.)
This suit also il¬ lustrates a per¬ missible variation in the trimming. Here folds of red flannel trim a blue serge suit. If it
Fig. (49) A sailor blouse for button-on trousers
[26]

HOW TO MAKE BOYS’ CLOTHES
1IUA ® ©
Fig. (jo) Bias folds Fig. (ji) The lower edge are used for trimming of the blouse is finished with
a band
were a wash suit of white Jean cloth or drill that you were making, you might use blue jean cloth bands and a blue embroidered star on the shield.
Making the Sailor Blouse in Tuck-in Style: Here too, the collar, sleeves and shield are made the same as the middy except for the
[27]

A COMPLETE COURSE IN DRESSMAKING
trimming. The trimming is bias folds of ma¬ terial stitched flat on either side. (See Fig. 50.)
Finish the lower edge of the blouse with a waistband, as shown in Fig. 51.
You can buy star and other emblems, suit¬ able for sailor suits, all ready to applique. However, a pretty star can be worked over a triangular diagram.
Draw a straight line as line AB, Fig. 52. Then draw two triangles with all sides equal, placing them on the line AB so that the distance from B to C and A to D is equal. If this is done, the other points will come the same.
To work the star, fill in the points with over-and-over stitches. (See Fig. 53.) Then in the center portion take three long stitches
and catch them in the center with a short stitch. (See Fig. 54.) Fill in the vacant space solid. (See Fig. 55.)
A Russian Blouse: Suits with this type of blouse are always in style for boys from six to eight years. They can
Fig. (54) The long be made in a great variety of stitches in the center materials.

HOW TO MAKE BOY’S CLOTHES
Wash suits in Russian blouse style are shown in striped kindergarten cloth, chambray, gingham, linen, percale and drill. Be sure to select a boyish color. Navy blue is always nice for a boy,
Fig* (tf) Th* star so is brown and the grayish completed , , ^ . 0 . J
tan shades. Gray is also a boy’s shade.
Homespun, tweed, serge and flannel are the woolen most often used for such a style as is shown in Fig. 56.
Making the Russian Blouse: The front- edges can be finished with plain hems or the hem allowance cut off and the edges faced. If the facing is used, cut it about four inches wide, using the front pattern as a guide.
After the fronts are finished close the shoul¬ der seams. In wash material, use lap-felled seams, but in cloth bind the edges and make open seams.
Line the collar and face it to the neck with a bias of lining or double stitch it to the neck. If it is double stitched to the neck, join first the outside collar piece to the neck, as shown in Fig. 57; then turn under the free edge of the collar and stitch it over the raw edges.
[29]

A COMPLETE COURSE IN DRESSMAKING
Fig* (56) Four-and six-year-old boys wear Russian blouses
[30]

HOW TO MAKE BOYS’ CLOTHES
(See Fig. 58.) This way of joining a collar to the neck is only practical where the collar comes to the edge of the closing. If the collar comes only to the center-front and the hem extends beyond the center-front, face the col¬ lar to the neck.
Stitch the sleeve to the armhole before the sleeve and underarm seams are joined. Make
Fig. (57) Stitching the collar to the
blouse
a double stitched or lap-felled seam where the sleeve sews to armhole. Close the sleeve and underarm seams in a continuous stitching making a French seam.
Line the cuff or cut it double and insert the bottom of the sleeve between the two thick¬ nesses.
Fig. (38) The free edge of the collar
turned in and
[31]

A COMPLETE COURSE IN DRESSMAKING
£-——( | 8_) t 5_ _* . i
Fig. (5p) The material for the Fig. {66) The strap turned belt strap right side out
Hem the lower edge of the blouse. To make the belt straps, stitch a fold of
material as shown in Fig. 59. Turn it right side out and press it as shown in Fig. 60. Turn in the raw edges at the ends and stitch across them. (See Fig. 61.) Place the belt strap with what will be outside when finished, next to the right side of the garment and stitch across the end as in Fig. 61. Then turn the belt strap into its finished position. Turn under the free end and stitch again, as in Fig. 62, being careful not to catch the loop of the strap in the stitching.
Line the belt, as shown in Fig. 63. Turn the belt right side out, fold in the raw edges at the end and stitch as in Fig. 64.
Fig. {61) One end of the strap stitched to the blouse
[32]
Fig. {62) The strap as it appears finished

HOW TO MAKE BOYS’ CLOTHES
Fig. (6j) The belt stitched to the lining
Work buttonholes in the left front of the coat and in the left end of the belt. Sew buttons to the right front.
TROUSERS
QNCE you have learned how to make one pair of boys’ trous¬
ers, you won’t have any more difficulty with trousers for they are practically all the same. Vents, flies and waistbands really are not as hard to stitch as frills and fancy work on a little girl’s dress. It is all in getting use to them.
Fig. (64) Fin¬ ishing the end of
the belt
I have selected examples of the general types of boys’ trousers. These give you all the different finishes.
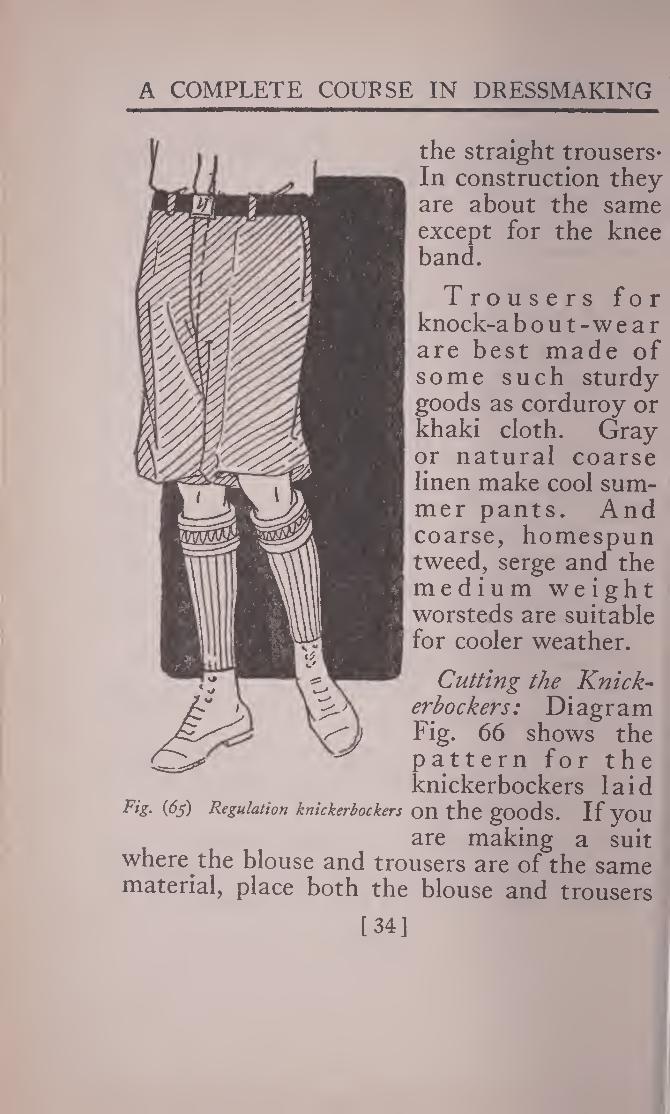
Knickerbockers : Boys ten, twelve and fourteen years old usually wear the knicker¬ bockers belted at the knee, in preference to
[33]
A COMPLETE COUPSE IN DRESSMAKING
the straight trousers* In construction they are about the same except for the knee band.
Trousers for knock-a bout-wear are best made of some such sturdy goods as corduroy or khaki cloth. Gray or natural coarse linen make cool sum¬ mer pants. And coarse, homespun tweed, serge and the medium weight worsteds are suitable for cooler weather.
Cutting the Knick¬ erbockers: Diagram Fig. 66 shows the pattern for the knickerbockers laid
(fy) Regulation knickerbockers on the goods. If you
are making a suit where the blouse and trousers are of the same material, place both the blouse and trousers
[34]

Bo-Ho^Me txte^s [oy\
St^LVv^ Fig. (66) The knickerbocker pattern placed on the goods
patterns on the goods at the same time—that is make one layout. It saves goods.
Making Knickerbockers: Here, too, it will save time to do as much finishing as possible before joining pieces. Cut an extension the
Fig. (67) Pattern for facing and lap of fly gether the knickerbockers
[35]

A COMPLETE COURSE IN DRESSMAKING
shape of the piece in Fig. 67. Line this. The Fig. 68 shows the lining stitched to the outside. Turn the extension right side out and press it. Join it to the right front for fly button-stand. The Fig. 69 shows the first stitching and Fig. 70 the second stitching, in joining the extension to the trousers.
Face left front, cutting the facing the same shape as the extension. (See Figs. 71 and 72.) The left front has a buttonhole-stand. Cut this twice the width of the extension as shown in Fig. 73. Fold the piece through the center and stitch as shown in Fig. 74. Stitch the back edge of the buttonhole-stand to the left
[36]

HOW TO MAKE BOYS* CLOTHES
front along the stitching of the facing.' (See Fig 75.) Make buttonholes in buttonhole- stand and sew buttons to extension, spacing them to match buttonholes. Tack button¬ hole-stand to trousers between the button¬ holes.
Fig. (73) The underlap for the
buttonholes
Fig. (74) The under lap
folded and stitched
nn 9\
Fig. (75) The underlap stitched to the left side of the knickerbockers
There is usually a slash pocket in the back of a boy’s trousers. (See Fig. 76.) To make a slash pocket, mark the proper position, of the pocket on the right side of the material. Cut two pocket pieces to extend about a half inch beyond the slash on either side and any desired depth. Place one piece above
[37]

A COMPLETE COURSE IN DRESSMAKING
the mark, lapping it a seam’s width over the mark. Stitch across the piece, running the stitching parallel to the mark and about a sixteenth of an inch from it. (See Fig. 77.)
Place the second pocket piece below the mark, lapping the top of the piece a seam’s width over the mark and stitch as shown in Fig. 78. This stitching ought to be placed about one-sixteenth of
Fig. (;76) Boys like an inch below the mark.
Valcl%Pth'tomas At the end of the pocket mark, stitch crosswise between the
stitching in the upper and lower pocket pieces. Stitch back and forth several times to make the ends of the pocket firm.
Then you are ready to make the slash for the pocket. Never attempt to slash the goods
Fig- (77) Stitching the upper pocket piece in place
[38]

HOW TO MAKE BOYS’ CLOTHES
Fig. (j8) Stitching the lower pocket piece in place
before stitching the pocket pieces in place for the material is bound to fray and stretch, making it impossible to finish the edges. In slashing, cut centerway between the two stitchings and diagonally to the corners. (See > ■.. .C Fig. 79.) Turn the
/ x pocket pieces Fig. (79) The slash i t ^1 1
through the slash on¬ to the wrong side of the trousers. Roll the pocket pieces so that they bind the edges and just come together. On the wrong side of the trousers, baste one pocket piece above and one below the opening. Baste the edges of the pocket opening together and press. (See Fig. 80.) Stitch around the opening again.
Rip the basting and turn down the upper
[39]

A COMPLETE COURSE IN DRESSMAKING
Fig. (So) As the slash will look on the right side
pocket piece so that it lies on top of the under piece, and stitch the two pocket pieces to¬ gether. (See Fig. 81.) Bind the raw edges of the pocket, using a thin, firm piece of ma¬ terial for the bias binding.
[40]

HOW TO MAKE BOYS* CLOTHES
For each side pocket, cut a pocket piece of firm lining material, as the piece shown in Fig. 82. Face either side with material the same as the trousers as shown in Fig. 83. Fold pocket piece and stitch around lower por¬ tion as shown in Fig. 84. Sew one side of pocket to front and one side to back of trousers. (See Fig. 85.) Join side seam of
Fig. (<84) The pocket piece turned and stitched
Fig. (<82) The pocket piece for the sides of the
trousers
Fig. (83) Facing
the pocket piece
trousers above and below pocket, making lap-felled seams. Leave side seams open at bottom for a space of two and a half inches, finishing the edges with narrow hems. (See Fig. 86.)
Next join inner leg seams. Close the crotch seam. Press these seams open and reinforce with straight linen tape. (See Fig.
87.)
A COMPLETE COURSE IN DRESSMAKING
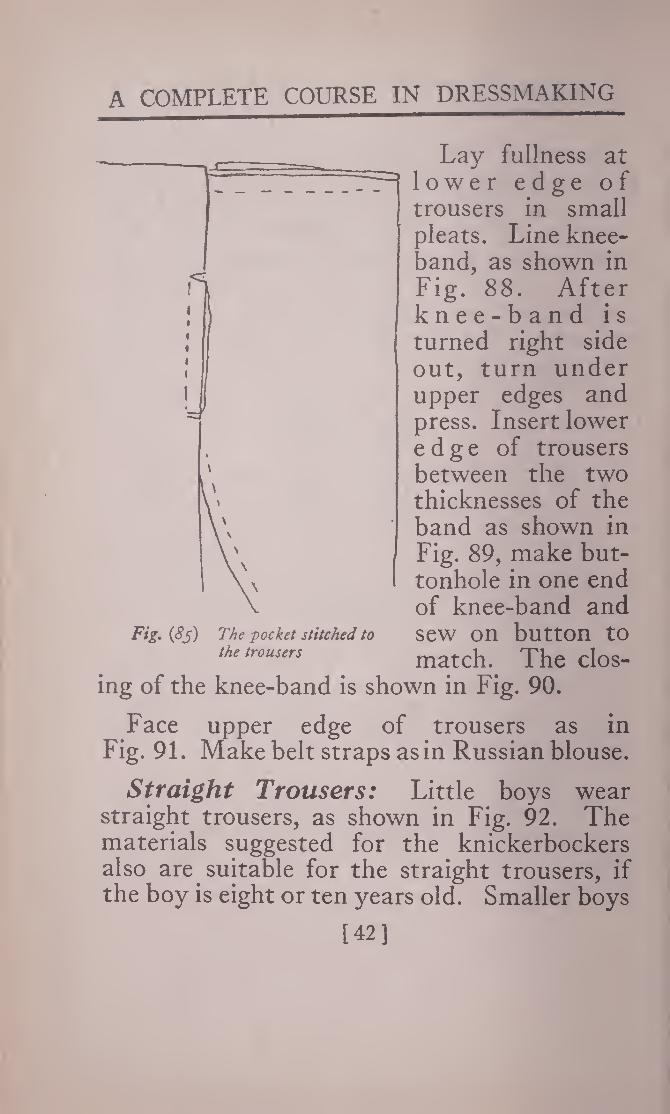
Lay fullness at lower edge of trousers in small pleats. Line knee- band, as shown in Fig. 88. After knee-band is turned right side out, turn under upper edges and press. Insert lower edge of trousers between the two thicknesses of the band as shown in Fig. 89, make but¬ tonhole in one end of knee-band and
Fig. (Sj) The pocket stitched to sew On button tO the trousers match.. The doS-
ing of the knee-band is shown in Fig. 90.
Face upper edge of trousers as in Fig. 91. Make belt straps as in Russian blouse.
Straight Trousers: Little boys wear straight trousers, as shown in Fig. 92. The materials suggested for the knickerbockers also are. suitable for the straight trousers, if the boy is eight or ten years old. Smaller boys
[42]

HOW TO MAKE BOYS’ CLOTHES
Fig. {86) Hem the leg vent in the knicker¬
bockers
Fig. {87) Tape the seams
may have more frivolous goods. For instance the six-year-old boy might
have trousers of dull light blue chambray and white pique or dotted swiss for his blouse. Light green is also nice for the small boy, when a touch of the same color is put on the blouse.
Cutting the Straight Trousers: Diagram Fig. 93 shows the pattern for the straight
Fig. {88) Lining the leg band
[43]

A COMPLETE COURSE IN DRESSMAKING
trousers placed on the goods, folded double lengthwise. I give the diagram mainly to re¬ mind you that you must make a layout to get the best result.
Fig. (89) The leg band stitched to the trousers
them to your width of goods.
Making the Straight Trousers: Small boys' trous¬ ers, as shown in Fig.
Fig. 92, are made
You may have to re¬ arrange the pieces to fit
(90) Finish the leg band with a button and buttonhole
with a drop seat and are finished differently at
Fig* (p^) Facing the top of the knickerbockers
[44]

HOW TO MAKE BOYS* CLOTHES
the fly. The pieces for the fly are shaped as shown in Fig. 94. Stitch around the outer edges of the fly pieces and turn right side out.
Fig. (pi) Eight-year-old boys usually wear straight trousers
Stitch one edge of the fly to the right front as shown in Fig. 95. Then turn under the free
[45]

A COMPLETE COURSE IN DRESSMAKING
edge a seam’s width and stitch as shown in Fig. 96.
The best way to finish the left side of the trousers at the fly opening is with a facing
the fly
[46]

HOW TO MAKE BOYS* CLOTHES
piece cut the same shape as the fly. Turn under the outer edges of the facing and stitch as shown in Fig. 97. Stitch the facing to the left front as shown in Fig. 98. Then turn it onto the wrong side of the trousers and tack it in place.
In finishing the uppfcr portion of the trous¬ ers at the side seams, face the edges. The
Fig. (98) The facing stitched in
place
Fig. (97) The facing hemmed
Fig. 99 shows the first stitching in joining the facing to the front and back, and Fig. 100 the second stitching, when the facings are turned onto the wrong side. Bind the edges and make open seams at the outside and inside leg seams. (See Fig. 101.) But make a lap- felled seam above and below the fly in the crotch joining. Face the top of the trousers.
[47]

A COMPLETE COURSE IN DRESSMAKING
Fig. (pp) Stitching the facings to the sides of the trousers
The Fig. 102 shows the facing stitched the first time and Fig. 103 the facing turned onto
the wrong side and basted.
Before stitching bot¬ tom of facing, fold a stay belt as shown in Fig. 104. Work but¬ tonholes at regular in¬ tervals to match but¬ tons on underwaist or
v .. „ ., , blouse and stitch it F,S. (too) The side vents finished along bottom Qf fadng
[48]

HOW TO MAKE BOYS’ CLOTHES
Fig. {tot) The open Fig. {102) Facing the top seam bound
(See Fig. 105.) Hem the lower edge of the trousers as shown in Fig. 106.
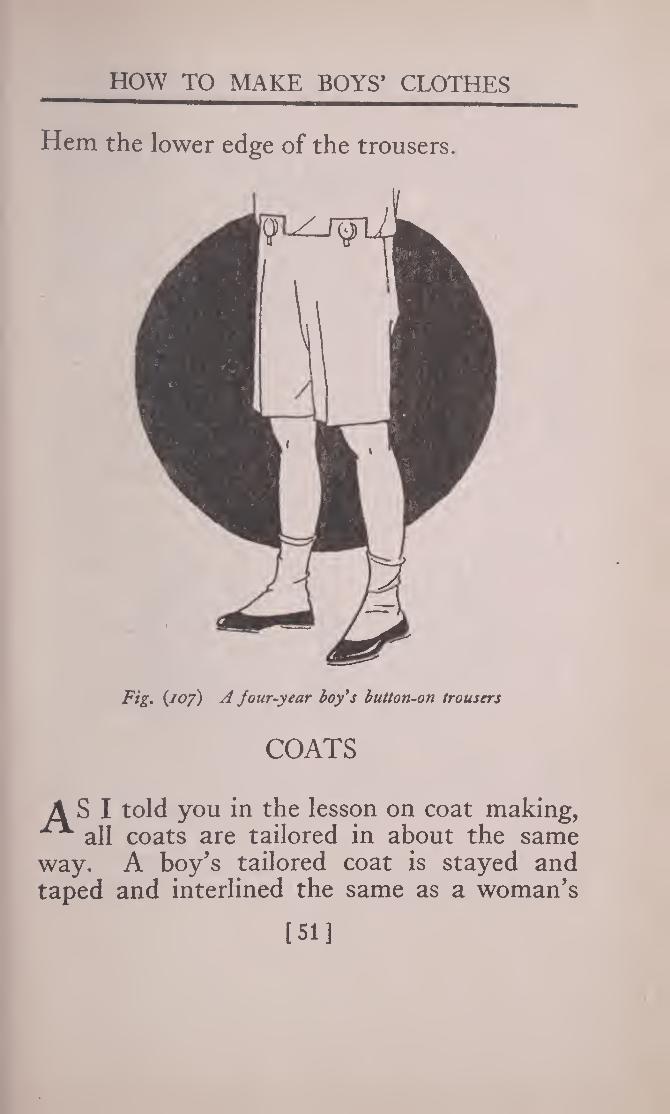
Button-on Trousers: Another style of small boy’s trousers is shown in Fig. 107. Different styles of tabs and points are often used to give a little touch of difference to the
- suit. These button-on styles
_ __ of trousers are used both in wash and cloth suits. Light blue, light green, gray or tan chambray trousers are shown with white batiste, linen and even dotted swiss waists
_ , x , . . .that have collars and F,i ^ il%?nslasui cuffs to match the trous-
[49]

A COMPLETE COURSE IN DRESSMAKING
-a ers. Where the trousers \ are serge, the blouse is of
__li white pique, striped kin- Fig. (wj) The under lap for dergarten cloth or natural
the top pongee.
Making the Button-on Trousers: The fly and side vent is finished the same as in the straight trousers just described.
Finish the top of the trousers with a shaped facing. Fig. 108 shows the facing stitched to the right side of the trousers. Turn it onto the wrong side and baste it in place. Make an underlap of a fold of material, creasing it lengthwise through the center, stitching the two raw edges together and turning it right side out. Work buttonholes in this to match the buttons on the waistband of the blouse and stitch it to the wrong side of the trousers, as shown in Fig. 109.
Fig. (/05) Stitching the underlap in place
Fig. (106) Hemming the bottom of the leg
[50]
HOW TO MAKE BOYS’ CLOTHES
Hem the lower edge of the trousers.
Fig. (ioy) A jour-year boy's button-on trousers
COATS
A S I told you in the lesson on coat making, ^ all coats are tailored in about the same way. A boy’s tailored coat is stayed and taped and interlined the same as a woman’s
[51]

A COMPLETE COURSE IN DRESSMAKING
tailored coat. You ought to be able to make any style of a boy’s coat following the general direc¬ tions in the coat les-
Fig. (108) Facing the top of the trousers
I am giving here only one example—a suit coat, Fig. 110.
It’s the kind of coat the smart shops are showing in the Palm Beach, mohair and linen suits. That is the reason I have selected it. I wanted to tell you especially about an unlined boy’s coat.
I might add that you can make good-look¬ ing tweed and serge suits with unlined coats, too.
Making an Unlined Suit Coat: Here are some of the important things in making an unlined summer coat: In taking up the dart,
y vent stretching, tape
taper the stitching at the ends. (See Fig. 111.) To pre¬
front of coat and roll line of revers, as in v-»j. U/Vtia, ao m
Fig. 112. Hold tape Fig. (/09) The facing and underlap
stitched in place taut and ease coat to
[52]

HOW TO MAKE BOYS’ CLOTHES
Fig. {no) Boy's linen suit
[53]

A COMPLETE COURSE IN DRESSMAKING
Fig. (ill) Fig. (.112) Taping Stitching the the front of the coat dart at the side
of the coat
it, taking a stitch first on one side and then on the other. (See Fig. 113.) Use care that stitches do not show on right side of goods.
In binding back edge of front facing, stitch bias to edge, as in Fig. 114, and turn it and stitch a second time, as in Fig. 115. After facing has been placed on right side of coat and stitched, as in Fig. 116, turn it onto the
[54]

HOW TO MAKE BOYS’ CLOTHES
wrong side, drawing and bast¬ ing it tightly below roll line to revers and easing it loosely over revers, so the revers will roll smoothly.
When plaits are laid in upper back, as in Fig. 117, stitch lower back to upper back with raw edges of seam extending on right side. (See Fig. 118.) Stitch belt flat over seam, as in Fig. 119. Bind edges at shoul¬ der and underarm before join¬ ing. Make open seams, as in Fig. 120.
Fig. (113) Cat stitch
Tape back of neck. Also, the tape in place
make open seam in under col¬ lar. (See Fig. 121.) Cut canvas interlining for collar without seams. In sewing canvas to under collar, cover crescent-shaped portion which comes at back of neck with machine
stitching. (See Fig. ——_122.) After top collar
is stitched to under collar, as in Fig. 123, turn it right side out,
7-7. , x ” . sew under collar to Fig. \Ji4) The first stitching in 1 t • i
applying the binding COat, and Slip-StltCh
55]

A COMPLETE COURSE IN DRESSMAKING
top collar over raw edges. (See Fig. 124.)
Stay coat where hem turns with tape. (Fig. 125.) Line cuff, as in Fig. 126, turn it
Fig. (//j) The second stitching in sewing on Fig. (116) The cloth the binding facing stitched to the
front
and baste to right side of sleeve; bind lower edge, as in Fig. 127, and hem. (See Fig. 128.)
Fig. {117) Pleating the lower edge of the upper back
Fig. (118) The back belt stitched in place
[56]

HOW TO MAKE BOYS’ CLOTHES
Fig. (//?)
As the back looksfinished
Turn edges and press pockets before joining to coat. (See Figs. 129 and 130.)
Fig, (120) Bind the shoulder seams
HATS
tJAVEyou ever tried your hand at making AJ‘ a boy’s cap? Hat making for the little
fellow is not as dif-
Fig. (I2i) Make an open seam in the under collar
Fig. (122) The canvas stitched to the under collar
Fig. (123) Top collar stitched to under collar
One-piece Cap:
ficult as it sounds. Careful stitching and
careful pressing are the two requirements for a result that you will be proud of.
Wouldn’t you like to make. Johnny a tweed cap to match his suit? And Fred may need a serge hat to wear to school.
Run through the de¬ scriptions of these caps and see how easy it is to make them. Every boy over eight
[57]

A COMPLETE COURSE IN DRESSMAKING
Fig. (125) Lower edge stayed with tape
Fig. {126) Fig. (124) Collar joined to coat
Fig. (127) Low¬ er edge of sleeve
bound
Fig. (128) Hem turned onto wrong
side of sleeve
[58]
Lining stitched to cuff
Fig. {129) Hem¬ ming top of pocket
1

HOW TO MAKE BOYS’ CLOTHES
years qld likes a regular man’s cap of tweed, serge, or linen. He doesn’t want any frill—just a plain peak cap as shown in Fig. 131.
In making the cap, stitch darts, as in Fig. 132, and press them ps- too) open. Stay the bottom with tail- turnf/and ors’canvas. (See Fig. 133.) Rein- pressed
force the seams of the lower lining with tape, as in Fig. 134. Cut the coarse, light-weight canvas interlining larger than the top lining piece. (See Fig. 135.) Figs. 136 and 137 show the two parts of the lining joined.
The top facing for the peak ought to be a
Fig. (iji) Peak cap of tweed Fig. {132) Stitching the dart
[59]

A COMPLETE COURSE IN DRESSMAKING
Fig. (/jj) Staying the lower edge
Fig. (134) The seams of the cap liningreinforced
with tape
Fig. (fJS) Interlining the top lining Fig. (136) The top and side lining
pieces joined
little larger than the under facing. (See Fig. 138.) In joining, hold it to the size of under facing. (See
Fig. (137) As the completed lining ^9.) VJ?
looks dation or stiff buck- r a m o r cardboard.
Fig. 140 shows facing slipped over foundation.
Join peak to outside hat, as in Fig. 141.
[60]

HOW TO MAKE BOYS* CLOTHES
Then, stitch lining to out¬ side across back and turn it inside the cap. Turn under raw edge of lining aCrOSS. J)eak, and slip- Fig. (138) The top facing for
stitch it in place. the *e 1 Sew the lining to the
cap as shown
the peak is larger than the under facing
in Fig. 142.
Turn it onto the inside of the
cap and slip-stitch it in place.
« , v , Hat with Rollins Brim g' ?ngfjailed fac~ and Sectional Crown: This
description applies to the little
serge and cotton crash hats that six- and eight-year- old boys wear. Sometimes the crown is in six sections _. , ^ and Sometimes in eight over the foundation peak
Fig. (141) The peak joined Fig. {142) The lining sewn to the cap to the cap
[61]

A COMPLETE COURSE IN DRESSMAKING
Fig. (143) The brim interlining
and the brim rolls up and flares a little.
Usually the brim is stitched around and around to give a tailored
effect. Incidentally too, the stitching helps to shape it.
Making Hat: Such a hat needs interlining. Use tail¬ ors’ canvas for the brim inter-
Fig. (,44) Mak, an !ining- . To prevent stretch- open seam in the brim ing, Stitch around the top
facings and bottom Gf tjie brim in-
Fig. {143) Run gather threads in the brim facing
terlining. (See Fig. 143.)
Make an open seam where bias brim facing joins. (See Fig. 144.) Fold brim lengthwise through center and run a
Fig. (146) The brim joined Fig. (14?) Make open to the headband seams in joining the
crown

HOW TO MAKE BOYS’ CLOTHES
Fig. (148) Stitch either side of the
seams
Fig. {149) The Fig. (fjo) The completed lining piece lining reinforced
gather thread around edge. (Fig. 145.) The fullness can be eliminated by covering
with a wet cloth and pressing with a hot iron. After facing is slipped over canvas, stitch around brim.
Cut the head band of buckram, and sew brim to it, as in Fig. 146. Make open seams in joining crown. (See Figs. 147 and 148.)
Reinforce lining pieces with net. (See Figs. 149 and 150.) Join outside crown to
buckram band. (See Fig. 151.) Then sew lining in place. Figs. 152 and 153 show the bow.
Hat with Four-Section Crown: Little two- and four-year-old boys also wear sectional hats but there is
N no need to make quite so
crown join'd to headband many sections to the crown.
[63]
A COMPLETE COURSE IN DRESSMAKING
£zz^ m~7 {Fig. (152) The first step in making Fig. (/£?) The bow corn-
how for the headband pleted
Four sections will do nicely. If you doubt it, look at picture Fig. 154. It’s white pique but you might also make it of natural linen, un¬ bleached muslin or serge.
In making the hat, join the crown section with open seams. The lining for the crown is made the same as the outside. Stitch the two pieces for the brim together at the lower edge, as shown in Fig. 155. Insert the crown
between the two pieces of the brim at the top. (See Fig. 156.) Cover the joining with a fold of the goods for a head- band. Where the fold meets cover with a flat bow or a large white pearl button.
Fig. {154) A pique hat for the little Tx ^ Sail Of Cap : fellow Have you ever
[64]

HOW TO MAKE BOYS’ CLOTHES i
Fig. (155) The two pieces Fig. (156) The crown or the brim stitched together joined to the brim
stopped to think why ready made sailor caps‘ roll so nicely at the edges. It’s the padding of tailors’ wadding that does the little trick. If you add an interlining you can have just as good looking a result in the hat you make.
Making a Sailor Cap\ Cut a thin layer of wadding larger than the top lining piece. (See Fig. 157.) Join the lining pieces as shown in Fig. 158. Cut the inside headband
Fig. (757) The wadding is larger Fig. (75c?) The lining pieces than the lining piece joined
of wrapping paper and cover with lining as in Fig. 159. Then join the lining to the head- band. (See Fig. 160.) Also make an outside headband of paper and cover it. (See Figs.
[65]

A COMPLETE COURSE IN DRESSMAKING
Fig. (/5p) The headband
Fig. (161) Covering the out¬ side headband
Fig. (162) The second stitching in covering the
outside headband
161 and 162.) Join the cap to the headband as in Fig. 163.
Stitch the lining'to the cap at the bottom.
Fig. C163) The cap joined to the Sew on a grosgrain rib- outsideheadband bon headband and
make a flat bow at the side as shown in Figs. 164, 165 and 166.
fin't step m making Fi§- 167 sh°WS the Completed the bow Cap.
[66]

HOW TO MAKE BOYS’ CLOTHES
UNDERWEAR
Summer Union Suit: An underwaist and drawers combina¬ tion is shown in Fig. 168. This makes an excellent warm weather
Fig. c165) The Fig. (.166) The garment in cross-barred bow completed bow on the wrong fllUslin
side
You can run up a half dozen of these little suits in a short time and save a good deal of money.
Cutting the Union Suit: The pattern for the union suit is shown in diagram, Fig. 169, placed on the goods folded double length¬ wise. Shift your pat¬ tern around on the goods until you are sure you have it fit¬ ted to advantage.
Making the Union Suit: Finish the front closing first with facings. The Fig. 170 shows the Fig. (i6y) The sailor cap completed
[67]

A COMPLETE COURSE IN DRESSMAKING
facing stitched to the front edge and Fig. 171 the facing turned onto the wrong side and stitched the second time. Close shoulder and underarm seams making lap-felled seams. A seam of this type lies much flatter than a French seam. Turn under nar¬ row hems at neck and armhole. (See Fig. 172.)
Reinforce the lower edge of the back and the waistline on the front with a fac-
Fig. (168) A little boy's summer union suit ing. First Stitch the facing to the
lower edge of the back. (See Fig. 173.) Then turn the facing onto the wrong side,
[68]

HOW TO MAKE BOYS’ CLOTHES
Fig. (169) The union suit pattern placed on the goods
fold under the edges and stitch as shown in Fig. 174.
Stitch back trouser section to front trouser section at outer leg, leaving seam open to placket depth. (See Fig. 175.) Make lap- felled seams. Finish placket with continuous facing. The Fig. 176 shows one edge of facing stitched to opening and Fig. 177, the facing turned onto the wrong side and stitched the second time.
Make lap-felled seams at inner leg and crotch joinings. Join back of trousers at top to waistband. Stitch waistband to trou¬ sers as shown in Fig. 178.r Turn under raw edge of waistband, fold it through the center and stitch as shown in Fig. 179.
Finish front closing with buttons and buttonholes and sew buttons to waistband at regular intervals. Make matching button¬ holes in top of back of trousers. Little boys’
[69]

A COMPLETE COURSE IN DRESSMAKING
trousers are often buttoned to a garment of this type.
Drawers Waist: A drawers waist is not diffi¬ cult to make. You can use any good fitting blouse pat¬ tern as a block and make a drawers waist pattern, low¬ ering the armhole and neck. Also mark for the belt at the bottom.
Fig. (170) Face the front
closing
Choose a fine, medium weight material to make it. There is nothing better than muslin. You can buy the
Fig. {171) The facing turned onto the wrong
side Fig. {172) Hem the
neck and armholes
bias seam binding already cut and folded which will facilitate the work.
Make lap-felled seams at the shoulder and underarm joinings. Then sew the belt to the
[70]

HOW TO MAKE BOYS’ CLOTHES
bottom, taking a narrow seam and letting the raw edges extend on the right side of the waist.
[71]

A COMPLETE COURSE IN DRESSMAKING
Run tape through bone buttons and tack them to this seam. (See Fig. 180.) Then bind the joining of the waist and belt.
Bind an extension to the right front at the closing and bind the outer edge of the exten¬ sion.
For the buttonhole extension bind both sides of a two-inch strip of material and cut it into inch-wide strips. Place these strips on the left front, with the bound edges (See Fig. 181.) Bind front of the waist and beyond the front.
Bind the outer edges Fig. 182.)
Fig. (.175) There is a vent at the side
next to each other, the raw edge of the turn the small pieces
of the pieces. (See
Also bind the armholes, neck and lower edges.
[72]

HOW TO MAKE BOYS’ CLOTHES
OVERALLS
Making Overalls: Now that you know how to make boys* trousers, overalls will be easy. It won’t take many minutes to run up a pair of jean overalls, as shown in Fig. 183.
Fig. {176) Finish the vent with a continuous facing
Double stitch the seams and make a fly in the front just as in the trousers. Leave the side seams open at the top for a vent. Bind the back edge of the vent. (See Fig. 184.)
[73]

A COMPLETE COURSE IN DRESSMAKING
JT:
Fig. i'77) The facing stitched in place
Fig, (.178) The waistband stitched to the drawers
Fig. (/79) The folded and stitehee
time
waistband ’ a second
[74]

HOW TO MAKE BOYS’ CLOTHES
Fig. (180) A practical type of drawers waist
The front edge ought to be finished with a pointed facing. Stitch the facing to the right side, as shown in Fig. 185. Turn under the
[75]

A COMPLETE COURSE IN DRESSMAKING
Fig. (182) The buttonholes com¬
pleted
raw edges a seam’s width, fold and stitch the facing, as shown in Fig. 186.
Turn narrow hems at the top of the over¬ alls and on the straps. Fig. 187 shows the straps sewn to the back. Work buttonholes in the front of the straps and sew buttons to the bib. Work a buttonhole in the facing on the front of the vent and sew a button to the back.
Hem the bottom of the trousers.
[76]

HOW TO MAKE BOYS’ CLOTHES
Fig. (/£?) Overalls are easy to make
Fig. (186) The pointedfacing folded and stitched in place
Fig. (.187) The hack straps stitched in
place
Fig. (184) Face one edge of the vent
[77]

A COMPLETE COURSE IN DRESSMAKING
TEST QUESTIONS
Answering the following questions will help to fix the problems of this lesson in your mind. Write out the answers and then review the lesson.
In how many different ways can the blouse be finished at the waistline ?
What does double stitching a collar to the neck mean ?
How do you make a diagram for a star ?
How do you make the fly in drop seat trousers ?
Does it differ from the fly in knickerbockers ?
Does a sailor hat need padding ?
What material is used for the foundation peak of a cap ?
Can you shape a hat brim with stitching ?
Does an unlined coat need a front facing?
How are the seams of a drawers waist fin¬ ished ?
This lesson will serve as a review for some of the earlier lessons. Compare the ways of
[78]

HOW TO MAKE BOYS’ CLOTHES
making boys* clothes with the making of girls’ clothes.
Older boys’ clothes are made the same as the men’s clothes which are described in the next lesson.
[79]


