bios phoenix k2 rev0 01
TRANSCRIPT

8/6/2019 BIOS Phoenix K2 Rev0 01
http://slidepdf.com/reader/full/bios-phoenix-k2-rev0-01 1/15
Phoenix BIOS Setup Utility System Parameters and Standard Settings
Copyright 2005 NEC Computers S.A.S. Page 1
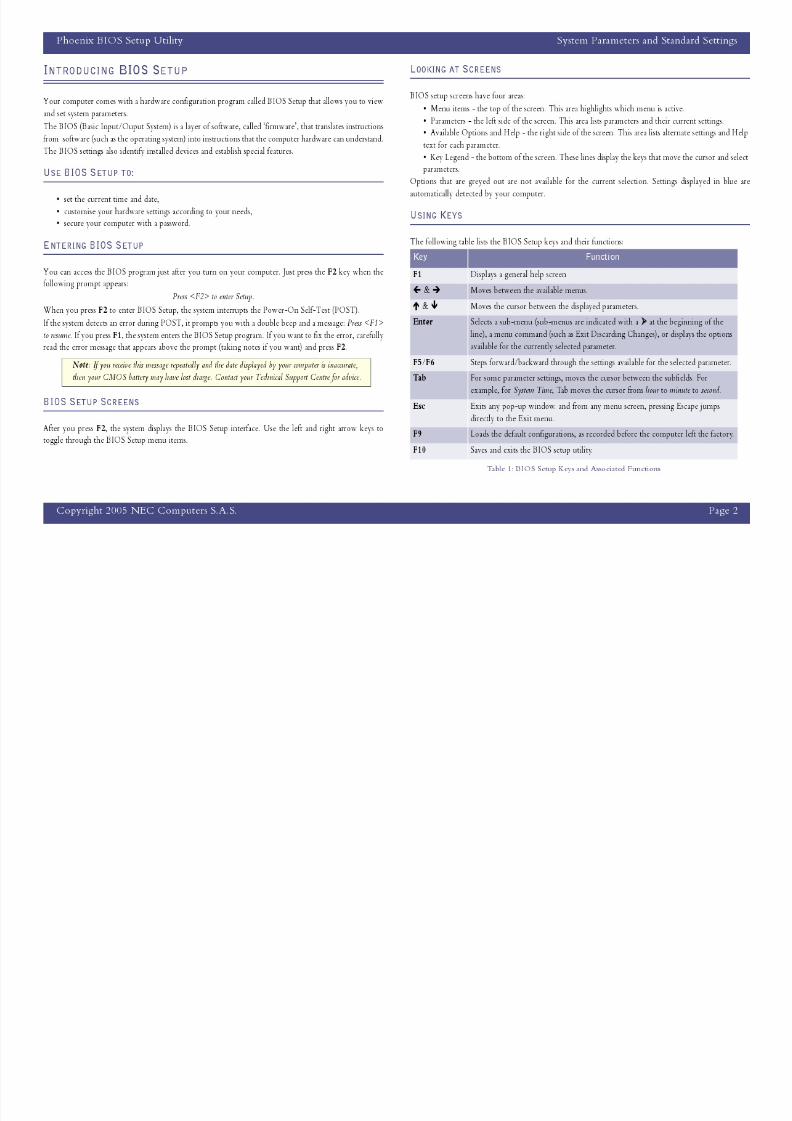
Introducing BIOS Setup . . . . . . . . . . . . . . . . . 2
Main Menu . . . . . . . . . . . . . . . . . . . . . . . . . . . 4Internal HDD Sub-menu . . . . . . . . . . . . . . . . . 6
Advanced Menu. . . . . . . . . . . . . . . . . . . . . . . 10
Security Menu. . . . . . . . . . . . . . . . . . . . . . . . 11
Boot Menu . . . . . . . . . . . . . . . . . . . . . . . . . . 14
Exit Menu. . . . . . . . . . . . . . . . . . . . . . . . . . . 15
Phoenix BIOS Setup Utility, version EM1, 03/2004 PhoenixBIOS is a trademark of Phoenix Technologies Ltd
PhoenixBIOS Setup Utility
System Parameters and Standard Settings
8/6/2019 BIOS Phoenix K2 Rev0 01
http://slidepdf.com/reader/full/bios-phoenix-k2-rev0-01 2/15

8/6/2019 BIOS Phoenix K2 Rev0 01
http://slidepdf.com/reader/full/bios-phoenix-k2-rev0-01 3/15
Phoenix BIOS Setup Utility System Parameters and Standard Settings
Copyright 2005 NEC Computers S.A.S. Page 3
SETUP MENUS
The Setup Utility features five menus which are listed on the menu bar at the top of the screen.Main - use this menu for basic system configuration.
Advanced - use this menu to set printer port addresses and interrupts, I/0 device configuration and
more.
Security - use this menu to set user and administrator passwords, and configure the hard disk boot
sector protection.
Boot - use this menu to set the boot sequence.
Exit - use this menu to exit the Setup utility with various save or discard options.
These menus are described in detail in the following pages.
Note: BIOS menu entries and settings may have changed since this document was created.

8/6/2019 BIOS Phoenix K2 Rev0 01
http://slidepdf.com/reader/full/bios-phoenix-k2-rev0-01 4/15
Phoenix BIOS Setup Utility System Parameters and Standard Settings
Copyright 2005 NEC Computers S.A.S. Page 4
Parameter Options Description
System Time hh/mm/ss Sets the time. Enter the current hour, minute and second in hr/min/sec, 24-hour format.
To set the time use the Tab or Enter keys to move from field to field. Simply type
the new number required.
System Date mm/dd/yyyy Sets your system's calendar month, day and year. These settings remain in
memory even after you turn off system power.
To set the date use the Tab or Enter keys to move from field to field. Simply type
the new number required.
Language English (US)
Japanese (JP)
Sets the BIOS Setup Utility language.
Internal HDD Press Enter to open the
HDD Sub-menu.
Displays the hard disk dr ive capacity.
Warning: changing any entries in this sub-menu can cause permanent loss of the
data on your hard disk drive.
Refer to the HDD submenu description on page 6 for more information.
Internal CD/DVD This field is read-only
and cannot be changedfrom BIOS Setup.
Example: CD/DVD
Displays the optical device detected during boot.
System Memory This field is read-only
and cannot be changed
from BIOS Setup.
Example: 640 KB
Displays the amount of conventional memory detected during boot.
Extended Memory This field is read-only
and cannot be changed
from BIOS Setup.
Example: 195072 KB
Displays the amount of extended memory detected during boot.
Table 2: Main Menu
MAIN MENU
Use the Main menu screen to view the System Time, System Date
and to modify drive parameters and related settings via the HDD
Sub-menu.
Factory settings are shown in red.

8/6/2019 BIOS Phoenix K2 Rev0 01
http://slidepdf.com/reader/full/bios-phoenix-k2-rev0-01 5/15
Phoenix BIOS Setup Utility System Parameters and Standard Settings
Copyright 2005 NEC Computers S.A.S. Page 5
CPU Type This field is read-only
and cannot be changed
from BIOS Setup.
Example: Intel(R)
Pentium(R) 4 Mobile
Displays the CPU type.
CPU Speed This field is read-only
and cannot be changed
from BIOS Setup.
Example: 1.60 GHz
Displays the CPU speed.
BIOS Version This field is read-only
and cannot be changed
from the BIOS Setup.
Example: 2A03-V102-
1A10/348A0500
Displays the BIOS revision number.
Product Name This field is read-only
and cannot be changed
from the BIOS Setup.
Displays the product’s name.
Serial Number This field is read-only
and cannot be changed
from the BIOS Setup.
Displays the product’s ser ial number.
Parameter Options Description
Table 2: Main Menu (Continued)
8/6/2019 BIOS Phoenix K2 Rev0 01
http://slidepdf.com/reader/full/bios-phoenix-k2-rev0-01 6/15
Phoenix BIOS Setup Utility System Parameters and Standard Settings
Copyright 2005 NEC Computers S.A.S. Page 6
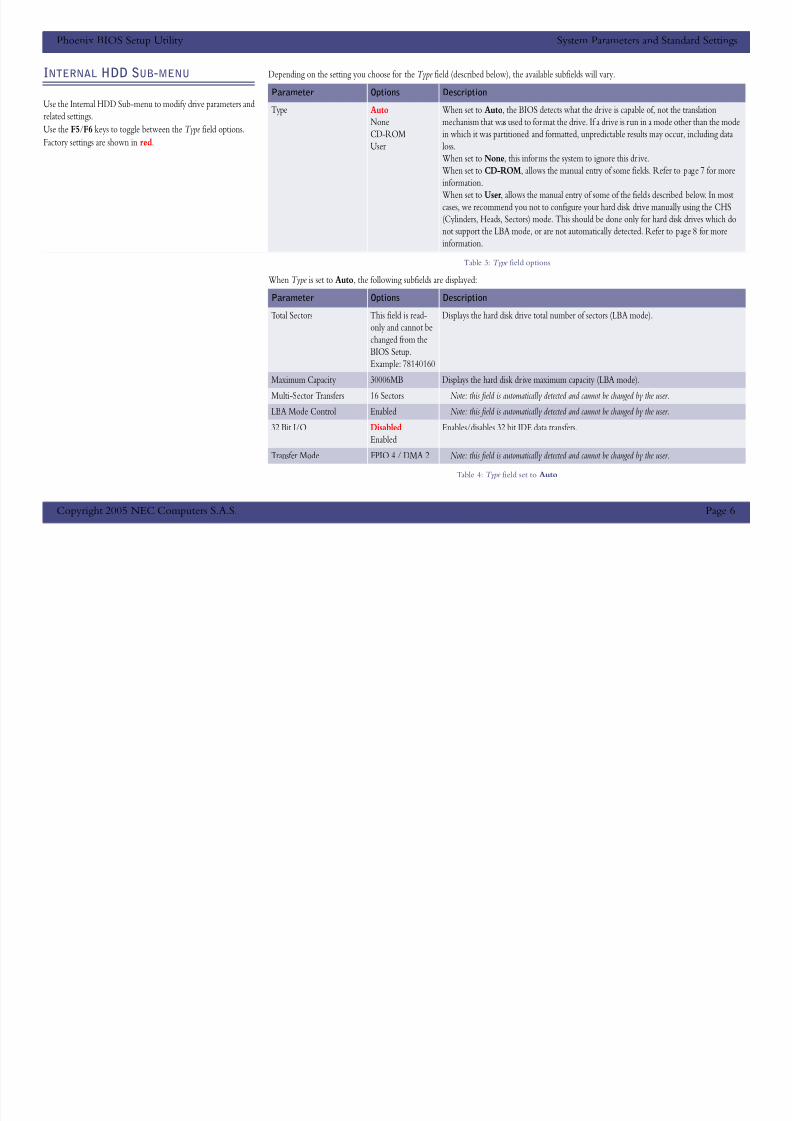
Depending on the setting you choose for the Type field (described below), the available subfields will vary.
When Type is set to Auto, the following subfields are displayed:
Parameter Options Description
Type Auto
None
CD-ROM
User
When set to Auto, the BIOS detects what the drive is capable of, not the translation
mechanism that was used to format the drive. If a drive is run in a mode other than the mode
in which it was partitioned and formatted, unpredictable results may occur, including data
loss.
When set to None, this informs the system to ignore this dr ive.
When set to CD-ROM, allows the manual entry of some fields. Refer to page 7 for more
information.
When set to User, allows the manual entry of some of the fields described below. In mostcases, we recommend you not to configure your hard disk drive manually using the CHS
(Cylinders, Heads, Sectors) mode. This should be done only for hard disk drives which do
not support the LBA mode, or are not automatically detected. Refer to page 8 f or more
information.
Table 3: Type field options
Parameter Options Description
Total Sectors This field is read-
only and cannot be
changed from the
BIOS Setup.
Example: 78140160
Displays the hard disk drive total number of sectors (LBA mode).
Maximum Capacity 30006MB Displays the hard disk dr ive maximum capacity (LBA mode).
Multi-Sector Transfers 16 Sectors Note: this field is automatically detected and cannot be changed by the user.
LBA Mode Control Enabled Note: this field is automatically detected and cannot be changed by the user.
32 Bit I/O Disabled
Enabled
Enables/disables 32 bit IDE data transfers.
Transfer Mode FPIO 4 / DMA 2 Note: this field is automatically detected and cannot be changed by the user.
Table 4: Type field set to Auto
INTERNAL HDD SUB-MENU
Use the Internal HDD Sub-menu to modify drive parameters and
related settings.
Use the F5/F6 keys to toggle between the Type field options.
Factory settings are shown in red.
8/6/2019 BIOS Phoenix K2 Rev0 01
http://slidepdf.com/reader/full/bios-phoenix-k2-rev0-01 7/15
Phoenix BIOS Setup Utility System Parameters and Standard Settings
Copyright 2005 NEC Computers S.A.S. Page 7
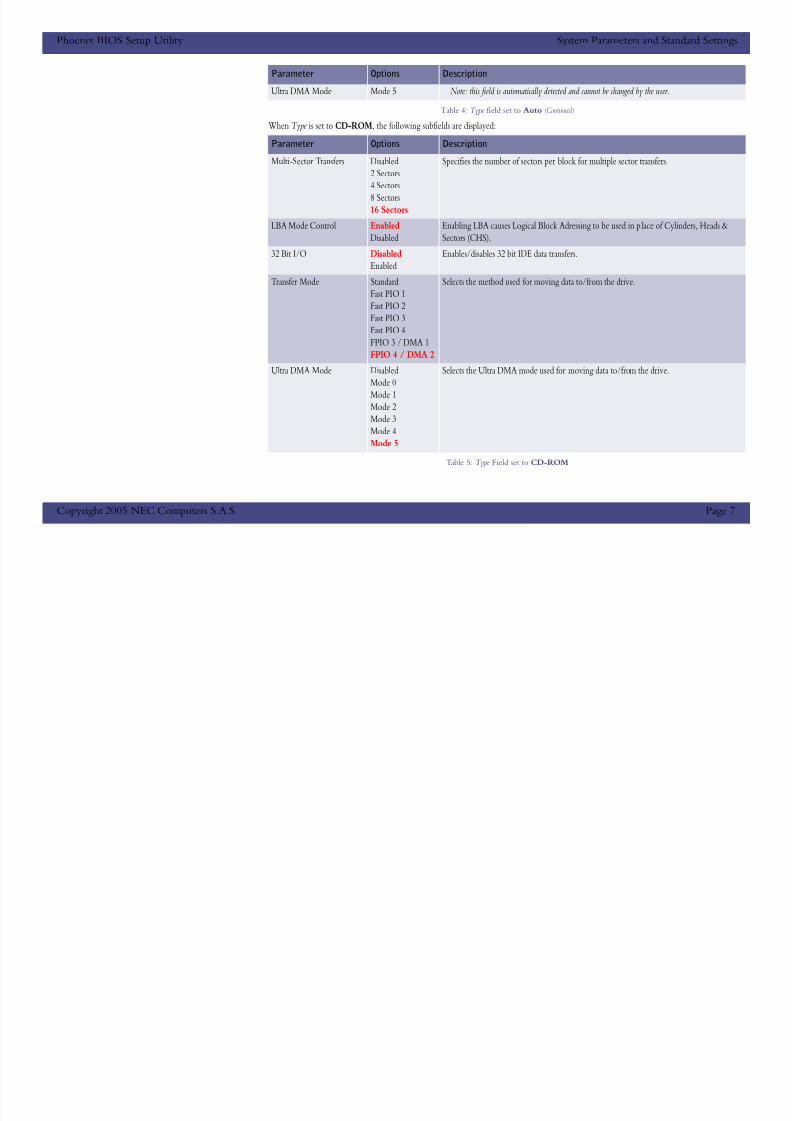
When Type is set to CD-ROM, the following subfields are displayed:
Ultra DMA Mode Mode 5 Note: this field is automatically detected and cannot be changed by the user.
Parameter Options Description
Multi-Sector Transfers Disabled
2 Sectors
4 Sectors
8 Sectors16 Sectors
Specifies the number of sectors per block for multiple sector transfers.
LBA Mode Control Enabled
Disabled
Enabling LBA causes Logical Block Adressing to be used in place of Cylinders, Heads &
Sectors (CHS).
32 Bit I/O Disabled
Enabled
Enables/disables 32 bit IDE data transfers.
Transfer Mode Standard
Fast PIO 1Fast PIO 2
Fast PIO 3
Fast PIO 4
FPIO 3 / DMA 1
FPIO 4 / DMA 2
Selects the method used for moving data to/from the drive.
Ultra DMA Mode Disabled
Mode 0
Mode 1Mode 2
Mode 3
Mode 4
Mode 5
Selects the Ultra DMA mode used for moving data to/from the drive.
Table 5: Type Field set to CD-ROM
Parameter Options Description
Table 4: Type field set to Auto (Continued)

8/6/2019 BIOS Phoenix K2 Rev0 01
http://slidepdf.com/reader/full/bios-phoenix-k2-rev0-01 8/15
Phoenix BIOS Setup Utility System Parameters and Standard Settings
Copyright 2005 NEC Computers S.A.S. Page 8
When Type is set to User, the following subfields are displayed:
Parameter Options Description
Cylinders 16383 In most cases, we recommend you not to configure your hard disk drive manually using the
CHS (Cylinders, Heads, Sectors) mode. This should be done only for hard disk drives which
do not support the LBA mode, or are not automatically detected.Heads 16
Sectors 63
Maximum Capacity 8455MB Displays the drive maximum capacity (using the CHS mode).
Total Sectors 58605120 Displays the hard disk drive total number of sectors (LBA mode).
Maximum Capacity 30006MB Displays the dr ive maximum capacity (using the LBA mode).
Multi-Sectors Transfers Disabled
2 Sectors
4 Sectors
8 Sectors
16 Sectors
Specifies the number of sectors per block for multiple sector transfers.
LBA Mode Control Enabled
Disabled
Enabling LBA causes Logical Block Adressing to be used in place of Cyliinders, Heads &
Sectors (CHS).
32 Bit I/O DisabledEnabled
Enables/disables 32 bit IDE data transfers.
Transfer Mode Standard
Fast PIO 1
Fast PIO 2
Fast PIO 3
Fast PIO 4
FPIO 3 / DMA 1
FPIO 4 / DMA 2
Selects the method used for moving data to/from the drive.
Table 6: Type field set to User

8/6/2019 BIOS Phoenix K2 Rev0 01
http://slidepdf.com/reader/full/bios-phoenix-k2-rev0-01 9/15
Phoenix BIOS Setup Utility System Parameters and Standard Settings
Copyright 2005 NEC Computers S.A.S. Page 9
Ultra DMA Mode Disabled
Mode 0
Mode 1
Mode 2
Mode 3
Mode 4
Mode 5
Selects the Ultra DMA mode used for moving data to/from the drive.
Parameter Options Description
Table 6: Type field set to User (Continued)

8/6/2019 BIOS Phoenix K2 Rev0 01
http://slidepdf.com/reader/full/bios-phoenix-k2-rev0-01 10/15
Phoenix BIOS Setup Utility System Parameters and Standard Settings
Copyright 2005 NEC Computers S.A.S. Page 10
Parameter Options Description
Internal Mouse EnabledDisabled Enabled forces the touchpad to be enabled regardless of whether a mouse ispresent.
Disabled prevents the touchpad from functioning, but frees IRQ 12.
LCD Panel View Expansion Enabled
Disabled
Enabled expands the panel view. The enabled setting sometimes affects
graphics quality.
Disabled reduces the panel view in some video modes.
Silent Boot Disabled
Enabled
Black
When set to Enabled, the logo screen appears during boot.
When set to Disabled, the POST messages appear during boot.
When set to Black, a black screen appears during boot.
USB Operation Mode 1.1 Mode
2.0 Mode
Sets the supported USB operation mode.
Remote Power On Enabled
Disabled
When set to Enabled, allows the LAN board to wake up the system.
Intel(R) SpeedStep(TM)
Technology
Enabled
Disabled
When set to Enabled, the system performs at the optimised performance set
under the operating system (if applicable).
When set to Disabled, the system preserves as much battery power as possible.This option is only available for Pentium-based computers.
Legacy USB Support Enabled
Disabled
Enables or disables the USB bus support when in connection with USB device.
Table 7: Advanced Menu
ADVANCED MENU
Use the Advanced menu to set various boot and DOS-mode
functions.
Factory settings are shown in red.
8/6/2019 BIOS Phoenix K2 Rev0 01
http://slidepdf.com/reader/full/bios-phoenix-k2-rev0-01 11/15

8/6/2019 BIOS Phoenix K2 Rev0 01
http://slidepdf.com/reader/full/bios-phoenix-k2-rev0-01 12/15
Phoenix BIOS Setup Utility System Parameters and Standard Settings
Copyright 2005 NEC Computers S.A.S. Page 12
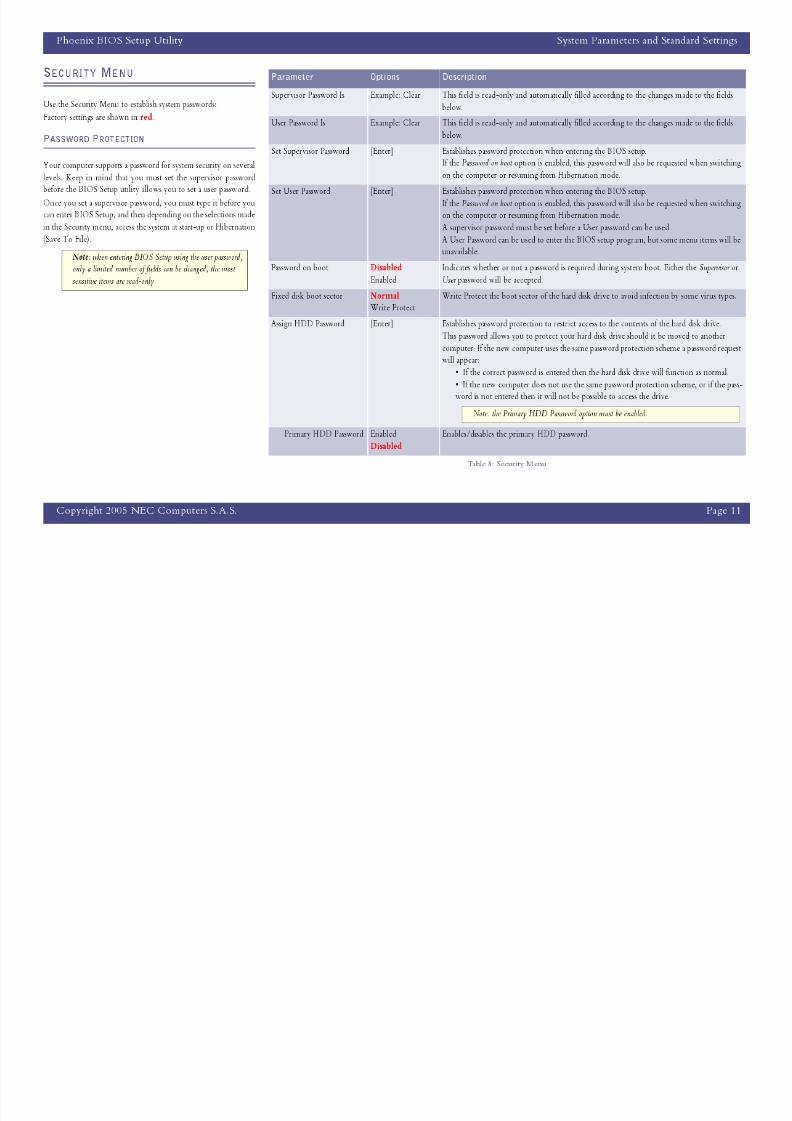
ESTABLISHING PASSWORDS
BIOS SETUP AND BOOT PASSWORDS
To establish password protection for entering the BIOS Setup utility or accessing the computer at start up, you must set the supervisor password
before setting a user password.
• To enter a password simply select Set Supervisor Password, type the password of your choice, press Enter, re-enter the password to con-
firm, press Enter again, and when prompted, press Enter to continue. Click on Set User Password and repeat this procedure to set the user
password.
• To initiate password protection while you step away from your system, simply put your system in Hibernation (Save To File) mode.
HARD DISK DRIVE PASSWORD
Your computer allows you to establish password protection for the internal hard disk drive. This protection restricts access to the drive, only if the
drive is removed from your computer and installed in another system. You are not prompted to enter your hard disk drive password while the drive
remains in your current system.
The HDD password is written to the system BIOS and to the hard disk drive to ensure that the password protection travels with the drive when
moved from system to system.
Establishing a Hard Disk Drive Password
1. In the BIOS Setup, select the Security menu.
2. Select Assign HDD Password and press Enter.
3. Type the password of your choice and press Enter.4. Type it again to confirm, and press Enter.When the Setup Notice pops up, press Enter to continue. Press the F10 key to save changes and exit
the BIOS Setup.
Changing Hard Disk Drive Passwords
1. In the BIOS Setup, select the Security menu.
2. Select Assign HDD Password and press Enter.
3. Type the current password and press Enter.
Note: for more information on security features (hardware and operating system passwords), please refer to the 'Using Your Notebook' section of the Online Documentation. You will find information on how to setup Windows® and network passwords, as well as passwords to resume from Standby
mode or from the screensaver.

8/6/2019 BIOS Phoenix K2 Rev0 01
http://slidepdf.com/reader/full/bios-phoenix-k2-rev0-01 13/15
Phoenix BIOS Setup Utility System Parameters and Standard Settings
Copyright 2005 NEC Computers S.A.S. Page 13
4. Type the new password of your choice and press Enter. Type it again to confirm, and press Enter.
Moving the Hard Disk Drive
When a password-protected hard disk drive is moved from its original system and installed in another system, error messages appear indicating that
the drive is locked. If the system is equipped with the same hard disk drive password protection feature, a Security Setup window will pop up, requiring
the user to enter the password to unlock the drive.
If you wish to move a hard disk drive from one system to another, make sure to clear the hard disk drive password before you do so.
Note: if you do not wish to establish another password, press Enter without entering any value in theses fields.

8/6/2019 BIOS Phoenix K2 Rev0 01
http://slidepdf.com/reader/full/bios-phoenix-k2-rev0-01 14/15
Phoenix BIOS Setup Utility System Parameters and Standard Settings
Copyright 2005 NEC Computers S.A.S. Page 14
Parameter Options Description
Network Boot Enabled
Disabled
When set to Enabled, allows your computer to access the network at start-up using a special
configuration file, usually in order to access special services or programs.
Table 9: Boot Menu
Parameter Description
Diskette Drive Refers to any additional floppy disk drive you have attached to your computer.
ATAPI CD-ROM Drive Refers to the computer's optical disc drive.
Network Refers to the network to which the computer is connected.
Hard Drive Refers to the internal hard disk dr ive. This is your normal boot device.
Pressing Enter on Hard Drive shows the computer’s hard disk drive model name.
Table 10: Boot Order
Note: please note that some USB devices may not be detected by the BIOS Setup (USB optical disc drive, for instance). However, if you need to boot
from this device, you will be able to do so without making any changes in the BIOS Setup Boot Order.
BOOT MENU
Use this menu to modify the boot options, and to specify the order
of the bootable devices.
BOOT ORDER
The entries from this field represent devices that can be used to
start your computer. When your computer starts it will search
each device, following the order defined in the list, for any 'boot'
(start-up) instructions available. If a disk is found that containssuch information, it will be used to start your computer.
This can be useful if the disk contains a 'rescue' program, that will
solve a serious problem with your computer (your Recovery Disk
or Recovery CD does this). Consequently, you should keep
removable devices above your main hard drive in this list. Should
your computer's hard drive develop a major fault, you will also be
able to use a bootable CD or floppy disk to start your computer.
Move the devices up or down the list by using the F5 or F6 keys
on the keyboard. Should you have more than one of the type of
device specified, you can expand the entry to see a list of
peripherals by pressing the Enter key.

8/6/2019 BIOS Phoenix K2 Rev0 01
http://slidepdf.com/reader/full/bios-phoenix-k2-rev0-01 15/15
Phoenix BIOS Setup Utility System Parameters and Standard Settings
Copyright 2005 NEC Computers S.A.S. Page 15
Parameter Description
Exit Saving changes Accepts changes made to current settings, and exits BIOS Setup.
Exit Discarding Changes Exits Setup without applying any changes that have been made during this session.
Load Setup Defaults Loads default configuration settings that were defined before the computer left the factory.
Discard Changes Reverses any changes that have been made dur ing this session.
Save Changes Replaces the default configuration settings with the current settings.
Battery Refresh Refreshes the battery.
1. Press Enter to display a confirmation dialogue box.
2. Unplug the AC adapter, and press Enter.3. When prompted to do so, press Y to start the refreshing process.
4. The system will automatically discharge the battery. When the countdown reaches 0%, the system will
automatically shutdown.
5. To finish the refresh process you will have to recharge the battery. Plug in the AC adapter and charge the
battery until the Battery Power LED turns off. You may use the computer during this time.
Table 11: Exit Menu
EXIT MENU
Use this menu to implement or discard the changes you made to
the BIOS Setup, and/or to exit the utility. Select any parameter
and press Enter to perform the corresponding action.
The Battery Refresh feature is also found in this menu. We
recommend you to refresh the battery regularly (about once a
month) in order to keep it in perfect working condition and
optimise its performances.
Note: you will always be prompted for confirmation.
Note: if the battery was completely charged, this process may take several hours to complete.