migration guide -...
TRANSCRIPT

2 | Installation Guide
Migration guide
Contents 1. Hardware Requirements .............................................................................. 3
2. Setting up your product in two easy steps.................................................... 5
Step one: Migrating to Sage Pastel Partner Version 18 on a Server or a
Stand-alone computer ................................................................................ 6
Step two: Migrating to Sage Pastel Partner Version 18 on a Workstation.. 14
3. Keyboard Shortcuts ................................................................................... 21
4. Useful Contact Details ............................................................................... 23

Installation Guide | 3
Welcome to Sage Pastel Partner Version 18. Thank you for choosing Sage Pastel as your accounting software, support and service provider. This Sage Pastel Partner Version 18 installation guide assists you with the smooth and effortless installation of your accounting software, providing you with easy to follow, step-by-step instructions.
1. Hardware Requirements These are the hardware and operating system software requirements for the system:
Workstation Server
HARDWARE
Minimum Single Core 1 GHz Single Core 2 GHz
Recommended Dual Core 2 GHz or higher
Dual Core 2 GHz or higher
DVD Drive Required if installing from a disk. Internet connection required for a software download install or software update.
RAM
Minimum 2GB 4GB
Recommended 2GB or higher 128MB per simultaneous
user who accesses the system
SCREEN RESOLUTION
Minimum 1024 x 768 1024 x 768
OPERATING SYSTEM
Supported Operating Systems
Windows 7, Windows 8, Windows 8.1 and Windows 10
Windows Server 2008 r2, Windows Server 2012, Windows Server 2012 R2, Windows 10 Server
OFFICE 365 SYSTEM REQUIREMENTS Business Premium only
Browser Safari, Chrome and Firefox – current version Microsoft Edge – latest version Internet Explorer 11
Mobile devices
Windows: Office Mobile applications (Word, Excel, PowerPoint, OneNote, Outlook Mail, and Outlook Calendar) require Windows 10.
iOS:

4 | Installation Guide
Office for iPad® and iPhone® requires iOS 8.0 or later. Office for iPad Pro™ requires iOS 9.0 or later.
Android: Office for Android™ can be installed on tablets and phones that meet the following criteria: running Android KitKat 4.4 or later version and have an ARM-based or Intel x86 processor.
● Microsoft Office integration and email functionality requires
you to have Microsoft Office version 2000 or above
installed on your workstation.
● Windows XP Operating System - NO LONGER
SUPPORTED
● Microsoft will no longer support Windows XP Operating
System. This means Windows XP users will not receive
Microsoft software updates, including security updates that
help protect your POS system from viruses, spyware and
other malicious software. If you are currently operating a
Windows XP Operating System, we recommend you move
to a supported operating system so you can continue
operating in a secure environment. In moving to a new
operating system, if your POS system also runs in
Windows XP, we suggest you contact your primary
support provider to discuss compatibility of your POS
system with the new operating system.

Installation Guide | 5
2. Setting up your product in two easy steps Step One - Migrating to Sage Pastel Partner Version 18 on a Server or a
Stand Alone computer Step Two - Migrating to Sage Pastel Partner Version 18 on a Workstation

6 | Installation Guide
Step one: Migrating to Sage Pastel Partner Version 18 on a Server or a Stand-alone computer When you open Pastel you will receive a notification that there is an upgrade. Click on the Download button to download the installation files for the upgrade. Once the download is completed, click on the Run button to start the installation. The Welcome screen will display. Click Next to continue.

Installation Guide | 7
The next screen that displays is the License Agreement screen:
Read the Licence Agreement, and select “I accept the terms in the license agreement”. The installation will not continue unless you accept the license terms. Click on the Next button to continue. Note that you can click the Back button at any time to review earlier screens.
8 | Installation Guide
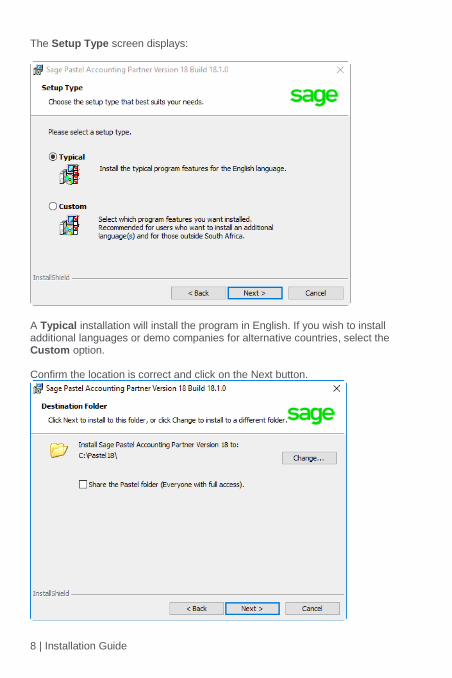
The Setup Type screen displays:
A Typical installation will install the program in English. If you wish to install additional languages or demo companies for alternative countries, select the Custom option. Confirm the location is correct and click on the Next button.

Installation Guide | 9
Click on the Next button to continue.
Read through the Migration Tips screen to understand the process of migrating your Version 17 to Version 18. Click on the Next button to continue.

10 | Installation Guide
On the screen that displays, confirm your registration details and click on the Next button to continue. If the system cannot locate your registration details, the following screen displays.
Enter your Version 17 Base Serial Number and click on the Validate button. If the validation is successful, the following screen will display. If the validation was unsuccessful, please contact the Client Services Department. You can alternatively select to check the check box Don’t register Sage Pastel Accounting Version 18 automatically. Only migrate the data.

Installation Guide | 11
Click on the Next button to continue.
All Version 17 companies will automatically be selected for the migration. If you wish not to migrate a company, uncheck the check box under the Migrate column. If you select not to migrate a company, you will need to manually copy the company to the new location and add the company in Pastel Version 18.

12 | Installation Guide
Click on the Next button to continue. The Ready to Install the Program screen displays.
Click the Install button to begin the installation.

Installation Guide | 13
The system displays a progress indicator:
Once the installation completes, the InstallShield Wizard Completed screen displays:

14 | Installation Guide
Click on the Finish button to complete the installation. In a Stand-alone environment, open Pastel and continue to process. In a multi user environment, proceed to step two.
Step two: Migrating to Sage Pastel Partner Version 18 on a Workstation Run the installation file on each workstation on the network. The Welcome screen will display. Click Next to continue.

Installation Guide | 15
The next screen that displays is the License Agreement screen:
Read the Licence Agreement, and select “I accept the terms in the license agreement”. The installation will not continue unless you accept the license terms. Click on the Next button to continue. Note that you can click the Back button at any time to review earlier screens.

16 | Installation Guide
The Setup Type screen displays:
A Typical installation will install the program in English. If you wish to install additional languages or demo companies for alternative countries, select the Custom option.

Installation Guide | 17
Click on the Next button to continue.
Read through the Migration Tips screen to understand the process of migrating your Version 17 to Version 18 Click on the Next button to continue. On the Destination Folder screen, click on the Change button next to Partner Version 18 Registration Folder.

18 | Installation Guide
The Change Registration Folder screed displays.
If you have already mapped the Pastel18 folder, click on the drop down in the Look in field and select the mapped drive. If you have not mapped the Pastel18 folder, click on the Browse button. Browse and select the shared Pastel18 folder on the server. Next select a drive letter from the drop down and click on the Map Drive button. Click the OK button to continue.

Installation Guide | 19
On the Destination Folder screen, click on the Next button to continue.
Companies added in Version 17 will display. Click on the Next button to continue. The Ready to Install the Program screen displays. Click the Install button to begin the installation. The system displays a progress indicator:

20 | Installation Guide
Once the installation completes, the InstallShield Wizard Completed screen displays:
Click on the Finish button to complete the installation. You can now open Pastel and continue to process in Version 18.
Installation Guide | 21
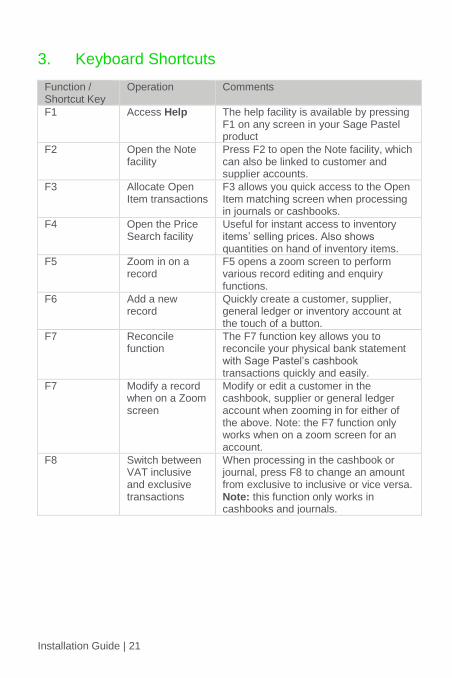
3. Keyboard Shortcuts
Function / Shortcut Key
Operation Comments
F1 Access Help The help facility is available by pressing F1 on any screen in your Sage Pastel product
F2 Open the Note facility
Press F2 to open the Note facility, which can also be linked to customer and supplier accounts.
F3 Allocate Open Item transactions
F3 allows you quick access to the Open Item matching screen when processing in journals or cashbooks.
F4 Open the Price Search facility
Useful for instant access to inventory items’ selling prices. Also shows quantities on hand of inventory items.
F5 Zoom in on a record
F5 opens a zoom screen to perform various record editing and enquiry functions.
F6 Add a new record
Quickly create a customer, supplier, general ledger or inventory account at the touch of a button.
F7 Reconcile function
The F7 function key allows you to reconcile your physical bank statement with Sage Pastel’s cashbook transactions quickly and easily.
F7 Modify a record when on a Zoom screen
Modify or edit a customer in the cashbook, supplier or general ledger account when zooming in for either of the above. Note: the F7 function only works when on a zoom screen for an account.
F8 Switch between VAT inclusive and exclusive transactions
When processing in the cashbook or journal, press F8 to change an amount from exclusive to inclusive or vice versa. Note: this function only works in cashbooks and journals.

22 | Installation Guide
F9 Open the calculator
F9 opens the calculator from Windows. Select View on the calculator and then click on Scientific for access to many additional, useful calculator functions.
F12 Return to the previous column
When processing in documents, journals or cashbooks, and you are in the Account field, you cannot move off the field without selecting an account. Pressing F12 while on the field will move you to the previous field without forcing you to select an account.
Ctrl + H Edit customer/supplier address details
When processing document lines, you can use Ctrl + H to jump to the Delivery Address field instantly. Note: you need to be on the transaction lines to use this shortcut.
Ctrl + L Insert lines on invoices
When processing documents, after selecting the customer/supplier account, you can use Ctrl + L to jump straight to the lines without tabbing through the rest of the fields in the header section. Note: you need to be on a header field to use this shortcut.
Ctrl + R Copy postal address to delivery address field or vice versa
In the Edit Customer/Supplier menu, you can use this function to copy your delivery address to your postal address field, and vice versa.

Installation Guide | 23
4. Useful Contact Details Cape Town Switchboard +27 21 522 7400 [email protected] Durban Switchboard +27 31 537 7100 [email protected] Johannesburg Switchboard +27 11 304 3000 [email protected] Registrations +27 86 112 6837 [email protected] Product Sales +27 11 304 3600 [email protected] Training +27 11 304 3670 [email protected] Installation Assistance +27 11 304 3830 [email protected] Client Services +27 86 112 6837 [email protected] Pastel Payroll +27 11 304 4000 [email protected] International Switchboard +27 11 304 3400 [email protected] Support +27 11 304 3300 [email protected] www.sage.com The specifications and information in this Installation Guide are correct at the time of printing. We continuously invest in Research and Development, and all the information in this guide is subject to change without prior notice. Therefore, Sage Pastel cannot be held responsible for errors or omissions. Copying or reprinting of this guide or sections thereof is not permitted without prior written authorisation.

24 | Installation Guide