php hacks · 216 chapter 6chapter six application design hacks 51–66 sitting on top of the...
TRANSCRIPT
PHP Hacks™
by Jack D. Herrington
Copyright © 2006 O’Reilly Media, Inc. All rights reserved.Printed in the United States of America.
Published by O’Reilly Media, Inc., 1005 Gravenstein Highway North,Sebastopol, CA 95472.
O’Reilly books may be purchased for educational, business, or sales promotional use. Onlineeditions are also available for most titles (safari.oreilly.com). For more information, contact ourcorporate/institutional sales department: (800) 998-9938 or [email protected].
Editor: Brett McLaughlin
Production Editor: Reba Libby
Cover Designer: Marcia Friedman
Interior Designer: David Futato
Printing History:December 2005: First Edition.
Nutshell Handbook, the Nutshell Handbook logo, and the O’Reilly logo are registered trademarksof O’Reilly Media, Inc. The Hacks series designations, PHP Hacks, the image of a propeller beanie,and related trade dress are trademarks of O’Reilly Media, Inc.
Many of the designations used by manufacturers and sellers to distinguish their products areclaimed as trademarks. Where those designations appear in this book, and O’Reilly Media, Inc. wasaware of a trademark claim, the designations have been printed in caps or initial caps.
While every precaution has been taken in the preparation of this book, the publisher and authorassume no responsibility for errors or omissions, or for damages resulting from the use of theinformation contained herein.
Small print: The technologies discussed in this publication, the limitations on these technologiesthat technology and content owners seek to impose, and the laws actually limiting the use of thesetechnologies are constantly changing. Thus, some of the hacks described in this publication maynot work, may cause unintended harm to systems on which they are used, or may not be consistentwith applicable user agreements. Your use of these hacks is at your own risk, and O’Reilly Media,Inc. disclaims responsibility for any damage or expense resulting from their use. In any event, youshould take care that your use of these hacks does not violate any applicable laws, includingcopyright laws.
This book uses RepKover™, a durable and flexible lay-flat binding.
ISBN: 0-596-10139-2[M]
,COPYRIGHT.4457 Page iv Monday, November 28, 2005 6:03 PM
216
Chapter 6C H A P T E R S I X
Application DesignHacks 51–66
Sitting on top of the database and below the HTML is application logic.This chapter concentrates on hacks that will add stability and flexibility toyour application logic. Topics covered include security and roles, passwordmanagement, login and session management, and e-commerce.
H A C K
#51Create Modular Interfaces Hack #51
Use dynamic loading to allow users to write snap-in modules for yourapplication.
Most of the really popular PHP open source applications have an extensionmechanism that allows for PHP coders to write small fragments of code thatare dynamically loaded into the application. This hack demonstrates anXML-based drawing script that you can extend simply by placing new PHPclasses into a modules directory; of course, the point is not as much thedrawing code as the way you can extend it easily.
The CodeSave the code in Example 6-1 as modhost.php.
Example 6-1. The code that handles a modular PHP architecture
<?php
class DrawingEnvironment
{
private $img = null;
private $x = null;
private $y = null;
private $colors = array( );
public function _ _construct( $x, $y )
{
$this->img = imagecreatetruecolor( $x, $y );
Create Modular Interfaces #51
Chapter 6, Application Design | 217
HACK
$this->addColor( 'white', 255, 255, 255 );
$this->addColor( 'black', 0, 0, 0 );
$this->addColor( 'red', 255, 0, 0 );
$this->addColor( 'green', 0, 255, 0 );
$this->addColor( 'blue', 0, 0, 255 );
imagefilledrectangle( $this->image( ),
0, 0, $x, $y, $this->color( 'white' ) );
}
public function image( ) { return $this->img; }
public function size_x( ) { return $this->x; }
public function size_y( ) { return $this->y; }
public function color( $c ) { return $this->colors[$c]; }
public function save( $file )
{
imagepng( $this->img, $file );
}
protected function addColor( $name, $r, $g, $b )
{
$col = imagecolorallocate($this->img, $r, $g, $b);
$this->colors[ $name ] = $col;
}
}
interface DrawingObject
{
function drawObject( $env );
function setParam( $name, $value );
}
function loadModules( $dir )
{
$classes = array( );
$dh = new DirectoryIterator( $dir );
foreach( $dh as $file )
{
if( $file->isDir( ) == 0 && preg_match( "/[.]php$/", $file ) )
{
include_once( $dir."/".$file );
$class = preg_replace( "/[.]php$/", "", $file );
$classes []= $class;
}
}
return $classes;
}
Example 6-1. The code that handles a modular PHP architecture (continued)
218 | Chapter 6, Application Design
#51 Create Modular InterfacesHACK
$classes = loadModules( "mods" );
$dom = new DOMDocument( );
$dom->load( $argv[1] );
$nl = $dom->getElementsByTagName( "image" );
$root = $nl->item( 0 );
$size_x = $root->getAttribute( 'x' );
$size_y = $root->getAttribute( 'y' );
$file = $root->getAttribute( 'file' );
$de = new DrawingEnvironment( $size_x, $size_y );
$obs_spec = array( );
$el = $root->firstChild;
while( $el != null )
{
if ( $el->tagName != null )
{
$params = array( );
for( $i = 0; $i < $el->attributes->length; $i++ )
{
$p = $el->attributes->item( $i )->nodeName;
$v = $el->attributes->item( $i )->nodeValue;
$params[ $p ] = $v;
}
$obs_spec []= array(
'type' => $el->tagName,
'params' => $params
);
}
$el = $el->nextSibling;
}
foreach( $obs_spec as $os )
{
$ob = null;
eval( '$ob = new '.$os['type'].'( );' );
foreach( $os[ 'params' ] as $key => $value )
$ob->setParam( $key, $value );
$ob->drawObject( $de );
}
$de->save( $file );
?>
Example 6-1. The code that handles a modular PHP architecture (continued)
Create Modular Interfaces #51
Chapter 6, Application Design | 219
HACK
Save the code in Example 6-2 as mods/Circle.php.
Running the HackThis hack is run on the command line. The first thing to do is to create anXML test file:
<image x='100' y='100' file='out.png'>
<Circle x='20' y='40' color='red' radius='15' />
<Circle x='60' y='30' color='green' radius='30' />
<Circle x='70' y='75' color='blue' radius='35' />
</image>
This XML file specifies that the image should be 100×100 pixels and namedout.png, and that the image should have three circles, each of varying sizeand color.
With the XML in hand, run the script:
% php modhost.php test.xml
Example 6-2. An example module that draws circles
<?php
class Circle implements DrawingObject
{
private $radius = null;
private $color = null;
private $x = null;
private $y = null;
function drawObject( $env )
{
$r2 = $this->radius / 2;
imagefilledellipse( $env->image( ),
$this->x - $r2, $this->y - $r2,
$this->radius, $this->radius,
$env->color( $this->color )
);
}
function setParam( $name, $value )
{
if ( $name == "radius" ) $this->radius = $value;
if ( $name == "color" ) $this->color = $value;
if ( $name == "x" ) $this->x = $value;
if ( $name == "y" ) $this->y = $value;
}
}
?>
220 | Chapter 6, Application Design
#51 Create Modular InterfacesHACK
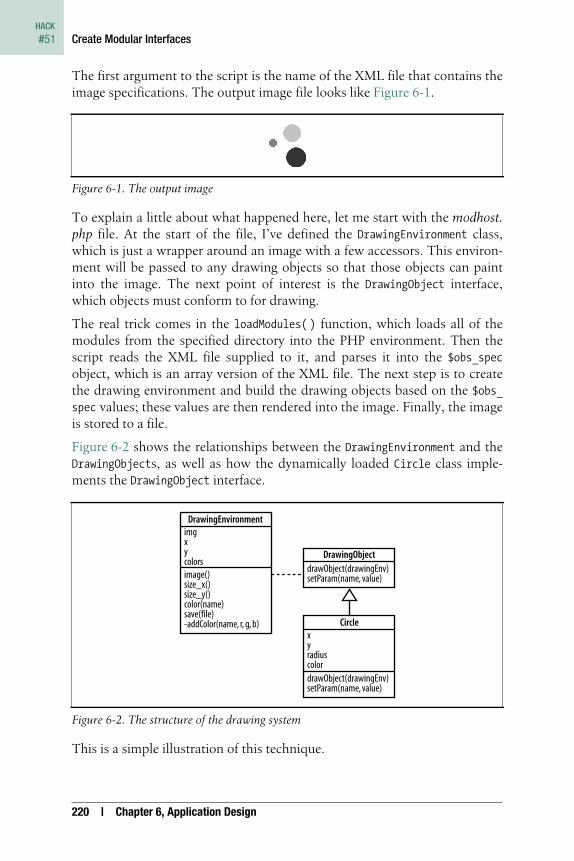
The first argument to the script is the name of the XML file that contains theimage specifications. The output image file looks like Figure 6-1.
To explain a little about what happened here, let me start with the modhost.php file. At the start of the file, I’ve defined the DrawingEnvironment class,which is just a wrapper around an image with a few accessors. This environ-ment will be passed to any drawing objects so that those objects can paintinto the image. The next point of interest is the DrawingObject interface,which objects must conform to for drawing.
The real trick comes in the loadModules( ) function, which loads all of themodules from the specified directory into the PHP environment. Then thescript reads the XML file supplied to it, and parses it into the $obs_spec
object, which is an array version of the XML file. The next step is to createthe drawing environment and build the drawing objects based on the $obs_
spec values; these values are then rendered into the image. Finally, the imageis stored to a file.
Figure 6-2 shows the relationships between the DrawingEnvironment and theDrawingObjects, as well as how the dynamically loaded Circle class imple-ments the DrawingObject interface.
This is a simple illustration of this technique.
Figure 6-1. The output image
Figure 6-2. The structure of the drawing system
DrawingEnvironmentimgxycolors
DrawingObjectdrawObject(drawingEnv)setParam(name, value)
CirclexyradiuscolordrawObject(drawingEnv)setParam(name, value)
image()size_x()size_y()color(name)save(file)-addColor(name, r, g, b)
Support Wiki Text #52
Chapter 6, Application Design | 221
HACK
The specification of an interface makes this a PHP 5-specificscript, but the include_once( ) and eval( ) functions were inPHP 4; it would take a bit of modification, but there is noreason that you can’t do something similar to this in PHP 4.
I strongly recommend adding an extension mechanism such as this to anyreasonably sized PHP application, especially when you expect deploymentin multiple environments that you don’t control. This approach gives endusers the ability to customize the program to their requirements, withoutyou having to go in and alter code directly for every new feature or objecttype.
See Also• “Create Objects with Abstract Factories” [Hack #68]
• “Observe Your Objects” [Hack #67]
• “Abstract Construction Code with a Builder” [Hack #70]
H A C K
#52Support Wiki Text Hack #52
Make it easier for your customers to enter styled text into your application bysupporting the Wiki syntax.
A new form of content management system for the Web, Wikis are a collec-tion of pages, each titled with a WikiWord, which is a set of two or morecapitalized words joined together without spaces. The ease with which youcan install and update Wikis has made them extremely popular both onintranets and on the Internet. Perhaps the most famous Wiki is Wikipedia(http://www.wikipedia.org/). This is an encyclopedia on the Web that any-one can contribute content to by using just their web browser.
Another reason wikis are so popular is that formatting a Wiki page is a loteasier than writing the equivalent HTML code. For example, you specify aparagraph break by just typing two returns—there is no need to add p tags.In fact, most of the time tags aren’t used at all. For example, you create abulleted list by putting an asterisk at the start of each line; this is far easierthan using the equivalent ul and li tags. This hack demonstrates using thewiki-formatting PEAR module in a PHP application.
The CodeSave the code in Example 6-3 as index.php.
222 | Chapter 6, Application Design
#52 Support Wiki TextHACK
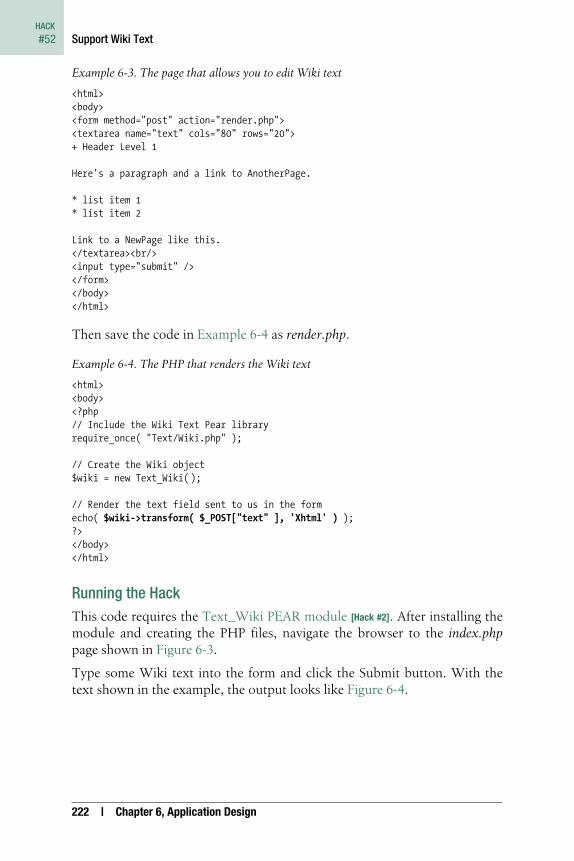
Then save the code in Example 6-4 as render.php.
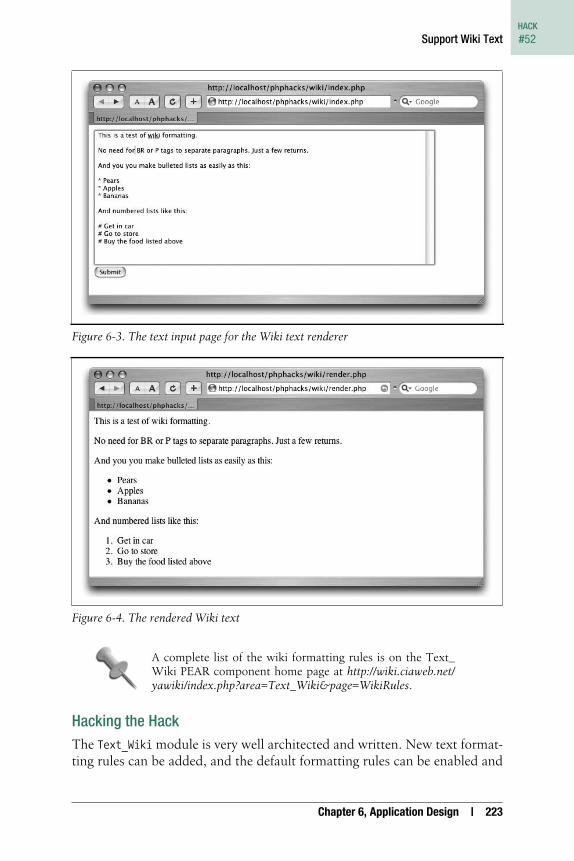
Running the HackThis code requires the Text_Wiki PEAR module [Hack #2]. After installing themodule and creating the PHP files, navigate the browser to the index.phppage shown in Figure 6-3.
Type some Wiki text into the form and click the Submit button. With thetext shown in the example, the output looks like Figure 6-4.
Example 6-3. The page that allows you to edit Wiki text
<html>
<body>
<form method="post" action="render.php">
<textarea name="text" cols="80" rows="20">
+ Header Level 1
Here's a paragraph and a link to AnotherPage.
* list item 1
* list item 2
Link to a NewPage like this.
</textarea><br/>
<input type="submit" />
</form>
</body>
</html>
Example 6-4. The PHP that renders the Wiki text
<html>
<body>
<?php
// Include the Wiki Text Pear library
require_once( "Text/Wiki.php" );
// Create the Wiki object
$wiki = new Text_Wiki( );
// Render the text field sent to us in the form
echo( $wiki->transform( $_POST["text" ], 'Xhtml' ) );?>
</body>
</html>
Support Wiki Text #52
Chapter 6, Application Design | 223
HACK
A complete list of the wiki formatting rules is on the Text_Wiki PEAR component home page at http://wiki.ciaweb.net/yawiki/index.php?area=Text_Wiki&page=WikiRules.
Hacking the HackThe Text_Wiki module is very well architected and written. New text format-ting rules can be added, and the default formatting rules can be enabled and
Figure 6-3. The text input page for the Wiki text renderer
Figure 6-4. The rendered Wiki text

224 | Chapter 6, Application Design
#53 Turn Any Object into an ArrayHACK
disabled to suit the application. The enableRule( ) and disableRule( ) meth-ods enable and disable the built-in text formatting rules. The addRule( )
method adds new rules to the formatting engine.
H A C K
#53Turn Any Object into an Array Hack #53
Use the Iterator interface in PHP 5 to turn any object into an array.
If you have ever used the DOM interface to read or write XML in PHP,you’re already familiar with the DOMNodeList interface. Many methods in theDOM return an array of nodes. That array is implemented by theDOMNodeList object. To read the node list, you have to write code like this:
$dl = $doc->getElementsByTagName( "foo" );
for( $i = 0; $i < $dl->length; $i++ )
{
$n = $dl->item( $i );
...
}
That’s kind of unfortunate, isn’t it, since PHP has that beautiful foreach
operator that gives access to arrays with almost no potential for messingthings up. Wouldn’t it be great if the interface to DOM looked more likethis?
foreach($doc->getElementsByTagName( "foo" ) as $n ) {
...
}
That is a lot cleaner and far less error prone.
Thanks to the additions in PHP 5, we can now allow foreach to work on anyobject, simply by having that class implement the Iterator interface. In thishack, I’ll show how to implement an Observer pattern [Hack #67] using theIterator interface.
The CodeSave the code in Example 6-5 as iterator.php.
Example 6-5. A class that uses PHP 5’s new Iterator interface
<?php
interface Listener
{
public function invoke( $caller, $data );
}
class ListenerList implements Iterator
{
private $listeners = array( );
Turn Any Object into an Array #53
Chapter 6, Application Design | 225
HACK
public function _ _construct( )
{
}
public function add( $listener )
{
$this->listeners []= $listener;
}
public function invoke( $caller, $data )
{
foreach( $this as $listener )
{
$listener->invoke( $caller, $data );
}
}
public function rewind( )
{
reset($this->listeners);
}
public function current( )
{
return current($this->listeners);
}
public function key( )
{
return key($this->listeners);
}
public function next( )
{
return next($this->listeners);
}
public function valid( )
{
return ( $this->current( ) !== false );
}
}
class SimpleListener implements Listener
{
private $v;
public function _ _construct( $v ) { $this->v = $v; }
public function invoke( $caller, $data )
{
echo( $this->v." invoked with with '$data'\n" );
}
Example 6-5. A class that uses PHP 5’s new Iterator interface (continued)
226 | Chapter 6, Application Design
#53 Turn Any Object into an ArrayHACK
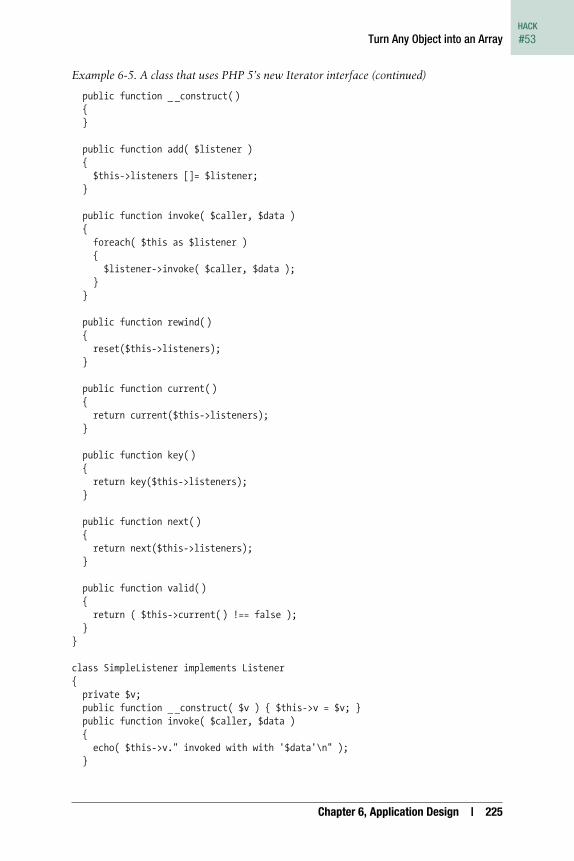
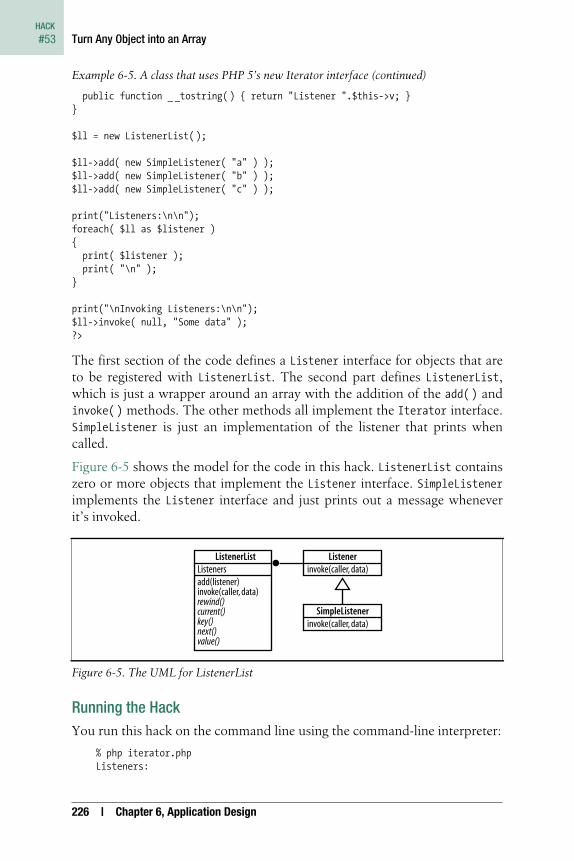
The first section of the code defines a Listener interface for objects that areto be registered with ListenerList. The second part defines ListenerList,which is just a wrapper around an array with the addition of the add( ) andinvoke( ) methods. The other methods all implement the Iterator interface.SimpleListener is just an implementation of the listener that prints whencalled.
Figure 6-5 shows the model for the code in this hack. ListenerList containszero or more objects that implement the Listener interface. SimpleListenerimplements the Listener interface and just prints out a message wheneverit’s invoked.
Running the HackYou run this hack on the command line using the command-line interpreter:
% php iterator.php
Listeners:
public function _ _tostring( ) { return "Listener ".$this->v; }
}
$ll = new ListenerList( );
$ll->add( new SimpleListener( "a" ) );
$ll->add( new SimpleListener( "b" ) );
$ll->add( new SimpleListener( "c" ) );
print("Listeners:\n\n");
foreach( $ll as $listener )
{
print( $listener );
print( "\n" );
}
print("\nInvoking Listeners:\n\n");
$ll->invoke( null, "Some data" );
?>
Figure 6-5. The UML for ListenerList
Example 6-5. A class that uses PHP 5’s new Iterator interface (continued)
ListenerListListeners
Listenerinvoke(caller, data)
SimpleListenerinvoke(caller, data)
add(listener)invoke(caller, data)rewind()current()key()next()value()
Create XML the Right Way #54
Chapter 6, Application Design | 227
HACK
Listener a
Listener b
Listener c
Invoking Listeners:
a invoked with with 'Some data'
b invoked with with 'Some data'
c invoked with with 'Some data'
%
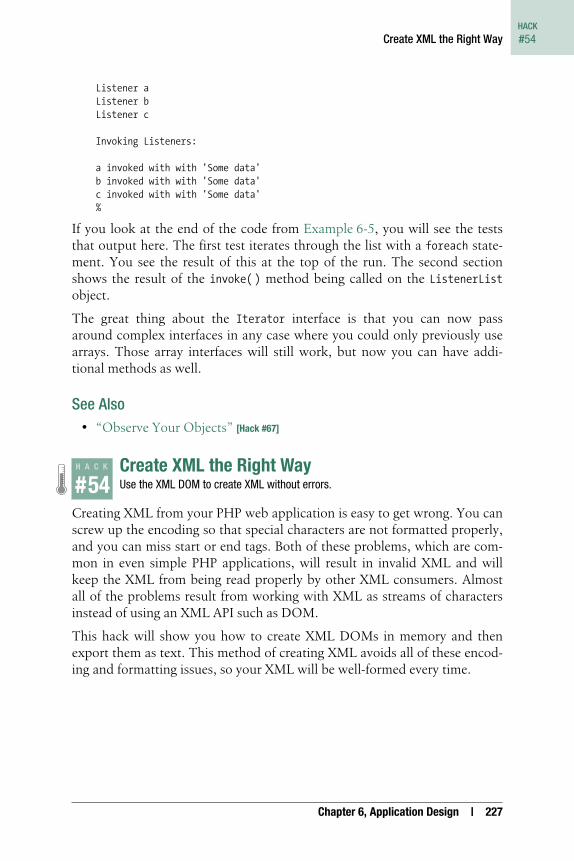
If you look at the end of the code from Example 6-5, you will see the teststhat output here. The first test iterates through the list with a foreach state-ment. You see the result of this at the top of the run. The second sectionshows the result of the invoke( ) method being called on the ListenerList
object.
The great thing about the Iterator interface is that you can now passaround complex interfaces in any case where you could only previously usearrays. Those array interfaces will still work, but now you can have addi-tional methods as well.
See Also• “Observe Your Objects” [Hack #67]
H A C K
#54Create XML the Right Way Hack #54
Use the XML DOM to create XML without errors.
Creating XML from your PHP web application is easy to get wrong. You canscrew up the encoding so that special characters are not formatted properly,and you can miss start or end tags. Both of these problems, which are com-mon in even simple PHP applications, will result in invalid XML and willkeep the XML from being read properly by other XML consumers. Almostall of the problems result from working with XML as streams of charactersinstead of using an XML API such as DOM.
This hack will show you how to create XML DOMs in memory and thenexport them as text. This method of creating XML avoids all of these encod-ing and formatting issues, so your XML will be well-formed every time.
228 | Chapter 6, Application Design
#54 Create XML the Right WayHACK
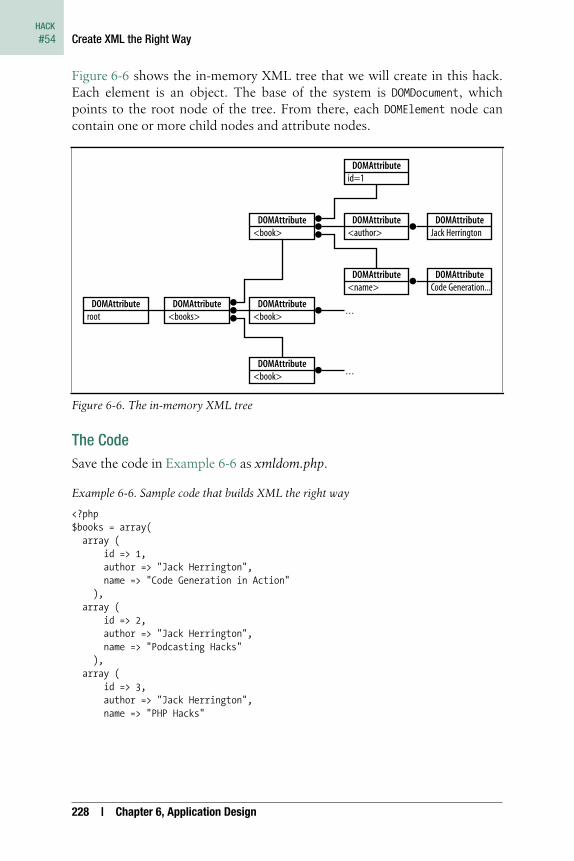
Figure 6-6 shows the in-memory XML tree that we will create in this hack.Each element is an object. The base of the system is DOMDocument, whichpoints to the root node of the tree. From there, each DOMElement node cancontain one or more child nodes and attribute nodes.
The CodeSave the code in Example 6-6 as xmldom.php.
Figure 6-6. The in-memory XML tree
Example 6-6. Sample code that builds XML the right way
<?php
$books = array(
array (
id => 1,
author => "Jack Herrington",
name => "Code Generation in Action"
),
array (
id => 2,
author => "Jack Herrington",
name => "Podcasting Hacks"
),
array (
id => 3,
author => "Jack Herrington",
name => "PHP Hacks"
DOMAttributeid=1
DOMAttribute<author>
DOMAttribute<name>
DOMAttributeJack Herrington
DOMAttributeCode Generation...
DOMAttribute<book>
DOMAttribute<book>
DOMAttribute<book>
DOMAttribute<books>
DOMAttributeroot
. . .
. . .
Create XML the Right Way #54
Chapter 6, Application Design | 229
HACK
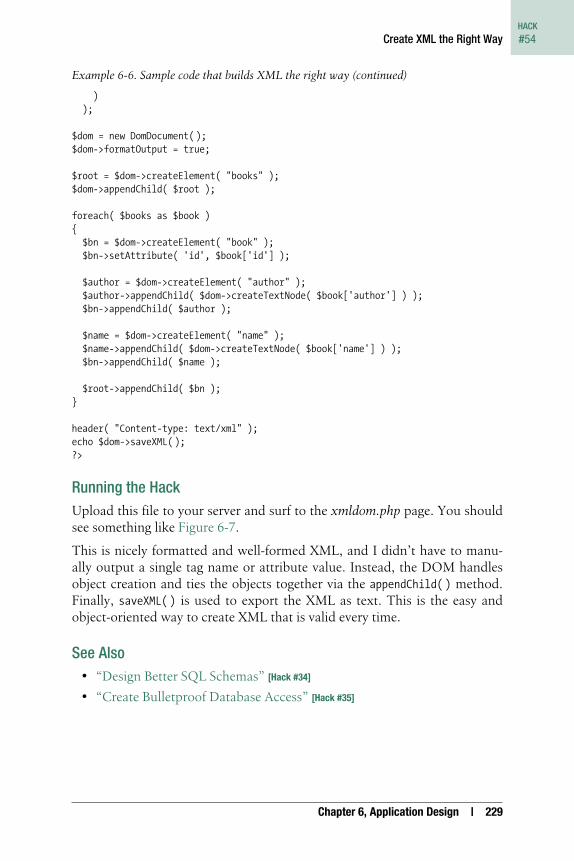
Running the HackUpload this file to your server and surf to the xmldom.php page. You shouldsee something like Figure 6-7.
This is nicely formatted and well-formed XML, and I didn’t have to manu-ally output a single tag name or attribute value. Instead, the DOM handlesobject creation and ties the objects together via the appendChild( ) method.Finally, saveXML( ) is used to export the XML as text. This is the easy andobject-oriented way to create XML that is valid every time.
See Also• “Design Better SQL Schemas” [Hack #34]
• “Create Bulletproof Database Access” [Hack #35]
)
);
$dom = new DomDocument( );
$dom->formatOutput = true;
$root = $dom->createElement( "books" );
$dom->appendChild( $root );
foreach( $books as $book )
{
$bn = $dom->createElement( "book" );
$bn->setAttribute( 'id', $book['id'] );
$author = $dom->createElement( "author" );
$author->appendChild( $dom->createTextNode( $book['author'] ) );
$bn->appendChild( $author );
$name = $dom->createElement( "name" );
$name->appendChild( $dom->createTextNode( $book['name'] ) );
$bn->appendChild( $name );
$root->appendChild( $bn );
}
header( "Content-type: text/xml" );
echo $dom->saveXML( );
?>
Example 6-6. Sample code that builds XML the right way (continued)
230 | Chapter 6, Application Design
#55 Fix the Double Submit ProblemHACK
H A C K
#55Fix the Double Submit Problem Hack #55
Use a transaction table in your database to fix the classic double submitproblem.
I have a couple of pet peeves when it comes to bad web application design.One of the biggest is the wealth of bad code written to fix “double submits.”How often have you seen an e-commerce site that implores you, “Do not hitthe submit button twice”?
This class problem results when a browser posts the contents of a web formto the server twice. However, if the user hits “submit” twice, this is exactlywhat the browser should do; it’s the server that needs to determine whetherthis is an error.
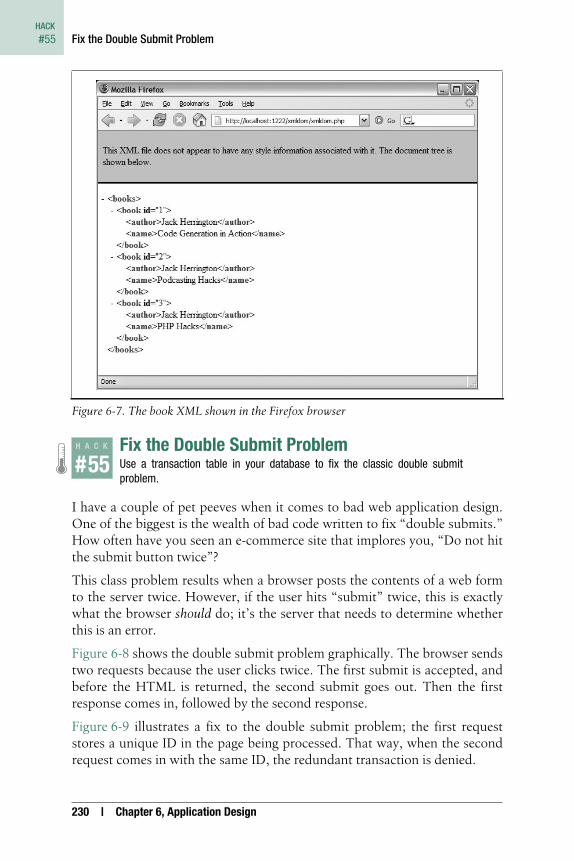
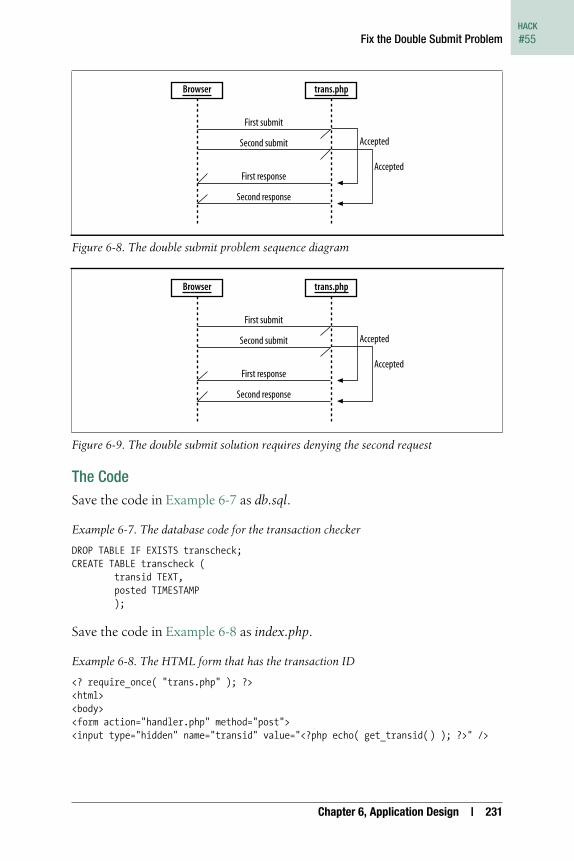
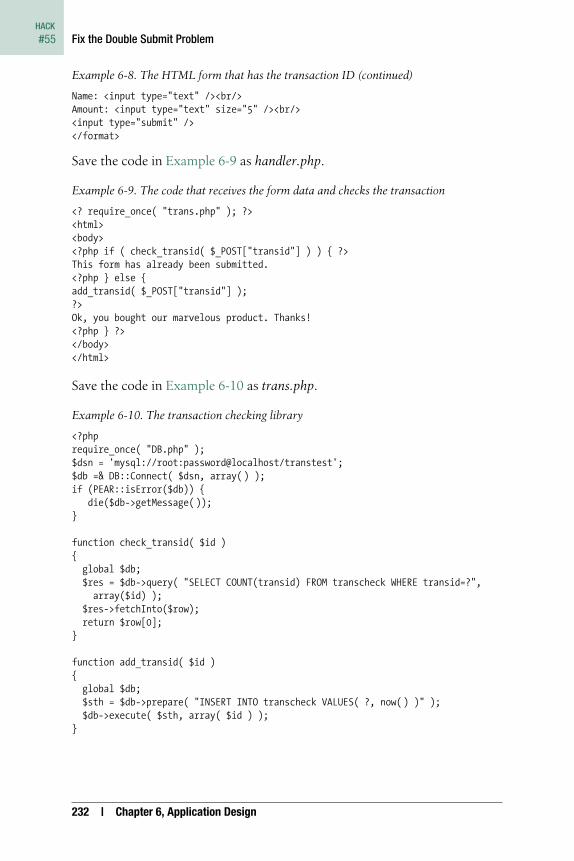
Figure 6-8 shows the double submit problem graphically. The browser sendstwo requests because the user clicks twice. The first submit is accepted, andbefore the HTML is returned, the second submit goes out. Then the firstresponse comes in, followed by the second response.
Figure 6-9 illustrates a fix to the double submit problem; the first requeststores a unique ID in the page being processed. That way, when the secondrequest comes in with the same ID, the redundant transaction is denied.
Figure 6-7. The book XML shown in the Firefox browser
Fix the Double Submit Problem #55
Chapter 6, Application Design | 231
HACK
The CodeSave the code in Example 6-7 as db.sql.
Save the code in Example 6-8 as index.php.
Figure 6-8. The double submit problem sequence diagram
Figure 6-9. The double submit solution requires denying the second request
Example 6-7. The database code for the transaction checker
DROP TABLE IF EXISTS transcheck;
CREATE TABLE transcheck (
transid TEXT,
posted TIMESTAMP
);
Example 6-8. The HTML form that has the transaction ID
<? require_once( "trans.php" ); ?>
<html>
<body>
<form action="handler.php" method="post">
<input type="hidden" name="transid" value="<?php echo( get_transid( ) ); ?>" />
Browser trans.php
First submit
Second submit
First response
Second response
Accepted
Accepted
Browser trans.php
First submit
Second submit
First response
Second response
Accepted
Accepted
232 | Chapter 6, Application Design
#55 Fix the Double Submit ProblemHACK
Save the code in Example 6-9 as handler.php.
Save the code in Example 6-10 as trans.php.
Name: <input type="text" /><br/>
Amount: <input type="text" size="5" /><br/>
<input type="submit" />
</format>
Example 6-9. The code that receives the form data and checks the transaction
<? require_once( "trans.php" ); ?>
<html>
<body>
<?php if ( check_transid( $_POST["transid"] ) ) { ?>
This form has already been submitted.
<?php } else {
add_transid( $_POST["transid"] );
?>
Ok, you bought our marvelous product. Thanks!
<?php } ?>
</body>
</html>
Example 6-10. The transaction checking library
<?php
require_once( "DB.php" );
$dsn = 'mysql://root:password@localhost/transtest';
$db =& DB::Connect( $dsn, array( ) );
if (PEAR::isError($db)) {
die($db->getMessage( ));
}
function check_transid( $id )
{
global $db;
$res = $db->query( "SELECT COUNT(transid) FROM transcheck WHERE transid=?",
array($id) );
$res->fetchInto($row);
return $row[0];
}
function add_transid( $id )
{
global $db;
$sth = $db->prepare( "INSERT INTO transcheck VALUES( ?, now( ) )" );
$db->execute( $sth, array( $id ) );
}
Example 6-8. The HTML form that has the transaction ID (continued)
Fix the Double Submit Problem #55
Chapter 6, Application Design | 233
HACK
Running the HackUpload the files to the server, and then use the mysql command to load thedb.sql schema into your database:
mysql --user=myuser --password=mypassword mydb < db.sql
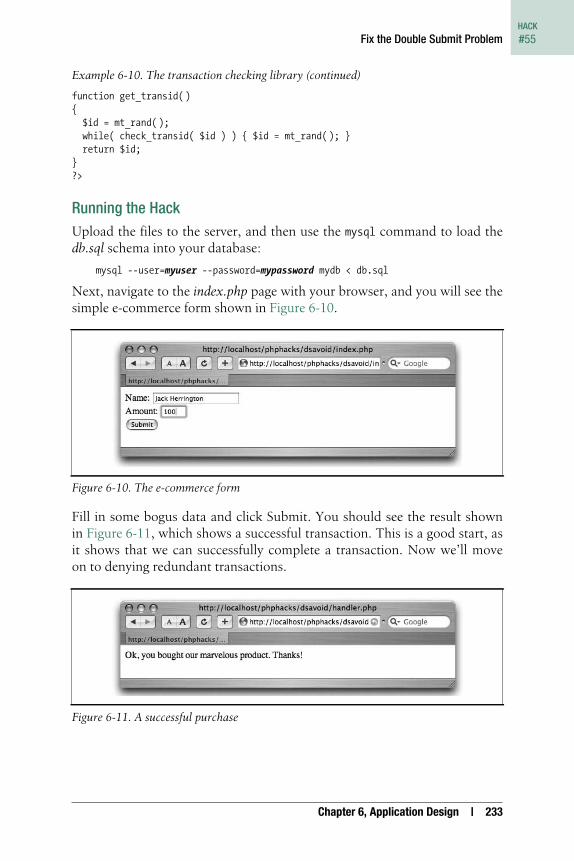
Next, navigate to the index.php page with your browser, and you will see thesimple e-commerce form shown in Figure 6-10.
Fill in some bogus data and click Submit. You should see the result shownin Figure 6-11, which shows a successful transaction. This is a good start, asit shows that we can successfully complete a transaction. Now we’ll moveon to denying redundant transactions.
function get_transid( )
{
$id = mt_rand( );
while( check_transid( $id ) ) { $id = mt_rand( ); }
return $id;
}
?>
Figure 6-10. The e-commerce form
Figure 6-11. A successful purchase
Example 6-10. The transaction checking library (continued)
234 | Chapter 6, Application Design
#56 Create User-Customizable ReportsHACK
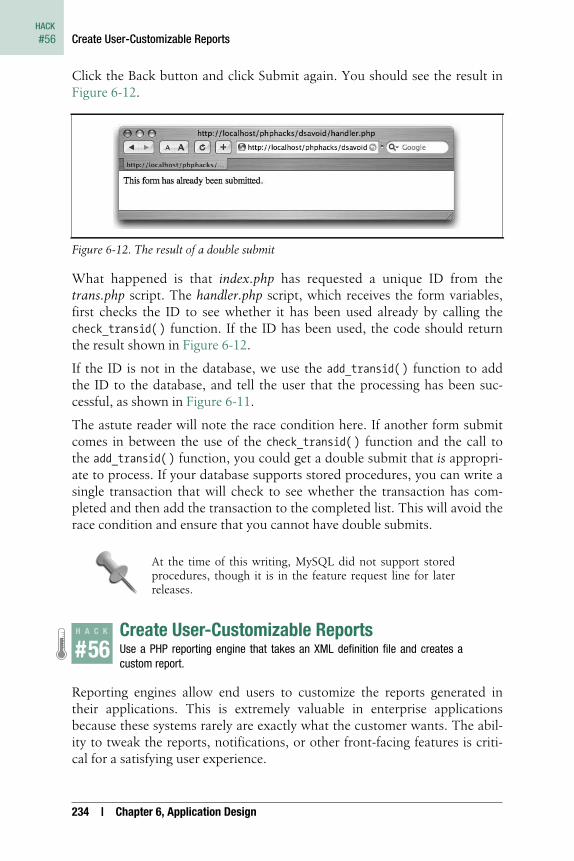
Click the Back button and click Submit again. You should see the result inFigure 6-12.
What happened is that index.php has requested a unique ID from thetrans.php script. The handler.php script, which receives the form variables,first checks the ID to see whether it has been used already by calling thecheck_transid( ) function. If the ID has been used, the code should returnthe result shown in Figure 6-12.
If the ID is not in the database, we use the add_transid( ) function to addthe ID to the database, and tell the user that the processing has been suc-cessful, as shown in Figure 6-11.
The astute reader will note the race condition here. If another form submitcomes in between the use of the check_transid( ) function and the call tothe add_transid( ) function, you could get a double submit that is appropri-ate to process. If your database supports stored procedures, you can write asingle transaction that will check to see whether the transaction has com-pleted and then add the transaction to the completed list. This will avoid therace condition and ensure that you cannot have double submits.
At the time of this writing, MySQL did not support storedprocedures, though it is in the feature request line for laterreleases.
H A C K
#56Create User-Customizable Reports Hack #56
Use a PHP reporting engine that takes an XML definition file and creates acustom report.
Reporting engines allow end users to customize the reports generated intheir applications. This is extremely valuable in enterprise applicationsbecause these systems rarely are exactly what the customer wants. The abil-ity to tweak the reports, notifications, or other front-facing features is criti-cal for a satisfying user experience.
Figure 6-12. The result of a double submit
Create User-Customizable Reports #56
Chapter 6, Application Design | 235
HACK
A reporting engine gives the user a declarative method for specifying areport. The host page sets up the query, gets the data, and then runs thereport engine to format the data. Some reporting engines, like RLIB (http://rlib.sf.net/), can export not only to HTML, but also to PDF, XML, and otherformats. In this hack, I use the PHPReports system (http://phpreports.sf.net/)to implement a simple book report.
The CodeSave the code in Example 6-11 as index.php.
Save the code in Example 6-12 as bookreport.xml.
Example 6-11. The PHP that runs the report generator
<?php
require_once( "PHPReportMaker.php" );
$rep = new PHPReportMaker( );
$rep->setUser( "root" );
$rep->setPassword( "" );
$rep->setDatabaseInterface( "mysql" );
$rep->setConnection( "localhost" );
$rep->setDatabase( "books" );
$rep->setSQL( "SELECT NAME,AUTHOR FROM BOOK ORDER BY NAME" );
$rep->setXML( "bookreport.xml" );
$rep->run( );
?>
Example 6-12. The report’s XML specification
<REPORT MARGINWIDTH="5" MARGINHEIGHT="5">
<TITLE>Book Report</TITLE>
<CSS>report.css</CSS>
<PAGE BORDER="0" SIZE="10" CELLSPACING="0" CELLPADDING="5">
</PAGE>
<GROUPS>
<GROUP NAME="author" EXPRESSION="AUTHOR">
<HEADER>
<ROW>
<COL CELLCLASS="header"><XHTML><i>Name</i></XHTML></COL>
<COL CELLCLASS="header">Author</COL>
</ROW>
</HEADER>
<FIELDS>
<ROW>
<COL TYPE="FIELD">NAME</COL>
<COL TYPE="FIELD">AUTHOR</COL>
236 | Chapter 6, Application Design
#56 Create User-Customizable ReportsHACK
Save the code in Example 6-13 as report.css.
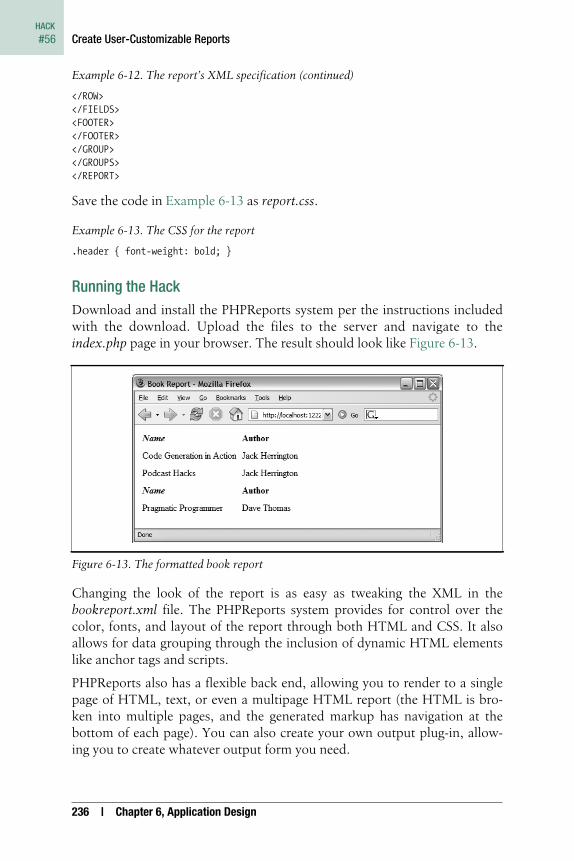
Running the HackDownload and install the PHPReports system per the instructions includedwith the download. Upload the files to the server and navigate to theindex.php page in your browser. The result should look like Figure 6-13.
Changing the look of the report is as easy as tweaking the XML in thebookreport.xml file. The PHPReports system provides for control over thecolor, fonts, and layout of the report through both HTML and CSS. It alsoallows for data grouping through the inclusion of dynamic HTML elementslike anchor tags and scripts.
PHPReports also has a flexible back end, allowing you to render to a singlepage of HTML, text, or even a multipage HTML report (the HTML is bro-ken into multiple pages, and the generated markup has navigation at thebottom of each page). You can also create your own output plug-in, allow-ing you to create whatever output form you need.
</ROW>
</FIELDS>
<FOOTER>
</FOOTER>
</GROUP>
</GROUPS>
</REPORT>
Example 6-13. The CSS for the report
.header { font-weight: bold; }
Figure 6-13. The formatted book report
Example 6-12. The report’s XML specification (continued)
Create User-Customizable Reports #56
Chapter 6, Application Design | 237
HACK
See Also• “Give Your Customers Formatting Control with XSL” [Hack #7]