[email protected]@adm.monash.edu.au – researchmaster training & support ...
Post on 21-Dec-2015
233 views
TRANSCRIPT
[email protected] – ResearchMaster Training & Support
ResearchMaster Enterprise PWI(Publications Web Interface)
An Introduction to the
Allow 20-30mins (of unbroken concentration!) to view this presentation.
ResearchMaster Training & Support 3
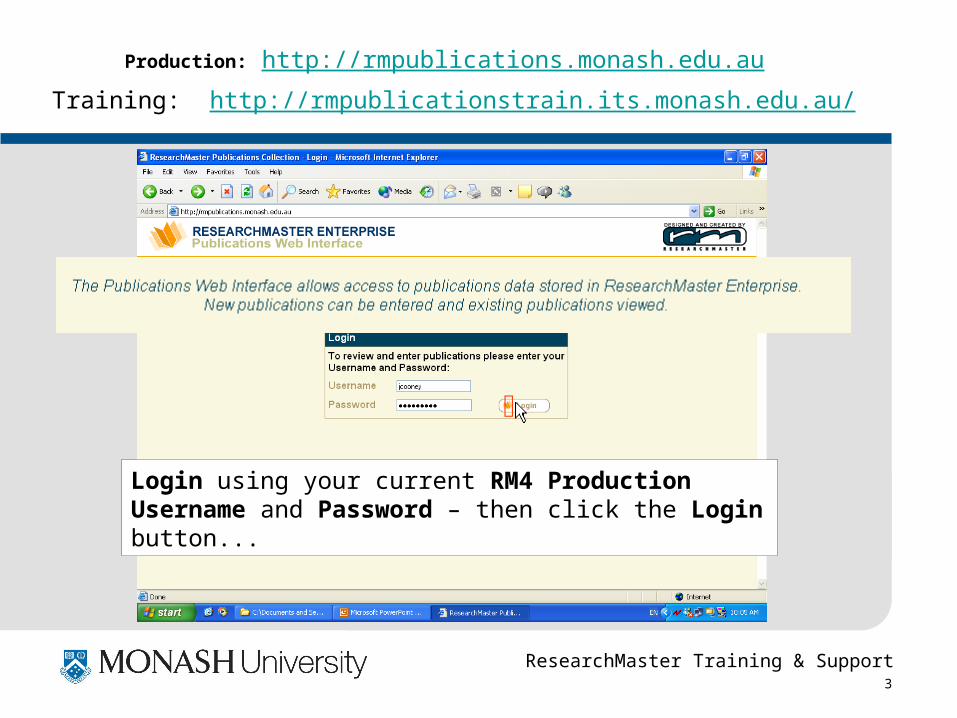
Production: http://rmpublications.monash.edu.au
Login using your current RM4 Production Username and Password – then click the Login button...
Training: http://rmpublicationstrain.its.monash.edu.au/
ResearchMaster Training & Support 4
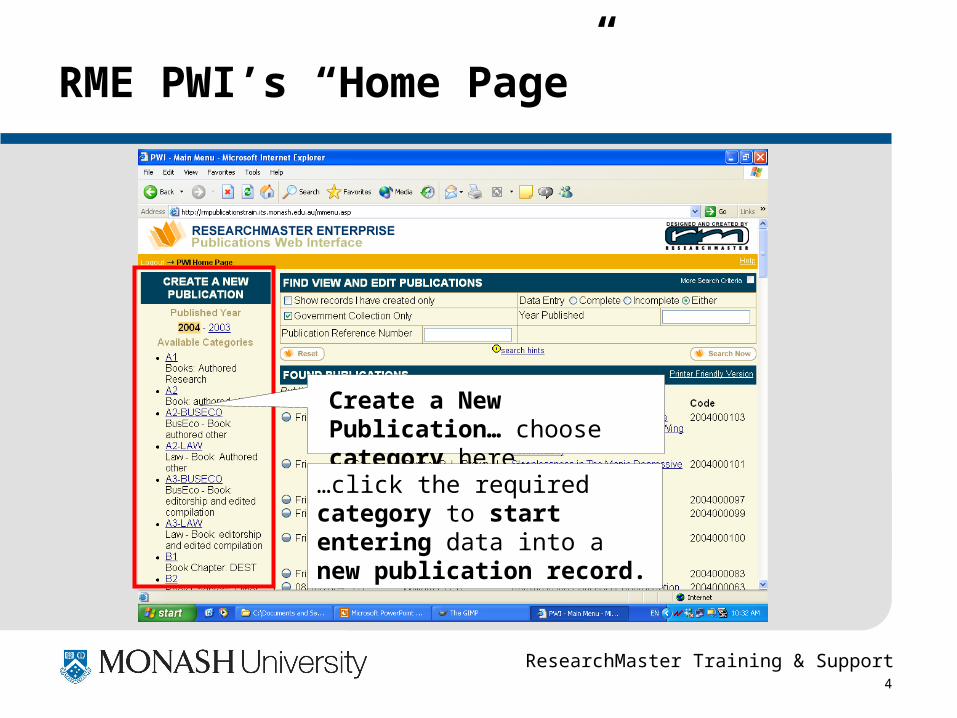
RME PWI’s “Home Page”
Create a New Publication… choose category here…
…click the required category to start entering data into a new publication record.
ResearchMaster Training & Support 5
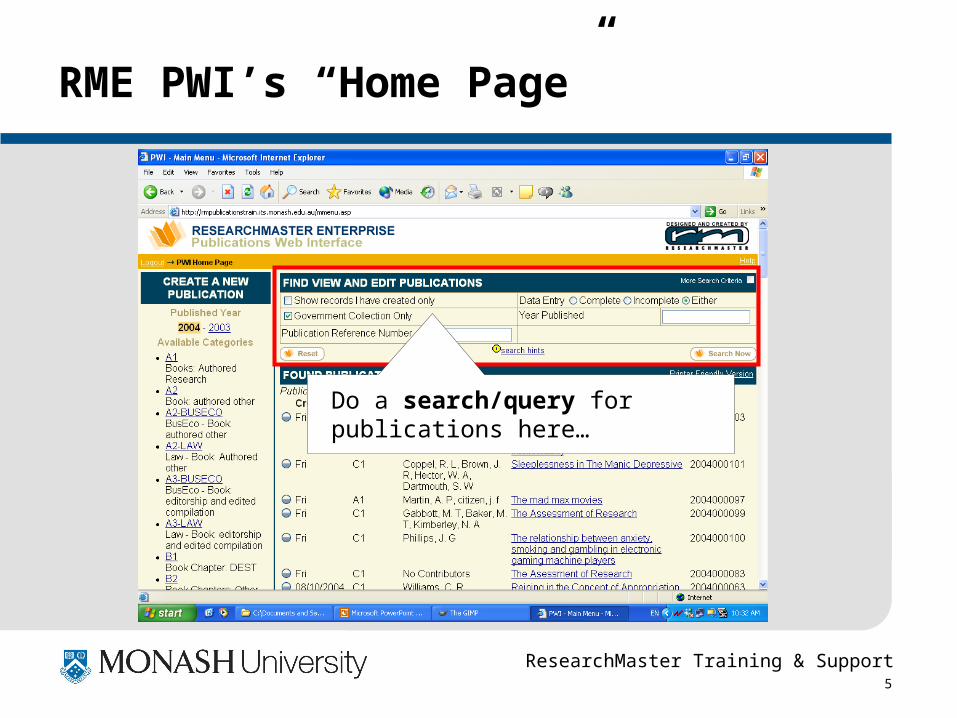
RME PWI’s “Home Page”
Do a search/query for publications here…
ResearchMaster Training & Support 6
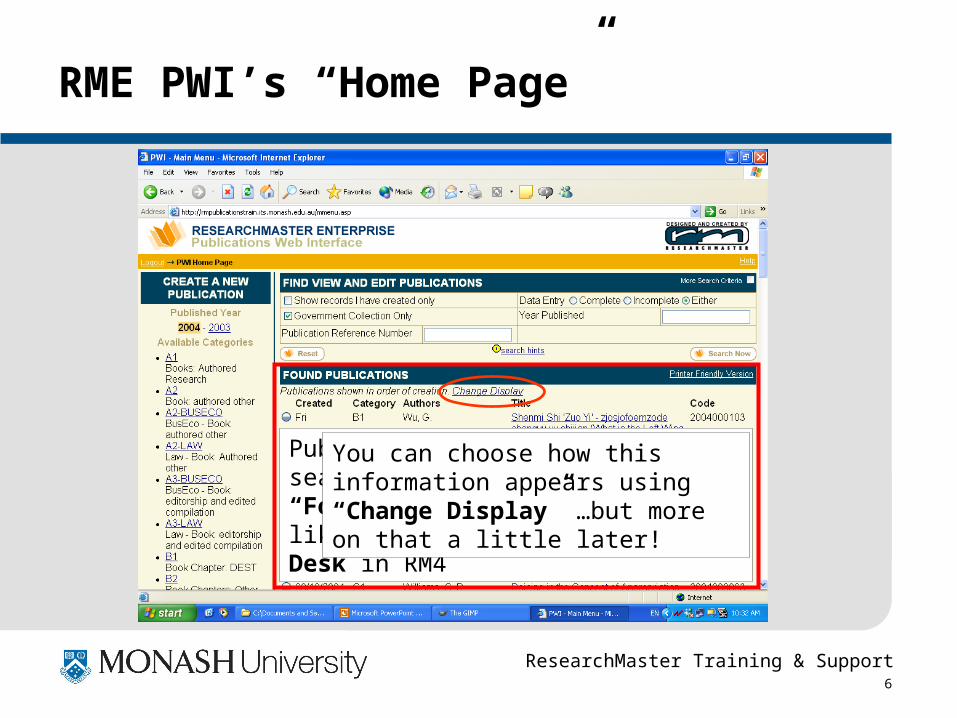
RME PWI’s “Home Page”
Publications returned by a search appear here in the “Found Publications” section – like they do on the Control Desk in RM4
You can choose how this information appears using “Change Display” …but more on that a little later!
ResearchMaster Training & Support 7
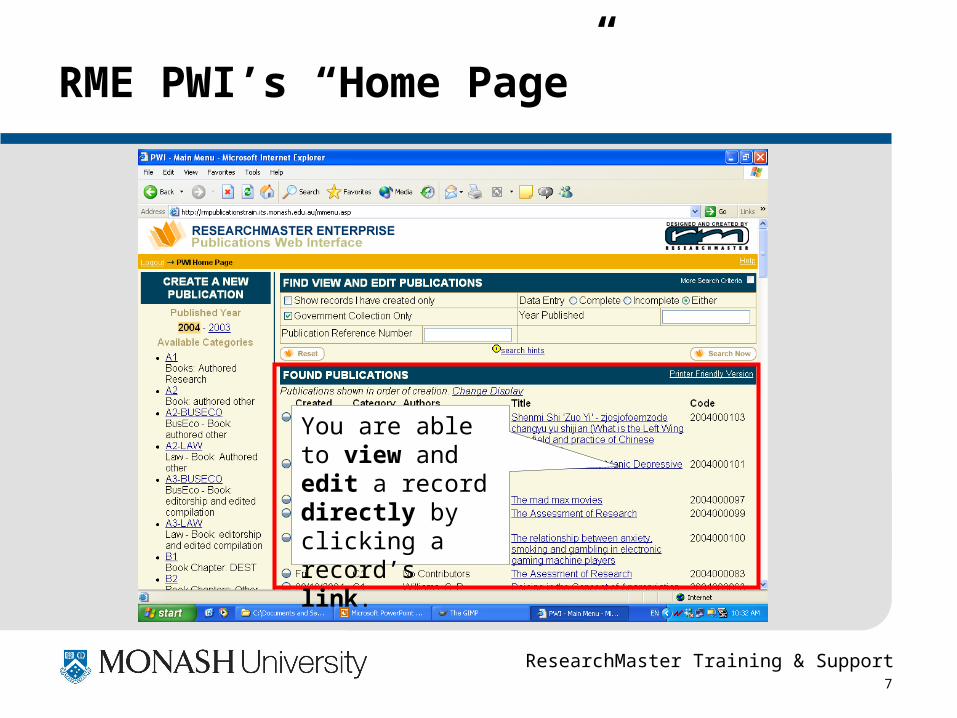
RME PWI’s “Home Page”
You are able to view and edit a record directly by clicking a record’s link.
ResearchMaster Training & Support 8
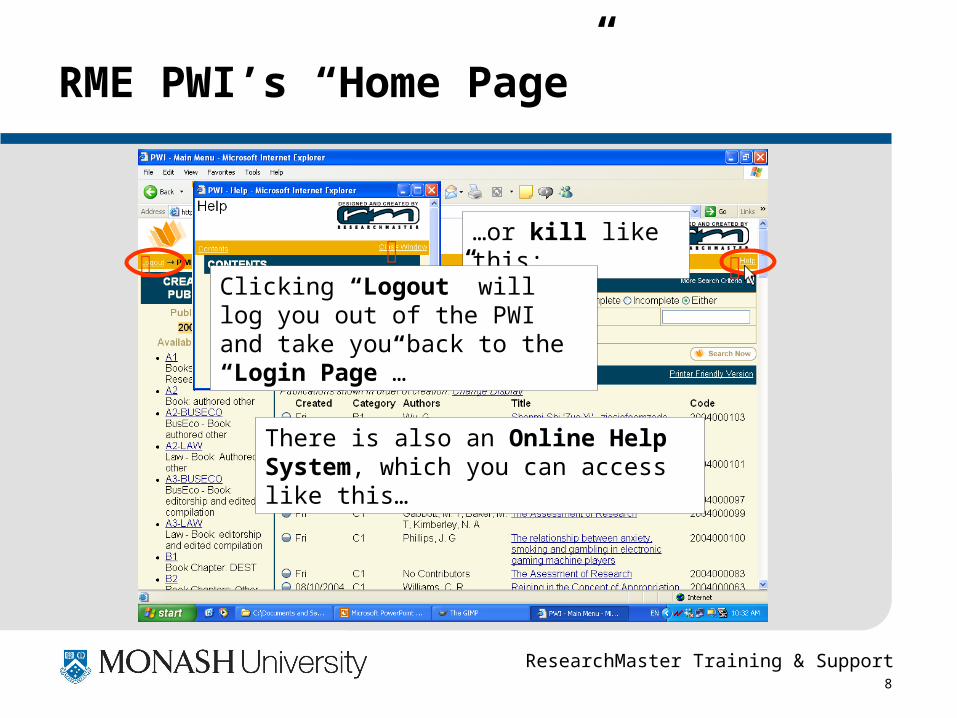
RME PWI’s “Home Page”
There is also an Online Help System, which you can access like this…
…or kill like this:
Clicking “Logout” will log you out of the PWI and take you back to the “Login Page”…
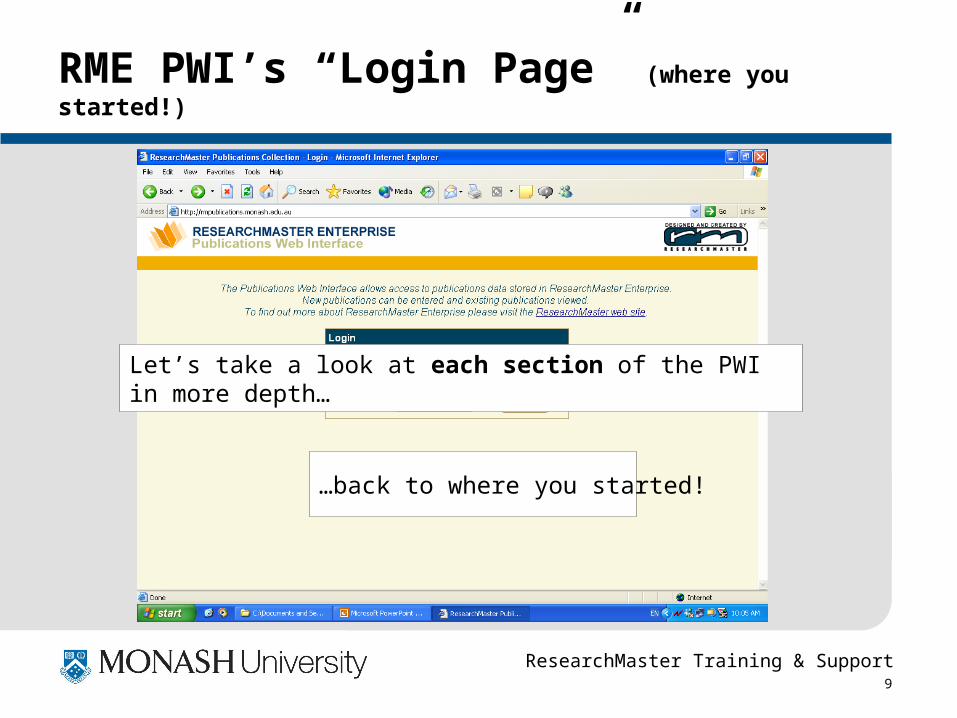
ResearchMaster Training & Support 9
RME PWI’s “Login Page” (where you started!)
Let’s take a look at each section of the PWI in more depth…
…back to where you started!
ResearchMaster Training & Support 10
RME Publications Web Interface
How to Conduct Searches/Queries
ResearchMaster Training & Support 11
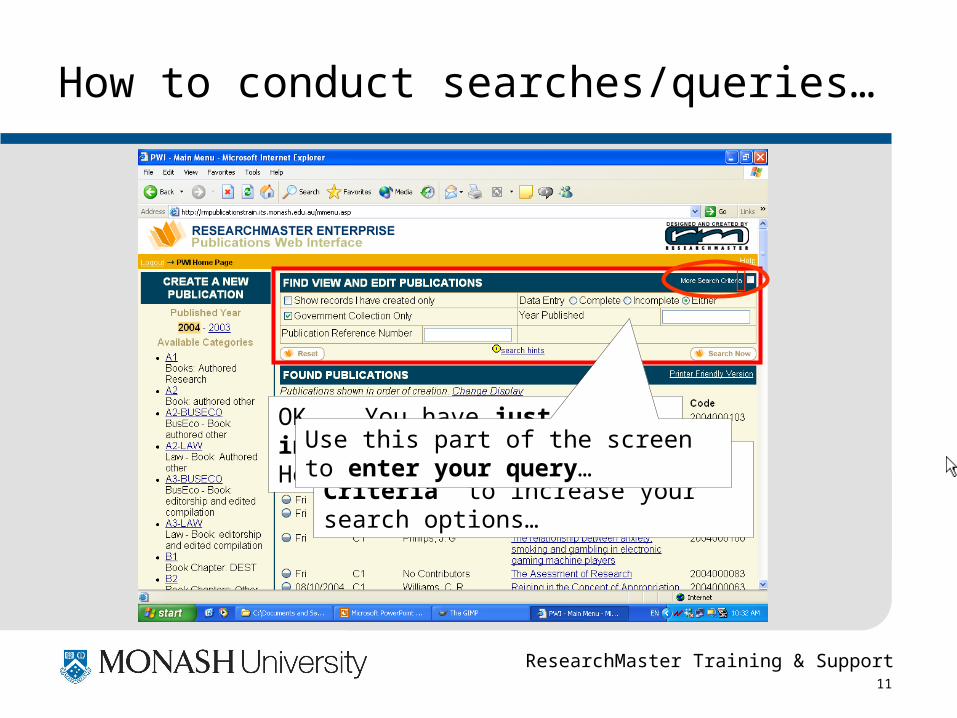
How to conduct searches/queries…
OK... You have just logged in – you are at the PWI Home Page.
You may click “More Search Criteria” to increase your search options…
Use this part of the screen to enter your query…
ResearchMaster Training & Support 12
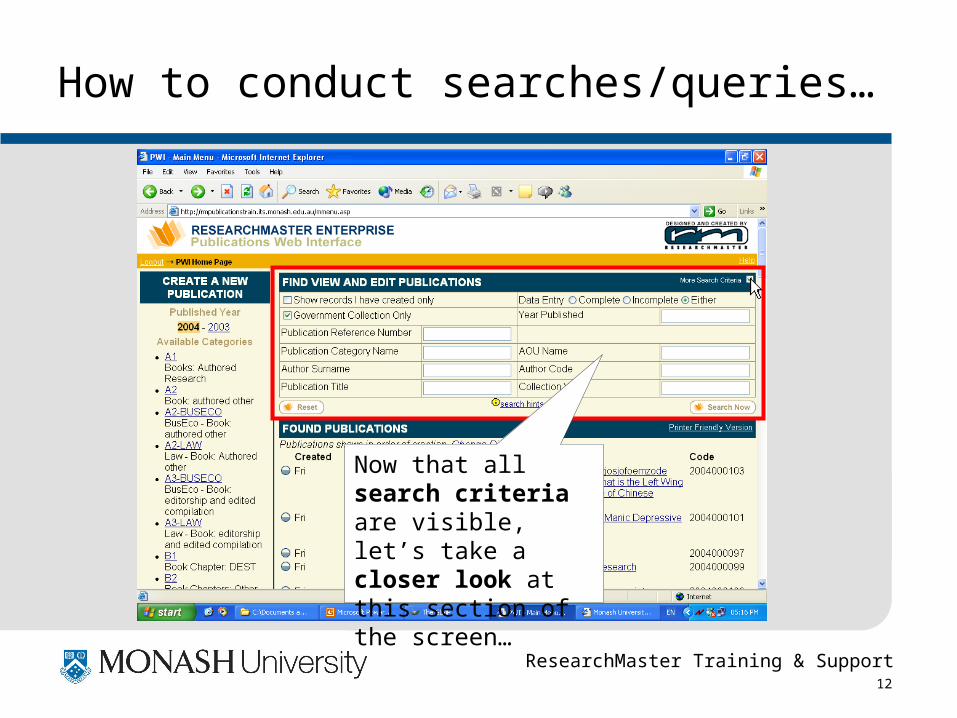
Now that all search criteria are visible, let’s take a closer look at this section of the screen…
How to conduct searches/queries…
ResearchMaster Training & Support 13
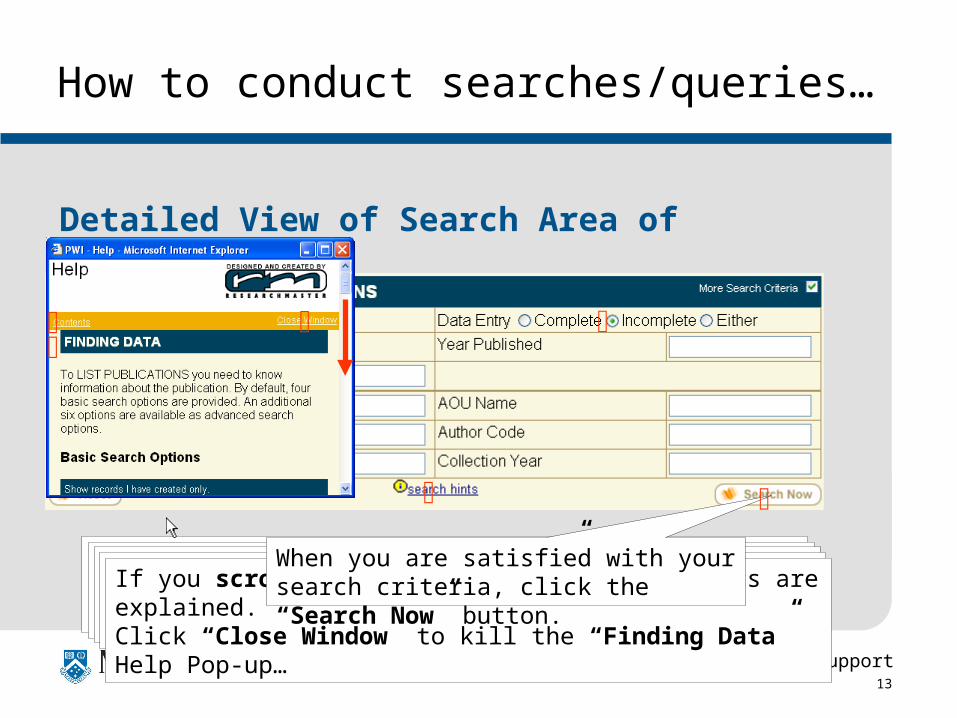
How to conduct searches/queries…
Detailed View of Search Area of Screen
Click “Government Collection Only” if you only require DEST category publications to be returned…A useful feature: “Show records I have created only”. Great for keeping track of what you alone have entered…Another useful ability of the PWI is to easily allow you to select just those records in a search that require completion…If you get stuck, you can refer to the online help – “search hints” section which - while sometimes ambiguous - is quite good…
If you scroll down, each of the search fields are explained. Click “Close Window” to kill the “Finding Data” Help Pop-up…
When you are satisfied with your search criteria, click the “Search Now” button.
ResearchMaster Training & Support 14
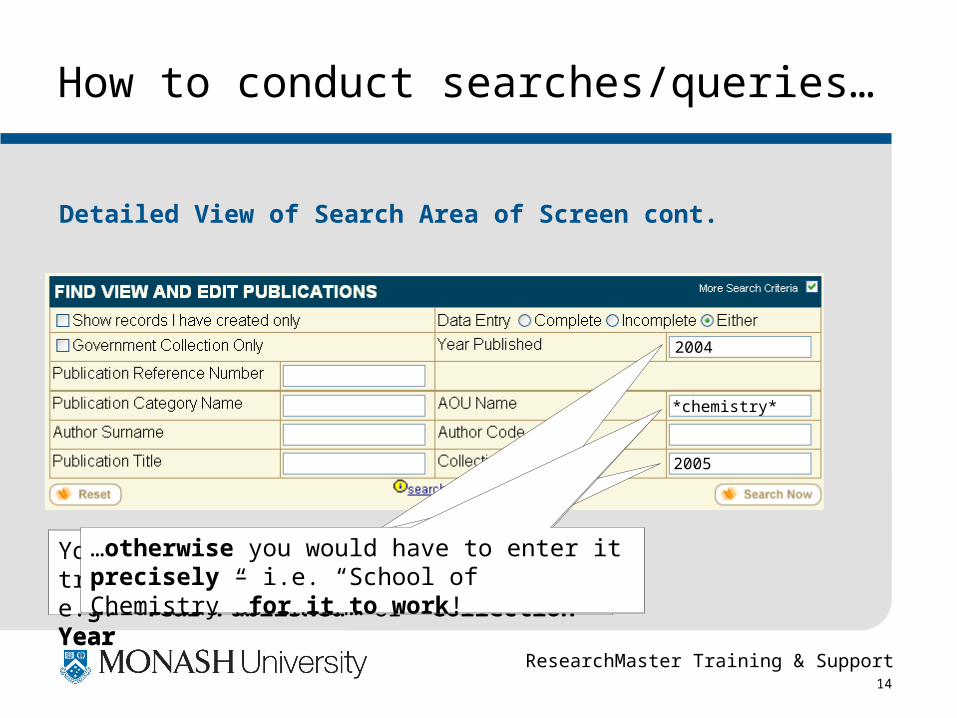
Detailed View of Search Area of Screen cont.
How to conduct searches/queries…
2004
2005
*chemistry*
You may also search by more traditional means…e.g. “Year Published” or “Collection Year”You may also search by more traditional means…e.g. “Year Published” or “Collection Year”
You can search by “AOU Name” – but ensure you use the asterisk (*) wildcards as shown……otherwise you would have to enter it precisely – i.e. “School of Chemistry” for it to work!
ResearchMaster Training & Support 15
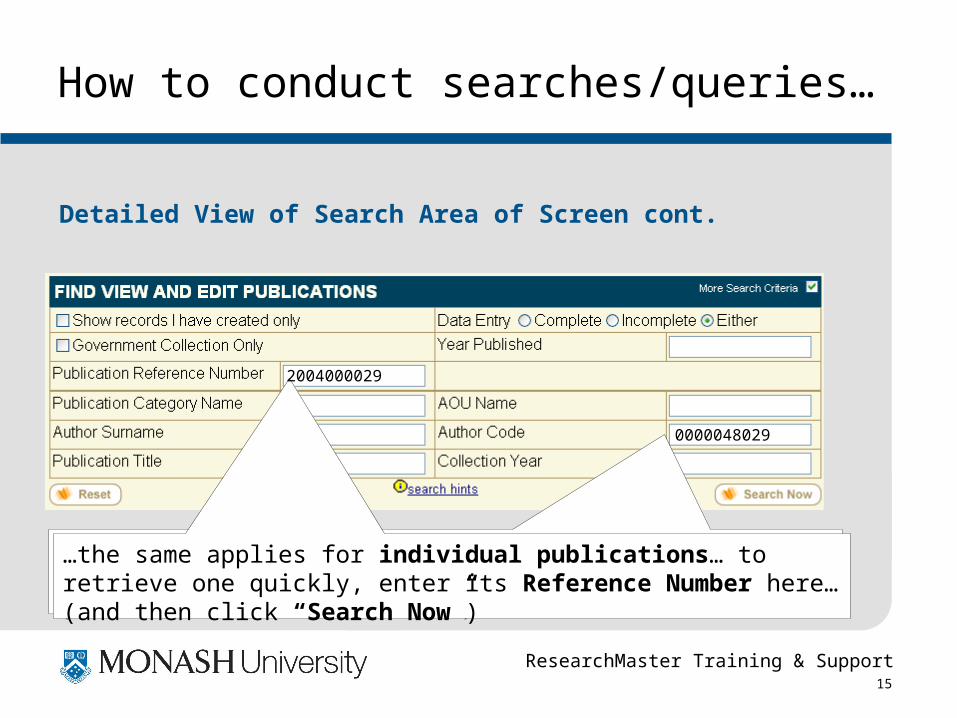
Detailed View of Search Area of Screen cont.
How to conduct searches/queries…
0000048029
Enter a RM4 Author/Person Code to retrieve records upon which that person has been listed as an author (and then click “Search Now”).…the same applies for individual publications… to retrieve one quickly, enter its Reference Number here… (and then click “Search Now”)
2004000029
ResearchMaster Training & Support 16
How to conduct searches/queries…
Detailed View of Search Area of Screen cont.
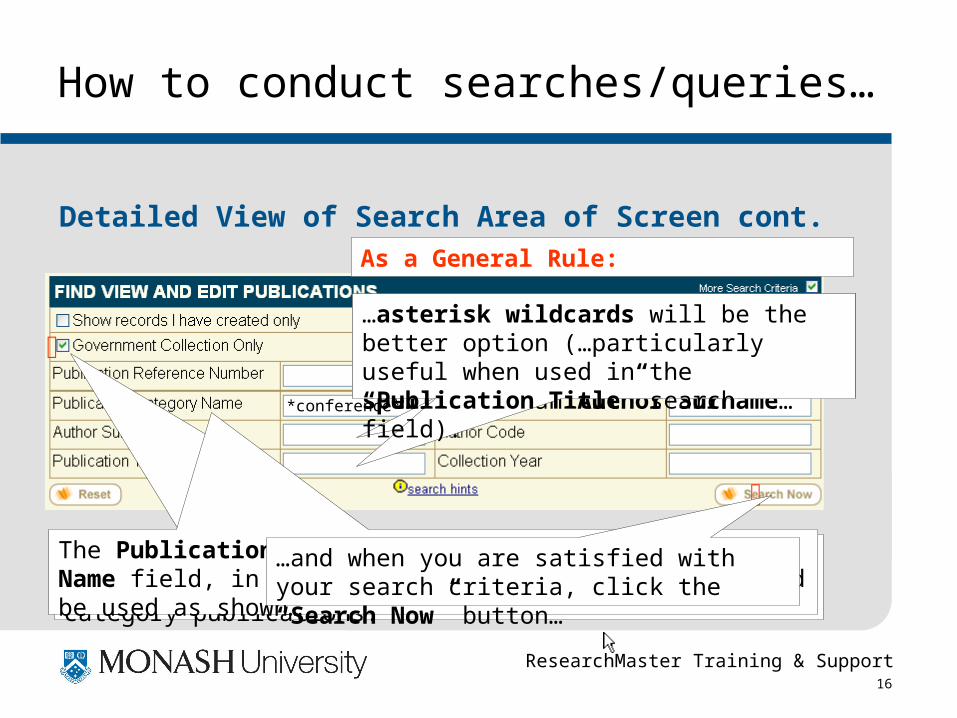
You may also consider checking the “Government Collection Only” checkbox, to exclude the non-DEST category publications.
The Publication Category Name field is like the AOU Name field, in that the asterisk wildcard (*) should be used as shown…
*conference*
…and when you are satisfied with your search criteria, click the “Search Now” button…
Unless you can enter precisely and completely what it is you are looking for e.g. the exact spelling of an Author Surname…
…asterisk wildcards will be the better option (…particularly useful when used in the “Publication Title” search field).
As a General Rule:
ResearchMaster Training & Support 17
A Summary for searches/queries…
So, nowhere near the range of selection criteria available in RM4……but enough criteria to locate records for viewing and
particularly for data entry.
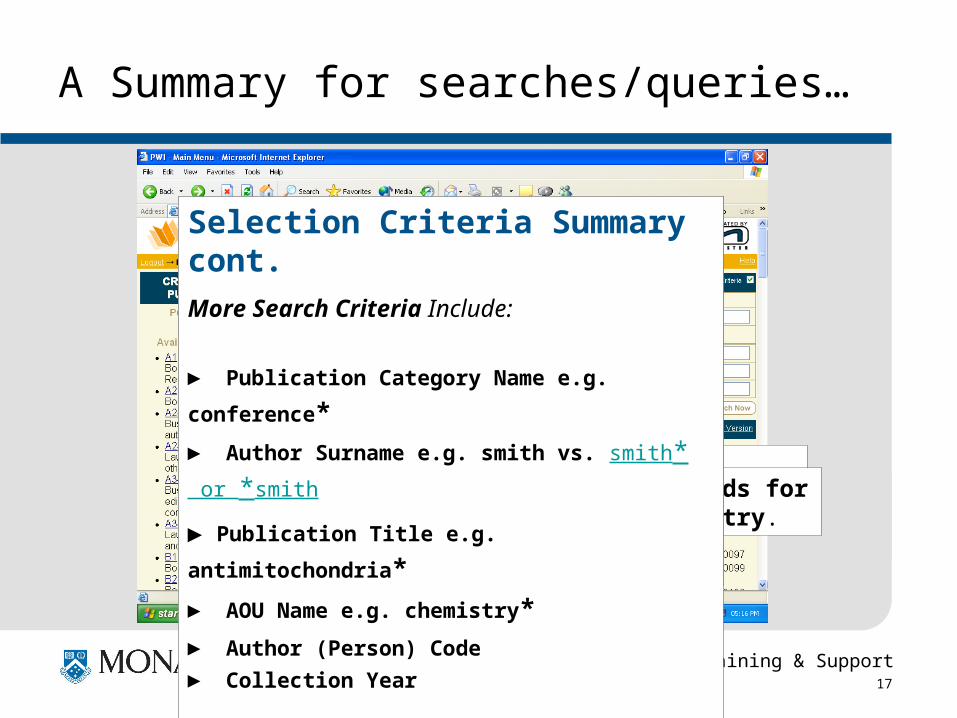
Selection Criteria Summary
Basic Search Criteria Include:
► “Show records I have created only”
► Government Collection Only
► Publication Reference No.
► Data Entry (Complete/Incomplete/Either)
► Year Published
Selection Criteria Summary cont.
More Search Criteria Include:
► Publication Category Name e.g. conference*► Author Surname e.g. smith vs. smith* or *smith
► Publication Title e.g. antimitochondria*► AOU Name e.g. chemistry*► Author (Person) Code
► Collection Year

ResearchMaster Training & Support 18
Questions on Searching Using the PWI?
ResearchMaster Training & Support 19
RME Publications Web Interface
How to Enter a New Publication
As DEST Category C1 publications (Journal Articles) account for a high proportion of the total number entered, we’ll examine the entry of one of them…
ResearchMaster Training & Support 20
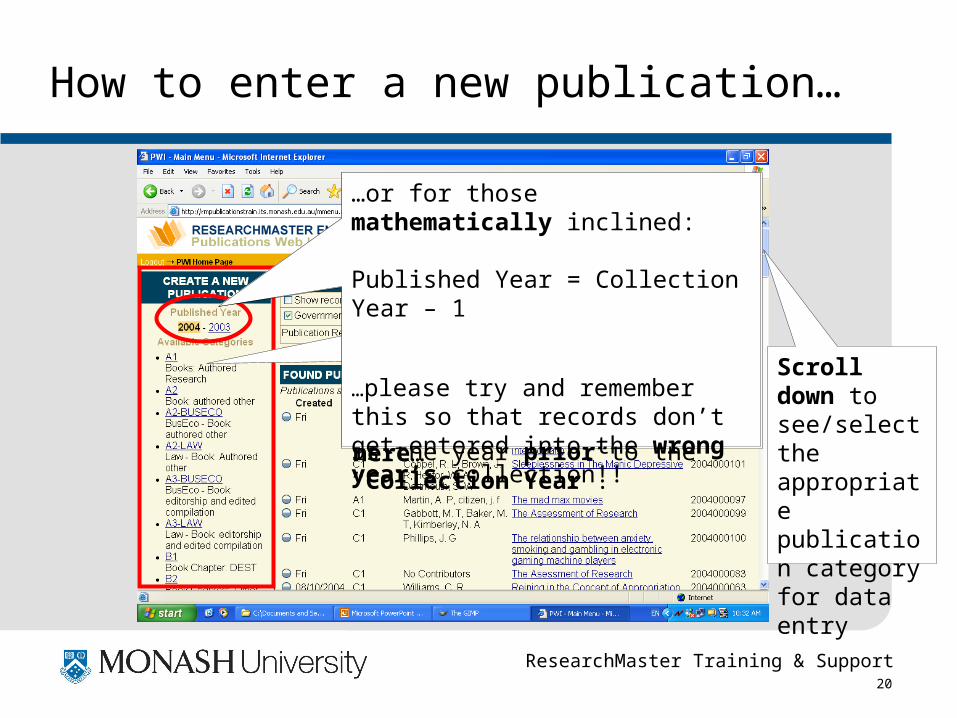
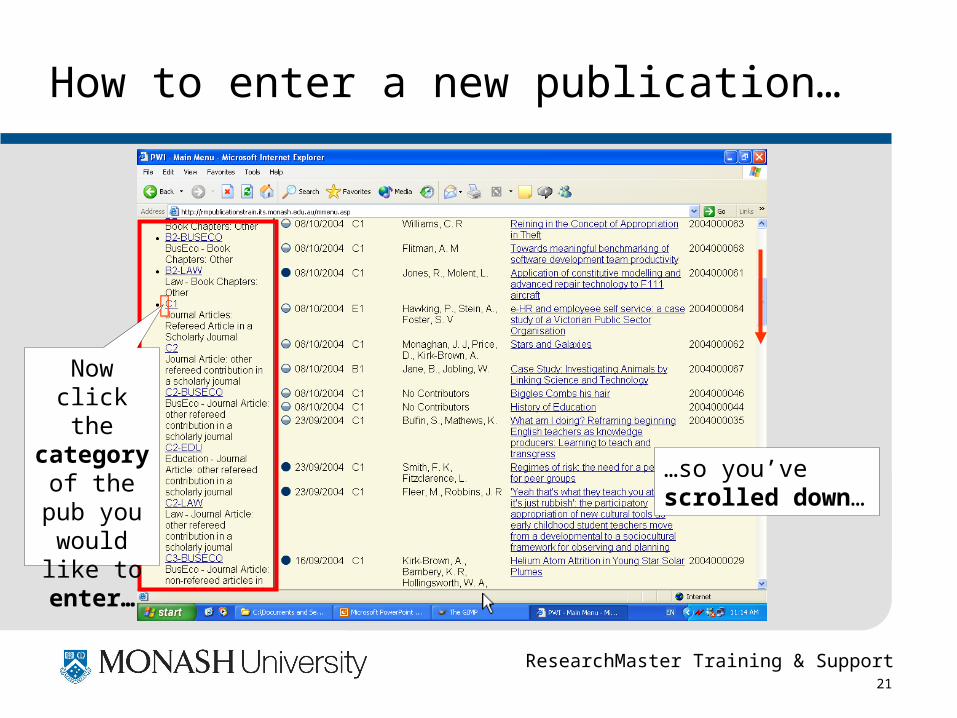
Scroll down to see/select the appropriate publication category for data entry
Recall that the publication categories from which you may select, are listed here…
How to enter a new publication…
CAUTION:
Note that this is “Published Year”, NOT “Collection Year”! As the term: “Collection Year” is used frequently in the RM4 Client Program, please be aware that “Published Year” is the year prior to the “Collection Year”.
…or for those mathematically inclined:
Published Year = Collection Year – 1
…please try and remember this so that records don’t get entered into the wrong year’s collection!!
ResearchMaster Training & Support 21
Now click the
category of the pub you would
like to enter…
How to enter a new publication…
…so you’ve scrolled down…

ResearchMaster Training & Support 22
How to enter a new publication…
► The Publication Entry screen opens…
► A brand new C1 (Journal Article) record may now be created.
► Let’s take a closer look at the fields…
ResearchMaster Training & Support 23
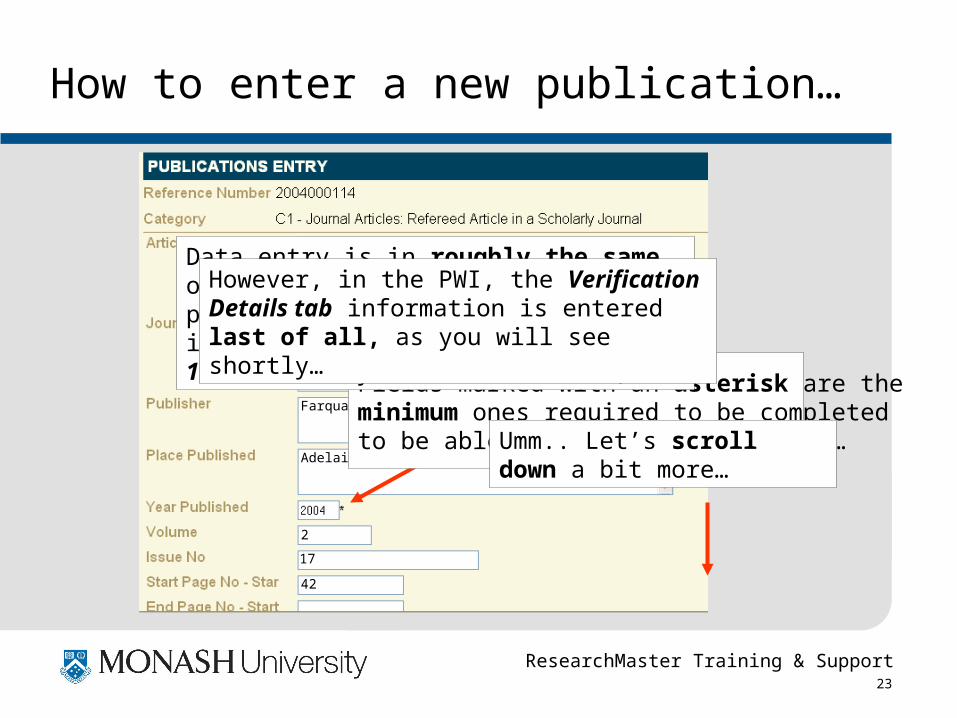
How to enter a new publication…
A study of antimitochondrial antibodies in a random population in the Hunter Valley
The Australian Journal of Paediatric Gastroenterology, Nutrition and Liver Diseases
Farquarson & Nisbett
Adelaide SA Australia
2
17
42
Fields marked with an asterisk are the minimum ones required to be completed to be able to save the new record…
Data entry is in roughly the same order as when using the RM4 client program (where the core record information on the Publication Details 1 & 2 tabs may be entered first).
However, in the PWI, the Verification Details tab information is entered last of all, as you will see shortly…
Umm.. Let’s scroll down a bit more…
ResearchMaster Training & Support 24
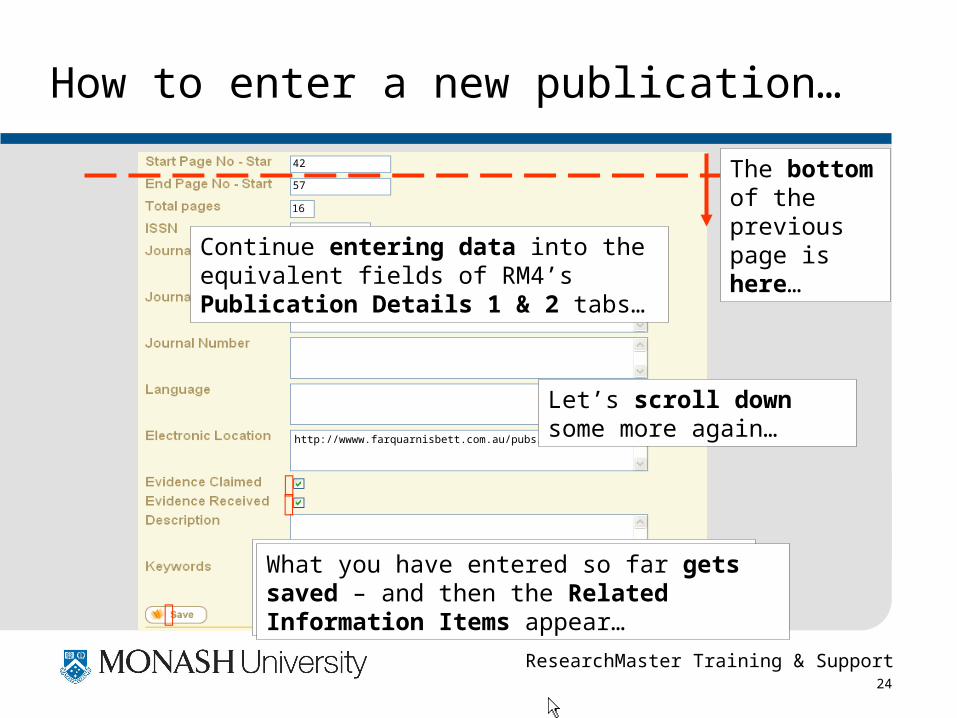
How to enter a new publication…
42
57
16
0412-2441
http://wwww.farquarnisbett.com.au/pubs/ajpg/e2004
Continue entering data into the equivalent fields of RM4’s Publication Details 1 & 2 tabs…
At this point, after you click the “Save” button, something “a bit different” happens!What you have entered so far gets saved – and then the Related Information Items appear…
Let’s scroll down some more again…
The bottom of the previous page is here…
ResearchMaster Training & Support 25
How to enter a new publication…
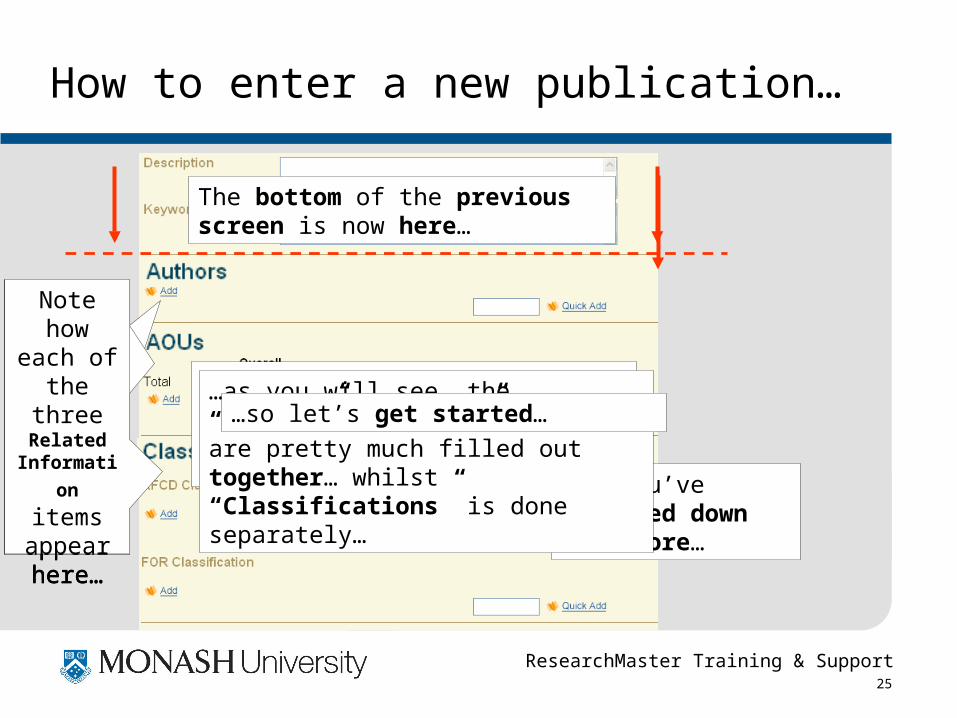
…so you’ve scrolled down some more…
The bottom of the previous screen is now here…
Note how each of
the three Related
Information items
appear here…
Note how each of
the three Related
Information items
appear here…
Note how each of
the three Related
Information items
appear here…
Let’s concentrate on the data entry requirements of each of these three sections separately…
…as you will see, the “Authors” and “AOUs” sections are pretty much filled out together… whilst “Classifications” is done separately…
…so let’s get started…
ResearchMaster Training & Support 26
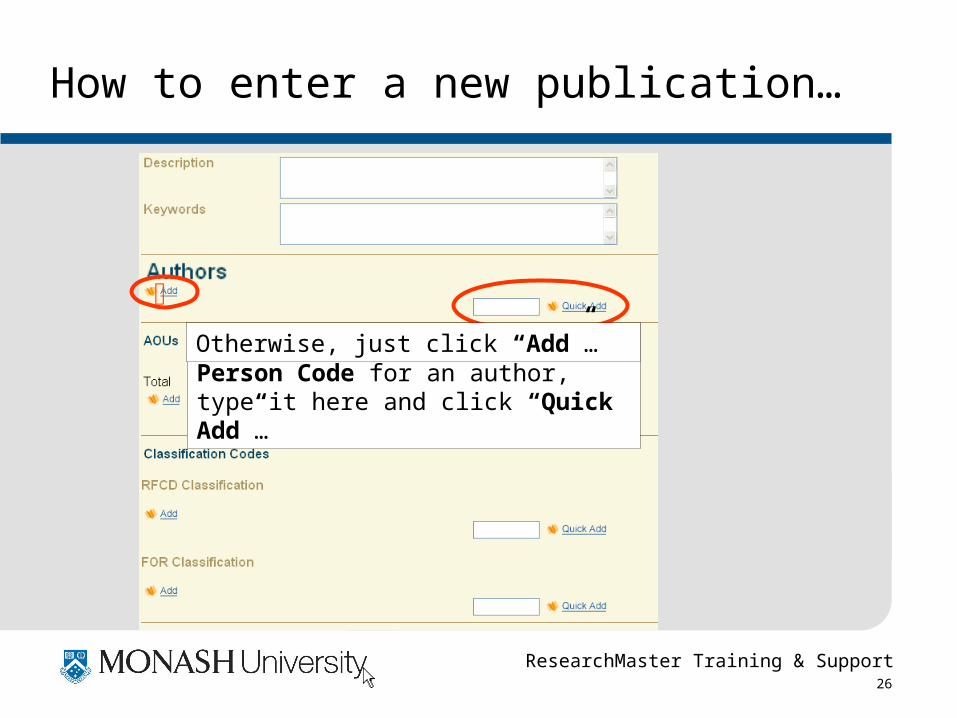
How to enter a new publication…
If you already know the RM4 Person Code for an author, type it here and click “Quick Add”…
Otherwise, just click “Add”…
ResearchMaster Training & Support 27
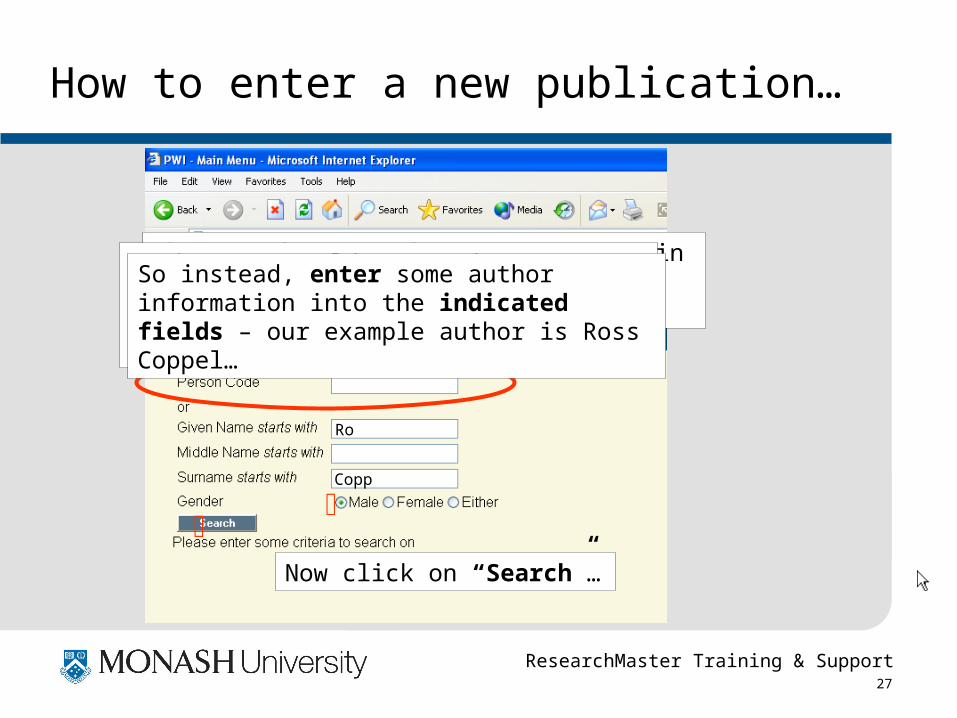
How to enter a new publication…
The Search For Author screen opens in the same browser window (replacing the previous page)…
Ro
Copp
Again, you could enter the RM4 Person Code for the Author here… but you might also have done that using “Quick Add” described earlier…
So instead, enter some author information into the indicated fields – our example author is Ross Coppel…
Now click on “Search”…

ResearchMaster Training & Support 28
How to enter a new publication…
Copp
Ro
If several folk appear here in a list, just click the button to the right of the correct person’s name - to add him/her as an author…
ResearchMaster Training & Support 29
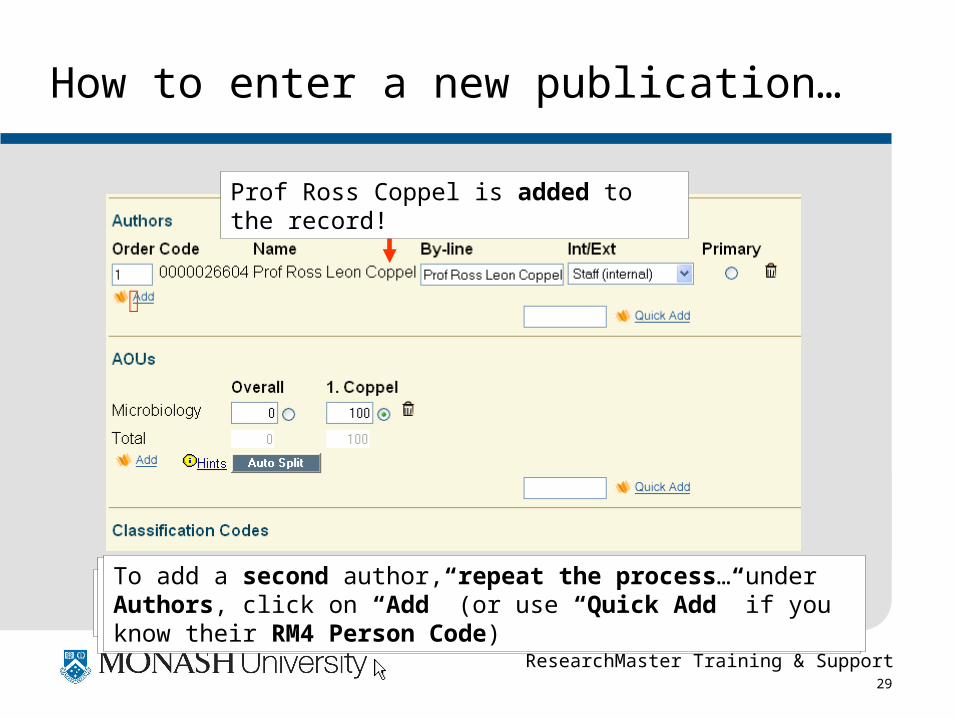
How to enter a new publication…
You are returned to the main data entry screen…Note that this view has been enlarged to include only the Authors and AOUs Related Information items.To add a second author, repeat the process… under Authors, click on “Add” (or use “Quick Add” if you know their RM4 Person Code)
Prof Ross Coppel is added to the record!
ResearchMaster Training & Support 30
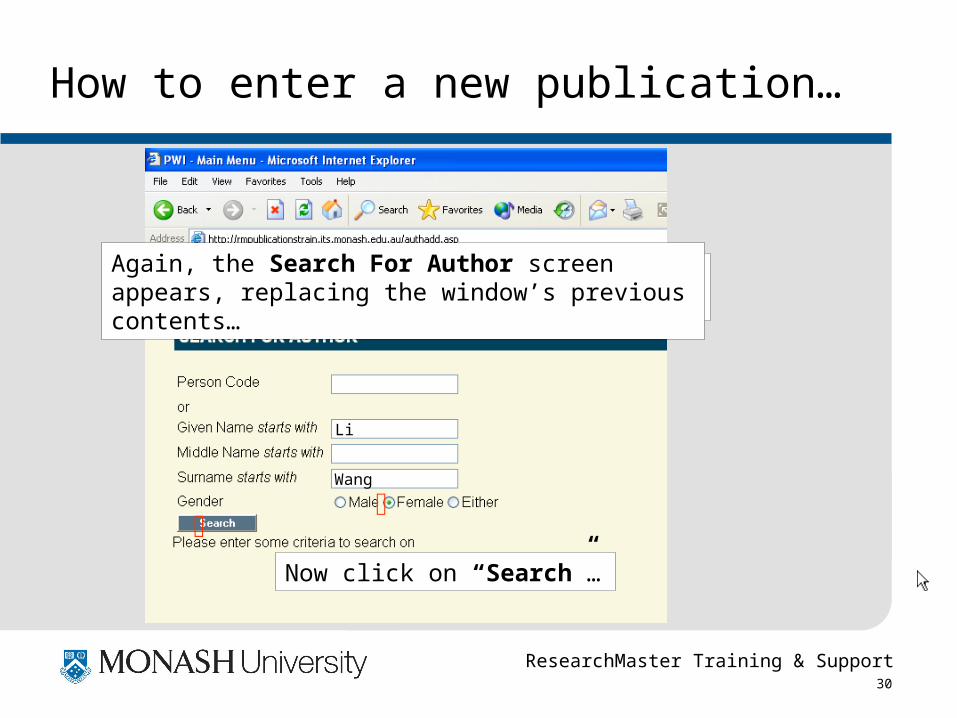
How to enter a new publication…
Li
Wang
Enter the next person’s details (this time: Dr Lina Wang)…
Now click on “Search”…
Again, the Search For Author screen appears, replacing the window’s previous contents…
ResearchMaster Training & Support 31
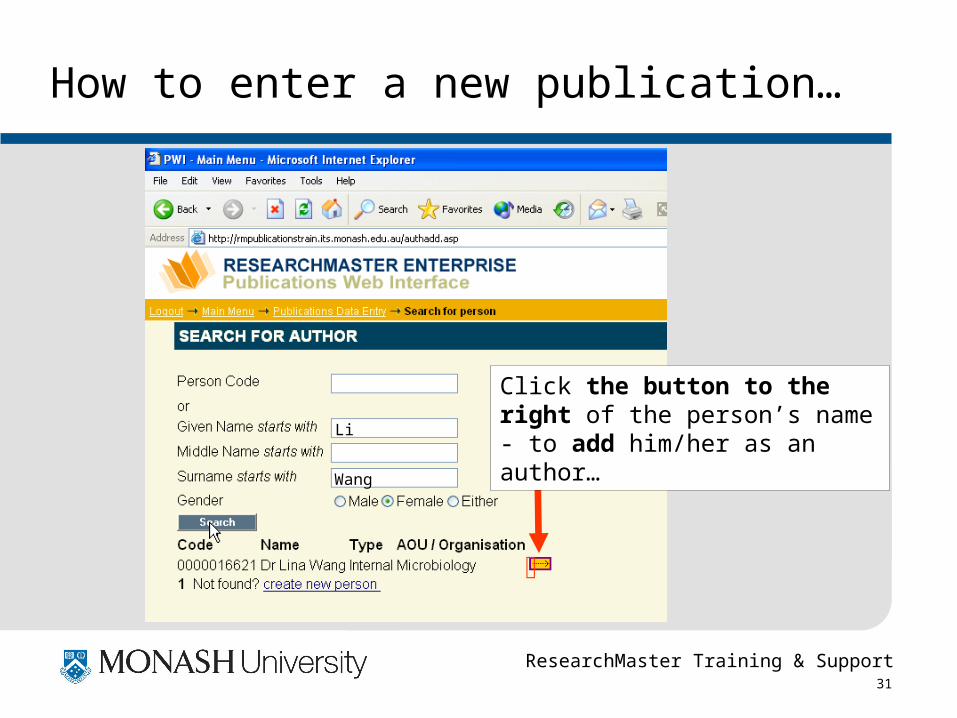
How to enter a new publication…
Wang
Li
Click the button to the right of the person’s name - to add him/her as an author…
ResearchMaster Training & Support 32
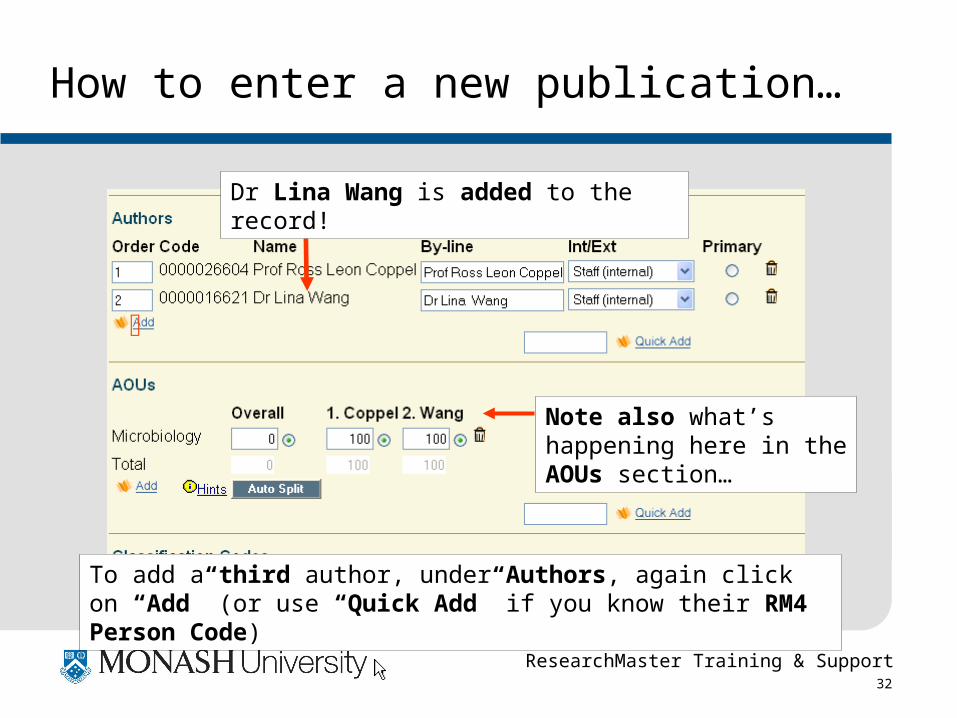
How to enter a new publication…
To add a third author, under Authors, again click on “Add” (or use “Quick Add” if you know their RM4 Person Code)
Dr Lina Wang is added to the record!
Note also what’s happening here in the AOUs section…
ResearchMaster Training & Support 33
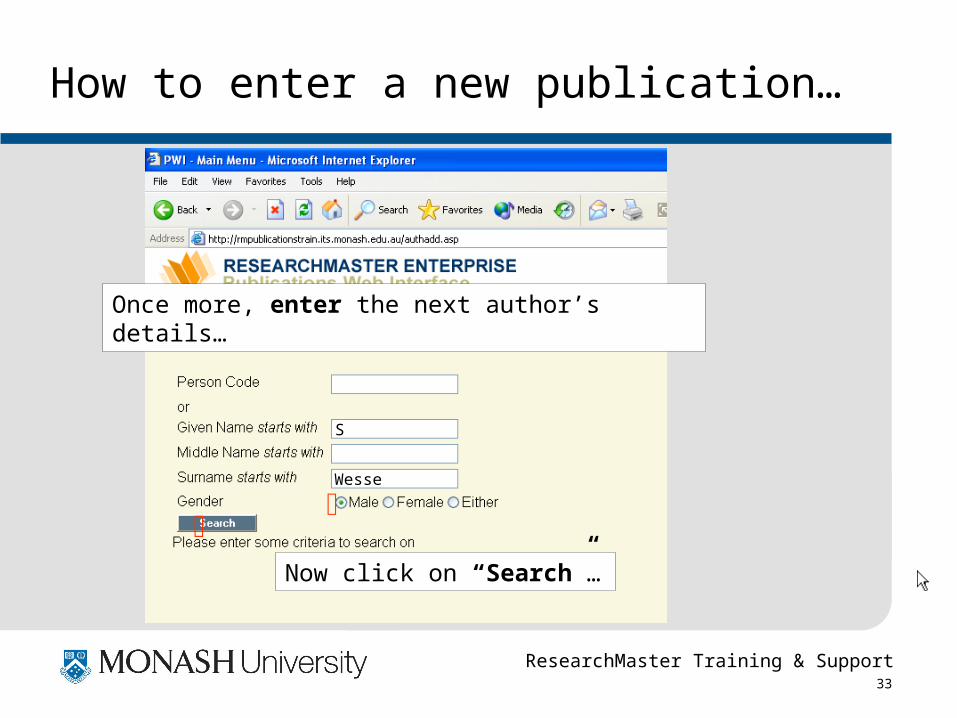
How to enter a new publication…
S
Wesse
Once more, enter the next author’s details…
Now click on “Search”…
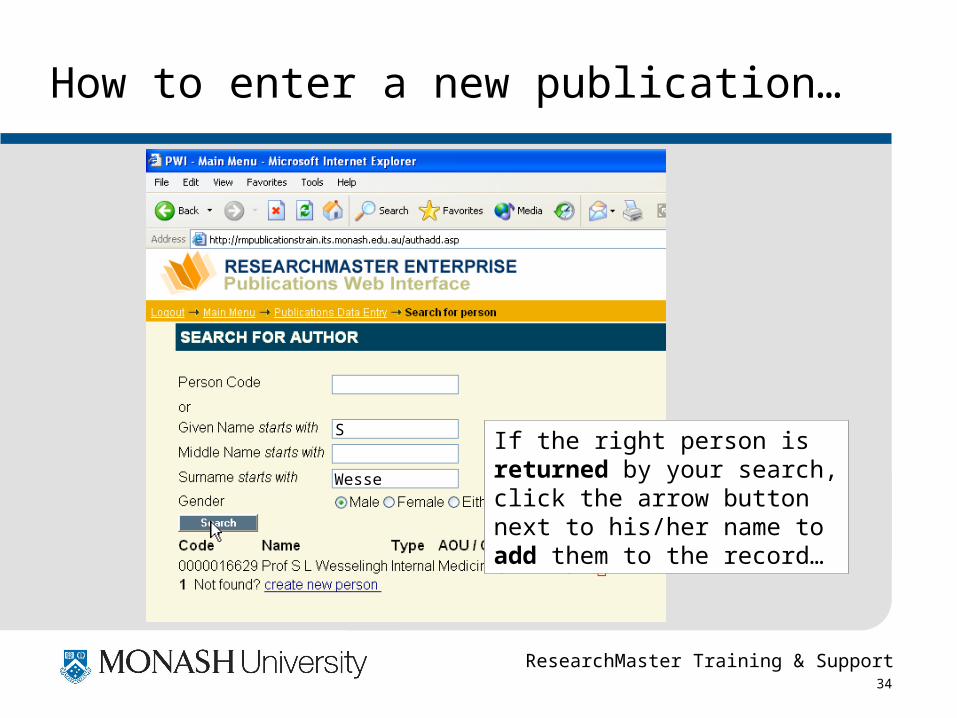
ResearchMaster Training & Support 34
How to enter a new publication…
S
Wesse
If the right person is returned by your search, click the arrow button next to his/her name to add them to the record…
ResearchMaster Training & Support 35
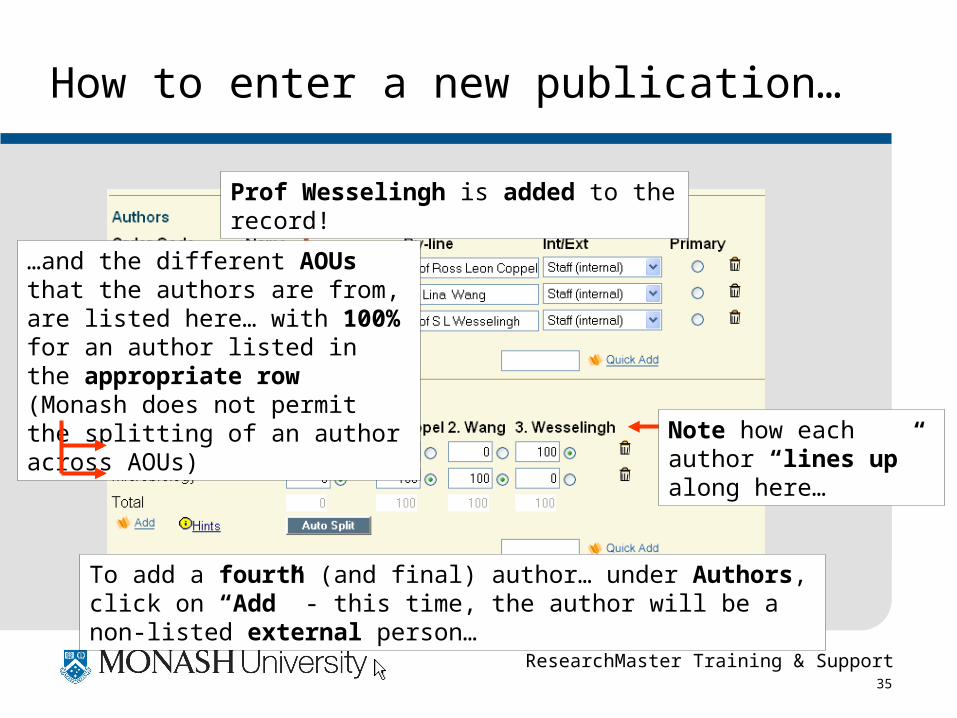
How to enter a new publication…
To add a fourth (and final) author… under Authors, click on “Add” - this time, the author will be a non-listed external person…
Prof Wesselingh is added to the record!
Note how each author “lines up” along here…
…and the different AOUs that the authors are from, are listed here… with 100% for an author listed in the appropriate row (Monash does not permit the splitting of an author across AOUs)
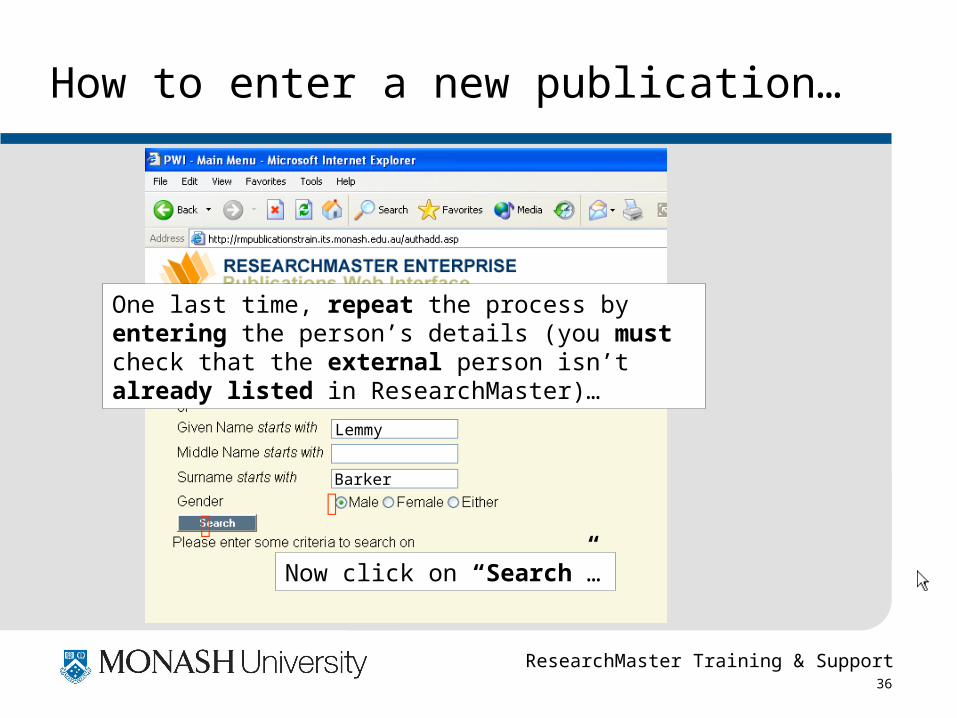
ResearchMaster Training & Support 36
How to enter a new publication…
Lemmy
Barker
One last time, repeat the process by entering the person’s details (you must check that the external person isn’t already listed in ResearchMaster)…
Now click on “Search”…

ResearchMaster Training & Support 37
How to enter a new publication…
Lemmy
Barker
This time, no record of the person exists in ResearchMaster, so click on create new person…
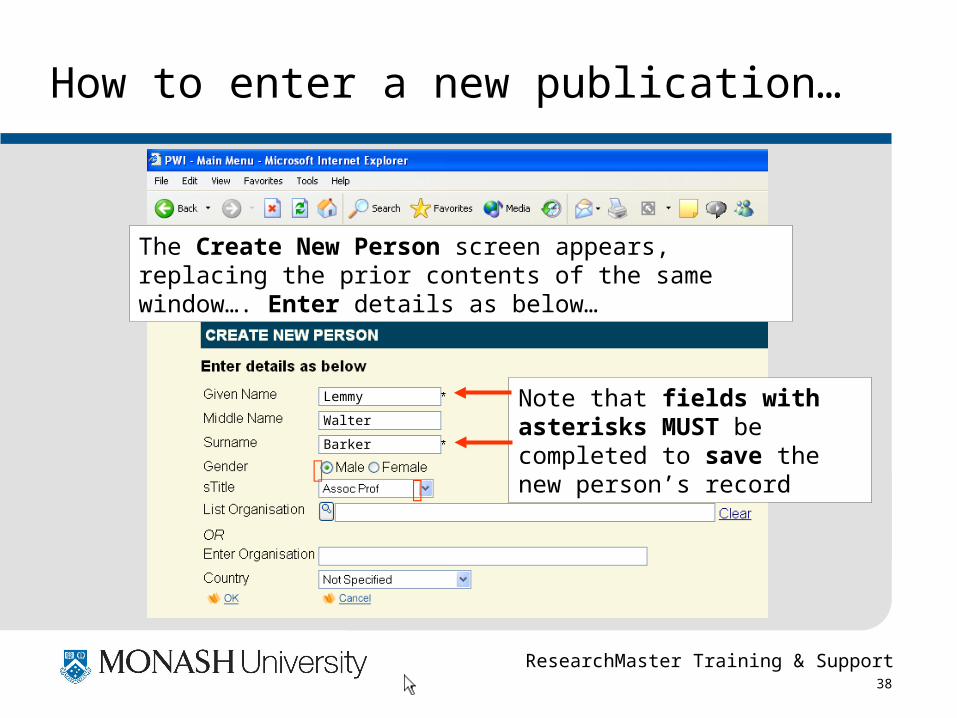
ResearchMaster Training & Support 38
How to enter a new publication…
The Create New Person screen appears, replacing the prior contents of the same window…. Enter details as below…
Lemmy
Walter
Barker
Note that fields with asterisks MUST be completed to save the new person’s record
ResearchMaster Training & Support 39
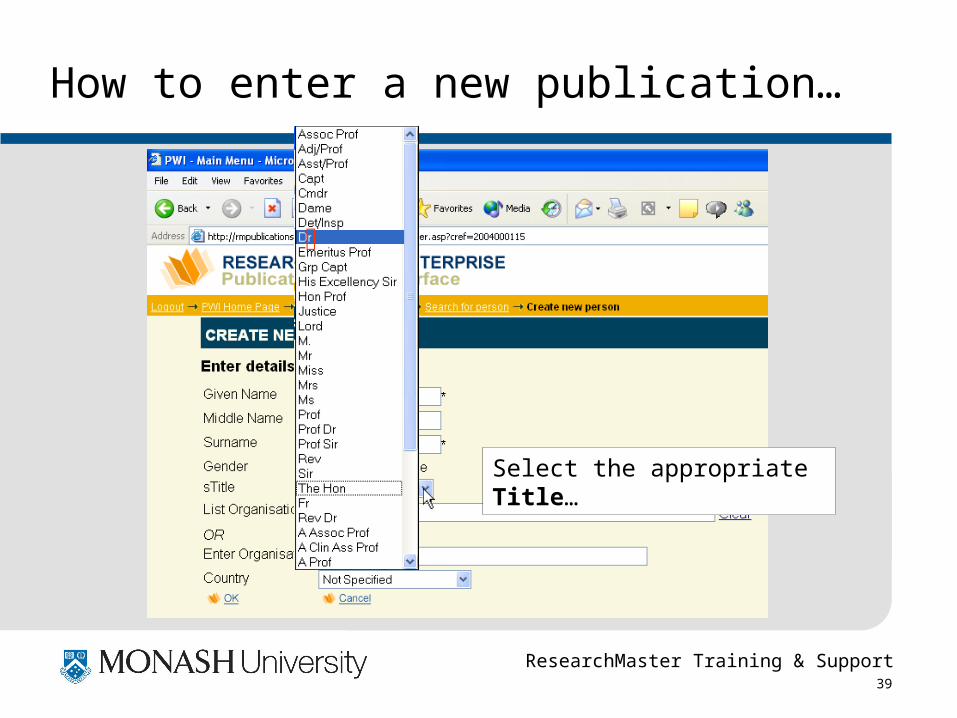
How to enter a new publication…
Lemmy
Walter
Barker
Select the appropriate Title…
ResearchMaster Training & Support 40
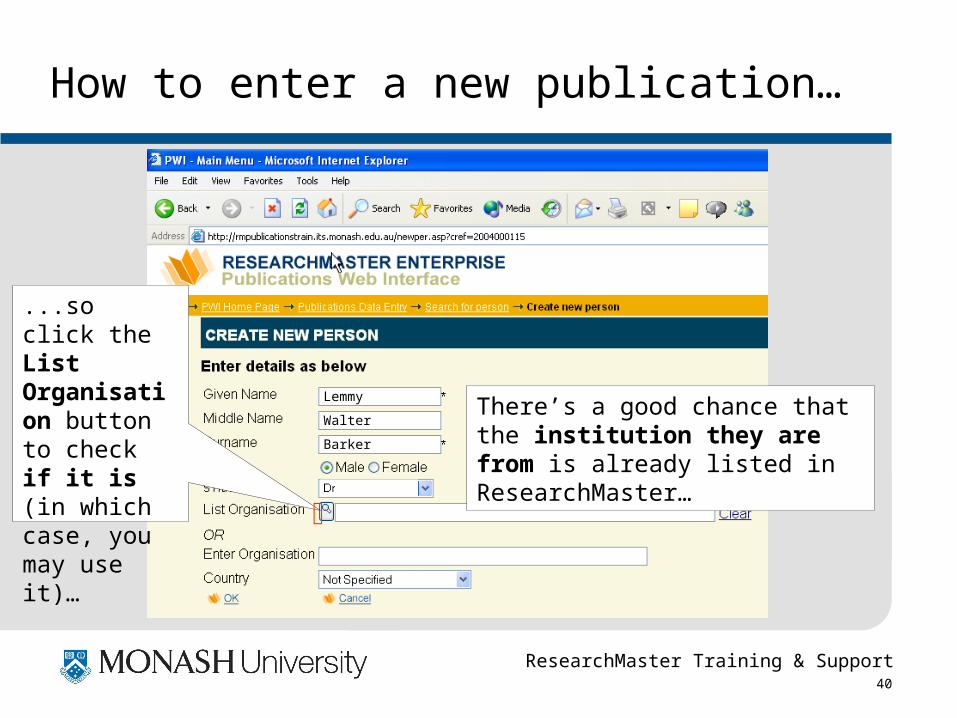
How to enter a new publication…
Lemmy
Walter
Barker
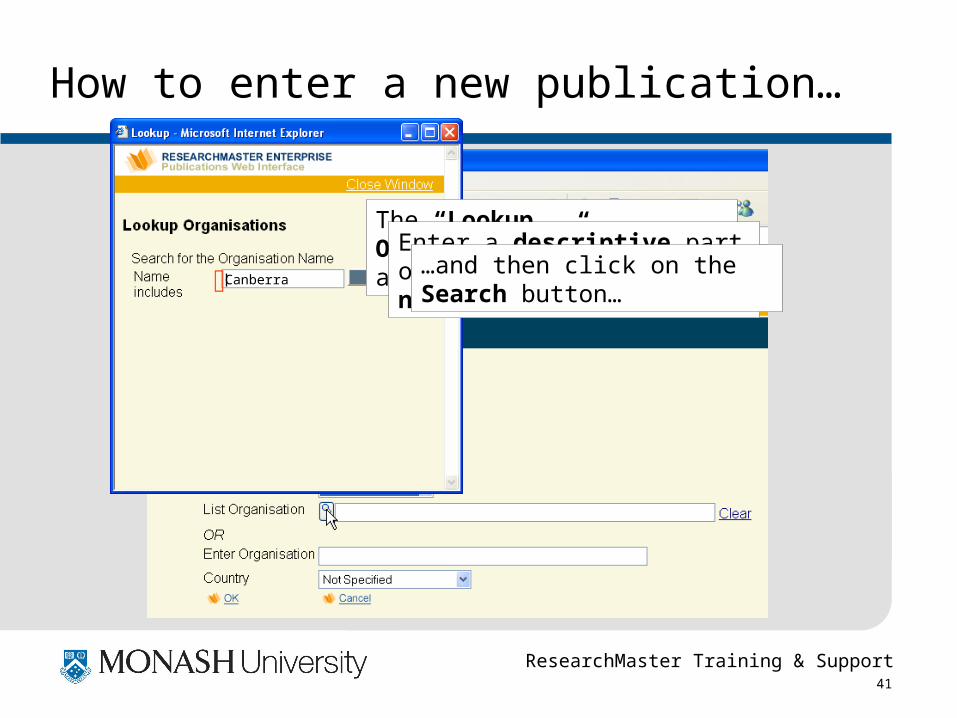
There’s a good chance that the institution they are from is already listed in ResearchMaster…
...so click the List Organisation button to check if it is (in which case, you may use it)…
ResearchMaster Training & Support 41
How to enter a new publication…
Lemmy
Walter
Barker
Canberra
The “Lookup Organisations” screen appears…Enter a descriptive part of the
institution’s name……and then click on the Search button…
ResearchMaster Training & Support 42
How to enter a new publication…
Lemmy
Walter
Barker
CanberraCanberra
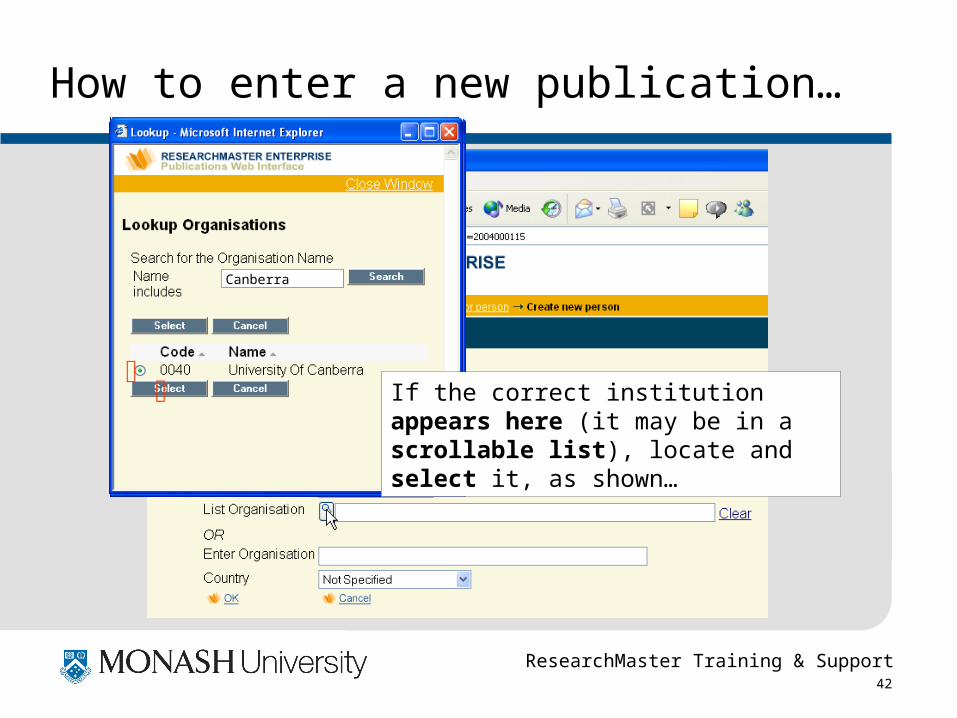
If the correct institution appears here (it may be in a scrollable list), locate and select it, as shown…
ResearchMaster Training & Support 43
How to enter a new publication…
Lemmy
Walter
Barker
CanberraTelopea
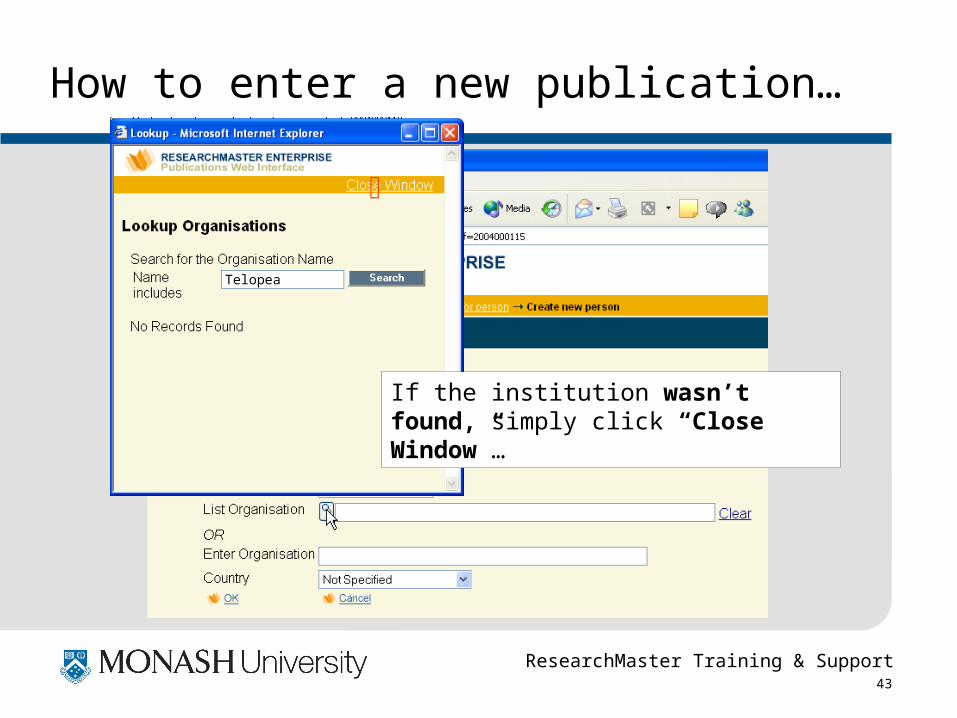
If the institution wasn’t found, simply click “Close Window”…
ResearchMaster Training & Support 44
How to enter a new publication…
Lemmy
Walter
Barker
Canberra
University of Canberra
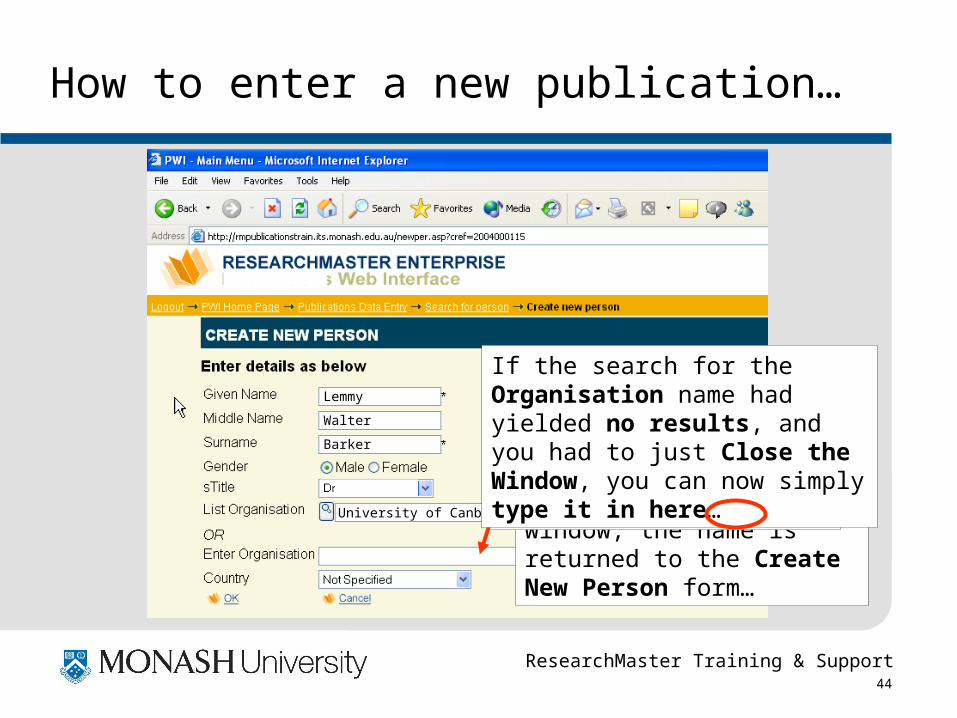
…assuming the institution name was found - and you’d clicked “Select” in the Lookup Organisations window, the name is returned to the Create New Person form…
If you made a mistake setting the List Organisation field , you may try again by clicking on “Clear” and repeating the process.
If the search for the Organisation name had yielded no results, and you had to just Close the Window, you can now simply type it in here…
ResearchMaster Training & Support 45
How to enter a new publication…
Lemmy
Walter
Barker
Canberra
University of Canberra
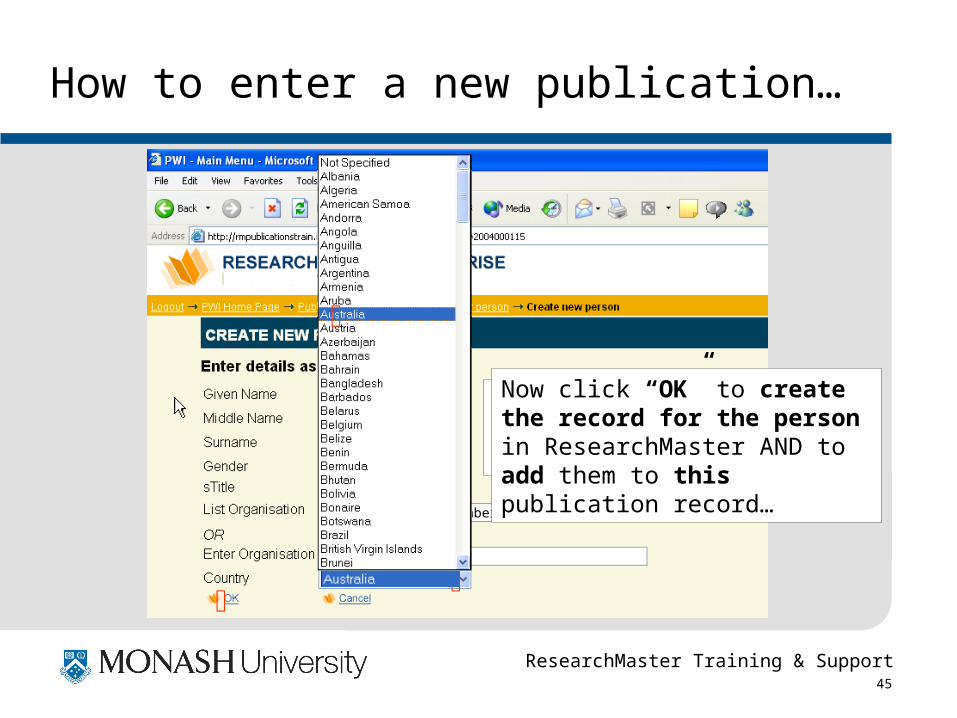
Select the country to which the author’s institution belongs…
Now click “OK” to create the record for the person in ResearchMaster AND to add them to this publication record…

ResearchMaster Training & Support 46
How to enter a new publication…
…and Dr. Lemmy Barker is added to the record!
Now the task is to assign one of the authors as the primary author for the publication.This is generally taken to be the first-listed Monash author on the publication (his/her school or department is assigned the responsibility for entering this record).
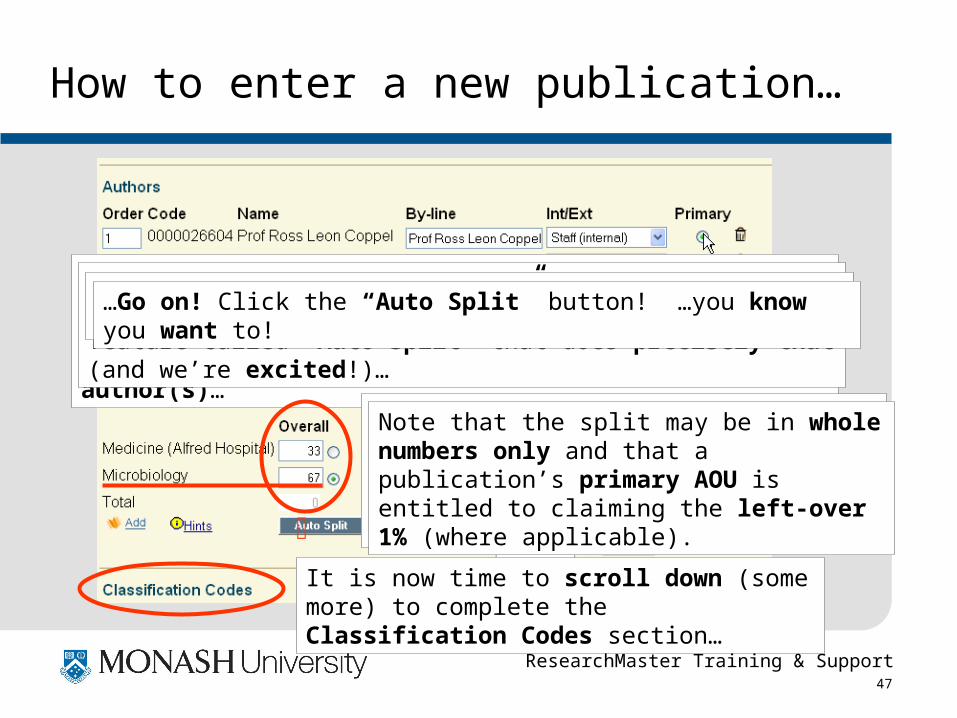
ResearchMaster Training & Support 47
How to enter a new publication…
Given that this is a DEST category publication where funds will be awarded – the next step involves correctly assigning the Monash University share of the amount awarded to the respective AOU(s) of the author(s)…
In the RM4 client program, the split between AOUs must be done manually …the PWI however, has a great feature called “Auto Split” that does precisely that (and we’re excited!)…
…removing the need for the data entry operator to perform the (error-prone) calculation… …Go on! Click the “Auto Split” button! …you know you want to!
It is now time to scroll down (some more) to complete the Classification Codes section…
Because Microbiology is the AOU for two of the three Monash authors, it receives two thirds (67%) of the share of the Monash component of the funds awarded by DEST.
Note that the split may be in whole numbers only and that a publication’s primary AOU is entitled to claiming the left-over 1% (where applicable).
ResearchMaster Training & Support 48
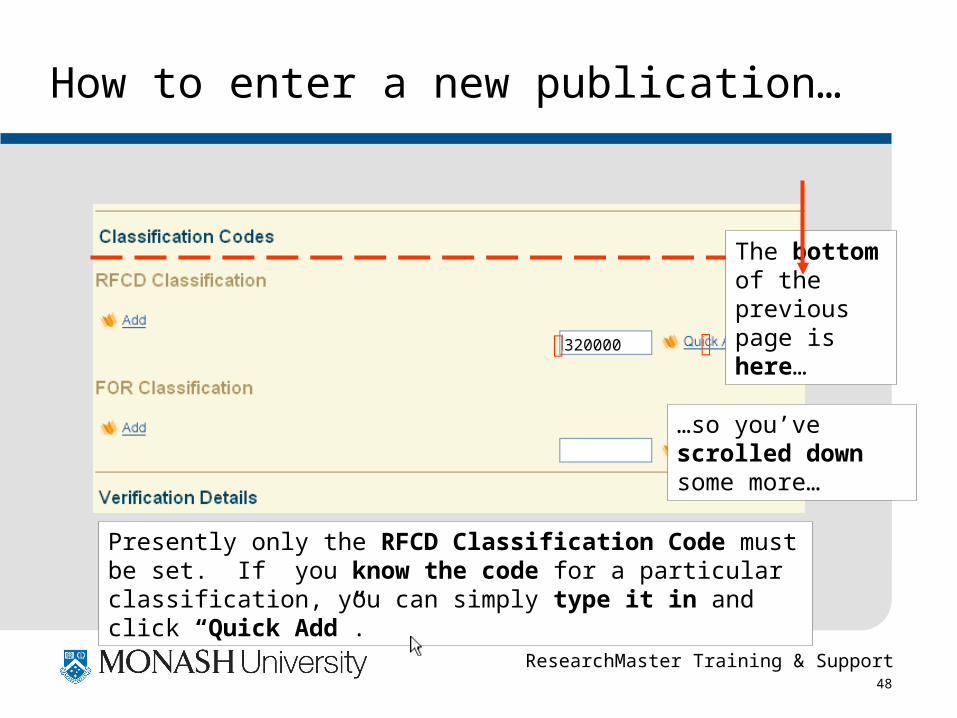
How to enter a new publication…
The bottom of the previous page is here…
…so you’ve scrolled down some more…
Presently only the RFCD Classification Code must be set. If you know the code for a particular classification, you can simply type it in and click “Quick Add”.
320000
ResearchMaster Training & Support 49
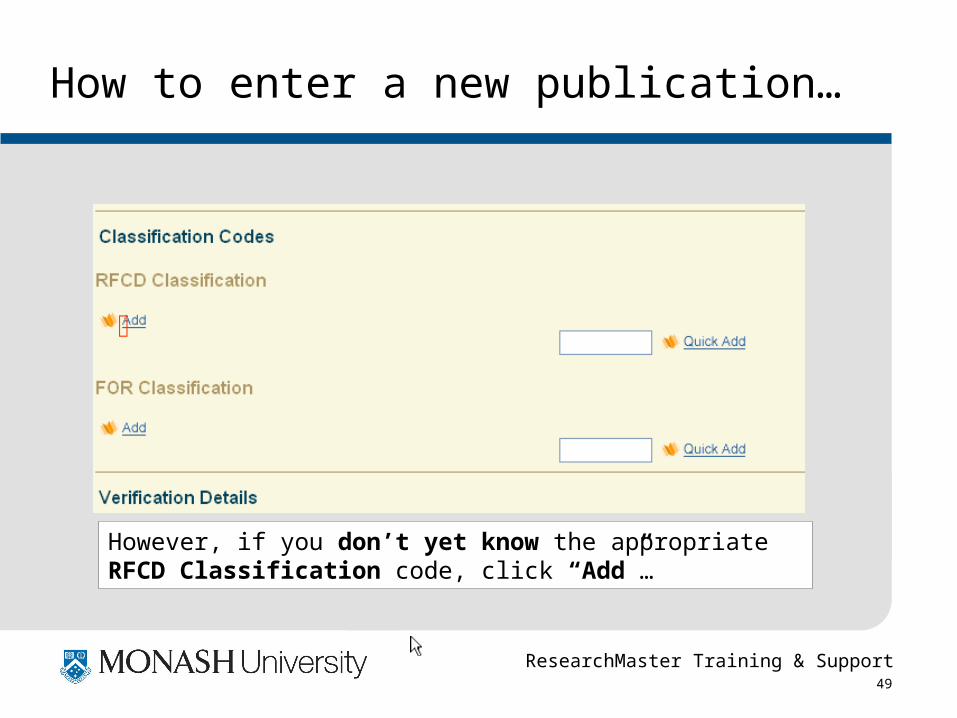
How to enter a new publication…
However, if you don’t yet know the appropriate RFCD Classification code, click “Add”…
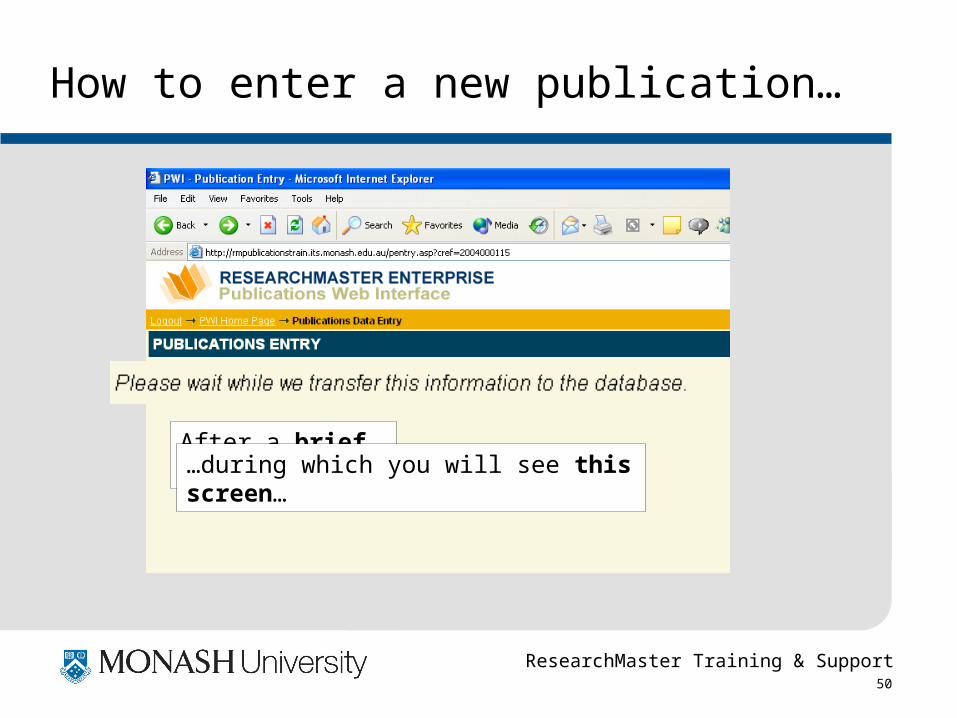
ResearchMaster Training & Support 50
How to enter a new publication…
After a brief wait……during which you will see this screen…
ResearchMaster Training & Support 51
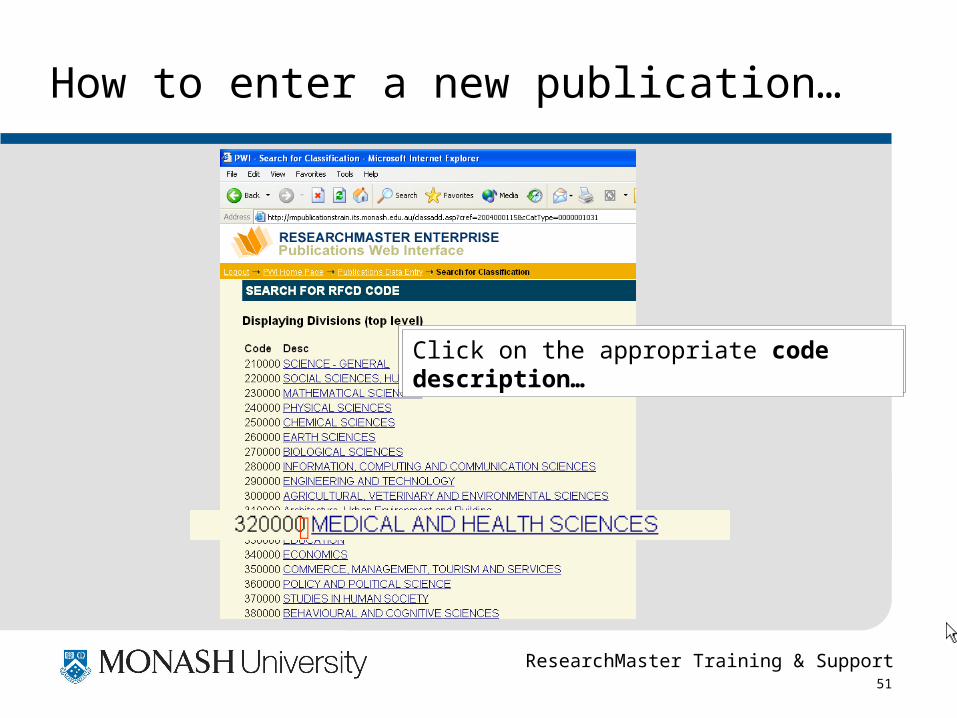
How to enter a new publication…
…the list of top level RFCD codes appears.Click on the appropriate code description…
ResearchMaster Training & Support 52
How to enter a new publication…
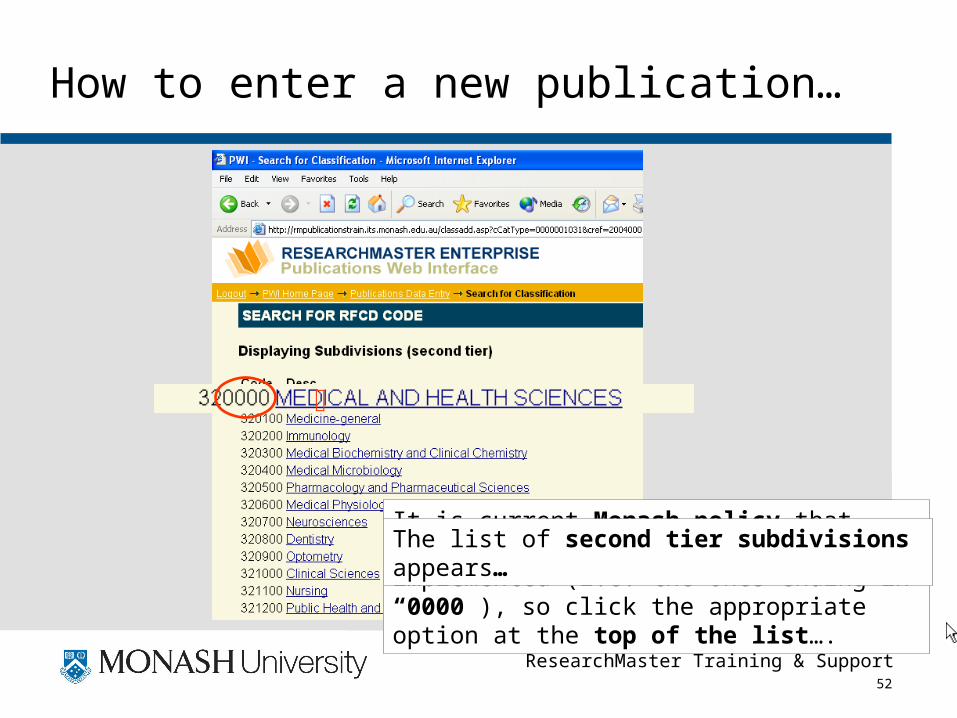
It is current Monash policy that only top level divisions be implemented (i.e. the ones ending in “0000”), so click the appropriate option at the top of the list….
The list of second tier subdivisions appears…
ResearchMaster Training & Support 53
How to enter a new publication…
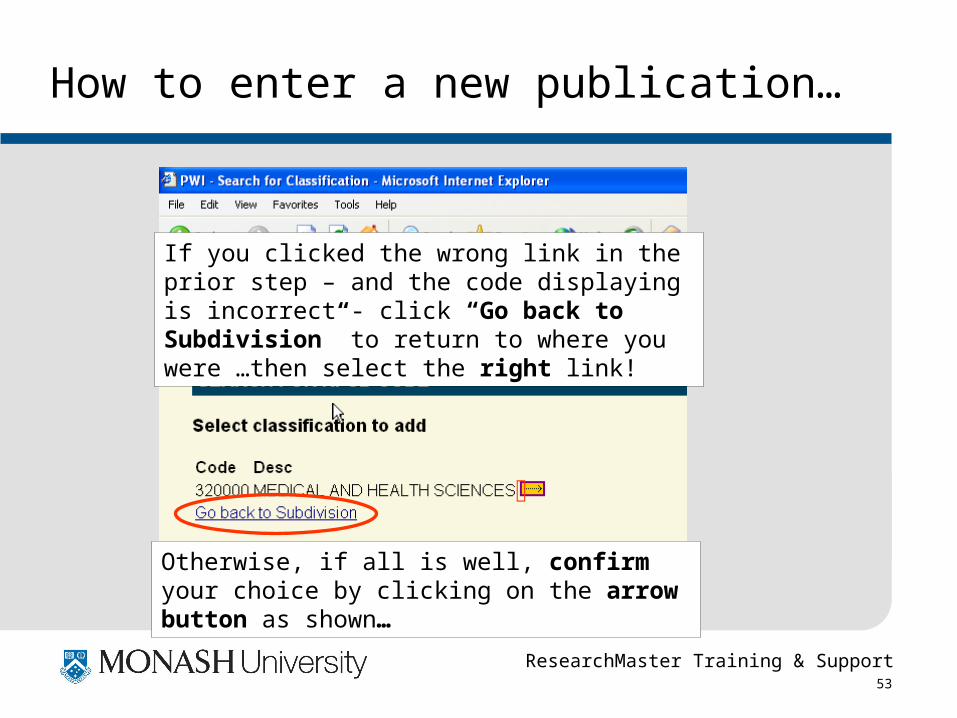
Otherwise, if all is well, confirm your choice by clicking on the arrow button as shown…
If you clicked the wrong link in the prior step – and the code displaying is incorrect - click “Go back to Subdivision” to return to where you were …then select the right link!

ResearchMaster Training & Support 54
How to enter a new publication…
…and the RFCD code is returned to the record!
While uncommon, it is feasible that more than one RFCD code may be included on a publication e.g. if authors on one pub. are from different faculties…
If this is the case, simply repeat the above procedure to add a second and subsequent RFCD codes if needed.
That concludes the data entry for the Related Information items on the publication record. It is now time to enter the Verification Details.
…so scroll down one more time…
ResearchMaster Training & Support 55
How to enter a new publication…
The bottom of the previous page is here…
…so you’ve scrolled down (…we’re at the bottom of the page now!)
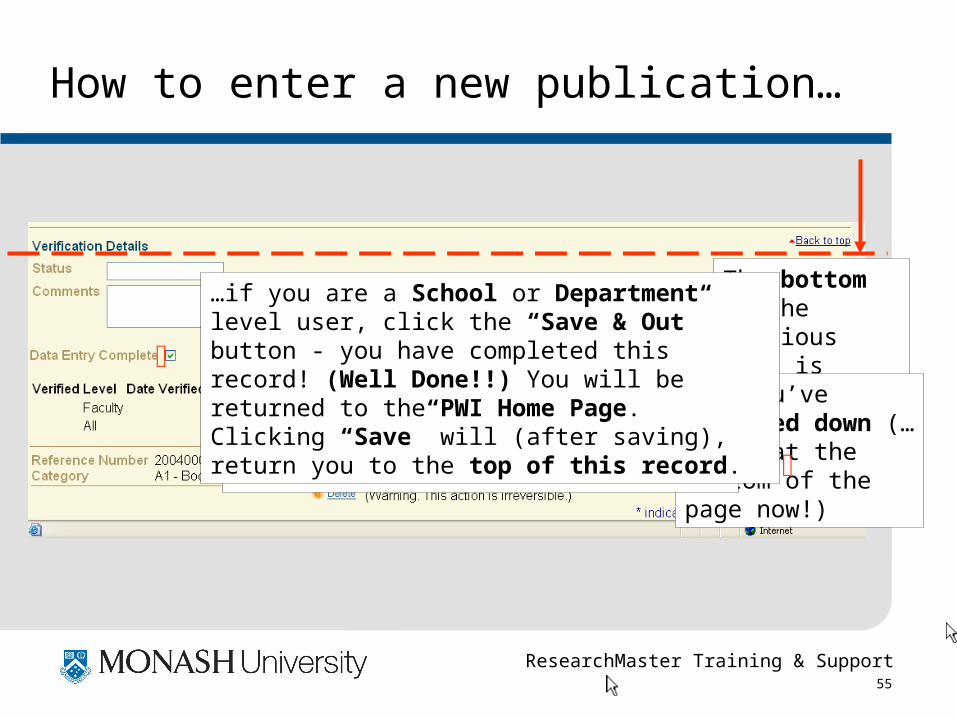
If you are sure that all the required data has been entered accurately, you may tick the Data Entry Complete checkbox, like this…
…if you are a School or Department level user, click the “Save & Out” button - you have completed this record! (Well Done!!) You will be returned to the PWI Home Page. Clicking “Save” will (after saving), return you to the top of this record.
ResearchMaster Training & Support 56
How to enter a new publication…
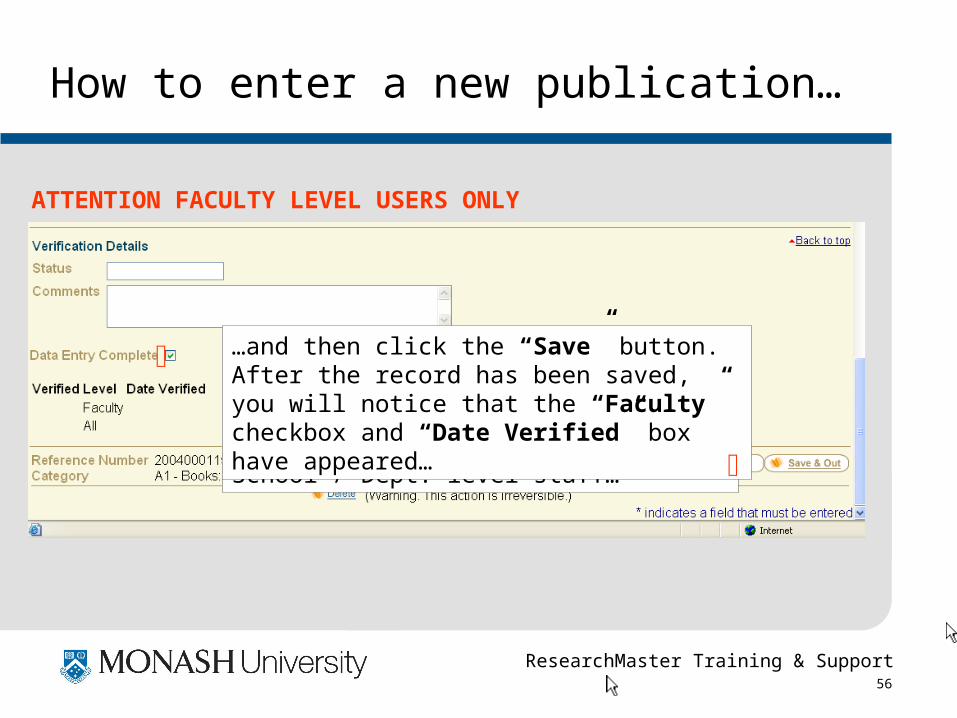
If you are a Faculty level user, click the “Data Entry Complete” checkbox like before – if it hasn’t been ticked already by School / Dept. level staff…
…and then click the “Save” button. After the record has been saved, you will notice that the “Faculty” checkbox and “Date Verified” box have appeared…
ATTENTION FACULTY LEVEL USERS ONLY
ResearchMaster Training & Support 57
How to enter a new publication…
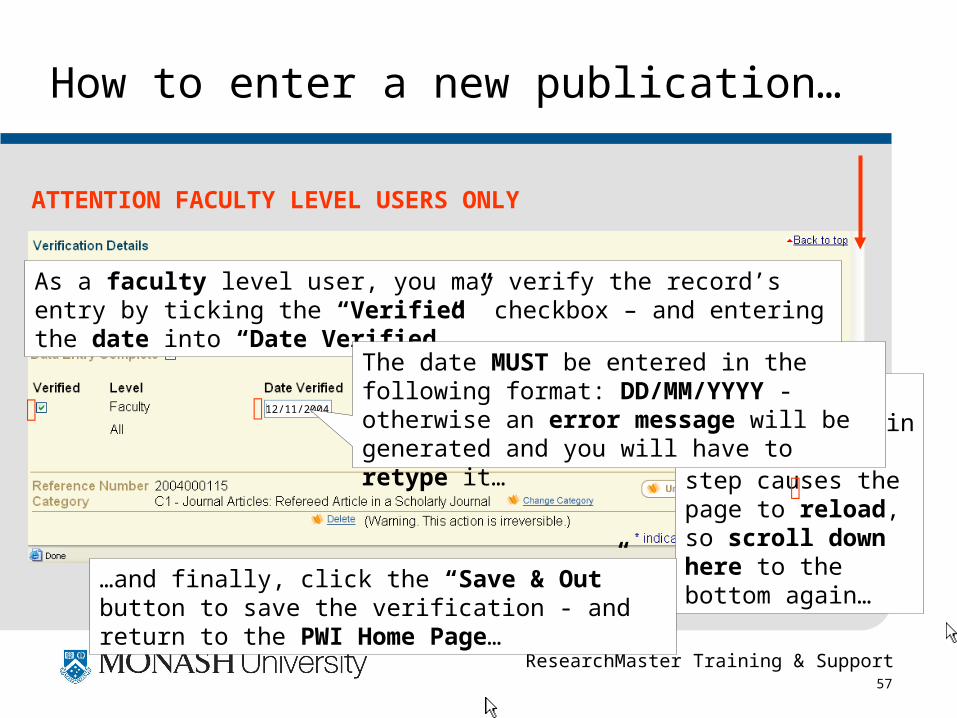
…clicking the “Save” button in the previous step causes the page to reload, so scroll down here to the bottom again…
As a faculty level user, you may verify the record’s entry by ticking the “Verified” checkbox – and entering the date into “Date Verified”.
12/11/2004
…and finally, click the “Save & Out” button to save the verification - and return to the PWI Home Page…
ATTENTION FACULTY LEVEL USERS ONLY
The date MUST be entered in the following format: DD/MM/YYYY - otherwise an error message will be generated and you will have to retype it…
ResearchMaster Training & Support 58
How to enter a new publication…
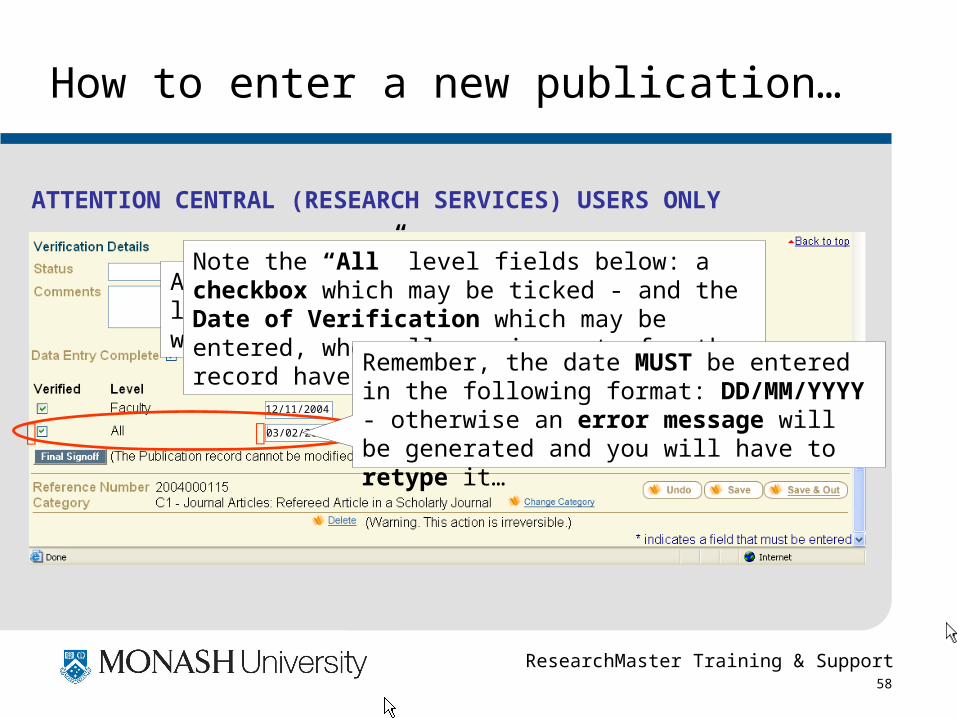
ATTENTION CENTRAL (RESEARCH SERVICES) USERS ONLY
12/11/2004
As a Central level user, it will be most likely that Faculty level verification will have already taken place…
Note the “All” level fields below: a checkbox which may be ticked - and the Date of Verification which may be entered, when all requirements for the record have been met…
03/02/2005
Remember, the date MUST be entered in the following format: DD/MM/YYYY - otherwise an error message will be generated and you will have to retype it…
ResearchMaster Training & Support 59
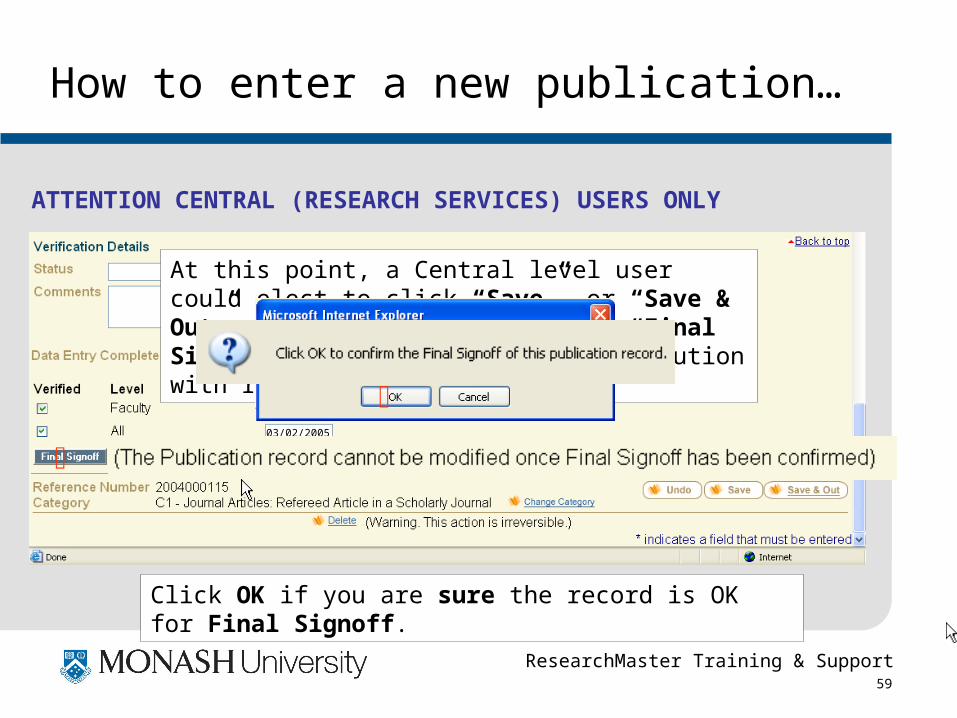
How to enter a new publication…
ATTENTION CENTRAL (RESEARCH SERVICES) USERS ONLY
12/11/2004
At this point, a Central level user could elect to click “Save”, or “Save & Out” as discussed, or click the “Final Signoff” button. Please note the caution with respect to Final Signoff.
03/02/2005
Click OK if you are sure the record is OK for Final Signoff.
ResearchMaster Training & Support 60
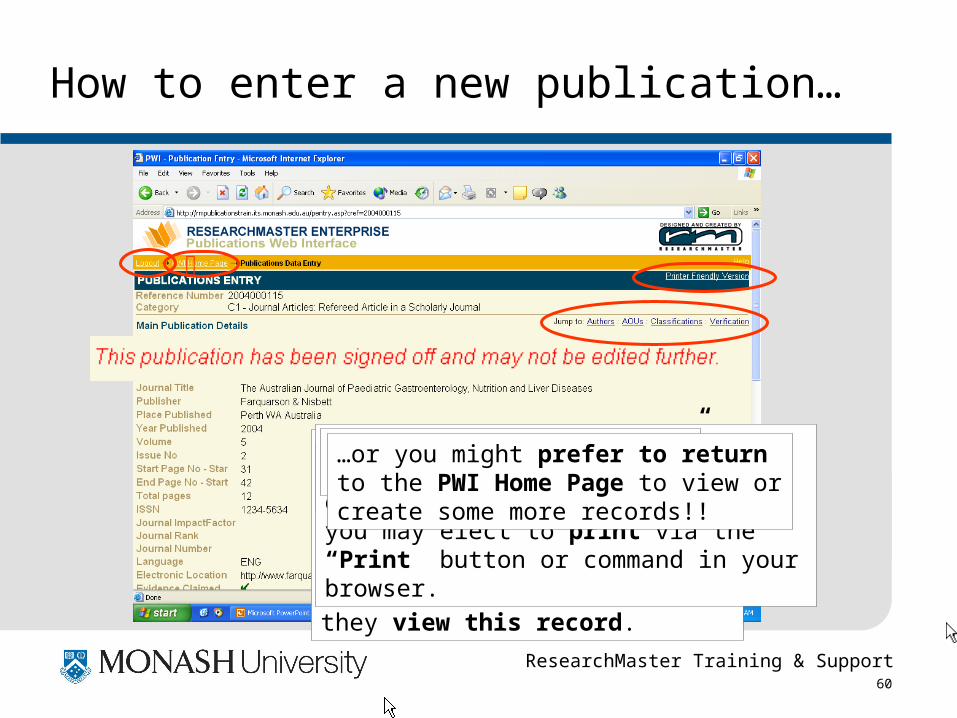
How to enter a new publication…
You are taken to the final record – now in its signed-off / un-editable format. This is what all users (with the appropriate permissions) will see from now on when they view this record.
From this screen, you may do the following……jump to different parts of this record e.g. the “Authors” or “AOUs” section…
…view a “Printer Friendly” version of the record (minus the orange navigation section)… that you may elect to print via the “Print” button or command in your browser.
…you could Logout entirely……or you might prefer to return to the PWI Home Page to view or create some more records!!
ResearchMaster Training & Support 61
How to enter a new publication…
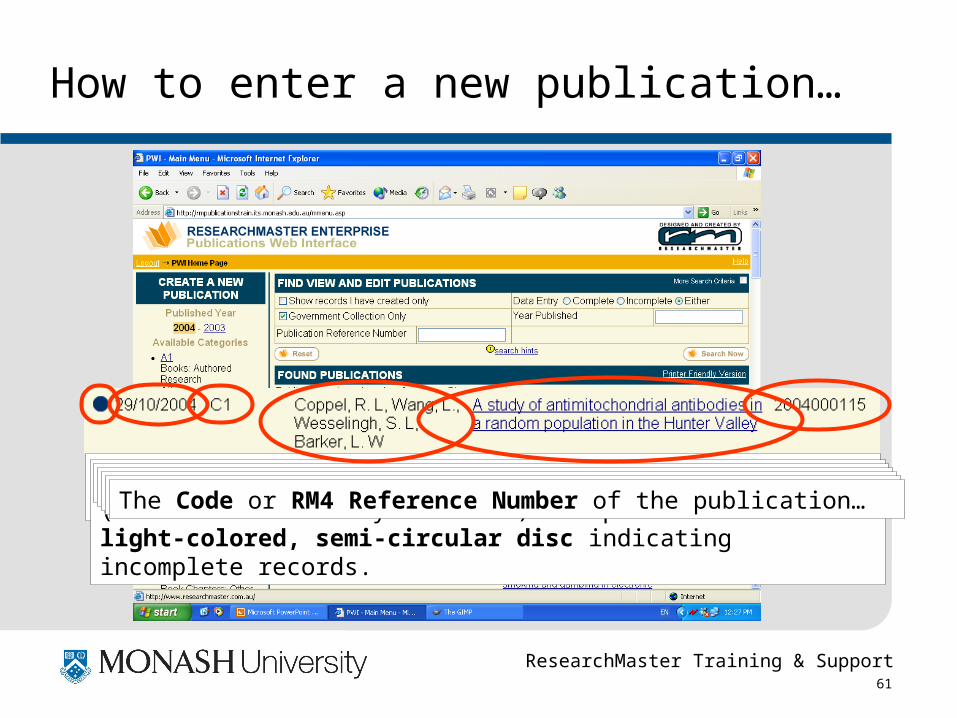
…here we are back at the PWI Home Page, ready for more action!
Here is the record that was just entered. Note the various parts of its listing…The dark disc, indicating that the record is complete (but not necessarily verified)… compare this to the light-colored, semi-circular disc indicating incomplete records.
The date the record was initially created (saved)…The category of the publication…The authors listed on the publication…The title of the publication…The Code or RM4 Reference Number of the publication…
ResearchMaster Training & Support 62
Questions on Creating a New Record in the PWI?
That concludes the “Creating a New Record in the PWI” section of this tutorial.
?
ResearchMaster Training & Support 63
RME Publications Web Interface
How to Change the Display
The PWI offers only limited reporting when compared to the RM4 client program. The “Change Display” feature enables a user to arrange the records returned by a search in a number of ways, prior to printing directly from the web browser window…
ResearchMaster Training & Support 64
RME Publications Web Interface
Notes on Displaying & Printing Records - 1
• In Normal View (as opposed to “Printer Friendly Version”), records display in groups of 20 to a page (where a search returns this many records!).
• To browse subsequent groups of records returned from the one search in Normal View, it is necessary to click on links at the foot of a group of 20 records. Printing in Normal View will omit information and cause the category list to be included on the left hand side of the page (ugly).
ResearchMaster Training & Support 65
RME Publications Web Interface
Notes on Displaying & Printing Records - 2
• In the Printer Friendly Version (as opposed to “Normal View”), records display in groups of 60 to a page (where a search returns this many records!).
• To browse groups of records returned from the one search in the Printer Friendly Version , it is necessary to click on links at the foot of a group of 60 records. You will be able to access and print each group of 60 records separately (NOT all at once) by clicking on the appropriate link at the foot of the page. This feature currently buggy.
ResearchMaster Training & Support 66
RME Publications Web Interface
Notes on Displaying & Printing Records - 3
• To print individual records, click on the “Printer Friendly Version” link towards the top right hand corner of the record page. This removes the orange navigational information and loads the page into a new window, ready for printing
• To actually print, simply click on the “Print” icon in the toolbar of your browser window, or alternatively click (up in your browser’s menu bar): File > Print
ResearchMaster Training & Support 67
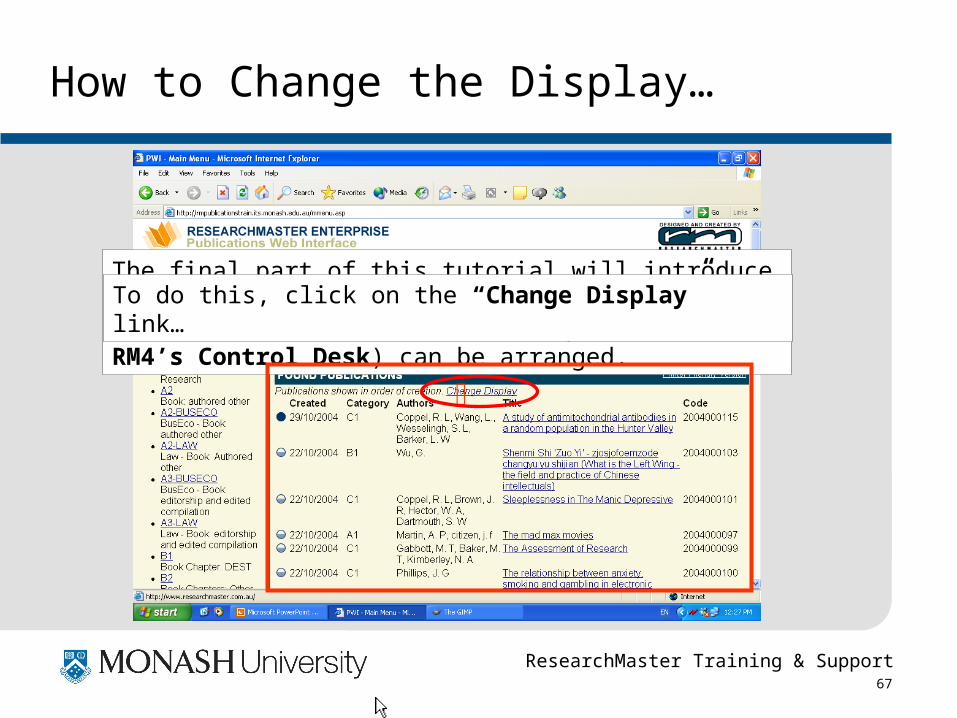
How to Change the Display…
The final part of this tutorial will introduce you to the different ways in which the PWI’s “Found Publications” section (equivalent to RM4’s Control Desk) can be arranged.To do this, click on the “Change Display” link…
ResearchMaster Training & Support 68
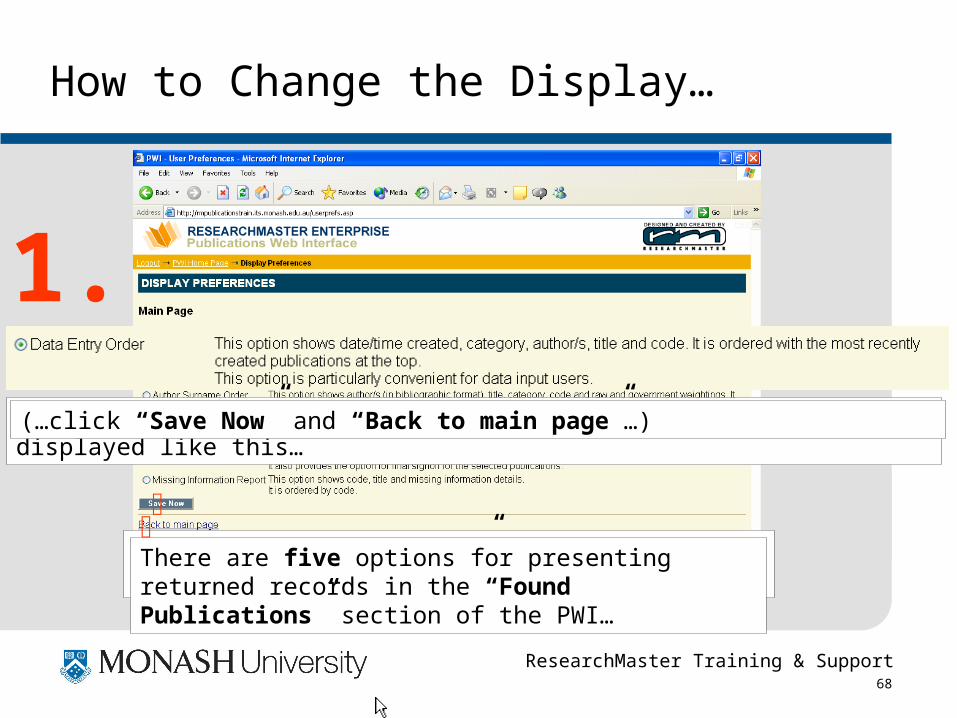
How to Change the Display…
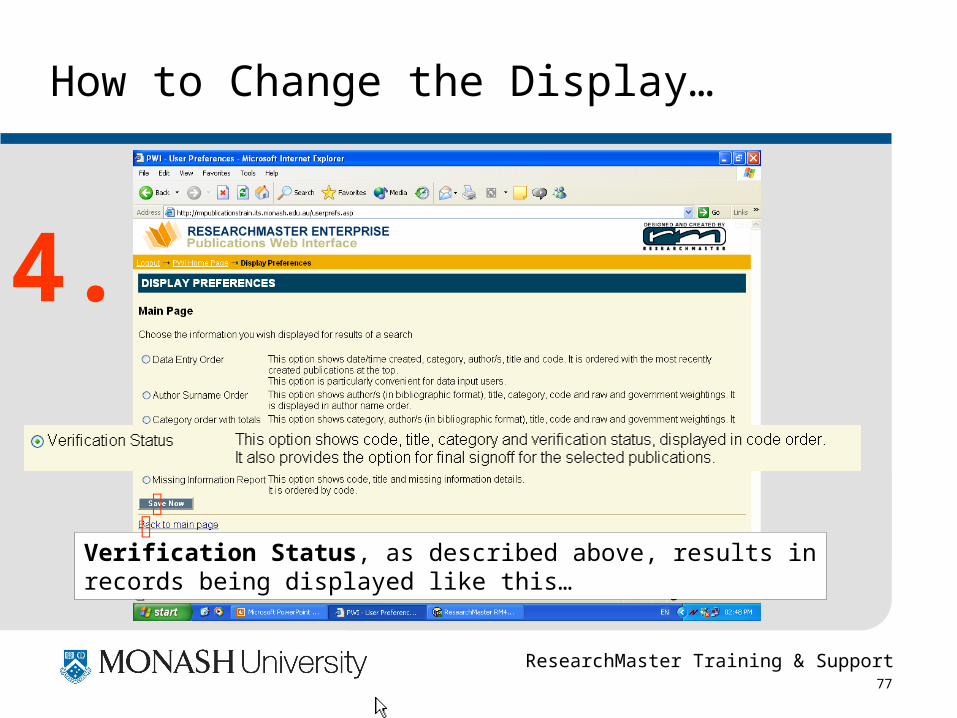
The “Display Preferences” screen appears, replacing the contents of the same window…There are five options for presenting returned records in the “Found Publications” section of the PWI…
Data Entry Order, as described above, results in records being displayed like this…
1.(…click “Save Now” and “Back to main page”…)
ResearchMaster Training & Support 69
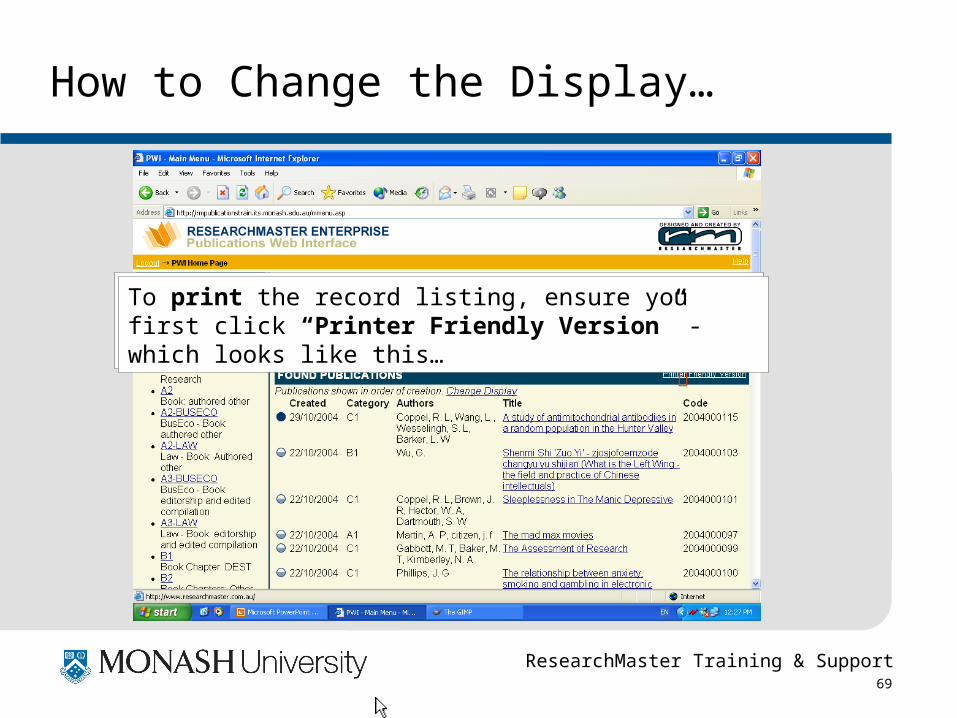
How to Change the Display…
Umm, that’s right! Nothing’s changed… we’ve been displaying all records in Data Entry Order so far!To print the record listing, ensure you first click “Printer Friendly Version” - which looks like this…
ResearchMaster Training & Support 70
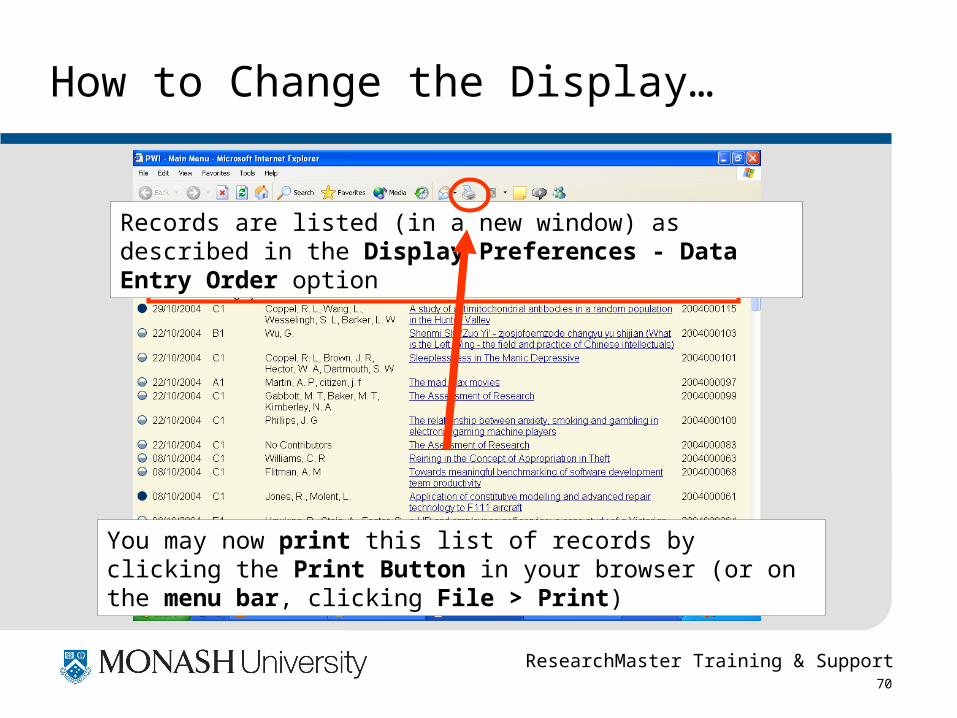
How to Change the Display…
Records are listed (in a new window) as described in the Display Preferences - Data Entry Order option
You may now print this list of records by clicking the Print Button in your browser (or on the menu bar, clicking File > Print)
ResearchMaster Training & Support 71
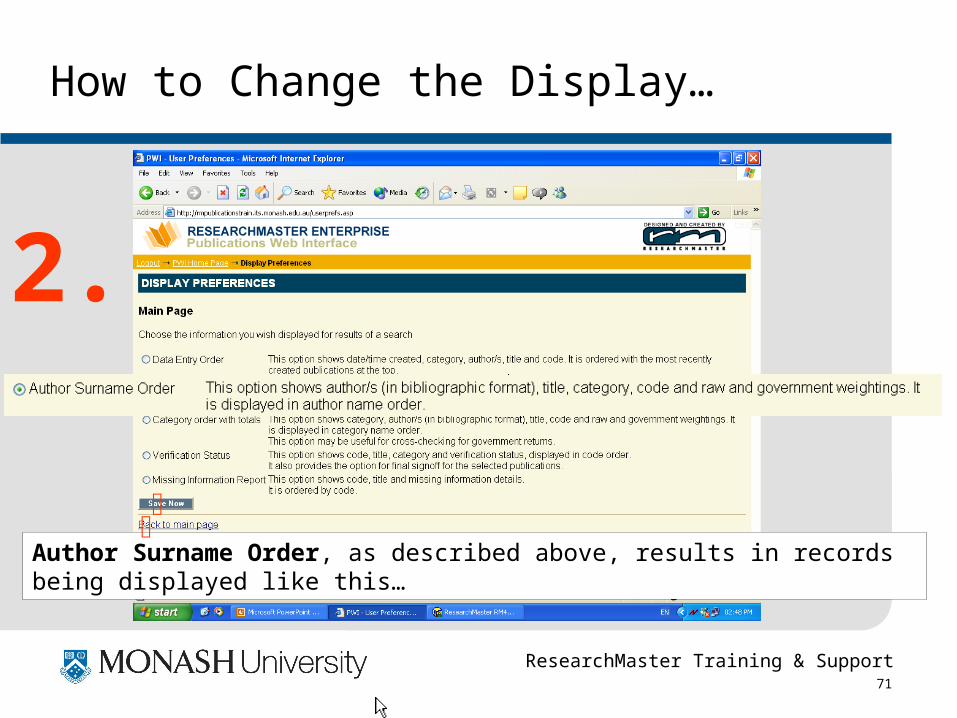
How to Change the Display…
Author Surname Order, as described above, results in records being displayed like this…
2.
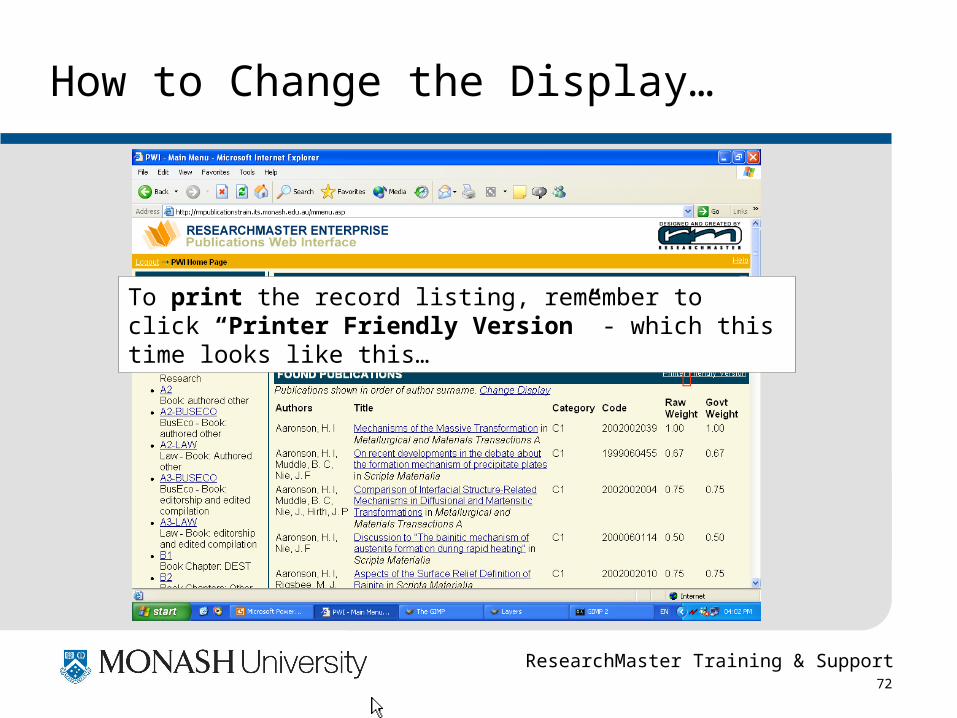
ResearchMaster Training & Support 72
How to Change the Display…
To print the record listing, remember to click “Printer Friendly Version” - which this time looks like this…
ResearchMaster Training & Support 73
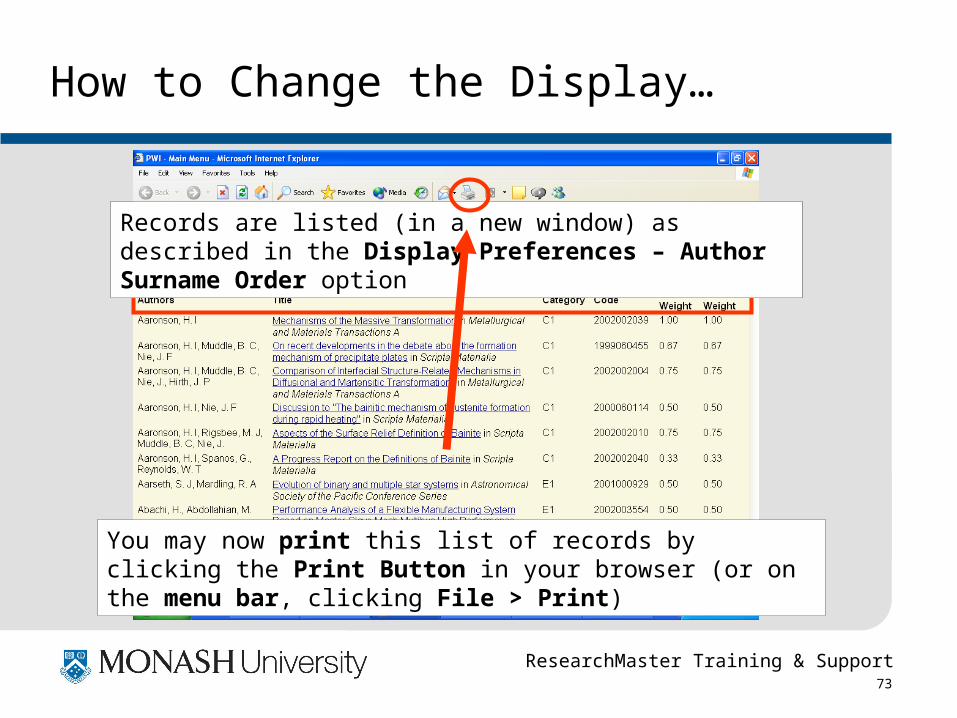
How to Change the Display…
Records are listed (in a new window) as described in the Display Preferences – Author Surname Order option
You may now print this list of records by clicking the Print Button in your browser (or on the menu bar, clicking File > Print)
ResearchMaster Training & Support 74
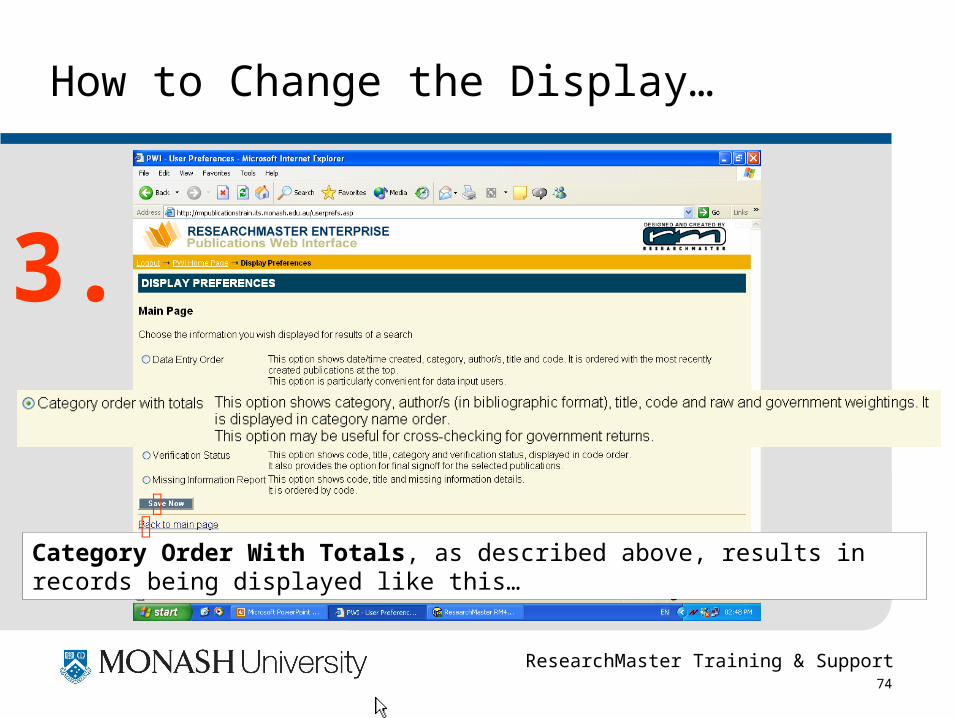
How to Change the Display…
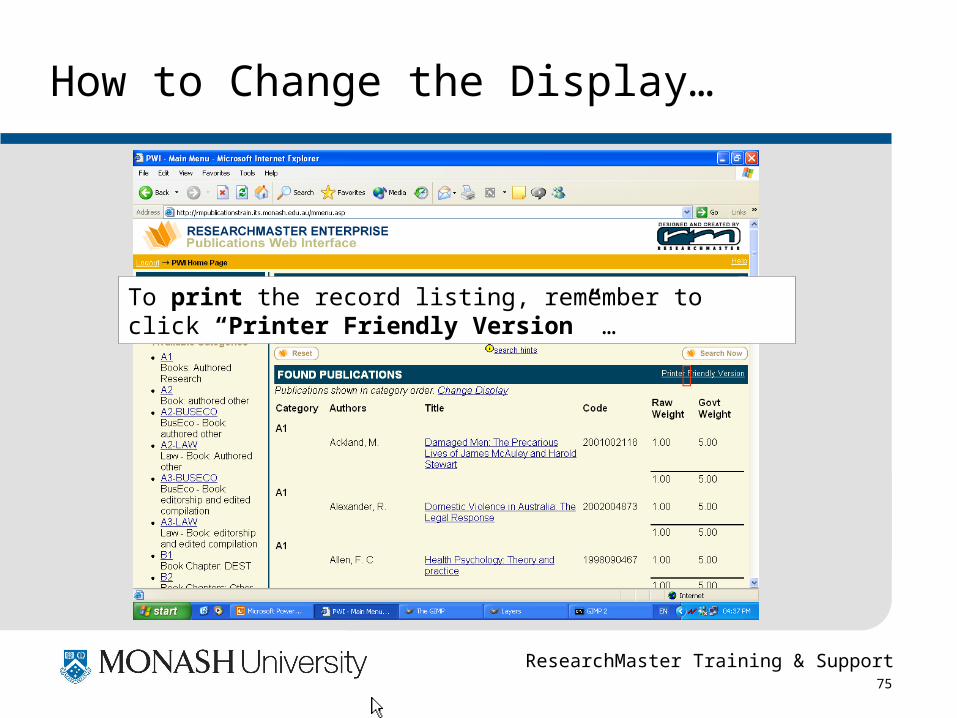
Category Order With Totals, as described above, results in records being displayed like this…
3.
ResearchMaster Training & Support 75
How to Change the Display…
To print the record listing, remember to click “Printer Friendly Version” …
ResearchMaster Training & Support 76
How to Change the Display…
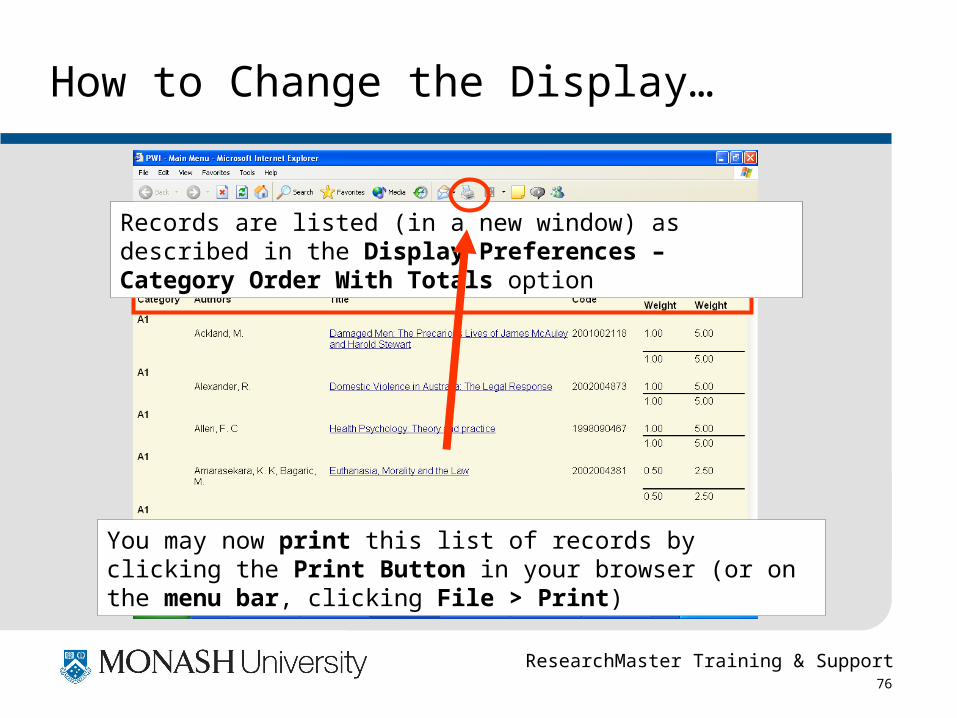
Records are listed (in a new window) as described in the Display Preferences – Category Order With Totals option
You may now print this list of records by clicking the Print Button in your browser (or on the menu bar, clicking File > Print)
ResearchMaster Training & Support 77
How to Change the Display…
Verification Status, as described above, results in records being displayed like this…
4.

ResearchMaster Training & Support 78
How to Change the Display…
To print the record listing, remember to click “Printer Friendly Version” …
ResearchMaster Training & Support 79
How to Change the Display…
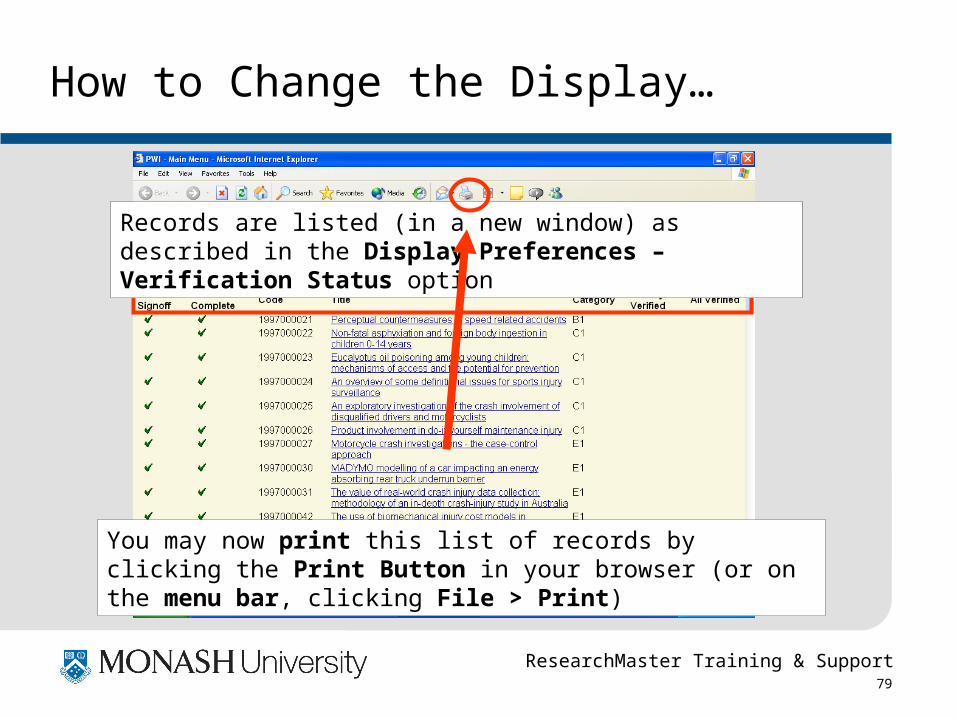
Records are listed (in a new window) as described in the Display Preferences – Verification Status option
You may now print this list of records by clicking the Print Button in your browser (or on the menu bar, clicking File > Print)

ResearchMaster Training & Support 80
How to Change the Display…
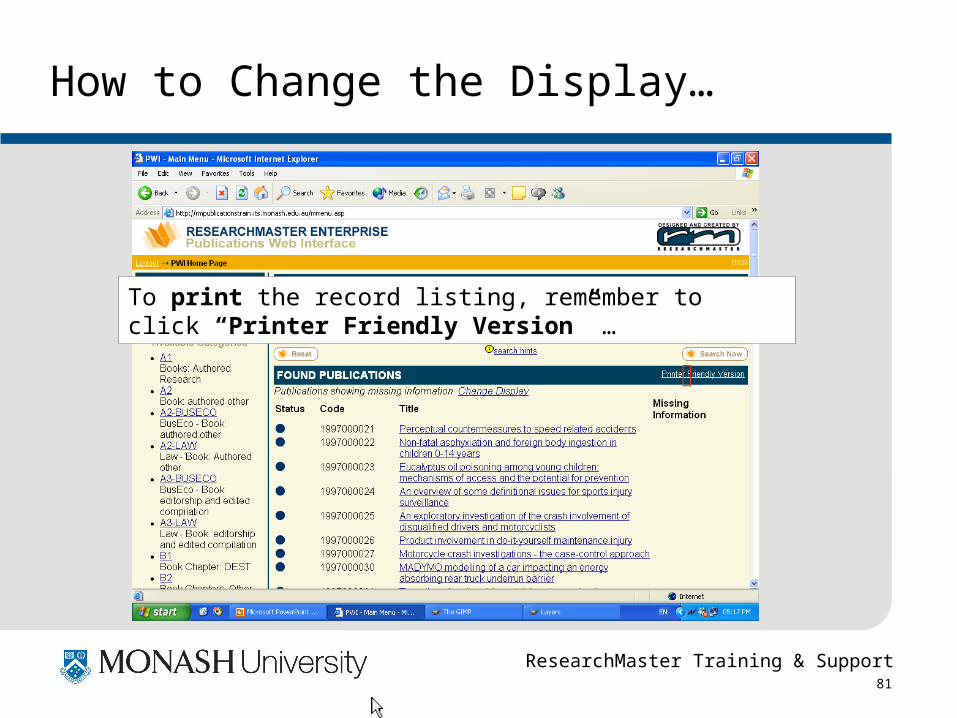
Missing Information Report, as described above, results in records being displayed like this…
5.
ResearchMaster Training & Support 81
How to Change the Display…
To print the record listing, remember to click “Printer Friendly Version” …
ResearchMaster Training & Support 82
How to Change the Display…
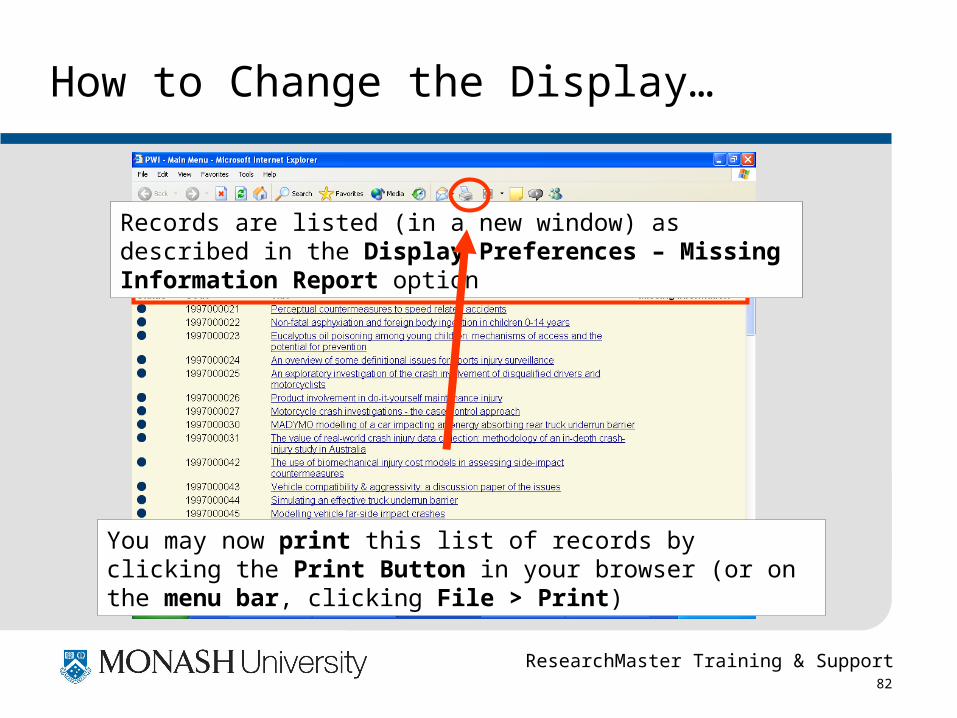
Records are listed (in a new window) as described in the Display Preferences – Missing Information Report option
You may now print this list of records by clicking the Print Button in your browser (or on the menu bar, clicking File > Print)
ResearchMaster Training & Support 83
How to Change the Display…
That concludes our look at How to Change the Display within the PWI.
I’ll conclude the tutorial with some really useful tips for using the PWI effectively…
ResearchMaster Training & Support 84
PWI Tips - 1
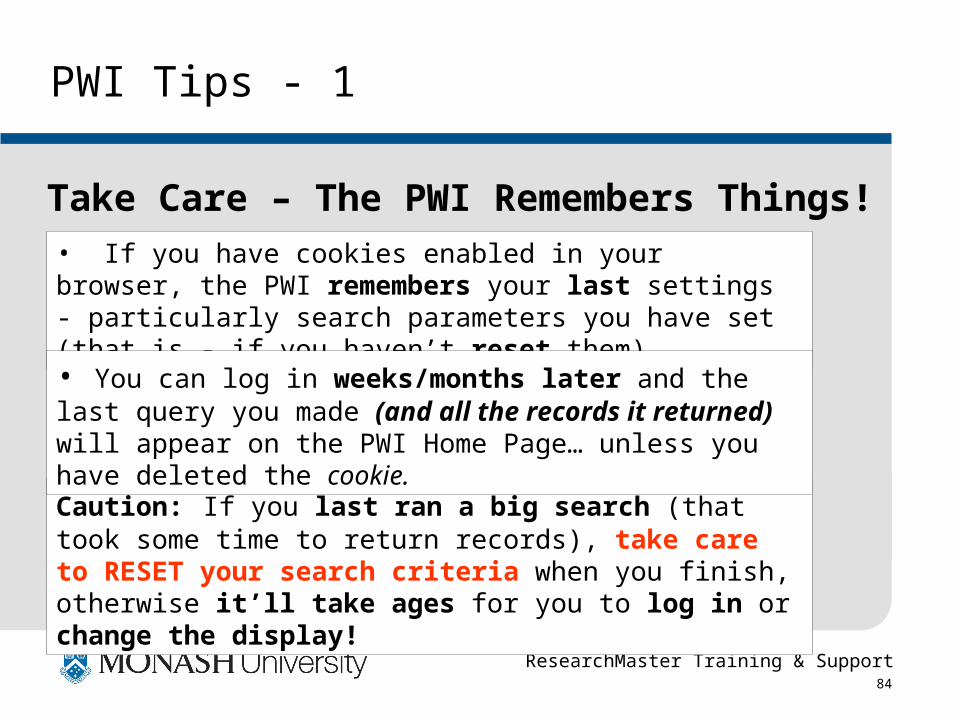
• If you have cookies enabled in your browser, the PWI remembers your last settings - particularly search parameters you have set (that is - if you haven’t reset them).
Caution: If you last ran a big search (that took some time to return records), take care to RESET your search criteria when you finish, otherwise it’ll take ages for you to log in or change the display!
• You can log in weeks/months later and the last query you made (and all the records it returned) will appear on the PWI Home Page… unless you have deleted the cookie.
Take Care – The PWI Remembers Things!
ResearchMaster Training & Support 85
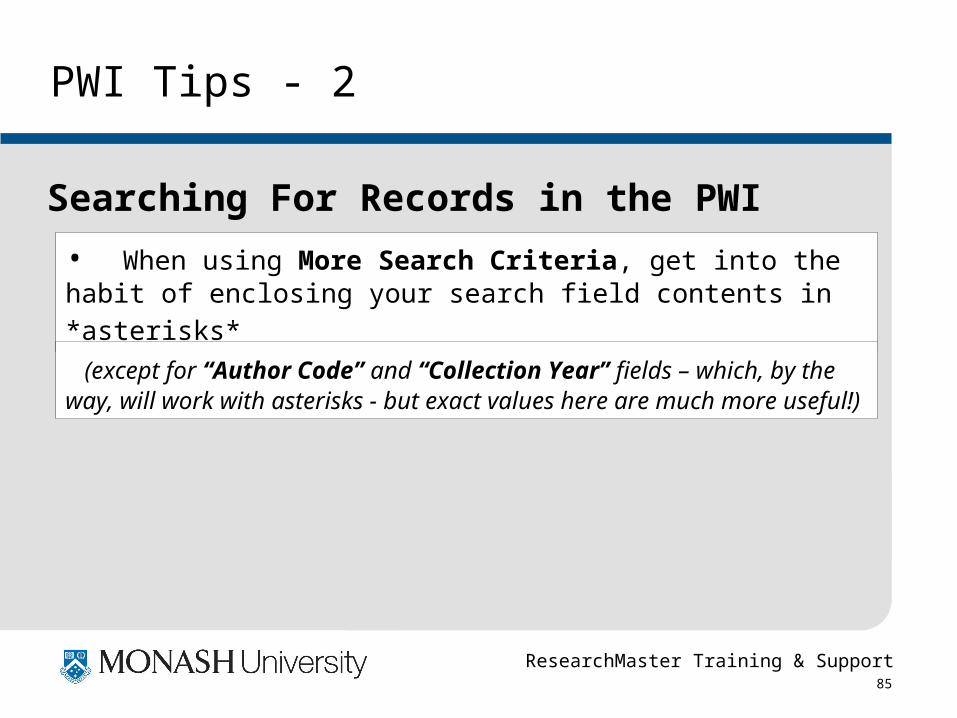
PWI Tips - 2
• When using More Search Criteria, get into the habit of enclosing
your search field contents in *asterisks*
(except for “Author Code” and “Collection Year” fields – which, by the way, will work with asterisks - but exact values here are much more useful!)
Searching For Records in the PWI
ResearchMaster Training & Support 86
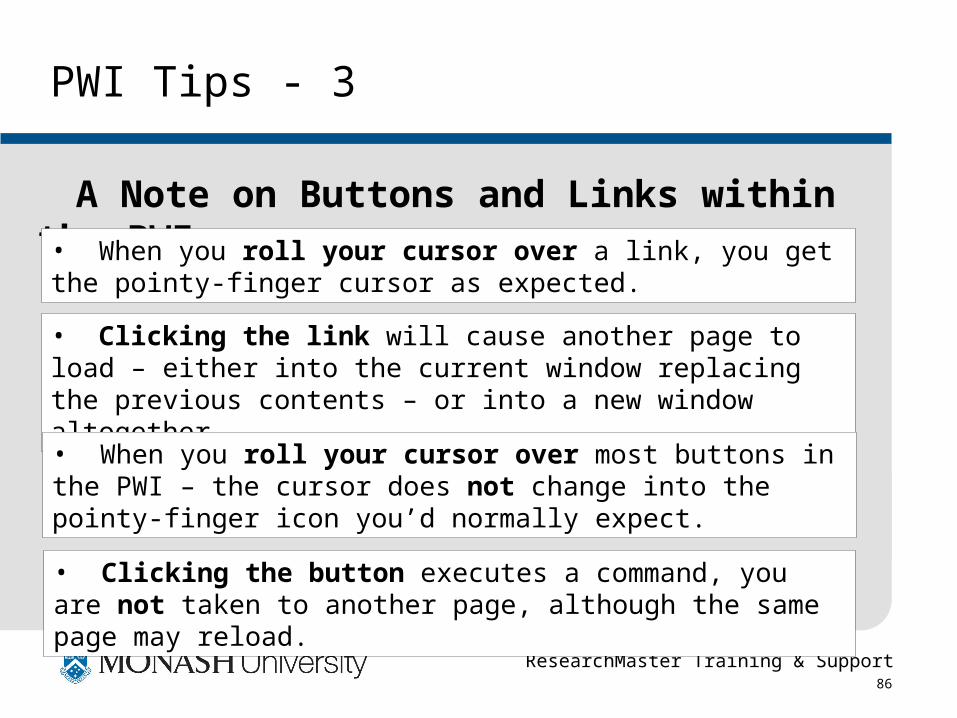
PWI Tips - 3
A Note on Buttons and Links within the PWI• When you roll your cursor over a link, you get the pointy-finger cursor as expected.
• Clicking the link will cause another page to load – either into the current window replacing the previous contents – or into a new window altogether.
• When you roll your cursor over most buttons in the PWI – the cursor does not change into the pointy-finger icon you’d normally expect.
• Clicking the button executes a command, you are not taken to another page, although the same page may reload.
ResearchMaster Training & Support 87
Conclusion
From a usability perspective, the Publications Web Interface is a great improvement on RM4… it is a nicer environment to view and input data.
The costs of this are less flexible searching and reporting options, but one must bear in mind the primary purpose behind the PWI – convenient, easy data entry and viewing of records.
ResearchMaster Training & Support 88
• Thank you for your attention!
http://rmpublications.monash.edu.au
Produced by John Cooney© Monash University 2004
