techd291-tos3-1_commandref
TRANSCRIPT
TippingPoint Command Line Interface Reference
V. 3.1
Part Number: TECHD-0000000291Publication Control Number: 112009:0439
Copyright © 2008 TippingPoint Technologies, Inc. TippingPoint® , the TippingPoint logo, and Digital Vaccine® are registered trademarks of TippingPoint Technologies, Inc. All other company and product names may be trademarks of their respective holders. All rights reserved. This document contains confidential information, trade secrets or both, which are the property of TippingPoint Technologies, Inc. No part of this documentation may be reproduced in any form or by any means or used to make any derivative work (such as translation, transformation, or adaptation) without written permission from TippingPoint Technologies, Inc. or one of its subsidiaries.
TippingPoint Technologies, Inc. reserves the right to revise this documentation and to make changes in content from time to time without obligation on the part of TippingPoint Technologies, Inc. to provide notification of such revision or change.
TippingPoint Technologies, Inc. provides this documentation without warranty, term, or condition of any kind, either implied or expressed, including, but not limited to, the implied warranties, terms, or conditions of merchantability, satisfactory quality, and fitness for a particular purpose. TippingPoint Technologies, Inc. may make improvements or changes in the product(s) and/or the program(s) described in this documentation at any time.If there is any software on removable media described in this documentation, it is furnished under a license agreement included with the product as a separate document.
UNITED STATES GOVERNMENT LEGENDS:If you are a United States government agency, then this documentation and the software described herein are provided to you subject to the following:
United States Government Legend: All technical data and computer software is commercial in nature and developed solely at private expense. Software is delivered as Commercial Computer Software as defined in DFARS 252.227-7014 (June 1995) or as a commercial item as defined in FAR 2.101(a) and as such is provided with only such rights as are provided in TippingPoint’s standard commercial license for the Software. Technical data is provided with limited rights only as provided in DFAR 252.227-7015 (Nov 1995) or FAR 52.227-14 (June 1987), whichever is applicable. You agree not to remove or deface any portion of any legend provided on any licensed program or documentation contained in, or delivered to you in conjunction with guide.
Unless otherwise indicated, TippingPoint registered trademarks are registered in the United States and may or may not be registered in other countries.
Microsoft and Windows are registered trademarks or trademarks of Microsoft Corporation in the United States and/or other countries.
Other brand and product names may be registered trademarks or trademarks of their respective holders.
Table of ContentsAbout This Guide vii
Overview viiTarget Audience viiConventions viii
Headings viiiTypeface viiiCross References viiiMessages viii
Product Documentation ixCustomer Support x
Contact Information x
System Overview 1
Overview 1TippingPoint Architecture 2Security Management System (SMS) 2
SMS Server 3SMS Client 3
Intrusion Prevention System Devices (IPS) 4IPS Local Clients 5
Core Controller 5High Availability 6Threat Suppression Engine 6Threat Management Center 7
Initial Configuration 9
Overview 9CLI Setup 10
Account Security Level 10Super-User Data 11Host Management Port Options 11Default Gateway Options 12DNS Configuration 13Timekeeping Options 14After the Setup Wizard 15
TippingPoint Command Line Interface Reference V. 3.1 i
Additional Configuration 15Web, CLI, and SNMP Server Options 15Restricted SMS Access 16Ethernet Port Settings 17Management Port Routing Options 17Default Alert Information 19
Navigation 21
Accessing the CLI 21Navigation 22
Command Types 22Using Hierarchical Commands 22Command Line Editing 23
Session Settings 24
TippingPoint IPS Commands 25
Conventions 26Global Commands 26
alias 27clear 28cls 29exit 29help 29history 30logout 30ping 30quit 30tree 30who 31whoami 31
TippingPoint Operating System Commands 31boot 2bugreport 2compact-flash 33configure terminal 33conf t action-set 35conf t autodv 37conf t category-settings 37conf t clock 38conf t compact-flash 39conf t default-alert-sink 39conf t default-gateway 40conf t email-rate-limit 40conf t filter 41conf t high-availability 42
TippingPoint Command Line Interface Reference V. 3.1ii
conf t host 43conf t inspection-bypass 44conf t inspection-bypass add 45conf t interface ethernet 47conf t interface mgmtEthernet 48conf t interface settings 49conf t lcd-keypad 50conf t log audit 50conf t monitor 51conf t named-ip 52conf t nms 53conf t notify-contact 53conf t port 54conf t profile 55conf t protection-settings 56conf t ramdisk 57conf t remote-syslog 58conf t reputation 59conf t reputation group 61conf t segment 62conf t server 63conf t service-access 64conf t session 64conf t sms 65conf t sntp 66conf t traffic-mgmt 67conf t tse 70conf t user 72conf t user options 73conf t virtual-port 74conf t virtual-segment 75conf t vlan-translation 75debug 75debug best-effort-mode 76debug traffic-capture 77halt 79high-availability 79quarantine 81setup 82show 83show configuration 87snapshot 90
Index 91
TippingPoint Command Line Interface Reference V. 3.1 iii

TippingPoint Command Line Interface Reference V. 3.1iv
List of Tables
Login and Password Name Examples 11CLI Edit commands 23Default Console Settings 24Alias Definition Examples 27clear subcommands 28boot subcommands 32compact-flash subcommands 33conf t action-set subcommands 35conf t category-settings subcommands 38conf t clock subcommands 38conf t compact-flash subcommands 39conf t default-alert-sink parameters 39conf t filter subcommands 41conf t high-availability subcommands 42conf t host subcommands 43conf t inspection-bypass parameters 44conf t inspection-bypass add parameters 45conf t interface ethernet subcommands 47conf t interface mgmtEthernet subcommands 48conf t interface subcommands 49conf t lcd-keypad subcommands 50conf t monitor subcommands 51conf t named-ip subcommands 52conf t nms subcommands 53conf t port subcommands 54conf t profile subcommands 55conf t protection-settings subcommands 56conf t ramdisk subcommands 57conf t remote-syslog subcommands 58conf t reputation subcommands 60TippingPoint Command Line Interface Reference V. 3.1v v

List of Tables
conf t reputation subcommands 61conf t segment subcommands 62conf t server subcommands 63conf t session subcommands 64conf t sms subcommands 65conf t sntp subcommands 66conf t traffic-mgmt subcommands 67conf t traffic-mgmt subcommands 68conf t tse subcommands 70conf t user subcommands 72conf t user options subcommands 73conf t virtual-port subcommands 74debug best-effort-mode subcommands 76debug best-effort-mode parameters 76debug traffic-capture subcommands 77debug traffic-capture parameters 77high-availability subcommands 79quarantine subcommands 81setup subcommands 82show subcommands 83show configuration subcommands 87snapshot subcommands 90
TippingPoint Command Line Interface Reference V. 3.1 vi
About This GuideExplains intended audience, where related information is located, and how to obtain customer support.
OverviewWelcome to the TippingPoint Command Line Interface Reference.
This section includes the following items:
• “Target Audience” on page vii
• “Conventions” on page viii
• “Product Documentation” on page ix
• “Customer Support” on page x
Target AudienceThe intended audience includes technicians and maintenance personnel responsible for installing, configuring, and maintaining TippingPoint security systems and associated devices. Users should be familiar with networking concepts and the following standards and protocols:
• TCP/IP
• UDP
• ICMP
• Ethernet
• Simple Network Time Protocol (SNTP)
• Simple Mail Transport Protocol (SNMP)
• Simple Network management Protocol (SNMP)
TippingPoint Command Line Interface ReferenceV. 3.1 vii
ConventionsThe TippingPoint documentation uses the following conventions for structuring information.
HeadingsEach main section starts with a brief description of the information you can find in that section, which correlates with the major headings in that section. Each major heading corresponds to a task or concept that is important for you to understand. Headings are of a different size and type to make them easy to skim, whether you are viewing an online or print copy of this document.
TypefaceThis document uses the following typeface conventions:
Bold Used for the names of screen elements like buttons, drop-down lists, or fields. For example, when you are done with a dialog, you would click the OK button.
Code Used for text a user must type to use the product.
Italic Used for book titles, variables, and important terms.
Hyperlink Used for Web site and cross reference links.
Cross ReferencesWhen a topic is covered in depth elsewhere in this document, or in another document in this series, a cross reference to the other information is provided as follows:
MessagesMessages are emphasized by font, format, and icons. There are four types of messages in this document:
• Warnings — indicate how to avoid physical injury to people or equipment. For people, injury includes anything from temporary conditions, such as pain, to irreversible conditions such as death. For equipment, injury includes anything requiring repair. Warnings indicate what you should or should not do and the consequences of not heeding the warning.
• Cautions — indicate how to avoid a serious loss that stops short of physical damage, such as the loss of data, time, or security. Cautions indicate what you should or should not do to avoid such losses and the consequences of not heeding the caution.
• Notes —Notes indicate information that might not be obvious or that does not relate directly to the current topic, but that may affect relevant behavior.
• Tips — Tips are suggestions about how to perform a task more easily or more efficiently.
TippingPoint Command Line Interface Reference V. 3.1viii
WarningWarnings are represented by a red octagon with a white lightning bolt drawn inside. Warnings also start with the word “WARNING” and are presented in bold face type.
CautionCautions are represented by a yellow triangle icon with a black exclamation point drawn inside. Cautions also start with the word “CAUTION”.
NoteA note has an icon represented by a piece of note paper and starts with the word “Note”.
TipA tip is represented by a circle icon with a light bulb drawn inside and starts with the word “Tip”.
Product DocumentationTippingPoint Systems have a full set of documentation. For the most current documentation, check the Threat Management Center (TMC) Web site at https://tmc.tippingpoint.com.
WARNING: Only trained and qualified personnel should install, replace, or service this equipment. Disconnect the system before servicing.
CAUTION: Do not type del *.* from the root (C:\) directory. Typing del *.* from the root directory will destroy all the program and configuration data that your computer needs to run, and will render your system inoperable.
Note: To view information about attacks, you must have Operator authority.To create or edit attack filters and related objects, you must have Super User or Administrator authority.
Tip: Setting the logging parameter to “off” or “minimal” will improve your system’s processing performance, but it will make debugging very difficult in the event of a system crash. During system integration, you can set logging to “full” to ease debugging. After you have finished testing, set logging to “minimal” to improve performance.
TippingPoint Command Line Interface ReferenceV. 3.1 ix
Customer SupportTippingPoint is committed to providing quality customer support to all of its customers. Each customer is provided with a customized support agreement that provides detailed customer and support contact information.
For the most efficient resolution of your problem, take a moment to gather some basic information from your records and from your system before contacting customer support, including your customer number.
Contact InformationUse the following information to contact TippingPoint Customer Support:
For additional information or assistance, contact TippingPoint Customer Support:
TelephoneNorth America: +1 866 681 8324International: +1 512 681 8324
For a list of international toll-free contact numbers, consult one of the following web pages:
• https://tmc.tippingpoint.com/TMC/Content/support/Support_Contacts
• http://www.tippingpoint.com/support.html
Have the following information available:
Information Location
Your customer number You can find this number on your Customer Support Agreement and on the shipping invoice that came with your TippingPoint system.
Your Core Controller serial number
You can find this information on the bottom of the server chassis. Also, from the Core Controller CLI, you can run the show version command.
Your Core Controller version number
From the Core Controller CLI, you can run the show version command.
TippingPoint Command Line Interface Reference V. 3.1x
1 System OverviewThe TippingPointTM system is a high-speed, comprehensive security system that includes theIntrusion Prevention System (IPS), Local Security Manager (LSM), Digital Vaccine™, theSecurity Management System ApplianceTM, and the Core Controller.
OverviewEnterprise security schemes once consisted of a conglomeration of disparate, static devices from multiple vendors. Today, TippingPoint’s security system provides the advantages of a single, integrated, highly adaptive security system that includes powerful hardware and an intuitive management interface.
This section includes the following topics:
• “TippingPoint Architecture” on page 2
• “Security Management System (SMS)” on page 2
• “Intrusion Prevention System Devices (IPS)” on page 4
• “Core Controller” on page 5
• “High Availability” on page 6
• “Threat Suppression Engine” on page 6
• “Threat Management Center” on page 7
TippingPoint Command Line Interface ReferenceV. 3.1 1
Chapter 1—System Overview
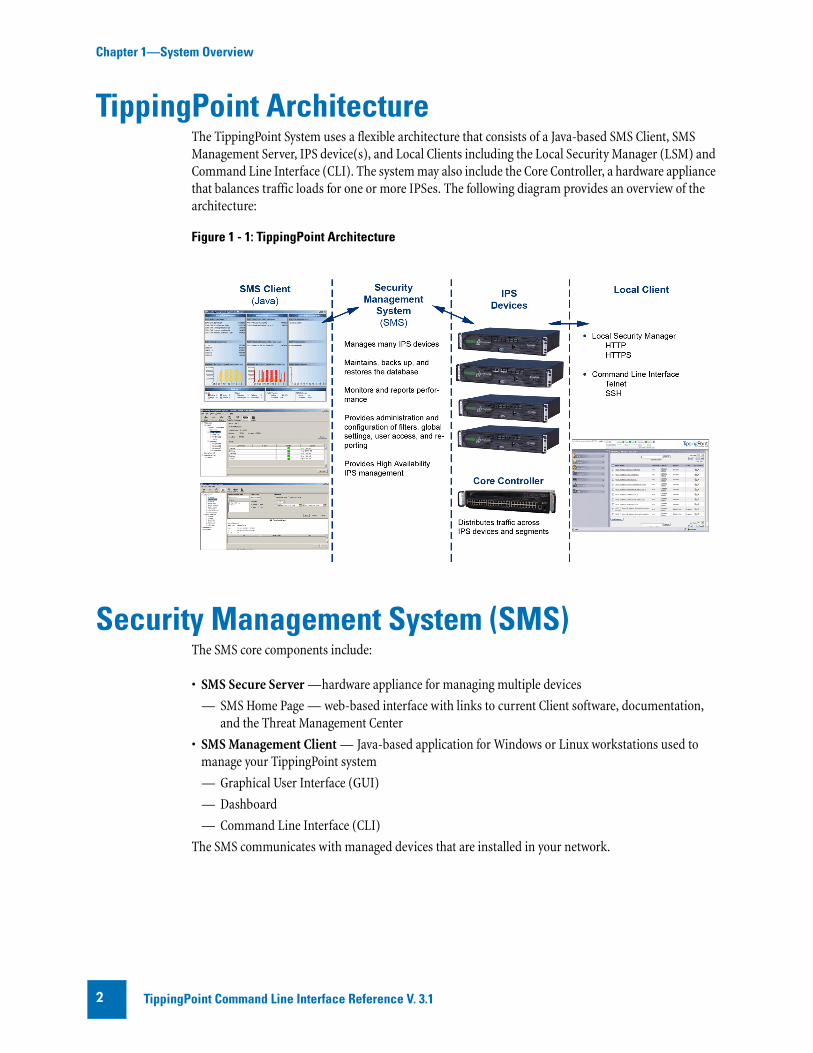
TippingPoint ArchitectureThe TippingPoint System uses a flexible architecture that consists of a Java-based SMS Client, SMS Management Server, IPS device(s), and Local Clients including the Local Security Manager (LSM) and Command Line Interface (CLI). The system may also include the Core Controller, a hardware appliance that balances traffic loads for one or more IPSes. The following diagram provides an overview of the architecture:
Security Management System (SMS)The SMS core components include:
• SMS Secure Server —hardware appliance for managing multiple devices
— SMS Home Page — web-based interface with links to current Client software, documentation, and the Threat Management Center
• SMS Management Client — Java-based application for Windows or Linux workstations used to manage your TippingPoint system
— Graphical User Interface (GUI)
— Dashboard
— Command Line Interface (CLI)
The SMS communicates with managed devices that are installed in your network.
Figure 1 - 1: TippingPoint Architecture
TippingPoint Command Line Interface Reference V. 3.12
Chapter 1—System Overview
The SMS architecture also includes the following components:
• Threat Management Center (TMC) — Centralized service center that monitors global threats and distributes up-to-date attack filter packages, software updates, and product documentation.
• Digital Vaccine (DV) — Update service that includes up-to-date filter packages for protecting your network
• Managed Devices — TippingPoint IPS or Core Controller devices that are installed in your network
SMS ServerThe SMS Server is an enterprise-class management platform that provides centralized administration, configuration, monitoring and reporting for well over a hundred TippingPoint IPS devices. The SMS provides the following functionality:
• Enterprise-wide device status and behavior monitoring — Stores logs and device status information, manages updates, and monitors filter, device, software, and network status.
• IPS networking and configuration — Stores device information and configures devices according to the settings that are modified, imported, or distributed by clients. These settings affect the flow and detection of traffic according to device, segment, or segment group.
• Filter customization — Stores filter customizations in profiles as maintained by the SMS client. These settings are distributed and imported to devices, which can be reviewed and modified by local clients. If a device is managed by the SMS Server, the local clients cannot modify settings.
• Filter and software distribution — Monitors and maintains the distribution and import of filters, Digital Vaccine packages, and software for the TippingPoint Operating System and SMS Client. The SMS client and Central Management Server can distribute these packages according to segment group settings. The Central Management Server maintains a link to the Threat Management Center (TMC) for downloading and installing package updates.
SMS ClientThe TippingPoint Security Management System (SMS) client provides services and functions to monitor, manage, and configure the entire TippingPoint system. This client is a Java-based application installed and accessed on a computer running the appropriate operating system. Each user receives a specific user level with enhanced security measures to protect access and configuration of the system.
TippingPoint Command Line Interface ReferenceV. 3.1 3
Chapter 1—System Overview
You can monitor the entire TippingPoint system through the SMS client on a computer with the following requirements:
• One of the following operating systems:
— Windows 98, 2nd edition
— Windows NT, Service Pack 5 or later
— Windows 2000, Service Pack 3 or later
— Windows XP
— Apple
— Red Hat Linux
• One of the following browsers:
— Microsoft Internet Explorer, version 6.0 or higher
— Firefox
— Safari
The SMS features a policy-based operational model for scalable and uniform enterprise management. It enables behavior and performance analysis with trending reports, correlation and real-time graphs - including reports on all, specific, and top attacks and their sources and destinations as well as all, specific, and top peers and filters for misuse and abuse (peer-to-peer piracy) attacks. You can create, save, and schedule reports using report templates. All reports are run against system and audit logs stored for each device managed by the system. These logs detail triggered filters. You can modify, update, and control distribution of these filters according to segment groups for refined intrusion prevention.
The SMS dashboard provides at-a-glance monitors, with launch capabilities into the targeted management applications that provide global command and control of TippingPoint. It displays the entries for the top 5 filters triggered over the past hour in various categories, a graph of triggered filters over the past 24 hours, the health status of devices, and update versions for software of the system. Through the Dashboard, you gain an overview of the current performance of your system, including notifications of updates and possible issues with devices monitored by the SMS.
Intrusion Prevention System Devices (IPS)Intrusion Prevention System (IPS) devices protect your network with the Threat Suppression Engine (TSE) by scanning, detecting, and responding to network traffic according to the filters, action sets, and global settings maintained on each device by a client.
Each device provides intrusion prevention for your network according to the number of network connections and hardware capabilities. IPS devices also have built-in intrinsic high-availability features, guaranteeing that the network keeps running in the event of system failure.
TippingPoint Intrusion Prevention Systems are optimized to provide high resiliency, high availability security for remote branch offices, small-to-medium and large enterprises and collocation facilities. Each TippingPoint can protect network segments from both external and internal attacks.
TippingPoint Command Line Interface Reference V. 3.14
Chapter 1—System Overview
IPS devices provide the following segments and traffic performance:
• TippingPoint 200/200E— Two 10/100 segments, 200 megabits/second
• TippingPoint 210E— Five 10/100/1000 segments, 200 megabits/second.
• TippingPoint 400 — Four 10/100 segments, 400 megabits/second
• TippingPoint 600E— Four 10/10/1000 segments, 600 megabits/second
• TippingPoint 1200/1200E — Four 10/100/1000 segments, 1.2 gigabits/second
• TippingPoint 2400/2400E — Four 10/100/1000 segments, 2.0 gigabits/second
• TippingPoint 5000E — Four 10/100/1000 segments, 5.0 gigabits/second
• TippingPoint 2500N — Five 1GbE copper segments, five 1GbE fiber segments, and one 10GbE fiber segment, 2.0 gigabits/second
• TippingPoint 5100N — Five 1GbE copper segments, five 1GbE fiber segments, and one 10GbE fiber segment, 5.0 gigabits/second
Multiple TippingPoint devices can be deployed to extend this unsurpassed protection to hundreds of enterprise zones. You can monitor and manage the devices by using the local client available on each device, or by using the SMS client to monitor and manage well over a hundred devices. E-Series systems provide Advanced DDoS protection. The TippingPoint N-Series support IPv6, tunneling (including GRE and multi-layer tunnels), and inspection bypass rules for trusted traffic.
IPS Local ClientsThe TippingPoint System provides various points of interaction, management, and configuration of the intrusion prevention system. The clients include graphical user interfaces (GUI) and command line interfaces (CLI). These clients include the following:
• Local Security Manager (LSM) — Web-based GUI for managing one IPS device. The LSM provides HTTP and HTTPS (secure management) access. This access requires access from a supported web browser (Internet Explorer, Mozilla Firefox, and Netscape). Using the LSM, you have a graphical display for reviewing, searching, and modifying settings. The GUI interface also provides reports to monitor the device traffic, triggered filters, and packet statistics.
• Command Line Interface (CLI) — Command line interface for reviewing and modifying settings on the device. The CLI is accessible through Telnet, SSH (secure access), and the Console serial port.
• LCD Panel — Several IPS TippingPoint devices provide an LCD panel to view, configure and modify some device settings.
Core ControllerThe TippingPoint Core Controller is a hardware-based device that enables inspection of up to 20 Gbps of traffic by sending the traffic to as many as 24 IPS device segments. The CoreController can control traffic across its three 10GbE network segment pairs and across multiple TippingPoint E-Series IPS devices. IPS devices are connected by 1GbE uplinks, and each packet that is received on a 10GbE CoreController interface passes through a load balancer that then determines the IPS connection to use for transmitting the packet.
TippingPoint Command Line Interface ReferenceV. 3.1 5
Chapter 1—System Overview
The Core Controller provides:
• 10GbE bidirectional traffic inspection and policy enforcement
• High Availability with an optional Smart ZPHA module
• Central management through the SMS
High AvailabilityTippingPoint devices are designed to guarantee that your network traffic always flows at wire speeds in the event of internal device failure. The TippingPoint System provides Network High Availability settings for Intrinsic Network HA (INHA) and Transparent Network HA (TRHA). These options enact manually or automatically, according to settings you enter using the clients (LSM and SMS) or LCD panel for IPS devices. Zero-Power High Availability (ZPHA) is available for the IPS as an external modular device, and for the Core Controller as an optional Smart ZPHA module.
The IPS uses INHA for individual device deployment and TRHA for devices deployed in redundant configurations in which one device takes over for another in the event of system failure. With INHA, a failure puts the device into Layer-2 Fallback mode and permits or blocks traffic on each segment. In TRHA, multiple IPS devices are synchronized so that when one device experiences a system failure, traffic is routed to the other device with no interruption in intrusion prevention services.
SMS high availability provides continuous administration through an active-passive SMS system configuration. A passive SMS is configured, synchronized with the active system, and waits in standby mode and monitors the health of the active system. If the health or communications check fails, the passive SMS will be activated.
The ZPHA modular device can be attached to an IPS to route traffic in the event of power loss. Smart ZPHA modules perform the same function and are installed directly in the device.
Threat Suppression EngineThe Threat Suppression Engine (TSE) is a highly specialized, hardware-based intrusion prevention platform consisting of state-of-the-art network processor technology and TippingPoint's own set of custom ASICs. The TSE is a line-speed, hardware engine that contains all the functions needed for Intrusion Prevention, including IP defragmentation, TCP flow reassembly, statistical analysis, traffic shaping, flow blocking, flow state tracking and application-layer parsing of over 170 network protocols.
The TSE reconstructs and inspects flow payloads by parsing the traffic at the application layer. As each new packet of the traffic flow arrives, the engine re-evaluates the traffic for malicious content. The instant the engine detects malicious traffic, it blocks all current and all subsequent packets pertaining to the traffic flow. The block of the traffic and packets ensures that the attack never reaches its destination.
Note: The Core Controller can be used with the 2400E and 5000E IPS devices, and with all N-Series devices.
TippingPoint Command Line Interface Reference V. 3.16
Chapter 1—System Overview
The combination of high-speed network processors and custom ASIC chips provide the basis for IPS technology. These highly specialized traffic classification engines enable the IPS to filter with extreme accuracy at gigabit speeds and microsecond latencies. Unlike software-based systems whose performance is affected by the number of filters installed, the highly-scalable capacity of the hardware engine allows thousands of filters to run simultaneously with no impact on performance or accuracy.
Threat Management CenterThe Threat Management Center (TMC) is a centralized service center that monitors global threats and distributes up-to-date attack filter packages, software updates, and product documentation.
The Threat Management Center (TMC) collects threat information and creates Digital Vaccine packages that are made available on the TMC web site. The packages include filters that block malicious traffic and attacks on your network. The filters provide the following protections:
• Application Protection — Defend against known and unknown exploits that target applications and operating systems:
— Attack Protection filters — Detect and block traffic known to be malicious, suspicious, and to have known security implications. These filters include the following: Vulnerabilities and Exploits filters.
— Security Policy filters — Detect and block traffic that may or may not be malicious. This traffic may be different in its format or content from standard business practice, aimed at specific software or operating systems, or contrary to your company’s security policies.
— Reconnaissance filters — Detect and block scans, sweeps, and probes for vulnerabilities and information about your network. These filters include the following: Probes and Sweeps/Scans filters.
— Informational filters — Detect and block classic Intrusion Detection System (IDS) infiltration
• Infrastructure Protection — Protect network bandwidth and network infrastructure elements such as routers and firewalls from attack using a combination of filter types:
— Advanced DDoS filters — Available on the 2400E and 5000E. Detect and block denial of service and flood requests, such as SYN Requests, that can overwhelm a system.
— Network Equipment Protection filters — Protect networked equipment from attacks
— Traffic Normalization filters — Detect and block abnormal or malicious traffic
• Performance Protection — Allow key applications to have prioritized bandwidth access setting that ensure mission critical applications have adequate performance during times of high congestion:
— Misuse and Abuse filters — Protect the resources and usage of file sharing across networks and personal computers. These filters protect peer-to-peer services.
— Traffic Management filters — Protect the network by shielding against IP addresses or permitting only a set of IP addresses
TippingPoint Command Line Interface ReferenceV. 3.1 7

Chapter 1—System Overview
TippingPoint Command Line Interface Reference V. 3.18
2 Initial ConfigurationDescribes the procedures for initial TippingPoint IPS configuration.
OverviewThe TippingPoint IPS Out of Box Experience (OBE) setup wizard provides a convenient method for entering configuration data when installing, moving, or reconfiguring a TippingPoint IPS device. The wizard runs automatically on the console that is connected to the device via the console port or on the LCD keypad. You can also initialize the setup wizard at any time by entering the setup command in the CLI.
This chapter is a guide for the CLI and LCD keypad versions of the OBE wizards and includes the following topics:
• “CLI Setup” on page 10
• “Additional Configuration” on page 15
TippingPoint Command Line Interface ReferenceV. 3.1 9

Chapter 2—Initial Configuration
CLI SetupBefore you begin, ensure that a console is connected to the TippingPoint IPS device via the console port, and that the console is powered on and ready. When you turn on the IPS, you will see several status messages before the OBE setup wizard initializes.
When the OBE setup wizard runs, the following screen appears:
Welcome to the TippingPoint Technologies Initial Setup wizard.Press any key to begin the Initial Setup Wizard or use LCD panel.
Press any key to begin the OBE setup wizard. The following message appears:
You will be presented with some questions along with default values in brackets[]. Please update any empty fields or modify them to match your requirements. You may press the ENTER key to keep the current default value. After each group of entries, you will have a chance to confirm your settings, so don't worry if you make a mistake.
Continue to the following section for instructions on account security.
Account Security LevelThe Security Level dialog sets the security level that restricts user names and passwords. The default security level is Level 2, but you have the option to select one of three available levels:
There are three security levels for specifying user names and passwords:
Level 0: User names and passwords are unrestricted. Level 1: Names must be at least 6 characters long; passwords at least 8. Level 2: In addition to level 1 restrictions, passwords must contain: - at least 2 alpha characters - at least 1 numeric character - at least 1 non-alphanumeric character
Please specify a security level to be used for initial super-user name and password creation. As super-user, you can modify the security level later on via Command Line Interface (CLI) or Local Security Manager (LSM).Security level [2]:
Note: For maximum security, TippingPoint recommends setting the account security level to 2.
TippingPoint Command Line Interface Reference V. 3.110
Chapter 2—Initial Configuration
Super-User DataThe Super-User Data dialog sets the super-user login name and password. The login name and password cannot contain spaces and must meet the restrictions of the security level that you set in the Security Level dialog. The following tables list examples of valid login names and passwords. .
In this example, the password is presented in italics. In the actual dialog, the password would not be visible.
Please enter a user name that we will use to create your super-user account. Spaces are not allowed.
Name: superuser
Do you wish to accept [superuser] <Y,[N]>:Y
Please enter your super-user account password: root--00Verify password: root--00Saving information...Done
Your super-user account has been created.You may continue initial configuration by logging into your device.
After logging in, you will be asked for additional information.
After logging in at the prompt, you can continue with the OBE setup wizard.
Host Management Port OptionsThe Host Management port is the Ethernet port located on the host processor module. Use the IP address of the Host Management port to connect to the TippingPoint IPS when you use the Command Line Interface and the LSM.
In this example, the host IP address is 216.136.56.239, the host name is NDS30, and the location is rack 3 - middle. The network mask is the default setting.
The host management port is used to configure and monitor this device via a network connection (e.g., a web browser).Enter Management IPv4 Address [none]: 10.252.0.71Enter Network IPv4 Mask [255.255.255.0]: Enable IPv6 [No]: y
Table 1: Login and Password Name Examples
Security Level Valid Login Names Valid Passwords
Level 0 fredj mypass
Level 1 fjohnson mypassword
Level 2 fjohnsonfredj123fredj-123fredj-*123
my-pa55wordmy-b1rthdaymyd*g’snam3
TippingPoint Command Line Interface ReferenceV. 3.1 11
Chapter 2—Initial Configuration
Enable IPv6 Address Autoconfig [No]: yEnter Host Name [myhostname]: device71Enter Host Location [room/rack]: Lab Host IPv4: 10.252.0.71/24 IPv6 Enabled: Yes Host Link-Local IPv6: fe80::207:99ff:fe66:6999/64 Host IPv6: Auto Host Name: device71 Host Location: LabEnter [A]ccept, [C]hange, or [E]xit without saving [C]: a
Management IPv4 AddressThe Host IP address is the IP address through which you access the TippingPoint IPS. The Host IP address must meet the following criteria:
• Must be standard IPv4 address format.
• Must be contained within the local network, but must not be contained within any subnets that pass traffic through the Multi-Zone Defense Module. If you assign the management port an IP address that is within a subnet connected through the Multi-Zone Defense Module interface card, the interfaces will not perform reliably.
• Must be accessible from the workstation from which you will manage the device.
Network IPv4 MaskThe network mask for the subnet on which the TippingPoint IPS is located.
Enable IPv6/Enable IPv6 Address AutoconfigSelect Y for both of these options to enable IPv6 on the device and to automatically configure the IPv6 address.
Host NameThe host name of the TippingPoint IPS. Use the name that the IPS will be known as on your network.
Host LocationThe host location is the physical location of the TippingPoint IPS. It is for informational purposes only.
Default Gateway OptionsThe Default Gateway options configure the routing information that the TippingPoint IPS needs to communicate with other networks.
Note: If the TippingPoint IPS Host Management Port and the workstation from which you will manage the IPS are on different subnets, you must define a default gateway or an additional route to enable network-based management of your IPS. See “Management Port Routing Options” on page 17.
TippingPoint Command Line Interface Reference V. 3.112
Chapter 2—Initial Configuration
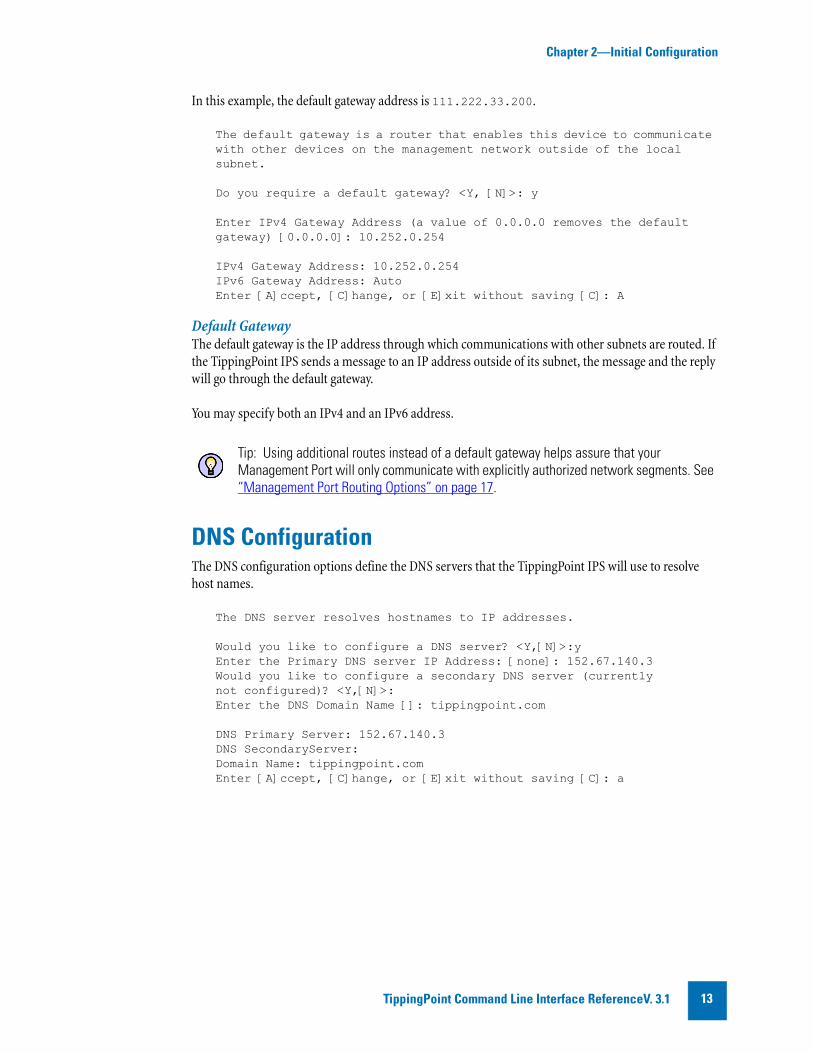
In this example, the default gateway address is 111.222.33.200.
The default gateway is a router that enables this device to communicate with other devices on the management network outside of the local subnet.
Do you require a default gateway? <Y, [N]>: y
Enter IPv4 Gateway Address (a value of 0.0.0.0 removes the default gateway) [0.0.0.0]: 10.252.0.254
IPv4 Gateway Address: 10.252.0.254IPv6 Gateway Address: AutoEnter [A]ccept, [C]hange, or [E]xit without saving [C]: A
Default GatewayThe default gateway is the IP address through which communications with other subnets are routed. If the TippingPoint IPS sends a message to an IP address outside of its subnet, the message and the reply will go through the default gateway.
You may specify both an IPv4 and an IPv6 address.
DNS ConfigurationThe DNS configuration options define the DNS servers that the TippingPoint IPS will use to resolve host names.
The DNS server resolves hostnames to IP addresses.
Would you like to configure a DNS server? <Y,[N]>:yEnter the Primary DNS server IP Address: [none]: 152.67.140.3 Would you like to configure a secondary DNS server (currently not configured)? <Y,[N]>:Enter the DNS Domain Name []: tippingpoint.com
DNS Primary Server: 152.67.140.3DNS SecondaryServer: Domain Name: tippingpoint.comEnter [A]ccept, [C]hange, or [E]xit without saving [C]: a
Tip: Using additional routes instead of a default gateway helps assure that your Management Port will only communicate with explicitly authorized network segments. See “Management Port Routing Options” on page 17.
TippingPoint Command Line Interface ReferenceV. 3.1 13
Chapter 2—Initial Configuration
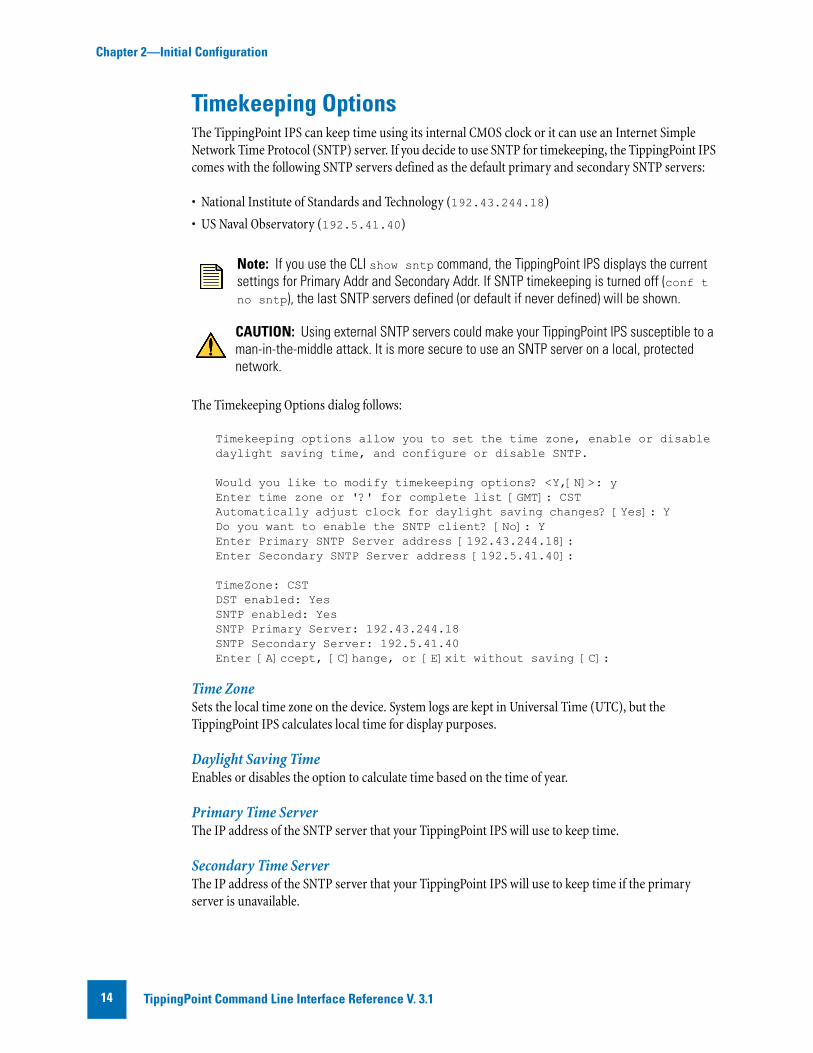
Timekeeping OptionsThe TippingPoint IPS can keep time using its internal CMOS clock or it can use an Internet Simple Network Time Protocol (SNTP) server. If you decide to use SNTP for timekeeping, the TippingPoint IPS comes with the following SNTP servers defined as the default primary and secondary SNTP servers:
• National Institute of Standards and Technology (192.43.244.18)
• US Naval Observatory (192.5.41.40)
The Timekeeping Options dialog follows:
Timekeeping options allow you to set the time zone, enable or disable daylight saving time, and configure or disable SNTP.
Would you like to modify timekeeping options? <Y,[N]>: yEnter time zone or '?' for complete list [GMT]: CSTAutomatically adjust clock for daylight saving changes? [Yes]: YDo you want to enable the SNTP client? [No]: YEnter Primary SNTP Server address [192.43.244.18]:Enter Secondary SNTP Server address [192.5.41.40]:
TimeZone: CSTDST enabled: YesSNTP enabled: YesSNTP Primary Server: 192.43.244.18SNTP Secondary Server: 192.5.41.40Enter [A]ccept, [C]hange, or [E]xit without saving [C]:
Time ZoneSets the local time zone on the device. System logs are kept in Universal Time (UTC), but the TippingPoint IPS calculates local time for display purposes.
Daylight Saving TimeEnables or disables the option to calculate time based on the time of year.
Primary Time ServerThe IP address of the SNTP server that your TippingPoint IPS will use to keep time.
Secondary Time ServerThe IP address of the SNTP server that your TippingPoint IPS will use to keep time if the primary server is unavailable.
Note: If you use the CLI show sntp command, the TippingPoint IPS displays the current settings for Primary Addr and Secondary Addr. If SNTP timekeeping is turned off (conf t no sntp), the last SNTP servers defined (or default if never defined) will be shown.
CAUTION: Using external SNTP servers could make your TippingPoint IPS susceptible to a man-in-the-middle attack. It is more secure to use an SNTP server on a local, protected network.
TippingPoint Command Line Interface Reference V. 3.114
Chapter 2—Initial Configuration
After the Setup WizardAfter you have completed the initial setup wizard, if you have changed from the HTTPS or SNMP server settings, you must reboot. Use the reboot command in the CLI. After the IPS reboots, you can use the Local Security Manager GUI to perform monitoring and configuration tasks or use the setup command in the CLI to perform additional configuration tasks. See “Additional Configuration” on page 15.
Additional ConfigurationAfter you have completed the initial setup wizard through the Command Line Interface or on the LCD screen, you can further configure your TippingPoint IPS. These subsequent setup options include the following:
• “Web, CLI, and SNMP Server Options” on page 15
• “Ethernet Port Settings” on page 17
• “Management Port Routing Options” on page 17
• “Default Alert Information” on page 19
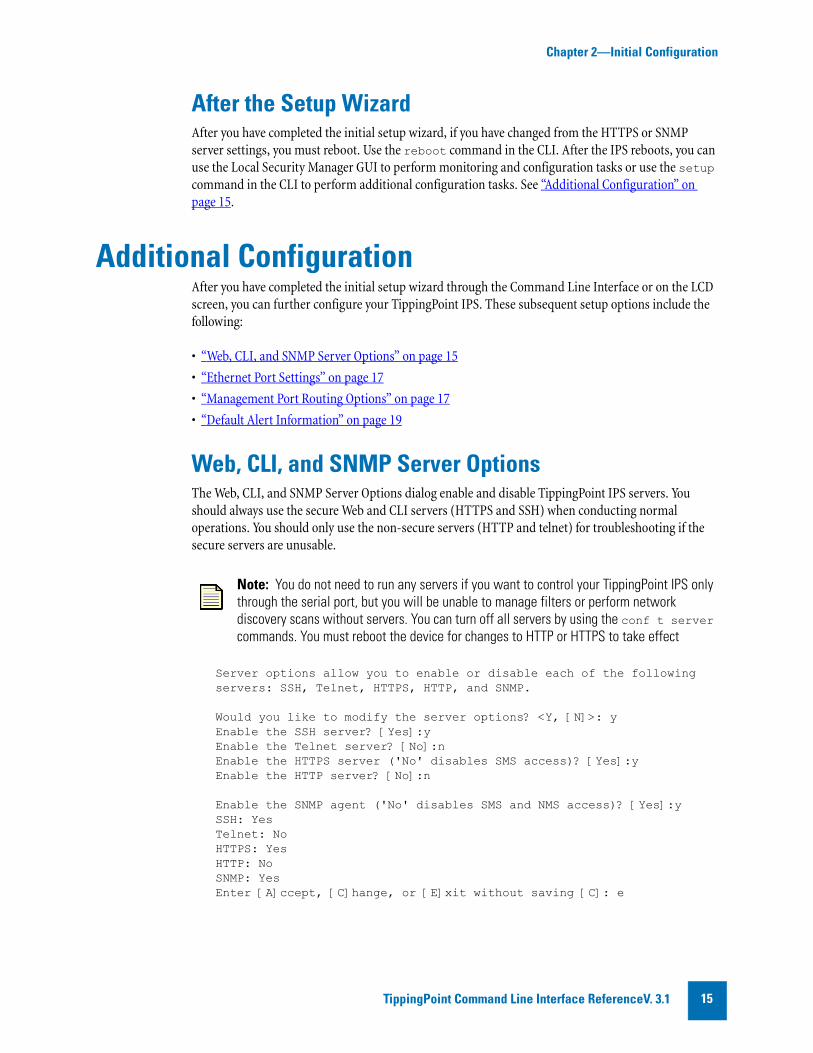
Web, CLI, and SNMP Server OptionsThe Web, CLI, and SNMP Server Options dialog enable and disable TippingPoint IPS servers. You should always use the secure Web and CLI servers (HTTPS and SSH) when conducting normal operations. You should only use the non-secure servers (HTTP and telnet) for troubleshooting if the secure servers are unusable.
Server options allow you to enable or disable each of the following servers: SSH, Telnet, HTTPS, HTTP, and SNMP.
Would you like to modify the server options? <Y, [N]>: yEnable the SSH server? [Yes]:yEnable the Telnet server? [No]:nEnable the HTTPS server ('No' disables SMS access)? [Yes]:yEnable the HTTP server? [No]:n
Enable the SNMP agent ('No' disables SMS and NMS access)? [Yes]:ySSH: YesTelnet: NoHTTPS: YesHTTP: NoSNMP: YesEnter [A]ccept, [C]hange, or [E]xit without saving [C]: e
Note: You do not need to run any servers if you want to control your TippingPoint IPS only through the serial port, but you will be unable to manage filters or perform network discovery scans without servers. You can turn off all servers by using the conf t server commands. You must reboot the device for changes to HTTP or HTTPS to take effect
TippingPoint Command Line Interface ReferenceV. 3.1 15
Chapter 2—Initial Configuration
SSH ServerEnables encrypted terminal communications. The SSH server must be enabled to establish a secure CLI session over your network. This option is enabled by default.
Telnet ServerEnables telnet connections to the IPS. The telnet server can be enabled to run non-secure CLI sessions over your network. This option is disabled by default.
HTTPS ServerEnables secure web access and encrypted file transfers over the network. The HTTPS server must be enabled to use SMS management. You can also run the LSM using the HTTPS server. This option is enabled by default.
HTTP ServerEnables non-secure web access. You can enable the HTTP server to run non-secure LSM session on your network. This option is disabled by default
SNMP ServerThe SNMP Server provides access to interface counters and other statistics, configuration data, and general system information via the Simple Network Management Protocol (SNMP). The SNMP server must be enabled to use SMS management or to allow NMS access. This option is enabled by default.
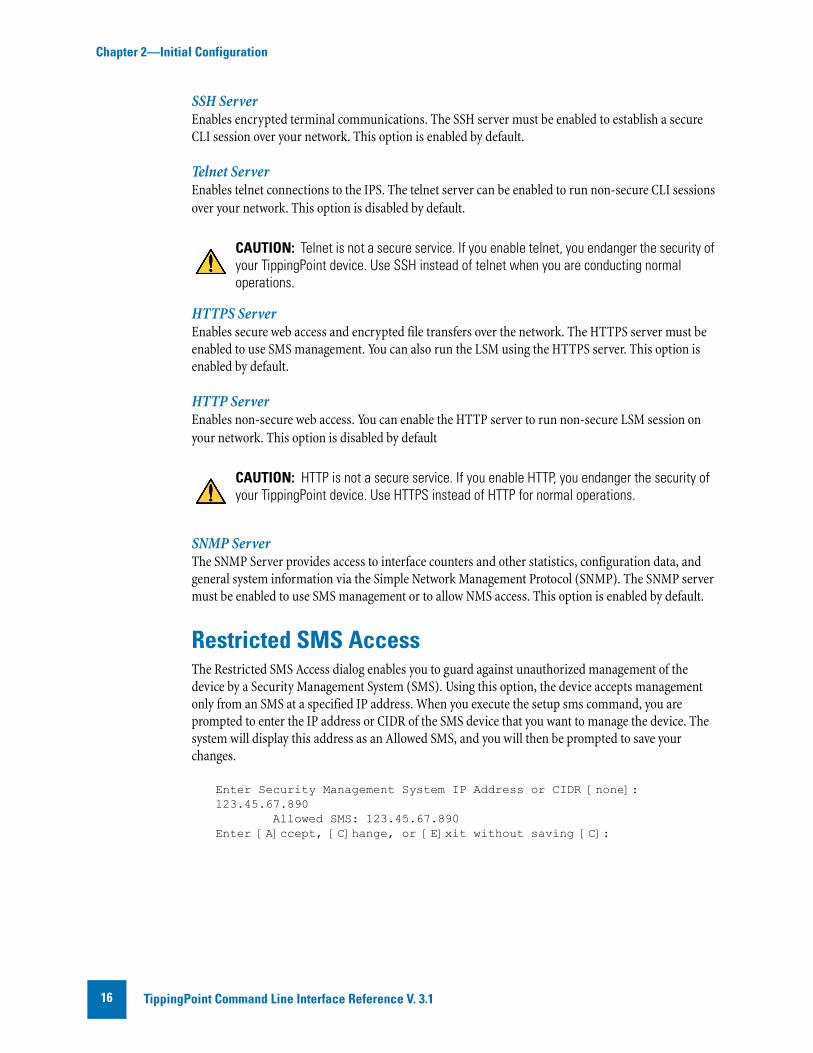
Restricted SMS AccessThe Restricted SMS Access dialog enables you to guard against unauthorized management of the device by a Security Management System (SMS). Using this option, the device accepts management only from an SMS at a specified IP address. When you execute the setup sms command, you are prompted to enter the IP address or CIDR of the SMS device that you want to manage the device. The system will display this address as an Allowed SMS, and you will then be prompted to save your changes.
Enter Security Management System IP Address or CIDR [none]: 123.45.67.890 Allowed SMS: 123.45.67.890Enter [A]ccept, [C]hange, or [E]xit without saving [C]:
CAUTION: Telnet is not a secure service. If you enable telnet, you endanger the security of your TippingPoint device. Use SSH instead of telnet when you are conducting normal operations.
CAUTION: HTTP is not a secure service. If you enable HTTP, you endanger the security of your TippingPoint device. Use HTTPS instead of HTTP for normal operations.
TippingPoint Command Line Interface Reference V. 3.116
Chapter 2—Initial Configuration
Ethernet Port SettingsThe Ethernet Port settings dialog enable and disable ports, and also set port speed, duplex, and negotiation settings. You can only access the Ethernet Port Setup by using the setup ethernet-port command in the CLI.
The Ethernet Port Options dialog configures individual port values for the IPS Ethernet interfaces.
Would you like to modify the Ethernet ports <Y,[N]>:y
We will now configure your Ethernet ports.
Configure port 1 (Ethernet Port)? <Y,[N]>:yThis port is currently enabled, would you like to disable it? <Y,[N]>:n
Please enter values for the following optionsLine speed [1000]:Duplex setting [Full]:Auto negotiation [On]:
Enter [A]ccept, [C]hange, or [E]xit without saving [C]: aConfigure Port 2 (Ethernet Port)? <Y,[N]>:
Line SpeedThe line speed setting for a port. You can set a port to 10, 100, or 1000 Kbps.
Duplex SettingThe duplex setting for the port. Copper can be set to full or half. Fiber ports can be set to full.
Auto NegotiationThe auto negotiation setting determines whether the port will negotiate its speed based on the connection it can make.
Management Port Routing OptionsThe Management Port Routing options dialog configures management port routes. You can only access the Management Port Routing options by using the setup mgmtEthernet command in the CLI.
Tip: You can configure Ethernet ports individually using the conf t interface ethernet command.
CAUTION: When you configure an Ethernet port using the command line interface, the port will be shut down. Use the conf t int ethernet <segment> <port> no shutdown command to restart the port.
TippingPoint Command Line Interface ReferenceV. 3.1 17
Chapter 2—Initial Configuration
These options enable the TippingPoint IPS device to be managed from a different network than the one to which the management port is connected. You can define up to 12 routes that your Management Port can use to communicate with other subnets.
Would you like to modify management port routes? <Y,[N]>:y Currently, the additional routes are as follows: # Destination Gateway 1 any4 10.252.0.254 2 none none 3 none none 4 none none 5 none none 6 none none 7 none none 8 none none 9 none none 10 none none 11 none none 12 none none Enter [A]ccept, [C]hange, [R]emove or [E]xit without saving [C]: c
The new route is added to the list. The following example shows an example of a routing table that has had both IPv4 and IPv6 addresses added to it:
Currently, the additional routes are as follows: # Destination Gateway 1 any4 10.252.0.254 2 1.2.3.0/24 10.252.0.123 3 fc01:afc::102:300/120 fe80::205:9bff:fe86:1234 4 none none 5 none none 6 none none 7 none none 8 none none 9 none none 10 none none 11 none none 12 none none
Destination NetworkThe IP network address of the subnet with which you want the IPS to communicate.
GatewayThe IP address on the IPS subnet that can communicate with the destination network.
CAUTION: Define additional routes with care. The broader a definition of additional routes you use, the greater the chance that an unauthorized user can reach your IPS.
TippingPoint Command Line Interface Reference V. 3.118

Chapter 2—Initial Configuration
Default Alert InformationThe Default Alert options dialog defines the default sender and recipient for filter alert emails. You can only access the Default Alert options by using the setup default-alert-sink command in the CLI.
Would you like to modify the default Email contact? <Y,[N]>:y
Enter TO: email address (128 max. characters)Must be a full email address (e.g., [email protected]) []: [email protected]
Enter FROM: email address (128 max. characters)Must be a full email address (e.g., [email protected]) []: [email protected]
Enter FROM: Domain Name (128 max. characters, e.g., company.com) []: company.com
Enter email server IP address []: 1.2.3.4
Enter period (in minutes) that email should be sent (1 - 10080) [1]: 5
To: [email protected]: [email protected]: company.comEmail Server: 1.2.3.4Period (minutes): 5Enter [A]ccept, [C]hange, or [E]xit without saving [C]: a
TO email addressThe email address to which alert notifications will be sent. The address must be:
• less than 129 characters long
• a valid email address. For example: [email protected]
FROM email addressThe address that alert notifications will contain in the from field. The address must be:
• less than 129 characters long
• a valid email account name on the SMTP server
• a valid email address on the SMTP server
DomainThe domain name of the SMTP server. The domain name must be:
• a valid domain name with a DNS entry on the network the TippingPoint device is located on
• the domain name where the SMTP server is located
Email Server IP addressThe address where the SMTP server is located. The address must be a valid IP address for an SMTP server
TippingPoint Command Line Interface ReferenceV. 3.1 19
Chapter 2—Initial Configuration
PeriodThe aggregation period for email alerts. The first time a filter that calls for email notification is triggered, the system sends an email notification to the target named in the filter. At the same time, the aggregation timer starts. The TippingPoint device counts additional filter triggers, but does not email another notification until it sends a count of all filter triggers that occurred during that period. The timer continues to count and send notifications at the end of each period.The period must be an integer between 1 and 10,080 representing minutes between notifications
TippingPoint Command Line Interface Reference V. 3.120
3 NavigationDescribes logging in and issuing commands with the CLI.
OverviewThe Command Line Interface (CLI) is a standard embedded system command line interface that provides access to hardware and embedded software configuration.
Accessing the CLILog into the CLI using an SSH session or through a terminal connected to the device through the console port. To log in via SSH, you must have:
• an SSH client
• a valid username and password on the device. If you do not have a username and password, a user with super-user access must create them for you.
To Log in to the CLI
1. If you are using SSH to connect to the CLI, start an SSH session using the IP address of the management port. If you are using the console, ensure that the console and device are powered on and ready.
2. Enter your username at the Login prompt.
3. Enter your password at the Password prompt.
TippingPoint Command Line Interface ReferenceV. 3.1 21
Chapter 3—Navigation
NavigationThe TippingPoint Command Line Interface offers the following features:
• Command Types
• Using Hierarchical Commands
• Command Hints
• Command Completion
Each of these features is described below.
Command TypesThe CLI has two types of commands.
• Global commands: Available from within any menu level in the CLI. Global commands do not report on or change configuration items. These commands are listed by the command help commands.
• Hierarchical commands: Configure, manage, and display TippingPoint IPS configuration. Some IPS commands are hierarchical, and are available only within a menu or submenu.
Using Hierarchical CommandsThe CLI divides the hierarchical commands into functional areas. There are several commands that lead to submenus, including configure terminal and show.
Context Sensitive PromptThe CLI prompt helps indicate what menu level you are currently using. The top-level menu prompt is:
hostname#
When you enter a submenu, the prompt changes to indicate the current menu level. For example, changing to the show submenu will change the CLI prompt from:
hostname# show
to
hostname(show)#
Exiting SubmenusThe exit command steps back to the previous menu, or up one submenu. The exit all command returns you to the hostname# menu level.
Command HintsOn each command level, you can view the hierarchical commands available at that level by typing a question mark (?).
TippingPoint Command Line Interface Reference V. 3.122
Chapter 3—Navigation
Command CompletionThe CLI attempts to match partially typed commands with valid commands. For example, if you type:
reb?
The CLI interprets this command as if you typed the following:
reboot
You can also use the Tab key for command completion.
Command Line EditingThe following commands can be used to edit your command line entries:
Table 3 - 1: CLI Edit commands
Key Combination Edit Function
Ctrl-d Delete current character
Ctrl-u Delete text up to cursor
Ctrl-k Delete from cursor to end of line
Ctrl-a Move to beginning of line
Ctrl-e Move to end of line
Ctrl-p Get prior command from history
Ctrl-n Get next command from history
Ctrl-b Move cursor left
Ctrl-f Move cursor right
Esc-b Move back one word
Esc-f Move forward one word
Esc-c Convert rest of word to uppercase
Esc-l Convert rest of word to lowercase
Esc-d Delete remainder of word
Ctrl-w Delete word up to cursor
Ctrl-t Transpose current and previous character
Ctrl-z Enter command and return to root prompt
Ctrl-l Refresh input line
up arrow Put last command on the command line
!! <cr> Execute last command
TippingPoint Command Line Interface ReferenceV. 3.1 23
Chapter 3—Navigation
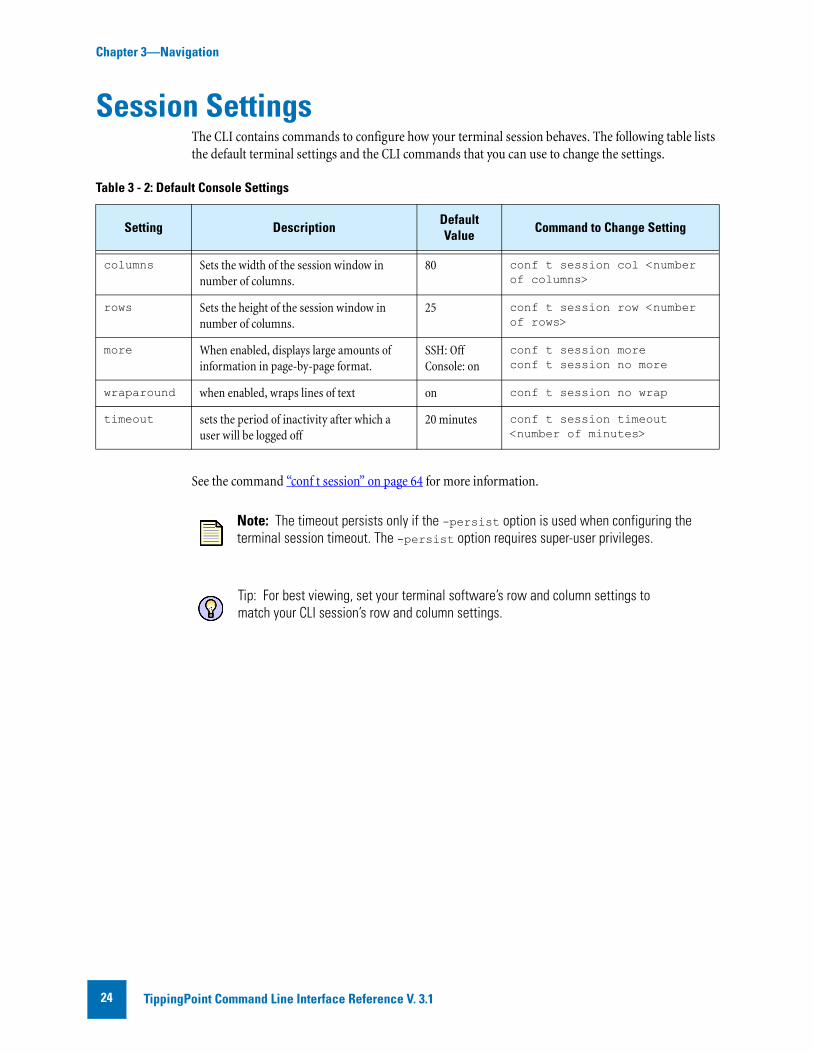
Session SettingsThe CLI contains commands to configure how your terminal session behaves. The following table lists the default terminal settings and the CLI commands that you can use to change the settings.
See the command “conf t session” on page 64 for more information.
Table 3 - 2: Default Console Settings
Setting Description Default Value Command to Change Setting
columns Sets the width of the session window in number of columns.
80 conf t session col <number of columns>
rows Sets the height of the session window in number of columns.
25 conf t session row <number of rows>
more When enabled, displays large amounts of information in page-by-page format.
SSH: OffConsole: on
conf t session moreconf t session no more
wraparound when enabled, wraps lines of text on conf t session no wrap
timeout sets the period of inactivity after which a user will be logged off
20 minutes conf t session timeout <number of minutes>
Note: The timeout persists only if the -persist option is used when configuring the terminal session timeout. The -persist option requires super-user privileges.
Tip: For best viewing, set your terminal software’s row and column settings to match your CLI session’s row and column settings.
TippingPoint Command Line Interface Reference V. 3.124
4 TippingPoint IPS CommandsThis chapter provides a reference for the Command Line Interface (CLI) for the TippingPoint IPS.
OverviewThis chapter contains reference information for each command and includes the following sections:
• “Conventions” on page 26
• “Global Commands” on page 26
• “TippingPoint Operating System Commands” on page 31
TippingPoint Command Line Interface ReferenceV. 3.1 25

Chapter 4—TippingPoint IPS Commands
ConventionsThis reference manual is divided into sections by top-level commands. Some top-level commands, such as configure terminal, have been split up for easier reference. Each command section includes the following information:
• Description
• Required privileges
• Subcommands and/or parameters
• Examples of usage
Variables are enclosed in angle brackets. For example, a snapshot name variable is represented as <snapshot name>. Optional flags and variables are enclosed in square brackets. For example, an optional profile name is represented as [-profile <profile name>].
Global CommandsThe commands in this section manage your CLI session. The settings and results do not persist across multiple sessions. These commands are available to all users and user roles.
• “alias” on page 27
• “clear” on page 28
• “cls” on page 29
• “exit” on page 29
• “help” on page 29
• “history” on page 30
• “logout” on page 30
• “ping” on page 30
• “quit” on page 30
• “tree” on page 30
• “who” on page 31
• “whoami” on page 31
CAUTION: The square brackets are included in usage examples for clarification purposes only. Do not type these brackets when entering a command.
TippingPoint Command Line Interface Reference V. 3.126
Chapter 4—TippingPoint IPS Commands
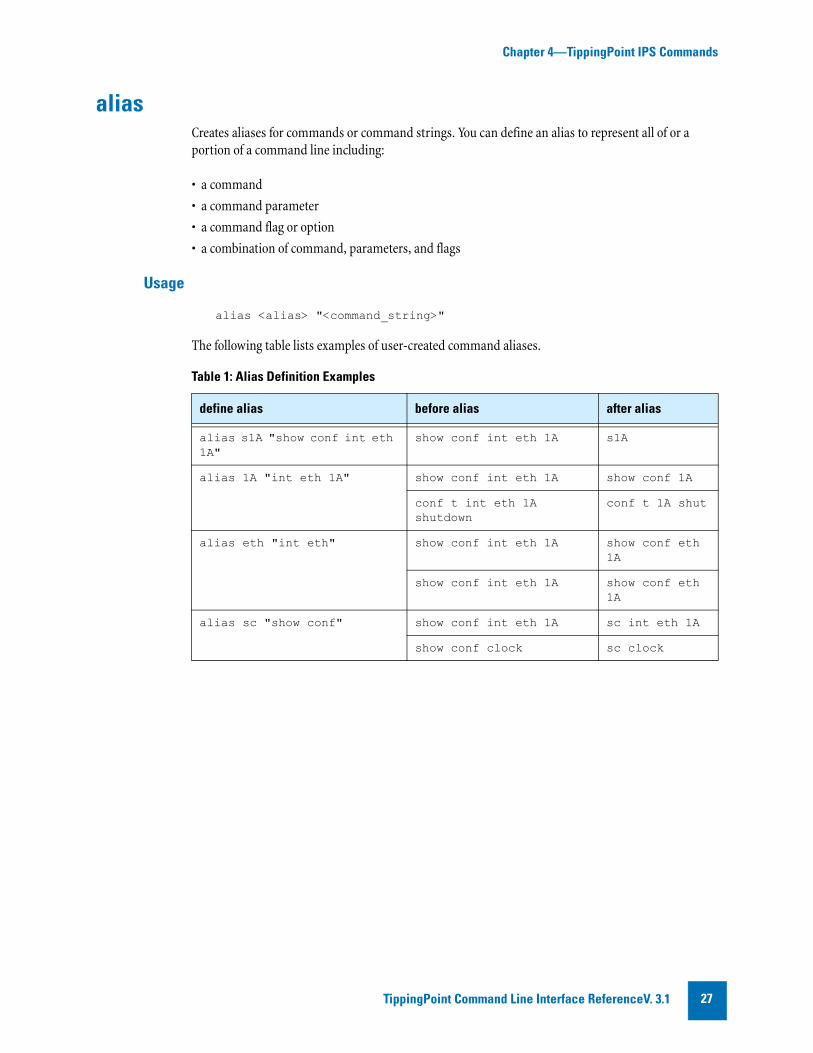
aliasCreates aliases for commands or command strings. You can define an alias to represent all of or a portion of a command line including:
• a command
• a command parameter
• a command flag or option
• a combination of command, parameters, and flags
Usage
alias <alias> "<command_string>"
The following table lists examples of user-created command aliases.
Table 1: Alias Definition Examples
define alias before alias after alias
alias s1A "show conf int eth 1A"
show conf int eth 1A s1A
alias 1A "int eth 1A" show conf int eth 1A show conf 1A
conf t int eth 1A shutdown
conf t 1A shut
alias eth "int eth" show conf int eth 1A show conf eth 1A
show conf int eth 1A show conf eth 1A
alias sc "show conf" show conf int eth 1A sc int eth 1A
show conf clock sc clock
TippingPoint Command Line Interface ReferenceV. 3.1 27
Chapter 4—TippingPoint IPS Commands
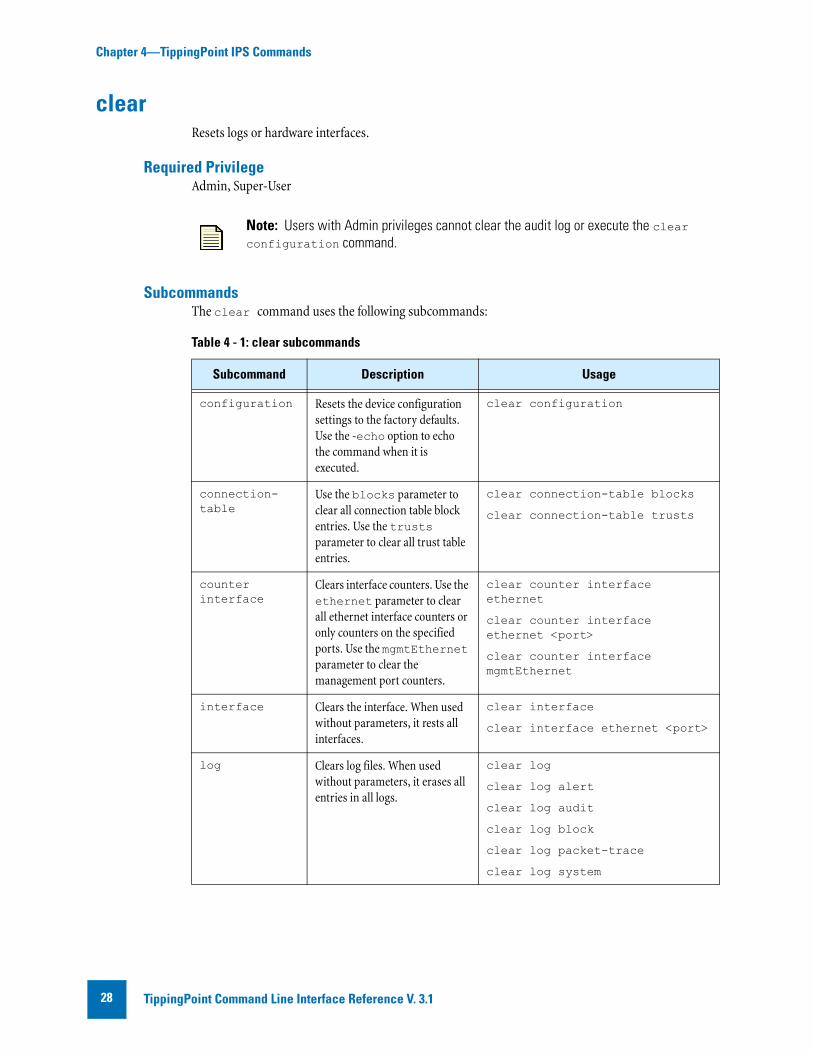
clearResets logs or hardware interfaces.
Required PrivilegeAdmin, Super-User
SubcommandsThe clear command uses the following subcommands:
Note: Users with Admin privileges cannot clear the audit log or execute the clear configuration command.
Table 4 - 1: clear subcommands
Subcommand Description Usage
configuration Resets the device configuration settings to the factory defaults. Use the -echo option to echo the command when it is executed.
clear configuration
connection-table
Use the blocks parameter to clear all connection table block entries. Use the trusts parameter to clear all trust table entries.
clear connection-table blocks
clear connection-table trusts
counter interface
Clears interface counters. Use the ethernet parameter to clear all ethernet interface counters or only counters on the specified ports. Use the mgmtEthernet parameter to clear the management port counters.
clear counter interface ethernet
clear counter interface ethernet <port>
clear counter interface mgmtEthernet
interface Clears the interface. When used without parameters, it rests all interfaces.
clear interface
clear interface ethernet <port>
log Clears log files. When used without parameters, it erases all entries in all logs.
clear log
clear log alert
clear log audit
clear log block
clear log packet-trace
clear log system
TippingPoint Command Line Interface Reference V. 3.128
Chapter 4—TippingPoint IPS Commands
clsClears the terminal screen.
Usage
cls
exitBacks you out of one or more command levels. For detailed information about command hierarchy, see “Using Hierarchical Commands” on page 22.
Usage
exit
exit all
helpDisplays documentation about the specified command. At the CLI prompt, you can access the help topics for commands. You can also specify help for commands and edit keys.
Usage
help
help commands
help edit
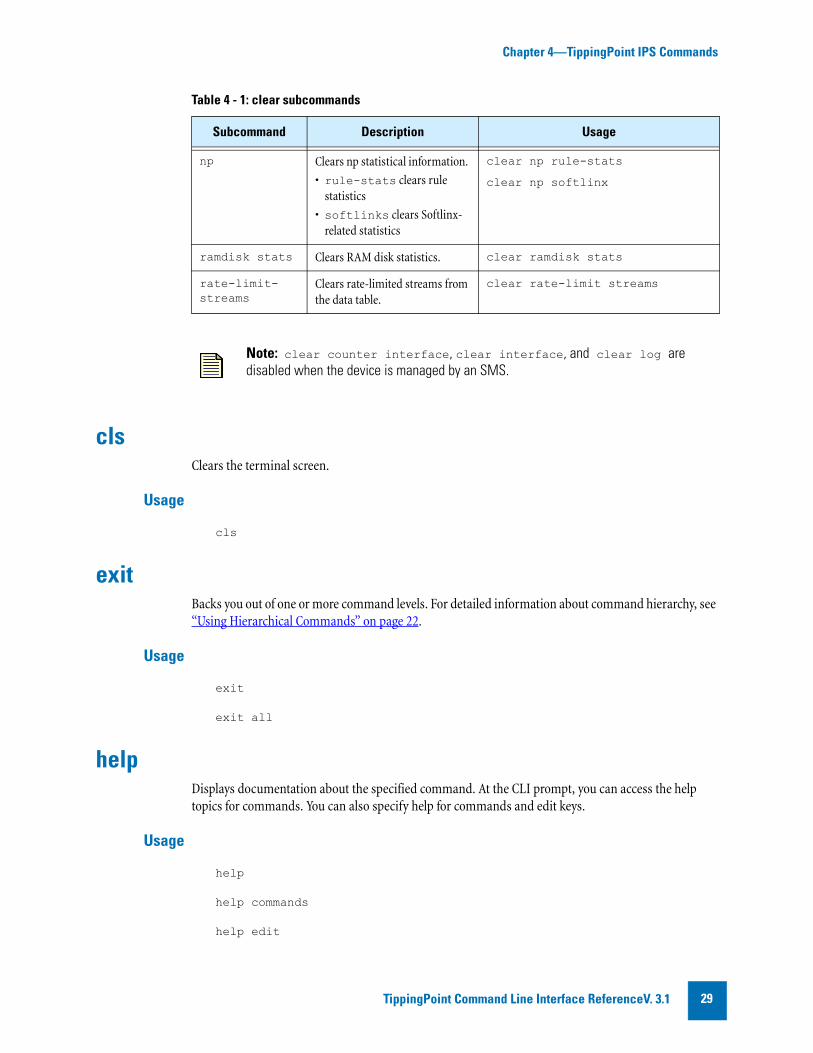
np Clears np statistical information.
• rule-stats clears rule statistics
• softlinks clears Softlinx-related statistics
clear np rule-stats
clear np softlinx
ramdisk stats Clears RAM disk statistics. clear ramdisk stats
rate-limit-streams
Clears rate-limited streams from the data table.
clear rate-limit streams
Note: clear counter interface, clear interface, and clear log are disabled when the device is managed by an SMS.
Table 4 - 1: clear subcommands
Subcommand Description Usage
TippingPoint Command Line Interface ReferenceV. 3.1 29
Chapter 4—TippingPoint IPS Commands
historyDisplays a list of commands that have been executed during the current CLI session.
Usage
history
logoutLogs you out of the TippingPoint IPS.
Usage
logout
pingTests whether a particular IP address can be reached and how long it takes to receiev a reply.
Usage
ping <ip address>
quitLogs you out of the TippingPoint IPS.
Usage
quit
treeDisplays the full command tree.
Usage
tree
TippingPoint Command Line Interface Reference V. 3.130
Chapter 4—TippingPoint IPS Commands
whoShows the usernames, connection methods, IP addresses, and login times of all the users who are currently logged into to IPS. By default, the login time is shown in the time zone that you set during setup or with the conf t clock command. Use the -utc option to view the login times in Universal Time.
Required PrivilegeAdmin, Super-User
Usagewho
who -utc
whoamiDisplays the username, role, and path of the currently logged-in user.
Usage
whoami
TippingPoint Operating System CommandsThe commands in this section configure, manage, and display information about the TippingPoint Operating System and its users.
• “boot” on page 32
• “bugreport” on page 32
• “compact-flash” on page 33
• “configure terminal” on page 33
• “debug” on page 75
• “halt” on page 79
• “high-availability” on page 79
• “setup” on page 82
• “show” on page 83
• “show configuration” on page 87
• “snapshot” on page 90
TippingPoint Command Line Interface ReferenceV. 3.1 31
Chapter 4—TippingPoint IPS Commands
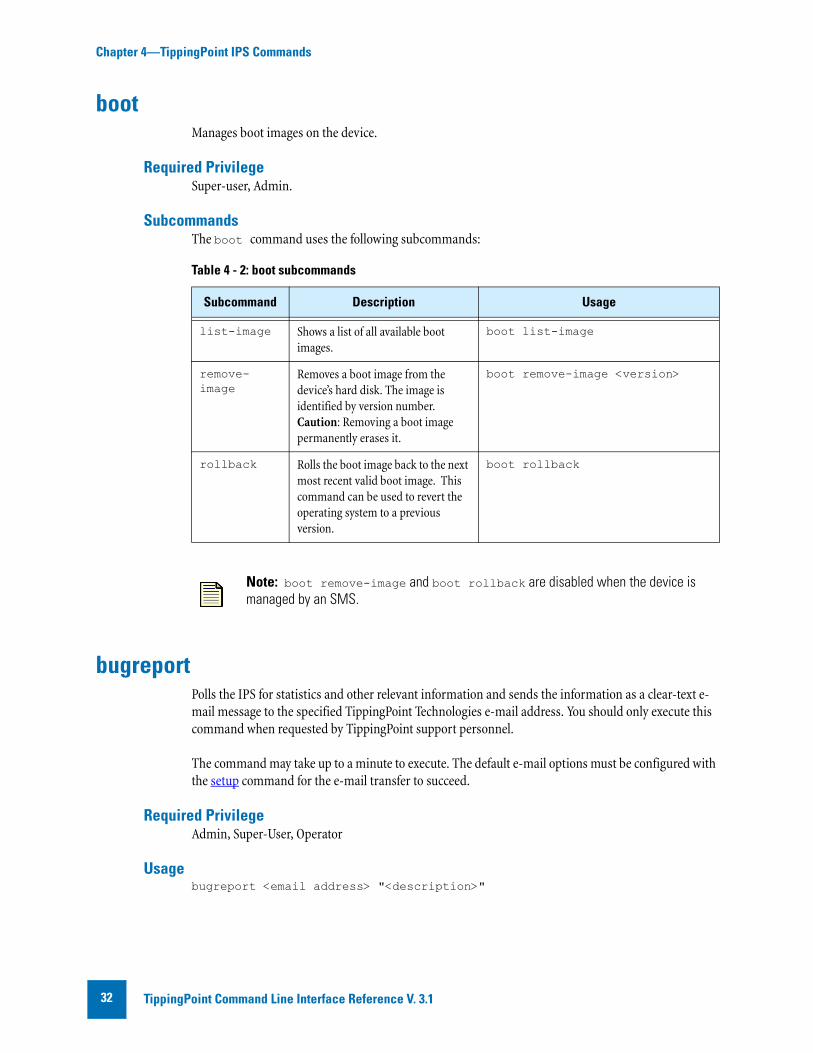
bootManages boot images on the device.
Required PrivilegeSuper-user, Admin.
SubcommandsThe boot command uses the following subcommands:
bugreportPolls the IPS for statistics and other relevant information and sends the information as a clear-text e-mail message to the specified TippingPoint Technologies e-mail address. You should only execute this command when requested by TippingPoint support personnel.
The command may take up to a minute to execute. The default e-mail options must be configured with the setup command for the e-mail transfer to succeed.
Required PrivilegeAdmin, Super-User, Operator
Usagebugreport <email address> "<description>"
Table 4 - 2: boot subcommands
Subcommand Description Usage
list-image Shows a list of all available boot images.
boot list-image
remove-image
Removes a boot image from the device’s hard disk. The image is identified by version number. Caution: Removing a boot image permanently erases it.
boot remove-image <version>
rollback Rolls the boot image back to the next most recent valid boot image. This command can be used to revert the operating system to a previous version.
boot rollback
Note: boot remove-image and boot rollback are disabled when the device is managed by an SMS.
TippingPoint Command Line Interface Reference V. 3.132
Chapter 4—TippingPoint IPS Commands
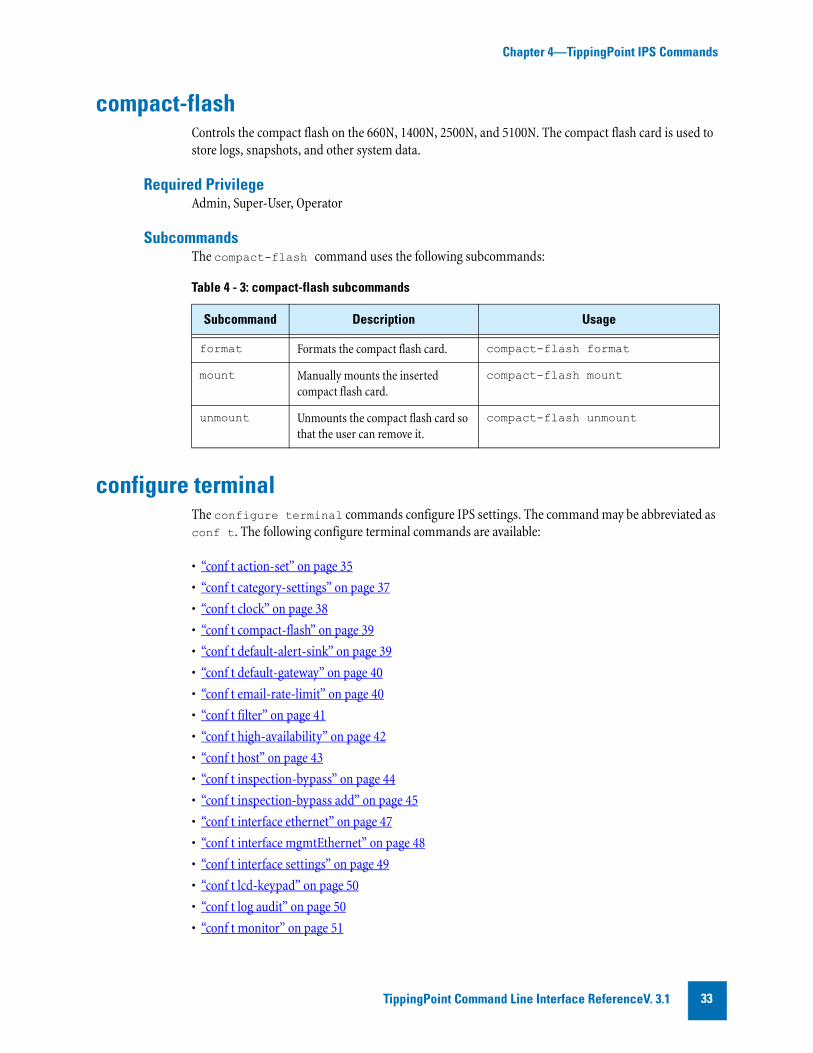
compact-flashControls the compact flash on the 660N, 1400N, 2500N, and 5100N. The compact flash card is used to store logs, snapshots, and other system data.
Required PrivilegeAdmin, Super-User, Operator
SubcommandsThe compact-flash command uses the following subcommands:
configure terminalThe configure terminal commands configure IPS settings. The command may be abbreviated as conf t. The following configure terminal commands are available:
• “conf t action-set” on page 35
• “conf t category-settings” on page 37
• “conf t clock” on page 38
• “conf t compact-flash” on page 39
• “conf t default-alert-sink” on page 39
• “conf t default-gateway” on page 40
• “conf t email-rate-limit” on page 40
• “conf t filter” on page 41
• “conf t high-availability” on page 42
• “conf t host” on page 43
• “conf t inspection-bypass” on page 44
• “conf t inspection-bypass add” on page 45
• “conf t interface ethernet” on page 47
• “conf t interface mgmtEthernet” on page 48
• “conf t interface settings” on page 49
• “conf t lcd-keypad” on page 50
• “conf t log audit” on page 50
• “conf t monitor” on page 51
Table 4 - 3: compact-flash subcommands
Subcommand Description Usage
format Formats the compact flash card. compact-flash format
mount Manually mounts the inserted compact flash card.
compact-flash mount
unmount Unmounts the compact flash card so that the user can remove it.
compact-flash unmount
TippingPoint Command Line Interface ReferenceV. 3.1 33
Chapter 4—TippingPoint IPS Commands
• “conf t named-ip” on page 52
• “conf t nms” on page 53
• “conf t notify-contact” on page 53
• “conf t port” on page 54
• “conf t profile” on page 55
• “conf t protection-settings” on page 56
• “conf t ramdisk” on page 57
• “conf t remote-syslog” on page 58
• “conf t reputation” on page 59
• “conf t reputation group” on page 61
• “conf t segment” on page 62
• “conf t server” on page 63
• “conf t service-access” on page 64
• “conf t session” on page 64
• “conf t sms” on page 65
• “conf t sntp” on page 66
• “conf t traffic-mgmt” on page 67
• “conf t tse” on page 70
• “conf t user” on page 72
• “conf t user options” on page 73
• “conf t virtual-port” on page 74
• “conf t virtual-segment” on page 75
• “conf t vlan-translation” on page 75
TippingPoint Command Line Interface Reference V. 3.134
Chapter 4—TippingPoint IPS Commands
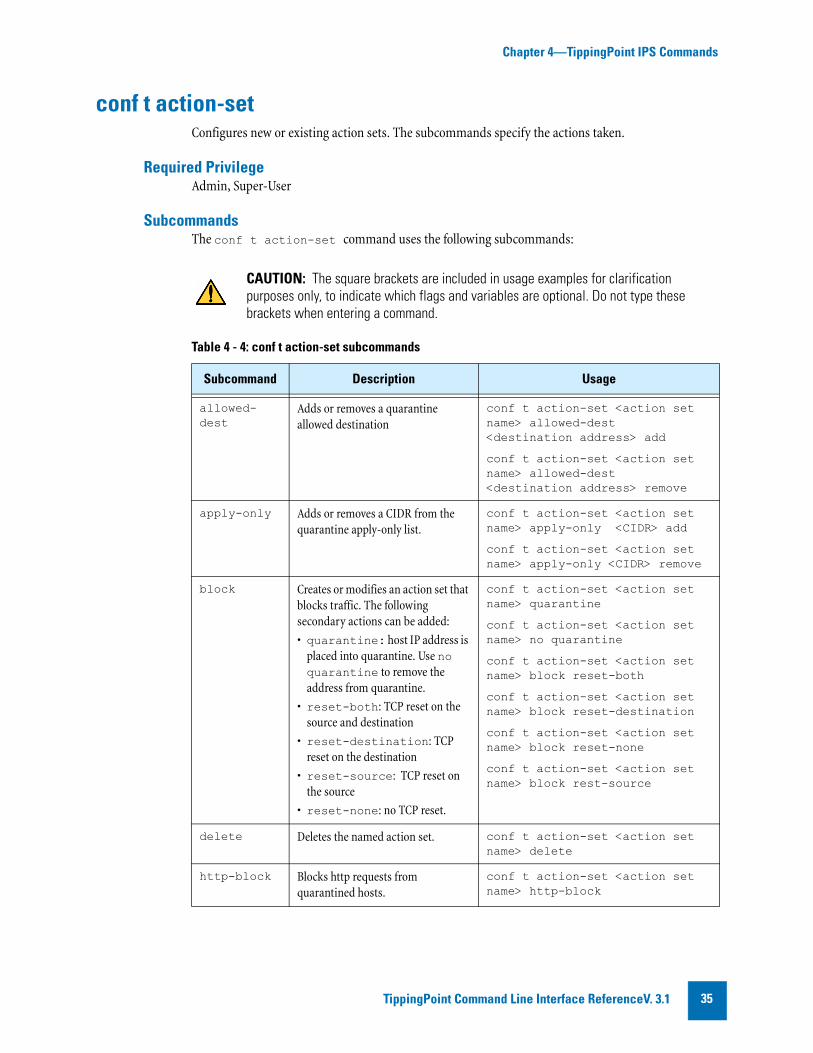
conf t action-setConfigures new or existing action sets. The subcommands specify the actions taken.
Required PrivilegeAdmin, Super-User
SubcommandsThe conf t action-set command uses the following subcommands:
CAUTION: The square brackets are included in usage examples for clarification purposes only, to indicate which flags and variables are optional. Do not type these brackets when entering a command.
Table 4 - 4: conf t action-set subcommands
Subcommand Description Usage
allowed-dest
Adds or removes a quarantine allowed destination
conf t action-set <action set name> allowed-dest <destination address> add
conf t action-set <action set name> allowed-dest <destination address> remove
apply-only Adds or removes a CIDR from the quarantine apply-only list.
conf t action-set <action set name> apply-only <CIDR> add
conf t action-set <action set name> apply-only <CIDR> remove
block Creates or modifies an action set that blocks traffic. The following secondary actions can be added:
• quarantine: host IP address is placed into quarantine. Use no quarantine to remove the address from quarantine.
• reset-both: TCP reset on the source and destination
• reset-destination: TCP reset on the destination
• reset-source: TCP reset on the source
• reset-none: no TCP reset.
conf t action-set <action set name> quarantine
conf t action-set <action set name> no quarantine
conf t action-set <action set name> block reset-both
conf t action-set <action set name> block reset-destination
conf t action-set <action set name> block reset-none
conf t action-set <action set name> block rest-source
delete Deletes the named action set. conf t action-set <action set name> delete
http-block Blocks http requests from quarantined hosts.
conf t action-set <action set name> http-block
TippingPoint Command Line Interface ReferenceV. 3.1 35
Chapter 4—TippingPoint IPS Commands
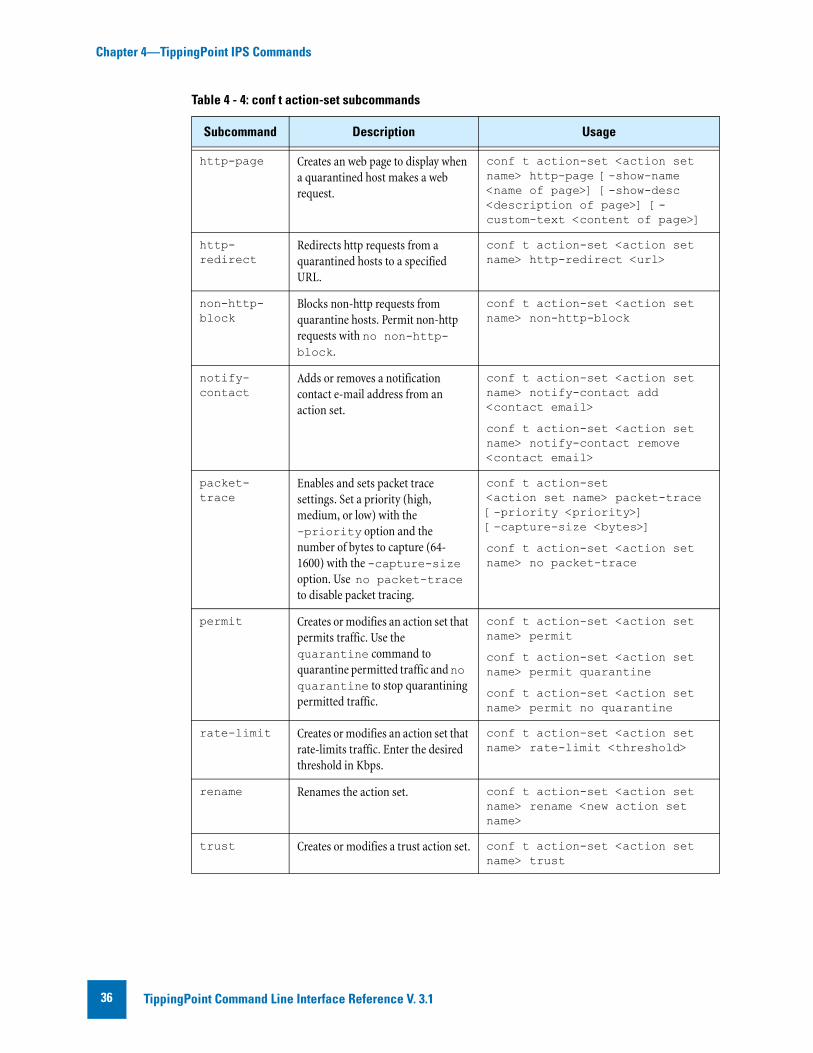
http-page Creates an web page to display when a quarantined host makes a web request.
conf t action-set <action set name> http-page [-show-name <name of page>] [-show-desc <description of page>] [-custom-text <content of page>]
http-redirect
Redirects http requests from a quarantined hosts to a specified URL.
conf t action-set <action set name> http-redirect <url>
non-http-block
Blocks non-http requests from quarantine hosts. Permit non-http requests with no non-http-block.
conf t action-set <action set name> non-http-block
notify-contact
Adds or removes a notification contact e-mail address from an action set.
conf t action-set <action set name> notify-contact add <contact email>
conf t action-set <action set name> notify-contact remove <contact email>
packet-trace
Enables and sets packet trace settings. Set a priority (high, medium, or low) with the -priority option and the number of bytes to capture (64-1600) with the -capture-size option. Use no packet-trace to disable packet tracing.
conf t action-set <action set name> packet-trace [-priority <priority>] [-capture-size <bytes>]
conf t action-set <action set name> no packet-trace
permit Creates or modifies an action set that permits traffic. Use the quarantine command to quarantine permitted traffic and no quarantine to stop quarantining permitted traffic.
conf t action-set <action set name> permit
conf t action-set <action set name> permit quarantine
conf t action-set <action set name> permit no quarantine
rate-limit Creates or modifies an action set that rate-limits traffic. Enter the desired threshold in Kbps.
conf t action-set <action set name> rate-limit <threshold>
rename Renames the action set. conf t action-set <action set name> rename <new action set name>
trust Creates or modifies a trust action set. conf t action-set <action set name> trust
Table 4 - 4: conf t action-set subcommands
Subcommand Description Usage
TippingPoint Command Line Interface Reference V. 3.136
Chapter 4—TippingPoint IPS Commands
conf t autodvEnables and disables the automatic download service for Digital Vaccine (DV) updates. This command requires a day of week and time of day for the download. If required, use the -period option to set the number of days between checks.
Required PrivilegeAdmin, Super-User
Usageconf t autodv day <day of week> time <time of day> -period <number of days>
conf t no autodv
conf t category-settingsEnables and disables filter categories. The command also enables you to assign a specific action set to each category. The following filter categories can be configured:
• exploits
• identity-theft
• im
• network-equipment
• p2p
• reconnaissance
• security-policy
• spyware
• streaming-media
• traffic-normal
• virus
• vulnerabilities
Required PrivilegeAdmin, Super-User
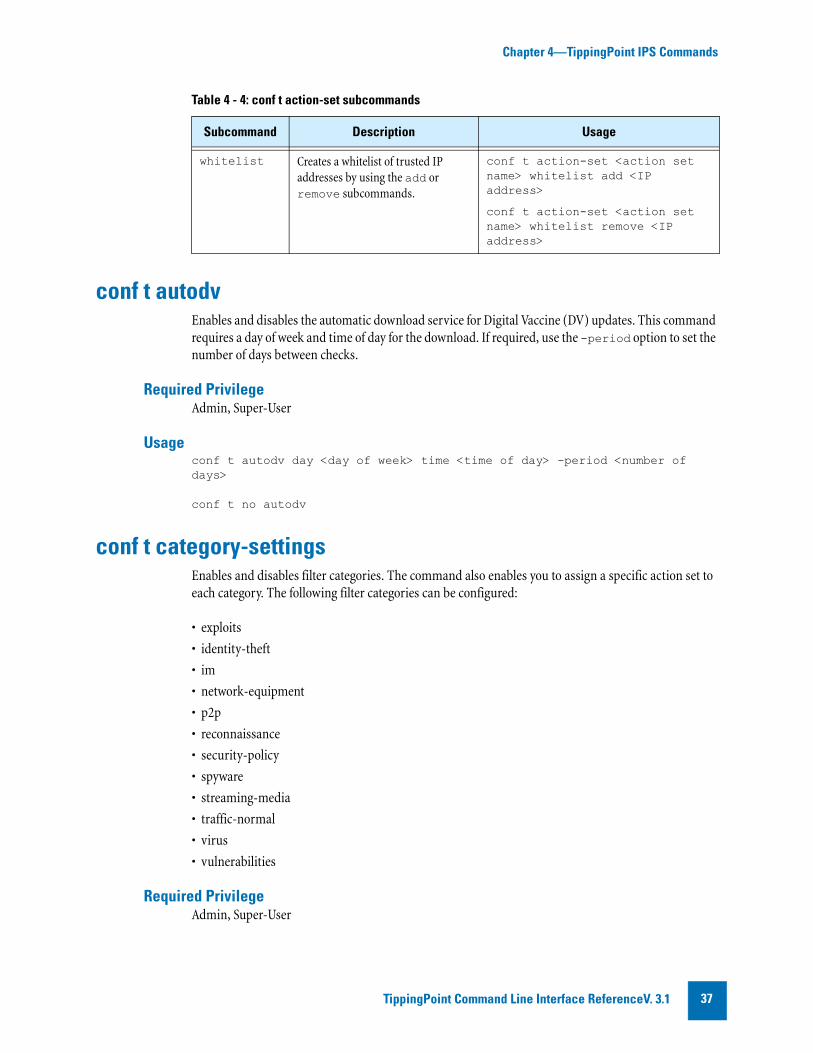
whitelist Creates a whitelist of trusted IP addresses by using the add or remove subcommands.
conf t action-set <action set name> whitelist add <IP address>
conf t action-set <action set name> whitelist remove <IP address>
Table 4 - 4: conf t action-set subcommands
Subcommand Description Usage
TippingPoint Command Line Interface ReferenceV. 3.1 37
Chapter 4—TippingPoint IPS Commands
SubcommandsThe conf t category-settings command uses the following subcommands:
conf t clockSets the software clock on the IPS device. Clock changes are synchronized with the appropriate clock driver, and the change is entered in the audit log.
Required PrivilegeAdmin, Super-User
SubcommandsThe conf t clock command uses the following subcommands:
CAUTION: The square brackets are included in usage examples for clarification purposes only, to indicate which flags and variables are optional. Do not type these brackets when entering a command.
Table 4 - 5: conf t category-settings subcommands
Subcommand Description Usage
enable Enables a filter category and assigns the named action set to the category. Enable the filter category for a specific profile with the -profile option.
conf t category-settings [-profile <profile name>] <filter category> enable -action-set <action set>
disable Disables the filter category. conf t category-settings <filter category> disable
Table 4 - 6: conf t clock subcommands
Subcommand Description Usage
date Sets the date. conf t clock date <YYYY-MM-DD>
dst Enables or disables Daylight Savings Time.
conf t clock dst
conf t clock no dst
time Sets the time according to the 24-hour clock. For example, to set the clock to 3:30 PM, enter 15:30.
conf t clock time <HH:MM:SS>
timezone Sets the time zone. For a list of available time zones, use the command show timezones.
conf t clock timezone <time zone>
TippingPoint Command Line Interface Reference V. 3.138

Chapter 4—TippingPoint IPS Commands
conf t compact-flashConfigures the mounting options for the compact flash card. By default, the device is set to automatically mount compact flash cards when inserted.
Required PrivilegeAdmin, Super-User
SubcommandsThe conf t compact-flash command uses the following subcommands:
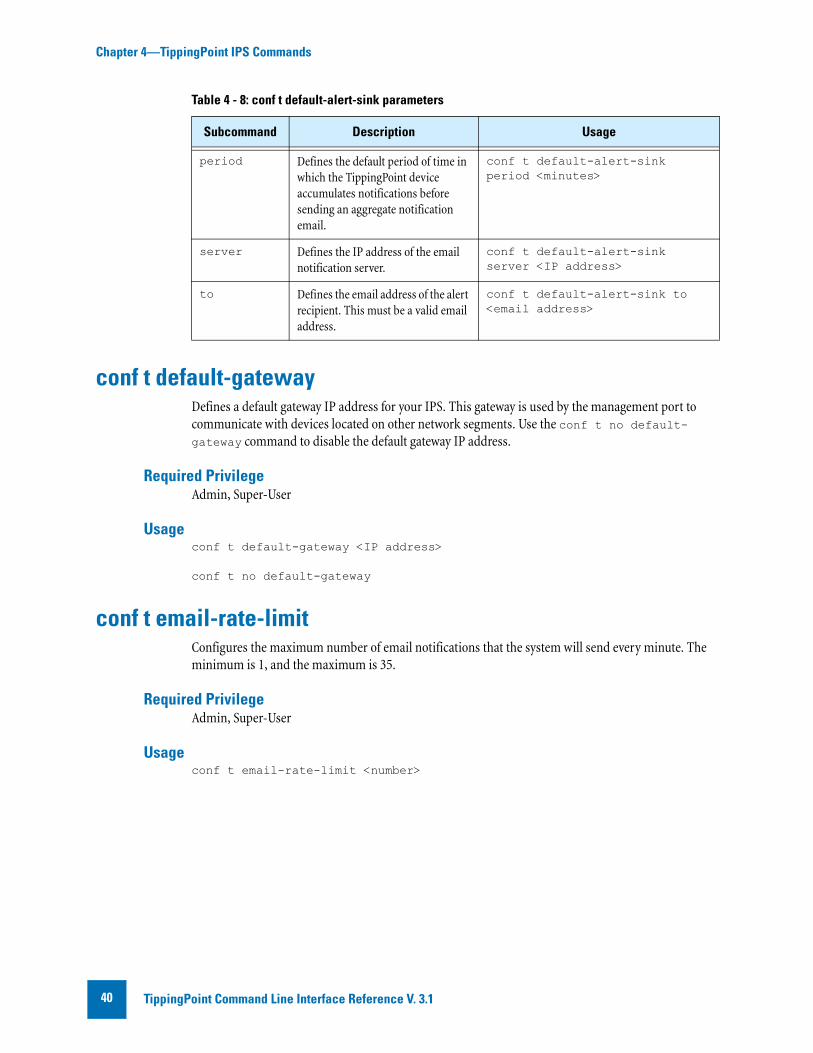
conf t default-alert-sinkDefines the default email recipient of traffic-triggered alerts
Required PrivilegeAdmin, Super-User
SubcommandsThe conf t default-alert-sink command uses the following parameters:
Table 4 - 7: conf t compact-flash subcommands
Subcommand Description Usage
operation-mode authenticate
Sets the device to require authentication when a compact flash card is inserted.
conf t compact-flash operation-mode authenticate
operation-mode auto-mount
Sets the device to automatically mount compact flash cards when inserted.
conf t compact-flash operation-mode authenticate auto-mount
Note: The email notification server must be an SMTP server that the IPS device can reach through its host management port. You may have to add an additional route to your host management port using the conf t interface mgmtEthernet command to enable this communication. See “conf t interface mgmtEthernet” on page 48.
Table 4 - 8: conf t default-alert-sink parameters
Subcommand Description Usage
domain Defines the domain name of the email notification server.
conf t default-alert-sink domain <domain name>
from Defines the email address for the IPS device. This must be a valid email user name on the notification server.
conf t default-alert-sink from <email address>
no Removes the default email destination
conf t no default-alert-sink
TippingPoint Command Line Interface ReferenceV. 3.1 39
Chapter 4—TippingPoint IPS Commands
conf t default-gatewayDefines a default gateway IP address for your IPS. This gateway is used by the management port to communicate with devices located on other network segments. Use the conf t no default-gateway command to disable the default gateway IP address.
Required PrivilegeAdmin, Super-User
Usageconf t default-gateway <IP address>
conf t no default-gateway
conf t email-rate-limitConfigures the maximum number of email notifications that the system will send every minute. The minimum is 1, and the maximum is 35.
Required PrivilegeAdmin, Super-User
Usageconf t email-rate-limit <number>
period Defines the default period of time in which the TippingPoint device accumulates notifications before sending an aggregate notification email.
conf t default-alert-sink period <minutes>
server Defines the IP address of the email notification server.
conf t default-alert-sink server <IP address>
to Defines the email address of the alert recipient. This must be a valid email address.
conf t default-alert-sink to <email address>
Table 4 - 8: conf t default-alert-sink parameters
Subcommand Description Usage
TippingPoint Command Line Interface Reference V. 3.140
Chapter 4—TippingPoint IPS Commands
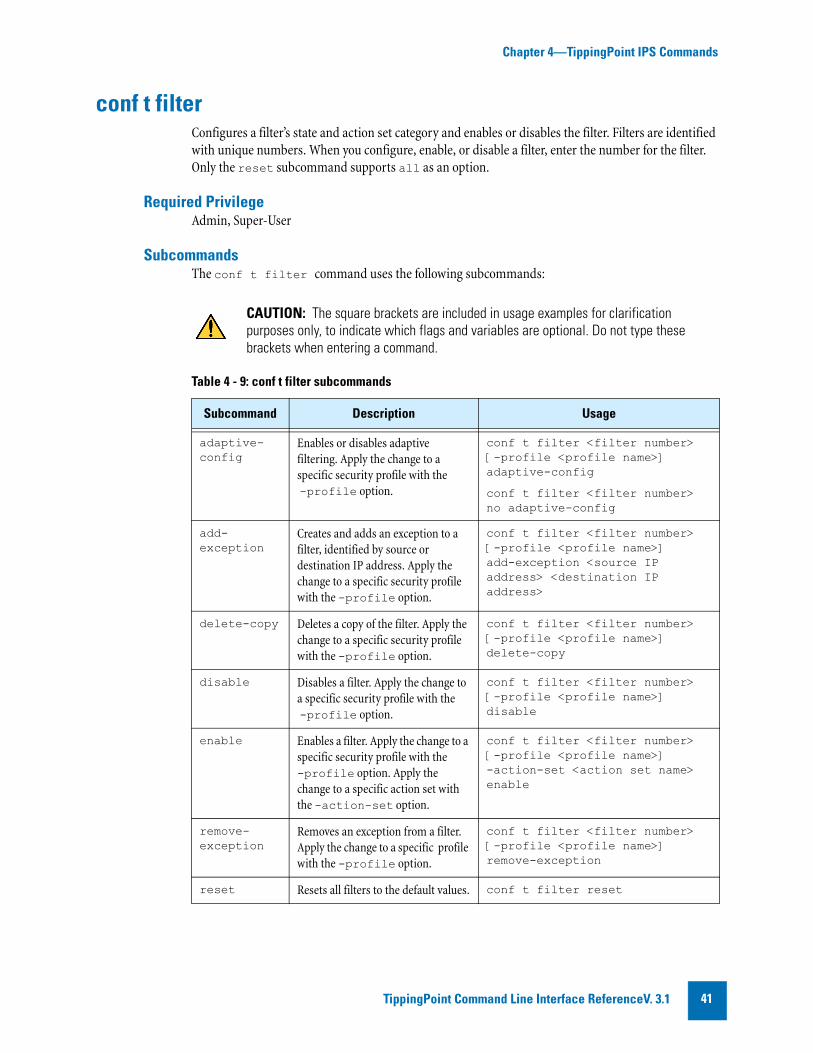
conf t filterConfigures a filter’s state and action set category and enables or disables the filter. Filters are identified with unique numbers. When you configure, enable, or disable a filter, enter the number for the filter. Only the reset subcommand supports all as an option.
Required PrivilegeAdmin, Super-User
SubcommandsThe conf t filter command uses the following subcommands:
CAUTION: The square brackets are included in usage examples for clarification purposes only, to indicate which flags and variables are optional. Do not type these brackets when entering a command.
Table 4 - 9: conf t filter subcommands
Subcommand Description Usage
adaptive-config
Enables or disables adaptive filtering. Apply the change to a specific security profile with the -profile option.
conf t filter <filter number> [-profile <profile name>] adaptive-config
conf t filter <filter number> no adaptive-config
add-exception
Creates and adds an exception to a filter, identified by source or destination IP address. Apply the change to a specific security profile with the -profile option.
conf t filter <filter number>[-profile <profile name>]add-exception <source IP address> <destination IP address>
delete-copy Deletes a copy of the filter. Apply the change to a specific security profile with the -profile option.
conf t filter <filter number>[-profile <profile name>] delete-copy
disable Disables a filter. Apply the change to a specific security profile with the -profile option.
conf t filter <filter number>[-profile <profile name>] disable
enable Enables a filter. Apply the change to a specific security profile with the -profile option. Apply the change to a specific action set with the -action-set option.
conf t filter <filter number>[-profile <profile name>] -action-set <action set name> enable
remove-exception
Removes an exception from a filter. Apply the change to a specific profile with the -profile option.
conf t filter <filter number>[-profile <profile name>] remove-exception
reset Resets all filters to the default values. conf t filter reset
TippingPoint Command Line Interface ReferenceV. 3.1 41
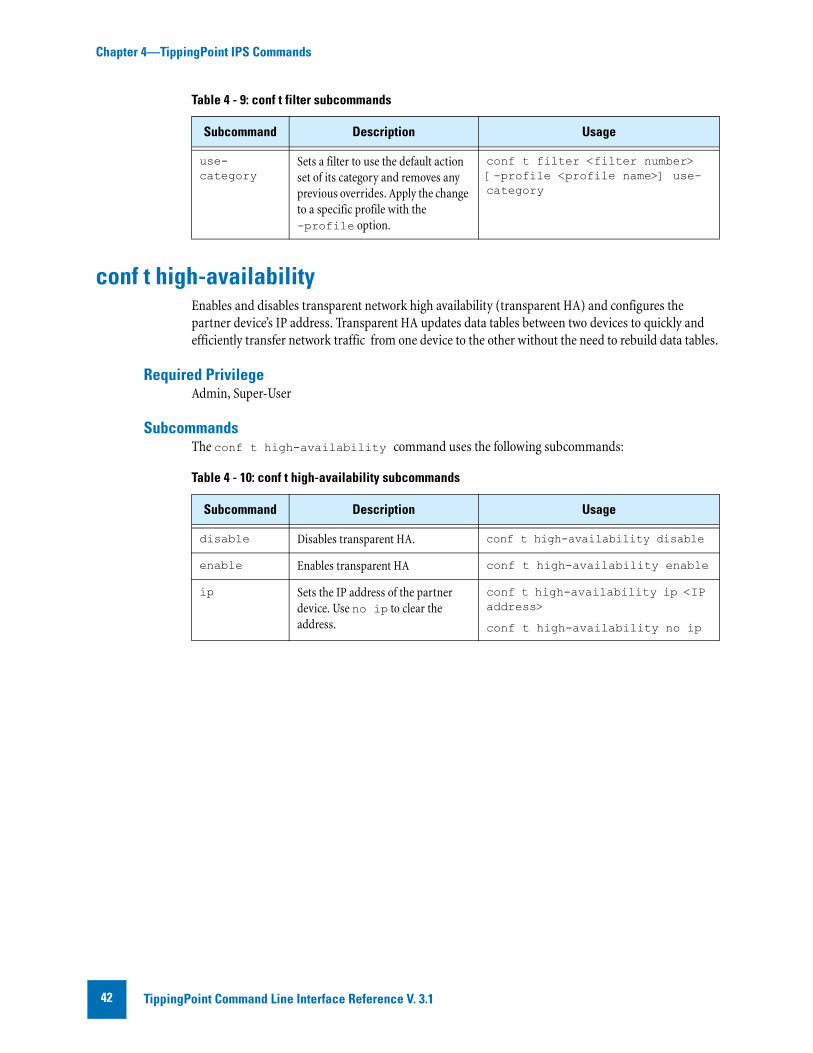
Chapter 4—TippingPoint IPS Commands
conf t high-availabilityEnables and disables transparent network high availability (transparent HA) and configures the partner device’s IP address. Transparent HA updates data tables between two devices to quickly and efficiently transfer network traffic from one device to the other without the need to rebuild data tables.
Required PrivilegeAdmin, Super-User
SubcommandsThe conf t high-availability command uses the following subcommands:
use-category
Sets a filter to use the default action set of its category and removes any previous overrides. Apply the change to a specific profile with the -profile option.
conf t filter <filter number>[-profile <profile name>] use-category
Table 4 - 9: conf t filter subcommands
Subcommand Description Usage
Table 4 - 10: conf t high-availability subcommands
Subcommand Description Usage
disable Disables transparent HA. conf t high-availability disable
enable Enables transparent HA conf t high-availability enable
ip Sets the IP address of the partner device. Use no ip to clear the address.
conf t high-availability ip <IP address>
conf t high-availability no ip
TippingPoint Command Line Interface Reference V. 3.142
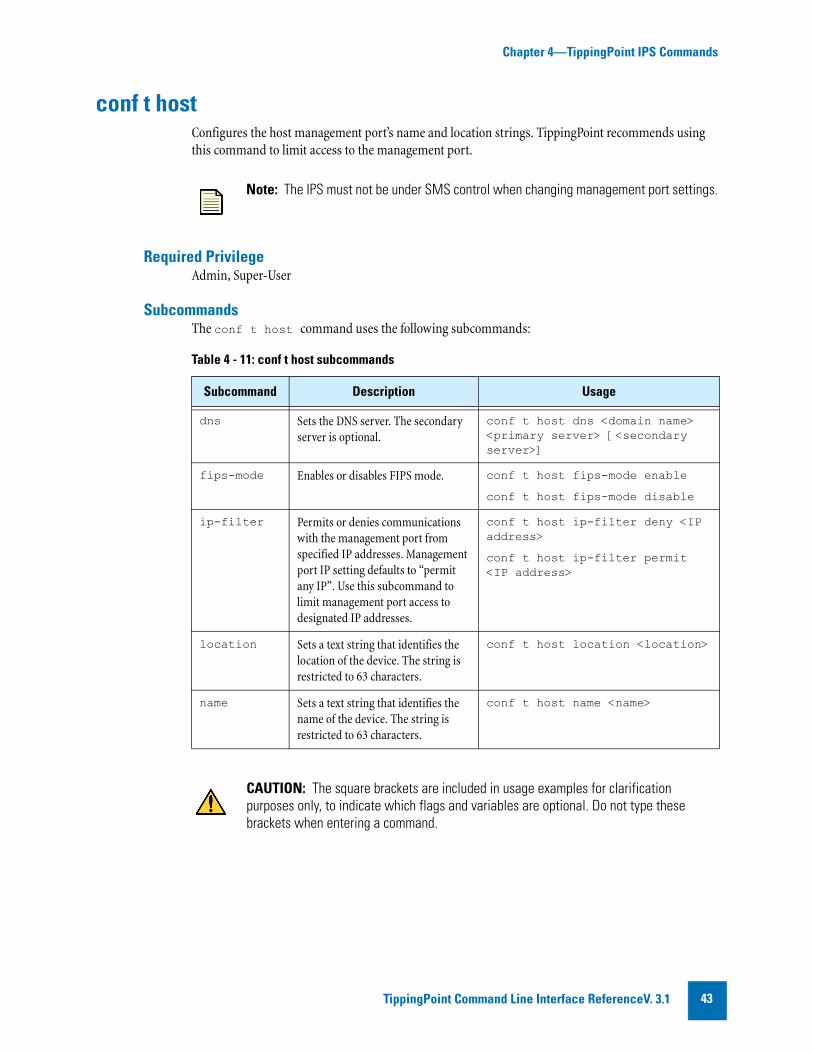
Chapter 4—TippingPoint IPS Commands
conf t hostConfigures the host management port’s name and location strings. TippingPoint recommends using this command to limit access to the management port.
Required PrivilegeAdmin, Super-User
SubcommandsThe conf t host command uses the following subcommands:
Note: The IPS must not be under SMS control when changing management port settings.
Table 4 - 11: conf t host subcommands
Subcommand Description Usage
dns Sets the DNS server. The secondary server is optional.
conf t host dns <domain name> <primary server> [<secondary server>]
fips-mode Enables or disables FIPS mode. conf t host fips-mode enable
conf t host fips-mode disable
ip-filter Permits or denies communications with the management port from specified IP addresses. Management port IP setting defaults to “permit any IP”. Use this subcommand to limit management port access to designated IP addresses.
conf t host ip-filter deny <IP address>
conf t host ip-filter permit <IP address>
location Sets a text string that identifies the location of the device. The string is restricted to 63 characters.
conf t host location <location>
name Sets a text string that identifies the name of the device. The string is restricted to 63 characters.
conf t host name <name>
CAUTION: The square brackets are included in usage examples for clarification purposes only, to indicate which flags and variables are optional. Do not type these brackets when entering a command.
TippingPoint Command Line Interface ReferenceV. 3.1 43
Chapter 4—TippingPoint IPS Commands
conf t inspection-bypassEnables, disables, or removes inspection bypass rules. Inspection bypass rules direct traffic through the IPS without inspection. The rules are identified by an ID number that is generated by the IPS when the rule is created with the conf t inspection-bypass add command. You can view a list of current inspection bypass rules with the show inspection-bypass command.
Required privilegeAdmin
ParametersThe conf t inspection-bypass command uses the following parameters:
Note: Inspection bypass rules are only available on the TippingPoint 2500N and TippingPoint 5100N.
Table 4 - 12: conf t inspection-bypass parameters
Subcommand Description Usage
add Adds an inspection bypass rule. See “conf t inspection-bypass add” on page 45.
conf t inspection-bypass add
clear-stats Clears statistics associated with an inspection bypass rule.
conf t inspection-bypass clear-stats <rule_ID>
enable Enables an inspection bypass rule. conf t inspection-bypass enable <rule_ID>
disable Disables an inspection bypass rule. conf t inspection-bypass disable <rule_ID>
remove Removes an inspection bypass rule. conf t inspection-bypass remove <rule_ID>
TippingPoint Command Line Interface Reference V. 3.144
Chapter 4—TippingPoint IPS Commands
conf t inspection-bypass addCreates and defines an inspection bypass rule. When you define an inspection bypass rule, using a parameter without a specified value defaults to a value of “any”.
Required privilegeAdmin
ParametersThe conf t inspection-bypass add command uses the following parameters:
Table 4 - 13: conf t inspection-bypass add parameters
Parameter Description Usage
-eth EthType. You can also use the strings ip or !ip.
conf t inspection-bypass add -eth <EthType>
-ports The port or ports to which the rule is applied. For more information, see “ports” on page 46.
conf t inspection-bypass add -ports <value> -<parameter>
-gre Specifies GRE tunneling traffic. Default value is any. You may also specify present or absent.
conf t inspection-bypass add -gre <value>
-mipv4 Specifies mobile IPv4 tunneling traffic. Default value is any. You may also specify present or absent.
conf t inspection-bypass add-mipv4 <value>
-ipv6in4 Specifies IPv6 6-in-4 tunneling traffic. Default value is any. You may also specify present or absent.
conf t inspection-bypass add-ipv6in4 <value>
-vlan Numeric value or range specifying the permitted VLAN IDs.
conf t inspection-bypass add -vlan <value>
-mpls Numeric value or range specifying the permitted MPLS IDs.
conf t inspection-bypass add -mpls <value>
-ip-proto IP protocol value. For more information, see “ip-proto” on page 46.
conf t inspection-bypass add -ip-proto <value>
-ip-saddr Source CIDR specification. Enter in the form xxx.xxx.xxx.xxx/xx.
conf t inspection-bypass add -ip-saddr <CIDR range>
-ip-daddr Destination CIDR specification. Enter in the form xxx.xxx.xxx.xxx/xx.
conf t inspection-bypass add -ip-daddr <CIDR range>
-upd-sport UPD source port. conf t inspection-bypass add -upd-sport <value>
-upd-dport UPD destination port. conf t inspection-bypass add -upd-dport <value>
TippingPoint Command Line Interface ReferenceV. 3.1 45
Chapter 4—TippingPoint IPS Commands
portsThe -ports parameter can be one or more comma-delimited 1GbE ports (1A, 1B, 2A, 2B, 3A, 3B). If you do not specify a port or define the -ports parameter as ANY, the inspection bypass rule will be applied to all ports on all segments.
A single inspection bypass rule can apply to all segments, to both ports on one segment, or to one port on one segment. You cannot apply a single inspection bypass rule to ports on two different segments. Instead, you must create a separate inspection bypass rule for each segment.
Example: Rules Applied to a Single SegmentIf you want to permit traffic that uses the IP Mobility protocol (MOBILE) on both ports of Segment 1, you would define the inspection bypass rule with the following command:
hostname# conf t inspection-bypass add -ports 1A,1B -ip-proto MOBILE
Example: Rules Applied Across Multiple SegmentsIf you want to permit traffic that uses the IP Mobility protocol (MOBILE) on both ports of Segment 1 and Segment 2, you would need to define two inspection bypass rules with the following commands:
hostname# conf t inspection-bypass add -ports 1A,1B -ip-proto MOBILEhostname# conf t inspection-bypass add -ports 2A,2B -ip-proto MOBILE
However, if you want to permit that traffic across all ports on all segments, you can define a single inspection bypass rule with the following command:
hostname# conf t inspection-bypass add -ip-proto MOBILE
When no segment is specified, the command defaults apply the inspection bypass rule to all ports on all segments.
ip-protoA full list of IP protocol values can be found at the Internet Assigned Numbers Authority web site at http://www.iana.org/assignments/protocol-numbers.
-tcp-sport TCP source port. conf t inspection-bypass add -tcp-sport
-tcp-dport TCP destination port. conf t inspection-bypass add -tcp-dport
Table 4 - 13: conf t inspection-bypass add parameters
Parameter Description Usage
TippingPoint Command Line Interface Reference V. 3.146
Chapter 4—TippingPoint IPS Commands
conf t interface ethernetConfigures IPS interfaces. Refer to physical interfaces by their segment and port numbers.
Required PrivilegeAdmin, Super-User
SubcommandsThe conf t interface ethernet command uses the following subcommands:
Table 4 - 14: conf t interface ethernet subcommands
Subcommand Description Usage
duplex Sets the duplex speed to half or full. conf t interface ethernet <port> duplex half
conf t interface ethernet <port> duplex full
linespeed Sets the line speed. You can set the speed to 10, 100, 1000, or 10000.
conf t interface ethernet <port> linespeed <speed>
negotiate Enables or disables auto-negotiate. conf t interface ethernet <port> negotiate
conf t interface ethernet <port> no negotiate
shutdown Shuts down the port. Use no shutdown to reactivate the port after a shutdown command or after configuration has changed.
conf t interface ethernet <port> shutdown
conf t interface ethernet <port> no shutdown
TippingPoint Command Line Interface ReferenceV. 3.1 47
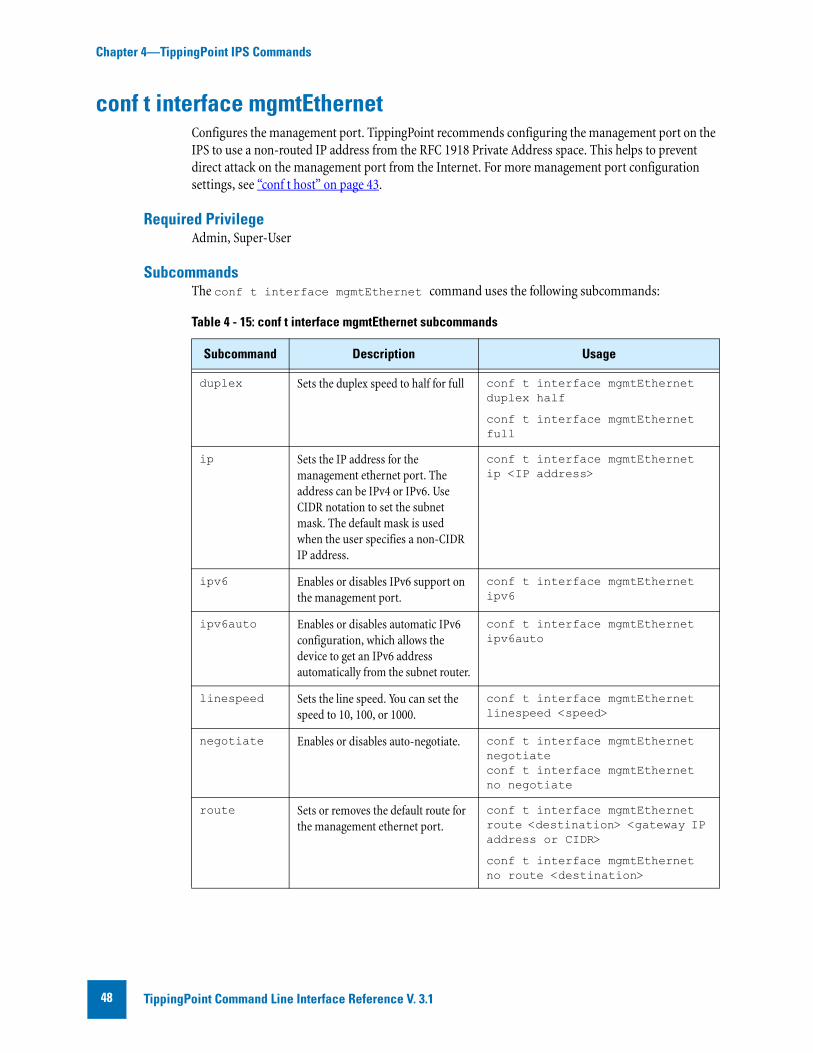
Chapter 4—TippingPoint IPS Commands
conf t interface mgmtEthernetConfigures the management port. TippingPoint recommends configuring the management port on the IPS to use a non-routed IP address from the RFC 1918 Private Address space. This helps to prevent direct attack on the management port from the Internet. For more management port configuration settings, see “conf t host” on page 43.
Required PrivilegeAdmin, Super-User
SubcommandsThe conf t interface mgmtEthernet command uses the following subcommands:
Table 4 - 15: conf t interface mgmtEthernet subcommands
Subcommand Description Usage
duplex Sets the duplex speed to half for full conf t interface mgmtEthernet duplex half
conf t interface mgmtEthernet full
ip Sets the IP address for the management ethernet port. The address can be IPv4 or IPv6. Use CIDR notation to set the subnet mask. The default mask is used when the user specifies a non-CIDR IP address.
conf t interface mgmtEthernet ip <IP address>
ipv6 Enables or disables IPv6 support on the management port.
conf t interface mgmtEthernet ipv6
ipv6auto Enables or disables automatic IPv6 configuration, which allows the device to get an IPv6 address automatically from the subnet router.
conf t interface mgmtEthernet ipv6auto
linespeed Sets the line speed. You can set the speed to 10, 100, or 1000.
conf t interface mgmtEthernet linespeed <speed>
negotiate Enables or disables auto-negotiate. conf t interface mgmtEthernet negotiateconf t interface mgmtEthernet no negotiate
route Sets or removes the default route for the management ethernet port.
conf t interface mgmtEthernet route <destination> <gateway IP address or CIDR>
conf t interface mgmtEthernet no route <destination>
TippingPoint Command Line Interface Reference V. 3.148
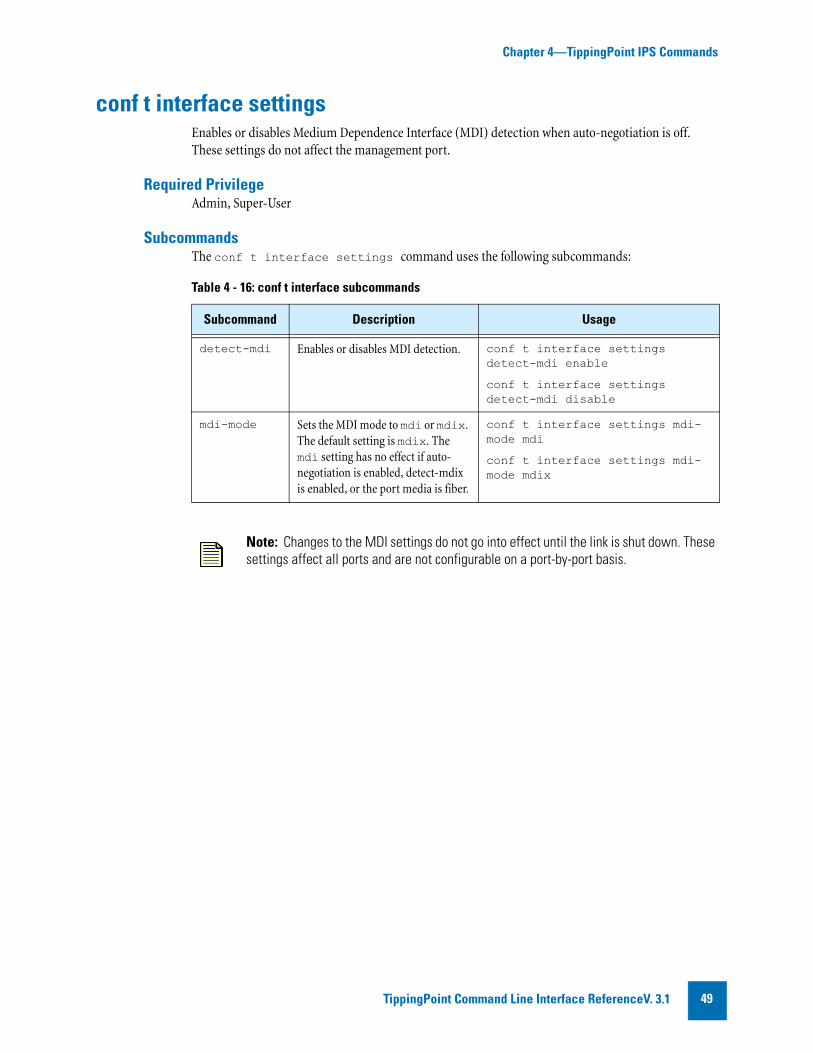
Chapter 4—TippingPoint IPS Commands
conf t interface settingsEnables or disables Medium Dependence Interface (MDI) detection when auto-negotiation is off. These settings do not affect the management port.
Required PrivilegeAdmin, Super-User
SubcommandsThe conf t interface settings command uses the following subcommands:
Table 4 - 16: conf t interface subcommands
Subcommand Description Usage
detect-mdi Enables or disables MDI detection. conf t interface settings detect-mdi enable
conf t interface settings detect-mdi disable
mdi-mode Sets the MDI mode to mdi or mdix. The default setting is mdix. The mdi setting has no effect if auto-negotiation is enabled, detect-mdix is enabled, or the port media is fiber.
conf t interface settings mdi-mode mdi
conf t interface settings mdi-mode mdix
Note: Changes to the MDI settings do not go into effect until the link is shut down. These settings affect all ports and are not configurable on a port-by-port basis.
TippingPoint Command Line Interface ReferenceV. 3.1 49
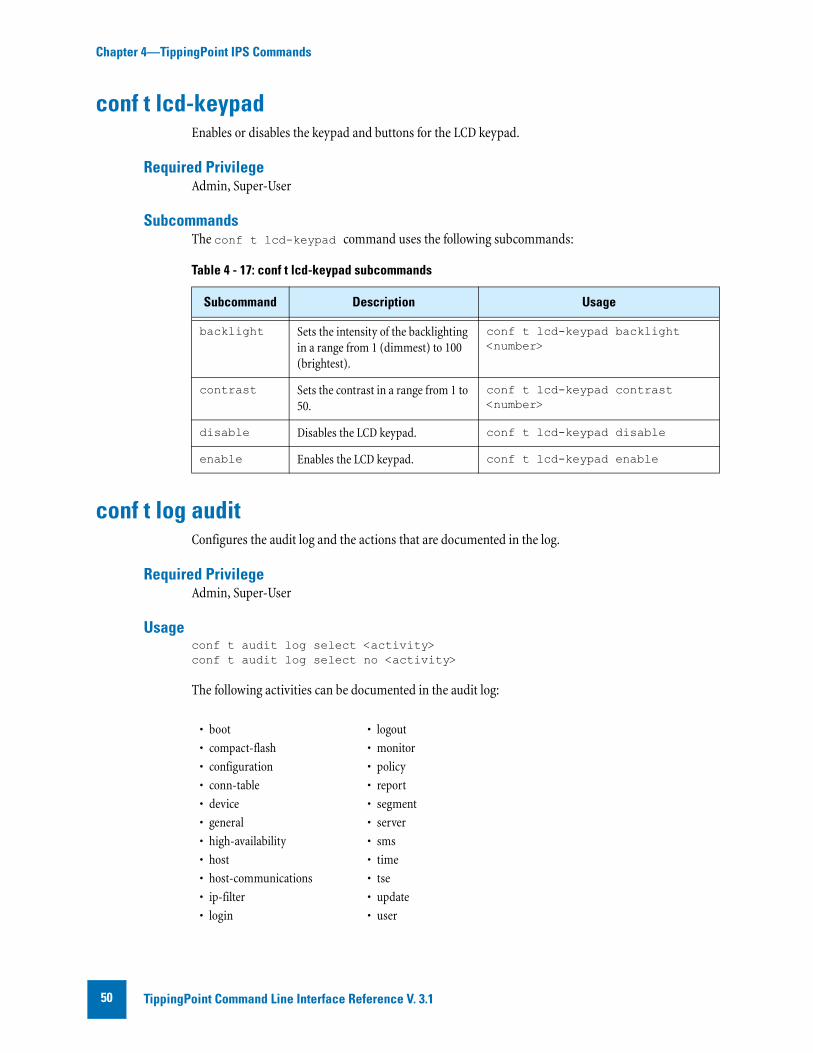
Chapter 4—TippingPoint IPS Commands
conf t lcd-keypadEnables or disables the keypad and buttons for the LCD keypad.
Required PrivilegeAdmin, Super-User
SubcommandsThe conf t lcd-keypad command uses the following subcommands:
conf t log auditConfigures the audit log and the actions that are documented in the log.
Required PrivilegeAdmin, Super-User
Usageconf t audit log select <activity>conf t audit log select no <activity>
The following activities can be documented in the audit log:
Table 4 - 17: conf t lcd-keypad subcommands
Subcommand Description Usage
backlight Sets the intensity of the backlighting in a range from 1 (dimmest) to 100 (brightest).
conf t lcd-keypad backlight <number>
contrast Sets the contrast in a range from 1 to 50.
conf t lcd-keypad contrast <number>
disable Disables the LCD keypad. conf t lcd-keypad disable
enable Enables the LCD keypad. conf t lcd-keypad enable
• boot
• compact-flash
• configuration
• conn-table
• device
• general
• high-availability
• host
• host-communications
• ip-filter
• login
• logout
• monitor
• policy
• report
• segment
• server
• sms
• time
• tse
• update
• user
TippingPoint Command Line Interface Reference V. 3.150
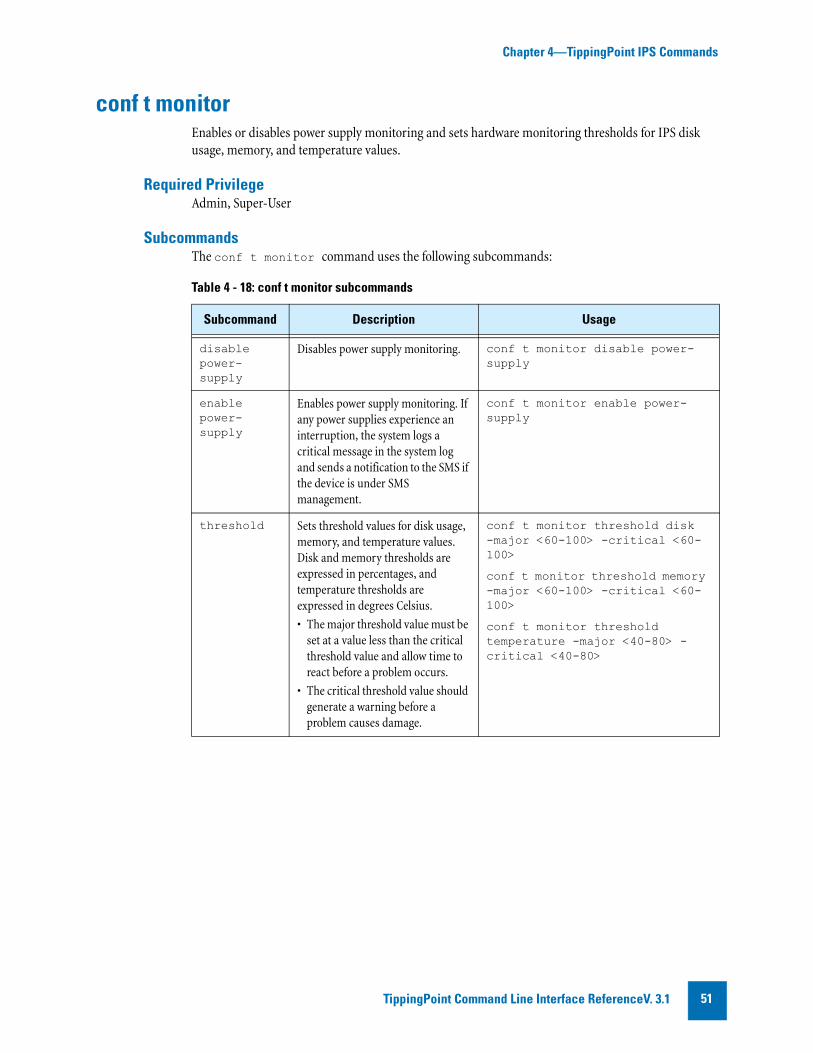
Chapter 4—TippingPoint IPS Commands
conf t monitorEnables or disables power supply monitoring and sets hardware monitoring thresholds for IPS disk usage, memory, and temperature values.
Required PrivilegeAdmin, Super-User
SubcommandsThe conf t monitor command uses the following subcommands:
Table 4 - 18: conf t monitor subcommands
Subcommand Description Usage
disable power-supply
Disables power supply monitoring. conf t monitor disable power-supply
enable power-supply
Enables power supply monitoring. If any power supplies experience an interruption, the system logs a critical message in the system log and sends a notification to the SMS if the device is under SMS management.
conf t monitor enable power-supply
threshold Sets threshold values for disk usage, memory, and temperature values. Disk and memory thresholds are expressed in percentages, and temperature thresholds are expressed in degrees Celsius.
• The major threshold value must be set at a value less than the critical threshold value and allow time to react before a problem occurs.
• The critical threshold value should generate a warning before a problem causes damage.
conf t monitor threshold disk -major <60-100> -critical <60-100>
conf t monitor threshold memory -major <60-100> -critical <60-100>
conf t monitor threshold temperature -major <40-80> -critical <40-80>
TippingPoint Command Line Interface ReferenceV. 3.1 51
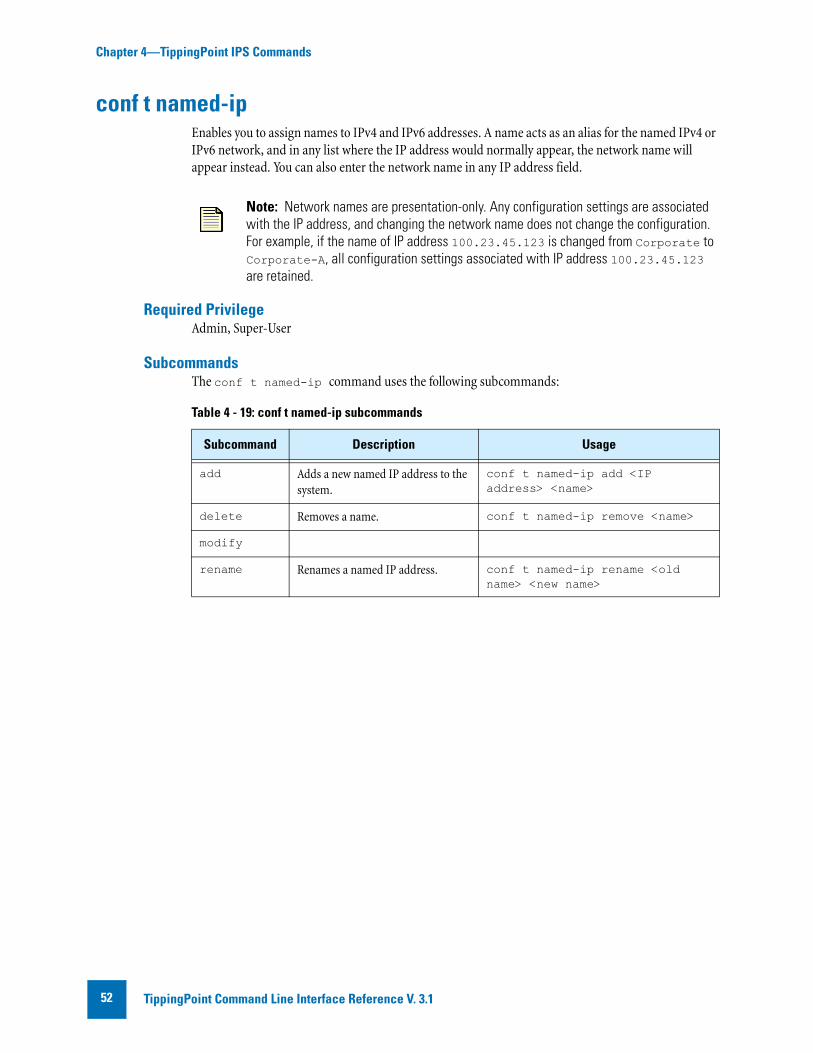
Chapter 4—TippingPoint IPS Commands
conf t named-ipEnables you to assign names to IPv4 and IPv6 addresses. A name acts as an alias for the named IPv4 or IPv6 network, and in any list where the IP address would normally appear, the network name will appear instead. You can also enter the network name in any IP address field.
Required PrivilegeAdmin, Super-User
SubcommandsThe conf t named-ip command uses the following subcommands:
Note: Network names are presentation-only. Any configuration settings are associated with the IP address, and changing the network name does not change the configuration. For example, if the name of IP address 100.23.45.123 is changed from Corporate to Corporate-A, all configuration settings associated with IP address 100.23.45.123 are retained.
Table 4 - 19: conf t named-ip subcommands
Subcommand Description Usage
add Adds a new named IP address to the system.
conf t named-ip add <IP address> <name>
delete Removes a name. conf t named-ip remove <name>
modify
rename Renames a named IP address. conf t named-ip rename <old name> <new name>
TippingPoint Command Line Interface Reference V. 3.152
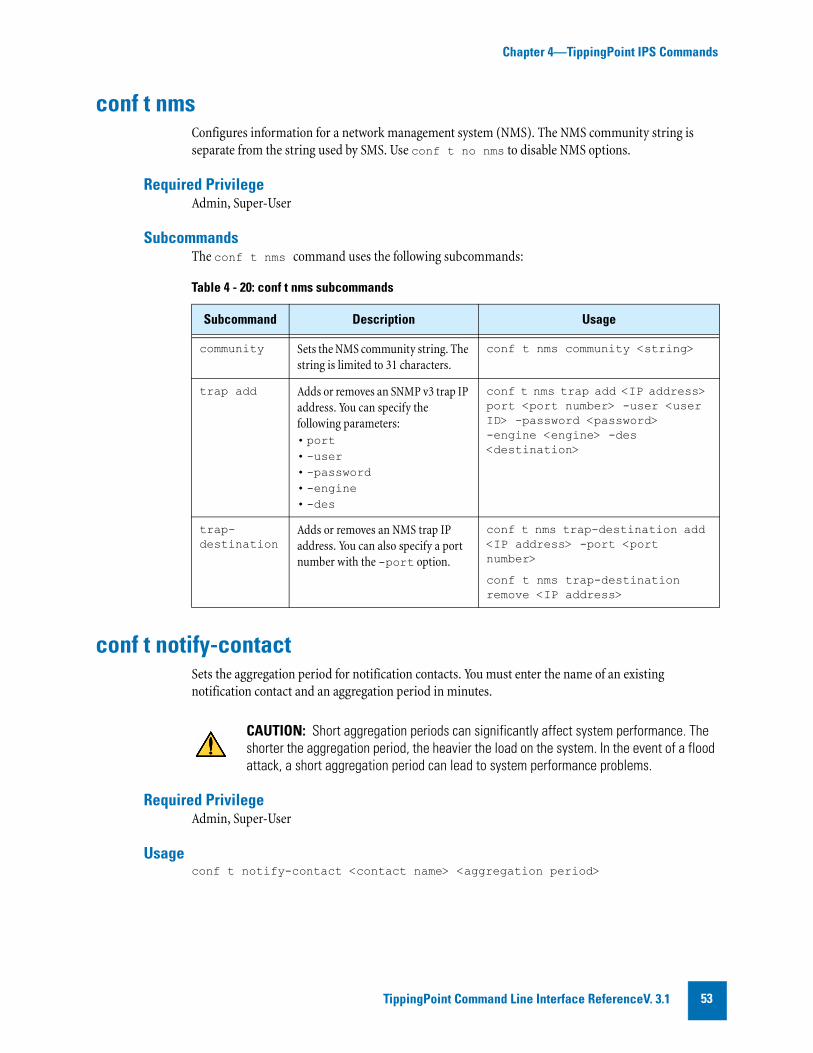
Chapter 4—TippingPoint IPS Commands
conf t nmsConfigures information for a network management system (NMS). The NMS community string is separate from the string used by SMS. Use conf t no nms to disable NMS options.
Required PrivilegeAdmin, Super-User
SubcommandsThe conf t nms command uses the following subcommands:
conf t notify-contactSets the aggregation period for notification contacts. You must enter the name of an existing notification contact and an aggregation period in minutes.
Required PrivilegeAdmin, Super-User
Usageconf t notify-contact <contact name> <aggregation period>
Table 4 - 20: conf t nms subcommands
Subcommand Description Usage
community Sets the NMS community string. The string is limited to 31 characters.
conf t nms community <string>
trap add Adds or removes an SNMP v3 trap IP address. You can specify the following parameters:• port• -user• -password• -engine• -des
conf t nms trap add <IP address> port <port number> -user <user ID> -password <password> -engine <engine> -des <destination>
trap-destination
Adds or removes an NMS trap IP address. You can also specify a port number with the -port option.
conf t nms trap-destination add <IP address> -port <port number>
conf t nms trap-destination remove <IP address>
CAUTION: Short aggregation periods can significantly affect system performance. The shorter the aggregation period, the heavier the load on the system. In the event of a flood attack, a short aggregation period can lead to system performance problems.
TippingPoint Command Line Interface ReferenceV. 3.1 53

Chapter 4—TippingPoint IPS Commands
conf t portConfigures the protocols that are permitted on the IPS ports. The available options include:
Required PrivilegeAdmin, Super-User
SubcommandsThe conf t port command uses the following subcommands:
• auth
• nstcp
• dnsudp
• finger
• ftp
• http
• imac
• ircu
• mssql
• nntp
• pop2
• pop3
• portmappertcp
• portmapperudp
• rlogin
• rsh
• smb
• smtp
• snmptcp
• snmpudp
• ssh
• telnet
Table 4 - 21: conf t port subcommands
Subcommand Description Usage
add Adds a protocol to a port. conf t port <protocol> add <segment> <port>
delete Removes a protocol from a port. conf t port <protocol> remove <segment> <port>
TippingPoint Command Line Interface Reference V. 3.154

Chapter 4—TippingPoint IPS Commands
conf t profileCreates, modifies, or deletes security or traffic management profiles.
Required PrivilegeAdmin, Super-User
SubcommandsThe conf t profile command uses the following subcommands:
Table 4 - 22: conf t profile subcommands
Subcommand Description Usage
add-pair Adds a port pairing to a profile. conf t profile <profile name> add-pair <port pair>
delete Deletes an existing profile. conf t profile <profile name> delete
description Enters a description string for the profile.
conf t profile <profile name> description "<description>"
remove-pair Removes a port pairing from a profile.
conf t profile <profile name> remove-pair <port pair>
rename Renames a profile. conf t profile <profile name> rename <new profile name>
security Creates a security profile. You can add a description string with the -description option.
conf t profile <profile name> security
conf t profile <profile name> security -description "<description>"
traffic-mgmt
Creates a traffic management profile. You can add a description string with the -description option.
conf t profile <profile name> traffic-mgmt
conf t profile <profile name> traffic-mgmt -description "<description>"
TippingPoint Command Line Interface ReferenceV. 3.1 55
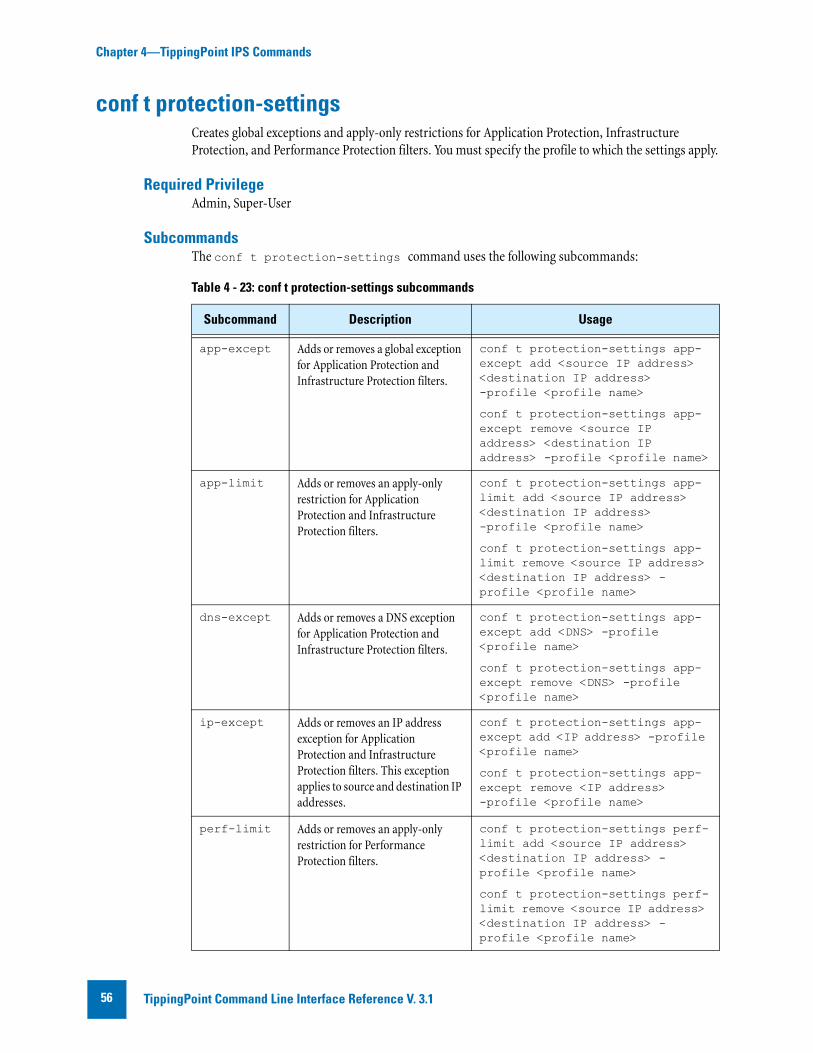
Chapter 4—TippingPoint IPS Commands
conf t protection-settingsCreates global exceptions and apply-only restrictions for Application Protection, Infrastructure Protection, and Performance Protection filters. You must specify the profile to which the settings apply.
Required PrivilegeAdmin, Super-User
SubcommandsThe conf t protection-settings command uses the following subcommands:
Table 4 - 23: conf t protection-settings subcommands
Subcommand Description Usage
app-except Adds or removes a global exception for Application Protection and Infrastructure Protection filters.
conf t protection-settings app-except add <source IP address> <destination IP address> -profile <profile name>
conf t protection-settings app-except remove <source IP address> <destination IP address> -profile <profile name>
app-limit Adds or removes an apply-only restriction for Application Protection and Infrastructure Protection filters.
conf t protection-settings app-limit add <source IP address> <destination IP address> -profile <profile name>
conf t protection-settings app-limit remove <source IP address> <destination IP address> -profile <profile name>
dns-except Adds or removes a DNS exception for Application Protection and Infrastructure Protection filters.
conf t protection-settings app-except add <DNS> -profile <profile name>
conf t protection-settings app-except remove <DNS> -profile <profile name>
ip-except Adds or removes an IP address exception for Application Protection and Infrastructure Protection filters. This exception applies to source and destination IP addresses.
conf t protection-settings app-except add <IP address> -profile <profile name>
conf t protection-settings app-except remove <IP address> -profile <profile name>
perf-limit Adds or removes an apply-only restriction for Performance Protection filters.
conf t protection-settings perf-limit add <source IP address> <destination IP address> -profile <profile name>
conf t protection-settings perf-limit remove <source IP address> <destination IP address> -profile <profile name>
TippingPoint Command Line Interface Reference V. 3.156
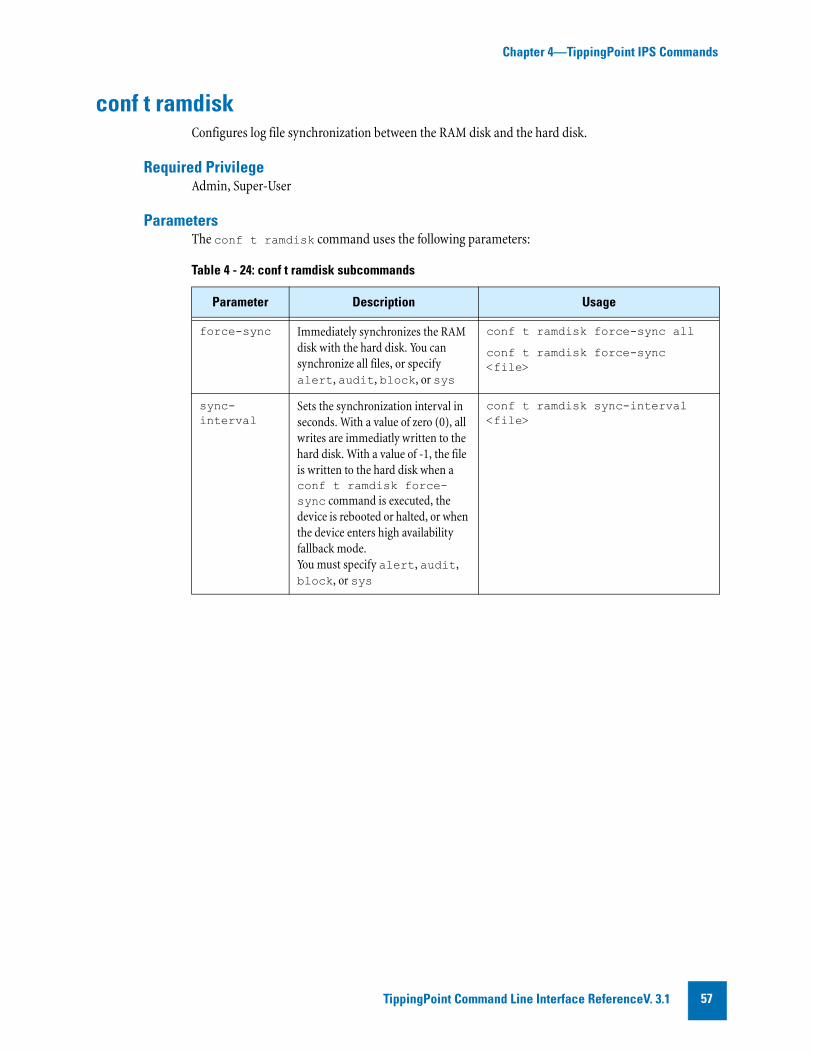
Chapter 4—TippingPoint IPS Commands
conf t ramdiskConfigures log file synchronization between the RAM disk and the hard disk.
Required PrivilegeAdmin, Super-User
ParametersThe conf t ramdisk command uses the following parameters:
Table 4 - 24: conf t ramdisk subcommands
Parameter Description Usage
force-sync Immediately synchronizes the RAM disk with the hard disk. You can synchronize all files, or specify alert, audit, block, or sys
conf t ramdisk force-sync all
conf t ramdisk force-sync <file>
sync-interval
Sets the synchronization interval in seconds. With a value of zero (0), all writes are immediatly written to the hard disk. With a value of -1, the file is written to the hard disk when a conf t ramdisk force-sync command is executed, the device is rebooted or halted, or when the device enters high availability fallback mode. You must specify alert, audit, block, or sys
conf t ramdisk sync-interval <file>
TippingPoint Command Line Interface ReferenceV. 3.1 57
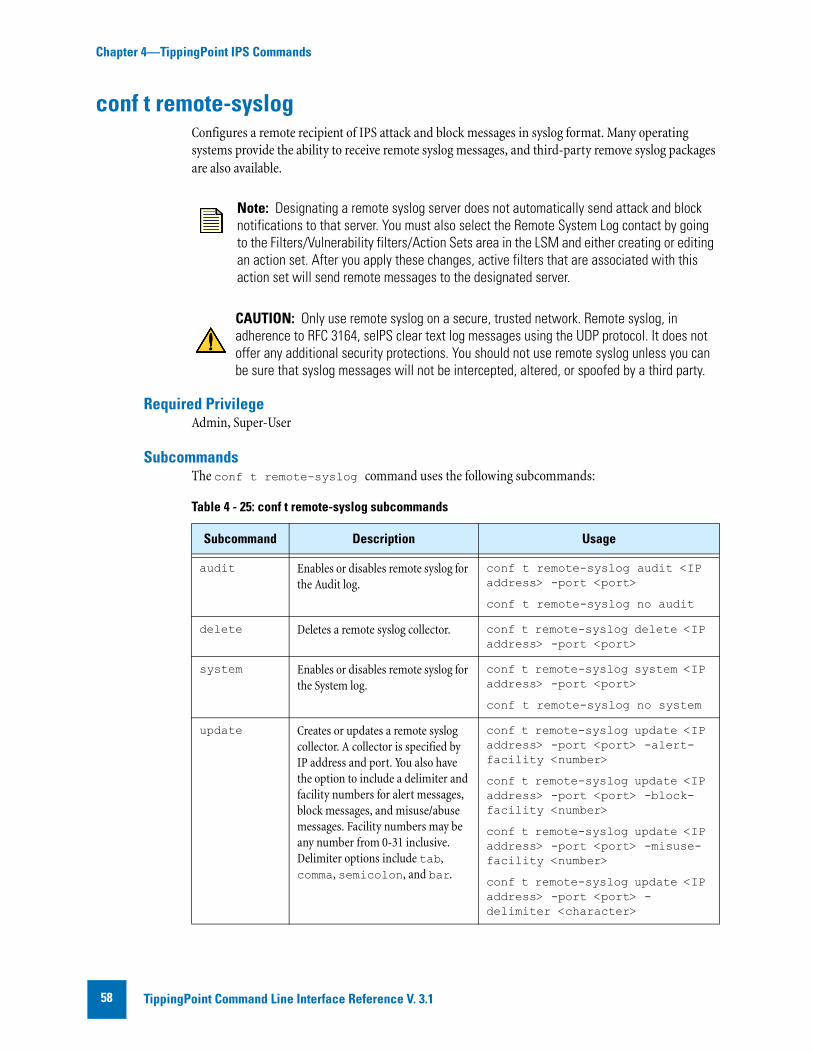
Chapter 4—TippingPoint IPS Commands
conf t remote-syslogConfigures a remote recipient of IPS attack and block messages in syslog format. Many operating systems provide the ability to receive remote syslog messages, and third-party remove syslog packages are also available.
Required PrivilegeAdmin, Super-User
SubcommandsThe conf t remote-syslog command uses the following subcommands:
Note: Designating a remote syslog server does not automatically send attack and block notifications to that server. You must also select the Remote System Log contact by going to the Filters/Vulnerability filters/Action Sets area in the LSM and either creating or editing an action set. After you apply these changes, active filters that are associated with this action set will send remote messages to the designated server.
CAUTION: Only use remote syslog on a secure, trusted network. Remote syslog, in adherence to RFC 3164, seIPS clear text log messages using the UDP protocol. It does not offer any additional security protections. You should not use remote syslog unless you can be sure that syslog messages will not be intercepted, altered, or spoofed by a third party.
Table 4 - 25: conf t remote-syslog subcommands
Subcommand Description Usage
audit Enables or disables remote syslog for the Audit log.
conf t remote-syslog audit <IP address> -port <port>
conf t remote-syslog no audit
delete Deletes a remote syslog collector. conf t remote-syslog delete <IP address> -port <port>
system Enables or disables remote syslog for the System log.
conf t remote-syslog system <IP address> -port <port>
conf t remote-syslog no system
update Creates or updates a remote syslog collector. A collector is specified by IP address and port. You also have the option to include a delimiter and facility numbers for alert messages, block messages, and misuse/abuse messages. Facility numbers may be any number from 0-31 inclusive. Delimiter options include tab, comma, semicolon, and bar.
conf t remote-syslog update <IP address> -port <port> -alert-facility <number>
conf t remote-syslog update <IP address> -port <port> -block-facility <number>
conf t remote-syslog update <IP address> -port <port> -misuse-facility <number>
conf t remote-syslog update <IP address> -port <port> -delimiter <character>
TippingPoint Command Line Interface Reference V. 3.158
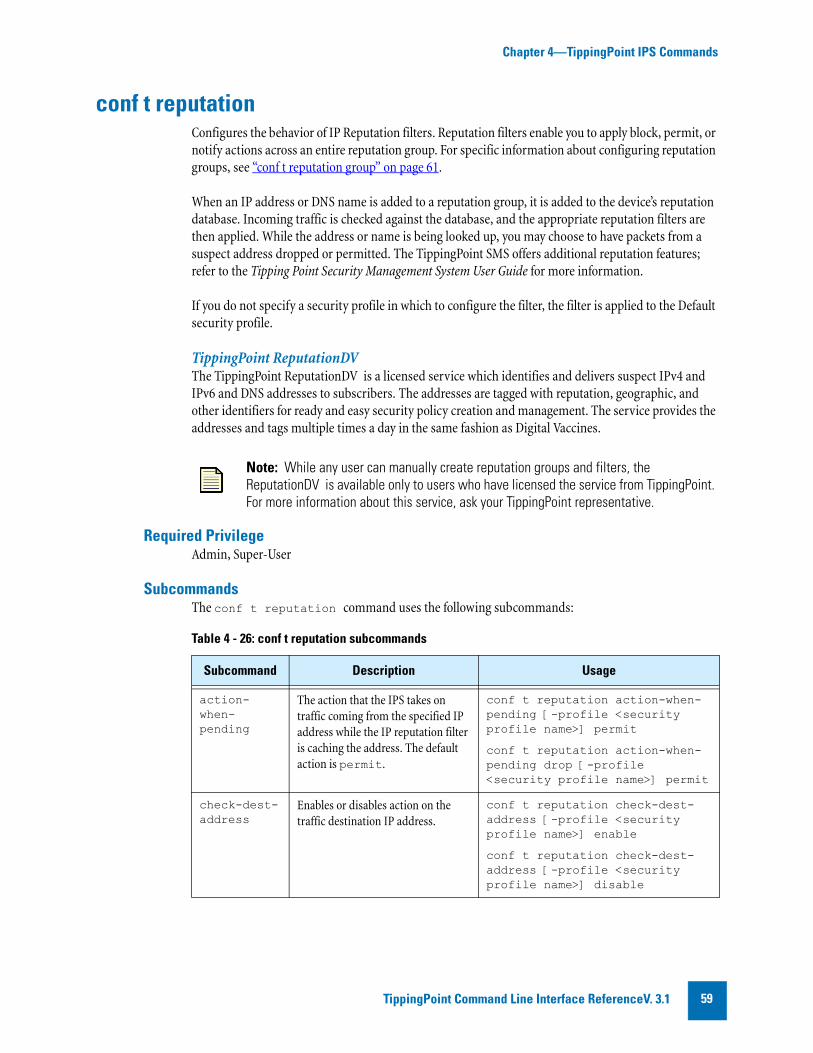
Chapter 4—TippingPoint IPS Commands
conf t reputationConfigures the behavior of IP Reputation filters. Reputation filters enable you to apply block, permit, or notify actions across an entire reputation group. For specific information about configuring reputation groups, see “conf t reputation group” on page 61.
When an IP address or DNS name is added to a reputation group, it is added to the device’s reputation database. Incoming traffic is checked against the database, and the appropriate reputation filters are then applied. While the address or name is being looked up, you may choose to have packets from a suspect address dropped or permitted. The TippingPoint SMS offers additional reputation features; refer to the Tipping Point Security Management System User Guide for more information.
If you do not specify a security profile in which to configure the filter, the filter is applied to the Default security profile.
TippingPoint ReputationDVThe TippingPoint ReputationDV is a licensed service which identifies and delivers suspect IPv4 and IPv6 and DNS addresses to subscribers. The addresses are tagged with reputation, geographic, and other identifiers for ready and easy security policy creation and management. The service provides the addresses and tags multiple times a day in the same fashion as Digital Vaccines.
Required PrivilegeAdmin, Super-User
SubcommandsThe conf t reputation command uses the following subcommands:
Note: While any user can manually create reputation groups and filters, the ReputationDV is available only to users who have licensed the service from TippingPoint. For more information about this service, ask your TippingPoint representative.
Table 4 - 26: conf t reputation subcommands
Subcommand Description Usage
action-when-pending
The action that the IPS takes on traffic coming from the specified IP address while the IP reputation filter is caching the address. The default action is permit.
conf t reputation action-when-pending [-profile <security profile name>] permit
conf t reputation action-when-pending drop [-profile <security profile name>] permit
check-dest-address
Enables or disables action on the traffic destination IP address.
conf t reputation check-dest-address [-profile <security profile name>] enable
conf t reputation check-dest-address [-profile <security profile name>] disable
TippingPoint Command Line Interface ReferenceV. 3.1 59
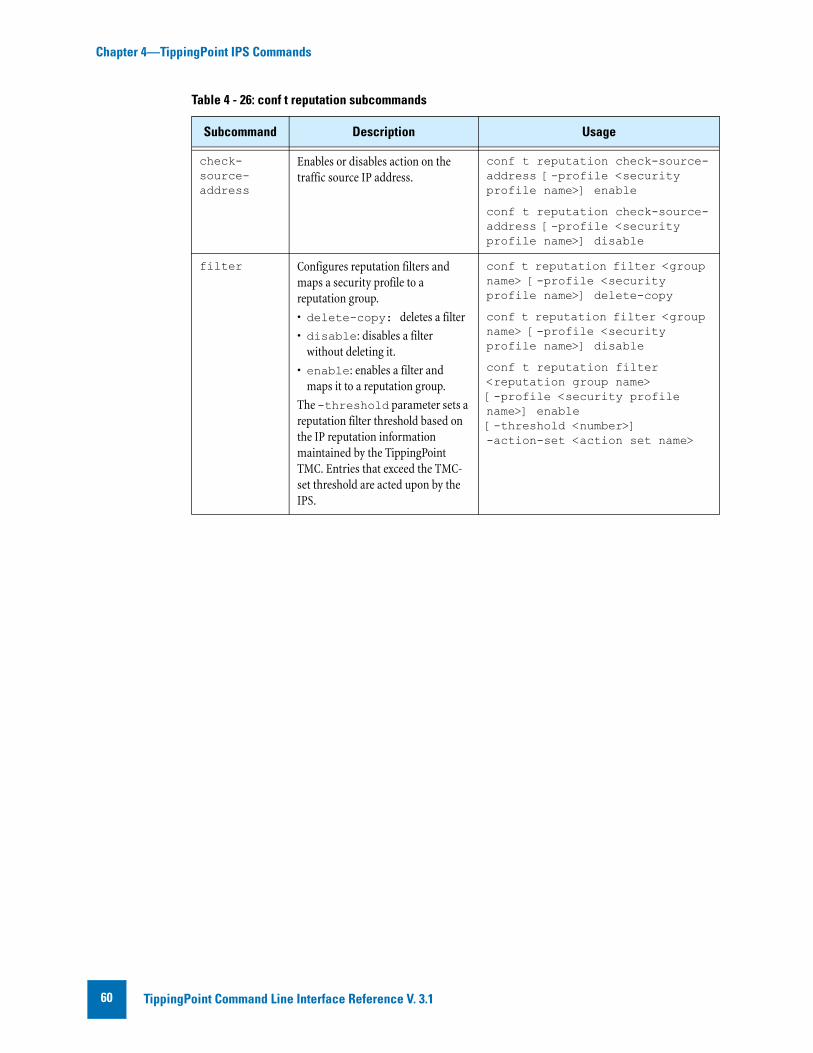
Chapter 4—TippingPoint IPS Commands
check-source-address
Enables or disables action on the traffic source IP address.
conf t reputation check-source-address [-profile <security profile name>] enable
conf t reputation check-source-address [-profile <security profile name>] disable
filter Configures reputation filters and maps a security profile to a reputation group.
• delete-copy: deletes a filter
• disable: disables a filter without deleting it.
• enable: enables a filter and maps it to a reputation group.
The -threshold parameter sets a reputation filter threshold based on the IP reputation information maintained by the TippingPoint TMC. Entries that exceed the TMC-set threshold are acted upon by the IPS.
conf t reputation filter <group name> [-profile <security profile name>] delete-copy
conf t reputation filter <group name> [-profile <security profile name>] disable
conf t reputation filter <reputation group name> [-profile <security profile name>] enable [-threshold <number>]-action-set <action set name>
Table 4 - 26: conf t reputation subcommands
Subcommand Description Usage
TippingPoint Command Line Interface Reference V. 3.160
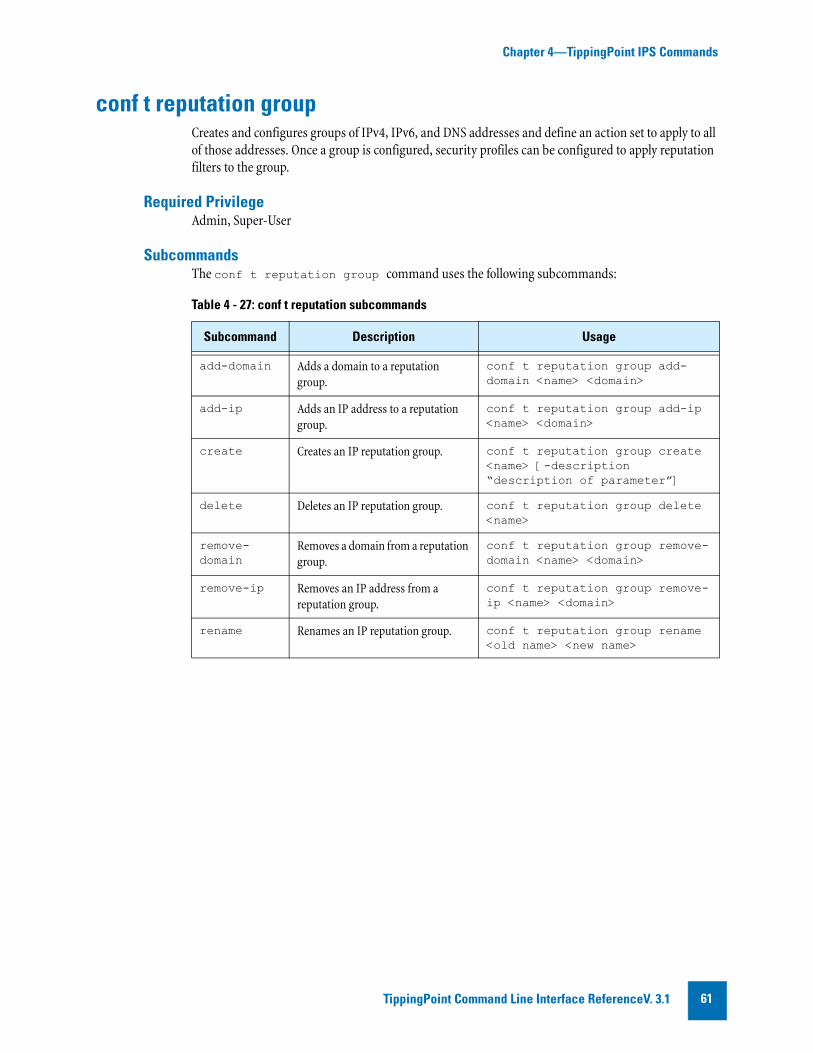
Chapter 4—TippingPoint IPS Commands
conf t reputation groupCreates and configures groups of IPv4, IPv6, and DNS addresses and define an action set to apply to all of those addresses. Once a group is configured, security profiles can be configured to apply reputation filters to the group.
Required PrivilegeAdmin, Super-User
SubcommandsThe conf t reputation group command uses the following subcommands:
Table 4 - 27: conf t reputation subcommands
Subcommand Description Usage
add-domain Adds a domain to a reputation group.
conf t reputation group add-domain <name> <domain>
add-ip Adds an IP address to a reputation group.
conf t reputation group add-ip <name> <domain>
create Creates an IP reputation group. conf t reputation group create <name> [-description “description of parameter”]
delete Deletes an IP reputation group. conf t reputation group delete <name>
remove-domain
Removes a domain from a reputation group.
conf t reputation group remove-domain <name> <domain>
remove-ip Removes an IP address from a reputation group.
conf t reputation group remove-ip <name> <domain>
rename Renames an IP reputation group. conf t reputation group rename <old name> <new name>
TippingPoint Command Line Interface ReferenceV. 3.1 61
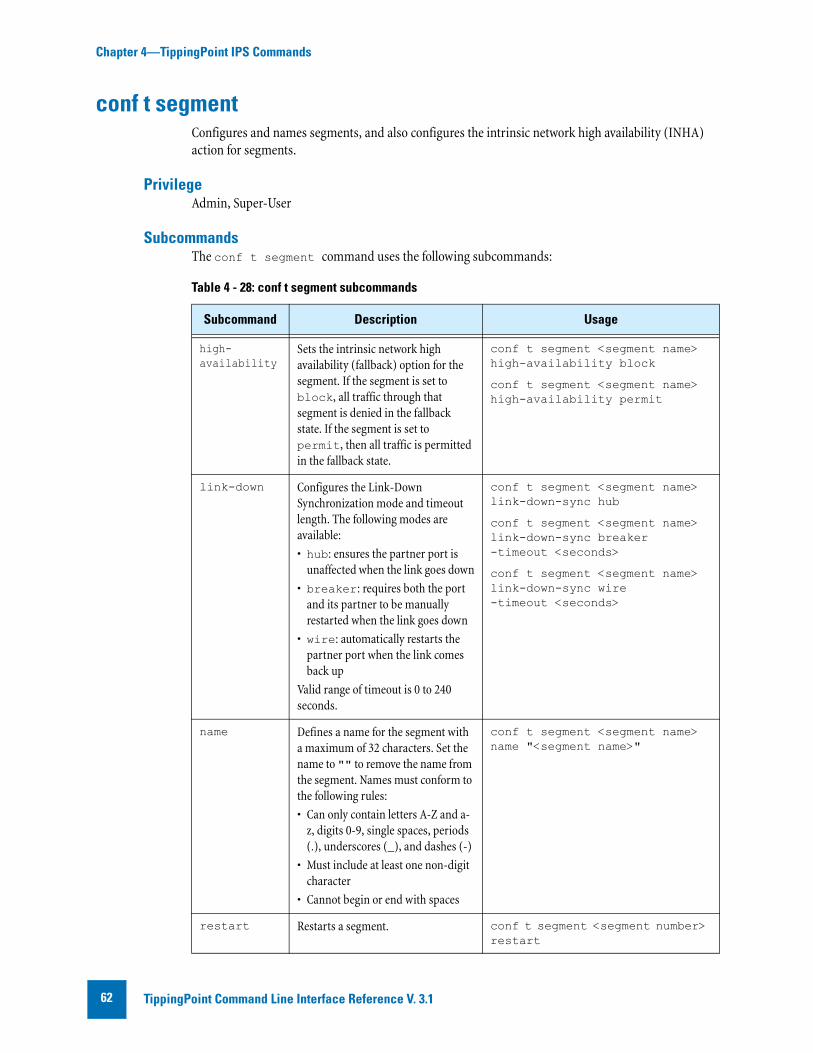
Chapter 4—TippingPoint IPS Commands
conf t segmentConfigures and names segments, and also configures the intrinsic network high availability (INHA) action for segments.
PrivilegeAdmin, Super-User
SubcommandsThe conf t segment command uses the following subcommands:
Table 4 - 28: conf t segment subcommands
Subcommand Description Usage
high-availability
Sets the intrinsic network high availability (fallback) option for the segment. If the segment is set to block, all traffic through that segment is denied in the fallback state. If the segment is set to permit, then all traffic is permitted in the fallback state.
conf t segment <segment name> high-availability block
conf t segment <segment name> high-availability permit
link-down Configures the Link-Down Synchronization mode and timeout length. The following modes are available:
• hub: ensures the partner port is unaffected when the link goes down
• breaker: requires both the port and its partner to be manually restarted when the link goes down
• wire: automatically restarts the partner port when the link comes back up
Valid range of timeout is 0 to 240 seconds.
conf t segment <segment name> link-down-sync hub
conf t segment <segment name> link-down-sync breaker-timeout <seconds>
conf t segment <segment name> link-down-sync wire-timeout <seconds>
name Defines a name for the segment with a maximum of 32 characters. Set the name to "" to remove the name from the segment. Names must conform to the following rules:
• Can only contain letters A-Z and a-z, digits 0-9, single spaces, periods (.), underscores (_), and dashes (-)
• Must include at least one non-digit character
• Cannot begin or end with spaces
conf t segment <segment name> name "<segment name>"
restart Restarts a segment. conf t segment <segment number> restart
TippingPoint Command Line Interface Reference V. 3.162
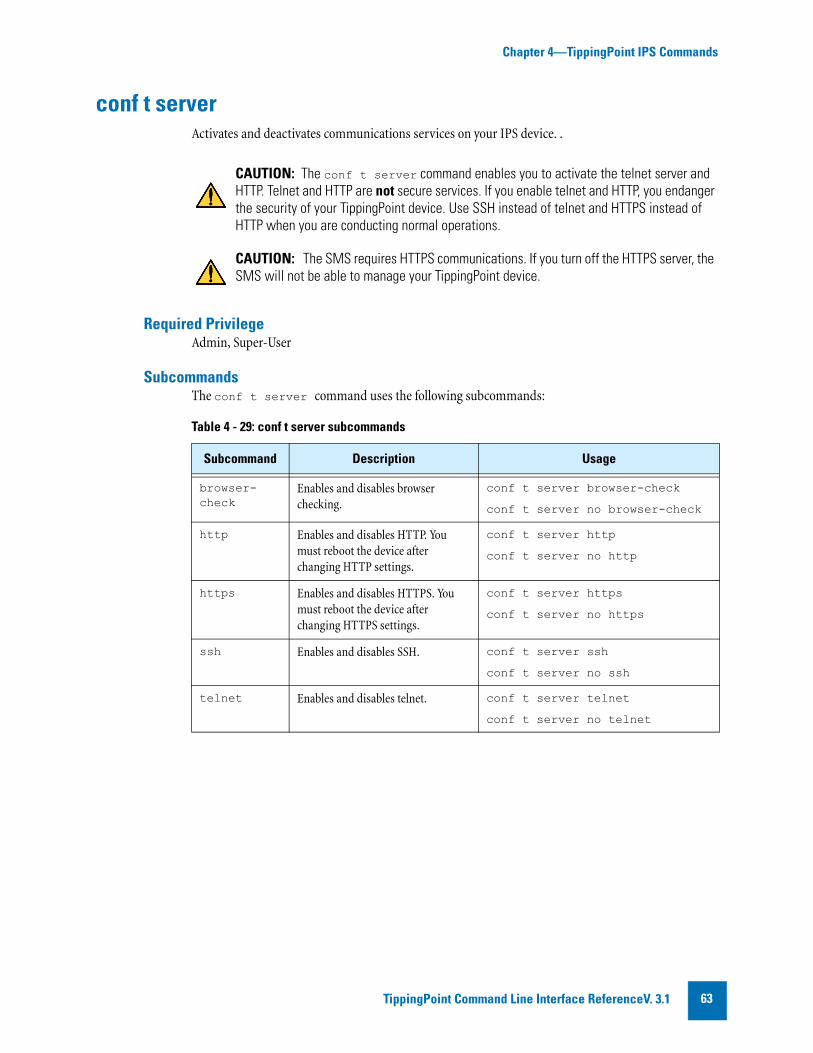
Chapter 4—TippingPoint IPS Commands
conf t serverActivates and deactivates communications services on your IPS device. .
Required PrivilegeAdmin, Super-User
SubcommandsThe conf t server command uses the following subcommands:
CAUTION: The conf t server command enables you to activate the telnet server and HTTP. Telnet and HTTP are not secure services. If you enable telnet and HTTP, you endanger the security of your TippingPoint device. Use SSH instead of telnet and HTTPS instead of HTTP when you are conducting normal operations.
CAUTION: The SMS requires HTTPS communications. If you turn off the HTTPS server, the SMS will not be able to manage your TippingPoint device.
Table 4 - 29: conf t server subcommands
Subcommand Description Usage
browser-check
Enables and disables browser checking.
conf t server browser-check
conf t server no browser-check
http Enables and disables HTTP. You must reboot the device after changing HTTP settings.
conf t server http
conf t server no http
https Enables and disables HTTPS. You must reboot the device after changing HTTPS settings.
conf t server https
conf t server no https
ssh Enables and disables SSH. conf t server ssh
conf t server no ssh
telnet Enables and disables telnet. conf t server telnet
conf t server no telnet
TippingPoint Command Line Interface ReferenceV. 3.1 63
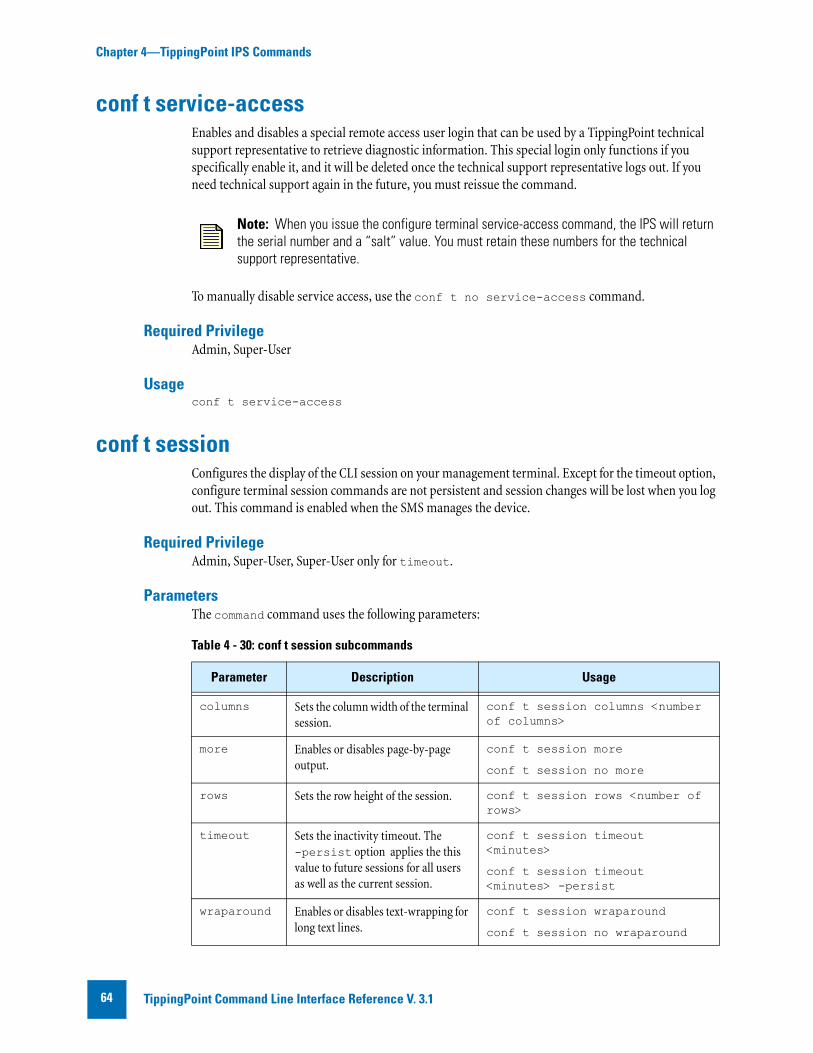
Chapter 4—TippingPoint IPS Commands
conf t service-accessEnables and disables a special remote access user login that can be used by a TippingPoint technical support representative to retrieve diagnostic information. This special login only functions if you specifically enable it, and it will be deleted once the technical support representative logs out. If you need technical support again in the future, you must reissue the command.
To manually disable service access, use the conf t no service-access command.
Required PrivilegeAdmin, Super-User
Usageconf t service-access
conf t sessionConfigures the display of the CLI session on your management terminal. Except for the timeout option, configure terminal session commands are not persistent and session changes will be lost when you log out. This command is enabled when the SMS manages the device.
Required PrivilegeAdmin, Super-User, Super-User only for timeout.
ParametersThe command command uses the following parameters:
Note: When you issue the configure terminal service-access command, the IPS will return the serial number and a “salt” value. You must retain these numbers for the technical support representative.
Table 4 - 30: conf t session subcommands
Parameter Description Usage
columns Sets the column width of the terminal session.
conf t session columns <number of columns>
more Enables or disables page-by-page output.
conf t session more
conf t session no more
rows Sets the row height of the session. conf t session rows <number of rows>
timeout Sets the inactivity timeout. The -persist option applies the this value to future sessions for all users as well as the current session.
conf t session timeout <minutes>
conf t session timeout <minutes> -persist
wraparound Enables or disables text-wrapping for long text lines.
conf t session wraparound
conf t session no wraparound
TippingPoint Command Line Interface Reference V. 3.164
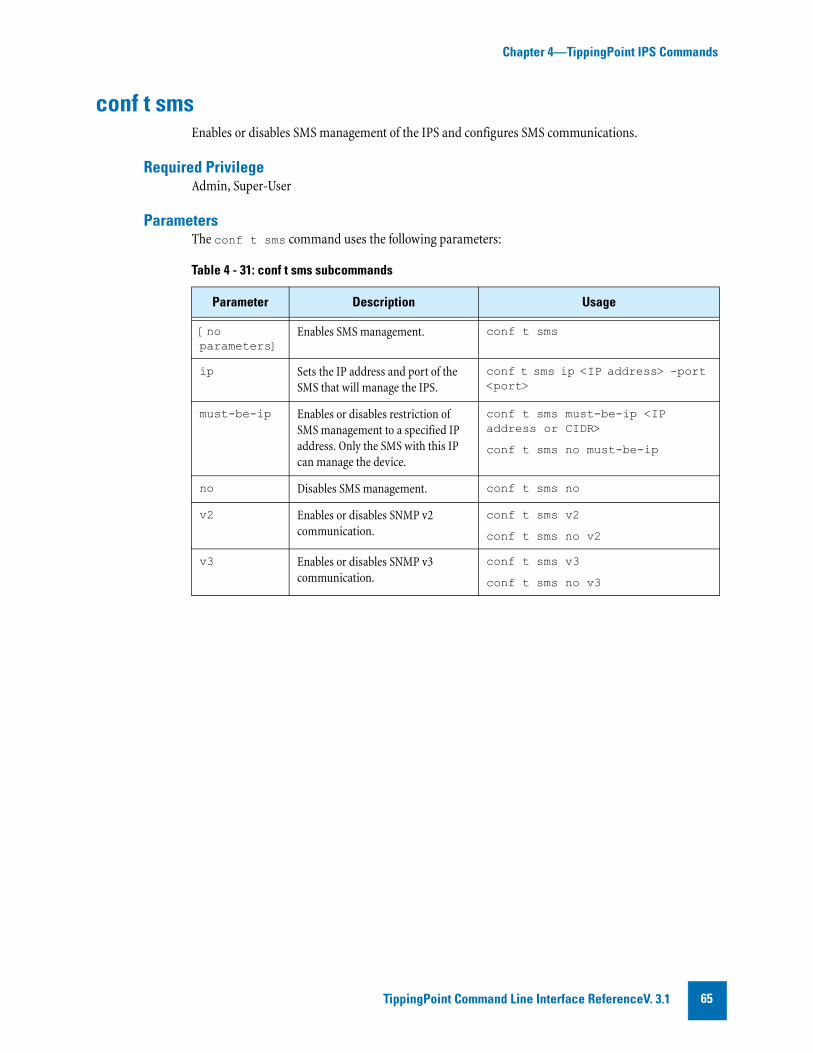
Chapter 4—TippingPoint IPS Commands
conf t smsEnables or disables SMS management of the IPS and configures SMS communications.
Required PrivilegeAdmin, Super-User
ParametersThe conf t sms command uses the following parameters:
Table 4 - 31: conf t sms subcommands
Parameter Description Usage
[no parameters]
Enables SMS management. conf t sms
ip Sets the IP address and port of the SMS that will manage the IPS.
conf t sms ip <IP address> -port <port>
must-be-ip Enables or disables restriction of SMS management to a specified IP address. Only the SMS with this IP can manage the device.
conf t sms must-be-ip <IP address or CIDR>
conf t sms no must-be-ip
no Disables SMS management. conf t sms no
v2 Enables or disables SNMP v2 communication.
conf t sms v2
conf t sms no v2
v3 Enables or disables SNMP v3 communication.
conf t sms v3
conf t sms no v3
TippingPoint Command Line Interface ReferenceV. 3.1 65
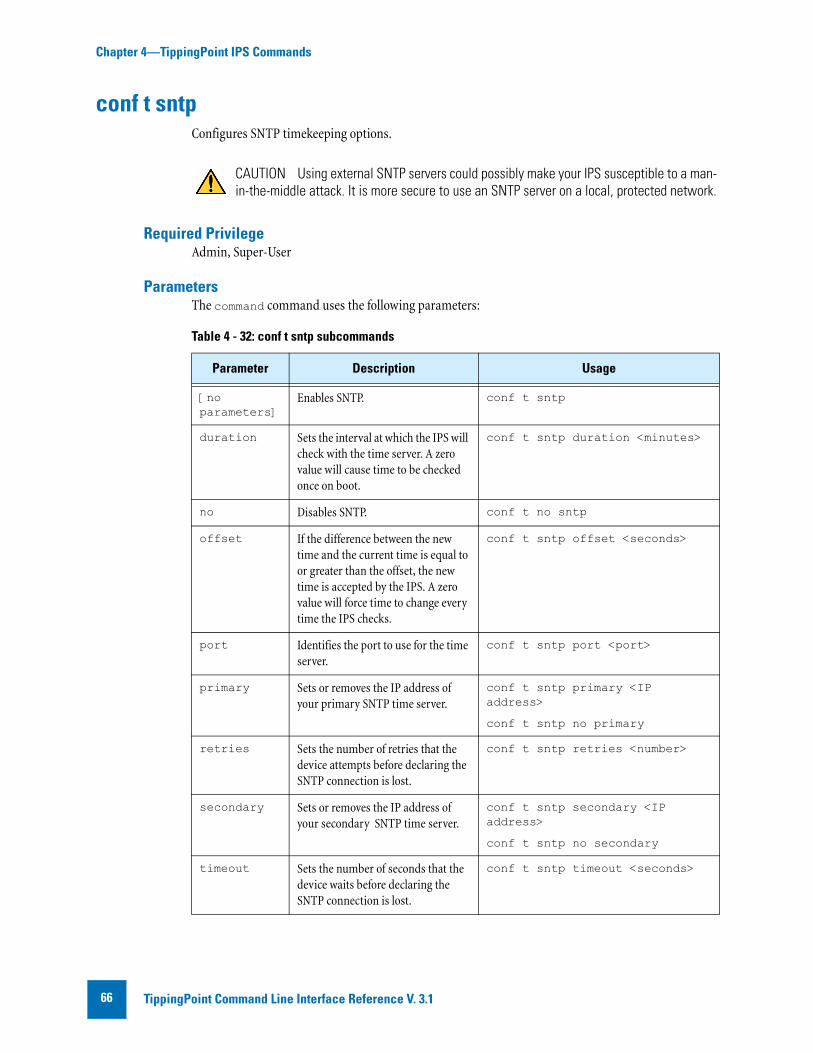
Chapter 4—TippingPoint IPS Commands
conf t sntpConfigures SNTP timekeeping options.
Required PrivilegeAdmin, Super-User
ParametersThe command command uses the following parameters:
CAUTION Using external SNTP servers could possibly make your IPS susceptible to a man-in-the-middle attack. It is more secure to use an SNTP server on a local, protected network.
Table 4 - 32: conf t sntp subcommands
Parameter Description Usage
[no parameters]
Enables SNTP. conf t sntp
duration Sets the interval at which the IPS will check with the time server. A zero value will cause time to be checked once on boot.
conf t sntp duration <minutes>
no Disables SNTP. conf t no sntp
offset If the difference between the new time and the current time is equal to or greater than the offset, the new time is accepted by the IPS. A zero value will force time to change every time the IPS checks.
conf t sntp offset <seconds>
port Identifies the port to use for the time server.
conf t sntp port <port>
primary Sets or removes the IP address of your primary SNTP time server.
conf t sntp primary <IP address>
conf t sntp no primary
retries Sets the number of retries that the device attempts before declaring the SNTP connection is lost.
conf t sntp retries <number>
secondary Sets or removes the IP address of your secondary SNTP time server.
conf t sntp secondary <IP address>
conf t sntp no secondary
timeout Sets the number of seconds that the device waits before declaring the SNTP connection is lost.
conf t sntp timeout <seconds>
TippingPoint Command Line Interface Reference V. 3.166
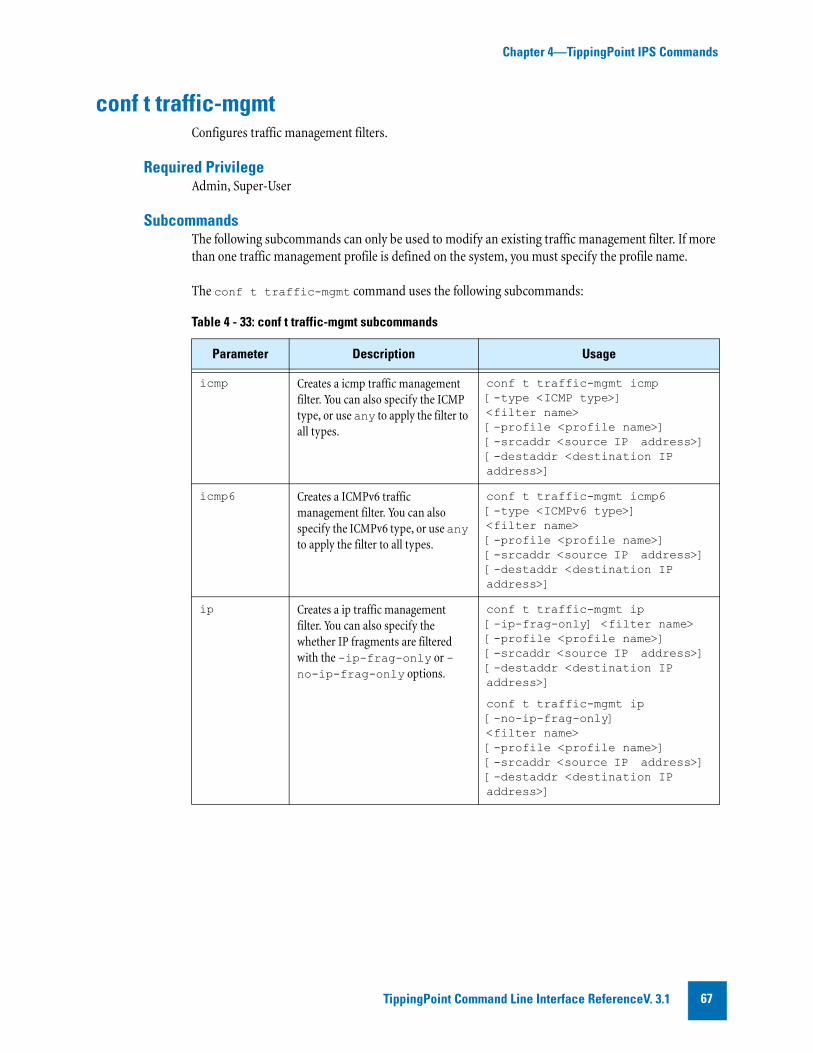
Chapter 4—TippingPoint IPS Commands
conf t traffic-mgmtConfigures traffic management filters.
Required PrivilegeAdmin, Super-User
SubcommandsThe following subcommands can only be used to modify an existing traffic management filter. If more than one traffic management profile is defined on the system, you must specify the profile name.
The conf t traffic-mgmt command uses the following subcommands:
Table 4 - 33: conf t traffic-mgmt subcommands
Parameter Description Usage
icmp Creates a icmp traffic management filter. You can also specify the ICMP type, or use any to apply the filter to all types.
conf t traffic-mgmt icmp [-type <ICMP type>]<filter name> [-profile <profile name>] [-srcaddr <source IP address>] [-destaddr <destination IP address>]
icmp6 Creates a ICMPv6 traffic management filter. You can also specify the ICMPv6 type, or use any to apply the filter to all types.
conf t traffic-mgmt icmp6 [-type <ICMPv6 type>] <filter name> [-profile <profile name>] [-srcaddr <source IP address>] [-destaddr <destination IP address>]
ip Creates a ip traffic management filter. You can also specify the whether IP fragments are filtered with the -ip-frag-only or -no-ip-frag-only options.
conf t traffic-mgmt ip [-ip-frag-only] <filter name> [-profile <profile name>] [-srcaddr <source IP address>] [-destaddr <destination IP address>]
conf t traffic-mgmt ip [-no-ip-frag-only] <filter name> [-profile <profile name>] [-srcaddr <source IP address>] [-destaddr <destination IP address>]
TippingPoint Command Line Interface ReferenceV. 3.1 67
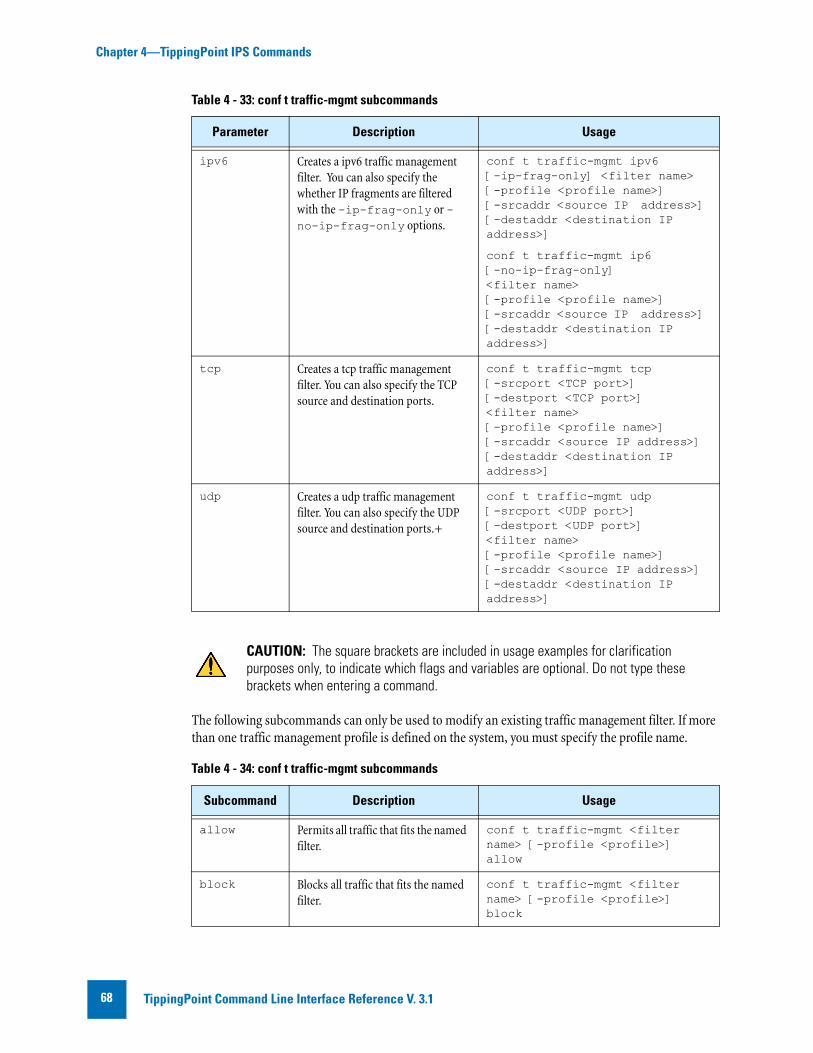
Chapter 4—TippingPoint IPS Commands
The following subcommands can only be used to modify an existing traffic management filter. If more than one traffic management profile is defined on the system, you must specify the profile name.
ipv6 Creates a ipv6 traffic management filter. You can also specify the whether IP fragments are filtered with the -ip-frag-only or -no-ip-frag-only options.
conf t traffic-mgmt ipv6 [-ip-frag-only] <filter name> [-profile <profile name>] [-srcaddr <source IP address>] [-destaddr <destination IP address>]
conf t traffic-mgmt ip6 [-no-ip-frag-only] <filter name> [-profile <profile name>] [-srcaddr <source IP address>] [-destaddr <destination IP address>]
tcp Creates a tcp traffic management filter. You can also specify the TCP source and destination ports.
conf t traffic-mgmt tcp [-srcport <TCP port>][-destport <TCP port>]<filter name> [-profile <profile name>][-srcaddr <source IP address>][-destaddr <destination IP address>]
udp Creates a udp traffic management filter. You can also specify the UDP source and destination ports.+
conf t traffic-mgmt udp [-srcport <UDP port>][-destport <UDP port>]<filter name> [-profile <profile name>][-srcaddr <source IP address>][-destaddr <destination IP address>]
CAUTION: The square brackets are included in usage examples for clarification purposes only, to indicate which flags and variables are optional. Do not type these brackets when entering a command.
Table 4 - 34: conf t traffic-mgmt subcommands
Subcommand Description Usage
allow Permits all traffic that fits the named filter.
conf t traffic-mgmt <filter name> [-profile <profile>] allow
block Blocks all traffic that fits the named filter.
conf t traffic-mgmt <filter name> [-profile <profile>] block
Table 4 - 33: conf t traffic-mgmt subcommands
Parameter Description Usage
TippingPoint Command Line Interface Reference V. 3.168
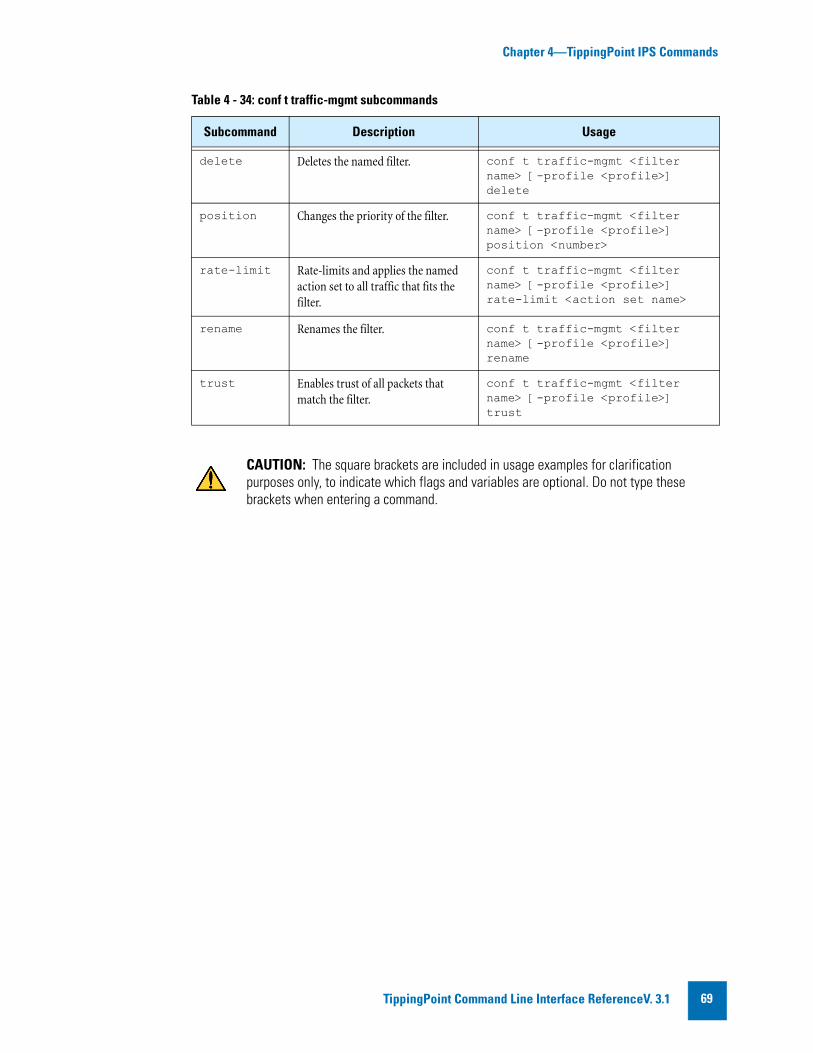
Chapter 4—TippingPoint IPS Commands
delete Deletes the named filter. conf t traffic-mgmt <filter name> [-profile <profile>] delete
position Changes the priority of the filter. conf t traffic-mgmt <filter name> [-profile <profile>] position <number>
rate-limit Rate-limits and applies the named action set to all traffic that fits the filter.
conf t traffic-mgmt <filter name> [-profile <profile>] rate-limit <action set name>
rename Renames the filter. conf t traffic-mgmt <filter name> [-profile <profile>] rename
trust Enables trust of all packets that match the filter.
conf t traffic-mgmt <filter name> [-profile <profile>] trust
CAUTION: The square brackets are included in usage examples for clarification purposes only, to indicate which flags and variables are optional. Do not type these brackets when entering a command.
Table 4 - 34: conf t traffic-mgmt subcommands
Subcommand Description Usage
TippingPoint Command Line Interface ReferenceV. 3.1 69
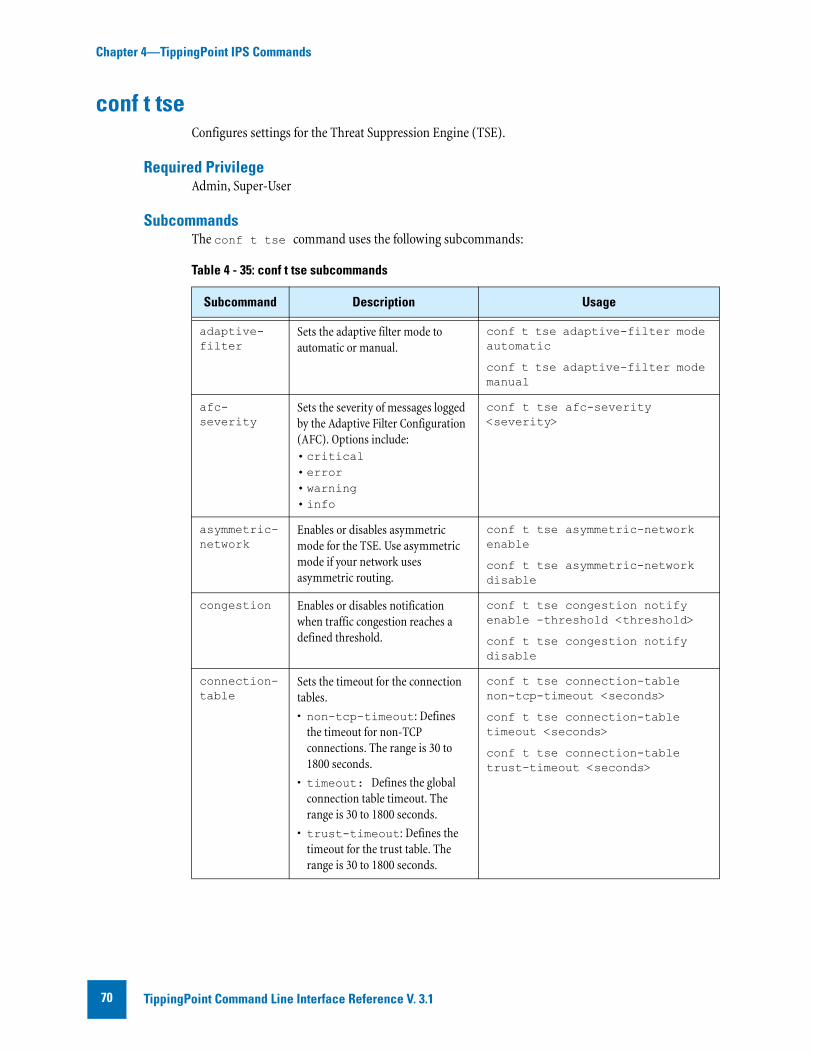
Chapter 4—TippingPoint IPS Commands
conf t tseConfigures settings for the Threat Suppression Engine (TSE).
Required PrivilegeAdmin, Super-User
SubcommandsThe conf t tse command uses the following subcommands:
Table 4 - 35: conf t tse subcommands
Subcommand Description Usage
adaptive-filter
Sets the adaptive filter mode to automatic or manual.
conf t tse adaptive-filter mode automatic
conf t tse adaptive-filter mode manual
afc-severity
Sets the severity of messages logged by the Adaptive Filter Configuration (AFC). Options include: • critical• error• warning• info
conf t tse afc-severity <severity>
asymmetric-network
Enables or disables asymmetric mode for the TSE. Use asymmetric mode if your network uses asymmetric routing.
conf t tse asymmetric-network enable
conf t tse asymmetric-network disable
congestion Enables or disables notification when traffic congestion reaches a defined threshold.
conf t tse congestion notify enable -threshold <threshold>
conf t tse congestion notify disable
connection-table
Sets the timeout for the connection tables.
• non-tcp-timeout: Defines the timeout for non-TCP connections. The range is 30 to 1800 seconds.
• timeout: Defines the global connection table timeout. The range is 30 to 1800 seconds.
• trust-timeout: Defines the timeout for the trust table. The range is 30 to 1800 seconds.
conf t tse connection-table non-tcp-timeout <seconds>
conf t tse connection-table timeout <seconds>
conf t tse connection-table trust-timeout <seconds>
TippingPoint Command Line Interface Reference V. 3.170
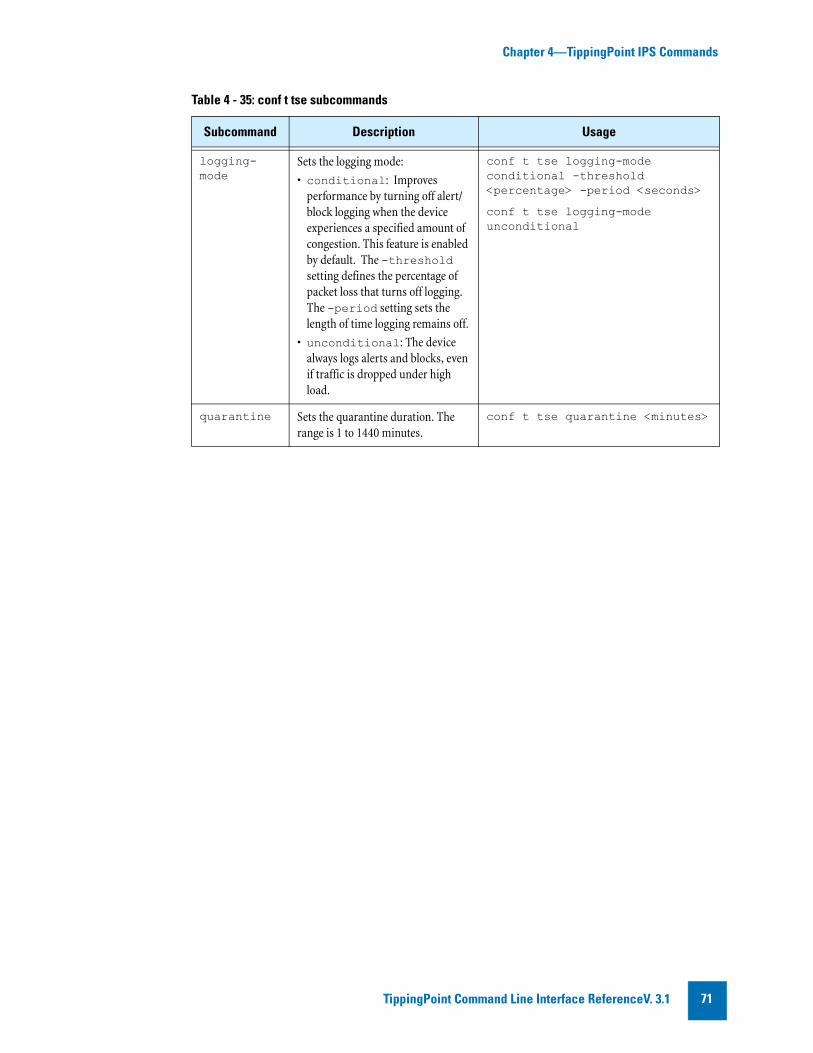
Chapter 4—TippingPoint IPS Commands
logging-mode
Sets the logging mode:
• conditional: Improves performance by turning off alert/block logging when the device experiences a specified amount of congestion. This feature is enabled by default. The -threshold setting defines the percentage of packet loss that turns off logging. The -period setting sets the length of time logging remains off.
• unconditional: The device always logs alerts and blocks, even if traffic is dropped under high load.
conf t tse logging-mode conditional -threshold <percentage> -period <seconds>
conf t tse logging-mode unconditional
quarantine Sets the quarantine duration. The range is 1 to 1440 minutes.
conf t tse quarantine <minutes>
Table 4 - 35: conf t tse subcommands
Subcommand Description Usage
TippingPoint Command Line Interface ReferenceV. 3.1 71
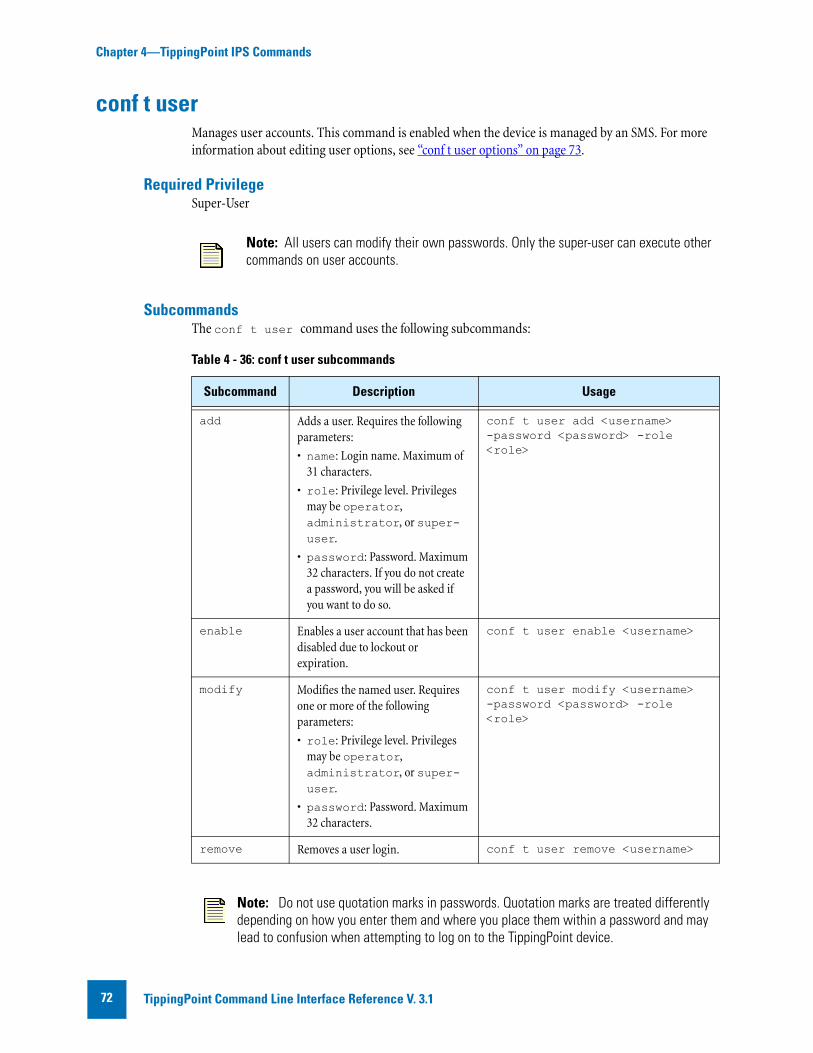
Chapter 4—TippingPoint IPS Commands
conf t userManages user accounts. This command is enabled when the device is managed by an SMS. For more information about editing user options, see “conf t user options” on page 73.
Required PrivilegeSuper-User
SubcommandsThe conf t user command uses the following subcommands:
Note: All users can modify their own passwords. Only the super-user can execute other commands on user accounts.
Table 4 - 36: conf t user subcommands
Subcommand Description Usage
add Adds a user. Requires the following parameters:
• name: Login name. Maximum of 31 characters.
• role: Privilege level. Privileges may be operator, administrator, or super-user.
• password: Password. Maximum 32 characters. If you do not create a password, you will be asked if you want to do so.
conf t user add <username>-password <password> -role <role>
enable Enables a user account that has been disabled due to lockout or expiration.
conf t user enable <username>
modify Modifies the named user. Requires one or more of the following parameters:
• role: Privilege level. Privileges may be operator, administrator, or super-user.
• password: Password. Maximum 32 characters.
conf t user modify <username> -password <password> -role <role>
remove Removes a user login. conf t user remove <username>
Note: Do not use quotation marks in passwords. Quotation marks are treated differently depending on how you enter them and where you place them within a password and may lead to confusion when attempting to log on to the TippingPoint device.
TippingPoint Command Line Interface Reference V. 3.172
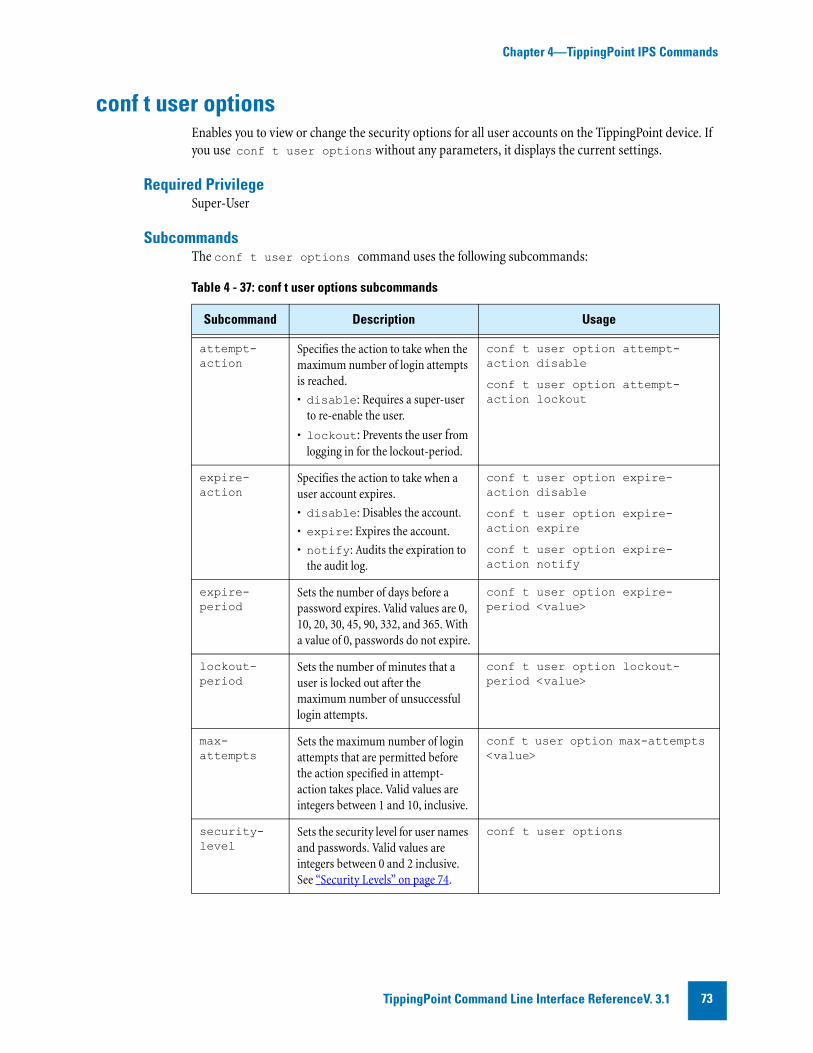
Chapter 4—TippingPoint IPS Commands
conf t user optionsEnables you to view or change the security options for all user accounts on the TippingPoint device. If you use conf t user options without any parameters, it displays the current settings.
Required PrivilegeSuper-User
SubcommandsThe conf t user options command uses the following subcommands:
Table 4 - 37: conf t user options subcommands
Subcommand Description Usage
attempt-action
Specifies the action to take when the maximum number of login attempts is reached.
• disable: Requires a super-user to re-enable the user.
• lockout: Prevents the user from logging in for the lockout-period.
conf t user option attempt-action disable
conf t user option attempt-action lockout
expire-action
Specifies the action to take when a user account expires.
• disable: Disables the account.
• expire: Expires the account.
• notify: Audits the expiration to the audit log.
conf t user option expire-action disable
conf t user option expire-action expire
conf t user option expire-action notify
expire-period
Sets the number of days before a password expires. Valid values are 0, 10, 20, 30, 45, 90, 332, and 365. With a value of 0, passwords do not expire.
conf t user option expire-period <value>
lockout-period
Sets the number of minutes that a user is locked out after the maximum number of unsuccessful login attempts.
conf t user option lockout-period <value>
max-attempts
Sets the maximum number of login attempts that are permitted before the action specified in attempt-action takes place. Valid values are integers between 1 and 10, inclusive.
conf t user option max-attempts <value>
security-level
Sets the security level for user names and passwords. Valid values are integers between 0 and 2 inclusive. See “Security Levels” on page 74.
conf t user options
TippingPoint Command Line Interface ReferenceV. 3.1 73
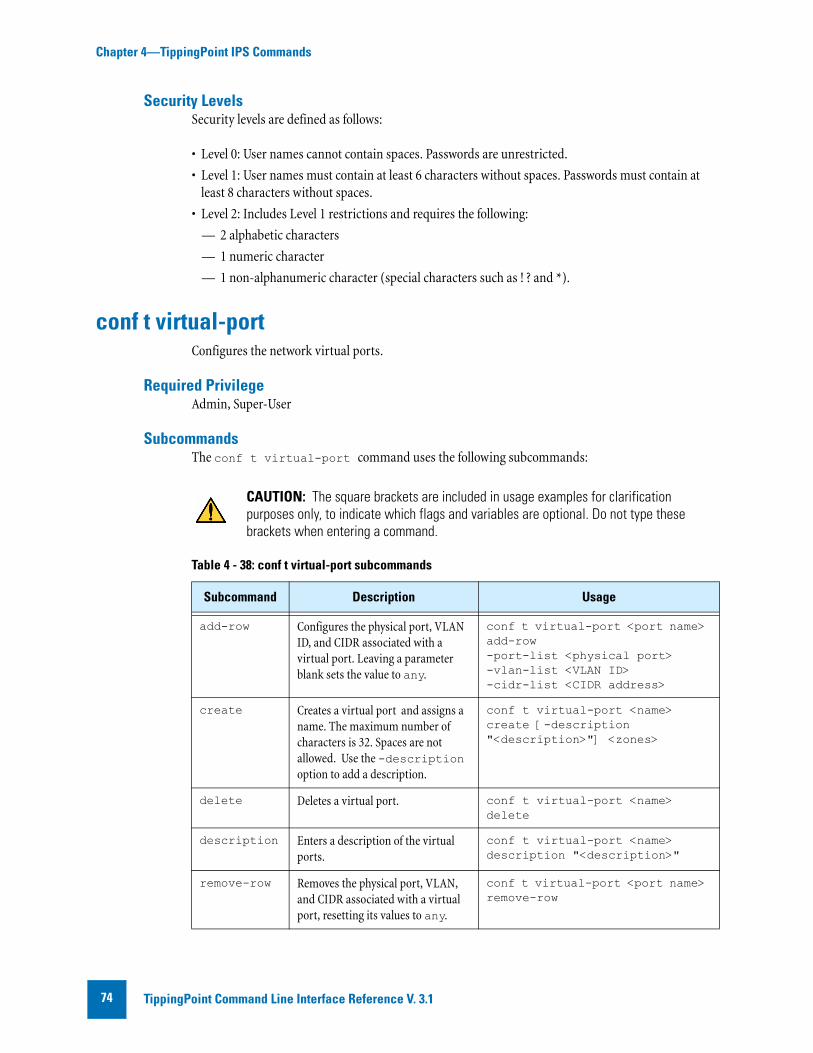
Chapter 4—TippingPoint IPS Commands
Security LevelsSecurity levels are defined as follows:
• Level 0: User names cannot contain spaces. Passwords are unrestricted.
• Level 1: User names must contain at least 6 characters without spaces. Passwords must contain at least 8 characters without spaces.
• Level 2: Includes Level 1 restrictions and requires the following:
— 2 alphabetic characters
— 1 numeric character
— 1 non-alphanumeric character (special characters such as ! ? and *).
conf t virtual-portConfigures the network virtual ports.
Required PrivilegeAdmin, Super-User
SubcommandsThe conf t virtual-port command uses the following subcommands:
CAUTION: The square brackets are included in usage examples for clarification purposes only, to indicate which flags and variables are optional. Do not type these brackets when entering a command.
Table 4 - 38: conf t virtual-port subcommands
Subcommand Description Usage
add-row Configures the physical port, VLAN ID, and CIDR associated with a virtual port. Leaving a parameter blank sets the value to any.
conf t virtual-port <port name> add-row -port-list <physical port>-vlan-list <VLAN ID>-cidr-list <CIDR address>
create Creates a virtual port and assigns a name. The maximum number of characters is 32. Spaces are not allowed. Use the -description option to add a description.
conf t virtual-port <name> create [-description "<description>"] <zones>
delete Deletes a virtual port. conf t virtual-port <name> delete
description Enters a description of the virtual ports.
conf t virtual-port <name> description "<description>"
remove-row Removes the physical port, VLAN, and CIDR associated with a virtual port, resetting its values to any.
conf t virtual-port <port name> remove-row
TippingPoint Command Line Interface Reference V. 3.174
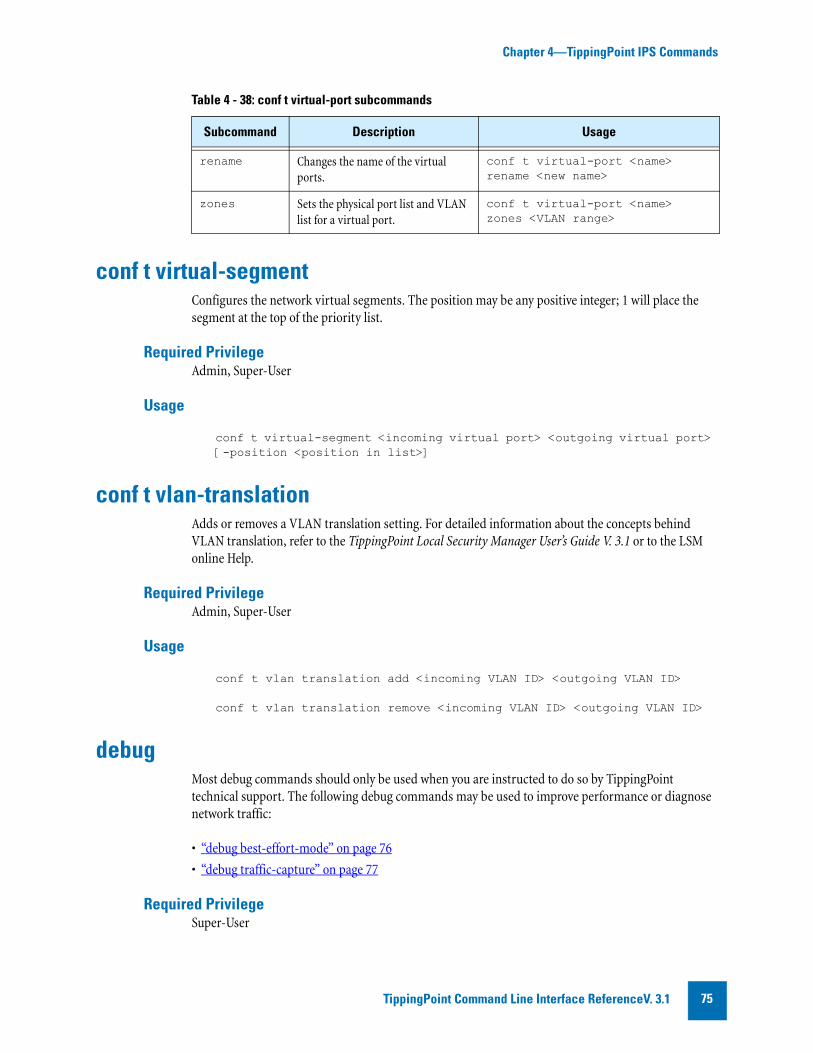
Chapter 4—TippingPoint IPS Commands
conf t virtual-segmentConfigures the network virtual segments. The position may be any positive integer; 1 will place the segment at the top of the priority list.
Required PrivilegeAdmin, Super-User
Usage
conf t virtual-segment <incoming virtual port> <outgoing virtual port> [-position <position in list>]
conf t vlan-translationAdds or removes a VLAN translation setting. For detailed information about the concepts behind VLAN translation, refer to the TippingPoint Local Security Manager User’s Guide V. 3.1 or to the LSM online Help.
Required PrivilegeAdmin, Super-User
Usage
conf t vlan translation add <incoming VLAN ID> <outgoing VLAN ID>
conf t vlan translation remove <incoming VLAN ID> <outgoing VLAN ID>
debugMost debug commands should only be used when you are instructed to do so by TippingPoint technical support. The following debug commands may be used to improve performance or diagnose network traffic:
• “debug best-effort-mode” on page 76
• “debug traffic-capture” on page 77
Required PrivilegeSuper-User
rename Changes the name of the virtual ports.
conf t virtual-port <name> rename <new name>
zones Sets the physical port list and VLAN list for a virtual port.
conf t virtual-port <name> zones <VLAN range>
Table 4 - 38: conf t virtual-port subcommands
Subcommand Description Usage
TippingPoint Command Line Interface ReferenceV. 3.1 75
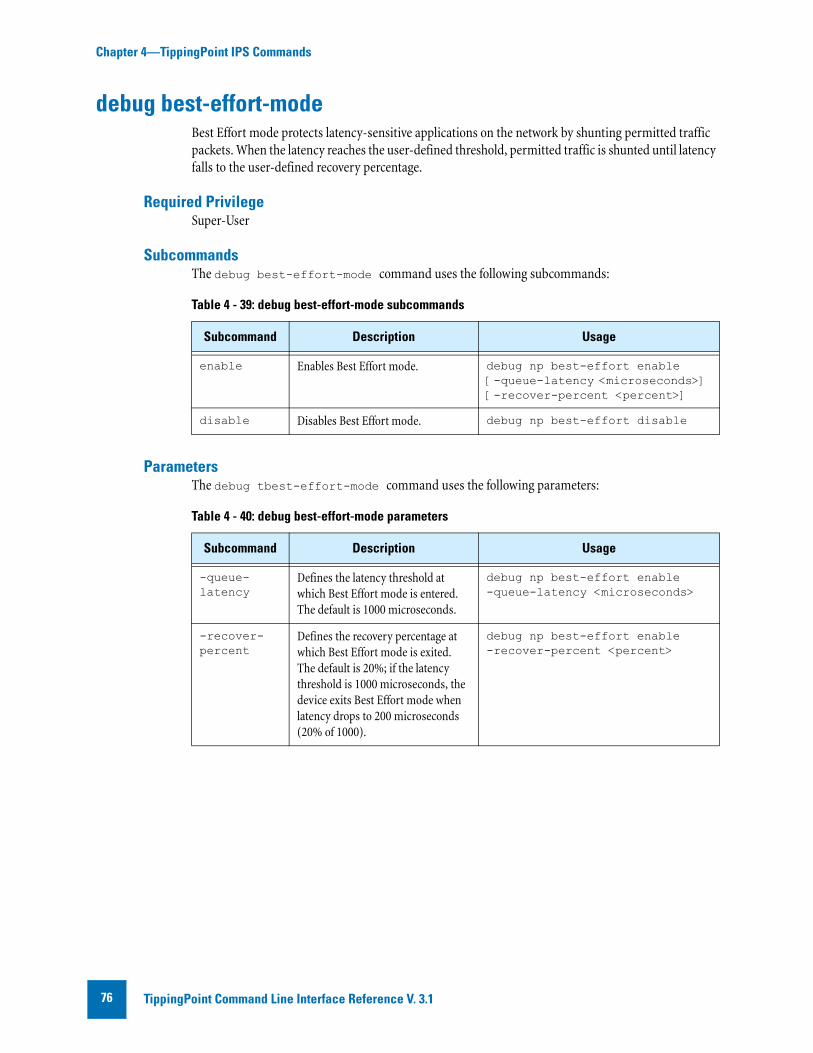
Chapter 4—TippingPoint IPS Commands
debug best-effort-modeBest Effort mode protects latency-sensitive applications on the network by shunting permitted traffic packets. When the latency reaches the user-defined threshold, permitted traffic is shunted until latency falls to the user-defined recovery percentage.
Required PrivilegeSuper-User
SubcommandsThe debug best-effort-mode command uses the following subcommands:
ParametersThe debug tbest-effort-mode command uses the following parameters:
Table 4 - 39: debug best-effort-mode subcommands
Subcommand Description Usage
enable Enables Best Effort mode. debug np best-effort enable [-queue-latency <microseconds>] [-recover-percent <percent>]
disable Disables Best Effort mode. debug np best-effort disable
Table 4 - 40: debug best-effort-mode parameters
Subcommand Description Usage
-queue-latency
Defines the latency threshold at which Best Effort mode is entered. The default is 1000 microseconds.
debug np best-effort enable -queue-latency <microseconds>
-recover-percent
Defines the recovery percentage at which Best Effort mode is exited. The default is 20%; if the latency threshold is 1000 microseconds, the device exits Best Effort mode when latency drops to 200 microseconds (20% of 1000).
debug np best-effort enable -recover-percent <percent>
TippingPoint Command Line Interface Reference V. 3.176
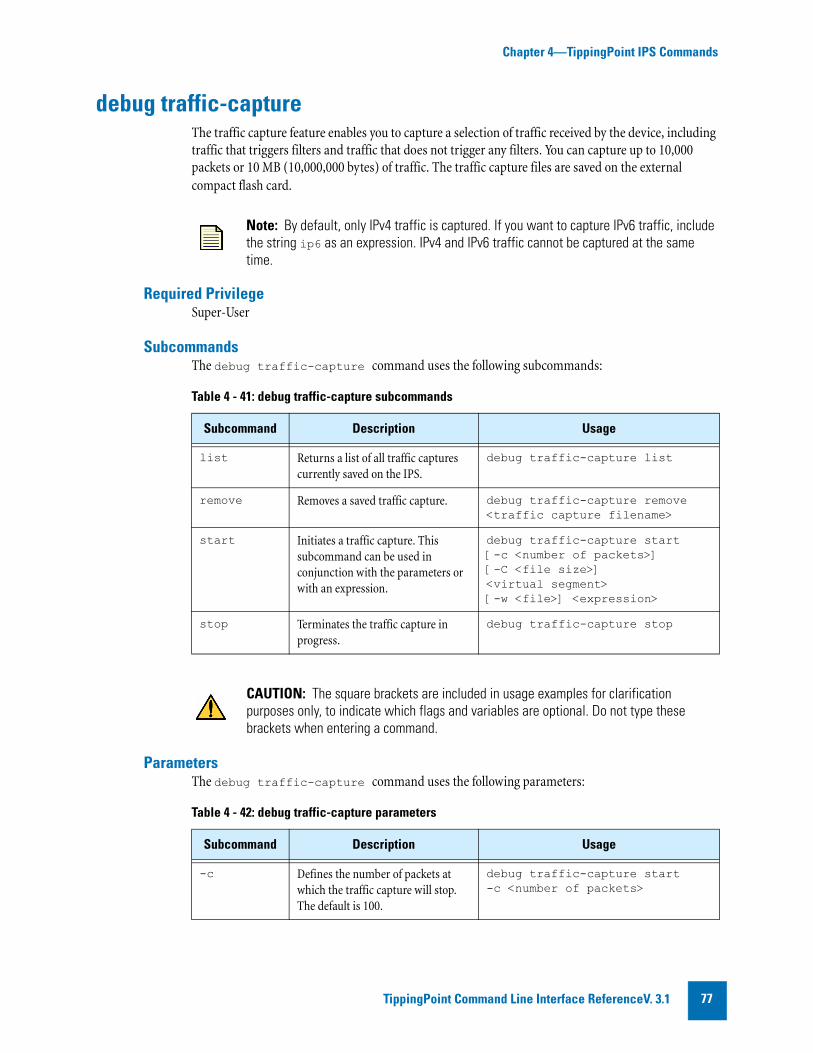
Chapter 4—TippingPoint IPS Commands
debug traffic-captureThe traffic capture feature enables you to capture a selection of traffic received by the device, including traffic that triggers filters and traffic that does not trigger any filters. You can capture up to 10,000 packets or 10 MB (10,000,000 bytes) of traffic. The traffic capture files are saved on the external compact flash card.
Required PrivilegeSuper-User
SubcommandsThe debug traffic-capture command uses the following subcommands:
ParametersThe debug traffic-capture command uses the following parameters:
Note: By default, only IPv4 traffic is captured. If you want to capture IPv6 traffic, include the string ip6 as an expression. IPv4 and IPv6 traffic cannot be captured at the same time.
Table 4 - 41: debug traffic-capture subcommands
Subcommand Description Usage
list Returns a list of all traffic captures currently saved on the IPS.
debug traffic-capture list
remove Removes a saved traffic capture. debug traffic-capture remove <traffic capture filename>
start Initiates a traffic capture. This subcommand can be used in conjunction with the parameters or with an expression.
debug traffic-capture start [-c <number of packets>] [-C <file size>] <virtual segment>[-w <file>] <expression>
stop Terminates the traffic capture in progress.
debug traffic-capture stop
CAUTION: The square brackets are included in usage examples for clarification purposes only, to indicate which flags and variables are optional. Do not type these brackets when entering a command.
Table 4 - 42: debug traffic-capture parameters
Subcommand Description Usage
-c Defines the number of packets at which the traffic capture will stop. The default is 100.
debug traffic-capture start -c <number of packets>
TippingPoint Command Line Interface ReferenceV. 3.1 77
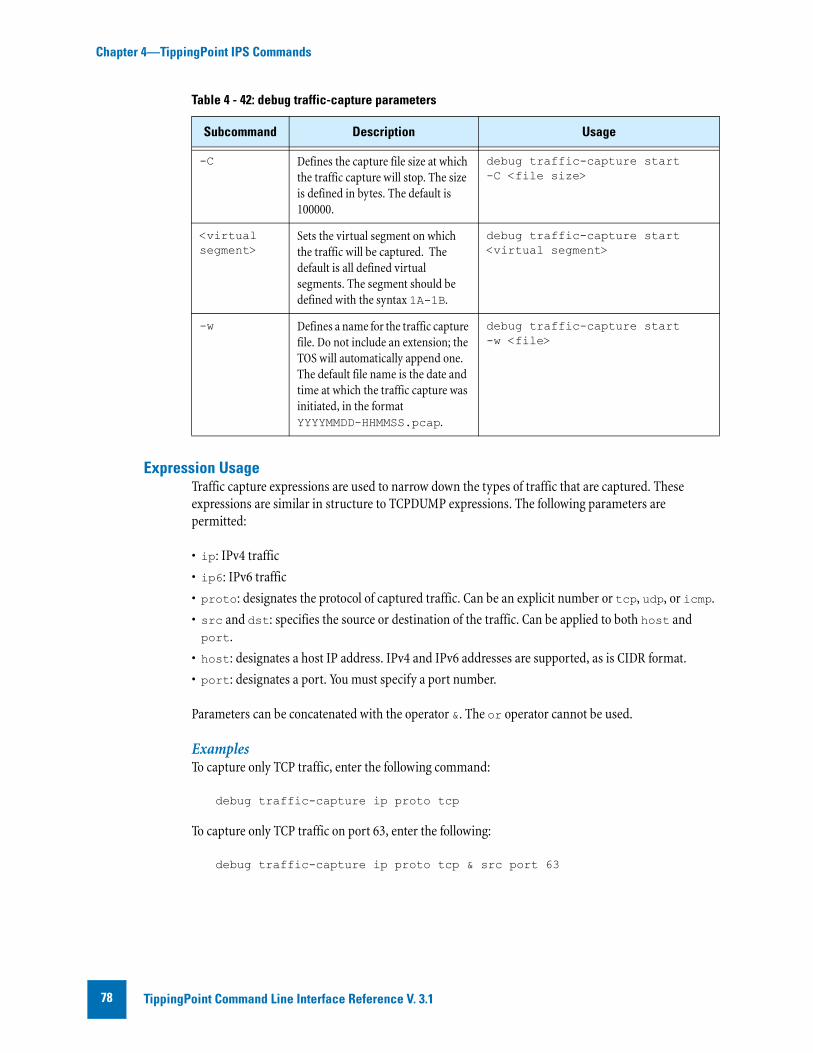
Chapter 4—TippingPoint IPS Commands
Expression UsageTraffic capture expressions are used to narrow down the types of traffic that are captured. These expressions are similar in structure to TCPDUMP expressions. The following parameters are permitted:
• ip: IPv4 traffic
• ip6: IPv6 traffic
• proto: designates the protocol of captured traffic. Can be an explicit number or tcp, udp, or icmp.
• src and dst: specifies the source or destination of the traffic. Can be applied to both host and port.
• host: designates a host IP address. IPv4 and IPv6 addresses are supported, as is CIDR format.
• port: designates a port. You must specify a port number.
Parameters can be concatenated with the operator &. The or operator cannot be used.
ExamplesTo capture only TCP traffic, enter the following command:
debug traffic-capture ip proto tcp
To capture only TCP traffic on port 63, enter the following:
debug traffic-capture ip proto tcp & src port 63
-C Defines the capture file size at which the traffic capture will stop. The size is defined in bytes. The default is 100000.
debug traffic-capture start -C <file size>
<virtual segment>
Sets the virtual segment on which the traffic will be captured. The default is all defined virtual segments. The segment should be defined with the syntax 1A-1B.
debug traffic-capture start <virtual segment>
-w Defines a name for the traffic capture file. Do not include an extension; the TOS will automatically append one. The default file name is the date and time at which the traffic capture was initiated, in the format YYYYMMDD-HHMMSS.pcap.
debug traffic-capture start -w <file>
Table 4 - 42: debug traffic-capture parameters
Subcommand Description Usage
TippingPoint Command Line Interface Reference V. 3.178
Chapter 4—TippingPoint IPS Commands
haltShuts down the IPS device. Use the now parameter to shut the device down immediately. You can also enter 1 to 3600 seconds for the IPS to wait before initiating the halt sequence. You will be prompted to confirm that you want to halt the device.
Required PrivilegeAdmin, Super-User
Usagehalt now
halt <seconds>
high-availabilityForces the system into fallback or forces a return to normal operation. In fallback mode, segments configured to “block” will prohibit all traffic, and segments configured to “permit” will allow all traffic to pass through the device. See “conf t segment” on page 62.
Required PrivilegeAdmin, Super-User
SubcommandsThe high-availability command uses the following subcommands:
CAUTION: The square brackets are included in usage examples for clarification purposes only, to indicate which flags and variables are optional. Do not type these brackets when entering a command.
Table 4 - 43: high-availability subcommands
Subcommand Description Usage
force The fallback option forces the TippingPoint into fallback or Intrinsic Network High Availability (INHA) mode.The normal option causes the TippingPoint to return to normal (non-INHA) operation.
high-availability force fallback
high-availability force normal
TippingPoint Command Line Interface ReferenceV. 3.1 79
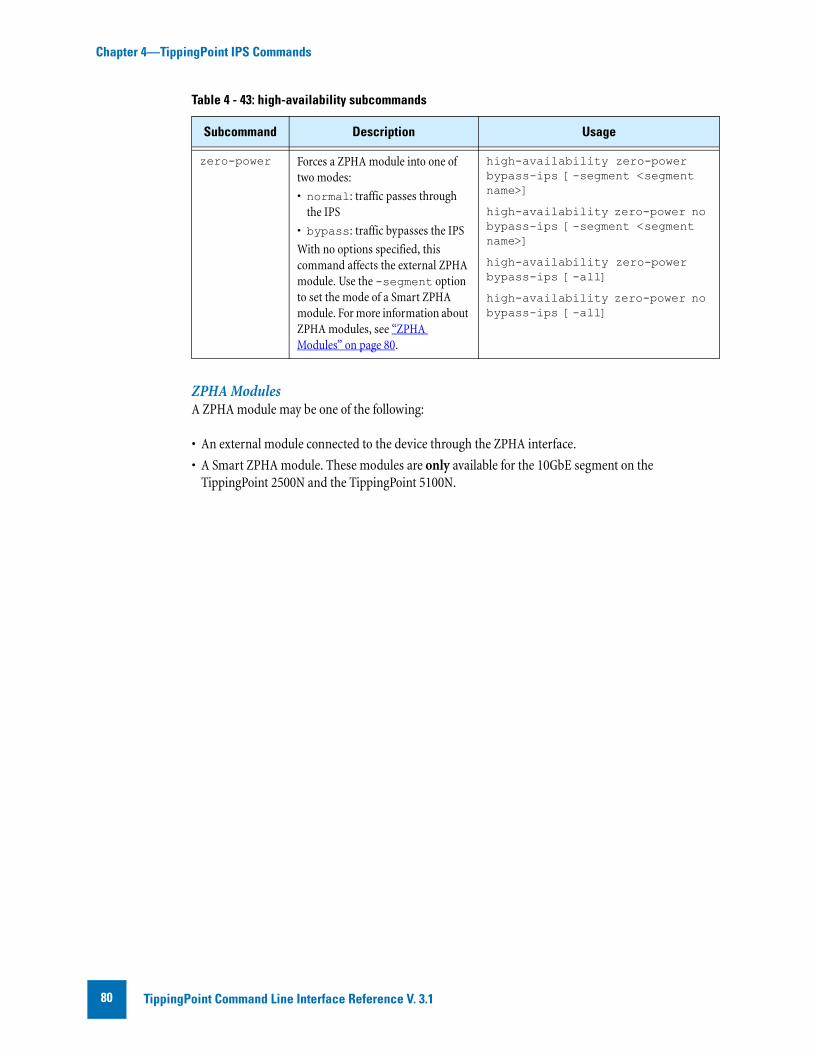
Chapter 4—TippingPoint IPS Commands
ZPHA ModulesA ZPHA module may be one of the following:
• An external module connected to the device through the ZPHA interface.
• A Smart ZPHA module. These modules are only available for the 10GbE segment on the TippingPoint 2500N and the TippingPoint 5100N.
zero-power Forces a ZPHA module into one of two modes:
• normal: traffic passes through the IPS
• bypass: traffic bypasses the IPS
With no options specified, this command affects the external ZPHA module. Use the -segment option to set the mode of a Smart ZPHA module. For more information about ZPHA modules, see “ZPHA Modules” on page 80.
high-availability zero-power bypass-ips [-segment <segment name>]
high-availability zero-power no bypass-ips [-segment <segment name>]
high-availability zero-power bypass-ips [-all]
high-availability zero-power no bypass-ips [-all]
Table 4 - 43: high-availability subcommands
Subcommand Description Usage
TippingPoint Command Line Interface Reference V. 3.180
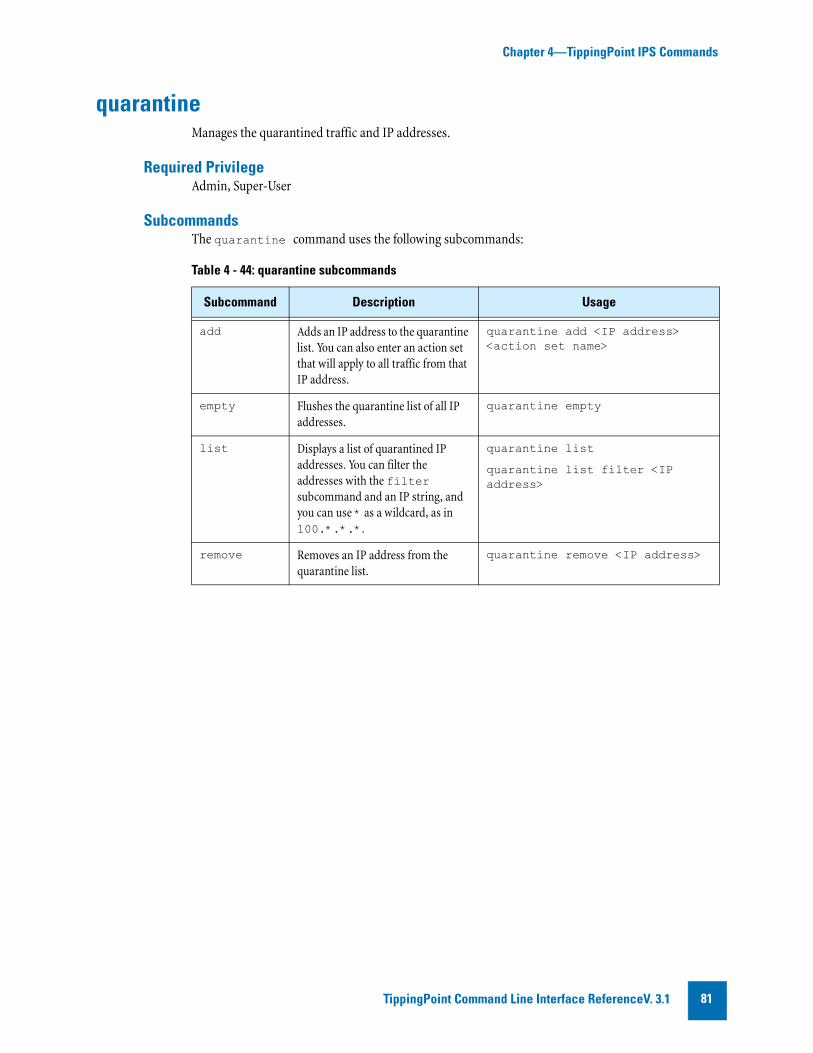
Chapter 4—TippingPoint IPS Commands
quarantineManages the quarantined traffic and IP addresses.
Required PrivilegeAdmin, Super-User
SubcommandsThe quarantine command uses the following subcommands:
Table 4 - 44: quarantine subcommands
Subcommand Description Usage
add Adds an IP address to the quarantine list. You can also enter an action set that will apply to all traffic from that IP address.
quarantine add <IP address> <action set name>
empty Flushes the quarantine list of all IP addresses.
quarantine empty
list Displays a list of quarantined IP addresses. You can filter the addresses with the filter subcommand and an IP string, and you can use * as a wildcard, as in 100.*.*.*.
quarantine list
quarantine list filter <IP address>
remove Removes an IP address from the quarantine list.
quarantine remove <IP address>
TippingPoint Command Line Interface ReferenceV. 3.1 81
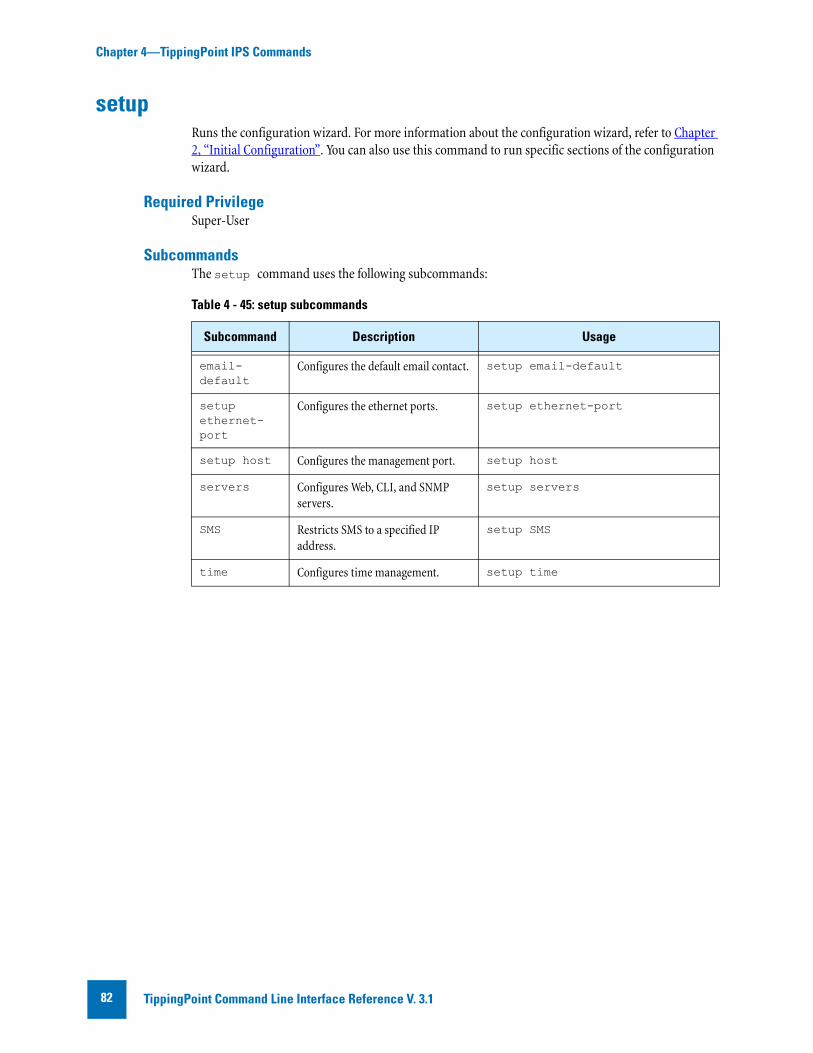
Chapter 4—TippingPoint IPS Commands
setupRuns the configuration wizard. For more information about the configuration wizard, refer to Chapter 2‚ “Initial Configuration”. You can also use this command to run specific sections of the configuration wizard.
Required PrivilegeSuper-User
SubcommandsThe setup command uses the following subcommands:
Table 4 - 45: setup subcommands
Subcommand Description Usage
email-default
Configures the default email contact. setup email-default
setup ethernet-port
Configures the ethernet ports. setup ethernet-port
setup host Configures the management port. setup host
servers Configures Web, CLI, and SNMP servers.
setup servers
SMS Restricts SMS to a specified IP address.
setup SMS
time Configures time management. setup time
TippingPoint Command Line Interface Reference V. 3.182
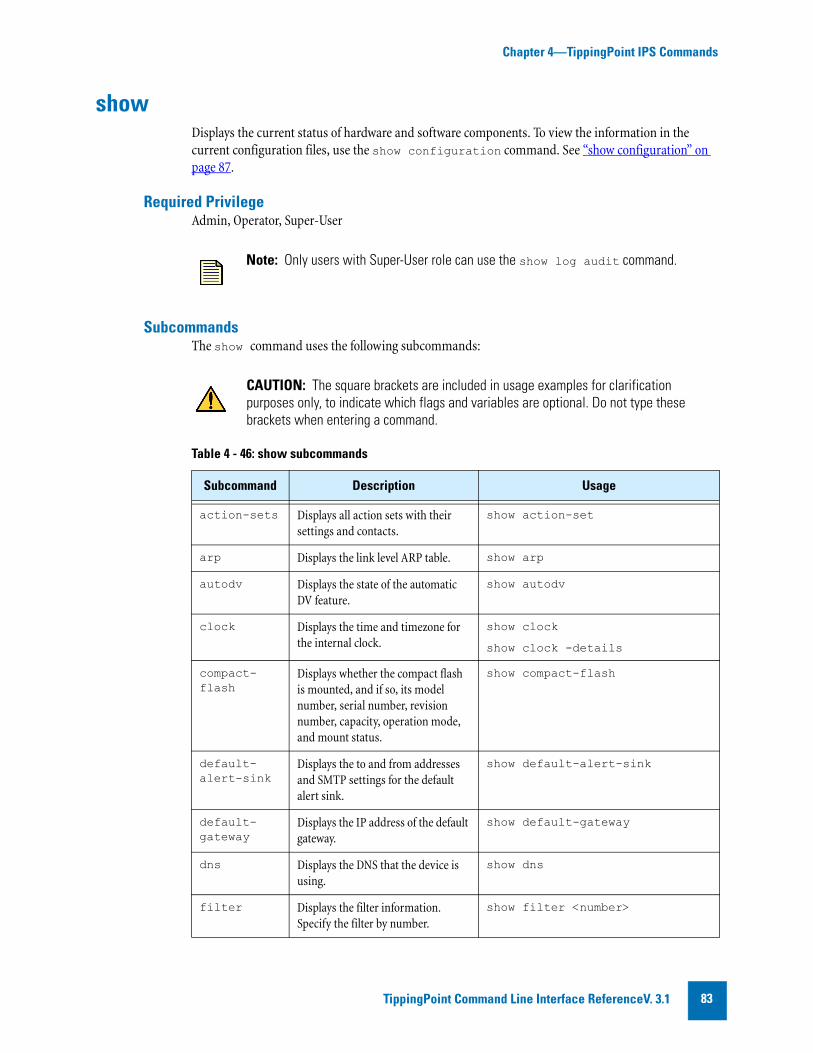
Chapter 4—TippingPoint IPS Commands
showDisplays the current status of hardware and software components. To view the information in the current configuration files, use the show configuration command. See “show configuration” on page 87.
Required PrivilegeAdmin, Operator, Super-User
SubcommandsThe show command uses the following subcommands:
Note: Only users with Super-User role can use the show log audit command.
CAUTION: The square brackets are included in usage examples for clarification purposes only, to indicate which flags and variables are optional. Do not type these brackets when entering a command.
Table 4 - 46: show subcommands
Subcommand Description Usage
action-sets Displays all action sets with their settings and contacts.
show action-set
arp Displays the link level ARP table. show arp
autodv Displays the state of the automatic DV feature.
show autodv
clock Displays the time and timezone for the internal clock.
show clock
show clock -details
compact-flash
Displays whether the compact flash is mounted, and if so, its model number, serial number, revision number, capacity, operation mode, and mount status.
show compact-flash
default-alert-sink
Displays the to and from addresses and SMTP settings for the default alert sink.
show default-alert-sink
default-gateway
Displays the IP address of the default gateway.
show default-gateway
dns Displays the DNS that the device is using.
show dns
filter Displays the filter information. Specify the filter by number.
show filter <number>
TippingPoint Command Line Interface ReferenceV. 3.1 83
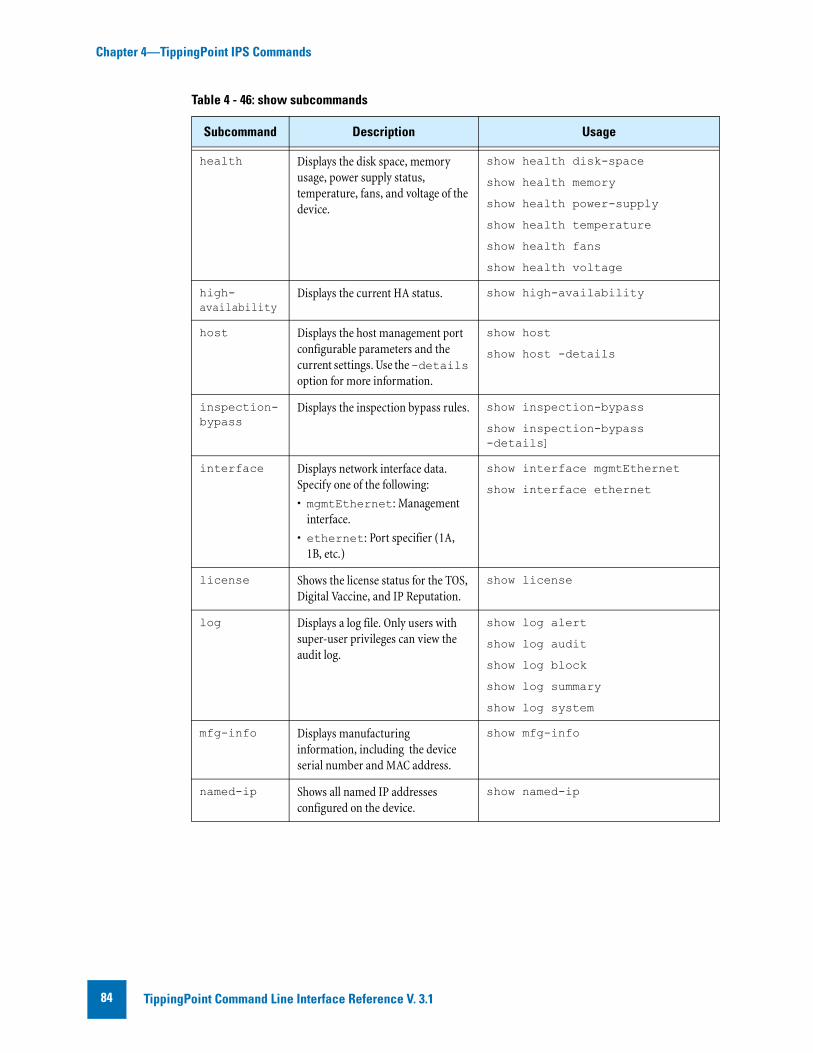
Chapter 4—TippingPoint IPS Commands
health Displays the disk space, memory usage, power supply status, temperature, fans, and voltage of the device.
show health disk-space
show health memory
show health power-supply
show health temperature
show health fans
show health voltage
high-availability
Displays the current HA status. show high-availability
host Displays the host management port configurable parameters and the current settings. Use the -details option for more information.
show host
show host -details
inspection-bypass
Displays the inspection bypass rules. show inspection-bypass
show inspection-bypass -details]
interface Displays network interface data. Specify one of the following:
• mgmtEthernet: Management interface.
• ethernet: Port specifier (1A, 1B, etc.)
show interface mgmtEthernet
show interface ethernet
license Shows the license status for the TOS, Digital Vaccine, and IP Reputation.
show license
log Displays a log file. Only users with super-user privileges can view the audit log.
show log alert
show log audit
show log block
show log summary
show log system
mfg-info Displays manufacturing information, including the device serial number and MAC address.
show mfg-info
named-ip Shows all named IP addresses configured on the device.
show named-ip
Table 4 - 46: show subcommands
Subcommand Description Usage
TippingPoint Command Line Interface Reference V. 3.184
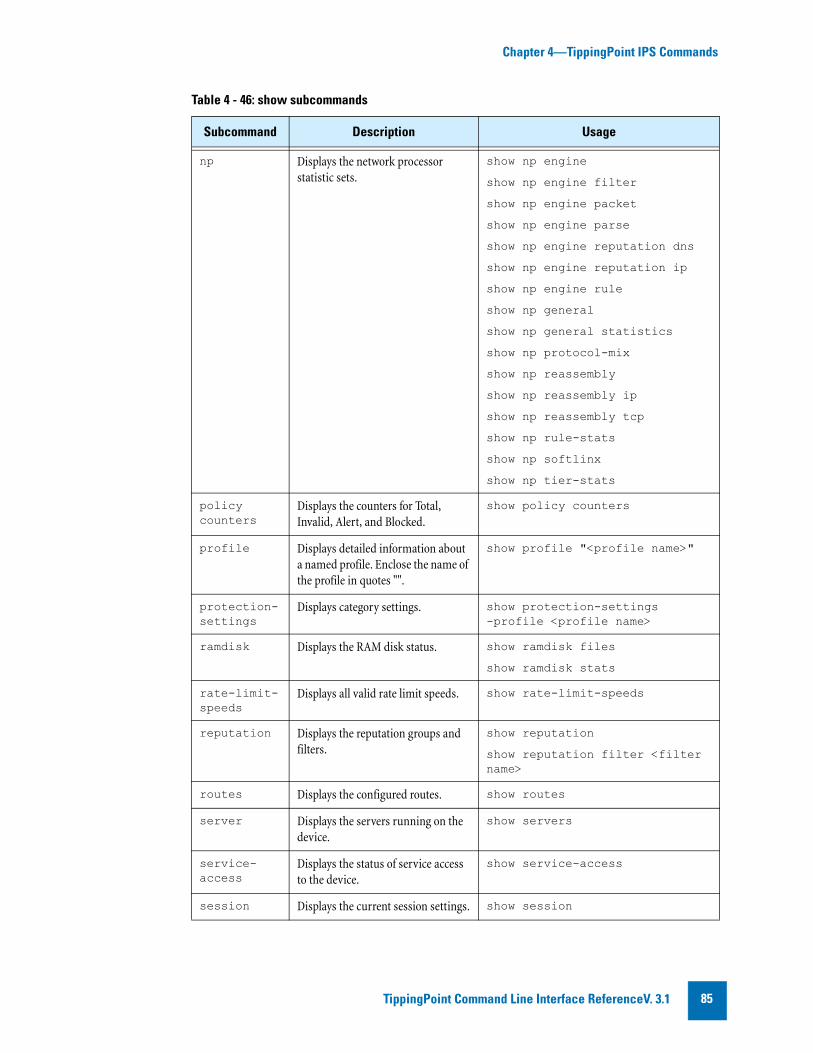
Chapter 4—TippingPoint IPS Commands
np Displays the network processor statistic sets.
show np engine
show np engine filter
show np engine packet
show np engine parse
show np engine reputation dns
show np engine reputation ip
show np engine rule
show np general
show np general statistics
show np protocol-mix
show np reassembly
show np reassembly ip
show np reassembly tcp
show np rule-stats
show np softlinx
show np tier-stats
policy counters
Displays the counters for Total, Invalid, Alert, and Blocked.
show policy counters
profile Displays detailed information about a named profile. Enclose the name of the profile in quotes "".
show profile "<profile name>"
protection-settings
Displays category settings. show protection-settings -profile <profile name>
ramdisk Displays the RAM disk status. show ramdisk files
show ramdisk stats
rate-limit-speeds
Displays all valid rate limit speeds. show rate-limit-speeds
reputation Displays the reputation groups and filters.
show reputation
show reputation filter <filter name>
routes Displays the configured routes. show routes
server Displays the servers running on the device.
show servers
service-access
Displays the status of service access to the device.
show service-access
session Displays the current session settings. show session
Table 4 - 46: show subcommands
Subcommand Description Usage
TippingPoint Command Line Interface ReferenceV. 3.1 85

Chapter 4—TippingPoint IPS Commands
sms Indicates whether an SMS is managing the device and displays information about the SMS.
show sms
sntp Displays the current SNTP settings. show sntp
timezones Displays the available timezones. show timezones
traffic-mgmt
Displays all traffic management filters defined in a traffic management profile. You must specify the profile by name unless there is only one profile on the device.
show traffic-mgmt -profile <profile name>
tse Displays information and settings regarding the Threat Suppression Engine.
show tse adaptive-filter top-ten
show tse connection-table blocks
show tse connection-table timeout
show tse connection-table trusts
show tse rate-limit streams
user Displays the user login accounts on the TippingPoint device
show user
show user -details
version Displays the version of the TOS software running on the IPS device.
show version
virtual-port
Displays information about a virtual port.
show virtual-port <port number>
virtual-segments
Displays all of the virtual segments configured on the device.
show virtual-segments
Table 4 - 46: show subcommands
Subcommand Description Usage
TippingPoint Command Line Interface Reference V. 3.186
Chapter 4—TippingPoint IPS Commands
show configurationThe show configuration command shows persistent configuration settings on the IPS. Show configuration commands can be used to feed configuration information back to the console. Without parameters, the command shows the system’s configuration.
Required PrivilegeAdmin, Operator, Super-User
SubcommandsThe show configuration command uses the following subcommands:
Tip: You can use the abbreviation show conf. Also, you can define an alias using the alias command.
Table 4 - 47: show configuration subcommands
Subcommand Description Usage
action-set Lists all action sets that have been defined for this device. You can also view a single action set by specifying the action set name.
show conf action-set
show conf action-set <action set name>
autodv Shows configuration settings for the automatic update service for Digital Vaccine packages.
show conf autodv
category-settings
Shows configuration settings for filter categories. You can also view the settings for a single profile by specifying the profile name.
show conf category-settings
show conf category-settings -profile <profile name>
clock Shows timezone and daylight saving time settings.
show conf clock
compact-flash
Shows the compact flash operation mode.
show conf compact-flash
default-alert-sink
Shows the default email address to which attack alerts will be directed.
show conf default-alert-sink
default-gateway
Shows the device default gateway. show conf default-gateway
email-rate-limit
Shows the maximum number of email notifications the system will send every minute. The minimum is 1; the maximum is 35.
show conf email-rate-limit
filter Shows the filter data for a specific filter, identified by filter number.
show conf filter <number>
TippingPoint Command Line Interface ReferenceV. 3.1 87

Chapter 4—TippingPoint IPS Commands
high-availability
Shows high availability configuration settings.
show conf high-availability
host Shows the host name and location. show conf host
inspection-bypass
Shows the current inspection bypass rule configuration.
show conf inspection-bypass
interface When used without qualifiers, shows configuration of all ports.
• ethernet shows Ethernet port information. Without parameters, this subcommand shows the status of all Ethernet ports. Use port specifiers (1A, 2A, etc.), to view the status of a single port.
• mgmtEthernet shows Management Ethernet port information
• settings shows the persistent configuration settings for MDI-detection.
show conf interface
show conf interface ethernet
show conf interface mgmtEthernet
show conf interface settings
lcd-keypad Shows the configuration setting for the LCD keypad.
show conf lcd-keypad
log Shows log configuration. show conf log
show conf log audit-log
monitor Shows the persistent configuration of monitor thresholds.
show conf monitor
nms Shows the NMS settings. show conf nms
notify-contacts
Shows the notification contacts and settings.
show conf notify-contacts
port Shows the configuration of all ports on the IPS.
show conf port
profile Lists all profiles that have been configured on the device. You can view an individual profile by including the profile name.
show conf profile
show conf profile <profile name>
protection-settings
Shows the protection settings. You can also view the settings for a single profile by specifying the profile name.
show conf protection-settings
show conf protection-settings -profile <profile name>
ramdisk Shows the RAM disk configuration. show conf ramdisk
Table 4 - 47: show configuration subcommands
Subcommand Description Usage
TippingPoint Command Line Interface Reference V. 3.188
Chapter 4—TippingPoint IPS Commands
remote-syslog
Shows the remote syslog configuration and the IP address of the remote log.
show conf remote-syslog
reputation Shows the configuration of reputation filters and groups, and of the IP Reputation feature.
show conf reputation
show conf reputation group
show conf reputation filter
segment Shows the segment configuration. You can view an individual segment by including the segment name.
show conf segment
show conf segment <segment name>
server Shows the device server configuration.
show conf server
service-access
Shows whether service access is enabled or disabled.
show conf service-access
session Shows the session timeout settings. Use show session to view the current session configuration.
show conf session
sms Shows if SMS is enabled and other SMS configuration settings.
show conf sms
sntp Shows the SNTP configuration. show conf sntp
traffic-mgmt Shows the traffic management configuration.
show conf traffic-mgmt
tse Shows the TSE information, including connection table timeout, asymmetric network setting, adaptive aggregation threshold, and adaptive filter mode.
show conf tse
user Shows user options. Use the -details option to view additional information.
show conf user
show conf user -details
virtual-port Shows virtual port configuration. To show the configuration of a specific virtual port, specify the virtual port name.
show conf virtual-port
show conf virtual-port <virtual port name>
virtual-segments
Shows the configuration of the virtual segments.
show conf virtual-segments
vlan-translation
Shows the VLAN translation configuration
show vlan-translation
Table 4 - 47: show configuration subcommands
Subcommand Description Usage
TippingPoint Command Line Interface ReferenceV. 3.1 89
Chapter 4—TippingPoint IPS Commands
snapshotCreates and manages snapshots of the device configuration settings. These snapshots can be applied to other devices, to roll back to previous configurations, and to back up the current configuration.
Required PrivilegeAdmin, Super-User
SubcommandsThe snapshot command uses the following subcommands:
Table 4 - 48: snapshot subcommands
Subcommand Description Usage
create Creates a snapshot with the given name.
snapshot create <snapshot name>
list Lists all snapshots saved on the device.
snapshot list
remove Deletes the named snapshot. snapshot remove <snapshot name>
restore Replaces the current configuration settings with the settings in the named snapshot. This process may take some time and will require a reboot of the device.
snapshot restore <snapshot name>
TippingPoint Command Line Interface Reference V. 3.190
Index
Aaccount security levels 10, 74action sets 35adaptive filtering 70aggregation period 53alert contact 39alias 27architecture 2asymmetric mode 70
BBest Effort mode 76boot images 32bug report, sending 32
Ccategory settings 37CLI session 64command line editing 23commands
about 31boot 32bugreport 32completion of 23configure terminal (conf t) 33debug 75debug best-effort-mode 76debug traffic-capture 77halt 79high availability 79hints 22setup 82show 83show configuration 87snapshot 90
commands, globalabout 26alias 27clear 28cls 29exit 29help 29history 30logout 30ping 30quit 30tree 30
who 31whoami 31
compact flashmode 39
configuration commands 33configuration commands (conf t)
action-set 35audit log 50autodv 37category-settings 37clock 38compact-flash 39default-alert-sink 39default-gateway 40email-rate-limit 40filter 41high-availability 42host 43inspection-bypass 44inspection-bypass add 45interface ethernet 47interface mgmtEthernet 48interface settings 49LCD panel 50monitor 51nms 53notify-contact 53port 54profile 55protection settings 56ramdisk 57remote syslog 58reputation 59reputation group 61segment 62server 63service-access 64session 64SMS 65SNTP 66traffic-mgmt 67tse 70user 72, 73virtual-port 74virtual-segment 75vlan-translation 75
connection table 70conventions 26
Ddefault alert contact 39default gateway 12diagnostics 64Digital Vaccine 37DNS servers 13
Eemail notifications 40ethernet interfaces 47ethernet ports 17
Ffilter categories 37filters
Application Protection 7, 56configuring 41disabling 41enabling 41exceptions 56Infrastructure Protection 7, 56Performance Protection 7, 56traffic management 67
Ggateway IP address 40global commands 22, 26guide
conventions viii, ixdocumentation, related ixoverview viitarget audience vii
TippingPoint Command Line Interface Reference V. 3.1 91
Hhierarchical commands 22hierarchical submenus 22high availability
Intrinsic Network HA (INHA) 6Intrinsic Network High Availability
(INHA) 62, 79Transparent Network HA (TNHA) 6Transparent Network High Availability
(TNHA) 42Zero-Power High Availability (ZPHA)
6, 80host management port
configuring 43host location 12host name 12IPv4 address 12IPv4 network mask 12IPv6 12
HTTP server 16, 63HTTPS server 16, 63
Iinspection bypass rules
adding 45disabling 44enabling 44examples 46removing 44
Intrusion Prevention System (IPS)client 5devices 4
LLayer-2 Fallback (L2FB) 79LCD panel
configuring 50logs
audit 50logging mode 71RAM disk synchronization 57
Mmanagement ethernet port 48management port
gateway 40Medium Dependence Interface (MDI) 49monitoring
hardware thresholds 51power supply 51
NNMS (Network Managemetn System) 53notification contact 53
Ppasswords 10, 72, 73ports 17
configuration 54protocols 54virtual 74
RRAM disk 57related documentation ixremote syslog
configuration 58reputation filters 59reputation groups 59, 61ReputationDV 59
SSecurity Management System (SMS) 65
client 3components 2server 3
security profiles 55segments
configuration 62virtual 75
Session Settings 24session settings 24setup
account security levels 10additional configuration 15CLI options 15default gateway 12DNS configuration 13Ethernet port 17OBE setup wizard 10SMS 16SNMP server options 15timekeeping options 14web options 15
SMS 16SNMP server 16SNTP 66sntp 14SSH server 16, 63support xsystem overview 1
Ttechnical support x, 64Telnet server 16, 63terminal 64Threat Management Center (TMC) 7Threat Suppression Engine (TSE) 6, 70timekeeping options 14, 38, 66TippingPoint architecture 2traffic capture 77traffic capture expressions 78traffic management profiles 55
Uuser names 10, 72, 73
Vvirtual ports 74virtual segments 75VLAN translation 75
92 TippingPoint Command Line Interface Reference V. 3.1