travel photography - maf1.com · for cropped sensor cameras, still use f/4 or greater but it is...
TRANSCRIPT

1
Travel Photography & Advanced Photographic Techniques
Presented by Tallahassee Senior Center
Volunteer Instructor: Dr. Mike Francis
Email: [email protected]
Website: http://www.maf1.com/dcc
© 2006-2018 Dr. Mike Francis, All rights reserved.

2
Session Topics
• Photo Taking Techniques
– Taking warmer photos
– Look Down, Look Up, Move to the Side
– Polarizing your shot
– Digital flash modes
– Slow motion and motion blur
– Shooting Stars and Star Trails
• Rule of Thirds
• Exposure, Focus
• Time of Day photography and Photographic Color Temperatures
© 2006-2018 Dr. Mike Francis, All rights reserved.

3
Session Topics (con’t.)
• Shooting better landscapes
• Dealing with low light conditions
• Time of Day photography and
Photographic Color Temperatures
• Photo Composition
© 2006-2018 Dr. Mike Francis, All rights reserved.

4
Taking a warmer photo
• Do your photos look “cold” or have too much bluish flavor to them? The default white balance setting for digital cameras is auto, and, while being fine for at least 75% of your shots, many cameras tend to be more on the "cool" side except for Sony consumer units. Most humans prefer a “warmer” look (image on the right) to their photos.
• When shooting outdoor still images and sunny landscapes, change your white balance from auto to cloudy. The way digital cameras are designed, this change has the affect of adding a warming filter to your lens. It enhances the reds and yellows thus producing a richer, warmer picture.
© 2006-2018 Dr. Mike Francis, All rights reserved.

5
Look Down, Look Up, Move to
the Side• An improved perspective can be gained by looking up,
looking down, or moving side-to-side of the subject of the photo.
© 2006-2018 Dr. Mike Francis, All rights reserved.

Adding Perspective
6© 2006-2018 Dr. Mike Francis, All rights reserved.

7
Lens Filters --
Two Mandatory Filters and one optional for Digital
© 2006-2018 Dr. Mike Francis, All rights reserved.
Circular
PolarizerNeutral
Density
UV
The circular polarizer filter, CP,
reduces object glare and haze
wash out caused by UV rays.
Because of the sensors in
digital cameras, always use a
circular polarizer which is
designed to protect the sensor
and not interfere with the auto
focus and metering.
The UV filter should stay on a
lens at all times. It protects
the lens from dust and
scratches. It also block UV
rays that tend to wash out the
photo and add bluish-purple
tent. It can be used with a CP
filter.
This filter, ND, is
designed for daytime
outdoor photography in
order to reduce the
brightness of the top or
bottom portion of the
image. It helps keep
contrast and brightness
in balance.

8
Polarizing Your Shot
• It is hard to find a polarizer for many of the consumer digital cameras. But, If you really want to enhance the depth and contrast of your photos, you need a polarizing filter. A polarizer is the one filter every photographer should have handy for landscapes and general outdoor shooting. By reducing glare and unwanted reflections, polarized shots have richer, more saturated colors, especially in landscape scenes and sky shots.
• Can’t find a polarizer for your camera? If you have a pair of polarized sunglasses with a flat lens, then use them as a polarizing filter. Place the glasses as close to the camera lens as possible, rotate the glasses for the desired effect then take the shot.
© 2006-2018 Dr. Mike Francis, All rights reserved.

9
Polarizing Your Shot
• Be sure to check that you are not shooting through polarized or reflection reducing glass when a polarizer is on your lens. The results good be dramatic.
© 2006-2018 Dr. Mike Francis, All rights reserved.
•With polarizer on lens and polarized windows
•Without polarizer and polarized windows

10
Flash modes
• One of the hidden secrets of digital cameras is the fill-flash feature or the
flash-when-needed feature that is generally effective from 4 to 8 feet.
• In the flash-on mode, the camera exposes for the background first, then
adds just enough flash to illuminate your portrait subject. The result is a
picture with better looking highlights, shadows and the main subject.
© 2006-2018 Dr. Mike Francis, All rights reserved.

11
Slow Motion Effect• If you want to add an artistic effect to photographs when shooting running
water, a stream or waterfall or anything with motion, you need to “hold the shutter open” for a longer period of time than the camera wants the shutter to stay open.
• Unless you can master holding the camera still for seconds, a tripod, and shutter release, if supported, on you camera are recommended.
© 2006-2018 Dr. Mike Francis, All rights reserved.

© 2006-2018 Dr. Mike Francis, All rights reserved.

13
3 steps toward motion blur• You'll need a tripod to steady the camera during the long
exposure, and you preferably should use the self timer to trip the shutter. If you camera has an aperture priority setting, use it and set the aperture to f-8, f-11, or f-16. Smaller apertures provide greater depth of field and will force the shutter speed to slow down in order to allow more light onto the sensor.
• It generally takes at least a 1/30 to 1/2 second exposure to create the flowing effect of the water and provide the desired artistic “Cotton Candy” look. Find streams and waterfalls that are more in the shade instead of the direct sunlight and the camera will sense the need to keep the lens open longer.
• A polarizer over the lens will slightly darken the scene and force a longer exposure and may remove any unnecessary reflections from the photo.
© 2006-2018 Dr. Mike Francis, All rights reserved.

14
Shooting Stars (The Milky Way)• Moonless nights and no ambient light are the best conditions for
shooting star formations and galaxy spirals.
• Use you best lens with the lowest aperture. Try for an F/2.8 lens if one is in gear. An F/3.5 will work but it is best to get as much light onto the sensor as possible.
• Use an ISO range from 2500 to 6400. Don’t worry about the digital noise. It is generally minimized due to the black of space.
• Set the exposure time for approximately 20-30 seconds. Use a stopwatch, smart phone or simply count 1001, 1002…etc. This is all accomplished on a tripod. If a wide angle lens is being used to capture stars on the horizon, leave the lens open for at least 30 seconds. Do not expose too long or star trails will show up.
• Moonlight nights with little or no ambient light is more challenging when photographing starts.
• Use and aperture of F/5.6 or slightly larger and set the ISO range from 800 to 2000. A 20 second exposure is usually sufficient to capture star image.
© 2006-2018 Dr. Mike Francis, All rights reserved.

15
Shooting Star Trails• Moonless or Moonlight nights will work for the star trails. Learn how
to set your camera to an open lens. Also learn how to close the lens when the scene is complete. Cameras with extended timers and/or remote extended timers work the best since there is no human physical interaction with the camera. This is all accomplished on a tripod.
• Use you best lens with the lowest aperture. Use at least an F/4 or faster lens. The faster lenses let more light onto the sensor.
• Use an ISO range from 400-800 on moonlight nights and ISO 800-1600 on moonless nights.
• Turn Auto White Balance off and set the white balance to 3500K or twilight or night shot WB.
• Turn Auto Focus off on your lens and use Manual focus. Set the camera in P or A mode.
• RULES: 1) use lower ISO for longer exposures and higher ISO for shorter exposures. 2) full frame cameras can use less exposure time than cropped sensor (APS-C) cameras.
• Experiment with exposures times from 30 seconds to 3 minutes. If an intervalometer is in the camera bag, use it.
© 2006-2018 Dr. Mike Francis, All rights reserved.

16
Shooting Star Trails (con’t.)
• If more light is required, increase ISO is a last resort. Extending the exposure time if the best option.
• A zoom lens can be used. When zooming in on the stars, the trails show up faster therefore not requiring as long or as many exposures.
• If a multiple exposure arrangement is being used to shoot star trails, then keep multiple, charged batteries on hand. With an intervalometer, 30-300 thirty to one-hundred twenty second exposures can be taken with at least one or two seconds between each exposure.
• Any of the camera modes, “A”, “P” or “M” is acceptable when shooting star trails.
• For full frame cameras, use an aperture of F/4 or greater such as F/2.8. For cropped sensor cameras, still use F/4 or greater but it is preferred to set the camera lens as fast as possible.
• When shooting star trails, a wide angle lens is the only one to use. While 14mm to 30mm works great for full frame cameras, cropped cameras require a smaller wide angle lens somewhere between 10mm and 20mm.
© 2006-2018 Dr. Mike Francis, All rights reserved.

17
Shooting Images
© 2006-2018 Dr. Mike Francis, All rights reserved. Stock images from Google

St. Marks Lighthouse, Aug. 2016
18
© 2006-2018 Dr. Mike Francis, All rights reserved. Photo credit belongs to Tommy McGraw.

19
Rule of Thirds
• For better photo perspective try not placing the subject of a photo the
middle of the scene. If possible, try not to place to primary subject of the
photo directly into the middle of frame.
– For centuries this concept has been applied to artwork and is known as
the Rule of Thirds. It is represented by a nine-box grid that virtually
overlays the scene about to the shot. Many statues and painting have
the face or the body of the subject looking away to broaden the images
perspective.
© 2006-2018 Dr. Mike Francis, All rights reserved.
WRONG CORRECT

20
Review of Important Tricks
Exposure
• All digital cameras have an auto setting which calculates what it anticipates will be the most suitable exposure. Most devices get it about right, but mistakes happen. There will also be times when you want a darker or brighter result.
• The camera’s exposure compensation (EC) setting provides flexibility in determining the amount of light that the sensor processes. This allows you to deliberately over-or-under expose the image and is normally set in a range described as -2EV to +2EV, in EV increments of a third. A setting of +1EV effectively doubles the exposure making the image brighter.
• Deliberately underexposing an image can be an affective way of cutting through haze or bringing out a colorful sunset. Underexposing is also a technique used to produce silhouette photos.
• Overexposing is also handy if your subject is dark and you can’t or don’t want to use a fill-in flash.
© 2006-2018 Dr. Mike Francis, All rights reserved.

21
Focus
• Digital cameras have an auto focus mode but, as with auto exposure, this can go wrong. A common problem is where the subject in the foreground is out of focus, but the background is in sharp focus. It’s clear that the camera has focused on the background by mistake.
• Understand that most cameras will focus on the spot in the middle of the frame as the default focus mode unless you use spot or zone focus. If the subject is not in the middle of your lens then point your camera at the subject, and lock the focus by pressing the shutter button halfway.
• Then, recompose the shot while keeping the button half-held and, finally, press it all the way to take the photo.
• Use a faster lens (f/4 for example) to minimize barb and fence wire interfering with the image. It works most of the time.
© 2006-2018 Dr. Mike Francis, All rights reserved.

Focused Thru the Image
22© 2006-2018 Dr. Mike Francis, All rights reserved.

23
About Those Sunsets• As light passes through our atmosphere, it's broken up in a process known
as Rayleigh scattering. When light comes through from directly overhead, the gas molecules in the atmosphere reflect the blue end (shortest wavelength) of the visible spectrum best. When the sun isn't directly overhead, such as when it's near the horizon during a sunset, the light must pass through more of the atmosphere, scattering out most of the blue light. This leaves the warm tones of red, orange, and yellow, which happen to be the longest wavelengths.
• With the scattering of light through gas molecules providing the color foundation, airborne particles give a sunset its zing. While the increase in air pollution is certainly lamentable, the added particulate matter in the atmosphere from smoke and smog means more light from the blue spectrum is scattered away, intensifying the red colors of a sunset. Water vapor from humidity has the same effect, as a hot, sticky summer night is more likely to produce a vibrant sunset than a cool, dry evening.
© 2006-2018 Dr. Mike Francis, All rights reserved.

24
Change the Shooting Angle
• Shoot from the high or low ground:– So many good landscape shots miss the chance to be great simply
because we lift the camera to our faces and shoot. While this captures
the background of the scene it misses the beginning of the shot. Simply
getting higher or lower to the ground can add more sky or reveal greater
background.
© 2006-2018 Dr. Mike Francis, All rights reserved.

25
Perspective• Shoot “through something” to frame the scene:
• Seek contrast:
– lights and shadows are allowed and many times desired.
• Seek beginning-to-end image like a long ceiling:
– This kind of image is best shot with a fast lens.
© 2006-2018 Dr. Mike Francis, All rights reserved.

26
Low Light Conditions
• Using a higher ISO (800-3200) to compensate for the lack of light will introduce noise in an image but allow for better exposure.
• Problems using wide open aperture to allow more light:
limited depth of field
potential for image blur
• Use flash if possible but remember that the flash is only usable from 6-14 feet depending on camera or flash model. Only use “fill-flash” in closeup situations, if your camera is so equipped.
© 2006-2018 Dr. Mike Francis, All rights reserved.
27
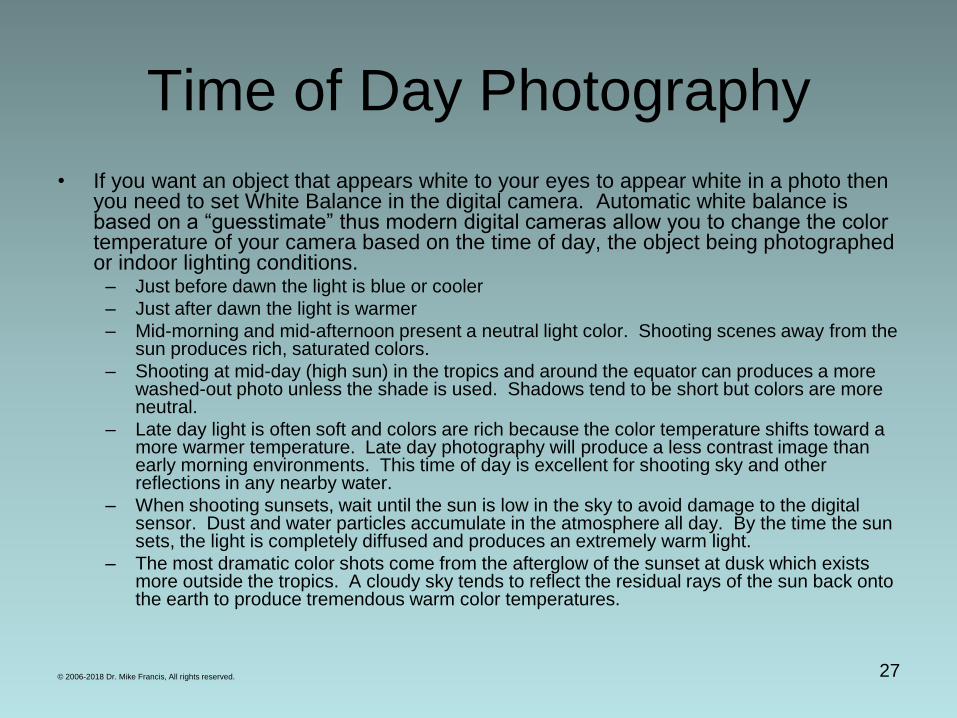
Time of Day Photography
• If you want an object that appears white to your eyes to appear white in a photo then you need to set White Balance in the digital camera. Automatic white balance is based on a “guesstimate” thus modern digital cameras allow you to change the color temperature of your camera based on the time of day, the object being photographed or indoor lighting conditions.
– Just before dawn the light is blue or cooler
– Just after dawn the light is warmer
– Mid-morning and mid-afternoon present a neutral light color. Shooting scenes away from the sun produces rich, saturated colors.
– Shooting at mid-day (high sun) in the tropics and around the equator can produces a more washed-out photo unless the shade is used. Shadows tend to be short but colors are more neutral.
– Late day light is often soft and colors are rich because the color temperature shifts toward a more warmer temperature. Late day photography will produce a less contrast image than early morning environments. This time of day is excellent for shooting sky and other reflections in any nearby water.
– When shooting sunsets, wait until the sun is low in the sky to avoid damage to the digital sensor. Dust and water particles accumulate in the atmosphere all day. By the time the sun sets, the light is completely diffused and produces an extremely warm light.
– The most dramatic color shots come from the afterglow of the sunset at dusk which exists more outside the tropics. A cloudy sky tends to reflect the residual rays of the sun back onto the earth to produce tremendous warm color temperatures.
© 2006-2018 Dr. Mike Francis, All rights reserved.

28
Photographic Color Temperature
• The visible light spectrum is divided into Kelvin temperatures develop by William Thomson Lord Kelvin in Great Britain in the mid-1800s.
– Color Temperature (in degrees Kelvin) is the temperature of a color emitted from a substance when heated.
– The human eye does not have a nominal color temperature. The eye sees white outdoors as one temperature, indoors as another temperature. The digital camera cannot perform this feat without the use of White Balance.
– “Daylight” is defined as a clear blue cloudless sky at 6000K.
– Most modern televisions have a color temperature of 6500K but allow you to adjust to a “cooler” or “warmer” look. The industry has called this setting White Balance long before digital cameras appeared on the market.
• Some digital cameras can be set to a default color temperature. For all practical purposes, set the camera’s color temperature for your most common type of shooting: 5200K-5500K for general purpose shooting and 6300K-6500K for outdoor shooting. If your camera’s default color temperature cannot be set then the camera simply does the best it can with automatic WB.
• Film has a native color temperature (daylight and tungsten) and is designed for a specified light source. Digital cameras use WB to set the color temperature for the scene being photographed and the overall color balance of the photo.
© 2006-2018 Dr. Mike Francis, All rights reserved.

29
Common Color Temperatures
These temperatures are affected by time of day, elevation and haziness.
1500k candlelight, oil lamps
2000K early morning sunrise
2680K 40W incandescent light
3000K 200W incandescent light, warm fluorescent lamp
3200K sunrise and sunset
3400K tungsten light; dawn/twilight
3500K sunlight right after dawn, retail fluorescent lamp
4300K sunlight in early morning or late afternoon hours
4500-5000K xenon light, sunlight fluorescent lamp
5500K sunny day at noon time “high noon daylight”
5600K electronic camera flash
5500-6500K daylight made of sun and sky
6000K bright sunlight with clear sky
6500-7500K overcast sky
7000-8000K outdoor in the shade
8000-10000K partly cloudy sky
10000K heavily overcast sky
9000-12000K deep blue sky, open shade on a clear day
11000K deep blue sky viewed away from the sun
20000K open mountain shade on a cloudless, very clear day
© 2006-2018 Dr. Mike Francis, All rights reserved.

30
Photo Composition
• Waterways: Waterways such as rivers and lakes provide for shadows and reflections in the water that are elements which add to the overall quality of the photo. Use a monopod or tripod and slow the shutter speed down if you want the flowing water to be blurred but the rest of the photo to remain sharp.
• Landscapes: when taking landscaped photos consider the viewpoint, time of day, and the weather. A cloudy sky, fog, and shadows all make for a more interesting photograph.
– When taking a landscape photo with a person in the foreground or background, the person should add perspective to the photo instead of being the subject of interest.
– What your eyes see in the landscape is generally different than the view the photograph reveals. The camera typically adds more detail to the photograph than your eyes perceive. Learn to take photos from a crouched position, an angle higher or lower than the normal standing position, or try to move in toward the landscape so that the camera comes closer to taking the shot your mind has framed.
• Seascapes: when taking beach photos there should be some clouds in the sky and preferably a wave rolling onto the shore.
– Automatic exposure cameras tend to lock onto the many reflections of the sky and water and cause the camera to think the image is brighter. The automatic exposure portion of the camera will underexpose the final image. This is where you lock onto the mid-tones of the image or an area with no reflections. By pressing the shutter button half-way while the camera is pointed at this area, turn the camera back to the full scene and take the photo. This helps balance the overall exposure of seascape scenes.
© 2006-2018 Dr. Mike Francis, All rights reserved.

31
Photo Compositon (con’t.)
• Reflections: photographs with reflections are interesting but be sure that the reflection is discernible in order to add value to the image. Be careful taking reflection shots involving modern glass buildings if your camera has a polarizing filter on the lens. Many times the polarizer will turn the tinted windows of the building into a bluish tone that blurs the reflection you are trying to photograph.
• People: This type of image involves either a head view, full or partial body length, and people involved with their work or play.
• Skies: if you desire the “deep blue sky” look, use a circular polarizer on your lens if you can place adaptors on the lens.
– The use of a circular polarizer on the lens greatly reduces that chance of additional spots being added to the image from any bright light source while taking sunrise or sunset shots.
• Autumn: it is the most photographed time of year due to the richness of colors in the leaves in parts of the United States.
© 2001-2018 Dr. Mike Francis, All rights reserved.

Photo Composition (con’t.)
• Close-up or Macro: it is best to use a very fast lens (aperture of f/4 down to f/1.2) along with a semi or fast shutter speed to get the best shot of a macro environment: flower, insect, coin, stamp, food, etc.
• Action and Sports: use of a fast shutter speed usually produces the action photo you see in the sports magazines and newspapers. No need for a tripod but a monopod or chest strap will help carry the lens weight.
• Sunsets: when taking photos of sunsets, especially with digital cameras, be careful not the point the lens directly at the sun. The camera’s sensor can be damaged or the bright light from the sun will bounce off the senor back to the lens then back onto the sensor. You will end up with extra sunspots in your image.
• Panoramic: unless you have a very special, expensive camera, you have to make your own panoramic shots. Use a tripod and take more exposures than you think you need.
• Long Exposure: another tripod-mandatory photo composition if you want a sharp, non-blurry exposure over a period of time.
32© 2001-2018 Dr. Mike Francis, All rights reserved.

33
Waterways
•© 2006-2018 Dr. Mike Francis, All rights reserved. Photo Courtesy of Tom Jones from the Francis Gallery

34
Waterways - 2
•© 2006-2018 Dr. Mike Francis, All rights reserved. Photo Courtesy of Tom Jones from the Francis Gallery

35
Landscapes
•© 2006-2018 Dr. Mike Francis, All rights reserved. Photo Courtesy of Marge Jones from the Francis Gallery

36
Landscape - 2
•© 2006-2018 Dr. Mike Francis, All rights reserved. Photo Courtesy of Charles Francis from the Francis Gallery

37
Landscape - 3
•© 2006-2018 Dr. Mike Francis, All rights reserved. Photo Courtesy of the Francis Gallery

38
Landscape - 4
•© 2006-2018 Dr. Mike Francis, All rights reserved. Photo Courtesy of Charles Francis from the Francis Gallery

39
Seascapes
•© 2006-2016 Dr. Mike Francis, All rights reserved. Photo Courtesy of Lisa Chason from the Francis Gallery

40
Seascape - 2
•© 2006-2018 Dr. Mike Francis, All rights reserved. Photo Courtesy of Marge Jones from the Francis Gallery

41
Seascape - 3
•© 2006-2018 Dr. Mike Francis, All rights reserved. Photo Courtesy of the Francis Gallery

42
Reflections
•© 2006-2018 Dr. Mike Francis, All rights reserved. Photo Courtesy of the Francis Gallery

43
Reflections - 2
•© 2006-2018 Dr. Mike Francis, All rights reserved. Photo Courtesy of the Francis Gallery

44
Reflections - 3
•© 2006-2018 Dr. Mike Francis, All rights reserved. Photo Courtesy of the Francis Gallery

45
Reflections - 4
•© 2006-2018 Dr. Mike Francis, All rights reserved. Photo courtesy of Charles Francis from the Francis Gallery

46
People
•© 2006-2016 Dr. Mike Francis, All rights reserved

47
People - 2
•© 2006-2018 Dr. Mike Francis, All rights reserved. Photo Courtesy of the Francis Gallery

48
Skies
•© 2006-2018 Dr. Mike Francis, All rights reserved. Photo Courtesy of the Francis Gallery

49
Autum
•© 2006-2018 Dr. Mike Francis, All rights reserved. Photo Courtesy of the Francis Gallery

50•© 2006-2018 Dr. Mike Francis, All rights reserved. Photo Courtesy of the Francis Gallery
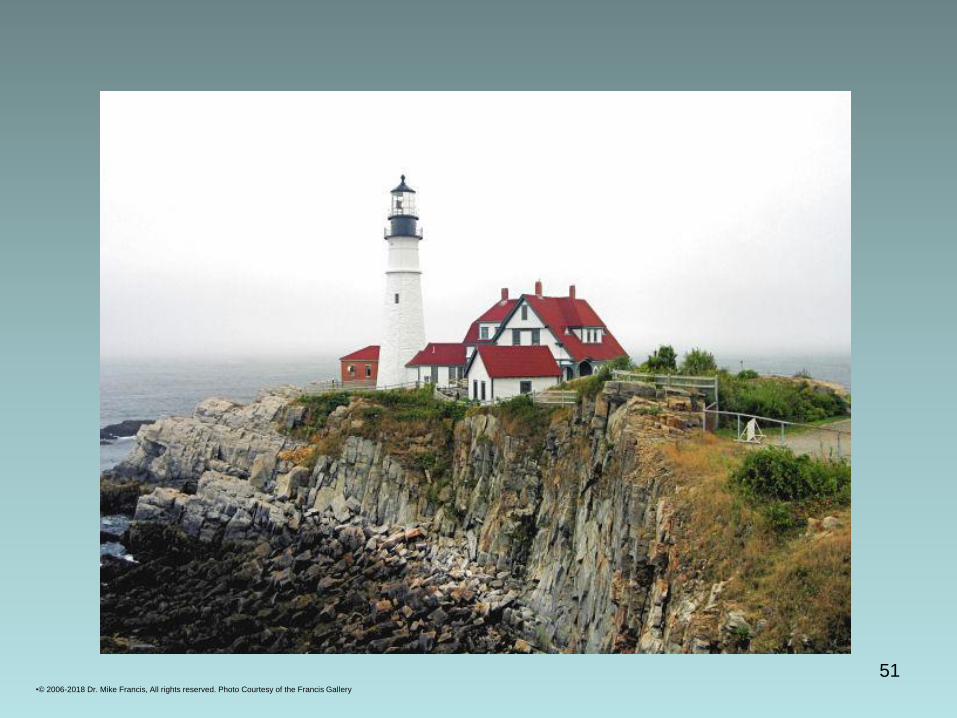
51•© 2006-2018 Dr. Mike Francis, All rights reserved. Photo Courtesy of the Francis Gallery

52•© 2006-2018 Dr. Mike Francis, All rights reserved. Photo Courtesy of Mike Francis from the Francis Gallery.

53•© 2006-2018 Dr. Mike Francis, All rights reserved Photo Courtesy of Mike Francis from the Francis Gallery.

54•© 2006-2018 Dr. Mike Francis, All rights reserved Photo Courtesy of Mike Francis from the Francis Gallery
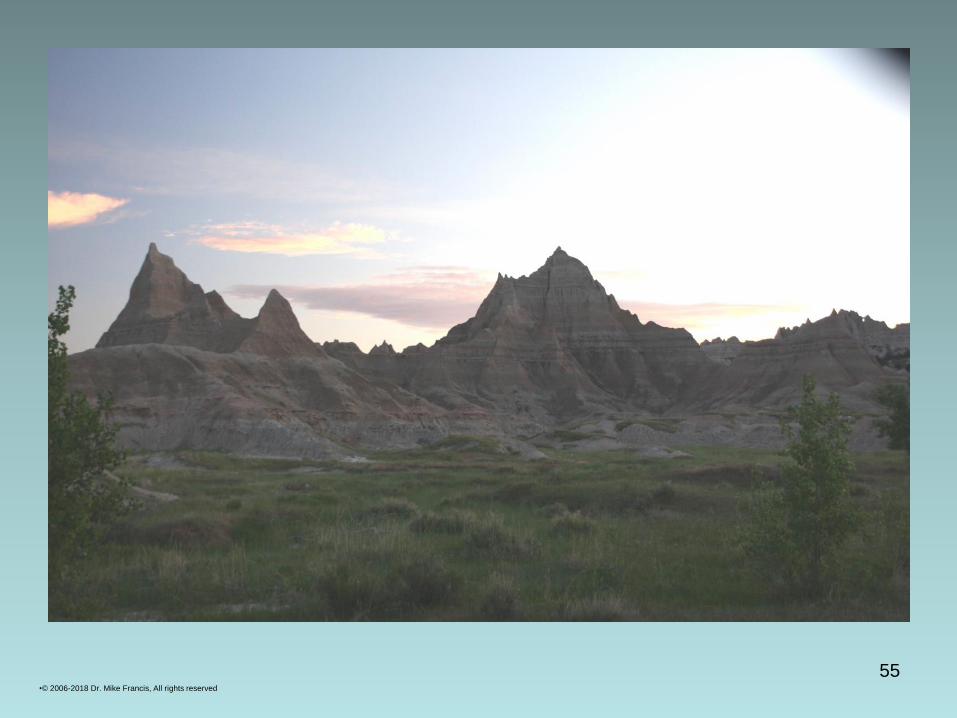
55•© 2006-2018 Dr. Mike Francis, All rights reserved

56•© 2006-2018 Dr. Mike Francis, All rights reserved. Photo Courtesy of Mike Francis from the Francis Gallery

57•© 2006-2018 Dr. Mike Francis, All rights reserved. Photo Courtesy of Mike Francis from the Francis Gallery

58•© 2006-2018 Dr. Mike Francis, All rights reserved. Photo Courtesy of Mike Francis from the Francis Gallery.

59•© 2006-2018 Dr. Mike Francis, All rights reserved. Photo Courtesy of Mike Francis from the Francis Gallery.

60•© 2006-2018 Dr. Mike Francis, All rights reserved . Photo Courtesy of Mike Francis from the Francis Gallery.

61•© 2006-2018 Dr. Mike Francis, All rights reserved . Photo Courtesy of Mike Francis from the Francis Gallery.

62•© 2006-2018 Dr. Mike Francis, All rights reserved . Photo Courtesy of Mike Francis from the Francis Gallery.

63•© 2006-2018 Dr. Mike Francis, All rights reserved . Photo Courtesy of Chris Francis from the Francis Gallery.

64•© 2006-2018 Dr. Mike Francis, All rights reserved . Photo Courtesy of Mike Francis from the Francis Gallery.

65•© 2006-2018 Dr. Mike Francis, All rights reserved