tutorial © mónica weaver, may 2013
TRANSCRIPT

Manhattan Flower Notepad Holder | 1
Manhattan Flower Notepad Holder
Tutorial © Mónica Weaver, May 2013
www.addalittledazzle.com
Supplies List
Stamp Kit: Loving Thoughts (#125845-clear and #125843-wood), Tea Shoppe (#125547-c and #125545-w)
Ink: Jet Black Staz On Ink (#101406)
Paper: First Edition Designer Series Paper (#126898), Basic Black Card Stock (#121045), Very Vanilla Card Stock (#101650), Scarlet Red Craft Metal Sheets, Garland Green Craft Metal Sheets (purchase at www.addalittledazzle.com)
Accessories: Lacy Brocade Impressions Folder (#127819), Manhattan Flower Impressions Folder (#114517), Big Shot (#113439), Stampin’ Dimensionals (#104430), Snail Adhesive (#104332), Sticky Strip (#104294), Rhinestone Basic Jewels (#119246), Stamping Sponges (#101610), Blossom Petals Builder Punch (#121808), Word Window Punch (#119857), Modern Label Punch (#119849)
Non-SU: 4” x 6” Sticky Notepad, Magnets
Tutorial © Monica Weaver 2013, Stampin’ Up! Demonstrator. All rights reserved. Artwork © Stampin’ Up!

Manhattan Flower Notepad Holder | 2
Dimensions:
First Edition Designer Series Paper: 3 ¾” x 5 ¾” (1 piece)
Basic Black Card Stock: 4” x 6” (1 piece), 6 ¼” x 10 3/8” (1 piece)
Very Vanilla Card Stock: 3” x 5 ¼” (1 piece)
Scarlet Red Craft Metal Sheet: 4” x 5 ¼” (1 piece)
Garland Green Craft Metal Sheet: 4” square (1 piece)
Basic Rhinestone Jewels: 5 jewels (medium)
Instructions for the Manhattan Flower Notepad Holder: Step 1 Take the 6 ¼” x 10 3/8” piece of Basic Black Card Stock, align the 10 3/8” side along the top of the Paper Cutter and score at 4 ¼” x 4 7/8”, 5 ½”, 6 1/8”. Fold all creases well. Step 2 Align the ruler along the folds at 5 ½” and make a mark at 2 ¼” x and 3 ¼”. Step 3 Accordion fold the creases and make a cut on each mark up to the second score line.
Tutorial © Monica Weaver 2013, Stampin’ Up! Demonstrator. All rights reserved. Artwork © Stampin’ Up!
5 ½”
Manhattan Flower Notepad Holder | 3
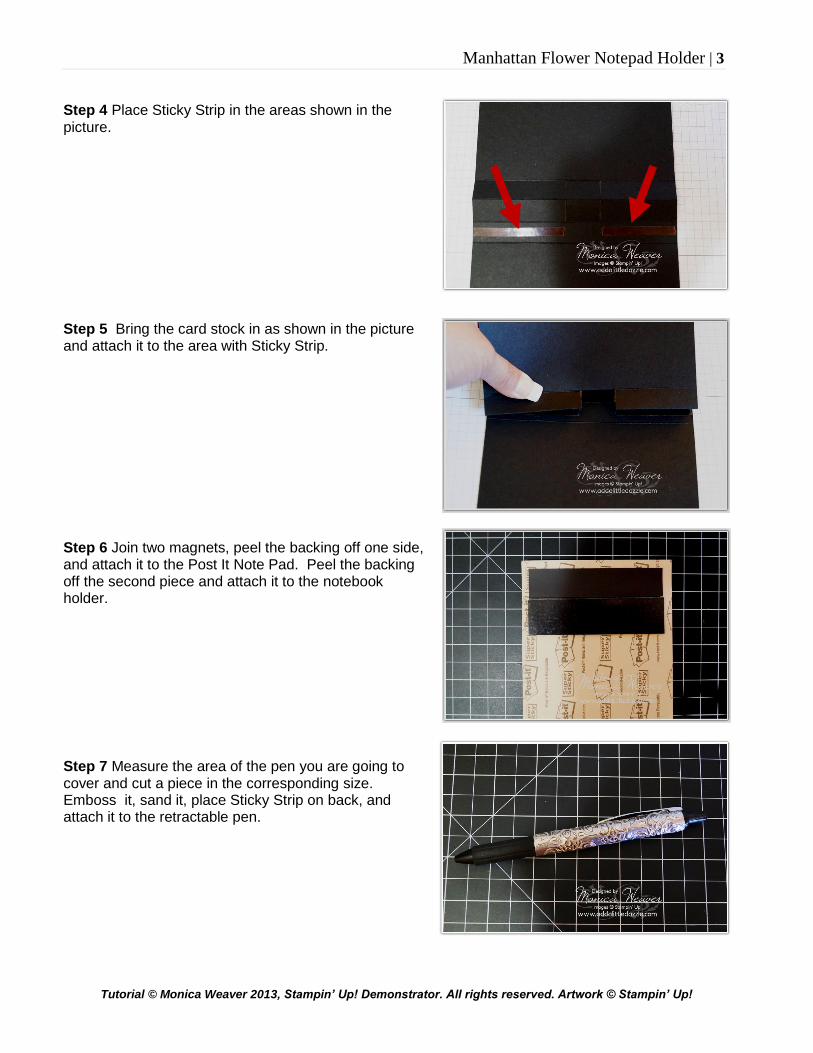
Step 4 Place Sticky Strip in the areas shown in the picture. Step 5 Bring the card stock in as shown in the picture and attach it to the area with Sticky Strip. Step 6 Join two magnets, peel the backing off one side, and attach it to the Post It Note Pad. Peel the backing off the second piece and attach it to the notebook holder. Step 7 Measure the area of the pen you are going to cover and cut a piece in the corresponding size. Emboss it, sand it, place Sticky Strip on back, and attach it to the retractable pen.
Tutorial © Monica Weaver 2013, Stampin’ Up! Demonstrator. All rights reserved. Artwork © Stampin’ Up!

Manhattan Flower Notepad Holder | 4
Step 8 Distress the First Edition Designer Series Paper with a Stamping Sponge and Jet Black Staz On Ink. Attach the Designer Series Paper to the 4” x 6” piece of card stock and attach it to the front of the notebook holder. Step 9 Emboss the Scarlet Red Craft Metal Sheet with the Manhattan Flower Impressions Folder. Cut out the flower design. Sand the top layer with the Sanding Block. Step 10 Emboss the Garland Green Craft Metal Sheet with the Lacy Brocade Impressions Folder and punch out two leaves with Blossom Petals Builder Punch. Step 11 Place Sticky Strip along the back of the cut out flower design, attach the leaves, and attach the entire piece to the front of the card. Step 12 Place 5 Rhinestone Basic Jewels along the upper right hand corner of the card. Step 13 Stamp the sentiment and image on the strip of Very Vanilla Card Stock and punch them out with the corresponding punches. Place Stampin’ Dimensionals along the back piece of the sentiment and attach it to the framed stamped piece. Place Mini Glue Dots on back and attach it to the front of the notebook cover.
Order Stampin’ Up! Product, Add a Little Dazzle Craft Metal
Sheets, & Tool Kit
Mónica Weaver, Independent Stampin’ Up! Demonstrator www.addalittledazzle.com
Tutorial © Monica Weaver 2013, Stampin’ Up! Demonstrator. All rights reserved. Artwork © Stampin’ Up!