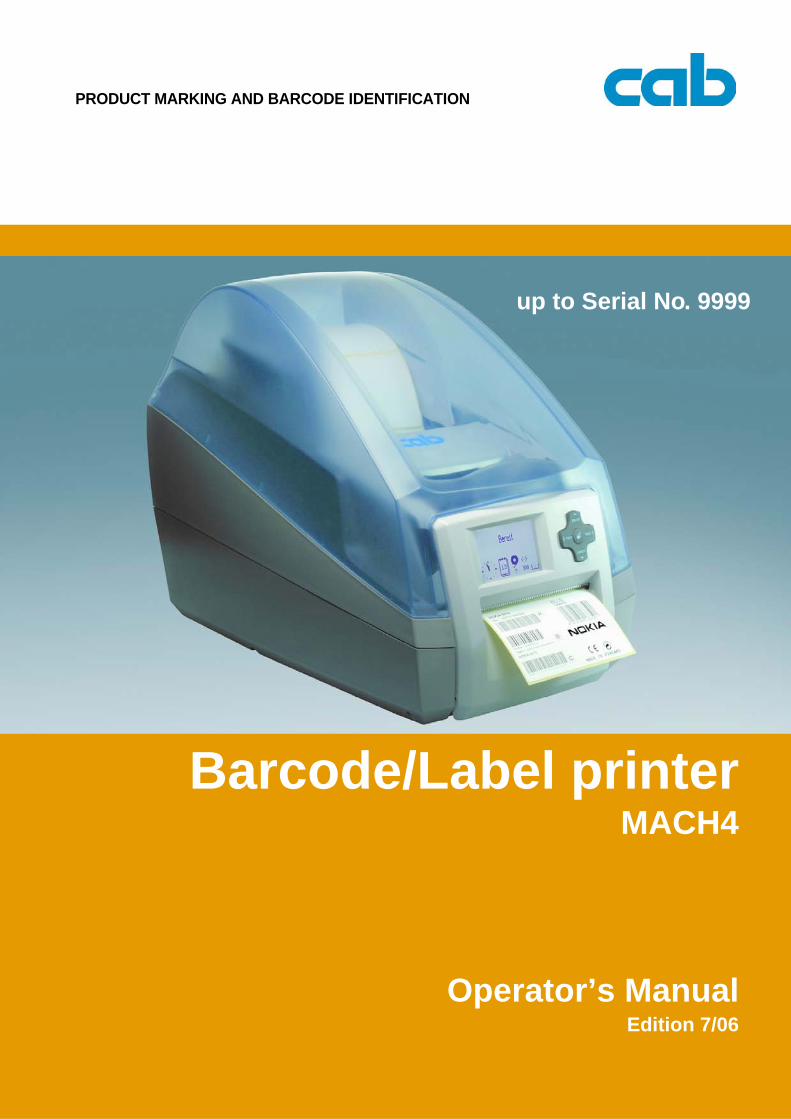
up to serial no. 9999 - cab
TRANSCRIPT
PRODUCT MARKING AND BARCODE IDENTIFICATION
Operator’s ManualEdition 7/06
Barcode/Label printerMACH4
up to Serial No. 9999
copyright by cab/9008531/Q34/1All specifications about delivery, design, performance and weight are given to the best of our current knowledge and are subject to change without prior notice.
All rights reserved, including those of the translations.
No part of this manual nor any translation may be reproduced or transmitted in any form or by any means, for any purpose other than the purchaser’s personal use, without the express written permission of cab Produkttechnik GmbH & Co KG Karlsruhe.
Compliances
cab label printers comply with the following safety regulations:CE EU Low Voltage Directive (73/23/EEC)
EU Machinery Directive (98/37/EC)EU Electromagnetic Compatibility Directive (89/336/EEC)
FCC Requirements of the FCC regulations part 15 for class A computers. Under disadvantageous circumstances, the operation of these devices may cause interference with radio orTV reception, which has to be eliminated by the operator.
Gesellschaft für
Computer- und Automations-Bausteine mbH & Co KG
cab-Produkttechnik GmbH & Co KG
Postfach 1904 D-76007 Karlsruhe, GermanyWilhelm-Schickard-Str. 14 D-76131 Karlsruhe, GermanyTelephone: +49 721 6626-0Telefax: +49 721 6626-249http://www.cabgmbh.com
E-mail: [email protected]

MACH4
Table of Contents
Table of Contents
1 A General Guide to the Documentation ............................................................................. 51.1 Structure of the Documentation and Navigation ........................................................... 51.2 Warning Notices, Notes and other Highlighted Elements ............................................. 51.2.1 Warning notices ............................................................................................................ 51.2.2 Notes............................................................................................................................. 61.2.3 Display text on the printer screen.................................................................................. 61.3 Cross references and References to Figures, Tables and Documents ........................ 61.3.1 Item numbers ................................................................................................................ 61.3.2 Cross references to sections and subsections.............................................................. 61.3.3 References to the other documents .............................................................................. 6
2 Safety and the Environment ................................................................................................ 62.1 Intended Use of the Printer ........................................................................................... 72.2 Safety Instructions......................................................................................................... 72.3 Disposal in an Eco-friendly Manner .............................................................................. 7
3 Installation............................................................................................................................. 83.1 Device Overview ........................................................................................................... 83.2 Unpacking the Label Printer.......................................................................................... 93.3 Installing the Label Printer............................................................................................. 93.4 Connecting the Label Printer......................................................................................... 93.4.1 Connection to the power supply.................................................................................... 93.4.2 Connection to a computer or computer network ......................................................... 103.5 Switching the Label Printer On and Off....................................................................... 10
4 Control panel ...................................................................................................................... 114.1 Structure of the Control Panel..................................................................................... 114.2 Functions in Print Mode .............................................................................................. 124.2.1 Symbol displays .......................................................................................................... 124.2.2 Power save mode ....................................................................................................... 124.2.3 Printer states ............................................................................................................... 124.2.4 Key functions............................................................................................................... 13
Edition 7/06 Operator’s Manual 3
Table of Contents
MACH4
5 Device types ....................................................................................................................... 145.1 Device with Peel-off Function...................................................................................... 145.2 Device with Cutting Function....................................................................................... 14
6 Loading Material................................................................................................................. 146.1 Loading Labels............................................................................................................ 146.1.1 Adapting the roll holder ............................................................................................... 146.1.2 Fitting label rolls .......................................................................................................... 156.1.3 Loading fanfold labels ................................................................................................. 166.1.4 Setting up the peel-off function ................................................................................... 176.2 Loading the Transfer Ribbon....................................................................................... 186.3 Label Sensors ............................................................................................................. 206.3.1 Gap sensors................................................................................................................ 206.3.2 Reflex sensor .............................................................................................................. 21
7 Printing Operation.............................................................................................................. 227.1 Synchronization of the Paper Feed............................................................................. 227.2 Tear-off Mode ............................................................................................................. 227.3 Peel-off Mode.............................................................................................................. 227.4 Cutting Mode............................................................................................................... 22
8 Cleaning and Maintenance ................................................................................................ 238.1 General Cleaning ........................................................................................................ 238.2 Cleaning the Media Feed Rollers................................................................................ 238.3 Cleaning the Printhead ............................................................................................... 238.4 Cleaning Label Sensors .............................................................................................. 248.5 Changing the Printhead .............................................................................................. 248.6 Replacing the Media Feed Roller ............................................................................... 25
9 Fault Correction.................................................................................................................. 269.1 Types of Errors............................................................................................................ 269.2 Problem Solution......................................................................................................... 279.3 Error Messages and Fault Correction ......................................................................... 28
10 EU Declaration of Conformity ........................................................................................... 31
Index .................................................................................................................................... 32
4 Operator’s Manual Edition 7/06
MACH4
A General Guide to the Documentation
1 A General Guide to the Documentation
1.1 Structure of the Documentation and Navigation
The documentation for the barcode/label printer MACH4 consists of the following parts:
• Operator’s Manual This is intended for trained operating personnel. It contains information for operating the printer, and the technical guide for exchanging modules and wearing parts.
• Configuration ManualThis is included on the supplied CD and can also be found on cab Internet pages, and is intended for persons who install and set up the label printer, and who perform the follow up maintenance work.
• Service ManualThis is included on the supplied CD and can also be found on cab Internet pages, and is intended for trained service personnel who maintain and repair the label printer.
Each guide has its own page and section numbering. The titles of the sections are also shown in the page headers to make navigation easier.
Follow up documentation
Tab.1: Follow up documentation
Please let us know if you have any questions or find any mistakes, so that we can continue to improve our manuals in future.
1.2 Warning Notices, Notes and other Highlighted Elements
1.2.1 Warning notices
Important information and instructions in this manual are designated as follows:
Spare Parts Lists Spare Parts
cab Transfer Printer Programming Manual Programming the label printer with the printer’s own command set
DANGER!indicates a very great, imminent danger that could lead to serious injuries or even death.
CAUTION!indicates a potentially hazardous situation that could lead to slight to moderate injuries or material damage.
Edition 7/06 Operator’s Manual 5
Safety and the Environment
MACH4
1.2.2 Notes
1.2.3 Display text on the printer screen
All texts appearing on the printer screen are displayed in a suitably abbreviated manner: e.g.: time zone > UTC+1. This abbreviated text prompts the user to select the time zone menu, and the UTC+1 option in this menu.
1.3 Cross references and References to Figures, Tables and Documents
1.3.1 Item numbers
Item numbers in a text are shown in brackets e.g. (5). If a figure number is not stated, the item numbers in the text always refer to the nearest figure above the text. If a reference is made to another figure, the figure number is also stated, e.g. Fig. 1 (8).
1.3.2 Cross references to sections and subsections
A cross-reference to a section and subsection gives the section number and page number, e.g. see sec-tion 5.2 on page 14)
1.3.3 References to the other documents
A reference to another document has the form: See “Configuration Manual“. All documents referred to in this guide are listed in the section "Structure of the Documentation and Navigation" (see section 1.1 on page 5).
2 Safety and the Environment
Please read this quick operator’s guide before using the label printer for the first time. This quick opera-tor’s guide describes all the main functions of the label printer during operation. The functions actually available depend on the version ordered.
NOTICE!draws attention to possible material damage or possible loss of quality.
INFORMATION!that makes a working sequence easier or draws attention to important working processes.
A detailed product description with all technical data can be found in the "MACH4 Configuration Manual" on the CD ROM or under www.cabgmbh.com.
6 Operator’s Manual Edition 7/06
MACH4
Safety and the Environment
2.1 Intended Use of the Printer
• The label printer is built in accordance with the current technological status and the recognized safety rules. However, danger to the life and limb of the user or third parties and/or damage to the label printer and other tangible assets can arise during use.
• The label printer may only be used for its intended purpose and if it is in perfect working order, and it must be used with regard to safety and dangers as stated in the operating manual. In particular, faults which affect safety must be rectified immediately.
• The label printer is intended exclusively for printing suitable materials that have been approved by the manufacturer. Any other use or use going beyond this shall be regarded as improper use. The manufacturer/supplier shall not be liable for damage resulting from unauthorized use; the user shall bear the risk alone.
• Usage for the intended purpose also includes complying with the operating manual, including the manufacturer’s maintenance recommendations and specifications.
2.2 Safety Instructions
• The label printer is configured for voltages of 100 to 240 V AC. Connect only to a power outlet with a grounded contact.
• The printer must only be connected to devices which have extra low voltage.
• Switch off all affected devices (computer, printer, accessories) before connecting or disconnecting.
• The label printer may only be used in a dry environment, do not expose it to moisture (sprays of water, mists, etc.).
• If the label printer is operated with the cover open, ensure that people’s clothing, hair, jewelry etc. do not come into contact with the exposed rotating parts.
• During the print process the print assembly can become hot. Do not touch during operation, and allow to cool down before changing material and before disassembly.
• Perform only those actions described in this operating manual. Work going beyond this may only be performed by trained personnel or service technicians.
2.3 Disposal in an Eco-friendly Manner
Obsolete devices contain valuable recyclable materials that should be sent for recycling. ⇒ Send to suitable collection points, separately from residual waste.The modular construction of the printer enables it to be easily disassembled into its component parts. ⇒ Send the parts for recycling.The electronic circuit board of the printer is equipped with a lithium battery.⇒ Take old batteries to collection boxes in shops or public waste disposal centers.
DANGER!Danger to life and limb from power supply.
⇒ Do not open the label printer casing.
Edition 7/06 Operator’s Manual 7

Installation
MACH4
3 Installation
3.1 Device Overview
Fig. 1: Overview
B
Apause
menu
cancel
feed
Bereit
6
pause
menu
cancel
feed
1917 18
9
1 2 3 4 5 6 7 8
10
1213
141516
1011
View A
View B
1 RS-232 serial interface2 USB 2.0 High Speed Slave interface3 Two USB master interfaces for
keyboard and scanner 4 Ethernet 10/10 Base T interface5 CompactFlash card slot 6 Power supply socket7 PC card slot, type II8 Power switch9 Cover
10 Roll hub11 Bracket grooves12 Ribbon rewind hub13 Printhead mounting with printhead14 Unlocking button of the print module15 Pressure roller16 Control panel17 Graphic display18 Slot for label output with tear bar19 Navigator pad
8 Operator’s Manual Edition 7/06
MACH4
Installation
3.2 Unpacking the Label Printer
⇒ Lift the label printer out of the carton by the straps.⇒ Check the label printer for any possible transportation damage. ⇒ Check that the delivery is complete.
Delivery scope:
• Label printer
• Power cable
• Quick Operator’s Guide
• Printer Accessories CD with printer driver and additional documentation
• cablabel Lite
3.3 Installing the Label Printer
⇒ Place the printer on an even surface.⇒ For operation in peel-off mode place the printer in such a position that the liner can run down without
hindrance (see section 6.1.4).
3.4 Connecting the Label Printer
The standard available interfaces and connectors are shown in figure 1 Overview, view A.
3.4.1 Connection to the power supply
The printer is equipped with a wide area network unit. The device can be operated with a supply voltage of 230 V~/50 Hz or 115 V~/60 Hz without adjustment.
1. Plug the power cable into the power connection socket (6).2. Plug the power cable into a grounded socket.
Please keep the original packaging in case the printer must be returned.
CAUTION!The device and printing materials will be damaged by moisture and wetness.
⇒ Set up label printers only in dry locations protected from splash water.
CAUTION!⇒ Switch the mains switch (8) to position "O" before connecting to the power supply.
Edition 7/06 Operator’s Manual 9
Installation
MACH4
3.4.2 Connection to a computer or computer network
⇒ Connect the label printer to a computer or network by a suitable cable.Please refer to the "Configuration Manual" for details of the configuration of the individual interfaces.
3.5 Switching the Label Printer On and Off
When all connections have been made:⇒ Switch the printer on at the power switch Fig. 1 (8).
The printer performs a system test, and then shows the system status "ready" in the display, Fig. 1 (17).
If an error occurs during the system test, the symbol and type of error are displayed (see section 9.1 on page 26).⇒ Switch the printer off at the power switch Fig. 1 (8) after finishing work.
Inadequate or no grounding can cause malfunctions during operations. Ensure that all computers and cables connected to the label printer are grounded.
10 Operator’s Manual Edition 7/06

MACH4
Control panel
4 Control panel
The user can control the operation of the printer with the control panel, for example:
• Issuing, interrupting, continuing and cancelling print jobs,
• Setting printing parameters, e.g. heat level of the printhead, print speed, interface configuration, lan-guage and time of day (see “Configuration Manual“),
• Start the test functions (see "Configuration Manual“)
• Control stand-alone operation with a memory module (see “Configuration Manual“),
• Update the firmware (see “Configuration Manual“).Many functions and settings can also be controlled by software applications or by direct programming with a computer using the printer’s own commands. See the "Configuration Manual“ for details.Settings made on the control panel make the basic settings of the label printer.
4.1 Structure of the Control Panel
The key functions depend on the current printer status:
• Active functions: Labels and symbols on the navigator pad keys.
• Active functions light up white in print mode (e. g. menu or feed).
• Active functions light up orange in the offline menu (arrows, key .. ).
Key Functions
⇒ The pause, cancel, menu, feed keys are explained in section 4.2.4.⇒ The up, down, left and right arrows are used for navigating in the menu.⇒ The key . corresponds to the Enter key on a computer keyboard. It confirms:
- The selection of a menu item, - The entry of a parameter, - The call of help information in the event of a fault
It is advantageous, whenever possible, to make adaptations to various print jobs in the software.
Fig. 2: Control panel
1 Graphic display2 Navigator pad with five integrated
keys
The graphic display indicates the current status of the printer and the print job, indi-cates faults and shows the printer settings in the menu.
pause
menu
cancel
feed
Bereit
6
1 2
Edition 7/06 Operator’s Manual 11
Control panel
MACH4
4.2 Functions in Print Mode
4.2.1 Symbol displays
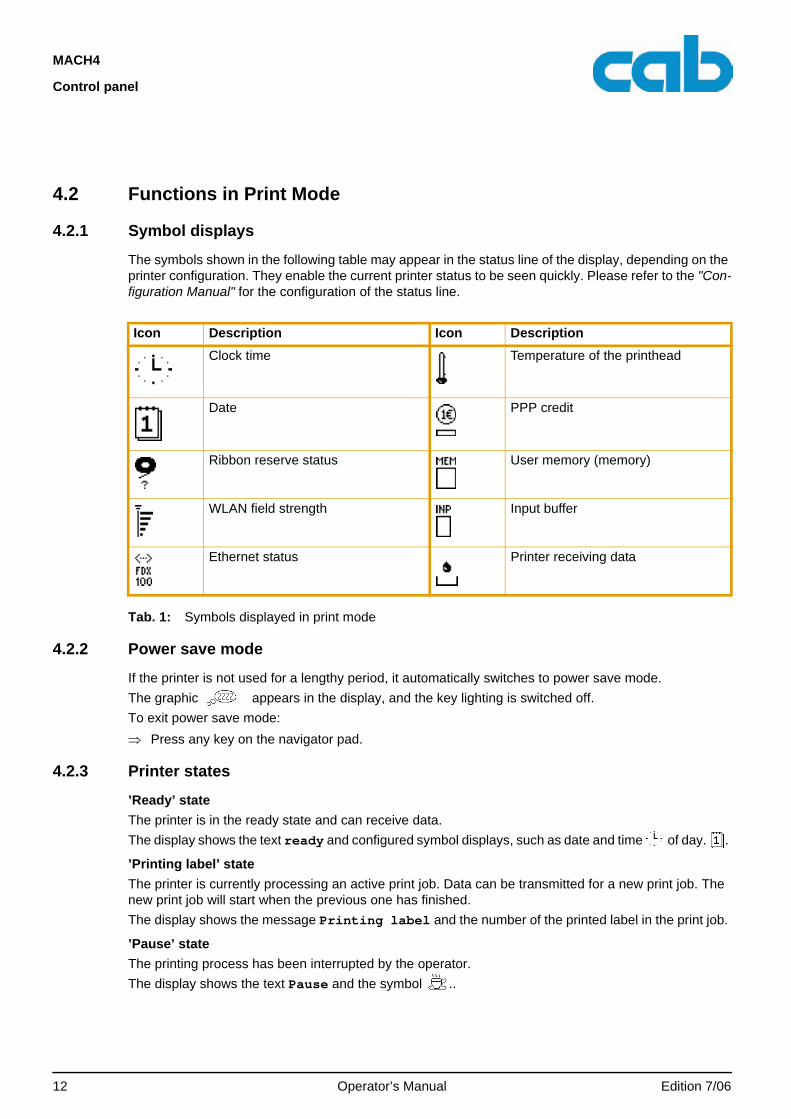
The symbols shown in the following table may appear in the status line of the display, depending on the printer configuration. They enable the current printer status to be seen quickly. Please refer to the "Con-figuration Manual" for the configuration of the status line.
Tab. 1: Symbols displayed in print mode
4.2.2 Power save mode
If the printer is not used for a lengthy period, it automatically switches to power save mode. The graphic appears in the display, and the key lighting is switched off.To exit power save mode:⇒ Press any key on the navigator pad.
4.2.3 Printer states
’Ready’ state
The printer is in the ready state and can receive data. The display shows the text ready and configured symbol displays, such as date and time of day. .
’Printing label’ state
The printer is currently processing an active print job. Data can be transmitted for a new print job. The new print job will start when the previous one has finished. The display shows the message Printing label and the number of the printed label in the print job.
’Pause’ state
The printing process has been interrupted by the operator. The display shows the text Pause and the symbol ..
Icon Description Icon Description
Clock time Temperature of the printhead
Date PPP credit
Ribbon reserve status User memory (memory)
WLAN field strength Input buffer
Ethernet status Printer receiving data
12 Operator’s Manual Edition 7/06
MACH4
Control panel
’Correctable error’ state
An error has occurred that can be rectified by the operator without interrupting the print job. The print job can be continued after the error has been rectified.The display shows the symbol , the type of error and the number of labels still to be printed.
’Irrecoverable error’ state
An error has occurred that cannot be rectified without interrupting the print job. The display shows the symbol , the type of error and the number of labels still to be printed.
’Critical error’ state
If an error occurs during the system test, the symbol and type of error are displayed.⇒ Switch the printer off and then on again at the power switch.
or⇒ Press cancel key.Call Service if the fault occurs persistently.
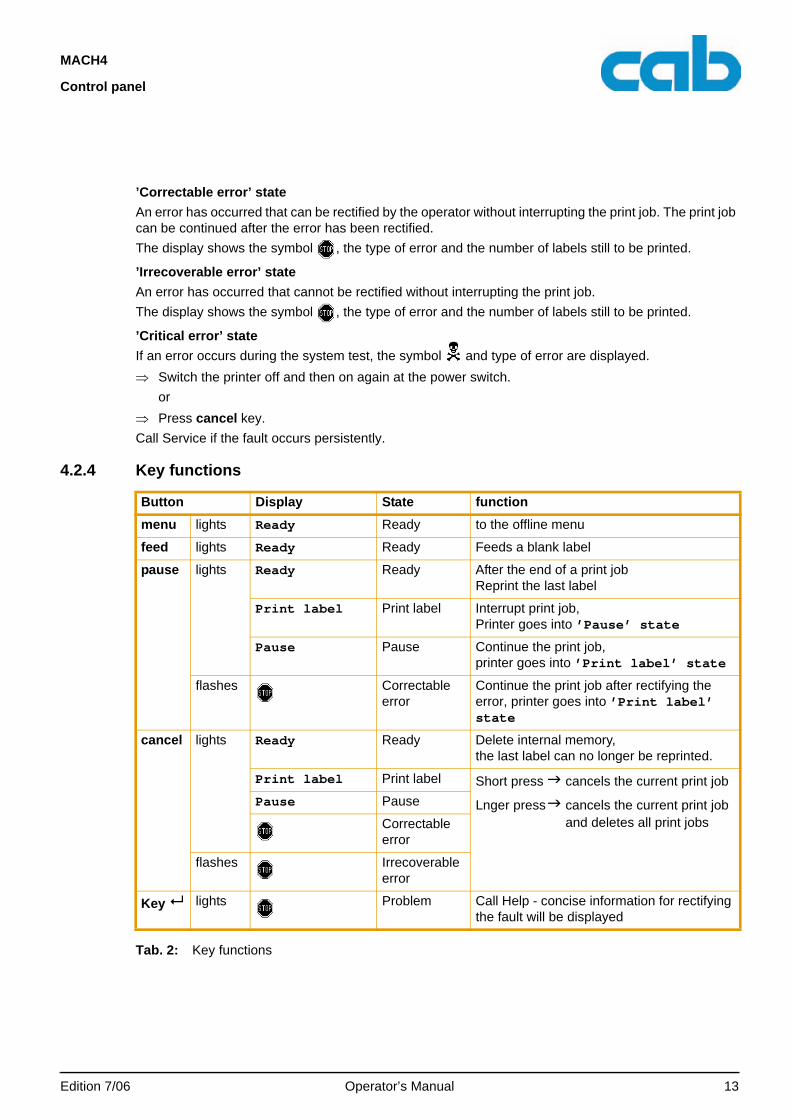
4.2.4 Key functions
Tab. 2: Key functions
Button Display State function
menu lights Ready Ready to the offline menu
feed lights Ready Ready Feeds a blank label
pause lights Ready Ready After the end of a print jobReprint the last label
Print label Print label Interrupt print job, Printer goes into ’Pause’ state
Pause Pause Continue the print job, printer goes into ’Print label’ state
flashes Correctable error
Continue the print job after rectifying the error, printer goes into ’Print label’ state
cancel lights Ready Ready Delete internal memory,the last label can no longer be reprinted.
Print label Print label Short press cancels the current print job
Lnger press cancels the current print job and deletes all print jobs
Pause Pause
Correctable error
flashes Irrecoverable error
Key . lights Problem Call Help - concise information for rectifying the fault will be displayed
Edition 7/06 Operator’s Manual 13
Device types
MACH4
5 Device types
Two versions of the label printer MACH4 are supplied, one with a peel-off function and the other with a cutting function. Both versions are offered with 203 dpi, 300 dpi or 600 dpi printheads.Both types of device are used to print labels or continuous material from rolls or fanfold labels. The print-ed labels can either be torn off at the tear bar integrated in the control panel or rolled up on an external label take up (optional).
5.1 Device with Peel-off Function
This device version also enables label output in peel-off mode. Here, the label is separated from the backing material after printing. The label is removed by hand.
5.2 Device with Cutting Function
The control panel of this version of the label printer is fitted with a cutter. The knife cuts material up to 250 g/m².
6 Loading Material
6.1 Loading Labels
6.1.1 Adapting the roll holder
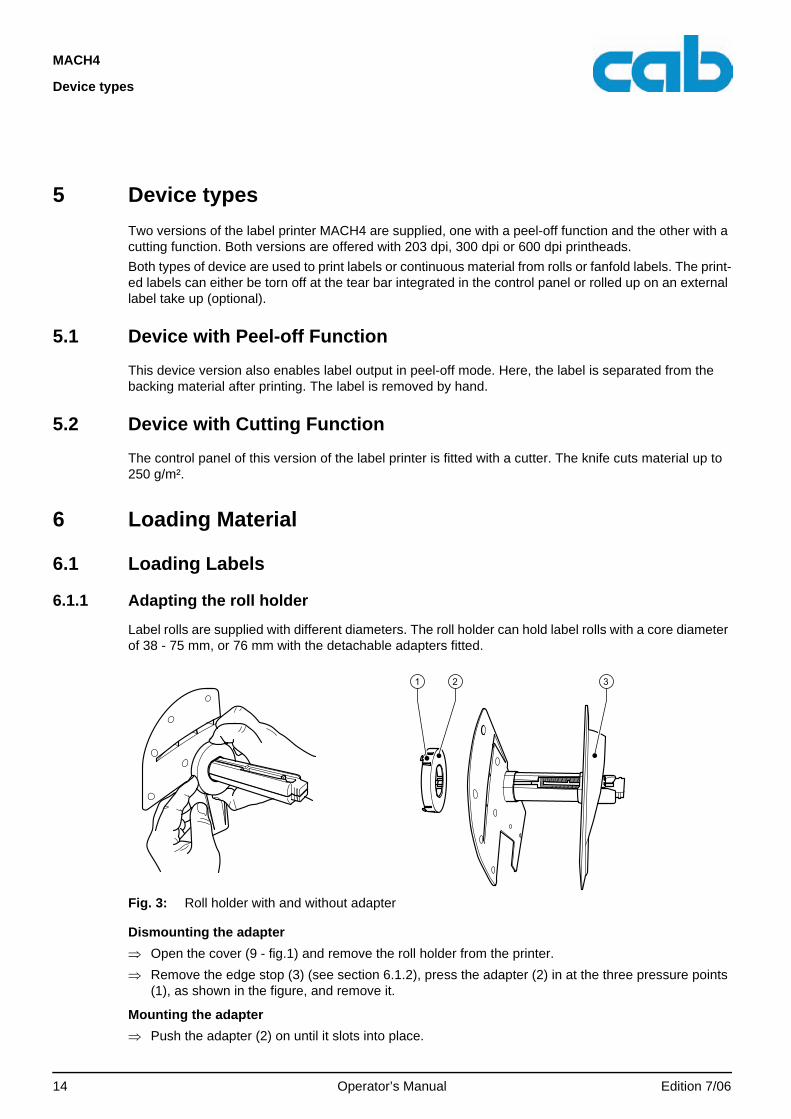
Label rolls are supplied with different diameters. The roll holder can hold label rolls with a core diameter of 38 - 75 mm, or 76 mm with the detachable adapters fitted.
Fig. 3: Roll holder with and without adapter
Dismounting the adapter
⇒ Open the cover (9 - fig.1) and remove the roll holder from the printer. ⇒ Remove the edge stop (3) (see section 6.1.2), press the adapter (2) in at the three pressure points
(1), as shown in the figure, and remove it.
Mounting the adapter
⇒ Push the adapter (2) on until it slots into place.
1 2 3
14 Operator’s Manual Edition 7/06
MACH4
Loading Material
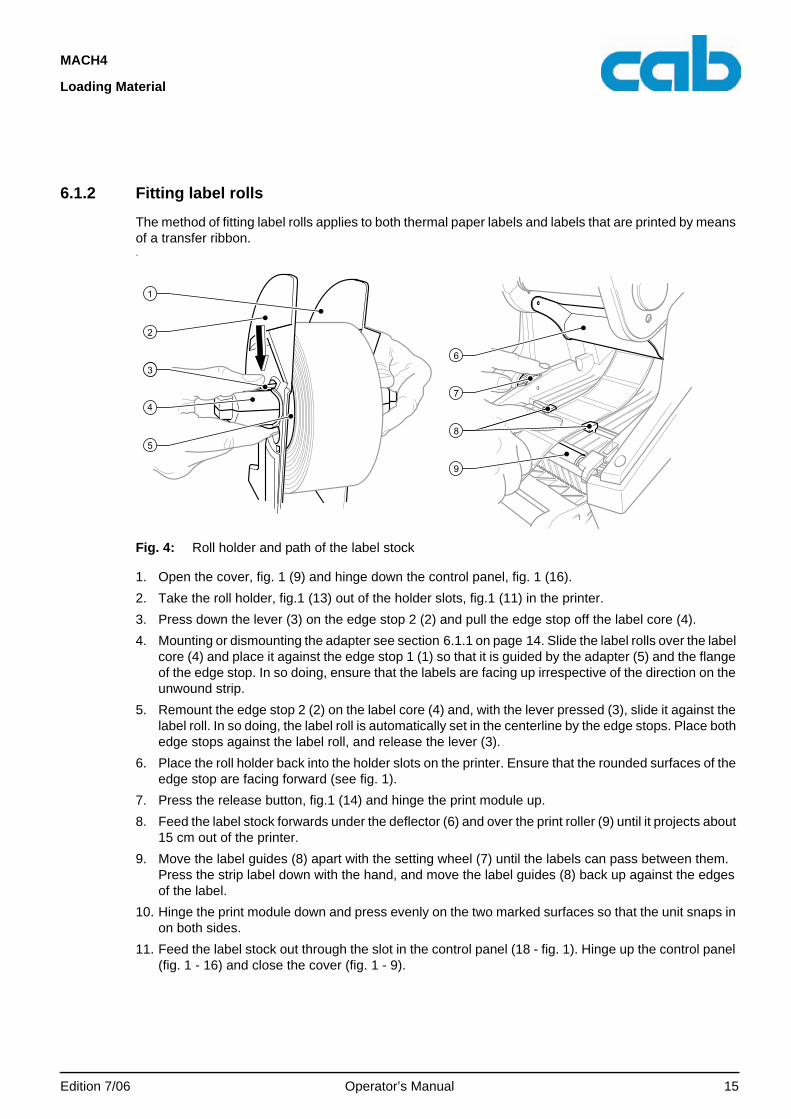
6.1.2 Fitting label rolls
The method of fitting label rolls applies to both thermal paper labels and labels that are printed by means of a transfer ribbon. .
Fig. 4: Roll holder and path of the label stock
1. Open the cover, fig. 1 (9) and hinge down the control panel, fig. 1 (16).2. Take the roll holder, fig.1 (13) out of the holder slots, fig.1 (11) in the printer. 3. Press down the lever (3) on the edge stop 2 (2) and pull the edge stop off the label core (4).4. Mounting or dismounting the adapter see section 6.1.1 on page 14. Slide the label rolls over the label
core (4) and place it against the edge stop 1 (1) so that it is guided by the adapter (5) and the flange of the edge stop. In so doing, ensure that the labels are facing up irrespective of the direction on the unwound strip.
5. Remount the edge stop 2 (2) on the label core (4) and, with the lever pressed (3), slide it against the label roll. In so doing, the label roll is automatically set in the centerline by the edge stops. Place both edge stops against the label roll, and release the lever (3).
6. Place the roll holder back into the holder slots on the printer. Ensure that the rounded surfaces of the edge stop are facing forward (see fig. 1).
7. Press the release button, fig.1 (14) and hinge the print module up. 8. Feed the label stock forwards under the deflector (6) and over the print roller (9) until it projects about
15 cm out of the printer. 9. Move the label guides (8) apart with the setting wheel (7) until the labels can pass between them.
Press the strip label down with the hand, and move the label guides (8) back up against the edges of the label.
10. Hinge the print module down and press evenly on the two marked surfaces so that the unit snaps in on both sides.
11. Feed the label stock out through the slot in the control panel (18 - fig. 1). Hinge up the control panel (fig. 1 - 16) and close the cover (fig. 1 - 9).
4
5
6
7
9
8
23
2
1
Edition 7/06 Operator’s Manual 15
Loading Material
MACH4
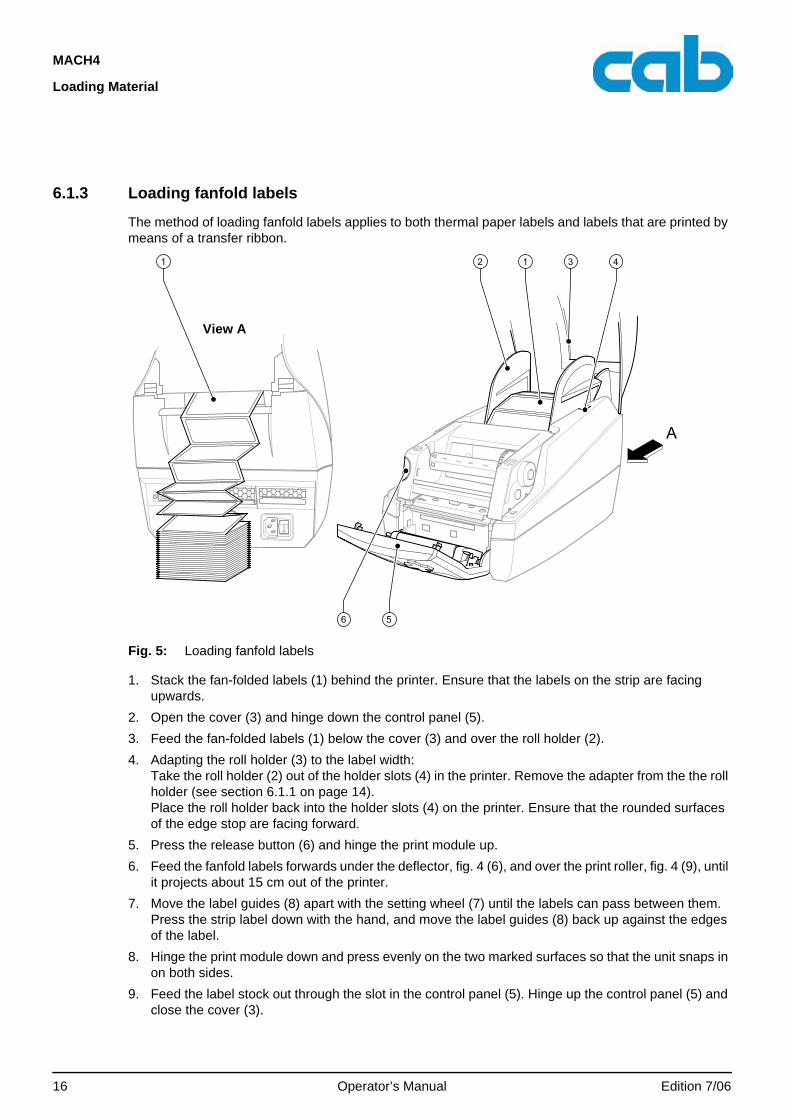
6.1.3 Loading fanfold labels
The method of loading fanfold labels applies to both thermal paper labels and labels that are printed by means of a transfer ribbon.
Fig. 5: Loading fanfold labels
1. Stack the fan-folded labels (1) behind the printer. Ensure that the labels on the strip are facing upwards.
2. Open the cover (3) and hinge down the control panel (5). 3. Feed the fan-folded labels (1) below the cover (3) and over the roll holder (2).4. Adapting the roll holder (3) to the label width:
Take the roll holder (2) out of the holder slots (4) in the printer. Remove the adapter from the the roll holder (see section 6.1.1 on page 14).Place the roll holder back into the holder slots (4) on the printer. Ensure that the rounded surfaces of the edge stop are facing forward.
5. Press the release button (6) and hinge the print module up.6. Feed the fanfold labels forwards under the deflector, fig. 4 (6), and over the print roller, fig. 4 (9), until
it projects about 15 cm out of the printer. 7. Move the label guides (8) apart with the setting wheel (7) until the labels can pass between them.
Press the strip label down with the hand, and move the label guides (8) back up against the edges of the label.
8. Hinge the print module down and press evenly on the two marked surfaces so that the unit snaps in on both sides.
9. Feed the label stock out through the slot in the control panel (5). Hinge up the control panel (5) and close the cover (3).
4
6 5
1 312
A
View A
16 Operator’s Manual Edition 7/06
MACH4
Loading Material
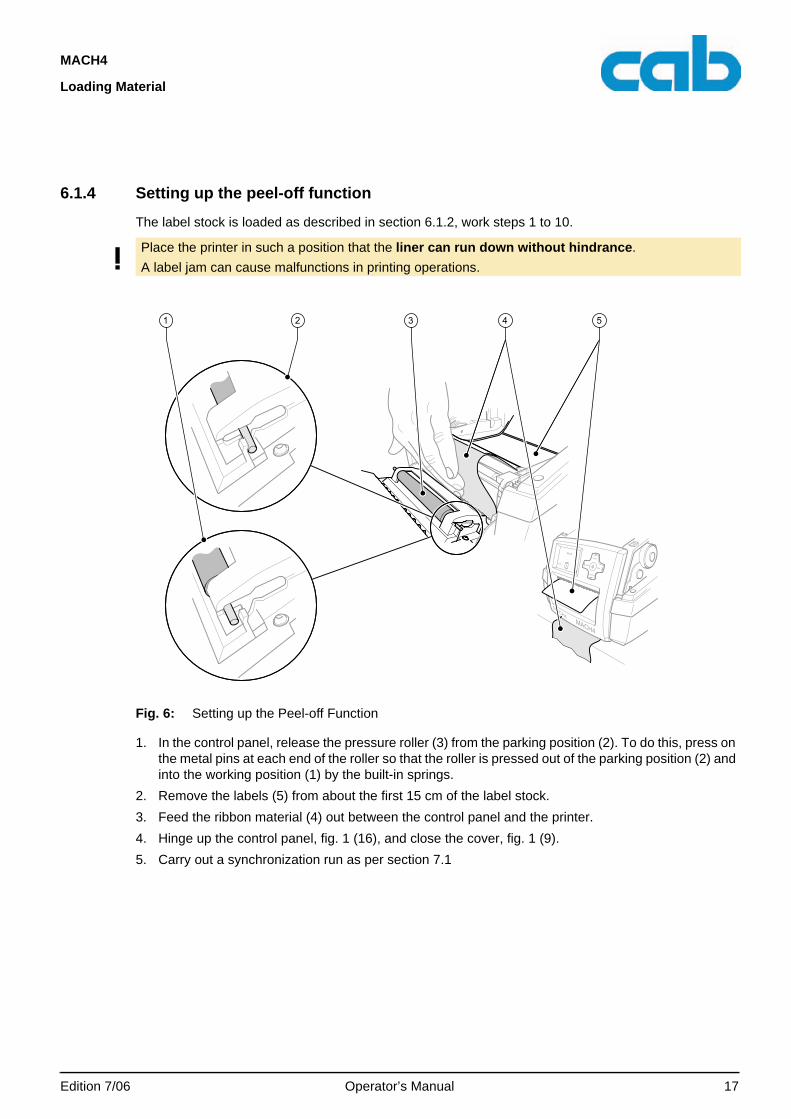
6.1.4 Setting up the peel-off function
The label stock is loaded as described in section 6.1.2, work steps 1 to 10.
Fig. 6: Setting up the Peel-off Function
1. In the control panel, release the pressure roller (3) from the parking position (2). To do this, press on the metal pins at each end of the roller so that the roller is pressed out of the parking position (2) and into the working position (1) by the built-in springs.
2. Remove the labels (5) from about the first 15 cm of the label stock. 3. Feed the ribbon material (4) out between the control panel and the printer.4. Hinge up the control panel, fig. 1 (16), and close the cover, fig. 1 (9).5. Carry out a synchronization run as per section 7.1
Place the printer in such a position that the liner can run down without hindrance. A label jam can cause malfunctions in printing operations.
4 51 2 3
Edition 7/06 Operator’s Manual 17
Loading Material
MACH4
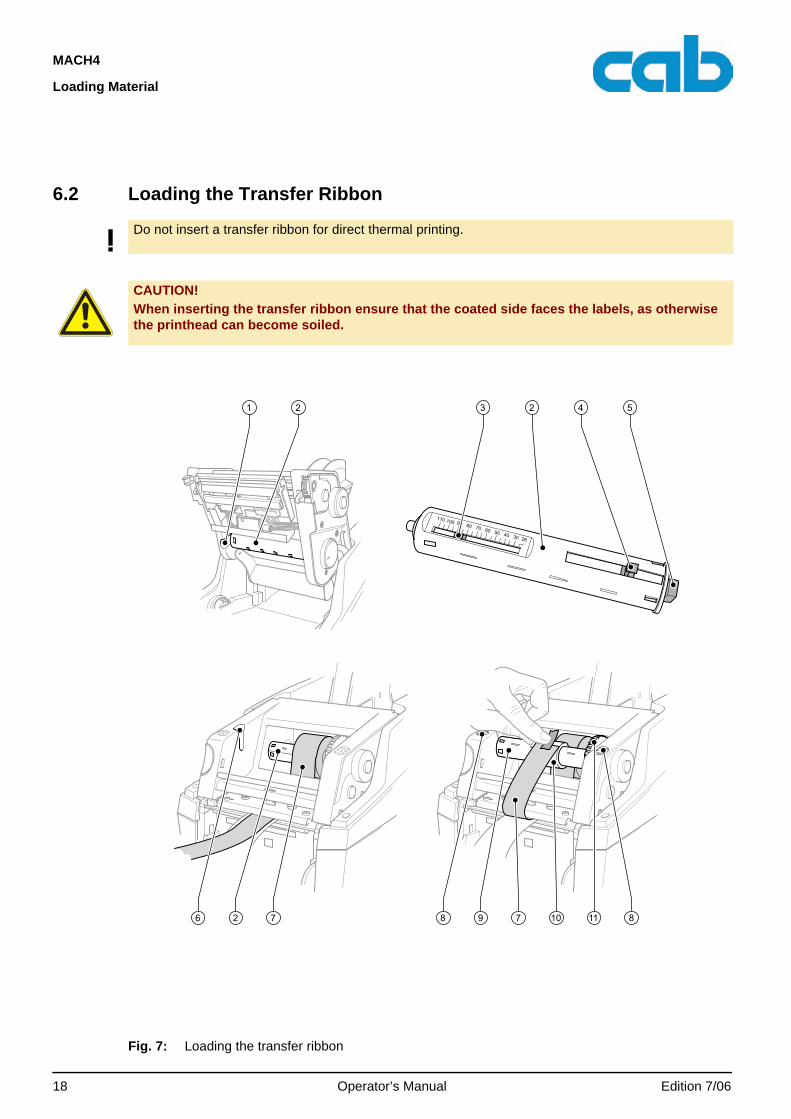
6.2 Loading the Transfer Ribbon
Fig. 7: Loading the transfer ribbon
Do not insert a transfer ribbon for direct thermal printing.
CAUTION!When inserting the transfer ribbon ensure that the coated side faces the labels, as otherwise the printhead can become soiled.
4 521 3 2
726 8 9 7 10 11 8
18 Operator’s Manual Edition 7/06
MACH4
Loading Material
1. Open the cover, fig. 1 (9) and hinge down the control panel, fig. 1 (16).2. Press the release button, fig.1 (14) and hinge the print module up. 3. Press the transfer ribbon unwinding unit (2) to the right until there is perceptible resistance, pull it to
the left out of the guide slot (1) and remove it.4. Set the width of the ribbon roll on the transfer ribbon unwinding unit (2). For that purpose press the
lever (4) and move it sidewards. The set roll width is shown on the scale (3) of the transfer ribbon unwinding unit (2).
5. Slide the ribbon roll onto the transfer ribbon unwinding unit (2) with the lever. Ensure that the coated side of the transfer ribbon (7) is facing the label stock.
6. To insert the transfer ribbon unwinding unit (2) again press the rectangular end (5) of the unwinding unit against the spring in the right-hand holder, and slide the left-hand end into the guide slot (1) as far as it will go.
7. Hinge the print module down (do not slot in).8. Insert an empty roll onto the ribbon take-up hub and set the width of the empty roll similarly to points
3 to 6.9. To insert the transfer ribbon rewinding unit (9) again press the rectangular end (5) of the unwinding
unit against the spring in the right-hand holder, and slide the left-hand end into the guide slot (6) as far as it will go.
10. Feed the transfer ribbon (7) over the printhead to the ribbon rewind hub (9), and attach the ribbon to the empty roll with adhesive tape. Ensure that it is wound as shown in the figure and ensure that the ribbon is not twisted.
11. Turn the tension wheel (11) in the winding direction until the ribbon is tightly wound on the roll.12. Slot in the print module by pressing the marked surfaces (8) on both sides, hinge up the control
panel, fig. 1 (16) and close the cover, fig. 1 (9).
Edition 7/06 Operator’s Manual 19

Loading Material
MACH4
6.3 Label Sensors
6.3.1 Gap sensors
Fig. 8: Selecting the gap sensor
The printer has two gap sensors (1, 2) to detect the start of a label and the end of the material, which can be used alternatively. The detectors (1a, 2a) are located in the transport module, the emitters (1b, 2b) in the print module. The gap sensor (2) is used as default. This is suitable for use with single and multi-lane labels with an odd number of lanes.When using multi-lane labels with an even number of lanes, e.g. two or four lane, one has to switch manually to the gap sensor (1).
1. Open the cover, fig. 1 (9) and hinge down the control panel, fig. 1 (16) Press the release button, fig.1 (14) and hinge the print module up.
2. Set the switch (3) as required: for gap sensor (1) - move switch (3) to left-hand position,for gap sensor (2) - move switch (3) to right-hand position.
3. Slot in the print module by pressing the marked surfaces (8) on both sides, hinge up the control panel, fig. 1 (16) and close the cover, fig. 1 (9).
This switch cannot be made by software.
20 100
10
3040
50
2a1a 3
1b 2b
20 Operator’s Manual Edition 7/06
MACH4
Loading Material
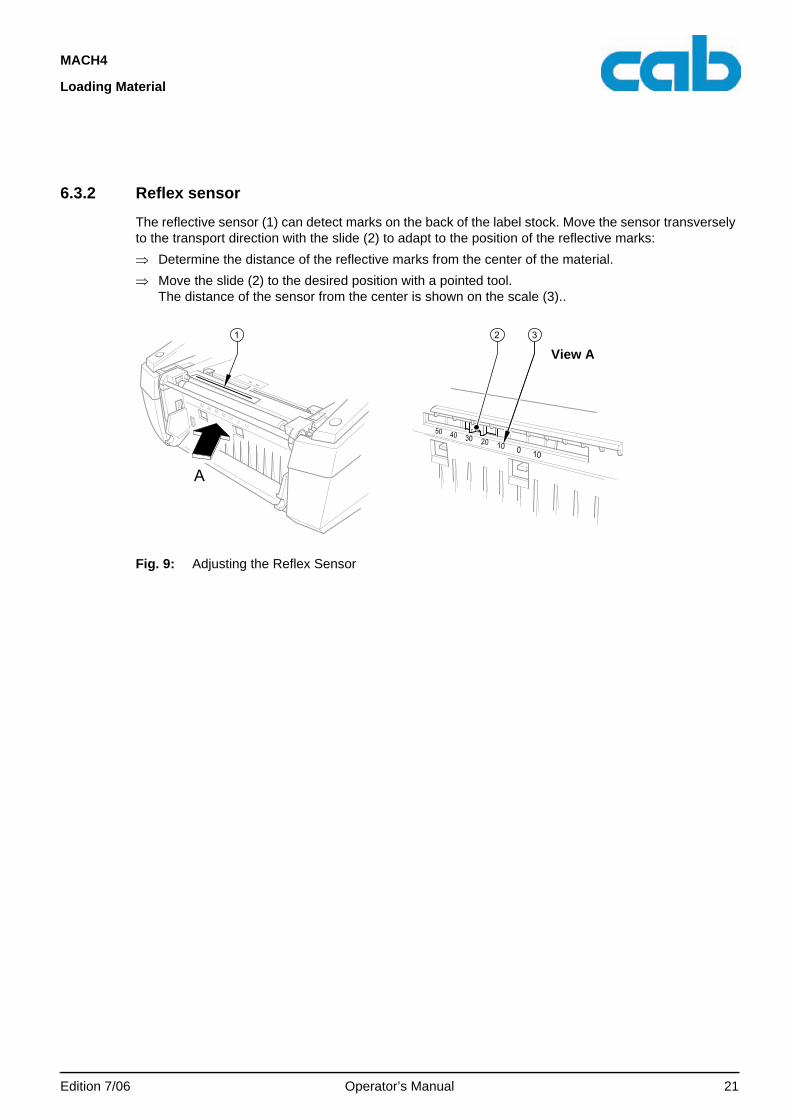
6.3.2 Reflex sensor
The reflective sensor (1) can detect marks on the back of the label stock. Move the sensor transversely to the transport direction with the slide (2) to adapt to the position of the reflective marks:⇒ Determine the distance of the reflective marks from the center of the material.⇒ Move the slide (2) to the desired position with a pointed tool.
The distance of the sensor from the center is shown on the scale (3)..
Fig. 9: Adjusting the Reflex Sensor
1010 0
20304050
20 100
10
3040
50
2 3
A
1
View A
Edition 7/06 Operator’s Manual 21
Printing Operation
MACH4
7 Printing Operation
The printer is ready for operation when all connections have been made and labels and, if applicable, the transfer ribbon have been loaded.
7.1 Synchronization of the Paper Feed
After the label stock has been inserted, for peel-off or cutting mode a synchronization of the paper feed is required. That way the first label, which is detected by the label sensor, will be transported to the print position and all labels in front will be fed out of the printer. So the synchronization avoids, that blank la-bels are peeled-off together with the first printed label or that the first cut label would be too long. Both effects can cause useless first labels.⇒ Press the feed key to start the synchronization.⇒ Remove the blank labels peeled-off or cut during the synchronization.
7.2 Tear-off Mode
Labels or continuous material are printed in tear-off mode. After printing, the strip label is detached by hand. The label printer is equipped with a tear bar, fig.1 (18) for this purpose. Optionally, the strip of la-bels can be wound up externally.
7.3 Peel-off Mode
In peel-off mode, the labels are automatically detached from the ribbon material after printing, and pre-sented for removal. Label stock is loaded as described in section 6.1.
7.4 Cutting Mode
Use the device variant with an integrated cutter for the cutting function. The labels or continuous material is cut-off automatically. The relevant cutting position is preferably set in the software.
CAUTION!Printhead damage caused by improper handling!
⇒ Do not touch the underside of the printhead with the fingers or sharp objects.
⇒ Ensure that the labels are clean.
⇒ Ensure that the label surfaces are smooth. Rough labels act like emery paper and reduce the service life of the printhead.
Print with the lowest possible printhead temperature.
Peel-off mode must be activated in the software.This is done with the "P command" in the direct programming, see “Programming Manual".
A sensor prevents further printing until the printed label has been removed from the peel-off position.
Cutting mode must be activated in the software.This is done with the "C command" in the direct programming, see “Programming Manual“.
22 Operator’s Manual Edition 7/06
MACH4
Cleaning and Maintenance
8 Cleaning and Maintenance
The label printer MACH4 requires very little maintenance. It is important to clean the thermal printhead regularly. This guarantees a consistently good printed image and plays a major part in preventing pre-mature wear of the printhead. Otherwise, the maintenance is limited to occasional cleaning of the device.
8.1 General Cleaning
⇒ Remove dust and paper fluff from the print area with a soft brush or vacuum cleaner.⇒ The cover of the printer can be cleaned with a standard cleanser.
8.2 Cleaning the Media Feed Rollers
Accumulations of dirt on the media feed rollers may impair the media transport and the print quality.In the case of slight soiling, it is not necessary to remove the print roller. The roller can be turned step by step by hand. Use a soft cloth and roller cleaner for cleaning. Remove the print roller (see section 8.6 on page 25) if it is heavily soiled.
8.3 Cleaning the Printhead
Dirt can collect on the printhead during printing which affects the printed image, for example by causing different contrasts or longitudinal stripes.
1. Open the cover, fig. 1 (9) and hinge down the control panel, fig.1 (16), press the release button, fig.1 (14) and hinge the print module up.
2. Remove the transfer ribbon and the label stock (see section 6 on page 14) 3. Clean the surface of the printhead with a cleaning pen, or with a cotton swab dipped in isopropyl alco-
hol. 4. Allow the printhead to dry for two or three minutes before starting the printer.
DANGER!Danger to life and limb from electric shock!Disconnect the printer from the electricity supply before starting any maintenance work.
CAUTION!The printer can be damaged by aggressive cleansers. Do not use abrasive cleaners or solvents for cleaning the external surfaces or modules.
CAUTION!Printhead damage!
⇒ Do not use sharp objects for cleaning the printhead.
⇒ Do not touch the protective glass layer of the printhead.
CAUTION!Risk of injury from the hot printhead line.Ensure that the printhead has cooled down before starting cleaning.
Edition 7/06 Operator’s Manual 23
Cleaning and Maintenance
MACH4
8.4 Cleaning Label Sensors
The label sensors can be soiled by paper dust. This can impair the detection of the start of the label or the print marks (see section 6.3 on page 20). ⇒ Clean the label sensors with a brush, or with a cotton swab dipped in isopropyl alcohol.
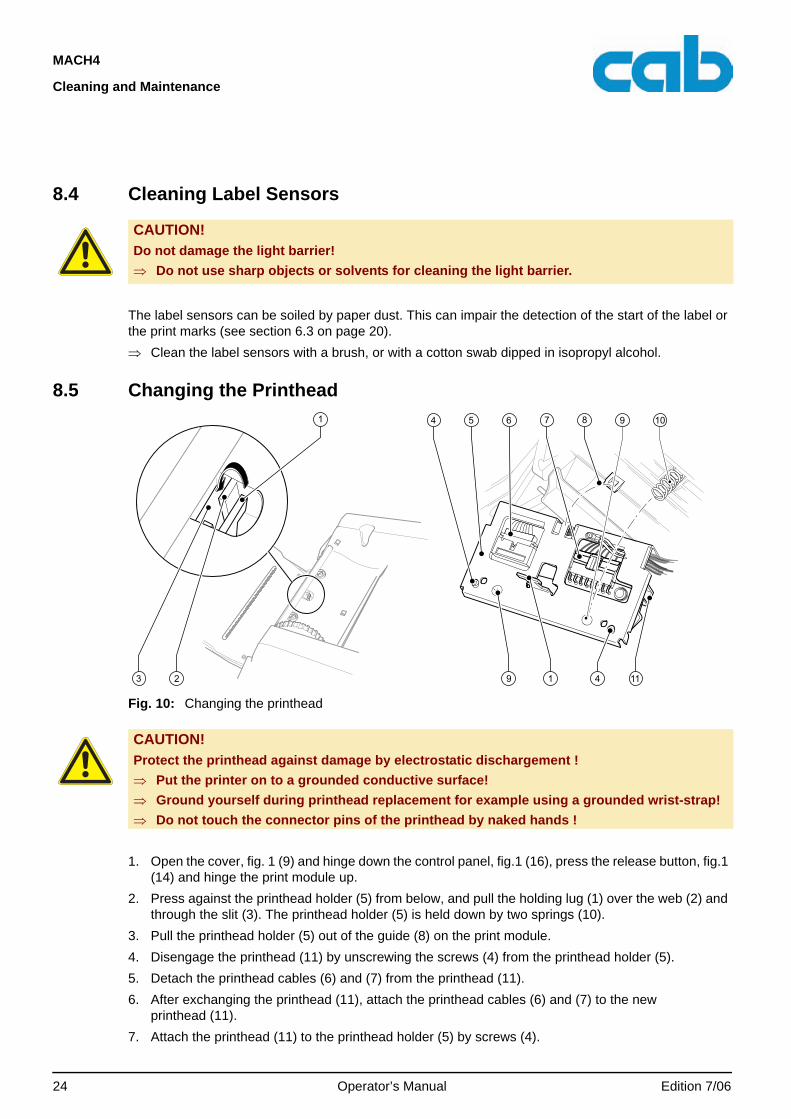
8.5 Changing the Printhead
Fig. 10: Changing the printhead
1. Open the cover, fig. 1 (9) and hinge down the control panel, fig.1 (16), press the release button, fig.1 (14) and hinge the print module up.
2. Press against the printhead holder (5) from below, and pull the holding lug (1) over the web (2) and through the slit (3). The printhead holder (5) is held down by two springs (10).
3. Pull the printhead holder (5) out of the guide (8) on the print module.4. Disengage the printhead (11) by unscrewing the screws (4) from the printhead holder (5).5. Detach the printhead cables (6) and (7) from the printhead (11).6. After exchanging the printhead (11), attach the printhead cables (6) and (7) to the new
printhead (11).7. Attach the printhead (11) to the printhead holder (5) by screws (4).
CAUTION!Do not damage the light barrier!
⇒ Do not use sharp objects or solvents for cleaning the light barrier.
23
5 864 1097
11419
1
CAUTION!Protect the printhead against damage by electrostatic dischargement !
⇒ Put the printer on to a grounded conductive surface!
⇒ Ground yourself during printhead replacement for example using a grounded wrist-strap!
⇒ Do not touch the connector pins of the printhead by naked hands !
24 Operator’s Manual Edition 7/06
MACH4
Cleaning and Maintenance
8. Insert the printhead holder (5) into the guide (8), and press upwards against the springs (10), whereby the springs (10) must contact the hickeys (9). In so doing, pass the holding lug (1) up through the slit (3), and slide the printhead holder (5) back until the holding lug (1) latches in over the web (2).
9. Hinge the print module down and press evenly on the two marked surfaces so that the unit snaps in on both sides. Close the control panel.
The printer is ready for use again.
8.6 Replacing the Media Feed Roller
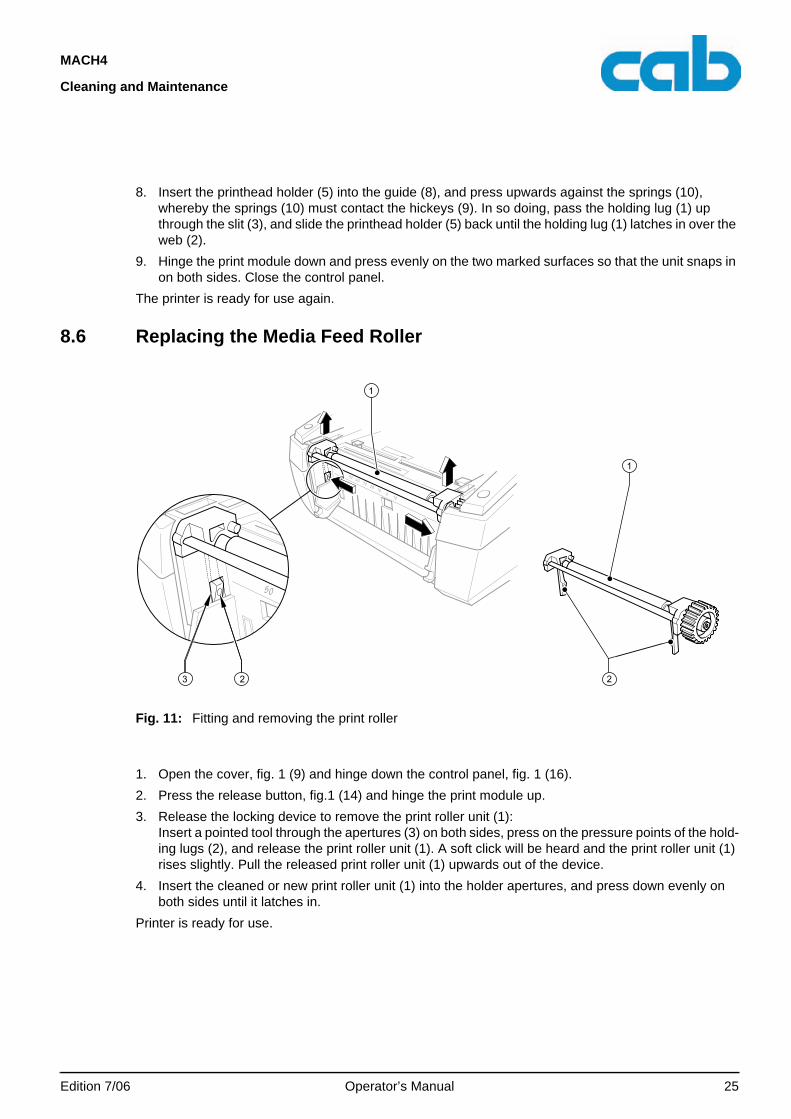
Fig. 11: Fitting and removing the print roller
1. Open the cover, fig. 1 (9) and hinge down the control panel, fig. 1 (16).2. Press the release button, fig.1 (14) and hinge the print module up. 3. Release the locking device to remove the print roller unit (1):
Insert a pointed tool through the apertures (3) on both sides, press on the pressure points of the hold-ing lugs (2), and release the print roller unit (1). A soft click will be heard and the print roller unit (1) rises slightly. Pull the released print roller unit (1) upwards out of the device.
4. Insert the cleaned or new print roller unit (1) into the holder apertures, and press down evenly on both sides until it latches in.
Printer is ready for use.
20 100
10
3040
50
50
3
1
2
1
2
Edition 7/06 Operator’s Manual 25
Fault Correction
MACH4
9 Fault Correction
9.1 Types of Errors
The diagnostic system indicates on the screen if an error has occurred. The printer is set into one of the three possible error states according to the type of error.
Tab. 3: Error states
Symbol Navigator pad Type of defect
pause flashescancel lights
Correctable error(see section 4.2.3 on page 12)
cancel flashes Irrecoverable error(see section 4.2.3 on page 12)
- Critical fault(see section 4.2.3 on page 12)
26 Operator’s Manual Edition 7/06

MACH4
Fault Correction
9.2 Problem Solution
Tab. 4: Problem solution
Problem Cause Remedy
Transfer ribbon creases Transfer ribbon too wide Use a transfer ribbon slightly wider than the width of label.
Print image has smears or voids
Printhead is dirty See "Cleaning the Printhead" on page 23.
Temperature too high Decrease temperature via software.
Unsuitable combination of labels and transfer ribbon
Use different type of ribbon.
Printer does not stop after transfer ribbon runs out
Thermal printing is chosen in the software
Change to thermal transfer printing.
Printer prints a sequence of characters instead of the label format
Printer is in ASCII dump mode Cancel the ASCII dump mode
Printer transports label media, but transfer ribbon does not move
Transfer ribbon incorrectly inserted.
Check and, if necessary, correct the transfer ribbon web and the orientation of the label side.
Unsuitable combination of labels and transfer ribbon
Use different type of ribbon.
Printer only prints each second label
Setting of the size in the soft-ware is too large.
Change the size in the software.
Vertical white lines in the print image
Printhead is dirty See "Cleaning the Printhead" on page 23.
Printhead os defective (failure of heat elements)
See "Changing the Printhead" on page 24.
Horizontal white lines in the print image
Printer is used with the back-feed > smart in the cut or peel-off mode
Set the backfeed > always in the setup. See “Configuration Manual“.
Print image is irregular, one side is lighter
Printhead is dirty See "Cleaning the Printhead" on page 23.
Edition 7/06 Operator’s Manual 27
Fault Correction
MACH4
9.3 Error Messages and Fault Correction
Error messages Cause Remedy
ADC malfunction Hardware error Switch the printer off and then on. If error recurs call service.
Barcode error Invalid barcode content, e.g. alphanumeric characters in a numerical barcode
Correct the barcode content.
Barcode too big The barcode is too big for the allocated area of the label
Reduce the size of the barcode or move it.
Battery low Battery of the PC card is flat Replace battery in the PC card
Buffer overflow The input buffer memory is full and the computer is still trans-mitting data.
Use data transmission via protocol (preferably RTS/CTS).
Card full No more data can be stored on the memory card
Replace card
Device not conn. Programming addresses a non-existent device
Either connect this device or correct the programming.
File not found Requested file is not on the card
Check the contents of the card.
Font not found Error with the selected down-load font
Cancel current print job,change font
FPGA malfunction Hardware error Switch the printer off and then on. If error recurs call service.
Head error Hardware error Switch the printer off and then on. If error recurs replace printhead (see section 8.5 on page 24).
Head open Printhead not locked Lock printhead.
Head too hot Printhead is overheated After pausing the print job will be contin-ued automatically.If the fault recurs repeatedly, reduce the heat level or the print speed via soft-ware.
Invalid setup Error in the configuration memory
Reconfigure printer.If error recurs call service.
Memory overflow Current print job contains too much information, e.g. selected font, large grafics
Cancel current print job. Reduce amount of data to be printed.
Name exists Duplicate usage of field name in the direct programming
Correct programming
No DHCP server. The printer is configured for DHCP, but there is no DHCP server, or the DHCP server is not currently available.
Switch off DHCP in the configuration, and assign a fixed IP address. Please contact your network administra-tor.
28 Operator’s Manual Edition 7/06
MACH4
Fault Correction
No label found There are labels missing on the label material
Press pause key repeatedly until printer recognizes the next label on the mate-rial.
The label format as set in the software does not correspond with the real label format
Cancel current print job. Change the label format set in the soft-ware. Restart print job
Printer is loaded with continu-ous paper, but the software is set on labels
Cancel current print job. Change the label format set in the soft-ware. Restart the print job
No label size The size of the label is not defined in the programming.
Check programming.
No Link No network link Check network cable and connector.Please contact your network administra-tor.
No record found Refers to the optional memory card; database access error
Check programming and card contents.
No SMTP server The printer is configured for SMTP, but there is no SMTP server, or the SMTP server is not currently available.
Switch off SMTP in the configuration.Caution! Then a warning cannot be sent by e-mail (EAlert).Please contact your network administra-tor.
No Timeserver Timeserver is selected in the configuration, but there is no Timeserver, or the Time-server is not currently availa-ble.
Switch off Timeserver in the configura-tion.Please contact your network administra-tor.
Out of paper Out of label roll Load label rolls(see section 6.1.2 on page 15) or load fanfold labels (see section 6.1.3 on page 16).
Error in the paper feed Check paper feed
Out of ribbon Out of transfer ribbon Insert new transfer ribbon.
Transfer ribbon melted during printing
Cancel current print job.Change the heat level via software.Clean printhead (see section 8.3 on page 23).Load transfer ribbon(see section 6.2 on page 18).Restart print job
The printer is loaded with ther-mal labels, but the software is set to transfer printing
Cancel current print job.Set software to direct thermal printing. Restart print job
Error messages Cause Remedy
Edition 7/06 Operator’s Manual 29

Fault Correction
MACH4
Tab. 5: Faults Correction
Protocol error Printer has received an unknown or invalid command from the computer.
Press the pause key to skip the com-mand orpress the cancel key to cancel the print job.
Read error Read error when reading from the memory card
Check data of the card. Backup data,reformat card
Structural err. Error in the file list of the memory card, data access is uncertain.
Format memory card.
Unknown card Card not formattedType of card not supported
Format card, use different type of card.
USB error Device stalled
A USB device has been detected, but it is not working.
Do not use the USB device.
USB error Too much current
The USB device consumes too much current.
Do not use the USB device.
USB error Unknown device
Failure to detect USB device Do not use the USB device.
Voltage error Hardware error Switch the printer off and then on. If error recurs call service.It is shown which voltage has failed. Please note.
Write error Hardware error Repeat the write process,reformat card
Write protected PC card write protection is activated.
Deactivate the write protection.
Wrong revision Error when updating the firmware. Firmware not com-patible with the hardware ver-sion
Load the compatible firmware.
Error messages Cause Remedy
30 Operator’s Manual Edition 7/06
MACH4
EU Declaration of Conformity
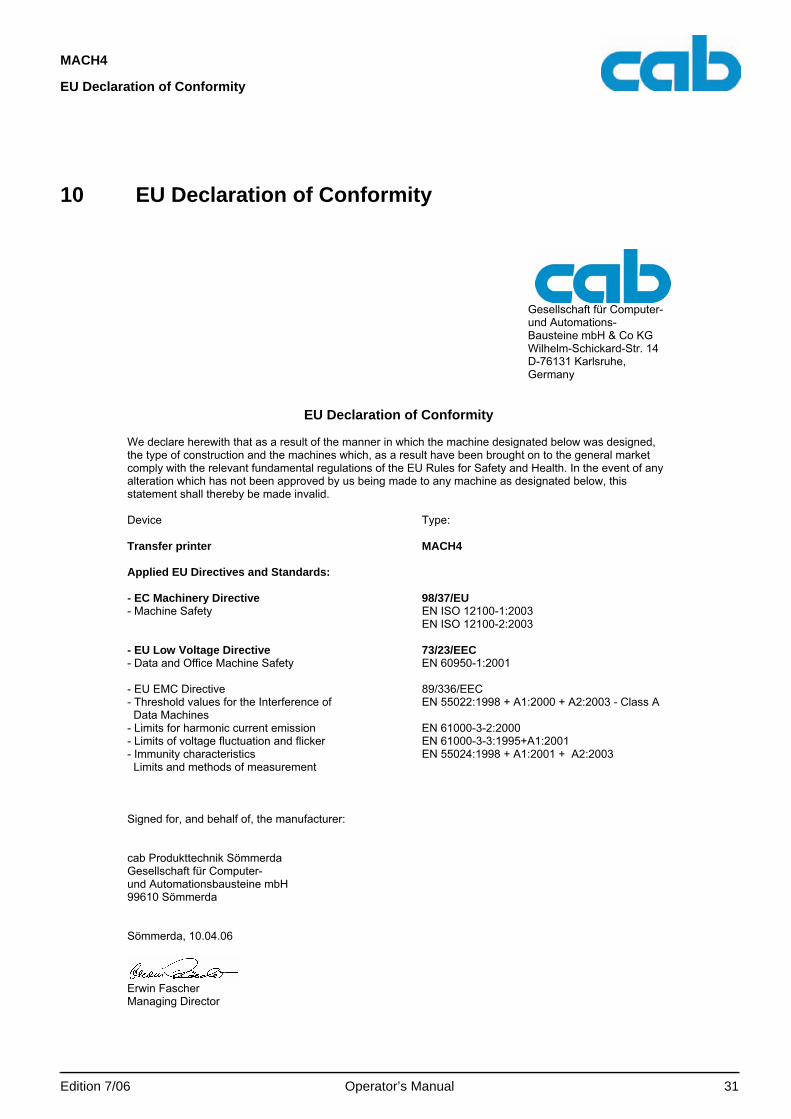
10 EU Declaration of Conformity
Gesellschaft für Computer- und Automations- Bausteine mbH & Co KG Wilhelm-Schickard-Str. 14 D-76131 Karlsruhe, Germany
EU Declaration of Conformity
We declare herewith that as a result of the manner in which the machine designated below was designed, the type of construction and the machines which, as a result have been brought on to the general market comply with the relevant fundamental regulations of the EU Rules for Safety and Health. In the event of any alteration which has not been approved by us being made to any machine as designated below, this statement shall thereby be made invalid.
Device Type:
Transfer printer MACH4
Applied EU Directives and Standards:
- EC Machinery Directive 98/37/EU - Machine Safety EN ISO 12100-1:2003
EN ISO 12100-2:2003
- EU Low Voltage Directive 73/23/EEC - Data and Office Machine Safety EN 60950-1:2001
- EU EMC Directive 89/336/EEC - Threshold values for the Interference of Data Machines
EN 55022:1998 + A1:2000 + A2:2003 - Class A
- Limits for harmonic current emission EN 61000-3-2:2000 - Limits of voltage fluctuation and flicker EN 61000-3-3:1995+A1:2001 - Immunity characteristics Limits and methods of measurement
EN 55024:1998 + A1:2001 + A2:2003
Signed for, and behalf of, the manufacturer:
cab Produkttechnik Sömmerda Gesellschaft für Computer- und Automationsbausteine mbH 99610 Sömmerda
Sömmerda, 10.04.06
Erwin Fascher Managing Director
Edition 7/06 Operator’s Manual 31
32 Operator’s Manual Edition 7/06
MACH4
Index
AAdapting the roll holders .................................14CChanging the media feed roller ........................25Changing the printhead ...................................24Cleaning ........................................................23
Clean label sensors ..................................24Clean media feed rollers ...........................23Clean printhead ........................................23
Cleaning label sensors ...................................24Connection to a computer ...............................10Connection to a network .................................10Cutting mode .................................................22DDanger ............................................................5Delivery scope .................................................9EEnvironment ....................................................6Error messages and fault correction .................28FFitting and removing the print roller ..................25Fitting and removing the printhead ...................24GGeneral guide to the documentation ...................5IIndicator ........................................................11KKey functions .................................................13LLoading fanfold labels .....................................16Loading labels ...............................................14Loading material ............................................14MMaintenance ..................................................23Mounting the adapter ......................................14OOperational states ..........................................12PPeel-off mode ................................................22Power save mode ..........................................12Printing operation ...........................................22Problem solution ............................................27SScreen ..........................................................11Setting up the peel-off function ........................17State
Correctable error ......................................13Critical error .............................................13Irrecoverable error ....................................13
Pause ..................................................... 12Printing label ........................................... 12Ready ..................................................... 12
Switch off ...................................................... 10Switch on ...................................................... 10Symbol displays ............................................ 12Synchronization run ....................................... 22TTransfer ribbon .............................................. 18Types of errors .............................................. 26UUnpacking ....................................................... 9WWarning notes ................................................. 5