cc: discover administration manual, v5 - incontact discover administration manual, v5.3 december...
TRANSCRIPT

www.uptivity.com
cc: Discover Administration Manual, v5.3
December 2013
Reference Guide

© Copyright 2014, Uptivity Inc. All rights reserved.
No part of this document may be transmitted or distributed, or copied, photocopied, scanned, reproduced, translated, microfilmed, or otherwise duplicated on any medium without written consent of Uptivity. If written consent is given, the same confidential, proprietary, and copyright notices must be affixed to any permitted copies as were affixed to the original. The information contained in this document does not constitute legal advice, and should not be considered a replacement for sound legal counsel. Uptivity shall be in no way liable for any use or misuse of the information presented herein.
Revision History
Revision Change Description Effective Date
0
Added information regarding multiple AD domain support and related
considerations.
Added "attempting to resolve" icon to site security settings.
Added Allow Call Segments setting.
Added Info Broker section.
Added new achievements permissions.
In the "Home Tab Widgets" section, updated "Manage Widgets" and
"Manage Dashboards" to include the new Achievement widget.
In the "Best Practices" section under "Disk Space Management", added
"Delete Files from Content Management Upload Directory."
2013-12-06
Added: Note If using Screen Recording with Timed Schedules, Screen
Recording will only use the Desktop Only Recording Path. Any Screen
Capture Paths entered in the Server Node will be ignored in favor of
the Desktop Only Recording Path.
2014-2-14
Corrected Scheduling Operators changing to “IN Test if an identifier is
in a bar separated list of values.” 2014-06-05
Security Classification: Uptivity Confidential.
Distribution: Approved internal Uptivity staff only and licensed Uptivity customers.
Note: Applicable non-disclosure agreements must be in force for authorization.
cc: Discover Administration Manual, v5.3 3
Table of Contents
Introduction ........................................................................................................... 9
Permissions .......................................................................................................... 10
Roles ................................................................................................................................................. 12
Create a Role ................................................................................................................................ 12
Delete a Role ................................................................................................................................. 12
Copy a Role ................................................................................................................................... 13
Permissions Definitions ...................................................................................................................... 13
General Administration .................................................................................................................. 13
System Permissions ...................................................................................................................... 13
Coaching Permissions ................................................................................................................... 14
Reporting Permissions ................................................................................................................... 14
Player Permissions ........................................................................................................................ 15
Survey Permissions (with Optional cc: Survey product installed) .................................................... 15
Analytics Permissions (with Optional cc: Analytics product installed) .............................................. 16
On-Demand Permissions ............................................................................................................... 16
Insight Dashboard Permissions ...................................................................................................... 17
Insight Permissions (with Optional cc: Insight product installed) ..................................................... 17
cc: Clarity Permissions ................................................................................................................... 17
User Edit Field Permissions ........................................................................................................... 19
Assign Access to CallCopy Groups ................................................................................................ 19
Assign Access to an ACD Group or Gate/Queue ............................................................................ 20
Assign a Role to Multiple Users ......................................................................................................... 21
Users ................................................................................................................................................. 21
Add a User .................................................................................................................................... 22
Edit a User..................................................................................................................................... 24
Lock a User Account ...................................................................................................................... 24
Deactivate a User .......................................................................................................................... 25
Delete a User ................................................................................................................................ 25
Import Users .................................................................................................................................. 25
4 cc: Discover Administration Manual, v5.3
Export Users .................................................................................................................................. 26
Set Up an Agent to Be Recorded ................................................................................................... 27
Groups .............................................................................................................................................. 28
Create a CallCopy Group ............................................................................................................... 28
Delete a CallCopy Group ............................................................................................................... 28
Add/Remove Agents in a CallCopy Group ...................................................................................... 29
Scheduling ........................................................................................................... 30
Scheduling Process Flow ................................................................................................................... 30
Relate Schedules to a Core ............................................................................................................... 31
Create Agent Schedules – Time-Based ............................................................................................. 31
Create Agent Schedules – Number-of-Calls Based ............................................................................ 32
Create Custom Schedules ................................................................................................................. 33
General Settings ............................................................................................................................ 33
Schedule Types ............................................................................................................................. 34
Schedule Priority ........................................................................................................................... 35
Call Parameters ............................................................................................................................. 36
Retention Rules ............................................................................................................................. 36
Capture Options ............................................................................................................................ 36
Schedule Requirements: Simple Business Rules ........................................................................... 37
Schedule Expression: Advanced Business Rules ........................................................................... 38
Copy, Edit, Delete Schedules............................................................................................................. 40
Find a Schedule ............................................................................................................................. 40
Schedule List ................................................................................................................................. 40
Timed Schedules ............................................................................................................................... 41
Licensing ....................................................................................................................................... 41
Timed Schedule List ...................................................................................................................... 42
Create a Timed Schedule .............................................................................................................. 42
Edit and Delete Timed Schedules .................................................................................................. 43
Tools .................................................................................................................... 44
Service Manager ............................................................................................................................... 44
Add/Edit/Remove a Server Node ................................................................................................... 45
cc: Discover Administration Manual, v5.3 5
Add a Service Application .............................................................................................................. 45
Edit/Remove a Service Application ................................................................................................ 46
Manage a Service .......................................................................................................................... 46
Manage Multiple Services .............................................................................................................. 46
Archiver Console ............................................................................................................................... 46
Archive Actions .............................................................................................................................. 47
Optical Drives ................................................................................................................................ 47
Output ........................................................................................................................................... 47
Recorder Settings ................................................................................................. 48
CTI Cores .......................................................................................................................................... 48
Buddy Cores ...................................................................................................................................... 48
Types of Configurations ................................................................................................................. 48
Applicable Integrations................................................................................................................... 49
Configure a Buddy Core ................................................................................................................ 49
Configure Buddy Core for "Warm Standby" (If Necessary) ............................................................. 50
Configure Settings ......................................................................................................................... 50
Set Cores to Automatically Restart ................................................................................................. 50
Custom Lookup ................................................................................................................................. 51
IP Phones .......................................................................................................................................... 52
Add Phones ................................................................................................................................... 52
Edit/Delete Phone .......................................................................................................................... 52
Import IP Phones via a CSV File .................................................................................................... 53
On-Demand ....................................................................................................................................... 53
Transcoder ........................................................................................................................................ 53
Configure Transcoder Settings ....................................................................................................... 54
Transcoder Settings ....................................................................................................................... 54
Configure Payload ......................................................................................................................... 57
Transcoder Configuration............................................................................................................... 58
Transcoder Troubleshooting .......................................................................................................... 58
Voice Boards ..................................................................................................................................... 60
Voice Boards List ........................................................................................................................... 60

6 cc: Discover Administration Manual, v5.3
Channel Configuration ................................................................................................................... 60
System Settings ................................................................................................... 62
API Servers List ................................................................................................................................. 62
API Server Settings ....................................................................................................................... 63
Web Server Settings ...................................................................................................................... 64
TCP Settings ................................................................................................................................. 64
Archive Actions .................................................................................................................................. 65
Configure Archive Actions .............................................................................................................. 66
Archive Action Settings .................................................................................................................. 67
Archiver ............................................................................................................................................. 71
General Settings ............................................................................................................................ 71
System Purge Action ..................................................................................................................... 72
Removable Media Settings ............................................................................................................ 72
MSSQL Database Backup Settings ................................................................................................ 72
Custom Extensions ............................................................................................................................ 72
Disk Space Notifications .................................................................................................................... 73
Info Broker Settings ........................................................................................................................... 74
Locations Settings ............................................................................................................................. 75
Logging Settings ................................................................................................................................ 76
Mail Settings ...................................................................................................................................... 76
Notifications ....................................................................................................................................... 77
Audible Alert Settings..................................................................................................................... 77
Disk Logging Settings .................................................................................................................... 77
E-Mail Notification Settings ............................................................................................................ 78
E-Mail Subscriptions ...................................................................................................................... 78
SNMP Notification Settings ............................................................................................................ 79
SNMP Subscriptions ...................................................................................................................... 79
Test Alerts ..................................................................................................................................... 79
Subscription Types ........................................................................................................................ 80
Screen Capture Settings .................................................................................................................... 81
Server Nodes .................................................................................................................................... 82

cc: Discover Administration Manual, v5.3 7
Web Media Server Settings ............................................................................................................... 83
Web Server Settings .......................................................................................................................... 84
Workstations Settings ........................................................................................................................ 86
Settings.ini ......................................................................................................................................... 86
Web Portal Settings ............................................................................................. 87
Comet Daemon ................................................................................................................................. 87
Security ............................................................................................................................................. 88
Terminology ....................................................................................................................................... 89
Web Portal......................................................................................................................................... 91
Home Tab Widgets ........................................................................................................................ 92
Web.config ........................................................................................................................................ 95
System Security ................................................................................................... 96
Security Design ................................................................................................................................. 96
‘Blackout’ Sensitive Data................................................................................................................ 97
Purging Sensitive Data .................................................................................................................. 98
Authentication and Passwords ....................................................................................................... 98
Windows PC, Server, Database, and Application Accounts ............................................................ 98
Logging and Auditing ..................................................................................................................... 99
Web Portal Settings: Security Page ................................................................................................... 99
Site Settings .................................................................................................................................. 99
ForgotPassword Settings ............................................................................................................... 99
Active Directory Settings .............................................................................................................. 100
Login Settings .............................................................................................................................. 100
PCI Settings ................................................................................................................................ 100
Login Mode Configuration ................................................................................................................ 102
Active Directory Settings .............................................................................................................. 102
Login Settings .............................................................................................................................. 104
IIS Site Settings for Hybrid Mode and AD Authentication .............................................................. 105
Settings Changes for Former AD Auto-Login Environments ......................................................... 105
IIS Session Timeout ..................................................................................................................... 106
File Encryption ................................................................................................................................. 107
8 cc: Discover Administration Manual, v5.3
Generating Keys .......................................................................................................................... 107
Encryption Best Practices ............................................................................................................ 108
Encryption Status Verification ...................................................................................................... 108
Considerations............................................................................................................................. 108
cc_crypt Utility Commands ........................................................................................................... 109
Thales Encryption vs. Standard Key Management ....................................................................... 110
SSL and TLS (Transport Security) ................................................................................................... 111
Enable Transport Security – Web Player and Live Monitoring....................................................... 111
Enable Transport Security – Servers ............................................................................................ 112
Enable Transport Security – Client Modules ................................................................................. 112
Enable Transport Security – Web Portal....................................................................................... 113
Transport Security and PCI Compliance....................................................................................... 113
HTTP/HTTPS Settings ................................................................................................................. 113
Best Practices .................................................................................................... 114
Disk Space Management ................................................................................................................. 114
Plan for Growth ............................................................................................................................ 114
Remove Patches and Installers .................................................................................................... 114
Set Up cc: Discover Disk Space Management Features ............................................................... 114
Delete Files from Content Management Upload Directory ............................................................ 115
Delete Temporary Files after Issues ............................................................................................. 115
Automatically Delete Temporary Files .......................................................................................... 115
Control Database Size ................................................................................................................. 116
Shut Down and Restart .................................................................................................................... 118
Anti-Virus ......................................................................................................................................... 119
Exclusion Guidelines ................................................................................................................... 119
Common File Types ..................................................................................................................... 120
Additional Considerations ............................................................................................................ 121
Expired or Corrupt License File ........................................................................................................ 121
License Requests ................................................................................................ 122
About Uptivity .................................................................................................... 123
Introduction
cc: Discover Administration Manual, v5.3 9
Introduction cc: Discover is a workforce optimization (WFO) suite that interfaces with your existing ACD/PBX
technology and personal computers. It enables organizations to maximize customer satisfaction by
leveraging call recording, quality management, screen capture, speech analytics, and performance
management capabilities.
This manual is for System Administrators and managers who will be performing the tasks outlined in the
table of contents.
This manual assumes that the system administrator is familiar with:
The ACD/PBX configuration relative to the cc: Discover and all relevant settings and identifiers for
their location.
Basic Windows PC usage such as right- and left-clicking the mouse.
Basic computer networking.
Administrators should also be familiar with information in cc: Discover’s guides for installation, reporting,
and integration. The cc: Discover Web Player Manual covers basic tasks such as navigation and logging
into the system.
Most administration tasks are performed in the cc: Discover Web Portal. This portal is deployed during the
installation process and can be accessed using either Internet Explorer or Firefox.
A hostname or IP address for the server will be established so that you may access the cc: Discover Web
portal. If multiple Web Portals are installed in a network, each will have a unique hostname and IP
address.
cc: Discover has a default account with system administrator level privileges. The CallCopy Installation
team will provide you with the account a Username and Password. It is recommended you change your
password from the default provided as soon as possible. To login using this account, the portal must use
either Database or Hybrid Mode authentication.
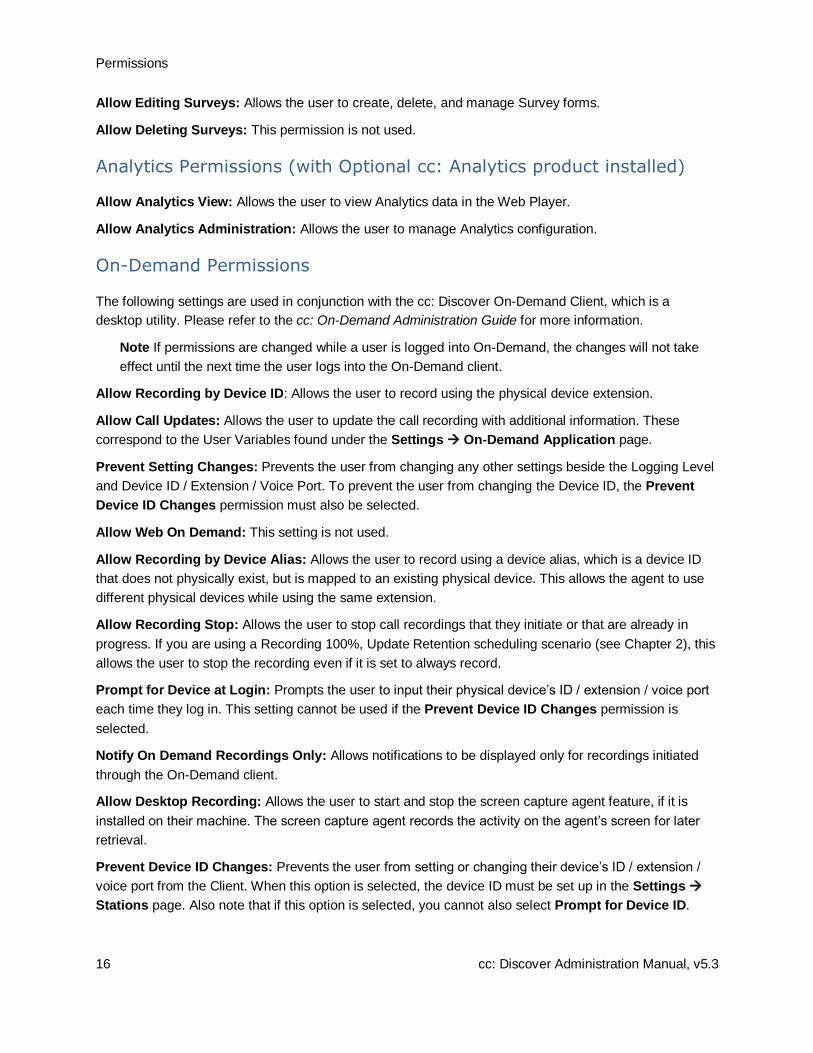
The version number for your cc: Discover software is displayed in the upper-right corner of the login page.
It also appears if you place the cursor over the CallCopy icon. This version number can be useful for
locating correct documentation for your software and when obtaining support for your system.
The cc: Discover platform allows administrators to customize field names and terminology in the Web
Portal to fit your unique environment. Therefore, screen examples and field names used in this manual
may differ from those seen in your implementation.

Permissions
10 cc: Discover Administration Manual, v5.3
Permissions To locate the Permissions menu, click the Administration tab. Expand the Permissions menu located on
the left side of the page.
Permissions define what users can do in the system and are organized by users, groups, and roles.
Users are individuals who have access to cc: Discover and can perform tasks. Users include agents,
supervisors, system administrators, and others. Users can be specified as Agents by selecting a setting
on their account profile. Users have to be agents in order to be recorded and appear in many reports.
Groups are collections of users. CallCopy groups are often used to mirror the labor/hunt/skill groups on
your ACD/PBX. Groups can also reflect a company’s organizational structure or geographic locations.
Supervisors and managers of these groups are then given a cc: Discover user account with specific
permissions to access records, evaluations, and reports for agents from the groups they manage. Several
quality assurance reports are based on group assignments.
A user may belong to one group, multiple groups, or no groups. Examples of groups include:
Departments (sales, service, etc.)
Teams (John’s Team, Jane’s Team, etc.)
Clients (for an outsourcer, Client A, Client B, etc.)
Note These are also sometimes called CallCopy groups to distinguish them from ACD groups.
Roles are attached to users and specify the tasks users are permitted to perform. These are key facts
about roles:
A role can be assigned to multiple users.
A user can be assigned multiple roles.
Role permissions are cumulative. For example, Role A has Permission 1, and Role B does not have
Permission 1. If a user is assigned both Role A and Role B, that user will have Permission 1.
cc: Discover permissions do not conflict. Permissions allow users to do things. A few On-Demand
product permissions prevent a user from doing something. (See the On-Demand permissions.)
An unlimited number of roles can be created. Having more roles allows security to be more granular
and targeted to the needs of specific users. But more roles can be confusing to administer, and users
may not know what roles they need when they request access.
cc: Discover includes
One default role: DiscoverDefaultAgent. This role cannot be deleted, but its permissions can be
edited.
Roles migrated from earlier versions of cc: Discover.
A Superuser account with all permissions. A user can be assigned Superuser access. This account
and access level is not considered a role.
Before creating users, develop a single plan that governs the use of groups and roles. Below are two
generic plans.

Permissions
cc: Discover Administration Manual, v5.3 11
Plan 1: Small Team
In this scenario, a company has one location, and 30 agents are divided evenly to work three eight-hour
shifts. Each shift has a supervisor that reviews call records and performs quality evaluations. The
company owner and another employee administer the network and cc: Discover. All calls are for the
company’s products.
The company could create:
An Agent role and an Agent group – All agents are placed in the group, and the role allows them to
review their own calls and evaluations.
A Supervisor role and a Supervisor group – All supervisors are placed in the group, and the role
allows them to review any agents’ calls, perform evaluations, and live monitor agents.
A system administrator role assigned to the company owner and administrator. These users can
create users, change system settings, and perform tasks that supervisor’s do.
Plan 2: Multiple Teams
In this scenario, the company now has three locations, and 120 agents who work a variety of shifts. All
agents answer calls for the company’s products. Some agents answer calls for a new Product X. Another
group answers Spanish callers.
An Agent role and an Agent group – All agents are placed in the group, and the role allows them to
review their own calls and evaluations.
A Supervisor role and a Supervisor group – All supervisors are placed in the group, and the role
allows them to review any agents’ calls, perform evaluations, and live monitor agents.
Spanish Agent role and Spanish Agent group – Only certain agents are placed in this group. The role
is assigned only to this group.
Spanish Supervisor role and Spanish Supervisor group that evaluates Spanish-speaking agents.
Product X role and Product X group. – Any supervisor can evaluate these calls, so the Supervisor
group is given permission to this group. Having the group allows calls for this product to be searched
for and reported on in cc: Discover.
A system administrator role assigned to the company owner and administrators. These users can
create users, change system settings, and perform tasks that supervisor’s do.
Roles can also be created for cc: Discover applications such as On-Demand and Insight. Some agents
may use these applications while other agents do not. In this situation, creating an On-Demand or Insight
agent role and assigning it to a few agents maintains the base agent role and allows the flexibility to
assign the application-specific role. Similarly, some supervisors will need access to certain reports but not
others. Creating one or more supervisor reports roles addresses this need for granularity.

Permissions
12 cc: Discover Administration Manual, v5.3
Roles
The Role list shows the existing role and when they were last modified. The system automatically
generates the Role ID.
Create a Role
Follow these steps to create a role:
1. Click Administration tab > Permissions > Roles.
2. Click Add Role.
3. Enter the required basic Information:
Role Name
Description
Created By/Modified By – The system automatically adds this information to the role.
4. Select the permissions needed for the role. (See the permission definitions later in this chapter.)
5. Click Save.
If a role needs changed, double-click it in the Roles list. On the Edit page, make the necessary changes
and click Save. The Role Name can be changed. The system uses the Role ID, which cannot be
changed, to track the role.
Delete a Role
Deleting roles removes the permissions from the users to which the role was attached. Users are not
deleted by deleting roles.
1. On the Roles page, click Delete Roles.
2. Select one or more of the Available Roles.
3. Click the right arrow.
4. Click Delete.
5. Click Back.

Permissions
cc: Discover Administration Manual, v5.3 13
Copy a Role
Copying a role assures consistent permissions assignment. For example, you have one role for a group
and want to create a group that will perform the same actions in cc: Discover but handle a different type
of call. Copying the role and giving it a different name assures that the agents have the exact same
permissions.
1. On the Roles page, click the role to be copied.
2. Click Copy Role.
3. Enter a name for the Role. Click Save. The role appears in the list.
Permissions Definitions
General Administration
Allow User Administration: Allows the user to add, edit, and delete other system users. This is an
administrator-level permission.
Allow Password Changes: Allows the user to modify their own password in cc: Discover. If unchecked,
a system administrator will have to modify the password for the user.
System Permissions
Allow System Configuration: Allows the user to modify system configuration settings. This should only
be given to system administrators.
Allow Recording Record and File Deletes: Allows the user to delete records from the system using the
CallCopy Player™.
Allow Archive Administration: Allows the user to create and edit Archives. This is an administrator-level
permission.
Allow Group Administration: Allows the user to create and edit CallCopy Groups.
Allow Scheduling: Allows the user to set system-wide schedules. Recordings based on system
schedules are not governed by the disk quota of the User who created the schedule. This is typically
administrator-level permissions.
Allow API Authentication: This permission is not used.

Permissions
14 cc: Discover Administration Manual, v5.3
Coaching Permissions
Note Several QA permissions are affected by the "Allow Viewing All Call Records and QA
Evaluations" permission for the Web Player. To understand the full scope of what these combined
permissions allow users to do, see Player Permissions.
Allow Viewing of QA Evaluations: Allows the user to view and access evaluations on any group to
which that user has permission, including their own evaluations. Selecting this option automatically
selects the other Coaching permissions. If those permissions are not appropriate for a role, they must be
cleared.
Allow Deletion of Completed QA Evaluations: Allows the user to delete a completed QA evaluation for
groups to which that user has permission, including their own evaluations. This allows for a disputed
score to be deleted, and then reissued when appropriate. This permission does not apply to in-progress
evaluations.
Allow Manage Achievements: Allows the user to add a new achievement type for any agent or group.
Also allows the user to view and edit added achievement types, view a list of achievements awarded to
agents, and upload custom icons displayed when achievements are awarded. Achievements can be
awarded to the specified groups or agents based on either QA evaluation scores or an ad hoc
achievement. To award ad hoc achievements, the user must have the Allow Award Ad Hoc
Achievements permission.
Allow Editing of Completed QA Evaluations: Allows the user to edit the score or responses of a
completed QA evaluation for groups to which that user has permission, including their own evaluations.
This permission does not apply to in-progress evaluations. To edit completed evaluations, the user must
also have the Allow Performing QA Evaluations permission.
Allow Performing QA Evaluations: Allows the user to issue an evaluation upon an agent in any group
to which that user has permission. Users with this permission may also serve as arbitrators for dispute
resolution involving the agents they have access to evaluate. This permission also allows a user to edit or
delete an in-progress evaluation for an agent in any group to which that user has permission.
Allow Award Ad Hoc Achievements: Allows the user to award an existing ad hoc achievement type to
any agent or group to which that user has permission. To add or edit achievement types, the user must
also have the Allow Manage Achievements permission.
Allow QA Form Administration: Allows the user to build and edit a QA form for any group.
Allow Content Library Management: Allows the user to upload and manage files in the Content Library.
Reporting Permissions
Allow Viewing Call Reports: Allows the user to run reports based on call detail data.
Allow Viewing QA Reports: Allows the user to run reports based on QA data.
Allow Viewing Analytics Reports: Allows the user to run analytics reports (Only for systems that have
the optional cc: Analytics product installed)

Permissions
cc: Discover Administration Manual, v5.3 15
Allow Viewing Audit Reports: Allows the user to run audit reports to monitor actions taken by other
users in the system.
Allow Viewing System Reports: Allows the user to perform system-level reporting. This is typically
administration-level permission.
Allow Discover Ad Hoc Reporting: Allows the user to view the Ad Hoc Reporting menu, create ad hoc
reports using the Report Builder page, and view/edit any ad hoc report that has been saved. This
permission does not provide access to any report data and does not change the ability to save report
search criteria as public or private. These reporting category permissions control the data fields a user
sees in the ad hoc report builder: Allow viewing call reports, Allow viewing QA reports, Allow
viewing survey reports, Allow viewing audit reports. Example: In order to create/edit an ad hoc report
on QA evaluations, a user needs Allow Viewing QA Reports and All Ad Hoc Reporting.
Allow Report Subscriptions: Allows the user to set a specific report to run at a scheduled time, and
provide the results to multiple users via e-mail.
Allow Viewing Survey Reports: Allows the user to run survey reports (Only for systems that have the
optional cc: Survey product installed)
Player Permissions
Allow Viewing of User’s Own Records: Allows the user to view calls recorded from his/her associated
user account.
Allow Viewing All Call Records & QA Evaluations: Allows the user to view all call recordings and QA
evaluations regardless of Group and/or Gate settings. If the user has this permission and the Allow
Performing QA Evaluations permission or permissions for editing and deleting completed evaluations,
that user can evaluate any agent or edit/delete any evaluation. It also enables a user to view all
groups/agents in QA reports. CallCopy strongly recommends assigning this permission to very few users.
Allow Live Monitoring of Calls: Allows the user to listen to audio of contacts in "real-time."
Allow Downloading of Export: Allows the user to export records from the Web Player directly to their
workstation.
Allow Emailing of Export: Allows the user to export records from the Web Player and be sent to an e-
mail address directly from the system.
Allow Bookmarking: Allows the user to leave bookmark comments attached to call records. These
bookmarks can be personal or public to all other users that can view the record.
Allow Viewing of Video: Allows the user to view video screen capture associated with call records
including Live Monitoring video and video for timed schedules (i.e., desktop only).
Survey Permissions (with Optional cc: Survey product installed)
Allow Viewing Surveys: Allows the user to view completed Survey results.
Allow Survey Administration: Allows the user to manage Survey server configuration.
Permissions
16 cc: Discover Administration Manual, v5.3
Allow Editing Surveys: Allows the user to create, delete, and manage Survey forms.
Allow Deleting Surveys: This permission is not used.
Analytics Permissions (with Optional cc: Analytics product installed)
Allow Analytics View: Allows the user to view Analytics data in the Web Player.
Allow Analytics Administration: Allows the user to manage Analytics configuration.
On-Demand Permissions
The following settings are used in conjunction with the cc: Discover On-Demand Client, which is a
desktop utility. Please refer to the cc: On-Demand Administration Guide for more information.
Note If permissions are changed while a user is logged into On-Demand, the changes will not take
effect until the next time the user logs into the On-Demand client.
Allow Recording by Device ID: Allows the user to record using the physical device extension.
Allow Call Updates: Allows the user to update the call recording with additional information. These
correspond to the User Variables found under the Settings On-Demand Application page.
Prevent Setting Changes: Prevents the user from changing any other settings beside the Logging Level
and Device ID / Extension / Voice Port. To prevent the user from changing the Device ID, the Prevent
Device ID Changes permission must also be selected.
Allow Web On Demand: This setting is not used.
Allow Recording by Device Alias: Allows the user to record using a device alias, which is a device ID
that does not physically exist, but is mapped to an existing physical device. This allows the agent to use
different physical devices while using the same extension.
Allow Recording Stop: Allows the user to stop call recordings that they initiate or that are already in
progress. If you are using a Recording 100%, Update Retention scheduling scenario (see Chapter 2), this
allows the user to stop the recording even if it is set to always record.
Prompt for Device at Login: Prompts the user to input their physical device’s ID / extension / voice port
each time they log in. This setting cannot be used if the Prevent Device ID Changes permission is
selected.
Notify On Demand Recordings Only: Allows notifications to be displayed only for recordings initiated
through the On-Demand client.
Allow Desktop Recording: Allows the user to start and stop the screen capture agent feature, if it is
installed on their machine. The screen capture agent records the activity on the agent’s screen for later
retrieval.
Prevent Device ID Changes: Prevents the user from setting or changing their device’s ID / extension /
voice port from the Client. When this option is selected, the device ID must be set up in the Settings
Stations page. Also note that if this option is selected, you cannot also select Prompt for Device ID.

Permissions
cc: Discover Administration Manual, v5.3 17
Allow Blackout Start and Stop: Allows the user to start/stop blackouts of audio recordings from a
desktop client.
Insight Dashboard Permissions
Allow Widget Administration: Allows the user to configure widgets or perform restricted tasks in
widgets. This permission is not for granting users access to data. For example, users must have this
permission to post items to the News widget. This permission is only for Discover.
Allow View Forecast Actual Data: Allows the user to view in cc: Discover forecasted call volume data
and actual call volume data created and maintained through cc: Clarity. This permission is only for cc:
Discover.
Allow View Service Level Data: Allows the user to view in cc: Discover Service Level data created and
managed through cc: Clarity. This is permission is only for cc: Discover.
Allow View Snapshot Data: Allows the user to view in cc: Discover call data (i.e., Queued, Active) and
agent status (i.e., Available, On Call, etc.) created and maintained through cc: Clarity. This permission is
only for cc: Discover.
Insight Permissions (with Optional cc: Insight product installed)
Allow Access Through Desktop: Allows the user to load and access the Agent Desktop application.
This permission requires that cc: Insight server is installed.
cc: Clarity Permissions
These appear when cc: Clarity is installed along with cc: Discover. Refer to the "Roles, Permissions, and
Accounts" section of the cc: Clarity Administration Manual for more information on managing permissions
for users and roles.
cc: Clarity Home Tab Permissions
Allow Change Password: Allows the user to change his/her password in cc: Clarity. Users do not have
to have this permission to change their password using the Forgot Password feature.
Edit News Widget: Allows the user to add, update, and remove items from the Home page’s News
widget.
Home Page Widgets: Allows the user to add/remove/view widgets from the Home page.
Employee Tab Permissions
Employee Create: Allows the user to create user accounts for cc: Clarity and cc: Discover.
Employee Profile All View: Allows the user to view profile information of any user.
Employee Profile Team View: Allows the user to view profile information of employees who are
members of a team for which the user is a supervisor. Also causes those employees to be visible on
Schedule Search screen.

Permissions
18 cc: Discover Administration Manual, v5.3
Employee Schedule All Edit: Allows the user to edit any employee’s schedule.
Employee Schedule All View: Allows the user to view any employee’s schedule.
Employee Schedule Team Edit: Allows the user to edit the schedules of employees who are members
of a team for which the user is a supervisor.
Employee Schedule Team View: Allows the user to view the schedules of employees who are members
of a team for which the user is a supervisor.
Employee Search: Allows the user to search for any employee and see those search results. Search
results can include Name, Labor Unit, Location, Title, and Team memberships.
Employee Section: Allows the user to access the Employee tab but not do anything on it. This
permission is required in order to have other Employee tab permissions.
Employee Self Edit: Allows the user to edit their profile’s email account and change the cc: Clarity/cc:
Discover password.
Forecast Tab Permissions
Forecast Acquire: Allows the user to load call history data to create a forecast data set.
Forecast Predict: Allows the user to generate a forecast.
Forecast Section: Allows the user to access the Forecast tab but not do anything on it. This permission
is required in order to have other Forecast permissions.
Forecast Trend: Allows the user to create an historical trend line when creating a forecast.
Reports Tab Permissions
Allow Clarity Ad Hoc Reporting: Allows the user to view the Ad Hoc Reporting button, create ad hoc
reports using the Report Builder page, view/edit any ad hoc report that has been saved, and save ad hoc
report search criteria as public or private. This permission provides access to all report data. A user must
have permission to the following in order to allow ad hoc reporting permissions: Reports Section,
Reports Real Time, Reports Historical, Reports Processes.
Historical Widgets: Allows the user to add and view historical reporting widgets.
Leave Request Approval All: Allows the user to approve leave requests for any employee.
Leave Request Approval Team: Allows the user to approve leave requests for employees who are
members of a team the user supervises.
Real Time Widgets: Allows the user to add and view real-time reporting widgets.
Reports Historical: Allows the user to access the Historical Reports page but not add or see the
historical widgets.
Reports Processes: Allows the user to access the Processes Reports page but not add or see the
historical widgets.
Reports Real Time: Allows the user to access the Real-time Reports page but not add or see the
historical widgets.

Permissions
cc: Discover Administration Manual, v5.3 19
Reports Section: Allows the user to access the Reports tab but not do anything on it. This permission is
required to have other Reports permissions.
Roster All: Allows the user to view roster for any Labor Unit or Skill group.
Roster Team: Allows a user to view the real-time roster of any team of a team for which the user is a
supervisor.
Swap Request Approval All: Allows the user to approve shift swap request for any employee.
Swap Request Approval Team: Allows the user to approve shift swap requests for employees who are
members of teams they supervise.
Schedule Tab Permissions
Schedule Create: Allows the user to create a schedule from loaded
Schedule Load: Allows the user to load a forecast data to create a schedule.
Schedule Publish: Allows the user to publish a schedule.
Schedule Section: Allows the user to access the Schedule tab but not do anything on it.
Administrator/Configuration Tab Permissions
Allow User Admin: Allows the user to change settings on user accounts.
Can Be Supervisor: Allows the user to be assigned as the Supervisor for a team. Additional permissions
are needed to perform tasks such as approving swaps. Removing this permission causes the user to be
removed as a supervisor from all teams immediately.
Configuration Section: Allows the user to do all tasks on the Configuration tab.
User Edit Field Permissions
Selected fields can have their labels changed on the Web Portal Settings’ Terminology page. For details,
see Terminology.
Assign Access to CallCopy Groups
Group permissions give a user access to call records and other items created by members of a CallCopy
group. A user also may need Player Permissions such as Allow Viewing of Video. These permissions do
not make a user with the role a member of the group. For details, see Groups.
A User assigned this role has access to calls for the Groups that are listed in the Attached CallCopy
Group list.
To attach a CallCopy group to a user, select a group from the Unattached CallCopy Group list. You
can use Control or Shift to choose multiple groups. Click the Attach ( ) button.
If there are Groups in the Attached CallCopy Group list you wish to remove from the User’s access
permissions, select the Group or Groups and click the Remove ( ) button.

Permissions
20 cc: Discover Administration Manual, v5.3
Assign Access to an ACD Group or Gate/Queue
ACD Group and Gate/Queue permissions give a user access to call records and other items created by
members of those groups. A user also may need Player Permissions such as Allow Viewing of Video.
(These permissions do not make a user with the role a member of the group or gate. Those memberships
have to be assigned on the PBX.) If no groups are specified, agents with this role will be able to view all
ACD Groups; if groups are specified here, the groups will still appear in the Call List Quick Filter Menu,
but only calls for the specified groups will be available. This behavior is consistent with how CallCopy
Group and Agent quick filters work in the Web Player.
Follow these steps to provide a role access to an ACD Group or Gate/Queue calls:
1. Go to the ACD and identify the Labor/Hunt/Skill Groups or Gates the user will access.
2. Enter them in the text field below the appropriate ACD Group or Gate list.
3. Click the Add ( ) button to add a value to the User’s allowed lists.
To remove a value, select it from the list and click the Delete ( ) button.
Permissions
cc: Discover Administration Manual, v5.3 21
Assign a Role to Multiple Users
Users can be assigned roles from the Assign Users to Roles page or from the user’s account page. For
details, see Add a User. The former is helpful if you are trying to duplicate another user’s roles for a new
user.
1. On the Roles page, click Assign Users to Roles.
2. Click a role. The Available and Attached Users appear and currently have the role assigned to them.
3. To assign the role, click one or more available users and click the right arrow. The selected users
move to the Attached Users box.
4. To remove the role, click one or more attached users and click the left arrow. The selected users
move to the Available Users box.
5. Click Save.
Users
Users must have a user account in order to login to cc: Discover and be recorded. Roles control what
they can do.
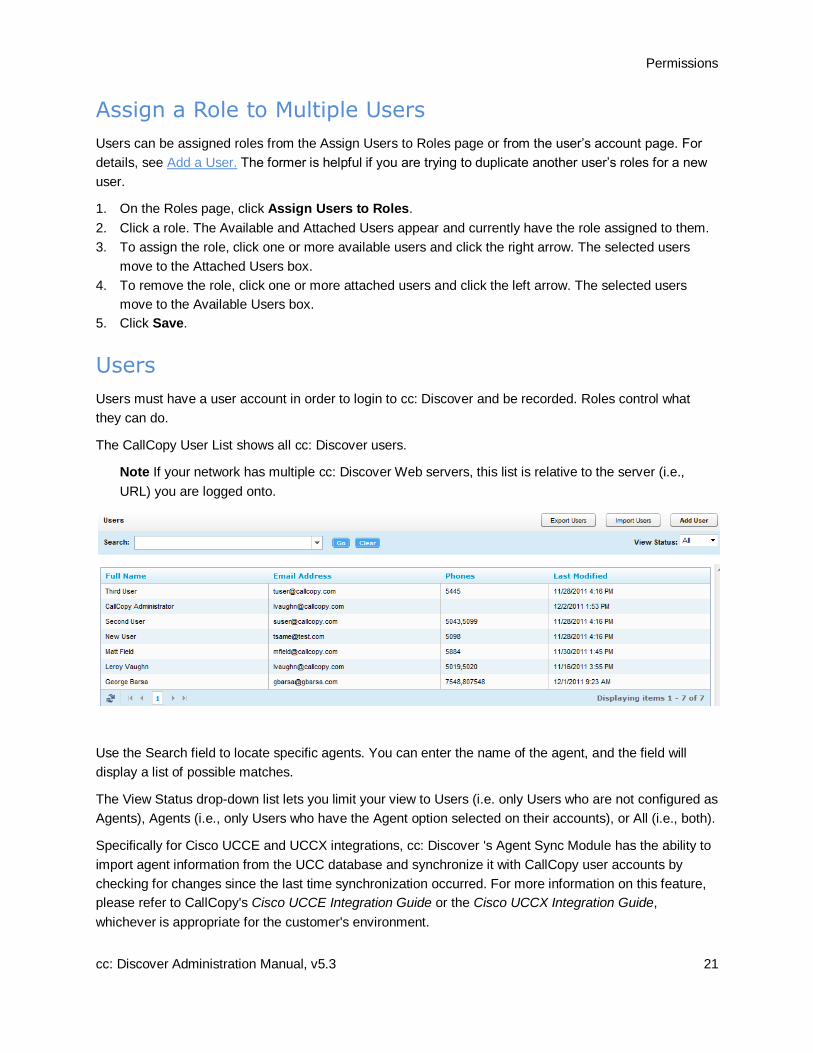
The CallCopy User List shows all cc: Discover users.
Note If your network has multiple cc: Discover Web servers, this list is relative to the server (i.e.,
URL) you are logged onto.
Use the Search field to locate specific agents. You can enter the name of the agent, and the field will
display a list of possible matches.
The View Status drop-down list lets you limit your view to Users (i.e. only Users who are not configured as
Agents), Agents (i.e., only Users who have the Agent option selected on their accounts), or All (i.e., both).
Specifically for Cisco UCCE and UCCX integrations, cc: Discover 's Agent Sync Module has the ability to
import agent information from the UCC database and synchronize it with CallCopy user accounts by
checking for changes since the last time synchronization occurred. For more information on this feature,
please refer to CallCopy's Cisco UCCE Integration Guide or the Cisco UCCX Integration Guide,
whichever is appropriate for the customer's environment.

Permissions
22 cc: Discover Administration Manual, v5.3
Add a User
Users must have a Username, Password, First Name, Last Name, and Email Address.
Note Several tasks must be performed in order for an agent’s audio to be recorded. For details, see
Set Up an Agent to Be Recorded.
Note If both cc: Discover and cc: Clarity are being used…
Creating the user in cc: Clarity will also create them in cc: Discover; this is the preferred method.
Creating the user in cc: Discover will require using the Mass Update Incomplete Users function in
cc: Clarity to import the user; see the cc: Clarity Administration Manual for more information.
Follow these steps to add a user:
1. Click Administration tab > Permissions > Users.
2. Click Add User at the top of the User List.
3. Enter a Username. Usernames must be unique. If you try to save a new User with a Username that
already exists, then you will receive the following error: That username already exists! Change the
username and try again.
Note cc: Discover has no restrictions on characters and spacing in the username. However, if the
system integrates with Active Directory (AD), AD might have restrictions.
4. Enter a password for the new User. There are no default restrictions for passwords. For all password
restriction options, see PCI Settings.
5. Enter the unique email address for this specific employee. This is used to automatically email
completed Quality Assurance forms directly to an agent.
6. The Grant Super User Access option gives the user full administrative permissions to add, delete, or
change any information in the system. This option should be selected very rarely. Most system
administrators will not need this level of access.
7. If you do not want the user to be able to login to cc: Discover, select Lock Account. For details, see
Lock a User Account.
8. Select the Agent option if the user will be recorded (either or both audio and desktop) and should be
tracked as an agent in reporting. Clearing this option will allow the user to log into cc: Discover, but
will not record their calls or include them in reporting. Existing calls can still be evaluated for users
whose agent status has been deactivated.
Note For reporting, an agent is Active if the Agent option has been enabled in the agent profile.
An agent is inactive if the Agent option was selected at one point and that option is now cleared.
Please see the cc: Discover Reporting Manual for more information on agent reports.
Permissions
cc: Discover Administration Manual, v5.3 23
9. Enter values in the Additional Information fields as needed:
System Username: This is the Windows username (i.e., Network ID) that the agent uses to log
into the network. This field is required for screen capture, as the recorder uses this to locate an
agent’s desktop via the Screen Capture Client. This username can also be used for recording
standard desktops, if all of the agents are required to log into their PC. For these features to work,
each agent must have a unique username, even if the agents are on different Windows domains.
System Domain: This is the Windows domain that the agent logs in to. The field is optional.
Active Directory Username: Required if using Active Directory login method. This field will be
auto-populated when using "Auto Create User on Login" or importing users, provided all
information is supplied in the import file.
Active Directory Domain: Required if using Active Directory login method. Supply the domain
that the agent logs into. This works independently of the System Domain field above, which is
primarily required for screen capture. This field will be auto-populated when using "Auto Create
User on Login" or importing users, provided all information is supplied in the import file.
Employee ID: A tracking number that you can assign to each agent. Employee ID is not a
required field; it is typically used as a unique numbering system to identify employees, often
mirroring some form of internal employee identification system.
CRM Username: This field is typically used in conjunction with an API call from a CRM, and is an
additional relational value that can be employed with 3rd
-party application integrations.
Location: Only appears if "Allow Lookup by Agent/Workstation" is enabled. Allows manual
designation of a specific site/location for an agent for proper local routing of Screen Capture and
Live Monitoring traffic. When the Agent Lookup setting is enabled, this setting is set to "Not Set"
by default (until this is configured to a specific valid location, screen capture will not be performed
for the agent, and warning messages will be logged to Core logs stating the Location is invalid),
but an agent cannot be edited and saved without choosing a specific Location. For details, see
Web Portal.
Quota: For legacy cc: Discover installations (i.e. ones that do not use the Core recording
technology), a User Quota sets disk space limits for the user. This value is in megabytes. A quota
must be assigned to any User who can set a schedule. If the Quota is left blank, any schedules
other than system schedules created by that User will fail to write records, as the User has no
disk storage space. This value really only applies when non-administrators are creating
schedules.
10. By default, cc: Discover displays time by the time zone of the server on which the system is installed.
Select Shift Times to User’s Time zone if you want time to be displayed using each user’s time zone.
Use of this setting should be communicated to users in different time zones. Example: An agent
works in the Eastern US zone. cc: Discover is installed on a server in the Central US zone. The
agent’s manager works in the Pacific US zone. The Shift Time option is set on the agent’s and
manager’s accounts. The agent records a call at 8 AM Eastern time, and it appears in the cc:
Discover to him as 8 AM. The call record appears to his manager as if the agent took the call at 5 AM.
11. Select a time display format.
12. The Phones field shows the logins and/or extensions associated with a user/agent. Enter the
extension in the lower field and click the green button. To remove an extension, select it in the list and
click the red X. If an extension is entered, the agent option is automatically selected.

Permissions
24 cc: Discover Administration Manual, v5.3
Note A phone number can be assigned to only one agent. If an admin attempts to assign a
number that is already assigned to another agent, an error message appears beside the Phones
box.
13. To attach a role, select one or more items in the Unattached Roles and click the right arrow. To
remove a role, select it in the Attached Roles list and click the left arrow.
14. Click Save.
Edit a User
To edit a user’s properties, double-click the user record on the User page.
Make the necessary changes and click Save. You will be returned to the User page.
Lock a User Account
By default, users can login to cc: Discover and view the Home tab and the Coaching tab’s Content
Library. In the library, they can only see documents that have been assigned to them.
Locking a user account prevents the user from logging into cc: Discover. All other functionality is
unaffected, including recording and the account information used for reporting. If the account is needed
again, it can be unlocked and will function normally. Users whose accounts have been locked receive a
locked account message if they attempt to login.
Accounts should be locked if a user leaves the company, transfers to another role in the company and no
longer needs access to cc: Discover, or is prohibited by the company from accessing the system for other
reasons. If an account is locked, the extensions/logins can be removed from the account and assigned to
another user.
To lock a user account:
1. Double-click the account in the User List.
2. Select the Account Locked option. Clear this option to unlock the account.

Permissions
cc: Discover Administration Manual, v5.3 25
Deactivate a User
Deactivating a user/agent is slightly more involved than simply locking the account, but not as permanent
as deleting a user altogether. Locking an account would suit someone who has changed positions or is
on extended leave. Deactivating would be more for a user who has left the company altogether or whose
extension has been reassigned, but the user still needs to appear in reports and the portal user list.
To deactivate a user:
1. Double-click the account from the user list in the Web Portal.
2. Check the box for Account Locked.
3. Clear the check box for Agent status.
4. Remove the assigned phone extension under Phones.
Note The extension cannot be reassigned if it still appears attached to a user. If you clear the
check box for Agent status and attempt to save changes without removing the extension(s), you
will receive an error message.
5. Click Save.
Delete a User
Users can be deleted from the Web Portal. The account information and call data is retained in the cc:
Discover database but cannot be seen in the portal.
To delete a user:
1. Double-click the account on the User list.
2. Click the Delete button on the top-right corner of the form.
3. You will be presented with a confirmation button. If you wish to delete the User, click OK.
Import Users
Users can be imported into the system in batches using the CSV (Comma Separated Value) file import
function. If you have a database or Excel spreadsheet of agents, you may be able to generate a CSV
data file of your agents. That information can then be imported into cc: Discover, saving time by
minimizing data entry tasks.
A file must be in the following format: username, password, locked, first_name, last_name, email,
active_agent, system_username, system_domain, employee_id, site_id, phone1;phone2;phone3,
roleId(role name);roleId(role name);roleId(role name) [optional], ActiveDirectoryDomain (for AD/Hybrid
auth), ActiveDirectoryUsername (for AD/Hybrid auth)

Permissions
26 cc: Discover Administration Manual, v5.3
The locked value is ‘Y’ or empty. Roles are optional. If "Allow Lookup by Agent/Workstation" is enabled in
the Web Portal Settings, importing the agent's Location is not supported and will be set by default to
"Dynamic." This may need to be configured separately for each agent after the import is completed
depending on the customer's environment. For details, see Web Portal.
Follow these steps to import users:
1. Create the CSV file and store it on a local or network drive.
2. Click Import on the Users list.
3. Click Select.
4. Browse to locate and open the file.
5. If the CSV file has a header row with column labels, select Import file has a header.
6. Click Upload File.
7. cc: Discover verifies that the data is in the correct format and that the CSV data does not duplicate
existing agent names, phone IDs, or AD usernames on the same domain if using Hybrid or AD
authentication. If the data is verified, click Import to create the agents. Otherwise, review the error
message and make the necessary corrections.
Notes
User data can be added or extracted via the CallCopy API. Please refer to the CallCopy API Manual for more information.
If agents are being assigned to Locations manually, this data cannot currently be imported through a CSV. Locations must be set manually for agents in that specific configuration.
Export Users
Click Export to generate a CSV file of user information. This allows you to create a backup file of the user
configuration data stored in the cc: Discover database. You may also use this list to import user
information into other applications.
This function will prompt you to download a file to your local system:
Follow the prompts to choose the location to save the CSV file.

Permissions
cc: Discover Administration Manual, v5.3 27
Set Up an Agent to Be Recorded
Several tasks must be performed in order for an agent’s audio to be recorded. The specifics of those
tasks vary greatly depending on the customer’s telephony system and workforce organization. The tasks
below assume that cc: Discover has been installed correctly and is ready to record call audio. They do not
cover screen capture and live monitoring. Unless otherwise indicated, instructions for the following tasks
appear in the cc: Discover Administration Manual.
1. Create a user account for the agent in cc: Discover. Select the Agent option.
2. Specify a telephone extension for assigned-seating environments or an agent number/login for free-
seating environments. Note that audio will still be recorded even if there is no extension or agent
number specified here. However, the audio will not be associated with the agent.
3. Set the agent's Location if using lookup by agent/workstation. For details, see Web Portal.
4. Make the user account a member of a group if the user will be evaluated and monitored. Group
membership is not required for the agent to be recorded.
5. A schedule must exist for users to be recorded. If schedules are created for specific users, a new
schedule must be created. If an existing schedule is used to record multiple agents (i.e., those in a
group or a range of ANIs), review the business rules for the schedule. The new user’s extension, ANI,
agent number, or other information may need added to the schedule’s rules.
6. Some telephony systems require that the user’s phone be configured to forward call audio or perform
in other ways. Review the PBX-specific CallCopy integration guide for the phone configuration
requirements.
7. Some telephony systems require that the user’s extension or device ID be added to a cc: Discover
voice board’s channel settings. Review the PBX-specific CallCopy integration guide for voice board
channel settings.
8. Some telephony systems require that the user’s extension or device ID be added to a cc: Discover
Core’s CTI module. Review the PBX-specific CallCopy integration guide for CTI module settings.
9. Occasionally, the cc: Discover script will not be able to register user phones in environments using
passive VoIP recording. As a last resort, administrators may have to add the user’s extension to cc:
Discover’s IP Phones list.
Permissions
28 cc: Discover Administration Manual, v5.3
Groups
CallCopy groups affect only data in cc: Discover. They can be based on ACD groups, gates, and queues,
but they are not those groups. Users must be in groups to be evaluated. Users can only be added to
groups if they have the Agent property assigned and a phone extension registered on their user profile.
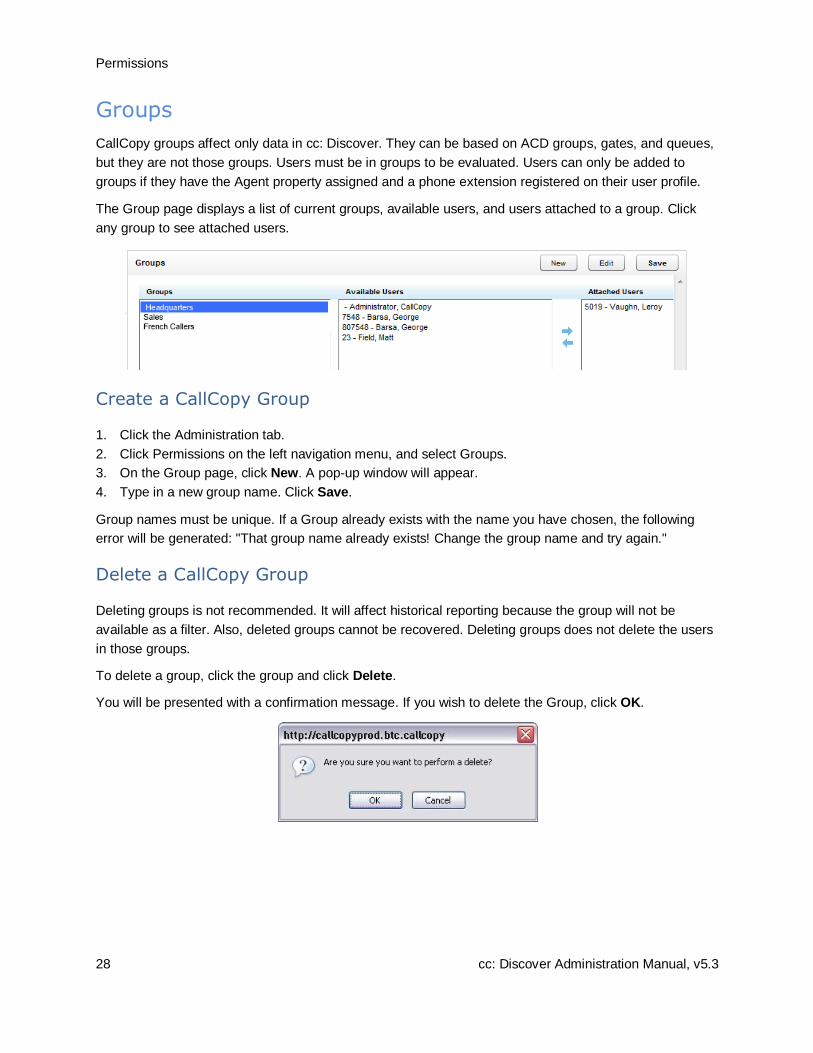
The Group page displays a list of current groups, available users, and users attached to a group. Click
any group to see attached users.
Create a CallCopy Group
1. Click the Administration tab.
2. Click Permissions on the left navigation menu, and select Groups.
3. On the Group page, click New. A pop-up window will appear.
4. Type in a new group name. Click Save.
Group names must be unique. If a Group already exists with the name you have chosen, the following
error will be generated: "That group name already exists! Change the group name and try again."
Delete a CallCopy Group
Deleting groups is not recommended. It will affect historical reporting because the group will not be
available as a filter. Also, deleted groups cannot be recovered. Deleting groups does not delete the users
in those groups.
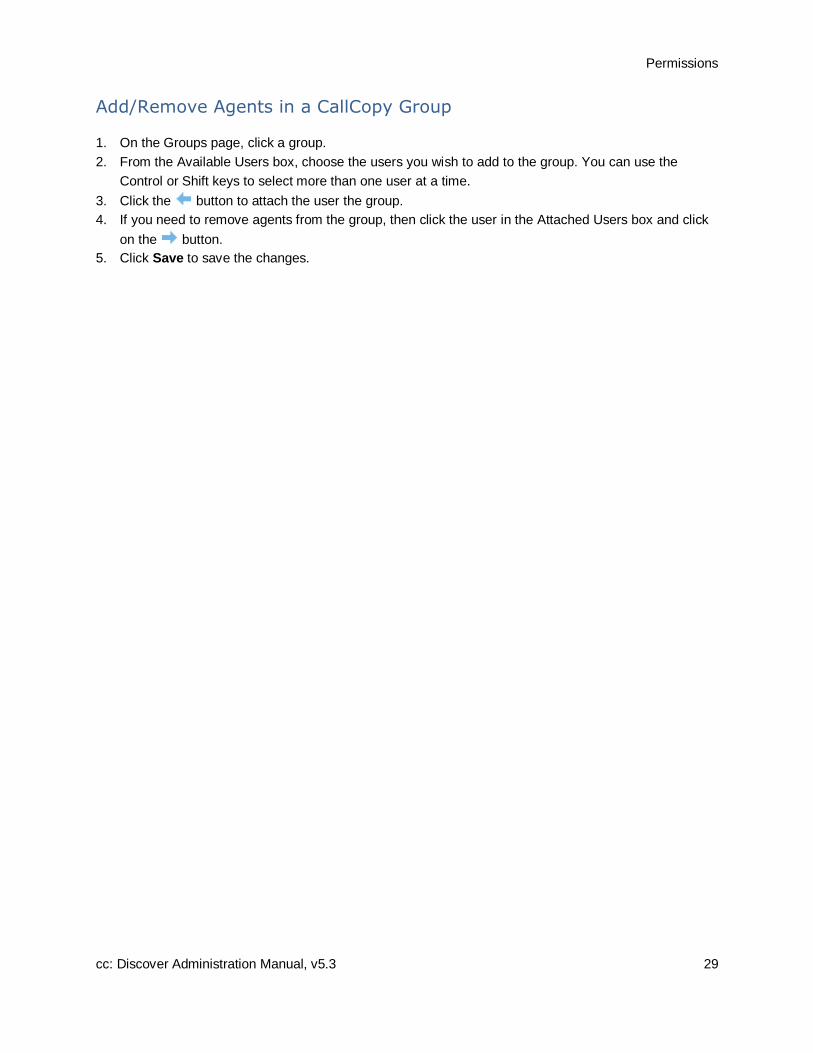
To delete a group, click the group and click Delete.
You will be presented with a confirmation message. If you wish to delete the Group, click OK.
Permissions
cc: Discover Administration Manual, v5.3 29
Add/Remove Agents in a CallCopy Group
1. On the Groups page, click a group.
2. From the Available Users box, choose the users you wish to add to the group. You can use the
Control or Shift keys to select more than one user at a time.
3. Click the button to attach the user the group.
4. If you need to remove agents from the group, then click the user in the Attached Users box and click
on the button.
5. Click Save to save the changes.

Scheduling
30 cc: Discover Administration Manual, v5.3
Scheduling Note Typically, archive actions should be created before schedules are created.
Schedules control which calls are recorded. Administrators create schedules based on business rules.
The scheduler is flexible enough to allow for 1% to 100% recording and other types of recording such as
time-.based blocks or a set number of calls that match a particular schedule.
Schedules can be set up across any combination of call variables. All requests, including CTI messages
and API requests related to call or agent information, are routed to the scheduler for processing.
Scheduling Process Flow
Every event that is received by the scheduler is compared against the business rules of all active
schedules. An event may match any number of schedules or none at all. When an event matches one or
more schedules, an entry is logged for each individual match.
Schedule options are aggregated, meaning that as an event matches schedules the least restrictive
values are assigned to the event. These values include minimum and maximum recording lengths,
priorities, retention & archiving, etc. The call is then sent to the recorder with the aggregated values
assigned to it, and the recording is then written to the system disk.
Note Schedules operate inside the constraints of the configured Voice Boards. When configuring
schedules, keep items such as recording capacity (fixed or concurrent) in mind.

Scheduling
cc: Discover Administration Manual, v5.3 31
Relate Schedules to a Core
Schedules can be related to a Core but do not have to be related. If no schedules are related to a Core,
that Core will use all schedules. If one or more schedules are related to a Core, that Core will use only
those schedules. Relating schedules to one or more Cores can be useful if
You want a specific Core(s) to record specific agents’ calls, such as agents dedicated to a customer
or language.
You want to balance the load of calls recorded by each Core.
The CallCopy Sales Engineer and Install team will discuss this issue before installing the system. See the
CallCopy integration guide for your specific PBX for information on configuring the Core and relating a
schedule.
Create Agent Schedules – Time-Based
A time-based schedule records all calls for an agent within a specified date range. Schedules created
using this procedure will use default values for Retention Days and other settings. For details, see Copy,
Edit, Delete Schedules.
1. Click the Administration tab > Scheduling > Create Schedule.
2. Click the option Record All Calls For An Agent During A Time Range.
3. The following information needs to be entered for the schedule:
Name: A friendly name for the schedule.
Description: A field to enter more specific details regarding the schedule.
Agent Number: The Phone ID that will be recorded.
Never Expire: If selected, the schedule will be in effect indefinitely.
Start/End Date: If the schedule should only be effective within a range of dates, select them
here.
4. Click Save. The schedule begins recordings on the entered start date.

Scheduling
32 cc: Discover Administration Manual, v5.3
Create Agent Schedules – Number-of-Calls Based
A call-based schedule records a specified number of calls for an agent within or outside a given date
range. Schedules created using this procedure will use default values for Retention Days and other
settings. For details, see Copy, Edit, Delete Schedules.
1. Click the Administration tab > Scheduling > Create Schedule.
2. Click the option Record the Next n Calls for an Agent.
3. The following information needs to be entered for the schedule:
Name: A friendly name for the schedule.
Description: A field to enter more specific details regarding the schedule.
Agent Number: The Phone ID that will be recorded.
Number of Calls: The number of calls to record for the agent.
Never Expire: If selected, the schedule will be in effect until the specified number of calls is
reached.
Start/End Date: If the schedule should only be effective within a range of dates, select them
here.
4. Click Save. The schedule begins recordings on the entered start date.

Scheduling
cc: Discover Administration Manual, v5.3 33
Create Custom Schedules
A Custom schedule enables you to create diverse sets of schedules to meet your business needs.
1. Click the Administration tab > Scheduling > Create Schedule.
2. Click the Create a Custom Schedule (Advanced) option.
3. Enter the necessary settings. See descriptions below.
4. Click Save Schedule. The schedule begins recordings on the entered start date.
General Settings
Name: A friendly name for the schedule.
Description: These fields are helpful when searching for a schedule in the system
Owner: Select the person who should be contacted if a schedule needs changes. Select Administrator if
no specific owner exists.
Never Expire: If selected, the schedule will be in effect until the specified number of calls is reached.
Start/End Date/Time: If the schedule should only be effective within a range of dates, select them here.
Scheduling
34 cc: Discover Administration Manual, v5.3
Schedule Types
Set Number: This schedule type records a set number of calls that match the business rules that you
apply. For example, if you need to record the next five calls for a specific phone extension, you would use
this schedule type.
Options
Minutes Between: If set, the schedule will prevent another recording from starting if the previous
call was recorded within the value set here.
Target Calls: The total number of calls to be recorded by this schedule.
Calls Between: If set, the schedule will prevent another recording from starting if the previous
call was recorded within the value set here.
Random Probability: Set the random probability to a number (0-100). See note at end of section
for more details.
Percentage: This schedule type gives you the flexibility to create randomized schedules as well as
schedules for complete call logging. Simply enter the percentage of calls that you would like to record (1-
100). Use a number below 100 for randomized recording for quality assurance, or set a schedule to 100%
for complete call logging.
Options
Target Percent: The percentage of calls to be recorded out of the total number delivered.
Random Probability: Set the random probability to a number (0-100). See note at end of section
for more details.
Agent Percentage: This schedule type allows you to create a schedule to record a percentage of every
agent’s calls. Simply enter the percentage of calls that you would like to record (1-100). This percentage
will apply to each agent, so if you set the percentage to 50%, then 50% of each agent’s calls will be
recorded.
Options
Days: The days of the week this schedule will be in effect.
Target Percent: The percentage of calls to be recorded out of the total number delivered to an
agent.
Random Probability: Set the random probability to a number (0-100). See note at end of section
for more details.
Scheduling
cc: Discover Administration Manual, v5.3 35
API Initiated: This schedule type will only be run if the call delivered was triggered by a 3rd
Party
application via the CallCopy API. This is useful for defining different rules for these calls vs. internally
generated calls via CTI or passive methods.
Options
Target Percent: The percentage of calls to be recorded out of the total number delivered to an
agent.
Random Probability: Set the random probability to a number (0-100). See note at end of section
for more details.
On-Demand: This schedule type will only be run if a delivered call was triggered via the CallCopy On-
Demand Client.
Options
Target Percent: This value is ignored. The call start/stop from the On-Demand client determines
recording.
Random Probability: Set the random probability to a number (0-100). See note at end of section
for more details.
Note When a call is delivered and the schedule is at or above its target percentage, the system
generates a random number for the call, between 0 and 100. If the random number is equal or less
that the Random Probability value, the call will be recorded. Otherwise, the call is skipped.
Schedule Priority
Priority: Schedules can be given a priority rating from 1 (lowest) to 100 (highest). If a call is delivered that
matches multiple schedules, the schedule with the highest priority will be used. If no schedule has a
higher priority, then the schedule with the oldest creation date will be used.

Scheduling
36 cc: Discover Administration Manual, v5.3
Call Parameters
Direction: If the data is available, you can specify to record only inbound/outbound calls, or both.
Min Record Length (sec): The minimum length, in seconds, for records matching that schedule. You can
use this setting to avoid recording hang-ups.
Max Record Length (sec): The maximum length, in seconds, for records matching that schedule. Longer
calls require more disk space, so some companies prefer to cap the recording length to prevent long calls
from depleting system resources.
Max Record Silence (sec): The maximum length, in seconds, for silence in the call before a recording is
automatically stopped.
Screen Capture Wrap Length: The duration (in seconds) to keep recording an agent’s screen after a call
has ended. Only available if the optional cc: Screen product is installed on the system.
Stop Screen Capture Wrap on Call Start: Determines whether screen capture for agents in wrap time
stops when a new call is detected to begin recording, or the Screen Capture Wrap Length time has been
reached. If set to Yes, a new call or chat will trigger the end of the current capture and initiate a new one,
even if the wrap time limit has not yet been reached.
Retention Rules
Retention Days: The number of days you would like calls matching that schedule to be saved in the
system before being (purged) deleted or archived.
Archive Action: Available Archive Actions for the call can be selected here. For details, see Archive
Actions. The default action is "Purge," which means that the system will purge records when the record
reaches the specified number of retention days.
Note Retention Days and Archive Actions are applied when the call is recorded. Changing this value
in a schedule only applies to calls made AFTER applying the schedule change. Changing this value
DOES NOT apply to already recorded records.
Capture Options
Audio Capture: If set to Yes, audio/voice will be captured for this record if available.
Screen Capture: If set to Yes, screen activity will be captured for this record if available. This setting is
ignored if the cc: Screen software was not licensed.
Speech Analytics: If set to Yes, the audio recording will be processed by the CallCopy Speech Analytics
application. This setting is ignored if the cc: Analytics software was not licensed.
Disk Location: Location (UNC path or local disk) to which audio/video files for the record will be written.

Scheduling
cc: Discover Administration Manual, v5.3 37
Schedule Requirements: Simple Business Rules
To use the simple business rule editor, select the AND or OR value from the Comparison setting. cc:
Discover can set up simple schedules by matching up to five variables within a schedule. Utilizing the
AND comparison, each rule set in the editor must match for a call to begin recording. Using the OR
comparison, only one of the rules must match to the call in order to start a recording. If no schedule
requirements are entered and the Comparison is AND or OR, the schedule can apply to all calls
depending on other factors.
The Value Type variables include:
Extension/Voice Port/DeviceID (physical device)
Agent Number (agent or phone number)
ACD Group (Labor group)
ACD Gate/Call Type (VDN, Queue, Application, etc.)
Number Called DNIS
CallerID (ANI)
User Variables – There are 5 fields available for user-defined variables that can be used to store
values received by your cc: Discover application server from other applications. For further
information see the CallCopy API Manual.
For each of these variables, the system can use the following comparison operators:
Equal to
Less than (<)
Greater than (>)
Not equal to
Starts with
Ends with
Contains
Does not contain
For non-numeric values, you can also perform a case sensitive match.
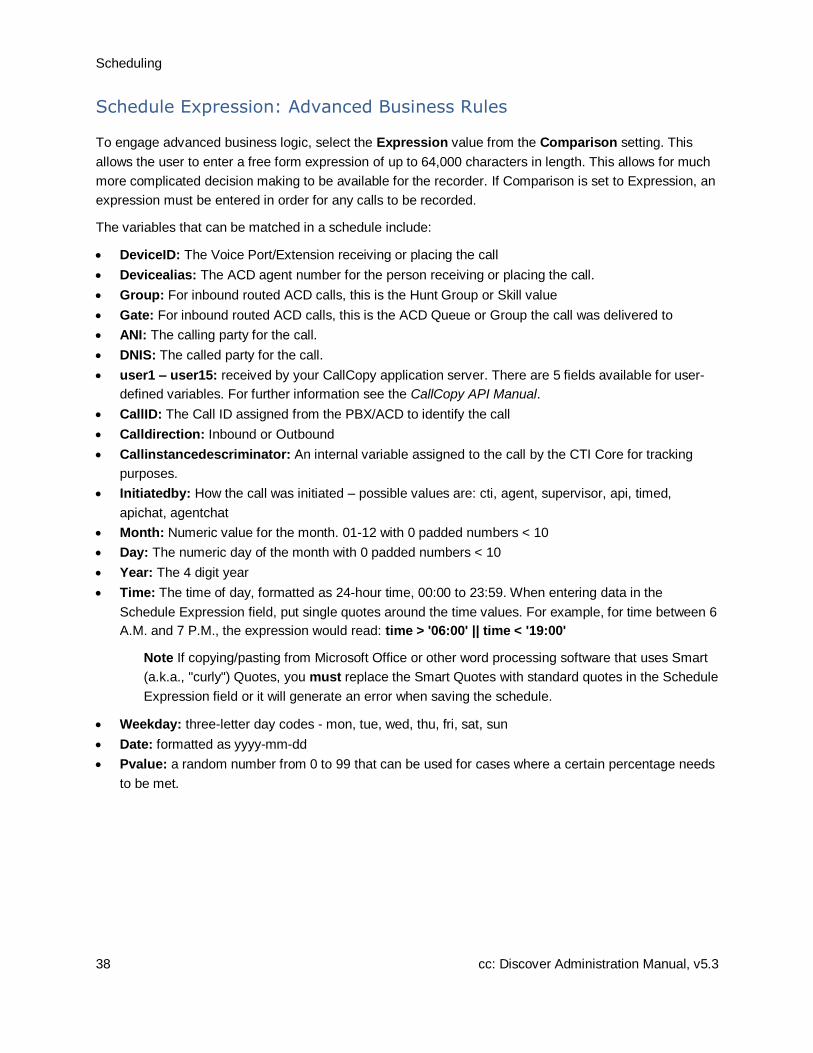
Scheduling
38 cc: Discover Administration Manual, v5.3
Schedule Expression: Advanced Business Rules
To engage advanced business logic, select the Expression value from the Comparison setting. This
allows the user to enter a free form expression of up to 64,000 characters in length. This allows for much
more complicated decision making to be available for the recorder. If Comparison is set to Expression, an
expression must be entered in order for any calls to be recorded.
The variables that can be matched in a schedule include:
DeviceID: The Voice Port/Extension receiving or placing the call
Devicealias: The ACD agent number for the person receiving or placing the call.
Group: For inbound routed ACD calls, this is the Hunt Group or Skill value
Gate: For inbound routed ACD calls, this is the ACD Queue or Group the call was delivered to
ANI: The calling party for the call.
DNIS: The called party for the call.
user1 – user15: received by your CallCopy application server. There are 5 fields available for user-
defined variables. For further information see the CallCopy API Manual.
CallID: The Call ID assigned from the PBX/ACD to identify the call
Calldirection: Inbound or Outbound
Callinstancedescriminator: An internal variable assigned to the call by the CTI Core for tracking
purposes.
Initiatedby: How the call was initiated – possible values are: cti, agent, supervisor, api, timed,
apichat, agentchat
Month: Numeric value for the month. 01-12 with 0 padded numbers < 10
Day: The numeric day of the month with 0 padded numbers < 10
Year: The 4 digit year
Time: The time of day, formatted as 24-hour time, 00:00 to 23:59. When entering data in the
Schedule Expression field, put single quotes around the time values. For example, for time between 6
A.M. and 7 P.M., the expression would read: time > '06:00' || time < '19:00'
Note If copying/pasting from Microsoft Office or other word processing software that uses Smart
(a.k.a., "curly") Quotes, you must replace the Smart Quotes with standard quotes in the Schedule
Expression field or it will generate an error when saving the schedule.
Weekday: three-letter day codes - mon, tue, wed, thu, fri, sat, sun
Date: formatted as yyyy-mm-dd
Pvalue: a random number from 0 to 99 that can be used for cases where a certain percentage needs
to be met.
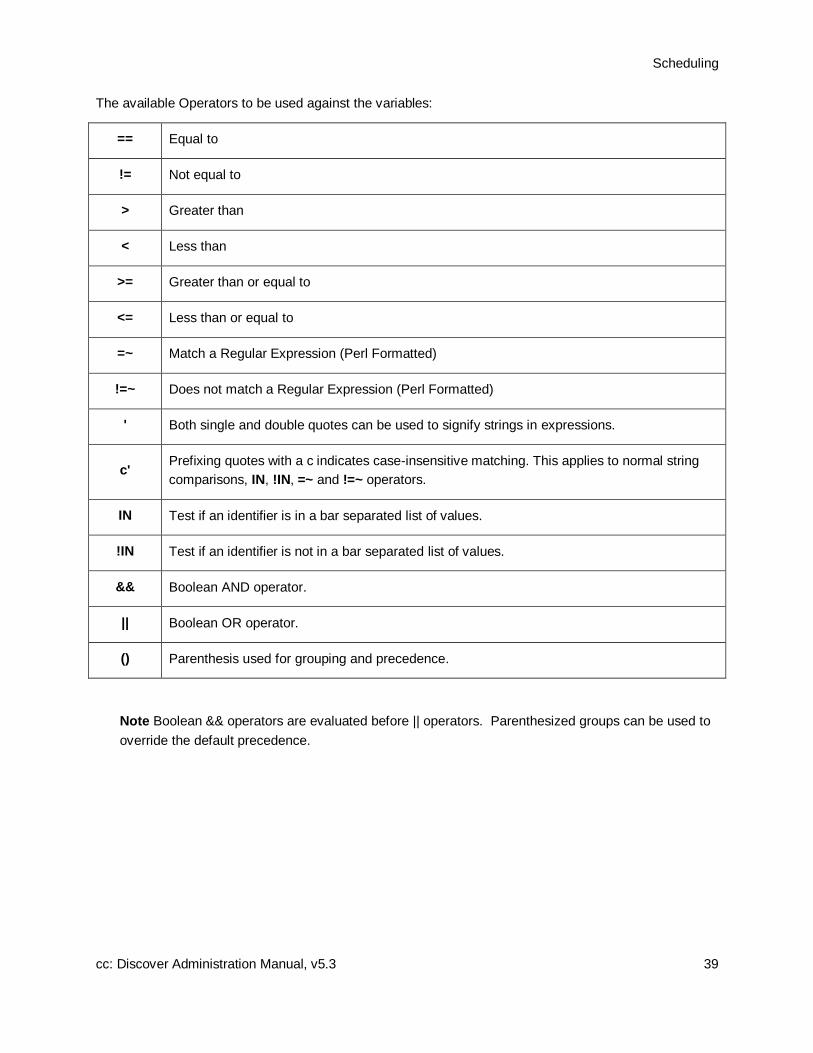
Scheduling
cc: Discover Administration Manual, v5.3 39
The available Operators to be used against the variables:
== Equal to
!= Not equal to
> Greater than
< Less than
>= Greater than or equal to
<= Less than or equal to
=~ Match a Regular Expression (Perl Formatted)
!=~ Does not match a Regular Expression (Perl Formatted)
' Both single and double quotes can be used to signify strings in expressions.
c' Prefixing quotes with a c indicates case-insensitive matching. This applies to normal string
comparisons, IN, !IN, =~ and !=~ operators.
IN Test if an identifier is in a bar separated list of values.
!IN Test if an identifier is not in a bar separated list of values.
&& Boolean AND operator.
|| Boolean OR operator.
() Parenthesis used for grouping and precedence.
Note Boolean && operators are evaluated before || operators. Parenthesized groups can be used to
override the default precedence.

Scheduling
40 cc: Discover Administration Manual, v5.3
Copy, Edit, Delete Schedules
Find a Schedule
1. Click the Administration tab > Scheduling > Find Schedule.
2. (Optional) If you want to search for schedules created by or assigned to specific users, select the
users from the Schedule Owners column, and click the right Move icon ( ) to move them to the
Schedule Owners Listed column. To remove a user from the Schedule Owners Listed column, select
the user and click the left Move ( ) icon. To retrieve all schedules, do not select an owner.
3. Click Search to display the Schedules list.
Schedule List
On The Schedule List, the following information is displayed:
ID: The internal identifier for the schedule.
Name: Schedule names do not have to be unique because the ID is always unique.
Description: The description details for the schedule.
Complete: If a schedule is set to expire, this value compares start date, end date, and today’s date to
get a percentage. If a schedule is set to record a number of calls, the percentage of recordings
completed. Schedules that do not expire are marked N/A.
Created: The date the schedule was created.
Owner: Informational field that can be set to schedule creator, administrator, or other.

Scheduling
cc: Discover Administration Manual, v5.3 41
From the Schedule List, you can perform the following operations on a schedule:
Edit: To edit a schedule, click the ( ) icon. Make the necessary changes and click Save Schedule.
Search for the schedule again to confirm that the changes appear. Changes made to a schedule do
not affect calls that have already been recorded.
Copy: To copy the schedule rules into a new schedule, click the ( ) icon. Edit as necessary and
click Save Schedule.
Delete: To delete a schedule, click the ( ) icon. Previously recorded calls are not affected by
deleting a schedule.
Timed Schedules
Timed schedules are used to record chat or email agents where beginnings of recordings are not
triggered by phone events. Timed schedules give the scheduler the capability to record an agent’s
desktop for a specified time period, dividing the recordings up incrementally according to the scheduler’s
needs. For example, recording could be scheduled from 8 AM to 5 PM, and each record could last 15
minutes. The desktop will be recorded provided the workstation is powered on and the Screen Capture
Client is running, whether the agent is actively using the workstation or not.
Note This feature will not work properly if the Workstations List is utilized. Unique usernames are
required.
Note If using Screen Recording with Timed Schedules, Screen Recording will only use the Desktop
Only Recording Path. Any Screen Capture Paths entered in the Server Node will be ignored in favor
of the Desktop Only Recording Path.
Licensing
The ability to use timed schedules is licensed separately from voice and screen recording. These
schedules require a Desktop Only license seat for each agent scheduled. Please consult your CallCopy
Account Manager for more information.

Scheduling
42 cc: Discover Administration Manual, v5.3
Timed Schedule List
To access the timed schedules, browse to the Administration tab on the Web Portal, select the
Scheduling menu, and click Timed Schedule.
The Timed Schedule List displays the following information for each schedule:
ID: The internal identifier for the schedule.
Name: The name of the schedule.
Start/End Time: The time of day the schedule will begin and end recordings.
Created: The date the schedule was created.
Click a schedule to see additional information about it.
Create a Timed Schedule
1. Click the New Schedule button on the Timed Schedules page.
Scheduling
cc: Discover Administration Manual, v5.3 43
2. The following fields are required:
Name: A friendly name for the schedule.
Type: Set to Desktop Only.
Days: The days of the week that the schedule will be in effect.
Start/End Time: The time of day the schedule will begin and end recording.
Record Interval (Minutes): The length each individual record will be.
Retention Days: The number of days you would like records to be saved in the system before
being (purged) deleted or archived.
Archive Action: Available Archive Actions for the call can be selected here. For details, see
Archive Actions.
3. To schedule an agent to be recorded, select the agent from the Unassigned Agents column and
click the right Move icon ( ) to move them to the Assigned Agents list.
4. To remove an agent from the schedule, highlight the agent and click the left Move ( ) icon.
5. Click Save.
Edit and Delete Timed Schedules
From the Timed Schedule List, you can perform the following operations on a schedule:
Edit: To edit a schedule, click the ( ) icon. Make the necessary changes and click Save. Changes
made to the schedule do not affect data that has already been recorded.
Delete: To delete a schedule, click the ( ) icon. Make sure that schedules are not in use before
deleting them.

Tools
44 cc: Discover Administration Manual, v5.3
Tools
Service Manager
The Service Manager page is located under the Tools menu on the Administration Tab.
The Service Manager is used to centrally manage all cc: Discover application services located on
different machines (i.e., server nodes). In order for the Service Manager to load and control application
services, the Comet Daemon and Service Manager module must be installed, configured, and running
on each machine.
If the daemon and module are not running properly, the Service Manager will show that it is not
connected to a server node.
Otherwise, the Service Manager should display the server node name, IP address, all CallCopy
application services on the node, and their current statuses.
Tools
cc: Discover Administration Manual, v5.3 45
The Manager displays the following data for each Service:
Application: The name of the service installed. This value is case sensitive and is usually the name
of the.exe in Windows Explorer. Some legacy services may have a different name. You can verify the
name by viewing the service's properties in Windows.
Status: Displays if the service is Running, Stopped, or Unknown.
Last Started: Time and date.
CPU %: This information is useful to determine why a service or server is running slowly.
Memory: Current usage of the local machines memory. Applications like the Transcoder and Archiver
use more memory as they process files.
Auto-Restart: If set to ‘Yes’, Service Manager will attempt to restart the application if it should stop
on the host machine because of a non-critical error. The application cannot be stopped on the
Windows machine if it is set to Auto-Restart. (If the host machine is rebooted, the application should
restart because it was registered as a service during the installation process.)
Add/Edit/Remove a Server Node
Server nodes can be added, edited, and deleted from the Service Manager. Editing and removing nodes
will affect the ability to manage the services on those nodes and the services themselves. Carefully plan
changes to IP address and removal of nodes.
To add a server node, click Add Server. Enter a name and IP address and click Save. The node's
corresponding Comet Daemon must also be configured.
To edit a node, click Edit. Make the needed changes and click Save.
To remove a node, click Remove.
Add a Service Application
1. Expand the server node and click Add Application.
2. Enter the name of the service. Typically, this will be the name of the EXE file. It must be entered
exactly as the name EXE, and are case sensitive.
3. Specify if the Service Manager should automatically restart the application.
4. Enter any parameters that must be set for the application. If the ident for a service was not set when
the service was originally installed from command line, it can be added here. For example, for the
Web Media Server using ident 1, the following would go in the parameters field:
-web_media_server=1
For details on whether a given service uses the ident parameter and the ident name format, refer to
the section of the cc: Discover Installation Guide that covers installing the service or the
administration manual specific to that feature.
5. Click Save.

Tools
46 cc: Discover Administration Manual, v5.3
Edit/Remove a Service Application
Applications can be added, edited, and deleted from a Service Manager server node. Editing applications
will affect the ability to manage that service. Carefully plan changes to IP address and removal of nodes.
To edit a node, click Edit. Make the needed changes and click Save.
To remove a node, click Remove.
Manage a Service
To stop a running service, click the Stop button next to the service you wish to shut down. The service
status will switch to ‘StopPending’. Once the Service is stopped, the service status will display as
‘Stopped’ and the Start button will be activated.
To start a stopped service, click the Start button on the right side of the service listing. The service status
will switch to ‘StartPending’. Once the Service is started, the service status will display as ‘Running’ and
the Stop button will be activated.
Manage Multiple Services
To start or stop multiple services at once, check all of the services you wish to control from the Service
Manager list. You may also use the Check All or Uncheck All buttons to quickly select or de-select all
services.
You can then click the Start Selected, Stop Selected, or Remove Selected Applications buttons to
perform the specified action on all of the selected services.
Archiver Console
The Archiver Console provides manual control for many Archiver module functions. To access the
manager, browse to the Administration tab, select the Tools menu, and click the Archiver Console link.

Tools
cc: Discover Administration Manual, v5.3 47
Archive Actions
Archive actions can be managed with the following commands:
Refresh List: Forces a refresh of the list of active Archive actions from the database. The List
automatically refreshes every 5 minutes.
Refresh Settings: Manually reloads the Archiver settings page options. The module can be
configured to automatically refresh these settings on an interval from the settings page.
Run File Purge: Forces an immediate processing of the File Purge queue.
Delete Empty Directories: Immediately runs a job to clear out any folders that are managed by the
Archiver that are empty.
Any listed Archive Actions can also be forced to run immediately by clicking the Run Now button.
Optical Drives
Optical drives can be managed with the following commands:
Load Archived Files: Will cause any queued calls to be burned immediately to disk. Once this
operation occurs, the disk must be replaced with a new one, as only one archive job can be executed
per disc.
Refresh Disk Status: Refreshes the status of discs in all drives.
Update Drive Letter: Scans the server for any added/removed DVD drives and updates the Drive
List.
Output
The results of any commands issued will be displayed in the Output window.

Recorder Settings
48 cc: Discover Administration Manual, v5.3
Recorder Settings The Recorder Settings control the actions of the cc: Discover Voice Recorder component.
CTI Cores
The CTI Cores List displays all configured CTI Core modules in the system. A CTI Core is the module that
provides the PBX/ACD integration, and makes call recording decisions based on Scheduling business
logic. The CTI Core is also responsible for recording the raw audio files used for playback.
The configuration of a CTI Core is dependent on the customer’s ACD/PBX. Integration guides are
available to detail the required configuration for each supported PBX/ACD platform. If integration
documents were not provided, please contact CallCopy Support to obtain a copy.
To access the CTI Cores list in the Web Portal, click the Administration tab > Recorder Settings > CTI
Cores.
Note If Core settings changes are required, only open one Core at a time for editing. Do not open
multiple Cores in separate browser tabs or, when saving one Core, another Core's settings may be
overwritten.
Buddy Cores
Buddy Core is a method of high availability and redundancy where only one Core is recording at a given
time. This is opposed to a system where a redundant recorder is always recording. Since only one Core
is recording at a time, it can save space and resources. For instance, in Avaya TSAPI/DMCC only one set
of DMCC stations is required and the buddy Cores will share these DMCC stations. Buddy Cores should
always run on different machines (including VM clusters) to avoid having a single point of failure.
Types of Configurations
There are two ways to configure buddy Cores: Primary/Secondary and Active/Inactive. The main
difference is in how the secondary Core behaves.
In Primary/Secondary, the secondary Core will not record unless instructed to by the primary.
In Active/Inactive, the secondary will record unless instructed not to by the primary.
Primary/Secondary
When the primary Core starts up, it will wait a configurable amount of time for the secondary Core to start
up. If a timeout occurs then the primary Core will start recording. When a connection is made with the
secondary Core, the secondary Core will inform the primary Core of its recording state (Recording,
NotRecording, or Deciding). If the secondary Core's state is NotRecording or Deciding, then the primary
Core will start recording. If the status is Recording, then the primary Core will go into warm standby. All
modules configured for warm standby will be started, but no recording will take place. If the secondary
Core drops off while the primary Core is in standby, the primary Core will start recording.

Recorder Settings
cc: Discover Administration Manual, v5.3 49
The secondary Core's function is different. When it starts up, it immediately goes into standby mode as
described above. When a connection is established to the primary Core and then fails, the secondary
Core starts recording. If no connection is ever made to the primary Core the secondary Core will wait
indefinitely in standby mode.
Active/Inactive
Both Cores will function the way the primary Core does as described in Primary/Secondary. If both Cores
start up at the same time and neither is recording (both are in the Deciding state), the Core that would be
considered the primary Core (i.e., not the Core configured with a broadcast receiver) from above will take
precedence and start recording, and the other Core goes into standby mode. If both Cores start up and
cannot connect to one another, then they will both start recording.
Applicable Integrations
Sales Engineering can determine whether a Buddy Core configuration would be compatible with the
customer's environment during the sales process.
Configure a Buddy Core
You will need the following information to get started:
Settings of the Primary Core via Web Portal.
List of CTI modules and settings for each in the Primary Core.
IP address of the server that will be running the Buddy Core.
Set Up Core and Voice Board
After installing cc: Discover on the second machine using the standard install process, set up a dedicated
CTI Core and Voice Board for the Buddy Core. Follow the instructions for Voice Boards, CTI Core
Configuration, and CTI Core Service in the Integration Guide that corresponds to the customer's
environment. Generally speaking, the Buddy Core's settings should mirror the Primary Core's.
Additionally, during Core configuration:
Relate the Buddy Core to the Primary Core, and vice versa.
Add a Broadcast Receiver module to the Buddy Core.
Customize Switch Over Delay as needed. This determines how long the buddy Core waits without
receiving an update from the primary Core before the buddy Core takes over recording. The default
value (in milliseconds) is 3000 (three seconds).
If you are working with a dual-AES configuration where one Core is associated with an individual AES,
within the TSAPI module, set the number of AES connection attempts to mirror the Primary Core's
setting. This is the number of times it will try to reconnect before shutting down the Primary Core and
activating the Buddy Core. Entering 0 disables the reconnection option. Core verifies AES connectivity
every 10 seconds.

Recorder Settings
50 cc: Discover Administration Manual, v5.3
Configure Buddy Core for "Warm Standby" (If Necessary)
Sometimes it is important for CTI modules to start up even though the buddy Core is in standby mode.
This is required if the module or script must track information required to record, and the module would be
unaware of the information from a cold start. The only example of this that has come up is when Avaya
TSAPI has "monitorfromhuntgroup" enabled – devices are monitored as agents log in to them, but TSAPI
must see the log-in in order to monitor the device. Currently the only way to configure this is in the
cc_cticore.ini file.
Use this configuration only if specific CTI modules (depending on customer's configuration/request) will
be started when the Core initially starts instead of waiting for Buddy. Modules not appearing on this list
will be started when a Buddy condition happens. Open the cc_cticore.ini file for the Buddy Core and add
the following:
[cticore]
warmstandbymodules= Names of CTI modules to start immediately, for example
"cc_avayaTSAPIFx, cc_AvayaDMCC"
Configure Settings
The settings that determine Primary/Secondary vs. Active/Inactive behavior as well as how long Cores
attempt to read each other's state when starting up must be configured for proper operation. Please refer
to knowledge base article # 000001508 for information on these settings and their values.
Set Cores to Automatically Restart
If the cause of the Buddy Core activating is due to a power outage, network problem, or other server fault
beyond just a Core failure, that issue will need to be resolved first.
Once the server is back online, perform the following steps during a time that will not affect service,
depending on the customer's configuration:
1. Log into cc: Discover Web Portal.
2. Go to Administration > Tools > Service Manager.
3. Ensure that Auto-Restart for both the primary and secondary Cores is set to Yes.
4. Save any configuration changes.
If an event causes a Core to stop and restart, it will go through the same determination process described
at the beginning of this section to choose what it should do. If the Buddy Core's cc_cticore.ini includes
modules that are set to warm standby, those will resume as well.
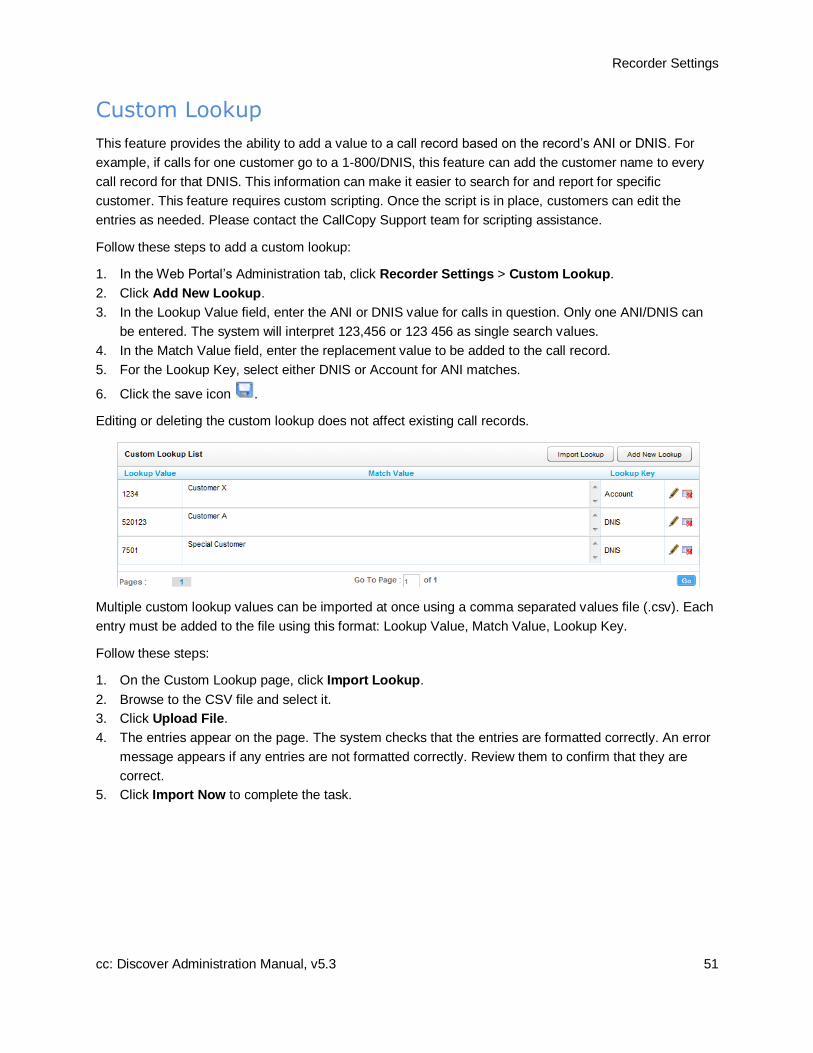
Recorder Settings
cc: Discover Administration Manual, v5.3 51
Custom Lookup
This feature provides the ability to add a value to a call record based on the record’s ANI or DNIS. For
example, if calls for one customer go to a 1-800/DNIS, this feature can add the customer name to every
call record for that DNIS. This information can make it easier to search for and report for specific
customer. This feature requires custom scripting. Once the script is in place, customers can edit the
entries as needed. Please contact the CallCopy Support team for scripting assistance.
Follow these steps to add a custom lookup:
1. In the Web Portal’s Administration tab, click Recorder Settings > Custom Lookup.
2. Click Add New Lookup.
3. In the Lookup Value field, enter the ANI or DNIS value for calls in question. Only one ANI/DNIS can
be entered. The system will interpret 123,456 or 123 456 as single search values.
4. In the Match Value field, enter the replacement value to be added to the call record.
5. For the Lookup Key, select either DNIS or Account for ANI matches.
6. Click the save icon .
Editing or deleting the custom lookup does not affect existing call records.
Multiple custom lookup values can be imported at once using a comma separated values file (.csv). Each
entry must be added to the file using this format: Lookup Value, Match Value, Lookup Key.
Follow these steps:
1. On the Custom Lookup page, click Import Lookup.
2. Browse to the CSV file and select it.
3. Click Upload File.
4. The entries appear on the page. The system checks that the entries are formatted correctly. An error
message appears if any entries are not formatted correctly. Review them to confirm that they are
correct.
5. Click Import Now to complete the task.

Recorder Settings
52 cc: Discover Administration Manual, v5.3
IP Phones
The IP Phones settings allow an administrator to register an extension with an IP Address manually. This
list is only used in passive VoIP recording configurations where a phone cannot be automatically
registered to the desired extension number. In most configurations, the use of this list is not necessary.
Click IP Phones under Recorder Settings to open the registration list.
Add Phones
To add an additional phone, click Add at the top of the page. A new row with text fields will appear at the
bottom of the list.
Enter the extension and IP Address for each device. Once you have finished inputting values, click Save.
Edit/Delete Phone
To change an existing entry, click the Edit ( ) icon next to the desired row. Change the extension and/or
IP Address, then click the Save ( ) icon. Extensions can be deleted by using the Delete ( ) icon from
this page as well.

Recorder Settings
cc: Discover Administration Manual, v5.3 53
Import IP Phones via a CSV File
IP Phones can be imported into the system via a CSV file by clicking Import on the IP Phone List page.
To upload a list of IP Phones, click Browse at the top of the page. In the dialog box, select the CSV file
that contains the list and click Open. Then click Upload File.
The CSV file must be in an ‘Extension’,’IP Address’ format such as the following:
1200, 10.100.1.40
1201, 10.100.1.41
1202, 10.100.1.42
If all the data in the file is formatted correctly, a preview list of your data will display below the Perform
Import section. If the data is correct, click Import Now to save the entries.
On-Demand
These settings are available only if CallCopy’s On-Demand module has been purchased. The On-
Demand module is a client/server application that allows users to control the recording of their calls from
a desktop button. It also enables users to add data into the recording’s cc: Discover call record manually.
See the cc: On-Demand Administration Guide for more information.
Transcoder
A Transcoder converts raw audio files recorded by the system into compressed audio files in .wav format
optimized for storage and playback retrieval. There are three options for relating Transcoders, voice
boards, and cc: Discover Cores:
One Transcoder for all Cores – This is the default setup.
One Transcoder per voice board – In this case, the Core’s Transcode by Board option is set to ‘True’,
and the Transcoder’s Look for Code field includes the voice board’s number.
One Transcoder per one or more Cores – In this case, each Core’s Transcode by Board option is set
to ‘True’. Each Core’s cc_cticore.ini file has to have a Transcoderprefix value set, and this value has
to be added to the Transcoder’s Look for Code field. The Transcoderprefix can be any arbitrary
number.
If both Transcoder-per-voice-board and Transcoder-per-Core are used, be careful to use
Transcoderprefix numbers that do not conflict with voice board numbers.

Recorder Settings
54 cc: Discover Administration Manual, v5.3
The best option depends on several factors including the number of calls, the duration of those calls, the
size of the call files, and the distribution of calls during a day. If two Cores are on the same machine,
using one Transcoder is usually acceptable. Transcode per board or per Core(s) is useful for distributing
work. If Cores are distributed over a network, pulling large, unprocessed call files over the network can be
avoided by using the per-Core option with a Transcoder on each network branch with a Core. A CallCopy
engineer works with a customer during the initial install to determine the best option. As call volumes and
networks change, users should be aware of which option they use and how it may affect transcoding.
Note The latest Transcoder scripts support file names up to 260 characters (up from 255 previously),
including the file extension.
Configure Transcoder Settings
From the Recorder Settings menu, click Transcoder to see the ones currently configured in the system.
To add a Transcoder to the list, click the Add button to open a new Edit Transcoder page. When the
settings have been configured as needed, click Save.
To view or change the settings, click the Edit ( ) icon on the right side of the row.
To remove a Transcoder, click the Delete ( ) icon. Do NOT delete a Transcoder if files are being
processed and until a new Transcoder is ready to process files.
Transcoder Settings
Each Transcoder has these settings:
Identity: An auto-generated integer value used as an internal identifier. For configuring distributed
transcoding environments, this ID needs to be configured in the corresponding Transcoder module
INI file.
Name: A friendly name to reference the specific Transcoder instance.
Max Retries: Number of times the module will attempt to process a file before it is considered
unreadable. The number of attempts for a file is recorded in the Transcoder table of the CallCopy
database. Increasing this value will not cause the Transcoder to retry files that have already reached
the maximum retries.
Minutes between Retries: The number of minutes to wait to retry a failed transcoding operation.
Number of Threads: Number of concurrent transcoding sessions. Raising this value may increase
Transcoder module performance, but can cause performance issues with other modules if the system
cannot process more concurrent threads in parallel. The default number of sessions is five (5).
Priority: System CPU priority assigned to Transcoding processing threads. Increasing this value can
increase performance, but may degrade any other components on the same server. The default is
"Low."

Recorder Settings
cc: Discover Administration Manual, v5.3 55
Temp Directory: Local directory where temporary conversion files are stored. The final file is stored
with the original CCA file.
Create CCP File: Creates a custom graphical representation of the audio waveform from a recorded
call. The representation is stored in a CCP file along with the audio file. Enabling this setting will result
in faster playback times as the waveform will not need to be recomputed for each playback.
CCP Interval: Time interval (in milliseconds) between waveform data points in the graphical display.
Increasing intervals can improve performance, but will create a less precise waveform display.
Store Original File Size in Field: This setting will insert the original file size of a VoIP recording in a
selected USER-defined field. This is useful for diagnosing and troubleshooting network issues.
Delay: Delay in minutes between conversion attempts for audio files. Increasing this value may be
needed for systems under heavy load, but will cause a delay in making the recording available for
playback in the system. This value also may need increased to two to three minutes if Screen
Capture and Fusion are used with call recording. The Screen Capture and Fusion must complete and
update their files in order for the Transcoder to process both the audio and video. If the Transcoder
starts processing the audio file before the video files are complete, video blackouts may not appear
on the processed file.
Format: Audio format for storing audio. The following formats are available:
GSM610: (~1.7KB/s) Compresses to smaller file sizes, but can have lower playback quality. Can
be played in standard media player.
VOX6K: (~2.9KB/s) Higher quality audio format, but will produce audio files that are 1.8x larger
than GSM.
VOX8K: (~4KB/s) Higher quality audio format, but will produce audio files that are 2.5x larger
than GSM.
CSA: (~1KB/s) Creates smaller files than GSM610, but are the highest quality of all available
formats. Requires CSA format license from CallCopy for use, files cannot be played in standard
media players.
CSASTEREO: (~2KB/s) Stereo version of CSA format. Creates files comparable in size to GSM,
but allows additional per-channel post-processing options (per channel volume level and VAD).
Requires CSA format license from CallCopy for use, files cannot be played in standard media
players.
Keep Days: Value in days to keep original (raw) audio files after they have been transcoded. This
setting will allow files to be recovered if there are errors in the transcoding process, but will add
additional disk space usage to keep the original files available in storage. Entering a value of ‘-1’ will
prevent the original file from being automatically deleted.
Create Analytics: If enabled, the system will create an additional very high quality stereo PCM .wav
audio file for each recording. The audio files are used for speech analytics processing. Requires
optional cc: Analytics module for processing.
Analytics Keep Days: Value in days to keep stereo (analytics) audio files after they have been
created. This setting will allow files to be stored for processing by a speech analytics engine, but will
add additional disk space usage to keep the stereo files available in storage. Entering a value of ‘-1’
will prevent the original file from being automatically deleted.
Normalize: Enables audio normalization, equalizing volume levels between PBX/Customer side and
extension/agent side of a recorded call.

Recorder Settings
56 cc: Discover Administration Manual, v5.3
Sample Rate (ms): Sample rate passed to the conversion module. Higher rates usually result in
higher quality audio files, but will cause audio files to use more disk space in storage.
Look for Code: The record codes reserved for this specific Transcoder. If the CTI Core setting
Transcode by Board is enabled, each Voice Board in the Core will have its own identifier (voice
board ID+1, ex. ‘31’ for Voice Board 3). This allows a Transcoder to be dedicated to specific boards.
A Transcoder can also be dedicated to specific Cores. See the introduction to this section for how
that configuration is done.
Perform Duplicate Packet Checks: Enabling this setting causes the Transcoder to check for
duplicate packets in recordings. Duplicate packets can occur in passive VOIP recording integrations if
the customer’s recordings are not setup correctly. They will cause the recording to appear to be
skipping.
Purge Record from Transcoder Table After Completion: Disabling this option will keep a record in
the Transcoder queue after it has been successfully processed. This is useful for troubleshooting if
reprocessing of files may be needed, but leaving it disabled for a long period of time can cause the
Transcoder table to grow significantly and impact the performance of the entire database. Unless
troubleshooting, this should always be enabled.
VAD Packet Count Trigger: The number of RTP packets with audio needed to trigger Voice Activity
after a period of silence. A lower setting may avoid choppy calls or calls where agent/customer audio
overlaps. Setting to 0 turns this off.
Analytic Storage Path: A hardcoded UNC or disk path that all Analytic .wav files will be written to.
Useful if files are being analyzed by a third party product.
Note If this setting is used, the third party product or the destination storage system, not cc:
Discover, will manage the files after creation.
Minimum Hold Duration: The amount of silence (in ms) before the Transcoder will insert a Hold
event in a recording.
Check Video Valid: If Yes is selected, the system will check to see if at least one valid video frame
was recorded for a screen capture. If that one frame does not exist, the file is still transcoded, and a
record for it is created. But when the user attempts to play the screen capture video, the Web player
displays this message: "Unable to play call: The call does not have audio or video."
Minimum Audio Duration: For audio recording files that are shorter than the minimum duration, the
Web player displays this message: "Unable to play call: The call does not have audio or video."
Enable Silence/Cross-talk Detection: If set to No, the other settings below are ignored and grayed
out, and the Transcoder will not detect silence/cross-talk. This is set to Yes by default.
Cross-talk Threshold: This is the gain level from 0.00 baseline that needs to be met on both
channels to trigger the cross-talk detection. The default value is 0.01, with a valid range from 0.01 to
1.00.
Cross-talk Minimum Duration: The minimum time (in ms) that the audio must stay above the
threshold in order for the cross-talk period to be displayed during call playback. The default value is
1000, with a valid range from 1000 to 65535.
Silence Threshold: This is the gain level from 0.00 baseline that the audio needs to stay below in
order to trigger silence detection. The default value is 0.01, with a valid range from 0.01 to 1.00.

Recorder Settings
cc: Discover Administration Manual, v5.3 57
Silence Minimum Duration: The minimum time (in ms) that the audio must stay below the threshold
in order for the silence period to be displayed during call playback. The default value is 3000, with a
valid range from 1000 to 65535.
Fragmentation Prevention: This setting (in ms) will prevent momentary noise in the audio from
fragmenting silence/cross-talk into multiple periods. If two periods are detected within the duration
specified, they will be combined into a single period. The default value is 2000, with a valid range
from 1000 to 65535.
Configure Payload
In order for a Transcoder to properly read recorded audio files, it needs to know which audio codec is
being used for the file, which for VoIP recording is stored in the RTP Payload Type. The RTP Payload
should match with the types defined in Network Working Group RFC 3551
(http://www.networksorcery.com/enp/rfc/rfc3551.txt).
By default, the Transcoder module is configured to follow the specified RTP. Some PBX vendors specify
Payload Types that do not follow the RFC. When this occurs, the audio files cannot be properly
transcoded, and the audio codec must be manually configured.
To manually configure a Payload Type, click the Configure Payload button for the desired Transcoder.
The Transcoder RTP Payload Mappings list will open.
To change the settings for a Payload, click the Edit ( ) icon on the right side of the row. Clicking the
Delete ( ) icon will remove the configuration.

Recorder Settings
58 cc: Discover Administration Manual, v5.3
Transcoder Configuration
The preferred method of configuring the Transcoder is via command line. Please refer to the Transcoder
configuration section of the cc: Discover Installation Guide for more information.
Configure INI
Use of an INI file to configure the Transcoder should only be done when advised by a developer. The INI
file used by the Transcoder is located at Recorder\Transcoder\cc_Transcoder.ini. The INI filename
should always match the name of the executable it configures. This is an example output of a
configuration file, with important settings detailed in the table to the right:
[app_settings]
[value_storer] If you need the possible values for this INI file, copy the key you
need from below and paste under the [app_settings] section.
Transcoder_ident=1
For configuring distributed transcoding environments, this ID needs
to be configured in the corresponding Transcoder module INI file.
Identity number is in cc: Discover Web portal for a Transcoder.
external_process=0 (or 1) Allows Transcoder to encapsulate conversion in external process.
Should rarely be used.
reverse_channels=0 (or 1)
Allows Transcoder to swap inbound and outbound streams for
analytic and CCP purposes. Do not activate unless told to by a
CallCopy developer.
debugexcess=false Set to True to enable. Logs out the most available information,
useful for troubleshooting.
Transcoder Troubleshooting
The Transcoder Status report provides information needed to troubleshoot issues. See the cc: Discover
Reporting Manual for additional information.
To access the report in cc: Discover, go to Reporting tab > System Reports > Transcoder Status.
The report organizes call records by status:
Completed: In the CallCopy database, the record has a Transcode Status of 2.
In Progress: The Transcoder is aware of the audio file and may have made one or more attempts to
transcode it. In the CallCopy database, the record has a Transcode Status of 1.
Failed: The Transcoder has unsuccessfully attempted to transcode the audio file the max retries
values. In the CallCopy database, the record has a Transcode Status of 4. If files have a Failed
status, contact CallCopy support to address the issue.
Note Records can have a status in the database of Processing (3) that does not appear on the report.

Recorder Settings
cc: Discover Administration Manual, v5.3 59
These issues may affect transcoding:
No connection to SQL database: The Transcoder has to access the database in order to determine
if there are audio files to transcode. A connection failure (i.e., timeout) should be recorded in the SQL
server logs.
Inadequate permissions: This situation can occur if the recorder and Transcoder are located on
different machines and the Transcoder does not have read/write permissions to the directory where
raw CCA and compressed files are located or the Transcoder’s temporary files are stored.
Network latency: If the recorder and Transcoder are on different machines and a network is slow to
copy files to the Transcoder’s temp directory, the Transcoder may timeout.
Inadequate disk space
Large number of files awaiting transcoding: Increasing the number of threads used by the
Transcoder can reduce this number but also affects the performance of other processes. If there are
periods during the day or week when CPU usage is lower, this number of threads can be increased
and then lowered.

Recorder Settings
60 cc: Discover Administration Manual, v5.3
Voice Boards
The voice boards provide configuration information specific to the PBX/ACD sending call data to cc:
Discover.
Integration guides are available to detail the required voice board configuration for each supported
PBX/ACD platform. If integration guides were not provided, please contact CallCopy Support to obtain a
copy.
Voice boards are licensed components of the cc: Discover software. The software will allow an unlimited
amount of voice board configurations to be added to the system, but the software will deny usage of any
unlicensed components. It is recommended that users contact CallCopy Support before adding or
removing voice boards to prevent any negative impact on the operation of the installed system.
Voice Boards List
To manage Voice Boards, browse to the Administration tab of the Web Portal, open the Recorder
Settings menu, and click the Voice Boards link.
To View or change the settings for a Voice Board, click the Edit ( ) icon on the right side of the row.
Clicking the Delete ( ) icon will remove the configuration for the Voice Board.
To clear all Voice Board entries from the system, click the Clear Boards button.
Notes
Any changes to these settings will require the recorder process to be restarted.
We recommend you contact your CallCopy support provider prior to adding or removing any
hardware components from your CallCopy system, as altering the hardware configuration may
void your warranty.
Channel Configuration
The channel configuration settings will vary depending on your specific integration. In this section the
available options are described, but not all options are available for some integration types. Detailed
information on board options is in the specific PBX/ACD integration in use.
Channel Number (#)
This field is the logical internal identifier for the recording port/channel. The recorder will use this number
to refer to any actions taken on the channel.

Recorder Settings
cc: Discover Administration Manual, v5.3 61
Assignment Type (Assign)
Not in Use: Select this value if the assignment type will not be used.
Anything: This allows the channel to be used for all recording and playback events. Use is governed by
schedule priorities.
Playback Anything: Limits this channel to playback of records via telephone.
Record Anything: Any schedule or API event may record calls using this channel.
Instant Record: This channel is dedicated to requests from the API
Dedicated Record ACD Group: Limits channel to recording only the specified ACD/PBX group (not the
CallCopy Group). This recording is performed independently of schedules.
Dedicated Record ACD Gate: Limits channel to recording a specific ACD queue type.
Dedicated Record Voice Port: Limits the board to recording a channel.
Dedicated Record Device: Limits channel to recording of a specific hardware resource (e.g., voice port
or DN) on the ACD/PBX.
Dedicated Record Extension: Limits the channel to recording of a specific extension.
Dedicated Record Agent Number: Limit channel to recording only an Agent Number.
Dedicated Record Device Alias: Limits channel to recording of an agent extension.
Dedicated Record Number Called DNIS: Limits channel to recording a specific inbound number, such
as an 800-number carrying traffic to your facility.
Dedicated Record CallerID ANI: Limits recording to a specific ANI. Full or partial ANI matches may be
used, e.g., limit to a matching area code.
Dedicated Record User 1-5: Limits recording to a specific user defined value specified by the API.
Examples include Account and Case Number.
Playback and Instant Record: Limits a channel to only playback and instant recording from the API.
Playback and Record: Limit calls to scheduled recordings and to playback.
Record and Instant Record: Limit calls to any recording type.
Unlicensed: Unlicensed channels are not used.

System Settings
62 cc: Discover Administration Manual, v5.3
System Settings Your installation engineer will work with your staff to configure your system. Should you ever desire to
change these settings, please refer to this chapter for definitions and examples. You may wish to
consider contacting your CallCopy support provider before making any changes to your system settings.
API Servers List
The API Server module handles connections from any application that is using the CallCopy API service.
This includes call control, management functions, and event stream service. API Servers are required for
Live Monitoring and Call Exporting features in the cc: Discover software. For more information on
CallCopy API Services, see the CallCopy API Manual.
Note Install the application or service that will use the API server before adding the API server to this
list. For example, a CTI Core must be installed and added to the CTI Core List before it can be added
to an API server.
The module is configured on the API Servers List page. In the Web Portal, click Administration tab >
System Settings > API Servers.
The List displays the following data for each API Server:
#: The internal identifier for the specific API Server. This identifier is an integer value, and is needed
for configuring distributed API environments.
Location: The hostname/IP Address of the server running the API Server.
Name: A friendly name set by the user given to the listed API Server.
Click the Edit ( ) icon on the right side of the row to configure it.
Click the Delete ( ) icon to remove the listed API Server.
Click Add API Server to create a new API Server entry in the list. Edit the entry as necessary.
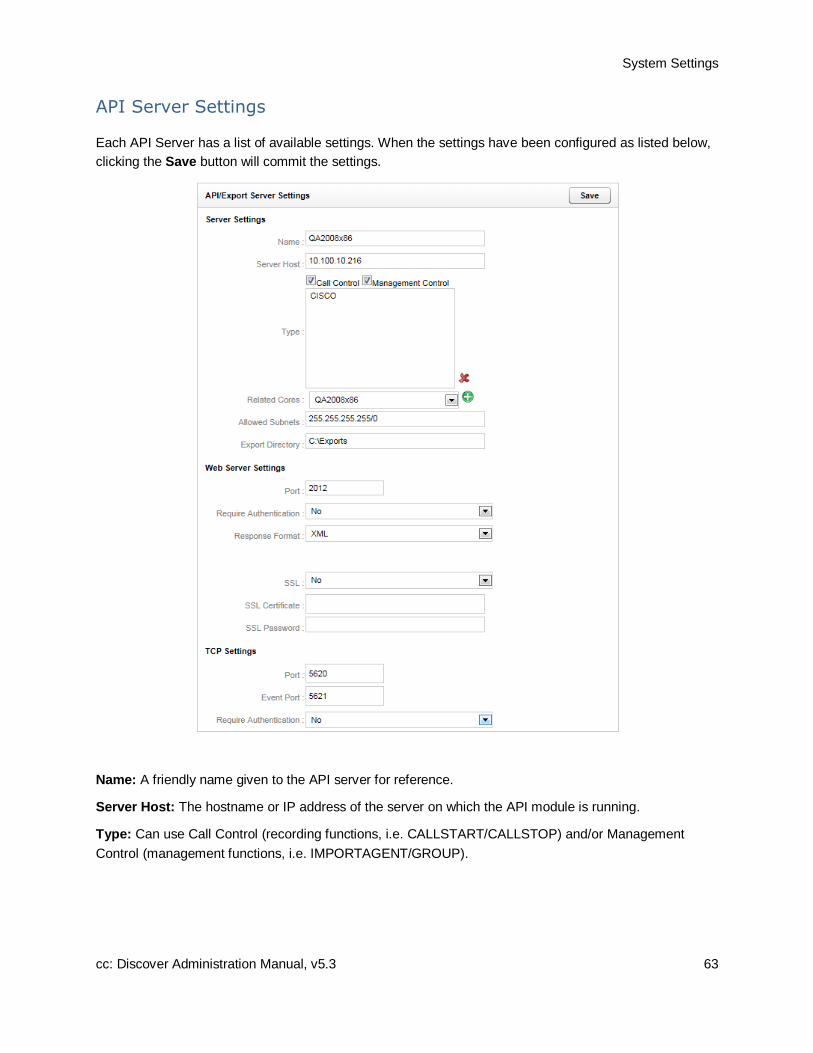
System Settings
cc: Discover Administration Manual, v5.3 63
API Server Settings
Each API Server has a list of available settings. When the settings have been configured as listed below,
clicking the Save button will commit the settings.
Name: A friendly name given to the API server for reference.
Server Host: The hostname or IP address of the server on which the API module is running.
Type: Can use Call Control (recording functions, i.e. CALLSTART/CALLSTOP) and/or Management
Control (management functions, i.e. IMPORTAGENT/GROUP).
System Settings
64 cc: Discover Administration Manual, v5.3
Related Cores: The CTI Core modules that are being serviced by this specific API Server instance.
Multiple Cores can be associated to a single API Server. Select the desired Core from the drop down
menu, and click the Add ( ) button to add it to the list. To remove a CTI Core, select it from the list and
click the Delete ( ) button.
Allowed Subnets: The API Server can be limited to accept requests from specific subnets only. By
default, requests from all addresses (255.255.255.255/0) are accepted.
Export Directory: Temporary location used for writing out files that are requested for export in the Web
Portal.
Web Server Settings
Port: The TCP port number that the API Server will accept HTTP WebAPI requests on. (Default is 2012)
Require Authentication: If enabled, all HTTP requests will have to provide the credentials of a user in
the cc: Discover system (not Active Directory credentials) in HTTP Basic Authentication format. If
authentication is required, other cc: Discover components will not be able to authenticate to this server.
For security purposes, it is possible to have an API server dedicated for Fusion/On-Demand with only Call
Control permissions (it cannot export) and a second API service that is used for exporting (it has
management permissions) . In this scenario, the second API service would have authentication enabled.
Response Format: Determines if API responses will be sent to clients in XML or SOAP format.
SSL: When enabled, all HTTP requests must utilize a secure SSL connection with a specified certificate.
SSL Certificate: Local path to the SSL certificate to use for encryption. Certificate must be in P12 format.
SSL Password: Password for the listed SSL Certificate.
Note The server must be rebooted for changes to this configuration to be effective.
TCP Settings
Port: The TCP port the API Server will listen for socket-based requests on. Default is 5620.
Event Port: The TCP port the API Server listens for Event Service calls from the CTI Core. Default is
5620 (the system is designed to receive all Port and Event Port messages on the same port).
Require Authentication: If enabled, cc: Discover user credentials must be passed on every connection
to the API socket.

System Settings
cc: Discover Administration Manual, v5.3 65
Archive Actions
Typically, disks on a local CallCopy system only have enough space to store recordings (i.e., audio and
video files) for a short time period. By establishing archives, additional drives can be attached so that
recordings can be stored indefinitely. Be aware that if a call is auto archived and/or deleted from the
server, the QA Evaluations performed on that call will remain on the database for historical searching and
review. However, if a call is manually deleted from the server, the QA Evaluations performed on the call
are deleted. If there are database entries for duplicate or missing files, the Archiver will continue trying to
archive these files unsuccessfully (and logging errors) until the invalid database entries are removed.
Recordings can be archived to local attached disks or to Windows Network File Shares (SMB). Archived
recordings are still available for playback, providing that the local disk is attached or the network file
system (SMB) is properly configured and available.
Archiving is controlled by:
Archive Actions: Archive actions control archiving for types of calls. For example, Client A requires
calls to be retained for one year, while Client B requires calls to be retained for two years. A One-
Year-Action and a Two-Year-Action can be created to archive the calls by clients.
Schedules: Schedules control when and what calls are recorded as well as how many days a
recording is retained. Archive actions are attached to schedules to control whether the recordings are
archived or purged once they exceed their retention days.
Notes
If a recording belongs to more than one schedule, the archive action for the schedule with the highest priority takes precedence. If priorities are equal, the earliest created schedule takes precedence.
Retention Days and Archive Actions are applied when the call is recorded. Changing this value in a schedule only applies to calls made AFTER applying the schedule change. Changing this value DOES NOT apply to already recorded calls.
Before you create a schedule that will require archived recordings, you should first configure the
archive action. Typically, only administrators have permissions to create archives, so administrators
will need to be responsible for communicating archive settings to users. Schedules should be audited
on a monthly basis to ensure all necessary information is being archived.
Archiver: This software manages the storage of recordings and the backup of the cc: Discover SQL
database based on the Archive Action specified for a call and its call record. The Archiver settings
page controls the overall performance of the software.
Note Before the Archiver can back up the SQL databases, an initial backup must be done
manually through SQL Server Management Studio. See the cc: Discover Installation Guide.
Archive Console: This tool provides information on archive actions and some manual control over
them.
Note For details, see Archiver Console and Scheduling.

System Settings
66 cc: Discover Administration Manual, v5.3
Configure Archive Actions
To create/view an Archive Action, browse to the Administration tab of the Web Portal. Under the
System Settings menu, click Archive Actions.
A list of the Archive Actions configured on the server will appear.
Note An archive will still display as active (i.e., Status equals A) even if an archived location is
technically unavailable. If an archived location is unavailable, the system notification tool will issue an
alert.
Follow these steps to create a new Archive Action:
1. On the Archive Action List, click Add.
2. Configure the needed settings. (See the settings information below.)
3. Press Save. The action appears in the list.
4. After an archive action is created, it has to be attached to a schedule in order to be used. For details,
see Scheduling.
To edit an existing archive action, click that action’s name in the list.

System Settings
cc: Discover Administration Manual, v5.3 67
Archive Action Settings
The Archive Action settings page will allow you to configure the desired archive actions.
Name: Name of the Archive Action. This name will also appear in the list of available Archive Actions in
the Scheduling section.
Storage Type: Choose the available storage type. The Archiver allows archiving to the following types:
Disk: The Location field must be a local drive path to Windows. The Archiver service credentials must
have read/write access to the drive for proper operation.
SMB: A SMB/CIFS network file storage share. If selected, the following options will appear:
User ID: If the storage location requires credentials, enter the username here.
Password: If the storage location requires credentials, enter the password here.
Location: The UNC path to the CIFS storage location used for archiving.
Note If the cc: Discover is unable to write to the SMB file share, the cc: Discover Notification
System will generate an alert.

System Settings
68 cc: Discover Administration Manual, v5.3
DVD: Recordable disc media (DVD+R, DVD-R, DVD+RW, DVD-RW single layer supported). If
selected, the following options will appear:
DVD Drive: The Archiver will auto-detect any compatible DVD drives installed on the system and
use the first one that has a blank disk in it.
Archive Time: The time of day the Archiver will start creating the DVD archive. It is recommended this time is set to the lowest usage period for the system, as creating the archive requires high system resources.
Note Archive actions using the DVD storage type will only execute once per day. DVD media
must be manually removed and new media inserted on a daily basis.
XAM:
Retention Period (days): Number of days that the Centera server will retain the archived files. This setting is used instead of the Next Archive Action setting.
PEA File: Required only if security authentication is needed to access Centera storage server. Full path name of the Pool Entry Authorization file for accessing the server.
Server IP Address: Centera server IP address, or multiple addresses, comma-separated.
Location: A direct file path can be entered here for the archive destination, or the path and/or file names
can be customized using file masks. File masks are only available for Disk and SMB storage types. The
available file masks are as follows.
%Y Four-Digit Year %A Agent Number (ID)
%y Two-Digit Year %R Record ID
%M Two-Digit Month %C Counter
%m Month Name (three-letter abbr. –
Jan, Feb, May, Dec)
%F Filename without path
%D Two-Digit Day %P path minus root*
%d Day Of Week (Name) %P<-1> path minus root remove 1 bottom
directory
%H Hour %P<1> path minus root remove 1 top directory
%N Minute %U<1>
through
%U<15>
user fields
%S Second

System Settings
cc: Discover Administration Manual, v5.3 69
For example, for the path "C:\recordings\test\device10\10-100-100.wav" these are the variables that
would be used and what they represent:
%P<-1> test\device10
%P<1> recordings\test
%P recordings\test\device10
%F 10-100-100
If no mask is specified, it will default to "%P\%F"; if only "C:\recordings\" or "C:\recordings" is entered, the
Archiver will default to "C:\recordings\%P\%F".
*If %P is not used in the file mask, the Archiver will determine one on its own using the following process:
1. Archiver checks the Core the file was recorded on. If it can find the right Core, it gets the default file
mask.
2. Archiver tries to match the filename of the file to the default file mask. If it matches, it will remove the
rest of the path that does not match.
3. If it does not match, it will remove the drive letter only.
4. The path is put at the end of the archive location, forming the new path.
The file is then archived using the generated mask.
Archive Restriction: This option specifies whether archived recording files are saved with Audio, Video,
and Analytics data, or if only a single component will be archived with the recorded audio.
Archive Everything: Archives Audio, Video and Analytics data.
Archive Audio Only: Archives only the audio portion of the record.
Archive Audio & Analytics Only: Archives Audio and Analytics data.
Archive Audio & Video Only: Archives Audio and Video data.

System Settings
70 cc: Discover Administration Manual, v5.3
Archive Type: The Archive Type determines how the files will be moved from the original location to the
archive location.
Normal: The files are moved to the archive location and then deleted from the original location. The
cc: Discover database call records for the files are updated with the new location of the file. Users can
access the archived file from cc: Discover if the archive location is accessible. Otherwise, the location
must be made accessible. If the recording was archived to a DVD, cc: Discover notifies an
administrator to load the disk and notifies the user when the recording file is available.
Copy: A copy of the original files is created in the archive location, and the files in the original location
remain untouched. If the files are later purged from the original location, they must be manually
restored for cc: Discover to access them.
Backup: The files are copied to the archive location and the original files are left alone. The call
records are copied to a backup table in the cc: Discover database and updated with the address of
the backup location. When the original file and call record are purged, the backup call record is
moved into the live database, making the file retrievable from the backup location.
Status: This is an indicator set by the administrator to show if the action is available for use (Active). This
does not affect the operation of the action or how it is attached to any recording schedules.
Next Archive Action: Sets the next desired action to be taken against the archived data. If there is
multiple archive actions created, another action can be selected. This allows chaining actions together to
move data between multiple archive locations. The Purge action can also be selected to delete the data
when the next archive action is performed. If no changes are to be taken on the files after the archive
action completes, select <None>.
Days until Next Archive: This sets the number of days between the successful execution of the current
archive action against the record, and the execution of the action in the Next Archive Action field above.
Use Schedule: When enabled, the archive action will only run during the time of day specified. This
setting is used to prevent overloading the system or connected environments with additional I/O during
peak hours.
Note This option is not available if DVDs are used.
Start Time/End Time: The time of day restriction for the action. The action will only run between these
hours if the Use Schedule setting is enabled.
Note This option is not available if DVDs are used.

System Settings
cc: Discover Administration Manual, v5.3 71
Archiver
The main purpose of the Archiver settings page is to throttle disk and network usage caused by Archive
Actions. This will prevent Archive Actions from overwhelming local system resources or network
bandwidth.
Note Before configuring the Archiver, review Archive Actions.
General Settings
Archiver Server Host: The IP Address or Hostname of the server running the Archiver service.
Archiver Server Port: The TCP Port the Archiver service is configured to listen on. (Default is 5639)
Purge Limit: This setting throttles the number of records purged from the local CallCopy system per
Purge job. A setting of 0 (zero) means unlimited: the system will purge all records ready to be purged in
the database.
Purge Interval: Time interval in minutes between running Purge jobs.
Archive Limit: Number of records sent to the archive per Archive job. A value of zero (0) will cause no
recordings to be archived, so it’s best to have a value greater than zero.
Archive Interval: Time interval in seconds between running Archive jobs. The system default is 60
seconds, and this value should be sufficient for most installations.
Enable Settings Reload: If set to ‘Yes’, settings on this page will automatically reload on an interval. If
set to ‘No’, the service will need to be restarted for the settings to take effect.
Settings Reload Interval: The time in seconds that the module will reload its settings from the database.
Any changes made to the settings on this page will not take effect until this interval has completed.
Hash Filename: When the record is archived, associated files are renamed as the SHA-1 hash of the
original path the record was stored at. This is to prevent possible duplicate filenames in the archive
location. This setting is not normally needed unless the original recording files have the potential of being
named the same.
Enable Empty Directory Purge: Enabling this setting will have the Archiver module periodically scan all
directories in any recording locations and remove any folders that have no files inside.
Record Purge on no RTP: This setting will remove records that are recorded when no audio is present
on the line. This setting is only effective in VoIP configurations and is mainly used to compensate for false
positive recording triggers in passive VoIP installations.
System Settings
72 cc: Discover Administration Manual, v5.3
System Purge Action
Use Schedule: If enabled, the Purge job will only run between the specified hours of the day. This setting
is used to prevent overloading the system or connected environments with additional I/O during peak
hours.
Start Time/End Time: The time of day restriction for the Purge job. The job will only run between these
hours if the Use Schedule setting is enabled.
Removable Media Settings
Playback Temp File Location: This is the location that any records restored from DVD backup will be
copied to for playback.
Temp File Retention: The number of days a restored recording will be available for playback before it will
need to be restored from DVD again.
Send Users Email Alert: If set to ‘Yes’, the Archiver will send an e-mail notification to the user that
requested a record be restored from backup when that record is available for playback.
MSSQL Database Backup Settings
Enable MSSQL DB Backup: Enabling this setting will have the Archiver initiate a daily backup of ONE of
the cc: Discover databases. This feature is useful if the installation is utilizing an SQL Express database
that cannot use scheduled backups.
Database Name: The name of the database that will be backed up.
Backup Filename: The location of the backup file that will be used. The location of this file is determined
during the cc: Discover installation. Please refer to the cc: Discover Installation Guide, section "Backup
the SQL Database" for more information.
Database Backup Time: The time of day that the backup job will be run. It is highly recommended that
this time be set to the lowest usage period of the day.
Custom Extensions
This page is reserved for custom settings if Professional Services development was completed for your
installation. Please contact CallCopy Support if you have any questions regarding settings listed on this
page.

System Settings
cc: Discover Administration Manual, v5.3 73
Disk Space Notifications
The Disk Space Notifications page can be used to monitor Free Space on any local or mapped network
drives that the Archiver tool accesses. (The Archiver tool manages disk utilization for original recordings,
archives, and the SQL databases.) If a specified drive drops below the free space threshold set, the
Archiver will send out a notification message, which will be sent to any e-mail addresses in the
Notifications list that have the Disk Alert notice type selected.
Follow these steps to add a drive entry to the list:
1. Click Add in the top-right of the page. A new entry will appear at the end of the list.
2. In the Drive column, enter the drive letter followed with a colon.
3. In the Notification Threshold field, enter the minimum free space (in megabytes) that needs to be
available on the drive.
4. Click the Save icon to add the entry to the list.
To edit an existing entry on the list, click the Edit icon . The fields in that row will become editable.
Make any changes needed and click the Save icon to update the entry.
To delete an existing entry, click the Delete icon . A confirmation window will pop up. To confirm the
delete, click OK.

System Settings
74 cc: Discover Administration Manual, v5.3
Info Broker Settings
The Information Broker manages how system components communicate with one another, promoting
greater scalability, resiliency, and compliance while reducing resource bottlenecks and potential break
points. The Info Broker service allows for greater system growth, expandability, and scalability by splitting
the Web Media Server's tasks between it and the Info Broker, allowing it to direct Live Monitor traffic and
requests between components rather than sending all traffic to the Web Media Server.
The Information Broker service can be monitored by the existing CallCopy service manager and restarted
as needed. The only feature wholly reliant on the Info Broker is Live Monitoring, so critical services will
continue to operate in the event that the Information Broker goes down or needs to be restarted.
When the Information Broker service starts up, it retrieves information from the CallCopy database about
devices, modules, hosts, and ports. It then sends a message to Core(s) asking for the current state of all
devices the core handles. The Information Broker also identifies all Web Media Servers and maintains a
list that it uses to direct data within a Location to specific servers. The Info Broker does not actively
communicate with the Screen Capture Servers unless it receives messages from them.
The Info Broker service is started during the installation process, and is required only in environments
using Live Monitoring. Please refer to the cc: Discover Installation Guide for more information on that
process. Follow these steps to configure the Info Broker:
1. Go to the Web Portal’s Administration tab > System Settings > Info Broker Settings.
2. Enter the appropriate values for the following settings:
Host: IP address of the server running the Info Broker service.
Port: Communications port on the server running the Info Broker service. Default is 50817.
HTTP Timeout Seconds: The timeout for individual communication requests between the Info
Broker and the Screen Capture Server, Core, and Live Monitor page. If the Info Broker does not
receive communication from Core within the specified time, it assumes it is not running and all the
calls on devices it was recording have ended. The default is 5 seconds.
Live Monitor Client Timeout Seconds: This is the amount of time that can pass without the Info
Broker hearing from a connected Live Monitor client before a timeout occurs. The default is 30
seconds.
Media Timeout Seconds: The timeout for the connection to Cores and Screen Capture Clients.
The default is 30 seconds.
Excessive Debugging: Checking this box adds detailed logging for the Info Broker, which can
be useful for troubleshooting.
3. Click Save.

System Settings
cc: Discover Administration Manual, v5.3 75
Locations Settings
The advent of the Info Broker introduced the concept of Locations, which allow for easy grouping of
Cores, Screen Capture Servers, and Web Media Servers for customers with multiple geographically or
logically separate sites. This also allows for better distribution of work between the Screen Capture
Servers and Web Media Servers within each Location, as well as reducing network traffic between
locations by prioritizing and utilizing local resources. Storing and retrieving data locally also means
customer locations are not isolated from their database or storage if a network outage occurs between
remote offices.
The standard configuration for Info Broker and Locations assumes a Core is present at each Location.
However, for environments where all calls come from only one Location and/or there is only a single Core
at one location that needs to send requests to Screen Capture Servers at several locations, agents can
be manually assigned to a location in their user profiles. In a multi-Location environment, a Web Media
Server must be configured for each Location where the customer wishes to use live monitoring.
API Servers are still assigned to Cores directly and are unaffected by the implementation of Locations.
A default Location is created during installation. If additional Locations need to be configured, follow these
steps:
1. Go to the Web Portal’s Administration tab > System Settings > Locations Settings.
2. Click Add.
3. Enter a name and description for the Location.
4. Click Save to commit changes, or Back to cancel changes.
To edit an existing Location:
1. Click the pencil icon ( ) on the Location to edit.
2. Make the necessary changes.
3. Click Save to commit changes, or Back to cancel changes.

System Settings
76 cc: Discover Administration Manual, v5.3
Logging Settings
Event logging is configured in the CallCopy components’ INI and configuration files and on the Web
Portal’s Logging Settings page. INI and configuration files specify the level of events the application
sends to the logger. The Logging Settings specify where logger writes the log files and the level of events
recorded to those files. For example, if an application is configured to send Debug and Info events, and
the logger is configured to write only Critical and Emergency events, all Debug and Info events will not be
written to the log files. Critical information may be lost due to this inconsistency. The number of days for
retaining log files is configured on the Notifications page. To configure logging:
1. Go to the Web Portal’s Administration tab > System Settings > Logging Settings.
2. The default Log Directory path can be changed. If this setting is changed, make sure that the new
directory has enough storage for the log file.
3. The logging levels correspond to the notification’s subscription types. CallCopy recommends leaving
all logging levels selected. Customers may opt to not log certain events. These settings configure
which logged events are passed on to notifications. For details, see Notifications. Settings that specify
which events are logged in the first place are configured for the Logger during initial installation.
Please refer to the "Logger Service" section of the cc: Discover Installation Guide for more
information on this configuration.
4. Click Save.
Mail Settings
These settings are for a mail account used by all features, such as evaluations, to communicate to users.
Configure these settings after creating an account in your email system. To configure the mail account:
1. Go to the Web Portal’s Administration tab > System Settings > Mail Settings.
2. Enter the Server Settings:
Mail Server Host: Enter the hostname or IP address of the SMTP mail server the CallCopy
server will be using to export recordings via email.
Mail Server Port: Identify the SMTP port that will be used.
From Address: This can be any email address, real or fake. It does not have to be an address
tied to the account for the entered username and password.
Display Name: This name appears on the emails sent from the account. This name does not
have to match the email account username.
3. Enter the Secure Settings:
Username: Enter the Username for authentication onto the SMTP server.
Password: Enter the Password for authentication onto the SMTP server.
Confirm Password: Re-enter the Password.
4. Click Save to record the changes to the database.
Note Any changes made to the mail settings require the API server to be restarted before calls
can be exported via email from the Web Player call list.
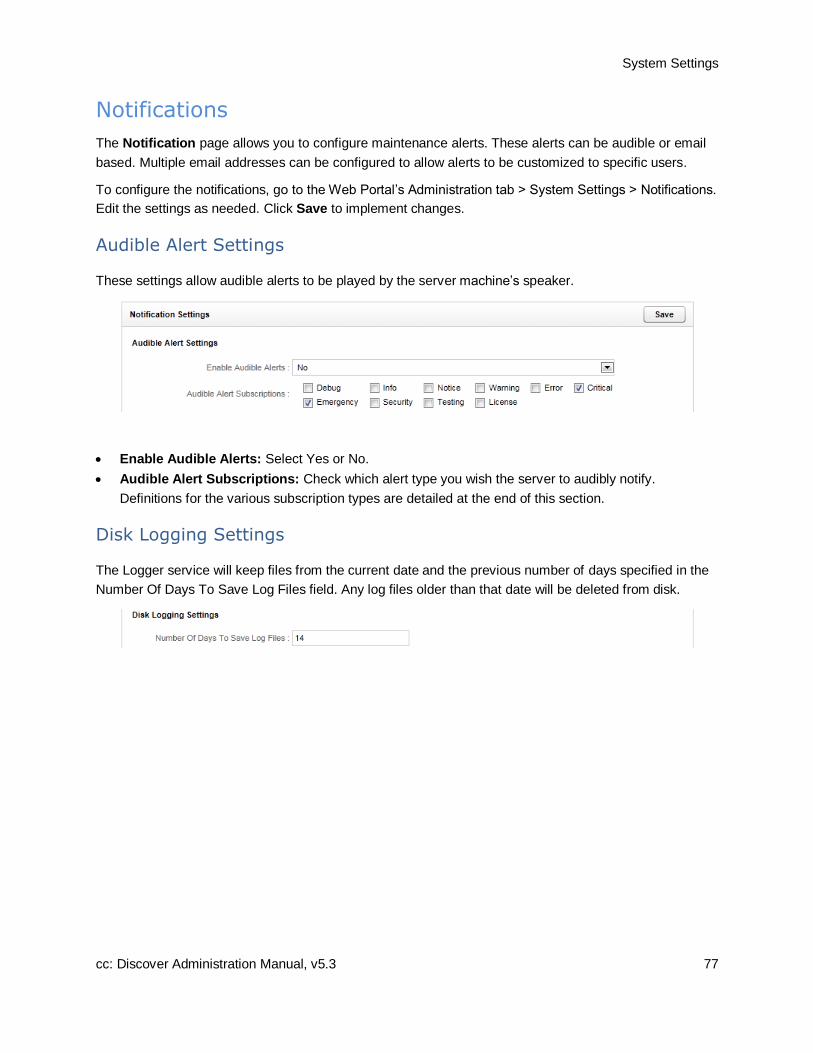
System Settings
cc: Discover Administration Manual, v5.3 77
Notifications
The Notification page allows you to configure maintenance alerts. These alerts can be audible or email
based. Multiple email addresses can be configured to allow alerts to be customized to specific users.
To configure the notifications, go to the Web Portal’s Administration tab > System Settings > Notifications.
Edit the settings as needed. Click Save to implement changes.
Audible Alert Settings
These settings allow audible alerts to be played by the server machine’s speaker.
Enable Audible Alerts: Select Yes or No.
Audible Alert Subscriptions: Check which alert type you wish the server to audibly notify.
Definitions for the various subscription types are detailed at the end of this section.
Disk Logging Settings
The Logger service will keep files from the current date and the previous number of days specified in the
Number Of Days To Save Log Files field. Any log files older than that date will be deleted from disk.

System Settings
78 cc: Discover Administration Manual, v5.3
E-Mail Notification Settings
These settings help configure e-mail alerting from the server. E-mail notifications can be sent any time a
log message is generated.
Enable Floodwall: Enabling will throttle e-mail alerts to prevent overloading the mail server.
Floodwall - Number of Allowed Messages: This value specifies the number of email messages that
the server will send per interval. Any further messages of the same type will be blocked until the
interval expires.
Floodwall - Number of Minutes: This defines the number of minutes per interval.
Disk Space Notification Interval: The interval in minutes between sending low disk space e-mail
alerts.
E-Mail Subscriptions
Click the Add E-Mail button to specify e-mail addresses that will receive alerts.
Email Address: Enter an e-mail address that will receive alerts. (Click the Delete ( ) icon to delete
an email subscription.)
Subscriptions: Check the event types the email address will to be alerted on. Definitions for the
various subscription types are detailed at the end of this section.
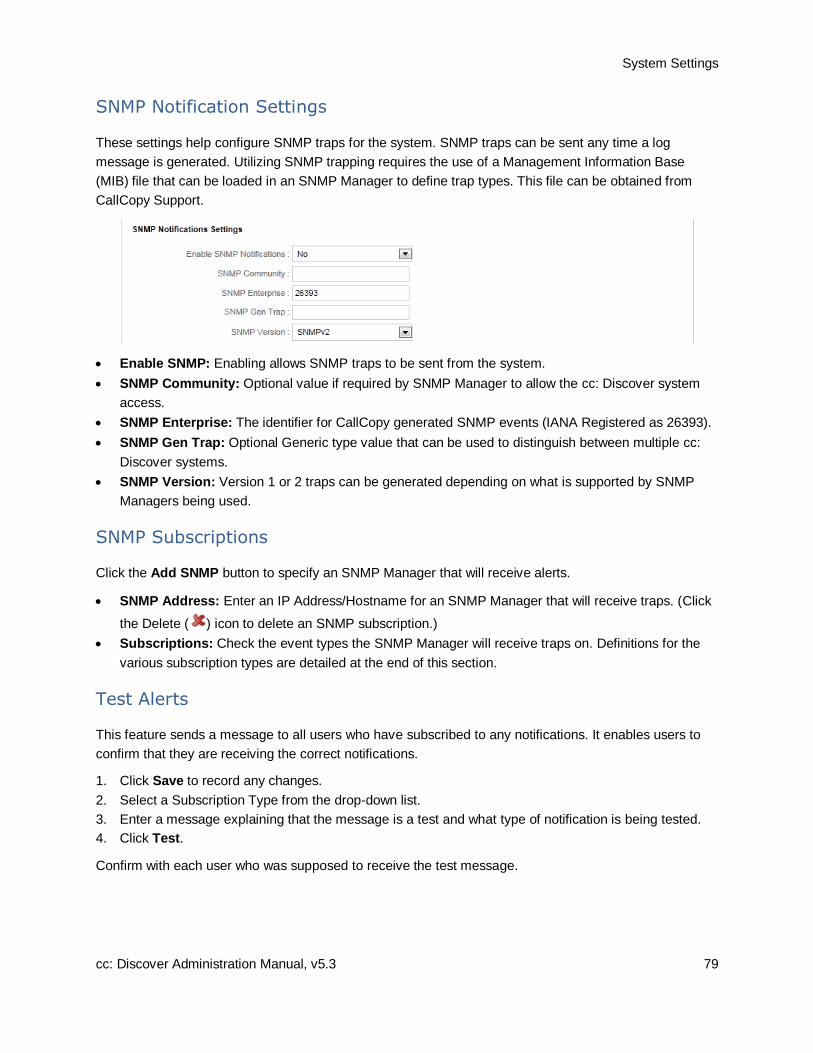
System Settings
cc: Discover Administration Manual, v5.3 79
SNMP Notification Settings
These settings help configure SNMP traps for the system. SNMP traps can be sent any time a log
message is generated. Utilizing SNMP trapping requires the use of a Management Information Base
(MIB) file that can be loaded in an SNMP Manager to define trap types. This file can be obtained from
CallCopy Support.
Enable SNMP: Enabling allows SNMP traps to be sent from the system.
SNMP Community: Optional value if required by SNMP Manager to allow the cc: Discover system
access.
SNMP Enterprise: The identifier for CallCopy generated SNMP events (IANA Registered as 26393).
SNMP Gen Trap: Optional Generic type value that can be used to distinguish between multiple cc:
Discover systems.
SNMP Version: Version 1 or 2 traps can be generated depending on what is supported by SNMP
Managers being used.
SNMP Subscriptions
Click the Add SNMP button to specify an SNMP Manager that will receive alerts.
SNMP Address: Enter an IP Address/Hostname for an SNMP Manager that will receive traps. (Click
the Delete ( ) icon to delete an SNMP subscription.)
Subscriptions: Check the event types the SNMP Manager will receive traps on. Definitions for the
various subscription types are detailed at the end of this section.
Test Alerts
This feature sends a message to all users who have subscribed to any notifications. It enables users to
confirm that they are receiving the correct notifications.
1. Click Save to record any changes.
2. Select a Subscription Type from the drop-down list.
3. Enter a message explaining that the message is a test and what type of notification is being tested.
4. Click Test.
Confirm with each user who was supposed to receive the test message.

System Settings
80 cc: Discover Administration Manual, v5.3
Subscription Types
CallCopy recommends that these alert types always be monitored:
Critical: A service or system has stopped functioning completely due to an error. It is recommended
that at least one email subscription notify on this alert type.
Emergency: A service or system has stopped functioning completely due to a configuration or
resource issue.
License: The system is reaching a license limitation or someone is attempting to use an unlicensed
feature. License events that are logged and generate notifications are:
License Expired
License Corrupted
License Invalid (no license for an accessed feature)
For Avaya: a recording does not occur because the number of Avaya licenses has been
exceeded.
Error: A system error has occurred that caused a single operation or transaction to fail.
Security: A security event, such as multiple password failures, has occurred.
These alert types are useful in some specific situations:
Warning: An event occurred that could be related to further errors. This event type is mainly used in
troubleshooting and is not recommended to be enabled by default.
Info: General system information.
Notice: An informational notice regarding system events.
Testing: Enhanced debugging and development information enabled for troubleshooting.
Debug: Highest volume/detail output for all modules. This type is not recommended for alerting.
System Settings
cc: Discover Administration Manual, v5.3 81
Screen Capture Settings
This section is used to configure the Screen Capture Server(s) for customers using the Desktop
Recording feature.
1. In the Web Portal, go to Administration tab > System Settings > Screen Capture Server Settings.
2. Click Add.
3. Fill in the appropriate values for the following settings:
Host: IP address of the Screen Capture Server.
Port: Communication port of the Screen Capture Server.
HTTP Port: The port used for messaging traffic with Info Broker. Default is 2014.
Write to Temp: Enable unless the Screen Capture Server is local to the recording location.
Default Temp Location: Location for temporary video files written by server.
Raise Error on Start Fail: When enabled, an error level notification is generated every time the
server cannot initiate a recording with a client.
SSL Certificate Name: Enter the certificate filename.
SSL Certificate Pass: Enter a password if the certificate is not in the IIS store and Discover will
need to load it.
Screen Capture Path: Enter the path where screen captures will be stored.
Location: Location with which this Screen Capture Server is associated.
4. Click Save to commit changes, or Back to cancel changes.

System Settings
82 cc: Discover Administration Manual, v5.3
Server Nodes
The Server Nodes page under the System Settings menu lists machines or virtual machines that are
running cc: Discover software modules. A separate entry must be created for each machine running
modules.
The central Service Manager tool uses this list to know where to look for cc: Discover modules. Adding,
deleting, or editing a server node adds, deletes, and changes a corresponding Comet Daemon. If you
change a node, you must check the setting of the daemon.
If services are being added or moved to new machines, complete the new installation, then add the
services to the new node. Delete the old node only after the new services are running correctly.
Follow these steps to add a Server Node:
1. In the Web Portal, go to Administration tab > System Settings > Server Nodes.
2. Click Add Node on the Server Node Settings.
3. Enter a friendly name for the Server Node for reference.
4. Enter the hostname or IP address of the Server Node.
Note Starting in v5.3, the remaining settings on this page are ignored; recording file storage paths
are managed within Schedules.
5. When the settings have been configured, click Save Node to commit the settings.
After creating a node, configure the corresponding Comet Daemon and Service Manager entry.
For existing nodes:
To change the settings for a Server Node, click the Edit ( ) icon on the right side of the row.
To delete a node, click the Delete ( ) icon. Nodes should not be deleted if services are attached to
them.
System Settings
cc: Discover Administration Manual, v5.3 83
Web Media Server Settings
The Web Media Server service is started during the installation process, but additional configuration can
be performed in the Web Portal. The Web Media Server can be used for just playback, just live monitor
streaming or both.
1. In the Web Portal, go to Administration tab > System Settings > Web Media Server Settings.
1. Click Add.
2. Fill in the appropriate values for the following settings:
Host: IP address of the Web Media Server.
Silverlight Port: The port used to play recordings and stream live audio.
Media Port: The port used for messaging traffic with Core and Screen Capture Server. Default is
5630.
HTTP Port: The port used for messaging traffic with Info Broker. Default is 2015.
Allow Live Monitor: Must be checked for the Web Media Server to be used for Live Monitoring.
Excessive Debugging: Checking this box adds detailed logging for the Info Broker, which can
be useful for troubleshooting.
API Host: IP address of the API Server. This is only used for exporting recordings via email.
API Port: Port used to communicate with the API Server.
API Reconnect Milliseconds: Frequency with which the TCP connection to API server will
attempt to reconnect in milliseconds.
API Connect Timeout Milliseconds: How long in milliseconds before the connection timeout
occurs with the API server when connecting. If it takes longer than this, we quit trying to connect
and sleep until the next reconnect attempt.
API Response Timeout Milliseconds: Amount of time waiting for a response from API server
before we consider the request to have timed out in milliseconds.
SSL Certificate Name: SSL certificate file name (no path required)
SSL Certificate Pass: SSL certificate password
Location: Location with which this Web Media Server is associated.
Mapped Drives: Drive settings – This is in case the recording path is different from what is
available to WMS. The system can set an internal drive map so that if the filename says
f:\recordings, but for WMS it is on Z:\recordings, the system can switch it so that f: becomes Z: on
WMS side.
3. Click Save to commit changes, or Back to cancel changes.

System Settings
84 cc: Discover Administration Manual, v5.3
Web Server Settings
These settings should be configured during the initial installation. Several CallCopy services utilize the
Web Server services such as call playback. For example, when reviewing reports, users can click links in
reports to play calls. cc: Discover detects the Web Server IP address and port during startup. When the
CallCopy services are distributed on multiple machines and the machine hosting the Web Server has
more than one network interface card, cc: Discover may detect the wrong IP and port. In this case, the
Reporting Server is provided the wrong information and not able to access the Web services. Users
receive an access error message. Manually setting the Web Server settings avoids this problem.
Note the explanation on the page. These settings do not configure IIS. If the manual override is not used,
the settings may be changed by other processes.
Follow these steps to enter the settings:
1. Go to Administration tab > System Settings > Web Server Settings.
2. Set Manual Override to ‘Yes’.
3. Enter the values from the IIS server hosting the Web Server:
Web Server Host: IP address.
Web Server Port: Port used to communicate.
Requires Secure Connection (SSL): Select ‘Yes’ if SSL has been setup on IIS.
4. Click Save.

System Settings
cc: Discover Administration Manual, v5.3 85
If Manual Override is disabled after having been enabled, the values in the Web Server Host and Web
Server Port field will be blanked. If this happens, users will not be able to play back calls from links in
reports until the values are restored. There are two ways to resolve this.
1. Open the web.config file, add a blank line at the beginning or end, save it, delete the blank line you
just entered, save it again, reopen the site and it will recompile the web.config and re-insert the
default automatic values for these fields. This method requires a bit more time/care but is less
invasive than #2 because it only affects cc: Discover.
2. Open IIS, restart the Application Pool for CCWeb, or restart the IIS service entirely. This method is
perhaps easier, but if other sites at the company rely on IIS, restarting it as a whole could cause a
brief interruption in service.
Once you apply your chosen fix, go back to Administration -> System Settings -> Web Server Settings
and verify that the fields are now filled.
System Settings
86 cc: Discover Administration Manual, v5.3
Workstations Settings
Core uses the Workstations List to determine which Screen Capture Server to send messages to, and is
not used in all installations. For more information about these settings, please see the "Screen Capture
Server Configuration > Add Workstations" section of the cc: Screen Administration Manual.
Settings.ini
This file stores settings for a wide range of software components, including survey configuration, software
modules, archiving, and settings and credentials for accessing the CallCopy databases. If you are
interested in encrypting the credentials stored in this file, please contact CallCopy Support and reference
knowledge base article # 000001461. It is strongly recommended that customers do not attempt to
modify the contents of this file. Doing so may cause components or even the entire system to stop
working. If you suspect that your system is configured incorrectly or if your CallCopy system is not
operating or performing as expected, please contact CallCopy Support to investigate the issue.
Web Portal Settings
cc: Discover Administration Manual, v5.3 87
Web Portal Settings To access these settings, click the Administration tab in the Web Portal and then click Web Portal
Settings.
Comet Daemon
When a server node is created, a corresponding Comet Daemon is created in the Web Portal. The Comet
Daemon manages connections to cc: Discover’s software modules. For example, the Service Manager is
a module, and the Comet Daemon manages connections between it and the CallCopy services on the
node. The Comet Daemon Settings page lists all daemons by server nodes and the nodes IP Address.
Follow these steps to edit a Comet Daemon:
1. On the Web Portal’s Administration tab, click Web Portal Settings > Comet Daemon.
2. Click the triangle for a server node/Comet Daemon to view the settings.
3. Edit the Comet Daemon Server Settings:
HTTP Port: This value should not be changed.
HTTP Address: If the server on which the Web Portal is installed is assigned multiple IP
addresses, this field can be used to restrict access to only one of those addresses. Using 0.0.0.0
uses all of the addresses.
HTTP Session Time Out Minutes: If the daemon does not receive a message from the Service
Manager within the specified minutes, it ends the session.
Allowed Subnets Client: (This subnet can use CIDR notation and be comma separated.
Determines what IP ranges are valid.) IP ranges clients are allowed to communicate with Insight
from.
Allowed Subnets System: (This subnet can use CIDR notation and be comma separated.
Determines what IP ranges are valid.) Secure range where Service Manager can communicate
with Insight server. For optimal security, this range should be limited so that only administrators
can access the server. In multi-server configurations, on the Web Portal server node, set this to
the subnet/IP of the server.
Allowed Subnets Session: Enter the IP address of the Web Portal used to access the node for
this daemon. (This subnet can use CIDR notation and be comma separated. Determines what IP
ranges are valid.) IP addresses where sessions can be initiated from. The client can start the
session in one subnet range. Once the session is started, it will continue the session using the
client subnet.

Web Portal Settings
88 cc: Discover Administration Manual, v5.3
4. Edit the Service Manager Module Settings:
Site IP: Informational only. Cannot be changed.
Status Timer Interval: Time in milliseconds for "heart beat" polling with the Comet Daemon.
Configuration Timer Interval: Time in milliseconds for reloading the module’s settings.
Search Directory: This is the CallCopy Install directory. The module knows what CallCopy
services are available based on the directories contents. If the CallCopy software was installed to
a different directory, this setting must be changed to that directory. This field is case sensitive.
5. Click Save.
Security
The Security page controls login and password settings for the Web Portal. Other security features, such
as recording file encryption, SSL, TLS, and IIS settings for session and login security are addressed by
different settings. For settings details, see System Security.
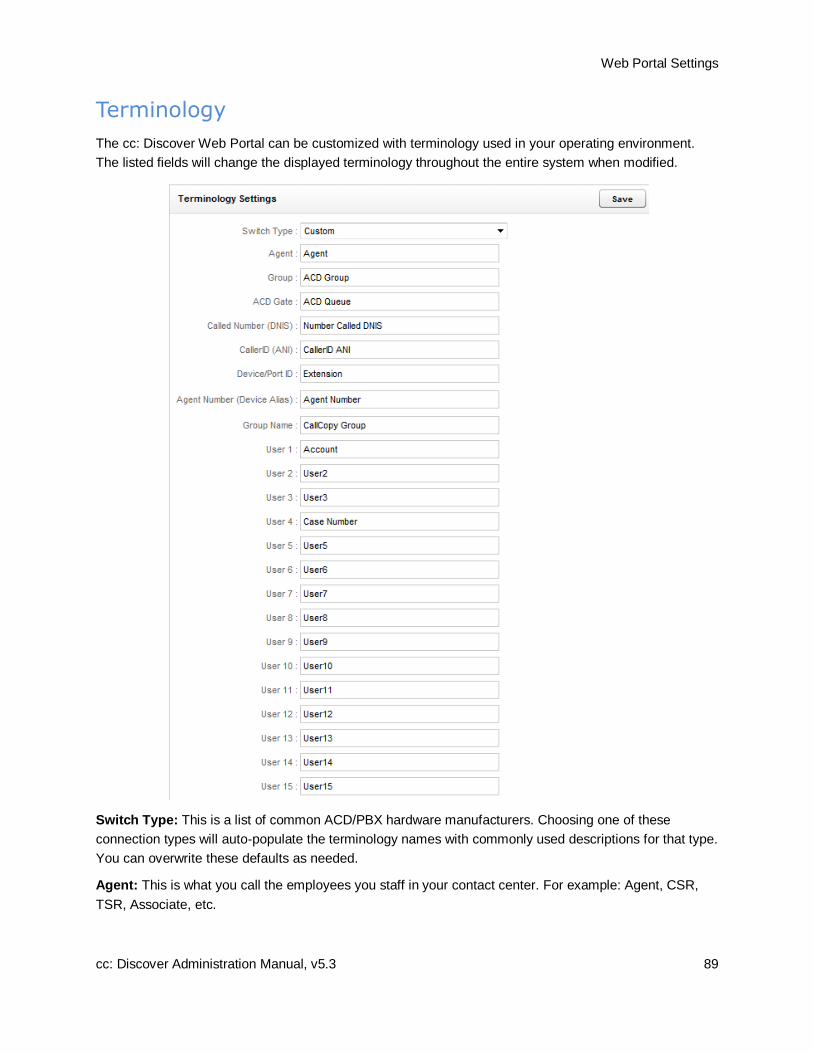
Web Portal Settings
cc: Discover Administration Manual, v5.3 89
Terminology
The cc: Discover Web Portal can be customized with terminology used in your operating environment.
The listed fields will change the displayed terminology throughout the entire system when modified.
Switch Type: This is a list of common ACD/PBX hardware manufacturers. Choosing one of these
connection types will auto-populate the terminology names with commonly used descriptions for that type.
You can overwrite these defaults as needed.
Agent: This is what you call the employees you staff in your contact center. For example: Agent, CSR,
TSR, Associate, etc.
Web Portal Settings
90 cc: Discover Administration Manual, v5.3
Group: This is the Group setting in your ACD/PBX, for example a Hunt Group, a Skill Group, or a Labor
Group. This does not refer to the CallCopy Group.
ACD Gate: This field refers to a queue. Different ABD/PBX systems have different terms for the queue,
for example Application, Split, Gate, etc.
Called Number (DNIS): Dialed Number Identification Service - call identifier from the telecommunications
carrier.
CallerID (ANI): Number of the calling party provided from the telecommunications carrier.
Device/Port ID: This is the ACD system’s hardware identifier. It may be referred to by the ACD/PBX
manufacturer as a position ID, phone port, DN, or extension.
Agent Number (Device Alias): ACD or PBX phone number/extension to which calls are delivered. This
is commonly an agent phone login or extension.
Group Name: CallCopy agent group. For details, see Groups.
User 1 – 15: These are custom data fields that are not normally utilized in the system. If your system is
performing custom API integrations, it is common for data received from third party IVR, CRM, or ACD
platforms to insert data into these fields. The fields may be renamed on the Terminology page to be more
descriptive regarding the data contained within the field.
Click Save when you have finished customizing the Terminology to reflect your operations.
Notes
The settings on this page can be automatically populated via the CallCopy API. Further
documentation regarding the API can be found in the CallCopy API Manual.
Angle brackets (i.e., < >), some special characters, and symbols may cause interactions with
User fields not to work. System administrators using these fields with the CallCopy API must
thoroughly test any calls they make. On-Demand users should be trained to avoid use of these
characters.
Terminology page settings changes will not appear in the ad hoc reporting pages immediately.
The cc: Discover application pool in IIS must be recycled in order for the changes to appear.
Web Portal Settings
cc: Discover Administration Manual, v5.3 91
Web Portal
The Web Portal page contains settings for configuring the Web Portal and Web Player. The page can be
accessed by browsing to the Administration tab > Web Portal Settings > Web Portal.
Content Management – Upload Directory: The disk or UNC path where files uploaded to the
Content Library are stored. For typical installations, cc: Discover runs under the IUSR/IIS_IUSRS
account, which will not have permissions to this default directory.
Fusion Script Settings – Upload Directory: If the CallCopy Fusion application was purchased, the
scripts used to manage Fusion clients are loaded into this directory. Make sure that the account
under which the Fusion server runs has access to this directory.
Location Settings – Allow Lookup by Agent/Workstation: Enable this setting ONLY if the
customer's environment is segmented in a way that inhibits standard agent lookup by Location. For
example, if all their telephony hardware and call routing is done from one location with agents, Screen
Capture Servers, and Web Media Servers set up at other Locations and agents cannot be grouped
logically into the primary location for audio recording, enabling this setting would ensure that agents
at the locations apart from the telephony system will have Screen Capture and Live Monitoring traffic
kept local to their site. Enabling this setting requires the Location setting to be configured for each
agent in the system. (CallCopy Install and Support personnel may consult development and/or sales
engineering to determine whether this setting/feature applies to a specific scenario.) If this setting is
enabled, every Core will connect to every Screen Capture Server. For more information on assigning
agents to specific Locations, see Add a User.
Call Segment Settings – Allow Call Segments: Determines whether Call Segments will be
generated and related for viewing in the Call List. Please refer to the cc: Discover Web Player Manual
for details on Call Segments.
Call List Quick Filters: Select items to have them appear as filters on the Web Player tab for all
users. The names of these items can be changed on the Terminology page.
Number of Items to Display: This sets the number of rows to return per page on the site, except on
Printable Reports and the Call List.
Display data value when building ad hoc reports: This setting controls whether preview data
appears on the Report Builder page in ad hoc reporting for both cc: Discover and cc: Clarity (if only
cc: Clarity is installed, this option is not available and is enabled by default). If set to Yes, data for a
field appears or disappears on the Report Builder preview each time the user moves a field to/from
the Structure area. The database is queried upon each of these changes, so if a timeout is
encountered, this feature can be disabled, preventing data from being displayed in the report preview.

Web Portal Settings
92 cc: Discover Administration Manual, v5.3
Home Tab Widgets
This section allows you to upload and administer which widgets are available for dashboard configuration
on the Home tab. This content applies only to Home tab widgets. For specific information on configuring
dashboards and individual widgets, please refer to the cc: Discover Widget Administration Manual.
Important Adding or deleting a widget cycles the application pool in IIS, and will require a page
refresh and new login to see changes. This will force a logout for all connected users and should
be performed outside of regular business hours.
Widget DLLs are stored in "\Program Files (x86)\CallCopy\WebPortal\bin." If managing widgets remotely,
the web portal application pool in IIS will need Full Control permissions to this folder. To configure this:
1. Browse to and right-click on the bin folder on the server.
2. Click Properties.
3. Open the Security tab.
4. If the web portal application pool (typically named WebPortalAppPool) is not listed, click Edit. If it is
already listed, skip to step 8.
5. Click Add.
6. Under "Enter the object name to select," enter "IIS AppPool\[web portal application pool name]."
7. Click OK.
8. With the application pool selected, check the box for Full Control and click OK.

Web Portal Settings
cc: Discover Administration Manual, v5.3 93
Manage Widgets
Possible interactions with Home tab widgets include:
Upload: New widgets can be added by clicking the Upload button and selecting the corresponding
widget DLL. The Date column shows when the widget was uploaded or last updated. New versions of
existing widgets can be uploaded as well. If the file names are identical, the system will prompt for
confirmation to overwrite the existing widget. Uploading a new version resets the widget's date to the
current day.
Edit: Allows the Title (25 character max) and Description (200 character max) of the widget to be
modified. Changes take effect immediately, do not require clicking Save, and will not affect login
status of connected users.
Delete: Removes a widget from the system and removes the corresponding DLL from the server.
Removing a widget from the system removes it from any user dashboards where it was displayed.
Note It is advised that widget DLLs be backed up before deletion in case they are needed again
later. The following are included by default:
AssignmentInbox.dll
ForecastVsActual.dll
KPIPerformance.dll
LiveSnapshot.dll
NewsWidget.dll
QaPerformance.dll
ServiceLevel.dll
The maximum number of widgets that will be listed per page is determined by the Number of Items to
Display setting, found above the Home Tab Widgets section of Web Portal Settings. If more widgets than
that are uploaded, pagination will be used to view the rest.

Web Portal Settings
94 cc: Discover Administration Manual, v5.3
Manage Dashboards
Once widgets are configured on the Administration tab, custom dashboards can be created and managed
from the Home tab. The News dashboard/widget is displayed by default, but can be reconfigured or
removed.
1. Under Dashboard on the left navigation menu, click Manage Dashboards.
2. Click Add New Dashboard. The Add New Dashboard dialog opens under the Dashboard List.
3. Add a Name (must be unique, 25 characters max) and Description (200 characters max).
4. Check boxes next to the widgets to be displayed and click Add. The same widget can be displayed
multiple times on the same dashboard. A maximum of 10 widgets can be displayed per dashboard
(this is a browser performance constraint).
5. Choose whether to set this dashboard as the default.
Note If you view another dashboard, the default setting is overwritten. When you log in again, the
last dashboard viewed is displayed.
6. Click OK to commit changes or Cancel to close without saving changes.
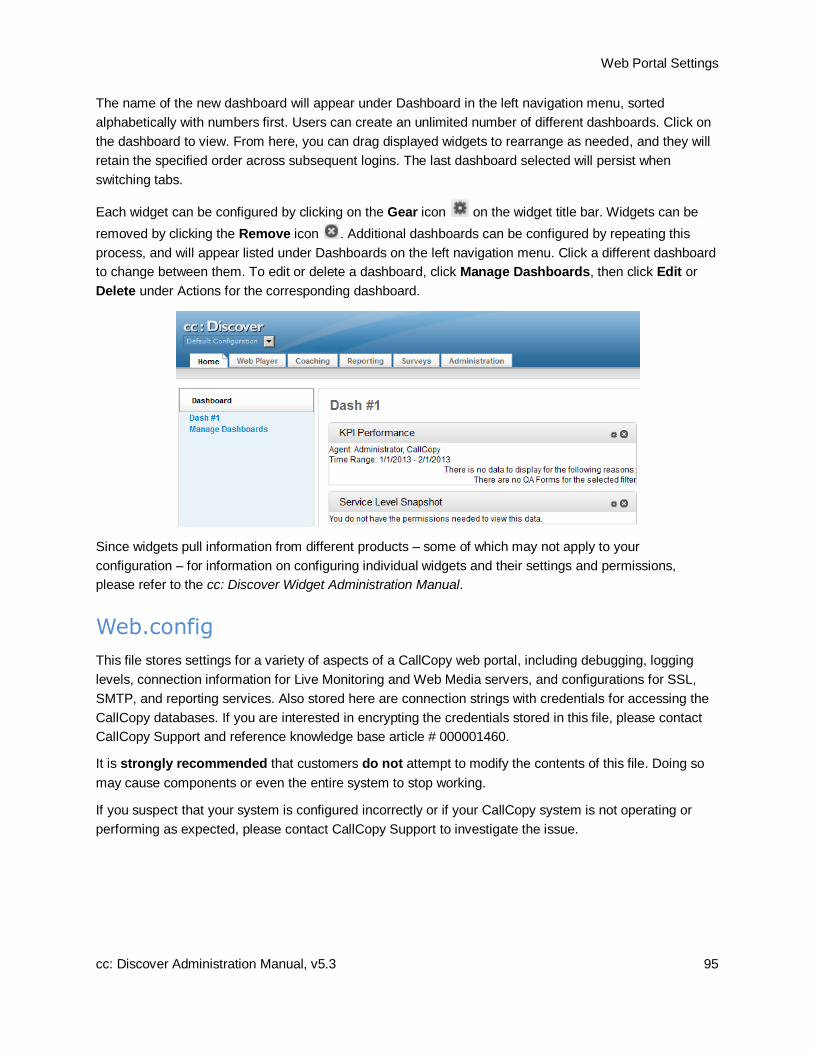
Web Portal Settings
cc: Discover Administration Manual, v5.3 95
The name of the new dashboard will appear under Dashboard in the left navigation menu, sorted
alphabetically with numbers first. Users can create an unlimited number of different dashboards. Click on
the dashboard to view. From here, you can drag displayed widgets to rearrange as needed, and they will
retain the specified order across subsequent logins. The last dashboard selected will persist when
switching tabs.
Each widget can be configured by clicking on the Gear icon on the widget title bar. Widgets can be
removed by clicking the Remove icon . Additional dashboards can be configured by repeating this
process, and will appear listed under Dashboards on the left navigation menu. Click a different dashboard
to change between them. To edit or delete a dashboard, click Manage Dashboards, then click Edit or
Delete under Actions for the corresponding dashboard.
Since widgets pull information from different products – some of which may not apply to your
configuration – for information on configuring individual widgets and their settings and permissions,
please refer to the cc: Discover Widget Administration Manual.
Web.config
This file stores settings for a variety of aspects of a CallCopy web portal, including debugging, logging
levels, connection information for Live Monitoring and Web Media servers, and configurations for SSL,
SMTP, and reporting services. Also stored here are connection strings with credentials for accessing the
CallCopy databases. If you are interested in encrypting the credentials stored in this file, please contact
CallCopy Support and reference knowledge base article # 000001460.
It is strongly recommended that customers do not attempt to modify the contents of this file. Doing so
may cause components or even the entire system to stop working.
If you suspect that your system is configured incorrectly or if your CallCopy system is not operating or
performing as expected, please contact CallCopy Support to investigate the issue.

System Security
96 cc: Discover Administration Manual, v5.3
System Security This section contains detailed settings needed to enable features like Hybrid and AD authentication, IIS
session timeouts, transport security (SSL/TLS), file encryption, an overview of Thales encryption, and
information on cc: Discover's PCI compliance status.
Security Design
This section explains cc: Discover’s high-level security design so that system administrators understand
how different features work together. Additional details may be available in sections specific to a cc:
Discover feature.
The general process for recording call audio, call data, and desktop data is as follows. Call audio comes
from the PBX or agent telephone. Call data comes from the PBX. Desktop screen capture data is
recorded from the agent’s PC over the LAN/WAN.
The recorders encrypt and write the audio and screen data to files on the Windows File Server. (Files are
not encrypted if the encryption keys are not created.) Files can initially be stored on the local server and
later written to another server based on schedules and available bandwidth. The temporary local files are
deleted. Records for each recording are created in the cc: Discover database for file and quality
management.
The audio and video files can be listened to and viewed from the file server by supervisors via the Web
Portal’s Web Player.
Recordings can be archived, if needed, to network attached storage, DVDs, ENC Centera XAM, or disks.
Records and archives can be configured with retention periods and automated purging.
Interactions between the cc: Discover suite components (e.g., servers, Web Portal), file servers, and
archive devices can use SSL if that feature is enabled. If users are recorded from remote locations or
access recordings from remote locations, a VPN must be established for PCI certification.

System Security
cc: Discover Administration Manual, v5.3 97
‘Blackout’ Sensitive Data
It is recommended that cc: Discover be configured via our API to be triggered to blank audio and screen
recording when sensitive data is being referenced or collected by any system. This feature is referred to
as a "blackout." Please refer to the cc: Discover Installation Guide for more information on configuring the
API server to perform blackouts.
In individual cases where this process fails and sensitive data is recorded to an audio or video file, these
files must be securely removed from the server using cc: Discover and a tool such as sdelete or Eraser.
Blackouts can be triggered two ways:
Manually using the "Start Blackout" and "Stop Blackout" options from the On-Demand client menu.
Can be used by an agent to apply blackouts to a captured call.
Automatically using cc: Fusion or a similar third-party application, which sends a scripted call to the
API server, which in turn issues BLACKOUTSTART and BLACKOUTSTOP commands to the
recording Core.
Blackouts do not stop the recording; they just prevent reviewers from hearing/seeing the blacked out
information. When the call and screen data is processed by the Transcoder, these start/stop events tell it
when to blank the screen and audio to protect sensitive information. The Transcoder deletes the recorded
content and replaces it with blank audio or video.
Here are a few features of blackouts:
A blackout is applied to an agent's entire call. If an agent's call has multiple instances, the blackout
criteria apply to all instances of that call. For example, if an agent answers a call, puts the call on
hold, calls a supervisor, ends the supervisor call, and returns to the original call, the blackout criteria
are applied to the entire original customer call and the supervisor call. The blackouts are inserted by
the Transcoder once the entire call is completed, so the number of activities performed during the call
does not impact this.
Blackouts are effective during call 'wrap' periods. The amount of wrap time allocated after a call is
determined by the associated schedule, which also tells cc: Screen to keep recording. API server
calls for blackout starts/stops are still being recorded and are applied during transcoding.
Blackouts can function with On-Demand recording.
Timed Schedules (screen-only recording done based on time schedules rather than call events)
cannot apply blackouts. Without call start/stop events from the device, it's difficult to associate
blackout events. However, if timed and non-timed events happen concurrently, blackouts can still be
applied to the non-timed events.

System Security
98 cc: Discover Administration Manual, v5.3
Purging Sensitive Data
If a customer’s business process requires recording and then deleting sensitive data after a period of
time, this action can be done either manually or automatically.
Clients can have CallCopy Support move files and their corresponding database records to the cc:
Discover Purge Queue. Files can then be purged by going to the Web Portal and going to
Administration tab > Tools menu > Archiver Console and clicking the Run File Purge link.
Automatic purging of data is controlled by schedules and archive actions in cc: Discover.
Files can be written and archived to network attached storage devices and DVDs. cc: Discover cannot
purge data from devices or disks that are not currently connected to the network.
Authentication and Passwords
Users can authenticate via a cc: Discover user account and password or their Windows network/Active
Directory credentials. If authentication is done via Active Directory, password length and other security
measures are configured in AD. If cc: Discover accounts are used, see Permissions and Security for
additional information.
Windows PC, Server, Database, and Application Accounts
Appropriate security measures must be utilized on any PCs, servers, applications, or databases included
in recording and storage of recording files and data.
Windows file servers – One or more server may be used for storing recording files with cardholder
data.
Any servers, network attached storage, or other devices used in archiving recording files with
cardholder data.
cc: Screen server – If video files are stored in a different location than audio files, you must specify a
UNC path for the location and a user account and password with Write permission for the location.
For details, see

System Security
cc: Discover Administration Manual, v5.3 99
Server Nodes.
These items do not store data, but for maximum security, the accounts and passwords used to manage
them should comply with overall security measures:
Windows/IIS Server – As a precaution, any account used to manage the Windows server and IIS
server hosting cc: Discover should be secured in order to prevent anyone from tampering with cc:
Discover’s operations.
SQL Server – CallCopy recommends using NT Authority\System for SQL Server Database Engine,
NT Authority\Network Service for SQL Server Reporting Services, and NT Authority\Local Service for
the SQL Server Browser. (See the cc: Discover Installation Guide for specific instructions.)
cc: Discover database (SQL) – This database is used to store recording records (i.e., metadata about
recording files), audit tables, and configurations.
Logging and Auditing
For details, see Logging Settings. Additional logging information appears in administration manuals for
each CallCopy application. Auditing information is discussed in the cc: Discover Reporting Manual.
Web Portal Settings: Security Page
These settings are accessed at Administration tab > Web Portal Settings > Security.
Site Settings
This section establishes the connection URLs for cc: Clarity and/or cc: Discover sites.
Clarity: IP or hostname of the cc: Clarity server.
Discover: IP or hostname of the cc: Discover server.
The IP should always work; the hostname has to resolve in DNS for the site to function properly. When in
doubt, use the IP. Entries should be in the format "http://1.1.1.1." If the "http://" is left off, the URL
validator will not receive a response from the supplied IP/port. You will see one of the following icons next
to the field after you enter the IP or hostname.
indicates a valid IP or hostname
indicates an invalid IP or hostname
indicates the system is currently attempting to resolve the IP or hostname
You will not be able to save changes to the page if the one of the URL fields contains an invalid value.
ForgotPassword Settings
A user can click the "Forgot your password?" link on the login page to have a temporary password
emailed to the address tied to his or her user account. This section of the Administration page allows you
to determine length and complexity of the auto-generated temporary password, as well as the subject and
body text of the email sent to notify the user of the change.

System Security
100 cc: Discover Administration Manual, v5.3
Password Max Length: Total number of characters used when generating a password reset.
Password Special Characters Length: Number of special characters used in a password reset.
Mail Subject: Subject of the password reset notification email.
Mail Body: Body text of the password reset notification email.
Active Directory Settings
For details, see Login Mode Configuration.
Login Settings
For details, see Login Mode Configuration.
PCI Settings
Note These settings only apply to cc: Discover database user accounts. If you are using Active
Directory or Hybrid authentication, the settings below will not govern AD accounts or their passwords,
which should be managed through Active Directory/group policy.
PCI Settings control the password policy for cc: Discover user accounts. The policies followed are based
on the PCI Security Standards Council's Data Security Standard v2.0, viewable at their website.
Passwords are automatically ‘salted’ by cc: Discover, and password changes are tracked through both
the Audit Log and the System Activity Summary Report.
These settings are optional:
Password Strength Enforcement: When selected, forces all new passwords to be a minimum of
eight characters in length and contain at least three of the following character types:
lower case letters
UPPER case letters
Numbers
Special characters
Prompt user to change password before expiration: Controls how long a password can remain
active. Use the top entry field to specify the number of days that a password can be valid before it
expires; this value cannot be zero. Use the second entry field to specify the number of days to prompt
users to change their password before the password expires. This applies to all accounts, including
the superuser account.
Prevent Re-use of Passwords: When a password is changed, it can be checked against a
password history to prevent re-use. Re-use can be checked against the last x passwords OR use in a
defined number of past days (e.g., the password x could not have been used in the last 180 days).
When enabling this feature, passwords used prior to enabling it are not recorded, so the re-use look-
back will not consider or compare them against new passwords.

System Security
cc: Discover Administration Manual, v5.3 101
Note Administrative users can manually change a user's password to anything that meets the
complexity requirements in force, including previously used passwords. This look-back affects
only users changing their own passwords.
Limit Failed Login Attempts: If this setting is enabled, a user’s account will be locked after the
defined number of failed login attempts. When an account is locked, a User Administrator must
unlock the account from the User’s profile page before they may attempt another login. This setting
does not apply to the Superuser account unless the Lock out Superuser option is selected.
Changing the password security settings in the Web Portal does not automatically force users to change
their passwords. The settings do not affect users until their passwords are changed, either by the user or
an admin. If the customer wants to enforce the PCI settings, then users must be forced to change their
passwords or have an admin do it for them.

System Security
102 cc: Discover Administration Manual, v5.3
Login Mode Configuration
cc: Discover supports three login modes:
Database Mode: Utilizes cc: Discover’s internal user database that has been populated from
entered user accounts and passwords. This mode is used by default.
Active Directory Mode: Uses Kerberos authentication to validate that an Active Directory user is
logged in and a member of the proper AD group to access the CallCopy system.
Hybrid Mode: Allows users to login using their cc: Discover user accounts or their Windows AD
account. On the cc: Discover login page, user must select either Database or Active Directory
mode.
The login mode is set during cc: Discover installation. If hybrid mode was selected or if only AD is wanted,
then the additional tasks for AD and hybrid mode in this section must be completed.
Active Directory Settings
This section allows administrators to configure options related to Hybrid- and AD-authenticated logins.
Auto Create User on Login allows the creation of a user account in the CallCopy database the first time
a user logs into the system using Windows credentials. The user account is populated with the AD
account’s login name, first name, last name, and email address.
If AD Group Role Synch is used, roles and permissions will be assigned to the user account automatically
at login based on their AD groups. For details, see AD Group Role Synch. If this feature is not used, the
account will need to have roles/permissions assigned to it manually once created.
If Using AD Group Role Synch, Delete User's Roles That Do Not Match an AD Group on Login is a
setting that, when enabled, will automatically update each user's groups, roles, and permissions
accordingly upon login. If not enabled, groups, roles, and permissions will only update when changed
manually.

System Security
cc: Discover Administration Manual, v5.3 103
Domains
Name: Enter the name of the domain. Additional domains can be added by clicking Add Domain.
Note In multiple domain environments, a separate user account is created in the CallCopy
system for each user on each domain (this also works with the "Auto Create User on Login"
feature). For example, if Joe Smith works at two different locations within a company, each with
their own domain, or uses two domains within the same company, user jsmith would be created
twice in cc: Discover, one assigned to each unique domain. Because of this, reporting and other
features treat the accounts as unique individual users.
LDAP: Enter the LDAP string; the "LDAP://" portion must be capitalized.
Note Consider the following when configuring LDAP, particularly if logging in with AD credentials
is not working properly:
Case Sensitivity – If a user logs into Windows with Username but their AD account is all lowercase, the login attempt may not pass through LDAP.
Idle States – If a computer enters a state of sleep, standby, hibernation, or another idle state that turns off the network interface card based on power management settings, the system will stop receiving polling updates from group policy and will be relying on cached credentials when the system becomes active again rather than logging in through the network. This can cause intermittent problems logging into cc: Discover when using AD integration. To avoid this, make sure power management settings are set to keep the system and network card awake during work hours.
Password Special Characters – Certain special characters may not work properly when passing through LDAP based on how LDAP interprets them, resulting in a failed login attempt. Avoid requiring #@*"&% but ()^$! should be fine.
Secure Sockets: Check to enable/require SSL.
Signing: Check to enable LDAP security; enabling it here and on Server 2008 encrypts the
connection between them.
Delete: Click this button to remove the domain and LDAP information for this row.
AD Group Role Synch
To integrate cc: Discover and AD, Windows users must be placed in an AD group that has access to cc:
Discover. Users can be in one or more AD groups that access the software. In this section you can add
Active Directory group names to relate cc: Discover roles to them. This allows groups, roles, and
permissions to be synchronized at each login, going so far as to remove any roles that are not linked to
an AD group when a user logs in.
When users log in using AD authentication, the following events are logged:
A message is sent from cc: Discover to AD.
cc: Discover receives a response from AD – if authentication fails, a specific message identifying the
cause is logged.
cc: Discover fails to receive a response – in this case, a "Directory Entry Failed" error is logged, as
AD could not be reached. There is no timeout associated with this; it either succeeds or fails. On the
cc: Discover login screen, the following message is displayed: "Login failed. No response was
received from Active Directory or Active Directory could not be contacted."

System Security
104 cc: Discover Administration Manual, v5.3
AD Group Role Synch is enabled simply by adding groups to the list here.
Add Group: Click to add an AD group and associate cc: Discover roles to it. Group names are case
sensitive.
Validate Groups: Click to test validation of the group back to AD. It will return one of two results.
-- This indicates the group checks out as valid in Active Directory.
-- This indicates that the group could not be validated with Active Directory. If validation fails,
verify the spelling and case of the group name, the LDAP string, and the presence of the group in
AD.
Add/Edit Roles: Allows you to modify the roles associated with an existing group/role combination.
Delete Group: Removes the AD group and disassociates roles from it. Removing a group will
remove that group members’ access to cc: Discover.
Login Settings
These settings should be reviewed and changed if necessary for a login mode.
Access Type: Select the login mode used for this installation.
User Token Expire Time: The user token monitors activity for a user ID within the site. It refreshes
the timestamp and expiration of the user token every time a user clicks on something. Once the token
expires, the next action a user takes will log them out and bring them back to the login screen. The
default expiration is five minutes but can be set to whatever the customer requires.
Login Token Expire Time: The login token is passed to the database when the user clicks the
button to log into the site. Once the session is established, the token is expunged from the database.
Since the token is removed almost as soon as it is created, the expiration time is used to clean up
any tokens left behind when the process of establishing the session/connection is interrupted or
encounters an error, causing the token to not be deleted normally. The timeout threshold should be
set to only a few seconds.
Integration Token Expire Time: The integration token works similar to the login token, but for
transitions between cc: Discover and cc: Clarity. The token is created to move the session from one
to the other. As soon as this transaction is complete, the token is removed from the database. If
something interrupts the transaction or the process encounters an error, the token may be left behind,
and this timeout triggers it to be automatically deleted. The timeout threshold should be set to only a
few seconds.
System Security
cc: Discover Administration Manual, v5.3 105
IIS Site Settings for Hybrid Mode and AD Authentication
This task must be completed for both Hybrid Mode and AD authentication. On the machine running cc:
Discover, perform the following tasks.
Windows Server 2008/IIS 7.x
1. In IIS Manager, expand Web Sites > CallCopy web site.
2. Click the CallCopy web site to see the site properties in the center panel.
3. Under the IIS section, double-click Authentication.
4. If Anonymous Authentication is not enabled, right-click it and select Enable.
Settings Changes for Former AD Auto-Login Environments
If the customer is upgrading from a previous version of cc: Discover that allowed automatic login (i.e.,
single sign-on) with AD authentication, for security reasons, and provided such changes do not
conflict with the operation of other existing customer applications, modify the following settings as
needed.
Windows Server 2008/IIS 7.x Win Login Settings
1. In IIS Manager, expand Web Sites > CallCopy web site.
2. In the Features View pane, open Authentication.
3. Right-click Windows Authentication and choose Disable.
4. Right-click Anonymous Authentication and choose Enable.
5. Right-click Anonymous Authentication again and choose Edit.
6. Configure to use a specific user account or application pool identity according to customer's
environment.
Internet Explorer Settings – Must Be Changed for Each User
1. In Internet Explorer, open Tools > Internet Options and click the Security tab.
2. Click Local Intranet > Custom Level.
3. In the Settings list, scroll to User Authentication. Set this to the mode required by the customer.
4. On the Advanced tab’s Settings list, scroll to the Security section. If not required by any other
customer applications, uncheck the box for Enable Integrated Windows Authentication.
5. Click OK. Restart Internet Explorer for the settings to take effect.
Other than having to now log in manually to cc: Discover/cc: Clarity, there should be no change to the
agent-side experience of using the software.

System Security
106 cc: Discover Administration Manual, v5.3
IIS Session Timeout
For Windows servers, session timeout is affected by several processes. cc: Discover allows for an
approximate session time setting via the IIS server and the Web Portal configuration file. Changing it in
one location automatically updates it in the other.
Windows Server 2008/IIS 7.x
1. On the server hosting cc: Discover, open IIS Manager.
2. Click on Application Pools. Right-click the application pool for the cc: Discover site, then Advanced
Settings.
3. Expand Process Model and update "Idle Time-out (minutes)" to 15 minutes.
Web Portal Configuration
To edit the Web Portal configuration file, follow these steps:
1. On the server hosting cc: Discover, open Windows Explorer and navigate to C:\Program
Files\CallCopy\WebPortal.
2. Open the Web.config file.
3. Find <sessionState timeout="60"/>. Change the value to 15.
4. Save changes.
Note If you set the recycling interval on the site's application pool to a lower threshold than the
timeout threshold, the site will recycle every 60 minutes, causing user sessions to time out
unexpectedly and possible data loss. This is a bug with IIS. It is best to set the recycling interval
greater than or equal to the session timeout threshold.

System Security
cc: Discover Administration Manual, v5.3 107
File Encryption
The cc: Discover application supports file level encryption for almost all audio and video data files (the
exceptions are noted below). To enable encryption, a system administrator must generate encryption
keys. Files are encrypted as they are written out to disk using AES-256-bit encryption. This provides full
end-to-end protection, as files are never left on disk in an unencrypted format. The encryption is based on
a unique key generated for each individual system. If encryption is enabled on an existing system,
enabling it only encrypts new files as they pass through the transcoder. Existing recording files can be
encrypted using a tool available to CallCopy Support personnel. Please contact Support for more
information.
While it is possible to encrypt existing recordings by reprocessing them with the transcoder after enabling
encryption, it is not recommended because:
All new calls to be transcoded would be queued up behind this work, meaning new calls cannot be
reviewed or played back until the queue is cleared.
A mass replace statement would need done to change the source type from CCA to WAV.
A purge record in the transcoder database table would clear records, making it impossible to re-
transcode any associated calls.
Encryption exceptions:
ShoreTel TAPI/WAV recording generates unencrypted .wav files; since we are relying on a third-party
library to generate these files, we cannot encrypt them while they are writing. However, the
Transcoder converts these to an encrypted format if/when they are transcoded.
Stereo .wav files generated by the Transcoder for Analytics are not encrypted since the Analytics
engine cannot read encrypted files. Once Analytics data has been captured, the calls can be
encrypted when archived, or deleted during a file purge. If security of the stereo .wav files is a
concern, they can be stored on an encrypted disk volume, though this will negatively impact
performance of the Analytics engine when reading the files.
The .xml files we generate as companions for the audio files that contain call metadata are not
encrypted. However, the option exists to turn off .xml file generation. The XML file generation toggle
is on the CTI Cores setting page under Administration > Recorder Settings > CTI Cores.
Generating Keys
Key generation activates encryption in cc: Discover, and the databases have tables to store keys by
default. Keys can be generated and managed using the cc_crypt.exe that is installed in the recorder
directory. This is a command line tool that accepts various parameters to generate, list, deactivate and
reactivate keys. Many commands will require you to type the database password to complete the
operation.
Any module that uses the encryption libraries will need to be able to query the database for the keys to
encrypt/decrypt the files. If there are active keys in the database, the modules supporting encryption
should automatically load and use them on startup. Modules will also periodically reload the keys to check
for changes once every 15 minutes.
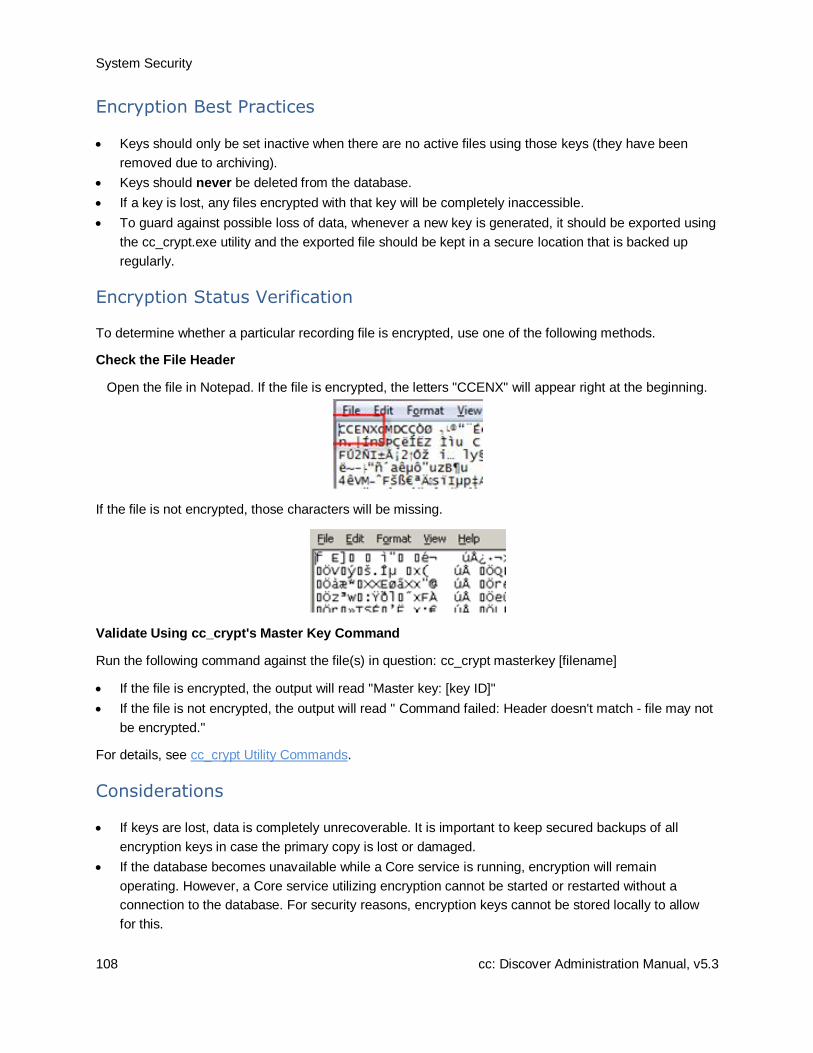
System Security
108 cc: Discover Administration Manual, v5.3
Encryption Best Practices
Keys should only be set inactive when there are no active files using those keys (they have been
removed due to archiving).
Keys should never be deleted from the database.
If a key is lost, any files encrypted with that key will be completely inaccessible.
To guard against possible loss of data, whenever a new key is generated, it should be exported using
the cc_crypt.exe utility and the exported file should be kept in a secure location that is backed up
regularly.
Encryption Status Verification
To determine whether a particular recording file is encrypted, use one of the following methods.
Check the File Header
Open the file in Notepad. If the file is encrypted, the letters "CCENX" will appear right at the beginning.
If the file is not encrypted, those characters will be missing.
Validate Using cc_crypt's Master Key Command
Run the following command against the file(s) in question: cc_crypt masterkey [filename]
If the file is encrypted, the output will read "Master key: [key ID]"
If the file is not encrypted, the output will read " Command failed: Header doesn't match - file may not
be encrypted."
For details, see cc_crypt Utility Commands.
Considerations
If keys are lost, data is completely unrecoverable. It is important to keep secured backups of all
encryption keys in case the primary copy is lost or damaged.
If the database becomes unavailable while a Core service is running, encryption will remain
operating. However, a Core service utilizing encryption cannot be started or restarted without a
connection to the database. For security reasons, encryption keys cannot be stored locally to allow
for this.
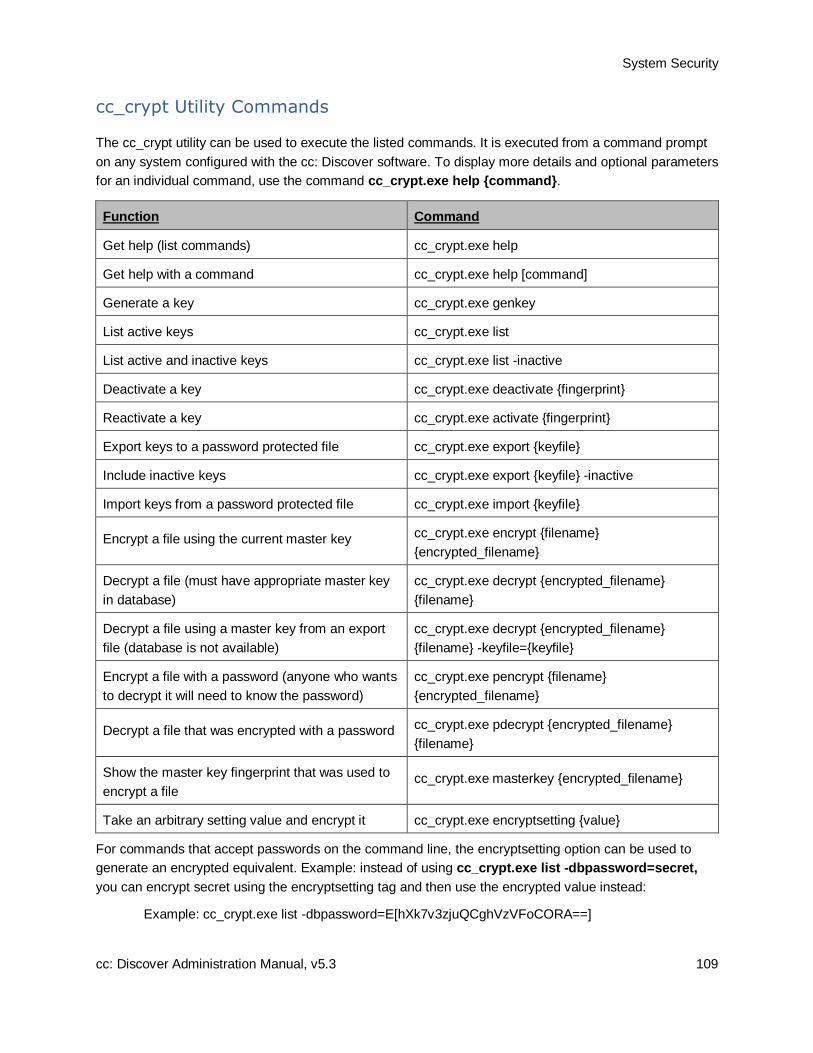
System Security
cc: Discover Administration Manual, v5.3 109
cc_crypt Utility Commands
The cc_crypt utility can be used to execute the listed commands. It is executed from a command prompt
on any system configured with the cc: Discover software. To display more details and optional parameters
for an individual command, use the command cc_crypt.exe help {command}.
Function Command
Get help (list commands) cc_crypt.exe help
Get help with a command cc_crypt.exe help [command]
Generate a key cc_crypt.exe genkey
List active keys cc_crypt.exe list
List active and inactive keys cc_crypt.exe list -inactive
Deactivate a key cc_crypt.exe deactivate {fingerprint}
Reactivate a key cc_crypt.exe activate {fingerprint}
Export keys to a password protected file cc_crypt.exe export {keyfile}
Include inactive keys cc_crypt.exe export {keyfile} -inactive
Import keys from a password protected file cc_crypt.exe import {keyfile}
Encrypt a file using the current master key cc_crypt.exe encrypt {filename}
{encrypted_filename}
Decrypt a file (must have appropriate master key
in database)
cc_crypt.exe decrypt {encrypted_filename}
{filename}
Decrypt a file using a master key from an export
file (database is not available)
cc_crypt.exe decrypt {encrypted_filename}
{filename} -keyfile={keyfile}
Encrypt a file with a password (anyone who wants
to decrypt it will need to know the password)
cc_crypt.exe pencrypt {filename}
{encrypted_filename}
Decrypt a file that was encrypted with a password cc_crypt.exe pdecrypt {encrypted_filename}
{filename}
Show the master key fingerprint that was used to
encrypt a file cc_crypt.exe masterkey {encrypted_filename}
Take an arbitrary setting value and encrypt it cc_crypt.exe encryptsetting {value}
For commands that accept passwords on the command line, the encryptsetting option can be used to
generate an encrypted equivalent. Example: instead of using cc_crypt.exe list -dbpassword=secret,
you can encrypt secret using the encryptsetting tag and then use the encrypted value instead:
Example: cc_crypt.exe list -dbpassword=E[hXk7v3zjuQCghVzVFoCORA==]

System Security
110 cc: Discover Administration Manual, v5.3
Thales Encryption vs. Standard Key Management
Thales Encryption Key Management is a system that provides similar functionality to cc: Discover's key
management. For a more detailed explanation on the hardware, software, and configuration of the Thales
platform's functionality, see the cc: Discover Thales Encryption Technical Brief.
When determining whether to use Thales or the built-in functionality of cc: Discover, consider the
structure of the encryption system:
The Primary Key stored in either a DLL (cc: Discover), data store attached to a Thales box, or ASCII
text file (cc: Discover). This key is used to decrypt…
The Database Key(s), stored in the cc: Discover database, used to decrypt…
The File Key, stored in the header of the encrypted file.
If the Primary Key becomes corrupt or lost, it can be easily replaced or changed if in the Thales or ASCII
text file format. If the key is stored as a DLL, the file will have to be decompiled, updated, recompiled, and
replaced in the system. Thales or the ASCII text file option offered in cc: Discover offer a similar level of
flexibility. The main difference is the extra hardware, cost, and configuration required when integrating
Thales into the cc: Discover environment.

System Security
cc: Discover Administration Manual, v5.3 111
SSL and TLS (Transport Security)
Interactions between the cc: Discover suite components (e.g., servers, Web Portal), file servers, and
archive devices can use SSL (Secure Socket Layer) and TLS (Transport Layer Security) for data in
transit; it is the customer's responsibility to obtain their own SSL certificate(s). For transport
security to be effective, all starting and ending points of communication should be secured. Configuration
details for each of these endpoints are explained in the next few sections. Bear in mind that SSL/TLS are
all-or-nothing solutions – if they are enabled on the Screen Capture or Web Media Server but not on the
client modules that rely on them, they will not be able to communicate.
If users are recorded from remote locations or access recordings from remote locations, a VPN must be
established for PCI certification.
In short…
Encryption TLS What is Encrypted
ON ON All supported file formats on disk.
All Web Player and Live Monitoring communications.
ON OFF All supported file formats encrypted on disk.
No Web Player or Live Monitoring communications.
OFF ON No supported file formats on disk.
All Web Player and Live Monitoring communications.
OFF OFF No supported file formats on disk.
No Web Player or Live Monitoring communications.
Enable Transport Security – Web Player and Live Monitoring
To enable secure communications in Silverlight (which encompasses both Web Player and Live
Monitoring), verify that cc: Discover's web.config file contains the following value:
<!--Silverlight Values-->
<add key="UseSilverlightSSL" value="1"/>

System Security
112 cc: Discover Administration Manual, v5.3
Enable Transport Security – Servers
At present, Screen Capture Server and Web Media Server allow for TLS. Add the appropriate values
for the corresponding SSL Certificate to the respective configuration screens under the Administration
Tab > System Settings > Screen Capture Settings and Web Media Server Settings:
[server]
ssl_certificate_name= SSL certificate file name (path optional if in root of CallCopy
directory)
ssl_certificate_pass= SSL certificate password
The Web Media Server and Screen Capture Server expect a file extension of .p12, which is the file type
of certificates directly from the store. Thus, if the certificate loads from the certificate store, only the name
(with or without file extension) as it is listed in the store is needed in the INI file. If the certificate loads
from the module directory, the file name and extension need to be in the INI file name and you will need
to rename the file to use a .p12 extension if necessary.
The settings INI needs to be present in the directory in which the module EXE resides. The certificate can
be stored in the local certificate store and/or in the directory with the module. For example, for the Screen
Capture Server module, these would go in C:\Program Files
(x86)\CallCopy\Recorder\CC_ScreenCapServer.
Enable Transport Security – Client Modules
The next step is to configure the client modules so that they will connect via a TLS method. Core and
Screen Capture Client can be enabled by configuring their respective INI files.
For Core, add the following to the cc_cticore.ini (in C:\Program Files (x86)\CallCopy\Recorder\CtiCore\):
[settings]
use-TLS=1 Tells the module whether to use TLS (0 for no, 1 for yes).
For the Screen Capture Client, add the following to the CC_ScreenCapClient.ini (in C:\Program Files
(x86)\CallCopy\ScreenCaptureClient\):
[app-settings]
use-TLS=1 Tells the module whether to use TLS (0 for no, 1 for yes).
The Screen Capture Client INI file is configured when building the MSI package before deployment to
agent computers. If the software is already in place prior to this configuration change, the INI files can be
mass updated by the customer, or a new updated Screen Capture Client package can be built by
CallCopy that will mass uninstall the existing client and settings, then mass reinstall using the new
settings.
System Security
cc: Discover Administration Manual, v5.3 113
Enable Transport Security – Web Portal
Configuring SSL for the Web Portal is handled through the settings in IIS. With the customer-provided
SSL certificate required for this process, complete the steps below.
Configure Windows Server 2008/IIS 7.x
1. Open IIS. On the main page, open the Server Certificates section.
2. Import the SSL certificate.
3. Right-click CCWeb and click Edit Bindings. Select "https" and leave the other settings at default
unless they create a conflict.
4. Under SSL Certificate, choose the SSL certificate. Click OK.
5. Back on the IIS page for the site, open SSL Settings. Check the option to require SSL and choose to
Ignore, Accept, or Require client certificates based on the client's needs. Click Apply.
Transport Security and PCI Compliance
Interactions between the cc: Discover suite components (e.g., servers, Web Portal), file servers, and
archive devices can use SSL and TLS for data in transit.
On-Demand, API Server, and Fusion are considered secure regardless of encryption usage. When
sensitive information is communicated, cc: Fusion triggers the API Server to stop recording, ensuring that
no such data is recorded or flowing through the application or network. Payment data is not at risk
because it is not communicated over networks via cc: Discover, but rather through the merchant's
payment application. On-Demand is not affected either way by encryption being on or off; it triggers call
recording, and as long as that component is encrypted, then the activity is secured.
Coalfire Systems, a Payment Application Qualified Security Assessor (PA-QSA) company, has
determined that the application is not "payment aware" at any time. When properly implemented following
best practices as outlined in the product documentation, cc: Discover will not negatively impact a
merchant’s PCI DSS compliance status.
Analysis of network transmissions and examination of the hard drive of the system running cc: Discover
using industry-standard forensic tools/techniques confirmed that no cardholder data was accessible.
Blackout techniques within the software render cardholder data inaccessible through call/screen
recordings.
HTTP/HTTPS Settings
If an environment uses HTTPS, select the "Force the site to use HTTPS" option under Administration >
Web Portal Settings > Security > HTTP/HTTPS Settings. In compliance with PCI guidelines, this setting
secures Web browser cookies (ASP.NET_SessionID) by setting the ‘secure’ flag, which prevents cookies
from being sent across non-https connections.
This setting affects only cc: Discover. Other CallCopy applications, such as cc: Insight, communicate with
cc: Discover, and they must also be configured separately to use SSL. (See each application’s installation
and administration guide for details.)

Best Practices
114 cc: Discover Administration Manual, v5.3
Best Practices
Disk Space Management
If servers running cc: Discover do not have adequate disk space, call recording and other functions will
stop. This section explains common disk space management issues and how system administrators can
address them.
Plan for Growth
During the sales and installation processes, CallCopy engineers use data from customers to estimate the
amount of disk space needed. Estimating future growth and changes is difficult. These common changes
alter the need for disk space:
Adding voice channels
Adding screen capture service
Changing desktop resolution
Increasing call volumes
If your company will be experiencing any of these or other changes, contact CallCopy so that the needed
disk space can be recalculated.
Remove Patches and Installers
Files used during install and maintenance may not need to remain on the server. Examples include
CallCopy software patches, downloaders, and installers. CallCopy Install and Support engineers attempt
to remove all unnecessary CallCopy files. Customer system administrators also need to remove any
unnecessary software if they do maintenance work, such as changes to the server operating system.
Set Up cc: Discover Disk Space Management Features
Disk space management is affected by settings on several cc: Discover features. The default settings are
adequate for most environments, but changes or specific situations may require setting adjustments. If
disk space is a recurring issue, review these settings to confirm that they manage disk space usage
efficiently:
Disk Space Notification
Logging Settings – Make sure that the system is not logging excessively.
Notifications > Number of Days to Save Log Files
Archiver and Archive Actions – Confirm that files are being purged after they are no longer needed.
Schedules – Confirm that schedules do not have excessive retention days and are tied to archive
actions or purging.
Transcoder – If you configured the Transcoder to retain files (Keep Days), lowering this setting can
free disk space.

Best Practices
cc: Discover Administration Manual, v5.3 115
Delete Files from Content Management Upload Directory
Files uploaded to the Content Library through the cc:Discover Web Portal are stored on the CallCopy
server in an upload directory specified on the Administration tab (Web Portal Settings > Web Portal >
Content Management). When a file is deleted from the Content Library on the Web Portal, only the entry
in the Web Portal is deleted. The actual file remains stored on the server with the filename updated to the
timestamp of the deletion.
If disk space becomes an issue, you may want to delete these files from the server after they have been
deleted through the Web Portal. If needed, contact CallCopy for assistance.
Delete Temporary Files after Issues
During service issues, log files grow significantly. After an issue is resolved, clear disk space by manually
deleting or editing files that are no longer needed. If an application was configured for excessive or debug
logging, reset it to the normal logging level.
Automatically Delete Temporary Files
Windows and IIS generate many temporary files that are retained indefinitely. These log files are mainly
for troubleshooting and reviewing security. If neither of those issues is of immediate interest to you, the
files can be deleted periodically. This section explains how to use a batch file and scheduled task to
delete automatically IIS files that are more than 14 days old.
Get the cleanTempFiles.bat file from CallCopy support or save this code as a batch file.
@echo off
del /f /s /q "%windir%\Temp\*.*"
del /f /s /q "%userprofile%\local settings\temp\*.*"
del /f /s /q "%userprofile%\local settings\temporary internet files\*.*"
Forfiles -p %systemroot%\system32\LogFiles\W3SVC1 -s -m *.log -d -14 -c "Cmd /C
DEL @File"
You will need to replace the path and filename in the last line of the batch file with the correct entries for
your server. To check the directory your Windows 2008 IIS server uses, follow these steps:
6. In IIS Manager, expand Web Sites.
7. Double-click the Discover site (usually CCWeb)
8. In the center pane, under IIS, double-click Logging (make sure you are in Features View).
9. The log file directory and name appear in the Log File section.
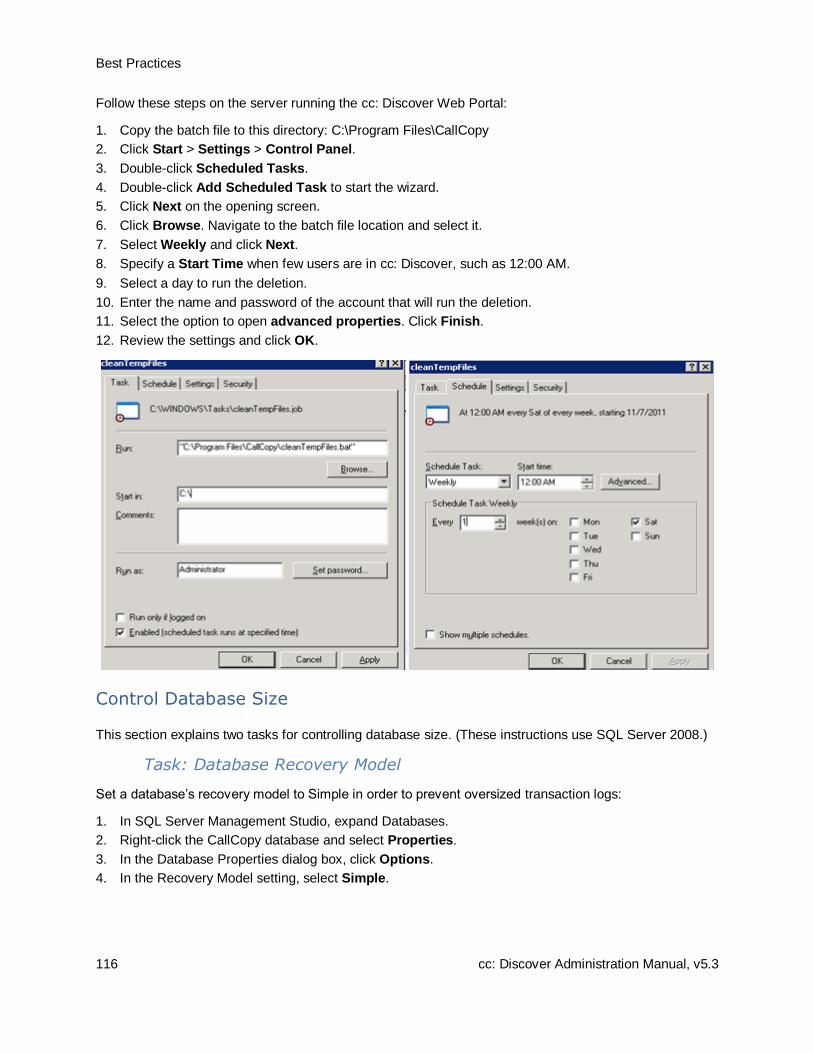
Best Practices
116 cc: Discover Administration Manual, v5.3
Follow these steps on the server running the cc: Discover Web Portal:
1. Copy the batch file to this directory: C:\Program Files\CallCopy
2. Click Start > Settings > Control Panel.
3. Double-click Scheduled Tasks.
4. Double-click Add Scheduled Task to start the wizard.
5. Click Next on the opening screen.
6. Click Browse. Navigate to the batch file location and select it.
7. Select Weekly and click Next.
8. Specify a Start Time when few users are in cc: Discover, such as 12:00 AM.
9. Select a day to run the deletion.
10. Enter the name and password of the account that will run the deletion.
11. Select the option to open advanced properties. Click Finish.
12. Review the settings and click OK.
Control Database Size
This section explains two tasks for controlling database size. (These instructions use SQL Server 2008.)
Task: Database Recovery Model
Set a database’s recovery model to Simple in order to prevent oversized transaction logs:
1. In SQL Server Management Studio, expand Databases.
2. Right-click the CallCopy database and select Properties.
3. In the Database Properties dialog box, click Options.
4. In the Recovery Model setting, select Simple.
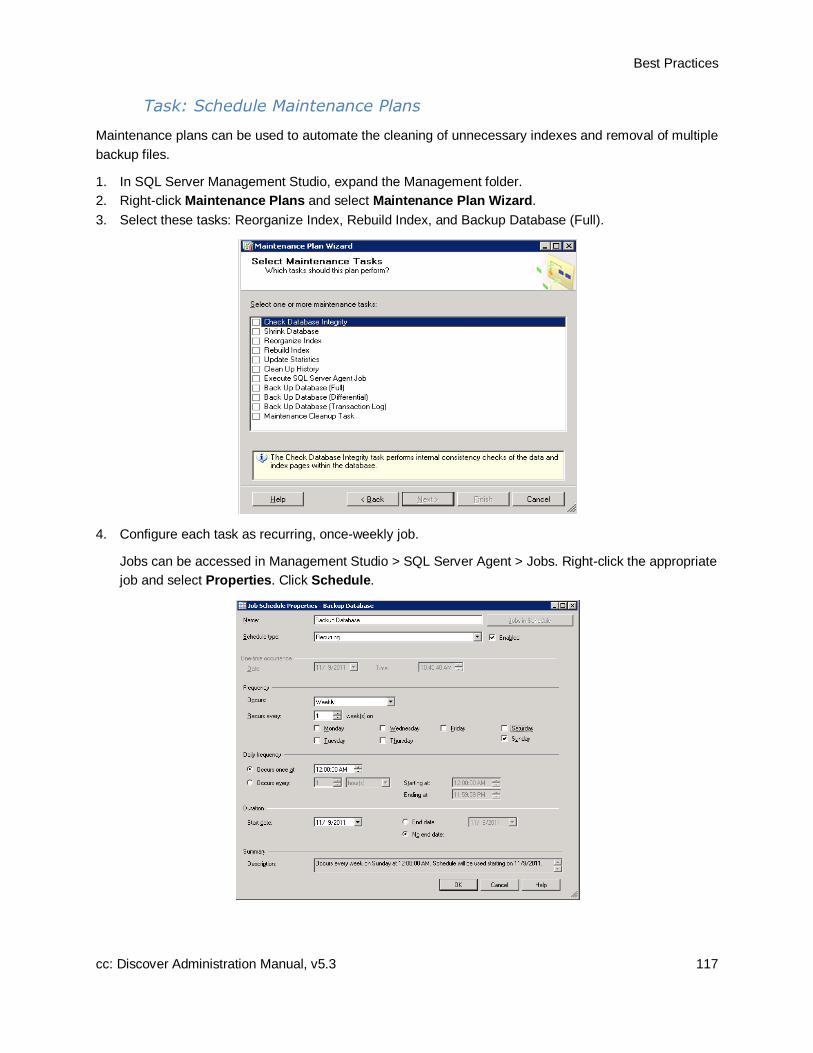
Best Practices
cc: Discover Administration Manual, v5.3 117
Task: Schedule Maintenance Plans
Maintenance plans can be used to automate the cleaning of unnecessary indexes and removal of multiple
backup files.
1. In SQL Server Management Studio, expand the Management folder.
2. Right-click Maintenance Plans and select Maintenance Plan Wizard.
3. Select these tasks: Reorganize Index, Rebuild Index, and Backup Database (Full).
4. Configure each task as recurring, once-weekly job.
Jobs can be accessed in Management Studio > SQL Server Agent > Jobs. Right-click the appropriate
job and select Properties. Click Schedule.

Best Practices
118 cc: Discover Administration Manual, v5.3
Shut Down and Restart
This information applies to planned shutdowns/restarts and unplanned Windows server outages.
Microsoft server updates (patches, hot fixes, etc.) typically do not affect cc: Discover. However, there is
no guarantee that this statement is always true.
Points to consider:
The standard install instructions call for registering cc: Discover’s applications as Windows services
that auto-start when the server starts. Archiver does not auto-start; it can be started from the Service
Manager. cc: Survey is not registered as a service. How it starts depends on how it was configured.
If calls are being recorded when the system is shut down, those calls are lost. A file of the recorded
audio is retained, but no call record is created, and the audio file is not transcoded.
The system does not restart recording calls. (If the admin is doing server patches, this probably will
not be an issue unless the call is particularly long.)
If the Transcoder is processing a call when the system is shut down, the Transcoder will reprocess
that call after the restart unless the maximum number of attempts has been reached.
If a call is being analyzed, the analytics engine will reprocess that call. (Analytics is installed on a
different server from other CallCopy applications, so this system should not be affected by work on
another server except for being able to get calls to process.)
If users are doing evaluations or creating evaluation or survey forms, all changes that were not saved
are lost.
Scheduled processes (e.g., archiving, report generation) can be affected by shutdowns. Admins need
to be aware of when these processes occur and may want to schedule the shutdown accordingly or
reschedule the processes.
The sequence in which CallCopy applications are started/stopped does not matter.
Procedure:
1. In the cc: Discover Web Portal, go to Administration tab > Tools > Service Manager.
2. Check all of the applications and click Stop Selected. The stop/start sequence does not matter for
CallCopy applications.
3. If any CallCopy applications were not run as services or not managed from the Service Manager, log
onto the Windows server and use the Task Manager to stop them.
4. Perform the necessary changes specified by Microsoft or other software and hardware vendors.
5. If the server is restarted, the CallCopy applications should restart and functioning normally.
6. If the server is not restarted, open a command line prompt and start the CallCopy applications that
were not configured to be managed from the Service Manager.
7. In the cc: Discover Web Portal, open the Service Manager page.
8. Confirm that all the applications are running. Start those that are not running.
9. Confirm that call recording and all other functions are operating normally.

Best Practices
cc: Discover Administration Manual, v5.3 119
Anti-Virus
Anti-virus exclusions are recommended to be configured in any system where anti-virus scanning is
installed. The guidelines below are provided to assist with ensuring the reliability and performance of the
CallCopy system, while still providing for a secure environment. A lack of exclusions can cause system
performance issues and possibly contribute to service outages.
These guidelines apply to both memory resident and on-demand scanning.
Exclusion Guidelines
The table below lists the recommended exclusions for each service or application. Any paths or ports
shown in this document are the installation defaults only. Actual paths or ports may vary depending on
configuration options set during installation.
Service/Application Process File, Extension, or
TCP/IP Port Default Folder
Logger Service cc_loggerservice.exe *.log C:\Program
Files\CallCopy\Logs\
CTI Core cc_cticore.exe *.cca, *.wav, *.vox, *.vox8,
*.xml C:\default_rec
Transcoder cc_Transcoder.exe *.cca, *.vid, *.wav, *.vox,
*.vox8, *.csa, *.ccp C:\temp\Transcoder-temp
Analytics cc_analytics.exe *.wav, *.idx
Screen Capture cc_screencapserver.exe *.vid C:\temp\
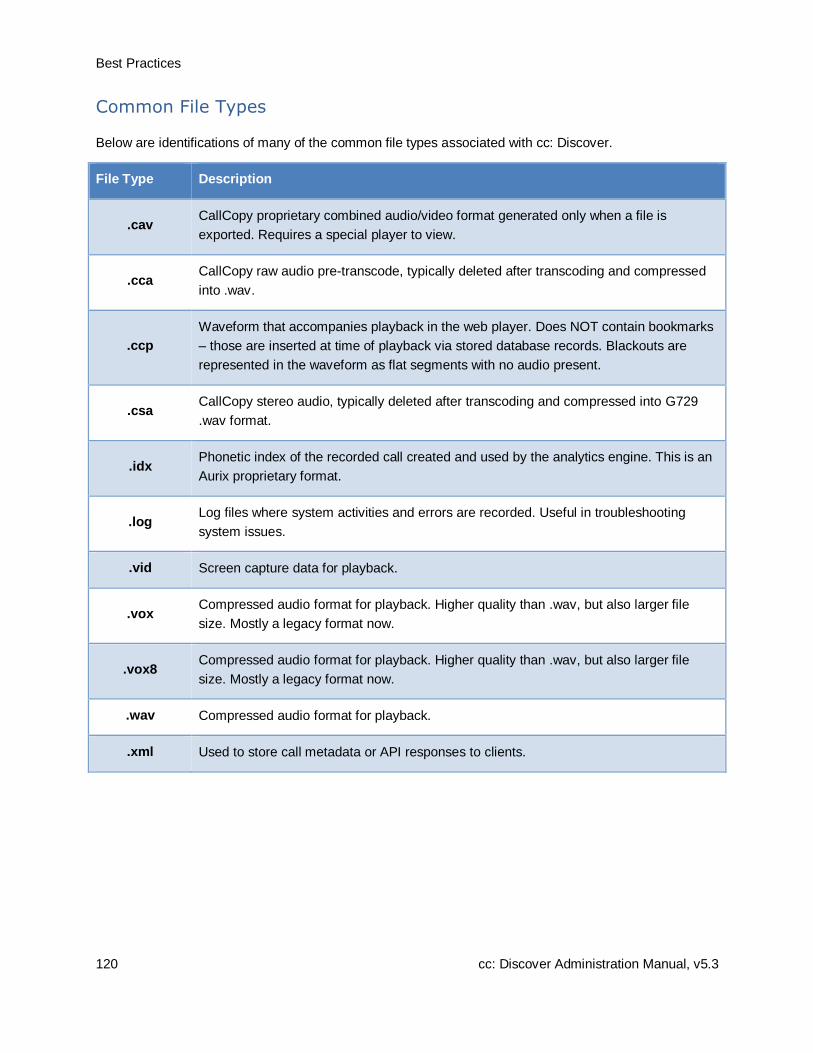
Best Practices
120 cc: Discover Administration Manual, v5.3
Common File Types
Below are identifications of many of the common file types associated with cc: Discover.
File Type Description
.cav CallCopy proprietary combined audio/video format generated only when a file is
exported. Requires a special player to view.
.cca CallCopy raw audio pre-transcode, typically deleted after transcoding and compressed
into .wav.
.ccp
Waveform that accompanies playback in the web player. Does NOT contain bookmarks
– those are inserted at time of playback via stored database records. Blackouts are
represented in the waveform as flat segments with no audio present.
.csa CallCopy stereo audio, typically deleted after transcoding and compressed into G729
.wav format.
.idx Phonetic index of the recorded call created and used by the analytics engine. This is an
Aurix proprietary format.
.log Log files where system activities and errors are recorded. Useful in troubleshooting
system issues.
.vid Screen capture data for playback.
.vox Compressed audio format for playback. Higher quality than .wav, but also larger file
size. Mostly a legacy format now.
.vox8 Compressed audio format for playback. Higher quality than .wav, but also larger file
size. Mostly a legacy format now.
.wav Compressed audio format for playback.
.xml Used to store call metadata or API responses to clients.
Best Practices
cc: Discover Administration Manual, v5.3 121
Additional Considerations
The exclusion guidelines listed above are product specific. For other applications (not listed above), it is
often necessary to determine exclusions on a case-by-case basis. The section below provides some
guidance in this area.
Files should typically be excluded based on the following criteria:
Locked Files - The files are permanently locked open by a legitimate server process. Examples of
these are databases such as DHCP and SQL Server, as well as files such as the Windows Pagefile.
Large Files - The files are manipulated often by a legitimate server process and are typically large in
size. Examples of these are copying CD/DVD images (.iso) and Virtual Machine Files (.vhd). In
addition operations may also include the likes of offline maintenance on Virtual Machine Files and
Exchange Server databases.
Temporary Files - A large number of temporary files are written to disk by a legitimate server
process.
Expired or Corrupt License File
Call recording will not work if the CallCopy software license file has expired or is corrupt. The license
status can be viewed on the License Info system report. (In the cc: Discover web portal, click Reporting >
System Reports.)
A license file may be expired, corrupt, or missing if call recording and other functions are not working and
the Windows server is repeatedly attempting to start the cc: Discover services and modules. This situation
can be viewed in Windows Task Manager.
In this situation, contact CallCopy Support to investigate.

License Requests
122 cc: Discover Administration Manual, v5.3
License Requests Making major changes to your cc: Discover system (e.g., such as changing the Windows machine name,
changing a motherboard, etc.) will cause your system to become unlicensed. The server will not function
until a new license is created and applied to the system.
CallCopy recommends any such maintenance be scheduled for an approved maintenance time, as the
system will be non-operational after the maintenance until a new license is applied. Contact your
CallCopy Support team if any such maintenance is planned, so a new license can be issued immediately
after the system maintenance is completed.
In order to create a new license file, a Machine ID must be generated on the server, and the ID supplied
to CallCopy. This must occur after any maintenance is completed.
Follow these steps to generate a new Machine ID:
1. Open the Recorder directory on your cc: Discover server.
2. Run the "LicenseRequest.exe" application. The application will open the License Request window.
Inside the window will be a Machine ID that will be used to create the license file.
3. Click Copy.
4. Open a new email and paste the Machine ID into it.
5. Send the email to the CallCopy Support team. The team will reply with a new license file.
About Uptivity
cc: Discover Administration Manual, v5.3 123
About Uptivity What boosts the bottom line for any company with a contact center? How about getting the best that
every agent can deliver from their first day on the job and constantly optimizing contact center
management and performance? Only Uptivity gives you the tools you need to continuously improve every
aspect of each step of every agent’s life cycle and enhance customer satisfaction. You get exactly what
you need thanks to a modern, integrated, and easy-to-use suite of tools that offers a unified system for
performance management, workforce management, speech analytics, and call recording. Unparalleled
customer service and support from our in-house staff combine with a better bundle for a better value, and
a lower total cost of ownership.
Headquartered in Columbus, Ohio, and on the Web at www.uptivity.com.