it essentials v4.0 preview chapter 6 laptops and portable · chapter 6 – laptops and ... 7 6.2.1....
TRANSCRIPT

IT Essentials v4.0 Preview Chapter 6
Laptops and Portable Devices
DRAFT
This document is a draft copy of Chapter 6 of the IT Essentials v4.0 online course.
It is intended as a preview of the course and not the final version.

Chapter 6 – Laptops and Portable Devices IT Essentials I v4.0 - DRAFT
Cisco Systems, Inc. 2007 DRAFT Page 2
Table of Contents
6. Laptops and portable devices ................................................................................ 3
6.1. Describe laptops and other portable devices .............................................. 3
6.1.1. Identify some common uses of laptops ................................................ 5
6.1.2. Identify some common uses of PDAs and Smart phones ................. 6
6.2. Identify and describe the components of a laptop ...................................... 7
6.2.1. Describe the components found on the outside of a laptop .............. 7
6.2.2. Describe the components found on the inside of the laptop ........... 11
6.2.3. Describe the components found on the laptop docking station ...... 13
6.3. Compare and contrast desktop and laptop components ......................... 15
6.3.1. Compare and contrast desktop and laptop motherboards .............. 15
6.3.2. Compare and contrast desktop and laptop processors ................... 16
6.3.3. Compare and contrast desktop and laptop power management.... 17
6.3.4. Compare and contrast desktop and laptop expansion capabilities 18
6.4. Explain how to configure laptops ................................................................. 22
6.4.1. Describe how to configure power settings ......................................... 23
6.4.2. Describe the safe installation and removal of laptop components . 28
6.5. Compare the different mobile phone standards ........................................ 35
6.6. Identify common preventive maintenance techniques used for laptops and portable devices.................................................................................................. 38
6.6.1. Identify appropriate cleaning procedures ........................................... 38
6.6.2. Identify optimal operating environments............................................. 41
6.7. Describe how to troubleshoot laptops and portable devices................... 43
6.7.1. Gather data from the customer ............................................................ 43
6.7.2. Verify the Obvious Issues ..................................................................... 46
6.7.3. Try Quick Solutions First ....................................................................... 49
6.7.4. Gather Data From the Computer ......................................................... 51
6.7.5. Evaluate the Problem and Implement the Solution .......................... 55
6.7.6. Close with the Customer ....................................................................... 56
6.8. Summary ......................................................................................................... 59
Index of Terms................................................................................................................ 61

Chapter 6 – Laptops and Portable Devices IT Essentials I v4.0 - DRAFT
Cisco Systems, Inc. 2007 DRAFT Page 3
6. Laptops and portable devices Do you know when the first laptops were developed? Who do you think used the early laptops?
One of the original laptops was the GRiD Compass 1101. It was used by astronauts on space missions in the early 1980s. It weighed 11 lb (5 kg) and cost US $8,000 - $10,000! Laptops today often weigh less than one-half the weight and cost less than one-third the price of the GRiD. The compact design, convenience, and evolving technology of laptops have made them as popular as desktops.
Laptop Evolution
Laptops, Personal Digital Assistants (PDAs), and Smartphones are becoming more popular as their prices decrease and technology continues to progress. As a computer technician, you need to have knowledge of portable devices of all kinds.
This chapter focuses on the differences between laptops and desktops and describes the features of PDAs and Smartphones.
After completing this chapter, you will meet these objectives:
Describe laptops and other portable devices
Identify and describe the components of a laptop
Compare and contrast desktop and laptop components
Explain how to configure laptops
Compare the different mobile phone standards
Identify common preventive maintenance techniques used for laptops and portable devices
Describe how to troubleshoot laptops and portable devices

Chapter 6 – Laptops and Portable Devices IT Essentials I v4.0 - DRAFT
Cisco Systems, Inc. 2007 DRAFT Page 4
6.1. Describe laptops and other portable devices NOTE: Notebooks, laptops, and tablets are types of portable computers. For clarity and consistency in IT Essentials I, all portable computers will be called "laptops".
Early laptops were heavy and expensive. Today, laptops are very popular because advances in technology have resulted in laptops that cost less, weigh less, and have improved capabilities. Many laptops can be configured with an additional video port, a FireWire port, an infrared port, or an integrated camera.
Laptops and Portable Devices
PDAs and Smartphones are examples of portable, hand-held devices that are becoming more popular. PDAs offer features such as games, web surfing, e-mail, instant messaging, and many other features offered by PCs. Smartphones are cell phones with many built-in PDA capabilities. PDAs and Smartphones can run some of the same software as laptops.
After completing this section, you will meet these objectives:
Identify some common uses of laptops
Identify some common uses of PDAs and Smartphones

Chapter 6 – Laptops and Portable Devices IT Essentials I v4.0 - DRAFT
Cisco Systems, Inc. 2007 DRAFT Page 5
6.1.1. Identify some common uses of laptops
The most significant feature of a laptop is the compact size. The design of the laptop places the keyboard, screen, and internal components into a small, portable case.
Laptops
Another popular feature of the laptop is that it can be used almost anywhere. A rechargeable battery allows the laptop to function when it is disconnected from an AC power source.
The first laptops were used primarily by business people who needed to access and enter data when they were away from the office. The use of laptops was limited due to expense, weight, and limited capabilities compared to less expensive desktops.
Today laptops have lower prices and increased capabilities. A laptop is now a real alternative to a desktop computer.
Here are some common uses for the laptop:
Taking notes in school or researching papers
Presenting information in business meetings
Accessing data away from home or the office
Playing games while traveling
Watching movies while traveling
Accessing the Internet in a public place
Sending and receiving email in a public place
Can you think of other uses for laptops?

Chapter 6 – Laptops and Portable Devices IT Essentials I v4.0 - DRAFT
Cisco Systems, Inc. 2007 DRAFT Page 6
6.1.2. Identify some common uses of PDAs and Smart phones
The concept of the PDA has existed since the 1970s. The earliest models were computerized personal organizers designed to have a touch screen and a stylus. Today, some models have both a touch screen and a keyboard and use an operating system that is similar to operating systems used on desktop computers.
The PDA is an electronic personal organizer with tools to help organize information:
Address book
Calculator
Alarm clock
Internet access
Global positioning
The Smartphone is a mobile phone with PDA capabilities. Smartphones combine cell phone and computer functions in a single, handheld device. The technology of the PDA and the technology of the smartphone continue to merge.
Smartphones may include these additional options:
Built-in camera
Document access
Abbreviated note taking
Television
Smartphone connectivity and PDA connectivity include Bluetooth and regular USB cable connections.
Can you think of other uses for the PDA and the Smartphone?
Worksheet Laptop, Smart Phone, and PDA Research laptop, smart phone, and PDA specifications
Chapter 6 – Laptops and Portable Devices IT Essentials I v4.0 - DRAFT
Cisco Systems, Inc. 2007 DRAFT Page 7
6.2. Identify and describe the components of a laptop What are some common laptop features?
They are small and portable.
They have an integrated display screen in the lid.
They have an integrated keyboard in the base.
They run on AC power or a rechargeable battery.
They support hot-swappable drives and peripherals.
Most laptops can use docking stations and port replicators to connect peripherals.
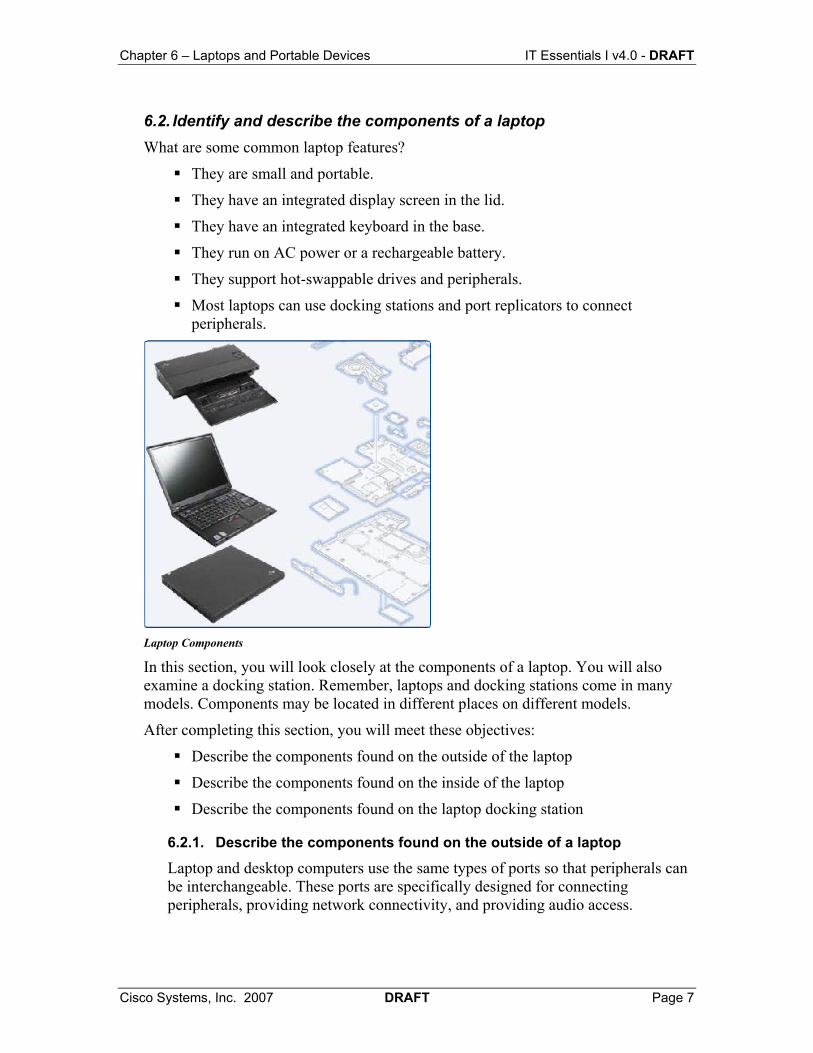
Laptop Components
In this section, you will look closely at the components of a laptop. You will also examine a docking station. Remember, laptops and docking stations come in many models. Components may be located in different places on different models.
After completing this section, you will meet these objectives:
Describe the components found on the outside of the laptop
Describe the components found on the inside of the laptop
Describe the components found on the laptop docking station
6.2.1. Describe the components found on the outside of a laptop
Laptop and desktop computers use the same types of ports so that peripherals can be interchangeable. These ports are specifically designed for connecting peripherals, providing network connectivity, and providing audio access.

Chapter 6 – Laptops and Portable Devices IT Essentials I v4.0 - DRAFT
Cisco Systems, Inc. 2007 DRAFT Page 8
Ports, connections, and drives are located on the front, back, and sides of the laptop due to the compact design. Laptops contain PC Card or ExpressCard slots to add functionality such as more memory, a modem, or a network connection.
Laptops require a port for external power. Laptops can operate using either a battery or an AC power adapter. This port can be used to power the computer or to charge the battery.
There are status indicators, ports, slots, connectors, bays, jacks, vents, and a keyhole on the exterior of the laptop. Click the highlighted areas in Figures 1 - 7 to discover additional information about each of these components.
NOTE: LED displays vary among laptops. Technicians should consult the laptop manual for a list of specific status displays.
There are three LEDs on the top of the virtual laptop.
Click the three highlighted areas in Figure 1 for more information about what the LEDs indicate:
1. Bluetooth 2. Battery 3. Standby
Figure 6.2.1 – 1: Laptop- Top View
There are three components on the back of the virtual laptop.
Click the three highlighted areas in Figure 2 for more information about the components:
1. Parallel port 2. AC power connector 3. Battery bay
Figure 6.2.1 – 2: Laptop- Rear View
A laptop operates using a battery or an AC power adapter. Laptop batteries are manufactured in various shapes and sizes. They use different types of chemicals and metals to store power.
Refer to Figure 3 to compare rechargeable batteries.

Chapter 6 – Laptops and Portable Devices IT Essentials I v4.0 - DRAFT
Cisco Systems, Inc. 2007 DRAFT Page 9
Figure 6.2.1 – 3: Laptop Battery Comparison
The left side of the virtual laptop has ten components. Click the ten highlighted areas in Figure 4 for more information about the components:
1. Security keyhole 2. USB 3. S-video connector 4. Modem 5. Ethernet 6. Network LEDs 7. Stereo headphone jack 8. Microphone jack 9. Ventilation 10. PC combo expansion slot
Figure 6.2.1 – 4: Laptop- Left Side View
The front of the virtual laptop has the components listed here. Click the four highlighted areas in Figure 5 for more information about the components:
1. Infrared port 2. Speakers 3. Laptop latch 4. Ventilation

Chapter 6 – Laptops and Portable Devices IT Essentials I v4.0 - DRAFT
Cisco Systems, Inc. 2007 DRAFT Page 10
Figure 6.2.1 – 5: Laptop- Front View
The right side of the virtual laptop contains four components. Click the four highlighted areas in Figure 6 for more information about the components:
1. Optical drive 2. Optical drive status indicator 3. Drive bay status indicator 4. VGA port
Figure 6.2.1 – 6: Laptop- Right Side View
The bottom of the virtual laptop has the components listed here. Click the four highlighted areas in Figure 7 for more information about the components:
1. Hard drive access panel 2. Battery latches 3. Docking station connector 4. RAM access panel
Figure 6.2.1 – 7: Laptop- Bottom View
Virtual Laptop Explore the different views of the virtual laptop

Chapter 6 – Laptops and Portable Devices IT Essentials I v4.0 - DRAFT
Cisco Systems, Inc. 2007 DRAFT Page 11
6.2.2. Describe the components found on the inside of the laptop
Laptops have a "clamshell" design. Typically, the laptop is closed when not in use. By opening the lid of the laptop, you can access a variety of input devices, LEDs, and a display screen.
There are several input devices available when the laptop lid is open. Click the five highlighted areas in Figure 1 for more information about the input devices:
1. Keyboard 2. Input devices 3. Fingerprint reader 4. Volume controls 5. Power button
Figure 6.2.2 – 1: Laptop- Open
A laptop receives and interprets data in many ways. As a result, the laptop is able to perform a variety of functions. Refer to Figure 6.2.2-1. Do you know which of those devices perform the following functions?
Move the pointer
Turn up the volume
Log on to the laptop
Type a document
Turn on the laptop
Switch to external monitor
Can you think of other information you may input?
At the bottom of the screen, there is a row of LEDs that shows the status of specific functions. Click the eight highlighted areas in Figure 2 for more information on these LEDs:
1. Wireless

Chapter 6 – Laptops and Portable Devices IT Essentials I v4.0 - DRAFT
Cisco Systems, Inc. 2007 DRAFT Page 12
2. Bluetooth 3. Num Lock 4. Caps Lock 5. Hard drive activity 6. Power on 7. Battery status 8. Hibernate/Standby
NOTE: Indicators may vary by laptop.
Figure 6.2.2 – 2: Laptop- Keyboard
A desktop monitor can be connected to a laptop. Using the function key, you can toggle the screen from the laptop to the desktop monitor or view both at the same time. View a demonstration in Figure 3.
Figure 6.2.2 – 3: Switching Displays
Virtual Laptop Explore the virtual laptop keyboard

Chapter 6 – Laptops and Portable Devices IT Essentials I v4.0 - DRAFT
Cisco Systems, Inc. 2007 DRAFT Page 13
6.2.3. Describe the components found on the laptop docking station
A base station is a device that attaches to AC power and to desktop peripherals. When you plug the laptop into the base station, you have convenient access to power and the attached peripherals.
There are two types of base stations: docking stations and port replicators. Docking stations and port replicators are used for the same purpose. Port replicators are usually smaller than docking stations and do not have speakers or PCI slots. Figures 1 – 3 illustrate a docking station.
Click the three highlighted areas in Figure 1 for more information about components on the top of the docking station:
1. Power button 2. Eject button 3. Laptop connector
Figure 6.2.3 – 1: Docking Station Top View
Some docking stations include the following drive bays and ports to provide additional functionality:
1. Parallel 2. USB 3. Ethernet 4. Video 5. Audio
The back of the docking station contains ports and connectors used to attach to desktop peripherals such as a mouse, a monitor, or a printer. A vent is also necessary to expel hot air from the docking station.

Chapter 6 – Laptops and Portable Devices IT Essentials I v4.0 - DRAFT
Cisco Systems, Inc. 2007 DRAFT Page 14
Click the 15 highlighted areas in Figure 2 for more information about the components located on the back of the docking station:
1. Exhaust vent 2. AC power connector 3. PC Card/ExpressCard slot 4. VGA port 5. DVI port 6. Line In connector 7. Headphone connector 8. USB port 9. Mouse port 10. Keyboard port 11. External-diskette-drive connector 12. Parallel port 13. Serial port 14. Modem port 15. Ethernet port
Figure 6.2.3 – 2: Docking Station Rear View
Secure the laptop to the docking station with a key lock. Click the highlighted areas in Figure 3 for more information about the key lock located on the right side of the docking station.
Figure 6.2.3 – 3: Docking Station Key lock
Worksheet Laptop Docking Stations True/False statements about docking stations
Virtual Laptop Explore the different views of the virtual docking station

Chapter 6 – Laptops and Portable Devices IT Essentials I v4.0 - DRAFT
Cisco Systems, Inc. 2007 DRAFT Page 15
6.3. Compare and contrast laptop and desktop components Most of the functions that a desktop can perform can also be performed by a laptop. However, these two kinds of computers are built very differently and the parts are not interchangeable. As an example, a plane and a helicopter can each travel to the same destination, but they cannot be repaired with the same spare parts. This is also true for laptops and desktops. Few components can be shared between desktops and laptops.
Laptop vs Desktop
Desktop components tend to be standardized. They usually meet universal form factors. Desktops made by different manufacturers can often use the same components. A DVD/CD-RW drive is an example of a desktop component that has a standard form factor.
Laptop components are much more specialized than desktop components. This is because laptop manufacturers focus on refining laptop components to make them more efficient and compact. As a result, manufacturers design laptop components to follow their own specific form factors. Laptop components are proprietary, so you may not be able to use components made by one laptop manufacturer to repair a laptop made by another manufacturer.
NOTE: Technicians may have to obtain certification for each laptop manufacturer they support.
After completing this section, you will meet these objectives:
Compare and contrast desktop and laptop motherboards
Compare and contrast desktop and laptop processors
Compare and contrast desktop and laptop power management
Compare and contrast desktop and laptop expansion capabilities
6.3.1. Compare and contrast laptop and desktop motherboards
Desktop motherboards have standard form factors. The standard size and shape allow motherboards from different manufacturers to be interchangeable.

Chapter 6 – Laptops and Portable Devices IT Essentials I v4.0 - DRAFT
Cisco Systems, Inc. 2007 DRAFT Page 16
Laptop motherboards vary by manufacturer and are proprietary. When you repair a laptop, it is strongly recommended that you obtain a replacement motherboard from the manufacturer of the laptop. Figure 1 shows a desktop motherboard and a laptop motherboard.
Figure 6.3.1 – 1: Laptop Motherboard and Desktop Motherboard
Laptop motherboards and desktop motherboards are designed differently. Components designed for a laptop generally cannot be used in a desktop. Figure 2 shows a few examples of the design differences.
Figure 6.3.1 – 2: Laptop and Desktop Comparison Table
6.3.2. Compare and contrast laptop and desktop processors
The central processing unit (CPU) or processor is the brain of the computer. The CPU interprets and processes instructions that are used to manipulate data.
Laptop processors are designed to use less power and create less heat than desktop processors. As a result, laptop processors do not require cooling devices that are as large as those found in desktops. Laptop processors also use CPU throttling to modify the clock speed as needed to reduce power consumption and heat.

Chapter 6 – Laptops and Portable Devices IT Essentials I v4.0 - DRAFT
Cisco Systems, Inc. 2007 DRAFT Page 17
This results in a slight decrease in performance. It also increases the lifespan of some components. These specially designed processors allow a laptop to operate for a longer period of time when using a battery power source. Figure 1 shows laptop processor specifications.
Figure 6.3.2 – 1: Laptop CPU and Desktop CPU
NOTE: Technicians should refer to the laptop manual for processors that can be used as replacement processors and for processor replacement instructions.
6.3.3. Compare and contrast laptop and desktop power management
Power management controls the flow of electricity to the components of a computer.
Desktops are usually set up in a location where they remain plugged into a power source. Desktop power management distributes electricity from the source to the components of the desktop. There is also a small battery in the desktop that provides electricity to maintain the internal clock and BIOS settings when the desktop is powered off.
Laptops are small and portable. This portability feature is achieved by combining the small size and weight of a laptop with the ability to operate from a battery. When the laptop is plugged in, laptop power management sends electricity from the AC power source to the laptop components. The laptop power management also recharges the battery. When the laptop is unplugged, laptop power management takes electricity from the battery and sends it to the laptop components.

Chapter 6 – Laptops and Portable Devices IT Essentials I v4.0 - DRAFT
Cisco Systems, Inc. 2007 DRAFT Page 18
Laptop Power Options and Desktop Power Options
There are two methods of power management:
1. Advanced Power Management (APM) 2. Advanced Configuration and Power Interface (ACPI)
APM is an earlier version of power management. With APM, the BIOS was used to control the settings for power management.
ACPI has replaced APM. ACPI offers additional power management features. With ACPI, the operating system controls power management.
6.3.4. Compare and contrast laptop and desktop expansion capabilities
Expansion capabilities add functionality to a computer. Many expansion devices can be used with both laptops and desktops:
External drives
Modems
Network cards
Wireless adapters
Printers
Other peripherals
Expansion devices are attached to laptops and desktops differently. A desktop attaches these devices with USB ports and parallel ports. A laptop attaches these devices with USB ports, parallel ports, and PC Cards.

Chapter 6 – Laptops and Portable Devices IT Essentials I v4.0 - DRAFT
Cisco Systems, Inc. 2007 DRAFT Page 19
The standardized use of USB and FireWire ports make it possible to connect many types of external components to laptops, docking stations, port replicators, and desktops. The USB and FireWire standards make it possible to connect and remove external components without the need to power off the system. USB and FireWire ports are used to connect a range of external components:
Printers
Scanners
Floppy disk drives
Mice
Cameras
Keyboards
Hard drives
Flash drives
Optical drives
MP3 players
Laptops and desktops have similar expansion capabilities. It is the difference in form factor between the computers that determines which type of expansion device is used. Desktops have internal bays that support 5.25" and 3.5" drives. Additionally, there is space to install other permanent expansion drives. Laptops have limited space so the expansion bays on laptops are designed to allow different types of drives to fit into the same bay. Drives are hot-swappable and are inserted or removed as needed.
Figure 1 shows a comparison of desktop and laptop expansion components.
Figure 6.3.4 – 1: Laptop and Desktop Expansion Components

Chapter 6 – Laptops and Portable Devices IT Essentials I v4.0 - DRAFT
Cisco Systems, Inc. 2007 DRAFT Page 20
Laptops use the PC Card slot to add functionality. The PC Card slot uses an open standard interface to connect to peripheral devices using the CardBus standard.
Here are some examples of devices that connect using PC Cards:
Memory
Modems
Hard drives
Network cards
PC Cards follow the PCMCIA standard. They come in three types: Type I, Type II, and Type III. Each type of PC Card is different in size and can attach to different devices. A newer type of PC Card is called the PC ExpressCard.
Figure 2 shows a comparison of PC Cards and PC ExpressCards.
Figure 6.3.4 – 2: Laptop Expansion Card Specifications

Chapter 6 – Laptops and Portable Devices IT Essentials I v4.0 - DRAFT
Cisco Systems, Inc. 2007 DRAFT Page 21
The PC ExpressCard has 34-pin and 54-pin configurations. Figure 3 shows an example of a PC Card and PC ExpressCards.
Figure 6.3.4 – 3: Laptop Expansion Cards
Suppose you need to purchase a wireless NIC for a laptop. Which type of PC Card would you select?
Worksheet Laptop Expansion Fill in the blank for laptop specifications

Chapter 6 – Laptops and Portable Devices IT Essentials I v4.0 - DRAFT
Cisco Systems, Inc. 2007 DRAFT Page 22
6.4. Explain how to configure laptops To allow applications and processes to run smoothly, it may be necessary to configure and allocate system resources, install additional components and plug-ins, or change environmental settings to match software requirements. Adding external components is usually accomplished through the use of Plug and Play, but occasionally driver installation and additional configuration may be required. Proper configuration of the power settings will help you get the maximum performance from a laptop, such as increasing the length of time the laptop can be used on battery power.
Laptop Components
With laptops, it may be necessary to exchange components as needed to accomplish different tasks and respond to changing situations and needs. A laptop can be customized for specific purposes by adding external components. For example, a second hard drive can be installed in a laptop to provide additional storage capacity. Components need to be carefully inserted or connected to bays, connectors, and proprietary expansion areas to avoid damage to the equipment. It is important to follow safe removal procedures when disconnecting hot-swappable and non-hot-swappable devices.
After completing this section, you will meet these objectives:
Describe how to configure power settings
Describe the safe installation and removal of laptop components

Chapter 6 – Laptops and Portable Devices IT Essentials I v4.0 - DRAFT
Cisco Systems, Inc. 2007 DRAFT Page 23
6.4.1. Describe how to configure power settings
One of the most popular features of a laptop is the ability to operate using batteries. This feature allows laptops to operate in locations where AC power is not available or is inconvenient. Advances in power management and battery technology are increasing the time laptop users can remain disconnected from AC power. Current batteries can last anywhere between 2 to 10 hours without recharging. Managing the power by configuring the power settings on a laptop is important to ensure the battery charge is used efficiently.
The Advanced Configuration and Power Interface (ACPI) standards create a bridge between the hardware and OS and allow technicians to create power management schemes to get the best performance from the computer. The ACPI standards can be applicable to most computers, but they are particularly important when managing power in laptops. Click the power states in Figure 1 to view more information about each power state.
Figure 6.4.1 – 1: Power Management States
Technicians frequently are required to configure power settings by changing the settings found in BIOS. Configuring power settings in BIOS affects the following conditions:
System states
Battery and AC modes
Thermal management
CPU PCI bus power management
Figure 2 shows an example of power settings in BIOS.

Chapter 6 – Laptops and Portable Devices IT Essentials I v4.0 - DRAFT
Cisco Systems, Inc. 2007 DRAFT Page 24
Figure 6.4.1 – 2: BIOS Settings
NOTE: When working in Windows XP, the ACPI power management mode must be enabled in BIOS to allow the OS to configure all of the power management states.
NOTE: There is no standard name for each power management state. Manufacturers may use different names for the same state.
Here are the steps to check the ACPI settings in the BIOS:
1. Enter BIOS setup by pressing the appropriate key or key combination while the computer is booting. Typically this is the Delete key or the F2 key, but there are several other options.
2. Locate and enter the “Power Management settings” menu item.
3. Use the appropriate keys to enable ACPI mode.
4. Save and Exit BIOS setup.
NOTE: These steps are common to most laptops and should be used only as a guideline. Be sure to check your laptop manual for specific configuration settings.
The Power Options in Windows XP allow you to reduce the power consumption of a number of devices or of the entire system. Power Options allow you to control the power management features of the following:
Hard Drive
Display
Shut Down, Hibernate, and Standby modes
Low-battery warnings

Chapter 6 – Laptops and Portable Devices IT Essentials I v4.0 - DRAFT
Cisco Systems, Inc. 2007 DRAFT Page 25
Configuring Power Settings in Windows XP You can adjust power management by using Power Options in the Control Panel. The Power Options in the Control Panel display the only options that can be controlled.
NOTE: Power Options will automatically detect devices that may be unique to your computer. Therefore the Power Options windows may vary by the hardware that is detected.
To configure your power settings, click: Start > Control Panel > Power Options
Power Schemes Power Schemes are a collection of settings that manage the power usage of the computer. Both the hard drive and the display consume large amounts of power. They can be configured under the Power Schemes tab.
When you open Power Options, you will notice that Windows XP has preset power schemes. These are the default settings and were created when Windows XP was installed. You can use the default Power Schemes or create customized schemes that are based on specific work requirements. Figure 3 shows the Power Scheme set for a laptop.
Figure 6.4.1 –3: Power Option Properties

Chapter 6 – Laptops and Portable Devices IT Essentials I v4.0 - DRAFT
Cisco Systems, Inc. 2007 DRAFT Page 26
Customize the Display and Hard Drive Power Setting As an example: A student uses a laptop for research on the Internet, but does not create or save files often. In this scenario, the student needs access to the display, but rarely accesses the hard drive.
Power Management for the Display In this example, the student will need the display to be on for long periods of time. When the laptop is plugged in, the “Turn off monitor” setting is 2 hours; when the laptop is unplugged, the “Running on batteries” setting is 1 hour.
Power Management for the Hard Drive One of the biggest power consumers on a laptop is the hard drive. In our example, the hard drive is not accessed often. The “Turn off hard disks” time is set for 1 hour when the laptop is plugged in, and 3 minutes when the laptop is “Running on batteries”.
You decide that the default settings for the Standby and Hibernate modes are acceptable and no changes are made. Power Schemes can be saved with a customized name. Saving the Power Scheme with a custom name allows the user to easily switch back to the default settings. In this example, save the Power Scheme settings as “Research” as shown in Figure 4.
Figure 6.4.1 –4: Power Scheme – Research Settings

Chapter 6 – Laptops and Portable Devices IT Essentials I v4.0 - DRAFT
Cisco Systems, Inc. 2007 DRAFT Page 27
Setting the Laptop to the Standby or Hibernate Sleep State If you do not want to completely shut down the laptop, you have two options – Standby and Hibernate.
Standby – Documents and applications are saved in RAM, allowing the computer to power on quickly
Hibernate – Documents and applications are saved to a temporary file on the hard drive, and will take a little longer than Standby to power on.
Figure 5 shows Hibernate enabled in the Power Options properties.
Figure 6.4.1 –5: Hibernate Options

Chapter 6 – Laptops and Portable Devices IT Essentials I v4.0 - DRAFT
Cisco Systems, Inc. 2007 DRAFT Page 28
Adjusting Low Battery Warnings In Windows XP, you can set the low battery warnings. There are two levels: Low Battery Alarm and Critical Battery Alarm. The Low Battery Alarm will warn you that the battery is low. The Critical Battery Alarm will initiate a forced standby, hibernate, or shutdown as shown in Figure 6.
Figure 6.4.1 –6 Critical Battery Alarm Actions
Worksheet ACPI Standards Match the ACPI standard to the correct characteristic
6.4.2. Describe the safe installation and removal of laptop components
There are a number of components on a laptop that may need to be replaced. Remember always to make sure that you have the correct replacement component and tools as recommended by the manufacturer. Some components are hot-swappable or can be removed and replaced while the computer is on. These are some components that may need to be replaced:
Battery
Optical drive
Hard drive
Memory
PC cards

Chapter 6 – Laptops and Portable Devices IT Essentials I v4.0 - DRAFT
Cisco Systems, Inc. 2007 DRAFT Page 29
Figure 1 shows an example of a laptop.
Figure 6.4.2 – 1: Typical Laptop
NOTE: Each laptop manufacturer uses unique hardware installation and removal procedures. Check the laptop manual for specific installation information and follow safety installation and ESD precautions.
CAUTION: Always disconnect power and remove the battery before installing or removing laptop components that are not hot-swappable.

Chapter 6 – Laptops and Portable Devices IT Essentials I v4.0 - DRAFT
Cisco Systems, Inc. 2007 DRAFT Page 30
Battery Replacement Steps [Figure 2]
Remove the battery from the battery bay:
1. Move the battery lock to the unlocked position.
2. Hold the release lever in the unlock position and remove the battery.
Install the battery into the battery bay:
1. Insert the battery.
2. Make sure that both battery levers are locked.
Figure 6.4.2 – 2: Laptop- Battery Replacement

Chapter 6 – Laptops and Portable Devices IT Essentials I v4.0 - DRAFT
Cisco Systems, Inc. 2007 DRAFT Page 31
Optical Drive Replacement Steps [Figure 3]
Remove the DVD/CD-RW drive:
1. Press the button to open the drive and remove any media in the drive. Close the tray.
2. Slide the latch to release the lever that secures the drive.
3. Pull on the lever to expose the drive. Remove the drive.
Install the DVD/CD-RW drive:
1. Insert the drive securely.
2. Push the lever inward.
Figure 6.4.2 – 3: Laptop- Optical Drive Replacement
Chapter 6 – Laptops and Portable Devices IT Essentials I v4.0 - DRAFT
Cisco Systems, Inc. 2007 DRAFT Page 32
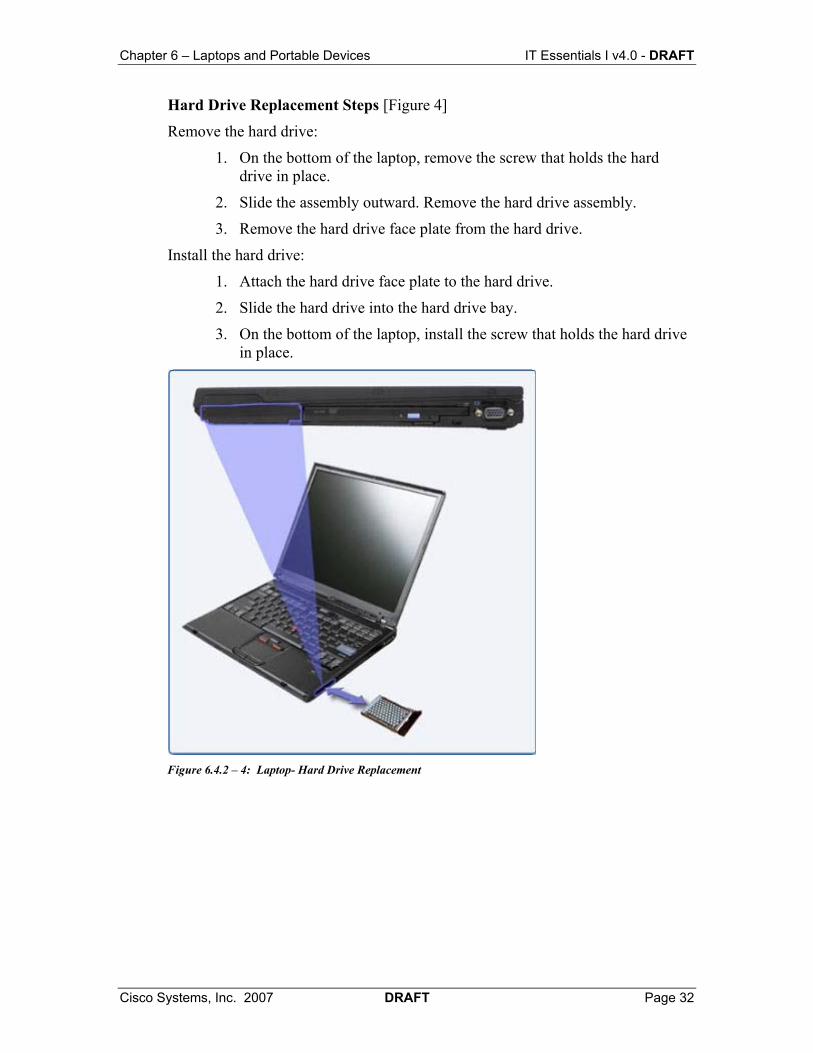
Hard Drive Replacement Steps [Figure 4]
Remove the hard drive:
1. On the bottom of the laptop, remove the screw that holds the hard drive in place.
2. Slide the assembly outward. Remove the hard drive assembly.
3. Remove the hard drive face plate from the hard drive.
Install the hard drive:
1. Attach the hard drive face plate to the hard drive.
2. Slide the hard drive into the hard drive bay.
3. On the bottom of the laptop, install the screw that holds the hard drive in place.
Figure 6.4.2 – 4: Laptop- Hard Drive Replacement

Chapter 6 – Laptops and Portable Devices IT Essentials I v4.0 - DRAFT
Cisco Systems, Inc. 2007 DRAFT Page 33
Expansion Memory Replacement Steps [Figure 5]
Laptop expansion memory is also called SODIMM. Remove the existing expansion memory SODIMM if there are no available slots for the new SODIMM:
1. Remove screw to expose expansion memory SODIMM.
2. Press outward on the clips that hold the sides of the memory SODIMM.
3. Lift up to loosen the SODIMM from the slot and remove the memory SODIMM.
Install the memory SODIMM:
1. Align the notch at a 45-degree angle.
2. Gently press down until clips lock.
3. Replace cover and install screw.
Figure 6.4.2 – 5: Laptop- Memory Replacement

Chapter 6 – Laptops and Portable Devices IT Essentials I v4.0 - DRAFT
Cisco Systems, Inc. 2007 DRAFT Page 34
PC Expansion Card Replacement Steps [Figure 6]
Remove the PC expansion card:
1. Press the top eject button to release the PC expansion card.
NOTE: There are two buttons. The bottom blue button ejects the Type II PC card. Install the PC expansion card:
1. Press the blue button inward.
2. Insert the PC expansion card into the express slot.
Figure 6.4.2 – 6: Laptop- Expansion Card Replacement
CAUTION: On some laptops, the PC Card, Optical Drive, and USB devices are hot-swappable. However, the internal hard drive, RAM and battery are NOT hot-swappable.
Hot-Swappable Device Removal Steps
1. Left-click the “Safely Remove Hardware” icon in the Windows system tray to ensure that the device is not in use.
2. Left-click the device you want to remove. A message pops up to tell you that it is safe to remove the device.
3. Remove the hot-swappable device from the laptop.
Virtual Laptop Explore the different layers of the virtual laptop

Chapter 6 – Laptops and Portable Devices IT Essentials I v4.0 - DRAFT
Cisco Systems, Inc. 2007 DRAFT Page 35
6.5. Compare the different mobile phone standards When people began to use cell phones, there were few industry-wide standards applying to cell phone technology. Without standards, it was difficult and expensive to make calls to people that were on another network. Today, cell phone providers use industry standards, which make it easier to use cell phones to make calls.
When the industry started, most cell phone standards were analog. Today, cell phone standards are mostly digital.
NOTE: Cell phone standards have not been adopted uniformly around the world. Some cell phones are capable of using multiple standards while others can use only one standard. As a result, some cell phones can operate in many countries while other cell phones can only be used locally.
The first generation (1G) of cell phones began service in the 1980s. First-generation phones primarily used analog standards, including Advanced Mobile Phone System (AMPS) and Nordic Mobile Telephone (NMT).
In an analog system, the voice information is sent by varying the radio signals used by the phone in the same pattern as the speakers’ voices. Unfortunately, this means that interference and noise, which also vary the signal, cannot easily be separated from the voice in the signal. This limits the usefulness of analog systems.
Digital signals convert the speakers’ voices into digital signal that uses a chain of ones and zeros. This degrades the signal a little, because ones and zeros are not a faithful representation of your voice. However, the digital signal is robust. It can be fixed using error correction routines if there is interference. Also, digital signals can be compressed, making the systems much more efficient than analog.
In the 1990s, the second generation (2G) of cell phones was marked by a switch from analog to digital standards. Second-generation cell standards included Global System for Mobile (GSM), Integrated Digital Enhanced Network (iDEN), and Code Division Multiple Access (CDMA).
Third-generation standards enable cell phones to go beyond simple voice and data communications. It is now common for cell phones to send and receive text, photos, and video. It is also common for 3G cell phones to access the Internet and to use the Global Positioning System (GPS).
NOTE: As 3G cell phone standards were being developed, extensions to the existing 2G standards were added. These transitional standards are known as 2.5G standards.
Fourth-generation (4G) standards have been championed by many users due to the availability of increased data rates. Higher data rates will allow users to download files, such as video and music, faster than what was available with standards of previous generations.

Chapter 6 – Laptops and Portable Devices IT Essentials I v4.0 - DRAFT
Cisco Systems, Inc. 2007 DRAFT Page 36
The following table shows more information about the different cell phone standards.
Generation Standard Name Features Used in NMT (Nordic Mobile Telephone)
Replaced wired telephones Saudi Arabia, Scandinavia
1-G (Analog cell phone standards introduced in the 1980s.)
AMPS (Advanced Mobile Phone System)
Replaced wired telephones United States, New Zealand
GSM (Global System for Mobile Communications)
Digital quality calls everywhere
Worldwide 2-G (Digital cellular) iDEN
Push-To-Talk service, international roaming
North and South America, Philippines, Singapore, Saudi Arabia
GPRS (General Packet Radio Service)
Data layer for GSM Worldwide
CDMA (Code Division Multiple Access) CDMA2000 1xRTT/IS-2000
Unified Digital Data, Voice service
North and South America, India, Indonesia, Japan, South Korea
2.5-G (Digital cellular + packet network for data.)
EDGE (EGPRS) Enhanced Data rates for GSM Evolution
Data upgrade to GPRS Worldwide
UMTS Universal Mobile Telecommunications System (also called 3GSM)
Advanced GSM phone system
Europe, Africa, Asia, US
3-G (Simultaneous voice and data, with e-mail and instant messaging.)
1xEV-DO/IS-856 (Pronounced D-O)
Advanced CDMA telephone system
Worldwide
4-G Technologies that are "3G and beyond"
HSDPA
Advanced UMTS system for voice, high-speed data
Worldwide
New technologies that add multimedia and networking functionality can be bundled with cell phone standards.

Chapter 6 – Laptops and Portable Devices IT Essentials I v4.0 - DRAFT
Cisco Systems, Inc. 2007 DRAFT Page 37
Figure 1 lists common technologies that may be added to the cell phone bundle of services. Most cell phone providers will charge extra for adding these features.
Figure 6.5 – 1: Internet Standards
Worksheet Cell Phone Standards Fill in the blank for cell phone standards

Chapter 6 – Laptops and Portable Devices IT Essentials I v4.0 - DRAFT
Cisco Systems, Inc. 2007 DRAFT Page 38
6.6. Identify common preventive maintenance techniques used for laptops and portable devices
Because laptops are mobile, they are used in different types of environments as shown in Figure 1. Some environments can be hazardous to a laptop. Even eating or drinking around a laptop creates a potentially hazardous condition.
Figure 6.6 – 1: Hazardous Environments
Consider what would happen if a drink was spilled into the keyboard of a laptop. Many components are placed in a very small area directly beneath the keyboard. Spilling liquid or dropping debris onto the keyboard can result in severe internal damage.
It is important to keep a laptop clean and to ensure that it is being used in the most optimal environment possible. This section covers preventive maintenance techniques for the laptop.
After completing this section, you will meet these objectives:
Identify appropriate cleaning procedures
Identify optimal operating environments
6.6.1. Identify appropriate cleaning procedures
Proper routine cleaning is the easiest, least expensive way to protect and to extend the life of a laptop. It is very important to use the right products and procedures when cleaning a laptop. Always read all warning labels on the cleaning products. The components are very sensitive and should be handled with care. Consult the laptop manual for additional information and cleaning suggestions.

Chapter 6 – Laptops and Portable Devices IT Essentials I v4.0 - DRAFT
Cisco Systems, Inc. 2007 DRAFT Page 39
Figure 6.6.1 – 1: Proper Cleaning Procedures
Laptop Keyboard Cleaning Procedures: 1. Turn off the laptop. 2. Disconnect all attached devices. 3. Disconnect laptop from the electrical outlet. 4. Remove all installed batteries. 5. Blow compressed air between the keys. 6. Wipe laptop and keyboard with a soft, lint-free cloth lightly moistened
with water or computer-screen cleaner.
Ventilation Cleaning Procedures: 1. Turn off the laptop. 2. Disconnect all attached devices. 3. Disconnect laptop from the electrical outlet. 4. Remove all installed batteries. 5. Use compressed air or a non-electrostatic vacuum to clean out the dust
from the vents and the fan behind the vent. 6. Use tweezers to remove any debris.
LCD Cleaning Procedures:
1. Turn off the laptop. 2. Disconnect all attached devices. 3. Disconnect laptop from the electrical outlet. 4. Remove all installed batteries. 5. Wipe display with a soft, lint-free cloth lightly moistened with water or
LCD cleaner.
CAUTION: Do not spray cleaning solution directly onto the LCD display. Use products specifically designed for cleaning LCD displays.

Chapter 6 – Laptops and Portable Devices IT Essentials I v4.0 - DRAFT
Cisco Systems, Inc. 2007 DRAFT Page 40
Touch Pad Cleaning Procedures:
1. Turn off the laptop. 2. Disconnect all attached devices. 3. Disconnect laptop from the electrical outlet. 4. Remove all installed batteries. 5. Wipe surface of touch pad gently with a soft, lint-free cloth moistened
with an approved cleaner. Never use a wet cloth.
CAUTION: Use a soft, lint-free cloth with an approved cleaning solution to avoid damaging laptop surfaces. Apply the cleaning solution to the lint-free cloth, not directly to the laptop.
Floppy Drive Cleaning Procedures: Use a commercially-available cleaning kit to clean a floppy drive. Floppy drive cleaning kits include pre-treated floppy disks that remove contaminants from the floppy drive heads that have accumulated through normal operation.
1. Remove all media from the floppy drive. 2. Insert the cleaning disk and let it spin for the suggested amount of time.
Optical Disk Cleaning Procedures: Dirt, dust and other contaminants can collect in your optical drives and on the discs. Contaminated drives and discs can cause malfunctions, missing data, error messages and lost productivity.
1. Use a commercially-available CD or DVD drive cleaning disc. Many floppy disc cleaning kits include an optical disc cleaner. Like the floppy disc cleaner, optical disc cleaner kits contain a cleaning solution and a non-abrasive disc that is inserted into the optical drive.
2. Remove all media from the optical drive. 3. Insert the cleaning disk and let it spin for the suggested amount of time to
clean all contact areas.
Cleaning a CD or DVD Disc: Inspect the disc for scratches. Replace discs that contain deep scratches as they may cause data errors. If you notice problems such as skipping or degraded playback quality with your CDs or DVDs, clean the discs. Commercial products are available that clean discs and provide protection from dust, fingerprints, and scratches. Cleaning products for CDs are safe to use on DVDs.
1. Hold the disk by the outer edge of the disc or by the inside edge of the center hole.
2. Gently wipe the disc with a lint-free cotton cloth. Never use paper or any material that may scratch the disc or leave streaks.
3. Wipe from the center of the disc outward. Never use a circular motion. 4. Apply a commercial CD or DVD cleaning solution to the lint-free cotton
cloth, and wipe again if any contaminates remain on the disc. 5. Allow the disc to dry before it is inserted into the drive.

Chapter 6 – Laptops and Portable Devices IT Essentials I v4.0 - DRAFT
Cisco Systems, Inc. 2007 DRAFT Page 41
6.6.2. Identify optimal operating environments
An optimal operating environment for a laptop is clean, free of potential contaminants, and within the temperature and humidity range specified by the manufacturer. Figure 1 shows examples of operating environments. With most desktop computers, the operating environment can be controlled. However, due to the portable nature of laptops, it is not always possible to control the temperature, humidity, and working conditions. Laptops are built to resist adverse environments, but technicians should always take precautions to protect the equipment from damage and loss of data.
Figure 6.6.2 – 1: Optimal Laptop Operating Environments
It is important to transport or ship laptops carefully. Use a padded laptop case to store your laptop. When you carry it, use an approved computer bag. If the laptop is shipped, use sufficient packing material. Figure 2 shows examples of laptop carrying cases and packing boxes.
Figure 6.6.2 – 2: Shipping and Transporting

Chapter 6 – Laptops and Portable Devices IT Essentials I v4.0 - DRAFT
Cisco Systems, Inc. 2007 DRAFT Page 42
CAUTION: Be sure to pack laptops and all accessories securely to prevent damage during transport.
Laptops are transported to many types of environments. Dust particles, temperature, and humidity can affect the performance of a laptop.
Follow these guidelines to help ensure optimal operating performance from your laptop:
Clean the laptop frequently to remove dust and potential contaminants.
Do not obstruct vents or airflow to internal components. A laptop can overheat if air circulation is obstructed.
Keep the room temperature between 45 to 90 degrees Fahrenheit (7 to 32 degrees Celsius).
Keep the humidity level between 10 to 80 percent.
CAUTION: Use a soft, lint-free cloth with an approved cleaning solution to avoid damaging laptop surfaces. Apply the cleaning solution to the lint-free cloth, not directly to the laptop.
Temperature and humidity recommendations will vary by laptop manufacturer. You should research these recommended values, especially if you plan to use the laptop in extreme conditions. Refer to Figure 3 for humidity and temperature examples.
Figure 6.6.2 – 3: Temperature and Humidity
Worksheet Preventive Maintenance Review questions for preventive maintenance

Chapter 6 – Laptops and Portable Devices IT Essentials I v4.0 - DRAFT
Cisco Systems, Inc. 2007 DRAFT Page 43
6.7. Describe how to troubleshoot laptops and portable devices When troubleshooting problems with laptops or portable devices, you should determine if a repair is cost-effective. To determine the best course of action, the cost of the repair should be compared to the replacement cost of the laptop or portable device less the salvage value.
Since many portable devices change rapidly in design and functionality, portable devices are often more expensive to repair than to replace. For this reason, portable devices are usually replaced while laptops can be replaced or repaired.
Follow the steps outlined in this section to accurately identify, repair, and document the problem. The troubleshooting process is shown in Figure 1.
Troubleshooting Process
Step 1 Gather Data from the Customer
Step 2 Verify the Obvious Issues
Step 3 Try Quick Solutions
Step 4 Gather Data From the Computer
Step 5 Evaluate the Problem and Implement the Solution
Step 6 Close with the Customer
Figure 6.7: Troubleshooting Process
After completing this section, you will meet these objectives
Gather data from the customer
Verify the obvious issues
Try quick solutions first
Gather data from the computer
Evaluate the problem and implement the solution
Close with the customer
6.7.1. Gather data from the customer
The first step in the troubleshooting process is to gather data from the customer as shown in Figure 1.

Chapter 6 – Laptops and Portable Devices IT Essentials I v4.0 - DRAFT
Cisco Systems, Inc. 2007 DRAFT Page 44
Step 1 Gather Data from the Customer
Customer Information
Company Name
Contact Name
Address
Phone Number
Figure 6.7.1-1: Gather Data from the Customer
This step allows the technician to evaluate the situation. The technician must organize the information about the customer and the reported problem. Often a work order is used to collect this information. A sample work order is shown in Figure 2.
Figure 6.7.1-2: Work Order
There are two types of questions you can ask: open-ended and closed-ended.
Open-ended questions cannot be answered with “yes” or “no” answers. The purpose of open-ended questions is to allow the customer to describe the problem. Refer to some possible open-ended questions in Figure 3.

Chapter 6 – Laptops and Portable Devices IT Essentials I v4.0 - DRAFT
Cisco Systems, Inc. 2007 DRAFT Page 45
Figure 6.7.1-3: Open-ended Questions
Closed-ended questions can usually be answered with “yes” or “no” answers. This type of question can help a technician focus in on an error and locate the exact problem once a potential solution is being tested. Refer to some possible closed-ended questions in Figure 4.
Figure 6.7.1-4: Closed-ended Questions
What are some benefits of open-ended and closed-ended questions?
This is the first step in the troubleshooting process. When a customer is not able to accurately describe the problem, there are other ways to evaluate the situation in the next steps of the troubleshooting process.

Chapter 6 – Laptops and Portable Devices IT Essentials I v4.0 - DRAFT
Cisco Systems, Inc. 2007 DRAFT Page 46
6.7.2. Verify the Obvious Issues
After speaking with the customer, the next step in the troubleshooting process is to examine the most obvious causes of a problem as shown in Figure 1.
Step 2 Verify the Obvious Issues
Battery LEDs Function Keys Cable Connections
Figure 6.7.2-1: Verify the Obvious Issues
Sometimes a problem can be solved by something as simple as finding a loose or improper connection. Most devices that are not working properly can be detected using the Device Manager. If the device is experiencing a problem, the nature of the problem is displayed in Device Manager.
The best way to check and properly secure a component is to remove and reinsert it. When removing or installing components such as batteries or optical drives, ensure you correctly manipulate any slide switches or locks. Do not apply any force or damage may occur.
NOTE: Always consult the laptop manual for proper component installation and removal procedures, LED indicators, and function (Fn) key settings.
Here are some components that may have laptop connection errors:
PC Card
External display, S-Video
Ethernet NIC
Modem
Devices such as printers and scanners that connect using the parallel and USB ports
As each component is reinstalled, use the Device Manager to get feedback. Look for error messages that may indicate additional problems.
Power Issues: Laptops use an AC adapter or a battery for power. Figure 2 shows the icons that indicate the type of power in use. Some errors may indicate that the battery is not charged or secured.

Chapter 6 – Laptops and Portable Devices IT Essentials I v4.0 - DRAFT
Cisco Systems, Inc. 2007 DRAFT Page 47
Figure 6.7.2-2: Laptop Battery Indicator and AC Power Adapter
These are possible reasons for power error messages:
The incorrect AC adapter is used
The battery is damaged
The AC adapter is damaged
The wall outlet is not supplying power
Wireless Network Issues: Many Laptops, Smartphones, and PDAs have a LED that will indicate wireless activity. Wireless network signal strength is generally indicated using software accessed via Control Panel. Check to see if the signal is active as in Figure 3. If the signal is not active, the software controls for the wireless should be checked and reset.
Figure 6.7.2-3: Wireless Signal Strength

Chapter 6 – Laptops and Portable Devices IT Essentials I v4.0 - DRAFT
Cisco Systems, Inc. 2007 DRAFT Page 48
The wireless antenna can be mounted internally where the user cannot disturb it. Some antennas connect to the back of the laptop, and others extend from a wireless PC card or USB wireless adapter. If the antenna is removed or is broken internally, wireless range will be significantly reduced. Here are some troubleshooting suggestions for wireless signal strength problems:
Disconnect and re-connect the antenna to make sure it is securely connected.
Removing or repositioning items between wireless devices may increase signal strength.
Move the laptop or portable device to various locations in the room to determine if other factors in the area are affecting signal strength and availability.
Sound and Audio Issues: Function (Fn) keys can cause error messages if used incorrectly and may affect audio and video. Figure 4 shows examples of laptop keyboards with Function keys.
Figure 6.7.2-4: Function Keys
Fn keys control these features on most laptops:
Volume
Mute/no mute
LCD brightness
External monitor
Stylus Issues: The stylus or digitizer controls the position of the screen cursor by responding to the pressure of a stylus on the PDA screen. PDAs work best when the stylus provided is used as shown in Figure 5.

Chapter 6 – Laptops and Portable Devices IT Essentials I v4.0 - DRAFT
Cisco Systems, Inc. 2007 DRAFT Page 49
Figure 6.7.2-5: Stylus
The point of a pencil or pen should never be used. Advise the user to avoid striking the screen too sharply. The display is durable, but it can break. Here are some troubleshooting suggestions for stylus issues:
Re-calibrate by differences in how hard various users press it.
Re-align the corners of the stylus field. Running the re-alignment procedure on the device could bring it back into proper calibration.
Clean the PDA screen to ensure the stylus is making good contact with the screen.
Check the Control Panel under Mouse Settings to check or adjust calibration.
Some laptops (known as Tablet PCs) allow the user to use a stylus on the laptop screen. Tapping the stylus simulates a mouse click. Make sure that the user is using the correct stylus.
6.7.3. Try Quick Solutions First
The next step in the troubleshooting process is to try quick solutions as shown in Figure 1.
Step 3 Try Quick Solutions
Reboot the Laptop
Check BIOS Settings
Disconnect peripherals
Use the Last Known Good Configuration Option
Figure 6.7.3-1: Try Quick Solutions First
If you identify simple problems and solutions early, you can save significant amounts of time for the technician and money for the client.

Chapter 6 – Laptops and Portable Devices IT Essentials I v4.0 - DRAFT
Cisco Systems, Inc. 2007 DRAFT Page 50
Here are some quick solutions:
Reboot the computer. Many problems can be resolved by rebooting the computer.
Verify BIOS settings. BIOS settings may have been altered by mistake. BIOS can be reset to the default setting to undo any changes made by the user. Figure 2 shows an example BIOS screen.
Figure 6.7.3-2: BIOS
Remove or unplug unnecessary peripherals. Removing a peripheral eliminates a variable that has the potential to cause a problem. If the problem is eliminated by removing peripherals, the technician can observe as peripherals are added back to the system. The last peripheral added before a problem recurs is likely to be the cause of the problem and may need to be checked for the correct system resource assignment.
Use the Last Known Good Configuration option. If the laptop has a problem caused from adding a new application, driver, or device, Last Known Good Configuration will allow you to boot the computer with the same settings that you had prior to the problem.

Chapter 6 – Laptops and Portable Devices IT Essentials I v4.0 - DRAFT
Cisco Systems, Inc. 2007 DRAFT Page 51
Figure 3 shows the Windows boot menu options.
Figure 6.7.3-3: Boot Menu Options
6.7.4. Gather Data From the Computer
If the obvious and quick solutions do not solve the problem, the next step in the troubleshooting process is to gather information from the laptop as shown in Figure 1.
Step 4 Gather Data From the Computer
System Properties Device Manager Network Settings Power Options Event Viewer Operating System Information Error Messages Beep Sequences
Figure 6.7.4-1: Gather Data from the Computer
Data gathered from the laptop can be used to confirm the problem description given by the customer. Figure 2 shows different ways to gather information from the computer. You can access information on a laptop by using the following commands:

Chapter 6 – Laptops and Portable Devices IT Essentials I v4.0 - DRAFT
Cisco Systems, Inc. 2007 DRAFT Page 52
Figure 6.7.4-2: Windows XP System Properties
System Properties [Figure 3]
Figure 6.7.4-3: System Properties

Chapter 6 – Laptops and Portable Devices IT Essentials I v4.0 - DRAFT
Cisco Systems, Inc. 2007 DRAFT Page 53
Device Manager [Figure 4]
Figure 6.7.4-4: Device Manager
Network Settings [Figure 5]
Figure 6.7.4-5: Network Settings

Chapter 6 – Laptops and Portable Devices IT Essentials I v4.0 - DRAFT
Cisco Systems, Inc. 2007 DRAFT Page 54
Power Options [Figure 6]
Figure 6.7.4-6: Power Options
Event Viewer [Figure 7]
Figure 6.7.4-7: Event Viewer

Chapter 6 – Laptops and Portable Devices IT Essentials I v4.0 - DRAFT
Cisco Systems, Inc. 2007 DRAFT Page 55
Operating System Information [Figure 8]
Figure 6.7.4-8: Operating System Information
NOTE: There are other possible command locations in Windows.
6.7.5. Evaluate the Problem and Implement the Solution
The next step in the troubleshooting process is to evaluate the information you have from the customer and from the laptop, determine possible solutions, and implement the best one as shown in Figure 1.
Step 5 Evaluate the Problem and Implement the Solution
Problem Solving Experience
Other Technicians Internet Search News Groups Manufacturer FAQs Computer Manuals Device Manuals Online Forums Technical Websites
Figure 6.7.5-1: Evaluate the Problem and Implement the Solution
Consider talking to other people that work with technology. Always consult the available documentation, search the web for white papers, and review technical information.

Chapter 6 – Laptops and Portable Devices IT Essentials I v4.0 - DRAFT
Cisco Systems, Inc. 2007 DRAFT Page 56
Figure 2 has resources for possible solutions.
Figure 6.7.5-2: Search Options
Here are some solution resources:
Previous experience of solving problems with computers
Other technicians
Internet search engines
News groups
Manufacturer FAQs
Computer manuals
Device manuals
Online forums and chat
Technical websites
Identify all possible solutions. In the end, you may have to replace the component.
Worksheet Researching Laptop Problems Research laptop issues
6.7.6. Close with the Customer
When you are confident that the problem has been resolved, the next step is to close with the customer as shown in Figure 1.

Chapter 6 – Laptops and Portable Devices IT Essentials I v4.0 - DRAFT
Cisco Systems, Inc. 2007 DRAFT Page 57
Step 6 Close with the Customer
Discuss solution implemented with customer
Have customer verify problem has been solved
Provide customer with all paperwork
Document steps taken to solve the problem in the work order and the technician’s journal
Document any components used in the repair
Document time spent to resolve the problem
Figure 6.7.6-1: Close with the Customer
The technician must completely document the customer contact information, problem description, and steps to resolve the issue in the work order. A completed work order is shown in Figure 2.
Figure 6.7.6-2: Work Order
Be sure you have tested the laptop with the following scenarios:
On AC power
On battery power

Chapter 6 – Laptops and Portable Devices IT Essentials I v4.0 - DRAFT
Cisco Systems, Inc. 2007 DRAFT Page 58
In the docking station
Attached to the port replicator
With all external devices attached
Connected to the internet
With the software used by the customer
Explain to the customer each step you took to solve the problem. The customer needs to understand what caused the problem in order to avoid future errors of the same nature. Turn on the laptop and let the customer verify that the problem has been solved. Finally, have the customer reboot the system and check for any problems.
Give the customer the invoice for the repair and explain the charges for labor and repair parts. Provide the customer with manuals or other product documentation, if available. If any parts were replaced, give the customer the broken or replaced items. Answer any questions the customer may have. Figure 2 shows the work order filled out and the steps taken to resolve the issue.
Complete the records. Make sure you fill out all internal documentation, such as sales orders, time logs, and receipts.
Document the following information:
Customer name and contact information
Time spent on solving the problem
Travel time and distance
Hardware and software configuration changes
Any components, cables, connectors, etc., that you used in the repair that belonged to you personally
Make sure to maintain a technician repair journal that details the process you used to solve each problem. You never know when something you learned from one repair can help in another. You can use the notes from the journal for future reference and to build a knowledge database.
NOTE: A repair is final when you have thoroughly tested the laptop and completed all paperwork.
Worksheet Describing Service Problems Summarize reported computer problems into complete and concise descriptions

Chapter 6 – Laptops and Portable Devices IT Essentials I v4.0 - DRAFT
Cisco Systems, Inc. 2007 DRAFT Page 59
6.8. Summary This chapter discussed the features of laptops, portable devices (PDAs) and Smartphones. A virtual laptop allowed you to become familiar with the various ports and components in a laptop. The following are some of the important concepts to remember from this module:
Laptops and PDAs are becoming increasingly popular due to reduced costs, lighter weights, increased capabilities, and battery power for portability.
PDAs and Smartphones are small handheld devices with many of the capabilities of a computer, such as an address book, calendar, e-mail, and Internet access.
Laptops and desktops have ports that are virtually the same, so peripherals are interchangeable. Laptops can use docking stations or port replicators to quickly connect to desktop peripherals and AC power.
Desktop and laptop components, such as motherboards, are not interchangeable. Additionally, laptop components tend to be proprietary to each manufacturer and designed with unique form factors.
The laptop CPU is designed to use less power and create less heat than the desktop computer. It uses CPU throttling to reduce power consumption and heat.
Functionality of the laptop can be expanded by adding components via PC Card or ExpressCard slots and USB, Firewire, and parallel ports.
An important component of laptop portability is the ability to run on battery power. The current method of managing power is through the operating system with the Advanced Configuration and Power Interface (ACPI). The ACPI standard defines six power management states.
There are several components of a laptop that may need to be replaced. Steps are defined to replace the battery, optical drive, hard drive, memory, and PC Cards.
Cell phone standards were developed in the 1980s. The current third-generation standards enable cell phones to share some laptop functions, such as e-mail, Internet access, and calendar and address functions. Standards have not been adopted worldwide.
Preventive maintenance will ensure optimal operation of the laptop. It is important to keep the laptop clean and in safe environments. It is critical to use the correct materials and techniques when cleaning the various components of a laptop. Procedures for cleaning the components are presented.
Dust, temperature, and humidity can affect laptop performance. Basic guidelines are to keep the laptop clean, with good ventilation and room temperature between 45 to 90 degrees F (7 to 32 degrees C) and humidity levels in the range of 10 to 80 percent.
Always verify that repair of a laptop is cost-effective.

Chapter 6 – Laptops and Portable Devices IT Essentials I v4.0 - DRAFT
Cisco Systems, Inc. 2007 DRAFT Page 60
Troubleshooting laptop problems requires the technician to identify, repair, and document the problem. Troubleshooting steps include: Gather data from customer, verify the obvious, try quick solutions first, gather data from the computer, evaluate the problem, implement the solution, and close with the customer.
When troubleshooting wireless-capable devices, check all status LEDs and signal strength indicators. Remove all unnecessary peripherals to isolate the problem.
Check for external problems, such as connection errors, power errors, and function key errors. Connection errors can often be solved by removing and reinserting components. Check in Device Manager for errors. Power errors can be caused by the use of incorrect adaptors, damaged batteries, damaged AC adaptors, or dead wall outlets. Check components controlled by Function keys.
Try quick solutions first to solve laptop problems. Reboot and verify the BIOS settings, start the laptop in safe mode, and use the Last Known Good Configuration Option.
For problem resolution, gather information from the computer from the Device Manager, Network Settings, Power Options, Event Viewer, and System Configuration.
Resources for troubleshooting should include the following: other technicians, Internet resources, manufacturers’ FAQs, and online forums.
The final steps in the troubleshooting process are to test the laptop in all scenarios, discuss the solution with the customer, fill out all necessary paperwork and billing documents, and document the solution.
The Advanced Laptops and Portable Devices chapter will focus on troubleshooting more difficult problems.

Chapter 6 – Laptops and Portable Devices IT Essentials I v4.0 - DRAFT
Cisco Systems, Inc. 2007 DRAFT Page 61
Index of Terms ACPI, 18 Advanced Configuration and Power
Interface (ACPI) standards, 23 analog, 34 APM, 18 hot-swappable, 28 base station, 13 Closed-ended questions, 44 CPU throttling, 16
Digital signals, 34 Hibernate, 27 Open-ended questions, 43 PDA, 6 Power management, 17 Smartphone, 6 SODIMM, 31 Standby, 27