molde bolsa de mão
DESCRIPTION
moldeTRANSCRIPT

Free Sewing Pattern � Quilted Purse
by: StarValkyrie
This pattern makes a sturdy purse 13�x9�x4� with 24� straps out of twocontrasting fabrics. It includes a zippered inner compartment, two largebuttoned pockets and three smaller pockets. A two-color bow and quiltingadd interest.
Printing Instructions
1. Important! You must change your print settings to print thisdocument to actual size. There is 4 inch square box across pages 1and 2 � measure it on your printout to make sure it has printedexactly to scale.
2. Either fold under or cut o� the top and left margins of each patternpage, then tape the pages together so each set of taping symbolsmatches.
3. Then the pattern pieces can be cut out and used like a normal tissuepattern.

Pattern pieces included:
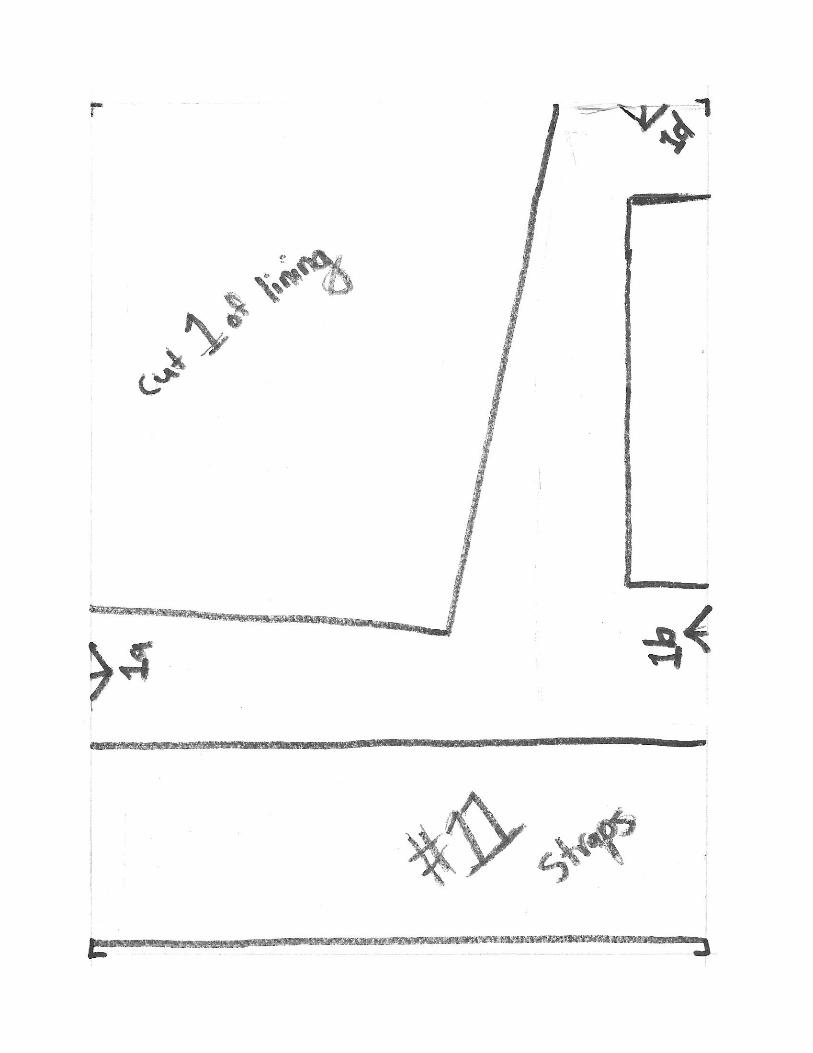
1 � Body Contrast
2 � Body Batting
3 � Straps Batting
4 � Base Batting
5 � Accent Bow
6 � Body (Main)
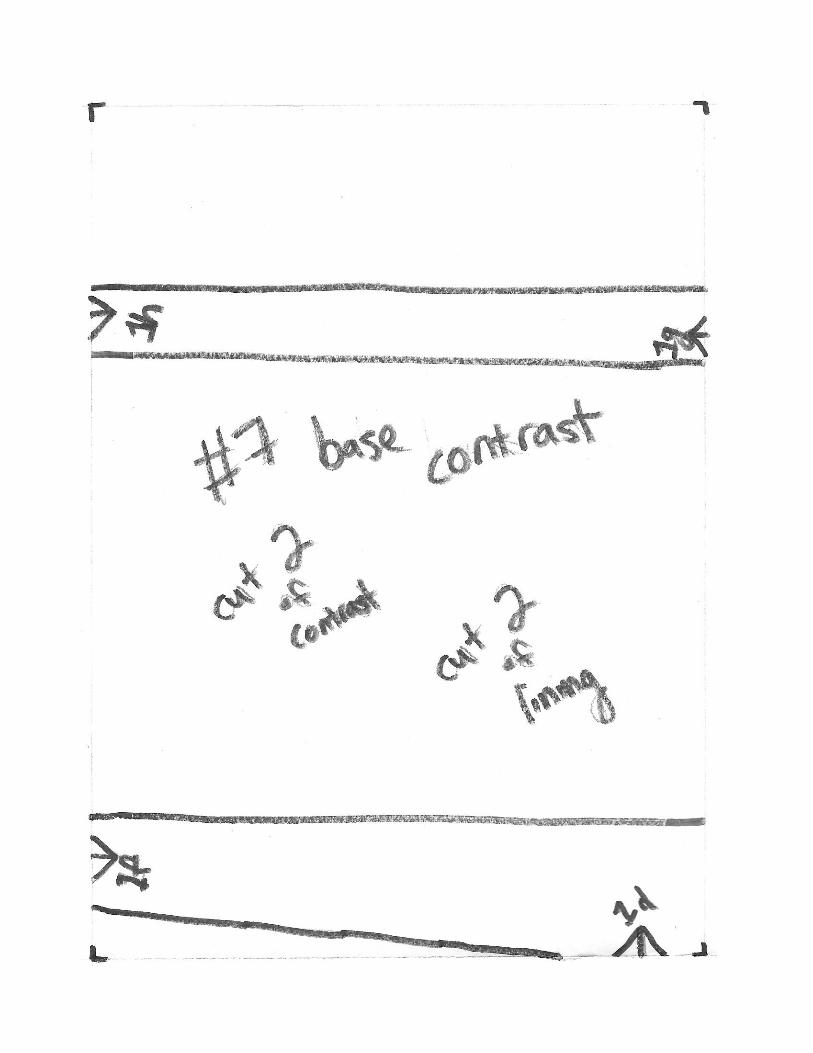
7 � Base (Contrast)
8 � Body (Lining)
9 � Double Pocket
10 � Single Pocket
11 � Straps
Materials Needed:
Fabric:
1 main color, 1 contrast color, 1 lining
Notions needed:
matching thread, 14� zipper, marking pencil or tailor's chalk, craftbatting, 2 buttons, 2 scraps of fusible interfacing
Other materials:
2 pieces about 30 inches long of scrap yarn or string, printer, paper, ink,pencil, paper scissors, fabric scissors, ruler, pins, 1 hand sewing needle, asewing machine, a zipper foot, buttonhole thread or a machine that canstitch buttonholes

Cutting instructions
From the main color fabric:
Cut 2 of #5, #6
Cut 4 of #11
From the contrast fabric:
Cut 2 of #1, #7
Cut 4 of #5
From lining:
Cut 1 of #7, #9, #10
Cut 8 of #8
From craft batting:
Cut 1 of #4
Cut 2 of #2, #3
Sewing instructions:
1. Pin top edge of one piece of #8 Body Lining to each top edge of #6Body Main with right sides together. Stitch and iron seams open.
2. Pin bottom edge of each body section to the top edge of each #1Body Contrast with right sides together. Stitch and iron seams open.
3. Fold each body section along the marked dotted line shown onpattern piece #6 with wrong sides together.
4. Lay the folded body section pieces on a table with themain/contrast side up. With a ruler and marking pencil, drawdiagonal lines 1 inch apart across the whole of the visible portion ofthe main color. Then mark horizontal lines 1/2 inch apart across thewhole of the contrast color. (Alternative: mark any quilting design...

try a lattice, wider or narrower parallel lines, meander stitch,free-hand stars or �owers, or quilt around any print on your fabric)
5. Also mark concentric lines 1/2 inch apart on one piece of #7 BaseContrast.
6. Pin each piece of #2 Body Batting in between the folded halves ofeach body section with the top edge of the batting right up againstthe fold and centered left-to-right.
7. Using matching top thread and a basic straight stitch, machine quiltalong all the diagonal lines and horizontally in the ditch of the seambetween the main and contrast colors. Switch to top threadmatching the contrast color and quilt the horizontal lines throughthe contrast.
8. Pin both pieces of #7 Base Contrast with wrong sides together andthe #4 Base Batting centered between them. Quilt the concentriclines.
9. With right sides together, pin the side seams of the body sectionsfrom the folded edge down the straight seams. Stitch, stopping5/8ths away from the curve.
10. With right sides together, pin one long side of the base section tothe bottom edge of one body section and stitch, stopping 5/8thsfrom the curve.
11. Pin half of one curve of the base section to the body section. Withthe base side up, stitch, continuing the straight line from step 10and following the curve to its point with 5/8ths seam allowance.
12. Repeat step 11 for the other half curve adjoining the sewn bodysection.
13. Repeat steps 10-12 for the other half of the base section. Turn rightside out.
14. Pin each pair of #11 Straps, right sides together, along the longestedges with a length of scrap string sandwiched between each pairand running the full length of the straps. Also pin one short side,

taking care to center the string in that seam. Then pin one piece of#3 Strap Batting on top of each pair of pinned straps, centered.Stitch the pinned edges with 5/8ths seam allowance, just catchingthe batting all the way. Backstitch a few times over the string asyou sew that short edge.
15. With the help of the string, turn the straps right sides out, takingcare not to tear the batting. When it is turned, cut the string o�right at the seam so none remains visible outside the strap.
16. Turn under the open edge of each strap by 5/8ths and hand sew theedge closed with an invisible or whip stitch.
17. With matching top and bobbin thread, edgestitch all around eachstrap.
18. Pin each strap to one side of the �nished body section of the bag,adjusting the length to suit you. Machine stitch all ends of thestraps to the bag with matching thread.
19. Layer two sections of #8 Body Lining with right sides together andpin all over. Also pin along the curves and bottom edge. Stitch onlythe curves and bottom edge. Repeat with another two sections of#8 Body lining.
20. Fold the 5/8ths seam allowance along the top of all the body liningpieces towards the wrong sides and iron.
21. Lay both loose (unstitched) lining sections wrong side up on thetable with just 1/4th inch between the ironed folds.
22. With the zipper zipped, lay the zipper on top of these, right side upand with equal overhang at either end. Pin and stitch along bothsides of the zipper.
23. Roll the edges of #9 Double Pocket and #10 Single Pocket under1/4 inch and iron. Roll another 1/4 inch and iron again. Topstitchall around to secure these folds.
24. To the right side of one lining piece that is attached to the zipper,pin the Double Pocket along the dotted line parked on pattern piece
#9 so that, imagining the piece as an arrow head, the center pointpoints towards the zipper. Sew.
25. Manipulate the lower edge of the double pocket so it is parallel tothe zipper and pin. Stitch.
26. Manipulate the side edges of the double pocket so they areperpendicular to the zipper. Pin and stitch.
27. To the other piece of body lining attached to the zipper, center the#10 Single Pocket. Pin and stitch.
28. Now, with right sides together, pin the side seams of these zipperedbody lining sections and stitch, stopping 5/8ths from the curves atthe bottom.
29. With right sides together, pin one long side of the base lining pieceto the bottom edge of one half of the zippered lining section andstitch, stopping 5/8ths from the curve.
30. Pin half of one curve of the base lining to the zippered body lining.With the base side up, stitch, continuing the straight line from step29 and following the curve to its point with 5/8ths seam allowance.
31. Repeat step 30 for the other half curve adjoining the sewn bodysection.
32. Repeat steps 29-31 for the other half of the base lining. Set aside.
33. Return to the pinned pairs of body lining sections and pin thesetogether along the side seams. Stitch through all layers, making sureto meet the stitching already �nished along the curves.
34. To the wrong side of each innermost body lining piece, iron a scrapof fusible interfacing about 1 inch from top edge and centered.
35. To the right side of those lining/interfacing sections, sew a button.
36. Slip the zippered body lining section in between the two pinnedpairs and pin the top (folded and ironed) edge of the body liningpieces that you just sewed the buttons on along the zipper andstitch without catching the outermost lining layers.

37. Slide the lining section inside the quilted section of the bag. Be sureto line up the seams of the base, NOT the top edges. Mark theposition for the buttonholes, then remove the lining and sew thebuttonholes by hand or machine as desired.
38. Slide the lining section inside the bag again and pin the top edge ofthe outermost lining layers to the quilted section of the bag. Handsew using a whip or invisible stitch.
39. Fold each piece of the contrast color of #5 Accent Bow in halflengthwise with wrong sides together. Iron.
40. Layer two pieces of the main color of #5 Accent Bow with right sidestogether. Sandwich one length of the contrast color as prepared inthe previous step between them along each of the long edges withraw edges aligned. Pin and stitch with a 1/2 inch seam allowance.Repeat for the remaining 2 pieces of the main color of #5 AccentBow and the remaining ironed contrast pieces of #5 Accent Bow.
41. Turn both bow pieces right sides out. Tools like a wooden chopstickand/or a pair of tweezers can help if you are having trouble turningthem.
42. With the aid of a ruler and a marking pencil, on one of the ribbonpieces, mark a line 1 inch from each end. Mark the remaining lengthinto 8 equal portions.
43. Turn the ends of the marked ribbon under by 1/2 inch and hand sewthem shut.
44. Fold the marked ribbon piece into four loops, such that 4 of themarked lines show where to fold the loops and the other marks(including the two at the ends) are all layered up in the center. Seethe illustration below.

45. By hand, stitch through the layers at the center along those markedlines.
46. Find the center of the other ribbon piece and lay it over thestitching at the center of those loops. Tie a simple knot with thecrossing at the back. Stitch through the crossing.
47. Hold the bow up to the front of the purse, at the point where oneside of one strap is attached to the purse body. Determine how longyou want the tails of the bow to hang. Mark that on each tail. Cut1/2 inch below those marked lines. Turn that 1/2 inch inside andwhipstitch the ends closed.
48. By hand, stitch the back of the bow to the purse body at the pointwhere one side of one strap is attached to the purse body (which endof which strap is up to you, but recommended is whichever will beaway from the body and to the front when the purse is worn onwhichever shoulder you normally wear your purse).
... and now you're �nished!
Pattern Pages: