the lowenfeld kaleidobloc test a nonverbal technique an
TRANSCRIPT

The Lowenfeld Kaleidobloc Test
A Nonverbal Technique
An Introductory Manual of Instruction for Administration of the Test
to Children and Adults
October 1976
Table of Contents
1. Introduction
2. The Test Materials
3. Description of the blocks
4. Interrelations of the blocks
5. Administration of the Test as a Free Design
6. Free Design: Instructions for Children
7. Free Design: Instructions for Adults
8. Administration of the Test as a Series of Problems
9. Problems: Instructions for Children
10. Identification of forms and relationships
11. Identification of colours
12. Copying geometric arrangements
13. Perceiving space

14. Imaging forms in different positions
15. Form and number calculation
16. Breaking up and re-assembling bricks
17. Making a person
18. Assembling the blocks in the box
19. Problems : Instructions for Adults
20. Identification of colours, forms and space relationships
21. Summation
22. Autonomy in free designs
Appendices:
Appendix A: Record of a Free Design
Appendix B: Recording the Free Design
Appendix C: Using the Kaleidobloc Test in Anthropological Research
Appendix D: Illustration of the 21 possible arrangements of triangles

Kaleidoblocs Manual
The late Dr. Margaret Lowenfeld developed a number of tools or techniques
for non-verbal communication with children. These were clinically to understand,
assess and, to a degree, 'treat' disturbed children and later adults. Through her long
association with Dr. Margaret Mead, several of these techniques have found a place
in anthropological field work and other studies.
The techniques were:
1. Lowenfeld World Techniques Lowenfeld
2. Mosaic Test
3. Poleidoblocs
4. Kaleidoblocs
Dr. Lowenfeld's Will set up a Trust, the Dr. Margaret Lowenfeld Trust, to
further the aims and objects of the Institute of Child Psychology, to which she
devoted her life. The Trustees decided that their first responsibility was to see that
the use of the various 'tools' was adequately documented and described. This meant
that priority had to be given to preparing manuals on the World Technique and
Kaleidoblocs. Dr. Margaret Mead and Miss Ville Andersen, long-time associates of
Dr. Lowenfeld, have prepared a text on 'Worlds', which is currently (summer 1976)
beginning its production cycle.
This manual describes the use of Kaleidoblocs (which may be obtained from
the Institute of Child Psychology, 6 Pembridge Villas, London, W11 ZSU). It was re-
written by Miss Andersen with help from Dr. Kate MacSorley and then revised by Dr.
Rhoda Metraux and Dr. T. Abel in New York. The trustees are particularly grateful to
them for their help and interest.
Kaleidoblocs Introduction

The Lowenfeld Kaleidobloc Test
A Nonverbal Technique
1. Introduction
The Lowenfeld Kaleidobloc Test provides an opportunity for the study of
spontaneous organizing behaviour and the play of imagination in children and adults.
It lends itself to studies of process as the observer records the subject's approach to
the task and his manner of carrying it out. The end product, a three-dimensional
design constructed by the subject, provides an objective record that can be
photographed and reproduced in full.
Kaleidoblocs is designed to be used in two quite distinct ways:
1. As a nonverbal projective test in which the subject is asked to construct a
free, three-dimensional design of his own choosing. In this form, the test may serve
both for diagnostic purposes and as an adjunct to a course of therapy with an
individual. In anthropological field work it may be used in research on' cultural
imagery and it can provide valuable insights in studies of cultural personality.
2. As a nonverbal test of the subject's ability to solve a variety of problems
concerned primarily with different kinds of space relationships.
Ordinarily, these two versions of the test should not be given to an individual
on the same occasion. Should it be necessary to do so, the free construction (1)
must come first.
Kaleidoblocs may be used independently or to complement other procedures.
This test has the advantage that the invariable and highly integrated set of objects
presented to the subject can be organized with great freedom. Moreover, while many
standardized tests can be usefully administered only once, subjects may repeatedly
construct Kaleidobloc designs in fresh and creative ways.

Kaleidoblocs is a valuable complement to the Lowenfeld Mosaic Test In the
Mosaic test, which also is a nonverbal technique, the subject is presented with a set
of small tiles in five shapes and six colours and is asked to construct a free two-
dimensional design. Used as a pair, these two tests can provide added insights
through an analysis of the different ways in which a subject constructs two- and
three-dimensional designs.
These two nonverbal techniques are especially valuable because, in each
case, the end product (the design made by the subject) can be reproduced for study
at a later time and by persons other than the original examiner. If he wishes to do so,
the analyst may view simultaneously a whole series of designs, made by one
individual or by a large group, and in this way discern common elements of imagery
and patterning or (in a series over time) study development and/or change as it is
taking place. And provided careful records have been kept, both tests lend
themselves to very detailed studies of process.
The main body of this manual is divided into three parts. In Part I the
Kaleidobloc test materials are described and illustrated. in Part II instructions for
children and adults are given for administering the test as a projective technique. In
Part III instructions for children and adults are given for administering the set
problems, with illustrations of the answers: this version of the test ends with free
designs which may be compared with those done earlier.
There are four appendices. Appendix A gives a sample record of one adult's
free design and interview with the examiner. Appendix 3 outlines a method of
recording the design by a combination of tracing and photography. Appendix C gives
some suggestions for using the test n field work. Appendix D contains a note on one
pioneer use of the Kaleidobloc test.

2. The Test Materials
The Kaleidobloc Test consists of 26 blocks of brightly coloured wood cut in
such a way as to contain in themselves simple, basic mathematical relationships.
The blocks are packed in a wooden box with a sliding lid. A diagram of the blocks as
packed in the box appears on the back of the lid. The size of the box is
approximately 28 X 6 x 6 cm.
The basic unit of measurement for all blocks is the length of the side of the
cube: 1.9 cm (3/4: inch).
3. Description of the Blocks
1. The arc: one piece 12 units in length and 12 ½ units in width with one
straight side and one side curved into the segment of a circle rising to a
height of 12 ½ units at its central and highest point. The arc is painted
white on its straight surface, blue on its curved surface and red on its”
sides.
2. The half-arc: two pieces, each with one curved and one straight side. The
length of the straight side is 6 units. The curved side, which fits over half of
the arc, is 12 ½ units in width and 2 units high at its highest end and 2-1
unit high at its lowest end. One half-art is painted green, the other yellow.
3. Right-angle triangle: four identical triangles (width 1 unit, length of short
sides 2 ½ units), all painted green.
4. A group of 19 rectangular prisms of different sizes, shapes and colours, as
follows:
1 5-unit block (5 x 1 x 1 units) painted blue

1 3-unit block (3 x 1 x 1 units) painted green
2 2-unit blocks (2 x 1 x 1 units) one painted red, one yellow
2 flat blocks (3 x 1 x ½ units) one painted red, one blue
4 rods (3 x ½ x ½ unit) one painted red, one green, one yellow, one white
3 cubes (1 x 1 x 1 unit) one painted red, one green, on white
6 half-cubes (1 x 1 x ½ unit) one painted red, one green, one yellow, one
blue and two white
4. Interrelations of the Blocks
Students who are learning to administer the Kaleidobloc Test should now use
the actual blocks to work out each of. the relationships described here in order to
familiarize themselves with all the pieces and the different ways in which they can be
fitted together.
The blocks are geometrically related to one another, as follows:
1. When the two half-arcs are placed end to end with the curved surface
fitting over that of the arc, the three blocks form a rectangular block (12 x 2
x 12 ½ units).
2. Placed end to end, the combined length of the 5-unit, 3-unit and two 2-unit
blocks is equal to the length of the arc (12 units)
3. Fitted together to form one rectangular block, the two flats and four rods
are equal in length to the arc (12 units).

4. All blocks, flats and rods combined form a rectangular block (12 x 2 x 1
units). If this block is set beside the block formed by the arc and half-arcs,
a new rectangular block is formed (12 x 2 ½ x 2 units).
If the four right-angle triangles are fitted together to form one two-layer
square, and this is set at the end of the rectangular block, a new
rectangular block is formed (14½ x 2½ x 2 units).
5. The length of the straight side of the half-arc (6 units) can be composed
four times by using the 19 rectangular prisms in various combinations.
6. The 5-unit block can be composed by 3 plus 2 units, by 2 plus 2 plus 1
unit, and by combinations of the smaller units. Its length is equal to the
short sides of two right-angle triangles placed side by side.
7. A length of four units can be composed by 3 plus 1 units, or 2 plus 2 units,
or a combination of smaller units.
8. The 3-unit block can be composed by the two flats (each 3 x 1 x ½ units),
or the three cubes, or the four rods, or the six half-cubes. In each group a
single piece represents a fraction (1/2, 1/3, 1/4, and 1/6) of the 3-unit
block.
9. The 2-unit block can be composed by cubes or half-cubes.
10. Omitting only the rods, the rectangular prisms can be formed into 3 blocks
of equal volume:
all blue blocks combined
all red and white blocks combined
all green and yellow blocks combined
5. Administration of the Test as a Free Design
The specific instructions are divided into two sections — for adults and for
children. The general conditions for the administration of the test and for recording
the steps by which the subject makes a design are the same for adults and children.
As far as possible the setting and working conditions as arranged on the first
occasion should be the same on subsequent occasions on which a subject may
make a Kaleidobloc design.

The Kaleidobloc Test is administered individually in order that the examiner
may fully record the subject's procedure and comments as well as the end product.
The test should be carried out in a quiet place where the subject will have
good light and be comfortable and will not be disturbed by onlookers or passers-by.
The subject should be seated at a table of an appropriate height. The examiner may
be seated across from or slightly to the left of the subject.
The working surface should be flat and smooth, but not polished, and should
be neutral in colour without any design.
Kaleidoblocs has not yet been standardized in regard to the use of a bounded
or an unbounded Space for the production of the free design. However, it is
exceedingly useful to know how subjects respond to a bounded area, and it is
recommended that the subject be given a flat, rimless tray on which to work. Copying
the finished design will be facilitated by placing a sheet of paper (neutral in colour -
beige, pale grey or white), cut to the size of the tray on the working surface.
Whatever decision is made as to size of tray and colour of paper, it is important to
record the dimensions and colour: where a group is to be tested, the conditions
should be the same for all individuals.
Instructions may be repeated until they are understood by the subject.
The subject's approach to the task and step-by-step procedure, including any
comments, should be recorded. The examiner should note whether the subject is
right- or left-handed or bilateral, whether he works with one hand only or 'assists'
with the other hand.
Although there is no time limit, the examiner should record the total time from
the moment the instructions are given to the moment the subject indicates he has
completed the task. Significant time intervals should be indicated. For example, the
subject may pause before picking up any pieces or he may stop at some stage to
consider what he has done, or he may destroy a design and start over.

When the subject has finished, the examiner should inquire about the
composition. (See Specific instructions for adults and children) The inquiry should be
treated as an Open-ended interview (See Appendix A for a sample record of the
process of construction and of the interview with the subject).
The examiner should ascertain whether the composition is representational or
an abstract design, whether it is based in actuality or fantasy, whether the abstract
design or the fantasy creation derives from a recognised convention or is
idiosyncratic. The examiner should also note the following:
-Have the shapes of the blocks been the main determinants for the structure?
-What use, if any, has been made of colour?
-Has the impossibility of colour-form symmetry been a frustrating element?
6. Free Design: Instructions for Children
The child should be seated comfortably at a table of suitable height. If he is to
work within a bounded area, the tray covered with a piece of tracing paper (as
described above) is placed in front of him. The examiner scatters the blocks on the
table in an even manner, all within easy reach of the child. The box is stored out of
sight. The examiner sits with the child in order to take notes unobtrusively of the
step-by-step procedure, including sketches of all designs whether or not they are
completed and retained.
The examiner says: "Look at these blocks. They are of different shapes and
colours. I would like you to make something - whatever you like — with them".
The child is allowed to build 0r play with the blocks as he chooses. As a rule
small children will talk while they build or play and the examiner may respond with
non- leading comments. The child's remarks — and any answers— should be
recorded together with his play and/or construction activities.

The child may turn the blocks into a narrative or moving scene, e. g. cars on a
highway. The examiner will allow the play to continue for a reasonable time,
recording what is going on, and then should bring the activity to an end.
If the child succeeds in completing a construction, the time should be
recorded. The examiner then asks: "What is it? Tell me what you have made.” She
may ask further non—leading questions to encourage the child to describe what he
had in mind, what gave him the idea and when (before beginning? in the course of
play? or after the construction was completed?) and what else occurred to him.
Questions should be noted, and replies must be recorded verbatim.
Even though the child does not complete a construction, a reasonable time
should be allowed according to the needs of the child: the fact should be recorded. In
addition to data on the child's age, sex and background, the record should include a
brief statement about the child's attitude toward the task.
7. Free Design: Instructions for Adults
When the subject has been comfortably seated, the blocks should be placed
on the table before him in a casual heap. If a tray covered with tracing paper is to be
used as a bounded work area, the blocks should be scattered outside this area. The
box should be out of sight.
The examiner says: "Please make something -whatever you with these
blocks. You may use them in any way you like.”
The examiner, seated so that she may observe and take notes unobtrusively,
should keep a careful step-by-step record of the subject‘s procedure, including
pauses and comments as they are made. She should sketch the arrangement of
blocks, including discarded arrangements, from the beginning to the completion of
the construction.

When the subject indicates that he is finished - or at least that he does not
intend to continue further — the examiner should ask: “What have you made?
Please tell me about it.”
As in the interview with a child, the examiner should encourage the subject to
describe what he had in mind, What gave him the idea and when (before beginning?
as he worked? after the construction was completed?) and what else occurred to
him. As suggested in the general instructions (p. 7), the examiner should ascertain
the nature of the design and the subject's response to - and use of - form and colour.
The question should be noted and the subject's comments should be recorded
verbatim.
In addition to data on the subject's sex, age and background, the record
should include a brief statement about the subject's attitude toward the task and
whether or not he appeared to be pleased with his composition.
8. Administration of the Test as a Series of Problems
In this version of the Kaleidoblocs Test, the subject - adult or child - is
presented with a series of problems having to do with form and colour and,
especially, spatial relationships. In contrast to the use of the test as a nonverbal
projective technique, the test as used here is concerned with the individual's ability to
perceive and recall relationship’s among concrete objects, learn from handling the
objects and put this learning to use, and to work within a disciplined framework in a
logical manner.
Since the required constructions are, in most cases, predetermined, is not
necessary to reproduce each one; however, a careful record should be kept of the
subject's spontaneous verbal responses and, in addition, of any errors or failures in
construction. The examiner should be attentive to the subject's total approach to the
task.

The subject should be seated at a table of appropriate height and size in a
quiet place with good light where he can work undisturbed by passers-by or
onlookers. For this version of the test, it is not necessary to have a bounded working
area or to trace the standardized constructions. However, at the end the subject is
asked to make a person and (adults only) a free design. These should be fully
recorded as was the free design in Part I. The subject should be provided with a tray
covered with tracing paper. If a second set of the test materials is available, this will
save time.
In the adult version time limits have been imposed. In the instruction for
children no Specific time limits have been set: the examiner should set limits suitable
for the individual child and keep a record of the actual time for each problem.
9. Problems: Instructions for Children
It is better practice to give the free construction and the problem version of the
Kaleidobloc Test on different occasions; where this is not possible, the child should
make a free design before attempting to deal with the problems.
The programme of the tests has been so arranged as to isolate single aspects
of the programme. Under each heading the problems related to this particular aspect
of the test are arranged in a series commencing with the most simple, suitable to a
child of 2 ½ years, up to the problems which lead directly to those for adults.
One aim of the version for children is to investigate how the mode or
presentation of a problem (in an abstract form or in a story setting) affects the child's
ability to perceive and recognize form. It is suggested that the problems be
presented first in abstract form. Then, after a lapse of time sufficient to prevent a
practice effect, the problems may be presented again in story form. The two
performances can be compared. Some, but not all, the problems are presented in
two forms.
The version for children consists of the following parts

a) Identification of forms and relationships (Problems 1-9)
b) Identification of colours (Problems 10-11)
c) Copying geometric arrangements (Problems 12-17)
d) Perceiving space (Problems 18-19)
e) Imaging forms in different positions (Problems 20-22)
f) Form and number calculation (Problems 23—27)
g) Breaking up and re—assembling forms (Problem 28)
h) Making a person (Problem 29)
i) Assembling the blocks in the box (Problem 30)
10. Identification of Forms and Relationships
1. The examiner shows the child a White half-cube and says: "Can you find
another one just like this, the same shape and colour?”
Answer: Other white half-cube.
2. The examiner places one white half-cube on top of the other. She shows the
child/the cube thus made and says: "Now find one that looks just
like this, the same shape and colour
Answer: White cube
3. The examiner places the white cube beside the cube of two half-cubes and
asks: "Can you find one block the same size and shape as this?"
Answer: Yellow or red 2-unit block.
4. The examiner forms the blocks into a square and says: "You see, now we
have a new shape. Can you find a block that will fit exactly any
side of this?"
Answer: The other 2-unit block.
5. The examiner sets the 2-unit block beside the square, forming an oblong
figure, and asks: "Can you find a block that fits the longer side of this?”
Answer: Green 3-unit block.

The next four problems in this group are presented (1) in abstract form and (2) in
story form.
6. First presentation: The examiner places the yellow 2-unit block upright on the
table and asks: "Can you find another block just this size?”
Second (alternative) presentation: The examiner places the yellow 2-unit
block upright on the table and explains: "This is a boy going for a
walk. He is looking for a boy in a red coat, who is exactly as big as
he is. Can you find the boy in the red coat?"
Answer: Red 2-unit block.
7. First presentation: If the child has succeeded in (6), the examiner now asks:
"Can you find a flat yellow block that will fit on top of the red block and a red
one the same size and shape that will fit on top of the yellow block?”
Second (alternative) presentation: The examiner explains: "The two boys
want to put on their hats. Can you find a flat yellow one for the boy in the red
coat and a flat red one for the boy in the yellow coat?”
Answer: The red and yellow half-cubes.
8. First presentation: The emminer removes the half-cubes and asks: Can you
find a block as fat as these two but one cube taller and put it between them?”
Second (alternative)presentation: The examiner says: WWW
two boys take off their hats. "She removes the half-cubes and
continues: "Their big brother is as fat as they are and one head taller. Can
you find him and put him between the two boys?"
Answer: The green 3-unit block.
9. First presentation: The examiner now asks: "Can you make the short ones as
big as the tall one?"
Second (alternative) presentation: The examiner now asks: “Can
you make the two boys grow as tall as their big brother?”
Answer: Any cube or combination of half-cubes placed on top of the yellow
and the red 2-unit blocks.

11. Identification of Colours
10. The examiner presents the child with all the blocks except the arc, the two
half-arcs and the four triangles. She picks up the red 2-unit block and asks:
“What colour is this?”
Answer: Red.
The examiner then asks: How many more blocks of the same colour can you
find? Put them all here." Repeat for all other colours (blue, green, yellow and
white), (The young child may not be able to name all the colours or count the
number but may be able to discriminate correctly by colour)
Answer: The blocks are named by colour and sorted into colour groups.
11. The examiner removes the blue and red flats, the four rods and one white
half-cube and asks: “Can you make five towers, each of one
colour only and each as tall as you can make it?”
Answer: Blue 5-unit block plus half-cube
Green 3-unit block plus cube plus half-cube
Red 2-unit block plus cube plus half-cube
Yellow 2-unit block plus half-cube
White cube plus half-cube
12. Copying Geometric Arrangements
12. The examiner takes two green triangles and places them flat on
the table forming a bigger triangle and says: "See if you can
find two blocks just like these and put them on the table in the same way.”
13. The examiner puts two triangles together to form a square flat on
the table and asks: "Can you do this with your two?”
14. The examiner sets two triangles upright on the table in the form of a larger
triangle.

First Presentation: “Can you put yours together like this?”
Second (alternative) Presentation: “Look, it's like a hat. Can you
make a hat out of your two?”
The examiner now explains: "We are going to make some bridges.”
15. The examiner places the two half-arcs upright on the table at less
than a 3-unit distance apart. She asks: "Can you bridge this using
pieces of just one colour?"
Answer: Red flat plus red rod.
16. The examiner presents the child with the two flats, four rods and six half-
cubes. She sets the green and yellow rods upright a short
distance apart, places the green and yellow half- cubes on top of
the corresponding rods, places the blue flat across, forming a
bridge, and places the blue half-cube on the centre of the bridge. She asks:
“Can you use the other pieces to make a bridge shaped like this one?” (The
colours, of course, will be dissimilar)
17. The examiner lines up in one row, standing erect and with a one-cube space
between the units, the green 3-unit block, the red 2-unit block
with the red cube on top, and the red and blue flats pushed
together to form a single pillar. She places the blue 5-unit block
across the three pillars and sets the yellow 2-unit block flat on the centre of
the bridge. She asks the child to look at the construction carefully. After 30
seconds the examiner takes the construction down and asks the child to
reassemble it.
13. Perceiving Space
18. The examiner segregates the green 3-unit block and the half-cubes. She
places the green 3-unit block flat on the table and asks: "How
many of the little ones, lying flat, will fit exactly on top of the green
one?"

Answer: Three half-cubes.
19. The examiner places two green triangles flat on the table, one-cube distance
apart, long sides facing. She asks: "Can you fill the space
between them with pieces of a single colour?”
Answer: Red 2-unit block plus red cube plus red half-cube, or Green 3-unit
block plus green half-cube.
14. Imaging Forms in Different Positions
20. The examiner places the red and green half-cubes flat on the table
on opposite sides of the red cube and asks: “Can you do the same
thing with the white ones?"
21. The examiner lays the blue 5-unit block flat on the table and asks: "How many
blocks of just this size and shape can you make out of all the other blocks?"
Answer: Three blocks.
A fourth block is one cube short. Picking up a cube,
the examiner asks: "How many of these are needed to
make the short block as big as the blue one?"
Answer: One cube or one more.
22. The examiner presents the four triangles in one solid square, first standing on
end and then lying flat. She says: "You see, this is a solid block with smooth
edges. Nothing sticks out. You can stand it up or lay it flat. Now, I want you to
see how many blocks with smooth edges you can make using these four
triangles, lying down or standing up. We'll count how many different blocks
you can make."
Answer: The twenty-one possible arrangements are
illustrated in Appendix D. Figs. 1—21. The arrangements
demonstrated here are Figs. 1 and 2.

15. Form and Number Calculation
23. The examiner places the blue 5-unit block with the red 2-unit block on top of it
on the table. She asks: "Can you tell how much of the blue block is not
covered? You may use other pieces to measure with.”
Answer: Three cubes of space, which may be arrived at in various ways.
24. The examiner removes the arc, the half- arcs, four triangles and four rods. All
other blocks are scattered on the table. The examiner says: "please sort these
so that blocks of the same colour are gathered together. "
Note: In this second trial the child is not given colour cues as in the first trial.
(See p. 13 f 10.)
The blocks should remain divided into colour groups for the next three
problems (Nos. 25, 26 and 27), the first two of which may be presented in
abstract or in story form:
25. The examiner picks up a half-cube from one of the colour groups and says :
First Presentation: “If this counts one, how much would each group of blocks
(touches them) add up to?”
Second (alternative) Presentation: “Supposing this were a piece of candy that
cost one penny and each colour were a different kind of candy, how much
would you have to pay to buy each kind of candy you see here?"
Answer: Blue: 14
Red: 10
Green: 9
Yellow: 5
White: 4
26. First Presentation: “Look, you have here a blue group, a red, a green, 3 yellow
and a white group of blocks. The blue is the largest. Which two of the other
four groups, if you put them together, would make a group the same size as
the blue one?”
Second (alternative) Presentation: "Two friends are

coming to visit you on your birthday. Because it's your birthday all the blue
candy is yours. But you want each friend to have as much candy as you do.
Can you figure out how to put together two of candies (two different colours)
so you will have two lots, each the same size as yours?"
Answer: Red plus white; green plus yellow.
27. Without breaking up the three colour-clusters (blue, red plus white; green plus
yellow), the examiner now asks: “Can you arrange
each of these three groups of blocks so that all the
groups have exactly the same shape?"
Answer: One solution is demonstrated: others are possible.
16. Breaking Up and Re-Assembling Forms (see also p. 15 #17.)
28. The examiner places on the table the green 3-unit block, beside
it the two flats, one on top of the other, and beside these the four
rods, fitted together so that the whole forms a 3-cube square.
The examiner says: "You see, all these blocks put together make a solid
square." She now scatters the pieces and asks: “Can you put them together
again in the same way?"
17. Making a person
29. The examiner removes the arc and half-arcs and scatters the rest of the
blocks and says: “Please make a person with these.”
The examiner should make a step-by-step record of the way in which the child
goes about making the figure. The steps, with alterations, may be sketched. In
general, follow the instructions for recording the free design? (Even a very
small child who has not been asked to attempt the more difficult problems
may succeed in constructing a person. A sheet of paper should be provided
so that this construction can be traced; if necessary it should also be
photographed for a permanent record.) When the child indicates the figure is

complete, the examiner asks: "Can you tell me about the person you've
made?” She may ask other non-leading questions to encourage the child to
describe this construction.
18. Assembling the Blocks in the Box
30. The examiner sets the box on the table and says: "The blocks all fit into this
box. Please put the blocks into it. ”
The examiner should note how the child carries out the task, observing
especially Whether the large or the small blocks are put in the box first. After a
reasonable time, if the child has not succeeded in packing the box correctly,
the examiner may say: "Let us do it together” and may show the child how to
fit the blocks together in the box.
19. Problems: Instructions for Adults
It is better practice to give the free construction and the problem versions of
the Kaleidoblocs Test on different occasions. Should this not be possible, the subject
should be asked to make the free design before he is faced with the problems
outlined here. In this case, it is essential to have two sets of the test on hand, so that
the subject need not wait while a full record is made of the free construction before
beginning on the problems.
In either case, the free design made before the subject has become familiar
with the test materials may be compared with the designs made in Part c. of this
version - free designs made when the subject has made disciplined use of the test
materials in a variety of ways.
In recording the way in which the subject handles each problem, the following
must be noted:
-The process by which the answer is arrived at as far as this can be observed

-Comments made spontaneously by the subject The correctness - or
incorrectness - of the answer
-The time taken
In Part a. , the first and third problems provide opportunities for observing
handedness (right - or left-handed, bilateral; work with one hand only, both hands,
one hand assisted by the other) and the handling of colour distinctions .
The test is divided into three parts, as follows:
a. Identification of colours, forms and Space relationships (Problems 1 - 9).
This part of the test is designed to investigate the subject's ability to deal with
certain kinds of practical problems and the presence of Specific abilities,
including the ability to memorise and learn from experience. It is helpful, also,
in identifying different types of adult personality.
b. Summation (Problems 10-11). Having now an extensive experience of the
blocks, the subject is asked first to reproduce a construction from memory and
then to organize the total set of pieces into a single whole.
c. Autonomy in free designs (Problems 12-13). Having worked in disciplined
way under direction, the subject now is asked to take the initiative in creating
designs.
20. Identification of Colours, Forms, Space Relationships
1. The examiner forms the four green triangles into a solid block flat on the table.
She says: “You see, this is a solid block with smooth edges; it can be placed
with the broad or the narrow side down.” She
demonstrates and then separates the triangles. She asks:
"In how many different ways can you arrange the triangles to fulfil the
conditions of a solid smooth-edged block?” Each change of position is
counted separately.
Time Limit: 10 minutes

Answer: The 21 possible arrangements are shown on p. 31 ;the figures
demonstrated here are Fig. 1 and 2.
2. The examiner presents the blue 5-unit block, the blue flat and the
blue half-cube, and says: “Please arrange these blocks so that,
looking down on them, you see five equal surfaces.”
Time Limit: 2 minutes
Answer: Each piece must be centred above the other, as demonstrated.
3. The examiner presents all the blocks except the arc, the two half-arcs and the
triangles, and says: “Please sort these by colour. ”
Time Limit: 2 minutes
4. The blocks remain sorted by colour. The examiner removes the four rods. She
picks up a half-cube and says: “Taking this as a unit of volume, tell me how
many units there are in each colour group. Each colour group must be kept
together.
Time Limit: 5 minutes
Answer: Blue: 14
Red 10
Green 9
Yellow 5
White 4
5. The blocks remain sorted by colour. The examiner asks: "Can you combine
some of the colour groups using all the pieces on the table to make three
groups, each containing the same number of units? You may combine
colours, but the pieces belonging to a colour group may not be separated.”
Time limit: 5 minutes
Answer: Blue
Red plus white
Green plus yellow
Note: In problems 4 and 5, the examiner should observe whether the subject

assesses the values of the smaller groups first and makes use of the solutions
in the numerical assessment of the larger groups.
6. The blocks remain sorted into three equal groups. The examiner now asks:
"Can you arrange these three groups, which have
an equal number of units, into three identical
shapes?”
Time limit: 5 minutes
Answer: In addition to the solution demonstrated there are five other possible
solutions.
7. The examiner casually disarranges the figures and adds the four rods. She
says: "You have sorted these by colour. Will you now please sort them by
shape.”
Time limit: 2 minutes
When this sorting has been carried out, the examiner asks: "Can you
separate the blocks into two groups which are distinctive in shape, one from
the other, so that it is not possible for a member of one group to belong to the
other?"
Time limit: 2 minutes
Answer: (i) All blocks one cube-unit thick in one group and all blocks one-half
cube-unit thick in the other. There is one point of difference between the two
groups.
(ii) All cubes and half-cubes in one group and all the long pieces in the other.
There are two point of different between the groups.
8. The examiner casually mixes the pieces and removes the blue 5-unit block,
the red 2-unit block, one cube and two half-cubes. Pointing to the pieces
remaining on the table, she asks: "Can you arrange the pieces in two groups
so that the relations among the pieces in one group are the same as the
relations among the pieces in the other group?”
Time limit: 5 minutes
Answer: As demonstrated

When the subject has completed the task (or, if he fails, when she has shown
the subject the correct answer), the examiner asks: "Can you describe in
words the relationship of the pieces to each other in the two sets?”
Answer: Each set consists of one whole, the whole split in half and the whole
split in quarters.
9. The examiner forms the four triangles into a solid rectangle and asks: “Using
any of the other pieces, can you construct an identical block and tell me the
number of cube units (cubic capacity) in this block?"
Time limit: 3 minutes
Answer: 12½ cube units
21. Summation
10. The examiner sets aside all the blocks and makes a construction on the table,
as follows (see diagram below):
-one white, one red and one green half-cube are set in a row separated by
one cube-unit space
-the blue 5-unit block is placed on top
-one green, one red and one white cube, in that order, are set on the blue
block separated by one cube-unit space
-the blue flat is centred on the red cube so that its edges touch the edges of
the green and the white cubes
-the red 2-unit block is centred on the blue flat
-the blue half-cube is centred on the red 2-unit block
The subject is asked to look carefully at the construction.
After 30 seconds the examiner dismantles it and says: "Please reconstruct
this arrangement"
Time limit: 5 minutes
If he succeeds, the subject should be asked to explain his reasoning in
making the construction.
Note: The blocks have been arranged in a logical manner: the form contains

two pyramids, the blue rising, the red inverted. The colours form an alternating
sequence of red and blue with two diagonals formed by the green and white
units
11. The examiner gathers all the blocks together casually and asks: "Can you
build all of these into one solid rectangular block?" After five minutes, if they
are still is taken as determining the length of the block, the examiner explains:
"The block does not have to be that length. I will give you another three
minutes to complete it."
Time limit: 8 minutes
If the subject has not yet succeeded in the task, the examiner may now give
him the empty box and ask him to fill the box. The solution is illustrated by the
diagram on the inside of the lid of the box.
22. Autonomy in Free Designs
12. The examiner presents the subject with all the blocks except the arc and the
two half-arcs and says: "Please construct a person with these. You may use
as many or as few blocks as you like."
Time limit: 5 minutes
13. The examiner presents the subject with the full set of blocks, casually
shuffled, and says: “Please use the blocks to make something whatever you
like - if possible using all the blocks."
Time limit: 10 minutes
Note: The step-by-step work process and the final constructions should be
fully recorded. The subject can be given a tray with tracing paper to work on
to facilitate copying. If possible, two sets of blocks should be used (one for
Problem 12, the other for Problem 13) so that recording of the constructions
can be completed after the session. The subject should be asked about each
construction: see instructions for interviewing on pp. 7 and 8.

Appendix A (by Dr. Rhoda Metraux): Record of a Free Design
Marion (M) volunteered to make a Kaleidobloc construction: she knew nothing
about the test beforehand. Examiner (E) asks her to sit down at a desk and sits
down opposite her with notebook and a mall tape recorder (Sketches are as in
examiner’s notes) The blocks are spread out casually next to the paper on which M
will work.
E: "Thank you for volunteering. Are you comfortable?” (M smiles and nods.)
"Well, you see, here are some little blocks- different colours and sizes and shapes.
I'd like you to make something - whatever you like - with them. ”
M: laughs and nods her head. She begins to work without comment:
She sets the arc, curved side facing her, on its side middle front of the work
area. Green half-arc to left, yellow half-arc to right.
Green and yellow rods puts them down at right: blue 5-unit block at left.
Pauses.
Picks up triangle: sets it, flat, behind rods.
Picks up green and white half-cubes; discards. Triangle; discards.
Pauses.
Fences in far end with blue 5-unit, green 3-unit, red 2-unit blocks and one red
cube.
Pauses. Discards this design.
M picks up the arc and sets it down, curved side on the paper, neatly in the
middle. Balances green half-arc on left end, yellow half-arc on right end of arc.

(This is a repeat, but now in a vertical position and. from this point on the whole play
is with balance.)
Delicately builds up blue, green and red blocks at centre of arc. Sets yellow rod at
right, green rod at left edge of blue block. Sets a green triangle at right and left, long
side- down, on arc. Carefully balances them. Sets red cube, centred, on red 2-unit
block. Moves it to left and adds, at right, green cube. Centres rods at edge and sets
blue flat, left, and red flat, right, on top to form a bridge. Centres yellow 2-unit block
on flats. Sets white half-cube at right, green half-cube at left on yellow block. Sets
another white half-cube on white half-cube; blue half-cube on green half-cube. Tries
a white cube at right; sets it down left on blue half-cube. Places a red rod at right on
red flat. Pauses. Places a white rod behind red rod. Places a triangle down at left on
blue flat. Sets a red half-cube on the two rods; a yellow half-cube on red one
11: arc, curve down
12: G half-arc
13: Y “ “
14, 15, 16: B. G, R blocks
17: Y rod
18: G H
19, 20: triangles hypoteneuse down
21, 22: R, G cubes
23, 24: B, R flats
25: Y 2-un1't block
26, 27: W, G half-cubes
28, 29: W, B half-cubes
30: W cube
31, 32: R, W rods
33, 34: R, Y half cubes
Up to this point, M has worked with very little hesitation. Now she pauses and
considers what to do with the one piece unplaced (triangle).
Removes triangle (# 23), forms square with remaining triangle and sets
square very delicately on blue flat (#23). Again pauses. Takes yellow half-cube (#34)
off, puts it back. Removes both half-cubes (#33 and # 34). Straightens white rod
(#32) and sets yellow half-cube on it. Sets red half-cube on outer edge of square.
Pauses, smiling to herself. Removes green triangles (# 19, # 20) from arc; returns
them, at right with hypotenuse facing away from herself; at left, hypotenuse down.
(The balance is the same but the effect is complementary.)
Removes yellow half-cube (# 34) from white rod; red half-cube (# 33) from
square. Moves white cube (# 30) on to white half-cubes (#26, # 28). (This improves
the balance visibly.) Moves red half-cube (#33) on to white rod (# 32); yellow half-
cube on to red rod (# 31).
M has now used every piece and the whole is in almost perfect balance. She smiles
and sits back.
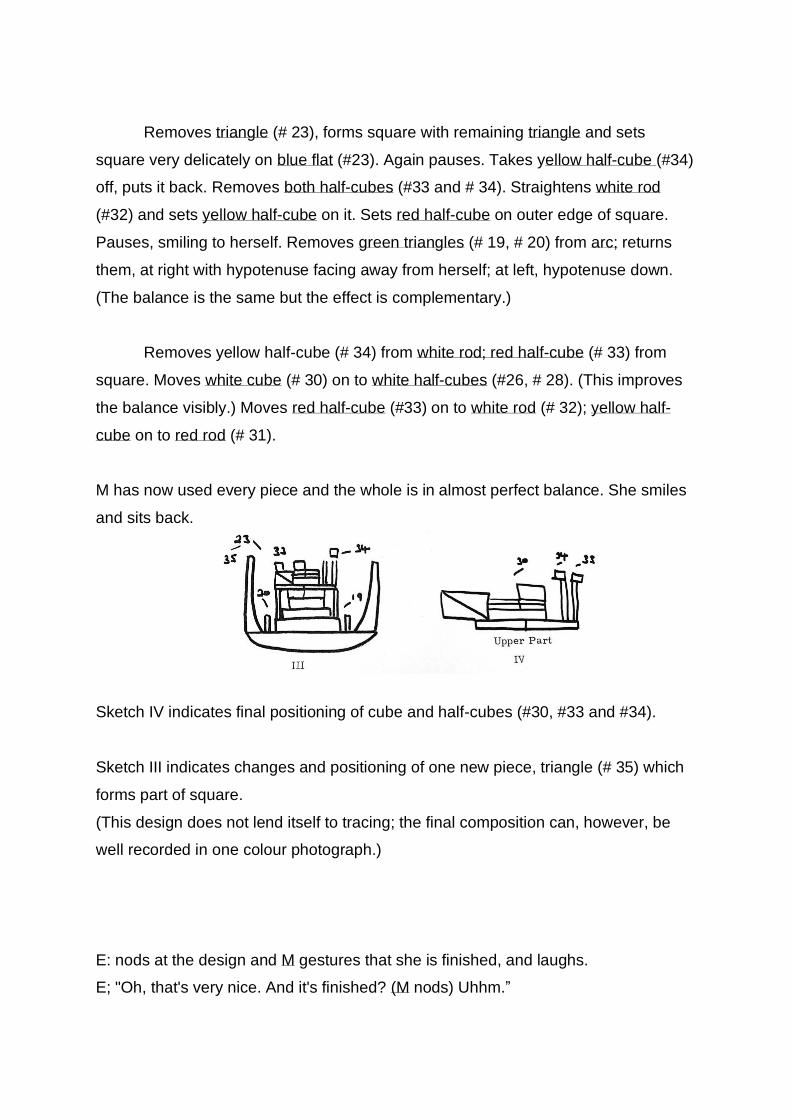
Sketch IV indicates final positioning of cube and half-cubes (#30, #33 and #34).
Sketch III indicates changes and positioning of one new piece, triangle (# 35) which
forms part of square.
(This design does not lend itself to tracing; the final composition can, however, be
well recorded in one colour photograph.)
E: nods at the design and M gestures that she is finished, and laughs.
E; "Oh, that's very nice. And it's finished? (M nods) Uhhm.”

M: "Feels like a kindergarten . . . I'm afraid it's not very imaginative."
E: “Oh, I think it's lovely. Tell me what you've made?" (M laughs.)
M: "I started out to make a -um -stage, because of this part (touches the arc), the
bottom part looked like ... (E: "Oh yes.") But the pieces were . . . I didn't know what to
do with the other pieces. So this is just something ... I wanted to have them balance .
. ."
E: (encouraging her, as she fades and fades away again): "Well it's lovely! It's really
very nice. And you used all the pieces. Very attractive."
M: "It's colourful." (Both laugh)
E: "What does it make you think of?"
M: "Kindergarten.” (Long pause.) A teeter-toter." (They both laugh)
E: "Very nice. M, tell me a little about yourself. We haven't had a chance to talk yet.
How old are you?"
M: "Twenty-one."
E: "Where have you been to school? Or what have you been doing?"
M: "For the last two years I've been at (a university in this city) . . . (E: Umhm)
Studying sociology and dramatic literature. (E: Umhm) I’ll be graduating in a couple
of weeks. (E: And before that?) A junior college in (smaller city). (E: is your home
there?) Yes. . . " (E: And now you're on your own living here?) M laughs and nods.
E: "Well, it’s nice to have you here, and thank you very much."
Marion was the new girl in our Museum office and was in the middle of a trial week. It
was difficult to judge whether she was simply shy or whether she is a nonverbal
person. E decided, in the circumstances, to cut the interview short. It should be
noted that she worked with great skill and amusement and did not make one false
move, that is, the design was always in balance.

Appendix B: Recording the Free Design
When Kaleidoblocs is used as a projective test, the subject is asked to
construct a free design. At the end of the problem-solving version, the subject (child
or adult) is asked to construct a person and also (adult only) to make a free design.
In both cases, the designs should be fully recorded for analysis. In recording, it is
important to distinguish between the two types of design. Particularly on the first
occasion on which the subject sees and manipulates the Kaleidoblocs, he is given
no leads in the projective test situation. But when a free design or a modified free
design ("make a person") is made at the end of the controlled test situation, the
subject is being released from control and has already a good deal of disciplined
experience of the materials. It is therefore important, in recording, to distinguish
between these two situations.
It is assumed that the examiner will keep notes and make sketches as the
work progresses; the sketches should include designs that are discarded and
alterations of a design as it progresses (See Appendix A).
In many cases it will be possible to trace the positions of pieces that are
spread out on the tray; this indicates the exact spread of the design. Where this is
not feasible (see design, Appendix A) the positioning of the base piece at least can
be indicated.
Usually two colour photographs (top and side or two sides) will suffice to
record the arrangement. A portrait lens is desirable as this permits close-up work. A
camera in which the photograph is immediately developed is very reassuring, but a
colour slide is likely to be much more useful as it enlarges the View as the
photograph is projected. Flash is recommended to ensure good lighting.

Appendix C: by Dr. Rhoda Metraux Using the Kaleidobloc Test in
Anthropological Research
Kaleidoblocs lends itself particularly well to field-work use both because it can
be used equally well with children and adults and because the end product, the free
design, is concrete and can be recorded and reproduced readily. It combines very
well with the Lowenfeld Mosaic Test and may be used together with the Weigl-
Goldstein-Scheerer Colour Form Blocks; the latter may be used, in a situation where
informants have never seen any material of this kind as a very simple introductory
test through which the examiner may make notes on handedness, colour grouping,
etc.
The alternative use of Kaleidoblocs as a test of the ability to solve problems is
not recommended for field work, because of the kinds of control imposed. It should
certainly not be combined with any techniques in which the subject's spontaneous
response is central.
The testing program should be initiated only when the anthropologist has
become a familiar figure to a large number of women as well as men and of smaller
children and adolescents as well as adults. Usually this means postponing testing for
many months; it should also be fitted into a period when the community is not deeply
involved in some important activity.
Ideally no one should see the test materials before actually using them and
only the subject should see the design(s) he/she has constructed. This means
setting up a working situation in which the subject and the test administrator are
ensured of privacy. It may be necessary for the pair to be in full View (e. g. in a
culture in which no decent woman would consent to being alone in a room with a
man who was not a close relative), but on-lookers must then be kept at a sufficient
distance so that they cannot observe - and remark on - what the subjects are doing.
One exception may be the mother who brings along a child nurse or a grandmother
(who will then not be tested) to keep a baby safe, quiet and out of the way. Like any
other modifications, this should be noted in the record.

By the time testing is undertaken, almost everyone should be family with the
anthropologist's notebook and pencil, camera and flash equipment and tape
recorder. After a few innocuous remarks have been made, the subject should be
allowed to hear that portion of the tape; usually this has a reassuring effect. It is well
to use a long-running cassette or to run a tape at slow speed so that there need be
no interruption in the middle of the proceedings.
The first subjects should be individuals who feel particularly at ease. Working
with them, it should be possible to get some idea of a working tempo and how long
an individual can keep at such unfamiliar tasks without boredom, annoyance or
disruptive fatigue. It then becomes possible to plan how many tests (perhaps not
more than one or two) can be administered in any one session. There may, of
course, be differences between men and women, adults and children (particularly
school children who have become task oriented). There is also the question of how
many test records the anthropologist can work up on the same day without
excessive fatigue.
This is not the place to discuss problems of sampling. It is obvious, however,
that the better each individual who is tested can be identified terms of placement in a
family and in the community, interests and activities, the more useful tests can be.
For the sake of others who may use the test results later, it is helpful to have a
picture of each person who is tested. The better each individual is known and can be
described, the clearer any delineation of cultural patterning will be as this can be
worked out from the performances of many individuals.

Appendix D: Illustration of the 21 possible arrangements of triangles