virginia beach city public schools office of technical and ...€¦ · culminate with the annual...
TRANSCRIPT

10/11/19
For more information contact Brandon Martin [email protected]
Mentor Handbook
2019 – 2020
Virginia Beach City Public Schools
Office of Technical and Career Education

10/11/19
For more information contact Brandon Martin [email protected]
Table of Contents
Introduction.…....……………………………………………………………………………..…..1
2019 SRC Design Brief...................................................................................................................2
SRC Mentor Duties and Responsibilities........................................................................................3
Robotics Engineering Design Process.……………....…………………………….......……….…4
SRC Program Calendar……………………………….....………………………..….….………...5
SRC Lesson Plans…………………………………….....………………………..….….………...5
STEM Robotics Design Brief (Level 1)………………………………………..….….…………..9
Appendix A……………...………………………………………………………….…….……...A
Python Robot Control Code for Raspberry Pi..…………………………………….……..….…..A
Raspberry Pi Startup Instructions..………………………………………………….…….….…..G
Appendix B……………...………………………………………………………....…….……....H
Monthly Calendar............................................................................................................................I
SRC Safety Letter/Pledge...............................................................................................................K
Micro:Bit Safety Guide…..............................................................................................................M
Micro:Bit Student Safety Guide………………………………………………………………….O
Appendix C……………...………………………………………………………....…….……...R
Micro:Bit Lesson Plans……………………………………………………………...…………...R


Department of Teaching and Learning
Office of Technical and Career Education
Acknowledgements
The Office of Technical and Career Education would like to acknowledge the significant
contributions of the following in the support and development of the STEM Trifecta:
The Office of Technical & Career Education Staff
Sara Lockett Director, Office of Technical and Career Education
Brandon Martin Coordinator, Office of Technical and Career Education
Charles Hurd Coordinator, Office of Technical and Career Education
Theresa Dougherty Coordinator, Office of Technical and Career Education
Kathleen Vuono Coordinator, Office of Technical and Career Education
Anjanette Hendricks School to Work Transition Supervisor, Office of Technical and
Gina Mancuso-Sidhu Administrative Coordinator, Office of Technical and Career
Education Career Education
Aaron Arnold Workforce Council Specialist, Office of Technical and Career
Education
Karen Boone Administrative Office Associate II, Office of Technical and Career
Education
Cheri Swofford Administrative Office Associate I, Office of Technical and Career
Education

1 | P a g e
Department of Teaching and Learning
Office of Technical and Career Education
Introduction
The Office of Technical and Career Education (TCE) would like to thank you for your willingness
to assist Virginia Beach City Public School students in a STEM after-school robotics challenge.
Students will have the opportunity to work in teams to build a remote-controlled robot and solve
problems. You will receive a stipend and be responsible for assisting student teams with their
documentation, planning, design, construction and competition preparation. These activities will
culminate with the annual STEM Trifecta on June 4, 2020.
Robotics Mission: To provide students with a robotics project-based learning experience that
incorporates most of the VBCPS 21st century skills. Robotics offers students STEM experiences
and exposures in an effort to increase student interest in STEM career pathways.

10/7/2019
Robots: At the Carnival
Design Brief: Elementary School, Middle School, High School Challenge:
Build a robot that uses Raspberry Pi or microcontroller technology to perform tasks commonly
seen in amusement parks. These tasks may involve popping balloons, moving rings and driving
in autonomous mode on various tracks within a specific time frame. Teams will chronicle the
Engineering Design Process via a new Video Portfolio (v-Portfolio) process.
Background
After-school robotics clubs have become a place for students, teachers and our community
volunteers to share good times discovering new ideas and possibilities. Students and teachers
develop problem-solving skills and new ways of understanding technological concepts like
coding and engineering design. While academic excellence is a priority of VBCPS we also want
our kids to have FUN! When we create an atmosphere where students can have fun learning
we create an incubator for creativity and problem-solving. Students test their ideas without
inhibition or judgment. This freedom frequently leads to innovative ideas and breakthrough
thinking. Award-winning Disney producer Don Hahn says, “play is the welcome cousin of
creativity.”
For the past few years our robotics competitions have become a new form or entertainment for
our students, staff and their families. Our STEM Trifecta has had exhibitions, a STEM playground
and a variety of community-based activities that have fostered new ideas and creativity in our
youth. With this in mind, we are looking forward to another great year where we can introduce
new concepts and have fun teaching and learning.

3 | P a g e
SRC Mentor Qualifications and Responsibilities
Qualifications:
• Strong interest in and passion for STEM and the Engineering Design Process.
• Ability to work with diverse students, some who may be academically challenged.
• Able to follow online learning modules to create a robot.
• Familiarity with robotics and engineering, safe and proper tool use, drawing and design
concepts.
• Experience in working on detailed, long-term projects with small groups of students.
• Strong problem-solving skills.
• Willingness to lead your SRC team towards the challenge in all aspects including project
and research based activities.
Responsibilities: The STEM after-school robotics mentor will be responsible for recording
attendance, keeping teams on task, making sure teams are well prepared, and also tracking
individual student progress. Along with those tasks, the mentor will:
• Submit all paperwork on assigned dates;
• Facilitate and assist student teams in following online learning modules that will
introduce them to coding and robotics;
• Assist students in preparation for all other aspects of the robot challenge;
• Encourage students to review careers or an education in a STEM field; and
• Coordinate the recruitment of a club technical advisor.
• This is an opportunity for business and community partners to become involved in
STEM;
• The mentor also recruits parents and other volunteers to get involved in the project;
• As with any other special project or study, these are the basic responsibilities. Each team
will have unique challenges to be faced and overcome during the course of the year. The
Office of TCE will act as a resource and support for all robotics activities.

4 | P a g e
Where do I begin??? This challenge is best solved utilizing the engineering design process. This
process is illustrated on the following page. Students use a portfolio to document their application
of the design process. Implementing this process will enable students to be successful in all aspects
of the robotics challenge throughout the year.
ROBOTICS ENGINEERING DESIGN PROCESS
1. Ask - Write a detailed problem statement.
2. Imagine – Do your research, brainstorm possible solutions, analyze ideas.
3. Plan – Design your solution to the problem identified in Step 1.
4. Create – Develop your solution to the problem.
5. Improve - Evaluate your solution.

5 | P a g e
STEM Robotics Challenge Program Calendar
2019 – 2020
A Note to Sponsors and Mentors: This document is designed to be used as a “recommended”
timeline and not as a strict schedule. Each school and team will progress at different rates.
There is no set number of meetings a month, however, more than once a week will be needed as
the year progresses. Please contact the TCE office for additional clarification if needed. Happy
Roboting!!!
September
• Meet with your co-mentor and discuss your goals and objectives for the year:
o Reflect on previous year (what worked, what needs improvement)
o How many robots do we want to build?
o How many students are we going to allow to join the club?
o Where will we meet?
o Advertising - Where can we market and recruit for our program (open house,
PTA meeting, school newspaper, etc.)
October
• Attend Robotics Kickoff
• Safety and proper lab procedures should be a priority in the early meetings. All
paperwork and parental permission forms must be signed and returned before any lab
activities can begin.
• Teachers show their working robot to students.
• Teachers have first club meetings to get students familiar with the program and to
organize who does what.
• Review design brief and discuss possible robot designs and cool challenge ideas.
• All SRC resources and files are available on the www.vbstemtrifecta.com website.
• Teachers encouraged to recruit potential technical advisors and establish a schedule for
their after-school meetings.

6 | P a g e
• Introduce students to the Micro:Bit and some of the fun coding activities. There are a
variety of training resources available for the Micro:Bit. If you have a new group of
students we recommend using the Micro:Bit Lesson plans in this handbook (Appendix C)
along with the PowerPoints on the STEM Trifecta website.
o Note: The number of lessons you explore depends entirely on how many times
you meet per week and the length of your meeting.
November
Robot
• Reverse engineer robot from previous year.
o Have students disassemble robot wheels, arm, and control board.
o Have students reassemble robot. Test to see if it is operating correctly.
• Teachers discuss mounting techniques for various components.
• Now that students are familiar with how to assemble the robot you can
either keep it assembled and begin modifying it in January for the
challenge.
OR
Disassemble the entire robot and have teams build it from scratch in
January.
Note: Building a robot from scratch is going to require more meeting
time to accomplish this task.
• Based on this year’s challenge have students sketch and brainstorm what type of device is
needed to move the desired objects.
• Students can use CAD software (SketchUp, TinkerCAD, etc.) to design
parts that need to be 3-D printed.
v-Portfolio
• Review v-Portfolio and Engineering Design Process.
• Students should begin to research the design brief problem and begin organizing their
portfolio documentation prior to shooting videos.

7 | P a g e
Coding
• Discuss how to upload the code for the robot.
• Coding is an important aspect of the robotics platform. Our goal is to get students
interested in STEM related fields of study by building up their confidence in coding.
Each school has been supplied with the following materials to enhance their coding
instruction:
Raspberry Pi Micro:Bit
Breadboards Micro:Bit Inventors Kit
Jumper Wires
Below is a list of additional resources we suggest for coding. If possible, spend about 2
weeks on these activities. You can always revisit these resources in future meetings if
time permits.
• Micro:Bit Resources
BBC micro:bit resources for teachers
SparkFun Inventor's Kit for Micro:Bit Experiment Guide
• Raspberry Pi Resources
Getting Started with the Raspberry Pi
December
• Students should be completing coding activities.
• Some teachers may allow some students to complete extra programming activities at
home over the winter holiday break.
• Students continue/update E-Portfolio progress documenting progress so far in meeting
the challenge.

8 | P a g e
January through Feb 1st
• Teachers should begin construction of the basic robot by attaching servos, raspberry pi
and the battery to the chassis.
• Teachers will need to spend some time explaining how the Raspberry Pi works. Students
need to understand how to setup, run and modify the existing robot code to control
servos.
• This will be a great time to discuss possible errors in robot programming.
• Once the basic robots are assembled teachers should help groups of students focus on
solving the technical challenges associated with the level 1 challenge.
• Technical challenges include making lifting arms and devices as well as gripper devices
for manipulation.
February
• Students will be working to develop and build the device that will be used to complete
the challenge (arm, grippers, etc.).
• Teachers should encourage students to design their devices on Card Stock weighted paper
to come to a solution.
• Once a solution is found, students should use the VEX materials and any scrap metal or
plastic to build their devices.
• Teachers and students should attempt to COMPLETE their robots during this series of
meetings so that students will be able to practice completing the task with their robots on
the arena playing field.
• E-Portfolio development and research should be ongoing during this time.
March
• Teachers should be working to wrap up all the robot designs and get all robots fully
functional.
• Practice rounds should be planned with your schools robots playing the contest against
one another.

9 | P a g e
• Students should create a checklist of; “WHAT TO DO?…in case ____” happens during
the contest! The day of the contest is extremely hectic and any preparation by teams to
be prepared for the kinds of things that could happen will help in a big way. These are
things such as: my robot won’t power up, my battery is dead, my wire is broken…, I have
a broken part (How do I fix it) etc…
• Teachers should establish a routine with students and mentors so that everyone knows
how to proceed in the event of a robot emergency!
• Teachers should be helping students look closely at their designs for ways to improve
their existing designs.
• Contest strategies should be discussed among all the members to get the most points
during each round.
• E-Portfolio development and research should be ongoing during this time.
April-May
• Teachers should continue helping students complete their E-Portfolio entries.
• Teachers should assist students with troubleshooting programming and construction
challenges.
• Meeting more than once a week may begin.
June – Challenge Day
• Final preparations are made to all robots and students should be ready to compete.
• Students should know all the rules for the events they are participating in.
• Students should get all the necessary forms to fill out for the event.
• Teachers should know the transportation plan for the event.
• Teachers should discuss SAFETY at the Contest with students and mentors.
• Students may want to do their final practice rounds to be sure their robot is working as
they want it to.
Challenge Day: June 4, 2020, A VBCPS/TCE STEM Event!

A | P a g e
APPENDIX A
Python Robot Control Code for Raspberry Pi
To access your code:
1. Plug in the monitor cable, keyboard, mouse (or wireless keyboard USB dongle), and
micro SD card.
2. Plug in the power cord.
3. When the computer powers up, enter the following:
a. Login: pi
b. Password: raspberry
c. OS Startup: startx
4. Open the File Cabinet icon at the top of the screen.
5. Open the Adafruit-Raspberry-Pi-Python-Code folder.
From the Raspbian
desktop Double-Click
the File Manager Icon
The Following Window will
appear. Then Double Click
the Adafruit Raspberry-pi-
Python-code Folder

B | P a g e
Open the Adafruit_PWM_Servo_Driver folder.
To edit your code:
a. Right-click on the file that contains the key stroke code. The name for the base
file is Servo_KeyPress.py. I recommend you open and edit this file, but Save
As… under another filename, like the team name.
b. Select Python 2.
c. Close the blank Python Shell window that opens.
d. Maximize the code window.
e. There are three sections of code you are interested in:
• Servo and Header Pin Declarations (section 6 below)
• Keyboard Control Declarations (section 7 below)
• Key Release (Servo Stop) Declarations (section 8 below)
The Following Window will
appear. Then Double Click the
Adafruit-PWM_Servo_Driver
Folder
The Following Window will
appear. This should be the
save location for any and all
files that will drive servos.

C | P a g e
7. Servo and Header Pin Declarations
a. Locate the following section of code. It should be near the top of the code.
b. The “servoLeft” and “servoRight” lines declare the names of the servos you will
be using. The “0” (zero) and “1” declare which header rows you will attach the
servos to on the HAT board. In this case, servoLeft will be on row 0, and
servoRight will be on row 1. Header pin rows are labeled on the HAT board.
c. To add additional servos, just click at the end of the servoRight line, press enter,
and add another servo name and pin declaration. Some suggestions for additional
servo names are “servoArm”, “servoGrip”, “servoSwing”, and “servoRotate”. The
name should reflect the function.
d. Save the file. I suggest making the file name something easy to recall, like the
team name.

D | P a g e
8. Keyboard Control Declarations
a. Locate the following section of code. It should be about halfway down the code.
b. Each indented section of this part of the code determines which keyboard strokes
will actuate which servos, what direction they will turn, and what will be
displayed in the terminal window. Here’s what each part means:
elif – means “else if”, or “this is what to
look at if the first part of the code
doesn’t happen.” The indentation level is
very important in the overall structure of
the program.
This is the key we are declaring
options for. In this case, we’re talking
about the “S” key.
Text to be displayed in the terminal
window when the key is pressed.
Sets the direction the servo will turn
when the key is pressed. Declares which servo the action
applies to.

E | P a g e
c. To add additional command keys, copy a single elif declaration in its entirety,
then paste it in the first available space. It is very important to maintain the
integrity of the indentation. When the elif statement does not remain in line with
the other elif statements, the code will not work and you will get a syntax error.
d. Edit the key stroke, text to be displayed, servo direction, and servo name.
e. Repeat for additional commands/servos.
f. Save the file. I highly recommend using the team name as the filename.
9. Key Release (Servo Stop) Declarations
a. Locate this section of code. It will be near the bottom of the code.
b. This will discontinue an action once the key being pressed is released. Otherwise,
power (or whatever action you programmed) would continue to be applied to the
circuit.
c. To add additional servos, copy the entire ServoStop line and paste it after the last
ServoStop line.
d. Edit the name of the servo.
e. Save the file. I highly recommend using the team name as the filename.
F | P a g e
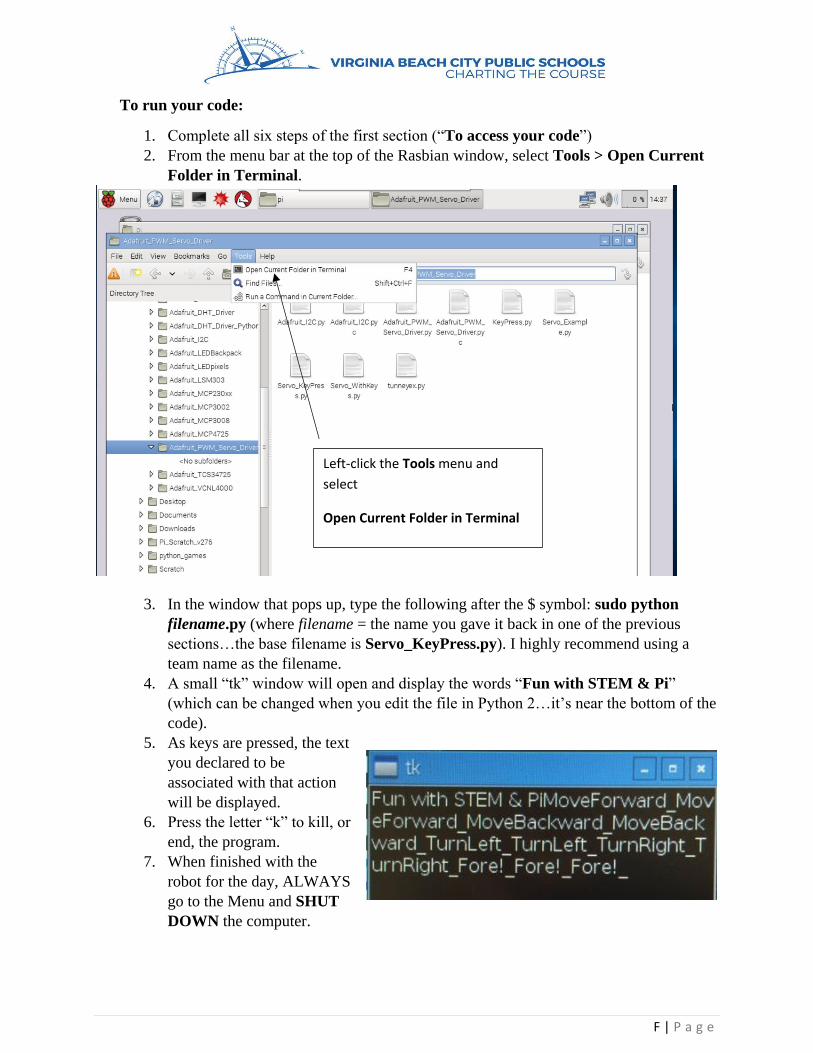
To run your code:
1. Complete all six steps of the first section (“To access your code”)
2. From the menu bar at the top of the Rasbian window, select Tools > Open Current
Folder in Terminal.
3. In the window that pops up, type the following after the $ symbol: sudo python
filename.py (where filename = the name you gave it back in one of the previous
sections…the base filename is Servo_KeyPress.py). I highly recommend using a
team name as the filename.
4. A small “tk” window will open and display the words “Fun with STEM & Pi”
(which can be changed when you edit the file in Python 2…it’s near the bottom of the
code).
5. As keys are pressed, the text
you declared to be
associated with that action
will be displayed.
6. Press the letter “k” to kill, or
end, the program.
7. When finished with the
robot for the day, ALWAYS
go to the Menu and SHUT
DOWN the computer.
Left-click the Tools menu and
select
Open Current Folder in Terminal

G | P a g e
Raspberry Pi Startup Instructions
1. Connect the Pi to a battery with the USB cable. (B sure the memory card is
inserted and a monitor, keyboard and mouse are connected BEFORE you power
up.
2. Power up the Raspberry Pi.
3. Find the folder marked SRC or STEM Trifecta and double click it.
4. Close that folder and RE-open it.
5. You should see a file named “SRC1.py” in that folder.
6. Click this file once - to highlight it
7. Then go to the menu above and select “tools”
8. Then select “open current folder in Terminal”
9. In the terminal type “sudo python SRC1.py”
10. When the two screens open up click the mouse in the screen which says STEM
TRIFECTA 2017
11. You should now be able to drive the robot using the commands below.
12. Keyboard letters “W”, “A”, “S” and “Z” are the driving controls, Letters “U” and
“D” are the arm controls for up and down and “O” and “C” are the gripper
commands.
13. So the new cards we just released already have control setup for four servos on Pins
“0 through “3” Be sure your drive wheels are connected to P0 and P1 the Arm is
connected to P2 and the gripper to P3
14. If you have more than 4 servos, I can show you how to add one by copying some of
the code that is already there and modifying it slightly.

H | P a g e
Appendix B
• Instructions for Completing & Submitting Monthly Calendar
Teachers are required to keep monthly meeting calendar. Each school must complete this
form at the end of each month as a record of your club meetings and activities. This
calendar is directly tied to payment for the mentor position, and a stipend cannot be
issued without its submission. For reporting purposes, each school must submit their
own calendar. Please submit calendars to [email protected] on the last
Friday of each month.
• SRC Safety Letter/Pledge
All mentors must have parents and students sign a safety pledge. The safety pledge is to
be kept on file at the home school. Safety is our first and most important rule in all SRC
programs throughout VBCPS. We highly recommend that “ALL” students turn in the
safety pledge and successfully pass a safety test prior to working on any project-based
learning experiences which require the use of tools or machinery.
Due Date: To be determined by mentor
I | P a g e
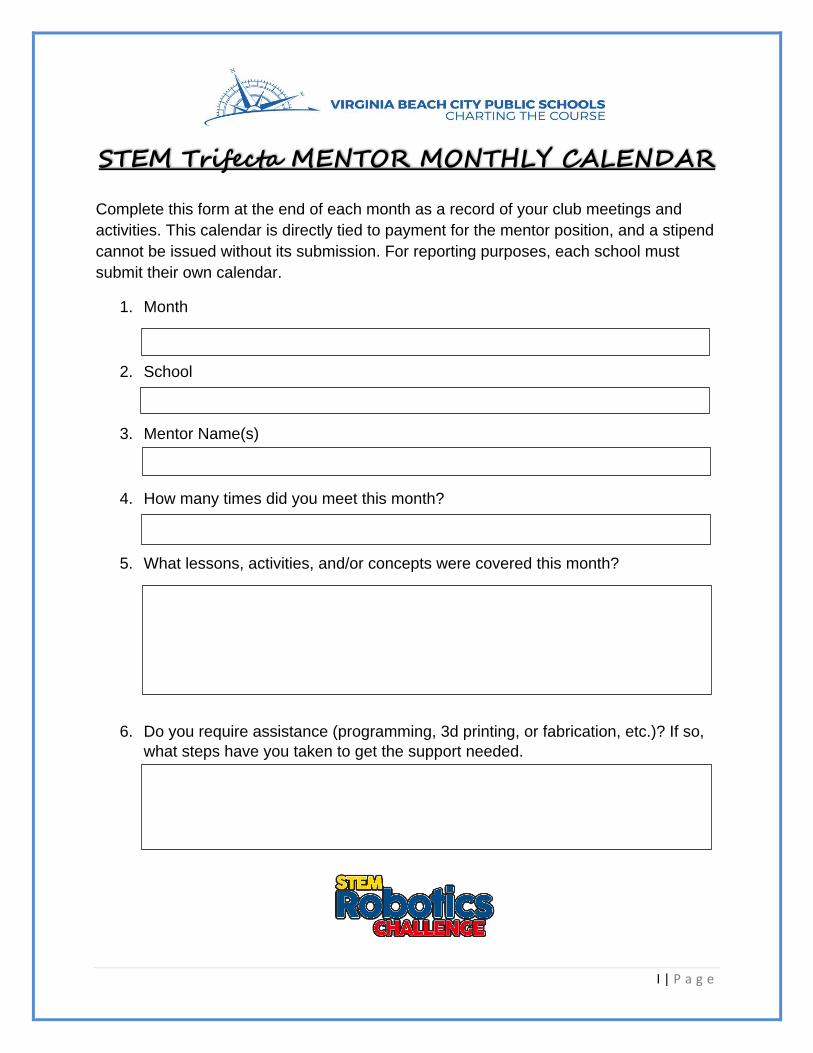
STEM Trifecta MENTOR MONTHLY CALENDAR
Complete this form at the end of each month as a record of your club meetings and
activities. This calendar is directly tied to payment for the mentor position, and a stipend
cannot be issued without its submission. For reporting purposes, each school must
submit their own calendar.
1. Month
2. School
3. Mentor Name(s)
4. How many times did you meet this month?
5. What lessons, activities, and/or concepts were covered this month?
6. Do you require assistance (programming, 3d printing, or fabrication, etc.)? If so,
what steps have you taken to get the support needed.

J | P a g e
Dear Students and Parents,
Students involved in the 2018-2019 Robotics Activities in Virginia Beach City Public
Schools (VBCPS) are expected to conduct themselves in a safe and respectful manner. To fulfill
this expectation, your child will receive instruction regarding all tools, machines, processes and
materials that they will be utilizing this year to design and build a robot.
Safety Regulations:
1. Safety glasses (furnished) are required to be worn at all times when activity involving the
use of tools and/or machines is taking place in the lab areas.
2. “Horseplay,” running or throwing of objects are dangerous behaviors and are prohibited
at all times. Horseplay is a referable offense and is listed in the student discipline matrix.
Safety is our first and most important rule in all robotics programs throughout VBCPS.
3. Broken or damaged tools should immediately be brought to the attention of the instructor.
Students are held accountable for the cost of repair or replacement of any school board
owned tool or material that is willfully damaged. [i.e. — tools, classroom
materials/supplies or furniture.]
4. Loose clothing, ties, jewelry are not be worn when operating the machinery or
equipment.
5. Never operate a machine of any type unless you have the instructor’s permission. Each
student will be checked out on each machine for safe and correct operation procedures.
A safety test will be administered to and passed by every student before lab activity
begins.
6. Always report any injury to the instructor including minor cuts and scrapes.
7. Use good common sense and judgment at all times. If it looks unsafe, it probably is.
8. Report all accidents to the teacher or sponsor immediately.
9. Be careful when soldering. The iron is EXTREMELY hot; be careful to keep hands
away from the tip. Keep the cord clear of the heating element and keep the tip coated
with solder (tinned). Solder in a well-ventilated area or near windows. Wash hands with
soap and water after handling solder.
These safety regulations are general requirements that apply to all robotics programs and
laboratories in Virginia Beach City Public Schools. Additional rules and regulations will be
in effect depending on the area in which the student is working. Failure to follow classroom
procedures and safety rules will result in corrective disciplinary action taken by the teacher or
school administrator. These rules are designed and intended to ensure safety for all students.

K | P a g e
Safety Pledge
I ____________________________________________ (print Student’s Name) have read the
safety regulations required in STEM Trifecta (ROBOTICS) activities and I understand that I am
expected to conduct myself according to these regulations at all times.
Student’s Signature: Date:
I have read what is expected of my son/daughter and herby grant him/her permission to
participate in the robotics program. This includes the use of power tools and equipment as well
as hand tools and various finishing materials. I also understand that my son/daughter will
receive safety and operating procedures for each type of equipment used and will pass a safety
test before being allowed to work in the lab.
Parent’s Signature: Date:
Home Phone #:
Work Phone #:
Emergency Contact:
Name: Phone#:
Note: Your child will not be allowed to use any tools or operate any machines until this letter is
completed, signed and returned along with a passing grade on the lab safety test. We appreciate
your cooperation in completing this requirement as soon as possible.
Thank you,
ROBOTICS Mentor Name: _____________________________________
E-mail: _____________________________________________________
Phone: ______________________________________________________

L | P a g e
Safety Documents
The following documents are available to new mentors upon request:
• Safety PowerPoint
• Safety Test
• Robotics Parent Letter/Safety Pledge
• Starting and Managing an SRC PPT (Developed by Carl Peake and Gina Byrn

SAFETY INSTRUCTIONSIMPORTANT:
THE MICRO:BIT IS AN EXPOSED BOARD, TO BE USED WITH CAREPLEASE RETAIN THIS INFORMATION FOR FUTURE REFERENCE
Bat
1. Always keep your BBC micro:bit in the anti-static bag when not in use. It's good practice for students to earth themselves before handling it.
2. Please handle your BBC micro:bit by its edges. This minimises the risk of damage through an electrostatic discharge.
3. Please use the battery pack and the USB lead provided to power your micro:bit. Do not use portable battery chargers or USB charging ports (often marked with a lightning bolt or 'SS'), to power your micro:bit. Using these may damage your micro:bit and stop it working properly.
4. Please do not attempt to keep using faulty micro:bits. If a school-issued micro:bit develops a fault, contact us at [email protected] immediately.
5. The maximum current safely supplied to an external circuit using the 3V pin on the edge connector is 100mA. Please make sure this limit is not exceeded.
6. Please do not store or use your BBC micro:bit in extremely hot or cold environments.
7. Do not place any metal objects across the printed circuits on the board as this can cause a short circuit damaging your BBC micro:bit. This can cause risk of burn or fire.
8. Do not use your BBC micro:bit in water or with wet hands.
9. Do not leave your BBC micro:bit plugged into a computer or any other device unsupervised.
Db
PnP
t
P
(wP
DeO
m
P
Please avoid handling the BBC micro:bit circuit board w
A swa
Cp
Pc
Pro
Ty
Using the BBC micro:bit is easy to use but is designed to have all the electrical parts on display. This does mean there's a small risk that the parts can be damaged and even overheat with a risk of injury but a little bit of care and caution will ensure you and your micro:bit will stay fit and healthy.
Safety warnings
hile plugged into a power supply.
ll peripherals (for example: USB cable, battery holder,ensors) used with your BBC micro:bit should comply ith the relevant standards and should be marked ccordingly
onnecting your BBC micro:bit to any unapproved eripherals could damage your BBC micro:bit
tery warningso not try to charge normal (non-rechargeable) atteries
lease do not mix different types of batteries or mix ew and used batteries lease use batteries of the same or equivalent type as
hose recommended
lease insert batteries the correct way round
ith the correct polarity)lease remove spent batteries from the battery holder
o not short-circuit the battery supply terminals, for xample by placing a metal object across the terminals
nly use Zinc or Alkaline batteries with your BBC
icro:bit
lease do not use rechargeable batteries
lease do not leave your BBC micro:bit within reach of hildren under 8 years of age.
lease operate your BBC micro:bit in a well ventilated om
o remove the battery pack, pinch the connector with our fingers. Do not remove by pulling the wires.

QUICK START GUIDEFor full set up instructions, please visit:
https://www.microbit.org/start
Requirements
Connecting your BBC micro:bitYou connect your BBC micro:bit to your computer with a
micro USB.
Coding your BBC micro:bit
Accessing the BBC micro:bit website
A male to micro USB cable to connect your computer
to your BBC micro:bit. This is the same cable that is
commonly used to connect a smart phone to a computer
A laptop or PC running Windows 7 or later, or a Mac
running OS X 10.6 or later
Access to the InternetConnect the small end of the USB cable to the micro USB
port on your BBC micro:bit
Connect the other end of the USB cable to a USB port on
your computer
Go to Create Code and choose the editor that you would
like to code with. There are lots of tutorials and information
on the website to help you on your coding journey
When you have finished your script, press run to see it
play on the on screen simulator
If you’re a student, just go to www.microbit.org and select Create Code to start coding.
Your computer should recognise your BBC micro:bit as a
new drive. On computers running Windows, MICROBIT
appears as a drive under Devices and drives. On a Mac it
appears as a new drive under Devices.
Compiling your script
Transferring the file to your BBC micro:bit
Open your script in your editor of choice.Click 'Compile' or 'Download'. Your script is converted into a .hex file that you can transfer and run on your BBC micro:bit.
When the file has downloaded, open up Windows Explorer and open up the MICROBIT drive. Drag and drop the .hex file onto your MICROBIT driveThe LED on the back of your BBC micro:bit flashes during the transfer which only takes a few seconds
Once transferred, the code will run automatically on your
BBC micro:bit. To rerun your program, press the reset
button on the back of your BBC micro:bit. The reset button
automatically runs the newest file on the BBC micro:bitOnce you transfer a file to the BBC micro:bit, you can disconnect the BBC micro:bit from your computer
When your BBC micro:bit is not connected to your
computer with a USB, you will need 2 x AAA batteries to power it.
Always keep your BBC micro:bit in the anti-static bag when not using it. It's good practice for students to earth themselves before handling it.Only handle the BBC micro:bit by its edges and avoid touching the components when powered.If your micro:bit is damaged stop using it immediately. Contact [email protected] with details about the unit.
Find out how to use the BBC micro:bit App to connect your
phones and tablets with the BBC micro:bit in the getting
started section on the website
Using phones and tablets
Powering your BBC micro:bit

Student Safety AdviceDo not place any metal objects
across the BBC micro:bit battery socket.
Do not place any metal objects across the printed circuits as this can cause a short circuit.
Do not leave your BBC micro:bit plugged into any device
unsupervised.
Do not use your BBC micro:bit in water or with wet hands.
Please avoid handling the BBC micro:bit circuit board while plugged into a power supply.
Please handle your BBC micro:bit by its edges.
All leads and accessories used with your BBC micro:bit should
meet the relevant standards and be marked to show this.
Connecting your BBC micro:bit to anything unapproved could
damage it.
Please do not leave your BBC micro:bit within reach of children under 8 years.
Please operate your BBC micro:bit in a well ventilated
room.
Only connect your BBC micro:bit to a power supply rated at 3
volts.
The maximum current safely supplied to an external circuit using the 3V edge connector is
100mA.
Please do not store or use your BBC micro:bit in extremely hot
or cold environments.
Only use zinc-carbon or alkaline batteries and follow all of the battery safety tips.

Battery advice• Please insert batteries the correct way round• Please remove spent batteries from the battery holder• Do not place any metal objects across the terminals as this may short-circuit the battery supply• Do not try to charge normal (non-rechargeable) batteries
• Only use Zinc-Carbon or Alkaline batteries with your BBC micro:bit• To remove the battery pack pinch the connector with your fingers• Do not remove by pulling the wires• Please do not mix different types of batteries or mix new and used batteries• Please use batteries of the same or equivalent type as those recommended

R | P a g e
Appendix C
About the lesson plans
• The numbers within the “Content” section relate to the corresponding slide on the lesson
PowerPoint.
• Each lesson will typically take a 4th or 5th grade class around 35 minutes, which would
include logging on to the machines, giving out devices, etc. Two lessons can therefore be
combined for hour long sessions. Most sessions can been used with students from third grade
to sixth grade. For older students, lessons 1, 2 and 3 could be taught in a single session,
followed by 4, 5 and 6.
• In the event more able students complete the challenges, they can:
o Assist other students – encourage them to explain the required instructions / concepts,
rather than simply undertaking the task for their peers
o Experiment with other instruction blocks within the JavaScript Block Editor
o Increase the complexity of their program – for example, when making animations in
lesson three, students might add additional images as part of their animation
o Undertake tasks from future lessons independently. Students could subsequently lead
the lesson introduction for their peers
o Use text based languages to program the micro:bit, such as MicroPython -
http://microbit.org/code/
Prior Learning
• Students should ideally be familiar with:
o Opening a web browser and entering a URL (address of a website)
o Copying files by dragging their icon from one location to another
o Block based programming environment, such as Scratch
• Before each session, students could undertake Hour of Code activities to reinforce the
appropriate programming concepts.

S | P a g e
Lesson Lesson
Objectives
Content Example
activities 1
• Students can
identify
components of
the micro:bit
• Students can stay
safe when using
the micro:bit
• Students can
upload a
program to the
micro:bit
• Students can
scroll messages
• Students can use
forever loops
• Students can
clear the display
• Students can
display their own
design on the
display
• Students can
implement a
pause between
events
• 2 – Discuss objectives with students and
show the micro:bit device
• 3 – Explain to students the various features of
the device, which include:
o Accelerometer – detects the
speed of movement
o Compass – detects the direction
the micro:bit is pointing in
o Bluetooth – allows us to
connect to other devices,
including mobile phones
o LEDs – programmable lights to
display information and images
o Buttons – to trigger events
o Edge connector – for
completing a circuit and
responding to touch
• 4 – Go through the main safety points with
students, including the information at
https://www.microbit.co.uk/safety-advice
which includes guidance for students, parents
and teachers
• 5 – Show students the micro:bit website –
microbit.org and how to get to the block
editor (Let’s code -> JavaScript Block
Editor) which is similar to Scratch
• 6 – Explain to students the first lesson will
involve scrolling (moving) messages across
the screen forever. Show students how to
drag the relevant blocks across and how the
program runs on the emulator, which copies
the behaviour of the physical device
• 7 – Explain to students they now need to put
the program onto their micro:bit.
Demonstrate pressing Download and copying
the file to the micro:bit (NB. the screenshots
on the slides are from Google Chrome for
Windows 7). Students will produce their
program and transfer it to the micro:bit
• 8 – Once complete, students will undertake
the various challenges: implement a pause
between messages, clear the screen and add
an image between messages
Cross-curricular
links
• Names badges
to introduce
students to
peers
• badge to show
students’
thoughts about
a topic being
discussed

T | P a g e
Lesson • Lesson
Objectives
• Content Example
activities
2 • Students can
display their own
design on the
display
• Students can
trigger events
based on button
presses
• Students can clear
the display
• Students can
implement a pause
between events
• 2 – Discuss objectives for the
sessions. Remind students how to
get to the micro:bit website and
how to transfer their programs on
to the device (use slides from the
start of lesson one as a prompt if
required)
• 3 – Show students an example of
the program they’re going to be
making and ask them to discuss
the function of the instructions
displayed on the screen.
Demonstrate to students how to
show different LEDs based on a
button press and ask them to
implement a program to show an
image when button A is pressed
• 4 – Once complete, students will
implement a different image when
button B is pressed, clear the
screen after a period of time and
also have an additional image
when A and B are pressed together
3 • Students can
display their own
design on the
display
• Students can
trigger events
based on button
presses
• Students can clear
the display
• Students can
implement a pause
between events
• Students can scroll
messages
• Students can alter
the brightness of
the display
• 2 – Discuss objectives with
students and explain they’re going
to build on their work from last
time by producing a short
animation, which should be shown
forever
• 3 – Show students an example
animation and discuss the required
instructions. Students will
implement their animation and
transfer it to the device
• 4 – Once complete, students will
add a message to scroll after their
animation, use button A to reduce
the brightness of the LEDs,
followed by using B to increase
the brightness, and A and B to turn
off the LEDs

U | P a g e
Lesson • Lesson
Objectives
• Content Example
activities
4 & 5 • Students can alter
the brightness of
the display
• Students can
trigger events
based on button
presses
• Students can
trigger events
when they shake
the device
• Students can alter
the value of
variables
• Students can use
selection
• Students can use
forever loops
• 2 – Show students the session
objectives
• 3 – Explain to students they’re
going to implement a heart fading
in and out. Remind students how
to alter the brightness of the
display and ask them to discuss the
required instructions to make the
heart flash
• 4 – Students will implement the
animation and transfer it to their
device
• 5 – Once complete, students will
make the heart fade more
gradually by adding additional set
brightness blocks
• 6 – Students will discuss how they
could reduce the number of
instructions within their program
using a variable
• 7 – Students will view an example
of the program and alter their own
program accordingly
• 8 – Students will alter the speed of
the fade by changing the length of
the pause and altering the
brightness increase each time
• 9 & 10 – Once complete, students
will alter the program so the heart
only displays when they shake the
device, followed by altering the
program so the heart goes bright if
they press button A, or darker on
button B, or off on A+B. Students
will also experiment with turning
the device up and down to alter the
brightness

V | P a g e
Lesson • Lesson
Objectives
• Content Example
activities
6 • Students can create
random numbers
• Students can
complete a circuit
using the micro:bit
pins
• Students can alter
the value of
variables
• Students can use
selection
• 2 – Show objectives and explain to
students were going to make a
“Friend Tester”
• 3 - Demonstrate to students how a
circuit can be made using the pins
on the micro:bit. Show students
how to set a variable to a random
number and display this on the
LEDs. Ask students to copy this
program to their device
• 4 – Ask students to discuss how
they could display a different
message depending on the number
selected. Show students how to
display a different message using
an if, then, else block. Students
will implement further messages
based on different numbers being
selected
• 5 – Once complete, students will
make the micro:bit display
messages when P2 is pressed, such
as to monitor their level of hunger
or choose their favourite football
team

W | P a g e
Lesson • Lesson
Objectives
• Content Example
activities
Independent
Project
(Step
counter)
• Students can
develop a
micro:bit step
counter
• 2 – Show objectives and explain to
students they’re going to be
producing their own project using
the concepts and features they’ve
examined in previous lessons
• 3 – Explain to students the benefits
of exercise and that 10,000 steps
per day, is the default target on
most step counters, such as FitBit.
Ask students to discuss what
features step counters have,
including those that are essential
and those than are desirable /
optional
• 4 – Show students the list of
essential and desirable features.
Discuss what other desirable
features the step counter could
have (e.g. record time spent
walking; stopwatch; emergency
call feature)
• 5 – Ask students to discuss in pairs
/ small groups how they might
implement the essential features
using the micro:bit. Students can
record their thoughts on individual
whiteboards if required
• 6 & 7 – Explain to students they
need a variable to record the
number of steps. The variable
should increase each time a step is
taken, which is detected when we
“shake” the micro:bit. An image
can also be displayed to
acknowledge a step has been taken
• 8 & 9 – Explain to students they
can display the value of the
variable recording our steps when
pressing button A, followed by
clearing the screen
• 10 & 11 – Remind students of the
desirable features and ask them to
implement the required code.
• 12 – Challenge more able students
to more accurately detect whether
a step has been taken, such as
through looking at the Y axis
values of the accelerometer
Cross-curricular
links
Science – importance
of exercise / changes
in the body; function
of heart, muscles, etc
X | P a g e
Lesson • Lesson
Objectives
• Content Example
activities
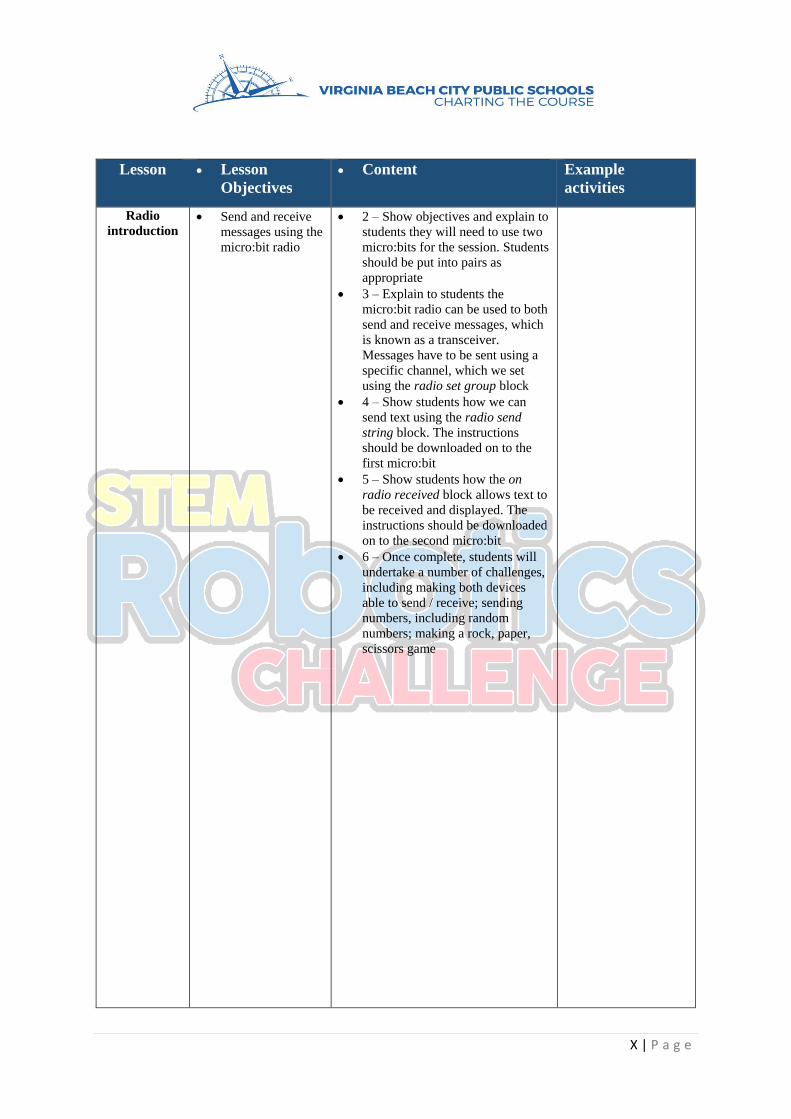
Radio
introduction • Send and receive
messages using the
micro:bit radio
• 2 – Show objectives and explain to
students they will need to use two
micro:bits for the session. Students
should be put into pairs as
appropriate
• 3 – Explain to students the
micro:bit radio can be used to both
send and receive messages, which
is known as a transceiver.
Messages have to be sent using a
specific channel, which we set
using the radio set group block
• 4 – Show students how we can
send text using the radio send
string block. The instructions
should be downloaded on to the
first micro:bit
• 5 – Show students how the on
radio received block allows text to
be received and displayed. The
instructions should be downloaded
on to the second micro:bit
• 6 – Once complete, students will
undertake a number of challenges,
including making both devices
able to send / receive; sending
numbers, including random
numbers; making a rock, paper,
scissors game

Y | P a g e
Lesson • Lesson
Objectives
• Content Example
activities
Independent
Project
(remote
temperature
monitor)
• Develop a
micro:bit based
remote
temperature sensor
• 2 – Show objectives and explain to
students they’re going to be
developing a remote temperature
sensor
• 3, 4, 5 – Describe the problem
facing NASA’s Earth orbiting
system and how the micro:bit
could be used to solve this issue.
Ask students to discuss in pairs /
small groups what features are
essential and which are desirable.
• 6 – Show students the list of
features and add further desirable
features if required.
• 7 - Ask students to discuss in pairs
/ small groups how they might
implement the essential features
using the micro:bit. Students can
record their thoughts on individual
whiteboards if required
• 8 & 9 – Explain to students they
need to set the radio group ID,
then regularly send the
temperature data, which is a
numerical value
• 10 & 11 – Explain to students we
need to ensure we have the same
radio group ID, then show the
number received
• 12 & 13 – Remind students of the
desirable feature to only show the
temperature when a button is
pressed. Ask students how this
could be achieve using an if, then
block
• 14, 15, 16 & 17 – Challenge more
able students to implement further
desirable features
Cross-curricular
links
Science – climate
change; habitats
Geography – weather
and climate;
environments;
locational knowledge