i 1”alfiles.support.epson.com/pdf/e386sx/e386sxu1.pdfcity: state: zip: please tear out and mail in...
TRANSCRIPT
m u cl3 0 zE
5J
I 1”al
y-
‘\
8 c 7 5 w ii u-l X

Reader Comment Card
Equity 386SX User’s Guide
Please use this card to evaluate this manual. Your comments andsuggestions will help us improve our publications.
Please rate the following: Exce l len t Good Fair Poor
n Organization of this manual Ll 0 cl Li
W Technical accuracy Li ci ci 0
n Completeness of instructions Li Ll Ll cl
n Clarity of concepts and wording Ll Li Ll Ll
n Quality of examples and pictures cl cl cl cl
W Quantity of examples and pictures cl cl Ll cl
Comments :
Name:
Title:
Company:
Address:
City:
State: Zip:
Please tear out and mail inThank you!EPSON

PLACESTAMPHERE
EPSON America, Inc.2780 Lomita Blvd.Torrance, CA 90505
MS 4-1
Fold Here
Tape Here - Do Not Staple
L

EPSON®
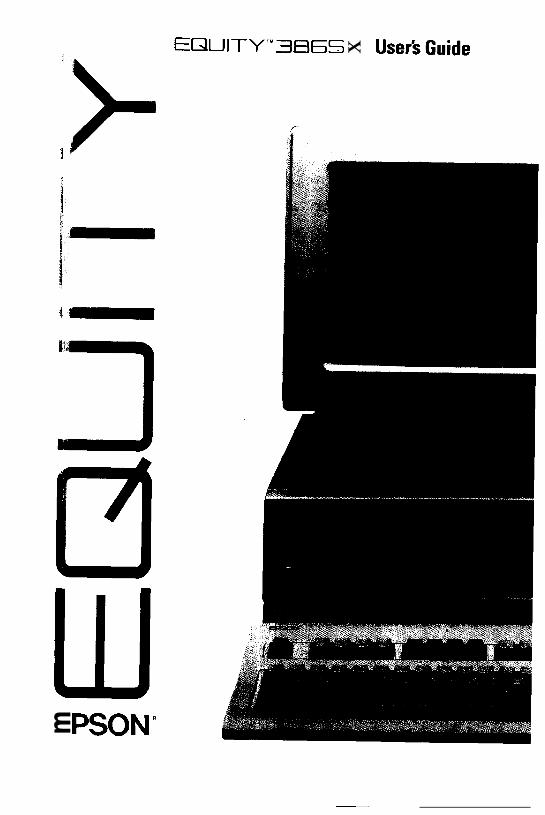
E Q U I T Y ™ 3 8 6 S X
User’s Guide
Y19299100100
IMPORTANT NOTICEDISCLAIMER OF WARRANTY
Epson America makes no representations or warranties, either express or implied, byor with respect to anything in this manual, and shall not be liable for any impliedwarranties of merchantability and fitness for a particular purpose or for any indirect,special, or consequential damages. Some states do not allow the exclusion ofincidental or consequential damages, so this exclusion may not apply to you.
COPYRIGHT NOTICEAll rights reserved. No part of this publication may be reproduced, stored in aretrieval system, or transmitted, in any form or by any means, electronic, mechanical,photocopying, recording, or otherwise, without the prior written permission of EpsonAmerica, Inc. No patent liability is assumed with respect to the use of informationcontained herein. While every precaution has been taken in the preparation of thispublication, Epson America assumes no responsibility for errors or omissions. Nor isany liability assumed for damages resulting from the use of the information containedherein. Further, this publication and features described herein are subject to changewithout notice.
TRADEMARKSEpson is a registered trademark of Seiko Epson Corporation.
Equity is a trademark of Epson America, Inc.
Centronics is a registered trademark of Centronics Data Corporation.
Hercules is a registered trademark of Hercules Computer Technology Corporation.
IBM is a registered trademark and AT and XT are trademarks of InternationalBusiness Machines Corporation.
Intel is a registered trademark and Above is a trademark of Intel Corporation.
Lotus and 1-2-3 are registered trademarks of Lotus Development Corporation.
Microsoft, MS-DOS, and MS are registered trademarks of Microsoft Corporation.
RampagePlus is a registered trademark of AST Research, Inc.
Copyright 0 1989 by Epson America, Inc.Torrance, California
ii

1.
2.
3.
Read all of these instructions and save them for later reference.
Follow all warnings and instructions marked on the product.
Unplug this product from the wall outlet before cleaning. Do notuse liquid cleaners or aerosol cleaners. Use a damp cloth forcleaning.
4.
5.
Do not use this product near water.
Do not place this product on an unstable cart, stand, or table.The product may fall, causing serious damage to the product.
6. Slots and openings in the cabinet and the back or bottom areprovided for ventilation; to ensure reliable operation of theproduct and to protect it from overheating, these openings mustnot be blocked or covered. The openings should never beblocked by placing the product on a bed, sofa, rug, or othersimilar surface. This product should never be placed near or overa radiator or heat register. This product should not be placed in abuilt-in installation unless proper ventilation is provided.
7. This product should be operated from the type of power sourceindicated on the marking label. If you are not sure of the type ofpower available, consult your dealer or local power company.
8. This product is equipped with a 3-wire grounding-type plug, aplug having a third (grounding) pin. This plug will only fit into agrounding-type power outlet. This is a safety feature. If you areunable to insert the plug into the outlet, contact your electricianto replace your obsolete outlet. Do not defeat the purpose of thegrounding-type plug.
9. Do not locate this product where the cord will be walked on.
IMPORTANT SAFETY INSTRUCTIONS
10. If an extension cord is used with this product, make sure that thetotal of the ampere ratings on the products plugged into the ex-tension cord do not exceed the extension cord ampere rating.Also, make sure that the total of all products plugged into thewall outlet does not exceed 15 amperes.
iii

11. Never push objects of any kind into this product through cabinetslots, as they may touch dangerous voltage points or short outparts that could result in a risk of fire or electric shock. Neverspill liquid of any kind on the product.
12. Except as specifically explained in the User’s Manual, do notattempt to service this product yourself. Opening or removingthose covers that are marked “Do Not Remove” may expose youto dangerous voltage points or other risks. Refer all servicing inthose compartments to service personnel.
13. Unplug this product from the wall outlet and refer servicing toqualified service personnel under the following conditions:
A. When the power cord or plug is damaged or frayed.
B. If liquid has been spilled into the product.
C. If the product has been exposed to rain or water.
D. If the product does not operate normally when the operatinginstructions are followed. Adjust only those controls thatare covered by the operating instructions, since improperadjustment of other controls may result in damage and willoften require extensive work by a qualified technician torestore the product to normal operation.
E. If the product has been dropped or the cabinet has beendamaged.
F. If the product exhibits a distinct change in performance,indicating a need for service.
iv
Contents
Introduction
How to Use This Manual . . . . . . . . . . . . . . . . . . . . . . . . . . . . . 3
Where to Get Help . . . . . . . . . . . . . . . . . . . . . . . . . . . . . . . . . . 4
Chapter 1 Setting Up Your System
1 Unpacking . . . . . . . . . . . . . . . . . . . . . . . . . . . . . . . . . . . . . . . 1-12 Choosing a Location. . . . . . . . . . . . . . . . . . . . . . . . . . . . . . . 1-33 Connecting a Monitor . . . . . . . . . . . . . . . . . . . . . . . . . . . . . 1-44 Connecting a Printer or Other Device. . . . . . . . . . . . . . . . . 1-7
Using the Parallel Interface . . . . . . . . . . . . . . . . . . . . . . . 1-7
Using the Serial Interface. . . . . . . . . . . . . . . . . . . . . . . . . 1-10Using the Mouse Connector . . . . . . . . . . . . . . . . . . . . . . 1-11
5 Connecting the Power Cord . . . . . . . . . . . . . . . . . . . . . . . . . 1-126 Connecting the Keyboard. . . . . . . . . . . . . . . . . . . . . . . . . . . 1-13
7 Turning On the Computer . . . . . . . . . . . . . . . . . . . . . . . . . . 1-15
Chapter 2 Running the Setup Program
Starting the Setup Program . . . . . . . . . . . . . . . . . . . . . . . . . . . . 2-2Continuing From an Error Message . . . . . . . . . . . . . . . . . 2-4Moving the Cursor Block. . . . . . . . . . . . . . . . . . . . . . . . . 2-6
Setting the Display Adapter Card Type . . . . . . . . . . . . . . . . . . 2-6Setting the Power-on Password. . . . . . . . . . . . . . . . . . . . . . . . . 2-8Setting the Fast Boot Function. . . . . . . . . . . . . . . . . . . . . . . . . 2-11Setting the Auto Speed Function. . . . . . . . . . . . . . . . . . . . . . . 2-12Setting the Real-time Clock . . . . . . . . . . . . . . . . . . . . . . . . . . . 2-14Setting the Hard Disk Drive Configuration . . . . . . . . . . . . . . . 2-17Setting the Diskette Drive Type(s) . . . . . . . . . . . . . . . . . . . . . 2-22
v

Setting the Serial and Parallel Interfaces . . . . . . . . . . . . . . . . . 2-24
Reviewing Your Settings. . . . . . . . . . . . . . . . . . . . . . . . . . . . . .
Leaving the Setup Menu. 2-28. . . . . . . . . . . . . . . . . . . . . . . . . . . . .2-26
Adding an Optional Memory Card . . . . . . . . . . . . . . . . . . . . . 2-29
Chapter 3 Using the Equity 386SX
Installing MS-DOS . . . . . . . . . . . . . . . . . . . . . . . . . . . . . . . . . . 3-1
Using a Power-on Password . . . . . . . . . . . . . . . . . . . . . . . . . . . 3-2
Changing a Power-on Password. . . . . . . . . . . . . . . . . . . . 3-3
Deleting a Power-on Password . . . . . . . . . . . . . . . . . . . . . 3-4
Selecting the Operating Speed . . . . . . . . . . . . . . . . . . . . . . . . . 3-5
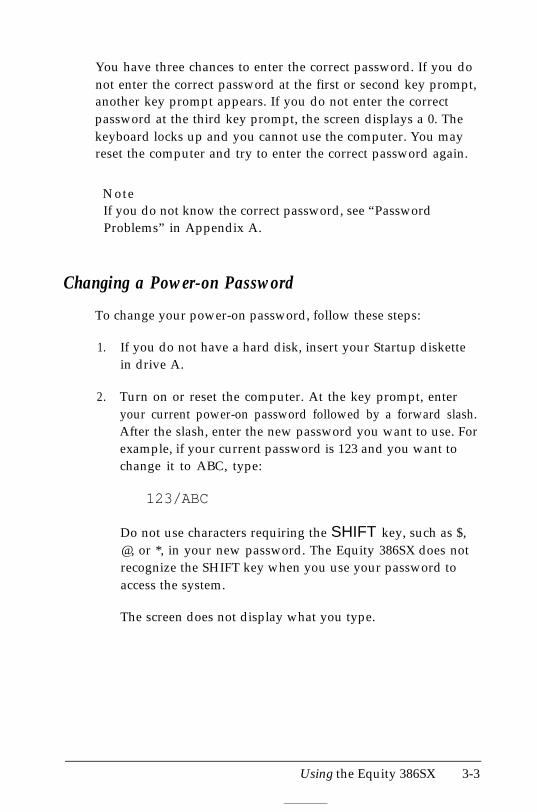
Special Keys on the Equity 386SX Keyboard . . . . . . . . . . . . . . 3-6
Stopping a Command or Program . . . . . . . . . . . . . . . . . . . . . . 3-8
Resetting the Computer . . . . . . . . . . . . . . . . . . . . . . . . . . . . . . 3-8
Using Disks and Disk Drives. . . . . . . . . . . . . . . . . . . . . . . . . . . 3-9
How Disks Store Data . . . . . . . . . . . . . . . . . . . . . . . . . . . 3-10
Types of Diskette Drives. . . . . . . . . . . . . . . . . . . . . . . . . . 3-12
Caring for Diskettes and Diskette Drives. . . . . . . . . . . . . 3-14
Inserting and Removing Diskettes . . . . . . . . . . . . . . . . . . 3-16
Write-protecting Diskettes. . . . . . . . . . . . . . . . . . . . . . . . 3-18
Making Backup Copies. . . . . . . . . . . . . . . . . . . . . . . . . . . 3-20
Using a Single Diskette Drive . . . . . . . . . . . . . . . . . . . . . 3-21
Using Two Diskette Drives . . . . . . . . . . . . . . . . . . . . . . . 3-22
Using a Hard Disk Drive . . . . . . . . . . . . . . . . . . . . . . . . . 3-22
Turning Off the Computer . . . . . . . . . . . . . . . . . . . . . . . . . . . . 3-25
vi
Chapter 4 Using MS-DOS with Your Equity 386SX
Starting MS-DOS . . . . . . . . . . . . . . . . . . . . . . . . . . . . . . . . . . . 4-2Using Drive Designators . . . . . . . . . . . . . . . . . . . . . . . . . . . . . . 4-3
The Current Drive . . . . . . . . . . . . . . . . . . . . . . . . . . . . . . 4-4Types of MS-DOS Commands . . . . . . . . . . . . . . . . . . . . . . . . . 4-5Entering an MS-DOS Command . . . . . . . . . . . . . . . . . . . . . . . 4-7Setting the Date and Time . . . . . . . . . . . . . . . . . . . . . . . . . . . . 4-8Creating and Managing Files . . . . . . . . . . . . . . . . . . . . . . . . . . 4-9
Naming Files. . . . . . . . . . . . . . . . . . . . . . . . . . . . . . . . . . . 4-9Copying Files . . . . . . . . . . . . . . . . . . . . . . . . . . . . . . . . . . 4-11Renaming Files . . . . . . . . . . . . . . . . . . . . . . . . . . . . . . . . . 4-14Deleting Files . . . . . . . . . . . . . . . . . . . . . . . . . . . . . . . . . . 4-15Printing Text Files . . . . . . . . . . . . . . . . . . . . . . . . . . . . . . 4-16
Using Directories. . . . . . . . . . . . . . . . . . . . . . . . . . . . . . . . . . . . 4-16The Current Directory . . . . . . . . . . . . . . . . . . . . . . . . . . . 4-19Changing the Current Directory . . . . . . . . . . . . . . . . . . . 4-19Using Pathnames . . . . . . . . . . . . . . . . . . . . . . . . . . . . . . . 4-20Including Filenames With Pathnames. . . . . . . . . . . . . . . 4-21Including Drive Letters With Pathnames and
Filenames . . . . . . . . . . . . . . . . . . . . . . . . . . . . . . . . . . 4-21Creating Directories . . . . . . . . . . . . . . . . . . . . . . . . . . . . . 4-23Listing the Contents of a Directory . . . . . . . . . . . . . . . . . 4-23Displaying a List of Directories . . . . . . . . . . . . . . . . . . . . 4-25Removing Directories. . . . . . . . . . . . . . . . . . . . . . . . . . . . 4-27
Formatting Diskettes. . . . . . . . . . . . . . . . . . . . . . . . . . . . . . . . . 4-27Using the FORMAT Command . . . . . . . . . . . . . . . . . . . 4-28
Backing Up Data. . . . . . . . . . . . . . . . . . . . . . . . . . . . . . . . . . . . 4-30Using the DISKCOPY Command . . . . . . . . . . . . . . . . . . 4-31Using the BACKUP Command. . . . . . . . . . . . . . . . . . . . 4-34
The MS-DOS Shell Program . . . . . . . . . . . . . . . . . . . . . . . . . . 4-35Using the Epson HELP Program. . . . . . . . . . . . . . . . . . . . . . . . 4-35
Using the Epson MENU Program. . . . . . . . . . . . . . . . . . . . . . . 4-37
Menu Program Options . . . . . . . . . . . . . . . . . . . . . . . . . . 4-39Using an AUTOEXEC.BAT File . . . . . . . . . . . . . . . . . . . . . . . 4-40
Creating an AUTOEXEC.BAT File . . . . . . . . . . . . . . . . 4-41Using Memory Beyond 640KB . . . . . . . . . . . . . . . . . . . . . . . . . 4-43
Using EMM386.SYS. . . . . . . . . . . . . . . . . . . . . . . . . . . . . 4-44
vii
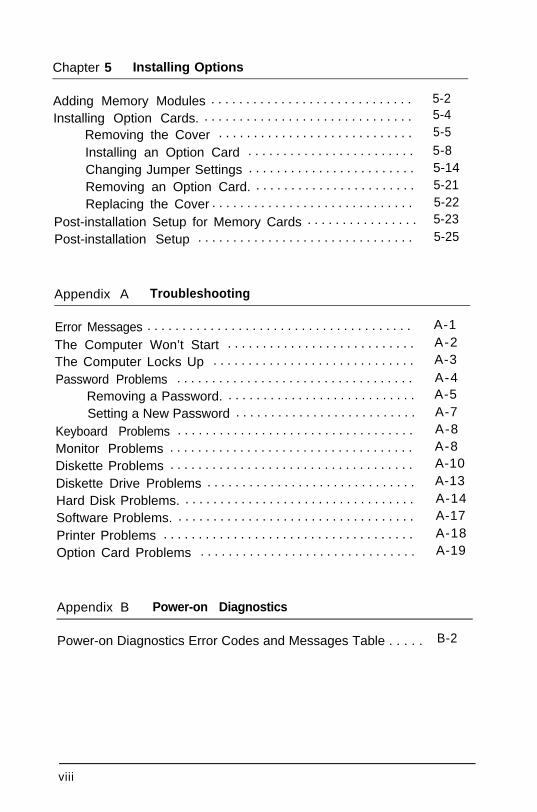
Chapter 5 Installing Options
Adding Memory Modules . . . . . . . . . . . . . . . . . . . . . . . . . . . . . 5-2
Installing Option Cards. . . . . . . . . . . . . . . . . . . . . . . . . . . . . . . 5-4
Removing the Cover . . . . . . . . . . . . . . . . . . . . . . . . . . . . 5-5
Installing an Option Card . . . . . . . . . . . . . . . . . . . . . . . . 5-8
Changing Jumper Settings . . . . . . . . . . . . . . . . . . . . . . . . 5-14
Removing an Option Card. . . . . . . . . . . . . . . . . . . . . . . . 5-21
Replacing the Cover . . . . . . . . . . . . . . . . . . . . . . . . . . . . . 5-22
Post-installation Setup for Memory Cards . . . . . . . . . . . . . . . . 5-23
Post-installation Setup . . . . . . . . . . . . . . . . . . . . . . . . . . . . . . . 5-25
Appendix A Troubleshooting
Error Messages . . . . . . . . . . . . . . . . . . . . . . . . . . . . . . . . . . . . . . A-1
The Computer Won’t Start . . . . . . . . . . . . . . . . . . . . . . . . . . . A-2
The Computer Locks Up . . . . . . . . . . . . . . . . . . . . . . . . . . . . . A-3
Password Problems . . . . . . . . . . . . . . . . . . . . . . . . . . . . . . . . . . A-4Removing a Password. . . . . . . . . . . . . . . . . . . . . . . . . . . . A-5
Setting a New Password . . . . . . . . . . . . . . . . . . . . . . . . . . A-7
Keyboard Problems . . . . . . . . . . . . . . . . . . . . . . . . . . . . . . . . . . A-8
Monitor Problems . . . . . . . . . . . . . . . . . . . . . . . . . . . . . . . . . . . A-8
Diskette Problems . . . . . . . . . . . . . . . . . . . . . . . . . . . . . . . . . . . A-10
Diskette Drive Problems . . . . . . . . . . . . . . . . . . . . . . . . . . . . . . A-13
Hard Disk Problems. . . . . . . . . . . . . . . . . . . . . . . . . . . . . . . . . . A-14
Software Problems. . . . . . . . . . . . . . . . . . . . . . . . . . . . . . . . . . . A-17
Printer Problems . . . . . . . . . . . . . . . . . . . . . . . . . . . . . . . . . . . . A-18
Option Card Problems . . . . . . . . . . . . . . . . . . . . . . . . . . . . . . . A-19
Appendix B Power-on Diagnostics
Power-on Diagnostics Error Codes and Messages Table . . . . . B-2
viii
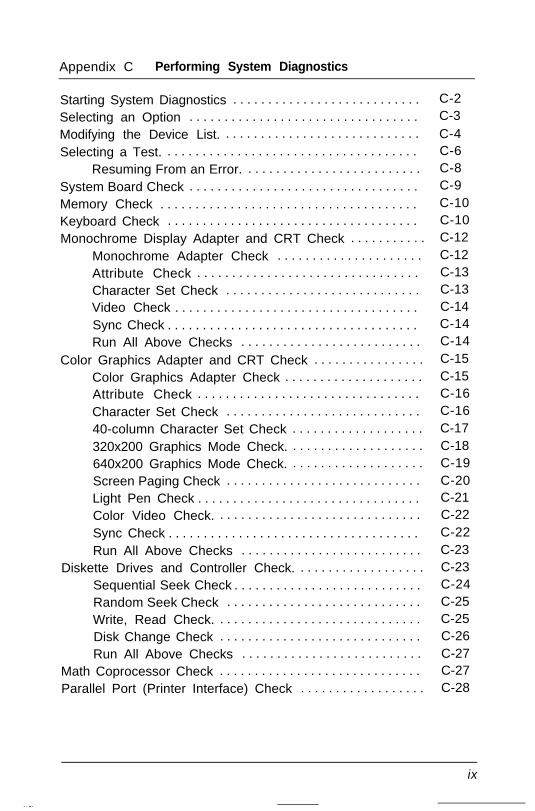
Appendix C Performing System Diagnostics
Starting System Diagnostics . . . . . . . . . . . . . . . . . . . . . . . . . . . C-2Selecting an Option . . . . . . . . . . . . . . . . . . . . . . . . . . . . . . . . . C-3Modifying the Device List. . . . . . . . . . . . . . . . . . . . . . . . . . . . . C-4Selecting a Test. . . . . . . . . . . . . . . . . . . . . . . . . . . . . . . . . . . . . C-6
Resuming From an Error. . . . . . . . . . . . . . . . . . . . . . . . . . C-8System Board Check . . . . . . . . . . . . . . . . . . . . . . . . . . . . . . . . . C-9Memory Check . . . . . . . . . . . . . . . . . . . . . . . . . . . . . . . . . . . . . C-10Keyboard Check . . . . . . . . . . . . . . . . . . . . . . . . . . . . . . . . . . . . C-10Monochrome Display Adapter and CRT Check . . . . . . . . . . . C-12
Monochrome Adapter Check . . . . . . . . . . . . . . . . . . . . . C-12Attribute Check . . . . . . . . . . . . . . . . . . . . . . . . . . . . . . . . C-13Character Set Check . . . . . . . . . . . . . . . . . . . . . . . . . . . . C-13Video Check . . . . . . . . . . . . . . . . . . . . . . . . . . . . . . . . . . . C-14Sync Check . . . . . . . . . . . . . . . . . . . . . . . . . . . . . . . . . . . . C-14Run All Above Checks . . . . . . . . . . . . . . . . . . . . . . . . . . C-14
Color Graphics Adapter and CRT Check . . . . . . . . . . . . . . . . C-15Color Graphics Adapter Check . . . . . . . . . . . . . . . . . . . . C-15Attribute Check . . . . . . . . . . . . . . . . . . . . . . . . . . . . . . . . C-16Character Set Check . . . . . . . . . . . . . . . . . . . . . . . . . . . . C-1640-column Character Set Check . . . . . . . . . . . . . . . . . . . C-17320x200 Graphics Mode Check. . . . . . . . . . . . . . . . . . . . C-18640x200 Graphics Mode Check. . . . . . . . . . . . . . . . . . . . C-19Screen Paging Check . . . . . . . . . . . . . . . . . . . . . . . . . . . . C-20Light Pen Check . . . . . . . . . . . . . . . . . . . . . . . . . . . . . . . . C-21Color Video Check. . . . . . . . . . . . . . . . . . . . . . . . . . . . . . C-22Sync Check . . . . . . . . . . . . . . . . . . . . . . . . . . . . . . . . . . . . C-22Run All Above Checks . . . . . . . . . . . . . . . . . . . . . . . . . . C-23
Diskette Drives and Controller Check. . . . . . . . . . . . . . . . . . . C-23Sequential Seek Check . . . . . . . . . . . . . . . . . . . . . . . . . . . C-24Random Seek Check . . . . . . . . . . . . . . . . . . . . . . . . . . . . C-25Write, Read Check. . . . . . . . . . . . . . . . . . . . . . . . . . . . . . C-25Disk Change Check . . . . . . . . . . . . . . . . . . . . . . . . . . . . . C-26Run All Above Checks . . . . . . . . . . . . . . . . . . . . . . . . . . C-27
Math Coprocessor Check . . . . . . . . . . . . . . . . . . . . . . . . . . . . . C-27Parallel Port (Printer Interface) Check . . . . . . . . . . . . . . . . . . C-28
ix

Alternate Parallel Port Check . . . . . . . . . . . . . . . . . . . . . . . . . C-28
Parallel Port (on Video Adapter) Check . . . . . . . . . . . . . . . . . C-29
Serial Port (RS-232C Port) Check. . . . . . . . . . . . . . . . . . . . . . C-29
Alternate Serial Port Check . . . . . . . . . . . . . . . . . . . . . . . . . . . C-31
Dot-matrix Printer Check. . . . . . . . . . . . . . . . . . . . . . . . . . . . . C-31
Hard Disk Drive(s) and Controller Check. . . . . . . . . . . . . . . . C-33
Seek Check . . . . . . . . . . . . . . . . . . . . . . . . . . . . . . . . . . . . C-33
Write, Read Check. . . . . . . . . . . . . . . . . . . . . . . . . . . . . . C-34
Read, Verify Check . . . . . . . . . . . . . . . . . . . . . . . . . . . . . C-35
Run All Above Checks . . . . . . . . . . . . . . . . . . . . . . . . . . C-36
Error Codes and Messages. . . . . . . . . . . . . . . . . . . . . . . . . . . . . C-37
Appendix D Physically Formatting a Hard Disk
Choosing the Type of Format . . . . . . . . . . . . . . . . . . . . . . . . . .
Reformatting a Used Disk . . . . . . . . . . . . . . . . . . . . . . . .
Formatting a New Disk. . . . . . . . . . . . . . . . . . . . . . . . . . .
Selecting an Option . . . . . . . . . . . . . . . . . . . . . . . . . . . . .
Starting the Formatting Process. . . . . . . . . . . . . . . . . . . .
Option 1, Format. . . . . . . . . . . . . . . . . . . . . . . . . . . . . . . . . . . .
Modifying the Defective Track Table . . . . . . . . . . . . . . .
Formatting the Disk . . . . . . . . . . . . . . . . . . . . . . . . . . . . .
Option 2, Destructive Surface Analysis . . . . . . . . . . . . . . . . . .
Option 3, Non-destructive Surface Analysis . . . . . . . . . . . . . .
Exiting the Hard Disk Format Menu . . . . . . . . . . . . . . . . . . . .
Appendix E Hard Disk Drive Types
D-2D-3D-4D-4D-4D-5D-7D-9D-10D-12D-13
Hard Disk Drive Types Table . . . . . . . . . . . . . . . . . . . . . . . . . . E-1
X

Appendix F Specifications
CPU and Memory . . . . . . . . . . . . . . . . . . . . . . . . . . . .Controllers. . . . . . . . . . . . . . . . . . . . . . . . . . . . . . . . . .Interfaces . . . . . . . . . . . . . . . . . . . . . . . . . . . . . . . . . . .Power Supply . . . . . . . . . . . . . . . . . . . . . . . . . . . . . . . .Mass Storage . . . . . . . . . . . . . . . . . . . . . . . . . . . . . . . .Keyboard . . . . . . . . . . . . . . . . . . . . . . . . . . . . . . . . . . .Environmental Requirements. . . . . . . . . . . . . . . . . . .Physical Characteristics . . . . . . . . . . . . . . . . . . . . . . .
. . . . . . F-1
. . . . . . F-1
. . . . . . F-2
. . . . . . F-2
. . . . . . F-2
. . . . . . F-3
. . . . . . F-3
. . . . . . F-4
Glossary
Index
xi
Introduction
The Epson® Equity™ 386SX is a high-performance personalcomputer which offers exceptional speed and versatility in acompact design. The computer’s 80386SX microprocessormakes all your programs run faster, even when supportingmultitasking operations.
The Equity 386SXS available in these configurations:
c3 A single diskette drive system with a 1.44MB (megabyte)3 ‘/z-inch diskette drive
Cl A hard disk drive system with one 40MB or 100MB harddisk and a 1.44MB diskette drive.
You can install an additional diskette drive or hard disk drive,up to a maximum of three drives total.
All models of the Equity 386SX include 1MB of internalmemory, five standard option slots (four 16-bit and one 8-bit),serial and parallel interfaces, and an auxiliary mouse connector.You can easily upgrade your computer by installing additionalmemory and adding optional devices.
Because of its industry-standard architecture, the Equity 386SXis fully compatible with the current installed base of personalcomputer hardware and software. You can install just about anyoptional device that is compatible with the IBM@ PersonalComputer, PC XT™, or PC AT™.
You can expand the computer’s memory up to 14MB byadding memory modules to a special card that comes with theEquity 386SX. Memory modules are efficient because theyeliminate the need to use one of your option slots to addmemory to your computer. If you do choose to use a memorycard, you can increase the computer’s memory up to 16MB.
You may also want to install an 80387SX math coprocessor inyour computer to speed up mathematical calculations. Checkwith your authorized Epson dealer to see which options areavailable.
The Equity 386SX ffo ers several features to enhance thesecurity and versatility of your computer:
D Password protection. This optional feature ensures that noone may access your computer unless they know thepassword.
Cl Embedded hard disk drive and integrated diskette drivecontrollers. Each controller can run up to two drives so youdon’t have to use an option slot to install additional drivesin your system.
Ll Automatic configuration. The Setup program automaticallyconfigures the memory and other items included in yoursystem, making it easier for you to get started.
Your Equity 386SX comes with version 4.01 of MS-DOS theoperating system by Microsoft? This version of MS-DOSincludes a Shell program, which lets you run MS-DOScommands by selecting options from on-screen menus. You’llfind a set of MS-DOS manuals packed in the box with thecomputer.
You probably also purchased other software; you can usevirtually any application program designed for the IBM PC,PC XT, PC AT, or compatible computers on yourEquity 386SX. You may also use powerful 32-bit software-such as Microsoft Windows/386-with your computer.
Additionally, Epson has included two time-saving utilites thatmake MS-DOS easier to use: HELP and MENU. The HELPprogram lets you display information on the screen about anyMS-DOS command. MENU provides an easy way to run manyuseful MS-DOS commands.
2 Introduction
MS-DOS is not the only operating system you can use withyour computer. If you have a hard disk you also may want touse MS®OS/2. Among other capabilities, MS OS/2 providesmultitasking, dual-mode processing, and online help. WithEpson’s version of MS OS/2, you can have both MS-DOS andMS OS/2 on your Equity 386SX; this way, you can select whichoperating system to load each time you turn on the computer.Ask your Epson dealer for more information.
How to Use This Manual
This manual explains how to set up and care for your.Equity 386SX. It also describes how to use your computer andrun diagnostics checks. You probably do not need to readeverything in this book; see the following chapter summaries.
Chapter 1 provides simple step-by-step instructions for settingup your system. On the back cover foldout are illustrationsidentifying the different parts of the Equity 386SX; you maywant to refer to this while setting up your system.
Chapter 2 describes how to run the Setup program to defineyour computer’s configuration. You must do this for a newcomputer before you use it. You may need to do it again later,if you change the configuration.
Chapter 3 provides instructions for performing importantoperating procedures, including using and caring for your disksand disk drives.
Chapter 4 provides basic instructions for using MS-DOS withyour computer.
Chapter 5 describes some of the options you can use in yourEquity 386SX and contains instructions for installing optioncards and changing jumper settings.
Introduction 3

Appendix A contains troubleshooting tips in case youencounter any problems while using your computer.
Appendix B provides information about the power-ondiagnostics.
Appendix C outlines the system diagnostics checks you canperform on your computer. If you are having trouble with anypart of the hardware, you may want to run some of thesediagnostics checks.
Appendix D describes how to perform a hardware-level formaton a hard disk. You need to do this only if you have installed anew hard disk that has never received this type of low-levelformat, or if you are having serious problems with the hard diskin your computer. (This is not the same type of format you canperform with the MS-DOS FORMAT command.)
Appendix E lists the types of hard disk drives you can use in theEquity 386SX.
Appendix F gives the technical specifications for the computer.
At the end of the manual, you’ll find a glossary of the computerterms used in this manual and an index.
Where to Get Help
Customer support and service for Epson products are providedby a network of authorized Epson dealers and Customer CareCenters throughout the United States. Epson America providesproduct information and support to its dealers and CustomerCare Centers.
Therefore, we ask that you contact the business where youpurchased your Epson product to request assistance. If thepeople there do not have the answer to your question, they canobtain it through our toll-free dealer support program.
4 Introduction

Epson is confident that this policy will provide you with theassistance you need.
Call the Epson Consumer Information Center at1-800-922-8911 for the following:
Cl The nearest Epson dealer
0 The nearest Customer Care Center
Cl Information on Epson User Groups.
To locate or purchase accessories or supplies, contact yournearest Epson dealer or call 1-800-873-7766.
Introduction 5

6 Introduction

Chapter 1Setting Up Your System
Setting up your Epson Equity 386SX personal computer is easy.Just follow the seven steps in this chapter. As you set up yourcomputer, you may want to leave this manual’s back coverfoldout open so you can refer to the two illustrations identifyingthe different parts of the computer.
1 Unpacking
As you remove your system components from their cartons, besure to inspect each piece. If anything is missing or looksdamaged, check with your Epson dealer.
Setting Up Your System 1-1

Besides this manual, you should have the following:
LI The computer and power cord
Ll The keyboard with attached cable
Cl Three MS-DOS 4.01 diskettes: Install, Operating, and Shell
Cl A Reference diskette
Ll Four MS-DOS manuals: an Installation Guide, a ShellUser’s Guide, a Reference Manual, and a CommandSummary.
In addition to these items, you need a compatible monitor anddisplay adapter card. You may also have a printer or otherperipheral device.
You’ll find a warranty card and a registration card with thecomputer. Keep the warranty card for your records. Fill out theregistration card now and mail it to Epson. With yourregistration card on file, Epson can send you updateinformation.
Be sure to keep your packing materials. They provide the bestprotection for your computer if you need to transport it later.
1-2 Setting Up Your System

2 Choosing a LocationBefore you set up your Equity 386SX, it’s important to choose acomfortable, convenient location where it can run properly.Select a location that provides the following:
A large, sturdy desk or table that can easily support theweight of your system, including all its components.
A flat, hard surface. Soft surfaces like beds and carpetedfloors attract static electricity, which can erase data on yourdisks and damage the computer’s circuitry. Soft surfaces alsoprevent proper ventilation.
Good air circulation. Air must be able to move freely underthe system as well as behind it. Leave several inches of spacearound the computer to allow ventilation.
Moderate environmental conditions. Protect your computerfrom extremes in temperature, humidity, dust, and smoke.Avoid direct sunlight or any other source of heat. Highhumidity also hinders operation, so select a cool, dry area.
Appropriate power sources. To prevent static charges,connect all your equipment to three-prong, 120-voltgrounded outlets. You need one outlet for the computer, onefor the monitor, and additional outlets for a printer and anyother peripherals. You can plug one peripheral into theauxiliary power outlet on the back panel of the computer,reducing the number of wall outlets you need.
No electromagnetic interference. Locate your system awayfrom any electrical device, such as a telephone, thatgenerates an electromagnetic field.
Setting Up Your System 1-3
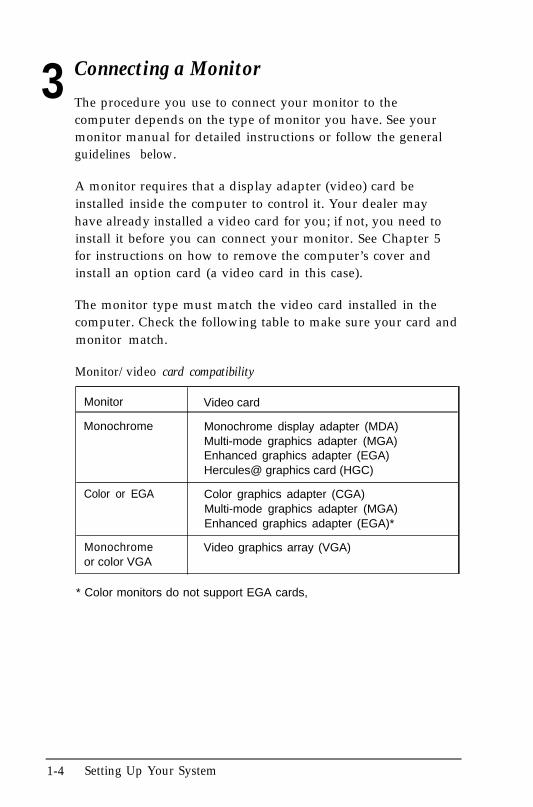
3 Connecting a MonitorThe procedure you use to connect your monitor to thecomputer depends on the type of monitor you have. See yourmonitor manual for detailed instructions or follow the generalguidelines below.
A monitor requires that a display adapter (video) card beinstalled inside the computer to control it. Your dealer mayhave already installed a video card for you; if not, you need toinstall it before you can connect your monitor. See Chapter 5for instructions on how to remove the computer’s cover andinstall an option card (a video card in this case).
The monitor type must match the video card installed in thecomputer. Check the following table to make sure your card andmonitor match.
Monitor/video card compatibility
Monitor
Monochrome
Color or EGA
Video card
Monochrome display adapter (MDA)Multi-mode graphics adapter (MGA)Enhanced graphics adapter (EGA)Hercules@ graphics card (HGC)
Color graphics adapter (CGA)Multi-mode graphics adapter (MGA)Enhanced graphics adapter (EGA)*
Monochromeor color VGA
Video graphics array (VGA)
* Color monitors do not support EGA cards,
1-4 Setting Up Your System
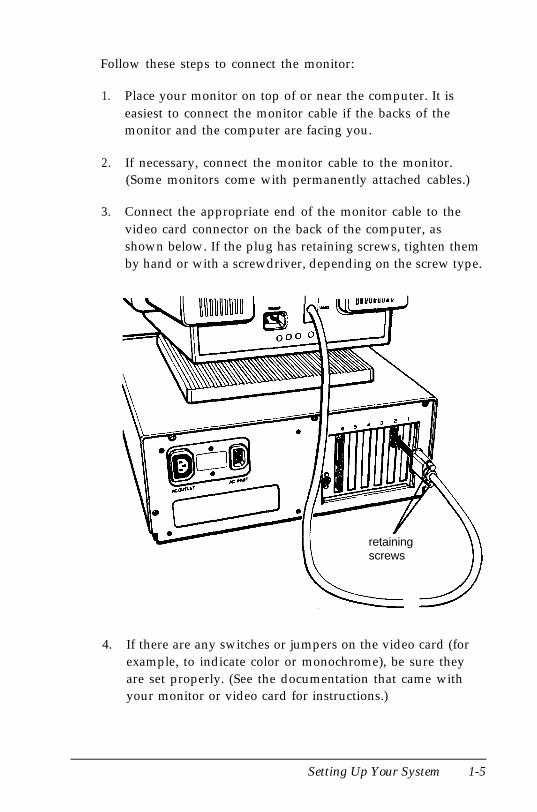
Follow these steps to connect the monitor:
1. Place your monitor on top of or near the computer. It iseasiest to connect the monitor cable if the backs of themonitor and the computer are facing you.
2. If necessary, connect the monitor cable to the monitor.(Some monitors come with permanently attached cables.)
3. Connect the appropriate end of the monitor cable to thevideo card connector on the back of the computer, asshown below. If the plug has retaining screws, tighten themby hand or with a screwdriver, depending on the screw type.
UL II 111111111111111111 I I I I
retainingscrews
4. If there are any switches or jumpers on the video card (forexample, to indicate color or monochrome), be sure theyare set properly. (See the documentation that came withyour monitor or video card for instructions.)
Setting Up Your System 1-5

5. Plug the monitor’s power cord into the monitor’s powerinlet, as shown below.
6. Plug the other end of the power cord into an electricaloutlet.
NoteIf the monitor has the proper type of plug, you can plug itinto the AC power outlet on the back of the computer,
1-6 Setting Up Your System

4 Connecting a Printer or Other DeviceThe Equity 386SX has a parallel interface, a serial interface, andan auxiliary mouse connector. To connect a printer or otherperipheral device to one of these interfaces, follow theinstructions below. Of course, Epson offers a full range ofprinters; check with your dealer for more information.
Using the Parallel Interface
The Equity 386SX parallel interface is Centronics®-compatibleand uses a DB-25S connector.
To connect a printer to the computer, you need an IBM-compatible printer cable. If you are not sure which one youneed, check with your Epson dealer.
Once you have the correct printer cable, follow these steps toconnect your printer to the parallel interface on the computer:
1. Be sure the power switches on the computer, monitor, andprinter are off.
2. Place the printer next to the computer.
Setting Up Your System 1-7
3. One end of the printer cable has a 25-pin, D-shell, maleconnector. Connect this end to the parallel port on theback panel of the computer, as shown below. If the plug hasretaining screws, tighten them by hand or with ascrewdriver, depending on the screw type.
- *-
\
retainingscrews
1-8 Setting Up Your System

4. Connect the other end of the cable to the printer, as shownbelow. To secure the cable, squeeze the clips at each side ofthe printer port and push them into place.
5. Plug the printer’s power cord into an electrical outlet.
Setting Up Your System 1-9
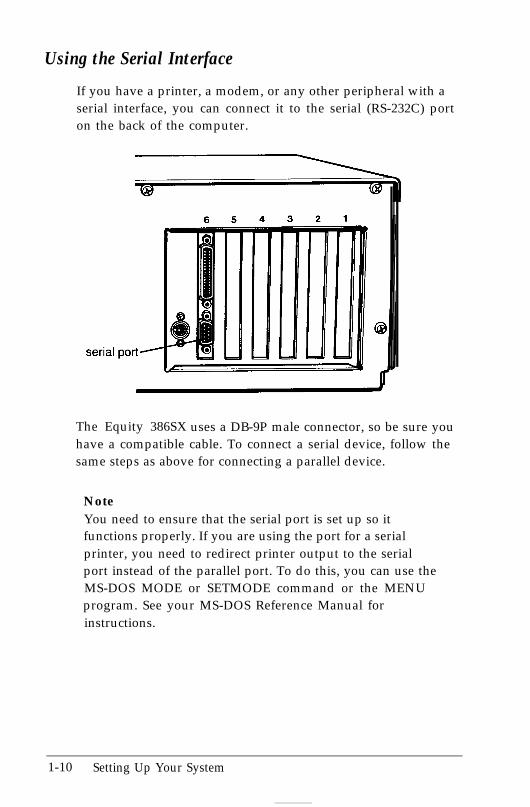
Using the Serial Interface
If you have a printer, a modem, or any other peripheral with aserial interface, you can connect it to the serial (RS-232C) porton the back of the computer.
The Equity 386SX uses a DB-9P male connector, so be sure youhave a compatible cable. To connect a serial device, follow thesame steps as above for connecting a parallel device.
NoteYou need to ensure that the serial port is set up so itfunctions properly. If you are using the port for a serialprinter, you need to redirect printer output to the serialport instead of the parallel port. To do this, you can use theMS-DOS MODE or SETMODE command or the MENUprogram. See your MS-DOS Reference Manual forinstructions.
1-10 Setting Up Your System

Using the Mouse Connector
The Equity 386SX has an auxiliary port for a mouse that uses amini DIN (6-pin) connector. To connect a mouse to the built-in mouse port and set up the computer to use it, see the manualthat comes with the mouse. To use a mouse with yourcomputer, you may need to add commands to your MS-DOSCONFIGSYS file. See your MS-DOS Reference Manual forinstructions.
mouse connector
6 5 4 3 2 1
NoteIf you want to use a mouse or other pointing deviceconnected to a port on an option card in your computer, youneed to disable the built-in mouse connector by changing ajumper setting in the computer. See “Changing JumperSettings” in Chapter 5 for instructions.
Setting Up Your System 1-11

5 Connecting the Power Cord
Follow these steps to connect the power cord:
1. Make sure the power switch on the computer is turned off.
2. Plug the power cord into the AC power inlet on the backpanel, as shown below. To avoid an electric shock, be sureto plug the cord into the computer before plugging it intothe wall socket.
3. Plug the other end of the power cord into a three-prong,120-volt, grounded electrical outlet.
1-12 Setting Up Your System

6 Connecting the KeyboardFollow these steps to connect the keyboard:
1. Turn the computer around so the front is facing you.
2. Open the door on the lower left corner of the computer’sfront panel by pressing it in slightly and then releasing it.
Setting Up Your System 1-13

__3. Plug the keyboard cable into the socket, as shown below.
Do not force the connector, but be sure to insert it all theway. Guide the keyboard cable through the notch on theleft side of the panel.
\c
4. Close the panel access door.
1-14 Setting Up Your System

You can change the angle of the keyboard by adjusting the legson the bottom. Turn the keyboard over and lift each leg upwarduntil it locks into place, as shown below. You can lock the legsto a low or high position, or leave them flat.
7 Turning On the Computer
After you set up your system, you’re ready to turn on the power.But first, read the following safety rules to avoid accidentallydamaging your computer or injuring yourself:
Ll
D
Ll
Do not dismantle any part of the computer. Only removethe cover to install or remove optional devices or changejumper settings. If there is a hardware problem you cannotsolve after reading the information on troubleshooting inAppendix A, check with your Epson dealer.
Always turn off the power, disconnect the computer’spower cord, and wait five seconds before you remove thecomputer’s cover.
Do not unplug cables from the computer when the poweris on.
Setting Up Your System 1-15
D Never turn off or reset your computer while a disk drivelight is on. This can destroy data stored on disk or make anentire disk unusable.
C! Always wait at least five seconds after you turn off thepower before you turn it on again. Turning the power offand on rapidly can damage the computer’s circuitry.
D Do not leave a beverage on top of or next to your system orany of its components. Spilled liquid can damage thecircuitry of your components.
Follow these steps to turn on your system:
1. Make sure the power cord is plugged into the AC powerinlet on the back panel of the computer and into a three-prong, 120~volt, grounded electrical outlet.
2. Turn on the monitor, printer, and any other peripheraldevices connected to the computer. (Always turn on themonitor and any peripheral devices before you turn on thecomputer.)
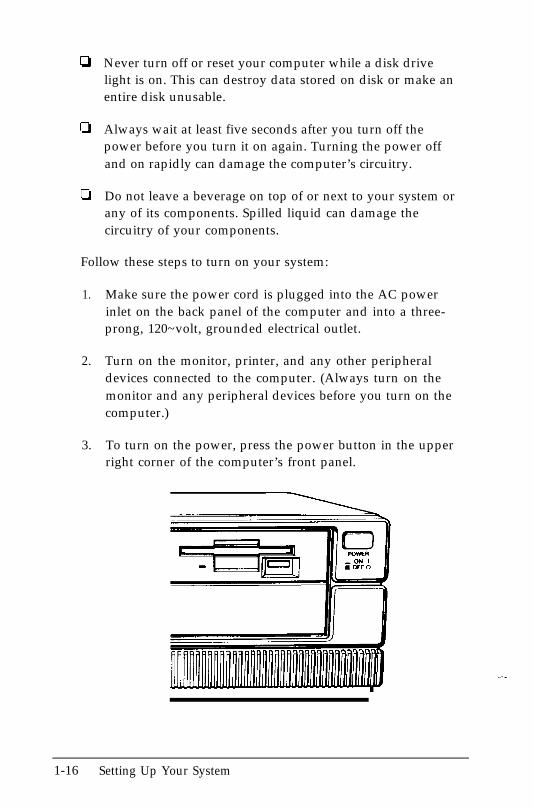
3. To turn on the power, press the power button in the upperright corner of the computer’s front panel.
1-16 Setting Up Your System

The power indicator on the front panel lights up. After a fewseconds, the computer starts to perform an internal self test.This is a series of checks the computer completes each time youturn it on to make sure everything is working correctly. Ifanything is wrong, an error message appears on the screen.
You see a message prompting you to insert a system diskette.(Do not insert a diskette at this point.)
If you cannot see the screen display clearly, use the controls onyour monitor to adjust the brightness and contrast untilcharacters on the screen are clear and bright. If the display isnot stable, check your monitor’s horizontal and vertical holdcontrols.
After you adjust the monitor’s brightness and contrast, press thepower button again to turn off the computer. Then turn off themonitor and any peripherals.
Now go on to Chapter 2 and follow the instructions there torun the Setup program. After you run Setup, you need to installMS-DOS using the instructions in your MS-DOS InstallationGuide.
Setting Up Your System 1-17

1-18 Setting Up Your System
Chapter 2Running the Setup Program
The first time you use your Equity 386SX, you need to run theSetup program on the Reference diskette to define thecomputer’s configuration. This is a simple procedure you mustdo at least once. (You may need to do it again later, if youchange the configuration.)
The Setup program lets you set (or change) the following foryour computer:
Type of display adapter (video) card installed
Power-on password
Fast boot function
Auto speed function
Real-time clock’s time and date
Hard disk drive configuration
Diskette drive type(s)
Serial and parallel port settings.
The configuration you define with the Setup program is storedin the CMOS RAM, which is permanent because it is backedup by a battery. Whenever you turn on the computer, itsearches the CMOS RAM for the correct installationinformation.
The Equity 386SX automatically defines your system’s memoryconfiguration and recognizes a math coprocessor, if you haveinstalled one. If the computer discovers a difference betweenthe information in the CMOS RAM and its actualconfiguration, it prompts you to run the Setup program.
Running the Setup Program 2-1

Starting the Setup Program
Follow these steps to start the Setup program:
1. Turn off your computer, monitor, and any peripheraldevices, if you have not already done so.
2. Insert the Reference diskette into drive A with the labelfacing up and the metal shutter leading into the drive, asshown below:
Slide the diskette into the drive until it clicks into place.(For more instructions on inserting and removing diskettes,see Chapter 3.)
2-2 Running the Setup Program

3. Turn on your system. (Remember to turn on your monitorand any peripherals before you turn on the computer.) Thescreen displays the Operation Menu:
OPERATION MENU
1 - Setup2 - Format hard disk3 - System diagnostics4 - Prepare hard disk for moving
0 - Exit to DOS for more utilities
NoteIf an error message appears when you rum on thecomputer, see “Continuing From an Error Message,”below.
4. The Setup option is highlighted. To select it, pressEnter. The screen displays the main Setup menu:
Exit
Display
Password
Fast boot
Auto speed
Real-time clock
Hard disk drive
Diskette drive
Serial / Parallel
Running the Setup Program 2-3

Continuing From an Error Message
If your computer has never been set up, you may see an errormessage, such as the following:
162 - System options not set(Run SETUP in REFERENCE DISK)
(Resume = "F1" key)
If you see an error message like this one, follow these steps toproceed:
1. Press F1. The computer beeps and the screen displaysmessages, such as the following:
!!!!! Error(s) detected !!!!!
The error message following the diamond indicates thecondition causing the error. There may be more than oneerror listed in the message. Here are the error messages youmay see:
Time is invalid
HDD and/or HDC failed initialization
Memory size is incorrect, correction made
Incorrect configuration
Checksum is incorrect
Real-time clock has lost power
2-4 Running the Setup Program

Some errors, such as Time i s invalid, do not allowyou to set a default value, so the screen does not display theSet default value prompt. If you see one of theseerrors, press ESC; the screen displays the main Setup menuso you can enter a new setting.
NoteIf you see the message Real-time clock hasl o s t power, contact your Epson dealer. You cannotcorrect this error using the Setup program.
2. Be sure Y is highlighted and press Enter. The Setupprogram changes the setting that caused the error to asetting that is more likely to match your systemconfiguration. The screen displays the main Setup menu:
ExitDisplayPasswordFast bootAuto speed
Real-time clockHard disk driveDiskette driveSerial / Parallel
You should check all the settings in the Setup program tomake sure they are correct for your system. The defaultvalue for the setting that caused the error may not be thecorrect one for your particular configuration.
Running the Setup Program 2-5

Moving the Cursor Block
Use 4 and ? to move the cursor block (the highlighted bar)through the options on the main Setup menu. After youhighlight the option you want, you can press Enter to select it.
NoteNoteIf the arrow keys on the numeric keypad do not appear towork, Num Lock mode may be enabled. If the Num Lockindicator in the upper right corner of the keyboard is lit, pressthe Num Lock key once to disable Num Lock mode. andenable the arrow keys on the numeric keypad. If you need toenter numbers while using the Setup program and you wantto use the numeric keypad, you need to turn on Num Lock.
Follow the instructions in the rest of this chapter to use theSetup program to define your computer’s configuration.
Setting the Display Adapter Card TypeFollow the steps below to set the type of display adapter (video)card you are using with your Equity 386SX.
NoteWith this option you select the type of display adapter cardyou are using-not the type of monitor.
2-6 Running the Setup Program

1. At the main Setup menu, highlight Display. You seethe current display adapter card type, such as the following:
Monochrome 80 column
If the display adapter card type is correct for your system,you can skip this section.
2. To change the display adapter card setting, press Enter. Thecursor block moves into the submenu and you see:
CGA 40 columnCGA 80 columnMonochrome 80 columnSpecial Adapter
The last option in this menu displays the type of displayadapter card you installed if it is an EGA, VGA, or MCGAcard. If you installed a different type of display adapter cardor a type listed as one of the first three options, you seeSpecial Adapter as the fourth option.
3. Press Enter to move the cursor block into this submenu andthen use ? or L to highlight the option that matches yourdisplay adapter card. If you are not sure which one tochoose, follow these guidelines:
Cl If you have a VGA, EGA, or MCGA card, select thefourth option.
Cl If you have a color graphics adapter (CGA) or a multi-graphics adapter (MGA) attached to an RGB (color)monitor, select CGA 80 column. (Also be sure toset the color/mono switch on the MGA card to color.)
Running the Setup Program 2-7

Ll If you have a composite color monitor, such as a colortelevision with a video input, try selecting CGA 8 0column. If the resulting resolution is poor, run Setupagain and select CGA 40 column.
Cl If you have a monochrome display adapter (MDA), anMGA, or a Hercules MGA attached to a monochromemonitor, choose Monochrome 80 column.(Also be sure to set the color/mono switch on the MGAcard to mono.)
LI If you have any other combination of monitor anddisplay adapter card, select Special Adapter.In addition, consult the documentation supplied withyour display adapter card.
4. After you highlight the appropriate display adapter cardtype, press Enter. The screen displays your new displayadapter card setting.
5. Highlight *** SAVE SETTING*** and press Enterto return to the main Setup menu.
Setting the Power-on Password
Setting a power-on password lets you control who can use yoursystem. However, you do not need to set a power-on passwordto use the Equity 386SX.
If you set a power-on password, you must enter it the next timeyou turn on or reset your computer. If you cannot enter itcorrectly, the computer locks up and does not respond to yourkeyboard entries. Therefore, if you set a power-on password, besure to remember it or write it down and keep it in a safe place.
2-8 Running the Setup Program

If you want to use your computer as a network server, you mustturn on network server mode. (A network server is the mastercomputer in a network which provides storage space for theother computers connected to it. The network server can writefiles to and read files from the other computers in the network.)To turn on network server mode, you must set a power-onpassword.
If you do not want to set a power-on password or turn onnetwork server mode, skip this section.
Follow these steps to set a power-on password (when one doesnot exist) and turn network server mode on or off:
1. At the main Setup menu, highlight Pas sword. Thissubmenu appears:
Power-on passwordNetwork server mode OFF
2. Press Enter. The cursor block moves to Power-onpassword.
NoteIf a password already exists, this message appears:
Power-on password already installed
The Setup program does not allow you to enter a newpassword if one already exists. However, you can easilychange or delete the current password if you know it. See“Using a Power-on Password” in Chapter 3 forinstructions.
3. Press Enter. You see this prompt:
r-7Running the Setup Program 2-9
To enter a password, type any combination of characters(including letters, numbers, and blank spaces) up to a totalof seven characters. Use the backspace key to deletemistakes.
Do not use characters requiring the SHIFT key, such as $,@, or *, in your password. The Equity 386SX does notrecognize the SHIFT key when you use your password toaccess the system.
WARNINGBe sure to remember the password you enter or write itdown and keep it in a safe place. If you cannot rememberthe password you enter now, you will not be able toaccess the computer the next time you turn it on.
If you want to return to the password submenu withoutsaving any changes, press ESC.
4. After you enter a password, press Enter to return to thepassword submenu.
5. Highlight Network server mode. To turn networkserver mode on or off, press Enter.
The Setup program requires a power-on password to turnnetwork server mode on. If you did not enter a password,this message appears:
Set a power-on password first
To enter a password, highlight Power-on passwordand follow steps 3 and 4 above.
6. After you enter a power-on password and turn networkserver mode on or off, highlight * * * * SAVESETTINGS * * * * and press Enter to return to the mainSetup menu.
2-10 Running the Setup Program
NoteIf you forget your password, there is a way to disable thepassword function. See “Password Problems” in Appendix Afor instructions.
Setting the Fast Boot Function
The Fast boot function allows you to start up your system fasterby reducing the time it takes the computer to perform its power-on diagnostics. Power-on diagnostics are a series of diagnosticschecks which your computer runs automatically each time youturn on the power.
When Fast boot is disabled, the diagnostics program performsthree different tests on your system’s memory and also checksthe internal devices in your computer. When you enable Fastboot, the program performs abbreviated versions of these tests.
You should enable Fast boot when you are using your computerin its current configuration. If you install additional memory inyour computer, disable Fast boot before you make the change.The next time you turn on your computer, it runs completepower-on diagnostics, allowing you to test your newconfiguration thoroughly. Then you can run the Setup programto enable the Fast boot function again.
NoteIf you disable the Fast boot function and then change yoursystem’s configuration, the computer can take up to fiveminutes to perform its power-on diagnostics the first time youturn it on.
Running the Setup Program 2-11

Follow these steps to change the Fast boot setting:
1. At the main Setup menu, highlight Fast boot andpress Enter. The current status appears:
Fast boot enabled** SAVE SETTING **
If the displayed setting is correct, press ? to return to themain Setup menu.
2. To change the setting from enabled to disabled or viceversa, press Enter.
3. Highlight * * SAVE SETTING * * and press Enter toreturn to the main Setup menu.
Setting the Auto Speed Function
The Equity 386SX can operate at 16 MHz or simulate an8 MHz operating speed. The 16 MHz speed is high and thesimulated 8 MHz speed is low. You can use the CPU SPEEDswitch on the computer’s front panel to select either speed.(See “Selecting the Operating Speed” in Chapter 3.)
You’ll probably use high speed for almost all your operations.Some copy-protected application programs, however, requirethe computer to run at the low speed while accessing theprogram on a diskette. These programs also usually require youto leave a key disk-the diskette that contains the copyprotection-in the diskette drive. If you use a copy-protectedprogram often, you may want to enable the Auto speedfunction.
--
2-12 Running the Setup Program

When Auto speed is enabled, the computer automaticallyswitches to low speed whenever it needs to access a diskettedrive. It runs at high speed for all other operations.
There are different types of copy-protected programs.Depending on the type you have, you may or may not want toenable the Auto speed function. Follow these guidelines:
Cl If you are using a copy-protected program that can run onlyon a diskette or that requires a key disk, try to start theprogram on high speed. If this works, you do not need toenable the Auto speed function.
If you can’t load the program on high, enable Auto speed.
D If you are using a copy-protected program that does notrequire a key disk but requires a special procedure to installthe program on a hard disk, set the CPU SPEED switch onthe front panel to LOW while you are installing theprogram. Once it is installed, set the switch to HIGH, whereyou should be able to leave it while you load and run theprogram.
LI If this does not work, try loading the program at low speedand then switch to high to run it. Do not enable the Autospeed function.
Follow these steps to change the Auto speed setting:
1. At the main Setup menu, highlight Auto speed andpress Enter. The current status appears:
Auto speed disabled** SAVE SETTING **
If the displayed setting is correct, press 1‘ to return to themain Setup menu.
Running the Setup Program 2-13

2. To change the setting from disabled to enabledor vice versa, press Enter.
3. Highlight * * SAVE SETTING ** and press Enter toreturn to the main Setup menu.
Setting the Real-time ClockThe real-time clock in your Equity 386SX constantly tracks thetime and date-even when the computer is turned off. The firsttime you run the Setup program, you use the Real-timeclock option to set the time and date for your computer. Youmay need to use this option again later to adjust the time fordaylight savings time. The computer automatically changes thedate for leap years.
Another way to change the real-time clock*s time and date iswith the MS-DOS TIME and DATE commands. See yourMS-DOS Reference Manual for instructions.
Follow these steps to set the real-time clock:
1. At the main Setup menu, highlight Real-timeclock. If the time and date have been previously set, thecurrent settings appear:
If the time and date are correct, you can skip ‘the rest of thissection.
2-14 Running the Setup Program
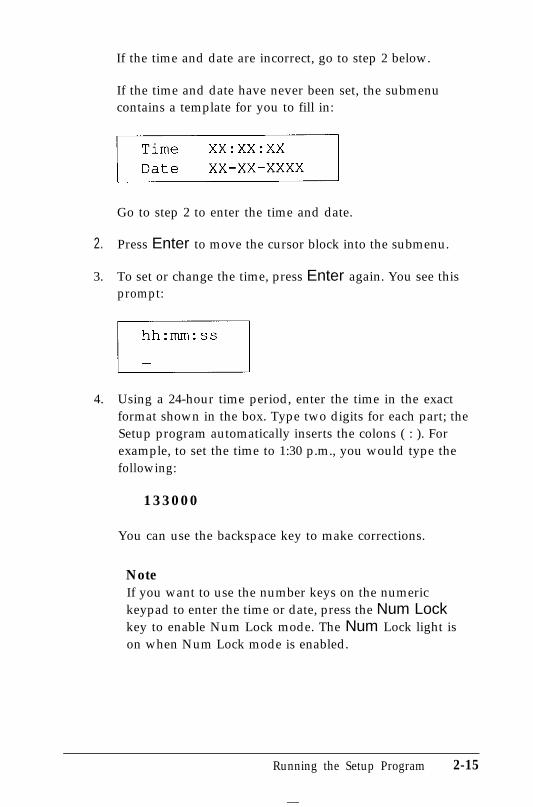
If the time and date are incorrect, go to step 2 below.
If the time and date have never been set, the submenucontains a template for you to fill in:
Go to step 2 to enter the time and date.
2. Press Enter to move the cursor block into the submenu.
3. To set or change the time, press Enter again. You see thisprompt:
4. Using a 24-hour time period, enter the time in the exactformat shown in the box. Type two digits for each part; theSetup program automatically inserts the colons ( : ). Forexample, to set the time to 1:30 p.m., you would type thefollowing:
1 3 3 0 0 0
You can use the backspace key to make corrections.
NoteIf you want to use the number keys on the numerickeypad to enter the time or date, press the Num Lockkey to enable Num Lock mode. The Num Lock light ison when Num Lock mode is enabled.
Running the Setup Program 2-15

If you enter an invalid time-for example, a number greaterthan 23 for the hours or greater than 59 for the minutes orseconds-the computer beeps and ignores your entry. Tryagain.
When the time is correct, press Enter.
5. To set or change the date, highlight Date and pressEnter. You see this prompt:
6. Enter the date in the exact format shown in the box. Usetwo digits for the month and day and four digits for the year;the Setup program automatically inserts the dashes. Forexample, to set the date for December 30, 1989, you wouldtype the following:
12301989
You can use the backspace key to make corrections.
If you enter an invalid date-for example, a number greaterthan 12 for the month or greater than the number of days in --that month-the computer beeps and ignores your entry.Try again.
When the date is correct, press Enter.
7. Check the new time and date to be sure they are correct.Then press 1‘ once or twice to return to the main Setupmenu.
2-16 Running the Setup Program

NoteThe Setup program automatically saves the time and datewhen you press Enter after typing-each one. If youchange the time or date and then exit the Setup programwithout saving your changes, the new time and date stilltake effect.
Setting the Hard Disk Drive Configuration
If your computer came with a 40MB or 100MB hard disk, yourcomputer’s hard disk configuration has already been set for youat the factory and you can skip this section.
If you installed or removed a hard disk, follow these steps to setthe computer’s hard disk configuration:
1. At the main Setup menu, highlight Hard diskdrive. Your current settings appear:
Drive 1: Type 17Drive 2: None
The Type number indicates the type of hard diskinstalled in your computer. See Appendix E for a list of harddisk drive types, and the documentation supplied with yourhard disk to find the correct type for the hard disk driveinstalled in your computer.
The None after Drive 2 indicates that there is not asecond hard disk.
If the displayed settings match your hard disk configuration,you can skip the rest of this section.
If a setting is incorrect, or if you want to see more detailsabout your hard disk configuration, go to step 2.
Running the Setup Program 2-17

2. To select Hard disk drive, press Enter. You see amenu such as the following:
Change settings** SAVE SETTINGS **
Drive 1: Type 17
Number of cylinders 977Number of heads 5Number of sectors 17Precomp. cylinder 300Landing zone 971Total capacity (MB) 40.5
Drive 2: None
Number of cylinders 0Number of heads 0Number of sectors 0Precomp. cylinder 0Landing zone 0Total capacity (MB) .0
The submenu lists the settings you can change for eachdrive: the number of cylinders (tracks), the number of read/write heads, the number of sectors, the precompensationcylinder, the landing zone (the cylinder on which you wantto park the heads when moving the computer), and thetotal storage capacity in megabytes.
3. If you want to change the settings for Drive 1 (which isdrive C on most computers), press Enter to highlightDrive 1:. If you want to change the settings forDrive 2, press Enter and then + to highlightDrive 2:.
4. Press Enter. You see this submenu:
5. If you want to change the drive type and the configurationof the hard disk you are installing matches one of the drivetypes listed in Appendix E, go to step 6.
2-18 Running the Setup Program
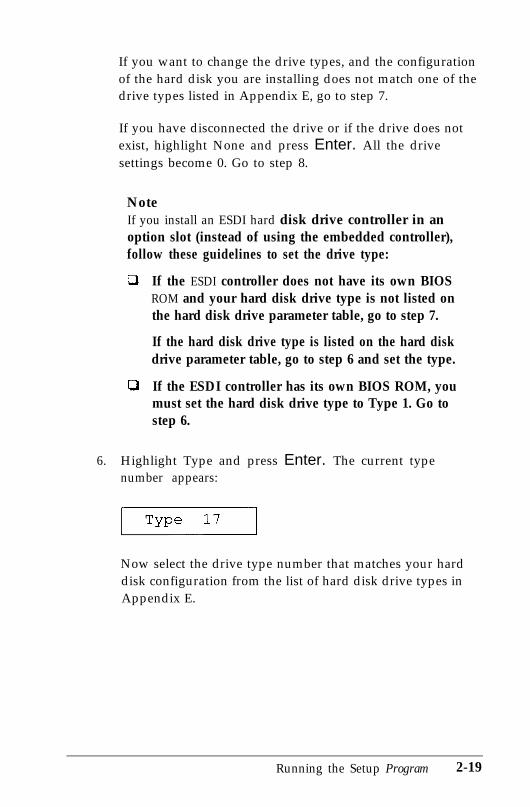
If you want to change the drive types, and the configurationof the hard disk you are installing does not match one of thedrive types listed in Appendix E, go to step 7.
If you have disconnected the drive or if the drive does notexist, highlight None and press Enter. All the drivesettings become 0. Go to step 8.
NoteIf you install an ESDI hard disk drive controller in anoption slot (instead of using the embedded controller),follow these guidelines to set the drive type:
D If the ESDI controller does not have its own BIOSROM and your hard disk drive type is not listed onthe hard disk drive parameter table, go to step 7.
If the hard disk drive type is listed on the hard diskdrive parameter table, go to step 6 and set the type.
Cl If the ESDI controller has its own BIOS ROM, youmust set the hard disk drive type to Type 1. Go tostep 6.
6. Highlight Type and press Enter. The current typenumber appears:
Now select the drive type number that matches your harddisk configuration from the list of hard disk drive types inAppendix E.
Running the Setup Program 2-19

You can enter the drive type in one of two ways:
Cl You can type the drive type number (listed inAppendix E) and press Enter. The screen displays thenew drive type number and hard disk settings. (Youcannot type 00 or a drive type number that has morethan three digits.)
Cl You can use the cursor keys to move through the drivetype numbers, as follows:
L
PgDn
PgUp
Home
End
increases the drive type number onenumber at a time
decreases the drive type number onenumber at a time
increases the drive type number inincrements of 10 (for example, from 47to 57)
decreases the drive type number inincrements of 10 (for example, from 47to 37)
enters drive type 1 (the first available drivetype)
enters drive type 63 (the last available drive
type)
This is a handy way to verify new hard disk settingsbefore you press Enter because the settings list isautomatically updated as you display each new typenumber.
After you enter the appropriate drive type number, pressEnter. The screen displays the new drive type number andhard disk settings. Go to step 8.
2-20 Running the Setup Program

7. If the configuration of the hard disk you are installing doesnot match one of the drive types listed in Appendix E,highlight User defined and press Enter. You see thefollowing:
Number of cylinders 977 I
The same parameter is highlighted on the submenu above.Enter the correct number of cylinders (tracks) for the diskand press Enter.
NoteNoteIf you use the number keys on the numeric keypad toIf you use the number keys on the numeric keypad toenter parameters, press the Num Lock key to enableenter parameters, press the Num Lock key to enableNum Lock mode. The Num Lock light is on when theNum Lock mode. The Num Lock light is on when theNum Lock mode is enabled.Num Lock mode is enabled.
The information for Number of cylinders isautomatically updated on the submenu above and you seethe next parameter, Number of heads. Enter thecorrect number of read/write heads for the hard disk andpress Enter.
Follow this same procedure for each remaining item in thesettings list (the number of sectors, the precompensationcylinder, and the landing zone).
If you enter a parameter incorrectly, press T or 1 tohighlight the parameter and then enter it again.
The Setup program does not allow you to enter the totalstorage capacity; it calculates the storage capacity for you,based on what you enter for the number of cylinders, heads,and sectors.
After you type the landing zone number and press Enter,the cursor block returns to the Drive submenu heading.
Running the Setup Program 2-21

8. If you want to change the hard disk settings for drive 2,press -+ and return to step 4.
9. When the hard disk drive settings are correct, press ? tomove the cursor block into the top submenu. Highlight** SAVE SETTINGS * * and press Enter to save yourhard disk drive configuration. The main Setup menuappears.
Setting the Diskette Drive Type(s)
Your Equity 386SX comes with one factory-installed diskettedrive. If you removed the installed drive or added a seconddiskette drive, you need to change the diskette drive settings tomatch your configuration. If you haven’t made any changes, youcan verify the drive type settings. Follow these steps:
1. At the main Setup menu, highlight Diskette drive.The current settings appear:
Each diskette drive is followed by its specific type (360KB,720KB, 1.2MB, or 1.44MB). If the diskette drive types onthe screen match your diskette drive configuration, you canskip the rest of this section.
2-22 Running the Setup Program

2.
3.
4.
5.
Press Enter. The cursor block moves into the diskette drivesubmenu and you see the following:
Not installed360 KB drive720 KB drive (3.5")1.2 MB drive1.44 MB drive (3.5")
If you want to change the drive A settings, be sureDrive A : is highlighted and press Enter. If you want tochange the drive B settings, highlight Drive B : andpress Enter. The cursor block moves into the submenu.
Use 1 or ? to highlight the correct type for your diskettedrive and press Enter. The screen displays the new diskettedrive type you selected.
If you want to enter the type for another diskette drive,return to step 3.
When the diskette drive settings are correct, highlight** SAVE SETTINGS * * and press Enter. The cursorblock returns to the main Setup menu and you see theupdated information for drives A and B.
Running the Setup Program 2-23

Setting the Serial and Parallel Interfaces
The serial and parallel interfaces in your computer are set up toact as the primary ports. If these are the only ports you are usingin your computer, you can skip this section.
If you install an option card with its own serial or parallel port,however, you may want to designate the built-in port assecondary and the additional port as primary. The Setupprogram lets you choose which port is primary and which issecondary so there is no conflict between the built-in port andthe additional port. Here are some examples:
D If you install an option card with a port pre-set as primaryby the manufacturer, you must designate it as the primaryport and make the computer’s built-in port the secondaryport.
0 If you install an option card or peripheral with a port notpre-set, you must designate it as the secondary port and thebuilt-in port as the primary port.
Cl If you install two option cards with ports, designate one asthe primary port and the other as the secondary port anddisable the built-in port.
Follow these steps to change your built-in serial and parallelinterface settings:
1. At the main Setup menu, highlight Serial/Parallel. The current settings for each port appear: .
Serial PrimaryParallel Primary
2-24 Running the Setup Program

2. Press Enter to move the cursor block into the submenu.You see:
3. If you want to change the serial port setting, be sureS e r i a l is highlighted and press Enter. If you want tochange the parallel port setting, highlight Paralleland press Enter. The cursor block moves into the submenu.
4. Use L or t to highl’ h hig t t e appropriate setting for the portyou selected and press Enter. The screen displays the newsetting.
NoteIf you add an option card with a parallel or serial port andhighlight a setting that causes a conflict between yourbuilt-in ports and the port on the option card, you seethis message:
Conflict with option card
Highlight a setting that is appropriate for your systemconfiguration and press Enter.
If you want to change the setting for the other port, returnto step 3.
5. When the serial and parallel port settings are correct,highlight *** SAVE SETTINGS *** and pressEnter. The cursor block returns to the main Setup menuand you see your updated serial and parallel interfacesettings.
Running the Setup Program 2-25

Reviewing Your SettingsWhen you finish using the Setup program to define yourcomputer’s configuration, press ‘? to highlight Exit at themain Setup menu and press Enter. The following Setupsummary appears on the screen:
M e m o r y Extended memory 384 KB
Base memory 6 4 0 K B
Password Power-on password not installedNetwork server mode OFF
Display type Monochrome 80 column
Fast boot enabled
If you see an error message on the first Setup summary screen,see “Adding an Optional Memory Card” later in this chapter.
There are two more Setup summary screens you need to check.To display the next screen, press PgDn. You see the following:
Real-time clock Time 13:40:38Date 12-30-1989
Auto speed disabled
Coprocessor not installed
Diskette drive Drive A: 1.44 MBDrive B: None
Serial
Parallel
Primary
Primary
2-26 Running the Setup Program

If you have never set the real-time clock, the real-time clockentry at the top of the screen flashes to remind you to set thetime and date.
To view the last Setup summary screen, press PgDn. You seeyour hard disk configuration(s):
Hard disk drive
Drive 1: Type 17 Drive 2: None
Number of cylinders 977Number of heads 5Number of sectors 17Precomp. cylinder 300Landing zone 977Total capacity (MB) 40.5
Number of cylinders 0Number of heads 0Number of sectors 0Precomp. cylinder 0Landing zone 0Total capacity (MB) .0
Change settingsExit without saving** EXIT AND SAVE **
Check each Setup summary screen to see if all the informationis correct. You can press PgUp to display the previous screen orPgDn to display the next screen.
If anything is incorrect, be sure Change settings ishighlighted and press Enter. The main Setup menu appears andyou can change the appropriate settings.
Running the Setup Program 2-27

Leaving the Setup MenuIf you want to save the settings you entered, highlight** EXIT AND SAVE * * and press Enter at a Setupsummary screen. The Setup program stores the new settings andresets the computer using the new configuration. If you have seta password, you need to enter it at the key prompt. (See “Usinga Power-on Password” in Chapter 3 for instructions.) TheOperation Menu appears. Press 0 and Enter to exit theOperation Menu.
If the computer displays an error message while it is starting up,run the Setup program again and check the setting the errormessage indicates. If the computer still displays an error messageafter you check your Setup program settings, see Appendix B orask your dealer for assistance.
NoteIf you did not change any settings or you want to cancel thechanges you made, highlight Exit without savingat a Setup summary screen and press Enter, The OperationMenu appears. Press 0 and Enter to exit from the OperaMenu. (If you changed the time or date, the new settingtakes effect even if you exit the Setup program withoutsaving your changes.)
After you save the settings you entered, remove the Referencediskette from your diskette drive and turn off your system. Thenfollow the instructions in your MS-DOS Installation Guide toinstall MS-DOS.
NoteBe sure to make a backup copy of your Reference disketteafter you run the Setup program and install MS-DOS. SeeChapter 3 for instructions on how to copy diskettes,
2-28 Running the Setup Program
Adding an Optional Memory Card
The first Setup summary screen shows the current amount ofmemory installed in your system. The Equity 386SX comes with1MB of on-board memory. (On-board memory is memory thatresides on the computer’s main system board.) Setupautomatically configures this memory as 640KB of base memoryand 384KB of extended memory. If you install even morememory, Setup configures it as extended memory also.
You can add more memory to your computer by installing singleinline memory modules (SIMMs) or by installing an optionalmemory card. Because SIMMs do not require you to use anoption slot, they provide a more efficient way to add memorythan optional memory cards: You can also add both SIMMs anda memory card.
All memory in your system has a particular address. A memoryaddress is the exact area where the memory resides in thesystem. If you add memory by installing a memory card, theaddress of the memory on the card could overlap the address ofmemory you added by installing SIMMs, or there could be a gapbetween the two addresses.
Setup displays this error message on the first summary screen if amemory address overlap occurs:
ERROR: Memory overlapping from 100000h to260000hReset Add-on memory board starting at200000h or 260000h
If there is a gap between the memory addresses, you see thismessage:
ERROR: Memory gapping from 160000h to200000hReset Add-on memory board starting at100000h or 160000h
Running the Setup Program 2-29

The addresses of the gap or overlap are shown in hexadecimalnumbers. (Hexadecimal is a base-16 numbering system used inprogramming.) The message tells you the starting and endingaddresses of the gap or overlap and recommends two startingaddresses for the memory you added on the memory card.
The first recommended starting address is the starting address ofthe 384KB of on-board extended memory. The secondrecommended starting address is the ending address of that384KB of memory. If you reset your memory card to the firstrecommended starting address, your system cannot use the384KB of on-board extended memory in your configurationsince its address is used by memory on the memory card. Bychoosing the second recommended starting address, you caninclude the 384KB of memory in your configuration because thememory you add on the memory card begins where the 384KBof memory ends.
Some memory cards limit the possible starting addresses you canset. See the manual that came with your memory card todetermine which starting address to use.
2-30 Running the Setup Program


2-32 Running the Setup Program

Chapter 3Using the Equity 386SX
This chapter describes the following procedures for using yourEquity 386SX computer:
0 Installing MS-DOS
CI Using a power-on password
Cl Selecting the operating speed
Cl Using special keys on the keyboard
CI Stopping a command or program
L! Resetting the computer
Cl Using disks and disk drives
0 Turning off the computer.
Installing MS-DOS
After you connect the components of your system and runthe Setup program, you must install MS-DOS. Follow theinstructions in your MS-DOS Installation Guide.
The MS-DOS installation process automatically copies theMS-DOS files onto your hard disk or generates working copiesof the original MS-DOS diskettes. It is best to make another setof backup copies of your original MS-DOS diskettes. You mayalso want to copy the working diskettes MS-DOS generates ifyou do not have a hard disk.
Using the Equity 386SX 3-1

In addition, be sure to make a backup copy of your Referencediskette; MS-DOS does not create one for you. See “MakingBackup Copies” in this chapter and “Backing Up Data” inChapter 4 for instructions on how to copy diskettes.
Using a Power-on Password
If you set a power-on password when you ran the Setupprogram, you must enter it every time you turn on or reset thecomputer. (See “Resetting the Computer” later in this chapterfor instructions on how to reset the computer.) Follow thesesteps:
1. If you do not have a hard disk, insert your Startup diskettein drive A.
2. Turn on your system. The screen displays a key prompt:
3. At the key prompt, enter the power-on password you setwhen you ran the Setup program. The key turns when youtype a character. The screen does not display the charactersyou type. Then press Enter.
After you type the complete password correctly and press Enter,a happy face character appears. Then the computer loadsMS-DOS. The screen displays the MS-DOS command promptor the MS-DOS Shell Start Programs menu, depending onwhether you installed the Shell program when you installedMS-DOS.
3-2 Using the Equity 386SX
You have three chances to enter the correct password. If you donot enter the correct password at the first or second key prompt,another key prompt appears. If you do not enter the correctpassword at the third key prompt, the screen displays a 0. Thekeyboard locks up and you cannot use the computer. You mayreset the computer and try to enter the correct password again.
NoteIf you do not know the correct password, see “PasswordProblems” in Appendix A.
Changing a Power-on Password
To change your power-on password, follow these steps:
1. If you do not have a hard disk, insert your Startup diskettein drive A.
2. Turn on or reset the computer. At the key prompt, enteryour current power-on password followed by a forward slash.After the slash, enter the new password you want to use. Forexample, if your current password is 123 and you want tochange it to ABC, type:
123/ABC
Do not use characters requiring the SHIFT key, such as $,@, or *, in your new password. The Equity 386SX does notrecognize the SHIFT key when you use your password toaccess the system.
The screen does not display what you type.
Using the Equity 386SX 3-3

WARNINGBe sure to remember the new power-on password youenter or write it down and keep it in a safe place. If youcannot remember the password you enter now, you willnot be able to access your computer the next time youturn it on.
3. Press Enter. A happy face character appears and then thecomputer loads MS-DOS.
To access the computer the next time you turn it on or reset it,you must enter the new power-on password.
Deleting a Power-on Password
To delete your power-on password, follow these steps:
1. If you do not have a hard disk, insert your Startup diskettein drive A.
2. Turn on or reset the computer. At the key prompt, enteryour current power-on password followed by a forward slash.For example, if your password is 123, type:
1 2 3 /
3. Press Enter. A happy face character appears and thenthe computer loads MS-DOS.
The next time you turn on or reset the computer, it does notrequest a password and loads MS-DOS immediately.
3-4 Using the Equity 386SX

Selecting the Operating Speed
The Equity 386SX can operate at two speeds: high and low.High speed is 16 MHz and low speed simulates 8 MHz. On high,the computer can access memory faster than on low.
You will probably use high speed for almost everything you do.However, certain application programs have specific timingrequirements for diskette access and can run only at the slowerspeed. See the manual for your application program todetermine if this is the case.
N o t e
If you enabled the Auto speed function when you ran theSetup program, the computer automatically slows down tolow speed whenever it accesses a diskette drive. SeeChapter 2 for information on the Auto speed function.
Use the CPU SPEED switch on the front panel to change theCPU speed; move it left for low and right for high. When thecomputer runs at low speed, the power light is orange; at highspeed, it is green.
CPU SPEED switch
WARNINGYou do not need to turn off the computer to change theoperating speed, but do not change it while you are running aprogram. Complete your current operation, exit the programto MS-DOS, and then change the speed.
Using the Equity 386SX 3-5
Special Keys on the Equity 386SX KeyboardCertain keys on your keyboard serve special functions whenyour computer is running MS-DOS or application programs.The following illustration shows the Equity 386SX keyboard,and the table that follows describes the special keys.
Key functions
Key Purpose
Tab ItTab +I
Caps Lock
Moves the cursor one tab to the right in normalmode and one tab to the left in shift mode.
Changes the letter keys from lower- touppercase; changes back to lowercase whenpressed again. The numeric/symbol keys onthe top row of the keyboard and the symbolkeys in the main part of the keyboard are notaffected.
Shift Produces uppercase characters or the topsymbols on the keys when used with the maincharacter keys. Produces lowercasecharacters when the Caps Lock function is on.
Ctrl Works with other keys to perform special(control) functions, such as editing operationsin MS-DOS and various application programs.
Alt Works with other keys to enter alternatecharacter codes or functions.
3-6 Using the Equity 386SX

Key
t Backspace
Purpose
Moves the cursor back one space, deleting thecharacter to the left of the cursor.
J Enter Ends a line of keyboard input or executes acommand.
Insert (Ins) Turns the Insert function on and off.
Delete (Del) Deletes the character marked by the cursor.
Home, End Control cursor location.Page UP (PgUp)Page Down (PgDn)Tel+
Num Lock
Esc
F1-F12
Print Screen(PrtSc)
SYS Rq (Req)
Scroll Lock
Pause
Break
Changes the function of the numeric/cursorkeys from entering numbers to positioning thecursor; changes back when pressed again.
Cancels the current command line oroperation.
Perform special functions within applicationprograms.
Prints the screen display on a line printer.
Generates the System Request function insome application programs (when used withAlt).
Controls scrolling in some applications.
Suspends the current operation.
Terminates the current operation (when usedwith Ctrl).
The Caps Lock, Num Lock, and Scroll Lock keys work astoggles; press the key once to turn on a function and again toturn it off. When the function is enabled, the correspondinglight in the upper right comer of the keyboard is on. When thefunction is disabled, the light is off.
Using the Equity 386SX 3-7
Stopping a Command or Program
You may sometimes need to stop a command or program whileit is running. Many application programs provide a commandyou can use to cancel or even undo an operation. If you haveentered an MS-DOS command that you want to stop, try one ofthe following commands:
0 Hold down the Ctrl key and press C
Q Hold down the Ctrl key and press Break.
These methods may also work in your application program. Ifyou cannot stop a particular operation, however, you may needto reset the computer, as described in the following section.
CautionIt is best not to turn off the computer to stop a program orcommand. If you created new data and you have not yetstored it, the data will be erased if you turn off the computer.The computer stores your data in its memory until you saveit; but the memory area is erased each time you turn off orreset the computer.
Resetting the Computer
Occasionally, you may want to clear the computer’s currentsettings or its memory without turning it off. This is calledresetting the computer.
If an error occurs and the computer does not respond to yourkeyboard entries, you can reset the computer to reload MS-DOSand try again. However, resetting erases any data in thecomputer’s memory that you have not stored; so reset yourcomputer only if necessary.
3-8 Using the Equity 386SX

WARNINGDo not reset the computer to exit a program unless you haveto. Some application programs classify and store new datawhen you exit the program. If you reset the computer withoutproperly exiting the program, you may lose data.
To reset the computer, MS-DOS must be either on the harddisk or on a diskette in drive A; so if your computer does nothave a hard disk, insert the Startup diskette in drive A.
There are three ways to reset. Because each is more powerfulthan the last, try them in the order listed here:
1. If you are using MS-DOS, hold down Ctrl and Alt and pressthe Del key. The screen goes blank for a moment and thenthe computer should reload MS-DOS. If it doesn’t, try thesecond method.
2. Press the RESET button on the front panel. This methodworks even when the computer does not respond to yourkeyboard entries. If this does not correct the problem, trythe third method.
3. Remove any diskette(s) from the diskette drive(s). Turn offthe computer and wait five seconds. If your computer doesnot have a hard disk, insert the Startup diskette in drive A.Then turn on the computer.
Using Disks and Disk Drives
The disk drives in your computer allow you to store data ondisk, and then retrieve and use your stored data when you wantto. The Equity 386SX comes with a single diskette drive or onediskette drive and one hard disk drive. You may add anotherdiskette or hard disk drive, up to a maximum of three drivestotal.
Using the Equity 386SX 3-9

This section explains how disks work and tells you how to dothe following:
Cl Use different types of diskettes and diskette drives
0 Care for your diskettes and diskette drives
Cl Insert and remove diskettes
0 Write-protect diskettes
Make backup copies of your diskettes
Li Use a single diskette drive
Ll Use two diskette drives
Cl Use a hard disk drive.
How Disks Store Data
The diskette you insert in your computer’s diskette drive ismade of flexible plastic coated with magnetic material. It isenclosed in a square jacket that is either hard (3 ‘/z-inchdiskettes) or slightly flexible (5 ‘/+-inch diskettes).
Unlike a diskette, a hard disk is rigid and fixed in place. It issealed in a protective case to keep it free of dust and dirt. Ahard disk stores data the same way that a diskette does, but itworks much faster and has a much larger storage capacity.
All disks are divided into data storage compartments by sides,tracks, and sectors. Double-sided diskettes store data on bothsides. On each side, there are concentric rings, called tracks(or cylinders), on which a disk can store data. Double-densitydiskettes have either 40 or 80 tracks on each side, and high-density diskettes have 80 tracks on each side.
3-10 Using the Equity 386SX

Because a hard disk consists of two or more platters stacked ontop of one another, it has four or more sides with many moretracks per side than a diskette. (The number of tracks dependson the capacity of the hard disk. You do not need to know howmany sides and tracks your hard disk has.)
A disk is further divided by sectors. To understand what a sectoris, picture the spokes on a bicycle wheel radiating from thecenter of the wheel to the tire. The space between one spokeand the next is like a sector on a diskette; the lines dividing thesectors cut across the tracks. (See the figure below.) A diskettecan have 8, 9, 15, or 18 sectors per track. The number of sectorson a hard disk depends on the type of hard disk.
sector
Using the Equity 386SX 3-11

Your computer uses the read/write heads in a disk drive to storeand retrieve data on a disk. To write to a disk, the computerspins it in the drive to position the area on the disk where thedata is to be written under the read/write head. A diskette hasan exposed area where the read/write head can access it.
Because data is stored magnetically, you can retrieve it, recordover it, and erase it-just as you play, record, and erase musicon a cassette tape.
Types of Diskette Drives
The Equity 386SX comes with one 1.44MB diskette. With thisdrive, use 3½-inch, double-sided, high-density, 135 TPI,1.44MB diskettes. These diskettes contain 80 tracks per side, 18sectors per track, and hold up to 1.44MB of information, whichis approximately 600 pages of text. MB stands for megabyte;each megabyte equals 1,048,576 bytes or 1024KB.
You may also have a second diskette drive, and it may be thesame type or it may be different. The following list describes theother types of diskette drives you can use in the Equity 386SXand which diskettes to use with them:
Cl 720KB drive-With this drive, use 3½-inch, double-sided,double-density, 135 TPI, 720KB diskettes. These diskettescontain 80 tracks per side, 9 sectors per track, and hold upto 720KB of information, which is approximately 300 pagesof text. KB stands for kilobyte; each kilobyte equals 1024bytes. Each byte represents a single character, such as A, $,or 3.
Cl 1.2MB drive-With this drive, use 5¼-inch, double-sided,high-density, 96 TPI, 1.2MB diskettes. These diskettescontain 80 tracks per side, 15 sectors per track, and hold upto 1.2MB of information, which is approximately 500 pagesof text.
3-12 Using the Equity 386SX

D 360KB drive-With this drive, use 5 l/4-inch, double-sided,double-density, 48 TPI (tracks per inch), 360KB diskettes.(You can also use single-sided, 160KB or 180KB diskettes.)These diskettes contain 40 tracks per side, 8 or 9 sectors pertrack, and hold up to 360KB of information, which isapproximately 150 pages of text. (With 8 sectors per track, adiskette holds up to 320KB.)
NoteNoteBefore you can use them with MS-DOS, you must formatBefore you can use them with MS-DOS, you must formatnew diskettes using the MS-DOS FORMAT command.Formatting erases all the data on a diskette and prepares it toreceive new data, so be sure to format only new blankreceive new data, so be sure to format only new blankdiskettes or diskettes that contain data you want to erase. Seediskettes or diskettes that contain data you want to erase. SeeChapter 4 for instructions on formatting diskettes.Chapter 4 for instructions on formatting diskettes.
Drive and diskette incompatibilities
If your computer has more than one type of diskette drive, or ifyou use diskettes from other computers with other types ofdiskette drives, you need to be aware of certain incompatibilitiesbetween the diskette drives and the diskettes they use.
Because of the size difference, you cannot use 5 l/4-inch diskettesin a 3 l/z-inch drive or vice versa. There are also certainlimitations on using diskettes that are the same size as the drivebut have different capacities. The following tables summarizethe possibilities and limitations.
3 ‘/I-inch drive/diskette compatibility
Drive type Diskette types it can read from and write to
720KB 720KB
1.44MB 720KB, 1.44MB
Using the Equity 386SX 3-13
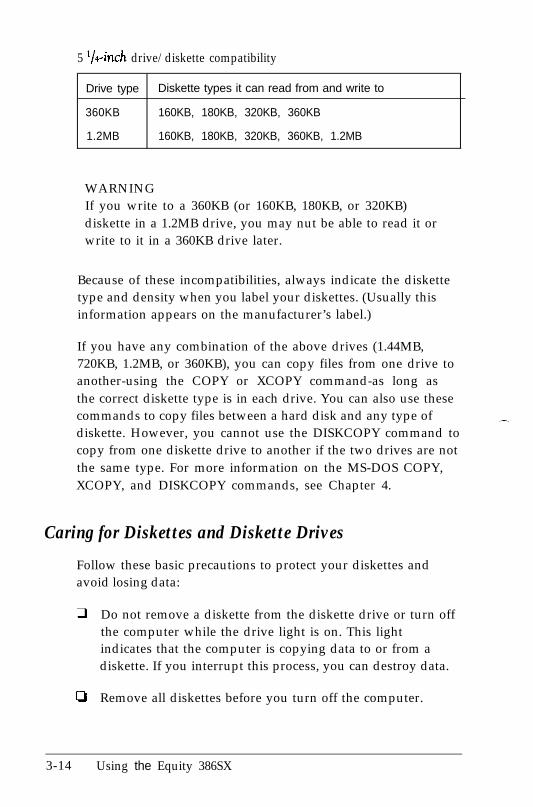
5 ‘Ivinch drive/diskette compatibility
Drive type Diskette types it can read from and write to
360KB 160KB, 180KB, 320KB, 360KB
1.2MB 160KB, 180KB, 320KB, 360KB, 1.2MB
WARNINGIf you write to a 360KB (or 160KB, 180KB, or 320KB)diskette in a 1.2MB drive, you may nut be able to read it orwrite to it in a 360KB drive later.
Because of these incompatibilities, always indicate the diskettetype and density when you label your diskettes. (Usually thisinformation appears on the manufacturer’s label.)
If you have any combination of the above drives (1.44MB,720KB, 1.2MB, or 360KB), you can copy files from one drive toanother-using the COPY or XCOPY command-as long asthe correct diskette type is in each drive. You can also use thesecommands to copy files between a hard disk and any type ofdiskette. However, you cannot use the DISKCOPY command tocopy from one diskette drive to another if the two drives are notthe same type. For more information on the MS-DOS COPY,XCOPY, and DISKCOPY commands, see Chapter 4.
Caring for Diskettes and Diskette Drives
Follow these basic precautions to protect your diskettes andavoid losing data:
Ll Do not remove a diskette from the diskette drive or turn offthe computer while the drive light is on. This lightindicates that the computer is copying data to or from adiskette. If you interrupt this process, you can destroy data.
0 Remove all diskettes before you turn off the computer.
3-14 Using the Equity 386SX
Keep diskettes away from dust and dirt. Small particles ofdust or dirt can scratch the magnetic surface, destroy data,and ruin the read/write heads in a diskette drive.
Never wipe, brush, or try to clean diskettes in any way.
Keep diskettes in a moderate environment. They work bestat normal room temperature and in normal humidity. Don’tleave diskettes sitting in the sun, or in extreme cold or heat.
Keep diskettes away from magnetic fields. (Remember thatdiskettes store information magnetically.) There are manymagnetic sources in your home or office, such as electricalappliances, telephones, and loudspeakers.
Do not place diskettes on top of your monitor or near anexternal hard disk drive.
Do not slide the metal shutter on a 3 ‘/2-inch diskette; thisexposes the diskette’s magnetic surface. If you have a 5 l/4+inch diskette drive, the surface of the diskette is exposed bythe read/write slot. Always hold this diskette by itsprotective jacket and never touch the magnetic surface.The oils on your fingertips can damage it.
Do not place anything on top of your diskettes, and be surethey do not get bent. A diskette does not rotate properly inthe drive if it has been damaged.
Carefully label your diskettes and be sure to indicate thediskette type and density. Attach labels firmly but gently,and only along the top of a diskette (next to themanufacturer’s label). Do not stick several labels on top ofone another; too many labels can make it difficult to insertand remove the diskette in the drive.
Using the Equity 386SX 3-15

For a 5 l/4-inch diskette, it is best to write on a label beforeyou attach it to a diskette. If you need to write on a labelthat is already on a 5 ‘/q-inch diskette, use only a soft-tippen-not a ballpoint pen or a pencil.
Store diskettes in a proper location, such as a diskettecontainer. Do not store diskettes flat or stack them on topof each other. If you use any 5 l/4-inch diskettes, store themin their protective envelopes.
Inserting and Removing Diskettes
Insert the diskette with the label facing up and the metalshutter leading into the drive, as shown below. Slide thediskette into the drive until it clicks into place.
To remove the diskette, press the release button. The diskettepops out of the drive. Pull out the diskette and store it properly.
3-16 Using the Equity 386SX

If you have a 5 ‘/+inch diskette drive, hold the diskette with thelabel facing up and the read/write slot leading into the drive.
Slide the diskette into the slot until it is in all the way. Thenturn the latch down to lock it in a vertical position. This keepsthe diskette in place and enables the read/write heads in thediskette drive to access the diskette.
To remove the diskette, turn the latch up until it is horizontaland the edge of the diskette pops out. Carefully pull out thediskette, place it in its protective envelope, and store it in aproper location, such as a diskette container.
WARNINGNever remove a diskette or turn off the computer while thediskette drive light is on. You could lose data. Also, be sure toremove all diskettes before you turn off the computer.
Using the Equity 386SX 3-17

Write-protecting Diskettes
You can write-protect a diskette to prevent its data from beingaltered. When a diskette is write-protected, you can read it andcopy data from it, but you cannot store new data on the disketteor delete any files it contains. If you try to change data stored ona write-protected diskette, MS-DOS displays an error message.
On a 3 ‘/I-inch diskette, the write-protect device is a smallswitch on the back of the diskette in the lower right corner,shown below. To write-protect a 3 ‘/z-inch diskette, slide theswitch toward the edge of the diskette until it clicks intoposition, exposing a hole in the comer.
/write-protectswitch
To remove the write protection, slide the switch toward thecenter of the diskette until it clicks into position so the hole iscovered.
3-18 Using the Equity 386SX

NoteSome program diskettes, such as your MS-DOS diskettes andyour Reference diskette, have no switch so they arepermanently write-protected. This protects them from beingaccidentally erased or altered. It is a good idea to write-protect the backup copies you make of your MS-DOS andReference diskettes.
To write-protect a 5 %-inch diskette, cover the small,rectangular notch (shown below) with an adhesive write-protect tab. Write-protect tabs usually come with new 5 ‘/.+-inchdiskettes when you buy them.
To remove the write protection, peel off the write-protect tab.
Using the Equity 386SX 3-19

Making Backup Copies
It is important to make copies of all your data and systemdiske t tes . Make backup (or work ing) copies contain programs, such as the original MS-DOS and Referencediskettes that come with the Equity 386SX, and use only thecopies. Store the original diskettes in a safe place away fromyour working diskettes.
Copy your data diskettes regularly, whenever you revise them,to keep them up-to-date, and store them away from youroriginals.
To make backup copies of your diskettes, use the DISKCOPYcommand, the MS-DOS Shell, or the MENU program. SeeChapter 4, your Shell User’s Guide, or your MS-DOS ReferenceManual for instructions.
It is best to store the programs and data files you use regularlyon the hard disk. Keep backup copies of all your program fileson diskettes, and regularly copy important data files to diskettesas well. See “Backing up the hard disk” in this chapter for moreinformation.
NoteMost files on your Reference diskette (including the Setupand diagnostics programs) run properly only if you executethem from the Reference diskette. If you have a hard disk,copy only the following Reference diskette files onto it:CORFIX.EXE, HDSIT.COM, HDSIT.VER, andROMBIOS.COM.
3-20 Using the Equity 386SX

Using a Single Diskette Drive
MS-DOS expects the computer to have at least two diskettedrives, and it displays prompts and messages accordingly. If yoursystem has a single diskette drive, MS-DOS treats your onedrive like two logical drives. This helps you perform operationsthat normally require two diskette drives.
Usually, MS-DOS recognizes the first diskette drive (the topdrive on the Equity 386SX) as drive A and a second diskettedrive as B. If you have only one diskette drive, MS-DOS cantreat it as both A and B.
For example, if you enter a command to copy from A to B,MS-DOS copies from the first diskette you place in the drive(A) to the computer’s memory. Then MS-DOS prompts you toinsert another diskette (for drive B) and copies from memory tothe new diskette. When copying is complete, you see a promptto insert the original diskette (for drive A).
Because you may often swap diskettes this way, it is importantto remember which diskette is which. It is also a good idea towrite-protect your original diskette.
If you have a hard disk and one diskette drive, you can load theoperating system and application programs from the hard disk,create and store your data there, and use the diskette drive justfor copying data to or from diskettes.
If you have only one diskette drive and no hard disk, you needto use that drive to load the operating system as well as theapplication programs you are using. First load the operatingsystem; this copies it to the computer’s memory (RAM) so youdo not need to leave the system diskette in the drive. Then youcan remove that diskette and insert the program diskette youwant to use, and load that into memory too. See yourapplication program manual for detailed instructions.
Using the Equity 386SX 3-21

Using Two Diskette Drives
If you have two diskette drives, you can use the top drive (A)for loading the operating system and application programs andthe second drive (B) for creating data. If you have a hard disk,you will probably need the diskette drives just to copy files toand from the hard disk and to copy diskettes.
NoteYou can load MS-DOS from an application program disketteif that diskette contains the MS-DOS system files.
--
Using a Hard Disk Drive
Working with a hard disk is similar to working with a diskette.However, the hard disk provides several advantages:
CI A 40MB hard disk can store as much data as approximately30 1.44MB diskettes, and a 100MB hard disk can store asmuch data as approximately 70 1.44MB diskettes.
Q Your computer can perform all disk-related operationsfaster.
CI You can store frequently used programs and data files on thehard disk, eliminating the inconvenience of swappingdiskettes to access different files.
The added storage capacity makes it easy to move back andforth between different programs and data files. However,because it is so easy to add programs and files to your hard disk,you may find yourself trying to organize hundreds of files.
MS-DOS lets you keep related files together in directories andsubdirectories so they are easy to find and use. See Chapter 4 forinstructions on how to use directories.
3-22 Using the Equity 386SX

NoteThe MS-DOS Shell program is a menu-driven programwhich makes it easy for you to move, create, delete, andrename files and directories, as well as view files and executecommands. See your MS-DOS Shell User’s Guide forinstructions.
If your Equity 386SX has a hard disk drive, follow theseprecautions to protect it from damage and to avoid losing data:
0
ci
ci
Never turn off the computer when the hard disk drive lightis on. This light indicates that the computer is copying datato or from the hard disk. If you interrupt this process, youcan lose data.
Never attempt to open the hard disk drive. The disk itself isenclosed in a sealed container to protect it from dust.
Before you move your computer (even to another part ofthe room), you need to prepare the hard disk for moving.See “Preparing the hard disk for moving,” below, forinstructions.
A hard disk must be partitioned and formatted before you canuse it. Be sure you have performed the procedures in yourMS-DOS Installation Guide to prepare your hard disk for use.
You can enhance the performance of your hard disk by usingthe SMARTDRV.SYS device driver and the FASTOPENcommand. See your MS-DOS Reference Manual forinstructions.
Using the Equity 386SX 3-23

Backing up the hard disk
While the hard disk is very reliable, it is essential to back upyour hard disk files to diskettes in case you lose some dataaccidentally. Make copies of all your system and applicationdiskettes before copying the programs to the hard disk. Afteryou create data files on the hard disk, be sure to copy them todiskettes whenever you revise them to keep your backupdiskettes up-to-date.
To make copies of your program diskettes before copying themto the hard disk, use the DISKCOPY command, the MS-DOSShell, or the MENU program. To copy your hard disk files ontodiskettes, use the BACKUP, COPY, or XCOPY command; theMS-DOS Shell; or the MENU program. See Chapter 4, yourShell User’s Guide, or your MS-DOS Reference Manual forinstructions.
Preparing the hard disk for moving
If you need to move your computer to a new location-whetherit is across the country or just across the room-you should runthe HDSIT program to protect the hard disk during the move.
The HDSIT program moves the disk drive’s read/write heads toa region on the disk surface that does not contain data, andlocks them securely in position. This protects the hard disk frombeing damaged if the computer is bumped accidentally.
Follow these steps to run HDSIT:
1. Exit any program you are using and display the MS-DOScommand prompt on the screen.
2. Insert the Reference diskette in drive A.
3. Type the following and press Enter:
A:HDSIT
3-24 Using the Equity 386SX
You see a message on the screen that tells you the disk drive’sread/write heads will remain locked until you reset thecomputer or turn the power off and on again. The computerlocks the heads and disables the keyboard. You can now turn offthe computer and prepare to move it to the new location.
Turning Off the Computer
Before you turn off your computer, save your data, exit theprogram you are using, and remove any diskettes from thediskette drives. Turn off the computer first, then turn off themonitor and any peripherals.
Using the Equity 386SX 3-25

-.
7.
R
-_
-
ri
h
14
3-26 Using the Equity 386SX

Chapter 4Using MS-DOS with Your Equity 386SX
Your Equity 386SX comes with version 4.01 of MS-DOS. Thisoperating system manages your computer by organizing thecomputer’s memory, controlling the monitor display, receivingkeyboard input, and accessing data.
How much you need to know about MS-DOS depends on howyou will be using your computer. If you plan to use it just to runapplication programs, the few MS-DOS commands you’ll needare introduced in this chapter. If you plan to use advancedfeatures, refer to your MS-DOS Reference Manual for completedescriptions of MS-DOS commands and features.
This chapter covers the following topics:
Starting and exiting MS-DOS
Using drive designators
Types of MS-DOS commands
Entering an MS-DOS command
Setting the date and time
Creating and managing files
Using directories
Formatting diskettes
Backing up data
The MS-DOS Shell program
Using the Epson HELP program
Using MS-DOS with Your Equity 386SX 4-1

Ll Using the Epson MENU program
Ll Using an AUTOEXEC.BAT file
Ll Using memory beyond 640KB.
Starting MS-DOS
Before you can run an MS-DOS application program, MS-DOSmust be loaded in the computer’s memory. If you have a harddisk and you installed MS-DOS according to the instructions inyour MS-DOS Installation Guide, the computer loads MS-DOSautomatically after you turn on the power (provided no disketteis in the diskette drive).
If you do not have a hard disk, you need to load MS-DOS whenyou turn on the computer. To do this, insert the MS-DOSStartup diskette in drive A and then turn on the computer.(The Startup diskette is one of the working diskettes MS-DOSgenerates during the installation process. See your MS-DOSInstallation Guide for instructions on how to install theoperating system.)
If you set a power-on password when you ran the Setupprogram, the computer displays the key prompt ( +n ) beforeloading MS-DOS. At the key prompt, type your power-onpassword and press Enter. (See “Using a Power-on Password” inChapter 3 for more information.) After you enter yourpassword, the computer loads MS-DOS.
When MS-DOS is loaded, the screen displays the Shell StartPrograms Menu if you installed the Shell program when youinstalled MS-DOS. If you did not install the Shell program, thescreen displays the MS-DOS command prompt, usually C> orA>. The MS-DOS command prompt identifies the currentdrive.
4-2 Using MS-DOS with Your Equity 386SX
NoteBefore you turn off the computer, be sure to exit anyapplication program you are using. The screen should displaythe Shell Start Programs Menu or the MS-DOS commandprompt. Then remove your diskettes (if any), turn off thecomputer, and turn off any peripherals.
Using Drive Designators
MS-DOS uses letters known as drive designators to identify thedisk drives in your computer. If you have one diskette drive, it isknown as drive A. If you have two diskette drives, the top driveis A and the bottom drive is B.
If you have one hard disk drive, MS-DOS identifies its primarypartition as drive C (even if you have only one diskette drive).If you have a second hard disk drive, MS-DOS identifies itsprimary partition as drive D.
If you created one or more extended partitions on your harddisk when you installed MS-DOS, the logical drives that makeup the extended partition(s) are identified by drive letters. Forexample, if you have one hard disk (one physical drive)partitioned into three logical drives, the logical drives are C, D,and E. If you have two hard disk drives partitioned into a totalof five logical drives (three on the first physical drive and twoon the second), the first physical drive is divided into logicaldrives C, E, and F, and the second physical drive is divided intological drives D and G, as shown here:
drive 1
C: (primary)E:F:
drive 2
D: (primary)G:
Using MS-DOS with Your Equity 386SX 4-3

The Current Drive
At any given time, MS-DOS considers one disk drive to be thecurrent (or default) drive. The current drive is the drive onwhich MS-DOS executes your next command, unless you tell itto do otherwise. For example, if the current drive is C, and youenter the DIR (directory) command, MS-DOS lists the filesstored on drive C. If the current drive is A and you type WP andpress Enter, MS-DOS looks on drive A for a file called WP andexecutes the instructions in that file. The current drive is thedrive you are logged onto at the time.
The MS-DOS command prompt tells you which drive is thecurrent drive. The MS-DOS command prompt includes thecurrent drive’s letter followed by a greater-than symbol.(Depending on how you installed MS-DOS, it may also includeadditional information.) Thus, when you see C> on the screen,you know the current drive is C. The MS-DOS commandprompt also lets you know that MS-DOS is ready to receive acommand from you.
If you need to access a file or program on another drive, you caneither change the current drive or specify the other drive whenyou give the command.
Changing the current drive
To change the current drive, type the letter of the drive youwant to change to, followed by a colon. Then press Enter. Forexample, to change the current drive from C to A, type A : atthe C> prompt and press Enter. MS-DOS acknowledges thechange by displaying the command prompt A>. Changing to anew drive is also known as logging onto that drive.
4-4 Using MS-DOS with Your Equity 386SX
Specifying the drive designator
If you want to access a program or file on another drive withoutfirst changing the current drive, type the drive designator alongwith the filename. For example, if you are logged onto drive Aand want to use a file named PROGRAM on drive B, typeB : PROGRAM and press Enter. MS-DOS loads and executesthe file named PROGRAM from drive B but stays logged ontodrive A.
Types of MS-DOS Commands
Each MS-DOS command is either internal or external. Internalcommands are built into MS-DOS; so you can use them anytime after MS-DOS has been loaded into memory. Externalcommands are separate files which MS-DOS must be able tofind before it can execute the command. If it cannot find thefile, MS-DOS displays an error message.
If you installed MS-DOS according to the instructions in yourMS-DOS Installation Guide, most external commands arestored in a subdirectory named DOS on the hard disk (unlessyou specified a different name when you installed MS-DOS).The external commands CONFIG.SYS, AUTOEXEC.BAT,and COMMAND.COM are stored in the root directory. (Forinformation on directories, see “Using Directories,” later in thischapter.) MS-DOS automatically finds any external commandsyou use in the DOS subdirectory or the root directory becausethe installation process has set a path to them. (For informationon setting paths, see “Using Pathnames,” later in this chapter.)
Using MS-DOS with Your Equity 386SX 4-5
If you do not have a hard disk, external commands are storedon the set of working diskettes generated when you installedMS-DOS. To use an external MS-DOS command, you mustinsert the diskette containing that command into a diskettedrive. To find out which external commands are on whichdiskettes, see the list of working diskette contents in yourMS-DOS Installation Guide.
For example, if you want to use the FORMAT command, youmust insert the Startup diskette into a diskette drive. Then youcan either log onto that drive and enter the FORMATcommand or specify the appropriate drive when you enter thecommand.
For example, if you have two diskette drives and you want toformat a diskette that is in drive B, you need to insert theStartup diskette into drive A, and log onto drive A. Then typethe following and press Enter:
FORMAT B:
MS-DOS finds the file named FORMAT.COM on the currentdrive.
If you are logged onto drive B, you need to type the followingand press Enter:
A:FORMAT B:
This tells MS-DOS to look on drive A for FORMAT.COMbecause the current drive is drive B.
4-6 Using MS-DOS with Your Equity 386SX
Entering an MS-DOS Command
To enter an MS-DOS command, you need to type thecommand in the correct format. The command format providesMS-DOS with the information needed to perform a task.
The MS-DOS command format consists of the command name,parameters, and delimiters. The command name tells MS-DOSthe task you want the computer to perform. Parameters specifyinformation such as what data you want to process and where tolocate or store a file. Delimiters are characters such as spaces orcommas that separate command names and parameters.
For example, the command to format a diskette in drive A is:
FORMAT A:
delimiter
FORMAT is the name of the command that tells MS-DOS toexecute the file FORMAT.COM. The A : is a parameter thattells MS-DOS what to format-in this case, the diskette indrive A. The space between FORMAT and A : is the delimiterthat allows MS-DOS to distinguish the command name(FORMAT) from the parameter (A : ).
Some commands also have optional switches you can use. Aswitch is a type of parameter that changes the effects of acommand. A forward slash usually precedes a switch. Forexample, suppose you want to format a 720KB diskette in a1.44MB diskette drive. To do this, you add the following switchto the FORMAT command:
FORMAT A: /F:720
If you do not add the /F:720 switch, MS-DOS tries to format the720KB diskette as a 1.44MB diskette.
Using MS-DOS with Your Equity 386SX 4-7

See your MS-DOS Reference Manual for more information onthe command format and for command descriptions thatexplain which parameters and delimiters are required and whichparameters and switches are optional for each command.
You can enter an MS-DOS command whenever you see theMS-DOS command prompt. Type the command name and anyparameters and delimiters. You can type command names andparameters in either uppercase or lowercase letters. Then pressEnter to execute the command.
If you make a mistake when typing a command and you noticeit before you press Enter, you can do either of two things:
Cl Use the backspace key to delete the error
Cl Press ESC and then Enter to cancel the current commandline and move to a new one.
Then reenter the command correctly.
If you press Enter when a command line has an error in it, thescreen displays an error message. Usually, the MS-DOScommand prompt reappears so you can try again. Type thecorrect command and press Enter.
Setting the Date and Time
The real-time clock in your Equity 386SX constantly tracks thecorrect time and date-even when the computer is turned off.To adjust the time for daylight savings time, you can use theMS-DOS TIME and DATE commands. See your MS-DOSReference Manual for instructions. The computer automaticallychanges the date for leap years.
4-8 Using MS-DOS with Your Equity 386SX

You can also use the Setup program on your Referencediskette to set the correct time and date, See “Setting theReal-time Clock” in Chapter 2 for instructions.
Creating and Managing Files
All your data and programs are stored in files on disk. A datafile contains information, such as words, numbers, or pictures. Aprogram file contains coded instructions that the computer canunderstand and execute.
The kind of file you create depends on the MS-DOS commandor application program you use to create it. In general, a datafile that you create using an application program is stored in aspecial format. If you use a different application program to readthat file, you may encounter problems.
When you create a file, you need to give it a name. The namemust be in the format MS-DOS requires.
Naming Files
Each file must have a unique name so that you can retrieve itwhen you need to. The name consists of two parts: the filenameand the extension (which is optional).
The filename can be up to eight characters long. Create afilename that identifies the information the file contains. Youcan use any characters or numbers except for blank spaces andthe following symbols:
*\/;?[I:;<>.,+=
Using MS-DOS with Your Equity 386SX 4-9
The extension is optional and can be up to three characterslong. You can use the extension to further identify a file or todescribe what type of file it is, such as a text file or program file.When you use an extension, separate it from the filename witha period, like this:
DATA.TXT
Do not use uppercase and lowercase letters to distinguishbetween files. MS-DOS does not recognize the difference anddisplays all filenames in uppercase.
Some application programs automatically add extensions to thefiles you create. These programs use the extension to determinewhether a data file is compatible. Avoid using the sameextensions that your application programs use.
MS-DOS reserves certain filenames for its own use. Thereserved filenames are:
AUXCLOCK$COM1COM2COM3
COM4 LPT3CON LSTLPT1 NULLPT2 PRN
MS-DOS also reserves certain extensions for program files. Thereserved extensions are .COM, .EXE, and .BAT, and files withthese extensions are also sometimes called executable files. Donot use these reserved filenames and extensions for your datafiles.
The extension .BAT denotes a type of executable file called abatch file. You can use batch files to automate sequences ofMS-DOS commands. Even if you are not a programmer, youmay want to create some batch files to save time. See “Creatingan AUTOEXEC.BAT File” in this chapter for a description of aparticularly useful kind of batch file, an autoexecute batch file.
4-10 Using MS-DOS with Your Equity 386SX

Copying Files
You can use the COPY command to copy individual files orgroups of files. COPY is an internal command; you can use itany time you see the MS-DOS command prompt.
You can use the COPY command to copy files in several ways:
Ll You can copy individual files from one disk to another
CI You can copy a group of files using wildcard characters
CI You can copy one or more files and give them new names
D You can combine or merge files into one file.
To use the COPY command, type COPY at the MS-DOScommand prompt, followed by the drive designators andnecessary filenames. Then press Enter to execute the command.
For example, to copy the file named REPORT from the diskettein drive A to the diskette in drive B (using the same name forthe copy as for the original file), type the following and pressEnter:
COPY A:REPORT B:
You now have two files named REPORT, one on the diskette indrive A and one on the diskette in drive B.
To copy the file named REPORT from the diskette in drive Ato the diskette in drive B using a new name, FACTS, for thecopy, type the following and press Enter:
COPY A:REPORT B:FACTS
The file REPORT remains unchanged on drive A and a new filenamed FACTS now exists on drive B.
Using MS-DOS with Your Equity 386SX 4-11
To copy the file named REPORT to the same drive or directoryand name the copy FACTS, type the following and press Enter:
COPY REPORT FACTS
Now you have two files on the current drive that have the samecontents but different names. In this example, you can omit thedrive designators because the original file and the copy are bothon the current drive.
You can use wildcard characters to copy a group of files. Thereare two wildcard characters: * and ?. The asterisk representsany group of characters and the question mark represents anysingle character.
For example, to copy all the files on the diskette in drive A tothe diskette in drive B, type the following and press Enter:
COPY A:*.* B:
To copy all files with names that begin with the four lettersMEMO and end with any single character (such as MEMO1),type the following and press Enter:
COPY A:MEMO? B:
You can also use the COPY command to combine several filesinto one file. For example, to create a new file called DATAthat consists of the files REPORT, FACTS, and MEMO, typethe following and press Enter:
COPY REPORT + FACTS + MEMO DATA
Now the file DATA consists of REPORT followed by FACTSfollowed by MEMO.
4-12 Using MS-DOS with Your Equity 386SX
To copy REPORT, FACTS, and MEMO from drive A to a filenamed DATA on drive B, type the following and press Enter:
COPY A:REPORT + A:FACTS + A:MEMO B:DATA
Remember these rules when using the COPY command:
Cl MS-DOS must be able to find the original file and knowwhere to store the copy; that is, you may need to specify thedrive (and directory, if necessary) for one or both.
Cl You cannot create a new file with the same name and in thesame directory as an existing file.
CI If there is a file on the destination diskette or directory thathas the same name as the file you are copying, the copyautomatically replaces the existing file. There is no warningthat the existing file is being replaced; so be careful that youdo not accidentally erase a file you want to keep.
Ci If you are copying to a diskette, the diskette must already beformatted.
NoteYou can also use the XCOPY command to copy individualfiles or groups of files. XCOPY-which is an externalcommand--offers an efficient way to copy certainfiles or whole directories. The MENU pro
groups ofgram allows you to
copy files with XCOPY using menus instead of the commanditself. See your MS-DOS Reference Manual and “Using theEpson MENU Program” in this chapter for inform&on onXCOPY and MENU.
You can also use the MS-DOS Shell program to copyindividual files, groups of files, or whole directories. See yourMS-DOS Shell User's Guide for instructions.
Using MS-DOS with Your Equity 386SX 4-13

Renaming Files
You can use the RENAME command to change the name ofa file or group of files on the same disk and directory. Forexample, to rename a file named PROSPECT (in the currentdirectory) to CLIENT, type the following and press Enter:
RENAME PROSPECT CLIENT
You can shorten the RENAME command to REN. For example,to change the name of a file from HAMMERS to WRENCHES,you can type the following and press Enter:
REN HAMMERS WRENCHES
You can use wildcards to rename groups of files. For example, tochange the extensions of all files on drive C with the extension.NEW from .NEW to .OLD, type the following and press Enter:
REN C:*.NEW *.OLD
To add the extension .OLD to all files that begin with the samefour characters, MEMO, but end with one varying character,type the following and press Enter:
REN MEMO? MEMO?.OLD
This command renames files such as MEMO1 and MEMO2 toMEMO1 .OLD and MEM02.OLD.
See your MS-DOS Reference Manual for more information onthe RENAME command.
4-14 Using MS-DOS with Your Equity 386SX

Deleting Files
You can delete files you no longer need with the DEL (delete)command. For example, to delete REPORT.AUG from drive C,type the following and press Enter:
DEL C:REPORT.AUG
To delete the file WRENCHES from drive C, type thefollowing and press Enter:
DEL C:WRENCHES
To display a prompt asking you to confirm that you want todelete the file before MS-DOS deletes it, use the /P switch.Type the following and press Enter:
DEL C:WRENCHES /P
You see this prompt:
C:\WRENCHES, Delete (Y/N)?
Press Y and Enter for yes or N and Enter for no.
You can use wildcards to delete groups of files. For example, todelete all files on the diskette in drive A (in the currentdirectory), you could type the following and press Enter:
DEL A:*.*
Because deleting all files is a serious procedure, MS-DOSprompts you to confirm the command when you use the * . *wildcard combination with the DEL command. Press Y andEnter to confirm the command and delete all files on thediskette in drive A or N and Enter to cancel the command.
You may substitute ERASE for DEL in the examples above.ERASE is a synonym for DEL.
Using MS-DOS with Your Equity 386SX 4-15

Printing Text Files
If you have a printer attached to your computer, you can printtext files with the PRINT command. In general, you willprobably use application programs to print files, but if you needto print a text file from the MS-DOS command prompt, followthe steps below.
To print a text file named STATS.NBA on drive C:
1. Make sure your printer is on and ready to print.
2. At the MS-DOS command prompt, type the following andpress Enter:
PRINT C:STATS.NBA
MS-DOS prompts you for the name of the printing deviceconnected to your computer. (This is usually the name ofthe communications port that the printer cable isconnected to, such as LPT1.)
3. Type the name of the device, such as LPT1, and pressEnter. MS-DOS prints the file on your printer.
See your MS-DOS Reference Manual for more information onthe PRINT command.
Using Directories
You can store many files on a diskette, and a hard disk canstore many more. To help you organize this much information,MS-DOS lets you subdivide a disk into logical units calleddirectories. Directories allow you to arrange your disk so that filesof similar type or purpose are kept together.
4-16 Using MS-DOS with Your Equity 386SX
Directories are essential for organizing files on a hard disk, andyou might even want to create directories on a 1.44MB diskette.However, you may not need to create directories if you uselower capacity diskettes-especially if the diskette contains onlya few large files.
Whenever you format a disk, MS-DOS automatically createsone main directory. This directory is called the root directory.Any directories you later create are logically subordinate to theroot directory; that is, they are subdirectories of the rootdirectory. Here is an example of a simple directory structure:
Root directoryI
WORDPROC DOS SPDSHEET
In this example, you keep your word processing programs anddata files in a directory called WORDPROC, your spreadsheetprograms and data files in a directory called SPDSHEET, andMS-DOS files in a directory called DOS. The few files thatMS-DOS needs to find as soon as you turn on your computer(such as COMMAND.COM, CONFIG.SYS, andAUTOEXEC.BAT) remain in the root directory at the toplevel of the structure.
As the number of files in your WORDPROC and SPDSHEETdirectories grows, you can create additional directoriessubordinate to those two-like this:
Root directory
WORDPROC DOS SPDSHEET
I I I IBUSINESSPERSONAL SALES PROJ
Using MS-DOS with Your Equity 386SX 4-17

This directory tree lets you separate business word processingfiles from personal word processing files, and sales spreadsheetsfrom spreadsheet files used for financial projections.
Your directory structure may be as simple as this example ormuch more complex. Organize your disk(s) to suit your needs.As your needs change, you can modify the structure by deletingold directories and creating new ones.
Here are some additional points about directories:
Name subdirectories the same way you name files. Thename can include up to eight characters (letters ornumbers), and you can add an extension of up to threecharacters.
The root directory does not have a name. It is identified bythe backslash character: \.
The total number of files and subdirectories in the rootdirectory must not exceed 512 on a hard disk or 112 on a1.44MB diskette.
All directories other than the root directory can have anynumber of files and subdirectories.
Like hard disks, diskettes have root directories, and you cancreate subdirectories on diskettes the same way as you createsubdirectories on a hard disk.
The following sections describe how to create, use, and deletedirectories.
NoteThe MS-DOS Shell program provides an easy way to see andorganize your directories. See “The MS-DOS Shell Program,”later in this chapter, and your MS-DOS Shell User’s Guide.
4-18 Using MS-DOS with Your Equity 386SX

The Current Directory
MS-DOS always recognizes one directory as the current (ordefault) directory, just as it always recognizes one drive as thecurrent drive. The current directory is the directory you arelogged onto at the time and the one in which MS-DOSperforms your commands, unless you tell it to do otherwise. Ifyou installed MS-DOS according to the instructions in yourMS-DOS Installation Guide, the MS-DOS command promptdisplays the current directory.
If you want to run a program or access a data file that is notstored in the current directory, you can either changedirectories (making a different directory the current directory)or include a pathname in your command.
Changing the Current Directory
To change from one directory to another, use the CHDIRcommand, or its shorthand equivalent, CD. For example, tochange to the root directory of the current drive from anywherein the directory tree, type the following and press Enter:
CHDIR \
If you are in the WORDPROC directory and you want tochange to PERSONAL, a subdirectory of WORDPROC, typethe following and press Enter:
CD PERSONAL
To change from PERSONAL back to WORDPROC, you canuse the special symbol . . (two periods). The . . symbol alwaysdesignates the parent directory, which is the directory one levelabove the current directory. You can type:
CD . .
Using MS-DOS with Your Equity 386SX 4-19
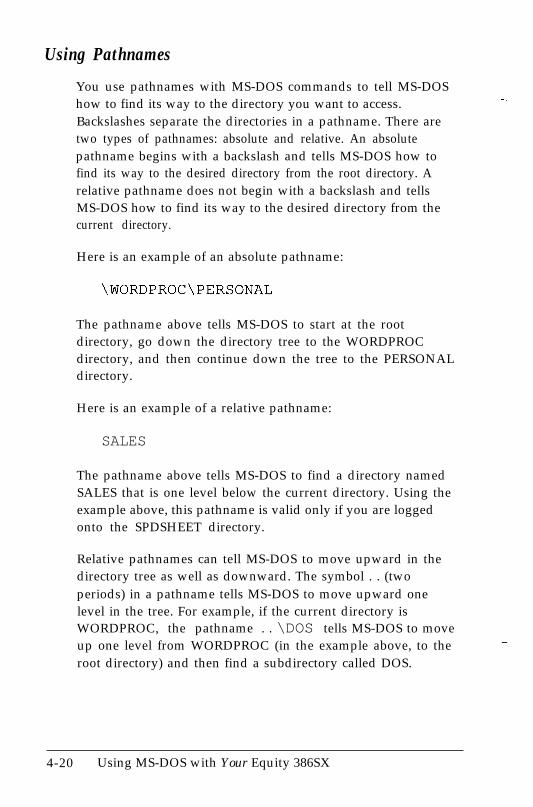
Using Pathnames
You use pathnames with MS-DOS commands to tell MS-DOShow to find its way to the directory you want to access.Backslashes separate the directories in a pathname. There aretwo types of pathnames: absolute and relative. An absolutepathname begins with a backslash and tells MS-DOS how tofind its way to the desired directory from the root directory. Arelative pathname does not begin with a backslash and tellsMS-DOS how to find its way to the desired directory from thecurrent directory.
Here is an example of an absolute pathname:
The pathname above tells MS-DOS to start at the rootdirectory, go down the directory tree to the WORDPROCdirectory, and then continue down the tree to the PERSONALdirectory.
Here is an example of a relative pathname:
SALES
The pathname above tells MS-DOS to find a directory namedSALES that is one level below the current directory. Using theexample above, this pathname is valid only if you are loggedonto the SPDSHEET directory.
Relative pathnames can tell MS-DOS to move upward in thedirectory tree as well as downward. The symbol . . (twoperiods) in a pathname tells MS-DOS to move upward onelevel in the tree. For example, if the current directory isWORDPROC, the pathname . . \DOS tells MS-DOS to moveup one level from WORDPROC (in the example above, to theroot directory) and then find a subdirectory called DOS.
4-20 Using MS-DOS with Your Equity 386SX

You can use either relative or absolute pathnames at any time,as long as you give MS-DOS enough information to find thedirectory or file at the end of the pathname.
Including Filenames With Pathnames
You can use a pathname when you want to access a file that isnot in the current directory. You specify the name of the fileyou want to access at the end of the pathname, like this:
TYPE \WORDPROC\PERSONAL\JEAN1204.DOC
This command tells MS-DOS to list on screen (TYPE) thecontents of the text file JEAN1204.DOC which is stored in thedirectory \ WORDPROC \ PERSONAL. You separate the nameof a file from the name of a directory with a backslash.
Including Drive Letters With Pathnames and Filenames
To access a file stored on a drive other than the current drive,you need to include a drive designator (A :, for example) as wellas a filename. If the file you want is not stored in the currentdirectory of that drive, you also need to include a pathname.
For example, if you are logged onto the root directory of drive Cand you want to delete the file JEAN1204.DOC stored in thedirectory \ WORDPROC \ PERSONAL of drive A, type thefollowing and press Enter:
DEL A:\WORDPROC\PERSONAL\JEANl204.DOC
If you change drives and then try to access a file on the previousdrive, MS-DOS remembers which directory was the currentdirectory the last time you were logged onto that drive. Forexample, suppose that the last time you were logged onto
Using MS-DOS with Your Equity 386SX 4-21
drive C, the root directory was the current directory. Now youare logged onto drive A and you enter the following commandto delete the file JEAN1204.DOC:
DEL C:JEAN1204.DOC
MS-DOS tries to find the file you want in the root directory ofdrive C. Because the file is not there, an error message appearson the screen. You need to enter the complete pathname insuch a case.
If you do not know which is the current directory on anotherdrive, it is best to include the full pathname whether or not youneed it. You can never give MS-DOS too much information.
To change to another directory on another drive, include thedrive designator in the command-like this:
CD B:\WORDPROC\PERSONAL
NoteMS-DOS provides several commands that make usingpathnames easy. When you use the following commands, youdon’t have to type a full pathname or enter the drive anddirectory every time you want to access certain files.
Cl The APPEND command lets you specify a search pathfor data files and executable files.
Cl The PATH command lets you specify a search path forprogram files and commands.
0 The SUBST command lets you substitute a drive letterfor a directory path, which is convenient if you type longpathnames often.
See your MS-DOS Reference Manual for information onthese helpful commands.
4-22 Using MS-DOS with Your Equity 386SX

Creating Directories
You use the MKDIR command to create directories. Forexample, to create a LEDGER directory under the root directoryof the current drive, type the following and press Enter:
MKDIR \LEDGER
You can abbreviate the name of this command to MD. Forexample, to create a SALES directory under the LEDGERdirectory, type the following and press Enter:
MD \LEDGER\SALES
If the current directory is the LEDGER directory, you can createthe SALES subdirectory with this command:
MD SALES
Listing the Contents of a Directory
You can use the DIR command to list the contents of adirectory. To list the files in the current directory, type thefollowing and press Enter:
DIR
MS-DOS lists the names of the files in the current directory onthe current drive, like this:
Volume in drive C is MEMODRIVEVolume Serial Number is 354C-12E9Directory of C:\WORDPROC\PERSONAL
<DIR> 11-09-89 10:16a. . <DIR> 11-09-89 10:16aLETTERS <DIR> 12-13-89 1:48pRESUME.713 8293 12-29-89 9:07aBOOKRPRT 10866 11-18-89 11:43p
5 File(s) 15013560 bytes free
Using MS-DOS with Your Equity 386SX 4-23

A directory listing includes the following information abouteach file in the directory:
Cl Name and extension
D Size of the file in bytes
tl Date and time the file was created or last modified(whichever is later).
The directory listing also shows any subdirectories in thedirectory; they are identified by the letters <DIR>. At the topof the listing, MS-DOS reports any name (Volume label) youhave given to the hard disk partition or diskette you are using,the volume serial number (an identifying code assigned by theMS-DOS FORMAT command), and the drive and name ofthe directory you are viewing. At the bottom of the listing,MS-DOS indicates the the total number of files (includingsubdirectories) in the directory and the number of bytes on thedisk that are still available for use.
If the directory listing is too long to fit on one screen, add the /Pswitch to the command, like this:
DIR /P
This switch causes MS-DOS to pause after displaying eachscreenful of information. To see the next screenful, press anykey.
You can also use the /W switch to view a long directory listing:
DIR /W
4-24 Using MS-DOS with Your Equity 386SX
This switch displays a wide-format directory listing, like this:
Volume in drive C is MEMODRIVEVolume Serial Number is 354C-12E9Directory of C:\WORDPROC\PERSONAL
. . LETTERS RESUME.713 BOOKRPRT5 File(s) 15013560 bytes free
This type of listing does not show the size of a file or the timeand date it was last modified.
To list the contents of a different drive or directory, include theappropriate drive designator and/or pathname in the command.For example, to see what is in the root directory of the diskettein drive A, type the following and press Enter:
DIR A:\
To display the contents of the WORDPROC\PERSONALdirectory (on drive C), type the following and press Enter:
DIR C:\WORDPROC\PERSONAL
Displaying a List of Directories
The TREE command displays a tree diagram of all thesubdirectories of the directory you specify. For example, to seethe names of all the subdirectories of the current directory, typethe following and press Enter:
TREE
Using MS-DOS with Your Equity 386SX 4-25

The screen displays a tree diagram of the subdirectories of thecurrent directory, for example:
C:\LEDGERRECEIVPAYABLSALES
tSALE1989SALE1990
To see a list of all the files in the subdirectories, add the /Fswitch, like this:
TREE /F
The screen displays the directory information shown above andthe names of all the files in each subdirectory:
C:\LEDGER
NOVRECVDECRECV
NOVSALES.RPTDECSALES.RPT
JANSALESFEBSALESMARSALES
4-26 Using MS-DOS with Your Equity 386SX
To see the list of subdirectories of another directory, include thepathname:
TREE C:\WORDPROC
Removing Directories
You may sometimes want to remove directories you no longerneed. However, before you can delete a directory, it must beempty. If it contains any files or subdirectories, MS-DOSdisplays an error message and does not delete the directory.(Use the DEL command to delete the files in a directory or theCOPY command to move them to another directory.)
To delete an empty directory from a disk, use the RMDIRcommand, or its shorthand equivalent, RD. For example, toremove the directory ACCOUNTS, which is a subdirectory inthe LEDGER directory on drive C, type the following and pressEnter:
RD C:\LEDGER\ACCOUNTS
If you are in the LEDGER d irectory, you can type the followingand press Enter:
RD ACCOUNTS
Formatting Diskettes
Before you can store data on a new diskette, you must format it.Formatting prepares the diskette so that MS-DOS can write toit. You need to do this only once, before you use the diskette forthe first time.
Using MS-DOS with Your Equity 386SX 4-27

You can reformat previously used diskettes. This process erasesall data on the diskette, so be sure you do not want to save anyof the data on a used diskette before you format it.
If you plan to use a new diskette to make a backup copy ofanother diskette, you do not need to use the FORMATcommand to format it first. The DISKCOPY commandautomatically formats a blank diskette if it has never beenformatted. (See “Using the DISKCOPY Command,” later inthis chapter.)
Also see your MS-DOS Reference Manual for informationabout the optional switches you can use with the FORMATcommand to format various diskette types in different types ofdrives.
NoteYou can also format diskettes using the MS-DOS Shell or theEpson MENU program. These programs are easy to usebecause they let you select options from menus instead ofusing commands, See your MS-DOS Shell User’s Guide and“Using the Epson MENU Program,” later in this chapter.
Using the FORMAT Command
1. If you do not have a hard disk, insert your Startup disketteinto drive A, and log onto drive A.
If you have a hard disk, type C : and press Enter to log ontodrive C.
2. At the MS-DOS prompt, type FORMAT A: and pressEnter. You see this prompt:
Insert new diskette for drive A:and press ENTER when ready...
4-28 Using MS-DOS with Your Equity 386SX

3. If necessary, remove the Startup diskette from drive A.Insert the diskette you want to format in drive A and pressEnter to start formatting.
4. When the diskette is formatted, you see this message:
Format completeVolume label (11 characters, ENTERfor none)?
5. At the Volume label prompt, you can enter a nameto describe the information the diskette will contain. Thename (the volume label) will appear whenever you view thecontents of a directory on the diskette using the DIRcommand. The volume label can be up to 11 characterslong and can consist of any characters or numbers, exceptfor blank spaces and the following symbols:
After you name the diskette, press Enter. (If you do notwant to name the diskette, simply press Enter.) Then yousee messages such as the following:
1457664 bytes total disk space1457664 bytes available on disk
512 bytes in each allocation unit2847 allocation units available on disk
Volume Serial Number is 344A-15DB
Format another (Y/N)?
6. To format another diskette, press Y and Enter. To return tothe MS-DOS command prompt, press N and Enter.
Using MS-DOS with Your Equity 386SX 4-29

Formatting a diskette to 720KE3
If you want to format a diskette to a capacity of 720KB in your1.44MB diskette drive, you need to use a switch with theFORMAT command.
The /F:size switch tells the FORMAT command to format thediskette as the size specified in the command even if thecapacity of the diskette drive is different. You can format a1.44MB or a 720KB diskette to a capacity of 720KB using thisswitch.
For example, to format a 720KB diskette in your 1.44MBdiskette drive, enter the following command:
FORMAT A: /F:720
Use this command when you follow the instructions in thissection to format a diskette.
Backing Up Data
It is very important to keep backup diskettes containing copiesof the files you create. You can copy your data (text andprogram files) in several ways:
Cl You can use the COPY or XCOPY command to copyindividual files or groups of files.
Cl You can use the DISKCOPY command to make an exactduplicate of a diskette.
4-30 Using MS-DOS with Your Equity 386SX

Ll You can use the BACKUP command to back up hard diskfiles to diskettes. Because BACKUP can split large filesacross two or more diskettes, it makes more efficient use ofdiskette space than COPY or XCOPY. It also allows you toback up files that are larger than the capacity of yourdiskettes. To access files created with BACKUP, you usethe RESTORE command.
DISKCOPY, BACKUP, and RESTORE are described below.“Copying Files,” earlier in this chapter, describes the COPYcommand. See your MS-DOS Reference Manual forinformation on XCOPY.
NoteThe MS-DOS Shell and the Epson MENU program provideeasy ways to perform the functions listed above. See yourMS-DOS Shell User’s Guide and “Using the Epson MENUProgram,” later in this chapter.
Using the DISKCOPY Command
The DISKCOPY command lets you make an exact copy of adiskette. (You cannot use DISKCOPY to copy to or from ahard disk.) Because this procedure copies the data byte by byte,the two diskettes must be of the same type. For example, youcannot use DISKCOPY to copy a 720KB diskette to a 1.44MBdiskette or a 360KB diskette to a 1.2MB diskette. (Use theCOPY command to copy files between different types ofdiskettes and to copy files to or from a hard disk.)
If the diskette you are copying to has never been formatted,DISKCOPY formats it automatically before copying the data.
The procedure for copying diskettes depends on whether youhave one or two diskette drives. Follow the instructions belowfor your configuration.
Using MS-DOS with Your Equity 386SX 4-31

Using DISKCOPY with one diskette drive
1. Make sure the diskette you want to copy is write-protected.(See Chapter 3 for instructions.)
2. If you don’t have a hard disk, insert your Startup disketteinto drive A.
3. If you have a hard disk, type C : and press Enter to log ontodrive C. If you do not have a hard disk, type A : and pressEnter to log onto drive A.
4. At the MS-DOS command prompt, type the following andpress Enter:
DISKCOPY A: A:
MS-DOS displays these messages:
Insert SOURCE diskette in drive A:
Press any key to continue . . .
5. If necessary, remove the Startup diskette from drive A.Insert the diskette you want to copy from (the sourcediskette) into the drive. Then press any key. DISKCOPYstarts to copy the contents of the diskette to the computer’smemory. When the computer’s memory is full, the screendisplays these messages:
Insert TARGET diskette in drive A:
Press any key to continue . . .
6. Remove the source diskette from drive A and insert thediskette you want to copy to (the target diskette). Thenpress any key. If the target diskette is not formatted,DISKCOPY formats it before copying data to it.
4-32 Using MS-DOS with Your Equity 386SX
7. After DISKCOPY copies the data from memory to thetarget diskette, the screen prompts you to insert the sourcediskette again to copy the remaining data to the computer’smemory (if necessary). Insert the source diskette intodrive A and press any key.
8. After DISKCOPY copies the rest of the source diskette’sdata to the computer’s memory, the screen prompts you toinsert the target diskette again to copy the remaining datafrom memory to it. Insert the target diskette and press anykey. When the copy is complete, you see this message:
Copy another diskette (Y/N)?
9. Press Y to copy another diskette or N to return to theMS-DOS command prompt.
Using DISKCOPY with two diskette drives
If you have two diskette drives, follow these steps to copy adiskette:
1. Make sure the diskette you want to copy is write-protected.(See Chapter 3 for instructions.)
2. If you don’t have a hard disk, insert your Startup disketteinto drive A.
3. At the MS-DOS command prompt, type the following andpress Enter:
DISKCOPY A: B:
MS-DOS prompts you to insert your diskettes:
Insert SOURCE diskette in drive A:
Insert TARGET diskette in drive B:
Press any key to continue . . .
Using MS-DOS with Your Equity 386SX 4-33

4. If necessary, remove the Startup diskette from drive A.Insert the diskette you want to copy from (the sourcediskette) into drive A and the diskette you want to copy to(the target diskette) into drive B. Then press any key tobegin copying. If the target diskette is not formatted,DISKCOPY formats it before copying data to it.
5. When the copy is complete, you see this message:
Copy another diskette (Y/N)?
Press Y to copy another diskette or N to return to theMS-DOS command prompt.
Using the BACKUP Command
Use the BACKUP command to back up the data on your harddisk. It provides a convenient and efficient way to copy the fileson the hard disk to diskettes. BACKUP allows you to do thefollowing:
Cl Split large files across two or more diskettes
Cl Copy only those files that have been modified since themost recent backup (with the /M switch)
Cl Copy only those files that have been created (or modified)after a specified date (with the /D switch)
Cl Copy files in the current directory together with files in allsubdirectories of the current directory (with the /S switch)
Cl Automatically format diskettes before copying files.
Unlike COPY, XCOPY, and DISKCOPY, which make readablecopies of files, BACKUP creates files that you cannot accessdirectly. To return files copied with the BACKUP command tothe hard disk, you need to use the RESTORE command.
4-34 Using MS-DOS with Your Equity 386SX

Make sure you have enough diskettes to back up the data onyour hard disk drive. For example, it takes about 30 1.44MBdiskettes to copy a 40MB hard disk partition that is completelyfull.
See your MS-DOS Reference Manual for complete instructionson using BACKUP and RESTORE.
The MS-DOS Shell Program
The MS-DOS Shell program allows you to execute manyMS-DOS commands and programs by selecting options frommenus. Using the MS-DOS Shell, you can run commandswithout having to remember their exact syntax. MS-DOS Shellmakes it easy for you to manage files and directories. It isespecially useful for managing the data on a hard disk, whereyou may have hundreds of files. For example, you can easilyview, create, move, rename, and delete files and directoriesusing MS-DOS Shell.
See your MS-DOS Installation Guide for instructions on how toinstall the Shell program and see your MS-DOS Shell User’sGuide for information on how to use it.
Using the Epson HELP Program
The Epson HELP program lets you display information on thescreen about MS-DOS commands and programs. You can useHELP in one of three ways:
0 At the MS-DOS command prompt, you can type HELPand press Enter to display the HELP menu.
Cl To bypass the HELP menu you can type HELP followed bythe name of the command you want information about.
Using MS-DOS with Your Equity 386SX 4-35

0 If you want information about more than one command you __can type HELP followed by the names of the commands,each separated by a space.
To use the HELP program, follow these steps:
1. If you don’t have a hard disk, make sure your Workingdiskette is in drive A.
2. If necessary, type A : and press Enter to log onto drive A.
3. If you want to use the HELP menu, type HELP and pressEnter. Use the cursor keys to highlight the command youwant information about and press Enter.
If you want to bypass the HELP menu and see informationabout one command, type HELP followed by the name ofthat command. For example, to see help information aboutthe COPY command, type the following and press Enter:
HELP COPY
If you want to see information about more than onecommand, type HELP and the names of the commands youwant information about. Separate each command namewith a space, as in the following example:
HELP DISKCOPY FORMAT COPY
The HELP information for the first command is displayedfirst.
4. If there is more than one screen of information about thecommand, you see the prompt PgUp at the top of thescreen. Press the PgUp key to display the next screen oftext.
4-36 Using MS-DOS with Your Equity 386SX
If there is yet another screen of text, you see both PgUpand PgDn at the top. Press PgUp to display the next screenof text or PgDn to see the previous screen. On the last pageof text you see only PgDn at the top.
5. If you used the HELP menu to chose your help information,press ESC to return to the menu.
If you requested information about more than one MS-DOScommand in the HELP command line, press ESC to seeinformation about the next command.
6. Press ESC to exit the HELP program.
Using the Epson MENU Program
The Epson MENU program lets you display a menu ofcommonly used MS-DOS commands and select the one youneed. It provides an easier way to run MS-DOS commandsbecause you can execute commands without having toremember their exact syntax.
To access MENU, follow these steps:
1. If you do not have a hard disk, insert your Working disketteinto drive A and log onto that drive.
2. At the MS-DOS command prompt, type MENU and pressEnter. You see this main menu:
EXITFile UtilitiesDisk UtilitiesMode Settings
Help1 Enter DOS Command
Using MS-DOS with Your Equity 386SX 4-37

3. To select an option, use the arrow keys to highlight theoption you want and press Enter. Most options containsubmenus; keep highlighting your selection and pressingEnter until you select the desired operation.
MENU works by calling external commands which it looks foron the current disk or path. If you do not have a hard disk andthe diskette in the current drive does not contain a commandcalled by MENU-for example, BACKUP.COM-you may seean error message like this when you select an option:
BACKUP.COM is not on the current diskor path.
Press any key to continue...
If you see a message similar to this one, insert the diskette thatcontains the command you selected into drive A and try again.(To see which commands are on which MS-DOS diskettes,refer to the list of your Working diskette contents in theMS-DOS Installation Guide.) _ _
NoteIf you find that you often have to swap diskettes when youuse MENU, see the description of MENU in your MS-DOSReference Manual for some recommended solutions.
4-38 Using MS-DOS with Your Equity 386SX
MENU Program Options
Following is a description of each MENU option. YourMS-DOS Reference Manual provides step-by-step instructionsfor using each option.
File Utilities
Disk Utilities
Mode Settings
Help
Enter DOS
Lets you back up and restore files, replacefiles, compare files, change file attributes,and copy files and directories. This optiondoes the work of the MS-DOS commandsBACKUP, RESTORE, REPLACE, FC,ATTRIB, and XCOPY.
Lets you check, copy, compare, and formatdiskettes. This option provides an easy-to-use alternative to the MS-DOS CHKDSK,DISKCOPY, DISKCOMP, and FORMATcommands.
Lets you change your configurationsettings. Also lets you select alternate codepages (character sets) and redirect datafrom the parallel port to the serial port.Because you can perform so many tasksfrom the Mode Settings submenus, thisoption is a simpler alternative to theMS-DOS MODE command.
Lets you access the Epson HELP program.
Lets you run other MS-DOS commandswithout leaving the MENU program.
See your MS-DOS Reference Manual for a complete descriptionof the MENU program.
Using MS-DOS with Your Equity 386SX 4-39

Using an AUTOEXEC.BAT File
You may want to run some commands every time you turn onyour computer. To run a command or a series of commandsautomatically upon startup, you can type the commands in aspecial file called AUTOEXEC.BAT. When you load MS-DOS,it always looks for this file. If MS-DOS finds anAUTOEXEC.BAT file in the root directory, it executes thecommands in that file.
Here are some tasks you can perform using anAUTOEXEC.BAT file:
Li Modify the PATH command to include the directoriescontaining other software programs you commonly use.This reduces the number of times you need to changedirectories or specify pathnames.
0 Add the command to start your most commonly usedapplication program (such as a word processing orspreadsheet program) so that it loads automatically whenyou turn on or reset the computer.
0 Change the information the MS-DOS command promptincludes.
See your MS-DOS Reference Manual for instructions on usingthe PATH command, the PROMPT command, and any othercommands you want to include in your AUTOEXEC.BAT file.Also see the chapter on batch processing commands in yourMS-DOS Reference Manual for detailed information aboutAUTOEXEC.BAT files.
4-40 Using MS-DOS with Your Equity 386SX
If you have a hard disk and you installed MS-DOS accordingto the instructions in your MS-DOS Installation Guide,MS-DOS automatically sets a path to the directory thatcontains the MS-DOS commands and the MS-DOScommand prompt displays the current drive and directory.
Creating an AUTOEXEC.BAT File
Here is an example of an AUTOEXEC.BAT file:
PATH C:\;C:\DOS;C:\WPPROMPT $P$G
The first line tells MS-DOS to look for programs or batch filesin the root directory, the DOS directory, and your wordprocessing directory. This way you can run programs in thosedirectories without having to specify pathnames in thecommands. The second line changes the MS-DOS commandprompt so that it displays your current directory.
To create an AUTOEXEC.BAT file, you can use any commandor program that lets you create a text-only file. If you have aword processing program that can save a file as a text-only file(sometimes called an ASCII text file), you can use that programto create your AUTOEXEC.BAT file. Name the fileAUTOEXEC.BAT and store it in the root directory of the harddisk or diskette from which you load MS-DOS.
Using MS-DOS with Your Equity 386SX 4-41

You can also use the MS-DOS COPY or EDLIN command tocreate an AUTOEXEC.BAT file. Follow these steps to createan AUTOEXEC.BAT file with the COPY command:
1. If you are creating an AUTOEXEC.BAT file on your harddisk, log onto the root directory of your hard disk. (TypeCD C : \ and press Enter.)
If you are creating an AUTOEXEC.BAT file on yourStartup diskette, insert the Startup diskette into drive Aand log onto that drive.
2. At the MS-DOS command prompt, type the following andpress Enter:
COPY CON: d:\AUTOEXEC.BAT
where d is the drive that will contain theAUTOEXEC.BAT file you are creating. This drive must bethe drive from which your computer loads MS-DOS. Forexample, if you load MS-DOS from drive C, type thefollowing and press Enter:
COPY CON: C:\AUTOEXEC.BAT
3. Now enter the commands you want to include in the file.Type them exactly as you want MS-DOS to execute them,and in the order you want MS-DOS to perform them. PressEnter at the end of each line. After you type the lastcommand, press Enter to move the cursor to the next line.
4. Press F6 and then Enter. MS-DOS copies everythingyou typed to the AUTOEXEC.BAT file. From now on,MS-DOS runs the commands in the AUTOEXEC.BAT fileevery time you turn on or reset the computer.
If you need to change anything in the AUTOEXEC.BAT filelater, you can use the same procedure to modify the commands.See your MS-DOS Reference Manual for more information.
4-42 Using MS-DOS with Your Equity 386SX
Using Memory Beyond 640 KB
The Equity 386SX comes with 1MB of random access memory.MS-DOS and your application programs that run underMS-DOS use the first 640KB of memory. You can use thememory between 640KB and 1MB as extended or expandedmemory. If your computer has more than 1MB of random accessmemory on SIMMS you can also use this additional memory asextended or expanded memory.
Expanded memory can be used by certain application programs(such as Lotus® l-2-3®) that support the Lotus/Intel/MicrosoftExpanded Memory Specification (LIM EMS).
To use expanded memory, you must modify the fileCONFIG.SYS, which is stored in the root directory of the harddisk or diskette from which you load MS-DOS. If you have aword processing program that can save a file as a text-only file(also called an ASCII text file), you can use that program tomodify the CONFIG.SYS file. Start your word processingprogram, load the file CONFIG.SYS, and then add thefollowing line to the file:
DEVICE=EMM386.SYS
You can add one or more of the optional switches explained inthe next section to this command line. Then save the file as anASCII text file and reset the computer.
If you do not have a word processing program capable of savingan ASCII text file, you can modify CONFIG.SYS using theMS-DOS COPY or EDLIN command. To modifyCONFIG.SYS using the COPY command, follow these steps:
1. Log onto the root directory of the hard disk or diskette fromwhich you boot MS-DOS.
2. Type COPY CONFIG.SYS + CON : and press Enter.
Using MS-DOS with Your Equity 386SX 4-43

3. Type DEVICE=EMM386.SY S and press Enter. You canadd one or more of the optional switches explained in thenext section to this command line.
4. Press F6 and then Enter.
5. Reset the computer.
Using EMM386.SYS
EMM386SYS is an expanded memory manager that lets youuse extended memory to emulate expanded memory so that youcan use application programs that support LIM EMS.
NoteDo not use EMM386.SYS if you installed an expandedmemory option card. Use the device driver that came withthe memory card. See the documentation that came with thecard for instructions.
The full syntax for the command line that activatesEMM386SYS is:
DEVICE= [d:][path] EMM386.SYS [size][X:mmmm-nnnn] [Mx]
The items in brackets are optional; you do not type any bracketswhen you enter this command. The following paragraphsdescribe the items in the command line.
The d:path parameter specifies the pathname. You specify thepathname if the file EMM386.SYS is not in the root directoryof the hard disk or diskette from which you load MS-DOS. Forexample, if EMM386.SYS is in a directory called \DOS ondrive C, include the pathname, like this:
DEVICE=C:\DOS\EMM386.SYS
4-44 Using MS-DOS with Your Equity 386SX

The size parameter allows you to specify the amount of extendedmemory to be used as expanded memory. You specify theamount of memory in kilobytes. If you do not specify a size, thedefault value is 256KB.
This example tells the computer to use 1024KB of extendedmemory as expanded memory:
DEVICE=EMM386.SYS 1024
The X:mmmm-nnnn parameter specifies a range of memory toexclude from the EMM386.SYS command in hexadecimalnotation. EMM386.SYS does not locate its page frame or othermappable pages in this memory range.
For example, to specify 1024KB of memory as expandedmemory and ensure that EMM386SYS does not locate anypages in the address range C400 to C7FF, include this commandin your CONFIG.SYS file:
DEVICE=EMM386.SYS 1024 X:C400-C7FF
You can include more than one X: parameter in yourDEVICE=EMM386.SYS command to exclude more than onerange of memory.
NoteDo not use the X: parameter unless you experience a memoryconflict with a memory option card.
Using MS-DOS with Your Equity 386SX 4-45
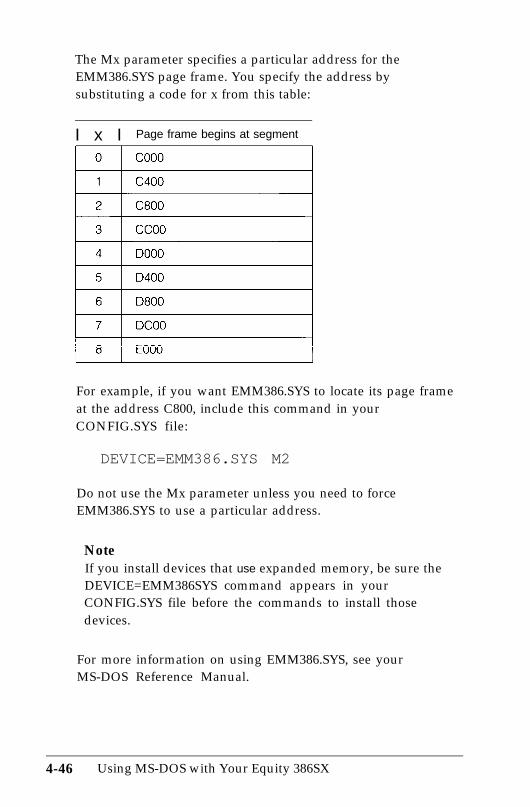
The Mx parameter specifies a particular address for theEMM386.SYS page frame. You specify the address bysubstituting a code for x from this table:
I x I Page frame begins at segment
For example, if you want EMM386.SYS to locate its page frameat the address C800, include this command in yourCONFIG.SYS file:
DEVICE=EMM386.SYS M2
Do not use the Mx parameter unless you need to forceEMM386.SYS to use a particular address.
NoteIf you install devices that use expanded memory, be sure theDEVICE=EMM386SYS command appears in yourCONFIG.SYS file before the commands to install thosedevices.
For more information on using EMM386.SYS, see yourMS-DOS Reference Manual.
4-46 Using MS-DOS with Your Equity 386SX

Chapter 5Installing Options
You can enhance the performance of your Equity 386SX byadding a variety of options, including the following:
Cl An 80387SX math coprocessor
Ll Memory modules
Cl A memory card
Cl Other option cards.
A math coprocessor speeds up the numeric calculations yourcomputer performs when using certain application software. Ifyou want to install a math coprocessor in your computer, askyour authorized Epson dealer to do it for you.
Memory modules allow you to increase the amount of memoryin your computer. This chapter briefly describes the types andamounts of memory modules you can use in the Equity 386SX.If you want to install memory modules in your computer,however, ask your dealer for help.
An option card is a circuit board you install in your computer toadd a particular function. A memory card is a type of optioncard that increases the total amount of memory in yourcomputer, over and above any installed memory modules. Othertypes of option cards contain a device, such as a modem, orprovide an interface, such as a connector to which you connecta monitor. This chapter describes how to install option cardsand configure the computer for use with them.
Installing Options 5-1

Adding Memory ModulesThe standard Equity 386SX system comes with 1MB of on-board memory. You can add SIMMs (single inline memorymodules) to increase the amount of memory in the computer.With added SIMMs, the total amount of memory in yourcomputer must be one of the following: 2MB, 4MB, 6MB, 8MB,10MB, 12MB, or 14MB.
You install SIMMs on the SIMM card that comes withyour computer. Any SIMMs you install must have 70ns(nanosecond) access speed or faster to operate in theEquity 386SX. Check with your dealer to ensure that thecorrect type of SIMMs are used.
There are 16 SIMM sockets on the SIMM card organized in twobanks containing eight sockets each. Each socket can containeither one 256KB or one 1MB SIMM. The following tableshows the possible configurations for the Equity 386SX:
Possible Equity 386SX SIMM configurations
Left bank Right bank Total
1A 2A 3A 4A 5A 6A 7A 8A 12A 13A 14A 15A 16A 17A 18A 19AMB
1 M B
* * * * 2 M B
1 * * * l 1 4 M B
11" * l l 1 1 6 M B
111* l l * 1 1 1 8 M B
1111 * l * * 1 1 1 1 1OMB
11111*** ' 1 1 1 1 1 12MB
1 11111* * l * 1 1 1 1 1 1 14MB
* = 256KB SlMMs1 = 1MB SlMMs
5-2 Installing Options

Two sockets in each bank accept only 256KB SIMMs. Thesesockets are labelled 7A, 8A, 12A, and 13A. The rest of thesockets accept only 1MB SIMMs. You must fill all of the 256KBSIMM sockets before using any of the 1MB sockets.
SIMMs must be distributed evenly between the two banks. Forexample, if you want to have 4MB of memory, install two256KB SIMMs and one 1MB SIMM in the left bank and two256KB SIMMs and one 1MB SIMM in the right bank. Youcannot install both of the 1MB SIMMs in just one of the banks.
NoteOnce SIMMs have been installed, you should be sure yourdealer has set a jumper on the SIMM card before you turn onyour computer. See “Changing Jumper Settings” later in thischapter for more information.
After SIMMs have been installed in your computer, you need torun the Setup program on your Reference diskette to set thecomputer’s memory configuration, as described in Chapter 2.Also see “Post-installation Setup,” later in this chapter.
NoteIf you want to use extended memory as expanded memory,you can use the EMM386,SYS utility, See “Using MemoryBeyond 640KB” in Chapter 4 and your MS-DOS ReferenceManual for more information.
Installing Options 5-3

Installing Option Cards
The Equity 386SX has ive standard option slots and one specialfoption slot occupied by the card that controls the serial andparallel interfaces (known as the SP card). The video card thatcontrols your monitor occupies one standard slot. You can buyadditional option cards from authorized Epson dealers as well asother vendors.
If you want additional memory, you can install a memory cardin your computer. (You can install a memory card whether ornot you have already added SIMMs.) With added SIMMs and amemory card, the Equity 386SX can have up to a total of 16MBof memory. Most popular memory cards are compatible with theEquity 386SX.
This section explains how to:
Ci Remove the computer’s cover
0 Install an option card
Cl Change jumper settings
LJ Remove an option card
Li Replace the cover.
NoteAfter you install or remove an option card, see “Post-installation Setup” at the end of this chapter to configureyour computer to operate with an option card. If you install amemory card, also see “Post-installation Setup for MemoryCards” in this chapter.
5-4 Installing Options

Removing the Cover
To install an option card, you need to remove the cover fromyour Equity 386SX. Follow these steps:
1.
2.
3.
4.
5.
Turn off the computer and then any peripherals (includingthe monitor and printer) that are attached to it.
Disconnect the computer’s power cable from the electricaloutlet and from the back panel. Then disconnect anyperipheral cables that are connected to the computer.
Disconnect the keyboard.
If the monitor is on top of the computer, lift it off and set itto one side.
As shown below, the top cover is secured by five screws onthe back panel and four screws on the side panels (two oneach side). Remove the screws and set them safely to oneside so you do not lose them.
- s c r e w s
Installing Options 5-5

6. Facing the front panel, grasp the two sides of the cover andcarefully pull it straight toward you and away from the backof the computer (as shown in the following illustration),until it is a few inches away from the back panel.
5-6 Installing Options

7. After the cover’s front panel clears the power button andthe diskette drive, you can lift off the cover. Separate thecover’s sides from the inside of the computer by pullingthem outward slightly, as shown below. Then lift off thecover and set it aside.
Installing Options 5-7

Installing an Option Card
The illustration below shows the five standard option slotsinside the Equity 386SX. (The SP card occupies a specialadditional slot, number 6.)
option card slots
ISP card
//
5-8 Installing Options
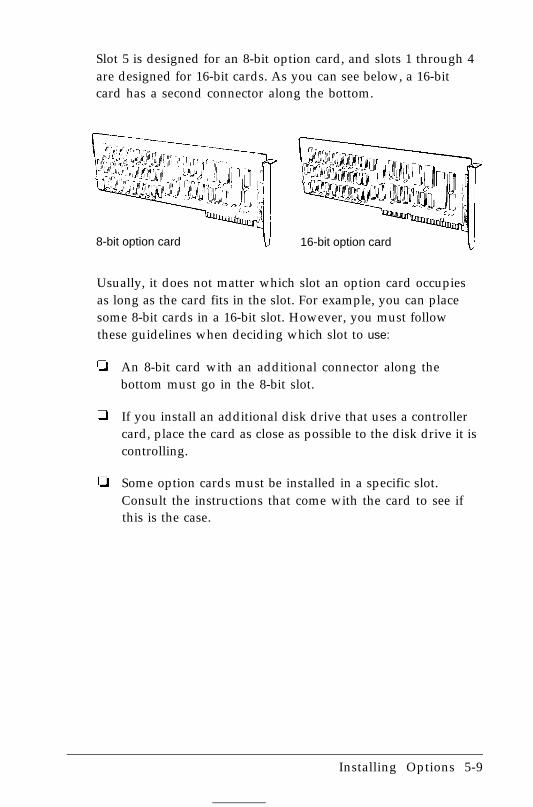
Slot 5 is designed for an 8-bit option card, and slots 1 through 4are designed for 16-bit cards. As you can see below, a 16-bitcard has a second connector along the bottom.
8-bit option card 16-bit option card
Usually, it does not matter which slot an option card occupiesas long as the card fits in the slot. For example, you can placesome 8-bit cards in a 16-bit slot. However, you must followthese guidelines when deciding which slot to use:
An 8-bit card with an additional connector along thebottom must go in the 8-bit slot.
If you install an additional disk drive that uses a controllercard, place the card as close as possible to the disk drive it iscontrolling.
Some option cards must be installed in a specific slot.Consult the instructions that come with the card to see ifthis is the case.
Installing Options 5-9

Follow these steps to install an option card:
1. Decide which slot you want to use. Then remove theretaining screw from the top of the metal option slot cover;hold on to the screw as you remove it so it doesn’t fall intothe computer. Lift out the slot cover.
Keep the screw to secure the option card to the computer.Store the slot cover in a safe place in case you remove theoption card later.
5-10 Installing Options
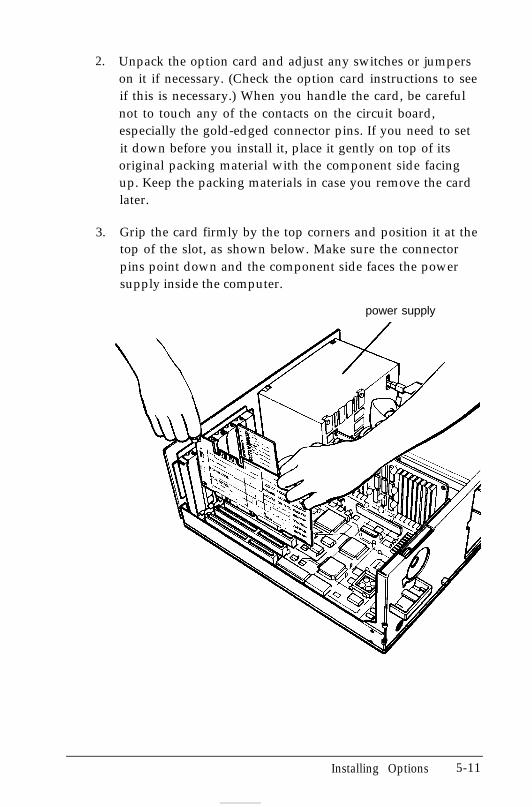
2. Unpack the option card and adjust any switches or jumperson it if necessary. (Check the option card instructions to seeif this is necessary.) When you handle the card, be carefulnot to touch any of the contacts on the circuit board,especially the gold-edged connector pins. If you need to setit down before you install it, place it gently on top of itsoriginal packing material with the component side facingup. Keep the packing materials in case you remove the cardlater.
3. Grip the card firmly by the top corners and position it at thetop of the slot, as shown below. Make sure the connectorpins point down and the component side faces the powersupply inside the computer.
power supply
Installing Options 5-11
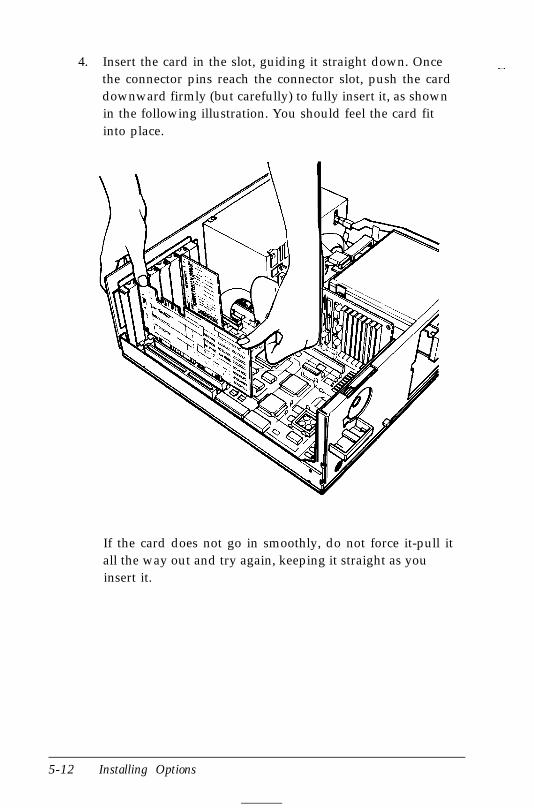
4. Insert the card in the slot, guiding it straight down. Once-the connector pins reach the connector slot, push the card
downward firmly (but carefully) to fully insert it, as shownin the following illustration. You should feel the card fitinto place.
If the card does not go in smoothly, do not force it-pull itall the way out and try again, keeping it straight as youinsert it.
5-12 Installing Options

5. Secure the end of the card to the back of the computer withthe retaining screw.
Installing Options 5-13

Changing Jumper Settings
If you change your computer’s configuration, you may need tochange a jumper setting in the computer. A jumper is a smallelectrical connector that controls one of the computer’sfunctions.
A jumper’s setting is determined by where the jumper is placed:either between pin 1 and pin 2 (position 1-2) or between pin 2and pin 3 (position 2-3), as shown below:
position 1-2 position 2-3
c!lj$? cg!g J@3 3 3
Jumper J5 on the main system board is different from the otherjumpers in the Equity 386SX. The pin positions for jumper JSare shown below:
position 1-2 position 2-3
& c@? cJ?$?1 1 1
The jumpers you may need to change are on the main systemboard. There is an additional jumper on the SIMM card thatyou may want to check if your dealer has installed SIMMs foryou. The following tables list the jumper settings and theirfunctions.
5-14 Installing Options
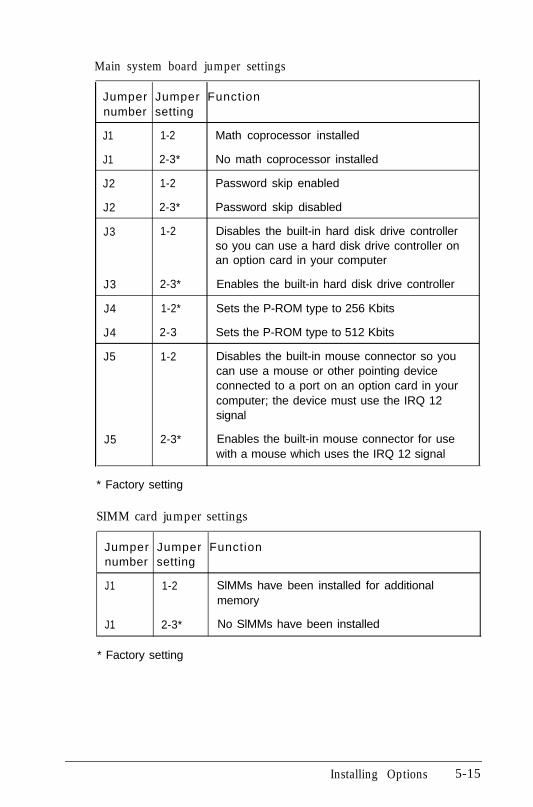
Main system board jumper settings
Jumper Jumper Functionnumber setting
J1 1-2 Math coprocessor installed
J1 2-3* No math coprocessor installed
J2 1-2 Password skip enabled
J2 2-3* Password skip disabled
J3 1-2 Disables the built-in hard disk drive controllerso you can use a hard disk drive controller onan option card in your computer
J3 2-3* Enables the built-in hard disk drive controller
J4 1-2* Sets the P-ROM type to 256 Kbits
J4 2-3 Sets the P-ROM type to 512 Kbits
J5 1-2 Disables the built-in mouse connector so youcan use a mouse or other pointing deviceconnected to a port on an option card in yourcomputer; the device must use the IRQ 12signal
J5 2-3* Enables the built-in mouse connector for usewith a mouse which uses the IRQ 12 signal
* Factory setting
SIMM card jumper settings
Jumper Jumper Functionnumber setting
J1 1-2 SlMMs have been installed for additionalmemory
J1 2-3* No SlMMs have been installed
* Factory setting
Installing Options 5-15

If you need to change or check any jumper settings, perform thefollowing procedures in the order listed here, as necessary foryour system:
Follow the instructions in “Removing the Cover” earlier inthis chapter to remove the computer’s cover.
If you need to change any jumper settings for jumpers J1, J2,J3, or J4 on the main system board, remove any option cardsthat may be blocking your access to those jumpers. See“Removing an Option Card” below.
If you need to change the jumper setting of jumper J5 onthe main system board, remove the SIMM card to accessthe jumper. See “Removing the SIMM card” below.
Change the main system board jumper settings as necessary.See “Changing the main system board jumper settings”below.
If you need to check the SIMM card jumper setting, see“Checking the SIMM card jumper setting” below.
Replace any option cards you removed. See “Replacing theoptions cards” below.
Follow the instructions in “Replacing the Cover” later inthis chapter to replace the computer’s cover.
5-16 Installing Options
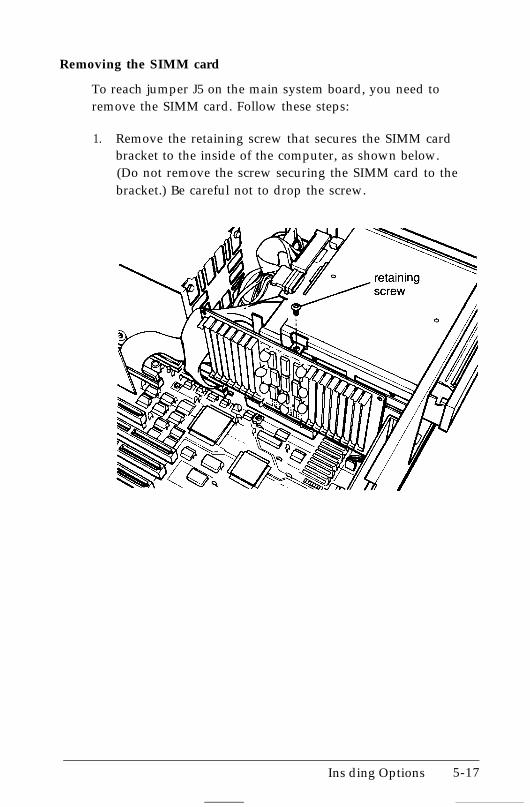
Removing the SIMM card
To reach jumper J5 on the main system board, you need toremove the SIMM card. Follow these steps:
1. Remove the retaining screw that secures the SIMM cardbracket to the inside of the computer, as shown below.(Do not remove the screw securing the SIMM card to thebracket.) Be careful not to drop the screw.
Ins ding Options 5-17
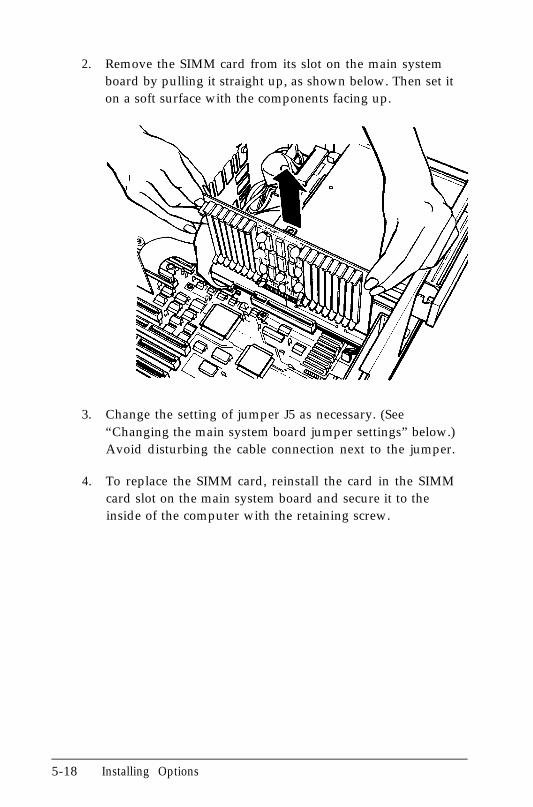
2. Remove the SIMM card from its slot on the main systemboard by pulling it straight up, as shown below. Then set iton a soft surface with the components facing up.
3. Change the setting of jumper J5 as necessary. (See“Changing the main system board jumper settings” below.)Avoid disturbing the cable connection next to the jumper.
4. To replace the SIMM card, reinstall the card in the SIMMcard slot on the main system board and secure it to theinside of the computer with the retaining screw.
5-18 Installing Options
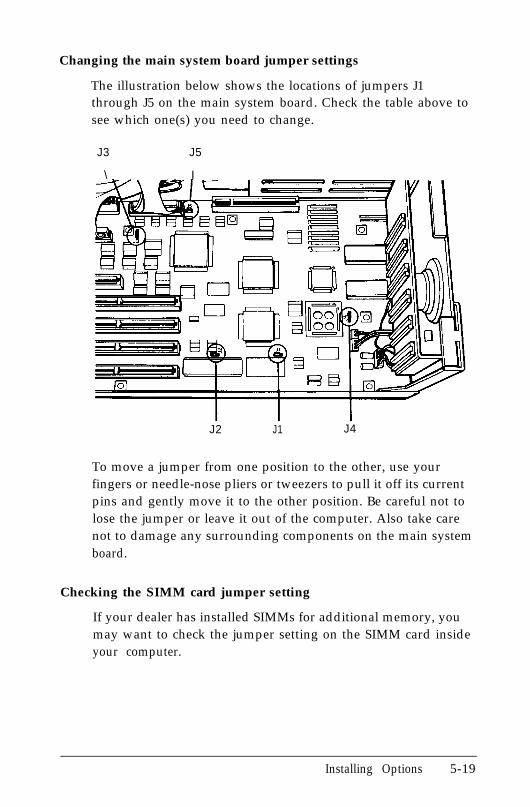
Changing the main system board jumper settings
The illustration below shows the locations of jumpers J1through J5 on the main system board. Check the table above tosee which one(s) you need to change.
J3 J5
\ I
J2 J1 J4
To move a jumper from one position to the other, use yourfingers or needle-nose pliers or tweezers to pull it off its currentpins and gently move it to the other position. Be careful not tolose the jumper or leave it out of the computer. Also take carenot to damage any surrounding components on the main systemboard.
Checking the SIMM card jumper setting
If your dealer has installed SIMMs for additional memory, youmay want to check the jumper setting on the SIMM card insideyour computer.
Installing Options 5-19
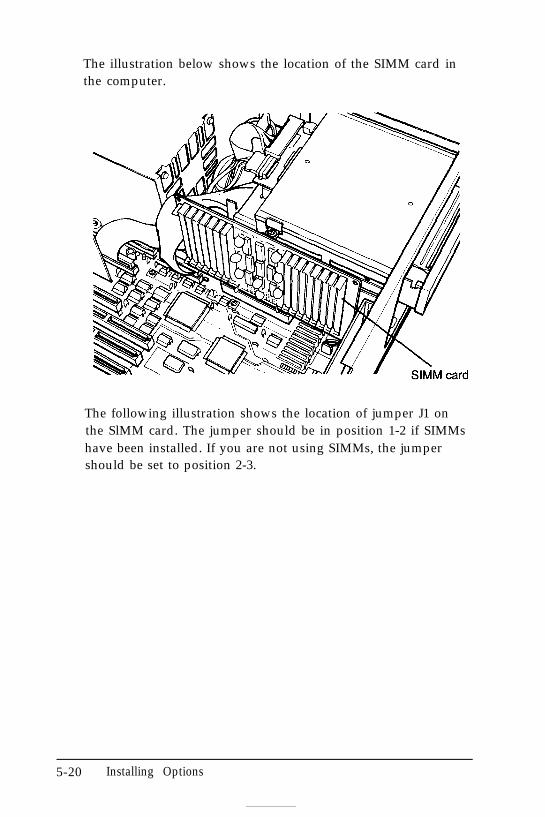
The illustration below shows the location of the SIMM card inthe computer.
The following illustration shows the location of jumper J1 onthe SlMM card. The jumper should be in position 1-2 if SIMMshave been installed. If you are not using SIMMs, the jumpershould be set to position 2-3.
5-20 Installing Options

If the jumper setting is incorrect, move it to the correct setting.You do not have to remove the SIMM card to change thejumper setting.
Replacing option cards
To replace any option cards you may have removed to accessthe main system board, reinstall the card in the appropriate slotand secure it to the back of the computer with the retainingscrew.
Removing an Option Card
If you later need to remove an option card, simply reverse thesteps you followed to install it. Remove the screw securing thecard to the back of the computer and pull the card straight upand out of the slot. Then carefully wrap the card, preferablywith the original packing materials, and place it inside its boxfor safe storage. Cover the end of the empty option slot with theoriginal metal cover and secure it with the retaining screw.
Installing Options 5-21
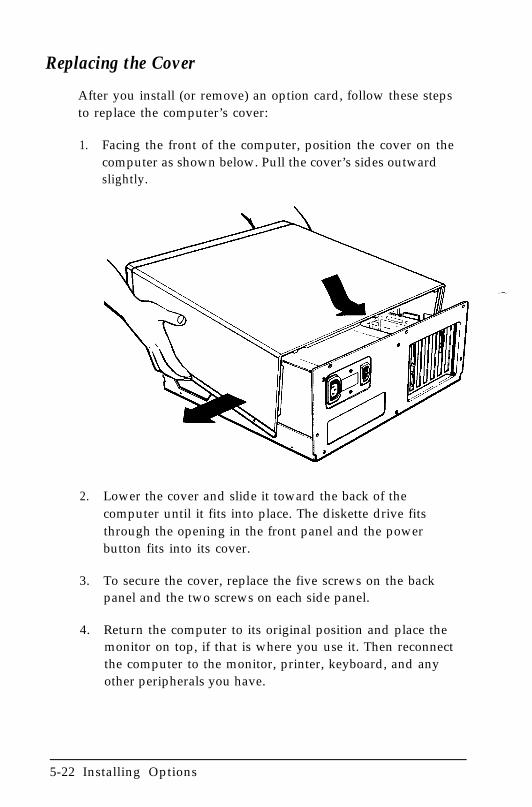
Replacing the Cover
After you install (or remove) an option card, follow these stepsto replace the computer’s cover:
1. Facing the front of the computer, position the cover on thecomputer as shown below. Pull the cover’s sides outwardslightly.
2. Lower the cover and slide it toward the back of thecomputer until it fits into place. The diskette drive fitsthrough the opening in the front panel and the powerbutton fits into its cover.
3. To secure the cover, replace the five screws on the backpanel and the two screws on each side panel.
4. Return the computer to its original position and place themonitor on top, if that is where you use it. Then reconnectthe computer to the monitor, printer, keyboard, and anyother peripherals you have.
5-22 Installing Options
5. Check to be sure the power button on the computer is off.Then reconnect the power cable to the back of thecomputer and to an electrical outlet.
Post-installation Setup for Memory Cards
After you install a memory card in your computer, you need toconfigure your computer to use it. Follow these guidelines:
Use the Setup program on your Reference diskette toautomatically reset your computer’s configuration to includethe memory on your installed memory card. See Chapter 2for instructions.
Use the setup program that comes with your memory cardto configure the computer for use with the installed memorycard. See your memory card manual for instructions.
If you installed a memory card and you want to use any ofits memory as expanded memory, use the EMM386.SYSutility. See “Using Memory Beyond 640KB” in Chapter 4and your MS-DOS Reference Manual for more information.
Also see “Post-installation Setup” at the end of this chapter formore information on setting up your computer for use with anoption card.
To configure your computer for use with the RampagePlus® 286memory card, you need to use CORFIX, an Epson utility onyour Reference diskette, and SMART, the RampagePlus 286setup program. You must use CORFIX before you use SMART.Follow these steps:
1. Make sure that the computer is on and that MS-DOS isloaded. (See “Loading MS-DOS” in Chapter 4 forinstructions.)
Installing Options 5-23

2. Insert the working copy of your Reference diskette intodrive A.
3. If necessary, type A: and press Enter to log onto drive A.
4. At the A> prompt, type CORFIX and press Enter. Thefollowing messages appear:
This program will configure thesystem to work with the SMARTutility when installing theRampagePlus 286.
SMART can only be executedimmediately after thisconfiguration program.Continue ? (Y/N)
--
5. To configure your computer for use with RampagePlus 286,press Y. (If you want to exit to MS-DOS withoutconfiguring your computer, press N.) If you press Y, you seethe MS-DOS A> prompt and this message:
Configuration completed. The SMARTinstallation utility may now beused.
6. Use the SMART setup program now. See yourRampagePlus 286 manual for instructions.
You can also execute CORFIX from your hard disk if youcopied the CORFIX utility from the Reference diskette toyour hard disk.
5-24 Installing Options
Post-installation Setup
After you install or remove a math coprocessor, memorymodules, or a memory card, you need to run the Setup programon your Reference diskette so it can automatically update thecomputer’s configuration information.
If you install or remove any other type of option card or device,such as a video adapter card or a diskette drive, it is importantto run the Setup program to check if you need to change anyconfiguration information. For example, if you add a hard disk,you need to let the computer know that it has the additionaldrive. See Chapter 2 for instructions.
Additionally you may also need to add some commands in yourconfiguration files. See the MS-DOS Reference Manual and themanual that comes with the option card for instructions.
You may want to test a newly-installed option. Some optionscome with their own diagnostics test programs, and you can testothers with the diagnostics programs on your Referencediskette. You can use the System diagnostics program on yourReference diskette to test the following:
D System memory
Cl 80387SX math coprocessor
Q Serial and parallel ports
LI Disk drives
0 Monitors and display adapters
0 Dot-matrix printers.
See Appendix C for instructions.
Installing Options 5-25

5-26 dling Options

Appendix ATroubleshooting
You should not encounter any difficulties as you set up and useyour computer, but if anything out of the ordinary happens,refer to this appendix. You can correct most problems byadjusting a cable connection, repeating a software procedure, orresetting the computer.
Besides trying the suggestions in this chapter, you can rundiagnostics checks on the various components of your computersystem. See Appendix C for instructions.
If the suggestions in this appendix or Appendix C do not solvethe problem, contact your authorized Epson dealer. Your dealermay be able to solve the problem; if not, he or she can referyou to an Authorized Epson Customer Care Center for service.If necessary, call the Epson Customer Information number(1-800-922-891 1) for the location of your nearest AuthorizedEpson Customer Care Center.
When you contact your dealer or Customer Care Center, beready to provide the serial number of your computer, itsconfiguration (including the type of disk drives, monitor, andoption cards), and the names and version numbers of anysoftware you are using.
Error Messages
If the screen displays an error message when you turn on thecomputer, see Appendix B, “Power-on Diagnostics.” If thescreen displays an error message while you are running systemdiagnostics, described in Appendix C, check the error messagetable at the end of that appendix for the cause. Then give thisinformation to your Epson dealer.
Troubleshooting A-1
The Computer Won’t Start
If your computer does not start when you turn on the power,check the following:
1. Is the power light on the computer’s front panel on? If not,remove any diskettes and turn off the power. Check thatthe power cord is securely connected to both the AC inleton the back panel and an electrical outlet.
WARNINGIf you need to turn off the computer for any reason,always wait at least five seconds before turning it back onagain. You can damage the computer if you rum it offand on rapidly.
Replace the Startup diskette, if necessary, and turn thecomputer on again.
2. If the computer’s power light still does not come on, checkthe electrical outlet for power. Turn off your computer andunplug the power cord from the wall outlet. Plug a lampinto the wall outlet, and turn it on to see if the outletsupplies power.
3. If the electrical outlet is working and all the connectionsare secure but your computer still won’t start, call yourEpson dealer.
4. If the computer starts but is taking a long time to completeits power-on diagnostics, you may have disabled the Fastboot function and made a change in your computer’sconfiguration. Power-on diagnostics may take up to fiveminutes to complete if this is the case. If the computer doesnot display the MS-DOS prompt after five minutes, pressthe RESET button and try again. If the computer still doesnot complete power-on diagnostics after five minutes,contact your Epson dealer.
A-2 Troubleshooting
If the computer starts but you can’t see anything on thescreen, see “Monitor Problems,‘” later in this appendix,
The Computer Locks Up
If your computer locks up and does not respond when you typeon the keyboard, follow these steps:
1.
2.
3.
4.
5.
6.
Some computer operations take longer than others tocomplete. For example, the computer takes longer to sort adatabase than to accept a single typed character. If yourcomputer is still locked after a reasonable length of time,proceed to the next step.
If you are running an application program, see “SoftwareProblems,” later in this appendix. This section coverscertain problems caused by application programs.
Did you enter the correct password? See “PasswordProblems,” below.
If you want to stop whatever the computer is doing andreturn to the MS-DOS command prompt, hold down theCtrl key and press Break. In most cases, this solves theproblem. See Chapter 3 for more information on stopping acommand or program.
If your computer still does not respond, you can reset it withthe RESET button. Follow the instructions in Chapter 3.
If resetting the computer does not work, turn off thecomputer, wait at least five seconds, and turn it on again.If you do not have a hard disk drive, insert the Startupdiskette in drive A. The computer should load MS-DOS.
Troubleshooting A-3

Password ProblemsIf you set a power-on password using the Setup program, youmust enter this password after you turn on your computer beforeyou can use the system. When you turn on the computer, thescreen displays a key prompt ( t+nl ). If you do not enter thecorrect password, you see an x on the screen to indicate it isincorrect. The computer gives you a second and third chance toenter it correctly.
If after three tries you have not entered the correct password,the computer locks up and does not respond to your keyboardentries.
If you have any trouble using your power-on password, try thefollowing:
1. If you think you know the correct password, reset thecomputer and try again. (You’ll get three chances, as before,to enter the correct password.) See Chapter 3 forinstructions on using the password.
2. If you know the current power-on password but you want tochange or delete it, see Chapter 3 for instructions.
3. If you do not know the current power-on password and youdo not want to set a new one, see “Removing a Password”below.
4. If you do not know the current power-on password and youwant to set a new one, see “Setting a New Password” below.
A-4 Troubleshooting
Removing a Password
If you have forgotten your password and you do not want to seta new one, there are two ways to remove the current password:
LI Disable the existing password
Ll Disable the password function.
To do either of these procedures, you must reset a jumper on themain system board.
You should disable the existing password if you want to be ableto set a new password later without having to reset a jumper onthe main system board again. See “Disabling an existingpassword” below for instructions.
If you disable the password function, you cannot set a newpassword unless you perform the steps to disable the existingpassword at that time. If you do not want to use a passwordanymore, follow the instructions under “Disabling the passwordfunction” below.
Disabling an existing password
If you do not know your power-on password and do not want toset a new one, follow these steps to disable the existingpassword:
1. Turn off the computer and follow the instructions under“Changing Jumper Settings” in Chapter 5 to enable thepassword skip function by setting jumper J2 to position 1-2.
2. Insert the Reference diskette into Drive A and turn on thecomputer. You do not see the key prompt ( C+rrn ).
Troubleshooting A-5

3. When the Operation Menu appears, highlight Setupand press Enter. Then see “Setting the Power-on Password”in Chapter 2 and follow the instructions as if you are goingto enter a new password. However, when you see thepassword prompt, press Enter immediately. This clears outthe existing password.
Make sure you save your password setting and that youhighlight * * EXIT AND SAVE * * when you leavethe Setup program.
4. Turn off the computer and follow the instructions under“Changing Jumper Settings” in Chapter 5 to disable thepassword skip function by setting jumper J2 to position 2-3.
5. Turn on the computer again. You do not see the key prompt( 9~ ) and the computer loads MS-DOS.
Later, if you want to create a power-on password, run Setup andenter a password. The jumper is already in the correct position.
Disabling the password function
If you do not want to use a power-on password anymore, youcan disable the password function. However, if you want to usethe password function later, your old password is still stored asthe current password. If you want to be able to easily set apassword later, follow the instructions in “Disabling an ExistingPassword” above.
To disable the password function, follow the instructions under“Changing Jumper Settings” in Chapter 5 to change the settingof jumper J2 on the main system board to position 1-2.
A-6 Troubleshooting
Setting a New Password
If you have forgotten your current power-on password and wantto set a new one, follow these steps:
1. Turn off the computer and follow the instructions under“Changing Jumper Settings” in Chapter 5 to enable thepassword skip function by setting jumper J2 to position 1-2.
2. Insert the Reference diskette into Drive A and turn on thecomputer. You do not see the key prompt ( ti ).
3. When the Operation Menu appears, highlight Setupand press Enter. Then follow the instructions under“Setting the Power-on Password” in Chapter 2 to enter anew password.
Make sure you save your password setting and that youhighlight * * EXIT AND SAVE * * when you leavethe Setup program.
4. After you exit Setup, you see this message:
TURN OFF POWER AND CORRECT JUMPERSETTING TO ENABLE PASSWORD CHECKING
5. Turn off the computer and follow the instructions under“Changing Jumper Settings” in Chapter 5 to disable thepassword skip function by setting jumper J2 to position 2-3.
6. Turn on the computer. You see the key prompt ( % ).Enter your new password to access the system. (See “Usingthe Power-on Password” in Chapter 3.)
NoteNotee sure to remember your new password or write it downand keep it in a safe place. If you forget the password youand keep it in a safe place. If you forget the password youenter now, you may have to repeat the procedure aboveenter now, you may have to repeat the procedure abovethe next time you turn on your computer.
Troubleshooting A-7
Keyboard Problems
If you are having trouble with the keyboard, check thefollowing:
1. If the screen displays a keyboard error when you turn on orreset the computer, make sure the keyboard is securelyconnected to the computer. See “Connecting theKeyboard” in Chapter 1 for instructions.
2. If nothing happens when you type on the keyboard, see“The Computer Locks Up,” earlier in this appendix.
3. If the cursor keys do not work properly, the Num Lockfunction may be on. When Num Lock is on, the numeric/arrow keys on the numeric keypad work only as numbers.Check to see if the Num Lock indicator in the upper rightcorner of the keyboard is lit; if it is, press the Num Lock keyto turn off the function.
Monitor Problems
For monitor problems, check the following:
1. If there is no display on the screen, check that the monitor’spower switch is on and that the power light on the monitoris lit. If the power light is on but you still do not seeanything on the screen, check the monitor’s brightness andcontrast controls.
2. If the power switch is on but the power light is not, turn offthe monitor’s power, wait five seconds, and turn the powerback on. Wait a few seconds to see if the screen displays anytext.
A-8 Troubleshooting

3. If the monitor’s power light still does not come on, checkthe electrical outlet for power. Turn off your monitor andunplug it from the wall outlet. Plug a lamp into the walloutlet and turn it on to see if the outlet supplies power.
4. If you still do not see anything on the screen, make sureyour monitor is connected to the computer properly. See“Connecting the Monitor” in Chapter 1 for more details.Also check the monitor manual for instructions on how toconnect it to the computer.
5. Make sure your monitor and display adapter card match,and, if your display adapter card has any switches orjumpers, be sure they are set properly. See “Connecting aMonitor” in Chapter 1 and the documentation that camewith your monitor and display adapter card for instructions.
6. If you are running an application program, see if you needto set up the program for the type of monitor and displayadapter card you have. Also make sure you are using theappropriate monitor and display adapter card for yoursoftware.
NoteIf your application program requires a monitor thatsupports graphics but you have a monochrome monitor,the results will be unpredictable.
7. Be sure you have chosen the correct display adapter cardtype in the Setup program. See “Setting the DisplayAdapter Card Type” in Chapter 2.
8. If you are still having difficulty with your monitor, tryrunning either the Monochrome Display Adapter and CRTCheck or the Color Graphics Display Adapter and CRTCheck, as described in Appendix C. If the diagnosticsprogram indicates an error, contact the place where youbought the monitor.
Troubleshooting A-9
Diskette Problems
If you have trouble accessing data on a diskette, try thefollowing steps:
1. Is the diskette inserted properly? You may have inserted itupside-down or it may not be inserted all the way. Removethe diskette from the drive and reinsert it with the labelfacing up. (See Chapter 3 for detailed instructions oninserting and removing diskettes.)
2. If reinserting the diskette does not solve the problem andyou have access to another diskette drive of the same type,place the diskette in the other drive and repeat theoperation. If you can successfully repeat the operation in thenew drive, the trouble may be in your diskette drive. See“Diskette Drive Problems,” below.
3. Have you inserted the right type of diskette? The diskettetype normally appears on the manufacturer’s label. Here arethe guidelines:
Ct In a drive that has a storage capacity of 1.44MB, such asdrive A, use 3 ‘/z-inch, double-sided, high-density, 135TPI diskettes. This type of drive can also read and writeto 720KB diskettes.
Li In a drive that has a storage capacity of 720KB, use3 ‘/z-inch, double-sided, double-density, 135 TPIdiskettes. You cannot use 1.44MB diskettes in thisdrive.
Cl In a drive that has a storage capacity of 1.2MB, use5 l/4-inch, double-sided, high-density, 96 TPI diskettes.You can also use 360KB diskettes in this drive, but ifyou write to a 360KB diskette in this drive, you mayhave trouble using the diskette in a 360KB drive later.
A-10 Troubleshooting

Cl In a drive that has a storage capacity of 360KB, use5 ‘/q-inch, double-sided, double-density, 48 TPIdiskettes. You cannot use 1.2MB diskettes in this drive.
See “Types of Diskette Drives” in Chapter 3 for moreinformation.
4. If your diskette is the right type for your drive, check to seeif the diskette is write-protected. On a 3 ‘/I-inch diskette,the write-protect switch may be set to the write-protectposition or there may be no switch. On a 5 ‘/.+-inch diskette,there may be a write-protect tab over the notch on the sideof the diskette or there may be no notch at all. You cannotstore or revise data on a write-protected diskette. SeeChapter 3 for information on write-protecting diskettes.
Some application programs do not function properly if thediskette is write-protected. Check the program manual.
5. If MS-DOS displays errors when you try to access data, yourdiskette may be defective. MS-DOS error messages that mayindicate a defective diskette include:
Cl Disk Drive Error: Abort, Ignore, Retry?
Cl Disk error reading drive d:
U Disk error writing drive d:
If you see one of these messages, make sure the diskette isproperly inserted in the diskette drive. If you use a 5 l/4-inchdiskette, make sure the diskette drive latch is closed. Trythe operation again. If the problem persists, try removingthe diskette and reinserting it. This may solve the problemif the diskette was not seated properly in the drive.
Is the diskette formatted? A new diskette must be formattedbefore you can store data on it. See Chapter 4 forinstructions on formatting diskettes.
Troubleshooting A-l I

If the error message still occurs, you probably have adefective diskette. Use the MS-DOS COPY command tocopy the files from the diskette onto another diskette. (See“Copying Files” in Chapter 4 for instructions.)
If you are not able to copy all the files from the defectivediskette, copy as many as you can and then use theMS-DOS program RECOVER. This program recovers allthe data that it can read on the diskette. It is specificallydesigned to work on disks that may be defective. See yourMS-DOS Reference Manual for instructions on usingRECOVER.
NoteRECOVER renames all files on the diskette, so use itonly after you have copied as many files as possible withthe MS-DOS COPY command.
6. If you see no error messages but there is something wrongwith the data in a file, MS-DOS or an application programmay have updated the storage information on the disketteincorrectly. This is probably the case if you have one ofthese problems:
0 Part of a file is missing
0 A file includes parts of other files
Cl An expected output file is missing.
To make the necessary repairs, use the MS-DOS programCHKDSK. See your MS-DOS Reference Manual forinstructions.
A-12 Troubleshooting

Diskette Drive Problems
Follow these steps if you are having difficulty with a diskettedrive:
1.
2.
3.
If the diskette is not turning or the diskette drive is makingloud noises, do not attempt any further examination of it.Contact your Epson dealer.
NoteDiskette drives may make different sounds with differentdiskettes.
If your diskette drive read/write heads are dirty, you mayoccasionally see this MS-DOS error message:
Error Reading Drive d: Abort,Retry, or Fail?
To clean the read/write heads, use a diskette drive headcleaning kit, available in most computer stores.
If you are still having problems with your diskette drive, tryrunning the Diskette Drives and Controller Checkdescribed in Appendix C. If the diagnostics programindicates an error, consult your Epson dealer.
Troubleshooting A-13
Hard Disk ProblemsIf you are having problems with the hard disk in your computer,try the following steps:
1. Be sure you have installed MS-DOS on the hard diskaccording to the instructions in the MS-DOS InstallationGuide.
2. If you have installed MS-DOS on the hard disk but it doesnot load MS-DOS when you turn on the computer, it maybe missing one of the MS-DOS system files. Turn off yourcomputer and insert your Startup diskette into drive A.Then turn on your computer again.
Type C : and press Enter to log onto the hard disk. If thisworks, the next step is to make sure the fileCOMMAND.COM is in the root directory of the hard disk.Type DIR and press Enter.
If COMMAND.COM is in the root directory, use theMS-DOS COMPARE command to compare theCOMMAND.COM file on your diskette with theCOMMAND.COM file on the hard disk. (See yourMS-DOS Reference Manual for instructions on usingCOMPARE.) If the files do not match, use the COPYcommand to replace COMMAND.COM on the hard diskwith the COMMAND.COM file on your diskette. Type thefollowing and press Enter:
COPY A:COMMAND.COM C:
3. If the hard disk still does not work, the root directory ofyour hard disk may be missing some hidden system files.(Hidden files are not displayed when you list files using theDIR command.)
A-14 Troubleshooting

To copy the hidden system files from your Startup disketteto the root directory of the hard disk, type A : to log ontodrive A. Then type the following and press Enter:
SYS c:
4. If you can load MS-DOS from your Startup diskette but youcannot access data stored on your hard disk, you may haveaccidentally repartitioned or reformatted part or all of thedisk.
Use the Display Partition Information option of the FDISKprogram to see if your hard disk has an active (bootable)DOS partition on it. (See the MS-DOS Reference Manualfor instructions on using FDISK.) If it does not, back up allyour hard disk files and then reinstall MS-DOS on the harddisk. See your MS-DOS Installation Guide for instructions.
If your hard disk does have an active DOS partition, backup all your hard disk files and then try reformatting yourhard disk using SELECT. See your MS-DOS InstallationGuide for instructions.
WARNINGReformatting destroys all the data currently on your harddisk, so do this only after careful consideration and aftertrying the preceding steps.
5. If your hard disk is producing a lot of read/write errors oryou are having other serious problems with it, try runningthe Hard Disk Drive and Controller diagnostics check,described in Appendix C. If the diagnostics programindicates an error, contact your Epson dealer. Never openthe sealed unit that encloses the hard disk.
Troubleshooting A-15

6. If you have been using your hard disk for a long time andbegin to see numerous read/write errors, the magneticsignals on the disk may be getting weak. If this is the case,you may need to reformat the hard disk. If you decide to dothis, follow these steps:
Ll Back up all the data on the disk using the BACKUPcommand (described in the MS-DOS ReferenceManual).
Li Follow the instructions in Appendix D to perform alow-level (physical) format.
Ll Follow the instructions in the MS-DOS InstallationGuide to install MS-DOS on the hard disk.
7. If you have installed a hard disk drive made by anothercompany in your computer, you need to install MS-DOS.See the MS-DOS Installation Guide for instructions. If thehard disk needs a low-level format, do that before youinstall MS-DOS. (See Appendix D for instructions.)
8. If you have installed a hard disk drive that has its controlleron an option card, you may need to change the position ofjumper J3 on the main system board. See “Changing JumperSettings” in Chapter 5. Also, if your Equity 386SX camewith a hard disk drive that you are no longer using, be surethe cable leading from that drive to the main system boardis disconnected.
A-16 Troubleshooting
Software Problems
If you are having trouble with an application program, try thefollowing solutions:
1. If the application program does not start, check that you arefollowing the correct procedure for starting the program,and that it is installed correctly. If you have a hard disk andthe program is stored in a directory on that drive, make sureyou are logged onto or specifying the correct directory. Ifyou don’t have a hard disk, make sure you have inserted theapplication program diskette in the top drive (drive A).
2. Your computer can run at either 16 MHz (high) speed orsimulated 8 MHz (low) speed. While almost all programswork properly at the faster speed, some must run at theslower speed. Check your software manual to see if this isthe case, and change the CPU operating speed if necessary.(See Chapter 3 for instructions.) Also see the description ofthe Auto speed function in Chapter 2 for information onaccommodating copy-protected programs.
3. If you have entered an MS-DOS command that you want tostop, there are special key combinations you can type to tellMS-DOS to stop what it is doing. These methods may alsowork in your application programs.
To interrupt an MS-DOS command while it is executing,try one of the following commands:
CI Hold down the Ctrl key and press C
CI Hold down the Ctrl key and press Break.
4. An application program can occasionally lock thecomputer, making it unresponsive to the keyboard. If yourcomputer does not respond when you type on the keyboard,you can reset it. Follow the instructions in Chapter 3.
Troubleshooting A-17
Printer Problems
Below are some general steps to follow if you are havingdifficulty with your printer. If the problem persists and you needmore detailed information, check your printer manual.
1. If your printer does not work correctly immediately afteryou install it, check that the printer has power and isproperly connected to the computer. See Chapter 1 or yourprinter manual for instructions on how to connect yourprinter to the computer.
Also make sure your printer has paper in it, since manyprinters cannot operate without paper.
2. Check the printer manual for the printer’s correct DIPswitch or control panel settings. These settings help aprinter communicate properly with the computer.
3. If you are using more than one parallel port or more thanone serial port, the computer must be set properly soMS-DOS knows which port is the primary port and whichis the secondary port. See Chapter 2 for instructions on howto set the serial and parallel ports using the Setup program.
4. If your printer is properly set up but is still not functioning,test it from the MS-DOS level. When the screen displaysthe MS-DOS command prompt (such as C> or A>), holddown Shift and press PrtSc. This should print the contentsof the screen on your printer.
If it does not, you may need to change the internal settingof the computer’s parallel port for a parallel printer (or serialport for a serial printer). To do this, use the MS-DOSMODE command or the MENU program. See your printermanual and the MS-DOS Reference Manual for moredetails.
A-18 Troubleshooting

5. Many application programs (such as word processors) mustbe set up properly before they can use a printer. Check yourprogram manual to see what customization is required.
6. Try running the Parallel Port (Printer Interface) Check ifyou have a parallel printer, or the Serial Port (RS-232C)Check if you have a serial printer. Appendix C describesthese diagnostics checks. If the diagnostics test indicates anerror, contact the place where you bought the printer.
Option Card Problems
If you install an option card and it is not functioning properly,check the following:
1.
2.
3.
4.
5.
Is the option card installed correctly? Check the installationprocedure described in Chapter 5 and also see theinstructions that come with the option card. The mostcommon problem with option cards is a loose connection.Make sure the option card is well-seated in its slot.
Did you set the necessary DIP switches or jumpers on theoption card? See your option card manual for instructions.
Did you run the Setup program to redefine your computer’sconfiguration after installing the card? See Chapter 2.
If you installed a memory card in your computer, see “Post-installation Setup for Memory Cards” in Chapter 5.
If you installed a hard disk drive that has its controller onan option card, you may need to change the position ofjumper J3 on the main system board. See “Changing JumperSettings” in Chapter 5. Also, if your Equity 386SX camewith a hard disk drive that you are no longer using be surethe cable leading from that drive to the main system boardis disconnected.
Troubleshooting A-19

6. If you used the option card to add an external device to yourcomputer, did you use the proper cable to connect thedevice to the option card connector on the back panel?
7. Did you perform the correct setup procedures for thesoftware you are using with the option card? If necessary, seeyour software manual for instructions on running thesoftware setup procedure.
A-20 Troubleshooting

Appendix BPower-on Diagnostics
Your computer’s built-in memory (ROM) contains a series ofdiagnostics programs, which your computer runs automaticallyevery time you turn on the power. These programs checkinternal devices such as ROM, RAM, the timer, the keyboardcontroller, and the hard disk drive. If the computer finds anerror, it displays a specific error number and error message onthe screen.
If the error is serious, the computer cancels further checkingand halts system initialization. The error message remains onthe screen, and the computer locks up. If this happens, contactyour dealer as soon as possible. Report both the error messageand code number.
If the error is not serious, the computer waits for you to resumefurther checking. You see this prompt:
(Resume = "F1" key)
Write down the error message and code number, and then pressF1 to continue. Report the error message and code number toyour dealer when requesting repairs.
The following table lists all the error codes and messages whichmay appear during power-on diagnostics checks.
Power-on Diagnostics B-1

Power-on diagnostics error codes and messages TableError code Message Notes
System Board101 SYSTEM BOARD ERROR INTC (8259)102 SYSTEM BOARD ERROR Timer (8254)103 SYSTEM BOARD ERROR Timer (8254)105 SYSTEM BOARD ERROR NMI generated (Parity
error or other)106 SYSTEM BOARD ERROR DMA page register
failure108 SYSTEM BOARD ERROR Timer (8254)
Real-time Clock161 SYSTEM OPTIONS NOT SET Power failure162 SYSTEM OPTIONS NOT SET Check-sum error163 TIME AND DATE NOT SET Invalid value164 MEMORY SIZE ERROR
Memory181 SYSTEM EXTENDED MEMORY Memory overlap
ERROR182 SYSTEM RESERVED MEMORY Memory overlap
ERROR (384KB)201 RAM ERROR First 64KB202 MEMORY ADDRESS ERROR Memory data or
parity error203 MEMORY ADDRESS ERROR Memory data or
parity error
Keyboard301 KEYBOARD ERROR303 KEYBOARD OR 8042 ERROR304 KEYBOARD OR 8042 ERROR
Diskette drive(s) and controller601 DISKETTE ERROR
Parallel port (printer interface)901 PARALLEL PORT ERROR
Serial port (RS-232C port)1101 SERIAL PORT ERROR
B-2 Power-on Diagnostics
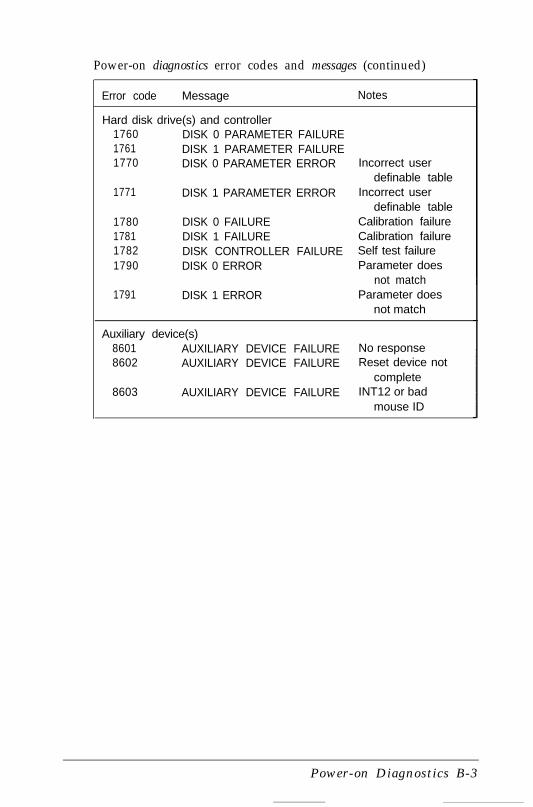
Power-on diagnostics error codes and messages (continued)
Error code Message Notes
Hard disk drive(s) and controller1760 DISK 0 PARAMETER FAILURE1761 DISK 1 PARAMETER FAILURE1770 DISK 0 PARAMETER ERROR Incorrect user
definable table1771 DISK 1 PARAMETER ERROR Incorrect user
definable table1780 DISK 0 FAILURE Calibration failure1781 DISK 1 FAILURE Calibration failure1782 DISK CONTROLLER FAILURE Self test failure1790 DISK 0 ERROR Parameter does
not match1791 DISK 1 ERROR Parameter does
not match
Auxiliary device(s)8601 AUXILIARY DEVICE FAILURE No response8602 AUXILIARY DEVICE FAILURE Reset device not
complete8603 AUXILIARY DEVICE FAILURE INT12 or bad
mouse ID
Power-on Diagnostics B-3

B-4 Power-on Diagnostics
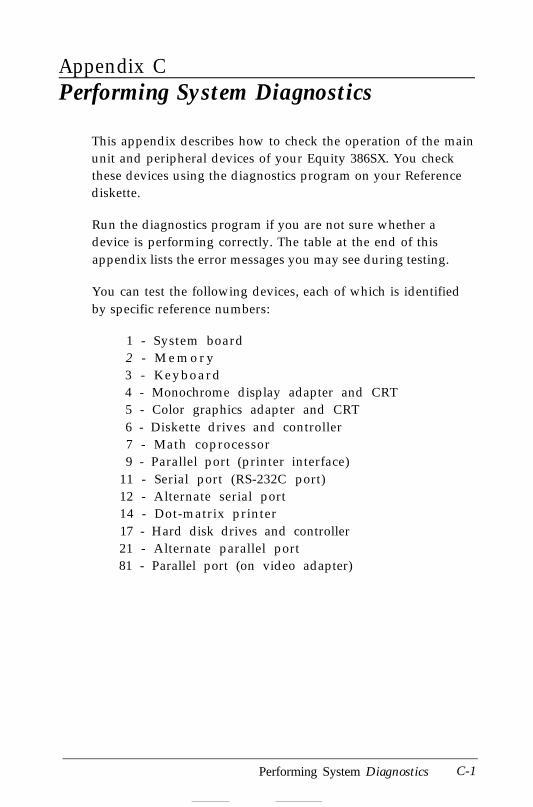
Appendix CPerforming System Diagnostics
This appendix describes how to check the operation of the mainunit and peripheral devices of your Equity 386SX. You checkthese devices using the diagnostics program on your Referencediskette.
Run the diagnostics program if you are not sure whether adevice is performing correctly. The table at the end of thisappendix lists the error messages you may see during testing.
You can test the following devices, each of which is identifiedby specific reference numbers:
1 - System board2 - M e m o r y3 - Keyboard4 - Monochrome display adapter and CRT5 - Color graphics adapter and CRT6 - Diskette drives and controller7 - Math coprocessor9 - Parallel port (printer interface)
11 - Serial port (RS-232C port)12 - Alternate serial port14 - Dot-matrix printer17 - Hard disk drives and controller21 - Alternate parallel port81 - Parallel port (on video adapter)
Performing System Diagnostics C-1

Starting System DiagnosticsTo run the System diagnostics program, you must turn on yourcomputer with the Reference diskette in drive A. If you startthis program in any other way, some tests may produce strangeresults.
To start the System diagnostics program, follow these steps:
1. Insert the Reference diskette in drive A.
2. Turn on or reset the computer. The Operation Menuappears.
3. If the Num Lock indicator is illuminated, press Num Lockto turn off the function.
4. Press 3 or use J to select System diagnostics andthen press Enter.
When you start the System diagnostics program, the computerchecks any peripheral devices that are connected to the system.Then you see a list of the devices available for testing. This listincludes only the devices that are part of your system, such asthe following, for example:
DEVICE LIST
1 - System board2 - Memory3 - Keyboard5 - Color graphics adapter and CRT6 - Diskette drives and controller9 - Parallel port (printer interface)
11 - Serial port (RS-232C port)14 - Dot-matrix printer17 - Hard disk drives and controller
C-2 Performing System Diagnostics
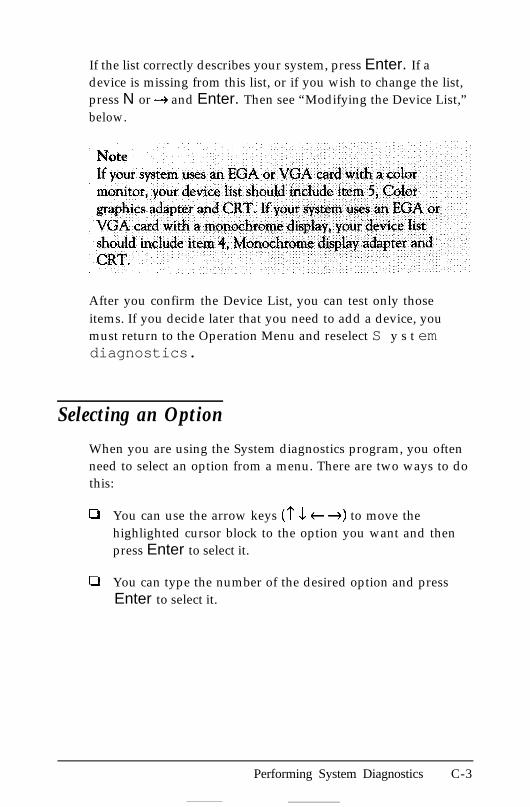
If the list correctly describes your system, press Enter. If adevice is missing from this list, or if you wish to change the list,press N or + and Enter. Then see “Modifying the Device List,”below.
After you confirm the Device List, you can test only thoseitems. If you decide later that you need to add a device, youmust return to the Operation Menu and reselect S y s t emdiagnostics.
Selecting an Option
When you are using the System diagnostics program, you oftenneed to select an option from a menu. There are two ways to dothis:
Q You can use the arrow keys (‘l’ L t +) to move thehighlighted cursor block to the option you want and thenpress Enter to select it.
0 You can type the number of the desired option and pressEnter to select it.
Performing System Diagnostics C-3

For example, you may see this menu:
1 - Run test one time2 - Run test multiple times
0 - Exit
Suppose the first option is highlighted. If you want to select thatoption, just press Enter (because it is already highlighted). Ifyou want to select option 2, you can either press 1 or 2; thiscauses the cursor block to move to that option. Then pressEnter to select it.
Therefore, when the instructions in this appendix tell you toselect an option, you can either use ‘l’, -1, t, or + to highlightthe option or you can type the number of the option. Thenpress Enter. (You must press Enter to start the operation.)
You can press ESC any time you want to leave the menucurrently displayed and return to the previous one.
Modifying the Device List
If an installed device is missing from the Device List, you mustadd it to the list and test it carefully. At the following prompt,select N.
DEVICE LIST is correct ? (Y/N)
C-4 Performing System Diagnostics

You see this menu:
1 - Add device2 - Delete device
0 - Finish modification
To add a device to the list, select 1. The program displays a listof other devices that are not currently included in the DeviceList. You see a menu similar to this:
4 - Monochrome display adapter and CRT7 - Math coprocessor
12 - Alternate serial port21 - Alternate parallel port81 - Parallel port (on video adapter)
0 - Exit to DEVICE LISTI
Additional DEVICE LIST
Select the item you wish to add.
NateIf you want to type the number for an option that has twodigits (such as 12 or 81) you must hold down the Alt keywhile you type the number.
You can add as many devices as necessary. When the DeviceList is complete, select 0 (Exit).
To remove a device from the list, select 2 (Delete device). Thescreen displays the current Device List.
Performing System Diagnostics C-5

Select the item you wish to delete. You can delete as manydevices as necessary.
When the Device List is correct, select 0. The screen displaysthe modified Device List for a final check and these options:
If the list is correct, select 0.
You are now ready to select a test.
Selecting a TestFrom the Device List, select the device you wish to test. Beforethe test begins, you are asked how many times to perform thetest. You see this menu:
Number of times to test device
You can specify that the test be performed one time only or anynumber of times in the range from 1 to 9999. Running a testmultiple times is for reliability testing of essential functionsonly; in most cases, running a test only once is sufficient.
C-6 Performing System Diagnostics

To perform the test once, select 1. The program then displays asubmenu of more detailed tests for the device you are checking.
To perform the test multiple times, select 2. You see thisprompt:
Terminate checking if an errordetected ? (Y/N)
Select Y to terminate checking if the device produces an error,or N to repeat the tests regardless of an error. You see thisprompt:
Repeat times (1-9999) ? 1
To perform the test once, press Enter.
If you wish to run the tests more than once, type the number oftimes and press Enter.
For some devices, the computer does not display a submenu oftests to choose from. Instead, it performs all the tests that do notrequire you to enter a response. If you chose to test the devicemore than once, the computer runs all the tests and thenrepeats them in the same order.
You may see this message on the screen during the tests:
On errors, press any key to stop
If you see an error while one of the tests is running, press anykey to terminate the test.
Performing System Diagnostics C-7

Resuming From an Error
If an error occurs during a test, the test stops at that point, andan error code and error message appear. If you want to recordthe problem, you can print out the message on your printer. Yousee this prompt:
Do you want a printout of the errorm e s s a g e ( s ) ? (Y/N)
To continue without printing the error message, select N.
Before you request a printout, be sure your printer is ready andcontains paper. Then select Y. If the printer is not ready, thefollowing message and prompt appear:
Printer is not installed correctly.Install correctly before entering.Continue ? (Y/N)
Correct the problem and select Y to continue printing, or selectN to cancel printing.
After printing the error message, the program displays thisprompt:
Printout is finished. Press ENTER toreturn to the menu.
The program continues after an error in one of the followingways:
D It returns to the Device List, or
Ll If you are running multiple tests and are not terminating onan error, the program repeats the test that caused the error.
C-8 Performing System Diagnostics

The remainder of this appendix describes the tests you can runon the system’s internal devices and on the optional devicesinstalled on your computer. The program displays the title ofeach check on the screen.
For a complete list of the error codes and messages these testsmay display, see the table at the end of this appendix.
System Board Check
Use this option to check the operation of each majorcomponent on the system board, including:
LI The 80386SX CPU chip
CI The system ROM
Ci The real-time clock, CMOS RAM, and battery
Cl The main integrated circuits.
The checks made on the 80386SX CPU chip are extremelycomprehensive and ensure that the CPU instruction set,including protected-mode operation, is functioning correctly.
If an error occurs, make a copy or a printout of the error codeand message, and contact your Epson dealer or service center forassistance. Attempting to correct system board errors yourselfmay violate your warranty agreement.
Performing System Diagnostics C-9

Memory CheckUse this option to check all the memory currently installed inyour computer. The program reads the CMOS RAM to find thetotal amount of memory. If any settings are incorrect, run theSetup program (described in Chapter 2) to automatically set thecorrect amount of memory in CMOS RAM. If you installed anoptional memory card, you may need to adjust some DIP switchsettings on the card.
For this check, the program writes specific data into memoryand then reads it back in blocks of 64KB. It also makes a paritycheck on each block. A memory count is displayed after eachblock is tested without error. After the program checks the lastblock, you see a message such as the following:
001024 KB OK
If an error occurs, make a copy or a printout of the error codeand message, and contact your Epson dealer or service center.Attempting to correct memory errors yourself may violate yourwarranty agreement.
NoteExtended memory, which is normally not available toMS-DOS, is checked using the protected mode of the80386SX CPU chip.
Keyboard CheckUse this option to check the operation and the configuration ofthe keyboard. The program first checks the keyboard controller;during this check, you see the green indicator lights on thekeyboard flash.
C-10 Performing System Diagnostics
Before checking the operation of the keys, you must identifyyour keyboard layout so the test is appropriate for the keys onyour keyboard. A display appears, asking you to identify theshape of your Enter key. Choose the shape that matches theone on your keyboard, then press Enter.
The program displays your keyboard layout on the screen.When you press a key on the keyboard, an asterisk appears atthe corresponding location on the keyboard layout. If you holda key down, the asterisk begins to blink. If an asterisk does notappear at the correct location, there is a problem with yourkeyboard. Test each key.
You see these messages on the screen:
Press ESC followed by ENTER to exit.Press END followed by ENTER if screenand keyboard do not match.
If all the keys function correctly and match the charactersdisplayed, press ESC and then Enter.
If all the keys function, but the characters displayed do notmatch the keys, press ESC and then Enter. Then reselect thekeyboard test from the Device List, and check that you selectedthe correct keyboard layout. You can find diagrams of all theinternational keyboard layouts in the MS-DOS ReferenceManual.
If any key is incorrect, press End and Enter. Make a copy of theerror code and message, or print them out, and contact yourEpson dealer or service center.
Performing System Diagnostics C-11

Monochrome Display Adapter and CRT CheckUse this option to verify the operation of a monochrome displayadapter, VGA, or EGA card attached to a monochromemonitor. This test includes several checks that allow you toidentify particular problems related to the monochrome display.
You can select the individual checks from this menu:
MONOCHROME DISPLAY ADAPTER AND CRT CHECK MENU
0 - Exit
If an error occurs during any of these tests, record the error codeand message, or print them out. Then contact your Epson dealeror service center.
When you finish testing the device, select 0 to exit.
Monochrome Adapter Check
To check the monochrome adapter, select 1. The programchecks the video RAM (display memory) on the display adapterby writing certain data to memory, then reading it back andcomparing it to the written data. The program also tests thevideo enable signal of the display controller chip.
C-12 Performing System Diagnostics
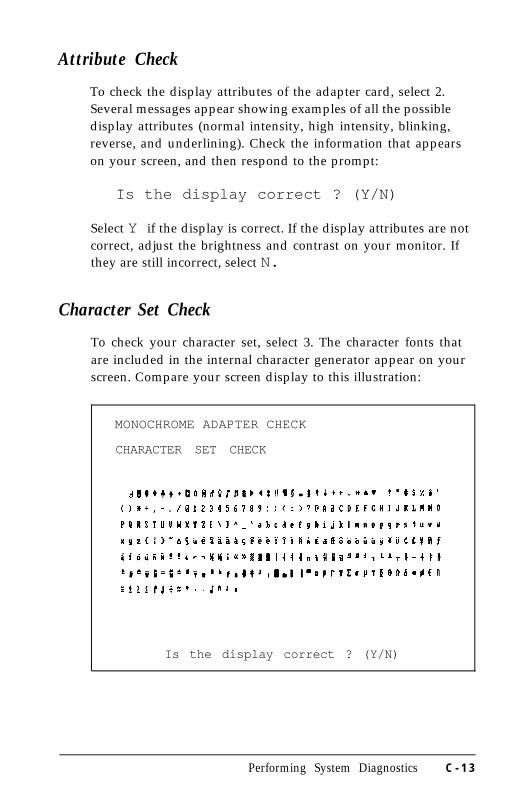
Attribute Check
To check the display attributes of the adapter card, select 2.Several messages appear showing examples of all the possibledisplay attributes (normal intensity, high intensity, blinking,reverse, and underlining). Check the information that appearson your screen, and then respond to the prompt:
Is the display correct ? (Y/N)
Select Y if the display is correct. If the display attributes are notcorrect, adjust the brightness and contrast on your monitor. Ifthey are still incorrect, select N.
Character Set Check
To check your character set, select 3. The character fonts thatare included in the internal character generator appear on yourscreen. Compare your screen display to this illustration:
MONOCHROME ADAPTER CHECK
CHARACTER SET CHECK
Is the display correct ? (Y/N)
Performing System Diagnostics C - 1 3
After checking the character fonts, respond to the prompt:
Is the display correct ? (Y/N)
If the characters match the illustration, select Y. If you find aproblem with the characters on the screen, select N to displaythe error message.
Video Check
To check the video output of your monochrome adapter,select 4. This check displays two different screens: black andintensified white. First you see the black screen; press any key todisplay the intensified white screen. Then press any key to endthis check.
You can use this test to adjust the size of the screen display. Thevertical and horizontal adjustments are located on yourmonitor.
Sync Check
This test is provided for service purposes only. If youaccidentally select this option, press any key to end the test.
Run All Above Checks
To run all the tests on the menu in sequence, select 6. Whenyou choose this option, all checks for the monochrome adapterand CRT are performed automatically in sequential order.Although you do not start each test, you must still supply theappropriate responses to progress from one test to the next.Press any key to return to the menu.
C-14 Performing System Diagnostics

Color Graphics Adapter and CRT Check
Use this option to check the operation of a color graphicsadapter (or MGA, EGA, or VGA) card and display. This testincludes several checks that allow you to identify particularproblems related to the color display. You can select theindividual checks from this menu:
COLOR GRAPHICS ADAPTER AND CRT CHECK MENU
1 - Color graphics adapter check2 - Attribute check3 - Character set check4 - 40-column character set check5 - 320X200 graphics mode check6 - 640X200 graphics mode check7 - Screen paging check8 - Light pen check9 - Color video check
10 - Sync check11 - Run all above checks
0 - Exit
If an error occurs during any of these tests, record the error codeand message, or print them out. Then contact your Epson dealeror service center.
When you finish testing the device, select 0 to exit.
Color Graphics Adapter Check
To check the color graphics adapter, select 1. The programchecks the video RAM (display memory) on the display adaptercard by writing test data to memory, and then reading it backand comparing it to the written data. The program also tests thevideo enable signal of the display controller chip.
Performing System Diagnostics C-15

Attribute Check
To check the display attributes of the color graphics adaptercard, select 2. Several messages appear showing examples of allthe possible display attributes and colors. Check theinformation on your screen, and respond to the prompt:
Is the display correct ? (Y/N)
Select Y if the display is correct. If the colors are not correct,adjust the controls on your monitor. If they are still incorrect,select N. Contact your dealer to verify any monitor problems.
Character Set Check
To check your 80-column character set, select 3. The characterfonts that are included in the internal character generator of thevideo adapter appear on your screen. Compare your screendisplay to the following illustration.
CHARACTER SET CHECK
Is the display correct ? (Y/N)
C-16 Performing System Diagnostics

After checking the character fonts, respond to the prompt:
Is the display correct ? (Y/N)
If the characters match the illustration, select Y. If you find aproblem with the characters on the screen, select N to displaythe error message.
40-column Character Set Check
To check your 40-column character set, select 4. The characterfonts that are included in the internal character generator aredisplayed on your screen. Compare the characters on yourscreen to the following illustration.
Is the display correct ? (Y/N)
After checking the character fonts, respond to the prompt:
Is the display correct ? (Y/N)
Performing System Diagnostics C-17
If the characters match the illustration, select Y. If you find aproblem with the characters on the screen, select N to displaythe error message.
320x200 Graphics Mode Check
To check your 320x200 graphics mode, select 5. The screendisplays three colored squares-green, brown, and red-againsta cyan background. These four colors are Color Set 0. If they arecorrect, select Y.
The same pattern appears again; this time the squares are cyan,white, and magenta, and the background is red. These colors arecalled Color Set 1. If these are also correct, select Y to end thetest.
If any colors are displayed incorrectly, first check theadjustment of your monitor, and make sure that both ends ofthe cable are plugged in firmly. If a problem still exists, select Nto display the error message.
C-18 Performing System Diagnostics
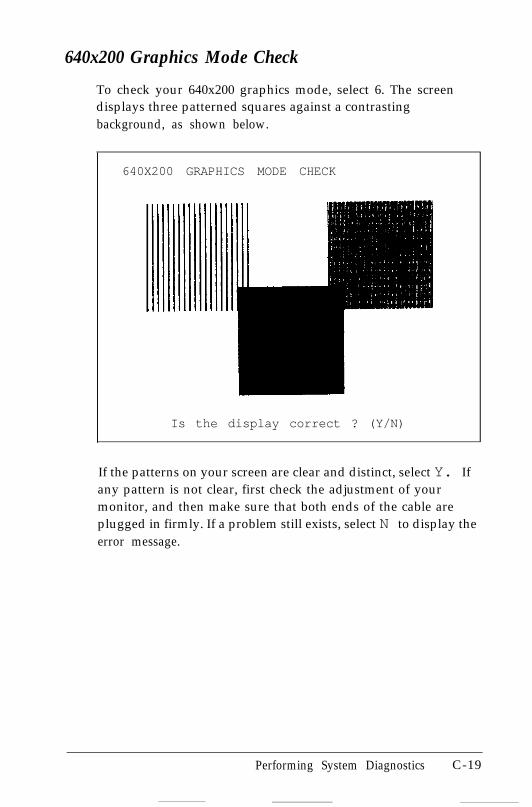
640x200 Graphics Mode Check
To check your 640x200 graphics mode, select 6. The screendisplays three patterned squares against a contrastingbackground, as shown below.
640X200 GRAPHICS MODE CHECK
Is the display correct ? (Y/N)
If the patterns on your screen are clear and distinct, select Y. Ifany pattern is not clear, first check the adjustment of yourmonitor, and then make sure that both ends of the cable areplugged in firmly. If a problem still exists, select N to display theerror message.
Performing System Diagnostics C-19

Screen Paging Check
To check the screen paging of your monitor, select 7. Thevideo RAM on the color graphics adapter is divided into eightindependent display pages (numbered 0 through 7). This testchecks the eight pages by first filling all eight with a numbercorresponding to the page, and then displaying each page inturn. You see the following pattern for screen 0:
SCREEN PAGING CHECK
Press any key for next page
Once you examine this screen, press any key to display the nextpage. The eight pages are displayed sequentially.
After the eighth page appears, you see the prompt:
Is the display correc t ? (Y/N)
If all eight pages are correct, select Y. If any page is filled withan incorrect number, select N to display the error message.
C-20 Performing System Diagnostics

Light Pen Check
To check the function of a light pen connected to the colorgraphics adapter card, select 8. This test checks that a light penconnected to the color graphics adapter is performingaccurately. When you select this check, you see these prompts:
Confirm light pen is connectedcorrectly before starting the check.
Start the check ? (Y/N)
After you verify that the light pen is connected properly,select Y.
You see this prompt:
PLACE LIGHT PEN ON CENTER OF WHITE BLOCK
Touch the center of the white block on the screen with thelight pen. When the light pen is correctly positioned, the blockmoves to another part of the screen for a second test. Afterthree successful tests, the check ends.
An error occurs if one of the following is true:
0 The light pen is not connected properly
Q The light pen is malfunctioning
Ll You do not touch the square within 12 seconds.
Performing System Diagnostics C-21

Color Video Check
This test displays 16 different screens, each a different color,and a message indicating the color. The screens show thefollowing colors in the order specified below:
1 - Black 9 - Gray2 - Blue 10 - Light blue3 - Green 11 - Light green4 - Cyan 12 - Light cyan5 - Red 13 - Light red6 - Magenta 14 - Light magenta7 - Brown 15 - Yellow8 - White 16 - White (high intensity)
To start this test, select 9. Press any key to display each screen.On the last screen, you see this prompt:
Is the display correct ? (Y/N)
If all the colors are correct, select Y to end the test. If any coloris incorrect, first check the adjustment of your monitor, andthen make sure that both ends of the cable are plugged infirmly. If a problem still exists, select N to display the errormessage.
Sync Check
This test is provided for service purposes only. If youaccidentally select this option, press any key to end the test.
C-22 Performing System Diagnostics
Run All Above Checks
To run all the tests on the menu in sequence, select 11. Whenyou choose this option, all checks for the color adapter andCRT are performed automatically in sequential order. Althoughyou do not start each test, you must still supply the appropriateresponses to progress from one test to the next. Press ESC toreturn to the menu.
Diskette Drives and Controller Check
Use this option to test the performance of the diskette drive(s)installed in your computer. This test includes several checksthat allow you to identify particular problems related to yourdiskette drives.
Before running these tests, format a diskette to use for the teststhat write data on the disk in the drive. To test a 1.44MB drive,you can use either a 1.44MB diskette or a 720KB diskette; but itis better to use the higher capacity diskette. In a 720KB drive,you can use only a 720KB diskette.
To test a 1.2MB drive, you can use a 1.2MB or a 360KBdiskette. However, to test the full capacity of the drive, use onlya 1.2MB diskette. In a 360KB drive, you can use only a 360KBdiskette.
Performing System Diagnostics C - 2 3

You can select the individual tests from the following menu.
DISKETTE DRIVE(S) AND CONTROLLER CHECK MENU
1 - Sequential seek check2 - Random seek check3 - Write, read check4 - Disk change check5 - Run all above checks
0 - Exit
Before it performs any checks, the program determines thenumber of diskette drives installed in your computer. If youhave more than one drive, you see this prompt each time youselect a test:
Enter drive number ? (1/2)
Select 1 (for drive A) or 2 (for drive B). If any errors occur,record the error code and message and contact your dealer.Always have the diskette drive serviced by your dealer or servicecenter.
When you finish testing the device and return to the menu,select 0 to exit.
Sequential Seek Check
This test checks the ability of the read/write heads to locate anypart of the diskette. This action by a read/write head is called aseek. During this test, each head seeks sequentially from theinnermost track to the outermost track. The innermost track istrack 79 for 1.44MB, 1.2MB, and 720KB diskettes and track 39for 360KB diskettes.
C-24 Performing System Diagnostics

Select option 1 from the menu to start this test. The programdisplays the number of each track it finds. For example, with a1.44MB diskette, the first message you see is:
Current track is 79
The track number counts down from 79 to 0 (39 to 0 for a360KB diskette). The seek is performed by each head, so you seethe count twice. If no errors occur, the menu is displayed.
Random Seek Check
This test is identical to the sequential seek check, except thatthe seek operation is performed on each track in random orderinstead of sequential order. Select option 2 from the menu tostart this test.
Write, Read Check
This test checks the ability of the selected disk drive to read andwrite data on a diskette. The test writes to and reads from eachtrack on the diskette, starting at the center.
WARNINGThis test destroys all data on the diskette in the selecteddrive.
Select option 3 from the menu to start this test.
Performing System Diagnostics C-25

If you have only one diskette drive, you see a prompt to removethe the Reference diskette and insert a blank diskette beforerunning the test. You see these messages:
If using drive 1, remove your Reference Disk.
Insert a formatted blank disk in the drivebefore starting the check.Any data present may be erased.
Start the check ? (Y/N)
Make sure the blank diskette you prepared is in drive A (l),then select Y. The program displays the current track number aseach cylinder is tested. For example, with a 1.44MB diskette,the first message you see is:
Current track is 79
After the test is over, be sure to replace the Reference diskettein drive A before you select another device from the Device Listor exit System diagnostics.
Disk Change Check
This option tests the ability of a diskette drive to detectwhether a diskette has been inserted or removed. Disk changescannot be detected by a 360KB diskette drive.
Select option 4 from the menu to start this test. The programchecks the selected drive type; if it is a 360KB drive, you seethese messages:
Drive d is a 360 KB drive.DISK CHANGE is not allowed with this type ofdrive.Press ENTER to return to the menu.
C-26 Performing System Diagnostics
When you run the test for 1.44MB, 1.2MB, or 720KB drive, yousee this prompt:
Remove the disk from drive 1.
Remove the diskette. The program displays the followingprompt:
Re-insert the disk into drive 1.
Reinsert the diskette. If no errors occur, the menu reappears.An error occurs if you do not remove or replace the diskette intime or if the drive is malfunctioning.
Run All Above Checks
To run all the tests on the menu in sequence, select 5. Whenyou choose this option, all checks for the diskette drive(s) andcontroller are performed automatically in sequential order.Although you do not start each test, you must still supply theappropriate responses to progress from one test to the next.Press ESC to return to the menu.
Math Coprocessor Check
Use this option to check the operation of the 80387SX mathcoprocessor if you have one installed in your computer. Tocheck the math coprocessor, select option 7 from the DeviceList.
The program runs a series of checks on the precision with whichthe coprocessor performs calculations and handles exceptions.
Performing System Diagnostics C-27
Parallel Port (Printer Interface) Check
Use this option to test the operation of the primary parallelprinter port. To perform the test, you must insert a special loop-back connector into the parallel port so that the computer cancheck individual pins of the port. Contact your dealer if youneed a loop-back connector. Note that a different connector isrequired to test the serial port.
_ _
When you select option 9 from the Device List, you see theseprompts:
Attach loop-back connector to parallelport before starting the check. .
Start the check ? (Y/N)
Insert the loop-back connector. Then select Y to start thecheck. The computer checks the port by writing and readingdata and control information, and reports errors for any pinsthat are faulty. Note that if you connect a printer cable insteadof a loop-back connector, you will get errors.
Alternate Parallel Port Check
Use this option to test the operation of an additional parallelport. To perform the test, you must insert the special loop-backconnector into the alternate parallel port so that the computercan check individual pins of the port.
This test is similar to the Parallel Port Check. For more details,see the description of the Parallel Port (Printer Interface)Check.
C-28 Performing System Diagnostics

Parallel Port (on Video Adapter) Check
Use this option to test the operation of an additional parallelport on a video adapter. To perform the test, you must insert thespecial loop-back connector into the parallel port on the videoadapter so that the computer can check individual pins of theport.
This test is similar to the Parallel Port Check. For more details,see the description of the Parallel Port (Printer Interface)Check.
Serial Port (RS-232C Port) CheckUse this option to test the functions of the primary serialcommunications (RS-232C) port. To perform the test, you mustinsert a special loop-back connector into the RS-232C port sothat the computer can check individual pins of the port.Contact your dealer if you need a loop-back connector. Notethat a different connector is required to test the parallel port.
When you select option 11 from the Device List, you see theseprompts:
Attach loop-back connector to serialport before starting the check.
Start the check ? (Y/N)
Insert the loop-back connector. Then select Y to start thecheck.
Performing System Diagnostics C-29
First, the program checks the serial port control lines to see thatthey are able to change from high to low and vice versa. Nomessages are displayed during this part of the test unless an erroroccurs.
The second test is an echo back check during which the portsends data to itself in a fixed data format, at all the possiblebaud rates. When this test begins, you see these messages:
RS-232C echo back check - at various baud ratesCurrent baud rate is 75Current test data is 00
Each baud rate is tested in turn, and the display informs you ofthe progress of the test. If the port does not become readycorrectly, a timeout error occurs. If any data received does notmatch the data sent, a verify error occurs, and the computerreports the transmitted and received data at the time of theerror.
The final test is an echo back check during which the portsends data to itself at 9600 baud, using various data formats. Atthe start of the test, you see these messages:
RS232C echo back check-with various data formatsCurrent data format: 5 data bits, 1 stop bit,
parity - NONECurrent test data is 00
Once again, if any data received does not match the data sent, averify error occurs, and the computer reports the transmittedand received data at the time of the error.
C-30 Performing System Diagnostics
Alternate Serial Port Check
Use this option to test the functions of an additional serialcommunications (RS-232C) port. To perform the test you mustinsert a special loop-back connector into the alternate serialport so that the computer can check individual pins of the port.
This test is identical to the check for the primary serial port. Formore details, see the description of the Serial Port (RS-232CPort) Check.
Dot-matrix Printer Check
Use this option to check the following:
Ei The operation of your printer in IBM-compatibility mode
D The compatibility of your printer with the extendedcharacter set your computer uses
LI The ability of your printer to produce bit-image graphicsand print images of the graphics screen.
When you select option 14 from the Device List, you see thisprompt:
Is dot-matrix printer on-line ? (Y/N)
Check that your printer is connected to the computer and thatit is turned on, loaded with paper, and online. Select Y tocontinue, or N to return to the menu.
Performing System Diagnostics C-31

When you continue the test, the program checks that theprinter is responding correctly. This test detects whether theprinter is offline or whether an interface error exists. If no errorsoccur, the computer sends a repeating sequence of ASCIIcharacters and bit-image data to the printer until you press anykey. The pattern looks like this:
The text data includes all the characters commonly used byprograms that require foreign languages or graphic characters.If your printer prints different characters than you see in theillustration, you may need to be careful with certain software.The bit-image data is sent to the printer using a command(ESC K) compatible with Epson and IBM printers.
NoteEven if the test runs only for a short time, your printer maystore many characters in its buffer. To stop printing, set theprinter offline.
C-32 Performing System Diagnostics

Hard Disk Drive(s) and Controller CheckUse this option to test the performance of the hard disk drive(s)installed in your computer. If any errors occur, have your dealeror service center check and service the drive. When you selectoption 17 from the Device List, you see this menu:
HARD DISK DRIVE(S) AND CONTROLLER CHECK MENU
1 - Seek check2 - Write, read check3 - Read, verify check4 - Run all above checks
0 - Exit 1
When you select a check from this menu, the programdetermines the number of hard disk drives installed in yourcomputer. If you have more than one physical drive, then eachtime you select a test you see this prompt:
Enter drive number ? (1/2)
Select 1 for the first hard disk or 2 for the second.
When you finish testing the device and return to the menu,select 0 to exit.
Seek Check
This test checks the ability of the read/write heads to locate anypart of the hard disk. This action by a read/write head is called aseek. During this test, each head seeks each cylinder of the diskin sequence, starting from the center.
Performing System Diagnostics C-33
Select option 1 from the menu to start this test. The programdisplays the number of each cylinder it finds. For example, witha hard disk, the first message you see is:
Current cylinder is nnn
where nnn is the largest cylinder number used on the drive. Thecylinder number counts down to 0. The seek is performed by theread/write heads simultaneously, so you see the cylindernumbers only once. If no errors occur, the menu reappears.
Write, Read Check
This check tests the ability of the hard disk drive to read andwrite data. The test writes to and reads from each sector of theinnermost cylinder of the disk, using each head.
NoteThis test destroys all data on the innermost cylinder of theselected hard disk drive. This cylinder is reserved fordiagnostics, and is never used for storage by MS-DOS or anyother operating system. Therefore, data created byapplication programs is not destroyed.
Select option 2 from the menu to start this test. You see thesemessages:
The data on the highest physicalcylinder may be destroyed by thecheck.
Start the check ? (Y/N)
Select Y to continue with the test. You do not see a cylindercount during the test. If no errors occur, the program returns tothe menu.
C-34 Performing System Diagnostics

If an error occurs, make a note of the code and message. Thenuse the Non-destructive surface analysis (option 3 on the HardDisk Format Menu) to check the condition of the hard disk.
If this analysis shows no other problems with the disk, followthese steps:
1. Back up all the files on your hard disk.
2. Reformat the disk using option 2, Format hard disk, on theOperation Menu.
3. Install MS-DOS on the hard disk according to theinstructions in the MS-DOS Installation Guide.
4. Restore your files.
Read, Verify Check
This test reads and verifies data from ‘all tracks of the disk,checking each cylinder and using all read/write heads.
Select option 3 from the menu to start this test. The programdisplays the number of each cylinder it finds. For example, witha hard disk, the first message you see is:
Current cylinder is nnn
The cylinder number counts down to 0. At the end of the test,you see a table of the results, as follows:
BAD TRACKS ................... nREAD ERROR TRACKS ............ n
GOOD TRACKS .................. n n n n
Press ENTER to return to the menu
Performing System Diagnostics C-35
Press Enter when you have viewed the table. If the results showany read error tracks, run the write/read test (described above),and follow the instructions there.
Run All Above Checks
To run all the tests on the menu in sequence, select 4.
When you choose this option, all checks for the hard diskdrive(s) and controller are performed automatically insequential order. Although you do not start each test, you muststill supply the appropriate responses to progress from one test tothe next. The first prompt you see is:
The data on the highest physicalcylinder may be destroyed by thecheck.
Start the check ? (Y/N)
Select Y to continue with the test.
C-36 Performing System Diagnostics
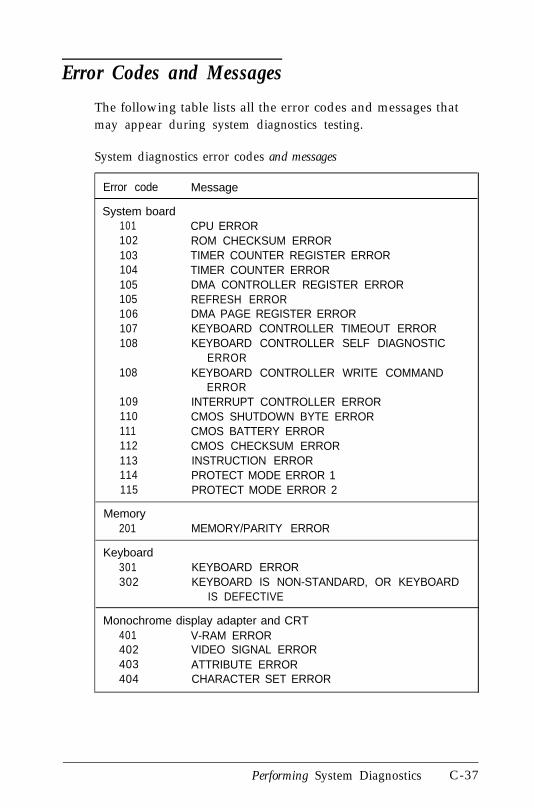
Error Codes and Messages
The following table lists all the error codes and messages thatmay appear during system diagnostics testing.
System diagnostics error codes and messages
Error code Message
System board101 CPU ERROR102 ROM CHECKSUM ERROR103 TIMER COUNTER REGISTER ERROR104 TIMER COUNTER ERROR105 DMA CONTROLLER REGISTER ERROR105 REFRESH ERROR106 DMA PAGE REGISTER ERROR107 KEYBOARD CONTROLLER TIMEOUT ERROR108 KEYBOARD CONTROLLER SELF DIAGNOSTIC
ERROR108 KEYBOARD CONTROLLER WRITE COMMAND
ERROR109 INTERRUPT CONTROLLER ERROR110 CMOS SHUTDOWN BYTE ERROR111 CMOS BATTERY ERROR112 CMOS CHECKSUM ERROR113 INSTRUCTION ERROR114 PROTECT MODE ERROR 1115 PROTECT MODE ERROR 2
Memory201 MEMORY/PARITY ERROR
Keyboard301 KEYBOARD ERROR302 KEYBOARD IS NON-STANDARD, OR KEYBOARD
IS DEFECTIVE
Monochrome display adapter and CRT401 V-RAM ERROR402 VIDEO SIGNAL ERROR403 ATTRIBUTE ERROR404 CHARACTER SET ERROR
Performing System Diagnostics C-37

System diagnostics error codes and messages (continued)
Error code Message
Color graphics adapter and CRT501 V-RAM ERROR503 ATTRIBUTE ERROR504 CHARACTER SET ERROR505 40-COLUMN CHARACTER SET ERROR506 COLOR GRAPHICS ERROR507 640 x 200 GRAPHICS MODE ERROR508 SCREEN PAGING ERROR509 LIGHT PEN ERROR510 COLOR VIDEO ERROR
Diskette drive(s) and controller601 DISKETTE DRIVE CONTROLLER ERROR602 SEQUENTIAL SEEK ERROR603 RANDOM SEEK ERROR604 WRITE ERROR605 READ ERROR606 DISK CHANGE CHECK REMOVE ERROR607 DISK CHANGE CHECK INSERT ERROR
Math coprocessor701 COPROCESSOR NOT INSTALLED702 COPROCESSOR INITIALIZE ERROR703 COPROCESSOR INVALID OPERATION
MASK ERROR704 COPROCESSOR ST FIELD ERROR705 COPROCESSOR COMPARISON ERROR706 COPROCESSOR ZERO DIVIDE MASK ERROR707 COPROCESSOR ADDITION ERROR708 COPROCESSOR SUBTRACTION ERROR709 COPROCESSOR MULTIPLICATION ERROR710 COPROCESSOR PRECISION ERROR
Parallel port (printer interface)901 ERROR PIN p
Serial port (RS-232C port)1101 control signal ALWAYS LOW1101 control signal ALWAYS HIGH1102 TIMEOUT ERROR1103 VERIFY ERROR
C-38 Performing System Diagnostics

System diagnostics error codes and messages (continued)
Error code Message
Alternate serial port1201 control signal ALWAYS LOW1201 control signal ALWAYS HIGH1202 TIMEOUT ERROR1203 VERIFY ERROR
Dot-matrix printer1401 status
Hard disk drive(s) and controller1701 SEEK ERROR1702 WRITE ERROR1703 READ ERROR1704 HEAD ERROR1705 ERROR DETECTION ERROR1706 ERROR CORRECTION ERROR
Alternate parallel port2101 ERROR PIN p
Parallel port (on video adapter)81nn ERROR PIN p
Performing System Diagnostics C-39

C-40 Performing System Diagnostics

Appendix DPhysically Formatting a Hard Disk
This appendix describes how to physically format a hard disk.Sometimes called a low-level format, this procedure should notbe confused with the logical format performed by the MS-DOSFORMAT command. The physical formatting of a hard disk is aseparate step that is usually done at the factory by the diskmanufacturer.
If your Equity 386SX came with a hard disk, that disk hasd already been physically formatted. You need only follow the- instructions in the MS-DOS Installation Guide to prepare your
hard disk for use.
You may need to physically format a hard disk, however, ifeither of the following is true:
Ci Your hard disk is producing numerous read/write errors oryou are having other serious problems with the disk.Sometimes, after a hard disk has been used for a long time,the disk’s data becomes fragmented, causing the disk tofrequently produce errors. You may need to reformat thedisk in this case.
Cl You have installed a hard disk in your computer that hasnever received the low-level format.
Physically formatting a hard disk erases any data it contains.If you have any data on the disk or you are unsure ifformatting is necessary, contact your Epson dealer forassistance.
Physically Formatting a Hard Disk D-1

In addition to destroying all the data on the hard disk,formatting removes any partitions defined on the disk bySELECT or FDISK and the logical formatting performed bySELECT or FORMAT. After you physically format a new orused hard disk (using option 1 or 2 of the Hard Disk FormatMenu), you need to install MS-DOS. Follow the instructions inyour MS-DOS Installation Guide. The installation processautomatically partitions and formats the hard disk to prepare itfor use.
Choosing the Type of Format
Follow these steps to display the formatting options:
1. Insert the Reference diskette in drive A.
2. Turn on or reset the computer. The computer automaticallyloads MS-DOS and displays the Operation Menu.
3. Press 2 to highlight Format hard disk and pressEnter. The Hard Disk Format Menu appears on the screen:
HARD DISK FORMAT MENU
1 - Format2 - Destructive surface analysis3 - Non-destructive surface analysis
0 - Exit
D-2 Physically Formatting a Hard Disk
The formatting options work as follows:
Format first scans the disk (if it has no defective tracktable) for defective (bad) tracks and lets you decide whichtracks to mark as bad. Then the program formats the diskand marks those bad tracks so they are never used to storedata.
Destructive surface analysis tests theentire disk for read/write errors or unflagged bad tracks andupdates the defective track table. Because this option writesand reads data on the disk, it destroys all data on any trackthat produces an error. You cannot run the Destructivesurface analysis on a disk that has never been formatted.
Non-destructive surface analysis checksthe disk for unflagged bad tracks without destroying data.You cannot run the Non-destructive surface analysis on adisk that has never been formatted.
The type of format you choose depends on whether you arereformatting a disk that has been used or formatting a new diskfor the first time. See the recommendations below.
Reformatting a Used Disk
If you are reformatting a disk you have been using that appearsto be damaged, follow these steps:
1. Use the Non-destructive surface analysis test to check forunflagged bad tracks.
2. If errors occur during the Non-destructive analysis, useBACKUP to back up the data on your disk. (See yourMS-DOS Reference Manual for instructions on how to useBACKUP.)
3. Run the Destructive surface analysis.
Physically Formatting a Hard Disk D-3
Formatting a New Disk
Many hard disk drives come with a printed list of bad tracks butwithout the bad tracks flagged on the disk. Other hard disks(such as those supplied by Epson) come with the bad tracksalready flagged. If you are formatting a new hard disk that hasnever been formatted, select the 1 -Format option to formatthe disk.
Selecting an Option
When using this program, you often need to select an optionfrom a menu. There are two ways to do this:
CI You can use the arrow keys (? L t +) to move thehighlighted cursor block to the option and press Enter.
Ci You can type the number of the option and press Enter.
You can select almost any option that appears on the screenwhile you are formatting the disk using either of these twomethods. Therefore, when the instructions in this appendix tellyou to select an option, you can either use the arrow keys (T 1t +) to highlight the option or you can type the number ofthe option. Then press Enter. (You must press Enter to startthe operation.)
Starting the Formatting Process
If you have more than one hard disk drive, you see this prompt:
Enter drive number ? (1/2)
Select 1 for the first hard disk or 2 for the second hard disk.Then see the instructions below for the Hard Disk FormatMenu option you want to use.
D-4 Physically Formatting a Hard Disk
Option 1, Format
If you select 1 -Format from the Hard Disk Format Menu,you see the following (for a disk that does not have a defectivetrack table):
Format Hard Disk < Drive 1: >
Scan hard disk to get defective trackinformation ? (Y/N)
(If the disk already has a defective track table, you do not seethe message because the disk does not need to be scanned forbad tracks.)
Select Y to scan the disk or N to skip the scanning process.
If you select Y, the program scans the disk and displays thesemessages during the process:
Scanning for flagged bad tracks...
Head : nnn Cylinder : nnnnn
You see the head and cylinder numbers decrease as the programprogresses. After scanning the disk, the program displays theresults, such as the following:
Scanning finished.
Count of tracks flagged bad EC 1Count of tracks with other errors = 0Count of good tracks = 4884
Next you see the following prompt:
Accept recommended skewed sectors informat : 1 ? (Y/N)
Physically Formatting a Hard Disk D-5

For the hard disk in the Equity 386SX, it is best to accept therecommended skewed sector (also called the interleave factor)of 1. For other hard disk drives, you may need to change thisvalue if the documentation that came with the hard diskrecommends a different number.
To accept the default, select Y.
To enter a new value, select N. You see the following prompt:
Enter new skewed sectors informat (1-16):
Enter a number from 1 through 16 which equals the maximumsector number for the drive minus 1. The maximum sectornumber varies, depending on the drive type. Then press Enter.
Next you see this prompt:
Accept recommended skewed sectors perhead in format : 0 ? (Y/N)
For an Epson hard disk drive, accept the recommended valueof 0. For another type of drive, use the value recommended inthe documentation for the drive.
To accept the default, select Y.
To enter a new value, select N. You see the following prompt:
Enter new skewed sectors per headin format (0-16):
Enter a number from 0 through 16 which equals the maximumsector number for the drive minus 1. The maximum sectornumber varies, depending on the drive type. Then press Enter.
D-6 Physically Formatting a Hard Disk
The program now allows you to edit the table of defectivetracks:
At the bottom of the table is this prompt:
Modify defective track table ? (Y/N)
Select N to leave the table as it is. Then skip the followingsection and go on to “Formatting the Disk,” below.
To modify the defective track entries, select Y.
Modifying the Defective Track Table
If you select Y to modify the table, you see the following optionsat the bottom of the table:
Defective Track Table : Move box cursor to desired track with cursor keyA = Add track, C = Change track, D = Delete track, F = Finish editingEnter command:
To add a bad track, follow these steps:
1. Press A. You see this prompt:
Enter cylinder number (1 -nnnn):
Physically Formatting a Hard Disk D-7

2. Type the number of the cylinder containing the bad trackand press Enter. You see this prompt:
Enter head number (0 -nn):
3. Type the head number for the bad track and press Enter.
To cancel the operation, press Enter without typing a value.
When you complete a valid entry, it appears in the table andyou can add the next bad track, if necessary.
If you make a mistake, move the cursor block to the incorrecttrack and press C to alter the track data or press D to removethe track from the table. Change the track data just as you add atrack.
The maximum valid cylinder number and head number (nnnnand nn) vary according to the capacity of the hard disk. If youenter an invalid cylinder or head number, a reminder of therange of values appears and the program asks you to enter thevalue again.
When you finish adding all the bad tracks, press Enter withouttyping a value. After you complete editing, check the entries inthe defective track table. When you are sure the table is correct,press F. The program displays a warning about the consequencesof proceeding with formatting.
D-8 Physically Formatting a Hard Disk

Formatting the Disk
When you are ready to start formatting the disk, you see thefollowing warning:
WARNING? ALL DATA WILL BE DESTROYED INALL PARTITIONS OF HARD DISK, NOT JUST INMS-DOS PARTITION!Do you want to start formatting ? (Y/N)
If you are not sure you want to format the hard disk, select N. Ifyou are sure, select Y; the program gives you one more chanceto cancel:
DOUBLE CHECK THAT YOU HAVE BACKUP
DISKETTE COPIES OF ALL YOUR FILES.Do you want to exit and check yourfile copies ? (Y/N)
Select Y to cancel formatting (and check your backups) or N tocontinue.
If you continue with formatting, you see:
Format started.
Head : nnn Cylinder : nnnnn
Physically Formatting a Hard Disk D-9
You see the head and cylinder numbers decrease as the programprogresses. When formatting is complete, the program flags anybad tracks and you see a series of messages like these:
Format finished.
Flagging bad tracks...
Cylinder is nnnn, head is nn
Format completed.
Press ENTER to return to the menu.
Press Enter to return to the Hard Disk Format Menu.
Option 2, Destructive Surface AnalysisYou can perform a Destructive surface analysis of your hard diskto accurately locate any bad tracks, and flag any bad tracks thatare not flagged.
WARNINGIf any errors occur during this check, all data on the trackthat produces the error is destroyed. For this reason, if youthink that an unflagged bad track is causing trouble, first runoption 3, Non-destructive surface analysis, to check the disksurface,
The Destructive surface analysis operates by a complex processof writing, reading, and verifying information on every track ofthe hard disk, except for tracks that are already flagged as badtracks.
D-10 Physically Formatting a Hard Disk
To start this test, select 2-Destructive surfaceanalysis from the Hard Disk Format Menu. You see thesemessages:
Analyze Hard Disk <Drive 1:>
Read/Save/Write/Read/Restore/Readcheck for all tracks...
Current cylinder is nnnn
As the program checks each track, it counts the cylindernumbers (nnnn) down to zero. When the test is complete, theprogram displays a report on the status of the disk, including atable of unflagged tracks that produced write, read errors-suchas the following:
Analysis finished.
Count of tracks flagged bad zz nCount of tracks with write, read errors = nCount of good tracks = nnnn
No write, read error was detected.
No data was destroyed.
Press ENTER to return to the menu.
If the program finds one bad track that is not flagged, thesummary would show one track with a write, read error. Thereport is followed by a table like this:
Write, Read Error Tracks
Cylinder Head Cylinder Head C y l i n d e r Head Cylinder Head I
Confirm to register the tracks in the Write, Read Error Track1 .a::: as :d tracks.,Y,N) 1
Do you want to register the error tracks as bad tracks?
Physically Formatting a Hard Disk D-11
To flag the error tracks as bad, select Y. You see a list of thetracks as they are flagged and these messages:
Flagging bad tracks...
Cylinder is 237, head is 2
Press ENTER to return to the menu.
Press Enter to return to the Hard Disk Format Menu.
Option 3, Non-destructive Surface Analysis
The Non-destructive surface analysis does not destroy any data,and you can use it to safely check the condition of your harddisk drive. However, this test does not flag any bad tracks itdetects.
To s tar t the tes t , se lec t 3 -Non-des t ruc t ive sur faceanalysis from the Hard Disk Format Menu. You see thesemessages:
Analyze Hard Disk <Drive 1:>
Read/Verify check for all tracks...
Current cylinder is nnnn
As the program checks each track, it counts the cylindernumbers down to zero. When the test is complete, the programdisplays a report on the status of the disk, such as the following:
Analysis finished.
Count of tracks flagged bad = nCount of tracks with read, verify errors = nCount of good tracks = nnnn
No read, verify error was detected.
D-12 Physically Formatting a Hard Disk
If the program finds errors, the screen displays a table of thetracks that gave errors, similar to the one the Destructivesurface analysis displays.
After the status reports, you see this message:
Press ENTER to return to the menu.
Check the information displayed. Then press Enter to return tothe Hard Disk Format Menu.
Exiting the Hard Disk Format Menu
To leave the Hard Disk Format Menu, select 0 -Exit. Thescreen displays the Operation Menu. At the Operation Menu,select O-Exit to DOS for more utilities.
If you formatted the hard disk with option 1 or 2, you must nowinstall MS-DOS on the hard disk to prepare it for use. Followthe instructions in your MS-DOS Installation Guide. (Theinstallation process automatically partitions and formats thehard disk.)
Physically Formatting a Hard Disk D-13

-
D-14 Physically Formatting a Hard Disk
-
-
-

Appendix EHard Disk Drive Types
This appendix lists the types of hard disk drives you can use inyour Equity 386SX. Check this table and the documentationsupplied with your hard disk to find the correct number for thetype of hard disk drive installed in your computer. You need toenter this number when you set the hard disk drive parametersin the Setup program. See Chapter 2 for instructions.
Hard disk drive types
Hard Disk Drive Types E-1

Type no
27
28
29
30
31
32
33
34
35
36
37
38
39
40
41
42
43
44
45
46
47
48
49
50
51
52
53
54
55
56
57
58
59
60
61
62
63
64-255
Cylinders Heads Sectors Precomp
698 7 17976 5 17
306 4 17
611 4 17
732 7 17
1023 5 17
300
488
0
306
300
1022 5 34 -
1022 5 36 -
1024 8 17 512
828 10 34 -
1024 5 17 512
615 8 17 128
820 6 17 -
830 10 17 -
1024 9 17 -
ESDI 828 7 34 -
ESDI 967 5 36 -
ESDI 967 7 36 -
ESDI 967 9 36 -
ESDI 1022 7 34 -
ESDI 967 5 34 -
ESDI 967 7 34 -
ESDI 967 9 34 -
AT 980 5 17 -
AT 776 8 33 -
AT 745 4 28 -
AT 965 5 17 -
AT 965 10 17 -
- -
T-
Landing
732
977
340
663
732
1023
1022
1022
1023
828
1023
618
820
830
1023
828
967
967
967
1022
967
967
967
979
775
744
Auto
Auto
-
MB-40.6
40.5
10.2
20.4
42.6
42.5
84.8
89.8
68.0
37.5
42.5
40.8
40.8
68.9
76.5
96.2
85.0
119.0
'53.0
18.8
80.3
12.4
144.5
40.5
100
40.540
80
-
Drive name
none
none
none
none
none
none
none
none
CDC 94216-106(3)
CDC94216-106
(4)Toshiba MK-156F
(5)NECD5147H
none
Seagate ST251
Toshiba MK56FB
Seagate ST4096
Toshiba MK-154F
CDC 94166-101
CDC 94166-141
CDC 94166-182
Micropolis 1354A
CDC 94166-101(3)
CDC 94166-141(3)
CDC 94166-182(3)
CONNERCP-344
CONNERCP-3104
Mini 8051A native mode
Quantum 40AT(6)
Quantum pro 8OAT(6)
none
E-2 Hard Disk Drive Types

Notes:
1. Miniscribe 8425F, Seagate ST125
2. Conner CP-344 or Miniscribe 8051A can be used as type 17
3. For Western Digital ESDI HDC or Drive Maker default setting
4. Micropolis 1325, Ataal 3085, Lanstor Lan64, Maxtor XT1O85, Newbury NDR1085
5. Micropolis 1323A, Miniscribe 3035, Microscience HH1050, Seagate ST4053
6. The landing zone value is 964
Types 1 through 47 are allocated at 0FE401 h, IBM new AT-compatible area.
Types 48 through 63 are allocated at 0FD2F1h to 0FDFFOh. extended Hard Drive Parameter area.
The factory-installed hard disk drive types for the Equity 386SX are number 17 (40.7MB) and number 60 (100MB)
The settings for types 59,60,61, and 63 are stored in the computer’s BIOS, so you do not need to enter theparameters for these drives in the Setup program.
Hard Disk Drive Types E-3

E-4 Hard Disk Drive Types
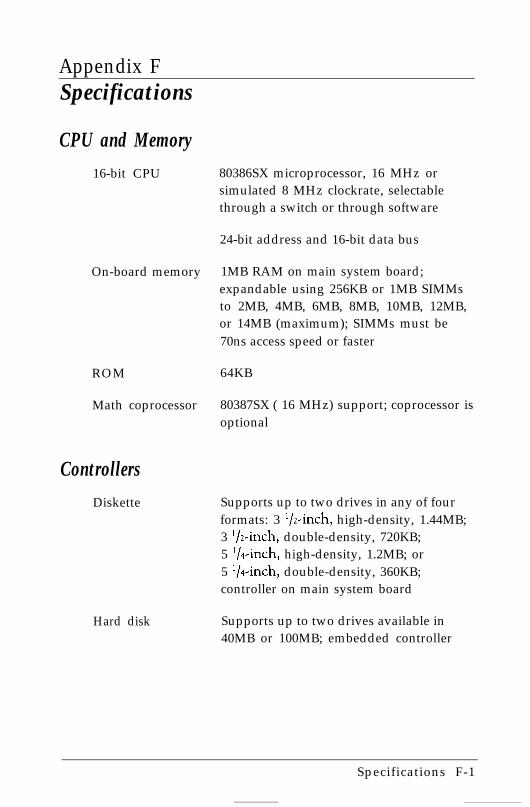
Appendix FSpecifications
CPU and Memory16-bit CPU
On-board memory
ROM
Math coprocessor
ControllersDiskette
Hard disk
80386SX microprocessor, 16 MHz orsimulated 8 MHz clockrate, selectablethrough a switch or through software
24-bit address and 16-bit data bus
1MB RAM on main system board;expandable using 256KB or 1MB SIMMsto 2MB, 4MB, 6MB, 8MB, 10MB, 12MB,or 14MB (maximum); SIMMs must be70ns access speed or faster
64KB
80387SX ( 16 MHz) support; coprocessor isoptional
Supports up to two drives in any of fourformats: 3 ‘/z-inch, high-density, 1.44MB;3 i/z-inch, double-density, 720KB;5 ‘/s-inch, high-density, 1.2MB; or5 i/4-inch, double-density, 360KB;controller on main system board
Supports up to two drives available in40MB or 100MB; embedded controller
Specifications F-1

Interfaces
Serial
Parallel
Auxiliary
Option slots
Speaker
Clock/calendarRAM
Power Supply
RS-232C, programmable, asynchronous;DB-9P male connector
Standard 8-bit parallel; DB-25S femaleconnector
Mini DIN (6-pin) connector for IRQ 12mouse or other device
Five standard input/output expansion slots(one with 8-bit bus and four with 16-bitbus); one special slot occupied by a serial/parallel interface card
Internal
Real-time clock, calendar, and 64-byteCMOS RAM for configuration; batterybackup
Switching type, fan-cooled, 115/230 VAC(switch-selectable), 140 W; +5 VDC,+ 12 VDC, - 5 VDC, - 1 2 VDC; 50/60 Hz
Mass Storage
Three half-height drives maximum
Standard
Optional
3 ‘/z-inch diskette drive, 1.44MB (high-density) storage capacity
3 ‘/z-inch diskette drive, 720KB (double-density) storage capacity
F-2 Specifications

Optional
Optional
Optional
Optional
Optional
Keyboard
Layout
Function keys
3 ‘/r-inch diskette drive, 1.44MB (high-density) storage capacity
5 l/4-inch diskette drive, 1.2MB (high-density) storage capacity
5 ‘/d-inch diskette drive, 360KB (double-density) storage capacity
3 ‘/I-inch hard disk drive (in a 5 l/4-inchmounting frame), 40MB storage capacity
3 ‘/z-inch hard disk drive (in a 5 ‘/J-inchmounting frame), 100MB storage capacity
Detachable, three positions,101 sculpted keys
58-key QWERTY main keyboard;17-key numeric/cursor pad; 10 cursor keys;16 function keys (user-definable)
Four levels (normal, shift, control,alternate); user-definable
Environmental Requirements
Temperature Operating range: 41° to 104° F(5° to 35° C)
Storage range: -40° to 158° F(40° to 60° C)
Humidity Operating range: 20% to 80%,non-condensing
Storage range: 5% to 95%,non-condensing
Specifications F-3

Physical Characteristics
Width 15.7 inches (400 mm)
Depth 16.4 inches (416.5 mm)
Height 6.2 inches (157 mm)
Weight(withoutkeyboard)
Single diskette drive model: 23.2 lb(10.5 kg)40MB or 100MB hard disk drive model:24.9 lb (11.3 kg)
F-4 Specifications
Glossary
Absolute pathname
A pathname that begins with the backslash character. Anabsolute pathname tells MS-DOS how to find its way to a givendirectory, starting at the root directory. See also Relativepathname.
Address
A number or name that identifies the location whereinformation is stored in a computer’s memory.
Application program
A software program designed to perform a specific task, such asa word processing or spreadsheet program.
ASCII
American Standard Code for Information Interchange. Astandardized coding system for representing characters, such asnumbers, letters, and graphic symbols. An ASCII characteroccupies one byte of storage. Files transmitted in ASCII codecan be used by many different computers, printers, andprograms.
Asynchronous
A method of data transmission in which one machine sendsdata one character at a time to another, without either machinepreparing for the transmission.
AUTOEXEC.BAT file
The batch file that is executed automatically when you loadMS-DOS. See also Batch file.
G l o s s a r y 1

Auto speed
The Equity 386SX feature that enables it to automaticallyswitch from 16 MHz to simulated 8 MHz speed when accessingthe diskette drive (for copy-protected programs).
Backup
An extra copy of a program, data file, or disk, kept in case yourworking copy is damaged or lost.
Base memory
The amount of memory in the computer below 1MB that isavailable to MS-DOS and application programs-usually640KB. Also called conventional memory or main memory.
Batch file
A type of file that lets you execute a series of MS-DOScommands by typing one command. Batch files are text fileswith the filename extension .BAT. In a batch file, eachcommand is entered on a separate line. When you type thefilename, MS-DOS executes all the commands in that filesequentially.
Baud rate
A measure of the speed of data transmission. Usually equivalentto bits per second.
BIOS
Basic Input/Output System. Routines in ROM (Read OnlyMemory) that handle basic input/output functions of theoperating system.
2 Glossary

Bit
A binary digit (0 or 1). The smallest unit of computer storage.The value of a bit represents the presence (1) or absence (0) ofan electric charge.
Boot
To load the operating system into the computer’s memory.
Byte
A sequence or group of eight bits that represents one character.
CGA
Color Graphics Adapter. A type of display adapter card that cangenerate up to 25 lines of text with 80 characters on each line,monochrome graphics at 640 x 200 resolution, or four-colorgraphics at 320 x 200 resolution.
Character
Anything that can be printed in a single space on the page orthe screen; includes numbers, letters, punctuation marks, andgraphic symbols.
CMOS
Complementary Metal-Oxide Semiconductor. A method ofmaking low-power silicon chips.
Code
A system of symbols for representing data or instructions. Alsoany software program or part of a program.
Code page
A table that defines the country-specific or language-specificcharacter set you are using.
Glossary 3

Command
An instruction you enter (usually on a keyboard) to direct yourcomputer to perform a specific function.
Command prompt
The symbol or message that tells you MS-DOS is loaded andready to receive instructions. The default command promptdisplays the current drive and directory. If you are logged ontodrive A, the command prompt looks like this: A>.
Configuration
The particular setup of a group of components. For example, atypical system configuration consists of a computer with onediskette drive and one hard disk drive and a monitor, connectedto a printer.
Control code
A command (generated when you hold down Ctrl and pressanother key on the keyboard) that instructs the computer toperform a specific function.
Conventional memory
The memory on the main system board (up to 640KB) used byMS-DOS and application programs. Also called base memory ormain memory.
Coprocessor
An optional device that enables the computer to process certainmathematical calculations faster.
4 Glossary

Copy-protected program
A type of program that cannot be copied. Some copy-protectedprograms require you to leave the program diskette in thediskette drive while you are using it. Some also require thecomputer to be running at simulated 8 MHz instead of 16 MHz.See also Auto speed.
CPU
Central Processing Unit. The primary unit of the computer thatinterprets instructions, performs the tasks you indicate, keepstrack of stored data, and controls all input and outputoperations.
Current directory
The directory where MS-DOS executes your next command,unless you tell it to do otherwise (by including a pathname withthe command). Also known as the default or working directory.
Current drive
The disk drive from which MS-DOS executes your nextcommand, unless you tell it to do otherwise (by including adrive designator with the command). Also known as the defaultdrive.
Cursor
The highlighted marker that shows your position on the screen.
Cylinders
See Tracks.
Data
Information such as text or graphics stored or processed by acomputer.
G l o s s a r y 5
Data diskette
A formatted diskette on which you store data files (as opposedto program files).
Data length
The number of bits per character in serial transmissions.
Default
Values or settings that take effect when the computer is turnedon or reset. A default value stays in effect unless you override ittemporarily by changing a setting or you reset the default valueitself.
Default directory
The directory you are logged onto and working in. Also knownas the current directory.
Default drive
The disk drive from which MS-DOS executes your nextcommand, unless you tell it to do otherwise (by including adrive designator with the command). Also known as the currentdrive.
Delimiter
A character or space used to separate different parts of anMS-DOS command.
Device
A piece of equipment that is part of a computer system andperforms a specific task, such as a disk drive, a monitor, or aprinter.
6 Glossary

Diagnostics
The tests and procedures the computer performs to check itsinternal circuitry and set up its configuration.
DIP switch
A small switch on a computer, option card, or printer thatcontrols a particular function. DIP stands for Dual In-linePackage.
Directory
A list of files stored in a particular area on a disk; part of astructure for organizing files into groups. A directory listingshows the name, location, and size of the files in the directory.A directory can contain both files and subdirectories.
Disk
The collective term for diskettes and hard disks.
Disk drive
The physical device that allows the computer to read from andwrite to a disk. A diskette drive has a disk slot into which youinsert a diskette. A hard disk is sealed inside a protective unit.
Diskette
A flat piece of flexible plastic coated with magnetic materialand used to store data permanently.
Display adapter card
The circuit board installed in one of the computer’s option slotsthat provides the interface to which you connect the monitor.The display adapter card controls the way the monitor displaystext and graphics. Also known as Video card.
Glossary 7

DOS
The Disk Operating System that controls the computer’s inputand output functions. See Operating system.
Double-density
A type of diskette format that allows you to store twice as muchdata as the standard-density format. A 3 l/z-inch double-densitydiskette can store 720KB of data. A 5 ‘/+inch double-densitydiskette can store 360KB of data.
Drive designator
The letter name of a disk drive, followed by a colon-forexample, C :.
EGA
Enhanced Graphics Adapter. A type of display adapter card thatallows you to display high-resolution graphics on a colormonitor. It can display up to 43 lines of text with 80 characterson each line, or it can display monochrome or 16-color graphicsat up to 640 x 350 resolution.
Executable file
A file containing program instructions, as opposed to datacreated with an application program. An executable file has theextension .BAT, .COM, or .EXE.
Expanded memory
Memory that specially-written MS-DOS application programscan use with an Expanded Memory Specification (EMS) devicedriver such as EMM386.SYS. Expanded memory does not fill acertain range of memory like conventional and extendedmemory; expanded memory can be mapped from the memoryarea between 640KB and 1MB.
8 Glossary
Extended Memory
Memory above 1MB that is accessed by the protected mode ofthe 80386SX microprocessor and available to some applicationprograms and operating systems.
Extended partition
An additional MS-DOS partition; you can create one primaryMS-DOS partition and one extended partition.
Extension
A suffix of up to three characters that you can add to a filenameto better identify it.
External command
An MS-DOS command stored in a program file. MS-DOS mustbe able to find the program file to execute the command. Seealso Internal command.
Fast boot
The Equity 386SX function that reduces the time it takes thecomputer to run power-on diagnostics.
File
A group of related pieces of information called records, orentries, stored together on a disk. Text files consist of words andsentences. Program files consist of codes and are used bycomputers to interpret and carry out instructions.
Filename
A name up to eight characters long that MS-DOS uses toidentify a file.
Glossary 9

Fixed disk
See Hard disk.
Format
To prepare a new disk (or an old one you want to reuse) so thatit can store information. Formatting divides a disk into tracksand sectors and creates addressable locations on it.
Graphics
Lines, angles, curves, and other nonalphanumeric data.
Hard disk
The enclosed unit used to store data permanently. Unlike adiskette, it is fixed in place. It can process data more rapidly andstore many more files than a diskette. Also called fixed disk.
Hardware
Any physical component of a computer system, such as amonitor, printer, keyboard, or CPU.
Hexadecimal
A base-16 numbering system frequently used by programmers.Any decimal number between 0 and 255 can be represented bya two-digit hexadecimal number.
High-density
A type of format that allows you to store more data thannormal. A 3 ‘/z-inch high-density diskette can store 1.44 MB ofdata. A 5 l/4-inch high-density diskette can store 1.2 MB ofdata.
Input/output (I/O) port
See Port.
10 Glossary
Interface
A physical or software connection used to transmit databetween equipment or programs.
Internal command
An MS-DOS command that is stored in the commandprocessor of the operating system; it is not a separate programfile. Examples include COPY, DEL, RENAME, and DIR.
Jumper
A small device that connects two pins on an option card, theSIMM card, or the main system board to activate a particularfunction.
Key disk
A diskette containing a copy-protected program that mustremain in the diskette drive while you are using the program.
Kilobyte (KB)
A unit used to measure storage space in a computer’s memory oron a disk. One kilobyte equals 1024 bytes.
LIM EMS
The Lotus/Intel/Microsoft Expanded Memory Specification-aprotocol that allows certain application programs to use memorythat MS-DOS cannot use.
Logical disk drive
A subdivision of a physical disk drive, which MS-DOS treats asthough it were a separate physical component of the computer.A physical disk drive may be divided into several logical diskdrives.
Glossary 11

Main system board
The board built into your computer which contains 1MB ofmemory and the circuitry the computer requires to operate.
Math coprocessor
An optional device that enables the computer to process certainmathematical calculations faster.
MCGA
Monochrome/Color Graphics Adapter. A type of displayadapter that runs either a monochrome or color graphicsmonitor.
Megabyte (MB)
A unit used to measure storage space in a computer’s memory oron a disk. One megabyte equals 1024KB.
Megahertz (MHz)
A unit used to measure oscillation frequency (of a computer’sinternal timing clock). A megahertz is one million cycles persecond. The Equity 386SX operates at 16 MHz or simulates an8 MHz operating speed.
Memory
The area where your computer stores data. Memory contentscan be permanent and inalterable (ROM) or temporary(RAM).
Memory module
A small circuit board with an edge connector that containsmemory chips. You can add 256KB or 1MB memory modules tothe SIMM card inside the Equity 386SX to expand thecomputer’s memory. A memory module is commonly called aSIMM (single inline memory module).
12 Glossary
Memory on card
The additional memory on an option card installed in thecomputer.
MGA
Multi-graphics Adapter. A type of display adapter card that candisplay monochrome text and color graphics on the screen.
Microprocessor
A small version of a CPU contained on one semiconductorchip.
Modem
A device that allows a computer to transmit signals overtelephone lines so it can send and receive data. Modem standsfor MOdulator/DEModulator.
Monitor
The piece of hardware that contains the screen and displaysinformation.
Monochrome monitor
A monitor that displays in only one color, such as green oramber, as opposed to a color monitor which can display inseveral colors.
Mouse
A hand-held pointing device with one or more buttons. Whenyou slide the mouse over a flat surface in a certain direction, thecursor moves in the same direction on the screen.
G l o s s a r y 1 3

MS-DOS
Microsoft Disk Operating System. The operating system thatcomes with your computer. See Operating system.
Network server
The master computer in a network which provides storage spacefor the other computers connected to it. The network servercan write files to and read files from the other computers in thenetwork.
Network server mode
The condition of a computer that is working as a networkserver.
Numeric keypad
The number keys grouped to the right of the keyboard.
On-board memory
The memory contained on the computer’s main system board.The Equity 386SX comes with 1MB of on-board memory.
Operating speed
The speed at which the central processing unit can executecommands. The Equity 386SX can run at 16 MHz or simulatean 8 MHz operating speed.
Operating system
A collection of programs (such as MS-DOS or MS OS/2) thatmanages a computer’s operations. The operating systemdetermines how programs run on the computer and supervisesall input and output.
14 Glossary

Option card
A circuit board you install inside the computer to provideadditional capabilities, such as more memory or a modem.
Parallel
The type of interface that transmits data in groups of bits. SeeInterface and Serial.
Parameter
A qualifier added to a command that tells MS-DOS whatparticular conditions to look for and specifies information suchas what data you want to process and where to locate or store afile.
Parent directory
The directory immediately above a given directory in thedirectory tree. In pathnames, the parent directory is representedby the symbol . . (two periods).
Parity
Data signals sent during communications to detect errors intransmitting or receiving data.
Partition
The area defined on a hard disk for use by an operating system;to divide a hard disk into separate sections or logical drives.
Pathname
The list of directories and subdirectories you specify to locate afile. For example, the pathname for the file SALES which islocated in the subdirectory BUSINESS of the root directory ( \ )is \ BUSINESS \ SALES.
G l o s s a r y 1 5

Peripheral
A device (such as a printer or a modem) connected to acomputer that depends on the computer for its operation.
Port
A physical input/output socket on a computer where you canconnect a peripheral device.
Power-on diagnostics
The system tests the computer runs to check its internalcircuitry and configuration each time you turn it on.
Power-on password
The sequence of characters you type after you turn on thecomputer in order to access and use your system. A power-onpassword can be up to seven characters long and can includeletters, numbers, and blank spaces.
Primary partition
The hard disk partition where the operating system is stored andfrom which the computer loads the operating system.
Program
A disk file that contains coded instructions and tells a computerwhat to do and how to do it.
Prompt
A message the screen displays that tells you what action youneed to perform next. See also Command prompt.
16 Glossary

R A M
Random Access Memory. The portion of the computer’smemory used to run programs and store data while you work.All data stored in RAM is erased when you turn off thecomputer; so you must store any data you want to keep on adiskette or hard disk.
Read
To move data from one area to another. For example, when youopen a text file stored on disk, the computer reads the data fromthe disk and displays it on the screen.
Read/write head
The physical device inside a disk drive that reads and recordsdata on the magnetic surface of a disk.
Real-time clock
A battery-powered clock inside the computer that keeps trackof the time and date, even when the computer is turned off.
Relative pathname
A pathname that does not begin with the backslash character.A relative pathname tells MS-DOS how to find its way to asubdirectory of the current directory, starting at the currentdirectory. See also Absolute pathname.
Reset
To reload a computer’s operating system so you can retry a taskor begin using a different operating system. Resetting erases allinformation in RAM.
RGB
Red Green Blue. A type of color monitor.
G l o s s a r y 1 7
ROM
Read Only Memory. A portion of memory that can only be readand cannot be used for temporary storage. ROM retains itscontents even when you turn off the power.
Root directory
The top-level directory in MS-DOS, designated by a \(backslash). All other directories are subdirectories of the rootdirectory or of other subdirectories.
RS-232C
A widely-used, standard type of serial interface. You can easilyconnect an RS-232C-compatible device to the computer.
Sector
A contiguous section of a disk track that provides an address atwhich the computer can access data.
Self test
The initial diagnostics procedures a system performs to check itshardware.
Serial
The type of interface that transmits data one bit at a time. SeeInterface and Parallel.
SIMM
See Memory module.
Software
The programs that enable your computer to perform the tasksand functions you indicate.
18 Glossary

Source diskette
The diskette that you are reading or copying data from during acopy or backup operation.
SP card
The circuit board inside the computer that provides the serialand parallel interfaces.
Stop bit
A signal sent in serial communications to mark the end of acharacter.
Subdirectory
A directory or group of files that branches down from anothersubdirectory or from the root directory.
Switch
An option added to an MS-DOS command that modifies theway the command works. Switches are usually preceded by a /(forward slash). For example, if you add the /S switch to aFORMAT command, MS-DOS installs the operating system onthe diskette as it formats it. See Parameter.
System diagnostics
A series of checks you can perform on the computer to makesure the hardware is functioning correctly.
System diskette
A diskette that contains the operating system.
Target diskette
The diskette to which you are writing or copying data during acopy or backup operation.
G l o s s a r y 1 9

Tracks
Addressable, concentric circles on a disk, resembling thegrooves on a record, which help to divide the disk into separateaccessible areas. There are 80 tracks on each side of a double-sided 1.44MB, 1.2MB, or 720KB diskette and 40 tracks on eachside of a double-sided 360KB diskette. The number of tracks ona hard disk depends on its capacity.
VGA
Video Graphics Array. A type of high-resolution color displayadapter card that can display monochrome text and graphics atup to 720 x 400 resolution, 16-color graphics at up to 640 x 480resolution, or 256-color graphics at 320 x 200 resolution.
Video card
The display adapter card installed in one of the computer’soption slots. The video card provides the interface to which youconnect the monitor and controls the way the monitor displaystext and graphics. Also known as Display adapter card.
Wildcard
A character that represents any character or group of characters.The wildcard character * (asterisk) represents a group ofcharacters, and the wildcard character ? (question mark)represents a single character.
Write
To store data on a disk.
Write-protect
To protect the data on a diskette from being changed by settingthe write-protect switch on a 3 ‘/z-inch diskette or by placing awrite-protect tab over the notch on the side of a 5 ‘/+inchdiskette. When a diskette is write-protected, you cannot erase,change, or record over its contents.
20 Glossary

Index
AAbsolute pathname, 4-20 -21Alternate parallel port check,
C-28Alternate serial port check, C-31APPEND, 4-22Auto speed function, 2-12 -14, 3-5AUTOEXEC.BAT, 4-5, 4-10,
4-40 -42
BBacking up data, 3-20 -22, 3-24,
4-30 -35with BACKUP, 3-24, 4-34 -35with DISKCOPY, 3-20, 3-24,
4-30 -34BACKUP, 3-24, 4-34 -35Base memory, 2-26, 2-29 -31Batch files, 4-10
AUTOEXEC.BAT, 4-5, 4-10,4-40-42
Break, 3-7, 3-8
CCards,
display adapter, see Video cardsmemory, Intro-l, 2-11, 2-26,
2-29 -31, 5-1, 5-4, 5-23 -25serial/parallel (SP), see SP cardvideo, see Video cards
CGA card, see Video cardsChanging directories, 4-19-21CHDIR (CD), 4-19Clock, real-time, 2-14 -17, F-2
Clock/calendar RAM, F-2CMOS RAM, 2-1, C-9, F-2Color graphics adapter (CGA) card,
see Video cardsColor graphics adapter and CRT
check, C- 15-23Command, entering 4-7 -8Command format, 4-7 -8Command prompt, 4-2, 4-4, 4-19,
4-40 -41COMMAND.COM, 4-5, 4-17, A-14CONFIG.SYS, 4-5, 4-17, 4-43, 4-45Configuring the system, Intro-l,
2-1 -31Consumer Information Center
Number, Intro-5Connecting,
keyboard, 1-13-15modem, 1-10monitor, 1-4 -6mouse, 1-11power cord, 1-12, 1-15 -16printer, 1-7 -10
Control codes,CTRL ALT DEL, 3-9CTRL BREAK, 3-8CTRL C, 3-8
Controllers, F-1COPY, 3-14, 3-24, 4-11 -13Copying
diskettes, 3-14, 3-20, 4-31 -34files, 4-11 -13hard disk files, 4-34 -35
Coprocessor, see Math coprocessorCopy-protected programs, 2-12 -13
Index 1
Cover,removing, 5-5-7replacing, 5-22 -23
CPU, F-1CPU speed, 2-12 -14, 3-5CPU SPEED switch, 2-12 -14, 3-5CTRL ALT DEL, 3-9CTRL BREAK, 3-8CTRL C, 3-8Current directory, 4-19, 4-41
changing, 4-19Current drive, 4-4 -5,
changing, 4-4 -5
DDATE, 2-14, 4-8 -9Date, setting, 2-16 -18, 4-8 -9Default directory, see Current
directoryDefault drive, see Current driveDEL, 4-15Deleting files, 4-15Delimiters, 4-7 -8Destructive surface analysis, D-2 -3,
D-10 -12Diagnostics,
power-on, B-1 -3system, C-1 -39
DIR, 4-23 -25Directories, 4-16 -27
changing, 4-19creating, 4-23current, 4-19, 4-41listing contents of, 4-23 -25naming, 4-18on diskettes, 4-18pathnames for, 4-20-22removing, 4-27root, 4-17-19tree diagram of, 4-25-27
DISKCOPY, 3-14, 3-20, 3-24,4-30 -34
Diskette drive,caring for, 3-14 -16compatibility, 3-12 -14configuring, 2-22 -23drive and controller check,
C-23 -27how they work, 3-10 -12inserting diskettes, 3-16 -17problems, A-13removing diskettes, 3-16 -17setting types, 2-22 -23single, 3-21, 4-32 -33types, 3-12 -14using, 3-9 -25
Diskettes,backing up, 3-20, 4-30 -35caring for, 3-14 -16choosing, 3-12 -14compatibility, 3-12 -14copying, 3-14, 3-20, 4-30 -35directories on, 4-18formatting, 3-13, 4-27 -30inserting, 3-16 -17labeling, 3-16naming, 4-29problems, A-10 -12read/write slot, 3-15removing, 3-16 -17storing, 3-16swapping, 3-21, 4-38system, 3-20types, 3-12 -14volume label, 4-29write-protecting, 3-18 -19
Display adapter cards, see Videocards
Display screen, see MonitorsDot-matrix printer check,
C-31 -32
2 Index

Double-density diskettes, 3-12-13Double-sided diskettes, 3-12-13Drive designator, 4-3-5Drives,
see Diskette drivessee Hard disks
EEGA card, see Video cardsEMM386.SYS, 4-43 -46Enhanced graphics adapter, see
Video cardsEnvironmental requirements,
F - 3 4Epson Consumer Information
Center number, Intro-5ERASE, 4-15Error codes and messages, 2-36,
2-29, A-1, B-1 -3, C-37 -39Expanded memory, 4-43 -46Extended memory, 2-26, 2-29 -31,
4-43 -46Extended partition, 4-3Extension, 4-9 -10External commands, 4-5 -6, 4-38
FFast boot, 2-11 -12, A-2FASTOPEN, 3-23FDISK, A-15, D-2Files,
AUTOEXEC.BAT, 4-5, 4-10,4-17, 4-40 -42
backing up, 4-11 -13batch, 4-10, 4-40 -42COMMAND.COM, 4-5, 4-17,
A-11CONFIGSYS, 4-5, 4-17, 4-43,
4-45copying, 4-11 -13creating and managing, 4-9-16
deleting, 4-15executable, 4-10naming, 4-9-10printing, 4-16renaming, 4-14
Floppy disk drives, see Diskette drivesFloppy disks, see DiskettesFORMAT, 3-13, 4-27 -30Formatting,
diskettes, 3-13, 4-27 -30extended partition, 4-3hard disk, 3-23, D-1 -13physical, D-1 -13primary partition, 4-3
HHard disks, see also Diskette drives
backing up, 3-24, 4-34 -35configuring, 2-17 -22controller and hard disk check,
B- ldrive and controller check,
C-33 -36formatting, 3-23, D-1 -13how they work, 3-10 -12installing MS-DOS on, 3-1 -2loading MS-DOS from, 4-2 -3parking the heads, 3-24 -25partitions, 4-3, D-2, D-13physically formatting, D-1 -13precautions, 3-23preparing for moving, 3-24 -25preparing for use, 3-23problems, A-14 -16setting types, 2-17 -22types, E-1 -3
HDSIT, 3-24-25HELP program, Intro-2, 4-35 -37Help, where to get, Intro-4 -5Hercules card, see Video cardsHigh-density diskette, 3-12-13

IInterfaces,
list of, F-2setting serial and parallel, 2-24 -25
Internal command, 4-5
JJumper settings, changing, 5-14 -21
KKeyboard,
adjusting angle, 1-15cable, 1-14check, C-10 -11connecting, 1-13 -15controller and keyboard check,
B-1layout, 3-6-7, F-3problems, A-8special keys, 3-6 -7
LLIM EMS, 2-6, 4-43 -46Loading MS-DOS, 4-2 -3Location, choosing for computer, 1-3Logical disk drive, 4-3
MMass storage, F-2 -3Math coprocessor,
check, C-27configuring, 2-1installing, 5-1jumper setting, 5-15specification, F-1
MCGA card, see Video cardsMemory,
above 640K, 2-29 -31, 4-43 -46base, 2-26, 2-29 -31
cards, Intro-l, 2-29 -31, 5-1,5-4,5-23 -25
check, C-10configuration, 2-1, 2-11EMM386.SYS, 4-43 -46expanded, 4-43 -46extended, 2-26, 2-29 -31,
4-43 -46gapping, 2-29 -31LIM EMS, 2-6, 4-43 -46modules, Intro-l, 2-29, 5-1 -3on-board, 2-29 -31, 5-2overlapping, 2-29 -31setting, 4-43 -46
MENU program, Intro-2, 3-20,4-37 -39
MGA card, see Video cardsMKDIR (MD), 4-23MODE, 1-10Modem, connecting, 1-10Monitor,
connecting, 1-4 -6problems, A-8 -9selecting type, 1-4, 2-6 -8
Monochrome display adapter andCRT check, C-12 -14
Monochrome graphics adaptercard, see Video cards
Mouse,connecting, 1-11setting jumper, 5-15
MS-DOS,command format, 4-7 -8command prompt, 4-2, 4-4,
4-19, 4-40 -41copying files, 4-11 -13correcting commands, 4-8current directory, 4-19, 4-41current drive, 4-4 -5deleting files, 4-15directories, 4-16-27
4 Index

diskettes, 1-2, 3-1 -2EMM386.SYS, 4-43 -46entering commands, 4-7 -8exiting, 4-3external commands, 4-5 -6,
4-38filenames, 4-9-10installing, 3-1-2internal commands, 4-5loading, 4-2-3pathnames, 4-20-22printing files, 4-16renaming files, 4-14Shell, 3-20, 3-23, 4-2 -3, 4-13,
4-18, 4-28, 4-31, 4-35starting, 4-2
MS OS/2, Intro-3
NNetwork server mode, 2-9-11Non-destructive surface analysis,
D-2 -3, D-12 -13
OOn-board memory, 2-29 -31, 5-2Operating speed, 2-12 -14, 3-5Operation Menu, 2-3Option cards, 5-1, 5-4-25
configuring, 5-23-25installing, 5-4-13memory, 5-1, 5-4, 5-23 -25problems, A-19 -20removing, 5-21serial/parallel, see SP cardtesting, 5-25video, see Video cards
Option slots, 5-3, 5-8 -9, F-2Options, installing, 5-1 -25
memory modules, 5-2-3
PPackage contents, 1-2Packing materials, 1-2Parallel, see also SP card
cable, 1-7 -9interface, 1-7 -9, F-2port, 1-7 -9port check, C-28port on video adapter check, C-29setting, 2-24 -25
Parameters, 4-7 -8Partitions on hard disk, 4-3, D-2,
D-13Password, see Power-on passwordPATH, 4-22Pathnames, 4-20 -22
absolute, 4-20 -21including drive letters in, 4-21 -22including filenames in, 4-21 -22relative, 4-20 -21
Physical characteristics, F-4Physical formatting, D-1 -13Port,
mouse, 1-11parallel, 1-7 -9serial, 1-10setting serial and parallel, 2-24 -25
Power,connecting power cord, 1-12,
1-15-16source, 1-3supply, F-2
Power-on diagnostics, 2-11, B-1 -3Power-on password,
changing, 3-3-4deleting, 3-4disabling, 5-15, A-4 -7entering, 3-2 -3problems, A-4 -7setting, 2-11 -13using, 3-2 -4, 4-2
Index 5

Precautions,computer, 1-15 -16hard disk, 3-23
Primary partition, 4-3PRINT, 4-16Printer,
connecting, 1-7 -10interface check, C-28parallel interface, 1-7 -9, 2-24 -25problems, A-18 -19serial interface, 1-10, 2-24-25
RRAM check, B-1Random access memory (RAM),
2-1, 3-21, 4-43, B-1Read only memory (ROM), B-l, C-9,
F-lRead/write heads, 3-12, 3-24-25Real-time clock, 2-14 -17, F-2Redirecting printer output, 1-10Registration card, 1-2Relative pathname, 4-20-21RENAME, 4-14RMDIR (RD), 4-27RESET button, 3-9Resetting the computer, 3-8-9ROM, see Read Only MemoryRoot directory, 4-17 -18
SSector, 3-11 -13SELECT, D-2Serial, see also SP card
cable, 1-10interface, 1-10port (RS-232C port) check,
C-29 -31setting, 2-24-25
SETMODE, 1-10Setting up, 1-1 -17
Setup menu, 2-3 -5Setup program, 2-1 -31, E-1
auto-speed function, 2-12-14clock, real-time, 2-14 -17cursor block, moving, 2-2 -6diskette drive types, 2-22 -23display adapter type, 2-6 -8error message, continuing from,
2-4 -6fast boot function, 2-11, A-2hard disk drive configuration,
2-17 -22interfaces, serial and parallel,
2-24 -25leaving the program, 2-28math coprocessor, 2-1memory, 2-1, 2-29-31password/ 2-8 -l1ports, serial and parallel,
2-24 -25real-time clock, 2-14 -17running, 2-1 -31starting the program, 2-2-6summary, 2-26-27
Shell program, 3-20, 3-23, 4-2-3,4-13, 4-18, 4-28, 4-31, 4-35
SIMM card, 5-2 -3, 5-14-21SIMMs, 2-29 -31, 5-1 -3, 5-15SMARTDRVSYS, 3-23Software problems, A-17Special keys, 3-6-7Specifications, F-1 -4Speed, changing, 2-12 -14,3-5SP card, 5-4, 5-8Subdirectories, see DirectoriesSwitches, 1-5, 4-7-8System,
board check, C-9device check, B-1diagnostics, C-1 -39setting up, 1-1 -17
6 Index

TTIME, 2-14, 4-8Time, setting, 2-14 -17,4-8Timer check, B-1Toll-free number, Intro-4Tracks, 3-10 -13TREE, 4-25 -27Troubleshooting, A-1 -20Turning off computer, 3-25, 4-3Turning on computer, 1-15 -17
UUnpacking the system, 1-1 -2
VVideo cards,
CGA, 1-4, 2-7-8color graphics adapter and
CRT check, C-15 -23compatibility, 1-4EGA, 1-4, 2-7Hercules graphics card, 1-4,
2-8installing, 1-4, 5-8 -13, 5-21,
5-25MCGA, 2-7MGA, 1-4, 2-7-8monochrome display adapter
and CRT check, C-12 -14parallel port (on video adapter)
check, C-29problems, A-9removing, 5-21setting display adapter card
type, 2-6-8VGA, 1-4, 2-7
Video graphics array (VGA) card,see Video cards
Video monitors, see MonitorVolume label, 4-29
WWarranty card, 1-2Wildcard characters, 4-11 -l2Write-protect notch, 3-18 -19Write-protect switch, 3-19Write-protect tab, 3-18Write-protecting diskettes,
3-18-19
XXCOPY, 3-14, 3-24, 4-13, 4-30 -31,
4-34, 4-39
Index 7

8 I n d e x

diskette release button
switch
power outlet option card slots
I \ parallel port
I serial portmouse port
