molecular and genetic tools for the analysis of medaka and ... · analysis of medaka and zebrafish...
TRANSCRIPT
EMBO COURSE MEDAKA & ZEBRAFISH HEIDELBERG 1
EMBO PRACTICAL COURSEON
Molecular and Genetic Tools for theAnalysis of Medaka and Zebrafish
Development
European Molecular Biology Laboratory, EMBL HEIDELBERGJuly 21st – 31st, 2002
Organized by:
Jochen Wittbrodt (Heidelberg)
Felix Loosli (Heidelberg)
Manfred Schartl (Würzburg)
Wolfgang Driever (Freiburg)
Akihiro Shima (Tokyo)
Monte Westerfield (Eugene)
Helped by the Wittbrodt lab
Alexander Arenz, Matthias Carl, Filippo DelBene, Clemens Grabher, Erika Grzebisz, Annette Krone,Felix Loosli, Lucia Poggi, Rebecca Quiring, Martina Rembold, Beate Wittbrodt
and
Emma Fassmann and Laura Vinti
EMBO COURSE MEDAKA & ZEBRAFISH HEIDELBERG 2
COURSE MANUAL
This manual contains protocols and experimental procedures for the experiments to be performed atthe EMBO course in Heidelberg. Protocols have been contributed by the instructors. Additional, relevantprotocols have been included in this manual from previous EMBO courses and from the Zebrafish WebSite at the University of Oregon (http://zfish.uoregon.edu/zf_info/zfbook/zfbk.html).
We also included some protocols which will not be used during the course, but may be relevant to youonce you are back home and want to perform real experiments. Many of these protocols areunpublished, lab based methods.
Contributions by:
L. Bally-Cuif
M. Carl, Heidelberg
W. Driever, Heidelberg
M. Furutani-Seiki, Kyoto
C. Grabher, Heidelberg
T. Henrich, Kyoto
R. Ho, Princeton
Y. Hong, Singapore
D. Kane, Rochester
A. Krone, Heidelberg
F. Loosli, Heidelberg
T. Matsuoka, Tokyo
H. Mitani, Tokyo
I. Nanda, Wuerzburg
K. Naruse, Tokyo
C. Neumann, Heidelberg
R. Quiring, Heidelberg
E. Raz, Goettingen
M. Rembold, Heidelberg
M. Schartl, Würzburg
A. Schier, New York
A. Shima, Tokyo
A. Shimada, Tokyo
L. Solnica-Krezel, Vanderbilt
B. Thisse, Strasbourg
Ch. Thisse, Strasbourg
H. Wada, Tokyo
Y. Wakamatsu, Nagoya
C. Walker, Eugene
M. Westerfield, Eugene
C. Winkler, Wuerzburg
B. Wittbrodt, Heidelberg
J. Wittbrodt, Heidelberg
Supported by: EMBO - European Molecular Biology Organization
EMBO COURSE MEDAKA & ZEBRAFISH HEIDELBERG 3
The organizers gratefully acknowledge support from the following companies:
Eppendorf
Zeiss
Intavis
Müller und Pfleger
Leica
Biozym
New England Biolabs
Clontech
Millipore
Roche
Promega
Qiagen
Stratagene
Invitrogen
Harvard Apparatus
Greiner
Inter Ryba (Hamburg)

EMBO COURSE MEDAKA & ZEBRAFISH HEIDELBERG 4
1. OBTAINING FISH EMBRYOS _______________________________________________________ 11
A FISH COLONY ___________________________________________________________________ 11SALT COMPOSITION OF WATER IN FISH FACILITY___________________________________________ 12FEEDING FISH _______________________________________________________________________ 12SETTING UP CROSSES TO OBTAIN EGGS BY NATURAL BREEDING ______________________ 13SET UP THE CROSS AS FOLLOWS: _______________________________________________________ 13OBTAINING MEDAKA EMBRYOS _____________________________________________________ 14MASS PRODUCTION OF EMBRYOS _______________________________________________________ 14PRODUCTION OF EMBRYOS FOR MICROINJECTION __________________________________________ 15REFERENCES _______________________________________________________________________ 16
2. GENETIC APPROACHES __________________________________________________________ 17
2.1 MUTAGENESIS SCREEN IN MEDAKA ______________________________________________ 17EXPERIMENTAL RATIONALE ___________________________________________________________ 17PLEASE FOLLOW THESE SAFETY INSTRUCTIONS__________________________________________ 18DETAILED PROTOCOL_______________________________________________________________ 19SET UP OF F1 AND F2 FAMILIES (3 WEEKS+3 MONTH+2 WEEKS+3 MONTH) ______________________ 20SCREENING_________________________________________________________________________ 20Day1 ______________________________________________________________________________ 21Day2 ______________________________________________________________________________ 21Day3,______________________________________________________________________________ 21Day4,______________________________________________________________________________ 21REFERENCES _______________________________________________________________________ 212.2 FREEZING MEDAKA SPERM SAMPLES ____________________________________________ 22MATERIAL NEEDED: __________________________________________________________________ 22BUFFERS AND SOLUTIONS: ____________________________________________________________ 23Triacine/MS222 Stock solution:__________________________________________________________ 23Ginzburgs Fishringer__________________________________________________________________ 23Freezing medium_____________________________________________________________________ 23PROTOCOL _________________________________________________________________________ 232.3 IN VITRO FERTILIZATION OF MEDAKA OOCYTES WITH FROZEN SPERM _____________ 24SOLUTIONS _________________________________________________________________________ 241x Yamamoto Ringer__________________________________________________________________ 24Hatching solution ____________________________________________________________________ 24PROTOCOL _________________________________________________________________________ 24Preparation of the donor female _________________________________________________________ 25In vitro fertilization ___________________________________________________________________ 252.4 FREEZING ZEBRAFISH SPERM SAMPLES __________________________________________ 252.5 FERTILIZATION WITH FROZEN ZEBRAFISH SPERM SAMPLES _______________________ 262.6 IDENTIFICATION OF STS MARKERS CLOSELY LINKED TO A MUTATION IN MEDAKA __ 27SEXUAL CROSS FOR MAPPING PANEL ____________________________________________________ 27GENOMIC DNA EXTRACTION___________________________________________________________ 27IDENTIFICATION OF THE LINKAGE GROUP LINKED TO A MUTATION USING THE BULK SEGREGANTANALYSIS WITH M MARKERS __________________________________________________________ 28PCR master Mix______________________________________________________________________ 28PCR condition _______________________________________________________________________ 28THE PRIMER SEQUENCE OF M MARKERS _________________________________________________ 29SEPARATION OF PCR PRODUCTS (NATIVE PAGE)___________________________________________ 30DETERMINATION OF THE CANDIDATE LINKAGE GROUP OF MUTATION __________________________ 30SEGREGATION ANALYSIS TO DETERMINE THE LINKAGE GROUP OF MUTATION ____________________ 30MATERIAL NEEDED __________________________________________________________________ 30REAGENTS _________________________________________________________________________ 31STOCK SOLUTIONS FOR POLYACRYLAMIDE GEL: ___________________________________________ 31Solution A__________________________________________________________________________ 31Solution B __________________________________________________________________________ 31Solution C __________________________________________________________________________ 31Solution D__________________________________________________________________________ 31Solution G__________________________________________________________________________ 32Solution E __________________________________________________________________________ 32

EMBO COURSE MEDAKA & ZEBRAFISH HEIDELBERG 5
GEL PREPARATION___________________________________________________________________ 32Separation gel Stacking gel ___________________________________________________________ 32REFERENCES _______________________________________________________________________ 322.7 FLUORESCENCE IN-SITU HYBRIDIZATION (FISH) __________________________________ 32CHROMOSOME PREPARATION __________________________________________________________ 33PRETREATMENT OF CHROMOSOME SPREADS (OPTIONAL)____________________________________ 35PROBE LABELLING ___________________________________________________________________ 35DOT-BLOT ASSAY TO TEST INCORPORATION OF LABEL ______________________________________ 36HYBRIDIZATION PROCEDURE___________________________________________________________ 36Probe preparation:____________________________________________________________________ 36DENATURATION OF PROBE AND CHROMOSOMES ___________________________________________ 37HYBRIDIZATION _____________________________________________________________________ 37POST HYBRIDIZATION WASHES _________________________________________________________ 37DETECTION_________________________________________________________________________ 38AMPLIFICATION PROTOCOL: ___________________________________________________________ 38MICROSCOPY _______________________________________________________________________ 38EVALUATION _______________________________________________________________________ 39MATERIAL NEEDED __________________________________________________________________ 39Probe labelling ( 2-4 hrs) ______________________________________________________________ 39Chemicals:__________________________________________________________________________ 39Test for probe labelling (optional) _______________________________________________________ 40Hybridization _______________________________________________________________________ 40BUFFERS AND SOLUTIONS _____________________________________________________________ 41Nicktranslation buffer _________________________________________________________________ 41Column buffer_______________________________________________________________________ 41AP I buffer _________________________________________________________________________ 42AP II buffer_________________________________________________________________________ 42Hybridization mixture _________________________________________________________________ 42Blocking solution ____________________________________________________________________ 42ADDITIONAL INFORMATION ____________________________________________________________ 42REFERENCES _______________________________________________________________________ 43ADDITIONAL LITERATURE _____________________________________________________________ 43
3. MICROSCOPIC OBSERVATIONS ___________________________________________________ 44
3.1 REMOVING EMBRYOS FROM THEIR CHORIONS ____________________________________ 443.2 VIEWING CHAMBERS____________________________________________________________ 453.3 METHYL CELLULOSE MOUNTING_________________________________________________ 453.4 AGAR MOUNTING_______________________________________________________________ 463.5 MICROSCOPIC OBSERVATION OF LIVE MEDAKA EMBRYOS (TIMELAPSE) ____________ 47REMOVAL OF CHORION _______________________________________________________________ 47Preparation of hatching enzyme (500 ml of embryos):_________________________________________ 47Removal of chorion___________________________________________________________________ 48AGAR MOUNTING ____________________________________________________________________ 48VIEWING CHAMBERS _________________________________________________________________ 49MATERIAL NEEDED __________________________________________________________________ 49BUFFERS AND SOLUTIONS _____________________________________________________________ 49Balanced Salt Solution (BSS) <Heading 4> _________________________________________________ 49Heptanol (SIGMA, H-6129) stock solution (1000 x) __________________________________________ 50REFERENCES _______________________________________________________________________ 50
4. MICROINJECTION AND OTHER TRANSFECTION METHODS___________________________ 50
4.1 EXPERIMENT: MICROINJECTION OF DNA ENCODING GFP AND SONIC HEDGEHOGTRANSCRIPTS UNDER THE CONTROL OF A HEAT-SHOCK INDUCIBLE PROMOTER,FOLLOWED BY SIMULTANEOUS DETECTION OF GFP PROTEIN AND SONIC HEDGEHOG RNA50OVERVIEW:_________________________________________________________________________ 50MICROINJECTION OF PLASMID DNA _____________________________________________________ 51HEATSHOCKING OF THE EMBRYOS ______________________________________________________ 51FIXATION/PERMEABILIZATION __________________________________________________________ 51POSTPERMEABILIZATION/PROTEINASE K TREATMENT _______________________________________ 51PREHYBRIDIZATION/HYBRIDIZATION _____________________________________________________ 52
EMBO COURSE MEDAKA & ZEBRAFISH HEIDELBERG 6
PROBE REMOVAL/WASHES _____________________________________________________________ 52DETECTION (FAST RED) _______________________________________________________________ 52LIST OF MATERIAL NEEDED____________________________________________________________ 53BUFFERS AND SOLUTIONS _____________________________________________________________ 53PBST______________________________________________________________________________ 53SSCT______________________________________________________________________________ 53Hyb- ______________________________________________________________________________ 53Hyb+______________________________________________________________________________ 53Staining buffer ______________________________________________________________________ 534.2 (ALTERNATE PROTOCOL) INJECTION OF RNA AND DNA INTO ZEBRAFISH EMBRYOS__ 54EXPERIMENT DESCRIPTION:____________________________________________________________ 54TIME TABLE:________________________________________________________________________ 54SUPPLIES NEEDED: ___________________________________________________________________ 54REAGENTS NEEDED: __________________________________________________________________ 54PRE INJECTION PREPARATIONS:_________________________________________________________ 55DECHORIONIZATION: _________________________________________________________________ 55INJECTION: _________________________________________________________________________ 554.3 INJECTION OF DNA/RNA/MORPHOLINOS/TRACER DYES INTO EARLY MEDAKAEMBRYOS _________________________________________________________________________ 56NEEDLES: __________________________________________________________________________ 56DNA INJECTION:_____________________________________________________________________ 56RNA/MORPHOLINO/TRACER INJECTION:___________________________________________________ 56BUFFERS AND SOLUTIONS _____________________________________________________________ 5710x (Yamamoto's isotonic BSS; Ringer´s solution): ___________________________________________ 57Hatching solution: ____________________________________________________________________ 57REFERENCES: _______________________________________________________________________ 574.4 HIGHLY EFFICIENT TRANSGENESIS IN FISH MEDIATED BY I-SCEI MEGANUCLEASE___ 57LIST OF MATERIAL NEEDED____________________________________________________________ 58BUFFERS AND SOLUTIONS _____________________________________________________________ 58Injection solution (15µl) _______________________________________________________________ 58Yamamoto buffer (1l) _________________________________________________________________ 581.5% agarose in water _________________________________________________________________ 59REFERENCES _______________________________________________________________________ 594.5 KNOCK-DOWN OF MATERNAL FACTORS BY NUCLEAR INJECTION OF MORPHOLINOSINTO PREMATURE MEDAKA OOCYTES _______________________________________________ 59ISOLATION OF PREMATURE OOCYTES____________________________________________________ 60NUCLEAR INJECTION INTO MEDAKA OOCYTES _____________________________________________ 60BUFFERS AND SOLUTIONS _____________________________________________________________ 61REFERENCES _______________________________________________________________________ 614.6 MONITORING SPECIFICATION OF CELL MOVEMENTS AND FATES IN ZEBRAFISHGASTRULA ________________________________________________________________________ 61PROTOCOL:_________________________________________________________________________ 62INJECTION AND UNCAGING OF FLUORESCEIN FOR FATE MAPPING AND EXTENSION MEASUREMENT __ 62LABELING UNCAGED DYE AFTER IN SITU HYBRIDIZATION ____________________________________ 62MATERIAL NEEDED __________________________________________________________________ 63BUFFERS AND SOLUTIONS _____________________________________________________________ 63REFERENCES: _______________________________________________________________________ 634.7 (ALTERNATE PROTOCOL) FATE MAPPING BY LOCAL ACTIVATION OFPHOTOACTIVABLE (CAGED) FLUORESCEIN___________________________________________ 64PROCEDURE FOR UNCAGING ___________________________________________________________ 64PROCEDURE FOR ANTI-FLUORESCEIN IMMUNOCYTOCHEMISTRY ______________________________ 65MATERIAL NEEDED __________________________________________________________________ 65REFERENCES _______________________________________________________________________ 654.8 RETROGRADE LABELING OF RETICULOSPINAL NEURONS __________________________ 66PROCEDURE ________________________________________________________________________ 66MATERIAL NEEDED __________________________________________________________________ 66REFERENCES _______________________________________________________________________ 664.9 CONDITIONAL MISSEXPRESSION BY ELECTROPORATION___________________________ 67PROCEDURE TO TARGET INTERNAL TISSUES_______________________________________________ 67PROCEDURE TO TARGET EXTERNAL TISSUES ______________________________________________ 67MATERIAL NEEDED __________________________________________________________________ 67REFERENCES _______________________________________________________________________ 68BUFFERS AND SOLUTIONS _____________________________________________________________ 68PBT_______________________________________________________________________________ 68
EMBO COURSE MEDAKA & ZEBRAFISH HEIDELBERG 7
PTD_______________________________________________________________________________ 68PTDBN ____________________________________________________________________________ 68Lysinated rhodamine dextran, fixable (Molecular Probes D-1817) _______________________________ 68Anesthetic: Tricaine (3-amino benzoic acidethylester, Sigma A-5040)_____________________________ 684% paraformaldehyde (PFA)____________________________________________________________ 68
5. HIGH THROUGHPUT SECREENING OF EXPRESSION PATTERNS _______________________ 69
5.1 PCR TRANSCRIPTS FROM A GRIDDED CDNA LIBRARY _____________________________ 69BUFFERS AND SOLUTIONS _____________________________________________________________ 69Master Mix for 400 10ml PCR reactions: ___________________________________________________ 6910x Perkin Elmer buffer:_______________________________________________________________ 69dNTPs _____________________________________________________________________________ 70MATERIAL NEEDED __________________________________________________________________ 705.2 DIGOXIGENINE LABELLED RNA PROBES OF PCR TRANSCRIPTS _____________________ 70LIST OF MATERIAL NEEDED: ___________________________________________________________ 70BUFFERS AND SOLUTIONS: ____________________________________________________________ 712xRNA-loading buffer ________________________________________________________________ 71Master Mix for 100 x transcripts:_________________________________________________________ 715.3 PURIFICATION OF RNA-DIG PROBES______________________________________________ 71MATERIAL NEEDED __________________________________________________________________ 72BUFFERS AND SOLUTIONS _____________________________________________________________ 72Hybridization Mix: ___________________________________________________________________ 725.4 PREPARATION OF EMBRYOS_____________________________________________________ 72BUFFERS AND SOLUTIONS _____________________________________________________________ 735.5 SETUP OF THE INTAVIS INSITUPRO ROBOT________________________________________ 73BUFFERS FOR INTAVIS INSITUPRO ROBOT________________________________________________ 74MATERIAL NEEDED __________________________________________________________________ 745.6 PRE ABSORPTION OF ANTIBODIES________________________________________________ 745.7 ADDING THE RNA PROBES TO THE INSITUPRO ROBOT _____________________________ 755.8 RUNNING OF THE PROGRAM_____________________________________________________ 755.9 STAINING ______________________________________________________________________ 75LIST OF MATERIAL NEEDED____________________________________________________________ 755.10 CLEANING OF THE INCUBATION COLUMNS_______________________________________ 76REFERENCES _______________________________________________________________________ 76
6. WHOLE MOUNT RNA OR PROTEIN DETECTION _____________________________________ 77
6.1 (ADDITIONAL PROTOCOL) WHOLE MOUNT IN SITU HYBRIDIZATION ON ZEBRAFISHEMBRYOS USING DIGOXIGENIN PROBES _____________________________________________ 77PROBE SYNTHESIS ___________________________________________________________________ 77PREPARATION OF EMBRYOS ___________________________________________________________ 77HYBRIDIZATION _____________________________________________________________________ 78PREABSORPTION OF THE ANTI-DIGOXIGENIN ANTIBODIES. ____________________________________ 78ANTIBODY INCUBATION AND STAINING ___________________________________________________ 78CLEARING AND EMBEDDING____________________________________________________________ 79REAGENTS _________________________________________________________________________ 79HYB_______________________________________________________________________________ 79STAINING BUFFER ___________________________________________________________________ 79SUBSTRATE SOLUTION ________________________________________________________________ 806.2 (ADDITIONAL PROTOCOL) ANTIBODY STAINING IN ZEBRAFISH _____________________ 806.3 (ADDITIONAL PROTOCOL) TWO COLOR WHOLE-MOUNT IN SITU HYBRIDIZATION INMEDAKA/ZEBRAFISH _______________________________________________________________ 82FIXATION AND STORAGE OF EMBRYOS ___________________________________________________ 82Reagents:___________________________________________________________________________ 82RNA PROBE PREPARATION ____________________________________________________________ 83Reagents:___________________________________________________________________________ 83PROTEINASE DIGESTION AND POSTFIXATION ______________________________________________ 85Reagents:___________________________________________________________________________ 85EMBRYO PRETREATMENT BY HEAT DENATURATION ________________________________________ 85HYBRIDIZATION _____________________________________________________________________ 86BUFFERS AND SOLUTIONS _____________________________________________________________ 86
EMBO COURSE MEDAKA & ZEBRAFISH HEIDELBERG 8
Heparin ____________________________________________________________________________ 86Hybridization Mix: ___________________________________________________________________ 86WASHES ___________________________________________________________________________ 86Reagents:___________________________________________________________________________ 86DETECTION_________________________________________________________________________ 87Reagents:___________________________________________________________________________ 87Primary staining _____________________________________________________________________ 87Removal of antibody __________________________________________________________________ 87Secondary staining ___________________________________________________________________ 87MOUNTING _________________________________________________________________________ 88PREABSORPTION OF ANTIBODIES________________________________________________________ 886.4 (ADDITIONAL PROTOCOL) IMMUNOHISTOCHEMISTRY IN MEDAKA/ZEBRAFISH _______ 89APPLICATION OF ANTIBODIES __________________________________________________________ 90Reagents ___________________________________________________________________________ 90DETECTION_________________________________________________________________________ 91Reagents:___________________________________________________________________________ 91MOUNTING _________________________________________________________________________ 92PREABSORPTION OF ANTIBODIES________________________________________________________ 92
7. TANSPLANTATION TECHNIQUES __________________________________________________ 93
7.1 (GENERAL THOUGHTS) SINGLE CELL TRANSPLANTATION IN ZEBRAFISH ____________ 93OVERVIEW _________________________________________________________________________ 93RANDOM THOUGHTS ON SUTTER PIPETTE PULLERS_________________________________________ 947.2 FOLLOWING CELLS IN FISH______________________________________________________ 95INTRODUCTION______________________________________________________________________ 957.3 CELL LABELING TECHNIQUES____________________________________________________ 95TABLE 1. COMMON VITAL DYES AND TERMINOLGY. ________________________________________ 97LABELING WHOLE EMBRYOS WITH LINEAGE TRACER DYES ___________________________________ 97PROTOCOL 1. AGAROSE PLATES FOR HOLDING EMBRYOS ____________________________________ 98Equipment and reagents _______________________________________________________________ 98Method ____________________________________________________________________________ 98PROTOCOL 2. EARLY CLEAVAGE INJECTIONS______________________________________________ 99Equipment and reagents _______________________________________________________________ 99Method ____________________________________________________________________________ 99LABELING INDIVIDUAL BLASTOMERES AFTER 256 CELL STAGE________________________________ 99PROTOCOL 3. LATE CLEAVAGE INJECTIONS.______________________________________________ 100Equipment and reagents ______________________________________________________________ 100Method ___________________________________________________________________________ 101LABELING GROUPS OF CELLS BY PHOTOACTIVATION_______________________________________ 101PROTOCOL 4. FITC PHOTOACTIVATION__________________________________________________ 102Equipment and reagents ______________________________________________________________ 102Method ___________________________________________________________________________ 102LABELING GROUPS OF CELLS BY LIPOPHILIC MEMBRANE DYES ______________________________ 1027.4 TRANSPLANTATION TECHNIQUES _______________________________________________ 102PRECISION TRANSPLANTATION OF SMALL GROUPS OF CELLS________________________________ 103PROTOCOL 5. CONSTRUCTION OF TRANSFER PIPETTES. ____________________________________ 105Equipment and reagents ______________________________________________________________ 105Method ___________________________________________________________________________ 105PROTOCOL 6. SINGLE CELL TRANSPLANTATION ___________________________________________ 105Equipment and reagents ______________________________________________________________ 105Method ___________________________________________________________________________ 106LARGE SCALE TRANSPLANTATIONS OF EARLY BLASTOMERES _______________________________ 106PROTOCOL 7. LARGE SCALE TRANSPLANTATION. _________________________________________ 107Equipment and reagents ______________________________________________________________ 107Method ___________________________________________________________________________ 107TRANSPLANTATION OF PIECES OF EMBRYOS _____________________________________________ 1087.5 PROCEDURES FOR OBSERVING LABELED CELLS__________________________________ 109PROCEDURES FOR OBSERVING LIVE MATERIAL.___________________________________________ 109PROTOCOL 8 OBSERVING LIVING FLUORESCENT CELLS_____________________________________ 110Equipment and reagents ______________________________________________________________ 110Method ___________________________________________________________________________ 111PROCEDURES FOR PREPARING FIXED MATERIAL.__________________________________________ 111
EMBO COURSE MEDAKA & ZEBRAFISH HEIDELBERG 9
PROTOCOL 9. PROCEDURE FOR WHOLE-MOUNT STAINING OF BIOTINYLATED AND FLUORESCEINDEXTRAN LABELED CELLS____________________________________________________________ 112Equipment and reagents ______________________________________________________________ 112Method ___________________________________________________________________________ 113Permeablization of embryos: ___________________________________________________________ 113Transfer fixed embryos into distilled water for 2 min (for gastrulae) to 5 min (for 24 h embryos). ______ 113Remove water (leaving embryos covered). _________________________________________________ 113Add ice cold acetone for 3 min (for gastrulae) to 7 min (for 24 h embryos)._______________________ 113Remove acetone (leaving embryos covered.) _______________________________________________ 113Watching the embryos under a dissecting scope in a spot plate, add water. As embryos begin to swell, gentlyadd back PBST to stop swelling. ________________________________________________________ 113For embryos older that 2 days: Transfer to quenching solution for 30 min. Afterwards, wash three to fivetimes with PBST. ____________________________________________________________________ 113If an antibody staining reaction for endogenous markers is to be done, insert method here.____________ 113Staining of biotin labeled cells: _________________________________________________________ 113Staining of fluorescein labeled cells: _____________________________________________________ 113PROTOCOL 10. MOUNTING PROCEDURE FOR STAINED EMBRYOS _____________________________ 114Equipment and reagents ______________________________________________________________ 114Method ___________________________________________________________________________ 114PROCEDURES FOR ANALYZING DATA.___________________________________________________ 1147.6 (ADDITIONAL PROTOCOL) PRODUCTION OF CHIMERIC MEDAKA___________________ 117PREPARATION______________________________________________________________________ 117FISH _____________________________________________________________________________ 117REAGENTS AND EQUIPMENTS _________________________________________________________ 117PREPARATION OF HATCHING ENZYME SOLUTION __________________________________________ 118PREPARATION OF AGAR PLATES _______________________________________________________ 118COLLECTION OF EMBRYOS____________________________________________________________ 118REMOVAL OF CHORION ______________________________________________________________ 119PREPARATION OF DONOR ES CELLS FOR CHIMERA FORMATION ______________________________ 120TRANSPLANTATION _________________________________________________________________ 120CULTURE AND OBSERVATION OF TRANSPLANTED EMBRYOS_________________________________ 121REFERENCES ______________________________________________________________________ 121
8. CELL CULTURE _________________________________________________________________ 122
8.1 ISOLATION AND LONG-TERM CULTIVATION OF MEDAKA BLASTULA CELLS_________ 122ISOLATION AND PRIMARY CULTURE ____________________________________________________ 1228.2 TRANSFECTION OF MEDAKA ES CELL CULTURES_________________________________ 1238.3 TRANSPLANTATION OF CULTIVATED MEDAKA CELLS INTO BLASTULA EMBRYOS ___ 123PREPARATION OF DONOR CELLS AT THE LOG PHASE _______________________________________ 123PREPARATION OF RECIPIENT EMBRYOS _________________________________________________ 124TRANSPLANTATION _________________________________________________________________ 124Preparation of transplantator or needle holder ______________________________________________ 124Orientation and injection of recipient embryos _____________________________________________ 125MATERIAL NEEDED _________________________________________________________________ 125BUFFERS AND SOLUTIONS ____________________________________________________________ 125ESM4 (for blastula cell culture)_________________________________________________________ 125TM1 buffer (for cell transplantation)_____________________________________________________ 126BSS (for cell culture)_________________________________________________________________ 126BSS-1% PEG_______________________________________________________________________ 126REFERENCES ______________________________________________________________________ 1268.4 (ADDITIONAL PROTOCOL) PRIMARY CULTURE OF BLASTULA CELLS IN MEDAKA ___ 127MATERIALS _______________________________________________________________________ 127METHODS _________________________________________________________________________ 127Collection of embryos ________________________________________________________________ 127Preparation of blastoderms for culture____________________________________________________ 127Culture of blastoderm cells ____________________________________________________________ 128Notes_____________________________________________________________________________ 1288.5 FLUORESCENCE ACTIVATED CELL SORTING (FACS)______________________________ 128PROTOCOL:________________________________________________________________________ 129MATERIAL NEEDED _________________________________________________________________ 129BUFFERS AND SOLUTIONS ____________________________________________________________ 129

EMBO COURSE MEDAKA & ZEBRAFISH HEIDELBERG 10
9. DATABASE RESOURCES _________________________________________________________ 130
9.1 INTERNET INFORMATION RESOURCES: ZFIN DATABASE___________________________ 1309.2 FROM AN EXPERIMENT TO A WEB ACCESSIBLE DATABASE________________________ 131DATABASE ________________________________________________________________________ 131Creating the Database structure _________________________________________________________ 131Drawing an ER diagram_______________________________________________________________ 131Creating the database_________________________________________________________________ 132MANIPULATING DATA _______________________________________________________________ 132RETRIEVING DATA __________________________________________________________________ 132ACCESSING THE DATABASE THROUGH THE WWW._________________________________________ 132Editing a HTML form ________________________________________________________________ 132Java servlets ________________________________________________________________________ 133Getting the Parameters from the HTML form ______________________________________________ 133Talking to the database _______________________________________________________________ 133Response to the Browser ______________________________________________________________ 134LINKS:____________________________________________________________________________ 134Servlet Engines _____________________________________________________________________ 134Servlet Tutorial _____________________________________________________________________ 134Java ______________________________________________________________________________ 134HTML____________________________________________________________________________ 134Databases__________________________________________________________________________ 134Biological Databases _________________________________________________________________ 134LITERATURE: ______________________________________________________________________ 134
APPENDIX ________________________________________________________________________ 136
RECIPES _________________________________________________________________________ 167TEACHERS _______________________________________________________________________ 176PARTICIPANTS ___________________________________________________________________ 179
EMBO COURSE MEDAKA & ZEBRAFISH HEIDELBERG 11
1. Obtaining Fish Embryos
A Fish Colony
A variety of set-up options currently exist for fish facilities. On a small scale, it is possible tomaintain fish for a constant supply of good eggs using standard aquarium tank set-ups obtained through apet shop.
For zebrafish the biggest problem may be to get young and good fish for egg production. In the US,Ekk Will Waterlife Resources (Symmes Road, Gibsonton, FL 33534-9714 phone: 1-800-237-4222) haveprovided us reliably with good breeders. In Europe, investigate with larger retailers.
For Medaka the best source of well producing heathy adults is Carolina Biological supply(https://www3.carolina.com/onlinecatalog/default.asp).
Depending on your financial frame and caretaker support, different systems have worked outsuccessfully for maintaining medaka and/or zebrafish colonies.
For a medium sized facility of 100-400 fish tanks, we find the Z-module systems from MarineBiotech (Marine Biotech, Inc.; 54 West Dane Street; Unit A; Beverly; Massachusetts 01915; USA;Telephone: +01 978 927-8720; Telefax: +01 978 921-0231) very easy to set up and run. Modules of upto 84 tanks can be combined to larger units. Setup is provided by the company, or can also be easilyperformed by a local workshop.
For larger systems, three companies have provided excellent solutions: Müller & Pfleger GmbH(Wiesenstrasse 27-29; Postfach 1234; D-67806 Rockenhausen; Germany; Telephone: 011-49-6361-92160; Telefax: 011-49-6361-921628, Aquarienbau Schwarz (Fabrikweg 8; D-37075 Göttingen;Germany; Telephone: 0551-33340; Telefax: 0551-376533), as well as Marine Biotech.
The system we are using is based on recirculating water flow. Water from a lower biofilter reservoir ispumped to an elevated reservoir above the level of the aquaria. The pump is a bit stronger than needed,and some water is always draining back to the lower reservoir, such that water levels in the top reservoiris constant. On its way to the top reservoir, water can be filtered through fine particle filters (Rainbow,USA), and sterilized using UV irradiation bulbs. Water from the top reservoir is fed to the tanks, suchthat the water is exchanged 2-3 times per hour (zebrafish) or once in two hours (medaka) in each tank.Tank sizes range from 2-3 liter (mouse cages size A; Tecniplast Deutschland GmbH; Hettenstr, 18, D-82383, Hohenpeissenberg; for up to 10 fish), 5 liter (glass tanks, up to 20 fish) to 12 to 15 liter tanks(glass tanks, up to 50 fish). Water from the tanks flows over into a draining system of pipes that deliversit to the top of a biofilter dry-wet trickle unit. Filter pads (polyester foam egg crate padding as used inbedding materials and other types of foam pads) in 6-8 drawers remove the solid waste (top drawers)acting like particle filters, and are substrate for biological filtration (denitrification). For zebrafish dayabout 10% of the total volume of the facility water is replaced by adding reversed osmosis purifiedwater, for medaka 10% exchange per week is optimal (and zebrafish used in the course are kept underthose conditions). To reconstitute salts to a level acceptable fish, we mix charcoal filtered tap water andfully deionized water (see below).
EMBO COURSE MEDAKA & ZEBRAFISH HEIDELBERG 12
System parameters are: temperature 26.0-28.0°C (controlled by room air temperature); salinity 0.03 -0.04% (conductivity: 0.2 mS); pH between 6.8 and 7.2; ammonia and nitrite below 2 ppm; and nitratebelow 60 ppm. Fish are kept at a 14 hours light / 10 hours dark cycle (8.00 a.m. to 10:00 p.m.). Tanksare kept clean and debris are syphoned off.
The cleaning regime for our fish systems is as follows; the process works in a 6 week cycle. From thetime that the system has been set-up, 3 weeks from this time, a 20% water change is to be performed.This is in addition to the water that will be replaced due to evaporation on a daily basis. Then 3 weeksafter the water change, ie: in the 5th week after the system set-up, a filter clean should be carried out. Byfilter clean, this basically means a thorough cleaning of every part of the system. This should includeremoving all the filters from the systems and eliminating all dirty particles from all filters. A lot of debriswill form in the tanks as well as in the filter housing itself, this should be removed/ syphoned off at thesame time. Then, once again, 3 weeks after the filter cleaning, a 20% water change should be performedetc etc. It is imperative that this cleaning schedule is maintained, the well being of all fish depends on awell kept aquarium!
Salt composition of water in fish facilityOur fish water is based on a 80% distilled water and 20% tap water (charcoal filtered) mix resulting in
a conductivity of 150 µS/cm. Our system automatically mixes 4000 liters to this conductivity. The wateris complemented by the additon of 5g/100L Sera Mineral Salt (Sera GmbH; P.O. Box 1466; D-52518;Heinsberg; Germany; Telephone: +49 2452 912615; Telefax: +49 2452 5922), trace elements using100mg/L Mikrosal supplement (H. Brustmann GmbH & Co. KG; P.O. Box 1129; D-65370; Oestrich-Winkel; Germany; Telephone: +49 6723 91767; Telefax: +49 6723 7772) and Ferrogan fluid; 2drops/50L (H. Brustmann; see above). Due to the hardness of our tap water, it would be advisable tocheck with your local water board to assess the hardness of your local tap water, once this is known,you can play with the two until the desired mix (conductivity) is obtained. The pH in the recirculatingwater system equilibrates to about 6.9 due to acid production in tanks and filters. We experienced thatthe addition of filtered tap water dramatically improved the buffer capacity as compared to fully artificialwater (even if we added buffering components there). Water contitioner such as tetra aqua safe did nothave additional beneficial effects and we avoid it completely.
Feeding FishWe feed hatched artemia nauplii (Western Brine Shrimp International, Inc.- Utah, “Red Dragon” &
Inter Ryba GmbH- Germany, “Silver Star Artemia”- Product of USA ) and flake food (JBL or Tetra).For raising larvae, Tetra produces a food, AZ 100, which is not commercially available so far, but can beobtained from the company:
Dr. H. Kürzinger; TETRA WERKE; Herrenteich 78; D-49304 Melle, Germany;
fax: +49 5422-42986. AZ 100 can be fed from day 5 of development onwards.
Recently we had excellent success with a liquid baby food (Baby Star, Inter Ryba, Dr. B. Jung,Tannenkamp 12, 27404 Zeven, Germany, phone: +49 4281-958833, fax: +49 4281-958836) that comesin different sizes and can be better adjusted to the size of the growing young fish. The food does not floaton the surface of the baby tanks, thus no decay, less cleaning! As the food is suspended in the water,much the same as hatched artemia, the food is eaten quickly by the larvae.
Adult fish are fed three to four times with artemia nauplii and Tetra-min dry food.
EMBO COURSE MEDAKA & ZEBRAFISH HEIDELBERG 13
Setting up crosses to obtain eggs by natural breeding(W. Driever)
Eggs from zebrafish can be obtained by either placing a breeding trap into a tank with many fishes, orby setting up a defined cross between a male and a female in a single trap on shelves in the fish room.
Genetic crosses between single females and males are productive if the fish are older than threemonths. You have a good chance to get large egg clutches when you follow most of these rules:
- use males and females once every one to two weeks
- use males and females of approximately the same size (of course, females are always slightly larger)
- handle fish for crosses very carefully
- set up crosses in the late afternoon or evening before the light turns off (14 hrs. light / 10 hrs. darkcycle) Make sure that you do not transfer debris or food from the tank into the breeding trap, whichmakes the water turn bad overnight and the fish suffer or die!!!!
Set up the cross as follows:1. Assemble a breeding trap: put a white plastic container (with the steel mesh) into a clear one. Fill
with fish water so that the water level is about 3 cm above the steel mesh.2. Transfer fish from tank to one mouse cage. Separate males and females from the mouse cage
into two separate mouse cages. Check the sexes by looking from the side at the mouse cage,while it is placed on a dark surface (when melanophores are dilated, males and females areeasier to distinguish)
3. Add the male and then the female Take nets made of white cloth net, which is softer than thegreen nets and better for small fish. (In a lab setting, you would use a fresh net for each newtank you take fish from, so not to transmit any putative diseases. Used nets get autoclaved).Cover the breeding trap with a lid, and place the whole trap on a black surface (bench orshelves).
Now your fish will or will not lay eggs (for wild type, between 5 and 8 out of 10 crosses mightlay eggs). On the next day: If you need to carry the trap, don't make any rapid movements: theeggs will whirl up and the fish will eat them! For all crosses that gave eggs, prepare a secondlabel and stick it to the breeding trap: one label will go with the fish, the other with the eggs! Thisprevents mix ups if you have to keep the parents for identification of genotype / new mutations.
5. Net the fish into new mouse cages before you put them into their appropriate containers ortanks. This allows to carefully check the sexes and to make sure that you do not mix up fish.Check the sexes by looking from the side at the mouse cage, which is placed on a blacksurface.
6. Remove the top of the trap.7. Recover the eggs by filtering the water from the breeding trap through a plastic tea sieve (I do
this with the sieve placed in a large petri dish, such that the stream of water can not damage theeggs).
9. Transfer eggs from sieve into 10 or 15 cm plastic Petri dish (with help of spray bottle). Fill withegg water.
10. Take a Pasteur pipette with a wide opening (VWR brand, or cut and flame polished, which isbetter) and pipette the good, fertilized eggs carefully into a fresh dish with egg water. Makesure that the opening of the pipette is large enough: the eggs should fit through easily, so that
EMBO COURSE MEDAKA & ZEBRAFISH HEIDELBERG 14
the chorion is not hurt. When you pipette eggs: never fill more than 50 eggs into the pipette;when you want to release the eggs again, first suck in some more water (so that the eggs getwhirled up) and then release them: otherwise they clog the pipette and they will be distorted ifyou try to press them out. Label the dish with the second tape you prepared!
11. Transfer to new Petri dish with methylene blue saline12. Never put more than 200 eggs into a 15 cm dish with 200 ml of egg water (50 eggs in 10 cm dish
with 30 ml egg water): they will not have enough oxygen, and bacteria growing on the chorionsmight later suffocate the fish.
13. Label the bottom part of the dish with a tape (at that stage you can write anything on it, but thedate and the genotype of the parents are certainly helpful).
14. Remove dead / black eggs in the evening and on the following morning: fungus will grow on thedead eggs and suffocate the good ones.
Obtaining medaka embryos(E. Gzebisz and J. Wittbrodt)
Mass production of embryos
The natural habitats of the medaka are the rice fields of South east Asia. In the laboratory these fishare extremely hardy and have no high demands for water quality, food or specific temperatures. Theytolerate direct sun light, massive growth of algae and changing temperature levels. Their natural spawningseason is between June and September with spawning occurring at dawn. One female usually producesmore than 3000 eggs per breeding season. Under laboratory conditions daily egg production can beinduced throughout the year by an artificial photoperiod of 14 hrs light/10 hrs darkness. Three factors areinstrumental for successful embryo production in the laboratory. Most important is the high intensity oflight applied for a specific time. Furthermore, optimal water temperature (28°C) and sufficient foodsupply (3 times daily; tetramin and/or brine shrimps) guarantee good egg production. A good and healthyadult female produces between 20 and 50 eggs per day in a laboratory tank for up to 3 months. Afterthree months males and females should be returned to a resting cycle (12hrs light/12hrs darkness; lowfood supply) to prevent exhaustion.
Males and females can be easily distinguished by their differently shaped anal and dorsal fins. Themale dorsal fin has a clearly visible deep notch between the last two rays. The male fins, both dorsal andanal, are larger compared to female fins. Those have a round shape with smooth margin and do not havenotches.
To obtain egg production in the laboratory, young medaka fish are kept after hatching under restingconditions at high density in large containers for up to 8 weeks after hatching (100 fish in a 50 liter tank).Young fish just after hatching are fed with rotifers, infusoria and/or powdered tetramin. Two weeks afterhatching fish are fed with brine shrimps and tetramin. No filtering or air bubbling is required and app.1/10 of the water is exchanged once a week. After 8 weeks (the generation time of medaka is 8-10 weeks)the light phase is changed to 14hrs and the fish are fed at least 3x daily (brine shrimps and/or tetramin).Under these conditions after 1-2 weeks the females start spawning with about 5-10 eggs per day. Malesand females can now be separated for several days before bringing them together for the production oflarge numbers of eggs.
EMBO COURSE MEDAKA & ZEBRAFISH HEIDELBERG 15
For mass production adult fish are kept at high density in large plastic containers with plants butwithout filtering and air bubbling. Medaka females carry clusters of eggs at their belly for several hoursbefore they are stripped off at plants in the tank. After onset of egg production (2 weeks after changingthe photoperiod) all plants with adherent eggs are removed from the tanks with the adult fish and putinto fresh tanks with aged, algae green tap water and free of snails or adult fish. After 2 weeks medakafish will hatch and can be fed with rotifers.
Production of embryos for microinjection
About 6 adult fish (5 females, 1 male) that have recently started to produce eggs under thereproductive cycle are transferred to a 7 l tank. Daily spawning takes place within the first 30 minutesafter the light is set on. The eggs stick together through hairy filaments and attach to the mother’s bellyfor several hours. Fertilized eggs can be obtained by carefully stripping off the egg clusters from femalesusing a bend preparation needle. Single eggs are obtained either by rolling egg clusters on a whatman filterpaper or by using forceps to remove hairy filaments under a stereoscope.
Injected embryos are transferred to Embryo Rearing Medium where they will hatch after 7-9 days.Dead embryos are removed daily. It is not necessary to change the medium before hatching except ifthere are signs of bacterial growth.
Embryos isolated from females during the first 60 minutes after the light is switched on, are still in theone-cell stage and need app. another 30 minutes to complete the first cell division. This gives enoughtime for microinjection into the 1 or 2-cell stage. However, it is possible to slow down development ofearly medaka embryos by incubating the eggs at 4°C for several hours without any problems withrespect to lethality or abnormal development. Embryos that are past midblastula stage can be stored forseveral weeks at 4°C to arrest development without any damage. The cold tolerance together with adevelopmental time of minimum 7 days also allows mailing of large numbers of medaka embryos by mailin Embryo Rearing Medium (ERM) in an Eppendorf tube.
Eggs from medaka can be taken every day from a coupling. It is also possible, and widely used, to set-up one male with up to 5 females. As the eggs remain attached to the belly of the female afterfertilization, there is no need to house the matings in special cages.
• the medaka adults will become sexually mature at around 3-4 months of age, if you push themthis time can be reduced to as little as 2 months.
• When collecting the embryos handle the fish very carefully as not to cause any injury or toomuch distress!
1. Once you have decided the strain/s of fish that you want to use, you can go ahead and select aproducing female/s and a fertile male for the mating set-up.
2. Once this has been done, the chosen fish can be placed together in a tank. Both glass andplastic tanks can be used for matings.
3. The fish usually prefer a couple of days to adjust to one another, but more often than not thefemales will begin to produce straight away. Spawning usually takes place at dawn, but thisvaries from strain to strain. Before spawning, the male displays a characteristic sexualmanoeuvring (dancing). The male approaches the female and performs swift circularmovements around the female. Once mating is complete a cluster of eggs remains attached tothe belly of the female for some hours, they hang from the oviduct by fine threads attached tothe chorion of the eggs. Those eggs that appear milky in colour may not be fertilised.
4. Once you see that the fish have mated, carefully remove the female from the tank with a finenet. Using either your fingers or, preferably, a egg hook (metal rod with slightly curved wire at
EMBO COURSE MEDAKA & ZEBRAFISH HEIDELBERG 16
one end, please ensure that the hook is completely blunted at curved end to avoid injury to thefemale) gently scrape the eggs away from the females abdomen onto the hook.
5. Tranfer the cluster of eggs into a petri-dish with 1x hatching solutiuon or 1x ERM, dependant onthe use of the embryos afterward. If screening the embryos for flourescence, then it is better touse the ERM solution, the methylene blue in the hatching solution represses the expression offlourescence somewhat.
6. Label the top of the pertri-dish with the name of the strain and the date of collection, togetherwith any additional information that may be useful.
7. It is advisable to seperate the eggs from one another. This can be done in two ways, firstly,simply using your index finger, gently place the finger in the top of the cluster and move yourfinger in a circular motion. (Be careful not to apply too much pressure to the eggs as this willcause them to burst!) You will see the eggs start to seperate from one another. The alternativeis to place the egg cluster on a piece of filter paper or tissue and seperate the eggs using yourindex finger or a pair of fine forceps. The forceps need to be distiguisable between those usedto handle living embryos and those for dead embryos. (The easiest way to do this is to label the“dead” forceps with some red tape and the “living” with some green tape.)
8. Once the eggs have been seperated remove all dead and injured embryos from the petri-dishusing forceps. (Dead/injured embryos decay and will cause bacteria to grow in the dish.)
9. Remove all debris (ie. faeces, snails, algae) from the perti-dish using either the forceps or adisposable pastuer pipette.
10. Drain off the original hatching solution or ERM. This can be done successfully by holding the lidof the petri-dish tightly and pouring off the liquid (the eggs will remain in the dish). Once the liquidhas been removed, refill the petri-dish with hatching solution or ERM (the best is to use a spraybottle, as this helps you to remove the eggs that may have attached to the side of the dishwithout damaging them). Alternatively, you can take up the eggs with a pastuer pipette andtransfer them to a newly filled petri-dish. Make sure not to use the pipette for different stocksand strains!
11. Never put more than 200 eggs into a 15 cm dish with 200 ml of hatch solution (50 eggs in 10 cmdish with 30 ml hatch sol.): the eggs will not have enough oxygen, and bacteria growing on thechorions might later suffocate the fish.
12. Check the petri-dish on a regular basis to ensure that no bacteria is growing and to remove anyembryos that may have died, this helps the healthy embryos to develop in the best conditionspossible.
ReferencesKirchen, R.V. & West, W.R. (1976). The Japanese medaka - its care and development. Carolina biological
supply Company. Burlington, North Carolina.
Yamamoto, T. (1975). Medaka (Killifish) - Biology and Strains. Keigaku Publishing Company, Tokyo,Japan.

EMBO COURSE MEDAKA & ZEBRAFISH HEIDELBERG 17
2. Genetic approaches
2.1 Mutagenesis screen in medaka(contributed by M. Furatani-Seiki)
The experiment of a mutagenesisscreen in Medaka, consists of 3 majorsteps such as (1) mutagenesis of G0male fish, (2) preparation of F2families by two generation in-crossingand (3) screening of embryos frompairs of F2 families (Fig.1). Since thefist and the second steps take at least9 month before you can start actualscreening, it is recommended to makea plan about the time table, the scaleof the screen (limited by the space ofthe fish facility or the speed of thescreen) before you start a screen
Although F1 fish is crossed withwild-type fish to produce F2 familiesin this scheme, we usually makecrosses within a F1 family.
Experimental rationale The chemical mutagen, N-ethyl-N-nitrosourea (ENU) can induce mutations in spematogonia and
differentiating male sperm cells at the time of ENU treatment of the male fish. Based on the results of thestudy on cell population kinetics of spermatogenesis of the Medaka (Egami and Hyodo-Taguchi, 1967),maturation stages at the time of mutagenesis are judged according to the day of fertilization aftermutagenesis as follows:
1 - 3 days after treatment; sperm
4 - 9 days after treatment; spermatids
10-15 days after treatment; spermatocytes
16-29 days after treatment; differentiating spermatogonia
Fig1. The three generation crossingscheme to detect recessive mutations(taken from Loosli et al., 2000)
EMBO COURSE MEDAKA & ZEBRAFISH HEIDELBERG 18
30 or more days after treatment; stem spermatogonia
It is reported that ENU induces point mutations in spermatogonia but deletions or translocations indifferentiating germ cells in zebrafish. Moreover, F1 fish become mosaic for induced mutations whenfertilized with those sperms where mutations were induced at differentiating stages. As this makes thescreen for the phenotype of mutations after 2 generations less efficient, mating of ENU treated G0 maleswith wild-type females to make F1 progenies should be started after 1 month of ENU treatment.
ENU mutagenesis is performed by the incubation of males in a ENU solution. The efficiency ofmutagenesis is determined using specific locus test. For proliferating germ cells, ENU is an effectivemutagen, as indicated by the frequencies of non-mosaic mutant progeny at four different pigmentationloci (Solnica-Krezel et al, 1994, Loosli et al., 2000). Several mutagenic regimens that varied in either thenumber of treatments, or the concentration of ENU were studied to achieve an optimal ratio between themutagenicity and toxicity. In zebrafish, the two most mutagenic regimens: 4 x 1h in 3 mM ENU or 6 x 1hin 3 mM ENU, the minimum estimate of frequencies of independent mutations per locus per gamete was0.9 - 1.3 x 10⁻³. There was a more than 10 fold difference in the relative mutability of the least mutablelocus brass and the most mutable tester locus sparse. ENU-induced mutations at the albino locusexhibited a range of hypomorphic phenotypes, indicating that the induced lesions were likely to beintragenic. They demonstrated that the mutations induced by ENU are transmitted to offspring and thatthey can be recovered in a two generation screen. The effectiveness of mutagenesis measured by thespecific locus rate of 1.2 x 10⁻³ approximately corresponds to two embryonic lethal mutations per singlemutagenized genome. The high rates of germ-line mutagenesis achievable with ENU will allow saturationmutagenesis screens to identify genes involved in a variety of aspects of Medaka development.
During the EMBO course, the experimental setup will be demonstrated, but we will not actually useENU: the course is too short to properly evaluate the experiment. In case you will actually engage in anENU mutagenesis experiment, this will likely be one of the most dangerous (scientific) experiments inyour life.
Please follow these SAFETY INSTRUCTIONS
ENU can penetrate the skin and is an extremely active mutagen and carcinogen. Extreme care isnecessary when handling this substance!
ENU is relatively stable in aqueous solutions, but gets inactivated in: 10% Sodium thiosulfatesolution, pH adjusted to about 10 with sodium hydroxide.
Just to give you an idea, here are some half-life data:
ENU in Thiosulfate, pH >9 at 20 Celsius 0.05 hours
ENU in water: at 20 Celsius 1.6 hours
ENU in water is less stable, but at acidic pH it can be stable for a long time!
For ENU, buy the 1 g sealed bottle only (SIGMA, Isopac bottles). For consistency in yourexperiments, buy one batch such that you have a sufficient amount of ENU for one set of experiments.Never try to handle ENU powder (or you risk your life and your will-be kid's genes!). Handle thechemicals in a chemical hood only! And: perform all the mutagenesis in a chemical hood and inactivatethe mutagen there, too. Under no conditions should any trace amount of mutagen have a chance to leavethe chemical hood. Always label the area where you do mutagenesis very well, so that nobody will enterby accident!
EMBO COURSE MEDAKA & ZEBRAFISH HEIDELBERG 19
Cloth: always wear lab coat and gloves when handling these chemicals. Of course, wear shoes and longpants to reduce risk of exposure.
Wear two pairs of gloves when handling mutagen solutions: in case of a spill, you can take off one pairwithout risking to expose bare skin! Cover the workplace with plastic backed paper. Dispose everysingle piece that had contact with the mutagen (pipette tips, fish nets, gloves etc.) into the thiosulfatesolution.
Inactivate the mutagen solutions (where the fish swam in) in thiosulfate, too, and submerse the flasksin the bath. Everything should stay in the thiosulfate solution for at least 24 hours.
Keep the fish in quarantine in the chemical hood for 24 - 48 hours, and change the water two timeswithin 24 hours. Inactivate the water in thiosulfate solution. Only then transfer the fish back to thesystem. (Within the fish, the mutagens are less stable than in water, due to the presence of reactivegroups e.g. in proteins and DNA).
DETAILED PROTOCOL
1. Take ENU (Sigma, 1g) in sealed/Isopac bottle out of can (stored at –20˚C) and equilibrate to roomtemperature for 15 min.
2. Put 3 kg sodiumthiosulfate in inactivation tank, dissolve in 12 l warm tap water. Adjust pH to 10by adding NaOH solution (good for 30 liter final volume of inactivation bath, including mutagensolution, etc.) set up in fish tank, 40 liter, or similar.
3. Inject 85.4 ml 10mM NaPO4 buffer (make by adding 5ml 0.5 M NaPO4 buffer pH6.0 to 245 ml H2O,final pH is 7.4). Two steps: 45 + 40.4 ml. Due to injection, air pressure in bottle will increase, letair escape only into syringe, not in environment i.e. after injection of buffer, move push-in part ofsyringe back to original location before removing syringe/needle from bottle. Remove air insyringe into inactivation tank)
Note: use 60 ml syringe, measure volume by looking at buffer/air border, not by looking at end ofsyringe. e.g. straight buffer/air border at 45 ml, syringe border at 50 ml. Inject 40 ml by pushingbuffer/air border down to 5 ml. Hold the push-in part of the syringe such that no dripping outoccurs.
4. Place ENU bottle in plastic box on a shaker. Fix the ENU/buffer bottles to box with tape, shake for60-90 min at level 4.5 on shaker in hood. Before turning on the shaker, reduce speed to 0
5. Fill 2 l Erlenmayer flasks with 992 ml eggwater + 1 ml 0.5 M NaPO buffer pH 6.0. Leave alufoil on.Put in waterbath (12 l distilled water) and set the temperature to 26° C, if necessary by additionof ice.
6. Put 6-8 male fish into each Erlenmayer. With some skills you can catch three fish in net, closeyour fingers around them, and put them in Erlenmeyer together..
In the following steps ENU solutions are in direct contact with the environment. Be even moreextremely careful than before!!
7. Put dissolved ENU solutions (30ml for 3mM final concentration) into Erlenmayer as follows: Inject50 ml of air into bottle and suck off 50 ml ENU solution. Adjust straight buffer/air border. Inject 30ml into each Erlenmeyer. Hold push-in part of syringe such that no dripping occurs!!!!! Use samestrategy for rest of ENU solutions.

EMBO COURSE MEDAKA & ZEBRAFISH HEIDELBERG 20
8. Check time now for start of mutagenesis
9. Inactivate the remaining ENU in bottle by injecting 90 ml of inactivation solution. Dump bottles ininactivation tank.
10. Incubate fish for 1 hour in ENU solution at 26° C, turn lights off, close hood. Check temperature1-2 times.
11. Pour Erlenmayer content through net into inactivation tank. Put fish into fresh water cage(15/cage). This is the time fish may die, maybe because of stress and heart attacks. Expose fishto as little harsh treatment as possible (including catching, putting in tank, and noise e.g. bytouching tank). Put each Erlenmayer flask into inactivation solution such that it is filled with thissolution.
12. Leave fish alone until next morning. I would not fish out seemingly dead fish (belly up) until latein the evening, because 1) some recover, and 2) fishing out stresses still living colleagues.Before you leave in the evening, check water level in waterbath.
13. Morning: Put fish in cages with fresh water. Discard cages and water in inactivation tank.
14. Noon: Feed shrimp.
15. Late Afternoon: same as morning.
16. After 1 h you can put fish in system again.
This mutagenesis is repeated three times at 2-3 days intervals with the same fish to obtain optimallevels of mutagenesis in Medaka.
Set up of F1 and F2 families (3 weeks+3 month+2 weeks+3 month)
Four weeks after the ENU mutagenesis, mutagenized G0 males are mated with wild-type females togenerate F1 progenies. Grow up about 80 F1 progenies per G0 (F1 family). After obtaining the F1progenies, mate G0 male with the tester strain female to carry out a specific locus test.
When F1 fish become fertile start to set up single pair crosses from each F1 family and grow up 60fish/pair in a tank (F2 families). We usually make about 30 F2 families/F1 family.
ScreeningNine-Ten months after the ENU mutagenesis, one can now start to do screen for mutations.
EMBO COURSE MEDAKA & ZEBRAFISH HEIDELBERG 21
Day1Set up to eight single pair crosses/F2 family to recover mutations in one F2 family. It isrecommended to keep the rest of the fish in the F2 family as a back-up stock.
Day2Collect eggs of successful matings on three successive days. Rolling clutches in the petri dishseparate eggs by tearing the attachment filaments off the chorion.
Incubate eggs from 6 pairs in one six-well tissue culture plates at 28 C in 1x hatching mediumand subject them to screening.
Score phenotypes on three successive days. Take pictures of mutants if necessary.
Day3,after 24h (approximately stage 18), inspect the neurula stage embryos for abnormalities in thebrain, somites and the notochord..
Day4,after 48h (approximately stage 25), examine the early organogenesis stage embryos forformation of lens, optic cup and compartmentalization of the brain.
References1. Egami, N, Hyodo-Taguchi, Y. An autoradiographic examination of rate of spermatogenesis at different
temperatures in the fish, Oryzias latipes. Exp. Cell Res. 1967, 47, 665-667.
2. Solnica-Krezel, L, Schier, AF, and Driever, W: Efficient recovery of ENU-induced mutations from thezebrafish germline. Genetics 1994,136:1401-20.
3. Driever, W, Stemple, D, Schier, A, and Solnica-Krezel, L: Zebrafish: genetic tools for studyingvertebrate development. Trends Genet. 1994, 10:152-9. (a comprehensive review for mutagensisscreen)
4. Shima, A & Shimada. A. :Proc. Natl. Acad. Sci. USA, 1991, 88: 2545-2549.
5. Loosli. F, Köster. RW, Carl, M. Kühnlein R, Henrich, T, Mücke, M, Krone, A, Wittbrodt, J. A geneticscreen for mutations affecting embryonic development in medaka fish (Oryzias latipes), Mech. Dev.2000, 97, 133-139.

EMBO COURSE MEDAKA & ZEBRAFISH HEIDELBERG 22
2.2 Freezing medaka sperm samples(Annette Krone and Jochen Wittbrodt)
Cryoconservation of sperm is a very suitable strategy for the preservation of important strains ormutants. This procedure is routinely used in aqua culture for a variety of different species (Rana and McAndrew, 1989, Steyn and van Vuren, 1987, Wheeler and Thorgaard, 1991). Poorly defined media likemilk powder, egg extracts or fetal calf serum used as cryoprotectants (Aoki et al., 1997, Chao et al.,1987, Wheeler and Thorgaard, 1991) may be the cause for variable fertilization rates. Here we describe arapid and reliable protocol that uses sucrose and DMSO as cryoprotectants (Holtz, 1993). The protocolallows to efficiently freeze and recover sperm obtained from living fish.
In brief sperm is obtained from the males by gently squeezing their testis with a pair of milliporeforceps. The sperm is subsequently mixed with freezing medium in a glass capillary. Sperm containingcapillaries are brought to successively lower temperatures and are eventually stored in liquid nitrogen.Successful recovery of the preserved stock after several month of storage in liquid nitrogen is routinelyachieved by in vitro fertilization.
Material needed:• Triacine (Sigma# A-5040)
• DMSO (Sigma# D-8418)
• Blunt forceps (millipore filter forceps cat # XX62 000 06)
• Glass capillaries (Desaga GmbH Heidelberg, Postfach 101969, D 69009 Heidelberg, Cat # 12 0196, the dimensions are 32 mm x 0.9 mm outer diameter)
• Cryo-tube: Nalgene cryogenic vials 5ml cat # 5000-0050
• 15 ml Falcon polypropylene tubes
• Sharp forceps (Dumont No 5 Biology)
• Pair of dissection scissors
• Ruler
• Timer
• Dissecting scope
• Ice bucket with dry ice
• Small Dewar with liquid nitrogen
• Plastic teaspoon
• Depression slides
EMBO COURSE MEDAKA & ZEBRAFISH HEIDELBERG 23
Buffers and solutions:
Triacine/MS222 Stock solution:Triacine 400 mgH2O 97.9 ml1M Tris pH9 2.1 ml
pH should be 7.0
Aliquots of stock soln are frozen and kept at -20°C
To anesthetize fish freshly mix 4.2 ml of the MS 222 sock and 100 ml tank water.
Ginzburgs FishringerNaCl 6.5 gKCl 0.25 gCaCl2 0.3 g
add 800 ml H2O
freshly add 0.2g NaHCO3 and fill up to 1000ml with H2O
Freezing mediumSucrose 0.6 MDMSO 10 %
freshly prepared
as stocks dissolve 20.54 g Sucrose in 100 ml H2O and freeze 900µl aliquots
To set up the freezing medium (always freshly prepared, briefly stored cold in the dark) mix 900µlSucrose stock and 100µl DMSO.
Protocol1. Isolate male fish one day prior to the sperm squeezing.2. Prepare dry ice, freezing tubes, ruler and all the material you will need. For successful sperm
freezing you will have to work quickly!3. Prepare MS222 mix to anesthetize the male fish4. Prepare the freezing medium and store cold in the dark5. Anesthetize the male fish for 5 to max. 12 min.6. in the meantime put 50µl of freezing medium onto a depression slide7. Catch the fish with a teaspoon and put it into a foam bed, the belly up. Keep the fish wet with
Ginzburgs fish ringer.8. Under the dissecting scope remove traces of feces with a tissue paper.9. Use a pair of millipore forceps to carefully squeeze the sperm out of the fish. Use the forceps to
stripe the sperm out of the testis beginning in the middle of the belly close to the air bladder.Stripe carefully towards the anus. Suck up the sperm (opaque) into a microcapillary.
EMBO COURSE MEDAKA & ZEBRAFISH HEIDELBERG 24
10. work fast now!!!11. put the fish back into fresh tank water.12. measure the level of sperm in the capillary with the ruler (e. g. 2 mm) and make a mark on the
capillary at 3x sperm volume (e.g. 6 mm)13. suck up freezing medium to the mark (6 mm). mixing occurs during this procedure. Extra mixing
will only introduce air bubbles and lead to loss of sperm!!14. put the capillary into the prelabelled cryo-tube. Transfer the tube and capillary to a 15 ml falcon
tube that has been precooled on dry ice. Freeze there for 20 min.15. Screw the cap onto the cryo tube containing the sperm capillary and put it into liquid nitrogen.
Avoid to warm up the tube!16. once thawed, the sperm can not be refrozen!!!!
2.3 In vitro fertilization of medaka oocytes with frozen sperm
Solutions
1x Yamamoto RingerNaCl 1.00 gKCl 0.03 gCaCl2 x 2H2O 0.04 gMgCl2 x 6H2O 0.10 gNaHCO3 0.20 g
dissolve in 800 ml H2O, adjust pH to 7.3, fill up to 1000 ml and sterile filter.
Hatching solutionNaCl 1.00 gKCl 0.03 gCaCl2 x 2H2O 0.04 gMgSO4 x 7H2O 0.16 gMethylene blue 0.0001 g
dissolve in 800 ml H2O and fill up to 1000 ml.
Protocolhave prepared one day in advance
◊ isolate females that produce many good eggs. Keep them single and prevent any stimulation bymales or other females to prevent them from spawning.
prepare on the ivf day:
◊ get the sperm frozen in liquid nitrogen in a small dewar
◊ get some fertilized eggs for a positive control

EMBO COURSE MEDAKA & ZEBRAFISH HEIDELBERG 25
Preparation of the donor female1. kill the female by decapitation with a pair of scissors2. remove the ovary and isolate ripe oocytes3. transfer the oocytes into a petri dish with 1x Yamamoto ringer and submerge carefully4. remove the follicle layer with a pair of sharp forceps, keep oocytes submerged
In vitro fertilization5. add 100 µl 1x Yamamoto ringer into a depression slide6. rapidly thaw one sperm capillary between the fingers and transfer the sperm to the ringer. Mix
carefully and rinse the capillary.7. remove as much as possible ringer from the oocytes and overlay them with the sperm
suspension. Incubate for 2 - 5 minutes.8. monitor the fertilization (after the incubation) under the dissecting scope. Cortical reaction
(concentration of oil droplets at the vegetal pole) will start in fertilized eggs. Unfertilized oocyteswill stay opaque.
9. transfer fertilized eggs into a petri dish with hatching solution and incubate at 28°C
References:Aoki, K., Okamoto, M., Tatsumi, K. and Y. Ishikawa (1997) Zoological Science, 14: 641-644.
Chao, N. H., Chao, W. C., Liu, K. C. and I. C. Liao (1987) J. Fish Biol., 30: 107-118.
Holtz, W. (1993) Aquaculture, 110: 97-100.
Kirchen, R. V. and W. R. West (1976) In: The Japanese Medaka: Its care and development. CarolinaBiological Supply Co., Burlington, North Carolina.
Rana, K. J. and B. J. Mc Andrew (1989) Aquaculture, 76: 335-345.
Steyn, G. J. and J. H. J. van Vuren (1987) Aquaculture, 63: 187-193.
Wheeler, P. A. and G. H. Thorgaard (1991) Aquaculture, 63: 35-44.
Yamamoto, T. (1975) In: Medaka (Killifish), Biology and Strains. Keigaku Publishing Company, Tokyo.
2.4 Freezing zebrafish sperm samples(J. Belak, J. Gruenbaum, Z. Rangini, W. Driever)
The protocol for cryopreservation of sperm was modified from the one developed in the Eugenezebrafish labs (Westerfield, 1994; "http://zfish.uoregon.edu/zf_info/zfbook/zfbk.html")
The method was changed to use standard plastic cryovials (see below), and times for freezing adjustedaccordingly.
Freezing medium was prepared as follows: 9.0 ml Ginzburg Ringer (6.5 g NaCl, 0.25 g KCl, 0.3 gCaCl 2, 0.2 g NaHCO3 per liter of H2O; pH adjusted to 8.0), and 1.0 ml methanol were mixed, and then
added at room temperature to 1.5 g Carnation nonfat milk powder. The solution was then thoroughly
EMBO COURSE MEDAKA & ZEBRAFISH HEIDELBERG 26
mixed by shaking for 5 minutes on a vortexer. Male adult zebrafish were anesthetized with Tricaine (3-amino benzoic acid ethylester; 168 mg / liter, pH 7.2; Sigma) and rinsed in egg water. The male wasplaced ventral side up in a slit cut into a polyfoam sponge. Excess water was blotted off with papertowel and 0.25 to 2.00 µl of sperm were collected from a male into a 1-5 µl calibrated glass capillary,gently squeezing the male with Millipore filter forceps. The sperm was added to 10 µl of prechilled (onice) freezing medium and immediately mixed in a prechilled (ice) microcentrifuge tube. The resultingmixture was drawn into the capillary, which was rapidly transferred to a 5.0 ml Falcon cryovial, placedinto a 50 mL Falcon polypropylene centrifuge tube. Both the 5 mL and 50 mL tube had been prechilledon dry ice. The freezing assembly was submerged horizontally in dry ice for 30 minutes. Finally, the 5.0mL cryovial with the sample were transferred quickly to liquid nitrogen for storage.
We keep track of frozen samples using a File Maker Pro database. We record: genotype of frozensperm sample; stock number of the male, date of freezing, amount of frozen sperm within the sample,quality of frozen sperm sample (a measure for density of sperm suspension: "good”;= milky white,“OK” = milky, but transparent; “not good”= diluted appearance; however, even samples classified as“not good” frequently give good numbers of fertilized eggs, given that large egg clutches are used.
2.5 Fertilization with frozen zebrafish sperm samples
(J. Belak, J. Gruenbaum, A. Fainsod, Z. Rangini, W. Driever)
The protocol for in vitro fertilization with cryopreserved sperm was
modified from the one developed in Eugene zebrafish labs (Westerfield, 1994;http://zfish.uoregon.edu/zf_info/zfbook/zfbk.html
The major differences to the previously published method is the use of a different buffer for in vitrofertilization, which was optimized in Abraham Fainsod’s lab.
Female zebrafish from six to eleven months of age were maintained in tanks separate from males. Toinduce oocyte maturation, females were set up for crosses in breeding traps, two females and one male, inthe late afternoon. The following morning, immediately after the lights were turned on, males and femaleswere separated. Within the next two hours, in vitro fertilizations were performed. Females wereanesthetized with Tricaine, rinsed with egg water, blotted dry on a paper towel, and transferred to a 6 cmpetri dish. Eggs were expelled from the females by applying gentle pressure with dampened finger tips toboth sides of the abdomen. Eggs were removed from the body of the female with a very fine (0.1 inch)paintbrush, and the female was transferred to a recovery tank. If at least 200 good eggs (of clear, slightlyyellowish appearance) were obtained, they were used for in vitro fertilization.
70 µl of ice cold freshly prepared “I-buffer” (116 mM NaCl, 23 mM KCl, 6 mM CaCl2 , then add 2
mM MgSO4 29 mM NaHCO3 and 0.5% fructose; pH to 7.2 and filtered through 0.22 micron filter) was
placed next to the eggs in the petri dish. The cryopreserved sample was removed from liquid nitrogen,rapidly thawed, and quickly mixed with the drop of ice cold I-buffer, to dilute the cytotoxic methanol.
EMBO COURSE MEDAKA & ZEBRAFISH HEIDELBERG 27
Immediately, the sperm sample in I- buffer was mixed with the egg clutch by tilting the petri dish, andincubated for 15 to 30 seconds. Fertilization was activated upon addition of 750 µl of 0.5% fructose inegg water. After 2 minutes more 0.5% fructose in egg water was added to fill the dish.
AB strain or AB-Tü hybrid females aged 6 to 11 months can be used for in vitro fertilization everythree to four weeks. Egg clutches of 300 - 400 eggs can be obtained routinely from most of the females,and fertilization rates with frozen sperm samples are usually 30 to 60%. In less than 10 %
of the samples, no eggs are fertilized. Therefore, if three or more sperm samples of a genotype havebeen frozen, the mutation can be safely recovered.
2.6 Identification of Sts Markers Closely Linked to A Mutation inmedaka
Contributed by K. Naruse, T. Jindo, T. Kitagawa, H, Takeda, H. Mitani and A. Shima
The identification of linkage between the mutated locus and polymorphic marker is the first step toidentify the genes that underlie mutant phenotypes. The presence of two genetically distinct, highlypolymorphic popµlations (northern and southern) and their inbred strains makes medaka a good tool forsuch studies. Sequence comparisons of orthologous loci showed that single base-pair polymorphismsbetween these two strains occur at about 3% in introns and 1% in exons. Sequence Tagged Site (STS)markers, M makers are selected from 24 medaka linkage groups, and their polymorphisms coµld beidentified with their PCR products size without a restriction-enzyme digestion. They can facilitate themapping procedures using medaka.
Sexual cross for mapping panel1. Heterozygous mutant carrier fish (derived from southern popµlation) are crossed with HNI or
Kaga strains (derived from northern popµlation) .2. Identify the fish which are heterozygous for mutant allele and wild type allele derived from HNI or
Kaga strains.3. Cross such heterozygous carrier fishes with each other and collect at least 30 mutants and 30
wild type sibling fishes. If the mutant is homozygous viable, you can use backcross.
Genomic DNA extractionThere are several genomic DNA extraction methods. DNA shoµld be extracted from each individual.
To examine large number of samples 96 well format DNA extraction or automatic DNA extractionmethods are recommended. This protocol is one of the examples for the small scale DNA extractionmethod.
1. Wash each egg with regent grad water and put each egg into 1.5 ml tube.2. Freeze egg at -80°C3. Add 200 µl of TNES-6U buffer (10mM Tris-HCl, pH 7.5; 125mM NaCl; 10mM EDTA; 1% SDS; 6M
Urea) and homogenize with a plastic pestle.4. Add 5 ml of protenase K solution (20 mg/ml) and incubate at 37 °C over night.

EMBO COURSE MEDAKA & ZEBRAFISH HEIDELBERG 28
5. Add 300 ml of phenol/chloroform solution (TE saturated phenol : chloroform : Isoamyl Alcohol =25 : 24 : 1) and mix well for 10 minutes by inversion.
6. Centrifuge at 10.000 rpm at room temperature.7. Transfer aqueous phase to a new tube and add 500 ml of diethyl ether, mix by inversion.8. Centrifuge at 5000 rpm for 2 minutes and remove ether and lipid phase.9. Add 20ml of 5M NaCl and 500 ml of 100% cold Ethanol (-20 °C) to the aqueous phase and
incubate at -80°C for 1 hour.10. Centrifuge at 15000 rpm for 15 minutes at 4°C.11. Remove supernatant and add 1000ml of cold 70% Ethanol (-20 °C).12. Centrifuge at 15,000rpm for 10 minutes at 4°C and remove supernatant.13. After drying add 250 ml of TE solution.
Identification of the linkage group linked to a mutation using the bulksegregant analysis with M markers
1. Mix 2 µl of each DNA solution extracted from 30 mutant and 30 wild-type fish in each 1.5 ml tube.You must use the sibling wild type and mutant fish.
2. Wells at column number 1 to 6 of PCR plate are used for mutant DNA and wells at columnnumber 7 to 12 are used for wild type DNA. . Mark left half of plates as “mutant” and right half as“wild” (see Fig.1).
3. Dispense 2 µl of primers of M markers( 48 markers for 24 linkage groups) to two wells formutant DNA and wild type DNA.
4. Prepare 2 tubes of 850 µl of PCR master mix.5. Add 50 µl of pooled DNA from mutant or wild-type to PCR master mix.6. Dispense 18 µl of PCR master mix with mutant DNA to each well of column number 1 to 6.7. Dispense 18 µl of PCR master mix with wild type DNA to each well of column number 7 to 12.8. Cover PCR plate with silicon rubber.9. Centrifuge PCR plate at 500 rpm for 1 minute to spin down the solution and mix by voltexing.10. Run thermocycling.
PCR master MixTaq Buffer (10 X) 100 mldNTP (10 mM dNTP) 5 mlDDW 738.5 mlTaq polymerase (Qiagen or Takara EX) 6.5 mlTotal volume 850 ml
PCR condition1 cycle 95 C - 120 sec.30 cycles 95 C - 30 sec., 55 C - 30 sec., 72 C - 60 or 180 sec.1 cycle 72 C - 300 sec.4 C -for keeping
mutant wild type
Fig. 1. 96 well PCRplate
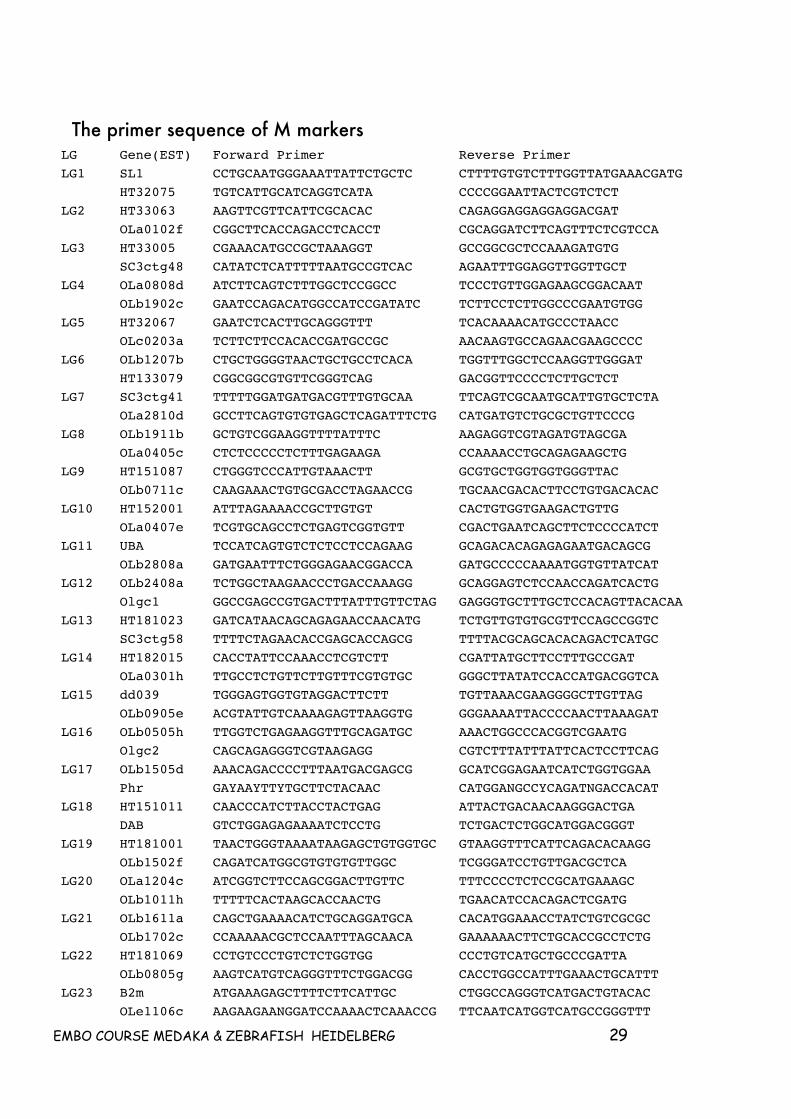
EMBO COURSE MEDAKA & ZEBRAFISH HEIDELBERG 29
The primer sequence of M markersLG Gene(EST) Forward Primer Reverse PrimerLG1 SL1 CCTGCAATGGGAAATTATTCTGCTC CTTTTGTGTCTTTGGTTATGAAACGATG
HT32075 TGTCATTGCATCAGGTCATA CCCCGGAATTACTCGTCTCTLG2 HT33063 AAGTTCGTTCATTCGCACAC CAGAGGAGGAGGAGGACGAT
OLa0102f CGGCTTCACCAGACCTCACCT CGCAGGATCTTCAGTTTCTCGTCCALG3 HT33005 CGAAACATGCCGCTAAAGGT GCCGGCGCTCCAAAGATGTG
SC3ctg48 CATATCTCATTTTTAATGCCGTCAC AGAATTTGGAGGTTGGTTGCTLG4 OLa0808d ATCTTCAGTCTTTGGCTCCGGCC TCCCTGTTGGAGAAGCGGACAAT
OLb1902c GAATCCAGACATGGCCATCCGATATC TCTTCCTCTTGGCCCGAATGTGGLG5 HT32067 GAATCTCACTTGCAGGGTTT TCACAAAACATGCCCTAACC
OLc0203a TCTTCTTCCACACCGATGCCGC AACAAGTGCCAGAACGAAGCCCCLG6 OLb1207b CTGCTGGGGTAACTGCTGCCTCACA TGGTTTGGCTCCAAGGTTGGGAT
HT133079 CGGCGGCGTGTTCGGGTCAG GACGGTTCCCCTCTTGCTCTLG7 SC3ctg41 TTTTTGGATGATGACGTTTGTGCAA TTCAGTCGCAATGCATTGTGCTCTA
OLa2810d GCCTTCAGTGTGTGAGCTCAGATTTCTG CATGATGTCTGCGCTGTTCCCGLG8 OLb1911b GCTGTCGGAAGGTTTTATTTC AAGAGGTCGTAGATGTAGCGA
OLa0405c CTCTCCCCCTCTTTGAGAAGA CCAAAACCTGCAGAGAAGCTGLG9 HT151087 CTGGGTCCCATTGTAAACTT GCGTGCTGGTGGTGGGTTAC
OLb0711c CAAGAAACTGTGCGACCTAGAACCG TGCAACGACACTTCCTGTGACACACLG10 HT152001 ATTTAGAAAACCGCTTGTGT CACTGTGGTGAAGACTGTTG
OLa0407e TCGTGCAGCCTCTGAGTCGGTGTT CGACTGAATCAGCTTCTCCCCATCTLG11 UBA TCCATCAGTGTCTCTCCTCCAGAAG GCAGACACAGAGAGAATGACAGCG
OLb2808a GATGAATTTCTGGGAGAACGGACCA GATGCCCCCAAAATGGTGTTATCATLG12 OLb2408a TCTGGCTAAGAACCCTGACCAAAGG GCAGGAGTCTCCAACCAGATCACTG
Olgc1 GGCCGAGCCGTGACTTTATTTGTTCTAG GAGGGTGCTTTGCTCCACAGTTACACAALG13 HT181023 GATCATAACAGCAGAGAACCAACATG TCTGTTGTGTGCGTTCCAGCCGGTC
SC3ctg58 TTTTCTAGAACACCGAGCACCAGCG TTTTACGCAGCACACAGACTCATGCLG14 HT182015 CACCTATTCCAAACCTCGTCTT CGATTATGCTTCCTTTGCCGAT
OLa0301h TTGCCTCTGTTCTTGTTTCGTGTGC GGGCTTATATCCACCATGACGGTCALG15 dd039 TGGGAGTGGTGTAGGACTTCTT TGTTAAACGAAGGGGCTTGTTAG
OLb0905e ACGTATTGTCAAAAGAGTTAAGGTG GGGAAAATTACCCCAACTTAAAGATLG16 OLb0505h TTGGTCTGAGAAGGTTTGCAGATGC AAACTGGCCCACGGTCGAATG
Olgc2 CAGCAGAGGGTCGTAAGAGG CGTCTTTATTTATTCACTCCTTCAGLG17 OLb1505d AAACAGACCCCTTTAATGACGAGCG GCATCGGAGAATCATCTGGTGGAA
Phr GAYAAYTTYTGCTTCTACAAC CATGGANGCCYCAGATNGACCACATLG18 HT151011 CAACCCATCTTACCTACTGAG ATTACTGACAACAAGGGACTGA
DAB GTCTGGAGAGAAAATCTCCTG TCTGACTCTGGCATGGACGGGTLG19 HT181001 TAACTGGGTAAAATAAGAGCTGTGGTGC GTAAGGTTTCATTCAGACACAAGG
OLb1502f CAGATCATGGCGTGTGTGTTGGC TCGGGATCCTGTTGACGCTCALG20 OLa1204c ATCGGTCTTCCAGCGGACTTGTTC TTTCCCCTCTCCGCATGAAAGC
OLb1011h TTTTTCACTAAGCACCAACTG TGAACATCCACAGACTCGATGLG21 OLb1611a CAGCTGAAAACATCTGCAGGATGCA CACATGGAAACCTATCTGTCGCGC
OLb1702c CCAAAAACGCTCCAATTTAGCAACA GAAAAAACTTCTGCACCGCCTCTGLG22 HT181069 CCTGTCCCTGTCTCTGGTGG CCCTGTCATGCTGCCCGATTA
OLb0805g AAGTCATGTCAGGGTTTCTGGACGG CACCTGGCCATTTGAAACTGCATTTLG23 B2m ATGAAAGAGCTTTTCTTCATTGC CTGGCCAGGGTCATGACTGTACAC
OLe1106c AAGAAGAANGGATCCAAAACTCAAACCG TTCAATCATGGTCATGCCGGGTTT
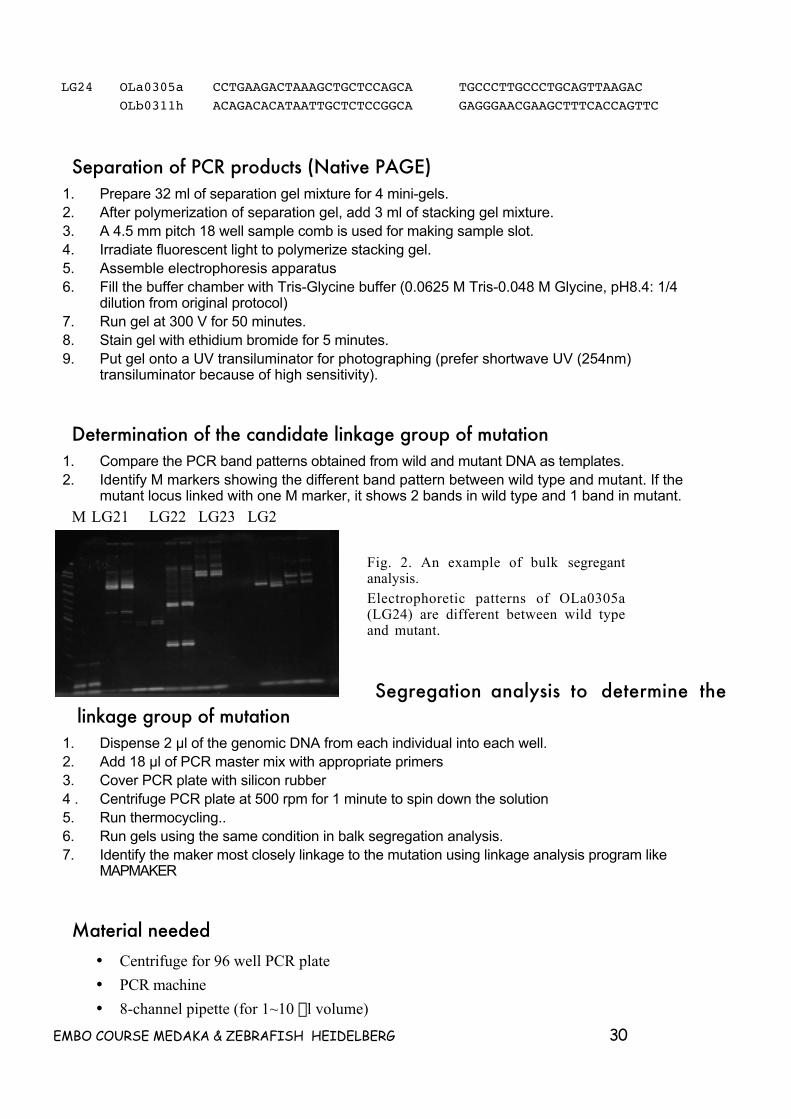
EMBO COURSE MEDAKA & ZEBRAFISH HEIDELBERG 30
LG24 OLa0305a CCTGAAGACTAAAGCTGCTCCAGCA TGCCCTTGCCCTGCAGTTAAGACOLb0311h ACAGACACATAATTGCTCTCCGGCA GAGGGAACGAAGCTTTCACCAGTTC
Separation of PCR products (Native PAGE)1. Prepare 32 ml of separation gel mixture for 4 mini-gels.2. After polymerization of separation gel, add 3 ml of stacking gel mixture.3. A 4.5 mm pitch 18 well sample comb is used for making sample slot.4. Irradiate fluorescent light to polymerize stacking gel.5. Assemble electrophoresis apparatus6. Fill the buffer chamber with Tris-Glycine buffer (0.0625 M Tris-0.048 M Glycine, pH8.4: 1/4
dilution from original protocol)7. Run gel at 300 V for 50 minutes.8. Stain gel with ethidium bromide for 5 minutes.9. Put gel onto a UV transiluminator for photographing (prefer shortwave UV (254nm)
transiluminator because of high sensitivity).
Determination of the candidate linkage group of mutation1. Compare the PCR band patterns obtained from wild and mutant DNA as templates.2. Identify M markers showing the different band pattern between wild type and mutant. If the
mutant locus linked with one M marker, it shows 2 bands in wild type and 1 band in mutant.
M LG21 LG22 LG23 LG2
Segregation analysis to determine thelinkage group of mutation
1. Dispense 2 µl of the genomic DNA from each individual into each well.2. Add 18 µl of PCR master mix with appropriate primers3. Cover PCR plate with silicon rubber4 . Centrifuge PCR plate at 500 rpm for 1 minute to spin down the solution5. Run thermocycling..6. Run gels using the same condition in balk segregation analysis.7. Identify the maker most closely linkage to the mutation using linkage analysis program like
MAPMAKER
Material needed• Centrifuge for 96 well PCR plate
• PCR machine
• 8-channel pipette (for 1~10 ml volume)
Fig. 2. An example of bulk segregantanalysis.Electrophoretic patterns of OLa0305a(LG24) are different between wild typeand mutant.M: 100 bp ladder
EMBO COURSE MEDAKA & ZEBRAFISH HEIDELBERG 31
• Polyacrylamide electrophoresis apparatus.
• 4.5 mm pitch 18 well (or 17 well) sample comb
• Power supply
Reagents• Acrylamide
• Bisacrylamide
• TRIS (HYDROXYMETHYL) AMINOMETHANE
• Glycine
• HCl
• Anmmonium persµlfate,
• Riboflavin
• TEMED
• M marker primer set
• Taq polymerase (Qiagen or Takara EX)
• dNTP
• Taq Buffer
Stock solutions for polyacrylamide gel:
Solution A1N HCl 48 mlTris 36.6 gTEMED 0.46 mlAdd DDW up to 100 ml
Solution B1N HCl 48 mlTris 5.98 gTEMED 0.46 mlAdd DDW up to 100 ml
Solution CAcrylamide 30 gBisacrylamide 0.8 g
Add DDW up to 100 ml
Solution DAcrylamide 10 gBisacrylamide 2.5 gAdd DDW up to 100 ml
EMBO COURSE MEDAKA & ZEBRAFISH HEIDELBERG 32
Solution GAmmonium persµlfate 0.2 gAdd DDW up to 100 ml
Solution ERiboflavin 4 mgAdd DDW up to 100 ml
Gel preparation
Separation gel Stacking gelA: 4 ml B: 2 mlC: 10 m D: 5 mlG: 16 ml E: 2 mlDDW: 2 ml G: 2 mlTotal 32 ml DDW: 5 ml
Total 16 ml
ReferencesDavis B. (1964) J. Ann N.Y. Acad. Sci. 121: 404
2.7 Fluorescence In-situ hybridization (FISH)(contributed by Indarjit Nanda and Manfred Schartl, Wuerzburg)
Objective: To demonstrate fluorescence in situ hybridization of DNA probes to medakachromosomes. Each participant will perform simultaneous two-color hybridization using two BACprobes.
Probes: BACs (From Wuerzburg)
Due to time constraints, participants will be provided with prepared chromosome slides of medaka.However, the method to obtain metaphase chromosomes will be briefly described during the course.
In-situ hybridization provides the most direct method to study the chromosomal localization of DNAsequences in cellular material fixed to a microscopic slide. The technique was first described more than 30years ago (Pardue & Gall 1969), using radioisotopes to label nucleic acids and autoradiography to detectthe hybrid sequences. The advent of recombinant technology in conjuction with the availability of newfluorochromes and more sensitive detection systems has contributed to the development of non-isotopicdetection alternatives, such as fluorescence in-situ hybridization (FISH) that involve visualization ofhybridized sequences at the target site through fluorescence microscopy. By now, FISH has become apopular experimental technique with immense applications in gene mapping and molecular cytogenetics.
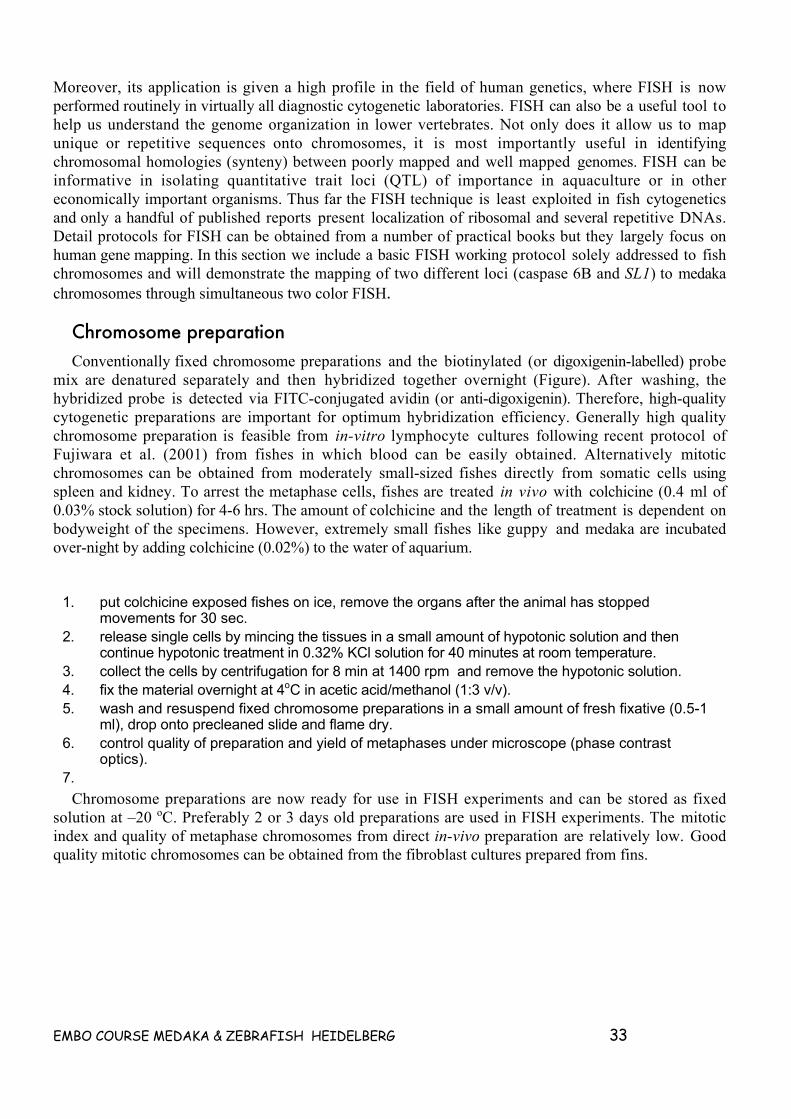
EMBO COURSE MEDAKA & ZEBRAFISH HEIDELBERG 33
Moreover, its application is given a high profile in the field of human genetics, where FISH is nowperformed routinely in virtually all diagnostic cytogenetic laboratories. FISH can also be a useful tool tohelp us understand the genome organization in lower vertebrates. Not only does it allow us to mapunique or repetitive sequences onto chromosomes, it is most importantly useful in identifyingchromosomal homologies (synteny) between poorly mapped and well mapped genomes. FISH can beinformative in isolating quantitative trait loci (QTL) of importance in aquaculture or in othereconomically important organisms. Thus far the FISH technique is least exploited in fish cytogeneticsand only a handful of published reports present localization of ribosomal and several repetitive DNAs.Detail protocols for FISH can be obtained from a number of practical books but they largely focus onhuman gene mapping. In this section we include a basic FISH working protocol solely addressed to fishchromosomes and will demonstrate the mapping of two different loci (caspase 6B and SL1) to medakachromosomes through simultaneous two color FISH.
Chromosome preparationConventionally fixed chromosome preparations and the biotinylated (or digoxigenin-labelled) probe
mix are denatured separately and then hybridized together overnight (Figure). After washing, thehybridized probe is detected via FITC-conjugated avidin (or anti-digoxigenin). Therefore, high-qualitycytogenetic preparations are important for optimum hybridization efficiency. Generally high qualitychromosome preparation is feasible from in-vitro lymphocyte cultures following recent protocol ofFujiwara et al. (2001) from fishes in which blood can be easily obtained. Alternatively mitoticchromosomes can be obtained from moderately small-sized fishes directly from somatic cells usingspleen and kidney. To arrest the metaphase cells, fishes are treated in vivo with colchicine (0.4 ml of0.03% stock solution) for 4-6 hrs. The amount of colchicine and the length of treatment is dependent onbodyweight of the specimens. However, extremely small fishes like guppy and medaka are incubatedover-night by adding colchicine (0.02%) to the water of aquarium.
1. put colchicine exposed fishes on ice, remove the organs after the animal has stoppedmovements for 30 sec.
2. release single cells by mincing the tissues in a small amount of hypotonic solution and thencontinue hypotonic treatment in 0.32% KCl solution for 40 minutes at room temperature.
3. collect the cells by centrifugation for 8 min at 1400 rpm and remove the hypotonic solution.4. fix the material overnight at 4oC in acetic acid/methanol (1:3 v/v).5. wash and resuspend fixed chromosome preparations in a small amount of fresh fixative (0.5-1
ml), drop onto precleaned slide and flame dry.6. control quality of preparation and yield of metaphases under microscope (phase contrast
optics).7.
Chromosome preparations are now ready for use in FISH experiments and can be stored as fixedsolution at –20 oC. Preferably 2 or 3 days old preparations are used in FISH experiments. The mitoticindex and quality of metaphase chromosomes from direct in-vivo preparation are relatively low. Goodquality mitotic chromosomes can be obtained from the fibroblast cultures prepared from fins.
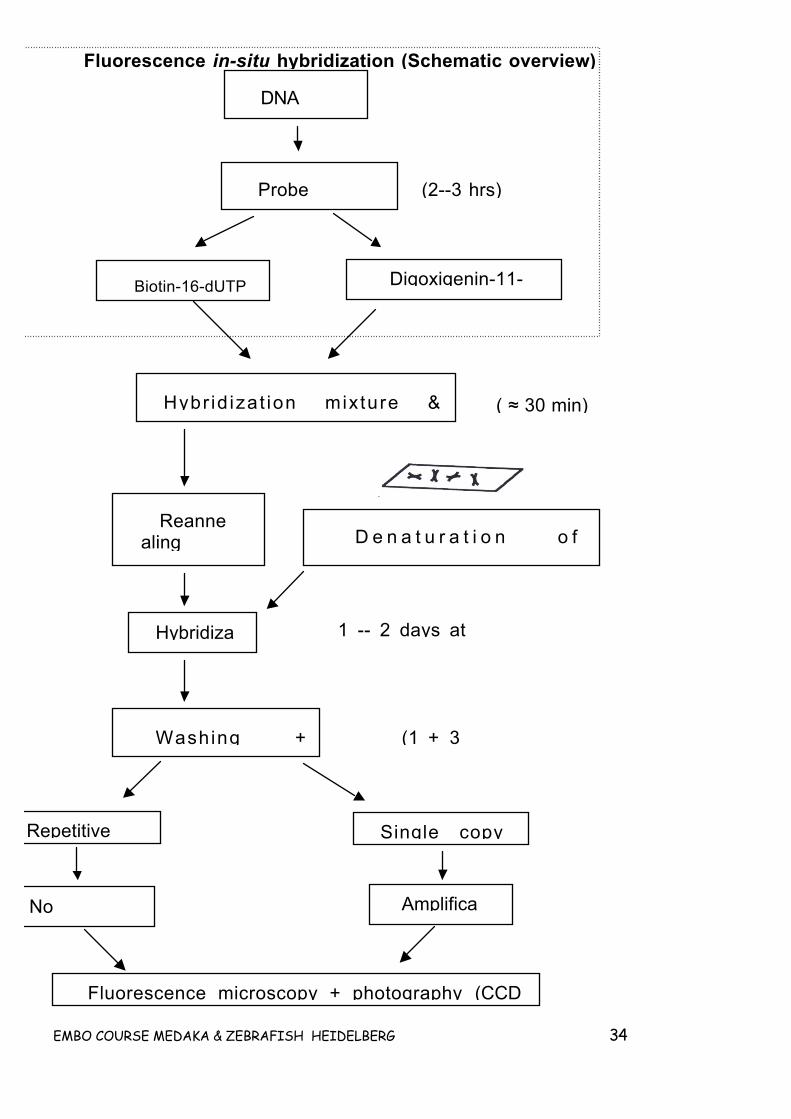
EMBO COURSE MEDAKA & ZEBRAFISH HEIDELBERG 34
Fluorescence in-situ hybridization (Schematic overview)
DNAProbes
Probelabelling
Biotin-16-dUTP Digoxigenin-11-dUTPr
Hybr id izat ion mixture &Denaturation
Reannealing
(optional)
D e n a t u r a t i o n o fchromosomes
Hybridization
Washing +Detection
Repetitivetarget
Single copytarget
NoAmplification
Amplification
Fluorescence microscopy + photography (CCDcamera)
(1 + 3hrs)
1 -- 2 days at37oC
(2--3 hrs)
( ≈ 30 min)
EMBO COURSE MEDAKA & ZEBRAFISH HEIDELBERG 35
Pretreatment of chromosome spreads (optional)Remnants of cellular RNA and cytoplasm can impair the success of FISH experiments by hampering
the penetration of probes to their target locus or due to unspecific interaction with theimmunofluorescence detection system. These interferences can result in a low signal intensity and highbackground hybridization. In cases where low signal intensities are expected (e.g. small probe size) theconditions for FISH experiments can be optimized removing these remnants.
1. apply 300 µl of RNase A solution (100 µg/ml in 2xSSC) to slides and cover with coverslip.2. incubate for 30 –60 min at 37oC in 2xSSC.3. wash slides in 3x4 min in 2xSSC at room temperature.
4. incubate slides in pepsin solution (0.5µg/ml in 0.01 M HCl) for 5 to 10 min at 37oC and washslides 3x4 min in 1x PBS.
5. place slides in PBS/50 mM MgCl2 for 5 min.6. fix in PBS/50 mM MgCl2 / 1% formaldehyde for 10 min.7. wash in 1xPBS 2x5 min (with agitation)8. dehydrate the slides through an ethanol series and allow to air dry
Probe labellingNon-isotopic labelling of the DNA probe can be achieved through various methods such as nick
translation, random primer labelling, PCR based labelling, end-labelling and in vitro translation. Manycompanies provide kits for labelling with ready made stock solutions with reliable and easy-to-followprotocols. Here we provide the protocol for labelling the probe through nick translation which isconvenient and generally effective for large genomic fragments.
1. Mix the following in a 1.5 ml microfuge tube:- 2µg of whole probe DNA (free of RNA and phenol-chloroform)- 10 µl of 10x nicktranslation buffer (0.5M Tris/HCl pH 8.0; 50 mM MgCl2; 0.5 mg/mL BSA)- 5 µl of ß-mercapto-ethanol (0.1 M)- 10 µl of unlabelled nucleotide mixture (0.5 mM dATP, dCTP, and dGTP)- 5 µl biotin-16-dUTP(1mM) or digoxigenin-11-dUTP- 5 µl of diluted DNase I (Roche): 1 µl of stock is diluted in 1 ml of distilled water (freshly
prepared and keep on ice)- 2 µl of E. coli DNA polymerase I (20 units)
2. adjust to 100 µl with double–distilled water.3. incubate the reaction for 90-120 minutes in a 15oC water bath.4. stop the reaction by placing the tubes on ice.5. check the size of the labelled products by running an aliquot (denature by boiling in a water
bath ) on a 2% agarose gel at 120-150 volts using 100 bp ladder as a size marker.6. if the labelled fragments are the correct size (smear range 100-400 bp), stop the reaction by
adding 2 µl of 0.5 M EDTA and 1 µl of SDS (10%) and heat at 68oC for 10 min.7. separate unincoporated nucleotides by spininng the reaction mixture through a Sephadex-G-50
spin column, equilibrated with column buffer (50 mM Tris/HCl pH 8.0; 1 mM EDTA, 0.1% SDS).
The fragment size of the labelled probe is critical for efficient hybridization to the target sequence.Probes larger than the optimum size give high back-ground signals and smaller-sized probe fragmentsmay give weak signals. The amount of DNase I used here is optimum for large genomic probes (BACs,PACs). In case of smaller probes (e.g. cDNA) the duration as well as amount of DNase I may differ.

EMBO COURSE MEDAKA & ZEBRAFISH HEIDELBERG 36
Dot-blot assay to test incorporation of label
After labelling, it is necessary to check the incorporation of labelled nucleotides into the probe througha simple colorimetric assay using different dilutions of labelled probe.
1. spot 1 µl of the different concentrations of labelled DNA (e.g. 1/10,1/100) on a small piece ofnitrocellulose filter (e.g 3x4 cm). Use 6xSSC for dilution of probe.
2. bake the filter for 30-60 min at 80oC.3. soak the filter with AP 1 buffer (0.1 M Tris-HCl pH 7.5, 0.1 M NaCl and 2 mM MgCl2) for 5-10 min
at room temeperature in a dish.4. discard the AP I buffer and incubate the filter in blocking buffer (0.1 g blocking agent (Roche) in
20 ml AP I buffer; will dissolve at 50oC) for 60 minutes at room temperature.5. discard the blocking buffer, wash in AP1 buffer briefly and incubate the filter in avidin (or anti-
digoxigenin) conjugated alkaline phosphatase (1:1000 dilution in AP I buffer) for 60 min at roomtemperature.
6. pour off antibody-AP mixture, wash twice for 5 min each in AP I buffer, then wash 3x4 min withAP II (0.1 M Tris-HCl pH 9.5, 0.1 M NaCl and 50 mM MgCl2) buffer.
7. discard the last washing buffer and cover the filter with color developing solution (45 µl of NBTand 35 µl of BCIP in 10 ml of AP II buffer). Incubate at least 1 hr in dark untill color developssufficiently.
8. To stop the reaction wash the filter in TE buffer several times.9. evaluate the signal intensity. At least the 10 pg spot should be clearly visible.
Prepare or purchase 75 mg/ml nitroblue tetrazolium (NBT) in 70% dimethylformamide and 50 mg/ml5 bromo-4-chloro-3-indolyl phosphate (BCIP) in dimethylformamide.
Hybridization procedure
Hybridization depends on the ability of denatured DNA strands to reanneal with theircomplementary target sequences. The details of hybridization parameters are extensively covered inseveral molecular biology text books. In the following the protocol is given for 10 µl hybridzation volumewhen a 18 mm2 coverslip is used to cover the hybridization mixture on the slide. When larger areas are tobe hybridized, scale up the solution accordingly. The majority of cloned genomic probes (>10 kb)contain interspersed repetitive sequences. Because of their ubiquitous nature, hybridization signals fromrepetitive sequences may obscure the specific signal from the unique sequences. It is therefore necessaryto suppress such signals within the probe by incubating (before hybridization) labelled probe withunlabelled competitor DNA. Competitor DNA is either Cot1 DNA or sheared, sonicated genomic DNA(50-500 bp size). Standard hybridization is performed in 50% formamide, 2xSSC and 10 %dextransulfate and 100 ng-200 ng labelled DNA per slide (single copy) in presence of excess amount ofcarrier DNA. It is advisable to include calf thymus DNA as carrier DNA instead of using standardsalmon sperm DNA for in-situ experiments with fish chromosomes.
Probe preparation:1. mix 100-200 ng of labelled DNA, 10 µg of carrier calf thymus DNA, 5 µg of yeast tRNA and 2-5
µg of competitor genomic DNA.
EMBO COURSE MEDAKA & ZEBRAFISH HEIDELBERG 37
2. add 1/10th volume of 3M sodium acetate (pH 5.0) and 2.5 vol of 100% ethanol. Allow the probe toprecipitate at least 2 hrs at –70oC or ovenight.
3. spin for 15 min in a microfuge at 15000 rpm for 15 min at 4oC and wash the pellet again with70% chilled ethanol.
4. vaccum dry pellet and dissolve the pellet in 10 µl of hybridization mixture (50% formamide, 10%dextransulfate, 2xSSC, 5x Denhardt‘s solution).
5. vortex briefly an incubate at 37oC for 30 min (to dissolve the probe).
For two-color hybridization co-precipitate both biotinylated and digoxigenin labeled probes.
Denaturation of probe and chromosomesFor hybridization of chromosomal DNA and labeled probe it is necessary that both DNAs are single
stranded. Since high temperature damages the chromosome preparation, they are denatured in 70% andhybridized in 50% formamide which reduces both denatuartion and hybridization temperatures
1. prewarm the slides to 50-60oC in a hotplate in order to prevent sudden temperature changeswhen the slides are put into hot denaturation solution.
2. denature chromosome spreads for 30 sec–1.5 min in 70% formamide/2xSSC (pH 7.0) at 70oC.3. dehydrate the slides in a series of ice-cold ethanol (70%--- 100%) for 5 min each. Allow them to
air dry.4. denature the probe DNA by incubation at 75oC for 10 min followed by chilling on ice.5. if the competition of repetitive sequences is necessary, allow reannealing of probe with
competitor DNA for 10min-1 hr at 37oC, then put on ice.
Poorly fixed chromosomes have a tendency to over-denature and come off the slide duringdenaturation in formamide. Over-denatured chromosomes have a hollow, puffy appearance under thephase contrast microscope. Underdenatured chromosomes might show perfect morphology but haveweak or no signal.
Hybridization1. Add 10 µl (or more) denatured probe mixture to denatured chromosome preparation.2. put an 18 mm2 (or higher range) coverslip on the probe mixture droplet. Avoid air
bubbles.3. seal the edges of the coverslip with rubber cement.4. transfer the slides into a moist chamber and incubate at 37oC for 1-2 days.
Post hybridization washesAfter hybridization, a series of washes is used to get rid of unbound probe. Increasing the washing
temperature and / or decreasing the salt concentration will increase the stringency and remove unwantedbackground.
1. carefully remove coverslip and wash slides 3x5 min in 2xSSC and then transfer to a coplin jarcontaining prewarmed 50% formamide in 2xSSC (pH 7.0) at 42oC in a shaking waterbath. Carryout washes in formamide solution for 3x5 min then three 5-min washes (with agitation) in 2xSSCat 42oC.
2. transfer the slides to a new coplinjar containing prewarmed 1x (or 2x) SSC and continuewashing at 60oC for 2x5 min. After this step the slides are immediately processed for detectionstep.
EMBO COURSE MEDAKA & ZEBRAFISH HEIDELBERG 38
DetectionDetection systems for biotin-labeled probes usually employ the biotin-avidin affinity systems and
those labelled with digoxigenin need anti-digoxigenin conjugated with a fluorochrome. For probes directlylabeled with fluorochromes (special cases), no detection steps are required. After the detection step theslides are mounted in appropriate mountant and counterstain. Counterstaining allows visualisation ofcomplete mitotic complement under fluorescence microscope and FISH signal on specific chromosomecan be seen in the background of counterstained chromosomes. For fluorescent detection, mostcommonly FITC (blue excitation, yellow green fluorescence), rhodamine, Texas Red or Cy3 (all greenexcitation, red fluorescence) conjugates are used. If two or more probes are detected simultaneously, it isnecessary to select the detecting systems, particularly when several antibodies and detection reagents aremixed and used simultaneously. In most cases single copy signal is enhanced through further rounds ofstaining with secondary antibody-fluorescence conjugates. Amplification can be carried out directly afterdetection of hybridization sites before counterstaining or after DAPI staining and examination under themicroscope. However, amplification step also enhances the background signals. During the wholedetection procedure the slides should not be left to dry.
1. after post hybridization washing, take the slides out of the coplin jar, drain them as efficiently aspossible by absorbing solution from the slide edges with a paper towel and apply 300 µl ofblocking solution (3% blocking reagent (Roche) in 4x SSC). Cover with a large coverslip (24x 60mm) and incubate for 30 min at 37°C in a moist chamber. (Blocking agent needs to be dissolvedat 60 oC with occasional vortexing).
2. allow the coverslip to slide off, drain excess fluid as possible and add 300 µl of detectioncocktail (5 µg/ml avidin-rhodamine and FITC conjugated mouse anti-digoxigenin (1:100) in 4xSSC/0.1% Tween/ 1% blocking agent). Cover with a coverslip and incubate at 370C in a moistatmosphere for 30 minutes.
3. remove coverslip carefully and wash the slides in 4x SSC/0.1% Tween at 37oC for 3x5 min withgentle agitation. (proceed for amplification, if required)
4. wash the slides for 3x5 min each in 4x SSC/ 0.1% Tween (prewarmed) on a shaker and againwash in 2x SSC for 3x5 min and allow to air dry.
5. mount slides in Vectashield containing 1.0 µg/ml DAPI.
Amplification protocol:1. apply 300 µl of biotinylated anti-rhodamine (5 µg/ml in 4xSSC/0.1% Tween/1% blocking reagent),
put on a coverslip and incubate in the dark for 30 min at 37oC in a moist chamber.2. wash slides 3x5 min in 4x SSC/ 0.1% Tween at 37oC with gentle agitation.3. apply 300 µl of avidin-rhodamine (5 µg/ml) and FITC conjugated sheep antibody against mouse
(1:150 dilution) in a soluion containing 4x SSC/0.1% Tween/ 1% blocking agent. Cover with acoverslip and incubate in dark at 37oC.
4. wash the slides for 3x5 min each in 4x SSC/ 0.1% Tween (prewarmed) on a shaker and againwash in 2x SSC for 3x5 min and allow to air dry.
5. mount slides in Vectashield containing 1.0 µg/ml DAPI.
MicroscopyMost modern epifluorescence microscopes are adequate for FISH analysis. The choice of filters and
objectives needs to be carefully considered. Fluorescence microscopes usually contain fluorescence filtersets consisting of an excitation filter, a dichroic mirror and an emission filter that permit the sequentialvisualization of the various fluorophores for color photomicrography. If digital imaging system is notavailable, use 640 ASA color slide films for photography. Dual or triple bandpass filters allow
EMBO COURSE MEDAKA & ZEBRAFISH HEIDELBERG 39
simultaneous visualization of differentially labeled probes and counterstain. However, the intensity offluorescence is reduced with these filters. On the other hand CCD cameras have increased the sensitivityand flexibility of FISH techniques as it captures fluorescent signals not visible to normal human eye. Thechoice of counterstain depends on the fluorochromes used for FISH. The commonly used fluorochromesfor counterstaining are DAPI and propidium iodide (PI). PI is not usually recommended as it fluorescesbrightly over a wide range of wavelengths. Hence, in most cases DAPI is used as counterstaining. BothDAPI as well as images with specific FISH signals can be merged with FISH software. Single copy probecloned in cosmids, YACs or BACs hybridize very efficiently so that only few metaphases need to beanalysed. In contrast, the hybridization efficiency is greatly reduced for 2-5kb probes. With this in mind,in some situations it may be preferable to isolate a larger clone for mapping by screening BAC or PAClibrary.
Evaluation
Since standard G or R-bands are difficult to induce on fish chromosomes a fluorescent signal onmetaphase chromosomes obtained by FISH is specifically assigned by measuring its position relative tothe end of the short arm of the chromosome (FLpter value). A disadvantage is that only low-resolutionmapping is possible with highly condensed metaphase chromosomes since two markers need to be atleast 1 Mb apart to be resolved as separate hybridization signals (Trask et al. 1991). However, in recentyears higher resolution FISH became feasible on extended or mechanically stretched chromosomes(Heiskanen et al. 1996) that allow to distinguish markers that are 200-300 kb apart. Even markers thatare less than 10 kb apart can be resolved using fiber-FISH (Michalet et al. 1997) but in this casechromosome morphology is lost.
Material needed
Probe labelling ( 2-4 hrs)
Chemicals:
• Biotin-16-dUTP (Roche; Cat No: 1093070)
• Digoxigenin –11-dUTP (Roche; Cat No. 1093088)
• DNase I, RNase free (Roche; Cat No: 776785)
• DNA Polymerase I (E. Coli) (NEB; Cat No: MO209S)
• Nucleotides (100 mM dATP, dGTP, dCTP ; GIBCO)
• 2-mercaptoethanol (SIGMA)
• Tris
• MgCl2
• EDTA (0.5M pH 8.0)
• SDS (10 or 20%)
• Agarose
EMBO COURSE MEDAKA & ZEBRAFISH HEIDELBERG 40
• Minigel (Complete set)
• Sephadex G50 DNA grade (autoclaved)
• Glass Wool (autoclaved)
• 1ml Syringes (OMNIFIX-F 1ml)
• 100 bp ladder (NEB 323-1S)
• EtBr2
• Thermobath ( 15 oC)
• microcentrifuge
• Waterbath (different temp.)
• Reaction tubes, microtips (sterile), micropipettes
• Pepsin (SIGMA, P6887)
• Formaldehyde 37% (MERK)
• 1N HCl (MERCK)
• Plastic petridisches (sterile), Disposable
• Transilluminator (gel documentation)
Test for probe labelling (optional)
• Streptavidin-alkaline phosphatase (Roche; Cat No: 1093266)
• Anti-digoxigenin-alkaline phosphatase (Rohe; cat No: 1093274)
• Nitroblue tetrazolium chloride (NBT) (Roche; Cat No: 1383213)
• 5-Bromo-4-chloro-3-indolyl-phosphate (BCIP) (Roche; Cat No: 1383221)
• Nitrocellulose paper
• Oven to bake nitrocellulose paper
• Blocking agent ( Roche; Cat No: 1096176)
•
• Duration: 2-3hr
Hybridization
• Sonicated calf thymus DNA (10 mg/mL)
• E.coli t RNA (SIGMA, D-2001)
• Sheared-sonicated genomic DNA (medaka)
• Deionized Formamide (Appligene; FORMD002, 500 mL)
• 3M NaOAc, pH 5.2
• 100X Denhardt (Appligene DENH 1001- 5 mL)
• 50% Dextran Sulfate (Appligene DEXT 5002, 50 mL)
• 20x SSC (pH 7.0)
EMBO COURSE MEDAKA & ZEBRAFISH HEIDELBERG 41
• Tween-20 Mol. Biol grade (Appligene Tween 201)
• Coverslip (24x60; 24x32; 21x26)
• Rubber Cement (Fixogum)
• PBS (10x) (Appligene PBS 10x02, 1 lit)
• Centrifuge (4oC, 15000 rpm with rotor for 1.5 ml tubes)
• Table top Centrifuge (for 1.5 ml tubes)
• Speed Vac
• PH meter
• Waterbath ( 45 oC; 60 oC) with shaker
• Shaker (Standard: IKA-VIBRAX-VXR)
• Couplin Jars (Vertical)
• Fluorescein AVIDIN DN (Vector; A-3101)
• Rhodamine AVIDIN D (Vectror; A-2002)
• Biotinylated Anti-Avidin D (Vector BA-0300)
• Monoclonal Anti-digoxin-FITC conjugates (SIGMA F-3523)
• FITC conjugated Sheep Anti-Mouse IgG (SIGMA; F-3008)
• Moist Chambers (Horizontal, For incubation, Preferrably metal autoclave box)
• Vectashield Mounting Medium with DAPI (Vector; H-1200)
• Fluorescence Microscope (Epifluorescence, Neofluor objectives 20x, 100x)
• Equipped with CCD camera with appropriate software to deal with multiple
• Colors
• Filter Sets( narrow range): DAPI, FITC, Rhodamine
• Horizontal slide folder (Praeparate mappe)
• Deep-freezer (-80 c) (for precipitation of probes)
• Incubator (37 oC)
• Ethanol
Buffers and solutions
Nicktranslation buffer0.5 M Tris/HCl pH 8.050 mM MgCl20.5 mg/ml BSA
Column buffer50 mM Tris/HCl pH 8.01 mM EDTA0.1% SDS
EMBO COURSE MEDAKA & ZEBRAFISH HEIDELBERG 42
AP I buffer0.1 M Tris/HCl pH 7.50.1 M NaCl2 mM MgCl2
AP II buffer0.1 M Tris/HCl pH 9.50.1 M NaCl50 mM MgCl2
Hybridization mixture50 % formamide10 % dextransulfate2x SSC5x Denhardt’s solution
Blocking solution3 % Blocking reagent (Roche) in 4x SSC
Additional information
A- Preparation of competitor DNA
1. prepare genomic DNA using standard procedure and dissolve in TE.2. add 10 N NaOH to dissolved DNA so that the final concentration of NaOH should be 0.5 M.3. heat at 96oC for 15-20 min and then keep on ice (around 5-10 min).4. add acetic acid so that the final molar concentration should be 0.5 M.5. precipitate the DNA with iso-propanol and Na-acetate. Mix well and place on ice for at least 30
minutes.6. spin down DNA, after a wash in 70% ethanol, vaccum dry and dissolve the pellet in TE.7. check the length of the competitor DNA on a minigel which should appear as smear ranging
between 100-500 bp
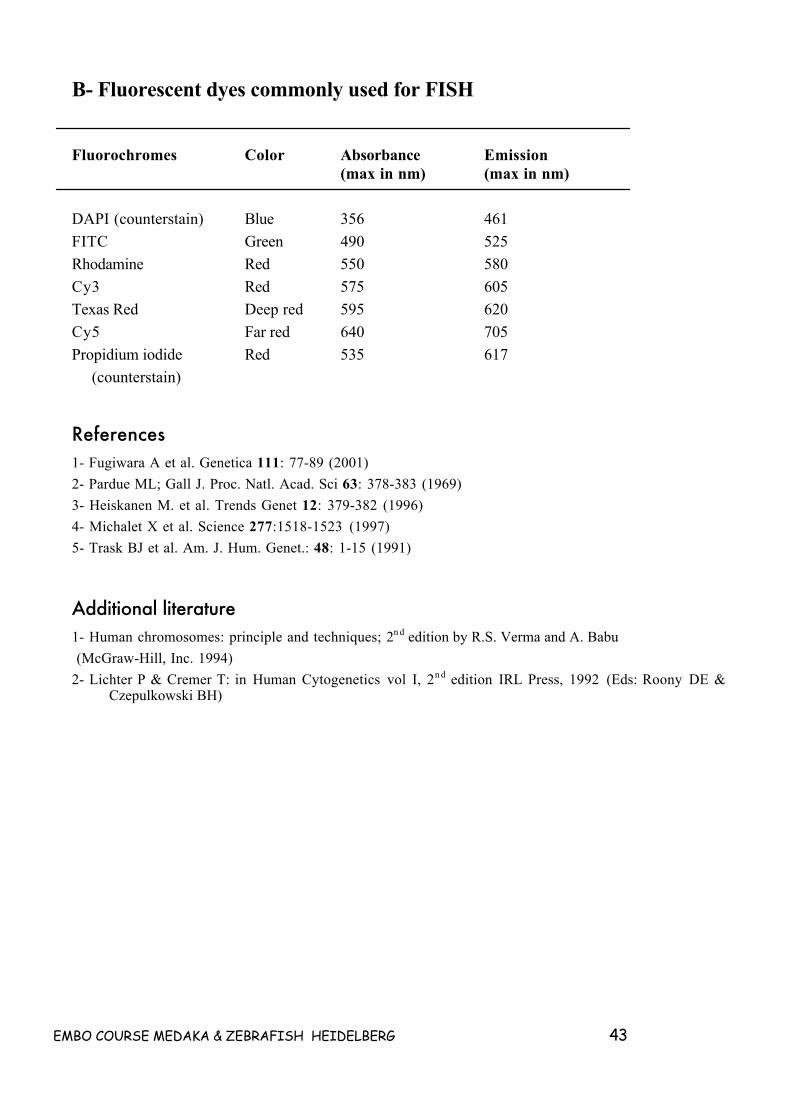
EMBO COURSE MEDAKA & ZEBRAFISH HEIDELBERG 43
B- Fluorescent dyes commonly used for FISH
Fluorochromes Color Absorbance Emission(max in nm) (max in nm)
DAPI (counterstain) Blue 356 461
FITC Green 490 525
Rhodamine Red 550 580
Cy3 Red 575 605
Texas Red Deep red 595 620
Cy5 Far red 640 705
Propidium iodide Red 535 617
(counterstain)
References1- Fugiwara A et al. Genetica 111: 77-89 (2001)
2- Pardue ML; Gall J. Proc. Natl. Acad. Sci 63: 378-383 (1969)
3- Heiskanen M. et al. Trends Genet 12: 379-382 (1996)
4- Michalet X et al. Science 277:1518-1523 (1997)
5- Trask BJ et al. Am. J. Hum. Genet.: 48: 1-15 (1991)
Additional literature1- Human chromosomes: principle and techniques; 2n d edition by R.S. Verma and A. Babu
(McGraw-Hill, Inc. 1994)
2- Lichter P & Cremer T: in Human Cytogenetics vol I, 2n d edition IRL Press, 1992 (Eds: Roony DE &Czepulkowski BH)
EMBO COURSE MEDAKA & ZEBRAFISH HEIDELBERG 44
3. Microscopic observations(M. Westerfield, Zebrafish book)
Live zebrafish embryos can be viewed at low magnification by placing them in depression slides filledwith 30% Danieau’s. After 16 h of development they become spontaneously motile and can beanesthetized with MESAB (see "Recipes"). After 23 h of development, they begin to developpigmentation which can interfere with some observations. To maintain optical transparency grow theembryos continuously, starting around 15 h, in 1- phenyl-2-thiourea (0.2 mM in 30% Danieau’s).
For observations at accurately determined developmental stages, it is imperative to maintain theembryos at 28.5°C at all times. This can be accomplished by keeping the embryos in small petri dishesor covered beakers on a microscope slide warmer and by using a microscope stage warmer, oralternatively by maintaining the observation room at the appropriate temperature.
3.1 Removing embryos from their chorions(Source: M. Westerfield, Zebrafish book)
Some observations of zebrafish development can be made directly through the chorion, however formost procedures it is better to remove the chorion. When raised in 30% Danieau’s at 28.5°C, zebrafishdevelop normally outside of their chorions. Chorions can be easily removed with sharp forceps by gentlymaking a tear in the chorion and turning it upside down so that the embryo falls out. To remove thechorions from young embryos (up to 15 h of development) care must be taken when opening the chorionsince these embryos are easily damaged. Pre treatment with a dilute solution of pronase (2 mg/ml in 30%Danieau’s, 1 min. to 3.5 min, RT) makes the chorions brittle and easier to remove. Be sure to rinse thepronase treated embryos thoroughly at least 3x to remove all the enzyme. Embryos usually fall out oftheir chorions with gentle swishing during the rinse. Note that pronase often contains nuclease and otherunwanted enzymatic activities which can be removed by self-digestion for several hours at 37°C.Embryos removed from their chorions can be transferred from one container to another by gently suckingthem up with a fire-polished Pasteur pipette. Small glass petri dishes (35 mm diameter) are adequate forholding small numbers of zebrafish embryos during the first few days of development. The embryos canbe brought to the center of the dish for viewing by gently swirling the saline with a circular motion.
Dechorionated embryos stick to plastic and dissolve, thus dechorionated embryos should always behandled in glass dishes, or plastic dishes coated with a thin layer of 1% agarose in 30% Danieau’s.
Agarose coated dishes should be filled with 30% Danieau’s after hardening of the agarose, for storagein the refrigerator. (Eggs , again, tend to stick if the agarose is dried out and rehydrates during the additionof eggs / 30% Danieau’s!).
We often include Penicillin / Streptomycin (1:50- to 1:100 from Gibco-BRL stock 100x) with the 30%Danieau’s (Em) to avoid bacterial infections, and increase survival rates.
EMBO COURSE MEDAKA & ZEBRAFISH HEIDELBERG 45
3.2 Viewing chambers(Source: M. Westerfield)
For higher magnification viewing with a compound microscope, mount the embryos between coverslips. A simple, disposable viewing chamber can be made from two large cover slips (25x60 mm) spacedapart with 2 smaller cover slips (22x22 mm). Using "Crazy Glue" (cyanoacrylate), glue one small coverslip near each end of one of the larger slips. Position the smaller slips so that one edge is flush with thelong side of the larger slip. Then glue another small slip on top of each of the first two. Transfer theembryo in a drop of saline to the space in the center of the large slip between the spacers and gentlycover with the other large slip. If the embryos need to be anesthetized, transfer them first to a small petridish with the MESAB solution and then into the viewing chamber. The chamber can be placed on astandard microscope stage by taping it to a glass slide or by using a holder with a recessed edge and acentral hole. To remove embryos from the chamber, dip one corner with the space between the smallerand larger slips into a petri dish filled with 30% Danieau’s and direct a stream of saline into the spacebetween the cover slips on the top edge of the chamber with a Pasteur pipette. The embryos will washout into the dish and can be picked up with a fire-polished Pasteur pipette.
In the course, we will use modified viewing chambers: We use a regular microscope slide. We fix 6x22mm cover slip stripes at 1 cm distance to the middle of the slide using “crazy glue”. For early stages, weuse 3 layers of strips, so the embryos will not get squeezed. For 24 hrs and older, it is often easier to use2 layers only, which squeezes the embryo a bit, but makes it easier to get the embryo / larvae into a goodfocal plane. We use 18x18 mm #1 cover slips. These smaller cover slips can easily be moved around a bitto reorient the embryo for viewing.
3.3 Methyl Cellulose mounting (Source: R. Warga)
For a very little rigid mounting medium, use a low concentration of agarose (0.1%) or 2%, 2.5% or3% methyl cellulose (Sigma M-0387). Methyl cellulose is especially good for orienting young embryos(less than 10 h old).
1. Apply a drop of 3% methyl cellulose to a depression slide.2. Suck an embryo up into a Pasteur pipette and position it near the opening in the pipette.3. Plunge the pipette into the methyl cellulose and gently expel the embryo with as little saline as
possible. The saline around the embryo will be quickly absorbed into the methyl cellulose.4. Use a fine loop of nylon fishing line to orient the embryo.5. Place a drop of saline over the well to keep the preparation from drying out and getting too
sticky.

EMBO COURSE MEDAKA & ZEBRAFISH HEIDELBERG 46
6. To release the embryo, drop the entire slide into saline for a few minutes. The methyl cellulosewill absorb the saline and become very soft so that the embryo can be teased free with thenylon loop.
3.4 Agar mounting(Source: J. Eisen)
For more precise orientation of zebrafish embryos and to keep them from floating around during longterm observations, embed them in agar.
1. Prepare a 1.2% solution of agar in 30% Danieau’s by heating in a boiling water bath or by usinga microwave oven. This solution remains liquid at 37- 40°C, but quickly hardens when cooled.
2. Keep a small amount of solution (1-5 ml) liquid in a test tube in a bench top test tube warmer orwater bath.
3. Transfer an embryo in a minimum amount of 30% Danieau’s into the test tube with a fire polishedpipette.
4. Quickly suck up the embryo and transfer onto a glass slide and add several drops of liquid agar.5. Let the agar harden and then using a pointed scalpel, cut the embryo out of the droplet in a little
block of agar.6. Pick up this block with forceps, orient it as precisely as you wish on a fresh glass slide and
cover it with more liquid agar to hold it in position.7. To remove an embryo from the agar, place several drops of saline on top of the agar.8. Using a pointed scalpel, create a "V" shaped cut in the agar with the point of the "V" aiming
towards the embryo's head.9. Hold the tips of a pair of sharp forceps closed and plunge them into the agar between the point
of the "V" cut and the head of the embryo.10. Gently open the points of the forceps creating a crack in the agar which will run along the length
of the embryo.11. The embryo will then float out of the agar into the saline and can be picked up with a fire-
polished Pasteur pipette.
1. Change water in fish-cross traps immediately after lights go on (you will get much cleaner eggsif you do this).
2. Within 30' or so of when eggs are laid, collect them and dechorionate them with pronase in 30%Danieau’s. Be careful not to over digest eggs with the pronase. If you don't get many eggs don'twaste your time with the rest of the experiment.
3. Reserve most of the embryos in a fresh agarose-coated 100 mm petri dish to use as hosts. Takewould-be donor embryos and load onto ramp(s). No more than about 30 per ramp. From now oncleanliness with the embryos is very important, and dead embryos must be promptly removed. Itis best not to keep more than approximately 30 embryos in a 100 mm agar-coated dish forextended (days) time.
4. Orient embryos so that ventral surface is facing up the slope of the ramp (do this right at thescope you are going to use for the yolk-poke).
5. Backfill a yolk-poke needle with appropriate dextran sol'n, and put needle in holder hooked up toair pressure station.
6. Inject embryo. Different experiments require different injection strategies. For dye filling, injectembryos by putting the needle into the ventral side of the yolk ball, bringing the tip all the waythrough the yolk until it is just below or within the cytoplasm.

EMBO COURSE MEDAKA & ZEBRAFISH HEIDELBERG 47
7. Inject a small bolus of dye (make a ball approx. 1/10-1/20 diameter of embryo). If the needle wasproperly positioned most of the dye should diffuse up into the cytoplasm within minutes and theentire blastoderm should look distinctly pink (if rhodamine-dextran was injected).
8. Yolk pokes can be done up to about the 8-cell stage, although earlier is better. More uniform dyelabeling in 4-16 cell embryos can be accomplished by delivering several smaller dye injections atevenly spaced intervals in the blastoderm.
9. Remove embryos from ramp, put into fresh agarose-bottomed dish and keep them in the dark.After an hour or so, pick out the unfertilized/abnormal embryos.
3.5 Microscopic observation of live medaka embryos (timelapse)(contributed by Martina Rembold)
Removal of chorion
Medaka embryos are covered with a 2-layered chorion that has a hard inner layer and a soft outersurface. To observe Medaka development under the microscope or stereomicroscope it is necessary toremove the chorion in a two step protease treatment employing Proteinase K and hatching enzyme. Thelatter is a protease, which is sereted from the hatching gland and dissolves the inner layer of the chorion(Yasumasu et al, 1994).
Dechorionated embryos are very sensitve, especially in earlier stages, when they expose most ofthe yolk, thus:.
• They may not contact air, or air bubbles in the pipet, otherwise they will immediately collapse.
• Use either non-adherent plastic suspension culture dishes or Petri dishes covered with 1%agarose in BSS to prevent embryos from adhering to the plastic.
• Use wide mouthed pipets to prevent damage of the embryos (eg. Cell saver tips)
• Use sterile solutions and BSS containing antibiotics (penicillin and streptomycin) if you want toculture them for a longer period.
Preparation of hatching enzyme (500 ml of embryos):1. Culture embryos in 0.5 ppm methylene blue solution at 28°C and collect them (100 – 200) just
prior to hatching (7 days after fertilization, green hatching enzyme gland is clearly visible).Transfer them into a 2 ml eppendorf tube and wash them 4-5x in distilled water to removemethylene blue.
2. Remove all of the water3. Shock freeze in liquid nitrogen4. Thaw at 37°C, pass through 3 sucessive freeze /thaw cycles5. Homogenize with pestle in eppendorf tube6. Spin down 5 min full speed7. Transfer supernatant to fresh tube on ice8. Homogenize remainder again, spin for 45 sec full speed, combine supernatants9. Homogenize pellet again with 500 ml PBS, spin 45 sec full speed and ccombine supernatants10 Spin supernatant again 10 min at full speed and transfer the liquid phase to a new tube
EMBO COURSE MEDAKA & ZEBRAFISH HEIDELBERG 48
11. The hatching enzyme can be used directly or be stored at -80°C after shock freezing in liquidnitrogen
Removal of chorion
1. Wash the embryos in 2-3x in distilled water and transfer them to a 24-well tissue culture plate2. ncubate embryos 40-60 minutes in 20 mg/ml Proteinase K in distilled water at RT in a limited
volume on a rocking platform. (NB: the Proteinase K solution can be frozen and reused once.)3. Wash embryos 3x in distilled water and transfer them to a 6 cm Petri dish. Remove all of the
water.4. Cover the embryos with a drop of hatching enzyme. Alternatively, use a 24- or 48-well tissue
culture plate. In either case, take care that the embryos are arranged in a monolayer. If eggs arepiled on top of each other, eggs at the bottom are crushed when the chorion dissolves.
5. Place a filter paper soaked in water into the lid of the Petri dish or tissue culture plate to preventevaporation of the hatching enzyme.
6. Incubate at 28°C.7. Check periodically under the stereomicroscope. Depending on the batch of hatching enzyme,
hatching takes between 1-3 hours.8. When the enzyme begins to work, a number of lunar crater-like holes open in the inner layer.
The inner layer soon disappears, leaving only the soft outer chorion layer which can be easilyremoved with sharp forceps.
9. After this treatment, use sterile tools and reagents.10. Add BSS/PEG/PS gently to float embryos.11. Draw up embryos slowly using a wide-mouthed pipet (eg. Cell saver tips) and transfer gently to
BSS/PEG/PS in a non-adherent plastic suspension culture dish. Alternatively, use a usualPetri dish covered with 1 % agarose in BSS, about 1 mm thick. Use this type of dish afterthis step to prevent dechorionated embryos from adhering to dishes.
12. Remove the outer layer of the chorion with sharp forceps sterilized in 70% alcohol.13. Transfer dechorionated eggs to fresh BSS/PEG/PS with a wide-mouthed pipet.. The embryos
will fall out of the pipet by gravity forces. Don’t make dechorionated embryos come into contactwith air. When they are drawn up with air bubbles, they collapse instantly.
Agar mounting
During gastrulation and body axis formation, medaka fish embryos show waves of contractilemovements across the periderm, a tissue layer that covers both the developing embryo and its associatedyolk cell. These contractions are generated by a layer of stellate-shaped cells closely apposed to the innersurface of the periderm (Cope et al 1990). In order to immobilize the embryos for microscopicobservation, these movements can be inhibited by adding 3.5 mM 1-heptanol to the medium (Cope et al.,1990, Meda et al. , 1986). The effect of heptanol is reversible, thus all media including the embeddingagarose must contain heptanol.
1. Transfer embryos to BSS/PEG/PS containing 3.5 mM Heptanol.2. Incubate for 40 – 60 min until most of the contractile movements ceased.3. In the meantime prepare a 0.2 - 0.5 % solution of low-melting point agarose in BSS and keep it at
37°C. Add 3.5 mM heptanol when the agarose cooled down to 37°C.4. Prepare 1 % agarose/BSS coated slides as shown below.

EMBO COURSE MEDAKA & ZEBRAFISH HEIDELBERG 49
5. Fill 0.5 % agarose into the depression of the slide and quickly transfer the embryo to theagarose.
6. Orient the embryo and let the agarose harden.7. Cover the slide with BSS/PEG/PS, 3.5 mM heptanol and seal with a coverslip (24 x 60 mm).
Viewing chambers
Material needed
Buffers and solutions
Balanced Salt Solution (BSS) <Heading 4>Solution A (500 ml):NaCl 65 gKCl 4 gMgSO4 x 7 H2O 2 gCaCl2 x 2 H2O 2 gPhenol Red 5 mg
Autoclave and store at 4°C for up to 1 month; Phenol red can be omitted from the solution.
Solution B:5 % NaHCO3 in dH2O, sterile filtered
Preparation of BSS:Dilute 25 ml Solution A in 475 ml dH2, add 1 ml Solution B to adjust the pH and sterile filter‡use this solution for preparing agarose in BSS
EMBO COURSE MEDAKA & ZEBRAFISH HEIDELBERG 50
To culture embryos for extended periods, add 1 % PEG 20000 (or 8000) and Penicillin-Streptomycin (GibcoBRL, # 15140-122, 100 x stock) and sterile filter.Store BSS at 4°C for up to 1 month.
Heptanol (SIGMA, H-6129) stock solution (1000 x)3.5 M 1-heptanol in DMSO. The endconcentration of DMSO in the medium will thus be 0.1 %.
ReferencesYasumasu, S. et al. (1994). CDNAs and the genes of HCE and LCE, two constituents of the Medaka
hatching enzyme. Develop. Grwoth & Differ. 36, 241-250
Cope, J. et al. (1990). The stellate layer and rhythmic contractions of the Oryzias latipes embryo. J. Exp.Zool. 254: 270-275
Meda, P. et al. (1986). Blockage of cell-to-cell communication within pancreatic acini is associated withincreased basal release of amylase. J. Cell Biol. 103:475-483
4. Microinjection and other transfectionmethods
4.1 Experiment: Microinjection of DNA encoding GFP and sonichedgehog transcripts under the control of a heat-shock induciblepromoter, followed by simultaneous detection of GFP protein andsonic hedgehog RNA
(contributed by Carl Neumann)
Injection of DNA into fertilized zebrafish eggs leads to mosaic inheritance of the injected DNA, andcan thus be used to drive the expression of specific transgenes in scattered cells or small groups of cells.To be useful, this experiment requires that we can identify the cells which are expressing the injectedtransgene. In this practical, we will test one possible approach to achieve this. We will inject a plasmidcarrying two transgenes, GFP and sonic hedgehog, each under the control of a heat-shock induciblepromoter. After activating expression by exposing the injected embryos to heat shock, we will usefluorescent immunohistochemistry to detect the GFP protein, and in situ hybridization with a sonichedgehog probe, followed by detection using the fluorescent substrate Fast Red. This will allowsimultaneous detection of the two gene products using confocal microscopy, and will reveal whether thetwo genes are co-misexpressed.
Overview:- Inject plasmid DNA into freshly laid fertilized eggs
EMBO COURSE MEDAKA & ZEBRAFISH HEIDELBERG 51
- Heat-shock injected embryos to activate the transgenes
- Select GFP-expressing embryos and fix
- Perform whole-mount in situ hybridization with a fluorescent substrate to detect sonic hedgehogtranscripts and fluorescent whole-mount immunohistochemistry to detect GFP protein
- Analyze embryos on Leica confocal microscope
Microinjection of plasmid DNA1. Break off the tip of a needle to be used for injection using forceps under a dissecting
microscope2. Load the needle with circular plasmid DNA (30ng/ml)3. Attach loaded needle to a microinjector4. Place an injection mold with medium undrneath the needle5. Dip needle into the medium, and observe it with the stereo microscope. If necessary, adjust
setting of the the microinjector such that no liquied is sucked up into the needle, and none leaksout.
6. Place freshly laid zebrafish eggs in the injection mold, and move the eggs into the trenches ofthe injection mold using forceps
7. Now bring a few eggs into focus, and adjust the injection needle so that it points at one of theseeggs, ready to be stabbed into it
8. Orient the egg such that the large cell on top of the yolk is pointing towards the needle, and pushthis egg into the agarose of the injection mold to stabilize it
9. Readjust needle using the micromanipulator, and stab it through the chorion into the large oocytecell
10. Eject a small volume of DNA solution into the cell, and withdraw needle11. After injecting a number of oocytes, move them from the injection mold to a petridish containing
hatching medium with a plastic pipette. Incubate at 28 degrees overnight
Heatshocking of the embryos1. Place the whole petridish containing injected embryos in a 37 degree incubator for 2 hours2. Allow recovery for at least 2 hours3. Examine embryos under a stereo microscope fitted with a fluorescent lamp and a GFP filter4. Identify embryos with GFP-expressing cells, and place these embryos in a 2 ml eppendorf tube
for fixation
Fixation/permeabilization1. Fix embryos with 4% PFA in PBS 1 hour RT or o/n at 4 degrees2. Rinse with PBS3. Transfer to petridish with PBS. Dechorionate with forceps4. Transfer to 0.7 ml eppendorf5. Replace PBS with methanol and leave for 5 min6. Replace with new methanol and place at –20 degrees for at least 0.5 hours
Postpermeabilization/proteinase K treatment1. Replace half of the methanol with PBS and leave for 5 min at RT2. Repeat step 1
EMBO COURSE MEDAKA & ZEBRAFISH HEIDELBERG 52
3. Replace all of the liquid with PBST and leave for 5 min4. Digest with 5mg/ml proteinase K (use 20mg/ml glycerol stock and add 0.25 ml to 1 ml PBST).
Digest 10 min5. Rinse 3 times with PBST
Prehybridization/Hybridization1. Replace PBST with 200 ml Hyb-. Incubate at 67 degrees for 5 min2. Replace Hyb- with 200 ml Hyb+. Prehybridize for 1 hour at 67 degrees3. Take off 120 ml of Hyb+ withour letting the embryos touch air4. Add 1 – 2 ml of probe to the sample (see protocol by M. Carl on how to make in situ probes)5. Incubate o/n at 67 degrees
Probe removal/washes1. Remove probe solution and wash 2 x 30 min with 50% formamide/2X SSCT at 67 degrees2. Wash 1 x 15 min with 2X SSCT at 67 degrees3. Wash 2 x 30 min with 0.2X SSCT at 67 degrees
Detection (Fast Red)1. Rinse once with 1X Malate butter2. Block at least 1 hour at RT with 1X Malate buffer plus 2% Roche blocking reagent3. Add alkaline phosphatase-coupled mouse anti-DIG antibody at 4000-fold dilution. Add 0.5 ml to 2
ml 1X Matate buffer plus 2% block. Also add primary rabbit anti GFP antibody at a 500-folddilution
4. Incubate 4 hours RT or o/n at 4 degrees5. Rinse 2X with 1X Malate buffer6. Wash 2X 45 min with 1X Malate buffer7. Rinse 2X with staining buffer pH 88. Wash 1X with staining buffer pH 8 for 15 min9. Dissolve 1/2 Fast Red tablet per 2 ml staining buffer pH8 using pipette tip10. Vortex briefly11. Spin the solution at highest setting for 5 min12. Transfer the solution to a new tube, leaving behind the undissolved particles13. Incubate the embryos in this solution for 15 min to several hours at 37 degrees14. Inspect embryos periodically under a Stereo Microscope. When the reaction is complete, rinse
several times with PBST15. Rinse 1X with Malate buffer16. Block 0.5 hours with 1X Malate buffer plus 2% blocking reagent17. Add secondary goat anti rabbit antibody conjugated with Alexa488 at a 50-fold dilution (add 10
ml to 500ml)18. Incubate 2 hours RT to o/n at 4 degrees19. Rinse 3X with PBST20. Wash 2X 45 min with PBST21. Fix 20 min with 4% PFA in PBS22. Equilibrate embryos in 80% glycerol with PBST23. Mount on a microscope slide and analyze with a confocal microscope
EMBO COURSE MEDAKA & ZEBRAFISH HEIDELBERG 53
List of material needed• Stereo Dissecting Microscope (Zeiss)
• Stereo Dissecting Microscope with Hg-lamp and filter for detecting GFP fluorescence (Leica)
• Confocal Microscope (Leica)
• Eppendorf Femtojet Microinjector
• Micromanipulator for injection needle (Eppendorf, Leica)
• Rabbit anti-GFP antibody (Torrey Pines Biolabs)
• Goat anti-rabbit antibody coupled to Alexa488 (Molecular Probes)
• Mouse anti-DIG antibody coupled to alkaline phosphatase (Roche)
• Fast Red tablets (Roche)
Buffers and solutions
PBSTPBS plus 0.1% Tween-20
SSCTSSC plusTween-20 0.1%
Hyb-Formamide 50%SSC 5xTween-20 0.1%(Store at -20oC)
Hyb+
Hyb-Heparin 50 mg/mltorula (yeast) RNA 5 mg/ml(Store at -20oC)
Staining bufferTris pH 8-8.2 100mM 50 ml 1M stockMgCl2 50 mM 25 ml 1M stockNaCl 100mM 16.7 ml 3M stockTween-20 0.1% (add just before use)
+ 408.3 ml H20
EMBO COURSE MEDAKA & ZEBRAFISH HEIDELBERG 54
4.2 (Alternate protocol) Injection of RNA and DNA into zebrafishembryos
(E. Raz, Göttingen)
Experiment description:GFP as mRNA and in a DNA expression construct will be injected into early zebrafish embryos.
Expression of GFP in the injected embryos will be followed and will be compared between the DNA andRNA injected fish. Injection of b catenin and of wnt8 mRNA will allow for biological effects of injectedRNA to be observed. The development of fish injected with the different RNAs will be observed in liveembryos and in fixed embryos stained with gsc and ntl probes.
Time table:day 1 afternoon - prepare injection ramps and micropipets. Set up crosses
day 2 morning - harvest eggs and inject.
follow the development of the injected embryos and look for GFP expression.
Supplies needed:
• Microinjector (Eppendorf)
• Micropipets
• Micropipet puller
• Microloader pipet tips (Eppendorf)
• Micromanipulator (Leica, Eppendorf)
• Dissecting scope (Zeiss)
• Glass Petri dish
Reagents needed:
1. 0.3X Danieau's
A 30 X Danieau's solution can be made (dilute it 1:100 before use)-1.74 M NaCl21 mM KCl12 mM MgSO4
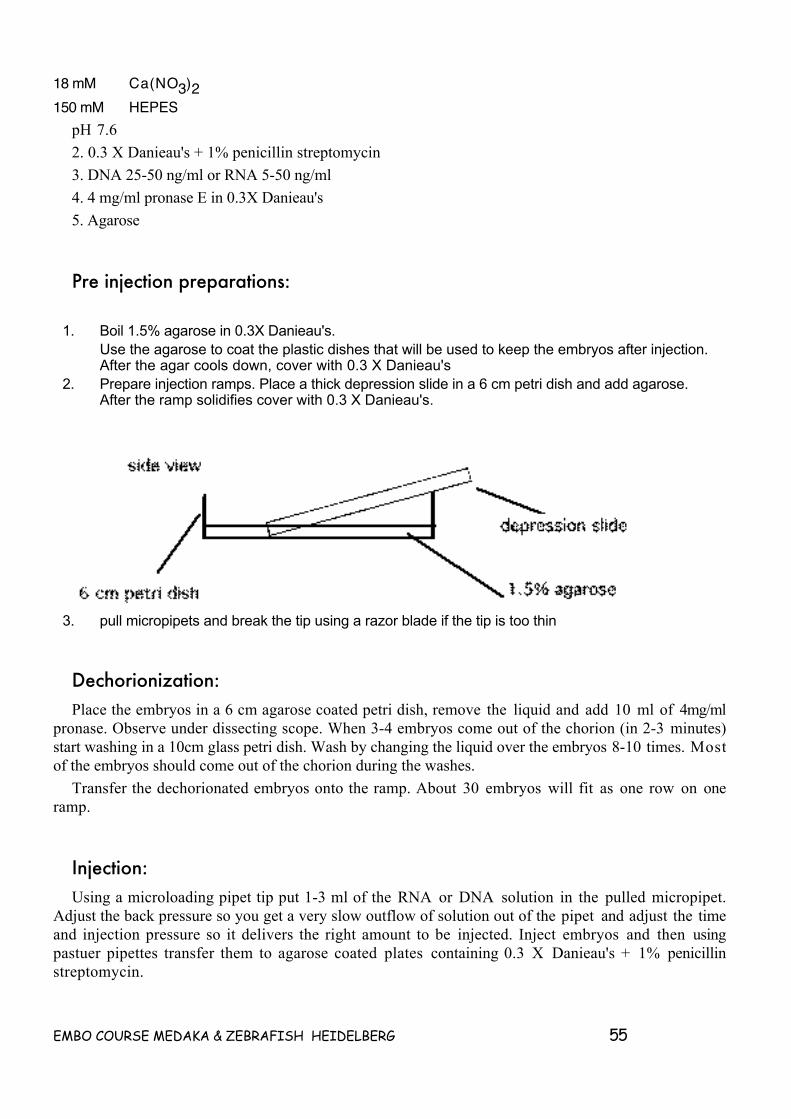
EMBO COURSE MEDAKA & ZEBRAFISH HEIDELBERG 55
18 mM Ca(NO3)2150 mM HEPES
pH 7.6
2. 0.3 X Danieau's + 1% penicillin streptomycin
3. DNA 25-50 ng/ml or RNA 5-50 ng/ml
4. 4 mg/ml pronase E in 0.3X Danieau's
5. Agarose
Pre injection preparations:
1. Boil 1.5% agarose in 0.3X Danieau's.Use the agarose to coat the plastic dishes that will be used to keep the embryos after injection.After the agar cools down, cover with 0.3 X Danieau's
2. Prepare injection ramps. Place a thick depression slide in a 6 cm petri dish and add agarose.After the ramp solidifies cover with 0.3 X Danieau's.
3. pull micropipets and break the tip using a razor blade if the tip is too thin
Dechorionization:Place the embryos in a 6 cm agarose coated petri dish, remove the liquid and add 10 ml of 4mg/ml
pronase. Observe under dissecting scope. When 3-4 embryos come out of the chorion (in 2-3 minutes)start washing in a 10cm glass petri dish. Wash by changing the liquid over the embryos 8-10 times. Mostof the embryos should come out of the chorion during the washes.
Transfer the dechorionated embryos onto the ramp. About 30 embryos will fit as one row on oneramp.
Injection:Using a microloading pipet tip put 1-3 ml of the RNA or DNA solution in the pulled micropipet.
Adjust the back pressure so you get a very slow outflow of solution out of the pipet and adjust the timeand injection pressure so it delivers the right amount to be injected. Inject embryos and then usingpastuer pipettes transfer them to agarose coated plates containing 0.3 X Danieau's + 1% penicillinstreptomycin.
EMBO COURSE MEDAKA & ZEBRAFISH HEIDELBERG 56
4.3 Injection of DNA/RNA/morpholinos/tracer dyes into earlymedaka embryos
(M. Carl and J. Wittbrodt)
Medaka egg clusters are collected from females 30 min after light turns on and are transferred to a petridish containing hatching solution. Eggs are separated by gently rolling them in the dish or on a Whatmanpaper. Remaining traces of attachment filaments are removed manually with forceps under a dissectingmicroscope. Embryos can be cooled down to 4°C for several hours to slow down development if a bignumber of embryos needs to be injected. Isolated embryos are transferred to agar coated Petri dish (1.5%Agarose in water) filled with 1x Yamamoto Ringer with grooves 1 mm wide, 0.9 mm deep to fix theembryos.
In Medaka, it is not necessary to remove the chorion prior to microinjection as it can be easilypenetrated with the injection needle. However, embryos tend to move inside the chorion, so that eachembryo has to be oriented properly just prior to the injection.
Needles:Filament containing borosilicate glass capillaries (Clarc Electromedical Instruments, GC100F-10) are
routinely used. Needles are pulled on a Sutter needle puller with a closed sharp, but rigid tip. Prior tofilling the needles the back ends are briefly fire polished. Needles are filled from the back with Eppendorfmicroloaders. The needle tip is opened under water by gently touching it with a pair of sharp forceps.For the Eppendorf microinjetor the starting settings are 80-100 hPa for holding pressure and 500-700hPa for injection pressure. The optimal injection time (to inject 15-20% of the cell volume) is establishedempirically.
DNA injection:App. 500pl (= 1/6 of the cell volume) of plasmid-DNA at a concentration of 10-50µg/ml (25pg DNA
in total injected per cell) are injected into the cytoplasm of early embryos (usually at the 2-cell stage,because this is easiest to inject). The DNA injection solution is in 1x Ringer (that can contain 0.2%phenol red).
RNA/morpholino/tracer injection:Capped mRNA is synthesized in-vitro using an Ambion "mMessage mMachine" Kit. The RNA is
injected in 1xRinger´s solution at concentrations of 50µg/ml up to 1mg/ml (i.e. from 25pg to 500 pg RNAper cell).
Tracer-dyes (like FITC-dextran; Rhodamine-Dextran) are injected at a concentration of 1.5% in 1xRinger´s solution.
Injected embryos are transferred to hatching solution and kept at 28°C till hatching.
EMBO COURSE MEDAKA & ZEBRAFISH HEIDELBERG 57
Buffers and solutions
10x (Yamamoto's isotonic BSS; Ringer´s solution):
NaCl 7.5 gKCl 0.2 gCaCl2 0.2 gNaHCO3 0.02 g
to a final volume of 100 ml with distilled water; adjust pH to 7.3
Hatching solution:
NaCl 0.1% (w/v)KCl 0.003% (w/v)CaCl2 x 2 H2O 0.004% (w/v)MgSO4 x 7H2O 0 . 0 1 6 %
(w/v)methylene blue 0.0001%
(w/v)
References:Winkler, C., Wittbrodt, J., Lammers, R., Ullrich, A. and Schartl, M. (1994). Ligand-dependent tumor
induction in medakafish embryos by a Xmrk receptor tyrosine kinase transgene. Oncogene 9 , 517-1525.
Wittbrodt, J. and Rosa, F. M. (1994). Disruption of mesoderm and axis formation in fish by ectopicexpression of activin variants: The role of maternal activin. Genes & Development 8, 1448-1462.
Oliver, G., Loosli, F., Köster, R., Wittbrodt, J. and Gruss, P. (1996). Ectopic lens induction in fish inresponse to the murine homeobox gene Six3. Mech Dev 60, 233-239.
Köster, R., Stick, R., Loosli, F. and Wittbrodt, J. (1997). Medaka spalt acts as a target gene of hedgehogsignaling. Development 124, 3147-3156.
4.4 Highly efficient transgenesis in fish mediated by I-SceImeganuclease
(contributed by Clemens Grabher, Felix Loosli, Jochen Wittbrodt)
The widespread use of fish as model systems is still limited by the mosaic distribution of cellstransiently expressing transgenes leading to a low frequency of transgenic fish. Here we present astrategy that overcomes this problem. Transgenes of interest are flanked by two I-SceI meganucleaserecognition sites, and co-injected together with the I-SceI meganuclease enzyme into medaka embryos(Oryzias latipes) at the one-cell stage. By this approach, the promoter dependent expression in F0 is
EMBO COURSE MEDAKA & ZEBRAFISH HEIDELBERG 58
strongly enhanced and the transgenesis frequency is raised to more than 30%. In addition, the averagegermline transmission rate (the number of transgenic F1 offspring of an identified founder fish)approaches the maximum of 50% for single insertions indicating an integration event already at the onecell stage.
Prepare injection plates (1.5% agarose/water)1. Collect eggs immediately after spawning (at the onset of light) and placed in pre-chilled
Yamamoto’s embryo rearing medium or Hanks (not pre-chilled !!) in case of zebrafish. Rollmedaka clutches to separate them into single embryos
2. Arrange single embryos appropriately in injection plates.3. Medaka embryos may be put to 4°C to arrest development. Let develop to one-cell stage.4. Backfill injection needles with injection solution using GELoader tips and mount to injector.5. Inject DNA through the chorion into the cytoplasm (not yolk!) of a one-cell stage embryo. Injection
volume should not exceed 10% of the cell volume.6. Monitor GFP fluorescence according to the promoter used between 8 hrs and 3 days after
injection. Change Yamamoto buffer daily.7. To identify stable transgenic fish, raise GFP expressing F0 fish to sexual maturity and mate to
wild type fish.
List of material needed• Medaka orange-red or Cab strain
• Zebrafish AB strain
• 10 cm bacterial dishes
• Injection plates
• Pressure Injector (Femtojet, Eppendorf, Germany)
• Borosilicate glass capillaries (GC100F, Clark Electromedical Instruments, UK)
• Wide-mouthed pipettes
• Forceps (INOX 5)
• Microloader tips (Eppendorf, Germany)
• Casting molds
Buffers and solutions
Injection solution (15µl)DNA (Qiagen Maxipreps) 10ng/µl Meganuclease buffer (NEB or Roche) 0.5xI-SceI meganuclease 0.2 units/µlDistilled water ad 15µl
Yamamoto buffer (1l)NaCl 7.5gKCl 0.2gCaCl2 0.2gpH 7.3Distilled water ad 1l
autoclave
EMBO COURSE MEDAKA & ZEBRAFISH HEIDELBERG 59
1.5% agarose in waterAgaraose (ultraPure, GibcoBRL) 6gDistilled water ad 400ml
ReferencesYamamoto, T. (1975) Medaka (killifish): biology and strains. Heigaku, Tokyo
Violette Thermes*, Clemens Grabher1*, Filomena Ristoratore#*, Franck Bourrat, André Choulika2, JochenWittbrodt1, Jean-Stéphane Joly (2002) I-SceI meganuclease mediates highly efficient transgenesis infish. Mechanisms of Development, in press
4.5 Knock-down of maternal factors by nuclear injection ofmorpholinos into premature medaka oocytes
(contributed by C.Winkler)
Medaka offers the unique possibility to maturate oocytes in-vitro using standard tissue-culture media.This allows the isolation of premature oocytes at a specific stage during oogenesis when the germinalvesicle is apparent. During a window of 2 to 3 hours the large and clearly visible germinal vesicle (GV)can be injected with a solution containing plasmid DNA, RNA or morpholinos. After injection theoocytes are cultured in a basic medium, where GV breakdown and the late stages of oogenesis occurduring maturation. In medaka, contrary to other fish species, these steps are apparently independentfrom the direct contact of oocytes to the supply of hormones in the ovary. After 8 hrs in culture, theisolated oocytes spontaneously ovulate and are then ready for in-vitro fertilization. In the basic mediumused they stay fertilizable for several hours (I checked fertilization 12 hours after the scheduled time anddid not find significant reduction of survival rates). The fact that plasmid DNA is injected directly intothe oocyte nucleus, where it stays for at least 9 hours before the first cell division, apparently increasesthe chance for integration into the host genome and for contribution to the germ line.
The method of nuclear oocyte injection and the conditions for in-vitro maturation to generate stabletransgenic medakafish has been originally described by Ozato in 1986. Thereafter, a number of transgeniclines have been established where various transgenes were successfully transmitted to progenies andproperly expressed.
Two experiments concerning nuclear transfer of morpholinos and RNA will be performed during thisEMBO course. First, a morpholino oligo directed against medaka b-catenin will be injected at differentconcentrations into immature oocytes. These oligos interfere with b-catenin translation and result in areduction of maternal b-catenin protein pools. The consequences of this on dorsoventral patterning ofthe embryonic axis will be analyzed morphologically after in vitro fertilization. A rescue of this"morphant" phenotype will by attempted by coinjection of RNA encoding Xenopus b-catenin intosome control oocytes. In a second set of experiments, RNA encoding a GFP fusion with DMRT-1 willbe injected as described above. The encoded fusion protein localizes to chromatin and will allow tofollow nuclear morphology during different phases of oocyte maturation, fertilization and cell divisions.
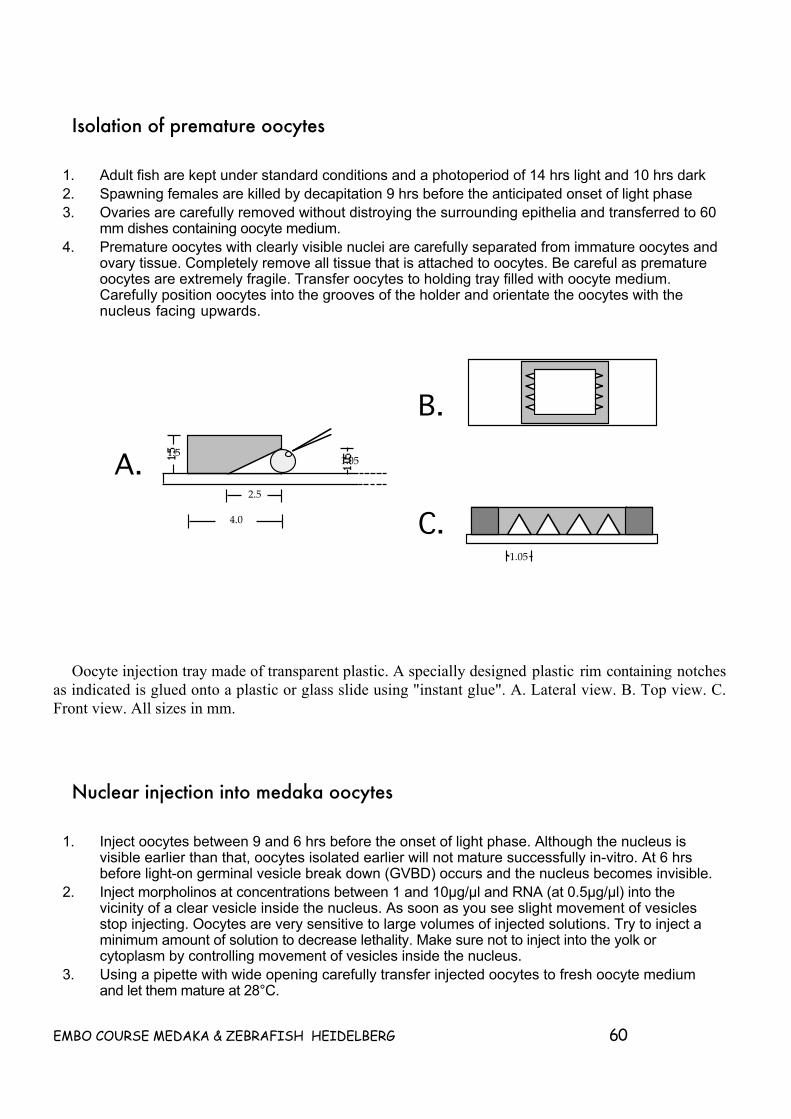
EMBO COURSE MEDAKA & ZEBRAFISH HEIDELBERG 60
Isolation of premature oocytes
1. Adult fish are kept under standard conditions and a photoperiod of 14 hrs light and 10 hrs dark2. Spawning females are killed by decapitation 9 hrs before the anticipated onset of light phase3. Ovaries are carefully removed without distroying the surrounding epithelia and transferred to 60
mm dishes containing oocyte medium.4. Premature oocytes with clearly visible nuclei are carefully separated from immature oocytes and
ovary tissue. Completely remove all tissue that is attached to oocytes. Be careful as prematureoocytes are extremely fragile. Transfer oocytes to holding tray filled with oocyte medium.Carefully position oocytes into the grooves of the holder and orientate the oocytes with thenucleus facing upwards.
Oocyte injection tray made of transparent plastic. A specially designed plastic rim containing notchesas indicated is glued onto a plastic or glass slide using "instant glue". A. Lateral view. B. Top view. C.Front view. All sizes in mm.
Nuclear injection into medaka oocytes
1. Inject oocytes between 9 and 6 hrs before the onset of light phase. Although the nucleus isvisible earlier than that, oocytes isolated earlier will not mature successfully in-vitro. At 6 hrsbefore light-on germinal vesicle break down (GVBD) occurs and the nucleus becomes invisible.
2. Inject morpholinos at concentrations between 1 and 10µg/µl and RNA (at 0.5µg/µl) into thevicinity of a clear vesicle inside the nucleus. As soon as you see slight movement of vesiclesstop injecting. Oocytes are very sensitive to large volumes of injected solutions. Try to inject aminimum amount of solution to decrease lethality. Make sure not to inject into the yolk orcytoplasm by controlling movement of vesicles inside the nucleus.
3. Using a pipette with wide opening carefully transfer injected oocytes to fresh oocyte mediumand let them mature at 28°C.
.
A.
B.
C.
1.5
2.5
4.0
1.05
1.05
EMBO COURSE MEDAKA & ZEBRAFISH HEIDELBERG 61
4. At the onset of light phase ovulation occurs spontaneously (if not, the follicular layer needs to beremoved manually with fine forceps).
5. Isolate testis from adult males that were separated from females the day before injection.6. In-vitro fertilize oocytes by mincing testis with forceps and mixing sperm suspension with
oocytes in as little volume of oocyte medium as possible; use 1 testis per 1 ovary used; checkmobility of sperm.
7. Incubate sperm with oocytes for 30 minutes at 28°C; check cortical reaction8. Thoroughly wash fertilized eggs 3 times with Embryo Rearing Medium. Remove follicular tissues
and testis.9. Incubate embryos in embryo rearing medium at 28°C till hatching. The medium should be changed
daily if residual follicular tissue is present and bacteria start to grow (though, medaka eggstolerate some contamination!). Check phenotypes of morpholino injected embryos duringgastrulation and neurulation stages. Analyze GFP expression in GFP::DMRT-1 injected oocytesduring maturation, pre- and post-fertilization stages.
Buffers and solutionsEarle's Medium 199; Gibco BRL (US# 31100-035), powdered, for 1 liter .
Gibco Pen-Strep solution (1 small bottle) 2 bottle-top filters (0.2µm; 500ml)
ReferencesHyodo-Taguchi, Y., Winkler, C., Kurihara, Y., Schartl, A. & Schartl, M. (1997). Phenotypic rescue of the
albino mutation in the medakafish (Oryzias latipes) by a mouse tyrosinase transgene. Mech. Dev. 68,27-35.
Ozato, K., Wakamatsu, Y. & Inoue, K. (1992). Medaka as model of transgenic fish. Mol. Mar. Biol. Biotech.1, 346-354.
Ozato, K., Inoue, K., and Wakamatsu, Y. (1989). Transgenic fish: biological and technical problems. Zool.Sci. 6, 445-457.
Ozato, K., Kondoh, H., Inohara, H., Iwamatsu, T., Wakamatsu, Y., and Okada, T.S. (1986). Production oftransgenic fish: introduction and expression of chicken delta-crystallin gene in medaka embryos. CellDiffer. 19, 237-244.
Takagi, S., Sasado, T., Tamiya, G., Ozato, K., Wakamatsu, Y., Takeshita, A. & Kimura, M. (1994). Anefficient expression vector for transgenic medaka construction. Mol. Mar. Biol. Biotech. 3, 192-199.
Toyohara, H., Nakata, T., Touhata, K., Hashimoto, H., Kinoshita, M., Sakaguchi, M., Nishikimi, M., Yagi,K., Wakamatsu, Y. & Ozato, K. (1996). Transgenic expression of L-gulono-gamma-lactone oxidase inmedaka (Oryzias latipes), a teleost fish that lacks this enzyme necessary for L-ascorbic acidbiosynthesis. Biochem. Biophys. Res. Comm. 223, 650-653.
4.6 Monitoring specification of cell movements and fates inzebrafish gastrula
(contributed by Lila Solnica-Krezel)
During gastrulation cell cells engage in gastrulation movements shaping the vertebrate body plan whiletheir fates become specified. The relationships between determination of cell fate and movementbehaviors are only poorly understood. It is known that in the fish gastrula, prospective mesendodermalcells at the blastoderm margin undergo involution/ingression to underlie ectodermal layer. Furthermore, allgerm layers engage in convergence and extension movements that elongate the nascent embryonic axisfrom head to tail and narrow it mediolaterally.
EMBO COURSE MEDAKA & ZEBRAFISH HEIDELBERG 62
Tracking dorsal translocation (convergence) or anteroposterior elongation (extension) of cell groupslabeled with either lipophilic or photoactivatable dyes revealed the presence of three C&E movementdomains in the zebrafish gastrula (Myers et al., 2002). First, the most ventrally located mesodermal cellsdo not converge but rather spread over the yolk, later migrating into the tailbud region without extension.Such cell behavior typifies cells residing within a 20-30˚ arc of the ventral margin, termed the noconvergence no extension zone (NCEZ). Second, in the lateral domain, convergence and extensionmovements are initially slow, increasing as cell groups move dorsally. Third, in the dorsal domain labeledcell populations exhibit strong extension with little convergence. These findings support a new model ofC&E at the cell population level whereby ventrally, convergence and extension are absent. Laterally, theyoccur at increasing rates and dorsally, strong extension movements are accompanied by limitedconvergence.
Marginal cell populations positioned at the beginning of gastrulation 90˚ from the embryonic shield, atthe onset of somitogenesis form anterposterior arrays located close to the dorsal midline. These cellarrays are found just at the lateral boundary of the first forming somites and within the presomiticmesoderm.
What are movements and fates of latero-ventral cell populations located between the boundary of theventral NCEZ and the 90˚ position? We will address this question by first injecting wild-type zebrafishzygotes with caged fluorescein dye and then photoactivating the dye in small cell populations located inthe ventrolateral margin at early gastrulation (shield stage). We will determine the exact position of thelabeled cell population with respect to the embryonic shield upon photoactivation and allow embryos tocomplete gastrulation. At the onset of somitogenesis embryos will be fixed and the labeled cellpopulations will be visualized using anti-Fluorescein Antibodies. We will assess fates of the labeled cellsby simultaneously monitoring expression of intermediate and lateral plate mesoderm markers (pax2.1,gata2) by whole mount in situ hybridization.
Protocol:
Injection and Uncaging of Fluorescein for Fate Mapping and ExtensionMeasurement
1. Dextran DMNB Caged fluorescein 10,000 MW (Molecular Probes D-3310) was dissolved in 120mM KCl, 20 mM Hepes pH 7.5 to a final concentration of 1% [Kozlowski, 1997 #2733]. Beforeuse, the dye was centrifuged 3-5' in a microfuge.
2. A small quantity (0.5 to 1 nl) was injected through the chorion into the yolk of an 1-8 cell stageembryo using a pneumatic picopump (WPI) as described in Marlow et al. (1998).
3. Following injection, embryos were sorted by stage and kept in the dark at 28.50.4. Embryos were manually dechorinated in sterile filtered embryo medium and mounted at shield
stage on bridge slides in 2.5% methyl cellulose in embryo medium with 10mM HEPES [Cooper,1998 #2532].
5. We uncage a small spot of dye at shield stage on the margin [Kozlowski, 1997 #2733] on anOlympus AX70 microscope, using DAPI filter epifluorescence, through a 40X objective and astopped down epifluorescence iris diaphragm. The location of the spot relative to dorsal wasdetermined using an eyepiece protractor reticle (Klarmann Rulings).
Labeling uncaged dye after In Situ Hybridization1. Prepare an in situ hybridization according to the Thisse protocol with a probe labeled with
digoxygenin and a probe labeled with FITC. Prepare two sets of blocking embryos to pre-clear

EMBO COURSE MEDAKA & ZEBRAFISH HEIDELBERG 63
both anti dig and anti-FITC antibodies at dilutions of 1:1000 in PBST, 2% sheep serum, 2 mg/mlbovine serum albumen. Use antibodies at 1:5000 dilution.
2. After coloring the in situ hybridization embryos, strip off the dig antibody with 0.1 M glycine pH2.2, 0.1% tween-20, 3x for 5 minutes.
3. Wash 3x 5 minutes with PBST.4. Bind 1:5000 dilution anti-FITC Ab to experimental embryos for 2 h at RT.5. Wash Ab 6 x 15 minutes in PBST.6. Wash 2 x 15 minutes in 0.1 M TRIS pH 8.2, 0.1% Tween-20.7. Prepare Fast Red solution. Dissolve the fairly insoluble tablet in 0.1 M TRIS pH 8.2, 0.1% Tween-
20 with vortexing. Remove particles from the solution either by using a syringe filter or byspinning the particles down using a microfuge.
8. Stain embryos in Fast Red solution at RT. The color will develop in about 5-10 minutes foruncaged FITC labeled cells.
Material neededDextran DMNB caged fluorescein 10,000 MW (Molecular Probes D-3310)
Antifluorescein alkaline phosphatase, Fab fragments (Boehringer Mannheim Biochemicals cat#852-631-24-06)
Fast red tablets (Boehringer Mannheim Biochemicals cat#1-496-549)This is only 20 tablets.
We used a protractor reticle (Klarrman Rulings) we purchased from Zeiss. Klarrman can be found onthe Web, however, asKlarrman is a US company, it would probably be easier to obtain a reticle locally
Buffers and solutions120 mM KCl, 20 mM Hepes pH 7.50.1M glycine pH 2.2, 0.1% tween 20100% Danieau's buffer (58 mM NaCl, 0.7 mM KCl, 0.4 mM MgSO4, 0.6 mM Ca(NO3)2, 5 mM Hepes,pH 7.6)2.5% methyl cellulose in embryo medium with 10mM HEPES . This hydrates slowly so start at least 2days before
References:Myers et al., 2002.
Kozlowski, D. J., Murakami, T., Ho, R. K., and Weinberg, E. S. (1997). Regional cell movement and tissuepatterning in the zebrafish embryo revealed by fate mapping with caged fluorescein. Biochem. CellBiol. 75, 551–562.
Marlow et al. (1998).
Cooper, 1998
Thisse, 1998
EMBO COURSE MEDAKA & ZEBRAFISH HEIDELBERG 64
4.7 (Alternate Protocol) Fate mapping by local activation ofphotoactivable (caged) fluorescein
(contributed by Laure Bally-Cuif)
This technique allows the irreversible labeling of a group of cells at a desired stage and location,permitting to follow cell fate over development. It uses the local activation of a photoactivatable dye thatis injected into the embryo at an early stage and becomes fluorescent when activated by specificwavelengths of UV light. The UV beam is produced by the epifluorescence illumination pathway of amicroscope, narrowed by a pinhole, or is produced by a laser. In the first case, a 0.15 mm diameterpinhole inserted at the focal plane into the path of the UV beam will allow to activate 10-50 cells at thegastrula stage with a 40x objective. When using a laser, single cells can be activated. Activated cells can befollowed on live specimen by fluorescence microsocopy. In addition, immunocytochemical detection ofcells containing uncaged fluorescein using an anti-fluorescein antibody can provide a stable record of celldistribution.
Procedure for uncaging1. Prepare the injection box: boil 1.2% agarose in embryo medium, pour in Petri dishes and overlay
with the injection molds; let set then remove the mold and cover with embryo medium;2. Prepare the uncaging boxes: boil 1.2% agarose, pour in a glass dish and overlay with the
transplantation mold; let set then remove the mold and cover with embryo medium +penicillin/streptomycin;
3. Align embryos (in their chorion) in the injection rows, yolk cell on the pipette’s side;4. Protect the lights of the room, as well as that coming from the stereomicroscope halogen lamp,
with UV-cut filters;5. Inject the caged fluorescein (5-10 mg/ml in Ambion H2O) at the 1-cell stage, approx. 10 pl per
embryo (settings of the microinjector: Pi 100-300 hPa; manual function for the time setting);6. Transfer injected embryos into a fresh Petri dish of embryo medium and let develop at 28.5°C in
the dark until the desired stage;7. Still using UV-cut filters, dechorionate the injected embryos under a stereomicroscope using fine
forceps, and dispose them into the transplantation holes, side to be activated up; transfer to themicroscope stage;
8. Protect the halogen illumination of the microscope with UV-cut filter, then, with a 40x (or 50x)water objective, focus on the cell group to be activated;
9. Insert the pinhole holder into the epifluorescence light pathway;10. Switch off the halogen illumination, switch on the mercury lamp and, by looking through the FITC
filter set, move the stage so that the cells to be irradiated (still in focus) are under the light beam;11. Switch the filter set to the DAPI filter and irradiate for 2-4 sec.;12. To visualize the irradiated cells, switch the filter set back to the FITC filter and remove the
pinhole; to avoid background, do not observe for longer than a few seconds!13. Remove the glass dish from the stage and let the embryos develop in their holes in the dark to
the desired stage;14. Fix overnight at 4°C in 4% PFA;15. Rinse in PBT, then dehydrate in 50% PBT;50% MeOH ‡ 20% PBT;80% MeOH ‡ 100% MeOH
(twice); store at –20°C.
EMBO COURSE MEDAKA & ZEBRAFISH HEIDELBERG 65
Procedure for anti-fluorescein immunocytochemistry1. Rehydrate to PBT in a reverse MeOH series;2. Incubate in H2O for 1 hr at room temperature;3. Transfer to eppendorf tubes, rinse in acetone then incubate in acetone for 7 min. at –20°;4. Rinse several times in H2O then transfer back to PTD;5. Block 1 hr at RT in PTDBN;6. Incubate overnight at 4°C in sheep anti-fluorescein-HRP antibody at a final dilution of 1/200 in
PTDBN;7. Rinse 5 times 10 min. at RT in PTD (optional: rinse then overnight at 4°C) with gentle rocking;8. Preincubate in 100 mg/ml DAB in 0.1 M Tris-HCl pH 7.59. Add H2O2 to a final concentration of 0.03% and monitor the color reaction under a
stereomicroscope10. When staining of a desired intensity is obtained, rinse the embryos at least 5 times 10 min. in PTD
at RT, then overnight in PTD at 4°C;11. Transfer to 80% glycerol, mount and observe under the microscope.
Material needed• Anesthetic: Tricaine (3-amino benzoic acidethylester, Sigma A-5040), 25x stock is 4 mg/ml
Tricaine in 20 mM Tris-HCl pH 7.5; dilute in embryo medium for use
• Injection mold (for injections rows and for transplantation holes) and agarose to make injectionbox
• DMNB-Caged fluorescein 10,000 MW (Molecular Probes D-3310) diluted to 20 mg/ml inAmbion H2O (stock solution, keep in the dark at –20°C)
• UV-cut filter (Encapsulite, ref. G10)
• Pipette puller and micropipettes
• Microinjector
• 0.1-0.15 mm stainless steel pinhole
• Microscope with epifluorescence (100W Hg-arc lamp and DAPI filter set)
• Embryo medium containing 1x penicillin/streptomycin (100x pen/strep stock Gibco ref. 15140-148)
• 4% paraformaldehyde (PFA) in PBS
• PBT (PBS; 0.1% Tween-20)
• PTD (PBS; 0.3% Triton x100; 1% DMSO)
• PTDBN (PTD; 2 mg/ml BSA; 1% Normal Goat Serum)
• Sheep anti-fluorescein-HRP antibody, Fab fragments (Roche ref. 1.426.346), preadsorbed at1/50 on fixed control embryos in PTDBN
• 1mg/ml DAB stock (in H2O)
•
ReferencesKozlowski and Weinberg, In Methods in Molecular Biology, Vol. 135: Developmental
Biology Protocols Vol.1 pp.349-355; R.S. Tuan and C.W. Lo eds, Humana Press Inc.(2000).
EMBO COURSE MEDAKA & ZEBRAFISH HEIDELBERG 66
4.8 Retrograde labeling of reticulospinal neurons(contributed by Laure Bally-Cuif)
This technique uses the retrograde propagation of lysinated rhodamine dextran to label, from a spinallesion, all neurons projecting to the spinal cord. The reticulospinal complex offers an excellent assay fornormal hindbrain / ventral midbrain development as many of the neurons of this complex are individuallyidentifiable and are arranged in a segmental manner that reflects their identity.
Procedure1. Anesthetize 4- to 5-day old “larvae” with Tricaine-containing embryo medium2. Pipet the larvae separately to the bottom of an empty Petri dish, one larva per drop of embryo
medium; pipet out the medium drop and immobilize the larvae by adding on top a drop of liquid1%LMP agarose; let set
3. Cut off the tail at the level of the anus using a fine sharp tool previously plunged into the 5%lysinated rhodamine dextran solution (label the tool again for each fish)
4. Let the larvae stand for a few more minutes under the agarose drop5. Remove the larvae from the agarose and let them recover for 1 hr in embryo medium6. Fix overnight in 4% PFA at 4°C7. Tranfer to PBS and dissect out the brains using fine forceps8. Rinse further 2x 5 min in PBS then clear stepwise in glycerol:PBS (50%, 80%)9. Mount in 80% glycerol between slide and coverslip, ventral side up, with the thickness of a
single coverslip as a spacer10. Observe under fluorescence standard or confocal microscopy
Material needed• Lysinated rhodamine dextran, fixable (Molecular Probes D-1817), 5% stock in H2O
• 1% low melting point agarose in embryo medium, kept at 42°C
• sharp beveled needle or fine blade
• 4% paraformaldehyde (PFA) solution in PBS
• Anesthetic: Tricaine (3-amino benzoic acidethylester, Sigma A-5040), 25x stock is 4 mg/mlTricaine in 20mM Tris-HCl pH 7.5; dilute in embryo medium for use
ReferencesKimmel et al., J. Comp. Neurol. 205, 112-127 (1982)
Alexandre et al., Development 122, 735-746 (1996)
Moens et al., Development 122, 3981-3990 (1996)
EMBO COURSE MEDAKA & ZEBRAFISH HEIDELBERG 67
4.9 Conditional missexpression by electroporation(contributed by Laure Bally-Cuif)
This technique allows the ectopic expression of a gene of interest from a desired stage. It can beperformed by incubation of entire embryos into the DNA solution at the time of electroporation; in thatcase essentially external tissues (ectoderm) are targeted. Alternatively, the DNA solution can be injectedat any stage into the extracellular space, targeting internal tissues. When performed at late stages (i.e.after 24 hpf), the DNA can also be targeted to specific territories by local extracellular injection, e.g. tothe anterior neural tube. Ubiquitous promoters such as CMV or CSKA are generally used to driveexpression of the gene of interest, leading to permanent expression following electroporation.
Procedure to target internal tissues1. Make the injection box: boil 1.2% agarose in embryo medium, pour in Petri dishes and overlay
with the injection molds; let set then remove the mold and cover with embryo medium;2. Anesthetize 24 hpf-old, dechorionated embryos in Tricaine-containing embryo medium;3. Dispose the embryos into the transplantation holes;4. Inject the DNA inside the brain (in the lumen if it is formed, otherwise between the cells), using a
micropipette with a rather big opening;5. Immediately transfer the injected embryos with a glass Pasteur pipette to the electroporation
chamber filled with embryo medium (Hank’s saline) (several embryos can be electroporated atonce);
6. Connect the electric wires, and orient the embryos such that the “+” pole is on the side to betargeted
7. Apply current with the following settings: Mode: low voltageVoltage: 10-20 VPulses length: 50 msNumber of pulses: 3-10Interval between pulses: 1s
8. Remove the embryos from the chamber and let them recover in embryo medium at 28.5°C untilthe desired stage of analysis.
Procedure to target external tissues1. Dechorionate the embryos;2. Pipet them into the electropration chamber filled with embryo medium;3. Pipet out the medium carefully and replace it with a 0.5-1 mg/ml DNA solution in embryo medium;4. Proceed as above from step 6.
Material needed• Injection mold (for transplantation holes) and agarose to make injection box
• Microinjector
• Pipette puller, micropipettes
EMBO COURSE MEDAKA & ZEBRAFISH HEIDELBERG 68
• Electroporator (Electro Square Porator TM ECM 830, BTX – Genetronix, Inc -)
• Electroporation cuvette with electrodes
• Plasmid DNA constructs, diluted at 0.5-1 mg/ml in Ambion H2O (e.g.: pCMV-GFP)
• Anesthetic: Tricaine (3-amino benzoic acidethylester, Sigma A-5040), 25x stock is 4 mg/mlTricaine in 20 mM Tris-HCl pH 7.5; dilute in embryo medium for use
ReferencesTawk et al., Genesis 32, 27-31 (2002)
Buffers and solutions
PBTPBS 1xTween-20 0.1%
PTDPBS 1xTriton x100 0.3%DMSO 1%
PTDBNPTD 1xBSA 2 mg/mlNormal Goat Serum 1%
Lysinated rhodamine dextran, fixable (Molecular Probes D-1817)5% stock in H2O
Anesthetic: Tricaine (3-amino benzoic acidethylester, Sigma A-5040)25x stock Tricaine Tricaine 4 mg/ml
in 20 mM Tris-HCl pH 7.5dilute in embryo medium for use
4% paraformaldehyde (PFA)solution in PBS
EMBO COURSE MEDAKA & ZEBRAFISH HEIDELBERG 69
5. High throughput secreening ofexpression patterns
(Rebecca Quiring, Beate Wittbrodt, Jochen Wittbrodt)
5.1 PCR transcripts from a gridded cDNA libraryThe cDNA library is a liquid culture of 384 colonies/384-well plate; stored at –80oC
From the library plates, fresh replicas were made as follows:1. upon total thawing of the plates at room temperature bacteria were transferred with a
384replicator into 65-70ml of LB (10% glycerol, 0.02g/AMP100ml)2. plates were incubated at 37oC for 16h (without shaking)3. original plates were re-frozen on dry ice (let freeze bottom to top)4. 10ml PCR Master Mix was pre-pipetted into a 384well plate with a 12channnel pipettor5. with a replicator the freshly grown bacteria were transferred into a 384-well plate containing
the Master Mix; plates were covered with a silicon cover
PCR reaction:96oC 3min96oC 10sec 70oC 3min 30x72oC 8min18oC hold
1ml of each PCR reaction was analysed on a 1.5% agarose gel (1xTAE )
“PCR” plates were frozen at -20 oC
Buffers and solutions
Master Mix for 400 10ml PCR reactions:10xPerkin Elmer taq polymerase buffer 400 ml3/86 primer (100pm/ml) 40 ml M13fwd primer (100pm/ml) 40 mltaq polymerase (Quiagen) 40 ml dNTPs 40 mlH2O 3440 ml
10x Perkin Elmer buffer:MgCl2 15mM Tris-HCl pH 8.3 100mM KCl 500mM
(no gelatine)
EMBO COURSE MEDAKA & ZEBRAFISH HEIDELBERG 70
dNTPsdNTP Mixture 2.5mM each (from TaKaRa or other brand)
Material needed• 384 replicator: NUNC
• 384well plate: NUNC; Kat.Nr.242765 clear (non treated) w/lid , sterile,PS, 120ml well
• PCR-Mikrotestplatte 384:LA-BIO-MED Kat.Nr.4028-0384 PP, ns,RNAse/DNAse-free (25mlwell)
• Silikonmatte PCR384: LA-BIO-MED; Kat.Nr.1000-1384,Sil., ns, RNAse/DNAse-free
• Gradient cycler: MJ research, model: PTC-200
5.2 Digoxigenine labelled RNA probes of PCR transcripts
1. pre-pipette 9,5 ml Master Mix into 96wells of 384 plate (use e.g. Eppendorf pipettor)2. thaw 384well plate with PCR transcripts from library clones3. add 0.5 ml of each PCR reaction with 12channel pipettor to prepipetted Master Mix4. incubate at 37°C for 5h5. test a few samples (1 in 10) on 1% agarose gel (1 ml from the 10 ml reaction with 1-2 ml 2xRNA
loading buffer)6. freeze until purification
List of material needed:• RNAguard=RNAse inhibitor (between29100 and 35800U/ml), Amersham Pharmacia
• Thermostable inorganic Pyrophosphatase , (2000U/ml), New England BioLabs
• rNTP-Mixs: ATP, CTP, GTP 15,4mM, UTP 10mM, Roche
• Digoxigenin-11- UTP, Roche
• SP6 Polymerase (20U/ml), Roche
EMBO COURSE MEDAKA & ZEBRAFISH HEIDELBERG 71
Buffers and solutions:
2xRNA-loading bufferdeonized formamide 100 mlEDTA, 0.5M 2 mlxylene cyanol 0.1%bromophenol blue 0.1%
Master Mix for 100 x transcripts:H2O 580 ml10x transcription buffer 100 mlRNAguard 50ml40mM MgCl2 50 mlThermostable inorganic Pyrophosphatase 20 mlRNTPs 65 mlDig UTP 35 mlSP6 Polymerase 100 ml
5.3 Purification of RNA-dig probes
Use Quiaquick PCR purification kit 96 with the QIAvac 96 according to manufactures instructionsexcept
1. add 350 ml of buffer RLT ( “RNAesy Kit” ) to the QIAquick 96 Plate2. add the 10ml RNA dig labelled probe (using 12channnel pipettor)3. add 250ml ETOH with “eppendorf research pro” pipettor set on “pip” with “rinse” option4. switch on vacuum source- pull liquid through-turn off vacuum
continue according to manual:
5. add 900ml of Buffer PE to each well6. switch on vacuum source- pull liquid through-turn off vacuum7. repeat last steps: “add 900ml PE…” etc.8. after Buffer PE in all wells has been drawn through, apply maximum vacuum for an additional
10min to dry the membrane9. switch off vacuum source, ventilate QIAvac 96 slowly. Lift top plate from the base (not 96 plate
from the top plate), vigorously rap the top plate on a stack of absorbent paper (until no dropscome out, and blot the nozzles of the plate with clean absorbent paper
10. replace waste tray with collection microtube rack (add 96plate back)11. elute with 80ml of buffer EB added to the center of each well12. let stand for 1min!!!13. switch on vacuum source for 5min14. test a few samples (1 in 10) on 1% agarose gel (4ml with 4ml 2xRNA loading buffer)15. add 150ml of Hybridization Mix
EMBO COURSE MEDAKA & ZEBRAFISH HEIDELBERG 72
Material needed• Quiaquick PCR purification kit 96
• QIAvac 96
• Ethanol
• "eppendorf research pro" pipettor
• 1% agarose
Buffers and solutions
Hybridization Mix:formamide (Fluka, ultra pure) 50%SSC 5xHeparin 50 µg/mlTween20 0.1%torula RNA 5 mg/ml
store at 20°C
5.4 Preparation of embryos1. separate embryos (only for medaka embryos) by rolling them gently in the petri dish or on a
sheet of Whatman-paper2. transfer separated embryos to a 25 ml glass vial and fix for 4 hrs at room temperature in 4%
PFA/2xPTW by vigorously rocking on a shaker3. transfer embryos to a small petri dish and remove chorion with two forceps4. transfer embryos back to glass vial and wash 4 x 5 min in 20 ml PTW5. wash 5 min at room temperature in 100% MeOH6. replace MeOH and store embryos at least over night at -20°C
Comments: MeOH treatment enhances probe penetration, a longer storage of embryos at -20°C inMeOH is advantageous.
All steps are performed at RT on a shaker except the digestion itself; volumes of solutions used perwell are 3-5ml. Transfer embryos of different stages to a 6-well cell culture dish (or 3cm petridishes)-stages: 4,5 or 6 day into separate 3cm petridish
1. rehydrate 5min in 75% MeOH/PTW2. rehydrate 5min in 50% MeOH/PTW3. rehydrate 5min in 25% MeOH /PTW4. rinse 2x5min each in PTW
EMBO COURSE MEDAKA & ZEBRAFISH HEIDELBERG 73
5. prepare ProteinaseK (10mg/ml in PTW -use prepared stock (20mg/ml) 1:2000= 10ml/20ml) withoutshaking- time according to stage of embryos
stage 18 7minstage23 9min4-5days 1h-1h15min6days 1h+20min-1h30min
6. prepare freshly 2mg/ml glycine/PTW (0.1g/50ml or 0.04g/20ml PTW)7. prepare 4% PFA/PTW8. rinse 2x shortly in glycine/PTW9. fix in 4% PFA/PTW for 20min10. wash 5x 5min in PTW11. use immediately or put to MeOH and store at –20 (rehydrate prior to loading the machine)
Buffers and solutionsPTW (2xPTW):
1x PBS (2xPBS), pH 7.5, add Tween20 to 0.1% and sterile filter (0.2 µm, nitrocellulose).
4% PFA: dissolve 16% paraformaldehyde in PBS by stirring and heating to 65°C, add dropwise 1 MNaOH until the solution gets clear (check pH ≈ 7.5), cool to room temperature and store at 4°C (for upto 4 weeks; if Medaka embryos do not stay clear but turn "milky" in MeOH prepare fresh 16% PFAstock). Mix with 3 volumes of 2xPTW just prior to use.
Use for early stages ( ≥16) use 1 1/2 x PTW + PFA and later stages (£17) 2x PTW + PFA for thefixation!
ProteinaseK: prepare a stock solution of 20 mg/ml and store frozen aliquots at -20°C, dilute 1:2000just prior to use to a final concentration of 10 µg/ml in PTW
5.5 Setup of the INTAVIS insituPro robot1. put fresh rinsing reagents into the insitu robot2. put fresh empty in situ tubes into machine3. fill machine completely to prevent evaporation4. cleaning run with water and H2O2
5. after cleaning run remove in situ tubes form the robot and put them into loading rack filled withdH2O (pipet tip box)
6. fill in situ tubes with PTW7. distribute equilibrated embryos with wide-bore eppendorf tip to approx 5-10 of each stage in
each in situ tube8. put in situ tubes with embryos (lid on) into the robot9. put tubes with setup reagents into robot
EMBO COURSE MEDAKA & ZEBRAFISH HEIDELBERG 74
Buffers for INTAVIS insituPro robot
1. add buffers to tubes and tubes into slots according to the letters marked on them
tubes: for 48x in situs:C Hybridization mix 20mlD 50% formamide/2xSSCT 20mlE 2xSSCT 20mlF 0.2xSSCT 20mlL blocking buffer: 10ml
sheep serum 5% (500ml/10ml)PTW
M preabsorbed anti-dig-UTP antibody 9ml
A PTW, add additional 0.1%Tween20 100ml
K staining buffer=SB: 150 ml
TrisCl, pH 9.5 100mM
NaCl 100mM
MgCl2 50mM
Tweeen20 0.1%
Material needed• formamide
• sheep serum (Sigma s-2263)
• ant-dig-UTP antibody (preabsorbed , see below)
• Tween 20
• 4xSSCT: dilute 20xSSC to 4xSSC and add Tween20 to 0.1%
5.6 Pre absorption of antibodiesembryos need not to be dechorionated1. fix embryos in 4% PFA/PTW 4 hrs at room temperature or at 4°C overnight2. wash 4 x 5 min in PTW3. store embryos in 100% MeOH at -20°C4. take 1 ml embryos and rehydrate by washing 3 x 5 min in PTW5. transfer embryos to 2 ml Eppendorf tube and homogenize in PTW with a pestle6. adjust volume to 1 ml PTW7. add 10 µl antibody (final: 1:100) and incubate by shaking at least overnight or store for several
days at 4°C8. spin down embryonic debris and sterile filter supernatant (cellulose acetate, 0.2 µm)9. resuspend embryonic debris in PTW, spin and sterile filter again.10. combine filtered antibody solutions, add 0.5 ml sheep serum and 200 µl 3% Sodium azide, and fill
up with PTW to 20 ml (final: 1:2000)
EMBO COURSE MEDAKA & ZEBRAFISH HEIDELBERG 75
11. store pre absorbed antibody at 4°C, it will be stable for 2-3 month
Comments: pre absorbed antibodies can be reused twice, zebrafish or medaka pre absorbed antibodies
work well also for staining of Drosophila embryos.
5.7 Adding the RNA probes to the insituPro robot
1. use 190ml Hybridization Mix + 10ml dig probe in 8-tube strips (PCR strips) (alternatively use 5mldigprobe +195ml HybMix)
2. put cap on strips and heat to 80 oC for 10min in PCR machine to denature the probe3. remove caps and put tube strips containing the denatured probes into robot
5.8 Running of the programThe program has been optimized to run efficiently with strong staining for approx. 20 hrs. It will
pause automatically and will wait for the addition of freshly prepared staining buffer (see above) in slotK. Push any key to continue.
5.9 Staining
List of material neededStaining buffer (see above)
BCIP (Roche)NBT (Roche)
1. take columns out of robot and stand in water filled transfer racks/ boxes (e.g.empty boxes fromArt 200 pipette tips)
2. transfer embryos into 24well dish by filling columns to the rim with SB (stainig buffer) then tiltingthem into the well already containing SB and make fluids surfaces contact
3. dissolve 4.5ml NBT per ml SB (final 337.5 mg/ml) and 3.5 ml per ml SB (final 175 mg/ml) and add toembryos after sucking off SB
4. stain in the dark without shaking up to 12h, monitor staining after 30 minutes, renew stainingsolution if necessary
5. to stop reaction: wash 3x 1min in PTW6. store in PTW+ ~1% PFA (3-5ml of 16% PFA for 50ml of PTW)
EMBO COURSE MEDAKA & ZEBRAFISH HEIDELBERG 76
5.10 Cleaning of the incubation columns
after each hybridization procedure according to Intavis instructions :
1. disassemble the columns, rinse the individual parts with water2. store them for about 12 hours in a solution of 0.1M NaOH3. rinse the parts again4. place the parts in a container filled with ethanol5. finally dry them in a drying cupboard for 1 hour at 50 oC maximum
ReferencesHauptmann G. and Gerster T. (1994). Two color whole-mount in situ hybridization to vertebrate and
Drosophila embryos. Trends Genet. 10: 266
EMBO COURSE MEDAKA & ZEBRAFISH HEIDELBERG 77
6. Whole mount RNA or protein detection
6.1 (Additional protocol) Whole mount in situ hybridization onzebrafish embryos using digoxigenin probes
(Alexander Schier)
Probe synthesisThis is essentially according to the method recommended by Roche Mannheim. Cut 10 ug of plasmid
DNA with appropriate enzyme in 100 µl. Phenol, phenol/chloroform, chloroform and ethanolprecipitate. Dissolve in 20 µl ddH2O.
1. Mix together 2 µl of linearised plasmid (1 µg of insert DNA); 2 µl of 10x transcription buffer (400mM Tris-HCl pH 8.0; 60 mM MgC12; 100 mM dithiothreitol; 20mM spermidine; 100 mM NaCl;RNase inhibitor 1 unit/µl); 2 µl of 10x nucleotide mix (10 mM each ATP, GTP, CTP; 6.5 mM UTP;with either 3.5 mM digoxigenin-UTP); 1 µl (20 units) of RNase inhibitor. Add 11 µl water to give a finalreaction volume of 20 µl and 2 µl (40 units) of the appropriate T7, T3 or SP6 RNA polymerase.Incubate the mixture for 2 hour at 37°C.
2. Add 2 µl (40 units) of DNase I and incubate at 37°C for 30 min. to remove the plasmid DNA.
3. Stop the reaction (optional) by adding 2 µl EDTA (0.2 M pH 8.0) and precipitate the RNA with2.5 µl 4 M LiCl, and 75 µl prechilled ethanol for 30 min on dry ice.
4. Spin down the pellet and redissolve in 100 µl of RNAse-free water. The probe can be checked byrunning 5 µl (should be about 500 ng) on a minigel. (As a "standard": 5 µl from tube 5 in kit correspondto 500 ng RNA). Probes are stored in aliquots at -20°C. Safest to store them in Hyb+ solution. We havehad success with probes of 0.5-2 kb and signals are stronger if they are not hydrolyzed prior to use(requires proteins K step!). I did not see any improvement by removing the nucleotides e.g. by NucTrapcolumns.
Preparation of embryosEmbryos are mixed during most incubations by pipetting up and down incubation media or by turning
on wheel. Heavy mixing or media/air interface contacts lead to damage of embryos.1. Embryos younger than 20 somites are best left non-dechorionated and fixed overnight (or
longer) in 4% paraformaldehyde/PBS at 4°C. Wash twice 5 min in PBS or PBT and dechorionatemanually.
2. After a few minutes of equilibration with 4-5 changes of methanol the embryos are stored at -20°C in glass specimen vials or Eppendorf tubes. (Embryos can be stored in this way forseveral months.)
EMBO COURSE MEDAKA & ZEBRAFISH HEIDELBERG 78
3. Rehydrate fixed embryos by soaking for 5 min each in 75% methanol + 25% PBT (lxPBS, 0.1%Tween 20); 50% methanol + 50% PBT; 25% methanol + 75% PBT. Young embryos (before 1S)seem to be rather fragile during rehydration!! Then 4x 5 min in 100% PBT.
4. Incubate embryos in proteinase K at room temperature (10 µg/ml PBT. I use -20oC aliquots of1mg/ml proteinase K in PBT. Dilute 100x before use). 5-10 min for pre 1S, 10-15 min pre 16h, 15-20 min post 16h. This step ideally should be titrated. Wash 2x PBT.
5. Refix embryos in 4% paraformaldehyde in 1x PBS for 20 min. at room temperature.6. Rinse 5x 5 min. in PBT.
Hybridization1. Prehybridize embryos in hybridization buffer (50% formamide, 5xSSC (pH 7.0), 500 µg/ml torula
(yeast) RNA, 50 µg/ml heparin, 0.1% Tween 20, 9mM citric acid to pH 6.0-6.5) for at least 1 hour(preferably for 4-5 h) at hybridization temperature (60-70°C). The hybridization temperature isdependent on the probe but we have obtained good signals with all our probes at 65-70°C in50% formamide. Zebrafish krox-20 and pax-b also work very well at 70°C in 65% formamide.
2. Replace prehybridization buffer with hybridization buffer containing probe. We use 150 ngdigoxigenin riboprobe in 200 µl hybridization solution (preheated) as a starting point.
3. Incubate overnight at 65-70°C in a 1.5 ml microfuge tube in a heating block or hybridization ovenor water bath. Probes are stable in hyb and can be reused several times.
4. Washes are all done at the hybridization temperature with preheated solutions. Mix after 5 minby turning tube. 10 min 75% hyb + 25% 2x SSC; 10 min 50% hyb + 50% 2x SSC; 10 min 25%hyb + 75% 2x SSC; 10 min 100% 2x SSC.
5. Wash embryos 2x 30 min. in 0.2x SSC at 70°C.6. Perform the following washes at room temperature: 5 min 75% 0.2x SSC + 25% PBT; 5 min 50%
0.2x SSC + 50% PBT; 5 min 25% 0.2x SSC + 75% PBT; 5 min 100% PBT.
Preabsorption of the anti-digoxigenin antibodies.The antibody must be pre absorbed against zebrafish embryos or adult zebrafish acetone powder
(Grind up several hundred day 2 embryos in minimal volume of egg water or freeze adult in liquidnitrogen and grind up. Add 4x vol. cold acetone, leave on ice for 30 min. Spin down 10k 10 min. DiscardS/N and wash again in acetone. Spin down, discard S/N and let embryo powder dry on filter paper.Pulverize and keep at 0.2% in 2 mg/ml BSA in PBT) Add 1 µl(0.75 units) antibody to 400 µl of 0.2%w/v zebrafish powder in 2 mg/ml BSA in PBT. Rotate sideways for at least 1 hour at room temperature,then spin in a microfuge before diluting to the desired concentration (1:2000). The diluted antibody isstable under these conditions at 4°C and we have reused it up to three times. Anti-Fluorescein antibodycoupled to HRP is used at a final 1:200 dilution of 0.15u/µl stock(i.e. twice as concentrated as anti-dig).
Antibody incubation and staining1. Block with 2 mg/ml BSA, 5% sheep serum in PBT for a minimum of 60 min.2. ncubate for 2 h at RT. or o/n at 4°C in 200 µl of a 1/2000 dilution (0.375 units/ml) of preabsorbed
sheep anti-digoxygenin-alkaline phosphatase conjugated Fab fragments or 1/200 (0.75 units/ml)anti-fluorescein-HRP in 2mg/ml BSA PBT.
3. Wash for at least 2 h in 2mg/ml BSA PBT with 8 solution changes.4. Equilibrate 3x 5 min in freshly made NTMT buffer (0.1 M Tris-HCl pH 9.5; 50 mM MgC12; 0.1 M
NaCl; 0.1% Tween 20). Stain with X-phosphate/NBT on shaker in dark (4.5 µl of 75 mg/ml NBT in
EMBO COURSE MEDAKA & ZEBRAFISH HEIDELBERG 79
70% dimethylformamide and 3.5 µl of 50 mg/ml X-phosphate in dimethylformamide added to 1 mlof NTMT buffer). Take care that embryos do not stick together.
5. Stop reaction with washes in PBT. krox-20 comes up within minutes, shh and gsc take longer.
Clearing and embedding1. Dehydrate 2x 5 min in methanol2. Clear in benzylbenzoate/benzylalcohol = 2:1. Precipitate will slowly dissolve (within few days) in
this solution. Keep in fridge. Mount in Permount and take pictures immediately after clearing.Embryos are very fragile.
Special Note:
no DEPC treated water used, all embryo incubation buffers (also where not specifically mentioned)except paraformaldehyde contain 0.1% Tween 20
Reagents
Dig RNA labeling mixture (10x) for 20 RNA samples Roche 1277 073Anti-Digoxygenin Fab fragment - alkaline phosphatase; 150 u Roche 1093 274T3 RNA polymerase; 1000 u + 10x buffer Roche 1031 163T7 RNA polymerase; 1000 u + 10x buffer Roche 881 767RNase inhibitor; 2000 u Roche 799 017DNase I; RNase free 10000 u Roche 776 785Proteinase K; 100 mg Roche 745 7231xPBS (2 l): 16 g NaCl; 0.4 g KCl; 2.88 g Na2HPO4; 0.48 g KH2PO4 pH 7.41xPBT: 1x PBS + 0.1% Tween 204% paraformaldehyde/PBS: 4 g in 100 ml PBS, dissolve at 68°C, add a few drops of 5N NaOH, checkpH 7.4. freeze -20°C20x SSC: 1 l: 175.3 g NaCl; 88.2 g sodium citrate pH 7.0
Hyb50% formamide5xSSC500 µg/ml torula (yeast) RNA Sigma 100g R-662550 µg/ml heparin0.1% Tween 209 mM citric acid(final pH is 6.0-6.5 !)BSA: 50g bovine albumin Sigma A-8022
Staining Buffer0.1 M Tris HCl pH 9.5; 0.1 M NaCl; 0.05 M MgCl2; 0.1% Tween 20
EMBO COURSE MEDAKA & ZEBRAFISH HEIDELBERG 80
500 ml: 6.05 g Trizma; 2.92 g NaCl; 25 ml 1M MgCl2; 5 ml 10% Tween 20; ca. 1ml 2M HCl to pH
9.5
Substrate solution50 ml staining buffer + 225 µl NBT (75 mg/ml NBT in 70% dimethylformamide) + 175 µl X-
phosphate (50 mg/ml X-phosphate in dimethylformamide)
6.2 (Additional Protocol) Antibody Staining in zebrafish(Schier, Neuhauss, Schulte-Merker, Solnica-Krezel, Holder, Hatta)
(Extensive washing protocol, found to reduce background significantly for HNK-1 staining). Good for24 hours and older. Gastrula stage embryos: might have to omit aceton permeabilization
day 1
1. Fix in 4% Paraformaldehyde in PBS 1h at RT.2. wash 4 times 5 minutes each in PBT pH 7.43. wash 1 time 5 minutes in ddH2O4. permeabilze for 7 minutes in aceton -20°C5. wash 1 time in H2O6. wash 1 time in PBDT (0.1% Tween 20, 1% DMSO in PBS)7. block in PBDT-10%NGS (PBDT plus 10% normal goat serum) for 100 minutes or more8. 1st antibody in PBDT-1%NGS o/n at 4°C on shaker (mab culture supernatants 1:1 to 1:50 ;
ascites 1:1000 to 1:10000 ; rabbit etc. serum 1:100 to 1:5000; optimal dilution needs to bedetermined for each antibody)
day 2
1. wash 2 times 1 minute and 6 times whole day in PBDT-1% NGS+0.1M NaCl, last wash in PBDT-1%NGS
2. 2nd antibody IgM (HNK-1) o/n 4°C at dilution of 1:1000 Vectastain Elite (in flies I used 1:500) inPBDT-1%NGS.
day 3
1. wash 2 times 1 minute and 5 times whole day (optional: and o/n in PBDT-0.1% NGS+0.1M NaCl)
day 4

EMBO COURSE MEDAKA & ZEBRAFISH HEIDELBERG 81
1. prepare ABC complex by incubating during last wash (30 min) 10 µl A + 10 µl B in 1 ml PBDT.2. wash 2x 30 min in PBDT.3. incubate embryos in ABCPBDT for 30-60 minutes4. wash 2 times 1 minute and 3 times 20 minutes in PBDTfor brown staining:5. wash in 100mM TrisCl buffer/Tween (10 ml 1M TrisCl pH 7.5 + 90 ddH2O + 100 µl 10% Tween20)
for 15 minutes (pH. 7.2 with acetic acid)6. stain with DAB/TrisCl solution (8.5 ml dH2O + 1 ml 1M TrisCl pH 7.5 , 0.1% Tween20 + 500 µl
10mg/ml DAB in Tris). 10-30 min preincubation, add 20 µl of 0.3% H2O2, follow under scope.7. stop by washing in Tris/Tween and PBDT.8. dehydrate in methanol, can leave o/n, clear in benzylbenzoate/benzylalcohol = 2/1, view in this
or mount in Permount
EMBO COURSE MEDAKA & ZEBRAFISH HEIDELBERG 82
6.3 (Additional protocol) Two color whole-mount in situhybridization in medaka/zebrafish
(M. Carl and J. Wittbrodt)
To simultaneously detect two messages in one embryo by whole mount in situ hybridization twodifferent RNA probes labeled with Digoxigenin-UTP and Fluoresceine-UTP respectively are hybridizedsimultaneously.
Detection is performed in two consecutive rounds.
The two colors used are Fast Red (weaker substrate) and NBT/BCIP (blue).
For best results the more abundant mRNA should be detected with a Fluoresceine-UTP labeled probein the first round of detection using Fast Red as a substrate.
Outline:
- Fix embryos
- Prepare RNA probe
- Dechrionate, wash and dehydrate embryos
- Check probe
- Rehydrate, proteinase K (or heat) treat, postfix andwash embryos
- Prehybridize and hybridize embryos
- Wash embryos
- Blocking and 1st AB incubation
- Wash embryos
- Detection
- 1st antibody removal
- 2nd AB incubation
- Wash embryos
- 2nd probe detection
- Fix, mount and take pictures
Fixation and storage of embryos
Reagents:PTW (2xPTW): 1x PBS (2xPBS), pH 7.5, add Tween20 to 0.1% and sterile filter (0.2 µm,
nitrocellulose).
EMBO COURSE MEDAKA & ZEBRAFISH HEIDELBERG 83
4% PFA: dissolve 16% paraformaldehyde in PBS by stirring and heating to 65°C, add dropwise 1 MNaOH until the solution gets clear (check pH ≈ 7.5), cool to room temperature and store at 4°C (for upto 4 weeks; if Medaka embryos do not stay clear but turn "milky" in MeOH prepare fresh 16% PFAstock). Mix with 3 volumes of 2xPTW just prior to use.
1. Separate embryos (only for medaka embryos) by rolling them gently in the petri dish or on asheet of Whatman-paper
2. Transfer separated embryos to a 25 ml glass vial and fix for 4 hrs at room temperature in 4%PFA/2xPTW by vigorously rocking on a shaker
3. Transfer embryos to a small petri dish and remove chorion with two forceps4. Transfer embryos back to glass vial and wash 4 x 5 min in 20 ml PTW5. Wash 5 min at room temperature in 100% MeOH6. Replace MeOH and store embryos at least over night at -20°C
Comments: MeOH treatment enhances probe penetration, a longer storage of embryos at -20°C inMeOH is advantageous. Set up fixed embryo stocks during periods of good egg laying.
RNA probe preparation
Reagents:NTP-Mix: ATP, CTP, GTP 15.4 mM each, UTP 10.0 mM (all Roche)
Digoxigenin-11-UTP 10 mM (Roche)
Fluorescein-12-UTP 10 mM (Roche)
RNasin 20-40 U/µl (Promega, Pharmacia)
T7-/SP6-/T3-RNA-Polymerase 20 U/µl (Roche)
5xTranscriptionbuffer (Stratagene)
DNaseI RNase-free 10U/µl (Roche)
STE: 100 mM NaCl/20 mM TrisCl, pH 7.5/10 mM EDTA
RNeasy (Qiagen)
Hybridization Mix-H2O
stock HYB-H2O
Formamide 100 % 5 ml
SSC 20 x 2.5 ml
Heparin 50 mg/ml 10 µl
Torula-RNA (Sigma) solid 50 mg
Tween20, 10 % 10 µl
Nylon-membrane (HybondN, Amersham)
PI: 100 mM TrisCl, pH 7.5/150 mM NaCl
PII: PBS/0.1% TritonX-100
PIII: 100 mM TrisCl, pH 9.5/100 mM NaCl/50 mM MgCl2
Anti-Digoxigenin-Fab fragments/Anti-Fluoresceine-Fab fragments (Roche)
EMBO COURSE MEDAKA & ZEBRAFISH HEIDELBERG 84
BCIP (Roche): 50 mg/ml in 100% DMF
NBT (Roche): 75 mg/ml in 70% DMF/H2O
1. Linearize 10 µg of template with a suitable enzyme allowing as transcription (blunt or 5-primeoverhang should be preferred to avoid snap back effects)
2. Purify template from enzyme and digestion buffer (QiaQuick nucleotide removal kit, Qiagen)3. Control for a complete digest on an agarose gel4. Add in the following order to a total volume of 20 µl:
linearized template 1 µg100 mM DTT 2 µlNTP-Mix 1.3 µl10 mM Dig-UTP/Fluorescein-UTP 0.7 µlRnasin 0.5 µl5xTranscriptionbuffer 4 µlH2O ad 19 µlRNA-Polymerase 1 µl
5. Incubate for 2 hrs at 37°C6. Add 1 µl DNaseI and incubate for another 15 min at 37°C7. Add 50 µl H2O8. Purify RNA using the Quiagen RNeasy kit (fast, relatively cheap)9. Elute the RNA from the column with 2x25 µl elution buffer10. Take an aliquot of 1-2 µl and load in formamide loading buffer onto a TAE agarose gel (prepared
from RNase free stocks) followed by 1 hr blotting to a nylon-membrane (HybondN, Amersham)11. Incorporation of Dig-/Fluorescein-UTP is controlled by 1 µl aliquots of a dilution series (1:1, 1:10,
1:50, 1:100, 1:500) on a nylon-membrane (HybondN, Amersham)12. Dried membranes are equilibrated for 1-2 min in PI13. Block membrane for 30 min in PII by gentle shaking14. Incubate membrane 30 min in 1:2000 dilution of antibody (Anti-Digoxigenin or Anti-Fluoresceine
respectively) in PII (≥0.2 ml/cm2)
15. Wash twice 15 min each in PI (≥1 ml/cm2)16. Incubate membrane 2 min in PIII17. Stain membrane for 5 min in 4.5 µl/ml NBT and 3.5 µl/ml BCIP in PIII18. Wash 1-2 min in PII and take picture
A good probe should give a signal at 1:500 dilution after 2-3 min19. Dilute probe in 150 µl Hyb-H2O and store at -20°C
Comments:
As a rule of the thumb 1 µl of the probe in Hyb-mix will give a good staining.
Probes from 0.4 - 2.5 kb were used successfully with this protocol, short probes below 0.4 kb willgenerate much background although this varies with the specificity of each probe and may be worth beingtried.
Hydrolysis of the probe might be required in a few exceptional cases.
EMBO COURSE MEDAKA & ZEBRAFISH HEIDELBERG 85
Proteinase digestion and postfixation
Reagents:ProteinaseK: prepare a stock solution of 20 mg/ml and store frozen aliquots at -20°C, dilute 1:2000
just prior to use to a final concentration of 10 µg/ml in PTW
4% PFA see above
All steps are performed at room temperature on a shaker except the digestion itself, volumes ofsolutions used per well are 3-5 ml
1. Transfer embryos of different stages to a 6-well cell culture dish2. Rehydrate 5 min in 75% MeOH/PTW3. Rehydrate 5 min in 50% MeOH/PTW4. Rehydrate 5 min in 25% MeOH/PTW5. Rinse 2 x 5 min each in PTW6. Digest with ProteinaseK (10 µg/ml in PTW) without shaking for several minutes depending on the
stage of the embryos7. Rinse 2 x shortly in freshly prepared 2 mg/ml glycine/PTW8. Fix in 4% PFA/PTW for 20 min9. Wash 5 x 5 min in PTW
Comments: The proteinaseK-digestion is a critical step of this protocol and will substantiallyinfluence the quality of the whole mount in situ, thus, times of digestion have to be optimized for eachproblem. The following list of digestion times worked well in our hands and can be used as guideline
stage* time of proteinaseK digestion
1 - 13 1 - 2 min
14 - 16 3 - 4 min
17 - 20 5 min
21 - 24 7 min
25 - 30 10 - 15 min
> 30 > 15 min
* stages are referred to Yamamoto, Medaka (Killifish), Biology and Strains,
Keigaku Publishing Company, Tokyo, Japan
Embryo pretreatment by heat denaturation(as an alternative to ProteinaseK treatment)
1. rehydrate embryos in the glass scintillation vial as outlined above.have the embryos in 6 ml 1xPTW
5. heat waterbath to 100°C, when boiling, turn it off6. put glass scintillation vial into a styrofoam-float, gently agitate embryos and incubate in the
waterbath for 5 min (gentle agitation every 1.5 min during the incubation prevents embryos fromsticking together).
7. chill on ice to cool down to RT (shake gently)8. ready

EMBO COURSE MEDAKA & ZEBRAFISH HEIDELBERG 86
Hybridization
Buffers and Solutions
Heparinmake a stock of 50 mg/ml in H2O, store at -20°C
Hybridization Mix:50% formamide (Fluka, ultra pure), 5xSSC, 50 µg/ml heparin, 0.1%Tween20, 5 mg/ml torula RNA,
store at -20°C,
for 50 ml of Hyb-Mix:
stock Hyb-mixFormamide 100 % 25 mlSSC 20 x 12.5 mlHeparin 50 mg/m l50 µlTorula-RNA (Sigma) solid 250 mgTween20 10 % 500 µlH2O ad 50 ml
All steps are performed in a water bath preheated to 65°C1. Transfer embryos to 2 ml Eppendorf tubes2. Prehybridize 1-2 hrs in 1 ml Hyb-Mix at 65°C3. Denature probe (1-5 µl/100µl Hyb-Mix, as a rule of the thumb 1 µl of the probe will give a good
staining) in 100 µl of Hyb-Mix (use 200 µl when larger amounts of embryos are hybridized) for10 min at 80°C
4. Remove prehybridization solution leaving embryos slightly covered to avoid their destruction, theembryos are very sensitive at 65°C
5. Quickly add hybridization probe, mix gently and hybridize at 65°C overnight
Comments: The right amount of probe has to be evaluated for each newly prepared probe, usually 1µl of a tested probe per 100 µl Hyb-Mix works well.
Washes
Reagents:4xSSCT: dilute 20xSSC to 4xSSC and add Tween20 to 0.1%
All steps are performed in a water bath, all wash solutions are prewarmed to 65°C1. Wash embryos 2 x 30 min in 2 ml 50% formamide/2xSSCT at 65°C2. Wash embryos 15 min in 2 ml 2xSSCT at 65°C3. Wash embryos 2 x each 30 min in 2 ml 0.2xSSCT at 65°C
EMBO COURSE MEDAKA & ZEBRAFISH HEIDELBERG 87
Detection
Reagents:
• Fast Red tablets: (Roche)
• BCIP (Roche): 50 mg/ml in 100% DMF
• NBT (Roche): 75 mg/ml in 70% DMF/H2O
• SB: 100 mM TrisCl, pH 9.5, 100 mM NaCl, 50 mM MgCl2, 0.1%Tween20
• for 50 ml of SB add:
stock 1xSBTrisCl, pH 9.5, 1 M 2.5 mlNaCl, 5 M 1.0 mlMgCl2, 1 M 2.5 mlTween20 10 % 500 µlH2O ad 50 ml
RSB: 0.1 M TrisCl, pH 8.2, 0.1% Tween 20
Primary stainingAll steps are performed on a shaker except the staining reactions
1. Block embryos 1(-2) hrs with 1-2 ml of 5% sheep serum/PTW at room temperature2. Incubate embryos for 1(-2) hrs in 200 µl pre absorbed anti-Fluorescein-AP Fab fragments at a 1
: 2000 dilution in PTW3. Transfer embryos to a 6-well dish and wash 6 x 10 min while shaking in PTW at room
temperature (one wash can be performed at 4°C overnight)4. Equilibrate 2 x 5 min in 0.1 M TrisCl, pH 8.2/0.1%Tween5. Dissolve Fast Red tablets in RSB (2 ml/tablet) and sterile filter (0.2 µm) to remove particles6. Add staining solution to embryos and stain in the dark without shaking for up to 48 hrs, replace
staining solution several times7. Wash 3 x 5 min in PTW8. If no second staining is required mount embryos
Removal of antibodyAll steps are performed on a shaker at room temperature
1. Incubate embryos 2 x 10 min in 0.1 M glycine/HCl, pH 2.2/0.1%Tween2. Wash 4 x 5 min in PTW
Secondary stainingAll steps are performed at room temperature on a shaker except the staining reaction
1. Transfer embryos to a 2 ml Eppendorf tube2. Incubate embryos for 2 hrs in 200 µl pre absorbed anti-Digoxigenin-AP Fab fragments at a
1:2000 dilution in PTW3. Transfer embryos to a 6-well dish and wash 6 x 10 min in PTW while shaking4. Equilibrate embryos 2 x 5 min in SB5. Dissolve 4.5 µl NBT (final: 337.5 µg|ml) and 3.5 µl BCIP (final 175 µg/ml) per ml SB and add to
embryos6. Stain up to 48 hrs in the dark without shaking

EMBO COURSE MEDAKA & ZEBRAFISH HEIDELBERG 88
7. Wash 3 x 5 min each in PTW
Comments: embryos in PTW can be restained after equilibration in SB and application of stainingsolution, stained embryos can be stored in PTW at 4°C for several days up to two weeks, which willreduce the background
8. Optionally refix embryos in PFA/PTW and wash 3x in PTW before mounting
Mounting1. Separate embryos from yolk in PTW2. Transfer embryos to 87% glycerol3. Leave in 87% glycerol at least overnight for complete equilibration4. Mount in 87% glycerol in viewing chamber and take pictures
Comments: Glue one or two small coverslips respectively on a microscope slide (with super glue) toprepare a viewing chamber.
Additional hints
Preabsorption of antibodiesEmbryos need not to be dechorionated
1. Fix embryos in 4% PFA/PTW 4 hrs at room temperature or at 4°C overnight2. Wash 4 x 5 min in PTW3. Store embryos in 100% MeOH at -20°C4. Take 1 ml embryos and rehydrate by washing 3 x 5 min in PTW5. Transfer embryos to 2 ml Eppendorf tube and homogenize in PTW with a pestle6. Adjust volume to 1 ml PTW7. Add 10 µl antibody (final: 1:100) and incubate by shaking at least overnight or store for several
days at 4°C8. Spin down embryonic debris and sterile filter supernatant (cellulose acetate, 0.2 µm)9. Resuspend embryonic debris in PTW, spin and sterile filter again.10. Combine filtered antibody solutions and fill up with PTW to 20 ml (final: 1:2000)11. Store pre absorbed antibody at 4°C, it will be stable for 2-3 month
Comments: Preabsorbed antibodies can be reused twice, zebrafish or medaka pre absorbed antibodieswork well also for staining of Drosophila embryos.(?vice versa?)
Reference:Hauptmann G. and Gerster T. (1994). Two color whole-mount in situ hybridization to vertebrate and
Drosophila embryos. Trends Genet. 10: 266.
EMBO COURSE MEDAKA & ZEBRAFISH HEIDELBERG 89
6.4 (Additional protocol) Immunohistochemistry inmedaka/zebrafish
(R. Köster & J. Wittbrodt)
Immunohistochemistry can be combined with the in situ protocol if the antibody to be used is able todetect its epitope even after proteinase K treatment (e.g. AB to acetylated tubulin, anti isl-AB) This hasto be determined experimentally. If the epitope is stable and abundant enough even 3 color detections(red, blue, green; immunodetection after two-color in situ hyb) are possible using NBT/BCIP, FastRedand naphtol-AS-GR-phosphate/Fast Blue BN (Roche multicolor detection set).
In every case in situ hybridization if performed first because there is probably no way to performimmunohistochemistry with RNase free reagents!!
Alternatively, if detection is to be performed on early stages of development (1 cell to 100% epiboly)in situ hybridization can be done omitting the proteinaseK step, which will allow to use a wider range ofantibodies in the immunohistochemistry.
Instead of using secondary antibodies coupled to alkaline phosphatase of course peroxidase coupledantibodies can be used. We prefer phosphatase coupled antibodies because one can extend the stainingtime up to 48 hrs without dramatically increasing the background.
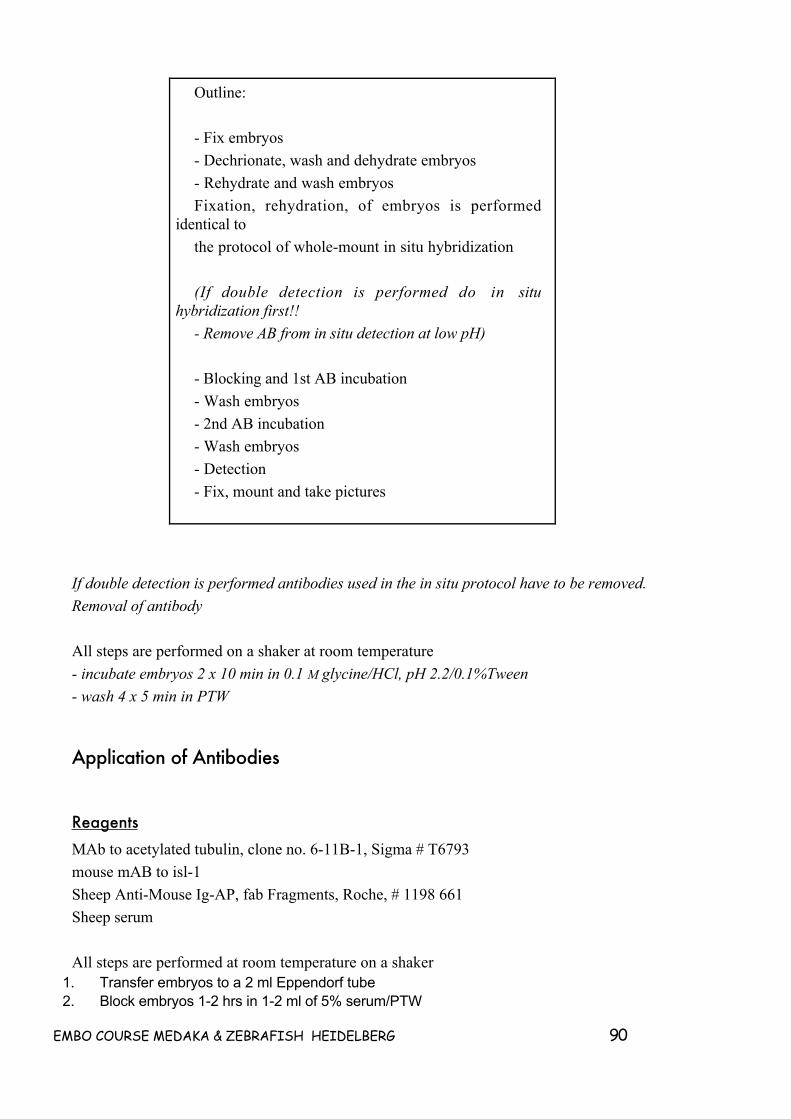
EMBO COURSE MEDAKA & ZEBRAFISH HEIDELBERG 90
Outline:
- Fix embryos
- Dechrionate, wash and dehydrate embryos
- Rehydrate and wash embryos
Fixation, rehydration, of embryos is performedidentical to
the protocol of whole-mount in situ hybridization
(If double detection is performed do in situhybridization first!!
- Remove AB from in situ detection at low pH)
- Blocking and 1st AB incubation
- Wash embryos
- 2nd AB incubation
- Wash embryos
- Detection
- Fix, mount and take pictures
If double detection is performed antibodies used in the in situ protocol have to be removed.
Removal of antibody
All steps are performed on a shaker at room temperature
- incubate embryos 2 x 10 min in 0.1 M glycine/HCl, pH 2.2/0.1%Tween
- wash 4 x 5 min in PTW
Application of Antibodies
ReagentsMAb to acetylated tubulin, clone no. 6-11B-1, Sigma # T6793
mouse mAB to isl-1
Sheep Anti-Mouse Ig-AP, fab Fragments, Roche, # 1198 661
Sheep serum
All steps are performed at room temperature on a shaker1. Transfer embryos to a 2 ml Eppendorf tube2. Block embryos 1-2 hrs in 1-2 ml of 5% serum/PTW
EMBO COURSE MEDAKA & ZEBRAFISH HEIDELBERG 91
3. Replace blocking solution by 500 µl of diluted (MAb to acetylated tubulin, 1:1000) first antibody in5% serum/PTW and incubate for 2 hrs (alternatively at 4°C overnight)
4. Transfer embryos to 6-well dish5. Wash 6 x 15 min in PTW6. Transfer embryos to a fresh 2 ml Eppendorf tube and apply 200-500 µl of diluted (in our case:
1:200) pre absorbed secondary antibody coupled to alkaline phosphatase in 5% serum/PTW andincubate for 2 hrs (alternatively at 4°C overnight)
7. Transfer embryos to a 6-well dish8. Wash 6 x 15 min in PTW
Comments:
The optimal dilution of primary and secondary antibody has to be established for each antibody tominimize the background and can range from 1:20 up to 1:5000. An established dilution for commerciallyavailable secondary antibodies will stay constant; the volume of wash solution in 6-well cell culture dishis 3-5 ml
Detection
Reagents:BCIP (Roche): 50 mg/ml in 100% DMF
NBT (Roche): 75 mg/ml in 70% DMF/H2O
Fast Red tablets: (Roche)
RSB: 0.1 M TrisCl, pH 8.2, 0.1% Tween 20
SB: 100 mM TrisCl, pH 9.5, 100 mM NaCl, 50 mM MgCl2, 0.1%Tween20
for 50 ml of SB add:
stock 1xSBTrisCl, pH 9.5 1 M 2.5 mlNaCl 5 M 1.0 mlMgCl2 1 M 2.5 mlTween20 10 % 500 µlH2O ad 50 ml
All steps are performed at room temperature on a shaker except the staining reaction
Fast Red staining1. Equilibrate embryos 2 x 5 min in 0.1 M TrisCl, pH 8.2/0.1%Tween2. Dissolve Fast Red tablets in RSB (2 ml/tablet) and sterile filter (0.2 µm) to remove particles3. Apply staining solution to embryos and stain without shaking in the dark up to 48 hrs, replace
staining solution several times4. To stop the staining reaction wash 3 x 5 min in PTW
NBT/BCIP staining1. Equilibrate embryos 2 x 5 min in SB

EMBO COURSE MEDAKA & ZEBRAFISH HEIDELBERG 92
2. Dissolve 4.5 µl NBT (final: 337.5 µg|ml) and 3.5 µl BCIP (final 175 µg/ml) per ml SB and apply toembryos
3. Stain up to 48 hrs in the dark without shaking4. Wash 3 x 5 min in PTW
Comments: Embryos in PTW can be restained by equilibration in SB and application of stainingsolution, stained embryos can be stored in PTW at 4°C for several days up to two weeks, which willreduce the background
Mounting1. Separate embryos from yolk in PTW2. Transfer embryos to 87% glycerol3. Leave in 87% glycerol at least overnight for complete equilibration4. Mount in 87% glycerol in viewing chamber and take pictures
Comments: Glue one or two small coverslips respectively on a microscope slide (with super glue) toprepare a viewing chamber.
Additional hints
Preabsorption of antibodiesEmbryos need not to be dechorionated
1. Fix embryos in 4% PFA/PTW 4 hrs at room temperature or at 4°C overnight2. Wash 4 x 5 min in PTW3. Store embryos in 100% MeOH at -20°C4. Take 1 ml embryos and rehydrate by washing 3 x 5 min in PTW5. Transfer embryos to 2 ml Eppendorf tube and homogenize in PTW with a pestle6. Adjust volume to 1 ml PTW7. Add 10 µl antibody (final: 1:100) and incubate by shaking at least overnight or store for several
days at 4°C8. Spin down embryonic debris and sterile filter supernatant (cellulose acetate, 0.2 µm)9. Resuspend embryonic debris in PTW, spin and sterile filter again.10. Combine filtered antibody solutions and fill up with PTW to desired dilution.11. Store pre absorbed antibody at 4°C, it will be stable for 2-3 month
Comments: Preabsorbed antibodies can be reused twice
EMBO COURSE MEDAKA & ZEBRAFISH HEIDELBERG 93
7. Tansplantation techniques
7.1 (General thoughts) Single cell transplantation in zebrafish
Overview(Source: R. Ho)
Successful cell transplantation in zebrafish embryos requires a steady hand, a calm spirit, and aknowledge of embryonic anatomy. In addition, concern for the continued good health of the embryos andaddition of penicillin and streptomycin to all media are necessary.
Unless one plans to perform transplantation of cells within an individual embryo, separate groups ofdonor embryos and host embryos are needed. Ordinarily, one should label one of the groups of embryos(usually the donors) so that after transplantation, the transplanted cells can be distinguished from hostcells. We have had great success with the family of highly fluorescent dextran compounds, in particular,rhodaminated-dextran, although fluoresceinated-dextran also works. Donor embryos are labeled withglass micropipettes. A pipette is filled with the dye solution and attached to an apparatus that forces thedye out of the pipette with air pressure. The tip of the pipette is then gently broken off, generally bytouching it to a pre-shaped glass rod, and inserted into the yolk cell of a donor embryo immersed in 30%Danieau’s in a depression slide. A small amount of dye is then expelled into the yolk before withdrawingthe pipette. Dye injected before the third cleavage division will be distributed throughout the blastodermvia the cytoplasmic bridges between cells within the embryo. See Blastomere Lineage Analysis, for moredetailed methods.
The technique of transplanting cells has taken us many years to perfect and involves the use ofspecialized transplantation pipettes formed from glass capillaries. Considerable "hands on" skill isrequired for production of the transplantation pipette. The capillaries are pulled to fine tips on aFlaming-Brown electrode puller. The tips are either broken off at an angle using a hand-held razor bladeor beveled with a commercial beveler and then fire polished with a micro-forge. Frequently, a sharp'spear-tip' is tooled onto the end of the pipette by briefly touching the pipette to the hot wire of themicroforge and drawing out the molten glass into a shape resembling that is shown in the figure. Thissharp spear-tip is useful for penetrating the outer epithelium of the embryo. A smooth and symmetricalpipette tip is required for successful transplantation. Ideally, the inner diameter should equal thediameter of the transplanted cells. For this reason, pre-formed transplantation pipettes with variousdiameters should be prepared.
During cell transplantation, arrange the labeled donor embryos and non-labeled host embryos on adepression slide in 3% methyl cellulose or 1.2% agar dissolved in 10% modified Hank's medium andcover with just enough medium to keep them wet. Fill the transplantation pipette with mineral oil andattach it to an oil-filled Hamilton syringe with polyethylene tubing. Mount the transplantation pipetteonto a micro-manipulator and position within the labeled donor embryo. Draw cells into the pipette withsuction from the Hamilton syringe. Withdraw the pipette, now containing labeled donor cells, and insert
EMBO COURSE MEDAKA & ZEBRAFISH HEIDELBERG 94
it into the non-labeled host embryo and expel the transplanted cells. Carefully withdraw the pipette fromthe host embryo and maintain this embryo with standard procedures.
Random Thoughts on Sutter Pipette Pullersfrom Scott Fraser, edited by Eliza Shah 7/29/94.
A typical pull cycle:
1. The glass is held at a weak "pull".
2. The heater melts the glass.
3. When the melting glass is stretched at rate set by "velocity",
the heater is turned off,
the strong pull begins, and
a puff of air is delivered to cool the glass more quickly.
Parameters Defined:
Heat (range 0-999) The current that passes through the heating ribbon. A ramp test should be run todetermine the heat setting needed to melt the glass being used, and settings should be within about 50 ofthe ramp test result. Warning: different filament will burn out at different heat settings. In general, thebox filaments will burn out at settings in the 800's and the trough filaments will burn out at settings in thehigh 400's.
Velocity (range 0-255) A measure of the fluidity of the glass, used as the threshold for the strong pull.Some pullers measure position instead of velocity, which is less accurate.
Time (range 0-255) The duration of a puff of air delivered to the glass and filament to cool the glass.This cooling permits the puller to form very sharp-tipped pipettes that are not long and whippy. Toolittle cooling may make tip too long and easy to plug, too much can cause the pipette tip to break with alarge opening for the tip.
Pull (range 0-255) The strength of the strong pull, applied by an electromagnet. Rule of Thumb:
Longer needles result from:
Heating the glass quickly
Pulling the glass more strongly
Higher velocity settings
Shorter tapers result from more cooling
EMBO COURSE MEDAKA & ZEBRAFISH HEIDELBERG 95
Complex programs of nested pulling steps can be created. Many of our programs stretch the glass to awaist (hour glass shaped) by applying heat but no strong pull, then a second step with a strong pullcreates the tip
7.2 Following cells in Fish(contributed by Don Kane)
IntroductionWhat with their genetics, zebrafish have become the Drosophila of the vertebrates. But these little fish
have many other advantages. As the developmental biologists of the mid- 20th century knew (1),zebrafish are superb for observational studies of development. Their eggs are fertilized externally, so thatit is a simple matter to have the embryos on a compound microscope a few moments after fertilization.There, the transparent embryo reveals the early cell cleavages of the blastula, the cell movements of thegastrula, or, later, the forming internal organs of the larva. In situ hybridization and antibody reactions aredone as whole mounts, for sectioning can be done later, if at all. And if lineage tracer is injected into cells,as we describe in this chapter, the cells can be recorded for days and sometimes weeks afterwards.
The technique of moving about pieces of tissue from embryo to embryo has been an essential part ofdevelopmental biology for nearly a century. By placing developing cells into ectopic positions, we testthe potential of the transplanted cells to develop into fates appropriate for the new position. Thesetechniques, described in this chapter, are essential for connecting the developmental biology of thezebrafish to that of more traditional experimental vertebrates, such as Xenopus and chick, and are alsonecessary for the analysis of gene action in the zebrafish mutants.
In this chapter we first describe some of the general methods for injecting lineage tracers in to theembryo. These techniques can be used for creating labeled embryos (for later experiments) or fordetermining cell fate. Next we describe methods for moving cells from one embryo to another, methodsthat are used to test cell fate or cell autonomy. Lastly, we describe methods for the analysis of theseexperiments.
Many of the methods we describe are imagined as difficult stuff, performed by those possessing calmtemperaments and quiet hands. In fact, we have introduced some of these methods into undergraduatelaboratory sessions, where students, after dechorionating embryos with watchmaker forceps, label cellswith hand held pipettes controlled by breath pressure, and later move cells about with small pieces ofcactus spines and broken glass. Most who attempt these techniques a few times will have them working.In fact, the ultimate challenge is not performing the manipulations themselves, but analyzing andinterpreting the huge amount of data often produced from seemingly small and simple experiments.
7.3 Cell labeling techniquesFate maps define what cells at some early stage later become. These maps are a starting point for the
description of the normal development of the embryo. The labeling techniques described in this
EMBO COURSE MEDAKA & ZEBRAFISH HEIDELBERG 96
subsection are used to construct these maps, and are the methods used for the now classic Kimmel Wargaand Schilling fate map of the zebrafish blastula (2). Still, much fate mapping remains in progress, either offiner regions or later stages (3-7). Much of this new work is motivated by the expression patterns of newcloned genes in zebrafish, where we wonder where fate lie in these expression patterns; other work ismotivated by mutants that change expression patterns, where we wonder if fates are changed as well.Thus, in both cases, to properly answer the question, we must label cells and ask what they become.
Fluorescent and biotinylated dextran conjugates are the molecules of choice for labeling blastomeres ofzebrafish embryos (Table 1). Having a high molecular weight, good water solubility and low toxicity,dextrans are hydrophilic polysaccharides that are stable in the intracellular space. Because dextranconjugates are membrane impermeable, they can be kept in clonal progeny of labeled blastomeres formany days, and, for some early differentiating cells, several weeks.
With a bright red fluorescence, the photostable tetramethylrhodamine dextran is the preferred dye forrepeated observation with epi-illumination. While the fluorescein dextrans are often used as a secondcolor, the photostability of the fluorescein conjugates is not as high as that of tetramethyrhodaminedextran and prolonged exposure causes substantial photodamage to the cells, making the dye lessdesirable for repeated observations by fluorescent microscopy. A rhodamine derivative, RhodoB, is nowavailable that fluoresces with the fluorescein filter set, and this new dye may be a partial replacement forfluorescein. Another alternative color is Texas Red, which can be seen on the rhodamine filter set.Cascade Blue, which uses the UV DAPI/Hoechst filter set, seems an obvious third color; however, itsuse as a vital dye is somewhat limited because of its UV excitation wave length, which is cytotoxic, andits blue emission, which is invisible to many intensified cameras. Note that most of these dyes come inlysine-fixable versions, allowing covalent linkage to surrounding tissue during fixation.
Due to their low diffusion, newer fluorescent and biotinylated dextrans of super high molecular weight(500,000 and 2,000,000 MW) are particularly useful for fate-mapping blastomeres of the early stageembryo. The lower molecular weight dextrans, under 50 MW, leak from blastomeres during early stages,when the cells are cytoplasmically bridged to the yolk, and then leak from the yolk and label otherblastomeres. Another advantage of the large MW dyes is that they are excluded from the nuclei, allowingcounterstaining of nuclei to visualize nuclear labels. However, clogging needles and low solubility limitsomewhat the convenience of the large molecular weight dyes.
For particularly difficult injection locations, the so called DMNB-caged fluorescein (MolecularProbes, Eugene, Oregon) dextrans can be used to label portions of the embryo. These dyes are injected atearly developmental stages, and then later the target cells, which may be small or buried in tissue, arephoto-activated with UV, uncaging the fluorescent molecule. Some of these dyes are fixable, e.g., theuncaged fluorescein can be late visualized with the normal antibody against fluorescein.

EMBO COURSE MEDAKA & ZEBRAFISH HEIDELBERG 97
Table 1. Common Vital Dyes and Terminolgy.
Rhodomine(tetramethyl-rhodomine)
Vital fluorescent dye; Red color when excited with green light; Good for lightintensifiers with sensetivities biased toward infrared; excellent resistance tophotobleaching and phototoxicity.
RhodoB Vital fluorescent dye; green color when excited with blue light; good resistance tophotobleaching and phototoxicity.
Texas Red Vital fluorescent dye; Red color when excited with green light; Good for lightintensifiers with sensetivities biased toward infrared; excellent resistance tophotobleaching and phototoxicity.
CascadeBlue
Vital fluorescent dye; Blue color when excited with UV light; Poor for light intensifierswith sensetivities biased toward infrared; excellent resistance to photobleaching andbut UV is toxic over intervals used for time lapse.
Fluorescein(fluoresceinisothiocynide)
Vital fluorescent dye; Green color when excited with blue light; Good for lightintensifiers with sensetivities biased toward infrared; poor resistance tophotobleaching; moderate phototoxicity
photoactivatabledyes.xxx
Vital fluorescent dye; little initial fluorescence; after ‘activation’ with UV light, the dyegives a green color when excited with blue light.
DiO, DiI Lipohilic dyes for marking cell membranes.
Biotin Added to lineage cocktail for later fixation, amplification with avidin-biotin andvisuation with horseradish peroxidase color reaction.
10 000 MW Normal weight for lineage analysis
70 000 MW High weight for lineage analysis of marginal blastomeres at 16 to 64 cell stage.
2000 000MW
Ultra high weight for lineage analysis of 2 to 16 cell stages.
Dextran Sugars covalently bound to tracers to increase molecular weight.
Anionic,Cationic
Charge on dextrans to aid in electrophrosing tracers into cells. Neutal dyes are fine forsimple pressure injection
Labeling whole embryos with lineage tracer dyesFor transplantation techniques, cells from donor embryos must be marked to distinguish them from
host cells. In classic work, this labeling was achieved by using donors possessing different geneticcharacteristics, such as different cytological characteristics (8) or lack of pigment color (9). These days,whole embryos are labeled by injecting fluorescent and biotinylated dextrans into the yolk prior to the 16cell stage (Figure 1). When the blastomeres of the early embryo are cytoplasmically continuous with theyolk, low molecular weight tracer dyes mix with cytoplasm amongst the yolk platelets and rapidly moveinto blastomeres carried by the early cytoplasmic streaming of the embryo. Clutches containing mutantembryos can be sub-divided into a number of groups of embryos, and each group labeled with a differentcolor, leaving one group unlabeled for later use as hosts. Embryos, later be used for transplantation, mustbe dechorionated, either manually with watchmaker forceps or enzymatically with 0.5 mg/ml ofProteinaseK.

EMBO COURSE MEDAKA & ZEBRAFISH HEIDELBERG 98
Protocols 1 and 2 are appropriate for large scale injections,where hundreds of embryos can be labeled in a single sitting. Withlittle modification, this method is also appropriate for injection ofDNA and RNA constructs, or for the injection of pharmaceuticalagents that that do not readily enter the embryo, such as ethanol,alpha amanitin or cytochalasin B. Alternate steps are outlined forsmall scale injections, where tens of embryos are injected, forwhich we prefer to manually dechorionate the embryos and theninject them in an agar bottomed Petri dish.
With the appropriate lineage tracers, this method can beextended to a crude sort of lineage technique. If a singleblastomere is injected with dyes that have molecular weights inthe 70 000 kD size range, or in the case of the 2 to 4 cell stage, the2000 000 kD size range, the dye only very slowly diffuses intothe adjacent cells, effectively labeling the progeny of the targetedcell. For general lineage work, these clones are too large to analyzebecause of the large region of fluorescent label which occludes
underlying cells, and because these early clones contribute to themajority of the tissues of the embryo. However, the method isvery useful as a teaching aid (10), and in certain experiments, it is
useful in the marking of co-injected DNA or RNA constructs (11).
Protocol 1. Agarose plates for holding embryos
Equipment and reagents• 60 or 100 mm plastic Petri dishes
• 1.5% agarose solution (in E2 medium). (Check note on agar media in Table 2)
• Plastic mold or glass 1 mm to 1.5 mm capillary pipettes or glass depression slides.
Method1. Pour liquefied 1.5% agarose into plastic Petri dish to a depth of about 5 mm.2a. Float a plastic mold into the agarose taking care to avoid trapping air bubbles below the mold.2b Alternate. Float several capillaries (1 mm to 1.5 mm diameter) in the liquid agar.2c Alternate. Tip a thick glass microscope slide (such as a depression slide) from the bottom of the
dish to the edge, to form a trough in the liquid agar.3. When the agarose is completely solidified, gently lift the mold or capillaries or slide away from
the agarose using coarse forceps or a sturdy needle.
_______________________________________
_______________________________________
Fig. 1: Single cell injection
EMBO COURSE MEDAKA & ZEBRAFISH HEIDELBERG 99
Protocol 2. Early Cleavage Injections
Equipment and reagents• Dissecting microscope, equipped with transmitted light.
• Micropipettes. Make micro pipettes from 1.0 or 1.2 mm thin walled glass capillary glass withfilaments (e.g. TW120F-4 from World Precision Instruments) The capillary is pulled by an electrodepuller (e.g. Flaming Brown) to produce a fine needle on the tip. This needle should be thick enough topenetrate the chorion without breaking, but thin and long enough (about 10 µm thickness and 1 mmlength) so the embryos are not dragged when the needle is withdrawn from the chorion. In thealternate method, (not penetrating the chorion) the needle can be thinner.
• Micromanipulator. One movement should be set so that the micro pipette moves parallel to theinjection needle.
• Micro injector. Most pressure injectors will work; we prefer models that are compact and manuallycontrolled. A simple and adequate setup is that by ASI with a pressure gauge, a switch (for pressureon/off), and mechanical pressure regulator. The unit should be able to attain 50 PSI.
• Agarose plates (Protocol 1)
• Fine forceps
Method1a. Place 1-16 cell stage embryos with chorions in the holes or slots in the agarose plate. If holes,
each hole can hold 1 embryo. As much as possible, remove extra medium on the agarose platewith a pipette. Embryos will be held firmly in the holes by the surface tension of the medium.
1b. Alternate. Dechorionate the embryos and place in an agar mold, or on a plain agar plate. In thiscase do not remove extra media.
2. Fill the micropipette with the dye solution. The capillary will draw the solution to the tip of thepipette. Special thin gel loader tips (e.g. Eppendorf Micro loader) are sometimes useful for thisstep. This step can be done the evening before the injections and the needles stored in a humidchamber; extra time helps the tips fill better and allows air bubbles at the tip of the pipette toescape.
4. Set the micropipette in the needle holder connected to the pressure injector.5. Break the tip of the micropipette with forceps or by touching lightly against a piece of cover slip.6. Place the tip in a droplet of mineral oil, and work the injector to make a small droplet of dye
solution. Adjust output pressure and injection time, so that the size of the droplet is between 50-60 µm (roughly 1/10 the diameter of the yolk cell).
7. Place the agarose plate with embryos on the stage. Move the micropipette tip to penetrate thechorion and place the tip at the center of the yolk by using the micromanipulator and/or bymovement of the agarose plate.
8. Inject the dye solution by pressure, and withdraw the micropipette from the embryo.9. Repeat steps 6-8 for each embryo.10. Add E2 medium on the agarose plate. Collect and transfer the embryos from the agarose plate to
Petri dishes containing E2 medium.11. Incubate the injected embryos away from direct light.
_______________________________________
Labeling individual blastomeres after 256 cell stageCells labeled before the late blastula or gastrula stage tend to give rise to many unrelated tissue types.
This is due in part to the short cell cycle times in the early blastula that produce some 20 to 50 cells and
EMBO COURSE MEDAKA & ZEBRAFISH HEIDELBERG 100
in part to the spreading into many different positions on the fate map driven by the radial intercalationmovements of early epiboly. Labeling shortly after the 1,000 cell stage does not eliminate theseproblems--epiboly is yet to begin--but it helps to manage the problem to a smaller number of cells thattend to remain together. The methods described here have been used to create the blastula fate map. Forlater fate maps, this method has been extended into the gastrula and segmentation periods (7,12). Theselater maps have less variability because the movements of local regions of the embryos become morepredictable, and cell mixing is less of a problem.
To label cells after the 1,000 cell stage, we resort to the technical methods of the cell physiologist,using electronics to enter the cell and even to inject dye. The general method, outlined in Protocol 3, is toplace the tip of the pipette on the cell membrane of the cell to be injected, depolarize the cell membranewhich creates a very small hole through which the pipette enters, and then use a combination of pressureand current to push dye into the cell.
Cells labeled in this manner often give rise to two related clones, one bright and one dim (See clone inFigure 7). The brightly labeled clone is descended from the injected cell; the weakly labled clone isdescended from the brightly labeled cell’s sister, which was labeled by leakage of dye across the midbodyremaining from the mitotic division preceding the injection. Because cell divisions at the early blastula cellstages tend to give rise to widely separated siblings, in this case the founder cells of each clone, these subclones can sometimes be mapped as independent clones. To avoid such dual clones, inject cells that haverounded up for mitosis; these cells have usually lost their midbody remnant.
Protocol 3. Late cleavage injections.
Equipment and reagents• Microscope: Upright design equipped with DIC optics, epifluorescence, 10x and 20x dry objective
lenses and 40x or 63x water immersion objective lenses.
• Micromanipulator: With fixed stage scopes, any of the heavy mechanical micromanipulators (such asthose manufactured by Leitz) are acceptable. If the scope has a movable stage then a lightmicromanipulator (such as those manufactured by Narishige) is necessary. The micromanipulatorsshould set with the z-direction square to the horizontal (aligned with the movement direction of theobjective) so that movement along this axis causes no apparent x and y movement when watching thepipette through the microscope. In the case of the stage mounted manipulators, it is very useful tohave the z-direction controlled hydraulically such as in the Narishige MO155. In all cases, besides x,y and z, a fourth hydraulically controlled movement aligned along the shaft of the pipette is veryuseful, allowing the simple retraction of the injection pipette out of the cell after injections.
• Micro injector as in Protocol 2.
• Electronics. The electronics set up is typical for cell physiology; expertise and advice on thesetechniques is often found in local Neuroscience departments. The central apparatus consists of anintercellular amplifier that can detect and control the voltage and current at the tip of the injectionpipette. An essential accessory is an electronics oscilloscope to visualize the output of theintercellular amplifier. The equipment should be able to measure current at levels of 2 mA. Alsouseful, are the so called 'cap comp' electronics, and a stimulator to control the amplifier to deliver a 10millisecond voltage spike of about 10 volts, both used for clearing clogged pipettes or enteringrecalcitrant cells. Completing the circuit is, on the pipette side, the pipette itself (back filled with 1M KCl) in a pipette holder with an silver bridge electrode holder (such as a World PrecisionInstruments MEH900S), and, on the bath side, a silver chloride agar bridge, made by inserting a silverwire into a 10 cm long plastic capillary filled with 1.5 % agar in 1 M KCl.
EMBO COURSE MEDAKA & ZEBRAFISH HEIDELBERG 101
• Glass pipettes. Preparation of proper glass pipettes for injection is crucial for this procedure. Again,a Neuroscience department often has the personnel that can help the inexperienced. Use1.2 mm thinwalled borosilicate capillary glass filaments (e.g. TW120F-4 from World Precision Instruments).Using a electrode puller, such as the Flaming Brown P80/PC electrode puller, this glass is pulled witha steep shank to produce a moderately stiff needle with a little whip. For late blastula labels (at the1,000 through 4,000 cell stages), the resistance of the pulled needle should be over 300 meg-ohm.Immediately before use, the tips of these needles are broken to a resistance of about 120 meg ohmson a glass ball. For gastrula labels, pull thick walled borosilicate capillary glass that has a hole thatresults in a resistance of about 100 to 300 meg ohm, trying to make a very steep shank, producing astiff needle with very little whip. Gastrula needles will not be broken before use. Using the capillaryof the pipette, the pipettes can be back filled several hours prior to (or the night before) theexperiment, and stored at 100% humidity. In general, the fine glass tips of the capillaries dull onstorage; thus, the glass should be pulled within 48 h of experiment.
Method1. Dechorionate embryos.2. Break pipette against glass ball (if injecting at the blastula stage).3. Place embryos in a depression slide in E2 medium.4. Focus microscope on the nucleus of the cell to be labeled.5. Bring focus on the lens up about 1 to 2 mm.6. Position pipette in light path and lower towards embryo, chasing the z-position of the needle with
the plane of focus of the microscope.7. Place the pipette above the cell and then lower the needle against the cell, dimpling it.8. Depolarize cell membrane using a voltage pulse.9. Verify that the pipette is in the cell (based on a change in voltage).10. Inject using pressure or electrophoresis.11. Back the needle out of the cell using axial drive.
_______________________________________
Labeling groups of cells by photoactivationOne method that has been gaining popularity in recent times is the marking of cells by photoactivation
of a dye that was initially injected into the entire embryo (13,14). This method has the advantage thatcells that are difficult to access with an injection needle can be labeled, and embryos are not traumatizedduring the sensitive gastrula stages by an injection needle. The labeling of the initial clone is bestaccomplished with a laser focused through the objective lenses of a compound microscope; an adequatereplacement is to activate using a small pinhole in the aperture of the UV epi-illumination, as we outlinein Protocol 4.
Typically, the labeled cells are not true clones, in that initially more than one cell is activated (or‘labeled’). Also, after repeated illumination, the activated cells and the unactivated cells immediatelysurrounding them seem to slowly assume the same level of fluorescence. Nevertheless, the method isideal for intermediate fate maps, where lineage restrictions are not being tested and where vectormovements of tissue layers are being analyzed.
One useful variation of this method is to co-inject a rhodamine labeled dye with the photoactivatabledye during late cleavage, and, at a later time point, activate the photoactivatable dye in a portion of the
EMBO COURSE MEDAKA & ZEBRAFISH HEIDELBERG 102
clone. This method produces a small sub-clone of cells which is framed by the movements of parentclone. This variation gives rise to a more manageable number of progeny, akin to a late blastula lineagelabel.
_______________________________________
Protocol 4. FITC photoactivation
Equipment and reagents• Microscope. Compound microscope equipped with epifluorescent illumination, 20x dry (0.5 NA),
40xW (0.7 - 0.9 NA) and 63xW (0.8 - 1.0 NA). DIC optics and epifluorescence for rhodamine, FITC,and DAPI/Hoechst. There must be an aperture at the virtual image of the epifluorescence path thatreduces the UV beam to a narrow beam. If there is no aperture, introduce a slider at the appropriateposition containing foil with a pin hole aperture. It is also helpful to have an appropriate combinationof neutral density filters and an aperture at the virtual focus of the epifluorescence path to controlUV intensity. An alternative method for photoactivation, not discussed here, is to activate the cellsusing a focused beam from a laser.
Method1. Inject embryos during early cleavage with caged dye.2. Incubate embryos to desired stage. Protect from light.3. Using the highest practical power/N.A. objective, focus in the embryo the
precise location to be labeled. Use the FITC filter with the apertureclosed to a pin hole to establish the area to be labeled.
4. Turn off the epifluorescence and slide the DAPI/Hoechst filter set in.5. Briefly illuminate the specimen, observing the change in color visually.
________________________________________
Labeling groups of cells by lipophilic membrane dyesAn alternative cell labeling technique is to label the cell membrane of cells. This is typically done with
the fluorescent dyes DiI and DiO, which can be visualized with the rhodamine and fluoresceine filtersets, respectively (15). These dyes, if injected or ‘stabbed’ with a tungsten needle into the embryo, willincorporate into the bi-lipid cell membrane of nearby cells. As for photoactivation, the labeled cells arenot clones, in that more than one cell is typically labeled. However, this is a particularly nice method tolabel cells or axons that migrate from the label site, and the method has been used successfully to labelmigrating neural crest cells and the migrating growth cones and axons of the motoneurons of the spinalcord.
7.4 Transplantation techniquesA central question in many developmental biology problems is knowing when and where cells begin to
irreversible enter a differentiated state. To test such ideas, we describe here methods for moving cells
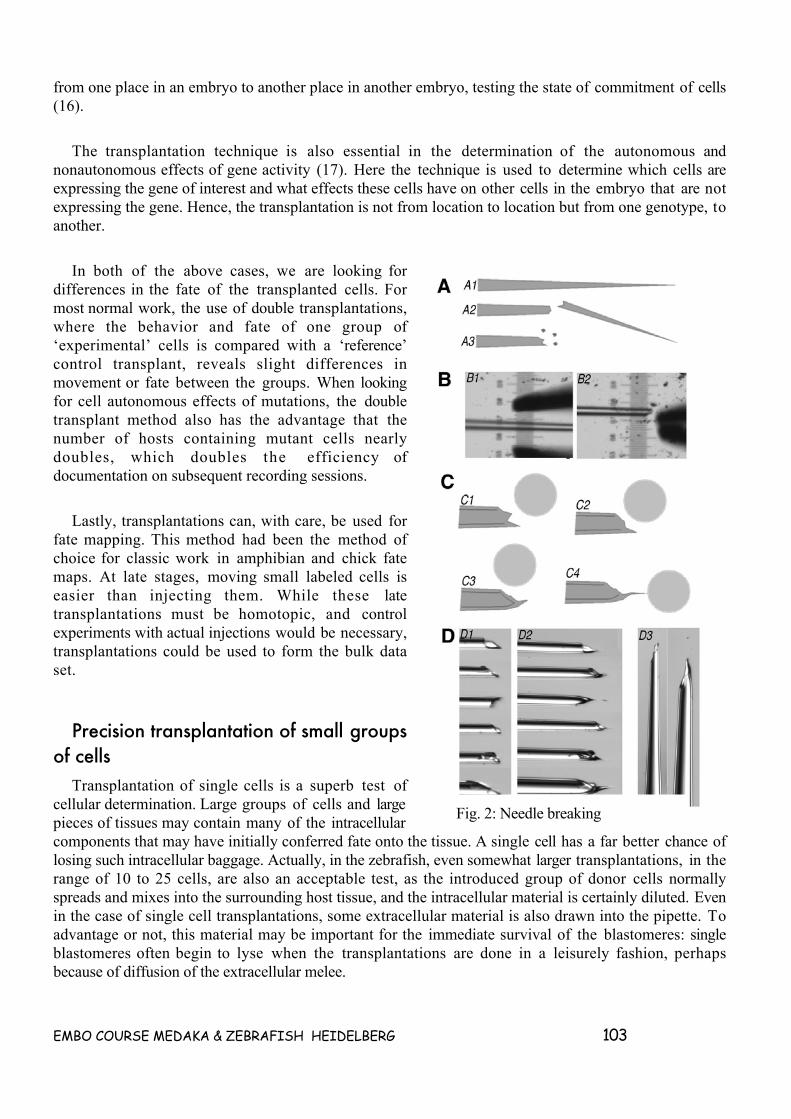
EMBO COURSE MEDAKA & ZEBRAFISH HEIDELBERG 103
from one place in an embryo to another place in another embryo, testing the state of commitment of cells(16).
The transplantation technique is also essential in the determination of the autonomous andnonautonomous effects of gene activity (17). Here the technique is used to determine which cells areexpressing the gene of interest and what effects these cells have on other cells in the embryo that are notexpressing the gene. Hence, the transplantation is not from location to location but from one genotype, toanother.
In both of the above cases, we are looking fordifferences in the fate of the transplanted cells. Formost normal work, the use of double transplantations,where the behavior and fate of one group of‘experimental’ cells is compared with a ‘reference’control transplant, reveals slight differences inmovement or fate between the groups. When lookingfor cell autonomous effects of mutations, the doubletransplant method also has the advantage that thenumber of hosts containing mutant cells nearlydoubles, which doubles the efficiency ofdocumentation on subsequent recording sessions.
Lastly, transplantations can, with care, be used forfate mapping. This method had been the method ofchoice for classic work in amphibian and chick fatemaps. At late stages, moving small labeled cells iseasier than injecting them. While these latetransplantations must be homotopic, and controlexperiments with actual injections would be necessary,transplantations could be used to form the bulk dataset.
Precision transplantation of small groupsof cells
Transplantation of single cells is a superb test ofcellular determination. Large groups of cells and largepieces of tissues may contain many of the intracellularcomponents that may have initially conferred fate onto the tissue. A single cell has a far better chance oflosing such intracellular baggage. Actually, in the zebrafish, even somewhat larger transplantations, in therange of 10 to 25 cells, are also an acceptable test, as the introduced group of donor cells normallyspreads and mixes into the surrounding host tissue, and the intracellular material is certainly diluted. Evenin the case of single cell transplantations, some extracellular material is also drawn into the pipette. Toadvantage or not, this material may be important for the immediate survival of the blastomeres: singleblastomeres often begin to lyse when the transplantations are done in a leisurely fashion, perhapsbecause of diffusion of the extracellular melee.
Fig. 2: Needle breaking
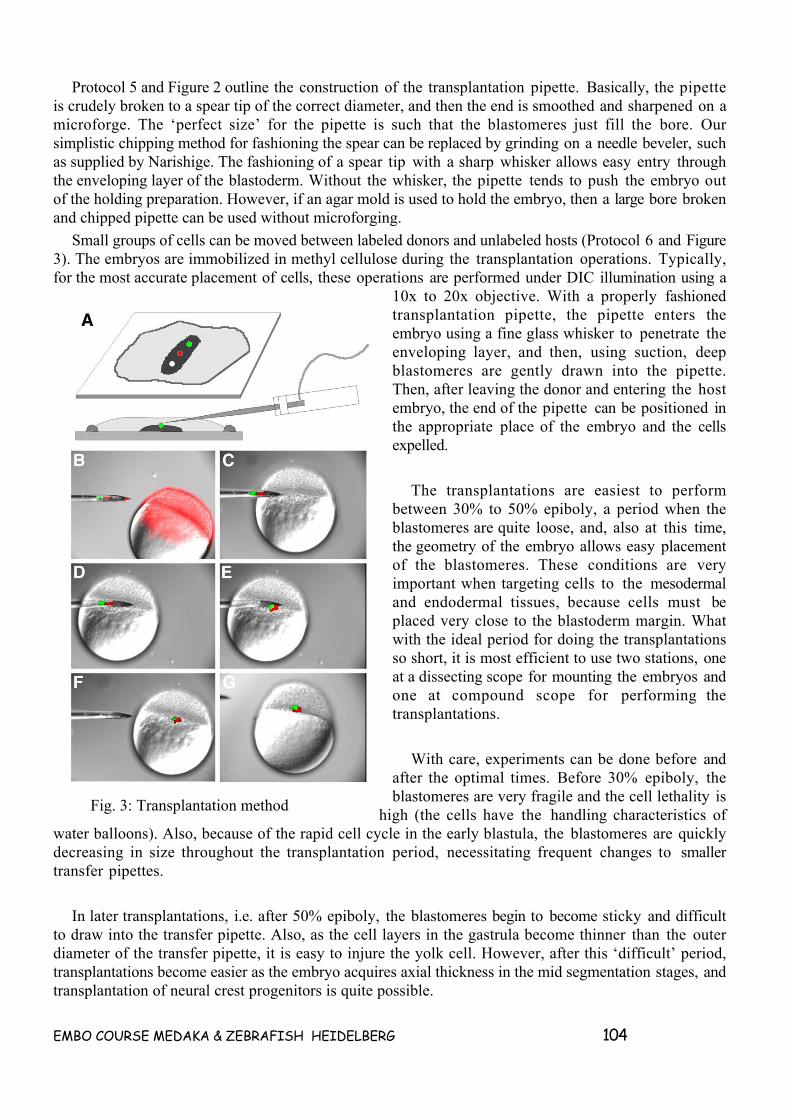
EMBO COURSE MEDAKA & ZEBRAFISH HEIDELBERG 104
Protocol 5 and Figure 2 outline the construction of the transplantation pipette. Basically, the pipetteis crudely broken to a spear tip of the correct diameter, and then the end is smoothed and sharpened on amicroforge. The ‘perfect size’ for the pipette is such that the blastomeres just fill the bore. Oursimplistic chipping method for fashioning the spear can be replaced by grinding on a needle beveler, suchas supplied by Narishige. The fashioning of a spear tip with a sharp whisker allows easy entry throughthe enveloping layer of the blastoderm. Without the whisker, the pipette tends to push the embryo outof the holding preparation. However, if an agar mold is used to hold the embryo, then a large bore brokenand chipped pipette can be used without microforging.
Small groups of cells can be moved between labeled donors and unlabeled hosts (Protocol 6 and Figure3). The embryos are immobilized in methyl cellulose during the transplantation operations. Typically,for the most accurate placement of cells, these operations are performed under DIC illumination using a
10x to 20x objective. With a properly fashionedtransplantation pipette, the pipette enters theembryo using a fine glass whisker to penetrate theenveloping layer, and then, using suction, deepblastomeres are gently drawn into the pipette.Then, after leaving the donor and entering the hostembryo, the end of the pipette can be positioned inthe appropriate place of the embryo and the cellsexpelled.
The transplantations are easiest to performbetween 30% to 50% epiboly, a period when theblastomeres are quite loose, and, also at this time,the geometry of the embryo allows easy placementof the blastomeres. These conditions are veryimportant when targeting cells to the mesodermaland endodermal tissues, because cells must beplaced very close to the blastoderm margin. Whatwith the ideal period for doing the transplantationsso short, it is most efficient to use two stations, oneat a dissecting scope for mounting the embryos andone at compound scope for performing thetransplantations.
With care, experiments can be done before andafter the optimal times. Before 30% epiboly, theblastomeres are very fragile and the cell lethality is
high (the cells have the handling characteristics ofwater balloons). Also, because of the rapid cell cycle in the early blastula, the blastomeres are quicklydecreasing in size throughout the transplantation period, necessitating frequent changes to smallertransfer pipettes.
In later transplantations, i.e. after 50% epiboly, the blastomeres begin to become sticky and difficultto draw into the transfer pipette. Also, as the cell layers in the gastrula become thinner than the outerdiameter of the transfer pipette, it is easy to injure the yolk cell. However, after this ‘difficult’ period,transplantations become easier as the embryo acquires axial thickness in the mid segmentation stages, andtransplantation of neural crest progenitors is quite possible.
Fig. 3: Transplantation method
EMBO COURSE MEDAKA & ZEBRAFISH HEIDELBERG 105
While more time consuming than that for large scale transplantations, this method is preferred forinitial training in the cell transplantation technique. Seeing the tip of the pipette, the embryo, and thecells and their nuclei helps to quickly correct common mistakes in manufacture of the transfer pipetteand treatment of the embryos.
________________________________________
Protocol 5. Construction of transfer pipettes.
Equipment and reagents
• Dissection microscope
• Pipette Puller
• Microforge
• Thin walled glass pipettes
• Razor blades or fine forceps.
• Stage micrometer or calibrated eyepiece ocular grid.
Method1. Pull pipette from thin walled glass tubing (OD 1.0 to 1.5 mm) with no capillary. The shape of the
pipette should have a long taper, narrowing from 10 µm to 100 µm over about 5 mm.2. Using a razor blade, break the glass to the appropriate diameter (OD of about 40 µm for late
blastula work).3. Working under a dissecting scope, chip back glass until the tip is spear shaped. At this point the
glass can be used for crude transplantation experiments.4. Using a microforge, melt the glass at the edges of the opening.5. Using a microforge, fashion a fine glass whisker on the tip of the spear by lightly touching the
pipette to the microforge filament and pulling away.
_______________________________________
_______________________________________
Protocol 6. Single cell transplantation
Equipment and reagents
• Room. The room that the microscope is placed in should be of uniform temperature and free ofdrafts. Temperature shifts will cause fluctuations in the movement of the oil in the micro injector. Ina drafty room, it is sometimes helpful to construct a box around the sides and back of themicroscope.
• Microscope. Upright compound microscope equipped with DIC optics and a 10x lens. A left handedmechanical stage allows the micromanipulator to be placed on the right side. Note that the mechanicalstage should be smooth and have no backlash. Epifluorescent illumination is recommended.
• Micromanipulator. If not using a fixed stage scope, the micromanipulator must move with the stage.A fixed stage microscope and a table mounted micromanipulator are recommended but expensive. A
EMBO COURSE MEDAKA & ZEBRAFISH HEIDELBERG 106
light manipulator, such as the Narishige MN151, attached to the stage mount of a normal compoundscope is quite acceptableand inexpensive. Set the angle of the micro manipulator to about 15 degreesto perpendicular.
• Micro injector. The cells at the tip of the pipette are controlled hydraulically using a hydraulic microinjector, such as the Narishige IM-5B or the Eppendorf Cell Tram. An inexpensive injector can bemade with a Hamilton 1702TRLT Threaded Syringe attached to about 60 cm of stiff tubing ending ina World Precision Instruments MPH4 or MPH3 pipette holder, taking care to epoxy the tubing tothe syringe and pipette holders. Carefully inspect the entire apparatus and remove any small airbubbles.
• 3% methyl cellulose
• Cover slips, microscope slides, forceps
• Vasoline
• E2 or Danieau’s. All media must contain antibiotics.
Method1. Dechorionate embryos.2. Inject embryos with lineage tracer before the 16 cell stage.3. Prepare 22x22 mm cover slips with Vasoline rings.4. Wet adjust transfer pipette in droplet on cover slip. Set up so that the pipette can be backed out
of the droplet using the x-axis drive allowing enough room to move the cover slip in and out.Adjust the oil meniscus to the tip of the pipette.
5. For each set of embryos:• Place a 4 x 10 mm swath of 3% methyl cellulose in the center of the cover slip.• Place a droplet of medium (E2 or Danieau’s) over the methyl cellulose.• Position embryo in methyl cellulose, arranging donor and host embryos in a line perpendicular
to the transfer pipette.6. Advance the transfer pipette into the droplet, positioning the tip of the needle over the donor
embryo.7. Lower the pipette to dimple the surface of the embryo and advance the needle sliding it into the
embryo, taking care to not nick the yolk cell.8. Back oil meniscus into pipette, pulling cells into pipette.9. Slide pipette out of embryo.10. Repeat steps 7 - 9 for additional donors as desired.11. Repeat steps 7 to 9 for host, only expelling cells in step 8 by advancing the oil meniscus.12. Transfer coverslips to 50 mm Petri dishes filled with E2 medium. The coverslips can be floated
on the top of the medium until the embryos have completed epiboly and later transferred to thebottom of the Petri dish and the cover slip removed.
_______________________________________
Large scale transplantations of early blastomeresWhen the difficulty of placing donor cells into a particular host tissue increases, the desire for greater
numbers of experiments increases. The fine scale transplantation technique normally yields about 15 to30 hosts, and using two donors per host only doubles this number. By using dissecting scopes, simplemicromanipulators, and agar plates, hundreds of experiments can be done in a single sitting. Furthermore,many workers tend to favor the convenience of using their own dissecting scopes for transplantation
EMBO COURSE MEDAKA & ZEBRAFISH HEIDELBERG 107
experiments rather than competing for the laboratory compound scope. Thus, the large scale methodoutlined in Protocol 7 has become quite popular.
Like in the fine transplantation technique, cells are moved with a hydraulically controlled pipettebetween labeled donors and unlabeled hosts. However, during the transplantation operations theembryos are immobilized in various types of crafted agarose surfaces and the operations are typicallyperformed under 50x on a dissecting scope. Because the field of view is larger and the depth of focus isgreater, the pipette can be quickly moved from one embryo to the next.
These transplantations are easiest to perform in the late blastula, a period when the large diametertransfer pipette can be kept away from the large yolk cell. Although at this time the geometry of theembryo does not allow easy placement of the blastomeres, the scatter of the blastomeres during epibolytends to distribute the donor cells to many tissues of the hosts.
The misplacement and death of embryos can be rather high in this experiment. ‘Jumping’ of embryosfrom one hole to another can be controlled with a layer of methyl cellulose. Misplacement errors can beminimized using an alternative experimental design where only wild type embryos are labeled and cellsare transferred into host embryos produced from mutant clutches. Thus, all unlabeled embryos in a Petridish are hosts. For the survival of the embryos, the use of antibiotics at all stages after the operation isessential. To prevent cross infection from dying embryos, embryos should be segregated into individualpetri dishes or wells by the early segmentation stages.
_______________________________________
Protocol 7. Large scale transplantation.
Equipment and reagents
• Room, Micropipettes, Micro injector. As in Protocol 6.
• Dissecting microscope, equipped with transmitted light, and powers from 20x to 50x.
• Micromanipulator, such as the Narishige MN151. Set the angle of the micro manipulator to about 45degrees to perpendicular.
• 3% methyl cellulose
• Agarose plates (Protocol 1)
• Watch maker forceps
Method1. Collect, dechorionate, and label embryos as in Protocol 6.2. Prepare the agarose plates by placing a bed of methyl cellulose in the troughs or holes,
afterwards scraping off the excess from the agar surface. Overlay the plate with 2 -5 mm ofmedium.
3. Transfer donor and host embryos in troughs of agarose plate, so donor and host embryos areplaced side by side.
4. Place the agarose plate under the dissecting microscope and move the agarose plate and themicropipette so that the tip of the pipette is touching the one labeled donor embryo.
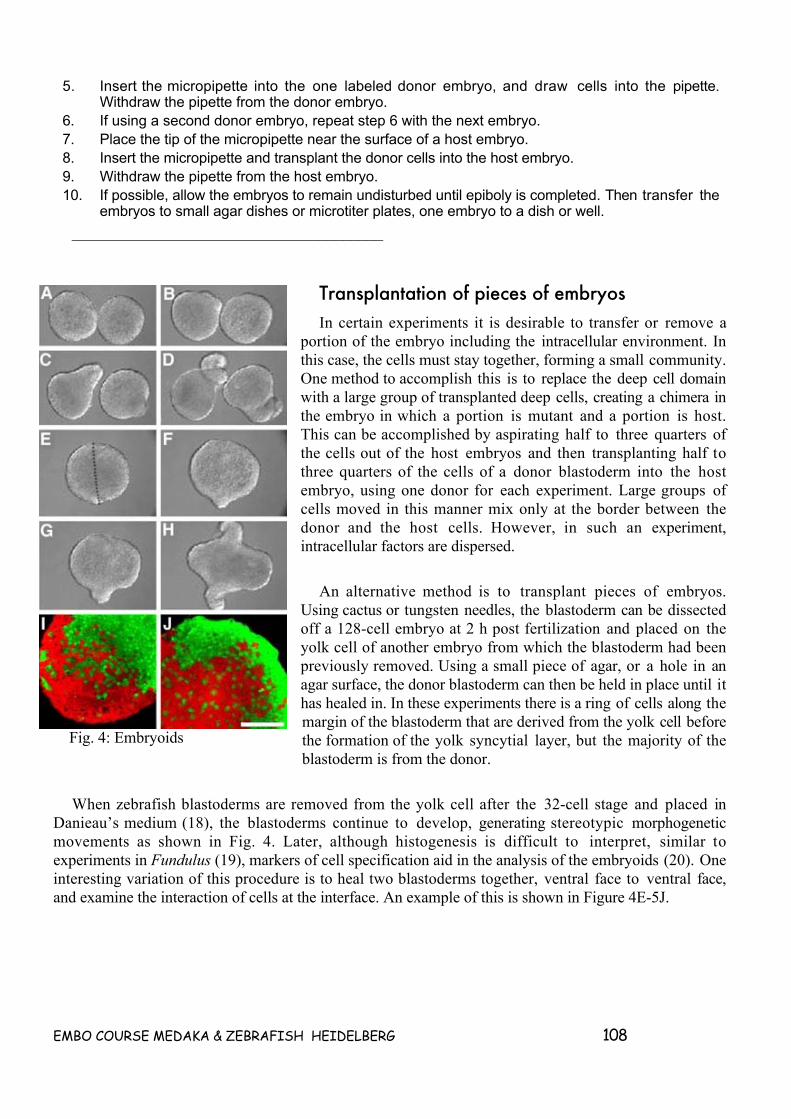
EMBO COURSE MEDAKA & ZEBRAFISH HEIDELBERG 108
5. Insert the micropipette into the one labeled donor embryo, and draw cells into the pipette.Withdraw the pipette from the donor embryo.
6. If using a second donor embryo, repeat step 6 with the next embryo.7. Place the tip of the micropipette near the surface of a host embryo.8. Insert the micropipette and transplant the donor cells into the host embryo.9. Withdraw the pipette from the host embryo.10. If possible, allow the embryos to remain undisturbed until epiboly is completed. Then transfer the
embryos to small agar dishes or microtiter plates, one embryo to a dish or well.
_______________________________________
Transplantation of pieces of embryosIn certain experiments it is desirable to transfer or remove a
portion of the embryo including the intracellular environment. Inthis case, the cells must stay together, forming a small community.One method to accomplish this is to replace the deep cell domainwith a large group of transplanted deep cells, creating a chimera inthe embryo in which a portion is mutant and a portion is host.This can be accomplished by aspirating half to three quarters ofthe cells out of the host embryos and then transplanting half tothree quarters of the cells of a donor blastoderm into the hostembryo, using one donor for each experiment. Large groups ofcells moved in this manner mix only at the border between thedonor and the host cells. However, in such an experiment,intracellular factors are dispersed.
An alternative method is to transplant pieces of embryos.Using cactus or tungsten needles, the blastoderm can be dissectedoff a 128-cell embryo at 2 h post fertilization and placed on theyolk cell of another embryo from which the blastoderm had beenpreviously removed. Using a small piece of agar, or a hole in anagar surface, the donor blastoderm can then be held in place until ithas healed in. In these experiments there is a ring of cells along themargin of the blastoderm that are derived from the yolk cell beforethe formation of the yolk syncytial layer, but the majority of theblastoderm is from the donor.
When zebrafish blastoderms are removed from the yolk cell after the 32-cell stage and placed inDanieau’s medium (18), the blastoderms continue to develop, generating stereotypic morphogeneticmovements as shown in Fig. 4. Later, although histogenesis is difficult to interpret, similar toexperiments in Fundulus (19), markers of cell specification aid in the analysis of the embryoids (20). Oneinteresting variation of this procedure is to heal two blastoderms together, ventral face to ventral face,and examine the interaction of cells at the interface. An example of this is shown in Figure 4E-5J.
Fig. 4: Embryoids
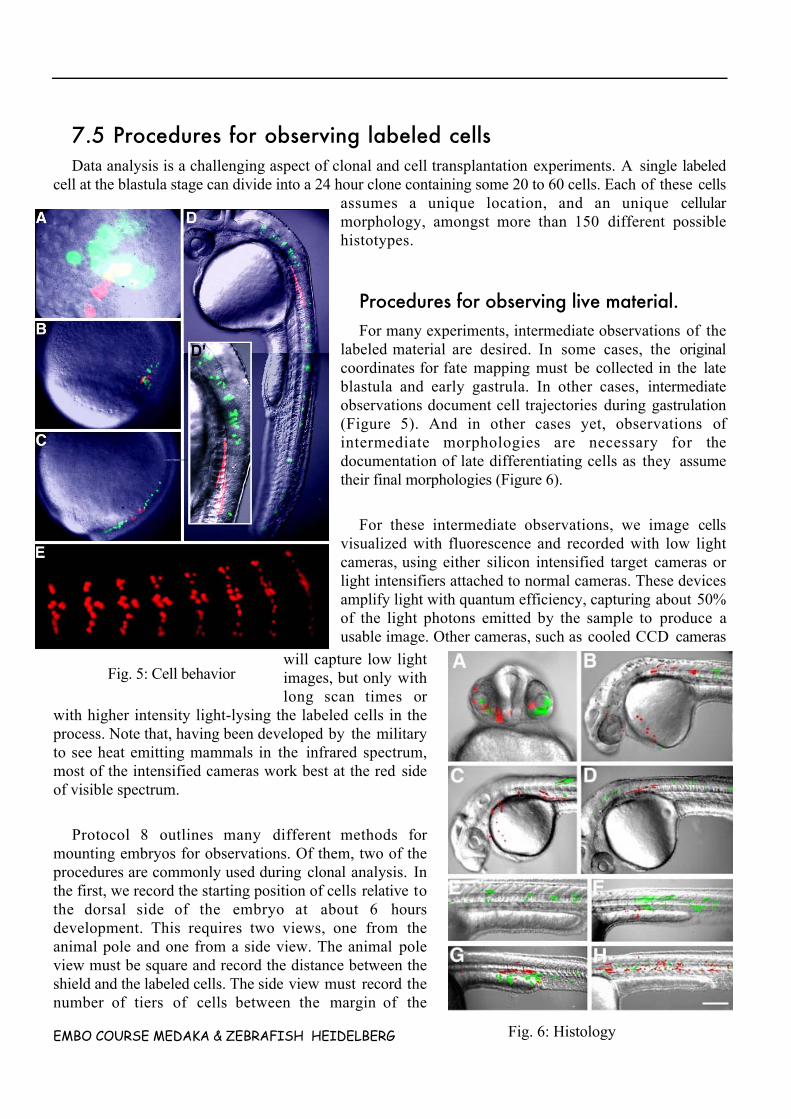
EMBO COURSE MEDAKA & ZEBRAFISH HEIDELBERG 109
7.5 Procedures for observing labeled cellsData analysis is a challenging aspect of clonal and cell transplantation experiments. A single labeled
cell at the blastula stage can divide into a 24 hour clone containing some 20 to 60 cells. Each of these cellsassumes a unique location, and an unique cellularmorphology, amongst more than 150 different possiblehistotypes.
Procedures for observing live material.For many experiments, intermediate observations of the
labeled material are desired. In some cases, the originalcoordinates for fate mapping must be collected in the lateblastula and early gastrula. In other cases, intermediateobservations document cell trajectories during gastrulation(Figure 5). And in other cases yet, observations ofintermediate morphologies are necessary for thedocumentation of late differentiating cells as they assumetheir final morphologies (Figure 6).
For these intermediate observations, we image cellsvisualized with fluorescence and recorded with low lightcameras, using either silicon intensified target cameras orlight intensifiers attached to normal cameras. These devicesamplify light with quantum efficiency, capturing about 50%of the light photons emitted by the sample to produce ausable image. Other cameras, such as cooled CCD cameras
will capture low lightimages, but only withlong scan times or
with higher intensity light-lysing the labeled cells in theprocess. Note that, having been developed by the militaryto see heat emitting mammals in the infrared spectrum,most of the intensified cameras work best at the red sideof visible spectrum.
Protocol 8 outlines many different methods formounting embryos for observations. Of them, two of theprocedures are commonly used during clonal analysis. Inthe first, we record the starting position of cells relative tothe dorsal side of the embryo at about 6 hoursdevelopment. This requires two views, one from theanimal pole and one from a side view. The animal poleview must be square and record the distance between theshield and the labeled cells. The side view must record thenumber of tiers of cells between the margin of the
Fig. 6: Histology
Fig. 5: Cell behavior
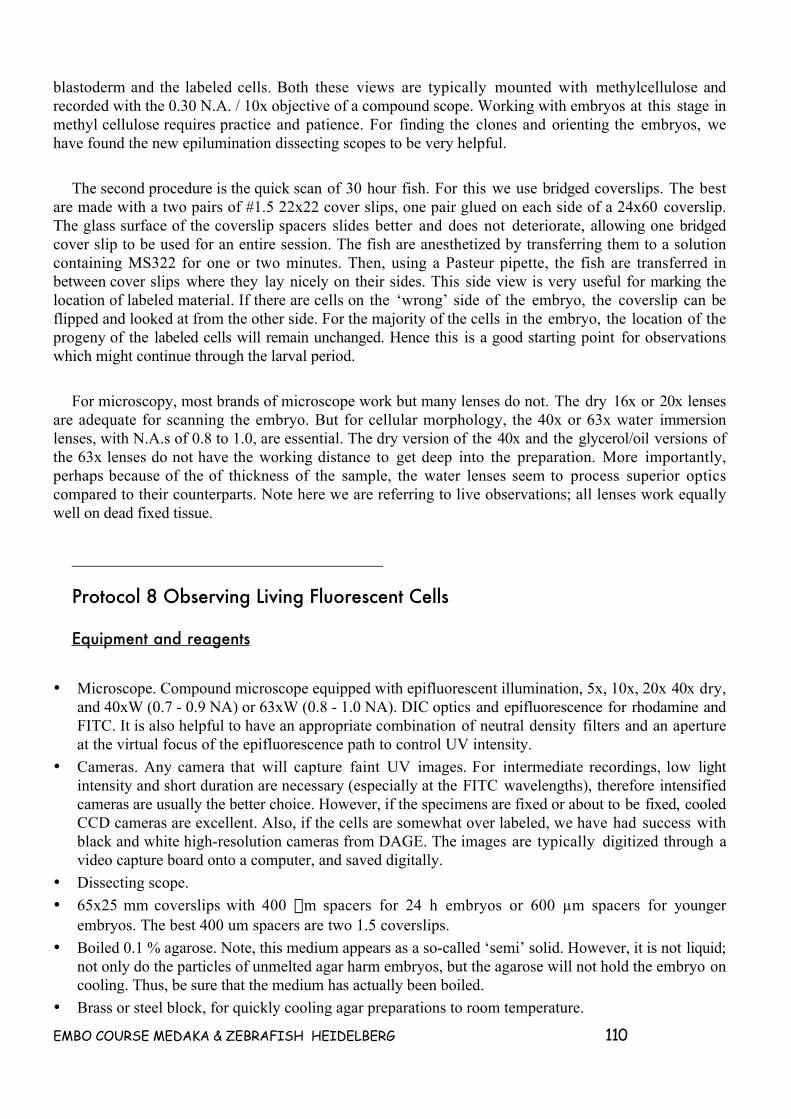
EMBO COURSE MEDAKA & ZEBRAFISH HEIDELBERG 110
blastoderm and the labeled cells. Both these views are typically mounted with methylcellulose andrecorded with the 0.30 N.A. / 10x objective of a compound scope. Working with embryos at this stage inmethyl cellulose requires practice and patience. For finding the clones and orienting the embryos, wehave found the new epilumination dissecting scopes to be very helpful.
The second procedure is the quick scan of 30 hour fish. For this we use bridged coverslips. The bestare made with a two pairs of #1.5 22x22 cover slips, one pair glued on each side of a 24x60 coverslip.The glass surface of the coverslip spacers slides better and does not deteriorate, allowing one bridgedcover slip to be used for an entire session. The fish are anesthetized by transferring them to a solutioncontaining MS322 for one or two minutes. Then, using a Pasteur pipette, the fish are transferred inbetween cover slips where they lay nicely on their sides. This side view is very useful for marking thelocation of labeled material. If there are cells on the ‘wrong’ side of the embryo, the coverslip can beflipped and looked at from the other side. For the majority of the cells in the embryo, the location of theprogeny of the labeled cells will remain unchanged. Hence this is a good starting point for observationswhich might continue through the larval period.
For microscopy, most brands of microscope work but many lenses do not. The dry 16x or 20x lensesare adequate for scanning the embryo. But for cellular morphology, the 40x or 63x water immersionlenses, with N.A.s of 0.8 to 1.0, are essential. The dry version of the 40x and the glycerol/oil versions ofthe 63x lenses do not have the working distance to get deep into the preparation. More importantly,perhaps because of the of thickness of the sample, the water lenses seem to process superior opticscompared to their counterparts. Note here we are referring to live observations; all lenses work equallywell on dead fixed tissue.
_______________________________________
Protocol 8 Observing Living Fluorescent Cells
Equipment and reagents
• Microscope. Compound microscope equipped with epifluorescent illumination, 5x, 10x, 20x 40x dry,and 40xW (0.7 - 0.9 NA) or 63xW (0.8 - 1.0 NA). DIC optics and epifluorescence for rhodamine andFITC. It is also helpful to have an appropriate combination of neutral density filters and an apertureat the virtual focus of the epifluorescence path to control UV intensity.
• Cameras. Any camera that will capture faint UV images. For intermediate recordings, low lightintensity and short duration are necessary (especially at the FITC wavelengths), therefore intensifiedcameras are usually the better choice. However, if the specimens are fixed or about to be fixed, cooledCCD cameras are excellent. Also, if the cells are somewhat over labeled, we have had success withblack and white high-resolution cameras from DAGE. The images are typically digitized through avideo capture board onto a computer, and saved digitally.
• Dissecting scope.
• 65x25 mm coverslips with 400 mm spacers for 24 h embryos or 600 µm spacers for youngerembryos. The best 400 um spacers are two 1.5 coverslips.
• Boiled 0.1 % agarose. Note, this medium appears as a so-called ‘semi’ solid. However, it is not liquid;not only do the particles of unmelted agar harm embryos, but the agarose will not hold the embryo oncooling. Thus, be sure that the medium has actually been boiled.
• Brass or steel block, for quickly cooling agar preparations to room temperature.
EMBO COURSE MEDAKA & ZEBRAFISH HEIDELBERG 111
Method
1a. For oriented views of embryos, mount with methyl cellulose. Lay a 2 mm by 10 mm by 0.5 mmhigh bed of 3% methyl cellulose on the coverslip in the middle of a Vasoline ring; overlay themethyl cellulose with 0.5 ml medium, using the ring of Vasoline to prevent spreading of themedium. Working under a dissecting scope, partially sink the embryos into the surface of themethyl cellulose, manipulating the embryos using dull forceps or nylon ‘hair’ loops. Thispreparation can be observed directly with low power lenses or cover slipped for higher powerviews.
1b. For quick side views of 24 h to 72 h embryos, anesthetize embryos in a solution of 0.01 mg/mlMS322, and slip in-between coverslips.
1c. For immobilizing embryos for repeated observations (or time lapse recordings), mount theembryos between coverslips in 0.1% agarose. Ring the agarose with a wall of Vasoline toprevent evaporation.
1d. For immobilizing embryos in oriented views, mount in 0.1% agarose in small 0.1 ml droplets.Working under a dissecting scope, as the agarose solidifies, manipulate each embryo using dullforceps or nylon ‘hair’ loops. If more embryos are to be added to the preparation, add each to aseparate droplet, orienting each embryo before adding the next. Ring the preparation with a wallof Vasoline to prevent evaporation. Then over lay the entire preparation with 0.1% agarose andcover with a coverslip. Wait at least 5 min before moving the preparation to allow the agarose tocompletely solidify.
2. Observations using UV epiflorescence must use low illumination and be short, especially whenusing the blue FITC filter set. When scanning the embryo, use the 10x objective; low numericalaperture lenses are less damaging to labeled material. At high power, do not use the UV to findcells and do not ‘study’ the illuminated embryo. Learn to use the intensified camera to observethe embryo and not the eyepieces. (The intensified camera can see dimmer cells at lower levelsthan human eyes.)
3. Rescue embryos from the preparations by immersing in a 150 mm Petri dish with 10 to 15 ml ofmedium. Carefully separate the coverslips under the surface of the medium, watching theembryos using a dissecting scope. For preparations made as in 1a, the embryos can be sweptfrom in-between the cover slips with a stream of medium from a Pasteur pipette.
______________________________________________
Procedures for preparing fixed material.In many cases, fixed material is desired, either for a permanent record or because there is inadequate
time for immediate analysis. Sometimes particular views require sectioning or cutting away part of theanimal. It is possible to visualize the florescently labeled cells in fixed material. However, conventionalstaining is easier to see in a complex tissue with DIC optics rather than fluorescence. Also, being moresensitive than the florescence, the biotin staining reveals dimly labeled cells.
After following the embryos using florescence, a common preparation has rhodamine/biotin in onegroup of cells, and fluorescein in another group of cells. Typically at the end of the experiment, the fishare anesthetized with MS322, and fixed with 4% para formaldehyde for 2 to 3 hours at room
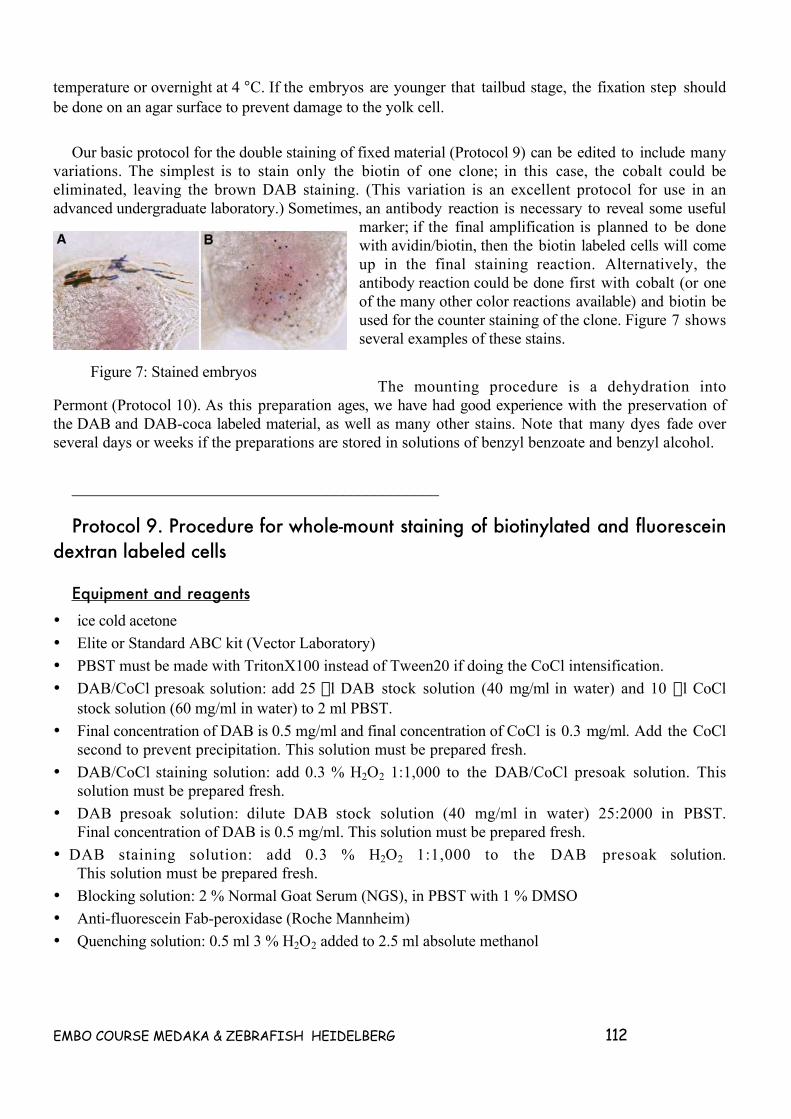
EMBO COURSE MEDAKA & ZEBRAFISH HEIDELBERG 112
temperature or overnight at 4 °C. If the embryos are younger that tailbud stage, the fixation step shouldbe done on an agar surface to prevent damage to the yolk cell.
Our basic protocol for the double staining of fixed material (Protocol 9) can be edited to include manyvariations. The simplest is to stain only the biotin of one clone; in this case, the cobalt could beeliminated, leaving the brown DAB staining. (This variation is an excellent protocol for use in anadvanced undergraduate laboratory.) Sometimes, an antibody reaction is necessary to reveal some useful
marker; if the final amplification is planned to be donewith avidin/biotin, then the biotin labeled cells will comeup in the final staining reaction. Alternatively, theantibody reaction could be done first with cobalt (or oneof the many other color reactions available) and biotin beused for the counter staining of the clone. Figure 7 showsseveral examples of these stains.
The mounting procedure is a dehydration intoPermont (Protocol 10). As this preparation ages, we have had good experience with the preservation ofthe DAB and DAB-coca labeled material, as well as many other stains. Note that many dyes fade overseveral days or weeks if the preparations are stored in solutions of benzyl benzoate and benzyl alcohol.
______________________________________________
Protocol 9. Procedure for whole-mount staining of biotinylated and fluoresceindextran labeled cells
Equipment and reagents• ice cold acetone
• Elite or Standard ABC kit (Vector Laboratory)
• PBST must be made with TritonX100 instead of Tween20 if doing the CoCl intensification.
• DAB/CoCl presoak solution: add 25 ml DAB stock solution (40 mg/ml in water) and 10 ml CoClstock solution (60 mg/ml in water) to 2 ml PBST.
• Final concentration of DAB is 0.5 mg/ml and final concentration of CoCl is 0.3 mg/ml. Add the CoClsecond to prevent precipitation. This solution must be prepared fresh.
• DAB/CoCl staining solution: add 0.3 % H2O2 1:1,000 to the DAB/CoCl presoak solution. Thissolution must be prepared fresh.
• DAB presoak solution: dilute DAB stock solution (40 mg/ml in water) 25:2000 in PBST.Final concentration of DAB is 0.5 mg/ml. This solution must be prepared fresh.
• DAB staining solution: add 0.3 % H2O2 1:1,000 to the DAB presoak solution.This solution must be prepared fresh.
• Blocking solution: 2 % Normal Goat Serum (NGS), in PBST with 1 % DMSO
• Anti-fluorescein Fab-peroxidase (Roche Mannheim)
• Quenching solution: 0.5 ml 3 % H2O2 added to 2.5 ml absolute methanol
Figure 7: Stained embryos
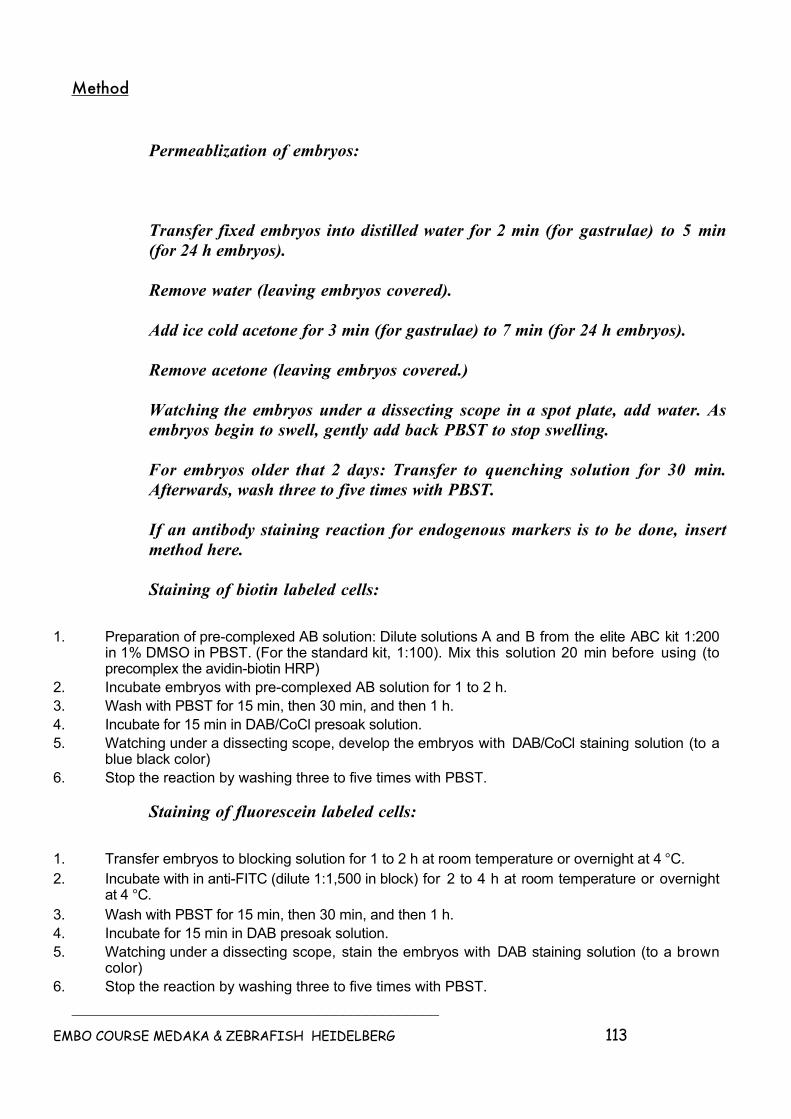
EMBO COURSE MEDAKA & ZEBRAFISH HEIDELBERG 113
Method
Permeablization of embryos:
Transfer fixed embryos into distilled water for 2 min (for gastrulae) to 5 min(for 24 h embryos).
Remove water (leaving embryos covered).
Add ice cold acetone for 3 min (for gastrulae) to 7 min (for 24 h embryos).
Remove acetone (leaving embryos covered.)
Watching the embryos under a dissecting scope in a spot plate, add water. Asembryos begin to swell, gently add back PBST to stop swelling.
For embryos older that 2 days: Transfer to quenching solution for 30 min.Afterwards, wash three to five times with PBST.
If an antibody staining reaction for endogenous markers is to be done, insertmethod here.
Staining of biotin labeled cells:
1. Preparation of pre-complexed AB solution: Dilute solutions A and B from the elite ABC kit 1:200in 1% DMSO in PBST. (For the standard kit, 1:100). Mix this solution 20 min before using (toprecomplex the avidin-biotin HRP)
2. Incubate embryos with pre-complexed AB solution for 1 to 2 h.3. Wash with PBST for 15 min, then 30 min, and then 1 h.4. Incubate for 15 min in DAB/CoCl presoak solution.5. Watching under a dissecting scope, develop the embryos with DAB/CoCl staining solution (to a
blue black color)6. Stop the reaction by washing three to five times with PBST.
Staining of fluorescein labeled cells:
1. Transfer embryos to blocking solution for 1 to 2 h at room temperature or overnight at 4 °C.2. Incubate with in anti-FITC (dilute 1:1,500 in block) for 2 to 4 h at room temperature or overnight
at 4 °C.3. Wash with PBST for 15 min, then 30 min, and then 1 h.4. Incubate for 15 min in DAB presoak solution.5. Watching under a dissecting scope, stain the embryos with DAB staining solution (to a brown
color)6. Stop the reaction by washing three to five times with PBST.
______________________________________________
EMBO COURSE MEDAKA & ZEBRAFISH HEIDELBERG 114
______________________________________________
Protocol 10. Mounting procedure for stained embryos
Equipment and reagents• Ethanol series: 30%, 50%, 70%, 80%, 90%, 100%, 100%
• 2:1 benzylbenzoate and benzyl alcohol
• Permount
• Bridged cover slips: 60x25 mm cover slips with 2 #2 thickness 22x22 mm on each end, glued togetherwith Permount. Make several days ahead.
• 40x24 mm Coverslips
Method1. Wash embryos in distilled water.2. Dehydrate the embryos by washing through the ethanol series, 5 min at each step.3. Transfer the embryos to a 2:1 mixture of benzyl benzoate and benzyl alcohol, and wait until the
embryos sink (about 15 min).4. Transfer the embryos into a small (about 10 to 20 µl) droplet of the benzyl benzoate and benzyl
alcohol solution on a bridged cover slip. Carefully remove excess solution with a tissue.5. Overlay with Permount, orient the embryos, and then cover with 40x24 mm cover slip.6. Slide and wiggle cover slip around to adjust orientation of embryo.7. The preparation is permanent, and lasts several years.
_______________________________________
Procedures for analyzing data.Describing the histotypes and fates of cells is the most
difficult aspect of the analysis of time lapse ortransplantation, requiring care and time. For each animalproduced, the cells and their histotypes must be recorded atthe end of the experiment. This is usually the most timeconsuming part of the experiment; a transplantation takes aminute or so but its analysis at 30 h takes about 20 min to 45min, and sometimes much longer.
At each time point, we typically hand record the locationand morphology of each labeled cell in the embryo, recordinghand notes on a template to help interpret—and find—theimages at later dates. This is shown in Figure 8. We alsodocument each group of cells on video or computer files,recording data as separate images for white light and UVepilumination, usually at many different focal planes.Occasionally we will re-check complicated sections using aconfocal microscope. Also, pay attention to dead and dyingcells. In both lineage and transplantation experiments, dead
Fig. 8: Documentation of thelocation and morphology oflabeled cells
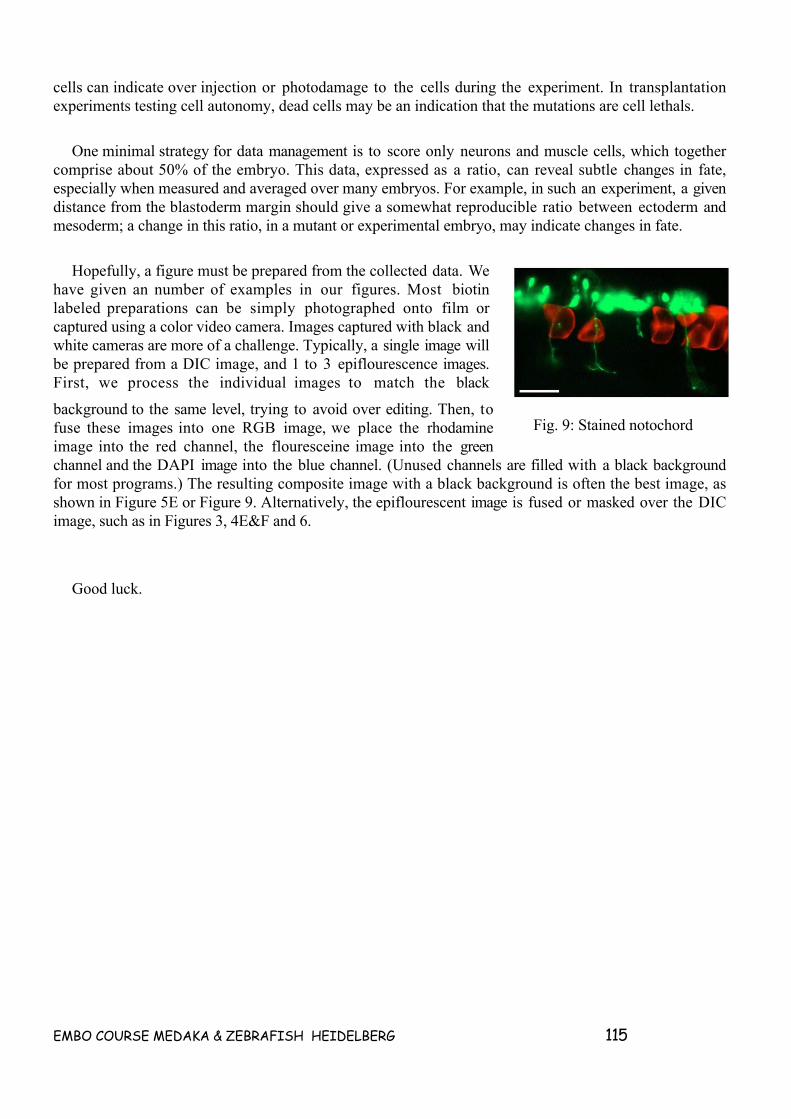
EMBO COURSE MEDAKA & ZEBRAFISH HEIDELBERG 115
cells can indicate over injection or photodamage to the cells during the experiment. In transplantationexperiments testing cell autonomy, dead cells may be an indication that the mutations are cell lethals.
One minimal strategy for data management is to score only neurons and muscle cells, which togethercomprise about 50% of the embryo. This data, expressed as a ratio, can reveal subtle changes in fate,especially when measured and averaged over many embryos. For example, in such an experiment, a givendistance from the blastoderm margin should give a somewhat reproducible ratio between ectoderm andmesoderm; a change in this ratio, in a mutant or experimental embryo, may indicate changes in fate.
Hopefully, a figure must be prepared from the collected data. Wehave given an number of examples in our figures. Most biotinlabeled preparations can be simply photographed onto film orcaptured using a color video camera. Images captured with black andwhite cameras are more of a challenge. Typically, a single image willbe prepared from a DIC image, and 1 to 3 epiflourescence images.First, we process the individual images to match the black
background to the same level, trying to avoid over editing. Then, tofuse these images into one RGB image, we place the rhodamineimage into the red channel, the flouresceine image into the greenchannel and the DAPI image into the blue channel. (Unused channels are filled with a black backgroundfor most programs.) The resulting composite image with a black background is often the best image, asshown in Figure 5E or Figure 9. Alternatively, the epiflourescent image is fused or masked over the DICimage, such as in Figures 3, 4E&F and 6.
Good luck.
Fig. 9: Stained notochord
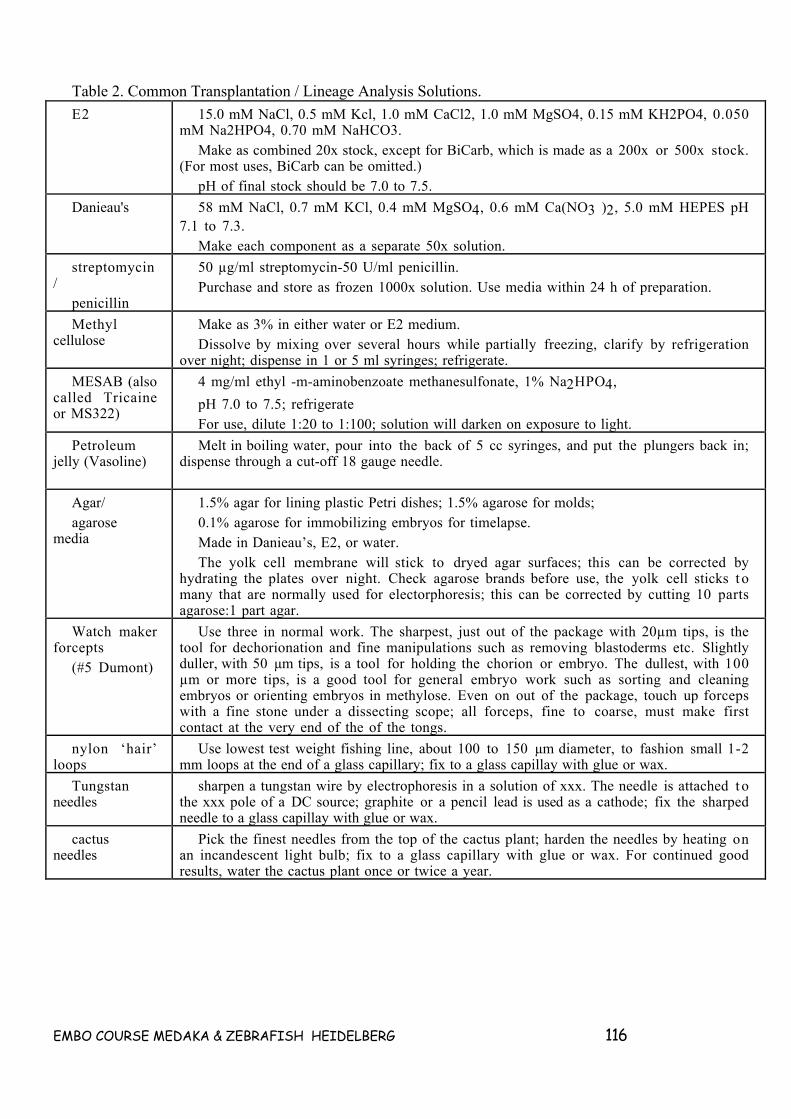
EMBO COURSE MEDAKA & ZEBRAFISH HEIDELBERG 116
Table 2. Common Transplantation / Lineage Analysis Solutions.
E2 15.0 mM NaCl, 0.5 mM Kcl, 1.0 mM CaCl2, 1.0 mM MgSO4, 0.15 mM KH2PO4, 0.050mM Na2HPO4, 0.70 mM NaHCO3.
Make as combined 20x stock, except for BiCarb, which is made as a 200x or 500x stock.(For most uses, BiCarb can be omitted.)
pH of final stock should be 7.0 to 7.5.
Danieau's 58 mM NaCl, 0.7 mM KCl, 0.4 mM MgSO4, 0.6 mM Ca(NO3 )2, 5.0 mM HEPES pH7.1 to 7.3.
Make each component as a separate 50x solution.
streptomycin/
penicillin
50 µg/ml streptomycin-50 U/ml penicillin.Purchase and store as frozen 1000x solution. Use media within 24 h of preparation.
Methylcellulose
Make as 3% in either water or E2 medium.Dissolve by mixing over several hours while partially freezing, clarify by refrigeration
over night; dispense in 1 or 5 ml syringes; refrigerate.
MESAB (alsocalled Tricaineor MS322)
4 mg/ml ethyl -m-aminobenzoate methanesulfonate, 1% Na2HPO4,
pH 7.0 to 7.5; refrigerateFor use, dilute 1:20 to 1:100; solution will darken on exposure to light.
Petroleumjelly (Vasoline)
Melt in boiling water, pour into the back of 5 cc syringes, and put the plungers back in;dispense through a cut-off 18 gauge needle.
Agar/agarose
media
1.5% agar for lining plastic Petri dishes; 1.5% agarose for molds;0.1% agarose for immobilizing embryos for timelapse.Made in Danieau’s, E2, or water.The yolk cell membrane will stick to dryed agar surfaces; this can be corrected by
hydrating the plates over night. Check agarose brands before use, the yolk cell sticks t omany that are normally used for electorphoresis; this can be corrected by cutting 10 partsagarose:1 part agar.
Watch makerforcepts
(#5 Dumont)
Use three in normal work. The sharpest, just out of the package with 20µm tips, is thetool for dechorionation and fine manipulations such as removing blastoderms etc. Slightlyduller, with 50 µm tips, is a tool for holding the chorion or embryo. The dullest, with 100µm or more tips, is a good tool for general embryo work such as sorting and cleaningembryos or orienting embryos in methylose. Even on out of the package, touch up forcepswith a fine stone under a dissecting scope; all forceps, fine to coarse, must make firstcontact at the very end of the of the tongs.
nylon ‘hair’loops
Use lowest test weight fishing line, about 100 to 150 µm diameter, to fashion small 1-2mm loops at the end of a glass capillary; fix to a glass capillay with glue or wax.
Tungstanneedles
sharpen a tungstan wire by electrophoresis in a solution of xxx. The needle is attached t othe xxx pole of a DC source; graphite or a pencil lead is used as a cathode; fix the sharpedneedle to a glass capillay with glue or wax.
cactusneedles
Pick the finest needles from the top of the cactus plant; harden the needles by heating onan incandescent light bulb; fix to a glass capillary with glue or wax. For continued goodresults, water the cactus plant once or twice a year.
EMBO COURSE MEDAKA & ZEBRAFISH HEIDELBERG 117
References1. Roosen-Runge, E. (1939) Biol. Bull., 77, 79-91.
2. Kimmel, C. B., Warga, R. M. and Schilling, T. F. (1990) Development, 108(4), 581-94.
3. Stainier, D. Y., Lee, R. K. and Fishman, M. C. (1993) Development, 119(1), 31-40.
4. Woo, K., Shih, J. and Fraser, S. E. (1995) Current Opinion in Genetics & Development, 5(4), 439-43.
5. Woo, K. and Fraser, S. E. (1995) Development, 121(8), 2595-609.
6. Schilling, T. F., Walker, C. and Kimmel, C. B. (1996) Development, 122(5), 1417-26.
7. Melby, A. E., Warga, R. M. and Kimmel, C. B. (1996) Development, 122(7), 2225-37.
8. Felsenfeld, A. L., Walker, C., Westerfield, M., Kimmel, C. and Streisinger, G. (1990) Development,108(3), 443-59.
9. Streisinger, G., Coale, F., Taggart, C., Walker, C. and Grunwald, D. (1989) Developmental Biology,131(1), 60-69.
10. Strehlow, D., Heinrich, G. and Gilbert, W. (1994) Development, 120(7), 1791-8.
11. Hammerschmidt, M. and Nüsslein-Volhard, C. (1993) Development, in press.
12. Melby, A. E., Kimelman, D. and Kimmel, C. B. (1997) Developmental Dynamics, 209(2), 156-65.
13. Girdham, C. H. and O'Farrell, P. H. (1994) Methods in Cell Biology, 44, 533-43.
14. Cambridge, S. B., Davis, R. L. and Minden, J. S. (1997) Science, 277(5327), 825-8.
15. Garcia-Martinez, V. and Schoenwolf, G. C. (1993) Developmental Biology, 159(2), 706-19.
16. Ho, R. K. and Kimmel, C. B. (1993) Science, 261, 109-111.
17. Ho, R. K. and Kane, D. A. (1990) Nature, 348(6303), 728-30.
18. Shih, J. and Fraser, S. E. (1996) Development, 122(4), 1313-22.
19. Oppenheimer, J. M. (1936) J. exp. Zool, 72, 247-269.
20. Sagerstrom, C. G., Grinbalt, Y. and Sive, H. (1996) Development, 122(6), 1873-83.
7.6 (Additional Protocol) Production of chimeric medaka(Y. Wakamatsu; modified to Ando & Wakamatsu, 1995)
Preparation
FishTwo medaka (Oryzias latipes) strains different in body color are used (wild-type strain as donor,
albino strain as recipient)
Reagents and Equipments• 90% calcium- and magnesium-free phosphate-buffered saline (90% CMF-PBS)
• Balanced salt solution for medaka (BSS) (Iwamatsu, 1983)
• BSS supplemented with 100 U/ml penicillin and 100µg/ml streptomycin (BSS+PS)
• BSS supplemented with 2 ppm methylene blue (BSS+MB)

EMBO COURSE MEDAKA & ZEBRAFISH HEIDELBERG 118
• Wide-mouthed pipet
• Stereoscopic microscope(magnification of 60-70)
• Plastic suspension culture dish (diameter 60mm,SUMILON)
• Fine forceps (INOX No.5)
• Micromanipulator (Eppendorf, NARISHIGE MN-2)
• Microneedle
• Loading capillary
• Degassed water
• Liquid paraffin
• Orientation needle (glass tube with plastic thread at tip)
Preparation of hatching enzyme solutionCulture embryos in 0.5 ppm methylene blue solution at 26°C and harvest them just before hatching
(8-9 days after fertilization). To remove methylene blue, transfer them to distilled water one day beforecollection.
Put harvested embryos in a homogenizer and add equivalent volume of 90% CMF-PBS. Homogenizeembryos on ice and store at 4°C overnight.
Centrifuge the homogenate at 15,000 rpm for 10 min at4°C.
Dispense the supernatant in 100µl aliquots into 1.5 mlcentrifuge tubes and store at -80°C.
Preparation of agar platesEmbryonic cell transplantation is carried out on an
aseptically-prepared agar plate.
Pour sterilized BSS containing 2% agar into a 6 cm plasticdish to a depth of 3 mm.
After the agar hardens, make two V-shaped grooves 1 mmwide and 1 mm deep for orientation of embryos with a sterilerazor blade (Figure 5). It is easy to make a groove using arazor blade held by forceps.
Collection of embryos
Embryos at midblastula stage (Iwamatsu,1994) are used fortransplantation. Collect embryos before morula stage because embryos continue to develop during thehatching enzyme treatment.
Figure 1: Agar plate. Two V-shaped grooves are made at oneside of the agar plate.

EMBO COURSE MEDAKA & ZEBRAFISH HEIDELBERG 119
Scoop females up with a net and collect clusters of eggs from the abdomen. Place egg clusters in thecenter of a paper towel and roll them pressing gently with another paper towel. Don't press the clustersfirmly, as embryos at the early stage are easily injured. The attaching filaments are broken and removedby this treatment, and egg clusters separate into single eggs.
Transfer single eggs to dishes of distilledwater. Remove unfertilized (lacking fertilizationmembrane) and dead eggs. Eggs whose chorionhas been dented in the process of removal ofattaching filaments return to normal after a shorttime, but eggs whose blastoderm has becomeblackish soon die.
Removal of chorion
Medaka embryos are covered with a 2-layer chorion that has a hard inner layer and a soft outersurface. Glass needles penetrate the hard chorion with difficulty so that operations such as aspirationand injection of blastodermal cells cannot be performed smoothly. Therefore, embryos dechorionatedwith medaka hatching enzyme are used for transplantation. The hatching enzyme is a protease, which issecreted from the hatching enzyme gland and dissolves the inner layer of the chorion (Yasumasu, et al,1994). Dechorionated embryos develop normally and at the same rate as embryos with a chorion.
Arrange eggs in a monolayer in a well of a 24- or 96-well plastic plate. If eggs are piled on top of eachother, eggs at the bottom are crushed when the chorion dissolves. Immerse eggs in the hatching enzymesolution and keep at 26°C. Check periodically under a stereoscopic microscope for dissolution ofchorion. When the enzyme begins to work, a number of lunar crater-like holes open in the inner layer,and the inner layer soon disappears, generally within 30-60 min. After this treatment, use sterile toolsand reagents.
Add BSS+PS gently after the inner layer dissolves.
Pipet gently with a wide-mouthed pipet to float embryos. Draw up floating embryos slowly andtransfer gently to BSS+PS in a plastic suspension culture dish. Use this type of dish after this step toprevent dechorionated eggs from adhering to dishes.
Transfer embryos to fresh BSS+PS to remove hatching enzyme.
Figure 2: Wide-mouthed pipet. Wide-mouthedpipets are made by cutting pasteur pipets wherethe inner diameter is 2 mm and fire-polishing thecut end .
Figure 3: Orientation needle.Orientation needles are made by fixingthe plastic thread to the tip of 5 mmo.d. glass tubing.
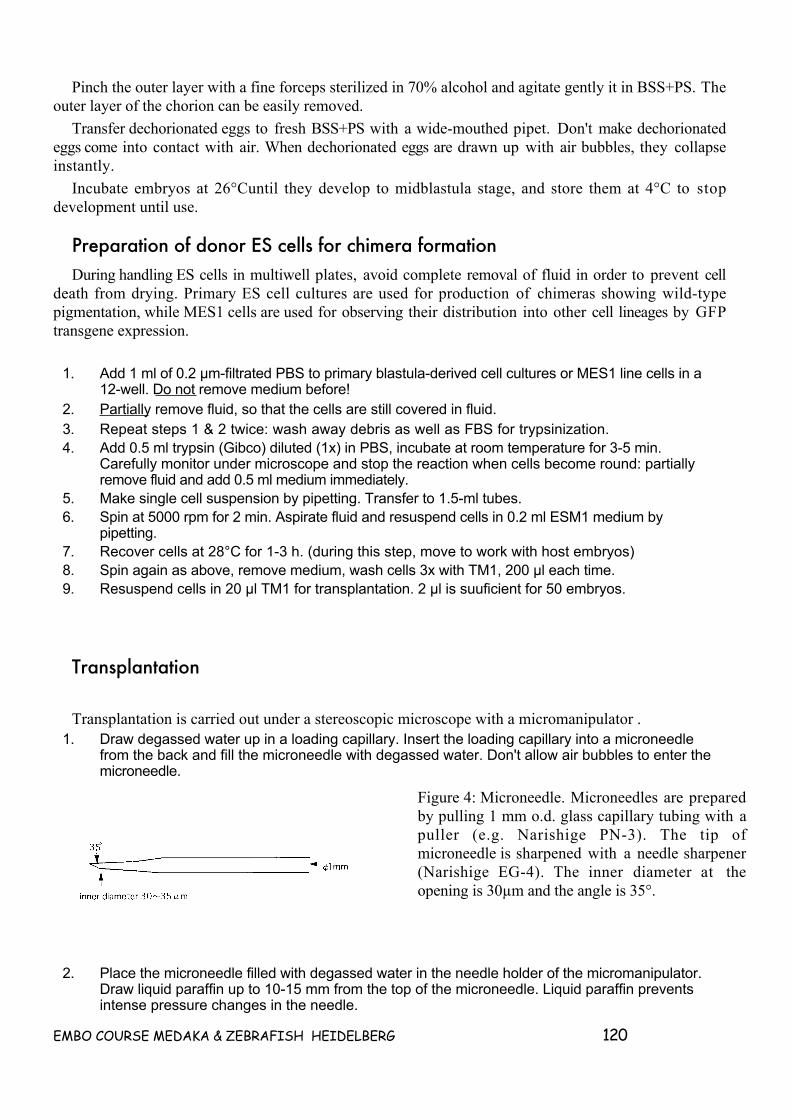
EMBO COURSE MEDAKA & ZEBRAFISH HEIDELBERG 120
Pinch the outer layer with a fine forceps sterilized in 70% alcohol and agitate gently it in BSS+PS. Theouter layer of the chorion can be easily removed.
Transfer dechorionated eggs to fresh BSS+PS with a wide-mouthed pipet. Don't make dechorionatedeggs come into contact with air. When dechorionated eggs are drawn up with air bubbles, they collapseinstantly.
Incubate embryos at 26°Cuntil they develop to midblastula stage, and store them at 4°C to stopdevelopment until use.
Preparation of donor ES cells for chimera formationDuring handling ES cells in multiwell plates, avoid complete removal of fluid in order to prevent cell
death from drying. Primary ES cell cultures are used for production of chimeras showing wild-typepigmentation, while MES1 cells are used for observing their distribution into other cell lineages by GFPtransgene expression.
1. Add 1 ml of 0.2 µm-filtrated PBS to primary blastula-derived cell cultures or MES1 line cells in a12-well. Do not remove medium before!
2. Partially remove fluid, so that the cells are still covered in fluid.3. Repeat steps 1 & 2 twice: wash away debris as well as FBS for trypsinization.4. Add 0.5 ml trypsin (Gibco) diluted (1x) in PBS, incubate at room temperature for 3-5 min.
Carefully monitor under microscope and stop the reaction when cells become round: partiallyremove fluid and add 0.5 ml medium immediately.
5. Make single cell suspension by pipetting. Transfer to 1.5-ml tubes.6. Spin at 5000 rpm for 2 min. Aspirate fluid and resuspend cells in 0.2 ml ESM1 medium by
pipetting.7. Recover cells at 28°C for 1-3 h. (during this step, move to work with host embryos)8. Spin again as above, remove medium, wash cells 3x with TM1, 200 µl each time.9. Resuspend cells in 20 µl TM1 for transplantation. 2 µl is suuficient for 50 embryos.
Transplantation
Transplantation is carried out under a stereoscopic microscope with a micromanipulator .1. Draw degassed water up in a loading capillary. Insert the loading capillary into a microneedle
from the back and fill the microneedle with degassed water. Don't allow air bubbles to enter themicroneedle.
2. Place the microneedle filled with degassed water in the needle holder of the micromanipulator.Draw liquid paraffin up to 10-15 mm from the top of the microneedle. Liquid paraffin preventsintense pressure changes in the needle.
Figure 4: Microneedle. Microneedles are preparedby pulling 1 mm o.d. glass capillary tubing with apuller (e.g. Narishige PN-3). The tip ofmicroneedle is sharpened with a needle sharpener(Narishige EG-4). The inner diameter at theopening is 30µm and the angle is 35°.
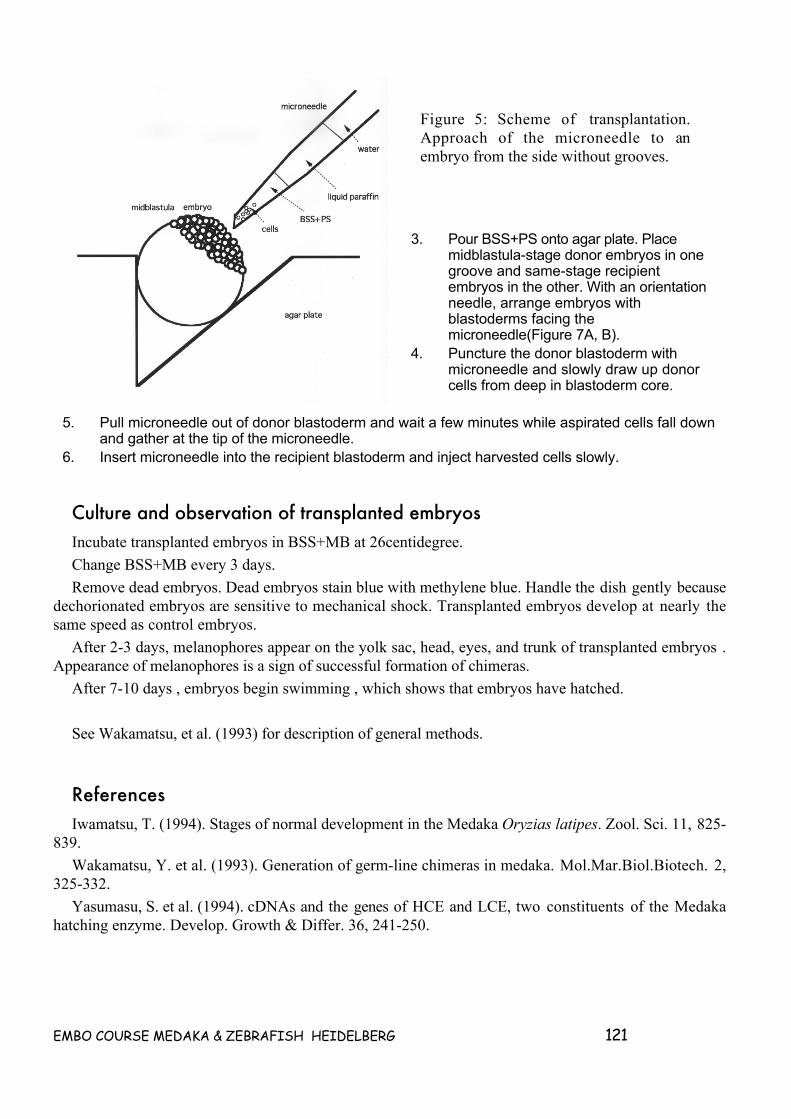
EMBO COURSE MEDAKA & ZEBRAFISH HEIDELBERG 121
3. Pour BSS+PS onto agar plate. Placemidblastula-stage donor embryos in onegroove and same-stage recipientembryos in the other. With an orientationneedle, arrange embryos withblastoderms facing themicroneedle(Figure 7A, B).
4. Puncture the donor blastoderm withmicroneedle and slowly draw up donorcells from deep in blastoderm core.
5. Pull microneedle out of donor blastoderm and wait a few minutes while aspirated cells fall downand gather at the tip of the microneedle.
6. Insert microneedle into the recipient blastoderm and inject harvested cells slowly.
Culture and observation of transplanted embryosIncubate transplanted embryos in BSS+MB at 26centidegree.
Change BSS+MB every 3 days.
Remove dead embryos. Dead embryos stain blue with methylene blue. Handle the dish gently becausedechorionated embryos are sensitive to mechanical shock. Transplanted embryos develop at nearly thesame speed as control embryos.
After 2-3 days, melanophores appear on the yolk sac, head, eyes, and trunk of transplanted embryos .Appearance of melanophores is a sign of successful formation of chimeras.
After 7-10 days , embryos begin swimming , which shows that embryos have hatched.
See Wakamatsu, et al. (1993) for description of general methods.
ReferencesIwamatsu, T. (1994). Stages of normal development in the Medaka Oryzias latipes. Zool. Sci. 11, 825-
839.
Wakamatsu, Y. et al. (1993). Generation of germ-line chimeras in medaka. Mol.Mar.Biol.Biotech. 2,325-332.
Yasumasu, S. et al. (1994). cDNAs and the genes of HCE and LCE, two constituents of the Medakahatching enzyme. Develop. Growth & Differ. 36, 241-250.
Figure 5: Scheme of transplantation.Approach of the microneedle to anembryo from the side without grooves.
EMBO COURSE MEDAKA & ZEBRAFISH HEIDELBERG 122
8. Cell culture
8.1 Isolation and long-term cultivation of medaka blastula cells(contributed by Y. Hong)
Preparations (in a tissue culture hood)1. Coat 24-well plates with 0,1% gelatin solution (0,5 ml/well) for 30 min.2. Aspirate gelatin solution and allow plates to air-dry for 2h.3. Add 1ml of ESM4 medium per well and pre-warm in a 28°C incubator.4. Put a dissecting microscope into a culture hood. Sterilize by 70% ethanol & UV treatment for 20
min.
Isolation and primary culture1. Collect clusters of eggs in a 6-cm Petri dish with ERM within 2 h postfertilization.2. Roll the eggs in the dish with a finger to remove larger hairs.3. Wash and transfer fertilized (transparent) eggs to a new dish with ERM (Embryo Rearing
Medium).4. Incubate at 26°C until 6h post fertilization.
The following steps are done in a tissue culture hood
5. Transfer embryos to 6-well plates6. Treat embryos with 10 ml 0,5% bleach for 1 min.7. Wash embryos with PBS 4-5 times.8. Transfer 20-30 embryos with a drop (300-400 µl) of PBS to the middle of a 6-cm dish.9. Poke the chorion and yolk with fine forceps under a dissecting microscope. Let stand for 5 min
(The yolk material will flow out).10. Replace half of PBS in the drop 3-5 times to remove yolk material.11. Press the chorion to release cells through the hole. Remove chorion and hairs.12. Make a cell suspension by pipetting. Swirl the suspension by pipetting in one direction at the
marginal region of the drop. Let stand for 5 min for the cells to settle down in the middle of thedrop.
13. Suck up 200-300µl supernatant carefully, without disturbing the cells. Add 200-300µl PBS.Pipette and swirl the drop (Keep the drop in a diameter not larger than 1 cm).
14. Repeat 4-5 times.15. After final washing step, suck up the cells with 100µl PBS and seed evenly in 1 ml ESM4 medium
in a 24-well plate pre-warmed at 28°C.16. Culture the cells in a 28°C incubator WITHOUT CO2.
17. After 1 day, change 800 µl medium and culture for 3-4 days. Observe daily.
EMBO COURSE MEDAKA & ZEBRAFISH HEIDELBERG 123
Hong, Y., Schartl, M.: Establishment and growth responses of early medakafish (Oryzias latipes)embryonic cells in feeder layer-free cultures. Mol. Mar. Biol. Biotechnol 5, 93-104, 1996.
Hong, Y., Winkler, C., Schartl, M.: Pluripotency and differentiation of embryonic stem cell lines fromthe medakafish (Oryzias latipes). Mech. Dev. 60, 33-44, 1996.
_________________________
8.2 Transfection of medaka ES cell cultures(contributed by Y. Hong)
Several protocols are effective for gene transfer into medaka ES cell cultures. Electroporation andGeneJuice Transfection Reagent (70967-3; Novagen) reproducibly give rise to a high efficiency (25-40%), while liposomes are inefficient. Here one stable medaka ES cell line, MES1, will be transfectedwith a GFP expression vector by using GeneJuice Transfection Reagent.
1. Seed 1 ml of MES4 cell suspension (105/ml ESM1) in gelatin-coated 12-well plates one daybefore so that cell density will be 70% confluency at transfection.
2. Prepare transfection mix by combining:(100 µl mix containing 2 µg plasmid DNA for 1 ml medium in a 12-well)
A: 40 µl pure DMEM medium (no antibiotics, no serum)10 µl GeneJuice Transfection Reagent
mix by pipetting gentlyB: 48 µl pure DMEM medium (no antibiotics, no serum)
2 µl pCVpf DNA (µg/µl)mix by pipetting gently
Add A to B, mix by pipetting. Incubate in cell culture hood for 5-10 min3. Drop the mix to cells.4. Two days later, the cells are checked by fluorescent microscopy: 5-20% are green due to GFP.
The cells are ready for drug selection or transplantation into blastulae.
8.3 Transplantation of cultivated medaka cells into blastulaembryos
(contributed by Yunhan Hong)
Preparation of donor cells at the log phase
EMBO COURSE MEDAKA & ZEBRAFISH HEIDELBERG 124
1. Day 0: Seed 106 MES1 (Medaka ES) cells expressing eGFP in 2 ml ESM4 medium in a 6-wellplate and culture at 28°C.
2. Day 1: Change the medium and culture at 28°C.3. Day 3: Aspirate the medium, wash 3x with PBS. Incubate cells with 1 ml PBS at RT for 10 min.
Pipette vigorously and transfer cell suspension to 1.5 ml tube. Spin at 5000 rpm for 2 min.Resuspend cell pellet in 1 ml PBS. Spin again. Wash twice with 0.5ml transplantation medium(TM1). Resuspend cells in 10-20µl TM1. Cells are now ready for injection.
Preparation of recipient embryos
Collect eggs shortly after fertilization. Remove the attachment filaments by finger-rolling in a 10-cmdish with ERM. Wash 3x with water.
Transfer eggs in a droplet of H2O to the center of a dry 3-cm dish. Remove residual H2O. Treat in200µl proteinase K (20mg/ml) at 28°C for 1-2 h. Wash 3x with H2O.
Transfer embryos with H2O into a 3-cm non-adhesive dish in such a way that embryos are arranged ina drop not larger than 1 cm in diameter. Remove excessive H2O so that all embryos are just immersed butnever exposed to air. Add hatching enzyme (HE) to the drop to cover all embryos (300-400 µl). Positionembryos in a single layer. Be sure that all embryos are submerged. Incubate at 28°C for 2-3 h.
Carefully put under a binocular for observation: chorion is fragmented or completely digested. PipetteBSS-1%PEG and gently add to the drop: 5 ml/dish. Remove chorions from all HEALTHY embryos byusing a pair of fine forceps. Transfer dechorionated embryos with a wide-opening plastic pipette into a3-cm non adhesive dish with 5 ml BSS-1%PEG. Now the embryos are ready for injection.
Note: Be careful when transferring dechorionated embryos, which are very fragile. Avoid air bubbleswhich will destroy embryos. Avoid direct contacts of embryos with solution surface, which also resultsin embryo collapse. During transfer, embryos should be floated in the middle of the narrow part of aplastic pipette which is fully filled with BSS-1% PEG. Insert the tip down to the solution in the dish,push the solution slowly and gently out from the pipette.
Transplantation(All transplantation steps are performed under sterile conditions (if possible!))
Preparation of transplantator or needle holder1. Wash transplantator thoroughly with ethanol and rinse with Millipore water2. Fill device with light mineral oil (Sigma # M3516) and place all components together3. Fill a transplantation needle with TM1 avoiding air bubbles; insert needle into device4. Place transplantator on top of a micromanipulator5. Break needle tip6. Pipette 5µl droplet of donor cell suspension into a sterile petri dish; bring needle tip into the
suspension and carefully suck up cells into the needle7. Remove needle from the suspension and let the cells sink down in the needle tip
EMBO COURSE MEDAKA & ZEBRAFISH HEIDELBERG 125
Orientation and injection of recipient embryos1. Transfer dechorionated recipient embryos to an agarose ramp or plastic devices (also used for
oocyte injection) containing BSS-1%PEG (12-15 ml per 6-cm dish).2. Make an opening approx 30 µm in diameter at the tip of a needle and put the needle into a 1.5-ml
microfuge tube filled with TM1, the sharp tip facing up: the needle is loaded by capillary force.Connect the needle to the micromanipulator, remove the air from the needle. Load 2-3 µl of theMES1 donor cells into a tiny drop on the cover of a 3-cm dish. Insert the needle to the cell dropand suck cells by a gentle negative pressure.
3. Carefully position embryos using an orientation needle (do not contact embryos with the sharptip, but the side of the tip), so that the cell mass (milky) faces the needle tip.
4. Insert needle into blastula stage recipient and inject app. 50 cells into the center of the blastula5. Remove injection needle out the injected embryo as quickly as you can.6. Transfer embryos carefully from injection device to Petri dish (non adhesive) filled with BSS-
1%PEG.7. Incubate at 18°C the first day, then at 28°C the following days. Change medium twice a day;
remove dead embryosObservation: after successful transplantation, green cells should be visible here or there in the cell
mass. After one day, green donors are seen in many different areas: head, trunk, somites, yolksac. On day 3, the donor cells are in the heart, circulation, eye etc.
Material needed• Wide-mouthed pipette
• Stereoscopic microscope
• Plastic suspension culture dishes (bacterial)
• Fine forceps (INOX 5)
• Micromanipulator (Eppendorf)
• Microneedles
• Loading capillary
• Orientation needle
•
Buffers and solutions
ESM4 (for blastula cell culture)DMEM 13 g/lGlucose 4.5 g/lHepes 20 mMStreptomycin/penicillin 50 U/ml/ 50/µg/mlNon-essential amino acids 1 mMNa-pyruvate 1 mMNa-selenite 2 nMGutamine 2 mM2-mercaptoethanol 100 µMES-FCS 15%Rainbow trout serum (self made) 1%
EMBO COURSE MEDAKA & ZEBRAFISH HEIDELBERG 126
bFGF; human recombinant 10 ng/mlMedaka embryo extract (self made) 1 embyo/ml
pH 7.6
filter through 0.2 µm filter
TM1 buffer (for cell transplantation)NaCl 100 mMKCl 5 mMHepes 5 mMPhenol red 2 µg/mlpH 7.0
filter through 0.2 µm filter
Proteinase K 20 mg/ml in water
BSS (for cell culture)Solution A (500ml):
NaCl 65gKCl 4gMgSO4 x 7H2O 2gCaCl2 x 2H2O 2gPhenol red 5mgautoclave
Solution B:NaHCO3 5%filter through 0.2 µm filter
dilute 25ml solution A with 475ml of distilled water and add 1ml of solution B
BSS-1% PEG PEG20000 in BSS 1%Streptomycin/penicillin 100 µg/U/mlSterile filter through 0.2 µm filter
ReferencesHong, Y., Winkler, C., Schartl, M. (1998) Proc. Natl. Acad. Sci. 95, 3679-3684.
Hong, Y., Winkler, C., Schartl, M. (1998) Dev. Genes Evol. 208, 595-602.
EMBO COURSE MEDAKA & ZEBRAFISH HEIDELBERG 127
8.4 (Additional protocol) Primary culture of blastula cells inmedaka
(Y. Wakamatsu)
Materials
• Medaka hatching enzyme solution2
• Medaka balanced salt solution supplemented with antibiotics (BSS + PS)2
• Culture medium3: Culture medium is prepared by modyfying Robertson´s methods for culture
of mouse embryonic stem cells4, that is, Dulbecco´s modified Eagle medium supplementedwith 15% fetal calf serum, 5% carp serum, 100U/ml penicillin, 100µg/ml streptomycin, non-
essential amino acids5, nucleosides6, 2-mercaptoethanol7, 103 U/ml leukemia inhibitoryfactor, 20ng/ml basic fibroblast growth factor, and 25mM Hepes (pH 7.3)
• Trypsin-EDTA solution3: Calcium- and magnesium-free Dulbecco´s phosphate buffered salinecontaining 0.25% trypsin and 0.04% EDTA is sterilized by filtration.
Methods
Collection of embryos
Medaka spawns every day throughout the year under a controlled condition of temperature (26°C)and lighting (14 hours light and 10 hours dark).
1. Collect 50 to 60 eggs in the morula stage8 from females belly.
2. Remove the attachment filaments of eggs by rolling them on a piece of paper2.3. Rinse the eggs twice in water.
Preparation of blastoderms for culture
1. Remove the chorion by using medaka hatching enzyme solution2. All procedures are done understerilized conditions after this step.
2. Rinse the dechorionated embryos twice in BSS+PS in a 60mm plastic dish for suspensionculture.
3. Suck the embryos gently into a pasteur pipet. Yolk of the embryos is broken by this treatment.4. Remove yolk fragments attaching to the blastoderms by fine forceps.5. Rinse the resulting cell masses of blastoderms twice in BSS+PS.

EMBO COURSE MEDAKA & ZEBRAFISH HEIDELBERG 128
Culture of blastoderm cells1. Divide each cell mass into several smaller fragments by forceps.2. Centrifuge the fragments at 500 rpm for five minutes3. Resuspend them in 500µl of the culture medium and inoculate them in a single well of a six-well
plate.4. Inoculate the plate at 28°C in air.5. The fragments attach to the substratum one to four days after inoculation. Replace half of the
medium in the well with fresh medium every two to three days.6. One week after inoculation, the attached fragments exhibit an active outgrowth. Dissociate the
fragments into smaller fragments and single cells by trypsinizing them with trypsin-EDTA solutionand pipetting.
7. Inoculate the resulting smaller fragments and single cells in a single well of a six-well plate.8. Replace half of the medium in the well every two to three days.9. When the cultures have grown, subculture them in larger dishes by routine culture methods.
Notes1 Wakamatsu, Y., Ozato, K., Sasado, T. (1994). Establishment of a pluripotent cell line derived from a
Medaka (Oryzias latipes) blastula embryo. Mol.Mar.Biol.Biotec. 3, 185-191.
2 See the protocol "Production of chimeric medaka (Oryzias latipes)"
3 Osmotic pressure of all solutions used for culture is adjusted to 90% of that in mammalin cell culture bydiluting them with double distilled water.
4 Robertson, E.J. (1987). Embryo-derived stem cell lines. In: Teratocarcinomas and Embryonic Stem Cells:A Practical Approach. Robertson, E.J. 8ed.), Oxford, IRL Press, pp. 71-112.
5 100x non-essential amino acids solution (Gibco)
6 100x nucleosides stock solution: Dissolve 80mg adenosine, 85mg guanosine, 73mg cytidine, 73mg uridine,and 24mg thymidine in 100ml double distilled water at 37°C and sterilize by filtration.
7 100x 2-mercaptoethanol stock solution: Dissolve 7µl of 2-mercaptoethanol in 10ml double distilled waterand sterilze by filtration.
8 Iwamatsu, T. (1994). Stages of normal development in the medaka Oryzias latipes. Zool. Sci. 11: 825-839.
8.5 Fluorescence activated cell sorting (FACS)(contributed by Felix Loosli)
Flow cytometry is a method for quantitating components or structural features of cells, primarily byoptical means. Although measurements are made on one cell at a time, several thousands of cells can beprocessed in a few seconds. Cells may be alive or fixed at the time of measurement, but must be inmonodisperse (single cell) suspension. They are passed single-file through a laser beam by a continuousflow of a suspension stream. Each cell scatters some of the laser light and also emits fluorescent lightexcited by the laser. The cytometer typically measures several parameters simultaneously for each cell:
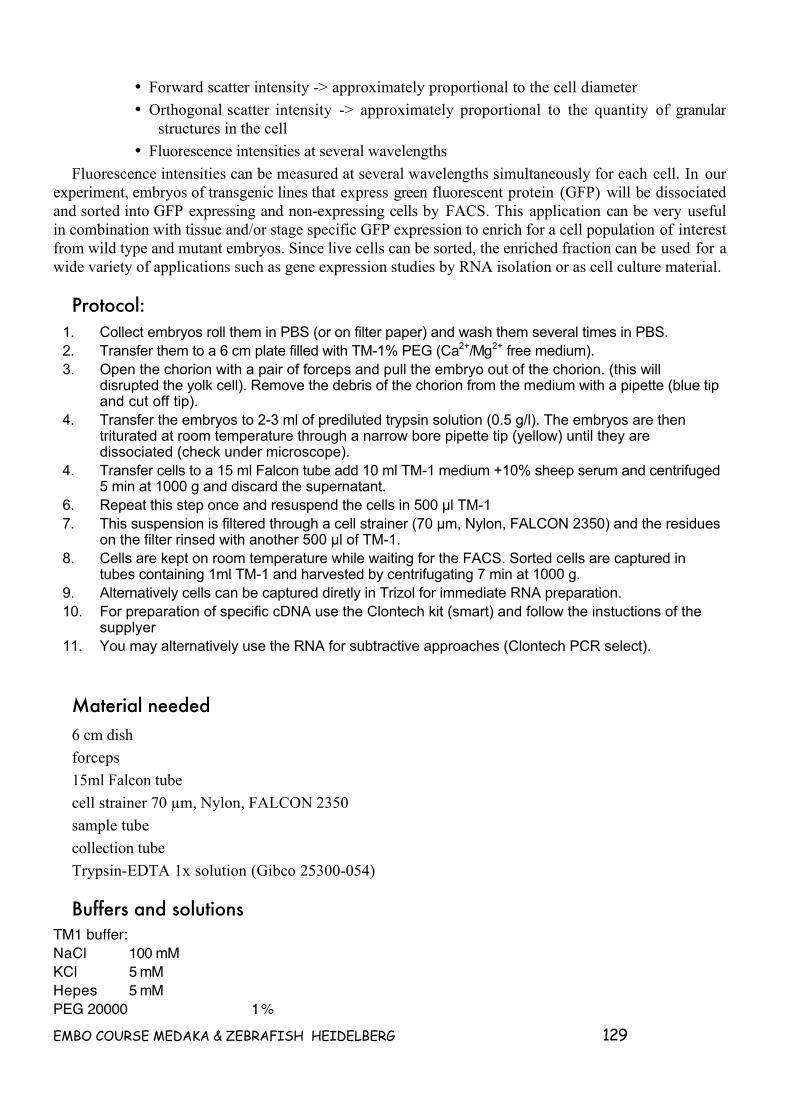
EMBO COURSE MEDAKA & ZEBRAFISH HEIDELBERG 129
• Forward scatter intensity -> approximately proportional to the cell diameter
• Orthogonal scatter intensity -> approximately proportional to the quantity of granularstructures in the cell
• Fluorescence intensities at several wavelengths
Fluorescence intensities can be measured at several wavelengths simultaneously for each cell. In ourexperiment, embryos of transgenic lines that express green fluorescent protein (GFP) will be dissociatedand sorted into GFP expressing and non-expressing cells by FACS. This application can be very usefulin combination with tissue and/or stage specific GFP expression to enrich for a cell population of interestfrom wild type and mutant embryos. Since live cells can be sorted, the enriched fraction can be used for awide variety of applications such as gene expression studies by RNA isolation or as cell culture material.
Protocol:1. Collect embryos roll them in PBS (or on filter paper) and wash them several times in PBS.2. Transfer them to a 6 cm plate filled with TM-1% PEG (Ca2+/Mg2+ free medium).3. Open the chorion with a pair of forceps and pull the embryo out of the chorion. (this will
disrupted the yolk cell). Remove the debris of the chorion from the medium with a pipette (blue tipand cut off tip).
4. Transfer the embryos to 2-3 ml of prediluted trypsin solution (0.5 g/l). The embryos are thentriturated at room temperature through a narrow bore pipette tip (yellow) until they aredissociated (check under microscope).
4. Transfer cells to a 15 ml Falcon tube add 10 ml TM-1 medium +10% sheep serum and centrifuged5 min at 1000 g and discard the supernatant.
6. Repeat this step once and resuspend the cells in 500 µl TM-17. This suspension is filtered through a cell strainer (70 µm, Nylon, FALCON 2350) and the residues
on the filter rinsed with another 500 µl of TM-1.8. Cells are kept on room temperature while waiting for the FACS. Sorted cells are captured in
tubes containing 1ml TM-1 and harvested by centrifugating 7 min at 1000 g.9. Alternatively cells can be captured diretly in Trizol for immediate RNA preparation.10. For preparation of specific cDNA use the Clontech kit (smart) and follow the instuctions of the
supplyer11. You may alternatively use the RNA for subtractive approaches (Clontech PCR select).
Material needed6 cm dish
forceps
15ml Falcon tube
cell strainer 70 µm, Nylon, FALCON 2350
sample tube
collection tube
Trypsin-EDTA 1x solution (Gibco 25300-054)
Buffers and solutionsTM1 buffer:NaCl 100 mMKCl 5 mMHepes 5 mMPEG 20000 1%

EMBO COURSE MEDAKA & ZEBRAFISH HEIDELBERG 130
pH7.0, filter through 0.2 µm filter
TM-1 buffer + 10% sheep serum
9. Database resources
9.1 Internet Information Resources: ZFIN Database(M. Westerfield)
The specific exercises will be passed out during the course. To prepare ahead of
time, read through the on-line information at:
http://zfish.uoregon.edu/zf_info/dbase/db.html
Particularly read:
http://zfish.uoregon.edu/ZDB/PAPERS/sdb/dbs.html
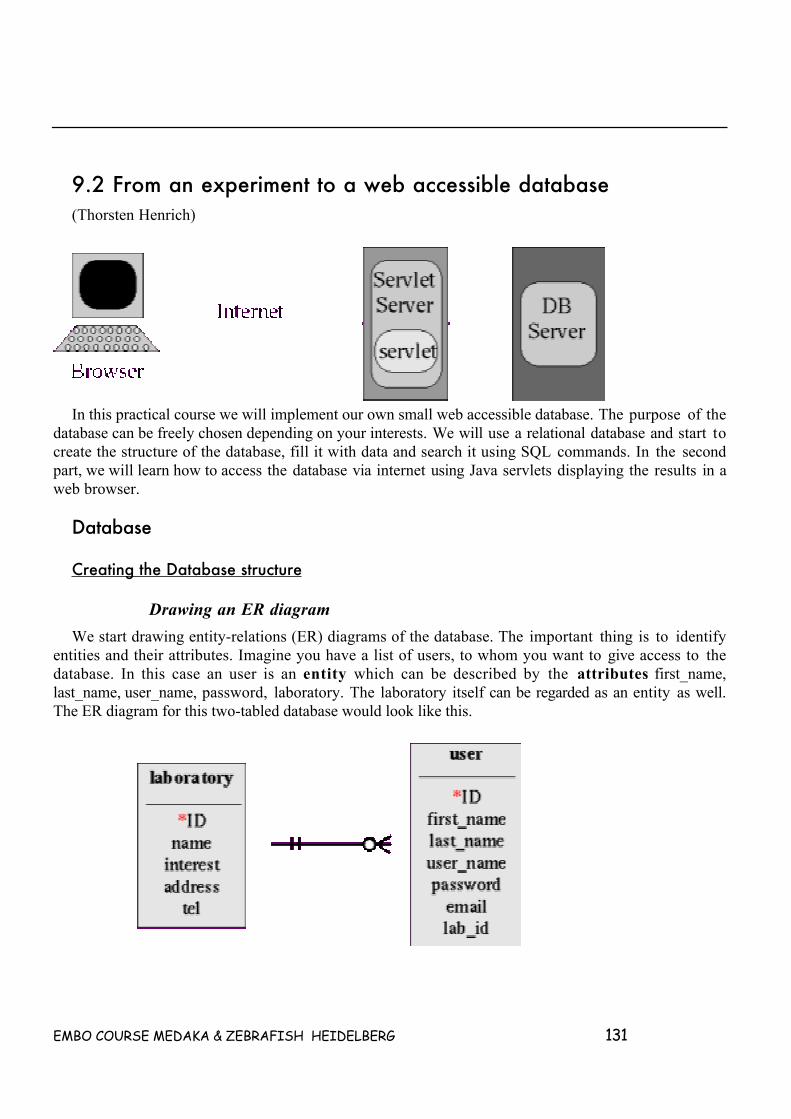
EMBO COURSE MEDAKA & ZEBRAFISH HEIDELBERG 131
9.2 From an experiment to a web accessible database(Thorsten Henrich)
In this practical course we will implement our own small web accessible database. The purpose of thedatabase can be freely chosen depending on your interests. We will use a relational database and start tocreate the structure of the database, fill it with data and search it using SQL commands. In the secondpart, we will learn how to access the database via internet using Java servlets displaying the results in aweb browser.
Database
Creating the Database structure
Drawing an ER diagram
We start drawing entity-relations (ER) diagrams of the database. The important thing is to identifyentities and their attributes. Imagine you have a list of users, to whom you want to give access to thedatabase. In this case an user is an entity which can be described by the attributes first_name,last_name, user_name, password, laboratory. The laboratory itself can be regarded as an entity as well.The ER diagram for this two-tabled database would look like this.
EMBO COURSE MEDAKA & ZEBRAFISH HEIDELBERG 132
The table user has 7 columns (ID, first_name...). The column lab_id connects the two tables with eachother. It is the foreign key to the tables laboratory. The two tables above have a one to manyrelationship. One lab can have many users and each user is member of only one lab.
Creating the database
In the next step we will translate the ER diagram into a relational database model. This basicallymeans to find the proper SQL commands to create the database tables. Here we will learn more about theSQL commands create table, drop table and alter table. To create the two tables shown above thefollowing commands have to be executed. > create table laboratory (id smallint not null, name varchar(20), interest varchar(30), address
varchar(30), tel varchar (15), primary key (id)) > create table user (id smallint not null, first_name varchar(10), last_name varchar(10), user_name
varchar(8), password varchar (8), email varchar(60), lab_id smallint, primary key (id), foreignkey lab_id (id) references laboratory on update restrict on delete restrict)Because table user depends on table laboratory it can only be created if table laboratory exists already.
To check if the table has been created properly type this: > describe select * from laboratory
One can delete a table from a database by entering the following command > drop table laboratory
or change it by: > alter table laboratory add column url varchar(128)
Manipulating DataOnce the structure of the database has been established, the database needs be filled with data. First,
we will learn how to do this 'by hand' on the command line. Here we will use the SQL commands insert,update and delete. > insert into laboratory values (10, 'JST', 'Medaka', 'Kyoto', '494-6380') > insert into user values (100, 'Thorsten', 'Henrich', 'henrich', '1616', '[email protected]', 'JST') > update user set password='1617' where user_name='henrich' > delete from user where id=100
Retrieving DataHere you learn how to search the database using the SQL command select. The following command
selects all columns (*) with ID 100. > select * from user where id=100
Combining data from two tables: > select user_name from laboratory, user where tel like '%6380%' and laboratory.id = user.lab_id
Accessing the Database Through the WWW.
Editing a HTML formHTML forms enable users to submit data from a browser to a server. An HTML form enables us to
parse variables to a Java servlet, which uses this information to communicate with the database. Asimple example is a login form.
<html><head> <title> Login </title> </head><body>
EMBO COURSE MEDAKA & ZEBRAFISH HEIDELBERG 133
<form METHOD="post" ACTION="/AccessDataServlet">User: <INPUT type=text size=10 name=user>Password:<INPUT type=password size=10 name=password><INPUT type=submit name=submit value="Login">
</form> </body></html>
The INPUT, SELECT and TEXTAREA tags offer various other ways to fill out HTML forms, e.g.check boxes, radio buttons, select lists. You will get a sample HTML form, which contains all possibleinput tags and we will adjust this file to our purpose.
Java servletsJava servlets are written in the Java programming language. This means they have to be compiled
using the Java compiler javac.
The comand:
javac myProgram.java
results in the generation of the Java class file myProgram.class. The Java compiler will complain ifyour source (myProgram.java) has errors. The templates for two servlets will be provided. One tosubmit data to the database, the other to search the database. Together we adjust these templates toreceive the data sent from our HTML form and to send the proper commands to the database .
Getting the Parameters from the HTML form
In 2.1 you learned how to send data from a browser to a server using an HTML form. Here you learnhow to receive this data and handle it.
String user = request.getParameter("user");String password = request.getParameter("password");
Talking to the database
Here you learn how to establish a connection from a servlet to the database using Java databaseconnectivity (JDBC), how to execute SQL statements and process the result set. An example for apassword check is shown below.
boolean CheckAccess (String user, String password) {try {Connection con = DriverManager.getConnection("jdbc:db2:dbName",
"dbUser", "dbPass");String command = "select password from user where
user_name='"+user+"'";Statement stmt = con.createStatement();ResultSet rs = stmt.executeQuery(command);while (rs.next()){if (rs.getString("password").equals(password) ) { return true; }}rs.close(); stmt.close(); con.close();} catch (SQLException e) {e.printStackTrace();}return false;
EMBO COURSE MEDAKA & ZEBRAFISH HEIDELBERG 134
}
Response to the Browser
Once you receive the result set from the database, you have to inform the user about the result, whichmeans you have to send a response to the browser.
PrintWriter out = response.getWriter();String user = request.getParameter("user");out.println ("Hello "+user+"<br>");
Links:
Servlet Enginestomcat http://jakarta.apache.org/tomcat/ (free)
WebSphere http://www-3.ibm.com/software/webservers/appserv/
Servlet Tutorialhttp://java.sun.com/j2ee/tutorial/1_3-fcs/doc/Servlets.html
JavaJava http://java.sun.com/
Java API 1.4 http://java.sun.com/j2se/1.4/docs/api/index.html
HTMLGerman and French http://selfaktuell.teamone.de/
NCSA: A Beginner's Guide to HTML
http://www.ncsa.uiuc.edu/General/Internet/WWW/HTMLPrimer.html
DatabasesIBM DB2 http://www-3.ibm.com/software/data/db2/
Oracle http://www.oracle.com/
mySQL http://www.mysql.com/ (free)
Biological DatabasesThe Molecular Biology Database Collection: 2002 update:
http://nar.oupjournals.org/cgi/content/full/30/1/1/DC1
Literature:Bioinformatics:
Developing Bioinformatic Computer Skills, Gibas and Jambeck, O'REILLY
Servlets:
Java Servlet Programming, Jason Hunter, O'REILLY

EMBO COURSE MEDAKA & ZEBRAFISH HEIDELBERG 135
Java:
Java How to Program, Deitel&Deitel, Prentice Hall
Understanding SQL and Java Together, M. Eisenberg, Morgan Kaufmann
Databases/SQL:
A Relat ional Model of Data for Large Shared Data B a n k s E . F . Codd,Communications of the ACM, Vol. 13, No. 6, June 1970, pp. 377-387.
http://www.acm.org/classics/nov95/
Relational Database Design Clearly Explained JL Harrington, AP Professional
SQL the Complete Reverence, G. Weinberg, McGraw-Hill
SQL for Dummies, Allan G Taylor IDG Books Worldwide
SQL for Smarties, Joe Celko, Morgan Kaufmann
LINUX:
LINUX in a Nutshell, O'REILLY
EMBO COURSE MEDAKA & ZEBRAFISH HEIDELBERG 136
AppendixEmbryo Production By In Vitro Fertilization
(Source: C. Walker and G. Streisinger; modified W. Driever)
Overview of in vitro fertilization:
Large numbers of synchronously developing embryos can be obtained by in vitro fertilization.Gametes are expressed from breeding adults by gentle pressure. The sperm are maintained in Hank'ssaline. The gametes are mixed together in a petri dish. When water is added to the egg- sperm mixture,fertilization takes place very rapidly in 20 to 60 seconds. After 1 minute, the sperm are no longer active.The clutch of embryos is fertilized essentially synchronously and develops synchronously during theearly cleavage stages if maintained at constant temperature
1. Set up "crosses" between 1 male and 2-3 females each in breeding traps during the lateafternoon of the day before beginning the in vitro fertilization.
("Male induction" of oocyte maturation)
2. Precisely at "dawn" , separate males and females into two tanks. For the females, collectsperm from the males.
a. Anesthetize the male fish by immersion in MESAB (see RECIPES). Gill movements should slowdown, They can be lifted out of the anesthetic with a plastic spoon
b. Rinse in fish water, and place belly up in a slit in a damp sponge.
c. Gently blot the genital region with a Kimwipe so that no water is present (very important,because water activates sperm)
d. Stroke the sides of the fish gently but firmly with smooth (Millipore) forceps.
e. As the milky sperm come out of the genital pore, collect them in a microcapillary using gentlesuction.
f. Pool the sperm from several males in ice-cold, full-strength Hank's saline. For each 1 µl of sperm,use 50 µl Hanks. Sperm from 5-10 males is adequate for fertilization of several hundred eggs. Sperm incold Hank's will continue to fertilize eggs efficiently for up to 90 minutes. "Eyeball" the concentration ofsperm, collecting enough to make a cloudy suspension.
We often prefer to use the "I-buffer" for sperm storage (116 mM NaCl, 23 mM KCl, 6 mM CaCl2, then add 2 mM MgSO4 , 29 mM NaHCO3 and 0.5% fructose; pH to 7.2 and filtered through 0.22
micron filter)
3. As early as possible in the morning, start collecting eggs.
a. Anesthetize a female in MESAB
Care should be taken not to leave fish in MESAB for too long. Sometimes fish can be revived fromtoo long exposure to MESAB by irrigating their gills with water. Also, extra care should be taken not todamage the gills. Handling fish "front-to-back" when using spoons and spatulas is helpful. Onecharacteristic of sick fish is that their gills hemorrhage easily and the fish die after exposure to MESAB.
b. Rinse in fish water and blot "damp-dry" on a paper towel. Excess water will swell the eggs andprevent fertilization
c. Place the female in a 35 mm plastic petri dish and with damp (not wet) fingers, press gently butfirmly on the belly. If she is prepared to lay eggs, they will come out quite easily

EMBO COURSE MEDAKA & ZEBRAFISH HEIDELBERG 137
d. Gather the eggs with a spatula and return the female to water. Good eggs are a yellowish,translucent color, whereas eggs that have remained in the female too long are white and watery. To ensuregetting good eggs, collect them during the first 90 min after "dawn"
4. Fertilize the eggs
a. Add 30-50 µl of the sperm suspension in Hank's to the eggs
b. Mix gently
c. Add about 0.5-0.75 ml of Fructose-eggwater: (0.5 % Fructose in eggwater) and after 1-2 minutes,add 2 mls more Fructose - egg water. The actual time of fertilization is when the first water is added tothe eggs. Typically, 60-90% of the eggs are fertilized in an in vitro cross. Depending on health andunknown factors, females will produce.
Detailed protocol for in vitro fertilization
Place on bench afternoon before squeeze
- 2 paper towels.
- finger bowl or large petri dish for rinsing fish
- 200 ml beakers of MESAB diluted
- 50 µl wiretrol
- spatula or 2, if dividing clutches
- plastic spoon
- "Sharpie" marker
Prepare for O/N storage in refrigerator
- 200 ml Fructose-eggwater: 0.5 % Fructose in eggwater at 28°C
(egg water is 0.03% Instant Ocean Salt mix)
- Hank's Premix solution, see "Recipes".
- MESAB
Morning of the Squeeze
1. Get ice in the ice bucket.
2. To pre measured sodium bicarbonate (0.35 g), add 10 ml dH2O.
3. Measure 9.9 ml of Hank's Premix solution into a clean test tube with a screw cap.
a. Add 0.1 ml fresh bicarbonate solution to the Hanks Premix.
b. Put the Hank's completed solution on ice.
Squeezing Males
Materials Needed:
MESAB solution in two 250 ml beakers

EMBO COURSE MEDAKA & ZEBRAFISH HEIDELBERG 138
Stereo microscope
Sperm collection apparatus
20 ml beaker of Hank's solution
Finger bowl with fish water
Lamp
Kimwipes
1. Estimate the number of egg clutches to be obtained.
2. Measure 0.05 ml of Hank's for every clutch of eggs anticipated.
3. Put the measured Hank's a 1.5 ml microcentrifuge tube and put in ice.
EMBO COURSE MEDAKA & ZEBRAFISH HEIDELBERG 139
Procedure
1. Remove two fish from the plastic holding container with net and place into the 250 ml beakercontaining the MESAB solution. Repeat this for the other 250 ml beaker.
2. When gill movement has slowed, remove one fish with the plastic spoon.
3. Rinse this fish in the water in the finger bowl and place it upside down in the small sponge in theplastic dish.
4. Gently wipe the region of the anal fin with the corner of a Kimwipe.
5. Place the dish with the fish under the objective of the microscope, with the light illuminating thefish, especially the region of the anal fin.
6. With the capillary tube of the sperm collecting apparatus, gently push aside the anal fins to exposethe anus.
7. Using the forceps gently squeeze the sides of the fish at a point just anterior to the anal fins,collecting the sperm with the capillary tube. When finished return the fish to the finger bowl or recoverycontainer.
8. When you have collected sperm from 2-3 fish, add them to the Hanks solution in the small testtube in the ice bucket.
9. Repeat until you have collected the required amount of sperm.
10. Keep the small test tube with the sperm and Hank's solution in the ice. This helps prolongthe viability of the sperm.
Squeezing Females
Materials Needed:
MESAB solution in two 250 ml beakers
Sperm in Hank's solution
50 mm petri dishes
10-200 µl pipettor
Egg Water
2-1 ml pipettes and a 25 ml pipette in a liter beaker of fish water
egg water
Procedure
1. Place two females into the MESAB solution in each of the two 250 ml beakers. 2. When gillmovement has slowed, remove one of the fish with the plastic spoon. 3. Rinse the fish in the water in thefinger bowl.
4. Gently place the fish on a paper towel to dry briefly.
5. Using the spoon, transfer the fish into a small plastic dish.
6. Slightly dampen your fingers.
7. Place one finger of one hand on the dorsal side of the fish.

EMBO COURSE MEDAKA & ZEBRAFISH HEIDELBERG 140
8. Using one finger of the other hand express the eggs by gently pressing on the ventral side of thefish, starting just behind the pectoral fins and moving toward the tail. Only gentle pressure is needed. Ifthe fish has eggs they will come out easily. If gentle pressure fails to produce eggs do not continue tosqueeze harder. Extra squeezing may injure the fish.
9. If eggs are obtained, use the metal spatula to gently move them away from the fish's body. Thenslide the fish out of the dish.
10. Put the fish into a recovery container to revive.
11. When eggs are obtained by squeezing, cover them with the lid to the dish. Use eggs forfertilization within 2-3 minutes!!!
12. Repeat this for the remaining fish.
In Vitro Fertilization Procedure
1. Pipette 50 µl of Hanks/sperm onto the eggs by pushing the plunger all the way through thecapillary so that the tip of the plunger extends out of the end of the capillary.
2. Gently mix the sperm and eggs with the tip of the pipettor.
3. Using the 1 ml pipette, add 0.75 ml of Fructose - egg water to the egg/sperm mixture. This activatesthe sperm so that they can fertilize the eggs. The time of fertilization occurs when the WATER is added,not when the sperm is added.
4. Cover the dish with its lid.
5. Allow two minutes for fertilization to complete, then add more egg water, approximately 5 ml.
Gynogenesis: Ploidy manipulation in zebrafish
Fertilization with UV inactivated sperm: Generation of haploid embryos
A. Preparation of females for squeezing
1. In each breeding trap set-up two females and one male overnight.
2. Promptly at 8:30 ( or dawn time) separate the females from the males, prior to egg laying.
B. Squeezing males for fresh sperm samples
1. Collect 1.0 µl of sperm for each clutch to be fertilized. 50.0 µl of Extension buffer(Israel) on ice,should be used as buffer for each 2.0 µl of sperm collected.
2. Samples of 5.0 µl of sperm, in 100.0 µl of Extension Buffer can be used to quicken UV treatmenttime(this way 25.0 µl of buffer can be used to rinse the watch glass after UV irradiation).
3. Sperm samples can be kept overnight, or collected in the morning.
C. UV inactivation of sperm
1. Fill 15 cm petri dish with ice and press clean watch glass onto surface.
2. Avoid any condensation forming on glass surface.
3. Transfer 100.0 µl sperm and buffer solution to chilled watch glass.
4. Place in Stratalinker(lid should be removed from petri dish) and irradiate for 0.3 minutes.
Note: Stratalinker should be warmed up prior to use, by running one cycle while empty. Note: ifyou are not familiar with the Stratalinker, test efficiency of UV light by trying to fertilize golden or
EMBO COURSE MEDAKA & ZEBRAFISH HEIDELBERG 141
albino eggs with wild type sperm. The embryos should have the genotype and phenotype of the mother.If UV inactivates sperm, embryos should develop as nonpigmented haploids.
5. Transfer 100.0 µl UV sperm solution to fresh Eppendorf tube.
6. Rinse watch glass with 25.0 µl extension buffer resulting in 125.0 µl UV sperm solution for 5clutches of eggs.
D. Squeezing females for egg clutch activation with irradiated sperm, immediately followed by earlypressure treatment
1. Squeeze eggs into 60mm petri dish.
2. Pipette 70.0 µl UV sperm solution onto the clutch of eggs.
3. Pipette 750.0 µl fructose egg water onto the clutch of eggs,.
Early Pressure Treatment
Proceed identical to generation of haploid embryos. After fertilization: the second meiotic division isblocked by a pressure pulse>
Squeezing females for egg clutch activation with irradiated sperm, immediately followed by earlypressure treatment
1. Squeeze eggs into 60mm petri dish.
2. Pipette 70.0 µl UV sperm solution onto the clutch of eggs.
3. Pipette 750.0 µl fructose egg water onto the clutch of eggs, starting the timer.
4. Within the next 1 minute and 24 seconds: a. transfer as many eggs as possible to glass scintillation vial.
b. fill vial completely to form convex meniscus.
c. lay parafilm over surface, making sure no bubbles form under the film.
d. cap vial, using plastic cap with a hole punched in the top and place upside-down inpressure cell, pre-filled with water.
e. push piston into cell to second grove.
f. slide cell into press and pump to desired pressure 8000 psi. (6280 lbs for a 1 inch diameterpiston)
5. When the time reaches 6 minutes turn bottom knob, which is located on the base of the press,counter clockwise to slowly release the pressure over a 1 minute time interval.
6. Transfer embryos to clean petri dish with blue egg water.
Heat shock
(C. Walker; Zebrafish book)
This method uses a heat shock to inhibit the first mitotic division of the embryo. Streisinger et al.(1981) report that 10-20% of embryos treated with heat shock develop into adults.
EMBO COURSE MEDAKA & ZEBRAFISH HEIDELBERG 142
Overview of heat shock
1. Proceed with in vitro fertilization using UV inactivated sperm as described above.
2. At 13 min. after fertilization (at 28.5C), heat shock the embryos for 2 min. by transferring them to 41°C water.
3. Cool them rapidly to 28.5°C.
Detailed heat shock procedures
Materials Needed:
2 water baths, one set at 28.5 °C, one set at 41.4°C
3 or 4 1-liter beakers filled with egg water
Distilled water
Egg water
Heat shock vials
Electric stirrer that can be immersed
Thermometer
Timer
Data pad
Pasteur pipettes with narrow ends removed
Preparation:
1. Soak the heat shock vials over night in distilled water.
2. Fill water baths with distilled water.
3. Place one 1 liter beaker in the 41°C bath on a magnetic stirrer.
4. Fill this beaker with egg water to the level of the surrounding bath water.
5. Place 2 or 3 1 liter beakers in the 28.5°C bath and fill them with egg water to the level of the surrounding bath water.
6. Remove the heat shock vials from the distilled water and allow them to dry on paper towels.
7. Prepare data sheet. (see Example below)
8. Place a few of the heat shock vials into one of the beakers in the 28.5C bath, beginning with the vial marked '1'.
Procedure:
1. Squeeze female fish as for Embryo Production by In Vitro Fertilization and activate them with UVsperm.
2. As the 1 ml of egg water is added to begin activation, start the timer. Mark this dish #1. Eachsuccessive batch of eggs obtained should be marked in numerical order.
3. Add more egg water to the fertilized eggs after about 30 seconds.
4. About 8 minutes after fertilization, transfer embryos from their dish to the appropriately numberedheat shock vial in the 28.5°C bath. Each batch of eggs treated should be transferred to the vial markedwith the same number as the number on the dish in which the eggs are fertilized.
5. At 13 min. after activation, transfer the vial containing the embryos to the 41.4°C water bath.
EMBO COURSE MEDAKA & ZEBRAFISH HEIDELBERG 143
6. At 15 min. after fertilization transfer the vial from the 41.4°C bath to the 28.5°C bath.
7. Repeat this for the other batches of eggs. This is different from EP in that you can continuesqueezing females while you are waiting to transfer the embryos from one bath to the other. Because ofthis, you will not restart the timer for each fertilization. For each subsequent fertilization simply recordthe time shown on the running timer as Time of Activation. At the time you transfer the eggs from the28.5°C bath to the hot bath add 2 minutes to that time to find the time to transfer the eggs from the hotbath back to the 28.5°C bath. (Again, see Sample data sheet).
8. Throughout the experiment you should be monitoring the temperature of the water baths,especially the 41.4°C water bath. Do this by putting the thermometer in the beakers themselves not intothe surrounding water of the baths. If the temperature is a little high you may want to add a little roomtemperature egg water to the beaker. If the temperature is a little low, you can remove a little water fromthe beaker. If the baths are holding steady at a temperature that is either too high or too low, you mayneed to adjust the temperature setting on the circulators of the baths.
9. When you are done squeezing fish, leave the heat shock vials in the 28.5°C bath until all theembryos have had time to divide at least once. Then remove the first vial, and transfer the embryos tobeakers or dishes for sorting the fertile eggs from the infertile eggs. Record the numbers of both classes onyour data sheet. Repeat this for all the other vials in the bath.
EMBO COURSE MEDAKA & ZEBRAFISH HEIDELBERG 144
Gynogenesis: Ploidy manipulation in medaka
UV-irradiation of sperm
(K. Naruse and A. Shima)
Detailed procedures for preparing sperm suspension
Materials needed:
Watch glass
Pasteur pipette
Fine forceps
Glass needle
Yamamoto's isotonic balanced salt solution (BSS) (Stock solution)
1. Dilute 10xBSS Stock solution with distilled water.
2. Add 1.5 to 2 ml of 1x BSS to a watch glass.
3. Decapitate 2 to 3 male fish.
4. Remove the testes gently with a fine forceps.
5. Transfer the testes to the watch glass with BSS.
6. Macerate the testes with a fine forceps and prepare sperm suspension .
7. Remove about 1 ml of sperm suspension without testicular debris with a Pasteur pipette andtransfer it to a new dry watch glass. Now sperm suspension is ready for UV irradiation. Discard thepipette having been used for preparing sperm suspension to prevent cross-contamination sperm.
UV irradiation
About 1 ml of sperm suspension is put into a small watch glass and is irradiated with UV light (UV-
C: germicidal lamp, predominant at 254 nm; total dose 200 J/m2).
Detailed procedures for UV irradiation
Materials needed:
Stop watch
Glass petri dish
Latex gloves
UV lamp
1. Turn on UV lamp 30 min. before UV irradiation.
2. Put the sperm suspension in a large petri dish and cover with top of the petri dish.
3. Operators should put on latex gloves on his/her hands.
4. Place the covered petri dish under UV lamp where UV dosimetry was done.
EMBO COURSE MEDAKA & ZEBRAFISH HEIDELBERG 145
5. Remove the cover of the petri dish and start the stopwatch.
6. After exposing sperm to UV for adequate time in order to make the sperm infertile (UV dose 200
J/m2), replace the cover of the petri dish and remove the whole material from UV exposure apparatus.Sperm suspension is ready for use for the artificial insemination
Production of gynogenetic diploid medaka fish by early pressure treatment
(Naruse, K. and A. Shima)
Collection of the unfertilized eggs and sperm
To obtain the ripe unfertilized eggs, female medaka fish confirmed to have spawned should beseparated from the males one day before the use for experiment. Sacrifice female medaka fish bydecapitation and gently remove ovaries on the day of the experiment. The ovaries removed be kept inYamamoto's isotonic balanced salt solution (BSS). The ripe unfertilized eggs be isolated with fine forcepsor glass needles and be kept in a small watch glass with BSS.
Two to three males be decapitated, the abdomen be cut open. The removed testes be kept in 1.5 to 2ml of BSS. Sperm suspension without testicular debris be prepared. In case one male is used as thesperm source, reduce the volume of BSS.
Detailed procedures for collecting the ripe eggs
Materials needed:
Small tank
Glass petri dish
Watch glass
Pasteur pipette
Large bore size pipette
Fine forceps
Glass needle
Yamamoto's isotonic balanced salt solution (BSS) (Stock solution)
Messing cylinder
One day before the experiment
1. Females which have spawned one or more times should be isolated from males one day before the experiment.
On the day of experiment
2. Dilute 10xBSS stock solution with distilled water.
3. Add 1xBSS to a glass petri dish
4. Sacrifice female fish by decapitation and remove the ovaries with a fine forceps.
5. Transfer the ovaries to a glass petri dish with BSS.
EMBO COURSE MEDAKA & ZEBRAFISH HEIDELBERG 146
6. Use 4 to 6 females until obtaining the desired number of eggs.
7. Separate the ripe unfertilized eggs with a glass needle or a fine forceps from ovarian tissues in BSS.The ripe unfertilized eggs can be distinguished from the unripe ones by their large size and translucency.
8. Transfer the ripe unfertilized eggs to a small watch glass with a large bore size pipette (over 1.5 mmdiameter).
9. Put the small watch glass with the unfertilized eggs in a larger petri dish and cover the larger dish.
Artificial insemination and early pressure treatment
Before insemination, remove excess BSS from the watch glass containing unfertilized eggs to preventthe dilution of sperm suspension. Excess dilution of sperm concentration may decrease fertilization rate.Artificial insemination is carried out by adding the sperm suspension to the eggs in the watch glass with aPasteur pipette.
The French press chamber should be assembled before the experiment. Eggs are put into the BSS-filledFrench press chamber with a large bore size pipette. The chamber is put on the French press. Within fiveminute after insemination ( earlier is better for good survival of embryos, but too early transfer of eggs toFrench press chamber may reduce the fertilization rate.), pressure is applied until the gauge reads 700kg/cm2 and this pressure is kept for 7 minutes. Alternatively, raise the pressure to 700 kg/cm2 and keepthat pressure for 6 min. and release pressure quickly and then reraise the pressure to 700 kg /cm2 andkeep that pressure
for another 6 min. The latter method sometimes increase survival of embryos.
Detailed procedures for early pressure treatment
Materials needed:
Stop watch
Glass petri dish
French press
Pressure chamber
Yamamoto's isotonic balanced salt solution (BSS).
Large bore size pipette
UV irradiated sperm
1. Fill the pressure chamber with 1xBSS. (Assemble the pressure chamber before collecting theunfertilized eggs.)
2. Remove excess BSS from a watch glass with a clean Pasteur pipette to prevent dilution of sperm.
3. Add UV-irradiated sperm suspension to eggs and start stop watch.
4. Allow about 1 min. for activation.
5. Transfer the fertilized eggs using a large bore size pipette to the pressure chamber directly.
6. Assemble top cover of the pressure chamber (do not tighten the release knob).
7. Remove air from the pressure chamber through the release hole and after that, tighten the releaseknob.
EMBO COURSE MEDAKA & ZEBRAFISH HEIDELBERG 147
8. Place the pressure chamber in the French press and raise the pressure to 700 kg/cm2.
9. Maintain the chamber under that pressure for 7 min. ( for total time from insemination is about 10to 12 min.). Alternatively, leave the chamber in the press for 6 min., release the pressure and thenreapply the pressure to 700 kg/cm2 for 6 min. This method sometimes increases the hatchability of theembryos. In our experience, hatchability of the treated embryos is about 20 %.
10. Remove the chamber from the press, release the knob and open the top cover.
11. Transfer the eggs from the chamber to a new petri dish with a large bore size pipette.
Keeping eggs after the pressure treatment
After releasing pressure, remove eggs from the chamber with a large bore size pipette and transfer theeggs into the fresh BSS. Keep eggs in the dark for about 2 hour to prevent photoreactivation (visiblelight-dependent repair of DNA damage induced in sperm by UV). Eggs are transferred to aged tap waterwith 0.005 % methylene blue.
Detailed procedures for keeping eggs after pressure treatment
Materials needed:
Glass petri dish
Yamamoto's isotonic balanced salt solution (BSS).
Large bore size pipette
96 well micro test plate
Tap water with 0.005% methylene blue
1. Keep eggs in the petri dish under the dark condition for about 2 hour to prevent photoreactivation.
2. Replace BSS to aged tap water with 0.005% methylene blue.
3. One day after the pressure treatment, eggs are separated from each other and inoculated in 96 wellmicro test plates so that individual embryos can be identified and closely observed.
Heat shock of oocytes: production of triploids and gynogenetic diploids
(D. Chourrout & C. Winkler)
1. Isolate males and females the day before heat shock
2. Dissect ripe medaka oocytes in 1x Ringer's solution at 25°C
3. In vitro fertilize with non-irradiated sperm (for triploids) or UV-irradiated sperm (for homozygous diploids) in 1x Ringer's at 25°C
4. After 2.5 min transfer fertilized oocytes to 41°C waterbath using a strainer
5. Incubate for 2.0 min
6. Transfer oocytes to 1x Ringer's at 25°C
7. Transfer to embryo rearing medium after 2 hrs
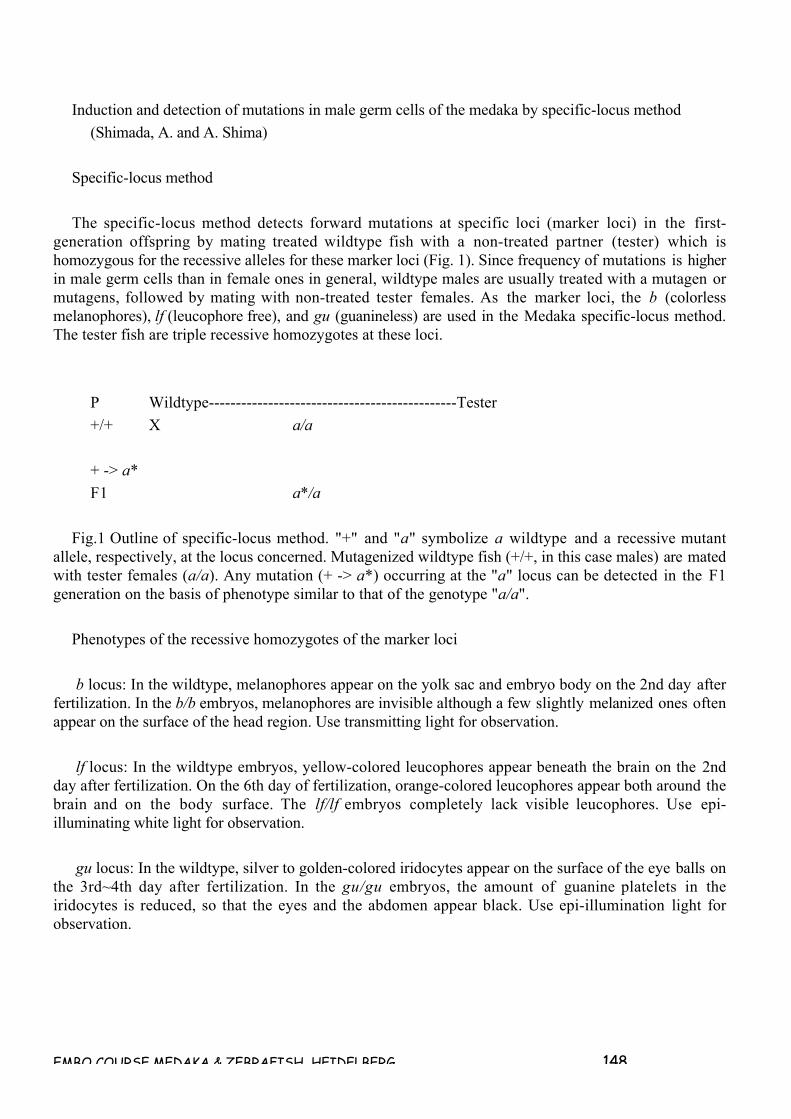
EMBO COURSE MEDAKA & ZEBRAFISH HEIDELBERG 148
Induction and detection of mutations in male germ cells of the medaka by specific-locus method
(Shimada, A. and A. Shima)
Specific-locus method
The specific-locus method detects forward mutations at specific loci (marker loci) in the first-generation offspring by mating treated wildtype fish with a non-treated partner (tester) which ishomozygous for the recessive alleles for these marker loci (Fig. 1). Since frequency of mutations is higherin male germ cells than in female ones in general, wildtype males are usually treated with a mutagen ormutagens, followed by mating with non-treated tester females. As the marker loci, the b (colorlessmelanophores), lf (leucophore free), and gu (guanineless) are used in the Medaka specific-locus method.The tester fish are triple recessive homozygotes at these loci.
P Wildtype----------------------------------------------Tester
+/+ X a/a
+ -> a*
F1 a*/a
Fig.1 Outline of specific-locus method. "+" and "a" symbolize a wildtype and a recessive mutantallele, respectively, at the locus concerned. Mutagenized wildtype fish (+/+, in this case males) are matedwith tester females (a/a). Any mutation (+ -> a*) occurring at the "a" locus can be detected in the F1generation on the basis of phenotype similar to that of the genotype "a/a".
Phenotypes of the recessive homozygotes of the marker loci
b locus: In the wildtype, melanophores appear on the yolk sac and embryo body on the 2nd day afterfertilization. In the b/b embryos, melanophores are invisible although a few slightly melanized ones oftenappear on the surface of the head region. Use transmitting light for observation.
lf locus: In the wildtype embryos, yellow-colored leucophores appear beneath the brain on the 2ndday after fertilization. On the 6th day of fertilization, orange-colored leucophores appear both around thebrain and on the body surface. The lf/lf embryos completely lack visible leucophores. Use epi-illuminating white light for observation.
gu locus: In the wildtype, silver to golden-colored iridocytes appear on the surface of the eye balls onthe 3rd~4th day after fertilization. In the gu/gu embryos, the amount of guanine platelets in theiridocytes is reduced, so that the eyes and the abdomen appear black. Use epi-illumination light forobservation.
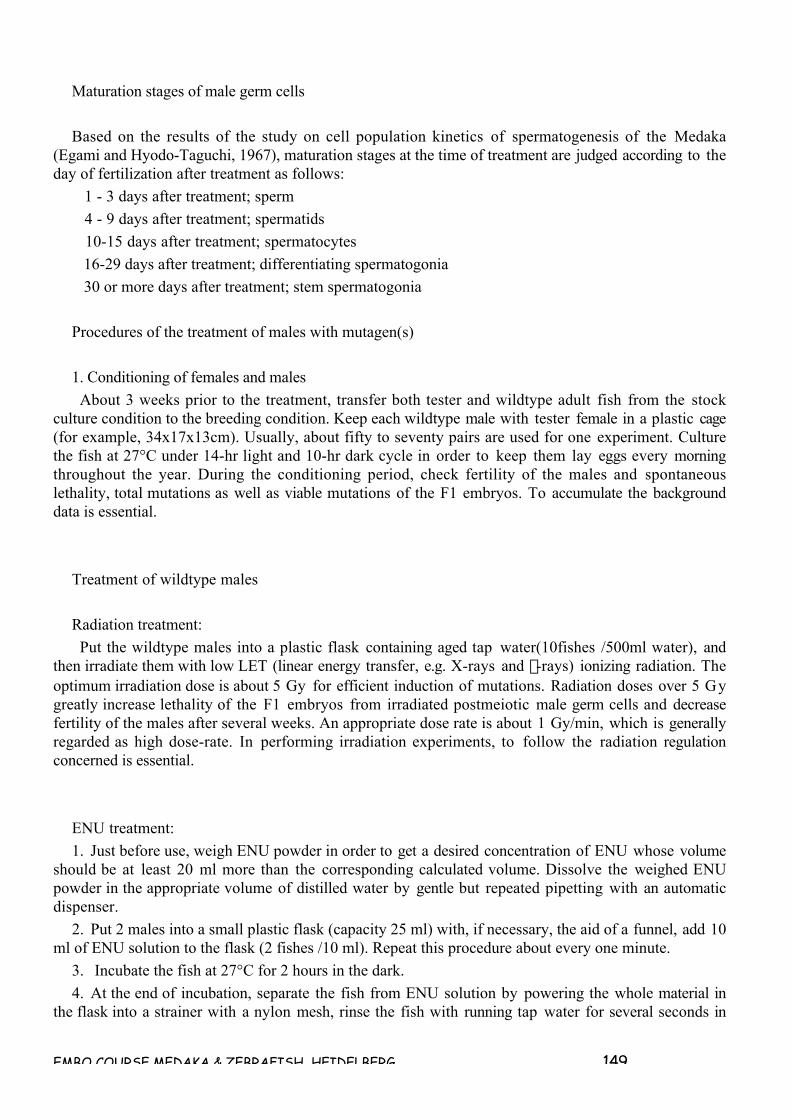
EMBO COURSE MEDAKA & ZEBRAFISH HEIDELBERG 149
Maturation stages of male germ cells
Based on the results of the study on cell population kinetics of spermatogenesis of the Medaka(Egami and Hyodo-Taguchi, 1967), maturation stages at the time of treatment are judged according to theday of fertilization after treatment as follows:
1 - 3 days after treatment; sperm
4 - 9 days after treatment; spermatids
10-15 days after treatment; spermatocytes
16-29 days after treatment; differentiating spermatogonia
30 or more days after treatment; stem spermatogonia
Procedures of the treatment of males with mutagen(s)
1. Conditioning of females and males
About 3 weeks prior to the treatment, transfer both tester and wildtype adult fish from the stockculture condition to the breeding condition. Keep each wildtype male with tester female in a plastic cage(for example, 34x17x13cm). Usually, about fifty to seventy pairs are used for one experiment. Culturethe fish at 27°C under 14-hr light and 10-hr dark cycle in order to keep them lay eggs every morningthroughout the year. During the conditioning period, check fertility of the males and spontaneouslethality, total mutations as well as viable mutations of the F1 embryos. To accumulate the backgrounddata is essential.
Treatment of wildtype males
Radiation treatment:
Put the wildtype males into a plastic flask containing aged tap water(10fishes /500ml water), andthen irradiate them with low LET (linear energy transfer, e.g. X-rays and g-rays) ionizing radiation. Theoptimum irradiation dose is about 5 Gy for efficient induction of mutations. Radiation doses over 5 Gygreatly increase lethality of the F1 embryos from irradiated postmeiotic male germ cells and decreasefertility of the males after several weeks. An appropriate dose rate is about 1 Gy/min, which is generallyregarded as high dose-rate. In performing irradiation experiments, to follow the radiation regulationconcerned is essential.
ENU treatment:
1. Just before use, weigh ENU powder in order to get a desired concentration of ENU whose volumeshould be at least 20 ml more than the corresponding calculated volume. Dissolve the weighed ENUpowder in the appropriate volume of distilled water by gentle but repeated pipetting with an automaticdispenser.
2. Put 2 males into a small plastic flask (capacity 25 ml) with, if necessary, the aid of a funnel, add 10ml of ENU solution to the flask (2 fishes /10 ml). Repeat this procedure about every one minute.
3. Incubate the fish at 27°C for 2 hours in the dark.
4. At the end of incubation, separate the fish from ENU solution by powering the whole material inthe flask into a strainer with a nylon mesh, rinse the fish with running tap water for several seconds in

EMBO COURSE MEDAKA & ZEBRAFISH HEIDELBERG 150
the nylon mesh-equipped strainer and transfer the treated fish into a container with about 10 liter of agedtap water.
5. Reserve the used ENU solution and de-mutagenized the used ENU solution in accordance with theguideline of your institution. In connection with this, to minimize the volume of ENU solution might bebeneficial.
6. After 1 hour, change the water.
7. After 2 hours, transfer the fish into the water containing 1~10 ppm methylene blue and 0.3% NaCland incubate overnight in order to help recovery of the treated males from acute chemical stress.
Collection and incubation of the F1 embryos
1. Next morning, allow each of the treated males to mate with a non-treated tester female in a breedingcage.
2. Every morning collect clusters of F1 embryos from females and put the embryos into glass vessels(9cm in diameter, 6cm in depth) containing the aged tap water with about 1ppm methylene blue.
3. Two to 10 hours later, put the embryos onto the palm of your hand and separate individualembryos by rolling the cluster with your finger, thus cutting long attaching filaments.
4. Change the methylene blue solution twice in order to remove debris. This is very important becauseembryos can develop normally in the clean water.
5. After checking fertility, put the fertilized embryos one by one into a well of a plastic microtiterplate (96-well, U-type) with about 0.3ml of methylene blue solution, and incubate them at 27°C.
Judgment of the phenotypes of the F1 embryos
1. Observe embryos in the microtiterplates at least twice a day under a stereoscopic microscope toexamine early death (ED)(death within a day after fertilization), middle death (MD)(death on the 2nd to6th day after fertilization), late death (LD)( death after 7th day of fertilization),hatch dead(HD), or hatchviable (HV).
2. Judge the phenotypic expression of the marker loci and any morphological abnormalities such asmorphology of the eye, brain, otic organs and trunk, embryo body size, angiogenesis, heart beating, andso on. Record anything you find during observation.
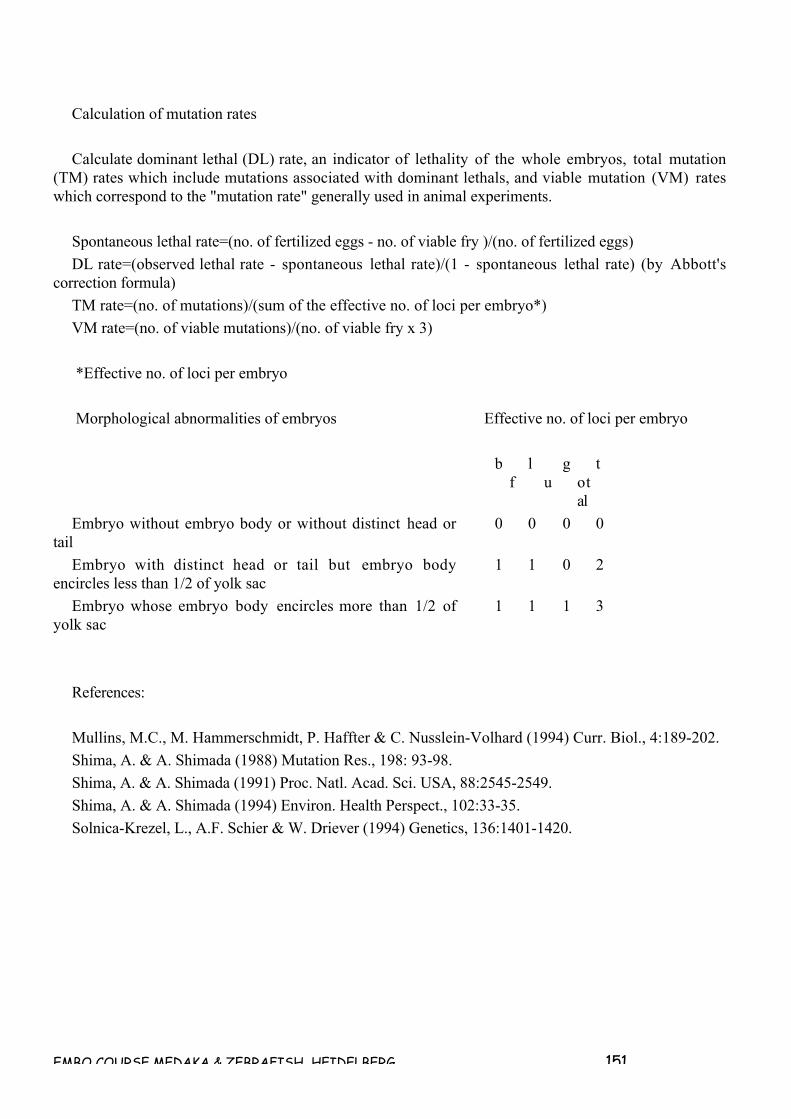
EMBO COURSE MEDAKA & ZEBRAFISH HEIDELBERG 151
Calculation of mutation rates
Calculate dominant lethal (DL) rate, an indicator of lethality of the whole embryos, total mutation(TM) rates which include mutations associated with dominant lethals, and viable mutation (VM) rateswhich correspond to the "mutation rate" generally used in animal experiments.
Spontaneous lethal rate=(no. of fertilized eggs - no. of viable fry )/(no. of fertilized eggs)
DL rate=(observed lethal rate - spontaneous lethal rate)/(1 - spontaneous lethal rate) (by Abbott'scorrection formula)
TM rate=(no. of mutations)/(sum of the effective no. of loci per embryo*)
VM rate=(no. of viable mutations)/(no. of viable fry x 3)
*Effective no. of loci per embryo
Morphological abnormalities of embryos Effective no. of loci per embryo
b lf
gu
total
Embryo without embryo body or without distinct head ortail
0 0 0 0
Embryo with distinct head or tail but embryo bodyencircles less than 1/2 of yolk sac
1 1 0 2
Embryo whose embryo body encircles more than 1/2 ofyolk sac
1 1 1 3
References:
Mullins, M.C., M. Hammerschmidt, P. Haffter & C. Nusslein-Volhard (1994) Curr. Biol., 4:189-202.
Shima, A. & A. Shimada (1988) Mutation Res., 198: 93-98.
Shima, A. & A. Shimada (1991) Proc. Natl. Acad. Sci. USA, 88:2545-2549.
Shima, A. & A. Shimada (1994) Environ. Health Perspect., 102:33-35.
Solnica-Krezel, L., A.F. Schier & W. Driever (1994) Genetics, 136:1401-1420.
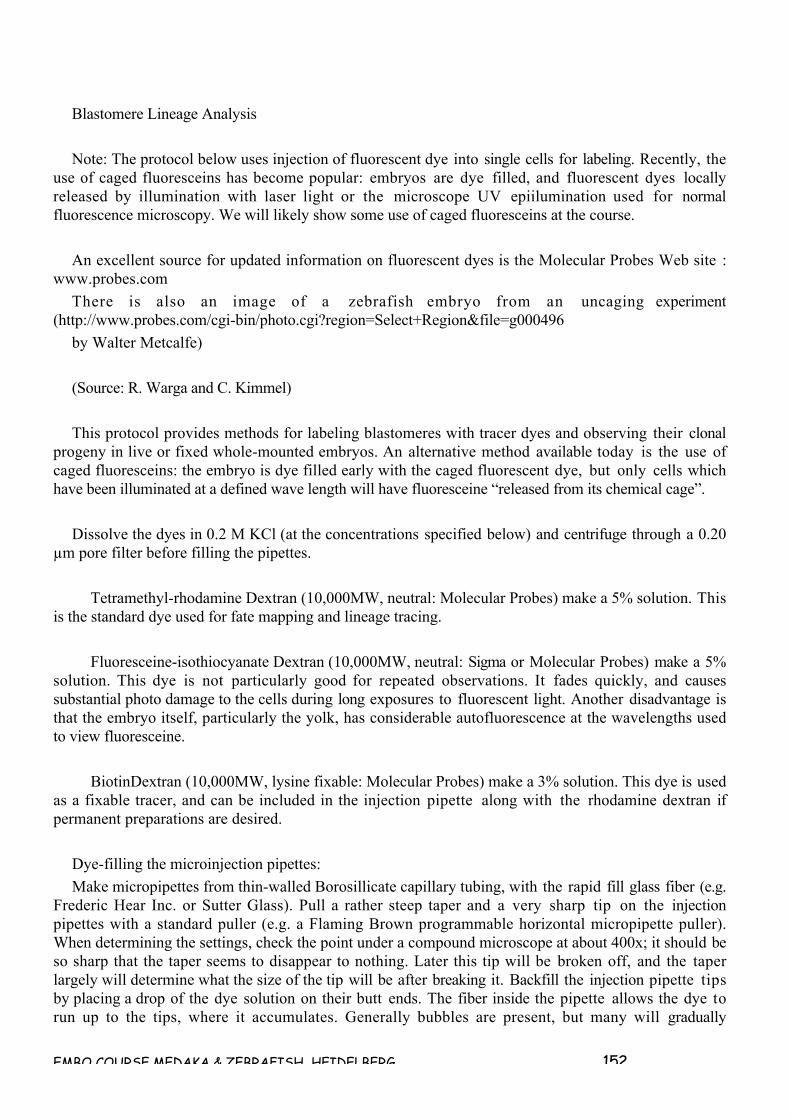
EMBO COURSE MEDAKA & ZEBRAFISH HEIDELBERG 152
Blastomere Lineage Analysis
Note: The protocol below uses injection of fluorescent dye into single cells for labeling. Recently, theuse of caged fluoresceins has become popular: embryos are dye filled, and fluorescent dyes locallyreleased by illumination with laser light or the microscope UV epiilumination used for normalfluorescence microscopy. We will likely show some use of caged fluoresceins at the course.
An excellent source for updated information on fluorescent dyes is the Molecular Probes Web site :www.probes.com
There is also an image of a zebrafish embryo from an uncaging experiment(http://www.probes.com/cgi-bin/photo.cgi?region=Select+Region&file=g000496
by Walter Metcalfe)
(Source: R. Warga and C. Kimmel)
This protocol provides methods for labeling blastomeres with tracer dyes and observing their clonalprogeny in live or fixed whole-mounted embryos. An alternative method available today is the use ofcaged fluoresceins: the embryo is dye filled early with the caged fluorescent dye, but only cells whichhave been illuminated at a defined wave length will have fluoresceine “released from its chemical cage”.
Dissolve the dyes in 0.2 M KCl (at the concentrations specified below) and centrifuge through a 0.20µm pore filter before filling the pipettes.
Tetramethyl-rhodamine Dextran (10,000MW, neutral: Molecular Probes) make a 5% solution. Thisis the standard dye used for fate mapping and lineage tracing.
Fluoresceine-isothiocyanate Dextran (10,000MW, neutral: Sigma or Molecular Probes) make a 5%solution. This dye is not particularly good for repeated observations. It fades quickly, and causessubstantial photo damage to the cells during long exposures to fluorescent light. Another disadvantage isthat the embryo itself, particularly the yolk, has considerable autofluorescence at the wavelengths usedto view fluoresceine.
BiotinDextran (10,000MW, lysine fixable: Molecular Probes) make a 3% solution. This dye is usedas a fixable tracer, and can be included in the injection pipette along with the rhodamine dextran ifpermanent preparations are desired.
Dye-filling the microinjection pipettes:
Make micropipettes from thin-walled Borosillicate capillary tubing, with the rapid fill glass fiber (e.g.Frederic Hear Inc. or Sutter Glass). Pull a rather steep taper and a very sharp tip on the injectionpipettes with a standard puller (e.g. a Flaming Brown programmable horizontal micropipette puller).When determining the settings, check the point under a compound microscope at about 400x; it should beso sharp that the taper seems to disappear to nothing. Later this tip will be broken off, and the taperlargely will determine what the size of the tip will be after breaking it. Backfill the injection pipette tipsby placing a drop of the dye solution on their butt ends. The fiber inside the pipette allows the dye torun up to the tips, where it accumulates. Generally bubbles are present, but many will gradually
EMBO COURSE MEDAKA & ZEBRAFISH HEIDELBERG 153
disappear. Hence, the pipettes can be filled the day before use, and stored in a refrigerator in a humidifiedcontainer.
The injection rig:
Standard methods borrowed from electrophysiologists are used to label cells. The basic setup includesa stimulator, an intracellular amplifier, and an oscilloscope, and you can learn how to hook the boxestogether from a cooperative physiologist if you don't know how to do these things. An audio monitor forhearing the voltage is also very useful. The holder for the injection pipette is mounted on amicromanipulator (e.g. a Leitz manipulator, which gives lovely control and stability, and a hydraulicadvance fitted in front of it, permitting very fine control of axial excursions of the pipette). Forblastomere injections, a relatively inexpensive Nomarski microscope with 10x and 20x objectives can beused. Even though the lenses are corrected for a coverslip, the optics are adequate without. The workingdistance for either objective is sufficient to position the injection pipette underneath, if you mount itwith the manipulator so that the pipette comes in at a shallow angle, about 20° from the horizontal, justclearing the microscope stage. To position the pipette near the cell of interest use both the manipulatorand microscope stage controls.
The holder for the injection pipette (WPI, Inc.) permits recording, passing current, and dye injectionby pressure. The pressure can be regulated with a commercial unit (e.g. General Valve, Corp.) or with asimple system built from individual parts. It is important to regulate the pressure both up and downagreeably and without hysteresis, while the pipette tip is inside the cell.
The "air in" in this system can come from an in house supply of air, but a nitrogen or compressed airtank can provide higher pressures. The "air out" goes directly to the pipette. Just before use, backfill thepipette (i.e. from its butt end) with 0.2 M KCl applied behind the dye solution. You can buy a long thinsyringe needle for this purpose (Hamilton) or pull out a suitably long capillary from a Pasteur pipette.Mount the pipette on the holder. With another manipulator, advance a glass rod firepolished at the endto produce a ball about 3 mm in diameter. This ball is used to break the point of the pipette by gentlyadvancing it against the ball, under the 20x objective. After breaking you will be able to see that the end isjust a bit blunt. A good pipette for injection, even in the small blastomeres of a late blastula, will have aresistance of about 80 megohms, as measured in a bath of 30% Danieau’s. The bath is grounded by anagar-bridged silver-silver chloride ground wire.
Agar bridged ground wires
Plate silver wires electrolytically with chloride or dip into molten silver chloride. (Dipped wires lastlonger than plated wires.) Insert the silver chloride ground wire into a 15 cm length, small diameter PEtube filled with 3% agar in 30% Danieau’s; this is the agar bridge. The ground wire should insert onlyabout halfway into the agar. Seal the agar bridge to the ground wire with epoxy and heat shrink tubing.Store in the refrigerator with the tubing immersed in 30% Danieau’s.
Preparing the Embryos
About an hour after fertilization, stage, and clean. Under a stereo dissection microscope, remove thechorions with fine sharpened watchmakers forceps (Dumont no. 5) by gently teasing open a hole in thechorion, widening it sufficiently and carefully shaking out the embryo (see Removing Embryos from theirChorions, Chapter 4, for more details). This is done in 30% Danieau’s, in agar-coated petri dishes (2%Difco Bactoagar). Once the embryos are free of the chorion, transfer with a fire polished pipette throughseveral rinses in 30% Danieau’s to a clean agar dish. Using both 30% Danieau’s and agar dishes greatlyimproves survival during and following dechorionation. 30% Danieau’s contains elevated Ca2+ whichhelps to keep the cells intact, and the agar provides a smooth nonsticky surface for the embryos to sit. If
EMBO COURSE MEDAKA & ZEBRAFISH HEIDELBERG 154
you put a dechorionated embryo at cleavage or blastula stage directly on the plastic surface of a dish, andcarry the dish around, you may end up with fragments or a dissociated suspension of dead cells. Afterthe injection, return the embryos to agar dishes for incubation, unless they are to be viewed immediately.For the injection, mount the embryo in a depression slide in a drop of 30% Danieau’s, or if you need toorient it in a position in which it won't lie still, use 3% methyl cellulose in 30% Danieau’s (see MethylCellulose Mounting).
Labeling the embryos
Use current injection to drive the electrode through the cell membrane. Blastomeres take an unusuallyhigh amount of negative current, driven by as much as 14 V with a duration of about 50 msec. Thismethod is vastly preferable to manually advancing the tip through the membrane or wiggling it throughby capacitance "ringing". Under visual control (20 x objective) advance the electrode against the cell ofinterest until you can see it dimple the cell surface. Then give it a blast of current and it should penetrate.You often see the dimple disappear, and if you are monitoring voltage through the injection pipette youwill see a negative 30 mV or so (as high as -70 mV) resting potential. If you have damaged the cell, or ifthe electrode has passed completely through the cell into the small amount of extracellular space withinthe blastoderm, you will observe a positive change, not a negative one. Deep cells can be penetrated byvery prominently dimpling an EVL cell that has a deep cell positioned just beneath it. After the currentinjection, the pipette will have usually advanced through the thin EVL cell and into the underlying deepone. Expel dye through the pipette by applying positive pressure, to lightly color the cell. You canmonitor the dye injection on a rig that is not equipped with fluorescence optics simply by watching theamount of color in the blastomere under Nomarski. The dye should diffuse throughout the whole cell, notbrightly label a small dot-like inclusion within the cell. If you can see the color easily with your eyes,you may have filled the cell too brightly. You should not notice a volume change in the cell nor anyevidence of damage (e.g. leaking cytoplasm) as you withdraw the pipette from the cell. Generally youneed fill the cell for only a few seconds. If you are doing a clonal analysis and want to be sure that only asingle cell is labeled, you need to look at the embryo immediately after the injection with fluorescenceoptics and image intensification. There is no other way to be certain that dye has not spuriously labeledneighboring cells.
Single looks at the clone
For a short-duration look at the labeled cells, as you might do in a fate mapping experiment, mountembryos in 3% methyl cellulose on a glass depression slide by gently inserting the embryo into a drop ofmethyl cellulose or by laying it on top of the gel, depending on how much methyl cellulose you wish touse. Carefully orient the embryo using a nylon hair loop. Add a thin film of 30% Danieau’s to cover thedrop of methyl cellulose, and view it with no coverslip. (See Methyl Cellulose Mounting, for moredetails.) Screen the clones with the aid of an image intensifying camera (e.g. Videoscope) mounted on acompound microscope. With signal intensification, one can detect very lightly labeled cells, using verylow levels of exciting light, thereby avoiding photodamage to the labeled cells. This is particularlyimportant if you are going to view them repeatedly. The camera output is sent directly to a video displaymonitor and also can be stored on a variety of storage devices, (e.g. a computer hard disk, an optical disk,or a VCR).
Labeling Single Cells With Lineage Tracers
(Source: B. Melby and D. Raible)
EMBO COURSE MEDAKA & ZEBRAFISH HEIDELBERG 155
This is a technique for intracellular labeling of small cells at gastrula stages or later.
Electronics
The electronics set-up is used as a means to get the dye out of the electrode and into the cell. Use anagar bridge (see Agar bridged ground wires) for the bath ground.
Pipettes
Success in single cell labeling lies primarily with the ability to make good pipettes. Pipettes should bepulled the day of the experiment. Allow at least 10 min for the tips to fill with dye. Electrodes are pulledfrom glass capillaries (e.g. Sutter thick wall, O.D. 1.2 mm, I.D. .69 mm) with an inner filament for easydye filling.
The ideal pipette tip can be attained only by fine-tuning and testing. The pipettes must be sufficientlysharp to pierce through the outer layer of the embryo, yet have a large enough tip diameter to pass dye.They should have a long, sharp shank but a blunt tip. An important feature of the pipettes is that theypass dye, either by current injection or by "ringing" the capacitance, and that they do not continuouslyleak dye. The resistance of the pipettes provides a measure of reproducibility from one experiment toanother. Good pipettes usually have a resistance in the range of 100-300 Mohm when filled with 0.2 MKCl. If the resistance is too high, it may indicate a problem with the dye, or with the bath ground, as wellas with the pipette shape.
The dye should be dissolved in 0.2 M KCl and filtered (e.g. 0.2 µm spin filters for themicrocentrifuge). A 3% solution of rhodamine dextran (Molecular Probes) works quite well. Dye can bemade in advance and stored at 4°C in a sealed tube. To fill pipette tips with dye, place a droplet of dye(about 0.5 µl) at the back of the pipette.
Labeling gastrula stage cells
Embryo preparation and mounting:
Embryos should be removed from their chorions in agar-coated dishes using fine forceps. Afterremoving the chorions, transfer the embryos with a fire-polished pipette. Experimental slides are madeby painting several coats of nail polish in a ring of about 3 cm diameter, on a glass slide. Mount embryosin methyl cellulose (see Methyl Cellulose Mounting) to permit easy manipulation and reorientation.Chilled methyl cellulose is stiffer, but tends to get bubbly as it warms up, therefore it is best to usemethyl cellulose at room temperature.
1. Spread a layer of methyl cellulose in the center of the experimental slide.
2. Cover with 30% Danieau’s, being careful not to spill over the nail polish ring.
3. Transfer an embryo to the center of the slide. Orient the embryo under the dissecting microscopeby gently nudging it with a hair loop.
4. When the embryo is in the preferred orientation, gently tamp it down into the methyl cellulose.Over time, the methyl cellulose will become diluted with 30% Danieau’s and will become too fluid, sothat the embryo may roll. If this happens, remove the embryo and remount.
5. Be sure to loosen the embryo from the methyl cellulose before trying to move it with a pipette.
EMBO COURSE MEDAKA & ZEBRAFISH HEIDELBERG 156
Labeling cells:
It is easiest to label cells if the embryo is oriented such that the surface to be labeled is at the top,lying flat. The ideal situation is to have the embryo oriented so that the cells to be labeled are easilyvisible in reference to landmarks such as the embryonic shield or the margin.
1. Check the orientation of the embryo at low and then high magnification, to be sure that it isappropriate.
2. Place a hanging droplet of 30% Danieau’s on the water immersion lens (e.g. 40x) and gently slidethe lens into place over the embryo, to avoid rolling the embryo.
3. Position the bath ground at the back of the slide, being sure that there is continuity between theagar and the 30% Danieau’s.
4. Raise the microscope objective so that there is plenty of space between the objective and theembryo.
5. Backfill a pipette with 0.5 M KCl, place it in the pipette holder, and attach the holder to theamplifier probe which should be mounted on the micromanipulator. There should be no large bubbles inthe pipette or holder; they will cause electrical discontinuity.
6. Advance the pipette into the 30% Danieau’s and position it above the embryo using the white lightand by viewing it from the side of the microscope.
7. Locate the tip under magnification, and check to make sure that it isn't broken.
8. Switch on the amplifier, this should only be turned on when there is a complete circuit (i.e. fromprobe, through the bath and bath ground, back to the amplifier).
9. A good pipette will release a small puff of dye when the capacity compensation (usually a button,sometimes a dial) is turned on (i.e. "ringing the capacitance"), or when the pipette check is pressed (thisinjects a small amount of current). A bad pipette will leak, or sometimes not release dye at all. Throw itaway and get a new one, but be sure to turn off the amplifier before you pull the pipette out of the bath.
10. Carefully lower the pipette to the level of the embryo, keeping it in focus. Superficial cellscan be labeled by positioning the pipette above the cell and lowering the tip through the EVL layer untilthe cell membrane dimples.
11. Monitor the fluorescence, and label the cell by ringing the capacitance, or by injecting current.Ringing the capacitance causes the pipette tip to vibrate, enabling penetration and it will also cause alittle bit of dye to be released.
12. After a cell has been labeled, rapidly remove the pipette using the stage control or themicromanipulator, and turn off the amplifier.
13 To label cells in deeper layers, it is best to bring the pipette in from the side. Focus on the cell layerof interest. Bring the pipette into the same focal plane as this cell layer. Advance the pipette up to thecell using a microdrive, or fine micromanipulator adjustment.
Sometimes cells along the pipette track tend to be labeled by dye leaking from the tip. The tip mayappear to have passed through these cells, but there is still continuity with their membranes. Single celllabels can be achieved by stopping dye injection as soon as one cell starts to label. Because of thisproblem, it is important to check the fluorescence without Nomarski optics (it will be much brighter) inorder to see all of the cells that have been labeled.
Localizing the labeled cell:
For mapping purposes, it is best to check the cell's location using three different orientations of theembryo. In the orientation in which the embryo was labeled, check the cell's distance from the margin
EMBO COURSE MEDAKA & ZEBRAFISH HEIDELBERG 157
under the 40x water immersion lens. Then turn the embryo onto it's side and check the cell's radial depthat 40x. It is important to have a fairly precise side orientation, or else the cell may appear deeper orshallower than it is. The depth can also be assessed by focusing up and down in the original orientation,although this method gives no information about the relationship of the cell to the hypoblast. Finally,assess the position with respect to the dorsal midline by orienting the embryo animal pole up andlooking at it under low power (10x objective).
Labeling single cells in older embryos
1. Mount embryos in agar as described in the section on Agar Mounting (Chapter 4). Orient theembryo so that the cell of interest is visible with Nomarski optics and accessible with the pipette.
2. Focus on the cell of interest, and bring the pipette along side the embryo in the same focal plane.
3. Using the stage controls, force the mounted embryo against the pipette until the skin springs backand the pipette tip enters the embryo.
4. Move the embryo away with the stage controls until there is no compression of the embryo by thepipette.
5. Then, using the fine control of the micromanipulator, move the pipette into position against the cellto be labeled. For cells close to the surface, the pipette can be inserted into the embryo at a different focalplane.
6. Label the cell as described above, and quickly remove the pipette from the embryo by moving theembryo away with the stage controls.
Preparation of chromosomes
(D. Chourrout, C. Winkler & Y. Hong)
1. Incubate 2 day old embryos in embryo rearing medium supplemented with 0.2 g/l colchicine (Serva) for 2 hrs at 28°C
2. Transfer embryos to 1x Ringer's; remove chorion
3. Incubate embryos in trisodiumcitrate (8 g/l) for 20 min
4. Fix in freshly prepared ethanol (-20°C)/acetic acid 3:1 (v/v) for 30 min (to o/n)
5. Change fixative; fix again for 15 min
6. Transfer single embryos to microwell with 20 µl 50% acetic acid
7. Incubate for 2 min
8. Spot dissociated embryos onto a slide on heating plate at 50°C
9. After 30 sec remove excess liquid; spot liquid again
10. Repeat twice
11. Air dry slides
12. Stain in freshly prepared 4% Giemsa solution in PBS (pH 6,8) for 30 min
13. Wash twice in water
14. Air dry slide
HISTOLOGICAL METHODS
Lac Z stain of zebrafish
(Anders Molven)
1. Fix embryos at 4°C for 30 minutes in:

EMBO COURSE MEDAKA & ZEBRAFISH HEIDELBERG 158
2% paraformaldehyde for 5 ml: 1.25 ml of 8% soln.
0.2% glutaraldehyde 125 µl of 8% soln.
0.02 % NP-40 10 µl of 10% soln.
1 x PBS 1 ml of 5x soln.
add 2.62 ml water to 5 ml
2. Rinse 3 times in 1 x PBS (2-3 min each)
3. Stain (15 min to 24 hrs) at 30°C
4. Mount in Glycerol
Staining solution:
final conc.
A 0.2 M Na phosphate buffer pH 7.3 50µl (10 mM)
5 M NaCl 30 µl (150 mM)
1 M MgCl2 1 µl (1mM)
0.1 M K4 (Fe3 (CN)6 ) 30 µl (3.1 mM)
0.1 M K3 (Fe2 (CN)6 ) 30 µl (3.1 mM)
dd water 859 µl
(make stock and store as frozen aliquots)
B 8% X-gal (5-bromo-4chloro-indolyl-ß-D-galactoside) in DMF
(store frozen aliquots)
Mix 974 µl A and 26 µl B immediately before use (a precipitate may form upon mixing, does notdisturb staining reaction)
10.2 OCT embedding for cryostat sectioning of embryos or larvae
(R. Bremiller)
The compositions of the solutions are listed in the "Recipes" section.
1. Fix animals as desired.
2. Wash in fix buffer, 3 times for 5 min each wash.
3. Soak fixed fish in 30% sucrose until they sink.
4. Transfer fish to embedding chamber (plastic test tube stoppers or inverted Beem capsules whosetips have been cut off) filled with OCT cryostat embedding medium (Tissue Tek).
5. Freeze chamber with a blast of compressed CO2 or by dipping chamber slowly and gradually intoliquid N2.
6. Frozen blocks can be stored at -70°C if they are wrapped well so that the tissue does notdehydrate.
7. Cut 10-20 µm sections on a cryostat at -20°C, transfer them to subbed slides and let them drycompletely.
8. Sections can be stored at -20°C in a sealed slide box.
EMBO COURSE MEDAKA & ZEBRAFISH HEIDELBERG 159
10.3. JB 4 plastic methacrylate section(W. Driever)
In many cases one wants to take a detailed look at in situ hybridization embryos or labeled clonesfrom transplantation experiments. We found that semi-thin section using methacrylate type resins areeasy to perform and give excellent results. You need microtome for semi thin sections, equipped for useof glass knifes for this procedure.
Materials
All solutions needed for embedding embryos are found in the JB-4 Plus Embedding Kit fromPolysciences, Inc., order no. 18570. In addition, you will need EBH-2 block holders, order no. 15899,and molding cup trays with dimensions 6W x 8L x 5H mm, order no. 17177A, both available fromPolysciences.
Preparation of JB-4 Catalyzed Infiltration Resin
The JB-4 Embedding Kit includes instructions for preparing the infiltration resin:
1. In the designated, foil-wrapped 200 ml bottle, combine 0.90 grams of dry catalyst C to 100 ml ofJB-4 Solution A (stored in refrigerator).
2. Mix until dissolved (circa 30 minutes).
3. Store for up to 4 weeks at 4˚C.
For preparation of the methylene blue II stain see protocol from Humphrey and Pittman (1974).
Preparing Embryos
Fixation
1. Dechorionate embryos.
2. Transfer embryos to labeled Eppendorf Tubes.
3. Take off egg water and add 4% formaldehyde in PBS.
4. Lay tubes on their sides to expose all embryos to the fixative equally well.
5. Allow embryos to stand in solution 4 hours at room temperature or overnight at 4˚C.
6. Wash with PBS
Agarose Blocks
If perfect longitudinal sections are desired, after fixation single embryos can be first embedded inAgarose blocks to insure proper orientation.
1. Prepare a solution of 1% Agarose in PBS.
2. Microwave solution on high for two minutes or until Agarose is completely dissolved.
3. Place solution in 56˚C water bath to inhibit solidification.
4. Transfer fixed embryo to mold (Polysciences, order no. 17177A).
5. Fill mold with Agarose medium.
6. Under a microscope, orient embryo with a needle. The fish should lay flat on the bottom of themold and on one side. Only one eye should be visible. The orientation should be done at the time theagarose solidifies - otherwise it moves again and lays down on its "side" - which is usually at 60 degreeventral lateral angel or so.
7. After medium has solidified, remove block from mold.

EMBO COURSE MEDAKA & ZEBRAFISH HEIDELBERG 160
8. With a razor blade, trim block evenly into a rectangular cube. One wall should be parallel to theanterior posterior axis of the embryo.
Proceed with dehydration, infiltration, and embedding as indicated in protocol.
Dehydration
1. Dehydrate embryos using the following ethanol concentrations:
50%, 70%, 85%, 95%, twice 100%
Wait 10-15 minutes between each washing.
Embryos can be stored for several days in 70% ethanol, if necessary.
Infiltration
1. Transfer embryos in 100% EtOH to labeled 5 ml narrow, glass scintillation vials.
2. Remove liquid and add JB-4 infiltration resin, filling the vial halfway (use glass pipet or one wayplastic). The liquid creates a column and allows the embryos to sink to the bottom as infiltrationproceeds.
3. Place vials overnight at 4˚C.
Embedding Embryos
Always wear gloves and work under a hood with microscope, if possible.
1. Prepare an ice tub to use for keeping vials and solutions cold.
2. Decide how many blocks are desired and label the corresponding block holders with pencil toidentify each block.
3. Mix the following amounts of solutions in a 15 ml tube according to the amount of blocks desired:
JB-4 Infiltration Resin JB-4 Hardner (B) Number of Blocks
6.25 ml 0.25 ml 4
12.5 ml 0.5 ml 8
25 ml 1.0 ml 16
4. Pipet up and down until thoroughly mixed, keeping solution on ice while mixing.
5. Pipet off JB-4 infiltration resin from embryos in scintillation vials and discard into waste collectionvial. For agarose blocks: add the block first and then the embedding solution.
6. Pipet on embedding solution.
7. Transfer embryos and liquid to molds. Make sure the mold disc is filled halfway. If mold containstoo much or too little liquid, adjust appropriately.
8. Under a microscope, place embryos in the center depression of the mold, allowing them to sink tothe bottom. Center embryos in the middle of the mold, leaving equal room on both sides for blocktrimming and room on one end for picking up sections while cutting.
9. Orient embryos with a needle.
EMBO COURSE MEDAKA & ZEBRAFISH HEIDELBERG 161
If longitudinal sections are desired, place embryos next to each other on their sides, point all headsin one direction, and allow to lay flat on the bottom of the mold. Agarose blocks can also be used toinsure proper orientation (see Agarose protocol).
If cross-sections are desired, place embryos flat against the bottom of the mold. Wait a few minutesfor the embedding medium to begin polymerization. Then, lift the tail of the embryo with a forceps,standing it on its head. The medium will hold it in a vertical position as polymerization starts. This cantake up to ten minutes or so but test the medium often, continually trying to stand the embryo on itshead. Do not wait too long to orient fish. Timing is critical: you got only 5 - 10 minutes!.
10. Once embryos are oriented and medium begins polymerization, securing embryos in their place,cover molds with labeled block holders.
11. Allow blocks to harden at room temperature for one hour or overnight.
12. When ready, pop blocks out of mold to section.
Sectioning Embryos
Making Knives
For any specific questions concerning the Knifemaker II from Leica, consult the operating instructionsmanual.
Always make glass knives as you need them because they become dull if stored too long.
Never touch knife to any surface. This immediately ruins the knife's sharpness.
1. Using the knifemaker, score and break glass into square blocks. Each block yields two knives(opposite corners). You should see a "right-hand" curve in the knives to be used.
2. Inspect each knife for faults and choose only good knives for sectioning.
3. Knives need replacing when sections become "milky" or start to roll up tightly.
Sectioning
1. Turn on heating unit for drying sections and prepare a water bath using distilled water and a fewdrops of ammonia. This water bath is used for straightening sections before they are mounted.
2. Select thickness of sections by turning dial. Usually, sections are cut 5 microns thick.
3. Trim block on two sides with a razor blade, eliminating excess plastic from sections. Block surfaceshould look like a rectangle.
4. Mount block by clamping it into place. Orient block-face lengthwise.
5. Move block back completely to allow for adjustment by pressing the double-arrow key. Light willflash when block is completely back. Press the single-arrow key to move block slightly forward until theblinking light goes off.
6. Put knife in holder and secure. Make sure knife is straight and flat against holder.
7. Move knife toward block until the two almost touch.
8. Loosen pegs and adjust knife and/or block so that knife edge is straight with block. This is thecritical step in obtaining good sections.
9. Once knife is properly oriented, select cutting setting of 1, 2, or 3. Setting 3 is used for the actualsectioning as it stops after each section, allowing you to collect them one by one. Setting 2 is only usedto trim the block if the fish is not flat against the surface. On this setting, the machine continually cutsuntil "run/ stop" is pressed. In addition, you can manually cut sections but this is not as efficient forobtaining many sections.
EMBO COURSE MEDAKA & ZEBRAFISH HEIDELBERG 162
10. Set cutting speed to around 8.
11. After selecting setting (usually 3), press "run/stop" button to cut.
12. Using two sets of dry forceps, carefully remove section from knife without touching the knifeedge. Pick up section on end where there is no trace of embryo to avoid ruining section.
13. Drop section into water bath, allowing it to straighten. It is important that the forceps are dry asthe section will easily stick to them if wet.
14. Take a pre-labeled slide and place it in the water bath under the section. With dry forcepsperpendicular to section surface, gently move section until it floats above slide. Always touch section onits surface with dry forceps or else it will stick to the forceps and is ruined.
(alternatively, sections can be stretched on drops of water positioned on a microscope slide on aheating block. Some people bring a cotton tab with chloroform close to the water drop before placing thesection on top of it. I supposed to help stretching of the section.
15. Once section is properly oriented in the water bath, slowly raise slide so that section rests uponit.
16. Place slide with section on heating unit to dry. Once all water disappears from section, it cannotbe washed off in the water bath.
17. Proceed with cutting and collecting sections, aligning them side by side and in two rows on slide.Allow sections to dry completely before staining.
If knife needs to be replaced or adjusted, always realign block before cutting. Also, if you interruptyour sectioning, upon returning, always realign the knife and block before proceeding because the blockcontinues to expand.
Note: You can recycle the block holders by pulling the resin block off the holder with two pairs ofpliers.
Staining Sections
1. Place slides in a plastic slide holder.
2. Microwave about 70 ml of methylene blue (see Humphrey & Pittman protocol) for 2 minutes onmedium heat.
3. Pour stain over slides and wait 1 minute.
4. Pour off stain (collect to be reused) and rinse well with distilled water.
5. Air dry or place on heating unit until dry.
6. Using Permount, place cover slip over sections and allow to dry completely.
Whole-mount in situ hybridization in zebrafish
Ch. Thisse and B. Thisse
Probe :
Work has to be done using sterile tubes and buffers and gloves
- DNA preparation :

EMBO COURSE MEDAKA & ZEBRAFISH HEIDELBERG 163
5mg of DNA is linearized with the appropriate restriction enzyme during 2h. The reaction is thenstopped using first a mix of phenol/chloroform, then chloroform. The DNA is then Ethanol precipitated,centrifuged and washed with RNAse free 70% Ethanol. DNA is then resuspended in Tris EDTA10mM/1mM and an aliquot is tested on agarose gel.
- RNA probe synthesis :
Transcription mix :
1mg linearized DNA
Transcription buffer (T3 ou T7 RNA polymerase) : 4µl
NTP-DIG-RNA (Roche) : 2µl
RNAse inhibitor (35u/µl) : 1µl
T3/T7 RNA polymerase (20u/µl, Stratagene) : 1µl
Sterile water : up to 20µl
- 2h at 37°C
- Digest the template DNA by adding 2µl RNAse free DNAse during 15min at 37°C.
- Stop the synthesis reaction and precipitate the RNA with 1µl EDTA 0.5M pH 8, 2.5µl LiCl 4Mand 75µl cold Ethanol 100%. After storage at-70°C during 30min, centrifuge at 4°C, during 30min at12OOO rpm, wash with 70% Ethanol, dry and resuspend in 20µl sterile DEPC water.
Test 1µl on agarose gel. (generaly 1µl will be used for the hybridization).
EMBO COURSE MEDAKA & ZEBRAFISH HEIDELBERG 164
In situ hybridization
- Fix embryos in 4% paraformaldehyde (PFA) in PBS overnight at 4°C.
- Remove chorions manually.
- transfer embryos in 100% Methanol (MeOH), store them at -20°C (2h-several months).
In situ Day 1 :
- Rehydratation :
put embryos is small baskets and rehydrate by successive incubtions in :
5min in 75%MeOH-25%PBS
5min in 50%MeOH-50%PBS
5min in 25%MeOH-75%PBS
4 x 5min in 100% PBT (PBS/tween20 0.1%)
- Digestion with Proteinase K (10µg/ml)
Blastula and gastrula : Ø, early somitogenesis : 1min; late somitogenesis (14 to 22 somites) : 4min,24h : 10min, 36h/48h embryos : 20min.
(One batch of embryos is used for the antibody preabsorption.
- Refixation 20min in 4%PFA-PBS
- Washes 5 x 5min in PBT
- Preadsorbtion of the anti-DIG antibody (Roche) in a 1000 dilution in PBT-sheep serum 2%-BSA2mg/ml for several hours at room temperature with the batch of embryos previously prepared.
Prehybridization and hybridization :
tRNA and Heparin are added for prehybridation and hybridization only. (% of formamide variesfunction of the stringency).
Hybridization mix :
- Formamide 50 - 65%
- SSC 5 x SSC
- Heparin 50 µg/ml
- tRNA 500 µg/ml
- tween 20 0.1%
- citric acid to pH 6.0 (460 µl of 1M for 100 ml)
Prehybridization :
2 to 5 hrs at 70°C in 800 µl of hybridization mix.
Hybridization :
EMBO COURSE MEDAKA & ZEBRAFISH HEIDELBERG 165
Prehybridization mix is removed, discarded and replaced by 200 µl of hybridization mix containing100 - 200 ng of antisens RNA probe. Hybridization is performed overnight, in a waterbath at 70°C.
Day 2 :
Washes : .
Embryos are transfered into small baskets fixed in floaters. Subsequent washes and incubation arecarried out by letting the floater swim under agitation in 200 ml of the adequate solution.
- 1 x fast in 100 HM at 70°C.
- 15 min in 75% HM/25% 2 x SSC at 70°C
- 15 min in 50% HM/50% 2 x SSC at 70°C
- 15 min in 25% HM/75% 2 x SSC at 70°C
- 15 min in 2 x SSC at 70°C
- 2 x 30 min in 0.2 x SSC (for normal stringency) or 0.05 x SSC (for high stringency).
- 10 min in 75% 0.2 (0.05) x SSC/25% PBT at room temperature (RT)
- 10 min in 50% 0.2 (0.05) x SSC/50% PBT at RT
- 10 min in 25% 0.2 (0.05) x SSC/75% PBT at RT
- 10 min in PBT at RT
- several hours in PBT/2% sheep serum/2mg:ml BSA at RT
Incubation with anti-DIG antiserum :
- Preadsorbed anti-DIG is used at the 5000 x dilution in PBT/2% sheep serum/2mg:ml BSAovernight with agitation at +4°C.
Antiserum is preadsorbed on the first day against
Day 3 :
Washes :
Antiserum is removed and discarded. Embryos are then extensively washed :
- 1 x fast in PBT at RT
- 6 x 15 min in PBT at RT
- 3 x 5 min in solution buffer (100 mM tris HCl pH9.5, 50 mM MgCl2, 100 mM NaCl, 0.1%tween 20)
Staining :
staining is performed at RT and monitored with a dissecting scope. Staining solution :
- 225 µl NBT 50 mg/ml
- 175 µl BCIP 50 mg/ml
EMBO COURSE MEDAKA & ZEBRAFISH HEIDELBERG 166
- 50 ml staining buffer
(NBT stock : 50 mg Nitro Blue Tetrazolium in 0.7 ml of Dimethylformamide anhydre + 0.3 ml H2O.BCIP stock 50 mg of 5-Bromo 4-Chloro3Indolyl Phosphate in 1 ml Dimethylformamide anhydre).
Reaction is stopped by removing the staining solution and washing embryos in stop solution : PBSpH5.5, EDTA 1mM. Embryos are then store in stop solution at +4°C in the dark.
Mounting :
- embryos can be observed directly in stop solution at the dissecting scope
- embryos can be mounted directly in 100% glycerol for observation at the compound microscope.
- Embryos at early developement stage (up to 18 hrs) are first dehydrated in 100% Methanol, thenclarified few minutes in methylsalycilate and then mounted in Permount.
------------------------------------------------------------
Materiels and supplies :
- paraformaldehyde (Sigma)
- 10 x PBS
- Methanol
- Tween 20 (Sigma P1379)
- Proteinase K (Roche 1000144)
- Anti DIG antibody - alkaline phosphatase Fab fragment (Roche 1 093 274)
- BSA fraction V protease free (Sigma A-3294)
- desionized Formamide (high purity grade)
- 20 x SSC
- Heparin at 5 mg/ml (Sigma H3393)
- RNAse free tRNA (50 mg/ml) (Sigma R7876, resuspended in Water and extensivelydeproteinized by series of Phenol/CHCl3 extractions)
- citric acid 1M
- Normal Sheep serum (Jackson immunresearch 013 000 121)
- Tris HCl pH9.5 1M
- MgCl2 1M
- NaCl 5M
- NBT 50 mg/ml (made from powder. Sigma N6876)
- BCIP 50 mg/ml (made from powder. Sigma B8503)
- PBS pH5.5
- EDTA 0.5M
- Glycerol 100%
- Methylsalycilate (Sigma M6752)
- Permount (Fisher SP15-100)
- Waterbath at 70°C (with shaking).
EMBO COURSE MEDAKA & ZEBRAFISH HEIDELBERG 167
- orbital shaker. (horizontal shaker).
RECIPES
Zebrafish
Agar/Sucrose:
1.5% agarose
5% sucrose Boil into solution and store as 1.5 ml aliquots at 4°C
BT Fix
4.0 ml 10% paraformaldehyde
5.0 ml 2x Fix buffer
Adjust pH to 7.3 if necessary. Add dH2O to a final volume of 10 ml. Final concentration is 4%paraformaldehyde, 0.15 mM CaCl2, 4%sucrose in 0.1 M PO4 buffer
Chorion Removal
Drain eggs in a 5 cm Petri dish
Add 5 ml of 0.5 mg/ml pronase until the first embryos pop out of the chrion (for about 3.5 min)
Dilute eggs with 200 ml of Egg Water. Rinse 3x more with 200 ml washes of Egg Water and transfersoon to 30% Danieau's.
Danieau's solution for incubation of dechorionated embryos
Full Strength:
Stock soln. use per L
58 mM NaCl (MW= 58.44 g/mol) 50x 169.5 g/L 20 ml
0.7 mMKCl (MW= 74.44 g/mol) 100x 5.2 g/L 10 ml
0.4 mMMgSO4 x 7 H2 O (MW= 246.47 g/mol) 100x 9.9 g/L 10 ml
0.6 mMCa(NO3 )2 (MW=236.2 g/mol) 100x 14.7 g/L 10 ml
5.0 mM HEPES (MW= 238.3 g/mol) pH 7.2 100x 119.1 g/L 10 ml
Use 30% Danieau's for incubation of dechorionated embryos
Use full strength Danieau's for surgery
Egg Water (EW)
A simple saline for embryos and larvae:
Dissolve 300 mg of Instant Ocean Salt mix per liter deionized water.
(Use reversed osmosis water, if available)
EMBO COURSE MEDAKA & ZEBRAFISH HEIDELBERG 168
EW Methyleneblue
Use 0.5 to 2 ppm solution of methyleneblue in eggwater.
Inhibits fungal and bacterial growth
Embryo Medium EM (formerly used for embryo incubation. We find 30% Danieau's is better forsurvival of emryos)
1.0 ml Hank's Stock #1
0.1 ml Hank's Stock #2
1.0 ml Hank's Stock #4
95.9 ml dd H2O
1.0 ml Hank's Stock #5
Use about 10 drops 1 M NaOH to pH 7.2
Fix Buffer
Dilute 2X fix buffer 1:1 with dH2O
2X Fix Buffer
8.0 g Sucrose
0.15 ml 0.2M CaCl2
90 ml 0.2M PO4 buffer, pH 7.3
Check pH. Adjust if necessary to 7.3 with 1 M NaOH or HCl.
Add 0.2 M PO4 buffer to a final volume of 100 ml
Fixatives
Fix buffer: 4% sucrose, 0.15 mM CaCl2, 0.1 M PO4 pH 7.3
For general fixation: 1.5% glutaraldehyde, 0.5% paraformaldehyde in fix buffer .
For antibody staining: 4% paraformaldehyde in fix buffer
Gelatin Embedding Medium
17% gelatin in 10% Hank's saline
Giemsa:
4 ml Giemsa Stock (Sigma Diagnostics)
4 ml 0.5 M Na Phosphate pH 7
200 mls distilled water
Hank's full strength with carbonate (Final): used for sperm storage only; not for embryos
9.9 ml Hank's Premix
EMBO COURSE MEDAKA & ZEBRAFISH HEIDELBERG 169
0.1 ml Stock #6
Hank's (Full Strength) composition
0.137 M NaCl
5.4 mM KCl
0.25 mM Na2H PO4
0.44 mM KH2 PO4
1.3 mM CaCl2
1.0 mM Mg SO4
4.2 mM NaH CO3
Hank's Premix:
Combine the following in order:
10.0 ml Solution #1
1.0 ml Solution #2
1.0 ml Solution #4
86.0 ml ddH2O
1.0 ml Solution #5
Store Hank's Premix in the refrigerator along with the Hank's solutions
Hank's Stock Solutions
Stock #1
8.0 g NaCl
0.4 g KCl
in 100 ml dd H2O
Stock #2
0.358 g Na2HPO4 anhydrous
0.60 g KH2PO4
in 100 ml ddH2O
Stock #4
0.72 g CaCl2
in 50 ml ddH2O
Stock #5
1.23 g MgSO4x7H2O
in 50 ml dd H2O
Stock #6

EMBO COURSE MEDAKA & ZEBRAFISH HEIDELBERG 170
0.35 g NaHCO3
10.0 mls dd H2O
MESAB: see tricaine, mesab
PO4 buffer (0.1 M, pH 7.3):
80 ml 0.1 M Na2HPO4 (13.8 g Na2HPO4xH2O/liter dH2O)
20 ml 0.1 M NaH2PO4 (26.8 g NaH2PO4x7H2O/liter dH2O)
Pronase E:
5 mg/ml pronase E diluted to 1 mg/ml in 30% Danieau’s
PTU:
0.003% 1-phenyl-2-thiourea in 10% Hank's saline.
Ringer's Solutions:
Normal
116 mM NaCl
2.9 mM KCl
1.8 mM CaCl2
5 mM HEPES, pH 7.2.
High calcium
116 mM NaCl
2.9 mM KCl
10 mM CaCl2
5 mM HEPES, pH 7.2.
Calcium free
116 mM NaCl
2.9 mM KCl
5 mM HEPES, pH 7.2.
Subbing Solution for Slides:
1.5% gelatin
0.15% CrK(SO4)x2H2O.
TBS:
20 mM Tris-Cl, pH 7.5
500 mM NaCl
EMBO COURSE MEDAKA & ZEBRAFISH HEIDELBERG 171
Tricaine / MESAB:
Tricaine (3-amino benzoic acidethylester) comes in a powdered form from Sigma (Cat.# A-5040).Make tricaine solution for anesthetizing fish by combining the following in a glass bottle with a screwcap:
400 mg tricaine powder
97.9 ml DD water
~2.1 ml 1 M Tris (pH 9).
Adjust pH to ~7. Store this solution in the freezer. (Buy the smallest amount possible because tricainegets old.)
To use tricaine as an anesthetic combine the following in a 250 ml beaker:
4.2 ml tricaine solution
~100 ml clean tank water.
Medaka
Balanced Salt Solution (BSS) 10x (Yamamoto's isotonic BSS; Ringer´s solution):
NaCl 7.5 g
KCl 0.2 g
CaCl2 0.2 g
NaHCO3 0.02 g
to a final volume of 100 ml with distilled water; adjust pH to 7.3
Balanced Salt Solution (BSS) (for cell culture):
Solution A:
For 500ml
NaCl 65g
KCl 4g
MgSO4 x 7H2O 2g
CaCl2 x 2H2O 2g
Phenol red 5mg
Solution B:
5% NaHCO3 in distilled water (Sterilize by filtration.)
EMBO COURSE MEDAKA & ZEBRAFISH HEIDELBERG 172
Dilute 25ml of solution A with 475ml of distilled water and autoclave. Add 1 ml of solution B to thissolution sterilized by filtration.
BSS-MB: add 1 ml 0.2% methylene blue per 1l BSS
Bleach (0.5%):
dilute 5% Na-hypochlorite (NaOCl; Sigma) in PBS (autoclaved)
Chelex solution (for fin-clips):
20% (w/v) Chelex 100 Sodiumform (Biorad # 143-2832) in ddH2O; equilibrate for 12 hrs, thenautoklave
CMF-PBS 90% (for cell culture):
PBS (Dulbecco's Formula without Magnesium and Calcium),TaKaRa 1 pellet
Distilled water 111 ml
To adjust to osmotic pressure of fish, Ca++ and Mg++ free PBS is diluted to 90% with distilledwater.
DNA extraction buffer (AP-PCR):
Stocksoln
Runningsoln (10ml)
Finalconc
NaCl 5M 0.2ml 100mM
Tris(pH8.0) 2M 0.1ml 20mM
EDTA-2Na(pH8.0)
0.5M 1.0ml 50mM
SDS 10% 0.5ml 0.5%
Proteinase K 20mg/ml 0.2ml 0.4mg/ml
make up to 10ml with ddH2O
DNA solution (cytoplasma injection):
2 µg plasmid DNA
4 µl 2.5 % phenol red
4 µl 10x Ringer's
ad40
µl H2O
EMBO COURSE MEDAKA & ZEBRAFISH HEIDELBERG 173
DNA solution (germinal vesicle injection):
0.5 µg plasmid DNA
5 µl 2.5 % phenol red
5 µl 10x Ringer's
ad50
µl H2O
Electrophoresis solutions (AP-PCR):
10x TBE buffer (0.89M Tris-borate, 0.002M EDTA)
Tris base 324g
boreic acid 165g
0.5MEDTA(pH8.0)
120ml
DW to 3000ml
7M urea-5% polyacrylamide gel (gel size:40cm x 20cm x0.35mm)
urea 13.5g
x10 TBE 3ml
40% acrylamidesolution
3.75ml
10% APS 180µl
DDW to 30ml
TEMED 26µl
Formamide dye
formamide 10ml
0.5MEDTA(pH8.0)
0.2ml
BPB 10mg
XC 10mg
Embryo Rearing Medium (ERM):
0.1% (w/v) NaCl, 0.003% (w/v) KCl, 0.004% (w/v) CaCl2 x 2 H2O, 0.016 % (w/v) MgSO4 x 7H2O,
0.0001% (w/v) methylene blue
EMBO COURSE MEDAKA & ZEBRAFISH HEIDELBERG 174
ESM1 (for blastula cell culture):
13 g/l DMEM (4.5 g glucose/l; Gibco)
20 mM Hepes
50 µg/ml streptomycin-50 U/ml penicillin
1 X Non-essential amino acids (1 mM; Gibco)
1 X Na-pyruvate (1 mM; Gibco)
1 X Na-selenite (2 nM; Gibco)
1 X glutamine (2 mM)
2 X 2-mercaptoethanol (100 µM; Gibco)
15% ES-FCS (Gibco)
1% rainbow trout serum (self made)
10 ng/ml bFGF; human recombinant (Gibco)
10 ng/ml LIF; human recombinant (UPI)
Medaka embryo extract (1 embyo per ml medium; self made)
Gelatin (0.1%):
0.5 g gelatin (Type A, 300 Bloom; Sigma) in 500 ml water, autoclave
Lysis buffer (for fin-clips):
100mM NaCl; 1.2% sarcosyl in ddH2O, autoclaved
medaka PBS 10x::1M NaCl, 19.5mM KCl, 59mM Na2HPO4, 11mM KH2PO4; pH to 7.3 - 7.4
medaka PBS (for cell culture):
108 mM NaCl; 252 mM Na2HPO4; 22.5 mM KH2PO4; pH7.3, autoclave
Oocyte Medium (Earle's medium 199):
9.9g Medium 199, Earle's salts
2.2g NaHCO3
50mg penicillin
30mg streptomycin
(or: 5ml Pen/Strep solution; Gibco)
20g BSA
ad 1.25l ddH2O; add NaOH to adjust pH to 8.0; filter through 0.2µm filter
EMBO COURSE MEDAKA & ZEBRAFISH HEIDELBERG 175
PCR buffers (AP-PCR):
x10 PCRbuffer
(lowstringency)
x10 PCRbuffer
(highstringency)
KCl 50mM 50mM
Tris(pH7.6) 10mM 10mM
gelatin 0.01% 0.01%
MgCl2 5mM 1.5mM
TM buffer (for cell culture):
100 mM NaCl
5 mM KCl
5 mM Hepes
1 mM CaCl2
1 mM MgCl2
100 µg/U/ml Strep-Peni
pH7.0; filter through 0.2 µm filter
TM1 buffer:
100 mM NaCl
5 mM KCl
5 mM Hepes
pH7.0; filter through 0.2 µm filter
TM-5% PEG:
Proteinase K (10 mg/ml in water)
1 vol 2 X TM
1 vol 10% PEG
filter through 0.2 µm filter

EMBO COURSE MEDAKA & ZEBRAFISH HEIDELBERG 176
Teachers
Chris AmemiyaVirginia Mason Rersearch Center
Benaroya Research Institute
Molecular Genetics Dept.
1201 Ninth Avenue
Seattle, WA 98101 USA
phone.: +1 206-583-6525 (office);
-6400 (lab);
fax: +1 206-583-2297
e-mail: [email protected]
Laure Bally-CuifZebrafish Neurogenetics Group
GSF-Research Center
Institute of Developmental Genetics
Ingolstaedter Landstrasse 1
D.85764 Neuherberg Germany
phone. +49 89 3187.3562 (office)
+49 89 3187.2944 (lab)
fax. +49 89 3187.3099
e-mail: [email protected]
Wolfgang DrieverInstitut für Biologie I
Entwicklungsbiologie
Hauptstr. 1
79104 Freiburg
GERMANY
fax: +49-761-203-2598
E-mail: [email protected]
Makoto Furutani-SeikiKondoh Differentiation Signaling Project
JSTC
14 Kawara-cho Yoshida, Sakyo-ku
Kyoto
606-8394 Kyoto, JAPAN
phone: +81-75-771-9362
fax: +81-75-771-8283
e-mail: [email protected]
Thorsten HenrichERATO,
Kondoh differentiation signaling project,
Kinki-chihou Hatsumei Center Building,
Yoshida-Kawaramachi 14, Sakyo-ku,
Kyoto 606-8305, Japan
email: [email protected]
phone +81-75-771-9362
fax +81-75-771-8281
e-mail: [email protected]
Yunhan HongDept of Biological Sciences
National University of Singapore
14 Science Drive 4
Singapore 117543, Singapore
fax: 7792 486
e-mail: [email protected]

EMBO COURSE MEDAKA & ZEBRAFISH HEIDELBERG 177
Don KaneDepartment of Biology
University of Rochester
Box 270211
Rochester, NY 14627
USA
fax: +1-716-275-2070
E-mail: ddke@uhur
Felix LoosliDevelopmental Biology Programme
EMBL Heidelberg
Meyerhofstrasse 1
D-69117 Heidelberg
GERMANY
phone: +49 6221-387- 147
fax: +49 6221-387- 166
e-mail:
Hiroshi MitaniDepartment of Integrated Biosciences
Department of Biological Sciences
University of Tokyo
5-1-5 Kashiwanoha
Kashiwa City 277-8562, Japan
phone: +81 3 5841-4441
fax: +81 3 5802 2911
e-mail: [email protected]
Indrajit NandaExperimentelle und Klinische Zytogenetic
Biozentrum der Universität Würzburg
Institut für Humangenetik
Am Hubland
97074 Würzburg
phone: +49 931 888 - 4078
fax: +49 931 888 – 4069
e-mail: [email protected]
Kyoshi NaruseDepartment of Biological Sciences
Graduate School of Science
University of Tokyo
Hongo7-3-1, Bunkyo-ku
Tokyo 113-0033, Japan
phone:+81-3-5841-4443
FAX: +81-3-5841-4410 (office)
e-mail: [email protected]
Carl NeumannDevelopmental Biology Programme
EMBL Heidelberg
Meyerhofstrasse 1
D-69117 Heidelberg
GERMANY
phone: +49 6221-387- 603
fax: +49 6221-387- 166
e-mail:
Masaru NonakaDepartment of Biological Sciences
Graduate School of Science
University of Tokyo
7-3-1 Hongo, Tokyo 113-0033 Japan
phone: +81-3-5841-7589
fax:+81-3-5800-3397
e-mail: [email protected]
Manfred SchartlPhysiological Chemistry I
Biocenter of the University Würzburg
Am Hubland
97074 Würzburg
GERMANY
phone: +49-931-888-4148
fax: +49-931-888-4150
e-mail:
EMBO COURSE MEDAKA & ZEBRAFISH HEIDELBERG 178
Akihiro ShimaDepartment of Integrated Biosciences
Department of Biological Sciences
The University of Tokyo
5-1-5 Kashiwanoha
Kashiwa City 277-8562, Japan
phone: +81 3 5841-4441
fax: +81-3-5802 2911
e-mail: [email protected]
Lilianna Solnica-KrezelDepartment of Biological Sciences
Vanderbilt University
VU Station B 351634
Nashville, 37235-1634
USA
phone. +1 615-343-9413
fax. +1 615-343-6707
e-mail:
Monte WesterfieldInstitute of Neuroscience
University of Oregon
219 Huestis Hall
Eugene OR 97403, USA
phone: +1 541 346 4607
fax: +1-541-346-4548
e-mail: [email protected]
Christoph WinklerPhysiological Chemistry I
Biocenter of the University Würzburg
Am Hubland
97074 Würzburg
GERMANY
phone: +49-931-888-4142
fax: +49-931-888-4150
e-mail:
Jochen WittbrodtDevelopmental Biology Programme
EMBL Heidelberg
Meyerhofstrasse 1
D-69117 Heidelberg
GERMANY
phone: +49 6221-387- 576
fax: +49 6221-387- 166
e-mail:
Wittbrodt Lab: Alexander Arenz, Matthias Carl, Filippo DelBene, Clemens Grabher, Erika Grzebisz,Annette Krone, Felix Loosli, Lucia Poggi, Rebecca Quiring, Martina Rembold, Beate Wittbrodt. E-mail:<first name>.<last name>@EMBL-Heidelberg.de
Additional help by
Antonio Giraldez ([email protected]), Juan-Ramon Martinez-Morales( i s r r 3 4 8 @ c a j a l . c s i c . e s ), Marlene R a u ([email protected]) , M a t t h i a s Schaefer([email protected]).
EMBO COURSE MEDAKA & ZEBRAFISH HEIDELBERG 179
Participants
Massimiliano AndreazzoliLab. Biol. Cell. e SviluppoFisiologia e BiochimicaVia Carducci, 1356010 Ghezzano (Pisa)Italyphone.: +39 050 878356fax: +39 050 878486
Email: [email protected]
Ronja BahadoriBrain Research Institute, ETH ZurichBiologyWinterthurerstr. 1908057 ZurichSwitzerlandphone.: +41 1635 3228fax: +41 1635 3303
Email: [email protected]
Anja BergerMPI for Molecular GeneticsLehrachIhnestr. 63-7314195 BerlinGermanyphone.: +49 30 84131339fax: +49 84131128
Email:[email protected]
Miguel ConchaUniversity College LondonAnatomy and Developmental BiologyGower StreetWC1E 6BT LondonUnited Kingdomphone.: 44 207 6793331fax: 44 207 6797349
Email: [email protected]
Karin DumstreiUniversity of California LosAngelesMolecular Cell DevelopmentalBiology4214 Life Science Bldg621 Charles E. Young Dr. South CA 90095 Los AngelesUnited Statesphone.: (310) 206 7376fax: (310) 206 3987
Email: [email protected]
William JackmanUniversity of Colorado at BoulderEvolutionary, Population, and OrganismicBiologyUniversity of ColoradoCampus Box 33480309-0334 BoulderUnited Statesphone.: +1 303 735 5153fax: +1 303 492 8699
Email: [email protected]
William JonesUniversity of KonstanzEvolutionary BiologyUniversitätsstraBe 10D-78457 KonstanzGermanyphone.: +49 7531 883710fax: +49 7531 883018
Email: [email protected]
Astrid KeijserNIOB/ Hubrecht Laboratoriumgroup van EedenUppsalalaan 83584 CT UtrechtThe Netherlandsphone.: +31 30 2121800fax: +31 30 2516464
Email: [email protected]
EMBO COURSE MEDAKA & ZEBRAFISH HEIDELBERG 180
Michael LangGSF Forschungszentrum fuerUmwelt und GesundheitInstitut fuer Saeugetiergenetik -ZebrafischgenetikIngolstaedter Landstr. 185764 NeuherbergGermanyphone.: +49 (0)89 3187-3181fax: +49 (0)89 3187-3192
Email: [email protected]
Jae-Seong LeeHanyang UniversityDepartment of Environmental Science17 Haengdang-dong, Seongdong-gu133-791 SeoulKorea, Southphone.: +82 2 2290 0769fax: +82 2 2294 6270
Email: [email protected]
Ming MAInstitute of MolecularAgrobiology, National Universityof Singapore 1 Research Link, NUS, Singapore117604 SingaporeSingaporephone.: +65 6872 7094fax: +65 6872 7007
Email: [email protected]
Csaba MiskeyMax Delbruck Center for MolecularMedicineTransposition GroupRobert Rossle Str. 1013092 BerlinGermanyphone.: +49 30 94062545fax: +49 30 94062547
Email: [email protected]
Andrea PasiniThe National Institute for MedicalResearchDevelopmental NeurobiologyThe Ridgeway, Mill HillNW7 7AA LondonUnited Kingdomphone.: +44 207 959 3666ext 2253fax: +44 208 906 4477
Email:[email protected]
Jorge Pereira PintoUniversidade do AlgarveFCMA/CCMARCampus de Gambelas8000 FaroPortugalphone.: +351 965357850fax: +351 289 818353
Email: [email protected]
Ombretta PozzoliUniversità degli Studi di MilanoBiologiaVia Celoria 2620133 MilanItalyphone.: +39 02 503 14791fax: +39 02 503 14781
Email:[email protected]
Michael SchebestaIMP Dr. Bohrgasse 7A-1030 ViennaAustriaphone.: +43 1 79730 425fax: +43 1 798 71 53
Email: [email protected]