travelport smartpoint app user guide · with existing galileo desktop and point and click products....
TRANSCRIPT

April 2011 version 1.3.4. build 6857 Page 1
Smartpoint App™
User Guide

Travelport Smartpoint App™ - User Guide Travelport © 2011
April 2011 version 1.3.4. build 6857 Page 2
Revision History
Ver Status Date Update Summary By
1.0 Draft 08FEB2011 Initial version Roberto Otero
Francesc P
1.1 Review 17FEB2011 Initial review J Ramsay
T Hempstock
S Barber
H Malm
F Puig
1.2 Review 17FEB2011 Second Review T Hempstock
1.3 Amendment
07APR11 Small Amendment to plug in table
T Hempstock
1.4 Review 10APR11 Copy editing; re-sizing and positioning of screen caps; re-organizing doc into a user guide format; moved architectural and technical information in appendix.
H Malm

Travelport Smartpoint App™ - User Guide Travelport © 2011
April 2011 version 1.3.4. build 6857 Page 3
Contents
Overview ....................................................................................................................................... 5
Main features ................................................................................................................................ 6
Increase Productivity ..................................................................................................................... 6
Language Translations ................................................................................................................... 6
Last Seat Availability ...................................................................................................................... 6
Starting Travelport Smartpoint App™ ............................................................................................ 7
Window Layout ............................................................................................................................. 7
Air Availability ............................................................................................................................. 10
e-Pricing™ fare search (FS) using Smarpoint ................................................................................. 12
Fare Displays using Smartpoint .................................................................................................... 14
Fare Quote and Best Buy ............................................................................................................. 15
Calendar ...................................................................................................................................... 18
Client Files ................................................................................................................................... 19
Booking Retrieve ......................................................................................................................... 19
The PNR Viewer ............................................................................................................................... 20
Configuring PNR Viewer ............................................................................................................... 21
Booking File sections and color indicators .................................................................................... 23
Formats and Functions .................................................................................................................... 23
Menus ......................................................................................................................................... 27
Booking Hotels using Smartpoint ................................................................................................. 28
Selling Cars using Smartpoint ....................................................................................................... 31
Low Cost Carriers ......................................................................................................................... 33
Timatic and other Host functions ................................................................................................. 34
Pkeys ........................................................................................................................................... 34
Global Access............................................................................................................................... 34
Language translation ................................................................................................................... 34
Keyboard shortcuts...................................................................................................................... 35
Quick Commands......................................................................................................................... 37

Travelport Smartpoint App™ - User Guide Travelport © 2011
April 2011 version 1.3.4. build 6857 Page 4
Appendix A - Interactive Response & Plug-in Architecture ........................................................... 38
Definitions ................................................................................................................................... 39
Appendix B - Technical Requirements .......................................................................................... 42
Appendix C - Installation .............................................................................................................. 43
FAQ – Frequently Asked Questions? ............................................................................................ 45

Travelport Smartpoint App™ - User Guide Travelport © 2011
April 2011 version 1.3.4. build 6857 Page 5
Overview
Travelport Smartpoint App™ is a Travelport professional services solution. It has been
created to supply customers with a valuable and powerful tool in order to speed up their daily
operational capability. Enhanced productivity, a more user friendly and intuitive environment
to operate in and a reduced reliance on cryptic entries all go to make this an ideal candidate
for call centre operations and conversion opportunities.
Travelport Smartpoint App™ is a completely new framework architecture which boosts agent
efficiency and introduces new functionality in addition to the functionality already in place
with existing Galileo Desktop and point and click products.
By default Travelport Smartpoint App™ provides a basic layout that consists of:
The Terminal Window to enter formats and obtain general responses
The PNR Viewer automatically refreshes the booking file
Smartpoint effectively reduces keystrokes, contributes to increased efficiencies and speeds
up the agent booking process.
A plug-in structure governs its design and environment. It is defined as a general application
connecting with small units of functionality, called plug-ins, which create a flexible framework
allowing a consumer to only use the functionality applicable to their business processes.
Travelport Smartpoint App™ is an example of how the technology of an XML API Desktop
product can be integrated with the Galileo Desktop platform to supplement cryptic and point
and click navigation with graphical user interfaces and to seamlessly guide an agent through
the booking process. Smartpoint support both Galileo and Apollo core systems and allows
agents to work on both systems using either system language.
Travelport Smartpoint App™ further improves and streamlines point & click navigation and
allows the agent to enter either Galileo or Apollo terminal emulation transaction commands
to invoke any GDS function, returning highlighted items (an interactive response) that the
user can click on to transmit core transaction, book and complete reservation.

Travelport Smartpoint App™ - User Guide Travelport © 2011
April 2011 version 1.3.4. build 6857 Page 6
Main features
Here are some of the main features provided
Automatic redisplay of PNR
Follow up transactions accessible with a click
Intuitive point and click approach to booking hotels and cars
Quick reservation process with up to 70% keystroke savings
Access to last seat availability from the initial display
Outbound and return availability using a single transaction
Shopping results sorted by price or departure time
Aggregated and surcharge inclusive shopping
Hotel Images
Increase Productivity
As well as the above Travelport Smartpoint App™ allows agents to focus on cross selling
and upselling. By making car and hotel reservations easier for the agent, it could significantly
increase attachment rates and subsequently increase revenue and profitability. Productivity
gains can be obtained by quicker reservations with fewer errors.
Limited cryptic entry knowledge needed so less training time
Experienced users retain control of their workspace via cryptic entries
Full set of cryptic transactions, keyboard navigation control and shortcuts
Multiple Window Support, Multi-Tab, dual Terminal per Tab
Quick Commands to customize own formats
Easy reporting of errors and bugs via e-mail notification
Pkeys support for any Travelport Smartpoint App™ entry
Language Translations
An important and useful feature of Travelport Smartpoint App™ is the ability to use the tool
as a transition and conversion instrument. During the process of changing a non-Travelport
GDS to Galileo/Apollo, Travelport Smartpoint App™ eases the transition and migration
efforts by providing a translation application for Sabre or Amadeus into Galileo or Apollo.
Entries can then be transacted in either the primary (Apollo or Galileo) or secondary (Sabre,
Amadeus, Galileo or Apollo) languages.
Last Seat Availability
Travelport Smartpoint App™ provides you with the last seat availability for over 300 airlines.
By leveraging our Dynamic Last Seat Availability capabilities with Travelport Cache
Control™, we offer the best possible last seat availability from the neutral availability
display. You can use a simple availability format and see the C* on screen indicator
providing you with confidence of our Inside Availability product. Link displays (A*BA for
Galileo, L@BA/A for Apollo) can be used inter-changeably.

Travelport Smartpoint App™ - User Guide Travelport © 2011
April 2011 version 1.3.4. build 6857 Page 7
Starting Travelport Smartpoint App™
Travelport Smartpoint App™ is launched by clicking this icon . It is part of the Custom
Toolbar in Desktop. Travelport Smartpoint App™ is re-launched (exit + re-access) every
time you click the icon.
Note that Travelport Smartpoint App™ can be configured to startup automatically when
Galileo Desktop is launched. Some customers use this capability in order to avoid the need
to launch Travelport Smartpoint App™ manually after each reboot. See Annex D for
advance configuration settings.
Window Layout
Travelport Smartpoint App™ supports multiple Terminal Windows that can be configured
independently. For example a terminal window can have its own font settings or use a
different connection to a different host if needed. The layout defined by the user can be
saved so that Travelport Smartpoint App™ uses it each time it starts up.
By default, the Travelport Smartpoint App™ window layout is composed of two basic
windows, the Terminal Window and the PNR Viewer. The Terminal window permits to input
formats easily by means of the command line on top and to obtain outputs to interact
according to functional needs. On the other hand, the PNR Viewer window constantly
updates the active booking file in the work area.

Travelport Smartpoint App™ - User Guide Travelport © 2011
April 2011 version 1.3.4. build 6857 Page 8
Signing in
If the Galileo sign-in was not previously entered, Travelport Smartpoint App™ will launch a
dialog window to complete with details for signing-on.
For Client IDs which require emulation, another box will be launched to indicate the
corresponding PCC if needed. Cancel must be clicked not to emulate.

Travelport Smartpoint App™ - User Guide Travelport © 2011
April 2011 version 1.3.4. build 6857 Page 9
shows how a terminal window is structured:
Application Menus: Provide access to different configuration options and keyboard
shortcuts among other things.
Connection Switcher: used to select among all available connections in Galileo
Desktop1
View Switch: Allows to resize the split Terminals in a Terminal Window.
Multi-Tab: support for multiple Tabs, therefore multiple Terminals inside a Terminal
Window.
Status Area: Activity indicator.
Custom Panel Area: this area is utilized by some Plug-ins in order to show some
user Interface elements to interact with. i.e. Area Switcher.

Travelport Smartpoint App™ - User Guide Travelport © 2011
April 2011 version 1.3.4. build 6857 Page 10
Air Availability
Standard availability request returns response from the direct carrier link. Users are no
longer required to access the Carrier Specific Display (A*AF for Galileo) or access the
Carrier Inside Link (L@AF/A for Apollo) to validate last seat availability before selling.
Travelport Smartpoint App™ leverages
Travelport‟s dynamic last seat availability and
Cache Control capabilities and automatically
populates standard availability screen with last
seat availability for over 300 of our participating
airlines.
Travelport Smartpoint App™ shows all classes of
service offered in a single expanded display.
There is no need to remember complicated follow
up entries. Travelport Smartpoint App™ uses
standard Galileo and Apollo entries to display
availability, pricing and ticket. In addition all main
displays are supported by highlighting. There is
no need to remember complicated follow on
transactions. Just point and click and sell flights,
access airport, terminal, equipment and flight
duration information.
What does the click do?
Blue links : On airport, carrier and equipment, performs a decode.
Flight Numbers: supplies terminal and elapsed flying time information
Booking classes in Yellow: Books confirmed.
Booking classes in Orange: Books on WL
Standard cryptic entries can also be used to sell a flight. For instance: N1Y1
Segment sell responses are displayed underneath the new segment in the PNR Viewer.
If the segment sell is unsuccessful, then it still displays this in the terminal window.
This behavior can be disabled in a configuration file if needed..
More Flights Link, returns more air availability. ALT + M can be entered instead of clicking
with the mouse. See Appendix A for more information about the keyboard shortcuts.

Travelport Smartpoint App™ - User Guide Travelport © 2011
April 2011 version 1.3.4. build 6857 Page 11
Round Trip Availability
Travelport Smartpoint App™ enables users to search for
outbound and return flights in a single transaction. In
response to such a request, outbound and return
availability displays are shown using the upper and
lower Terminal Partitions. Users can book both the
outbound and inbound segments in a single entry or
click on the booking class to sell:
Both screens show the Prior/Next Day toolbar to
navigate forward or back and select the quantity of
passengers.
Multi sector legs can be booked with the same booking
class from a single entry using a “+” symbol. For
instance: A10MAYBCNMAD+15MAY.
Cryptic formats can be also entered to book outbound and inbound flights. For instance:
N1Y1+N1Y4
Prior/Next Day search bar
Dates and number of passengers can be changed after availability is performed, so agents
can quickly access to the same availability request for the following/prior day or for a
different number of passengers.

Travelport Smartpoint App™ - User Guide Travelport © 2011
April 2011 version 1.3.4. build 6857 Page 12
e-Pricing™ fare search (FS) using Smarpoint
Searching for lower fares using Travelport Smartpoint App™ provides a 70% reduction in
keystrokes. Users can access valuable information with a single click.
Using a simple transaction format, customers have access to the broadest choice of any low
fares search and pricing system in the industry. Travelport e-Pricing™ technology now
powers all fare searches and pricing requests.
All Focalpoint Shopping options can be ordered by price, departure time and journey time.

Travelport Smartpoint App™ - User Guide Travelport © 2011
April 2011 version 1.3.4. build 6857 Page 13
When requesting round trip itineraries on the same date for both the outbound and the
inbound sector, Focalpoint Shopping supplies the options with the ground time to evaluate
the convenience of selecting that alternative.
There are some links available that provide the following functionality:
Book: books the selected itinerary.
Details: provides more details about this itinerary and its fares.
Rules: provides detailed information about the fare rules.
More*n: allows the agent to see more itineraries that meet the selected fare.

Travelport Smartpoint App™ - User Guide Travelport © 2011
April 2011 version 1.3.4. build 6857 Page 14
Fare Displays using Smartpoint
Travelport Smartpoint App™ offers a fantastic environment to request fares for city pairs to
check details and analyze rules.
Apart from the current information supplied by Focalpoint, there are many clickable items
with follow-up material to complete the whole fare investigation process.
Agents can get access to some follow up entries/functions by clicking on the links shown
above.

Travelport Smartpoint App™ - User Guide Travelport © 2011
April 2011 version 1.3.4. build 6857 Page 15
Some of the options are:
Line number: displays interactive flight availability for specific carrier/class
Fare basis: accesses the complete fare rules
Currency code: displays a dialog window to change into another currency
Carrier code: decodes the carrier code.
Fare amount: displays penalties fare category
Booking class: displays a dialog window to select other booking classes as per primary
or secondary carriers, equivalent to the information supplied by the FDC format.
Advanced Purchase information: accesses the advanced purchase fare category
Min/Max information: accesses the minimum and maximum fare categories
Season dates: displays the seasonality fare category
The R indicator: accesses the routing information as per the FR entry
The global indicator code: decodes
D, DT or DT indicators=launches the Day/Time restriction fare category
“Unsaleable fares may exist” means that any unsalable fare for that point of sale if
applicable (FU* cryptic format)

Travelport Smartpoint App™ - User Guide Travelport © 2011
April 2011 version 1.3.4. build 6857 Page 16
Fare Quote and Best Buy
The fare quote response has been enhanced to offer a quick way to check rules. Just FQ,
FQBB or FQBC and analyze fare categories easily.
DISPLAY RULES is the gateway. Then, each fare basis participating in the quotation for
each fare component can be accessed to display the complete fare rule text.
A simple click on the city pair is required to read only category 16 for penalties.

Travelport Smartpoint App™ - User Guide Travelport © 2011
April 2011 version 1.3.4. build 6857 Page 17
The lowest fare available for an itinerary FQBB response also supplies agents with a clickable FQBBK to make the booking final step more dynamic.

Travelport Smartpoint App™ - User Guide Travelport © 2011
April 2011 version 1.3.4. build 6857 Page 18
Calendar
The Travelport Smartpoint App™ Calendar is contextual, that means that the user can
trigger air availabilities, Focalpoint shopping requests, hotel and cars from the calendar. In
order to do this, first select the date range and then right-click on that range, a context menu
will be shown with the following options:
The user can also tell Travelport Smartpoint App™ that wants to open up the calendar when
the application starts up, for that purpose use the “Open on start-up” checkbox in the
calendar.
Users can select a range of dates by selecting the departure date first and then the return
date. Month calendar provides a full calendar for next 12 months.
Travelport Smartpoint App™ - User Guide Travelport © 2011
April 2011 version 1.3.4. build 6857 Page 19
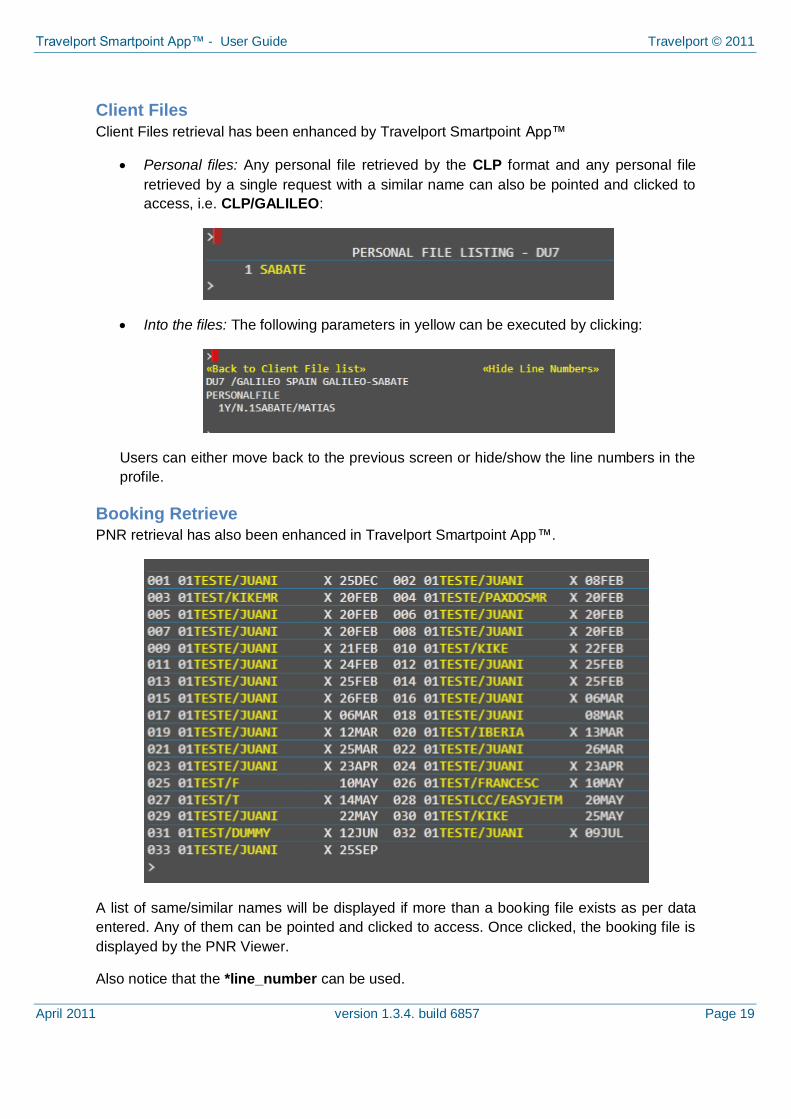
Client Files
Client Files retrieval has been enhanced by Travelport Smartpoint App™
Personal files: Any personal file retrieved by the CLP format and any personal file
retrieved by a single request with a similar name can also be pointed and clicked to
access, i.e. CLP/GALILEO:
Into the files: The following parameters in yellow can be executed by clicking:
Users can either move back to the previous screen or hide/show the line numbers in the
profile.
Booking Retrieve
PNR retrieval has also been enhanced in Travelport Smartpoint App™.
A list of same/similar names will be displayed if more than a booking file exists as per data
entered. Any of them can be pointed and clicked to access. Once clicked, the booking file is
displayed by the PNR Viewer.
Also notice that the *line_number can be used.

Travelport Smartpoint App™ - User Guide Travelport © 2011
April 2011 version 1.3.4. build 6857 Page 20
The PNR Viewer
The PNR Viewer is another Travelport Smartpoint App™ Plug-in that provides an instant
view of any change the agent does in the booking file. It shows all relevant information and
grouped in sections that can be accessed easily.
PNR Viewer is a sophisticated component in Travelport Smartpoint App™ that can be
configured to the customer needs in order to select what information will be displayed. There
is an XML File that drives the refresh process in the PNR Viewer and that can be
customized2. The concept behind this is that Travelport Smartpoint App™ keeps a list of the
entries/formats that will force a refresh of the PNR Viewer content.
PNR Viewer has been designed to access the Booking File data quickly and efficiently,
however the agent can force a PNR redisplay in the current Terminal Window by adding up
the semicolon (;) at the end of the pnr retrieve entry (i.e. *R; in the Galileo System).
2 This should be discussed with Travelport’s Solutions Consultants in order to know how to manipulate this file and how to customize properly. Modifying files inside the Smartpoint program folder without the right knowledge might end up with Smartpoint being unable to work properly.
Travelport Smartpoint App™ - User Guide Travelport © 2011
April 2011 version 1.3.4. build 6857 Page 21
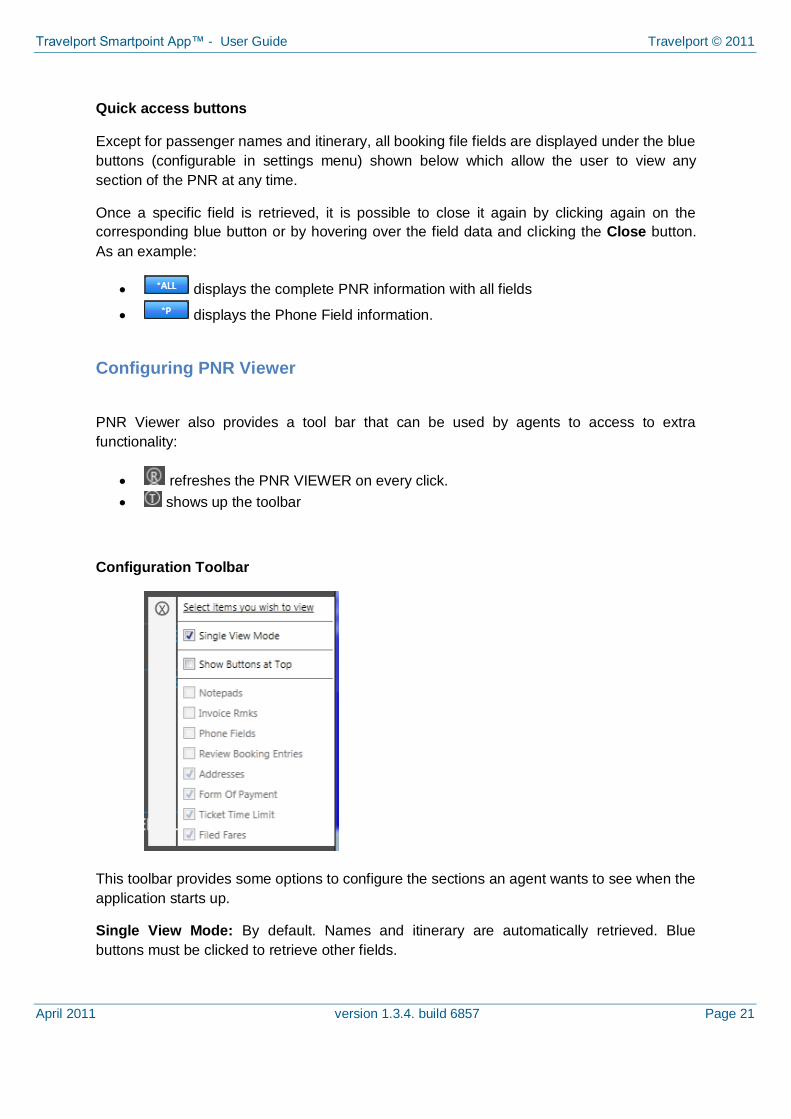
Quick access buttons
Except for passenger names and itinerary, all booking file fields are displayed under the blue
buttons (configurable in settings menu) shown below which allow the user to view any
section of the PNR at any time.
Once a specific field is retrieved, it is possible to close it again by clicking again on the
corresponding blue button or by hovering over the field data and clicking the Close button.
As an example:
displays the complete PNR information with all fields
displays the Phone Field information.
Configuring PNR Viewer
PNR Viewer also provides a tool bar that can be used by agents to access to extra
functionality:
refreshes the PNR VIEWER on every click.
shows up the toolbar
Configuration Toolbar
This toolbar provides some options to configure the sections an agent wants to see when the
application starts up.
Single View Mode: By default. Names and itinerary are automatically retrieved. Blue
buttons must be clicked to retrieve other fields.

Travelport Smartpoint App™ - User Guide Travelport © 2011
April 2011 version 1.3.4. build 6857 Page 22
Multiple View Mode: It can be configured by activating the different fields to be displayed in
an automatic and unhidden mode.
Show Buttons at Top
Access buttons are displayed at the bottom of the segments section by default, however it
can be configured to show at the top of the PNR Viewer, example:
View Mode
PNR Viewer can be configured to show the PNR information in three different ways:
Single Page: Agent can navigate through different pages by using
Two Pages: PNR Viewer will show two columns simultaneously.
Scroll Mode: only one page will be available but a vertical scrollbar will be available
to slide up and down the PNR.
Zoom
Zoom level in the PNR Viewer can be adjusted in order to fit well in the screen. On some PC
configurations the resolution might not be optimal for a clear view of the PNR, therefore
agents should change this in order to have the PNR width adjusted to the PNR Viewer
window width.
Search
When working with large PNRs it might be useful to search any word inside the PNR viewer.
This tool allows an agent to look for a word or words in the current PNR. When found, the
words will be highlighted in the PNR Viewer.

Travelport Smartpoint App™ - User Guide Travelport © 2011
April 2011 version 1.3.4. build 6857 Page 23
Booking File sections and color indicators
Some booking file fields or elements can be clicked in order to activate follow-up entries or
launch pop up boxes, generated by the Viewpoint3, to be completed for different further
actions.
These are some main examples:
Yellow4 items means that an action will be performed, such as opening a new dialog
window or sending new formats to the host. For example, when clicking on any of the
passenger names, a Viewpoint dialog window will be opened in order to make
changes on its personal data, phones, emails, etc.
There are some special links that are important and
might require more attention:
Segment number: will launch a dialog window
to search for hotels or cars. Search criteria will
be based on the current pnr.
Booking class reserved: will display a dialog
window providing a seat map with a real-time
view of available seats. This is only applicable if
the airline publishes a seat map for that flight.
Blue items do normally decode data or supply complementary information. Good
instances are flight numbers, city/airport codes, status codes, electronic ticket
indicator, filed fare quotation number, etc.
Formats and Functions
Travelport Smartpoint App™ has been designed to supply users with some enhanced
formats and interactive responses to speed up follow on actions and processes.
No additional entries are required to get them, just the standard cryptic ones.
3 Some Viewpoint dialog Windows can be accessed from Smartpoint. Notice this is not available to all users, some users might want to have this disabled. 4 Notice that colors might change depending on the agent’ selected theme in Smartpoint

Travelport Smartpoint App™ - User Guide Travelport © 2011
April 2011 version 1.3.4. build 6857 Page 24
Terminal Partitions
All terminal windows can hold one or more Tabs, each Tab holds two terminal partitions
(upper and lower), and by default, only one (the top terminal partition) is shown.
Both terminal emulators can be rearranged through different options.
Simple window partition:
The work window is divided into two parts (terminal partitions) which belong to the
same work area (actually all terminal partitions in all Tabs belong to the same area).
The View Switch button which activates and deactivates the window partition with
just the click of the mouse.
Once the split line is shown, it can be dragged to adjust the size of the upper/lower
terminal partition.
A click is just also required to change from the upper to the lower sub-window or vice
versa.
In addition, Alt + D (lower window=2) or Alt + U (upper window=1) are valid. If these
keystrokes are repeated, these sub-windows are zoomed in / out.
TABs
Each window can be also divided into flaps or strips called “Tabs”. It allows users to
multitask in order to conduct many searches at the same time.
The “Terminal” drop down menu offers “New Terminal in Tab” to create them. Alt + N is also
valid if keystrokes are preferred. Each tab gets a name which corresponds to the last input
entered. In addition, a number indicator also gets assigned.
These tabs can be deleted just by means of the X present next to their names or by means
of Alt + R. It is also possible to remove the current terminal tab by means of the Terminal
drop down menu.
Alt + 1, 2, 3 changes cursor to the relevant tab section to work. Tabs are renumbered
automatically when added/removed, auto-numbering only happens for the first 9 tabs5.
Moving between windows (see keyboard shortcuts section)
Ctrl + Q allows the user to move between the existing work windows and the PNR
Viewer instead of clicking the mouse.
5 By default Smartpoint is configured to Support only 9 Tabs, but it can be expanded beyond this limit.

Travelport Smartpoint App™ - User Guide Travelport © 2011
April 2011 version 1.3.4. build 6857 Page 25
The WINDOW drop down menu also permits users to select the window area to
move and work.
Scroll Bar
Some outputs display long responses. The scroll bar allows all available information
and details to be viewed at once. However, and in accordance with each type of
function, it is possible to click to obtain more details and complementary data.
Work Areas (Area Switcher):
The area switcher is served by a Plug-in that allows the user to switch the area
easily.
As per the Galileo/Apollo Central System design, Travelport Smartpoint App™ also
offers the 5-work-area infrastructure: A, B, C, D and E. The active one is indicated in
the lower right corner. It is also possible to switch between them in an easy way by
clicking on their icons. The SA, SB..SE entries are still accepted. Besides the OP/W*
Galileo format refreshes the area switcher buttons.
If a retrieved booking file is identified by the host it is automatically displayed in the
PNR Viewer. It is also possible to verify the PNR Viewer contents of another work , a
thumbnail will appear to show those contents of an existing booking file by hovering
over the relevant icon.

Travelport Smartpoint App™ - User Guide Travelport © 2011
April 2011 version 1.3.4. build 6857 Page 26
GDS languages: This feature is also provided by its own Plug-in and allows
the user to set the host language preferences. Travelport Smartpoint App™ offers
multiple GDS language options. It supports Galileo and Apollo as primary languages
and Amadeus, Sabre, Apollo and Galileo as secondary ones. It allows users to mix
and operate with multiple system languages in the same record, considering the
most important and basic entries. A more detailed explanation on how this works can
be found later in this document.
The Cursor: Its color indicates if the insertion mode is active or not. When the
cursor (caret cursor block) is red it means that the insertion mode is activated, when
yellow means disabled (override mode).
Type Ahead: The Type Ahead capability which permits users to go on typing entries
while system is processing and returning responses is activated.
Send an Entry to the Host: When pressing the Enter/return key, the format/request
is sent to the host and its response will be shown in the same tab and Terminal
Partition that the user is working in. However, it is possible to send it to a new tab by
using Ctrl + Enter.
Window control buttons: There are 3 icons in the upper right
corner of the windows for additional features.
*The first icon is valid for some different copy actions: “Take a window snapshot”,
“Copy content as Image” and “Copy content as Text”. This is a contextual menu that
behaves differently depending on what window the user is on (activated).
*The second one is to maximize/restore the window

Travelport Smartpoint App™ - User Guide Travelport © 2011
April 2011 version 1.3.4. build 6857 Page 27
*The third one will close the window (not available in the PNR Viewer, i.e. the PNR
Viewer can‟t be closed). If the user has configured more than one terminal window,
the close button will close the selected window only and no confirmation will be
requested to the user. However, confirmation will be prompted when the window
close button is clicked on the last terminal window or when there is only one
available.
By default Travelport Smartpoint App™ hooks to the Galileo Desktop window that
means the user moves the Galileo Desktop window, all the Travelport Smartpoint
App™ windows will move together.
GALILEO XML DESKTOP or APOLLO XML DESKTOP This is the connection
selector. It is automatically activated once Travelport Smartpoint App™ is launched.
Menus
The “Application” drop down menu is composed of several elements which controls
configuration, position and settings of the window area where entries and point-and-click
actions are executed and responses are displayed.
Some Menus show a keyboard shortcut that can be used instead; this is implemented in
order to avoid the use of Mouse as much as possible. Therefore, users can chose between
menu navigation or keyboard shortcuts.
Travelport Smartpoint App™ - User Guide Travelport © 2011
April 2011 version 1.3.4. build 6857 Page 28
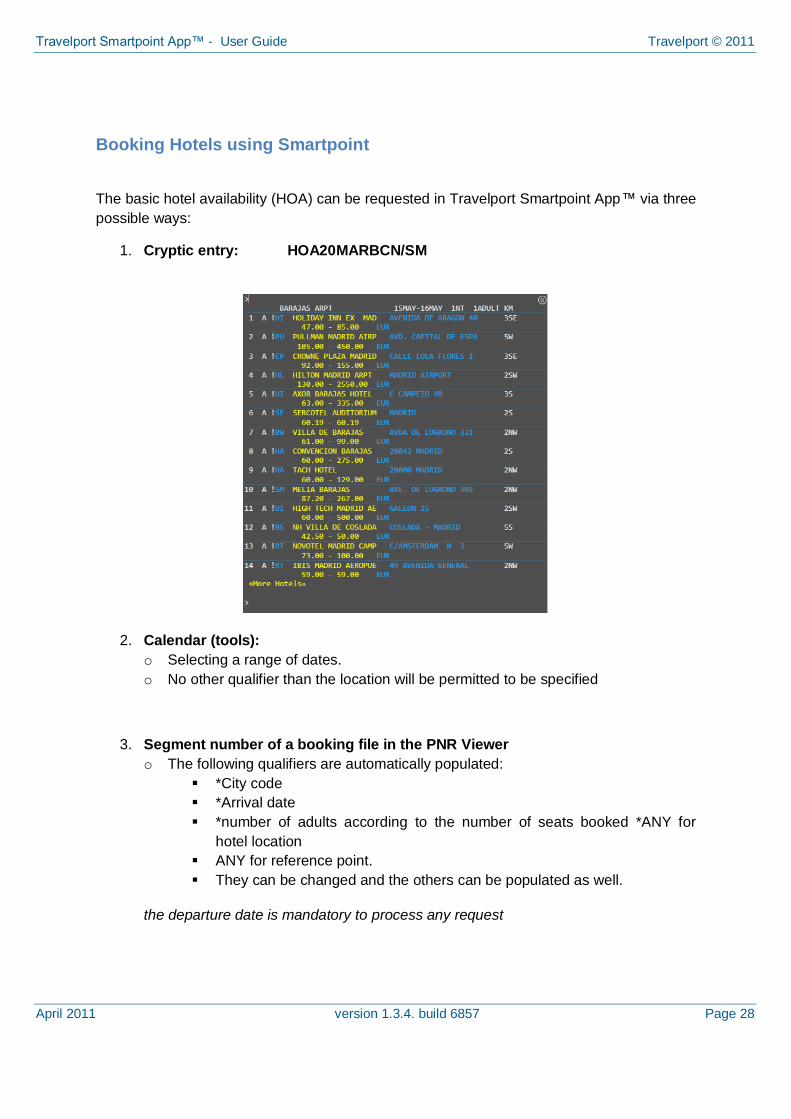
Booking Hotels using Smartpoint
The basic hotel availability (HOA) can be requested in Travelport Smartpoint App™ via three
possible ways:
1. Cryptic entry: HOA20MARBCN/SM
2. Calendar (tools):
o Selecting a range of dates.
o No other qualifier than the location will be permitted to be specified
3. Segment number of a booking file in the PNR Viewer
o The following qualifiers are automatically populated:
*City code
*Arrival date
*number of adults according to the number of seats booked *ANY for
hotel location
ANY for reference point.
They can be changed and the others can be populated as well.
the departure date is mandatory to process any request

Travelport Smartpoint App™ - User Guide Travelport © 2011
April 2011 version 1.3.4. build 6857 Page 29
Once Travelport Smartpoint App™ has returned the availability response above, the agent
can click on the rates in order to access to a list of all rates for that property, the following
screenshot shows its result:
Now the agent can click on any of the nightly rates in order to access to the property
information page that will let us to book the room:

Travelport Smartpoint App™ - User Guide Travelport © 2011
April 2011 version 1.3.4. build 6857 Page 30
From here the agent can chose “sell room” to quickly sell the room (if it doesn‟t require
guarantee) or clicking on the “advanced sell” the following dialog window will be shown in
order to proceed with the booking:

Travelport Smartpoint App™ - User Guide Travelport © 2011
April 2011 version 1.3.4. build 6857 Page 31
Selling Cars using Smartpoint
The low-to-high car availability (CAL) can be requested in Travelport Smartpoint App™ via
three possible ways:
1. Cryptic entry: CAL20JUN-22JUNVGO/ARR-1000/DT-0900
2. Calendar (tools):
selecting one single or a range of dates.
No other qualifiers than the pick-up and drop-off locations and time will be
permitted to be specified.
3. Segment number of a booking file in the PNR Viewer:
By clicking on it
The following qualifiers are automatically populated:
*Pick-up and Drop-off city code (=segment destination)
*Pick-up and Drop-off date (=segment date and 1 day)
*Pick-up and Drop-off time (=segment arrival time)
*ANY for location
They can be changed and the others can be populated as well.

Travelport Smartpoint App™ - User Guide Travelport © 2011
April 2011 version 1.3.4. build 6857 Page 32
Selling cars follows the same mechanic as selling hotels, however, specific sell indicators
are returned by Travelport Smartpoint App™ at the complete rules CAV environment
Sell Car(s): books the car with no additional modifier
Advanced sell: launches a dialog box to populate with additional modifiers:

Travelport Smartpoint App™ - User Guide Travelport © 2011
April 2011 version 1.3.4. build 6857 Page 33
Low Cost Carriers
Low Cost Carriers may be accessed via Travelport Smartpoint App™, this provides access
to the same Low cost carriers available today in Focalpoint.
A Galileo neutral availability request supplies low cost carriers information but some airlines
do not show all available booking classes. Consequently, a carrier specific availability
request is advisable:
A14SEPOSLSTO*DY
Once the availability information is displayed, all follow-up entries under tab stops, such as
fare rules and sell entries, can be also clicked.
From a booking file containing any low cost carrier segment it is possible to launch a dialog
window to complete all PNR information in order not to forget any data to end transaction for
the reservation. There is a special symbol before the carrier code $ which requires a click to
open:

Travelport Smartpoint App™ - User Guide Travelport © 2011
April 2011 version 1.3.4. build 6857 Page 34
Timatic and other Host functions
Existing Focalpoint functions are supported in the active window, including Timatic, queue
displays , country maps, etc.
Pkeys
Pkeys (except for any key configured with sign-in details) are also supported and allow the
user to configure them from Galileo Desktop. The operation is simple; the user has to
configure the pkey from Galileo Desktop as done in the past, then save the pkey file and
restart Galileo Desktop and Travelport Smartpoint App™. Travelport Smartpoint App™ will
automatically pick up the pkey configuration file and will use it.
Global Access
Travelport Smartpoint App™ goes on supporting Switchable Access (6C1G, 6C1V) to
access Global PNRs (**B-Smith or *1V/**B-Smith). These functions provide clients with the
ability to offer global account servicing.
Language translation
Travelport Smartpoint App™ has a helper feature that can be used to transition from a GDS
system to another. Therefore, Travelport Smartpoint App™ supports a Primary and
Secondary Language and can be configured by clicking on . The following dialog
window will be shown and the agent will be able to setup his/her system language
preferences:
Note that Travelport Smartpoint App™ cannot translate *all* entries, this is designed to
be a helper for the travel agent and help agents to transition from one GDS to another,
therefore a limited subset of entries on each GDS system is supported. This capability
doesn‟t mean that the agent won‟t need to be trained on either Galileo/Apollo, Training is
still required.

Travelport Smartpoint App™ - User Guide Travelport © 2011
April 2011 version 1.3.4. build 6857 Page 35
Keyboard shortcuts
Keyboard shortcuts have been previously introduced and explained as per the
corresponding thematic item.
Shortcut Function
Alt+Up Arrow Go back to previous interactive response from the response history.
Alt+Down Arrow Go to the next interactive response from the response history.
ALT+S Stores the current window positions
Alt+’n’ Move the keyboard focus to Tab „n‟. For example, ATL+1 moves to Tab #1.
ALT+B Move to the previous interactive response (move back to previous screen).
ALT+C Copies the Terminal content as text and for the entire host content. Example: do a HELP A and then use ALT+C
ALT+M Host entries like availabilities, Focalpoint shopping, etc. provide a link at the end for “more” results. This shortcut can be used instead of clicking on that link with the mouse.
ALT+X If windows positions are changed but not saved, this option returns to the previous layout.
ALT+D Changes from the upper (1) to the lower (2) Terminal Partition. If this keystroke is repeated, this sub-window is zoomed in and out.
ALT+U Changes from the lower (2) to the upper (1) sub-window. If this keystroke is repeated, this sub-window is zoomed in and out.
ALT+N Creates a new Tab in the current Terminal Window.
ALT+R Removes the current Tab.
ALT+C Copies terminal content as Text in the clipboard.
ALT+H Goes to current terminal

Travelport Smartpoint App™ - User Guide Travelport © 2011
April 2011 version 1.3.4. build 6857 Page 36
CTRL+F12 Hides/Shows Travelport Smartpoint App™ quickly.
CTRL+W
Clears active Terminal Partition (upper or lower)
CTRL+S Clears all Terminal Partitions in the current Tab.
Enter Sends a format/entry to the host and shows the interactive response in the current Tab.
CTRL+Enter Sends a format/entry to the host and shows the interactive response in a new Tab
CTRL+C Copies the selected text/data in the clipboard.
CTRL+Q Moves through all Travelport Smartpoint App™ windows. Each time this shortcut is used it moves to the next window.
CTRL+TAB Navigates through all Tabs in the current terminal window.
CTRL+Up Arrow Repeats previous (back) entries typed by the user. Supports the last 200 entries
CTRL+Down Arrow Repeats previous entries. (forward) Supports the last 200 entries
CTRL+B Prints current Terminal Partition content.
CTRL+M Opens the Calendar widget.
TAB Moves the cursor to the next tab stop. Users can also click on tabbed entries.
SHIFT+TAB Moves the cursor to the previous tab stop
Page Up Moves to the top of the page
Page down Moves the cursor to the bottom of the page
ALT+W Shows the Next/Pervious Day toolbar
ALT+E Hides the Next/Previous toolbar.

Travelport Smartpoint App™ - User Guide Travelport © 2011
April 2011 version 1.3.4. build 6857 Page 37
Quick Commands
Travelport Smartpoint App™ also comes with a Plug-in called “Quick Commands” that
allows advanced users to modify a XML file that contains its definitions. There is a list of
predefined commands that can be found in the Appendix B. If additional quick commands
are required please contact your Travelport to know more about this.
#DF Direct sell flight segment
#PH Passive hotel segment sell
#DH Direct Hotel segment sell
#DC Direct Car segment sell
#PC Passive Car segment sell
#SEAT Displays seat maps for the booked flights
#VT Launches ViewTrip for a completed PNR
#VTETR Shows e-ticket via ViewTrip for a completed PNR

Travelport Smartpoint App™ - User Guide Travelport © 2011
April 2011 version 1.3.4. build 6857 Page 38
Appendix A - Interactive Response & Plug-in Architecture
Travelport Smartpoint App™, as briefly introduced in the general overview, offers the
capability to respond to the user´s input in an interactive way, not only supplying a closed
structured output but an open follow-up transaction flow. As well as, the possibility of specific
window configurations, you can also multitask by means of multiple tabs for several
concurrent searches and a dynamic work area system complete the whole landscape.
The architecture which defines Travelport Smartpoint App™ is based on a flexible module
diagram that adds specific features, services and functionalities to the larger unit. The
components simply plug in to the existing system and enable the execution of different
functions. These add-ons for the main program are replaceable and able to be activated and
deactivated as required with the aim of customizing the agent operational environment.
Figure 1 shows an overview of the Plug-in architecture behind Travelport Smartpoint App™.
SmartpointFramework
Air Availability Plugin
Focalpoint Shopping Plugin
PNRViewer Plugin
...
Ever
y p
lugi
n o
ffer
sIt
s o
wn
leve
l of
fun
ctio
nal
ity
and
pro
vid
es a
n in
tera
ctiv
e re
spo
nse
.
Galileo Desktop
Apollo / Galileo Host
Further details about these two characteristics will be explained in depth in the following
topics and subjects.
Travelport Smartpoint App™ - User Guide Travelport © 2011
April 2011 version 1.3.4. build 6857 Page 39
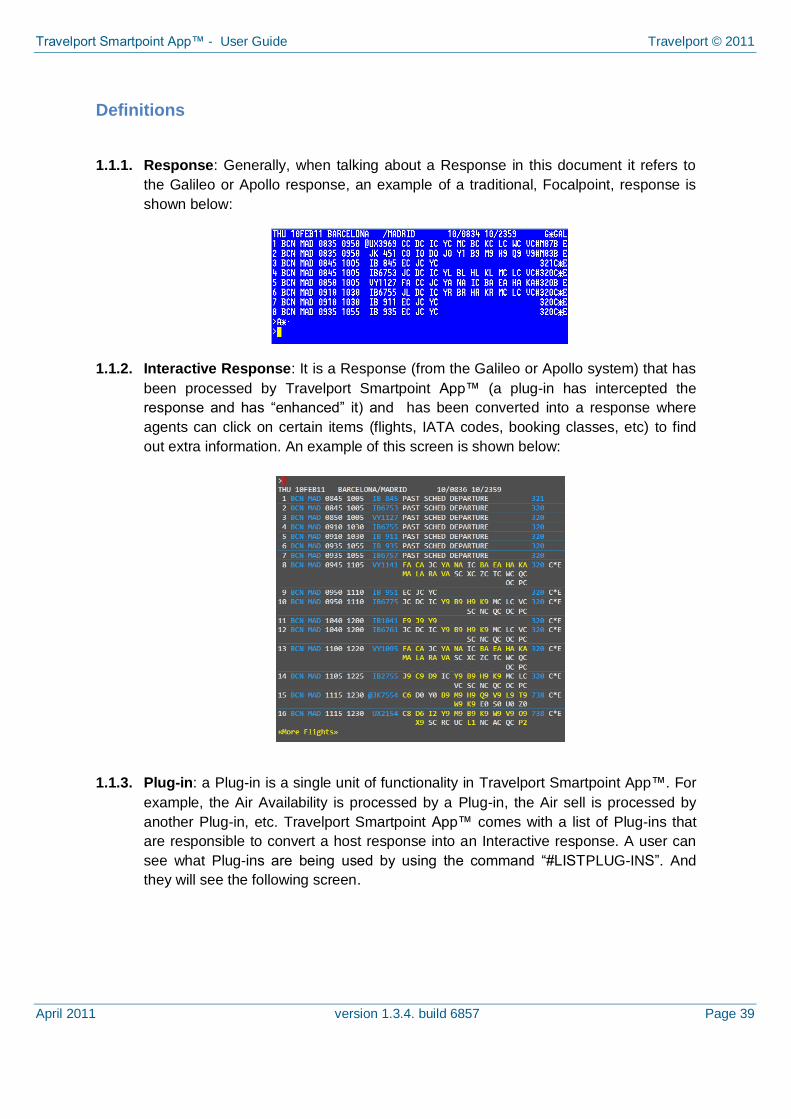
Definitions
1.1.1. Response: Generally, when talking about a Response in this document it refers to
the Galileo or Apollo response, an example of a traditional, Focalpoint, response is
shown below:
1.1.2. Interactive Response: It is a Response (from the Galileo or Apollo system) that has
been processed by Travelport Smartpoint App™ (a plug-in has intercepted the
response and has “enhanced” it) and has been converted into a response where
agents can click on certain items (flights, IATA codes, booking classes, etc) to find
out extra information. An example of this screen is shown below:
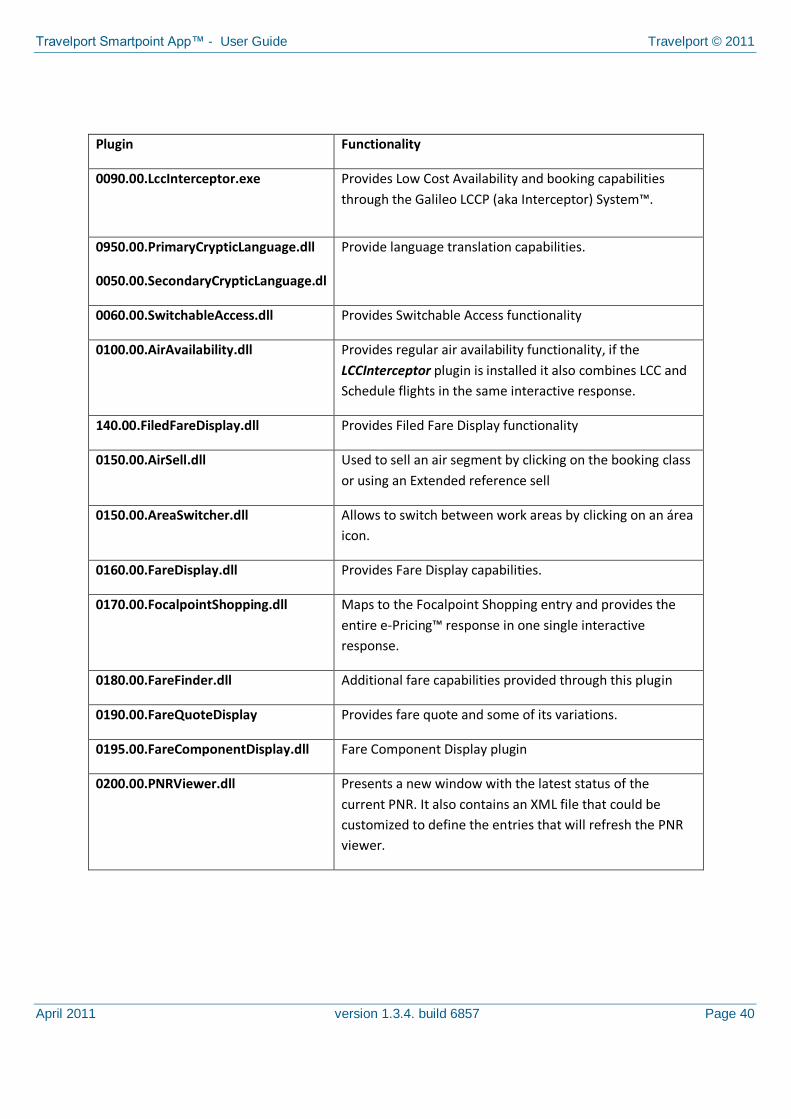
1.1.3. Plug-in: a Plug-in is a single unit of functionality in Travelport Smartpoint App™. For
example, the Air Availability is processed by a Plug-in, the Air sell is processed by
another Plug-in, etc. Travelport Smartpoint App™ comes with a list of Plug-ins that
are responsible to convert a host response into an Interactive response. A user can
see what Plug-ins are being used by using the command “#LISTPLUG-INS”. And
they will see the following screen.
Travelport Smartpoint App™ - User Guide Travelport © 2011
April 2011 version 1.3.4. build 6857 Page 40
Plugin Functionality
0090.00.LccInterceptor.exe
Provides Low Cost Availability and booking capabilities
through the Galileo LCCP (aka Interceptor) System™.
0950.00.PrimaryCrypticLanguage.dll
0050.00.SecondaryCrypticLanguage.dl
Provide language translation capabilities.
0060.00.SwitchableAccess.dll Provides Switchable Access functionality
0100.00.AirAvailability.dll Provides regular air availability functionality, if the
LCCInterceptor plugin is installed it also combines LCC and
Schedule flights in the same interactive response.
140.00.FiledFareDisplay.dll Provides Filed Fare Display functionality
0150.00.AirSell.dll Used to sell an air segment by clicking on the booking class
or using an Extended reference sell
0150.00.AreaSwitcher.dll Allows to switch between work areas by clicking on an área
icon.
0160.00.FareDisplay.dll Provides Fare Display capabilities.
0170.00.FocalpointShopping.dll Maps to the Focalpoint Shopping entry and provides the
entire e-Pricing™ response in one single interactive
response.
0180.00.FareFinder.dll Additional fare capabilities provided through this plugin
0190.00.FareQuoteDisplay Provides fare quote and some of its variations.
0195.00.FareComponentDisplay.dll Fare Component Display plugin
0200.00.PNRViewer.dll Presents a new window with the latest status of the
current PNR. It also contains an XML file that could be
customized to define the entries that will refresh the PNR
viewer.

Travelport Smartpoint App™ - User Guide Travelport © 2011
April 2011 version 1.3.4. build 6857 Page 41
0300.00.HotelAvailability.dll Gets the Hotel availability as an interactive response.
0310.00.HotelSell.dll Sell a hotel room
0320.00.HotelAndCarSearch.dll Used by other plugins in order to launch Hotel and Car
search from the PNR Viewer.
0330.00.FareQuoteAlternative.dll Fare quote alternative plugin
0340.00.TicketDisplay.dll Shows information about the tickets.
0350.00.PKeys.dll Provides PKEY Support
0370.00.QuickCommands.dll Plugin that allows users to customize their own Entries,
such as shortcuts to external applications etc. For more
information please contact your Travelport representative.
0400.00.CarAvailability.dll Car Availability
0410.00.CarSell.dll Sell a rent-a-car service.
0430.00.Timetable.dll Show timetables
0500.00.ClientFile.dll Provides interactive responses for Client File entries.
0600.00.Expozee.dll Allows users to quickly hide/show Smartpoint by pressing
CTRL+F12.
0610.01.ViewtripPlugin.dll Allows the user to quickly Access to viewtrip by using #VT
and #VTETR.
0620.00.CrypticSettings.dll For internal use only.
0800.00.CalendarViewer.dll Shows a Calendar.
Travelport Smartpoint App™ - User Guide Travelport © 2011
April 2011 version 1.3.4. build 6857 Page 42
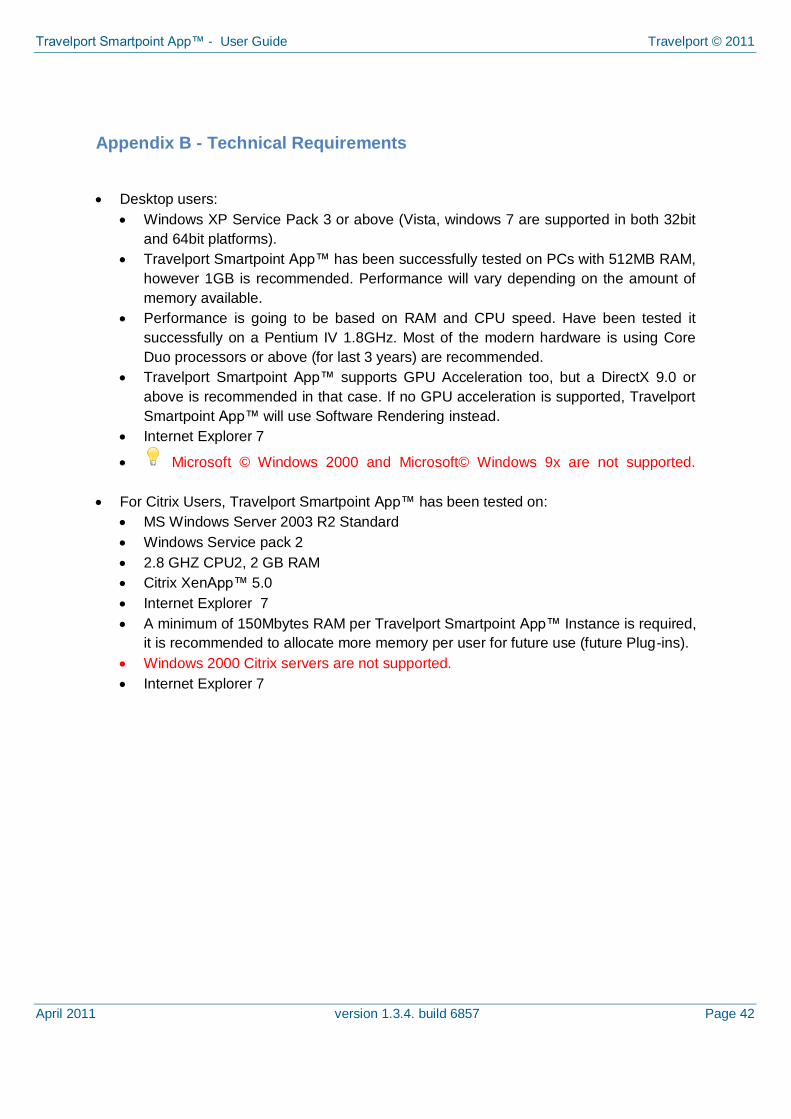
Appendix B - Technical Requirements
Desktop users:
Windows XP Service Pack 3 or above (Vista, windows 7 are supported in both 32bit
and 64bit platforms).
Travelport Smartpoint App™ has been successfully tested on PCs with 512MB RAM,
however 1GB is recommended. Performance will vary depending on the amount of
memory available.
Performance is going to be based on RAM and CPU speed. Have been tested it
successfully on a Pentium IV 1.8GHz. Most of the modern hardware is using Core
Duo processors or above (for last 3 years) are recommended.
Travelport Smartpoint App™ supports GPU Acceleration too, but a DirectX 9.0 or
above is recommended in that case. If no GPU acceleration is supported, Travelport
Smartpoint App™ will use Software Rendering instead.
Internet Explorer 7
Microsoft © Windows 2000 and Microsoft© Windows 9x are not supported.
For Citrix Users, Travelport Smartpoint App™ has been tested on:
MS Windows Server 2003 R2 Standard
Windows Service pack 2
2.8 GHZ CPU2, 2 GB RAM
Citrix XenApp™ 5.0
Internet Explorer 7
A minimum of 150Mbytes RAM per Travelport Smartpoint App™ Instance is required,
it is recommended to allocate more memory per user for future use (future Plug-ins).
Windows 2000 Citrix servers are not supported.
Internet Explorer 7

Travelport Smartpoint App™ - User Guide Travelport © 2011
April 2011 version 1.3.4. build 6857 Page 43
Appendix C - Installation
Minimal System Requirements
Travelport Smartpoint App™ a Windows Presentation Foundation application, and as
such it requires that the host PC to have Windows XP or above, therefore it is not
supported on Windows 2000 nor Windows 9x machines. See Technical
Requirements Annex for more information.
Installation Process
1. Galileo Desktop® must be pre-installed and working (this guide has been tested with
Galileo Desktop® - which versions does it work with – list here (See Technical
Requirements Annex for more information.) this is a prerequisite to continue with the
installation.
If Galileo Desktop is running in your PC close it before proceeding.
2. Run the Setup.exe file included as part of this release. It is commonly distributed in a
zip file that contains two files, setup.exe and the .msi installer. You must run the
setup.exe as this will check out whether the installation of .Net 4.0 Client Profile is
required or not.
The .NET 4.0 Installation might require to reboot the PC several
times.
3. Once setup.exe has installed .NET it will launch the .msi installer included as part of
this package install.
4. If you want to proceed with the installation you must read and agree with the License agreement terms. If you agree, then select “I Agree” and click on “Next”
5. Click on “Next” Again.
6. In the next dialog you can specify the default destination folder for Travelport Smartpoint App™. You can just click on “Next” to accept the default installation settings. Then click “Next” and the installation will start.
On Windows 7 and Windows Vista machines the UAC (User Access
Control) system might prompt a message in order to get confirmation that you
wish to install this application. Just accept clicking on the “Yes” button.
7. Both a Desktop shortcut and a GD toolbar button will be created (the desktop icon should not be used unless indicated by Travelport) the newly created button in the Galileo desktop toolbar should be used to launch Travelport Smartpoint App™ instead.
8. Run Galileo Desktop and once it is loaded and with the Focalpoint Windows visible, click on the new Travelport icon in the toolbar.

Travelport Smartpoint App™ - User Guide Travelport © 2011
April 2011 version 1.3.4. build 6857 Page 44
9. Travelport Smartpoint App™ will launch, it may take a while the first time you run the App™ after each PC boot up as the .NET framework needs to load up in memory as well. In case you had a previous version of Travelport Smartpoint App™ a message might popup telling you that a corrupt file exists, just accept that and launch Travelport Smartpoint App™ again.
10. You should see two windows by default on top of Galileo Desktop, the PNR Viewer and the main Terminal Emulator screen.
11. Now you can resize and adjust your windows at your discretion, go to Application->Save Windows Positions to store the current layout. You can also change the fonts, etc and even add more terminal windows by going to Application->Application Settings (don‟t forget to save the new settings).
How to test all is installed and working properly?
1. You have to be signed on in Galileo Desktop or in Travelport Smartpoint App™. 2. Make sure you are emulated to a valid PCC. In most of the cases agents are
preset to a particular PCC. In order to know whether you are in a valid PCC just type >QCA and the PCC will be shown.
3. To test Travelport Smartpoint App™ just enter any air availability command such as: ABCNMAD and the air response should be displayed, then you can click on the airport codes and should be decoded properly, that indicates that Travelport Smartpoint App™ can access to its internal database and all is properly installed.
4. Test some of the Keyboard shortcuts shown in the table below.

Travelport Smartpoint App™ - User Guide Travelport © 2011
April 2011 version 1.3.4. build 6857 Page 45
FAQ – Frequently Asked Questions?
Q1. When I try to send a format to the Galileo or Apollo system I got a message like
this:
What do I have to do?
A1. This message is not an error, it actually says that the modifier being used has not been
implemented in Travelport Smartpoint App™. It‟s important to remember that NOT ALL
modifiers supported by the Galileo or Apollo systems are implemented in Travelport
Smartpoint App™. Travelport continues enhancing Travelport Smartpoint App™ as a result
of the feedback provided by customers.
In this case there are two possible options.
1. First, tab into the yellow entry, which essentially includes the format typed by the
agent and the semicolon at the end (;). Remember that the semicolon character is
used to tell Travelport Smartpoint App™ that we don‟t want this format to be
processed by Travelport Smartpoint App™, so we just want to send it to the host and
get the response back. This can be used for any modifier that is not supported by
Travelport Smartpoint App™. When this message appears means that there is a
Travelport Smartpoint App™ Plug-in that is responsible to process that format, but
the passed modifier is not implemented, so other modifiers will work just right and the
responses will be converted into “interactive responses”.
2. Tab into the “#NOTIFYENTRY” format to report this to Travelport. Travelport will
receive an email with this message so will be aware that this is in the customer‟s
wish list. However, keep in mind that this won‟t necessarily mean that Travelport will
implement this feature; instead, Travelport will evaluate all requests from all
customers and will prioritize accordingly. If your belong to a large Travel agency
organization, Travelport might have a dedicated account manager for you, in that
case would be recommended that you pass your feedback back to the account
manager.

Travelport Smartpoint App™ - User Guide Travelport © 2011
April 2011 version 1.3.4. build 6857 Page 46
Once you have decided to notify this to Travelport using the “#NOTIFYENTRY”
option, a dialog window will be shown:
It is important you fill up this little form in order to add as much detailed information
as possible, so the Travelport engineering group can actually evaluate this request.
Hit “Send” and an email will be created and sent to Travelport.
Some large customers have configured this to also send an email to their own
product/IT departments.

Travelport Smartpoint App™ - User Guide Travelport © 2011
April 2011 version 1.3.4. build 6857 Page 47
Q2. I am a Galileo or Apollo agent and some other GDS formats are not supported
even I have configured the secondary language to use that GDS Language format.
What is the problem?
A2. As mentioned in this document, not all the “secondary” GDS languages are supported.
For example, if the “primary” language is set to Galileo and the “secondary” language is set
to Apollo then it doesn’t mean that all Apollo formats can be used in the Galileo system by
using Travelport Smartpoint App™, only a limited subset of the Apollo (or any other) GDS
are supported. This feature is not meant to be a replacement for training, instead, is was
implemented to help the transition from one GDS to another, or for large organizations that
have global call centers to better support their customers.
Q3. When launching Travelport Smartpoint App™ I can’t see the application in the screen.
A3. This occurs in some scenarios, such as multi-monitor setups, or when the configuration
file is corrupted. In order to start it up with a default configuration follow these simple steps:
1. Click on the Travelport Smartpoint App™ launch button in Galileo Desktop
2. When the Travelport Smartpoint App™ splash screen is shown, press *shift* and
keep it pressed until a message is shown asking for a configuration reset.
3. Click Yes.
Keep
“SHIFT”
key
pressed

Travelport Smartpoint App™ - User Guide Travelport © 2011
April 2011 version 1.3.4. build 6857 Page 48
©2011 Travelport Inc. All rights reserved. All Travelport logos and marks as well as all other Travelport proprietary materials depicted herein are the property of Travelport Inc. and/or its affiliates.